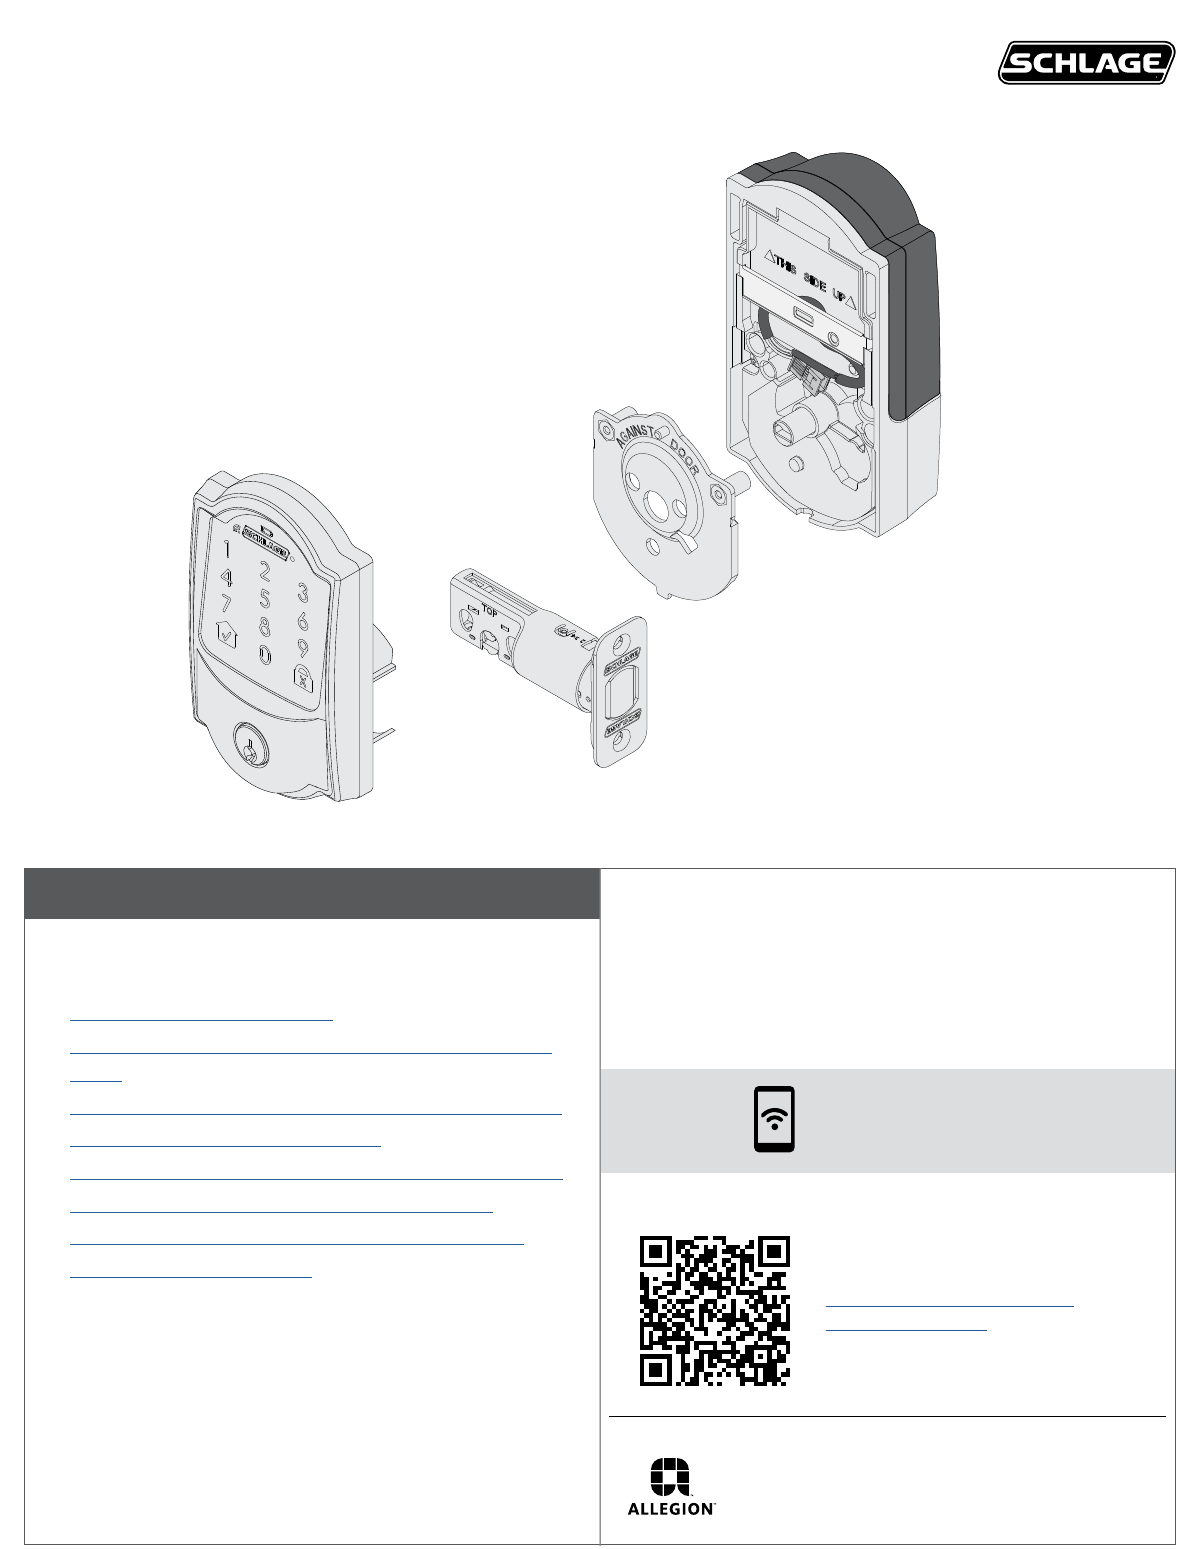
Schlage Lock DENALI Electronic Door Lock User Manual
Schlage Lock Company Electronic Door Lock
User Manual
*P518-414*
P518-414
Table of Contents
Click any of the options below to go directly to the section
you need.
• How do I lock and unlock?
• What are the necessary door dimensions for my
lock?
• Where are the default codes for my lock located?
• How do I change my batteries?
• Where are the manual programming instructions?
• How do I reset to factory default settings?
• My battery is dead, how do I unlock the lock?
• How do I clean my lock?
Questions about your new
Denali Smart Deadbolt?
Please don’t return it to the store!
Let us help you rst!
U.S.A.: 888-805-9837
Canada: 800-997-4734
Mexico: 018005067866
For simple step-by-step instructions, check out:
https://instructions.allegion.
com/instr/65/1110
Model BE489WB
Denali - Beta Reference Guide
Reference Guide
© Allegion 2018
Printed by you!
P518-414 Rev. 03/18-a16
Check out the Interactive Instructions
For step-by-step, illustrated and video instructions, check out
the interactive instructions at the link below. Use any QR code
reader or type in the address into your web browser on any
internet-connected device.
https://instructions.allegion.
com/instr/65/1110
Prepare for Installation
Tools Needed
• Phillips screwdriver
• Tape Measure
• Pencil
For Alternate Faceplate
• Wood Block
• Hammer
IMPORTANT NOTES
DO NOT use a power drill for installation!
• Install and test lock with door open to avoid being locked
out.
Installation Instructions
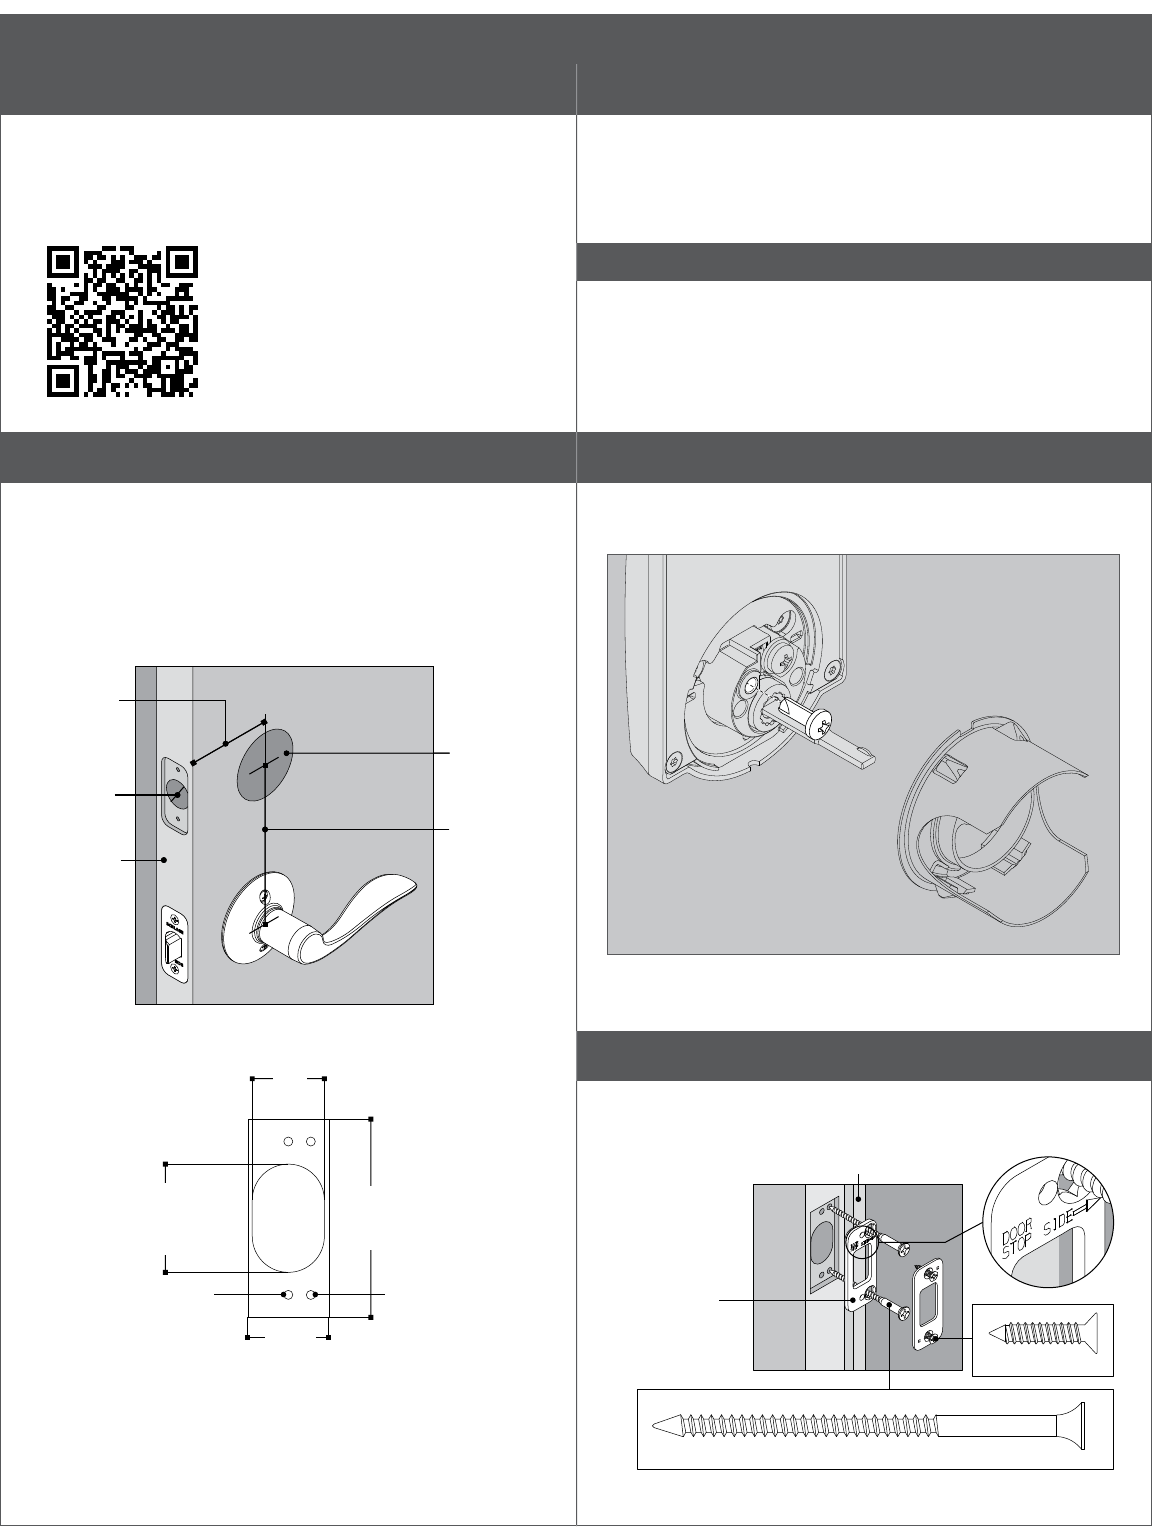
A Check door dimensions.
See consumer.schlage.com/Service-Support for door
preparation instructions if dimensions are different. If
crossbore is 1½", follow steps to remove spacer.
Also, check your door alignment. Make sure that the hole for
the bolt in the door edge lines up with the hole for the strike
in your door jamb.
2³⁄₄" (70 mm)
OR
2³⁄₈" (60 mm)
1" (25 mm)
Door Edge
2¹⁄₈" (53 mm)
Crossbore
Hole
4" (100 mm)
Minimum
1¹⁄₈"
(29 mm)
2³⁄₄"
(70 mm)
1"
(25 mm)
¹⁄₈" (3 mm)
Pilot Hole
¹⁄₈" (3 mm)
3" (76 mm) Deep
1¹⁄₂" (38 mm)
1" (25 mm)
Deep
Strike Cut-Out (not to scale)
Rotate 180˚
if door stop is
on left side.
For maximum
security, install
reinforcement plate.
Actual Size
Actual Size
Door Stop
Only if crossbore is 1½” (Step A), Remove spacer.
Remove screw and remove spacer by rotating from the
outside touchscreen.
Reinstall screw then continue.
B Install strike and reinforcement plate into door jamb.
Door jamb may need preparation to t strike reinforcement
plate.
1¹⁄₈"
(29 mm)
2³⁄₄"
(70 mm)
1"
(25 mm)
¹⁄₈" (3 mm)
Pilot Hole
¹⁄₈" (3 mm)
3" (76 mm) Deep
1¹⁄₂" (38 mm)
1" (25 mm)
Deep
Strike Cut-Out (not to scale)
Rotate 180˚
if door stop is
on left side.
For maximum
security, install
reinforcement plate.
Actual Size
Actual Size
Door Stop
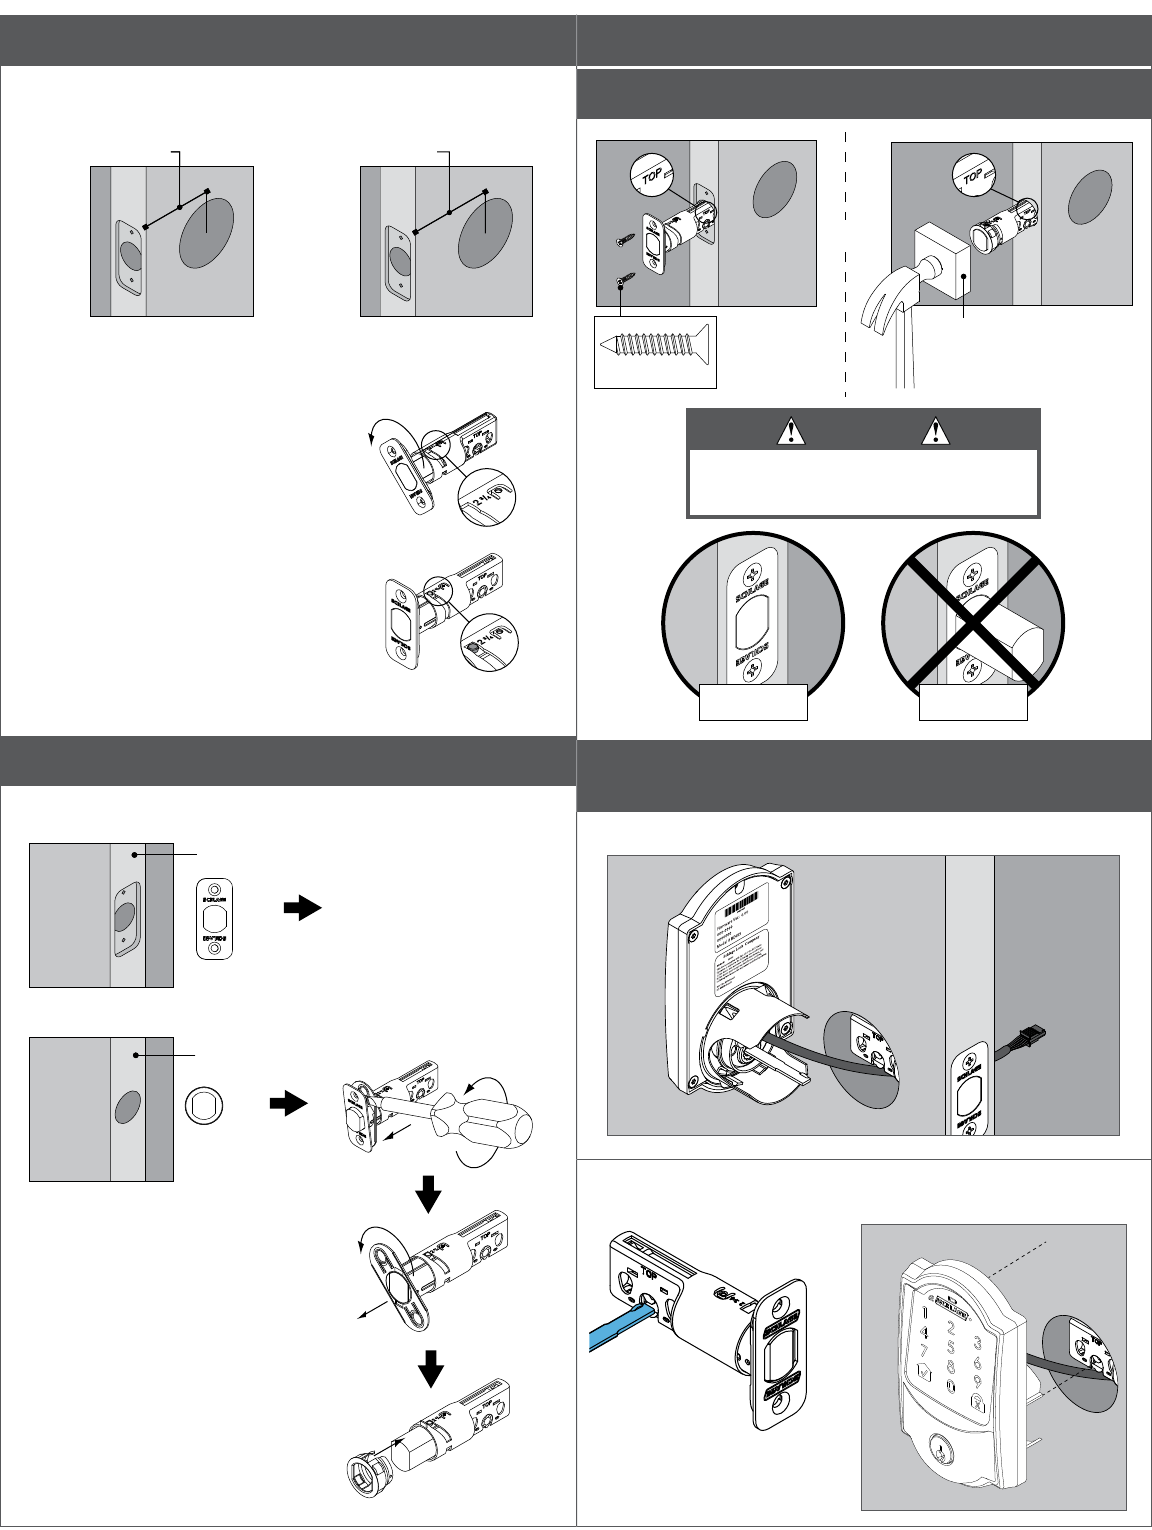
C Adjust bolt length, if necessary.
Measure the dimension shown. If the measurement is 2C\v” (70
mm), extend the bolt.
2³⁄₈" (60 mm)
OR
2C\v" (70 mm)
No adjustment needed. Rotate faceplate
180° to extend.
Extended
D Change faceplate, if necessary.
Choose the drawing that matches your door edge.
Door Edge
No change necessary.
OR
Door Edge
Install Lock
1 Install the bolt.
OR
Wood Block
(Not Included)
Actual Size
CAUTION
Bolt must remain retracted
throughout installation!
Retracted Extended
2 Install the touchscreen on the outside of the
door.
2a Route wire under the bolt.
2b Align tailpiece to slot in deadbolt. Push assembly
until secure on door.
The bump on the tailpiece
aligns with slot on bolt.
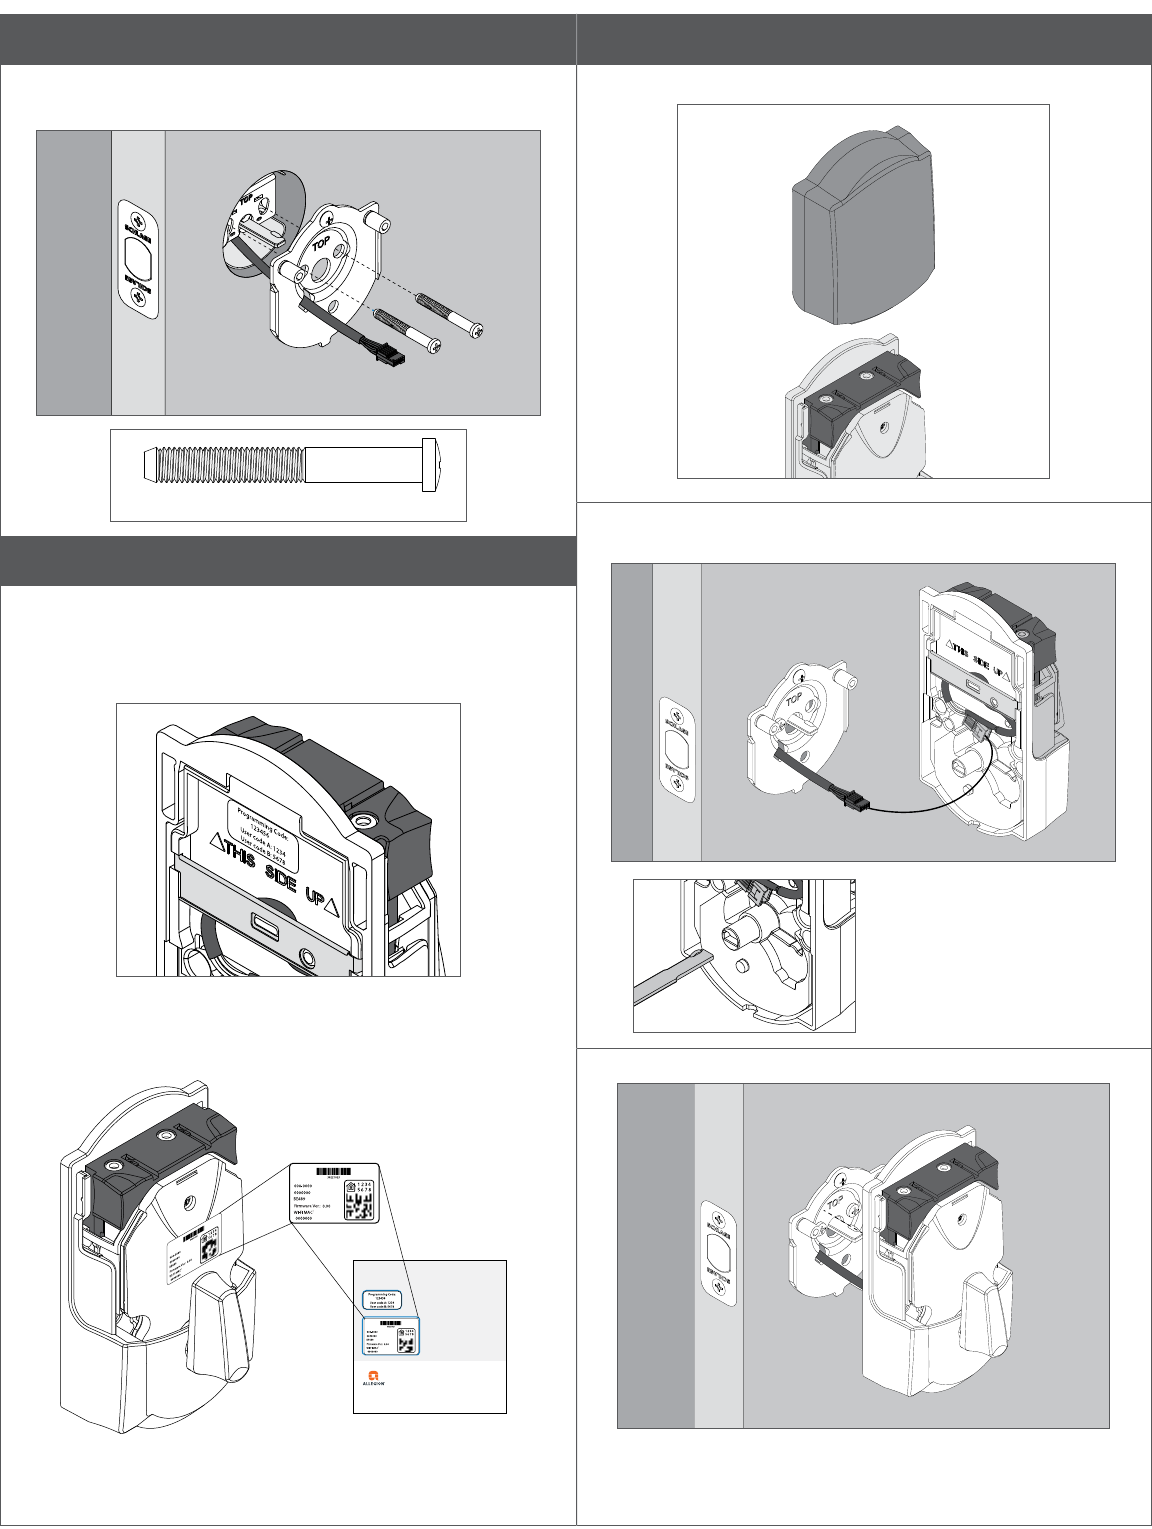
3 Install the mounting plate.
3a Route wire through slot. Secure with mounting
screws.
Actual Size
4 Find and record Programming and User Codes.
The default Programming Code and two User Codes are
printed on a sticker on the back of the printed Quick Start
Guide. It is also on the inside assembly. You will need the
code for the setup procedure after the lock is installed.
The HomeKit sticker is located on the front of the inside
assembly and on the back of the printed Quick Start Guide.
© Allegion 2018
Printed in U.S.A.
P518-415 Rev. 02/18-b
PLACE LABEL
HERE
save this guide!
These are your default codes.
You will need these codes if you ever factory
default reset your lock. Keep these safe!
3
P518-415
PLACE LABEL
HERE
5 Install the inside assembly.
5a Remove battery cover.
5b Connect cable from outside touchscreen to the
connector on the inside assembly.
The bump on the tailpiece
aligns with the slot in the
back of the inside assembly.
If it does not line up, make
sure the thumbturn is
vertical.
5c Press inside assembly onto the mounting plate.
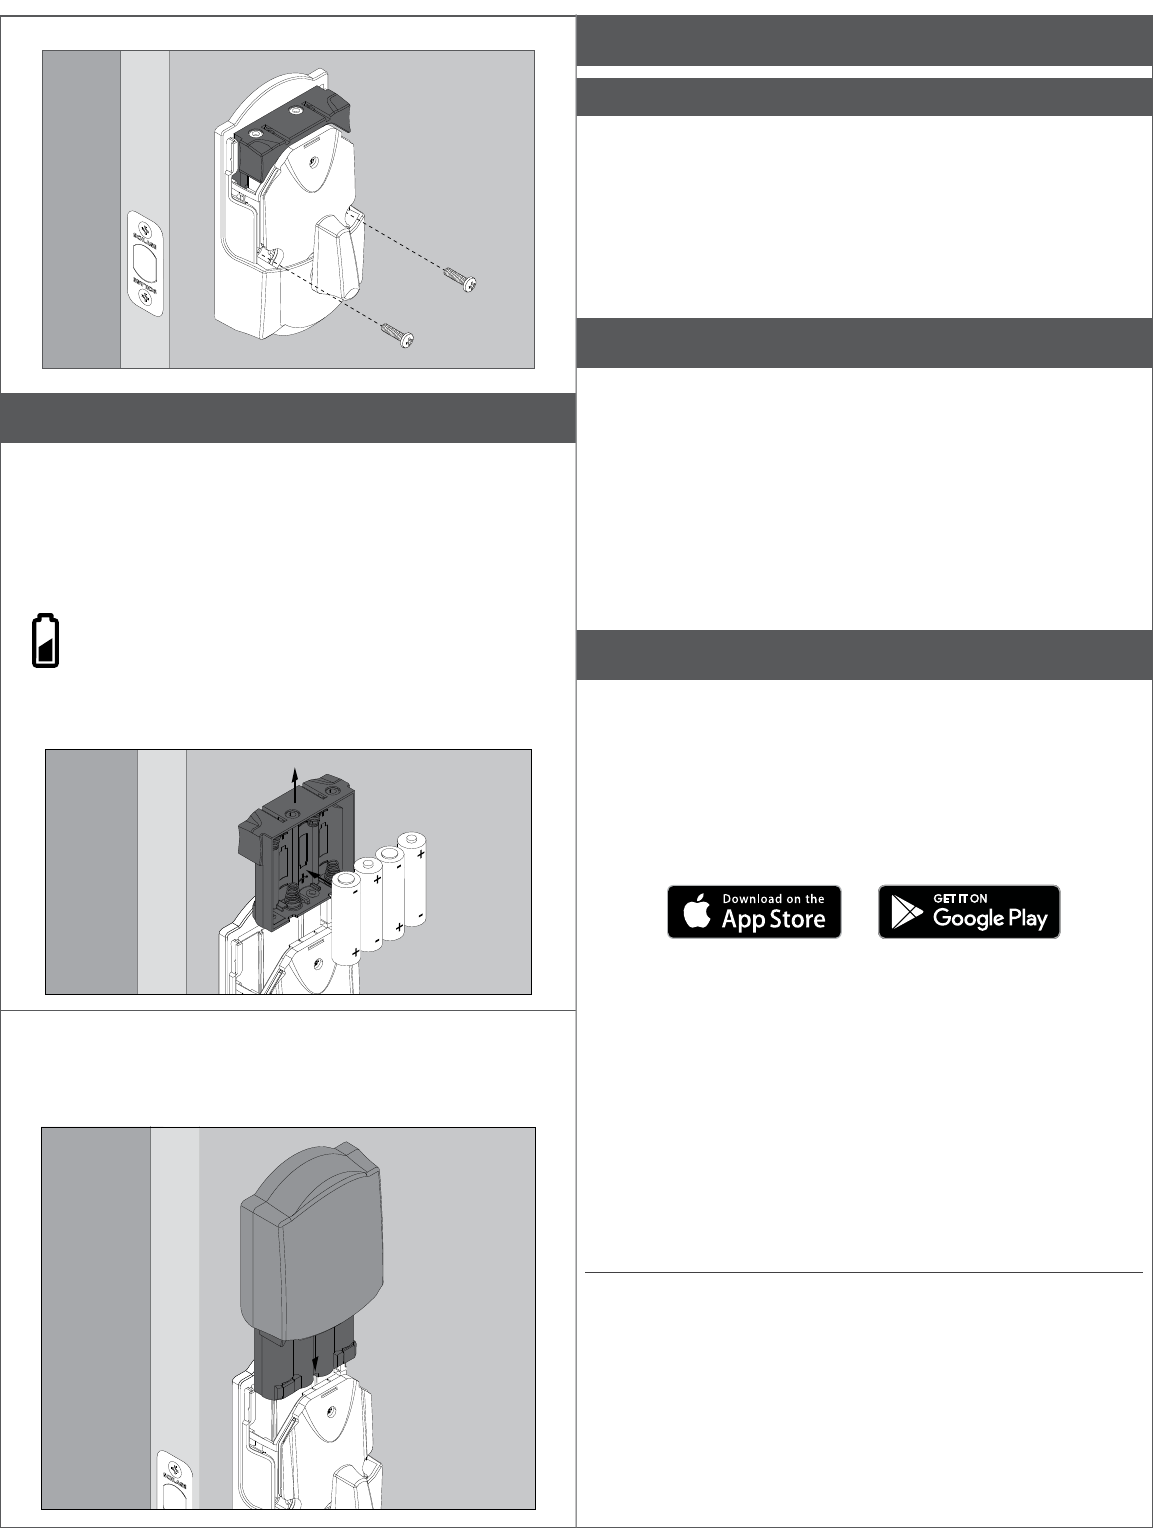
5d Secure the inside assembly with screws.
6 Install batteries.
• Replace the batteries in your lock at the same time each
year that you test and replace the batteries in your smoke
alarms. This will ensure continued reliable operation.
• Use four high-quality alkaline AA batteries for
replacement.
Lithium batteries may have a longer life, but
when they begin to fail, they fail quickly. We don’t
recommend them because they don’t give you a
lot of time to change your batteries before the lock
is completely dead.
6a Remove the battery holder and insert batteries.
6b Reinstall the battery pack and battery cover. Make
sure the batteries face the door.
You’re not nished yet! You must perform the set up
procedure in the next step for the lock to work!
7 Start setup procedure.
IMPORTANT!
You must perform setup procedure before using your lock.
Make sure door is open before beginning!
7a With door open, enter one of the default user
codes.
7b Wait until the bolt stops moving before continuing.
8 Test your lock.
8a Close your door.
8b Extend and retract the bolt using the inside
thumbturn.
8c Make sure the bolt retracts smoothly.
8d Open your door.
8e Extend the bolt using the inside thumbturn.
8f Now enter a user code at the touchscreen. The
bolt should retract.
Download the app!
Just search for “TBD” in the App Store or on Google Play.
Once you connect your lock to your app, the manual
programming functions will be disabled and any access codes
will be deleted.
Be sure to accept any available rmware upgrades. The app
will alert you to upgrades and walk you through the process.
The Schlage Sense app works on iPhone, iPad, and iPod touch with iOS 9.3 or later or
devices with Android 5.0 or later.
Apple HomeKit™ technology provides an easy, secure way to control your home’s
lights, doors, thermostats, and more from your iPhone®, iPad®, or iPod touch®.
HomeKit requires an iPhone, iPad, or iPod touch with iOS 9.3 or later.
HomeKit is a trademark of Apple Inc. Use of the HomeKit logo means that an
electronic accessory has been designed to connect specically to iPod, iPhone, or
iPad, respectively, and has been certied by the developer to meet Apple performance
standards. Apple is not responsible for the operation of this device or its compliance
with safety and regulatory standards. Please note that the use of this accessory with
iPod, iPhone, or iPad may affect wireless performance.
Apple, iPhone, iPad, iPad Air, and iPod touch are trademarks of Apple Inc., registered
in the U.S. and other countries. HomeKit is a trademark of Apple Inc.
Google Play and the Google Play logo are trademarks of Google Inc. Android is a
trademark of Google Inc.
That wasn’t so bad, was it?
Your lock is now installed! Take a look at the next pages for
basic manual programming instructions.
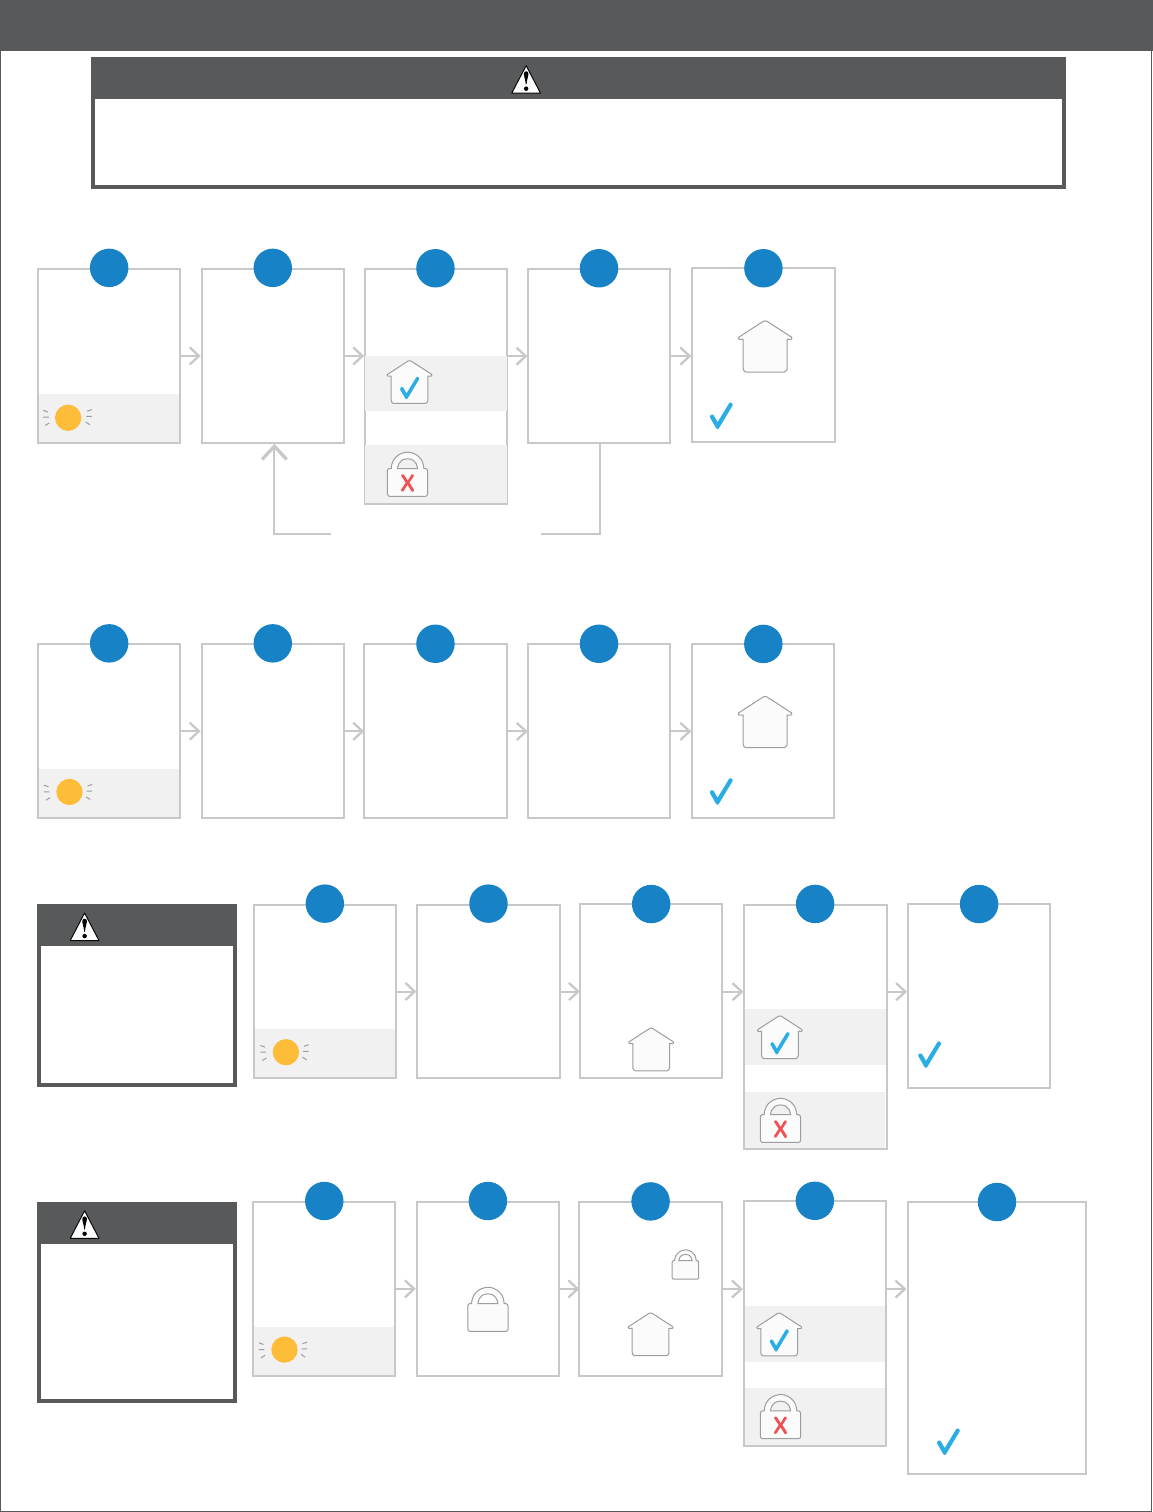
Manual Programming Guide
CAUTION
Manual programming is disabled after your lock is programmed using the mobile app. If you
manually program your lock and choose to later link your lock to the app, all manually programmed
user codes and the programming code are deleted.
Add or Delete User Codes
Enter 6 digit
Programming
Code
Choose and
press:
or
Enter
user code
to
add or delete
Re-enter
user code to
conrm
1 2
light on
4
add/delete another
user code
3
Press to exit
5
indicates
success
add
delete
Change Programming Code
Enter 6 digit
Programming
Code
Enter current
Programming
Code
again
Re-enter new
Programming
Code
to conrm
1 2
light on
4
Enter
new
Programming
Code
3
Press to exit
5
indicates
success
Change User Code Length
indicates
success
CAUTION
Changing the user
code length will
delete all codes
currently in the
lock.
Enter 6 digit
Programming
Code
Choose the
code length
(from 4 - 8 digits)
and press
and hold that
number.
Success!
User code
length has
been changed!
1 2
light on
5
While you’re
holding the
number
Press
3
conrm
cancel
Release then
choose:
or
4
Delete All Codes
CAUTION
You cannot
recover deleted
user codes! Make
sure you have
your default
codes available!
Enter 6 digit
Programming
Code
Press and hold: Success! All codes
are deleted. See
the sticker on the
back of the Quick
Start Guide or the
back of the inside
escutcheon for
your default codes.
1 2
light on
5
While you’re
holding
Press
3
conrm
cancel
Release then
choose:
or
4
indicates
success
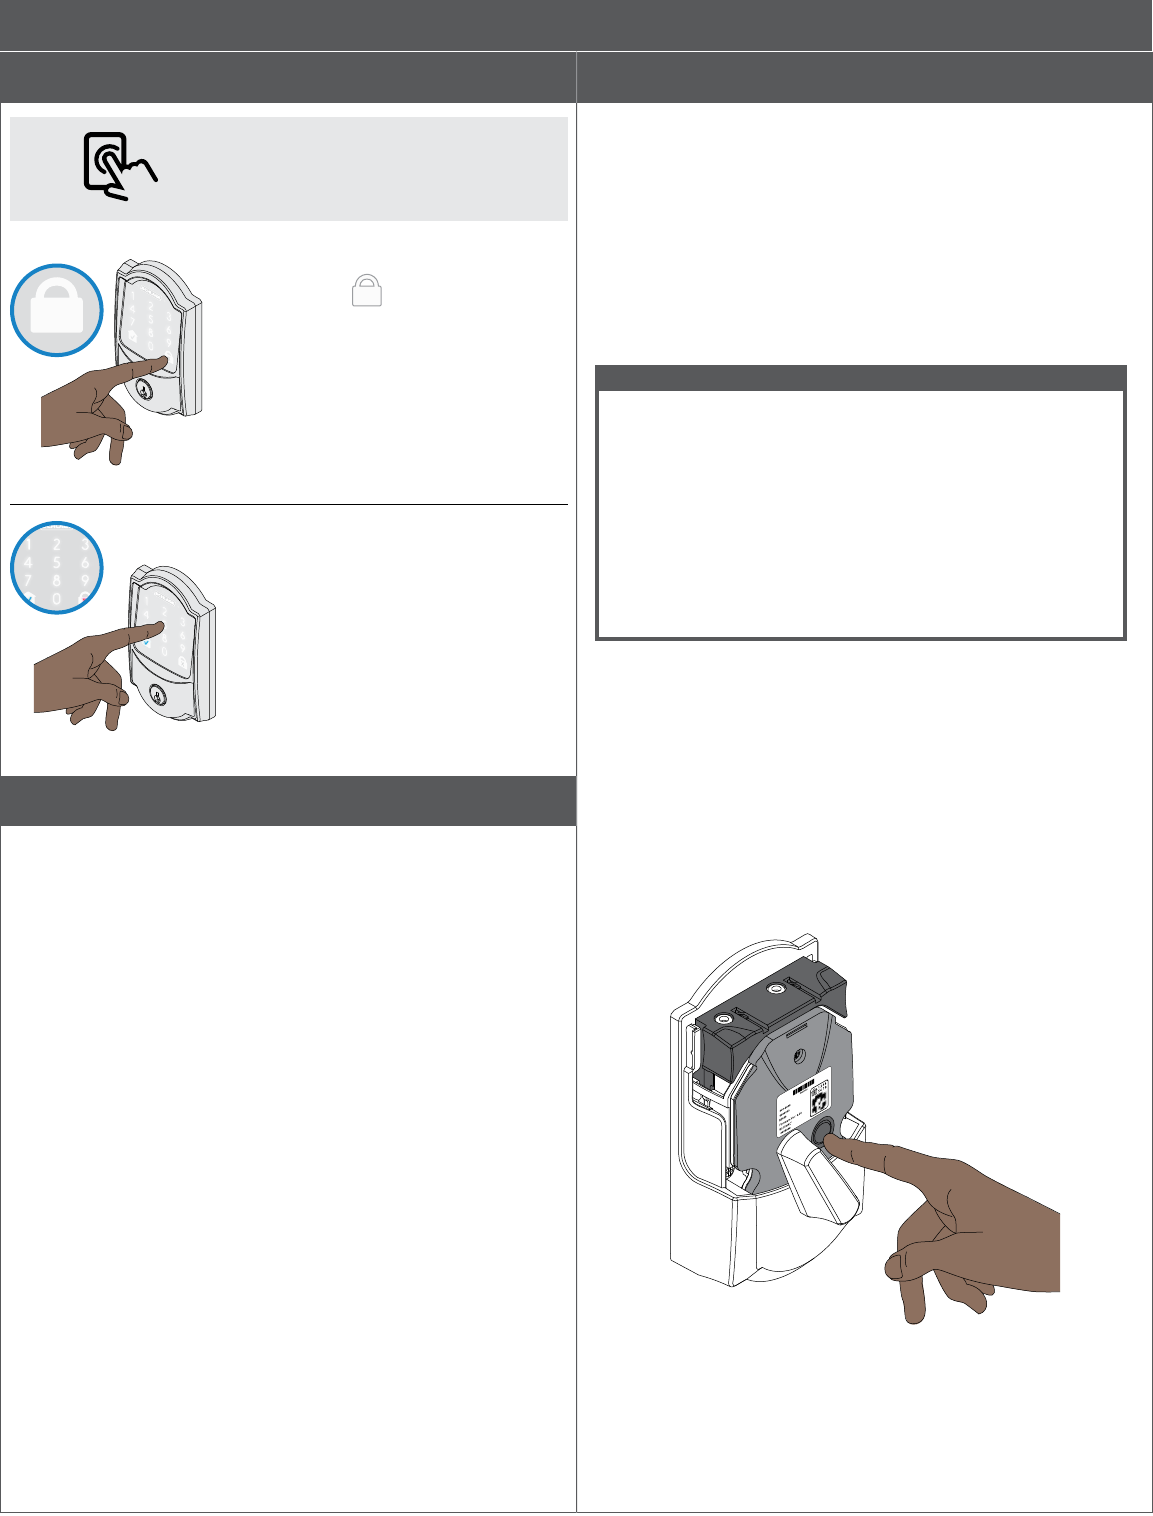
Locking and unlocking
You can lock and unlock your door
with a simple press using the app!
To lock your door just
tap the lock.
You can also lock your door by
entering a user code while the
door is closed.
You can also lock your door
from inside by turning the
thumbturn toward the door
edge.
To unlock your door
enter a user code.
You can also unlock your door
from inside by turning the
thumbturn away from the door
edge.
Emergency key override
Emergency key override can be used when the battery is
completely dead, or when no valid access code is known.
Insert key and rotate to unlock, just like any lock. Now install 4
new alkaline AA batteries.
This lock may be rekeyed to match other locks in a residence.
Contact a locksmith for assistance.
Factory Default Reset (FDR)
When should you perform a Factory Default Reset?
• If you want to move the lock to a different door, you need
to restore default settings, move the lock to the new door,
and then set up the lock again.
• If you have forgotten your Programming Code, you can
restore the default codes.
• If you have set up your lock using the mobile app, and
would like to force the lock to unpair from all mobile
devices, erase all codes, and restore the factory default
settings and default codes.
WARNING
Locate the default Programming and access codes
on the front of this guide or the back of the Alarm
Assembly before beginning! Default Programming and
access codes will be restored. All existing access codes
and current Programming Code will be erased.
CUSTOMER SERVICE CANNOT RETRIEVE LOST
DEFAULT CODES! DO NOT RESTORE FACTORY
SETTINGS UNLESS YOU CAN LOCATE THE
DEFAULT CODES.
1. Take off the battery cover.
2. Press and hold the black circle reset button to the right of
the thumbturn on the inside of the lock for 7 seconds then
release.
3. Once the factory default reset is successful, all of the
keypad lights will light up for 3 seconds. The blue
checkmark will stay on for an additional 2 seconds and will
beep.
LThe red “X” on the lock icon will light up and the lock
will beep if the FDR fails.
User Guide

Clean your lock
In order to properly clean the touchscreen from build-up of
dirt, oils, or other contaminants; you should use a mild dish
soap with warm water and follow the general rules below:
• Do rinse the touchscreen with warm water prior to
cleaning process.
• Do follow the application of soap with a damp, lukewarm
cloth
• Don’t use abrasives, high alkaline cleaners, or gasoline
• Don’t leave cleaners on touchscreen for long periods,
wash immediately.
• Don’t apply cleaners in direct sunlight or at elevated
temperatures.
• Don’t use scrapers, squeegees or razors.
The bolt itself can be cleaned using a mild dish soap and
warm water. This can help improve decreased performance.
Warranty and FCC/IC Statement
Lifetime Limited Mechanical and Finish Warranty and 3-Year Limited Electronics Warranty
Subject to the terms and conditions of the warranty, Schlage extends a lifetime limited mechanical
and nish warranty and a three-year limited electronics warranty to the original consumer user
(“Original User”) of our Schlage brand product (“Product”) against defects in material and
workmanship, as long as the Original User occupies the residential premises upon which the Product
was originally installed. See answers.schlage.com for specic warranty details and limitations, or
contact Schlage Customer Service at (888) 805-9837 in the U.S. and Canada or (800) 506-7866 in
Mexico for assistance.
FCC/IC Statement
FCC Interference Statement
This equipment has been tested and found to comply with the limits for a Class B digital device,
pursuant to Part 15 of the FCC Rules. These limits are designed to provide reasonable protection
against harmful interference in a residential installation. This equipment generates, uses and can
radiate radio frequency energy and, if not installed and used in accordance with the instructions, may
cause harmful interference to radio communications. However, there is no guarantee that interference
will not occur in a particular installation. If this equipment does cause harmful interference to radio
or television reception, which can be determined by turning the equipment off and on, the user is
encouraged to try to correct the interference by one of the following measures:
- Reorient or relocate the receiving antenna.
- Increase the separation between the equipment and receiver.
- Connect the equipment into an outlet on a circuit different from that to which the receiver is
connected.
- Consult the dealer or an experienced radio/TV technician for help.
This device complies with Part 15 of the FCC Rules. Operation is subject to the following two
conditions:
1. This device may not cause harmful interference, and
2. This device must accept any interference received, including interference that may cause undesired
operation.
Changes or modications not expressly approved by the party responsible for compliance could void
the user’s authority to operate the equipment.
RF Exposure
To comply with FCC/IC RF exposure requirements for mobile transmitting devices, this transmitter
should only be used or installed at locations where there is at least 20 cm separation distance
between the antenna and all persons. Under Industry Canada regulations, this radio transmitter may
only operate using an antenna of a type and maximum (or lesser) gain approved for the transmitter
by Industry Canada. To reduce potential radio interference to other users, the antenna type and its
gain should be so chosen that the equivalent isotropically radiated power (e.i.r.p.) is not more than
that necessary for successful communication.
Conformément aux normes d’Industrie Canada, ce transmetteur radio ne peut fonctionner qu’avec
une antenne dont le type et le gain maxiumum sont approuvés par Industrie Canada. Pour réduire
les risques d’inteférences radio encourus par d’autres utilisateurs, le type et le gain de l’antenne
doivent être choisis de façon à ce que la puissance rayonnée isotrope équivalente (PIRE) ne soit pas
supérieure à celle nécessaire pour établir une bonne communication.
This Device complies with Industry Canada License-exempt RSS standard(s). Operation is subject
to the following two conditions: 1) this device may not cause interference, and 2) this device must
accept any interference, including interference that may cause undesired operation of the device.
Cet appareil est conforme norme Industrie Canada RSS exempts de licence (s). Son fonctionnement
est soumis aux deux conditions suivantes: 1) cet appareil ne doit pas provoquer d’interférences, et
2) cet appareil doit accepter toute interférence, y compris les interférences pouvant provoquer un
fonctionnement indésirable de l’appareil.
Use of the HomeKit logo means that an electronic accessory has been designed to connect
specically to iPod, iPhone, or iPad, respectively, and has been certied by the developer to meet
Apple performance standards. Apple is not responsible for the operation of this device or its
compliance with safety and regulatory standards. Please note that the use of this accessory with iPod,
iPhone, or iPad may affect wireless performance.
Apple, iPhone, iPad, iPad Air, and iPod touch are trademarks of Apple Inc., registered in the U.S. and
other countries. HomeKit is a trademark of Apple Inc.