Schwinn Journey 4 5 Assembly And Owners Manual SCH.470.AM.OM.W.121513.F
Schwinn-Journey-4-5-Elliptical-Owner-S-Manual schwinn-journey-4-5-elliptical-owner-s-manual
Schwinn-Schwinn-470-Elliptical-Owner-S-Manual schwinn-schwinn-470-elliptical-owner-s-manual
2015-05-15
: Schwinn Schwinn-Journey-4-5-Assembly-And-Owners-Manual-718263 schwinn-journey-4-5-assembly-and-owners-manual-718263 schwinn pdf
Open the PDF directly: View PDF ![]() .
.
Page Count: 48

ASSEMBLY MANUAL / OWNER’S MANUAL
Manual en Español Latino Americano:
http://www.schwinnfitness.com
270 /
230 /
430 /
470 /
2.5

2
Important Safety Instructions - Assembly 3
Safety Warning Labels / Serial Number 4
Grounding Instructions 5
Specications 6
BeforeAssembly 6
Parts 7
Hardware 8
Tools 8
Assembly 9
Moving the Machine 21
Leveling the Machine 22
Important Safety Instructions 23
Features 24
Console Features 25
Operations 30
Adjustments 30
Power Up / Idle Mode 30
Quick Start Program 31
UserProles 31
Pausing or Stopping 37
Results / Cool Down Mode 37
GOAL TRACK Statistics 38
Console Service Mode 40
Maintenance 41
Maintenance Parts 42
Troubleshooting 44
Warranty 47
Nautilus,Inc.,(800)NAUTILUS/(800)628-8458,www.NautilusInc.com-CustomerService:NorthAmerica(800)605-3369,
csnls@nautilus.com|outsideU.S.+01-360-859-5180,technics@nautilus.com|PrintedinChina|©2013Nautilus,Inc.
Table of ConTenTs
Tovalidatewarrantysupport,keeptheoriginalproofofpurchaseandrecordthefollowinginformation:
Serial Number __________________________
Date of Purchase ____________________
Toregisteryourproductwarranty,goto:www.SchwinnFitness.com/register
Orcall1(800)605–3369.
Ifyouhavequestionsorproblemswithyourproduct,pleasecall1(800)NAUTILUS(628–8458).

3
ImporTanT safeTy InsTruCTIons
-assembly
This icon means a potentially hazardous situation which, if not avoided, could result in death or serious injury.
Obey the following warnings:
Read and understand all warnings on this machine.
Carefully read and understand the Assembly instructions. Read and understand the complete Manual. Keep
the Manual for future reference.
To reduce the risk of electrical shock or unsupervised usage of the equipment, always unplug this machine
from the electrical outlet immediately after using and before cleaning.
• Keepbystandersandchildrenawayfromtheproductyouareassemblingatalltimes.
• Donotconnectpowersupplytothemachineuntilinstructedtodoso.
• Themachineshouldneverbeleftunattendedwhenpluggedin.Unplugfromoutletwhennotinuse,andbeforeputtingon
or taking off parts.
• Beforeeachuse,examinethemachinefordamagetopowercord,loosepartsorsignsofwear.Donotuseiffoundinthis
condition. Contact Nautilus® Customer Service for repair information.
• Donotdroporputobjectsintoanyopeningofthemachine.
• Donotassemblethismachineoutdoorsorinawetormoistlocation.
• Makesureassemblyisdoneinanappropriateworkspaceawayfromfoottrafficandexposuretobystanders.
• Somecomponentsofthemachinecanbeheavyorawkward.Useasecondpersonwhendoingtheassemblysteps
involvingtheseparts.Donotdostepsthatinvolveheavyliftingorawkwardmovementsonyourown.
• Setupthismachineonasolid,level,horizontalsurface.
• Donottrytochangethedesignorfunctionalityofthismachine.Thiscouldcompromisethesafetyofthismachineandwill
void the warranty.
• Ifreplacementpartsarenecessary,useonlygenuineNautilus® replacement parts and hardware. Failure to use genuine
replacement parts can cause a risk to users, keep the machine from operating correctly and void the warranty.
• Donotuseuntilthemachinehasbeenfullyassembledandinspectedforcorrectperformanceinaccordancewiththe
Manual.
• Usethismachineonlyforitsintendeduseasdescribedinthismanual.Donotuseattachmentsnotrecommendedbythe
manufacturer.
• Doallassemblystepsinthesequencegiven.Incorrectassemblycanleadtoinjuryorincorrectfunction.
• Connectthismachinetoaproperlygroundedoutletonly(seeGroundingInstructions).
• Keepthepowercordawayfromheatsourcesandhotsurfaces.
• Donooperatewhereaerosolproductsarebeingused.
• Todisconnect,turnallcontrolstotheoffposition,thenremoveplugfromoutlet.
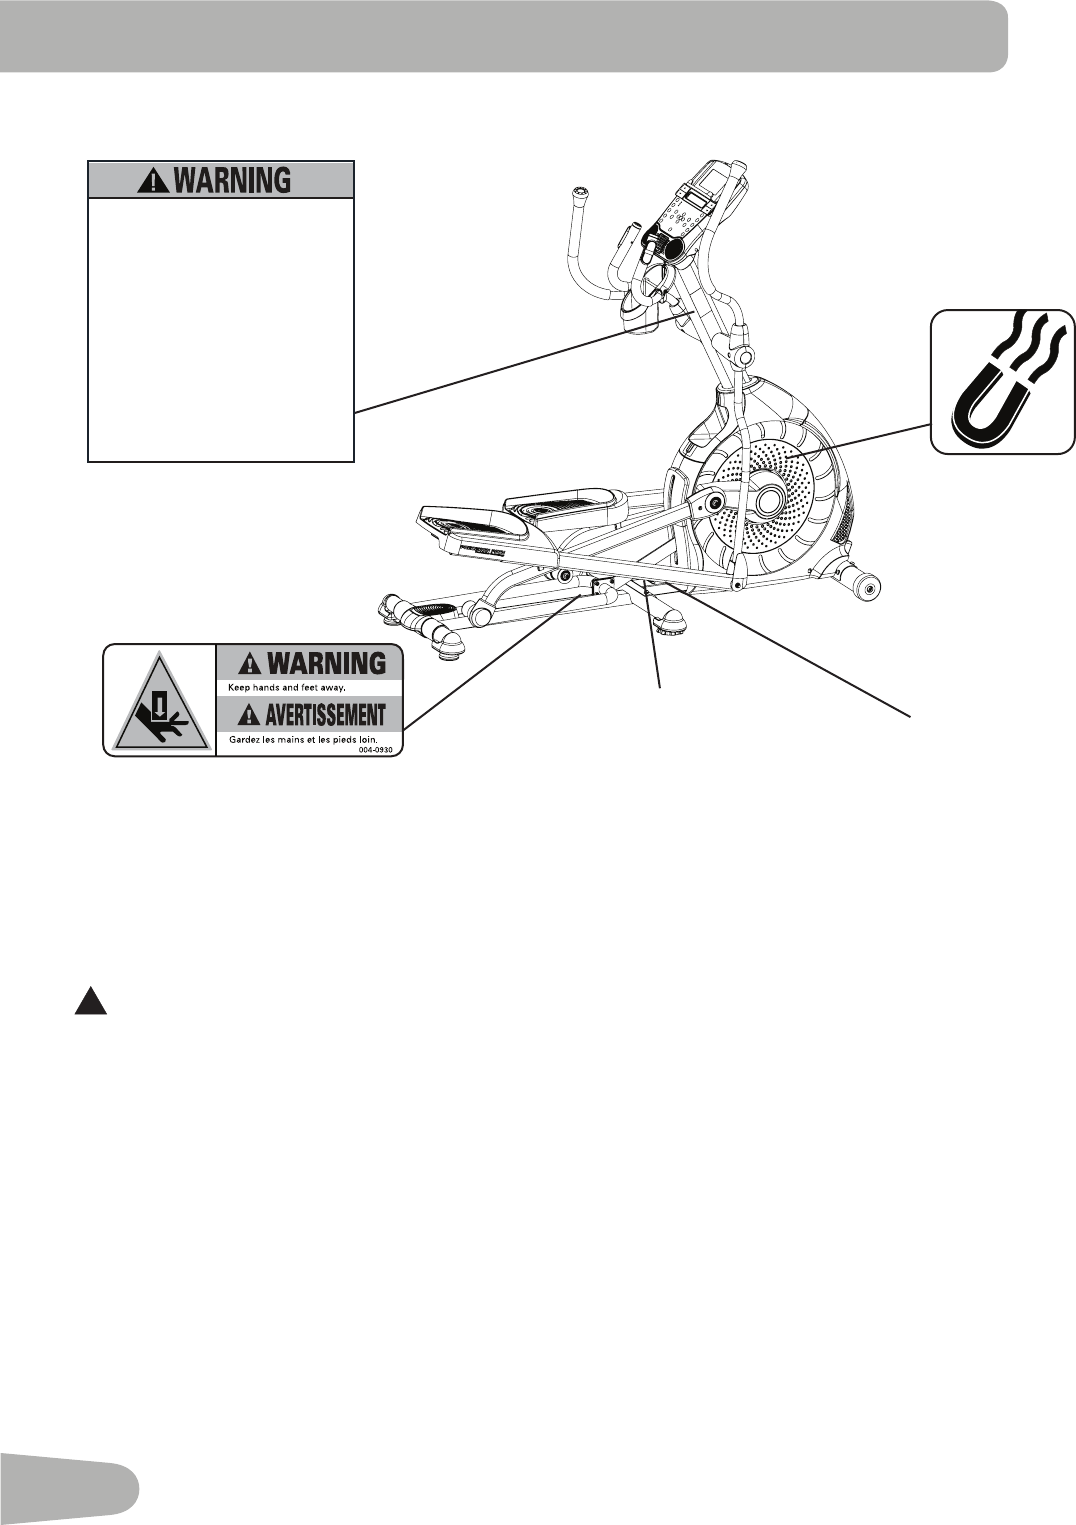
• Thisproductcontainsmagnets.Magneticfieldscaninterferewiththenormaluseofcertainmedicaldevicesataclose
range.Usersmaycomeintoproximityofthemagnetsintheassembly,maintenance,and/oruseoftheproduct.Given
the obvious importance of these devices, such as a pacemaker, it is important that you consult with your medical provider
in connection with the use of this equipment. Please consult the “Safety Warning Labels and Serial Number” section to
determine the location of the magnets on this product.
• SAVETHESEINSTRUCTIONS.
4
safeTy WarnIng labels and serIal
number
FCC Compliance
!Changesormodificationstothisunitnotexpresslyapprovedbythepartyresponsibleforcompliancecouldvoidthe
user’s authority to operate the equipment.
Themachineandpowersupplycomplywithpart15oftheFCCrules.Operationissubjecttothefollowingtwoconditions:
(1)Thisdevicemaynotcauseharmfulinterference,and(2)thisdevicemustacceptanyinterferencereceived,including
interference that may cause undesired operation.
Note:ThismachineandpowersupplyhavebeentestedandfoundtocomplywiththelimitsforaClassBdigitaldevice,
pursuant to Part 15 of the FCC Rules. These limits are designed to provide reasonable protection against harmful
interference in a residential installation. This equipment generates, uses and can radiate radio frequency energy and, if
not installed and used in accordance with the instructions, may cause harmful interference to radio communications.
However,thereisnoguaranteethatinterferencewillnotoccurinaparticularinstallation.Ifthisequipmentdoescauseharmful
interference to radio or television reception, which can be determined by turning the equipment off and on, the user is
encouragedtotrytocorrecttheinterferencebyoneormoreofthefollowingmeasures:
•Reorientorrelocatethereceivingantenna.
•Increasetheseparationbetweentheequipmentandreceiver.
•Connecttheequipmentintoanoutletonacircuitdifferentfromthattowhichthereceiverisconnected.
•Consultthedealeroranexperiencedradio/TVtechnicianforhelp.
Serial Number
REVISIONS
ECO
REVISION
REV DESCRIPTION
APPROVED
DATE
TITLE.
PART NO.
REV.
SHEET 1 OF 1
SCALE: 1:1
DO NOT SCALE DRAWING
1. ALL ITEMS MUST BE RoHS COMPLIANT
2. ALL DIMENSIONS APPLY BEFORE PLATING OR COATING.
3. REMOVE ALL BURRS, BREAK SHARP EDGES 0.5 MM MAX.
4. ALL MACHINES SURFACES Ra 3.2 uM.
5. ALL APPLICABLE NAUTILUS STANDARDS AND
SPECIFICATIONS APPLY.
6. ALL DIMENSIONS ARE IN MILLIMETERS
7. ALL DUAL DIMENSIONS ARE IN INCH
UNLESS OTHERWISE SPECIFIED:
METRIC
THIRD ANGLE
PROJECTION
INTERPRET DIMENSIONS AND TOLERANCES
PER ASME Y14.5M - 1994
2.5
1.5
0.75
0.25
1°
X.
X.X
X.XX
X.XXX
ANGULAR
C
SIZE
This document is the property of Nautilus, Inc. It may not be reproduced in whole or part, provided to third parties, or used for any purposes other than the performance of work for Nautilus, Inc. without written authorization. All rights are reserved, including copyrights.
TOLERANCES.
DRAWN
DESIGNED
DATE
METRIC_C_REV G
NAUTILUS, INC.
16400 SE NAUTILUS DRIVE, VANCOUVER, WA 98683
LIFECYCLE
- -
APPROVALS
- -
- - - -
WARRANTY ITEM:
L.SEVIER
3/29/2013
L.SEVIER A
8002739
GWl BIKE AND ELLIPTICAL 300lb 2013
MATERIAL.
COLOR.
DIE LINE
PMS 152
PMS 109
BLACK
WHITE
Labels must be created from an agency approved tamper proof labeling system
such as "UL Recognized component marking and labeling system (example: UL PGGU2) or equivalent.
Label and adhesive must be rated for surface it is applied to (painted metal or ABS plastic),
Label and adhesive must be rated for 60 degrees C minimum. Labels must meet UL 1647 Permanence of Marking Test.
50mm
117.7mm
A RELEASE 3/29/2013
LSEVIER
xxxxxxx
• Lisez et assimilez tous les avertissements
apposés sur cet appareil.
• Gardez les enfants et les animaux de
compagnie éloignés de cette machine en
tout temps
• Déconseillé aux enfants âgés de
moins de 14 ans.
• Lisez et familiarisez-vous avec le Manuel
du propriétaire et avec tous les
avertissements avant d’utiliser cette
machine.
• Soyez prudent lorsque vous utilisez cet
équipement pour ne pas vous infliger de
graves blessures.
• Cette machine supporte un poids
maximal de 300lbs. (136kg).
• Remplacez toute étiquette
d’avertissement endommagée, illisible
ou manquante.
• La fréquence cardiaque qui s’affiche
sur la console peut être inexact et
doit être utilisée seulement à titre
indicatif.
• Read, understand and obey all
warnings on this machine.
• Keep children away.
• Not intended for use by anyone
under 14 years of age.
• Prior to use, read and understand
the Owner’s Manual.
• Injury or death is possible if
Caution is not used while using this
machine.
• The maximum user weight for this
machine is 300 lbs (136 kg).
• Replace any “Caution”, “Warning”
or “Danger” label that is illegible,
damaged, or removed.
• The heart rate displayed may be
inaccurate and should be used for
reference only.
8002739_A
REVISIONS
ECO
REVISION
REV DESCRIPTION
APPROVED
DATE
TITLE.
PART NO.
REV.
SHEET 1 OF 1
SCALE: 1:1
DO NOT SCALE DRAWING
1. ALL ITEMS MUST BE RoHS COMPLIANT
2. ALL DIMENSIONS APPLY BEFORE PLATING OR COATING.
3. REMOVE ALL BURRS, BREAK SHARP EDGES 0.5 MM MAX.
4. ALL MACHINES SURFACES Ra 3.2 uM.
5. ALL APPLICABLE NAUTILUS STANDARDS AND
SPECIFICATIONS APPLY.
6. ALL DIMENSIONS ARE IN MILLIMETERS
7. ALL DUAL DIMENSIONS ARE IN INCH
UNLESS OTHERWISE SPECIFIED:
METRIC
THIRD ANGLE
PROJECTION
INTERPRET DIMENSIONS AND TOLERANCES
PER ASME Y14.5M - 1994
2.5
1.5
0.75
0.25
1°
X.
X.X
X.XX
X.XXX
ANGULAR
C
SIZE
This document is the property of Nautilus, Inc. It may not be reproduced in whole or part, provided to third parties, or used for any purposes other than the performance of work for Nautilus, Inc. without written authorization. All rights are reserved, including copyrights.
TOLERANCES.
DRAWN
DESIGNED
DATE
METRIC_C_REV G
NAUTILUS, INC.
16400 SE NAUTILUS DRIVE, VANCOUVER, WA 98683
LIFECYCLE
7-22-10
APPROVALS
- -
- - - -
WARRANTY ITEM:
A RELEASED
NPI 13149 DLOVELY 7-22-10
D.LOVELY
D.LOVELY
07 /22 / 2010
D.LOVELY
A
004-0930
CRUSH WARNING
21.78mm
54.8mm
MATERIAL.
COLOR.
DIE LINE
PMS 152
PMS 109
BLACK
WHITE
Labels must be created from an agency approved tamper proof labeling system
such as "UL Recognized component marking and labeling system (example: UL PGGU2) or equivalent.
Label and adhesive must be rated for surface it is applied to (painted metal or ABS plastic),
Label and adhesive must be rated for 60 degrees C minimum. Labels must meet UL 1647 Permanence of Marking Test.
•
•Product Specification
5
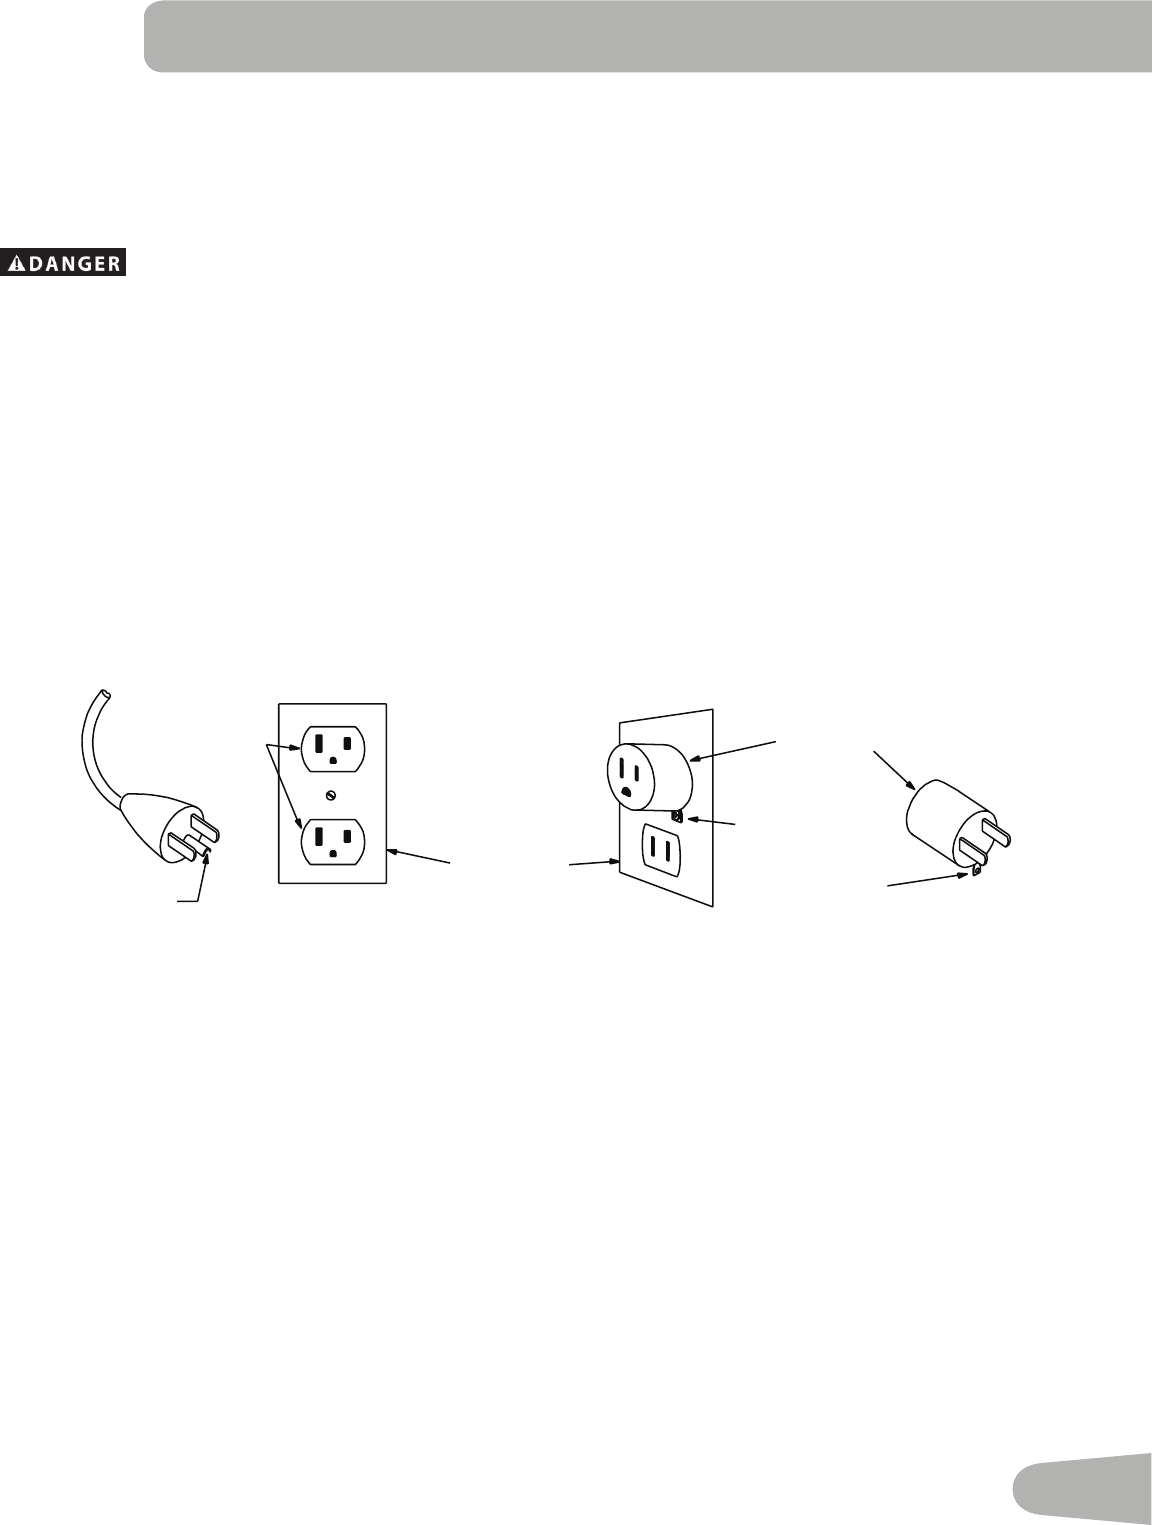
Grounding Instructions
Thisproductmustbegrounded.Ifitshouldmalfunctionorbreakdown,groundingprovidesapathofleastresistancefor
electric current to reduce the risk of electric shock. This product is equipped with a cord having an equipment-grounding
conductor and a grounding plug. The plug must be plugged into an appropriate outlet that is properly installed and grounded
in accordance with all local codes and ordinances.
Improperconnectionoftheequipment-groundingconductorcanresultinariskofelectricshock.Checkwith
aqualifiedelectricianorservicemanifyouareindoubtastowhethertheproductisproperlygrounded.Do
not modify the plug provided with the product – if it will not fit the outlet, have a proper outlet installed by a
qualified electrician.
Thismachineisforuseonanominal120-Vcircuit,andhasagroundingplugthatlooksliketheplugillustratedbelow.A
temporaryadapterthatlooksliketheadapterillustratedmaybeusedtoconnectthisplugtoa2-polereceptacleasshownif
a properly grounded outlet is not available.
The temporary adapter should be used only until a properly grounded outlet can be installed by a qualified electrician. The
greencoloredrigidear,lug,orthelikeextendingfromtheadaptermustbeconnectedtoapermanentgroundsuchasa
properlygroundedoutletboxcover.Whenevertheadapterisused,itmustbeheldinplacebyametalscrew.
Metal Screw
Tab for
Grounding
Screw
Adapter
Grounded
OutletBox
Grounded
Outlet
GroundingPin
6
speCIfICaTIons
Before Assembly
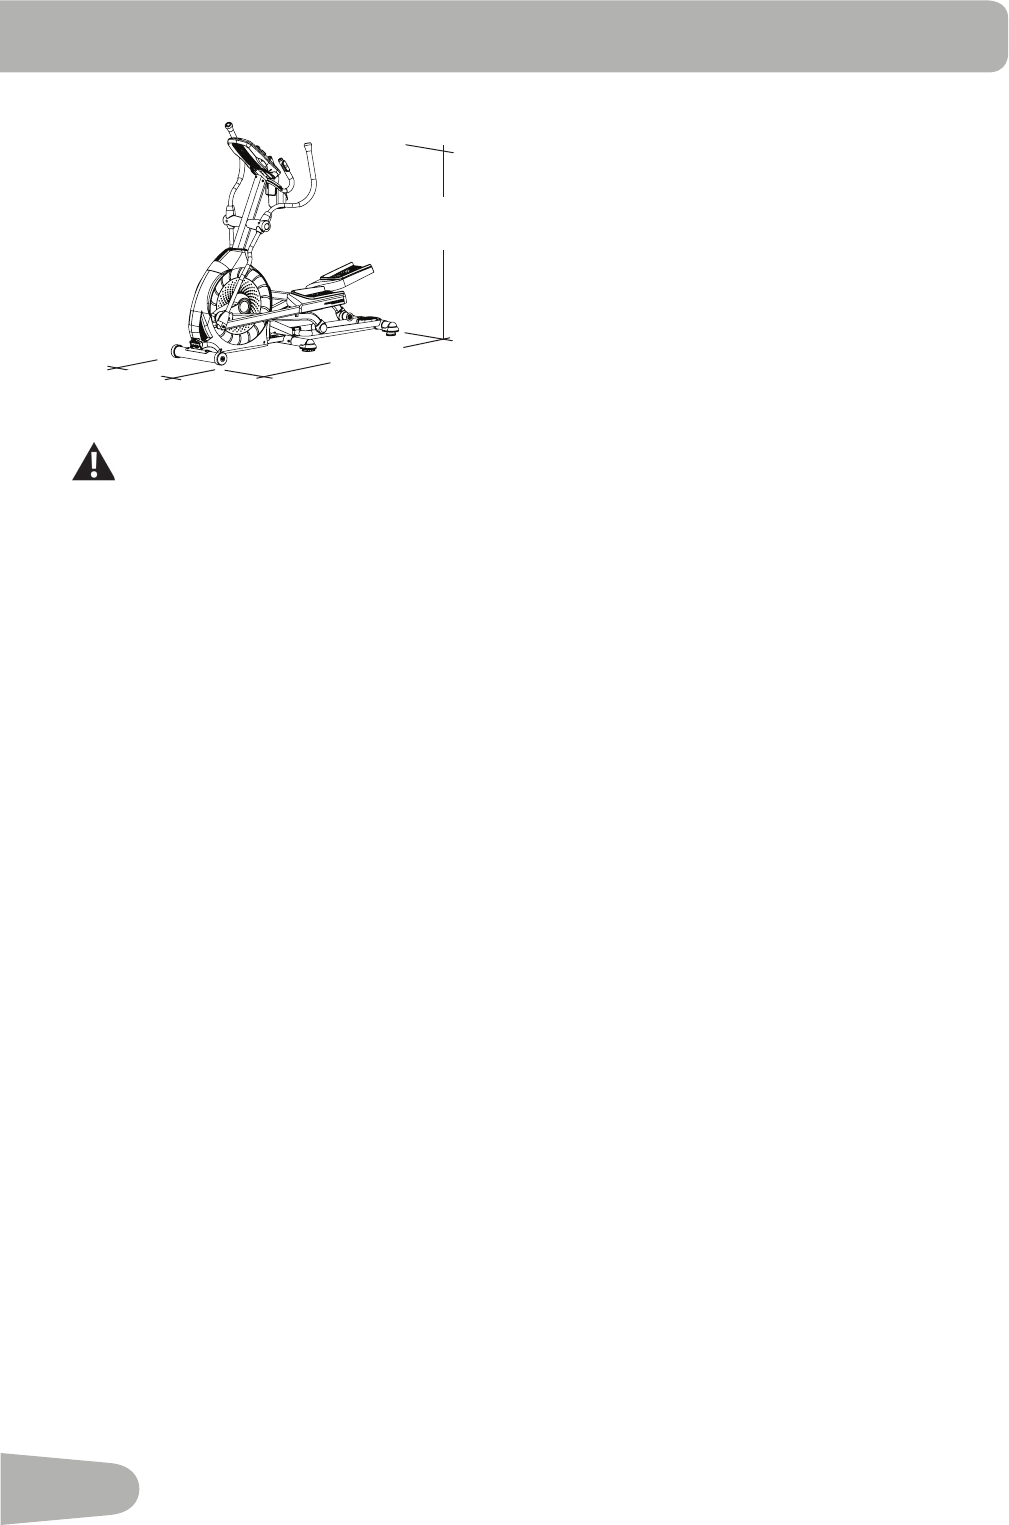
Select the area where you are going to set up and operate your machine. For safe operation, the location must be on a
hard,levelsurface.Allowaworkoutareaofaminimum76.2”x118.1”(193.4cmx300cm).Besurethattheworkoutspace
youareutilizinghasadequateheightclearance,takingintoconsiderationtheheightoftheuserandthemaximuminclineof
the elliptical machine.
Basic Assembly Tips
Followthesebasicpointswhenyouassembleyourmachine:
• Readandunderstandthe“ImportantSafetyInstructions”beforeassembly.
• Collect all the pieces necessary for each assembly step.
• Usingtherecommendedwrenches,turntheboltsandnutstotheright(clockwise)totighten,andtheleft(counterclock-
wise)toloosen,unlessinstructedotherwise.
• Whenattaching2pieces,lightlyliftandlookthroughtheboltholestohelpinserttheboltthroughtheholes.
• Theassemblycanrequire2people.
Maximum User Weight: 300lbs.(136kg)
Power Requirements:
OperationalVoltage: OperationalVoltage120VAC
OperatingCurrent: 2A
Regulatory Approvals:
ULlisted,Rated120VAC,60HzInput,2A.
This product, its packaging, and components contain chemicals known to the State of California to cause cancer,
birthdefects,orreproductiveharm.ThisNoticeisprovidedinaccordancewithCalifornia’sProposition65.Ifyou
wouldlikeadditionalinformation,pleaserefertoourwebsiteatwww.nautilus.com/prop65.
63.2”
(160.5 cm)
70.1”
(178.1 cm)
28.2”
(71.5 cm)
7
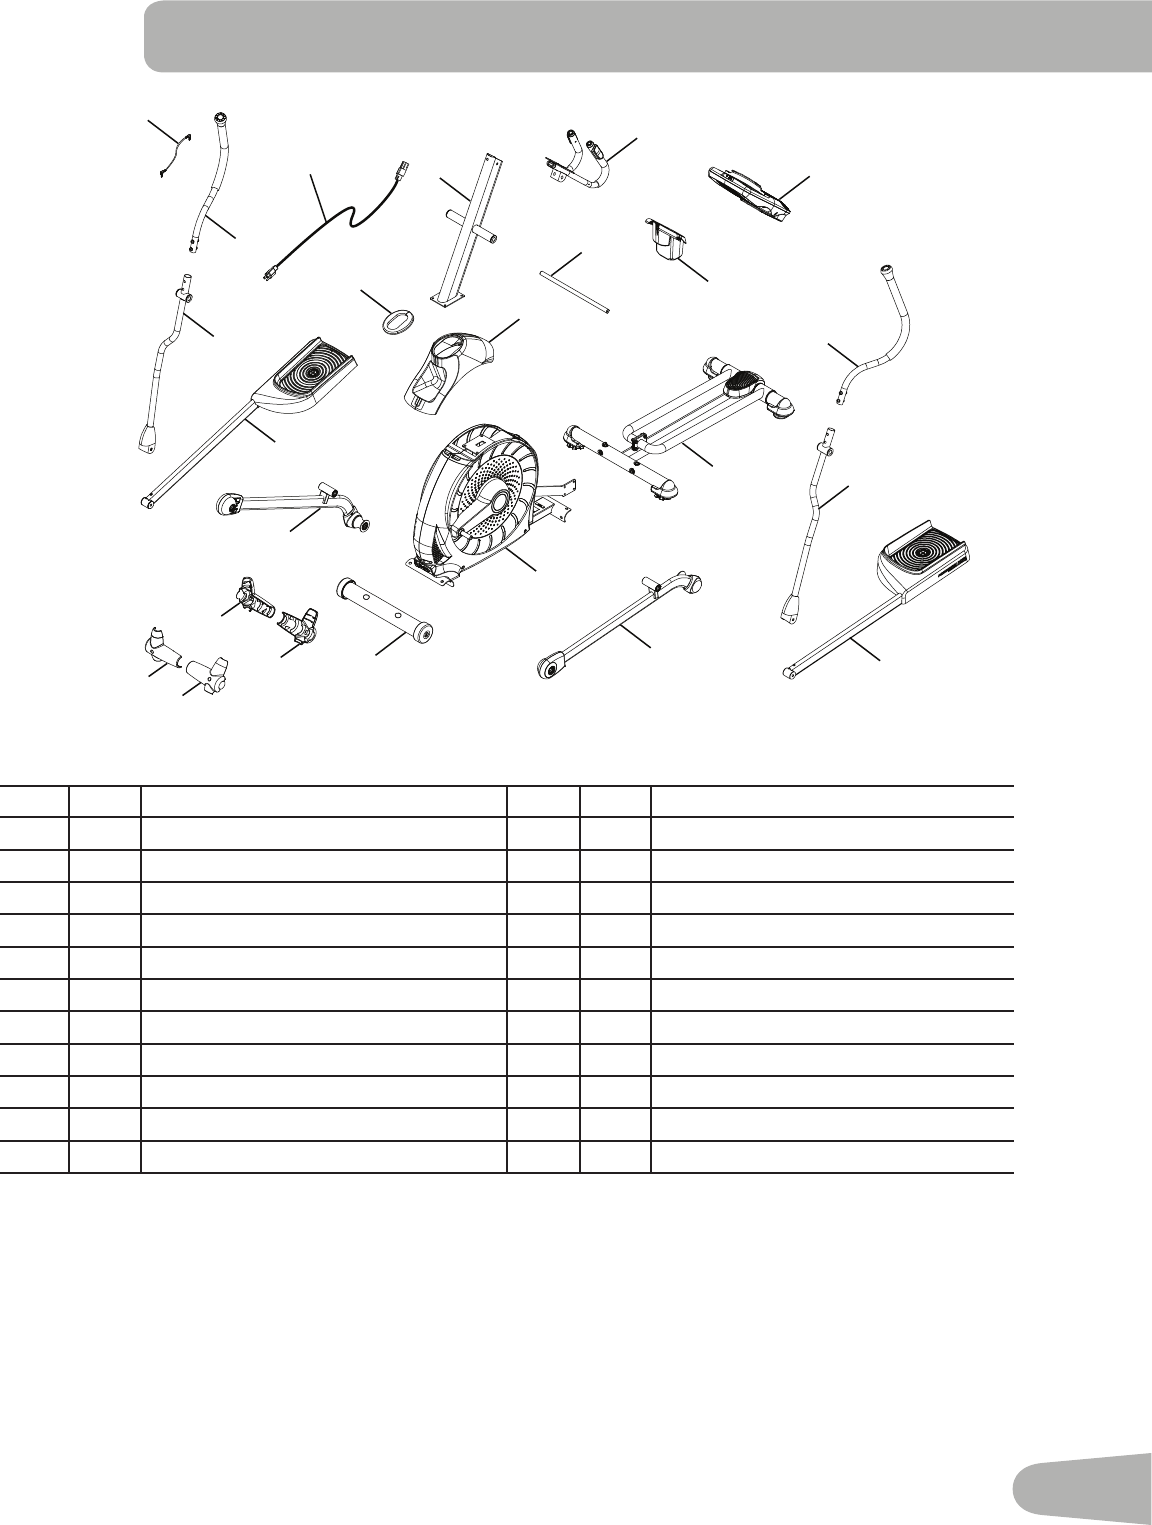
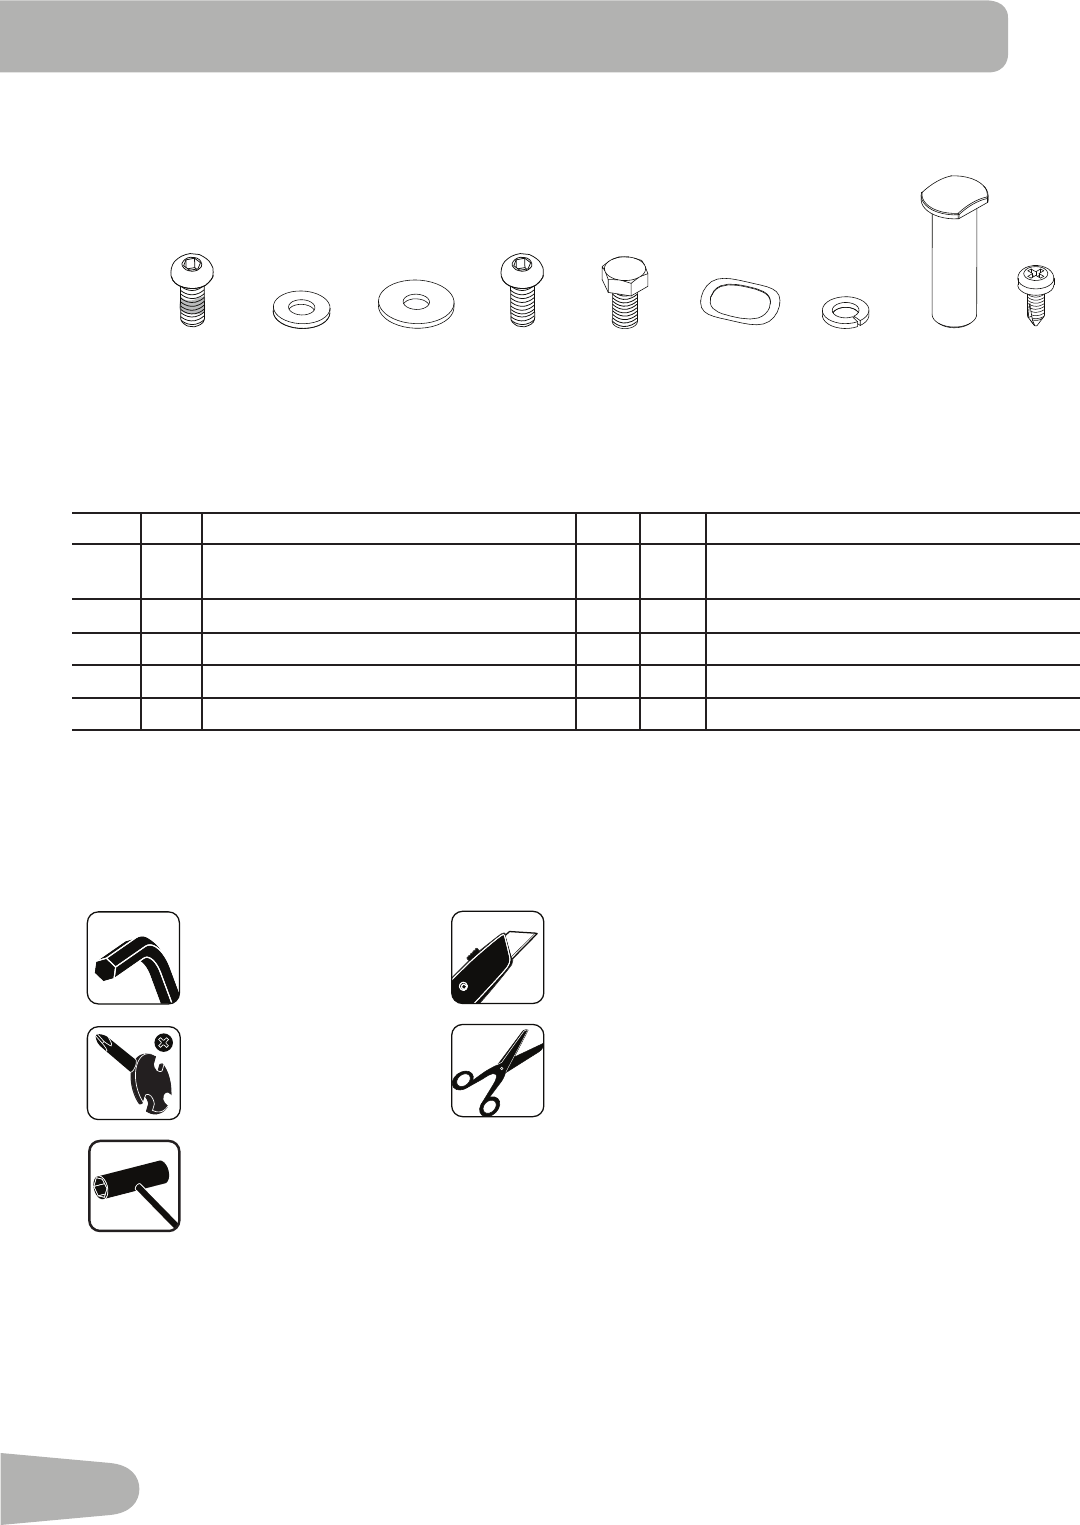
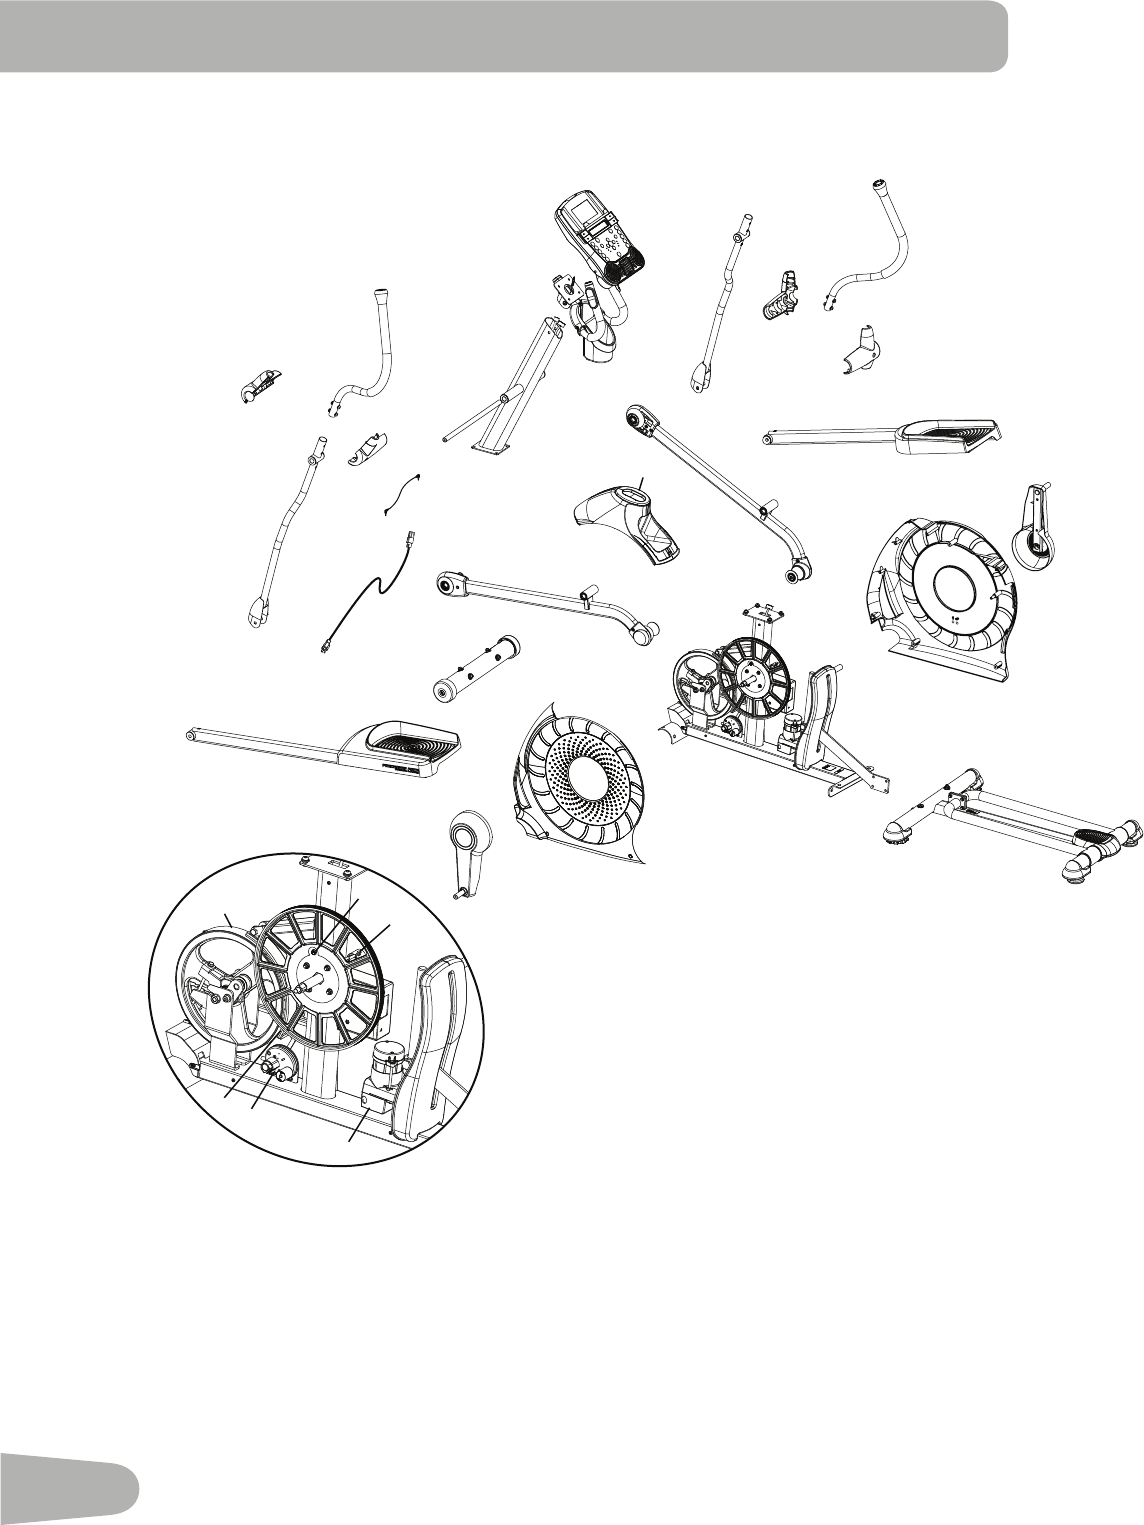
Adecalhasbeenappliedtoallright(“R ”)andleft(“L ”)partstoassistwithassembly.
Item Qty Description Item Qty Description
1 1 Console Mast 12 1UpperShroud
21StaticHandlebar 13 1 Front Stabilizer
31 Arm Pivot Rod 14 2 HandlebarShroud,Inner
41WaterBottleHolder 15 2 HandlebarShroud,Outer
5 1 Console 16 1 Right Leg
6 1 UpperLeftHandlebarArm 17 1 Right Pedal
7 1 LowerLeftHandlebarArm 18 1 Shroud Cap
81 Left Pedal 19 1LowerRightHandlebarArm
91 Rail Assembly 20 1UpperRightHandlebarArm
10 1 Left Leg 21 1 Power Cord
11 1 Frame 22 1MP3Cord
parTs
1
4
6
5
2
3
12
7
8
10
11
9
18
16
13
20
19
17
15
14
15
14
21
22
8
Item Qty Description Item Qty Description
A 6 ButtonHeadHexScrew,M8x16(with
Loctite® adhesive)
F6Wave Washer
B 4 FlatWasher,M8 G 12 Lock Washer,M8
C8 WideWasher,M8 H 2Pivot Sleeve
D 4 ButtonHeadHexScrew,M8x16 I4PhillipsHeadScrew,M5x12
E 2 HexHeadScrew,M8x20
HardWare / Tools
Tools
Included Not Included
6 mm (recommended)
A B C D E F G H I
#2
13mm
15 mm
19mm
9
assembly
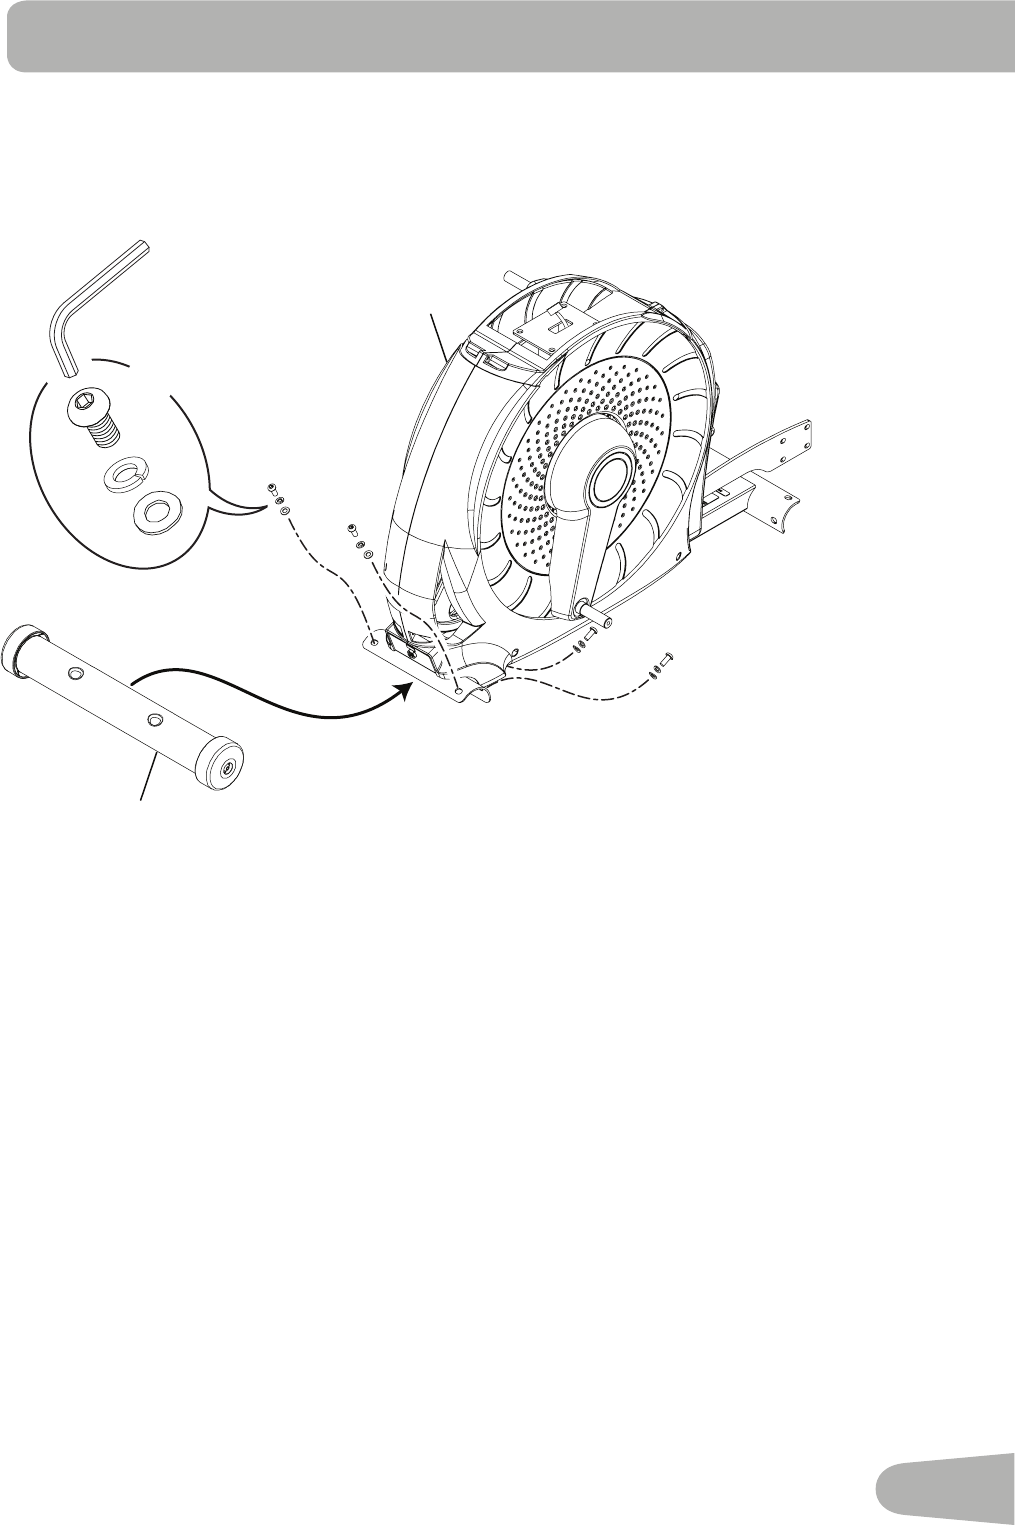
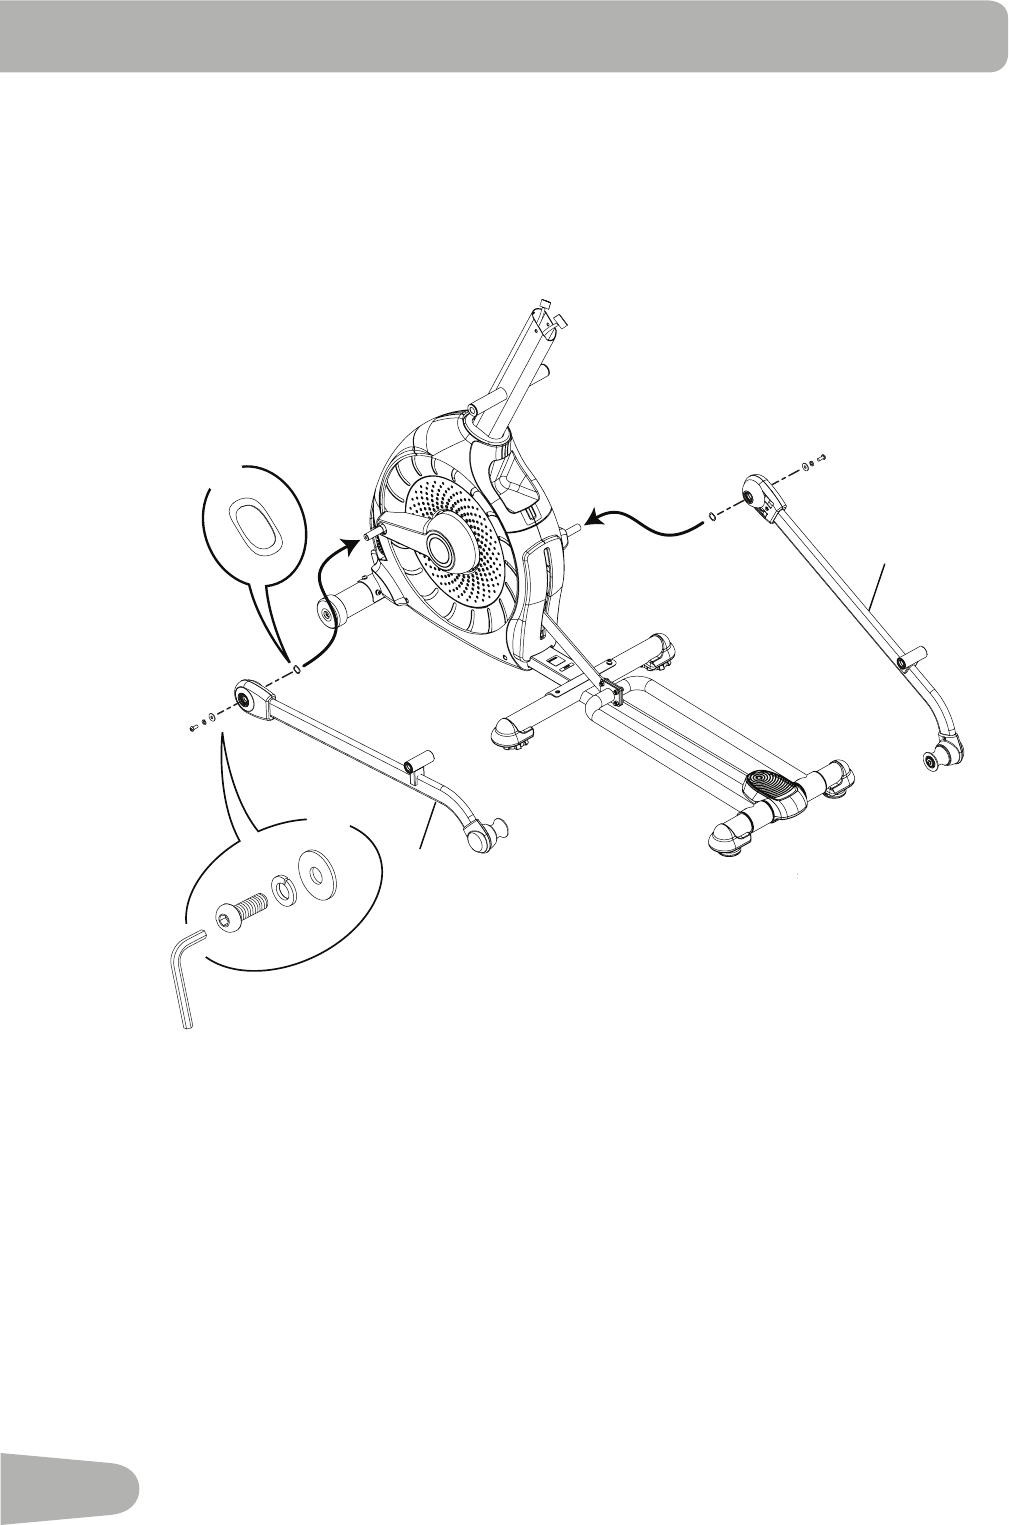
1. Attach Front Stabilizer to Frame
Note:Hardwareispre-installedandnotontheHardwareCard.*
13
11
6mm
*
*
X4
*
10
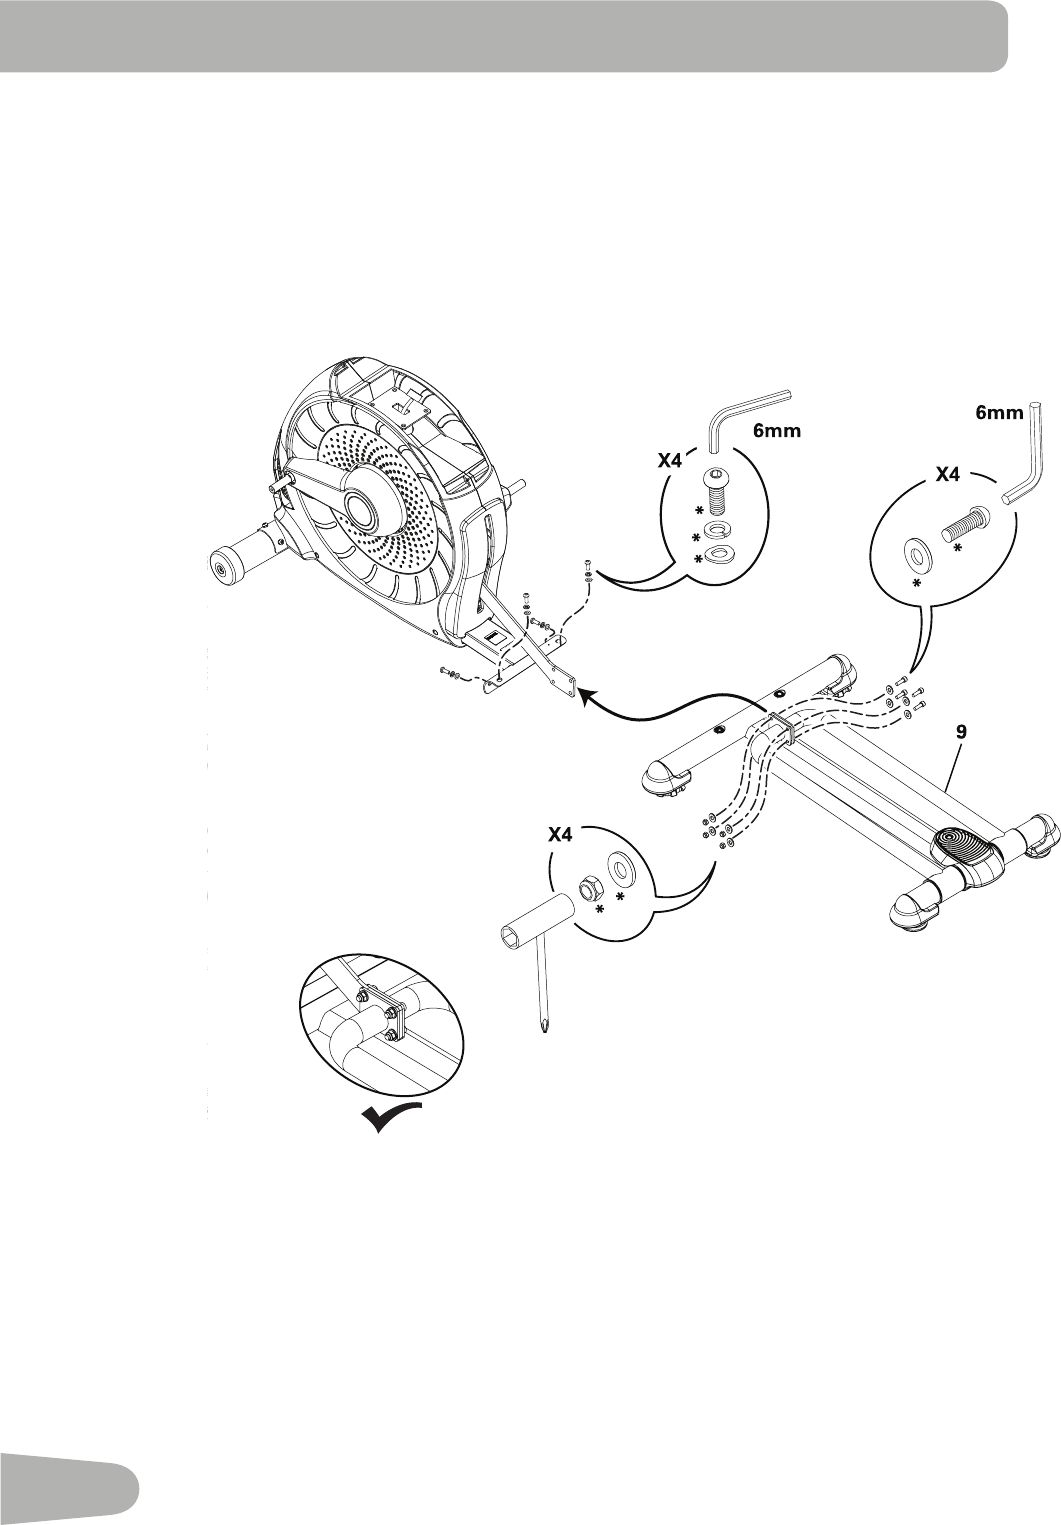
2. Attach Rail Assembly to Frame Assembly
Note:Hardwareispre-installedandnotontheHardwareCard.*
11
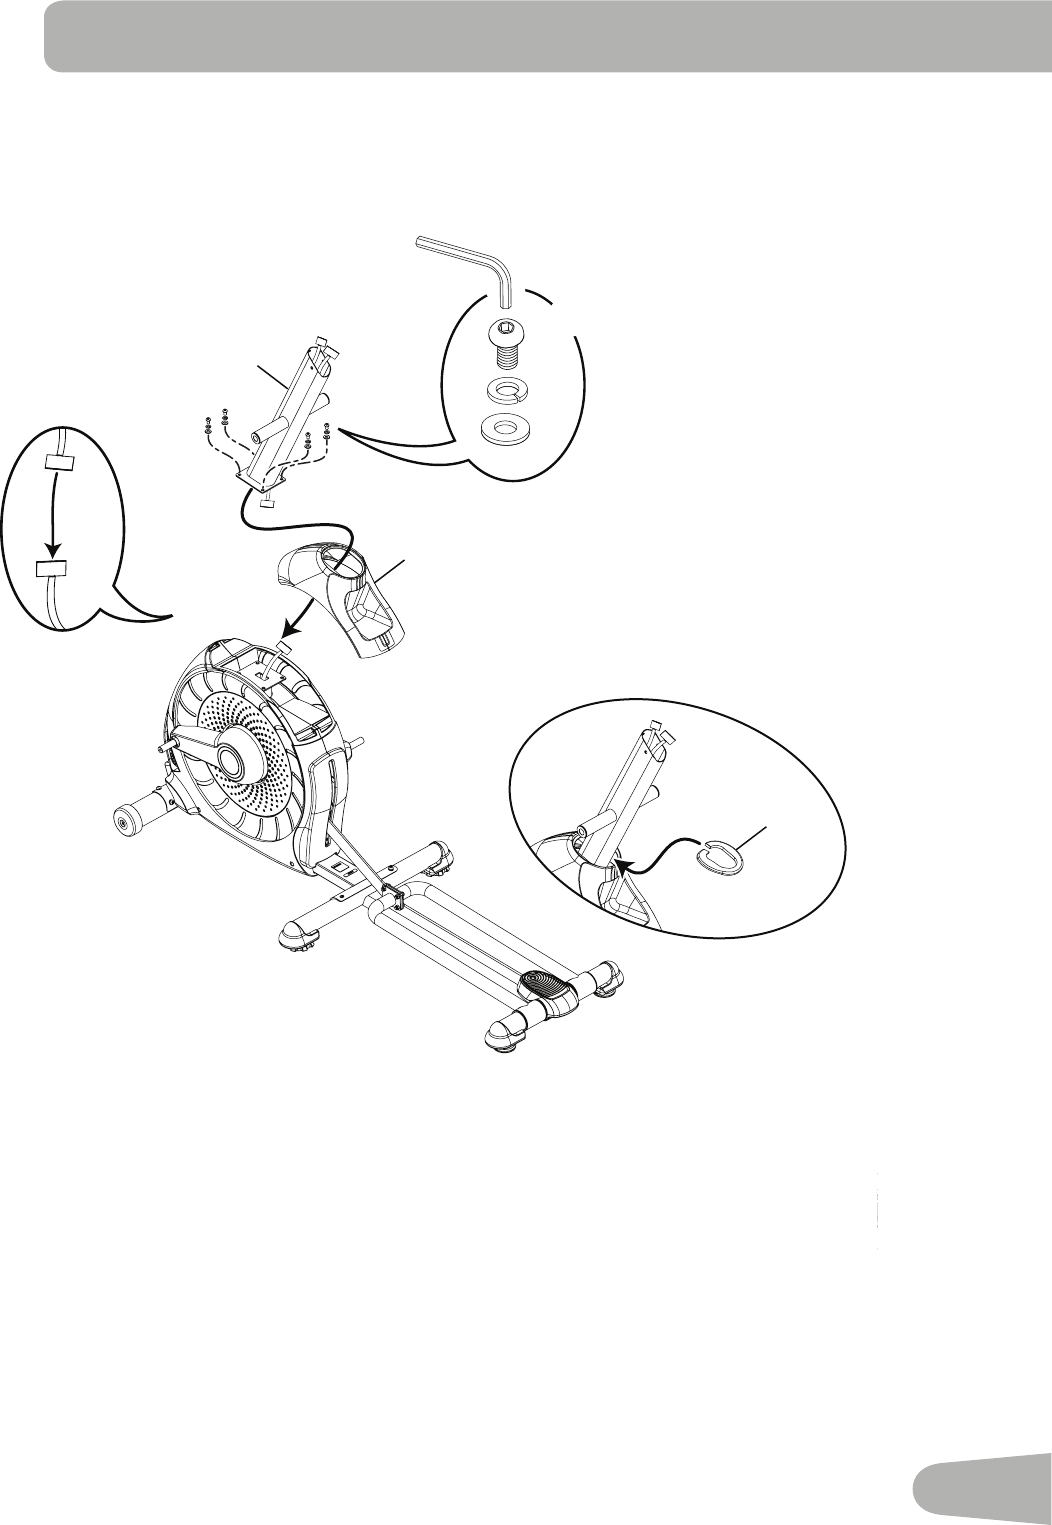
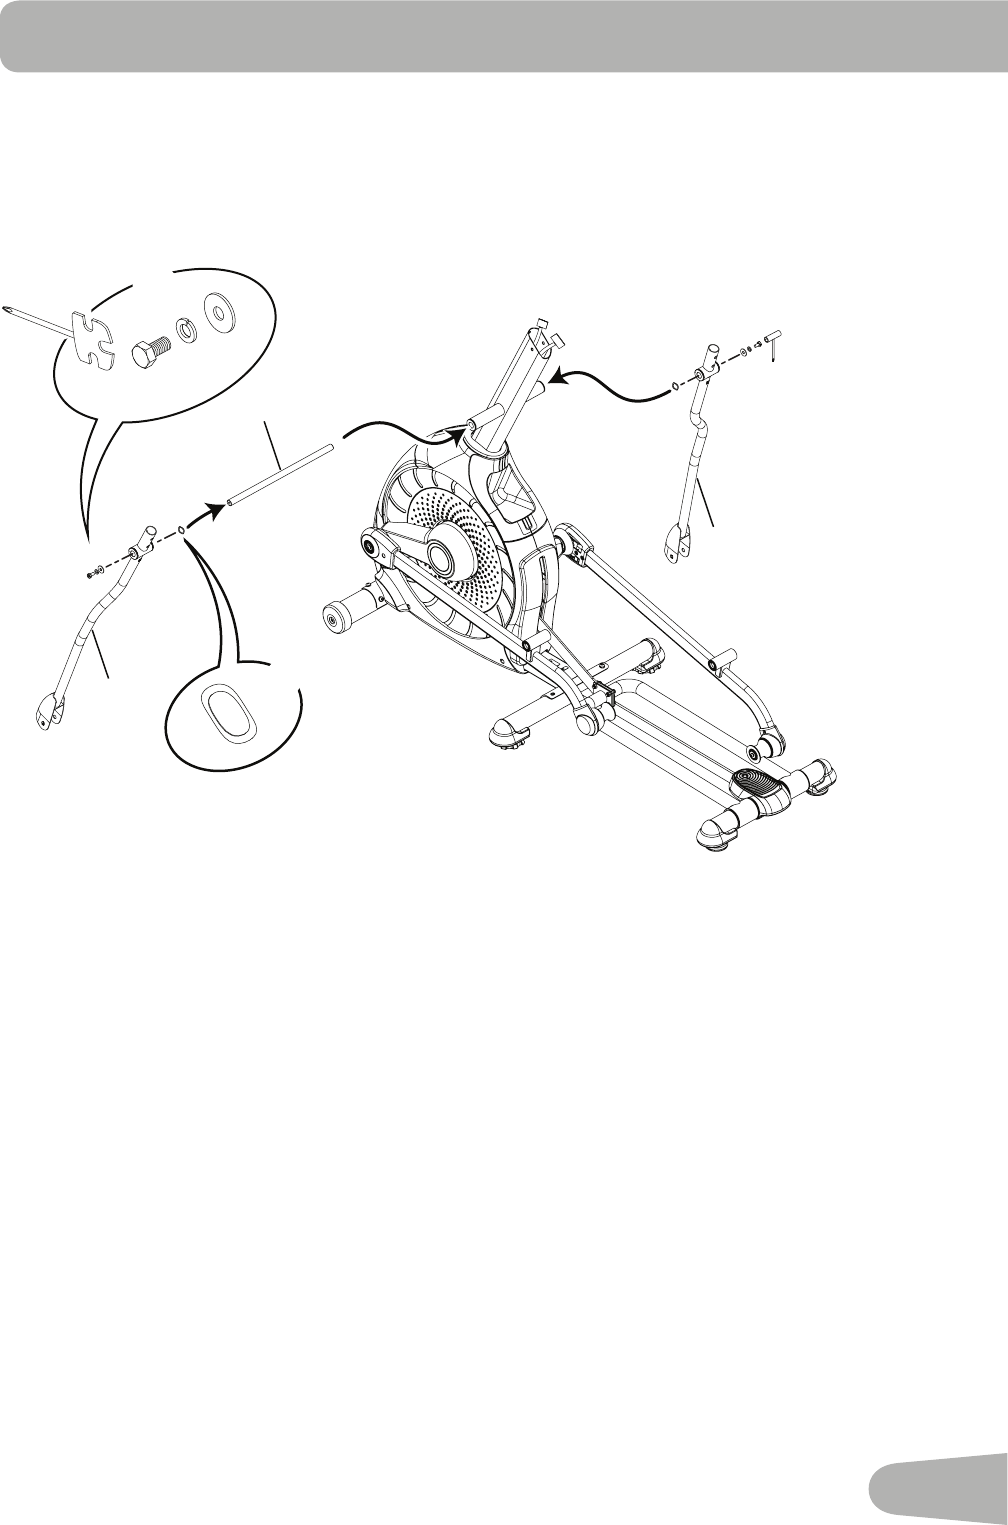
3. Connect the Cable and Attach the Console Mast to Frame Assembly
NOTICE :Donot crimp Console Cable.
18
1
12
B
D
G
6mm
X4
12
4. Attach Legs to Frame Assembly
10
16
A
C
G
F
X2
X2
6mm
13
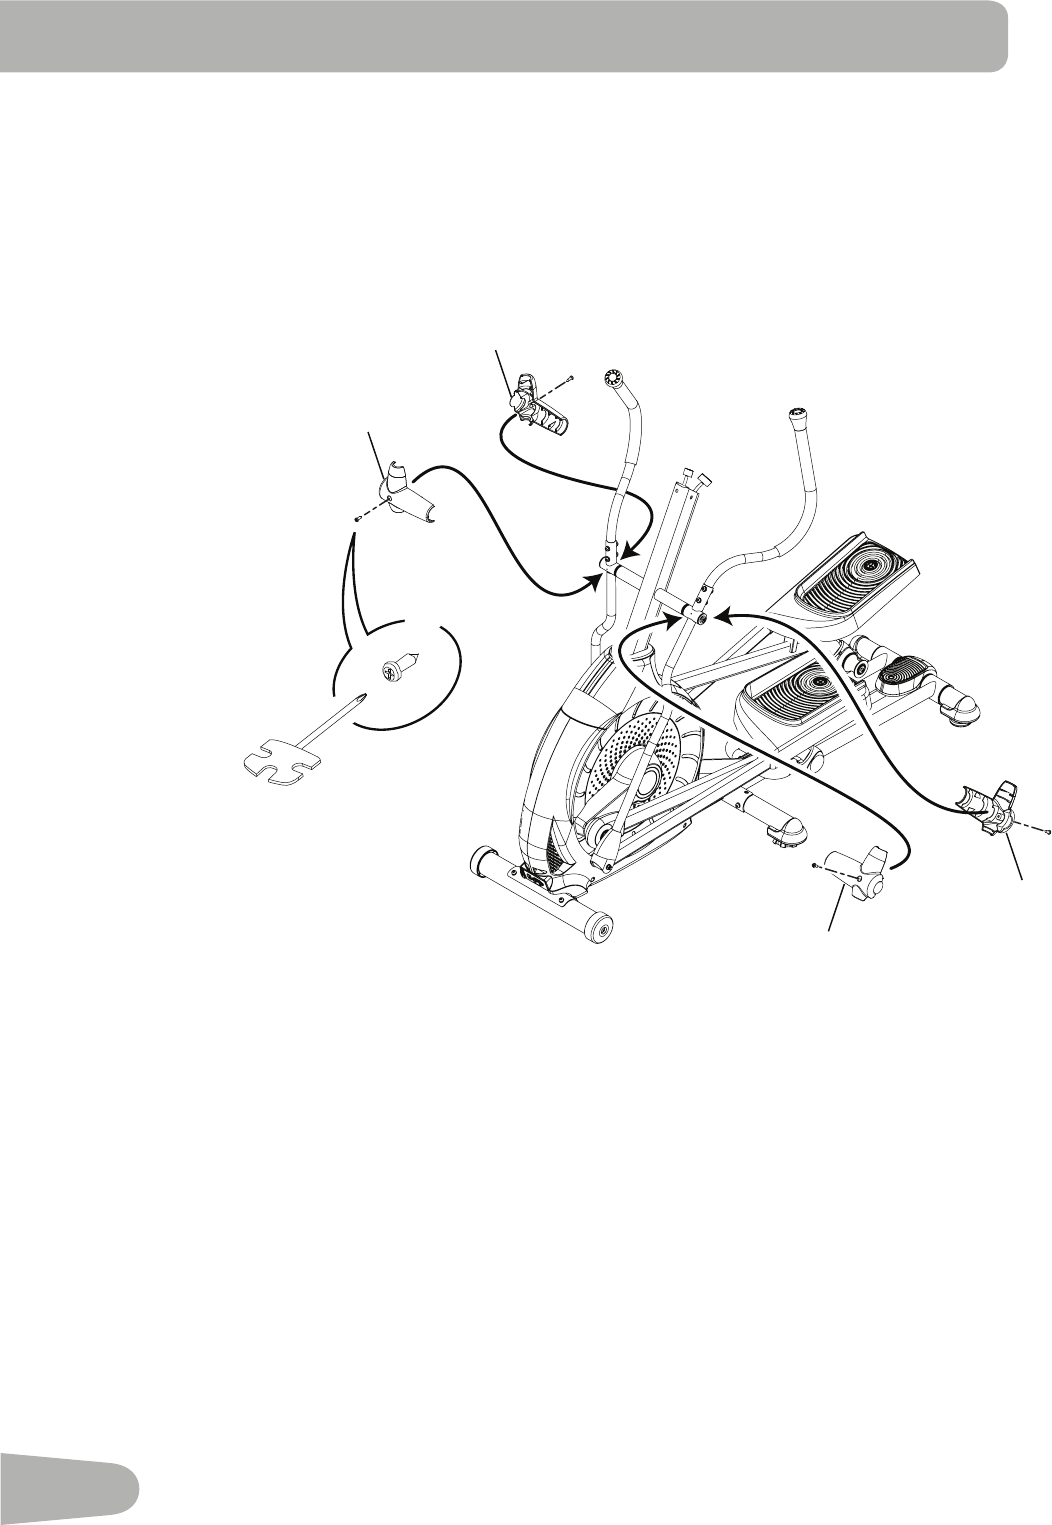
5. Attach Arm Pivot Rod and Lower Handlebar Arms to Frame Assembly
19
3
7
C
G
E
F
X2
X2
13 mm
14
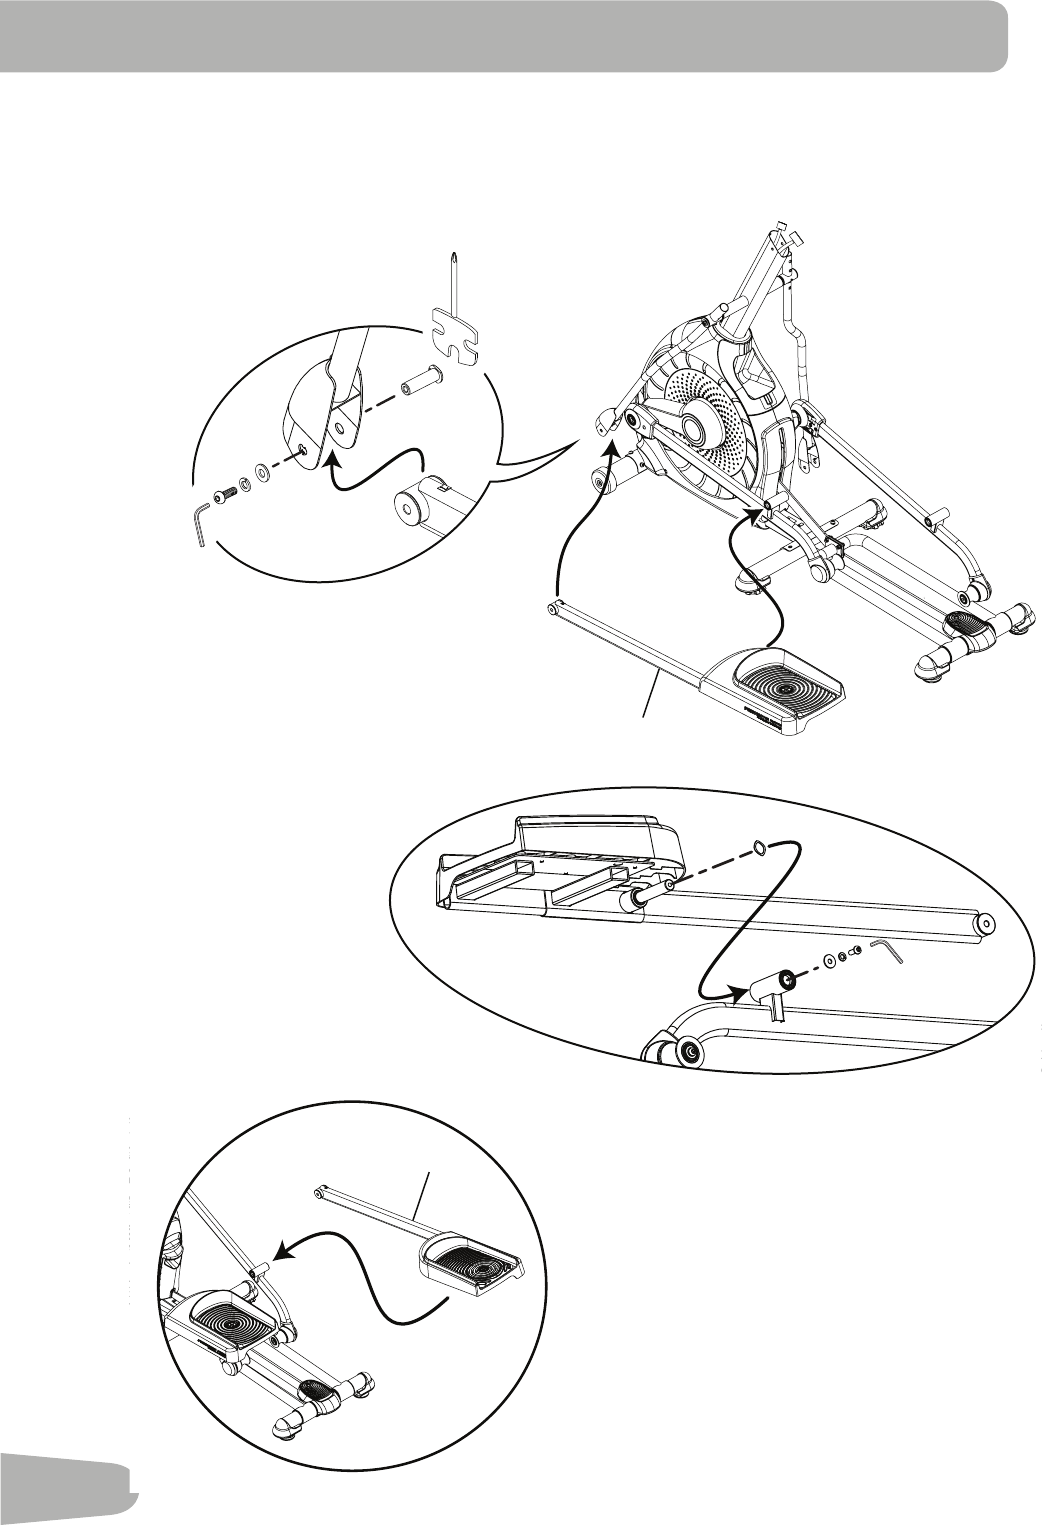
6. Attach Left Pedal to Frame Assembly
NOTICE :RepeatsteponoppositesidewiththeRightPedal(Item17).
F
A
CG
8
17
C
H
G
A
6mm
15
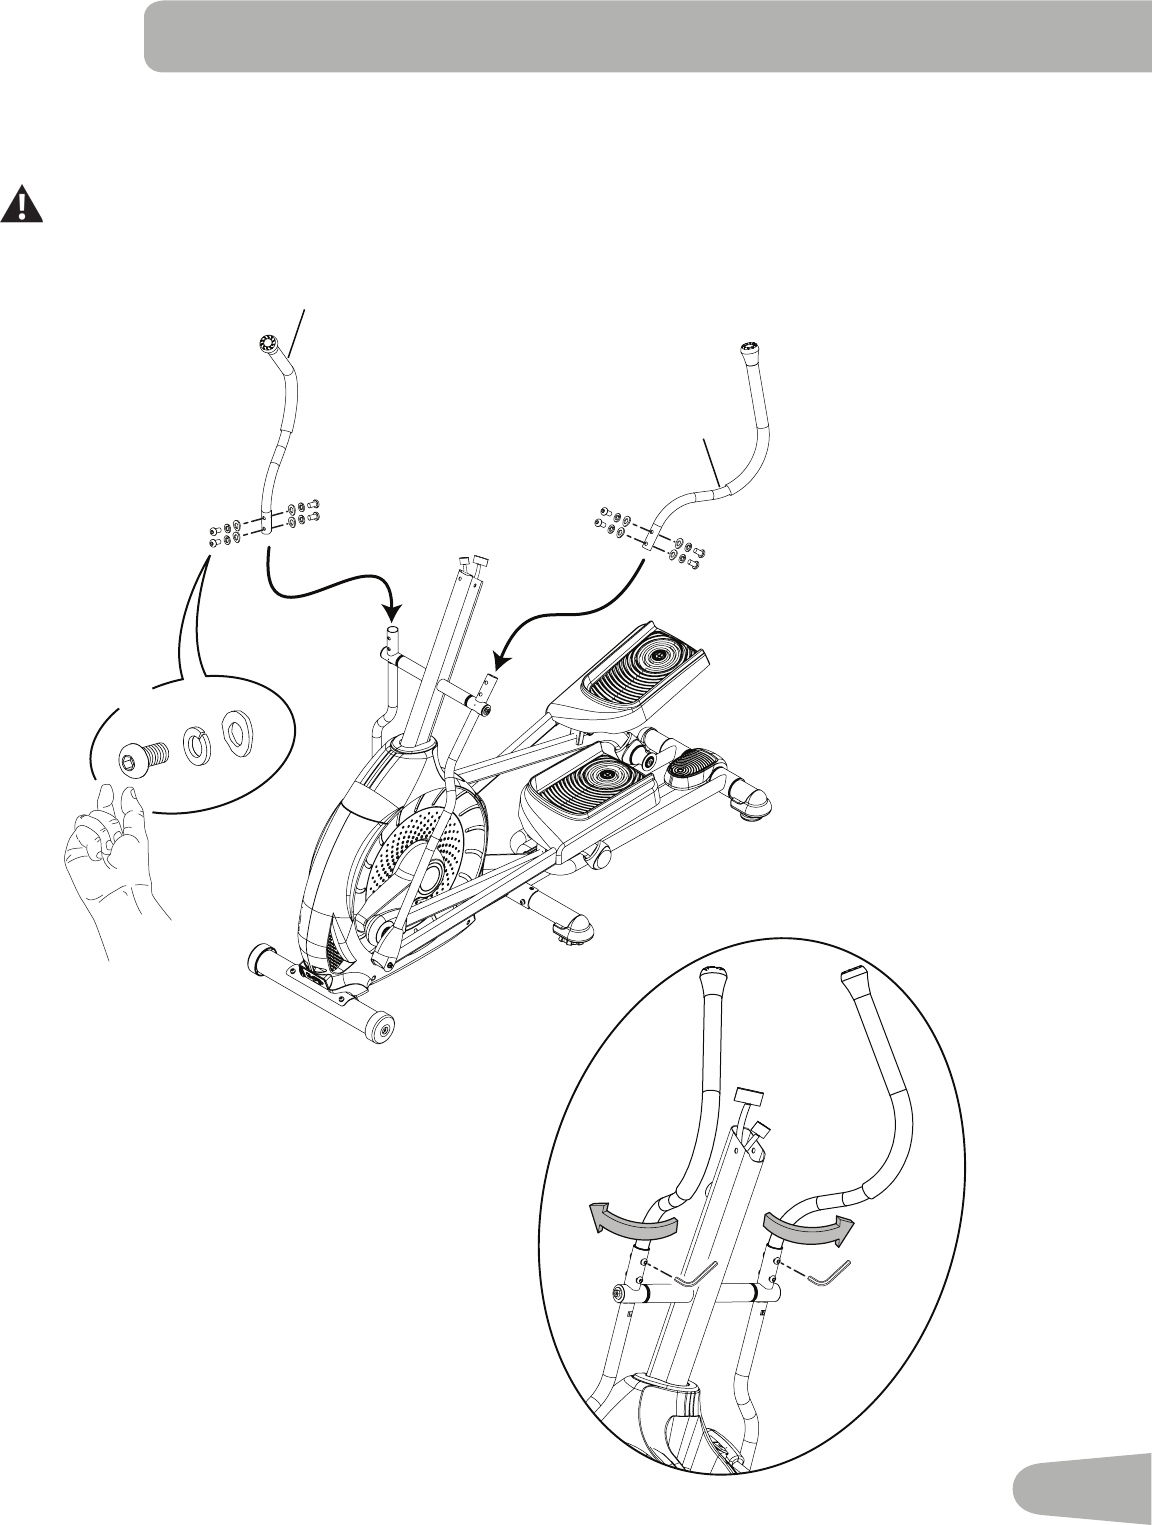
7. Attach and Adjust the Upper Handlebar Arms to Frame Assembly
Note:Hardwareispre-installedandnotontheHardwareCard.*
MakesuretheUpperHandlebarArmsaresecurebeforeyouexercise.
6mm
20
6
***
X8
16
8. Attach Handlebar Shrouds to Frame Assembly
Note:Hardwareispre-installedandnotontheHardwareCard.*
15
14
15
14
I
#2
X4
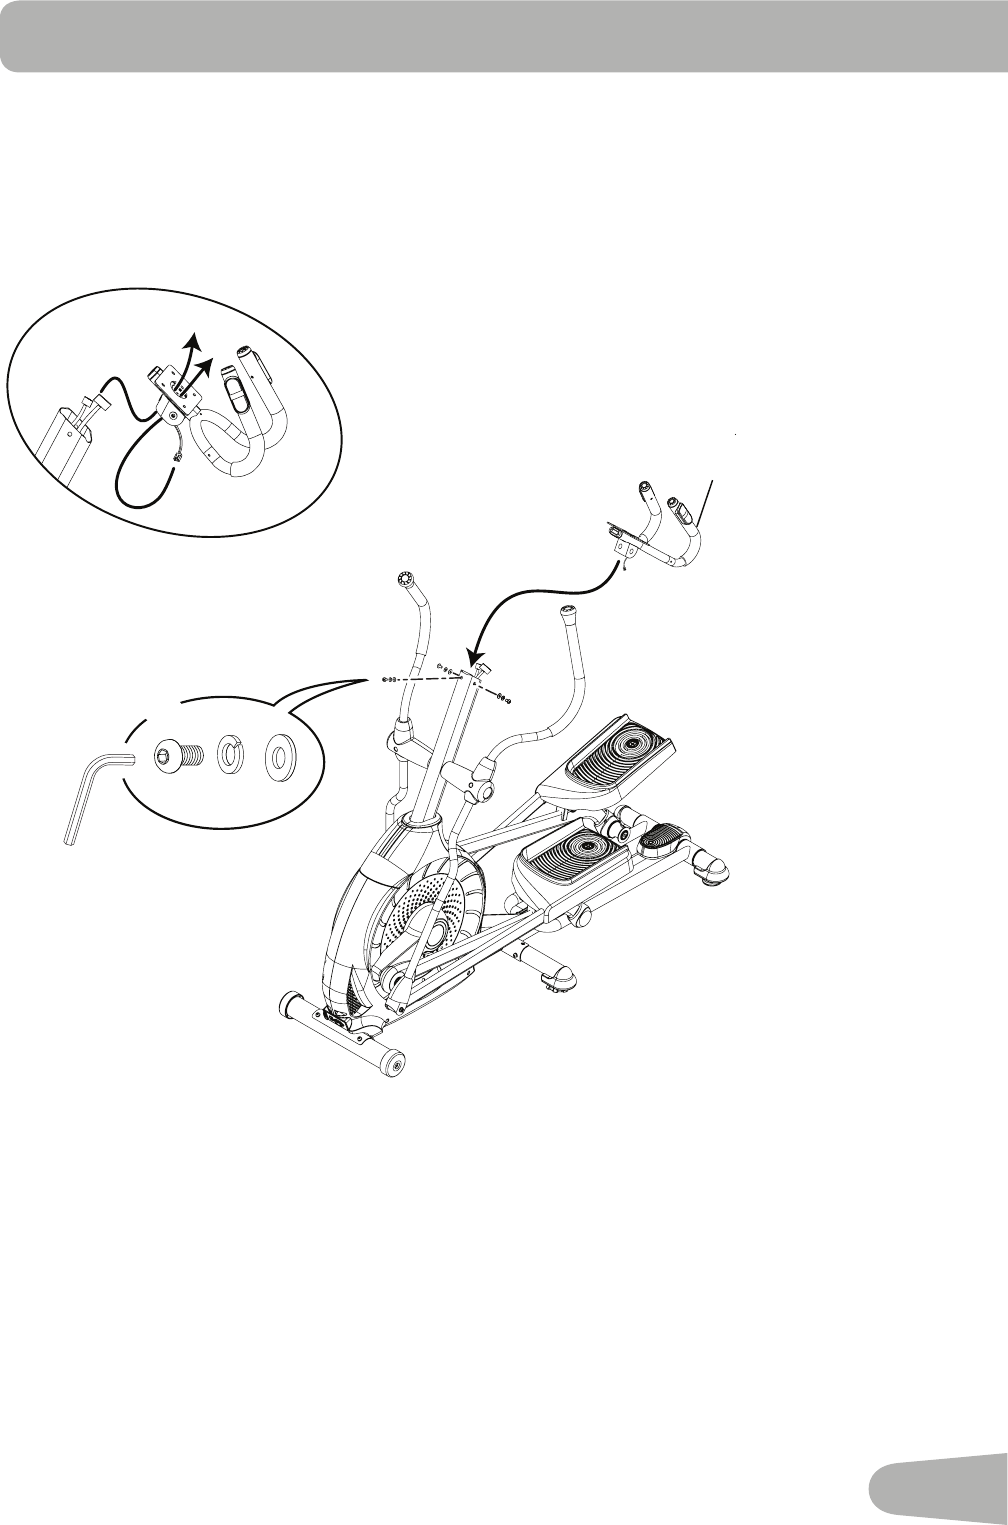
17
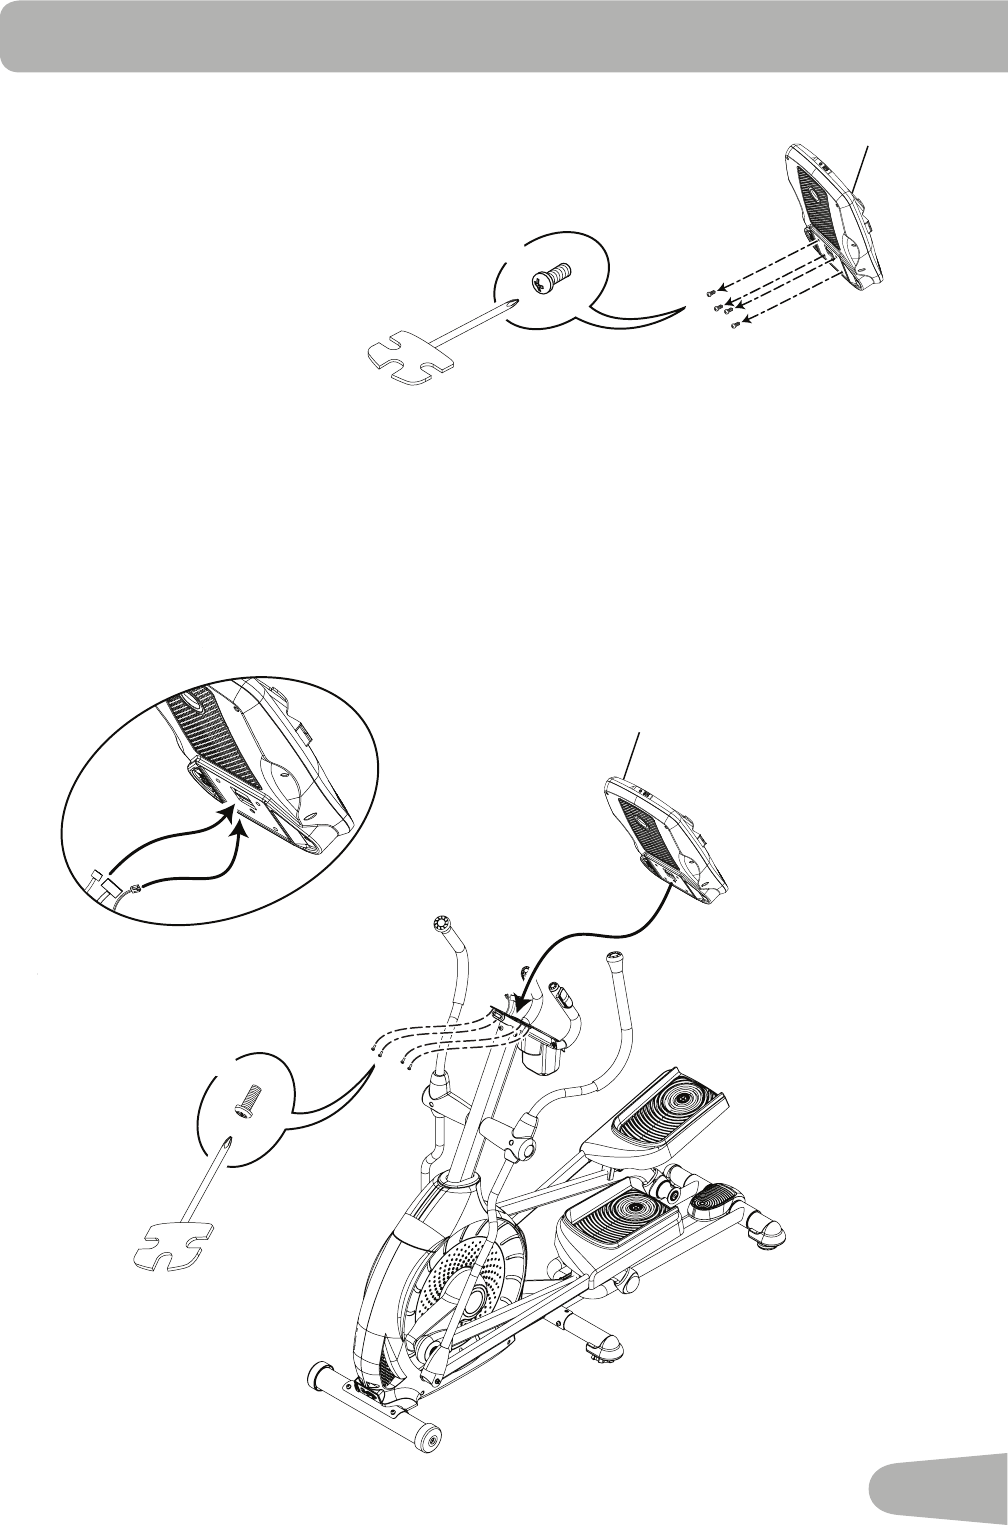
9. Route Cables and Attach the Static Handlebar to Frame Assembly
NOTICE :DonotcrimptheConsoleCables.
2
*
X3
6mm
**

18
10. Attach Water Bottle Holder to Frame Assembly
Note:Hardwareispre-installedandnotontheHardwareCard.*
4
#2
*
X3
19
12. Connect Cables and Attach Console to Frame Assembly
NOTICE :Aligntheclipsonthecableconnectorsandmakesuretheconnectorslock.Donotcrimp cables.
11. Remove Hardware from Console
NOTICE :Donotcrimpthecable.
Note:Hardwareispre-installedandnotontheHardwareCard.*
5
*
X4
#2
5
*
X4
20
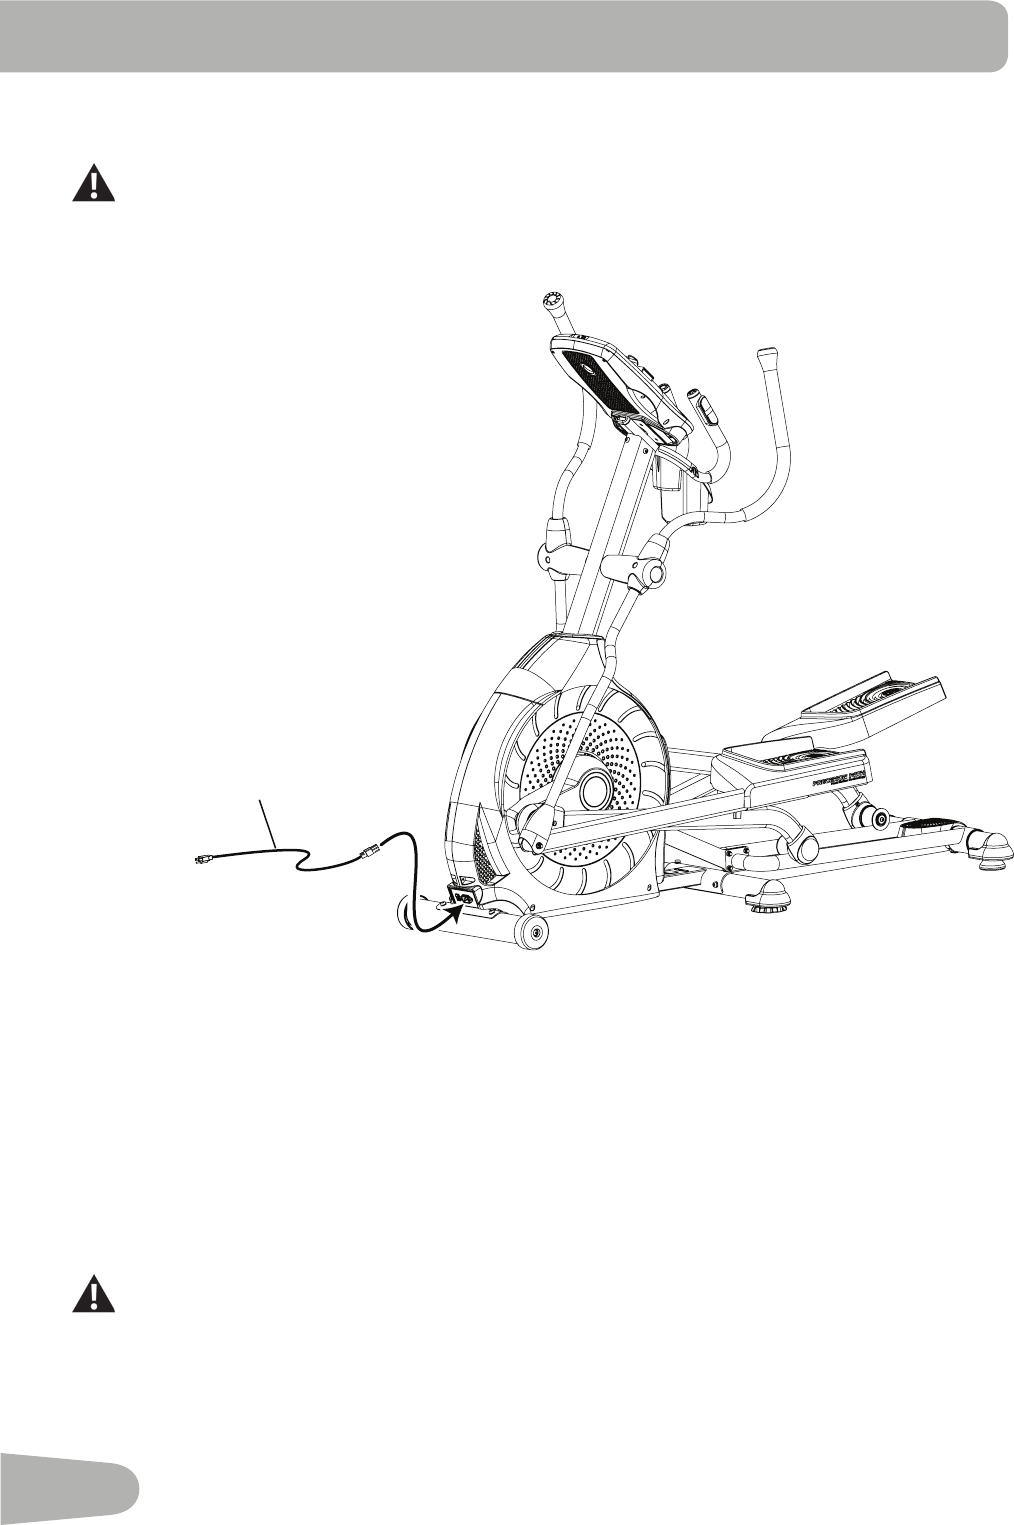
13. Connect the Power Cord to Frame Assembly
Connectthismachinetoaproperlygroundedoutletonly(seeGroundingInstructions).
21
14. Final Inspection
Inspect your machine to ensure that all hardware is tight and components are properly assembled.
Be sure to record the serial number in the field provided at the front of this manual.
Do not use until the machine has been fully assembled and inspected for correct performance in accordance with the Owner’s
Manual.
21
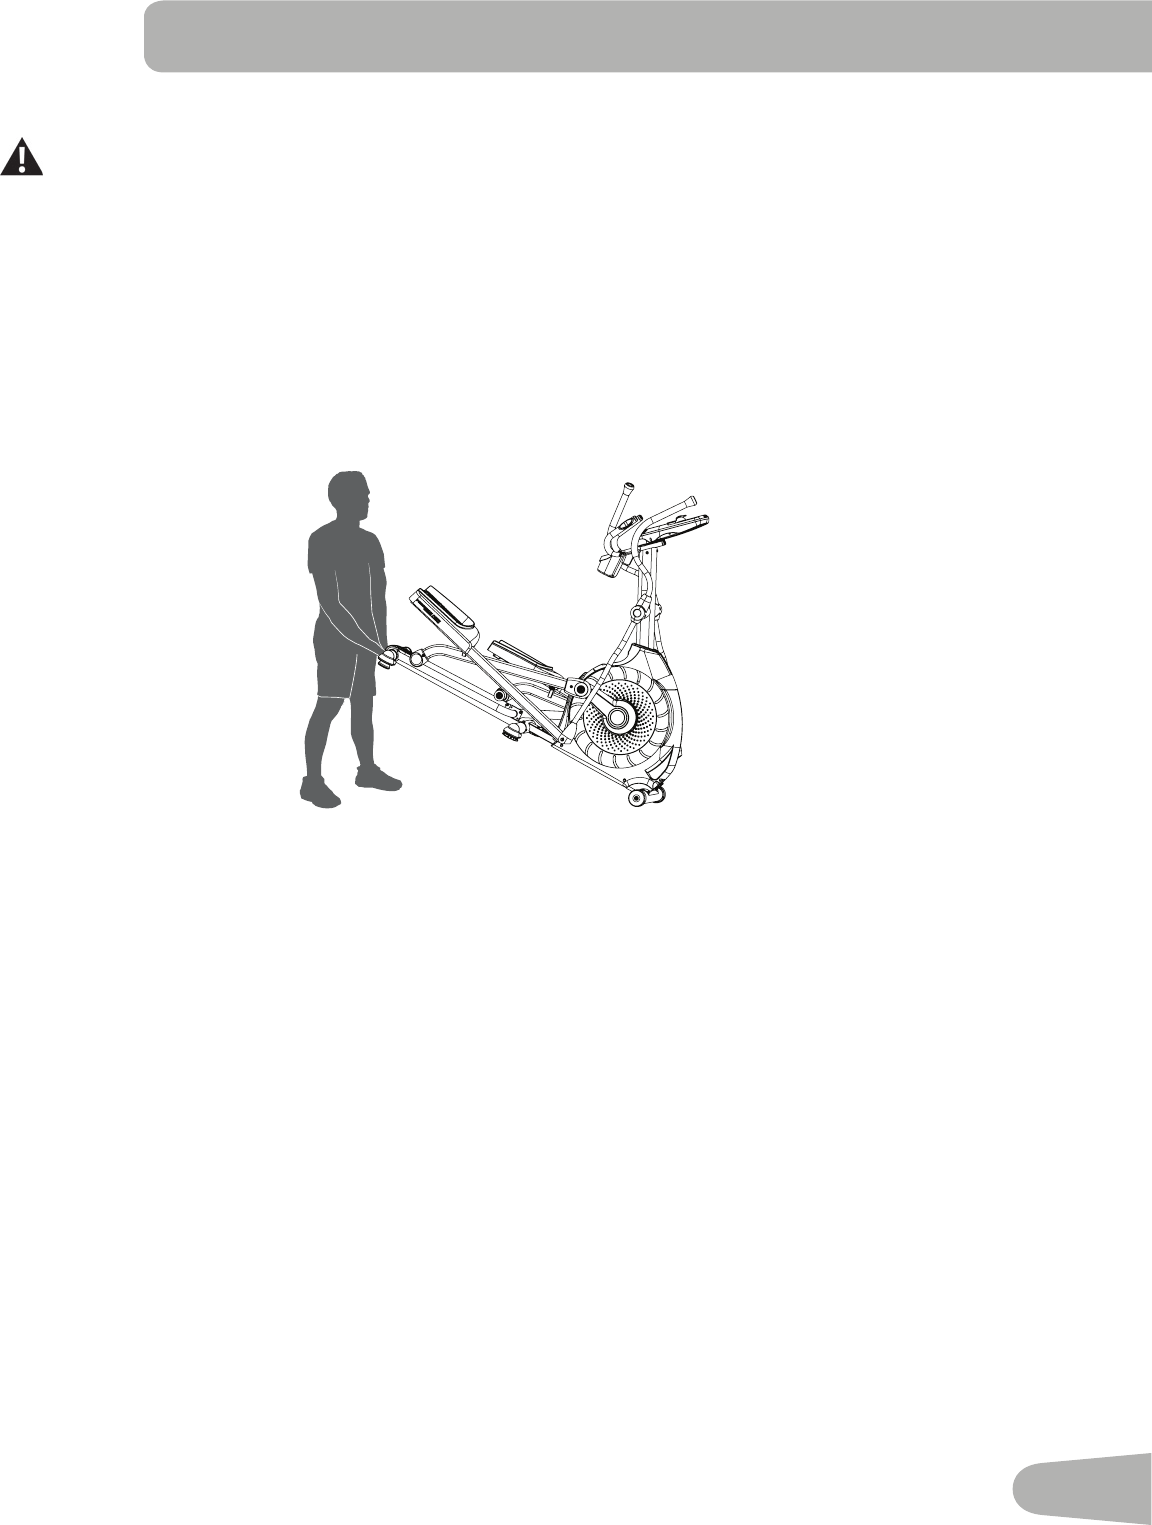
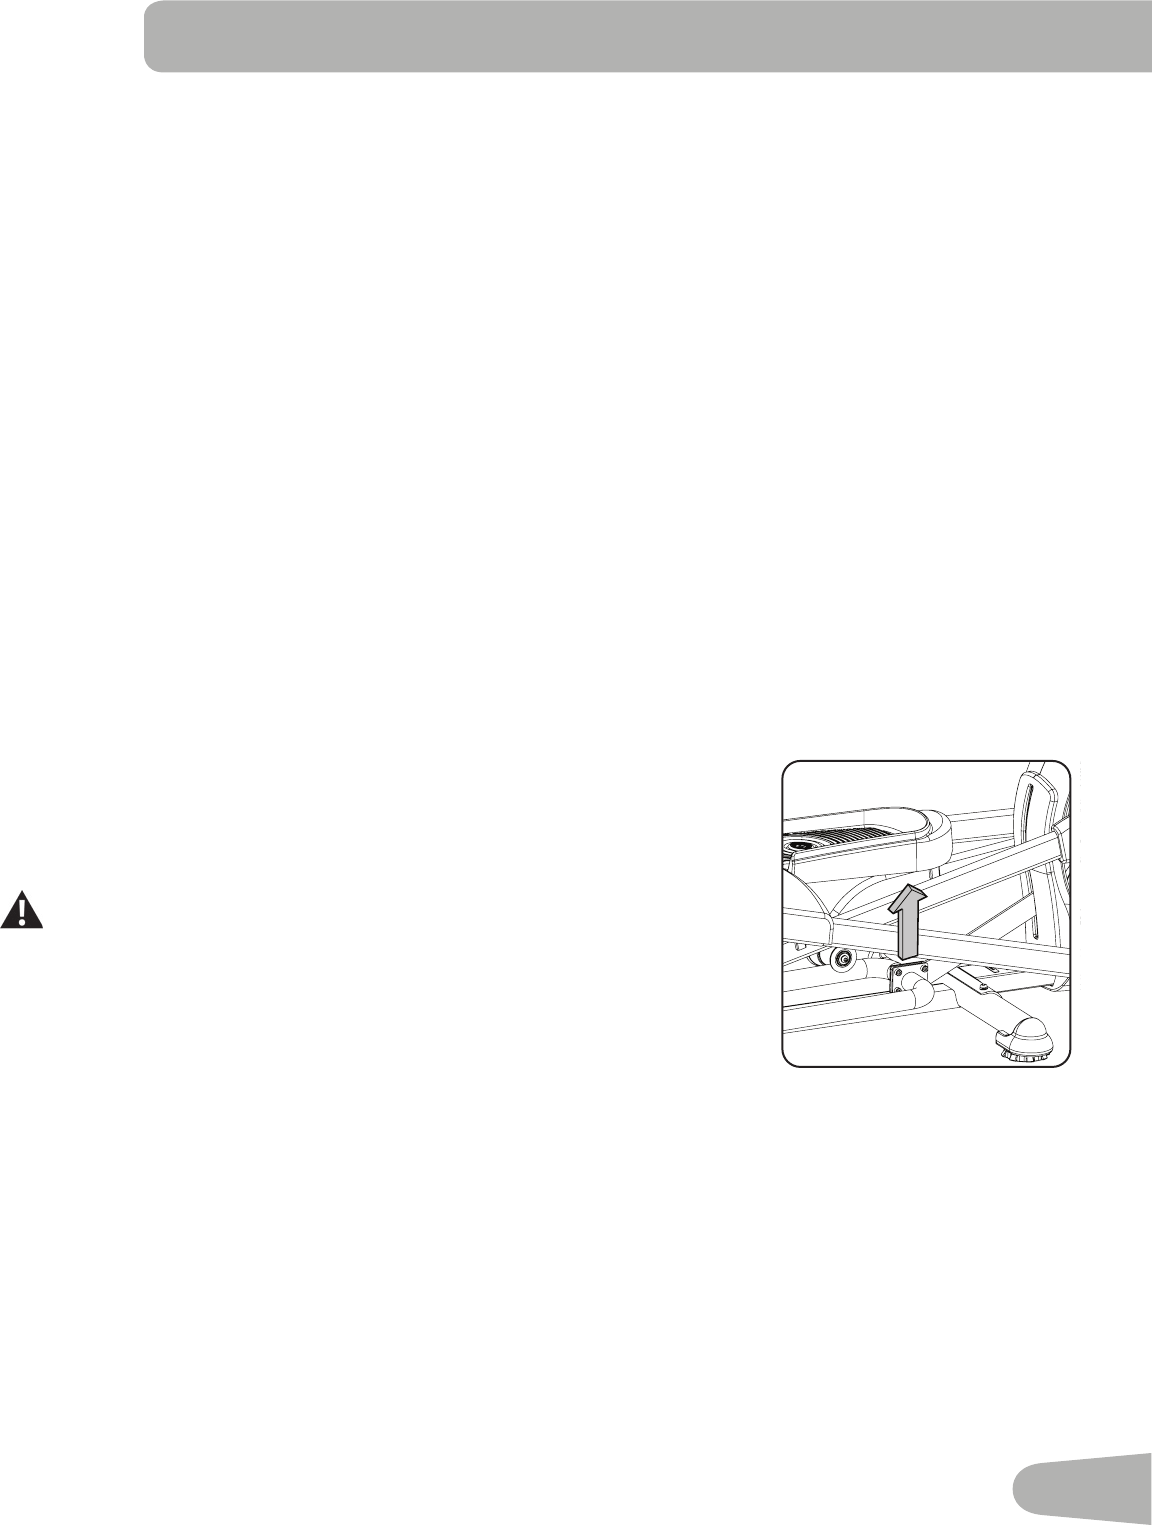
Moving the Machine
The machine may be moved by one or more persons depending on their physical abilities and capacities. Make sure that you
and others are all physically fit and able to move the machine safely.
1. Remove the power cord.
2. UsetheTransportHandletocarefullyliftthemachineontothetransportrollers.
3. Pushthemachineintoposition.
4. Carefullylowerthemachineintoposition.
NOTICE:Becarefulwhenyoumovetheelliptical.Allabruptmotionscanaffectthecomputeroperation.
before you sTarT
22
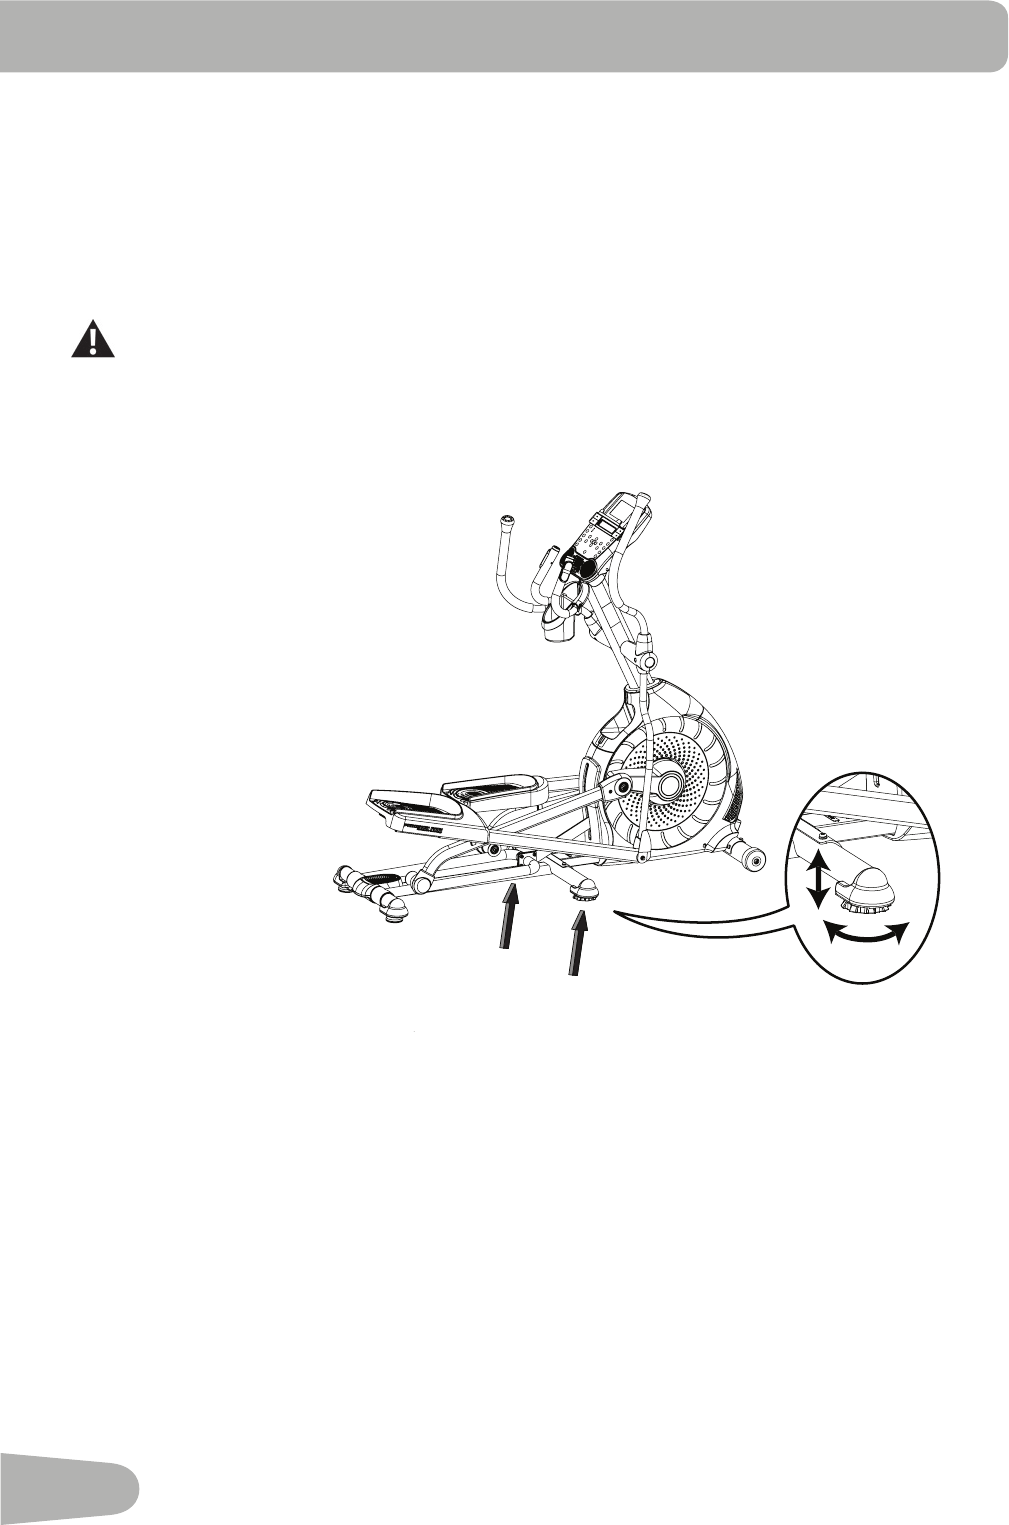
Leveling the Machine
ThemachineneedstobeleveledifyourworkoutareaisunevenoriftheRailAssemblyisslightlyoffthefloor.Toadjust:
1. Place the machine in your workout area.
2. SafelystandonthebackoftheRailAssemblyforapproximately20seconds.
3. Stepoffthemachine.
4. Loosenthelockingwingnutsandadjustthelevelersuntiltheyallcontactthefloor.
Do not adjust the levelers to such a height that they detach or unscrew from the machine. Injury to you or
damage to the machine can occur.
5. Adjust until the machine is level. Tighten the locking wing nuts.
Makesurethemachineislevelandstablebeforeyouexercise.

23
ImporTanT safeTy InsTruCTIons
This icon means a potentially hazardous situation which, if not avoided, could result in death or serious injury.
Before using this equipment, obey the following warnings:
Read and understand the complete Manual. Keep the Manual for future reference.
Readandunderstandallwarningsonthismachine.IfatanytimetheWarningstickersbecomeloose,unreadable
or dislodged, contact Nautilus® Customer Service for replacement stickers.
• Childrenmustnotbeletonorneartothismachine.Movingpartsandotherfeaturesofthemachinecanbe
dangerous to children.
• Notintendedforusebyanyoneunder14yearsofage.
• Consultaphysicianbeforeyoustartanexerciseprogram.Stopexercisingifyoufeelpainortightnessinyour
chest,becomeshortofbreath,orfeelfaint.Contactyourdoctorbeforeyouusethemachineagain.Usethevalues
calculated or measured by the machine’s computer for reference purposes only.
• Beforeeachuse,examinethismachineforloosepartsorsignsofwear.Donotuseiffoundinthiscondition.Monitor
the Pedals and Crank Arms closely. Contact Nautilus® Customer Service for repair information.
• Maximumuserweightlimit:300lbs.(136kg).Donotuseifyouareoverthisweight.
• Thismachineisforhomeuseonly.
• Donotwearlooseclothingorjewelry.Thismachinecontainsmovingparts.Donotputfingersorotherobjectsinto
movingpartsoftheexerciseequipment.
• Setupandoperatethismachineonasolid,level,horizontalsurface.
• MaketheFootPedalsstablebeforeyousteponthem.Usecautionwhenyousteponandoffthemachine.
• Disconnectallpowerbeforeservicingthismachine.
• Donotoperatethismachineoutdoorsorinmoistorwetlocations.
• Keepatleast24”(0.6m)oneachsideofthemachineclear.Thisistherecommendedsafedistanceforaccessand
passage around and emergency dismounts from the machine. Keep third parties out of this space when machine is
in use.
• Donotoverexertyourselfduringexercise.Operatethemachineinthemannerdescribedinthismanual.
• CorrectlyadjustandsafelyengageallPositionalAdjustmentDevices.MakesurethattheAdjustmentDevicesdonot
hit the user.
• KeeptheFootPedalscleananddry.
• Exerciseonthismachinerequirescoordinationandbalance.Besuretoanticipatethatchangesinspeedand
resistance level can occur during workouts, and be attentive in order to avoid loss of balance and possible injury.
• Amachineshouldneverbeleftunattendedwhenpluggedin.Unplugfromoutletwhennotinuse,andbeforeputting
on or taking off parts.
24
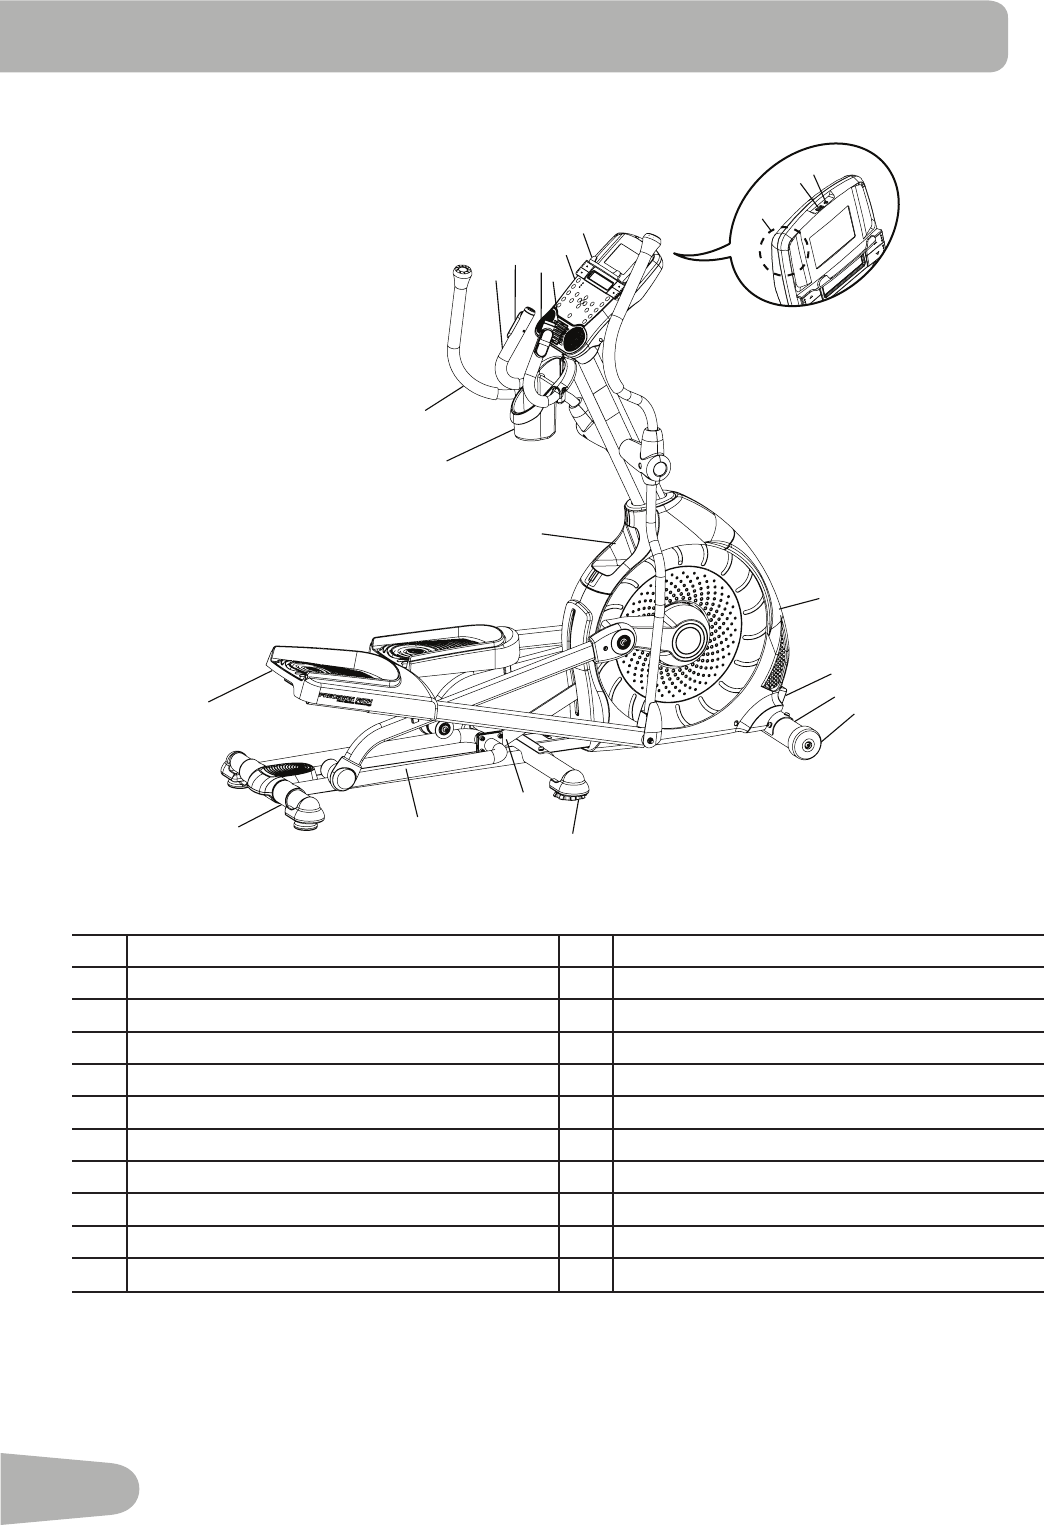
feaTures
AStaticHandlebar L Transport Roller
B ContactHeartRate(CHR)Sensors M Leveler
C Speakers N InclineArm
DFan ORail
EMedia Tray P TransportHandle
F Console Q Foot Pedal
G USBPort RStorageBin
H MP3Input SWaterBottleHolder
IFully Shrouded Flywheel T UpperHandlebar
JACAdapterInlet/PowerSwitch U TelemetryHeartRate(HR)Receiver
K Stabilizer
GH
R
S
AB
Q
POM
N
I
J
KL
C
F
E
D
T
U
25
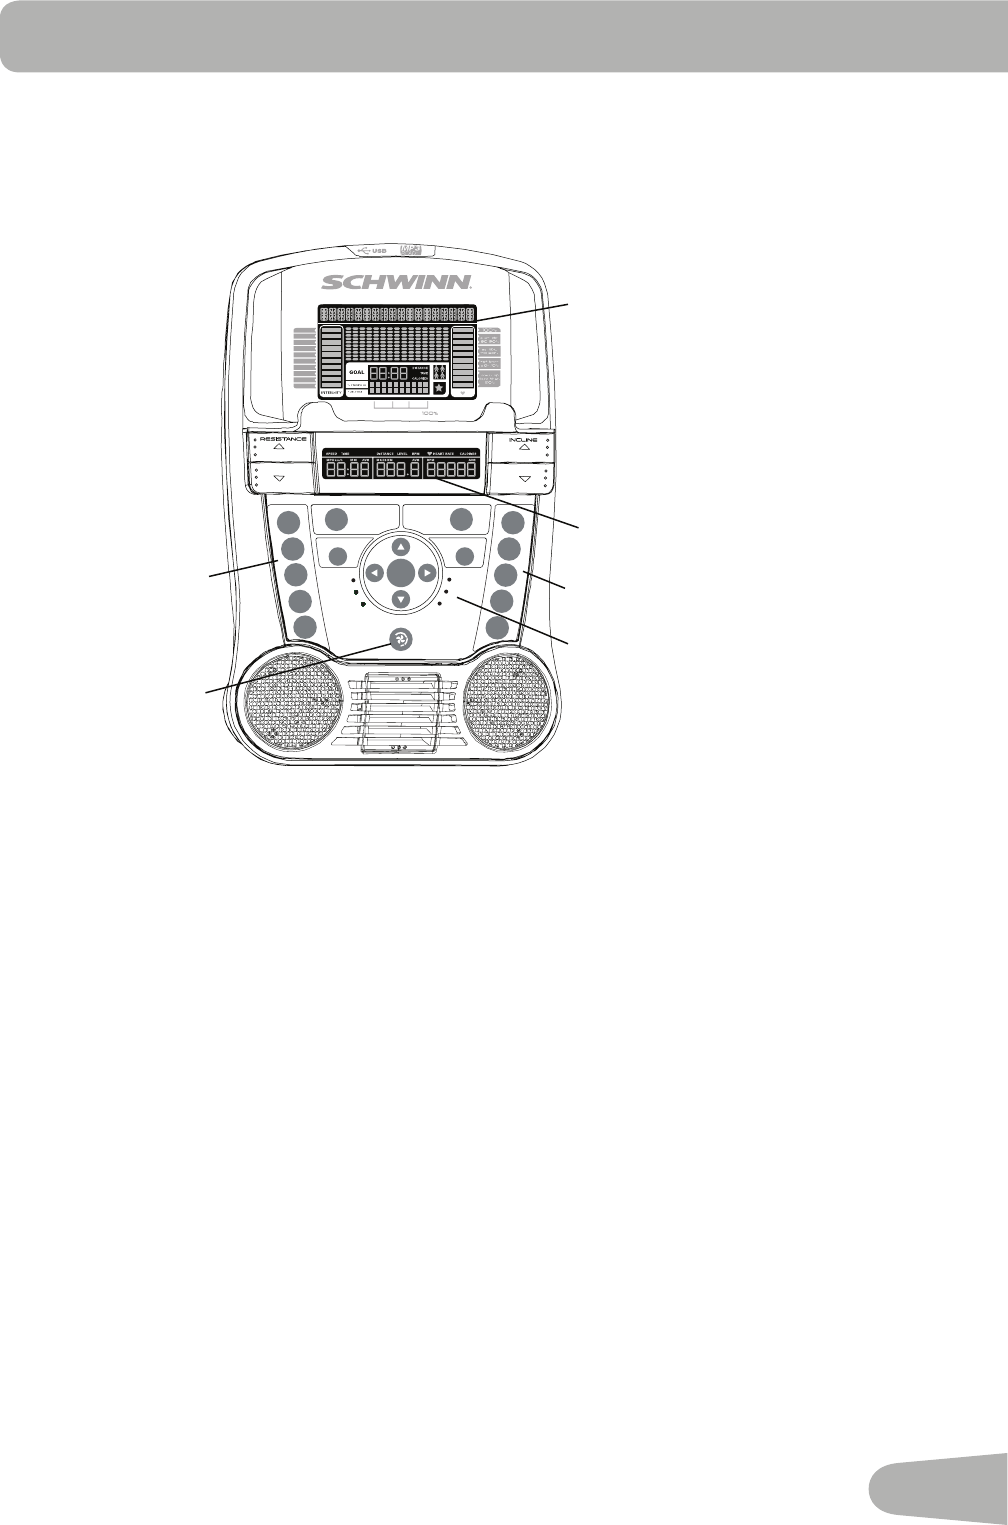
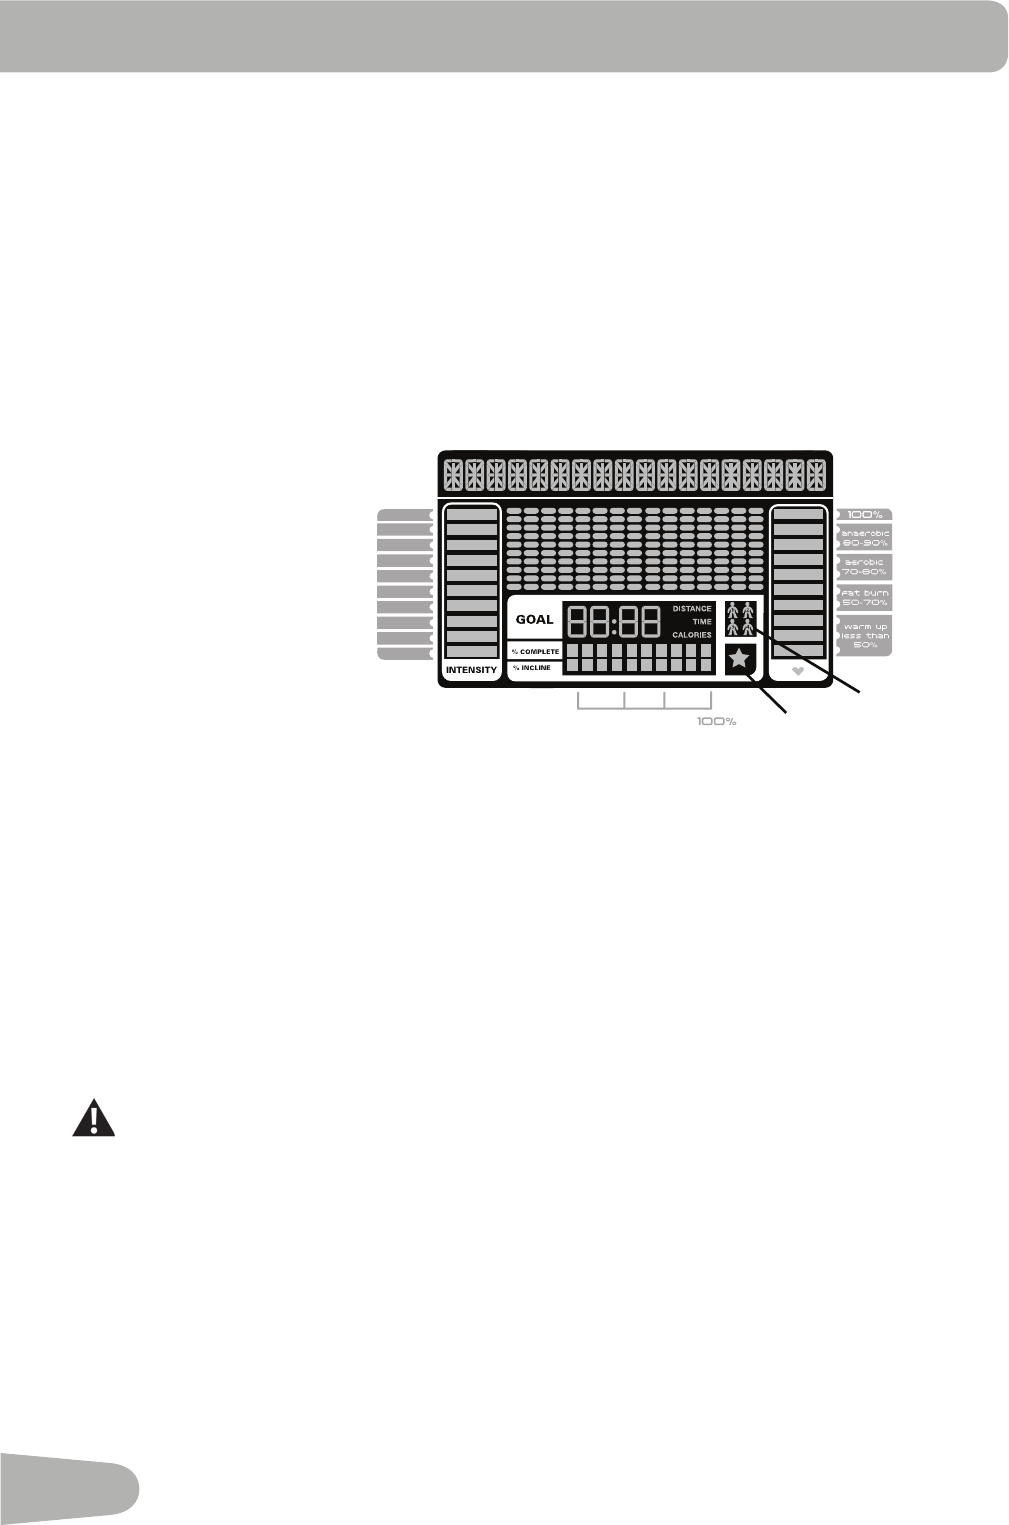
Console Features
TheConsoleprovidesimportantinformationaboutyourworkoutandletsyoucontroltheresistancelevelswhileyouexercise.
TheConsolefeaturestheSchwinnDualTrack™displaywithtouchcontrolbuttonstonavigateyouthroughtheexercise
programs.
1
5
9
15
21
OK
PAUSE/
END
QUICK
START
PROGRAMS GOAL TRACK
LONGEST WORKOUT
CALORIE RECORD
LAST 30 DAYS CURRENT WORKOUT
LAST WORKOUT
LAST 7 DAYS
10% 40% 70%
1
2
3
4
5
6
7
8
9
10
Hr
0%
20%
40%
70%
100%
10% 40% 70%
1
2
3
4
5
6
7
8
9
10
Hr
Keypad Functions
ResistanceIncrease()button- Increasestheworkoutresistancelevel
ResistanceDecrease()button-Decreasestheworkoutresistancelevel
InclineIncrease()button-IncreasestheInclineangleoftheRailAssembly
InclineDecrease()button-DecreasestheInclineangleoftheRailAssembly
QUICKSTARTbutton-BeginsaQuickStartworkout
PROGRAMSbutton-Selectsacategoryandworkoutprogram
PAUSE/ENDbutton-Pausesanactiveworkout,endsapausedworkout,orgoes back to the previous screen
GOALTRACKbutton-DisplaystheWorkoutTotalsandAchievementsfortheselectedUserProfile
Increase()button-Increasesavalue(age,time,distance,orcalories)ormovesthroughoptions
Left()button-Displaysdifferentworkoutvaluesduringaworkout,andmovesthroughoptions
OKbutton-StartsaProgramworkout,confirmsinformation,orresumesapausedworkout.
Right()button-Displaysdifferentworkoutvaluesduringaworkout,andmovesthroughoptions
UpperDisplay
LowerDisplay
InclineLevelQuickButtons
ResistanceLevelQuickButtons
AchievementIndicatorLights
Fan
26
Decrease()button-Decreasesavalue(age,time,distance,orcalories)ormovesthroughoptions
FANbutton-Controls3-speedfan
ResistanceLevelQuickButtons-Shiftstheresistancelevelstothesettingquicklyduringaworkout
InclineLevelQuickButtons-Shiftstheinclineleveltothesettingquicklyduringaworkout
AchievementIndicatorLights-whenanachievementlevelisreachedoraresultisreviewed,theachievementindicatorlight
will activate.
Schwinn Dual Track™ Display
Upper Display Data
1
5
9
15
21
OK
PAUSE/
END
QUICK
START
PROGRAMS GOAL TRACK
LONGEST WORKOUT
CALORIE RECORD
LAST 30 DAYS CURRENT WORKOUT
LAST WORKOUT
LAST 7 DAYS
10% 40% 70%
1
2
3
4
5
6
7
8
9
10
Hr
0%
20%
40%
70%
100%
10% 40% 70%
1
2
3
4
5
6
7
8
9
10
Hr
UserDisplay
AchievementDisplay
Program Display
TheProgramDisplayshowsinformationtotheUserandthegriddisplayareashowsthecourseprofilefortheprogram.
Eachcolumnintheprofileshowsoneinterval(workoutsegment).Thehigherthecolumn,thehighertheresistancelevel.The
flashing column shows your current interval.
Intensity Display
TheIntensityDisplayshowsthelevelofworkatthatmomentbasedonthecurrentresistancelevel.
Heart Rate Zone Display
TheHeartRateZoneshowswhichzonethecurrentheartratevaluefallsintoforthecurrentUser.TheseHeartRateZones
canbeusedasaworkoutguideforacertaintargetzone(anaerobic,aerobic,orfatburn).
Consultaphysicianbeforeyoustartanexerciseprogram.Stopexercisingifyoufeelpainortightnessinyourchest,
becomeshortofbreath,orfeelfaint.Contactyourdoctorbeforeyouusethemachineagain.Usethevaluescalculated
or measured by the machine’s computer for reference purposes only.
Note:Ifnoheartrateisdetected,thedisplaywillbeblank.
NOTICE:TopreventinterferencewiththetelemetryHRreceiver,donotplaceanypersonalelectronicdevicesintheleftside
of the media tray.
Goal Display
TheGoalDisplayshowsthecurrentlyselectedtypeofgoal(Distance,TimeorCalories),thecurrentvaluetoachievethegoal,
and the percent completed toward the goal.
User Display
TheUserDisplayshowswhichUserProfileiscurrentlyselected.

27
Achievement Display
TheAchievementDisplayactivateswhenaworkoutgoalisreachedoraworkoutmilestoneissurpassedfrompastworkouts.
TheConsoledisplaywillcongratulateandinformtheUseroftheirachievement,alongwithacelebratorysound.
Lower Display Data
TheLowerDisplayshowstheWorkoutValuesandcanbecustomizedforeachUser(Consultthe“EditUserProfile”sectionof
thismanual).
Speed
TheSpeeddisplayfieldshowsthemachinespeedinmilesperhour(mph)orkilometersperhour(km/h).
Time
TheTIMEdisplayfieldshowsthetotaltimecountoftheworkout,theaverageTimefortheUserProfile,orthetotaloperational
time of the machine.
Note: IfaQuickStartworkoutisperformedformorethan99minutesand59seconds(99:59),theunitsforTimewillshiftto
hoursandminutes(1hour,40minutes).
Distance
TheDistancedisplayshowsthedistancecount(milesorkm)intheworkout.
Note:TochangethemeasurementunitstoEnglishImperialormetric,refertothe“ConsoleSetupMode”sectioninthis
manual.
Level
TheLEVELdisplayshowsthecurrentresistancelevelintheworkout.
RPM
TheRPMdisplayfieldshowsthepedalrevolutionsperminute(RPM).
Heart Rate (Pulse)
TheHeartRatedisplayshowsthebeatsperminute(BPM)fromtheheartratemonitor.Whenaheartratesignalisreceivedby
the Console, the icon will flash.
Consultaphysicianbeforeyoustartanexerciseprogram.Stopexercisingifyoufeelpainortightnessinyourchest,
become short of breath, or feel faint. Contact your doctor before you use the machine again. The heart rate displayed is
anapproximationandshouldbeusedforreferenceonly.
Calories
TheCaloriesdisplayfieldshowstheestimatedcaloriesthatyouhaveburnedduringtheexercise.
1
5
9
15
21
OK
PAUSE/
END
QUICK
START
PROGRAMS GOAL TRACK
LONGEST WORKOUT
CALORIE RECORD
LAST 30 DAYS CURRENT WORKOUT
LAST WORKOUT
LAST 7 DAYS
10% 40% 70%
1
2
3
4
5
6
7
8
9
10
Hr
0%
20%
40%
70%
100%
10% 40% 70%
1
2
3
4
5
6
7
8
9
10
Hr

28
Remote Heart Rate Monitor
MonitoringyourHeartRateisoneofthebestprocedurestocontroltheintensityofyourexercise.ContactHeartRate(CHR)
sensorsareinstalledtosendyourheartratesignalstotheConsole.TheConsolecanalsoreadtelemetryHRsignalsfroma
HeartRateChestStrapTransmitterthatoperatesinthe4.5kHz-5.5kHzrange.
Note: The heart rate chest strap must be an uncoded heart rate strap from
PolarElectrooranuncodedPOLAR®compatiblemodel.(CodedPO-
LAR®heartratestrapssuchasPOLAR®OwnCode® chest straps will
notworkwiththisequipment.)
Ifyouhaveapacemakerorotherimplantedelectronicdevice,consult
your doctor before using a wireless chest strap or other telemetric heart
rate monitor.
NOTICE:TopreventinterferencewiththetelemetryHRreceiver,donotplace
any personal electronic devices in the left side of the media tray.
Contact Heart Rate Sensors
ContactHeartRate(CHR)sensorssendyourheartratesignalstotheConsole.TheCHRsensorsarethestainlesssteelparts
oftheHandlebars.Touse,putyourhandscomfortablyaroundthesensors.Besurethatyourhandstouchboththetopand
thebottomofthesensors.Holdfirm,butnottootightorloose.BothhandsmustmakecontactwiththesensorsfortheCon-
sole to detect a pulse. After the Console detects four stable pulse signals, your initial pulse rate will be shown.
OncetheConsolehasyourinitialheartrate,donotmoveorshiftyourhandsfor10to15seconds.TheConsolewillnow
validatetheheartrate.Manyfactorsinfluencetheabilityofthesensorstodetectyourheartratesignal:
• Movementoftheupperbodymuscles(includingarms)producesanelectricalsignal(muscleartifact)thatcaninterferewith
pulse detection. Slight hand movement while in contact with the sensors can also produce interference.
• Calluses and hand lotion may act as an insulating layer to reduce the signal strength.
• SomeElectrocardiogram(EKG)signalsgeneratedbyindividualsarenotstrongenoughtobedetectedbythesensors.
• Theproximityofotherelectronicmachinescangenerateinterference.
Ifyourheartratesignaleverseemserraticaftervalidation,wipeoffyourhandsandthesensorsandtryagain.
OK
PAUSE/
END
QUICK
START
PROGRAMS GOAL TRACK
29
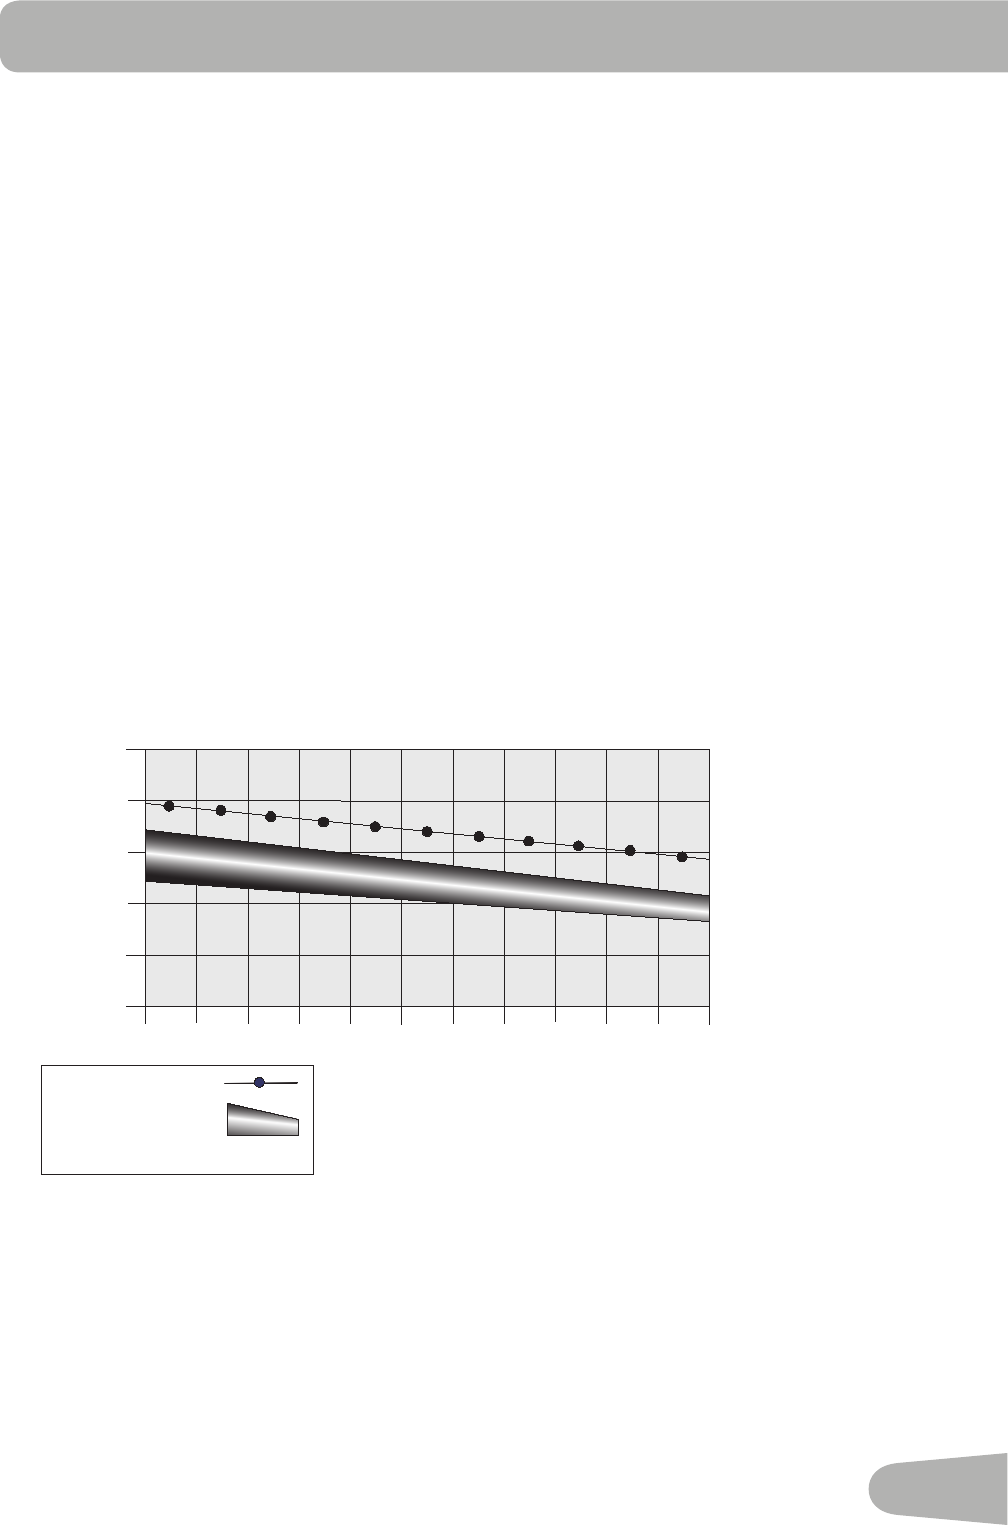
Heart Rate Calculations
Yourmaximumheartrateusuallydecreasesfrom220BeatsPerMinute(BPM)inchildhoodtoapproximately160BPMby
age60.Thisfallinheartrateisusuallylinear,decreasingbyapproximatelyoneBPMforeachyear.Thereisnoindicationthat
traininginfluencesthedecreaseinmaximumheartrate.Individualsofthesameagecouldhavedifferentmaximumheartrates.
Itismoreaccuratetofindthisvaluebycompletingastresstestthanbyusinganagerelatedformula.
Yourat-restheartrateisinfluencedbyendurancetraining.Thetypicaladulthasanatrestheartrateofapproximately72
BPM,whereashighlytrainedrunnersmayhavereadingsof40BPMorlower.
TheHeartRatetableisanestimateofwhatHeartRateZone(HRZ)iseffectivetoburnfatandimproveyourcardiovascular
system.Physicalconditionsvary,thereforeyourindividualHRZcouldbeseveralbeatshigherorlowerthanwhatisshown.
Themostefficientproceduretoburnfatduringexerciseistostartataslowpaceandgraduallyincreaseyourintensityuntil
yourheartratereachesbetween60–85%ofyourmaximumheartrate.Continueatthatpace,keepingyourheartrateinthat
targetzoneforover20minutes.Thelongeryoumaintainyourtargetheartrate,themorefatyourbodywillburn.
The graph is a brief guideline, describing the generally suggested target heart rates based on age. As noted above, your opti-
mal target rate may be higher or lower. Consult your physician for your individual target heart rate zone.
Note:Aswithallexercisesandfitnessregimens,alwaysuseyourbestjudgmentwhenyouincreaseyourexercisetimeor
intensity.
20-24
FAT-BURNING TARGET HEART RATE
Heart Rate BPM (beats per minute)
Age
25-29
0
50
100
150
200
250
30-34 35-39 40-44 45-49 50-54 55-59 60-64 65-69 70+
196 191 186 181 176 171 166 161 156 151 146
167 162 158 154 150 145 141 137 133 128 126
Maximum Heart Rate
Target Heart Rate Zone
(keep within this range
for optimum fat-burning)
118 115 112 109 106 103 100 97 94 91 88
30
operaTIons
What to Wear
Wearrubber-soledathleticshoes.Youwillneedtheappropriateclothesforexercisethatallowyoutomovefreely.
How Often Should You Exercise
Consultaphysicianbeforeyoustartanexerciseprogram.Stopexercisingifyoufeelpainortightnessinyourchest,
becomeshortofbreath,orfeelfaint.Contactyourdoctorbeforeyouusethemachineagain.Usethevaluescalculated
or measured by the machine’s computer for reference purposes only. The heart rate displayed on the console is an
approximationandshouldbeusedforreferenceonly.
• 3timesaweekfor30minuteseachday.
• Schedule workouts in advance and try to follow the schedule.
Mounting and Dismounting the Machine
Care should be used when mounting or dismounting the machine.
BeawarethatthePedalsandtheHandlebarsareconnectedandwheneitherofthesepartsmovetheotherdoesas
well.Inordertoavoidpossibleseriousinjury,onlygrasptheStaticHandlebarstosteadyyourself.
Tomountthefitnessmachine:
1. Move the Pedals until the one nearest you is in the lowest position.
2. GrasptheStaticHandlebarsundertheConsole.
3. SteadyingyourselfwiththeStaticHandlebars,stepupontothelowestPedalandplaceyourotherfootontotheopposite
Pedal.
Todismountthefitnessmachine:
1. Move the Pedal you want to dismount from to the highest position, and bring the machine to a complete stop.
This machine is not equipped with a free-wheel. Pedal speed should be reduced in a controlled manner.
2. GrasptheStaticHandlebarsundertheConsoletosteadyyourself.
3. Withyourweightonthelowestfoot,swingtheupperfootoffthemachineanddownontothefloor.
4. StepoffofthemachineandreleaseyourgripfromtheStaticHandlebars.
Power-Up / Idle Mode
The Console will enter Power-Up/IdleModeifitispluggedintoapowersourceandthePowerSwitchturnedon,anybutton
is pushed, or if it receives a signal from the RPM sensor as a result of pedaling the machine.
Auto Shut-Off (Sleep Mode)
IftheConsoledoesnotreceiveanyinputinapproximately5minutes,itwillautomaticallyshutoff.TheLCDdisplayisoffwhile
in Sleep Mode.
Note: TheConsoledoesnothaveanOn/Offswitch.
To disconnect, turn all controls to the off position, then remove plug from outlet.

31
Initial Setup
Duringthefirstpower-up,theConsoleshouldbesetupwiththedate,timeandyourpreferredmeasurementunits.
1. Date:PushtheIncrease/Decreasebuttonstoadjustthecurrentlyactivevalue(flashing).PushtheLeft/Rightbuttonsto
changewhichsegmentisthecurrentlyactivevalue(month/day/year).
2. PushOKtoset.
3. Time:PushtheIncrease/Decreasebuttonstoadjustthecurrentlyactivevalue(flashing).PushtheLeft/Rightbuttonsto
changewhichsegmentisthecurrentlyactivevalue(hour/minute/AMorPM).
4. PushOKtoset.
5. UnitsofMeasurement:PushtheIncrease/Decreasebuttonstoadjustbetween“MILES”(ImperialEnglish)or“KM”
(metric).
6. PushOKtoset.TheConsolegoesbacktothePower-Up/IdleModescreen.
Note: Toadjusttheseselections,consultthe“ConsoleSet-UpMode”section.
Quick Start ( Manual ) Program
TheQuickStart(Manual)programletsyoustartaworkoutwithoutenteringanyinformation.
DuringaManual Workout, each column representsa2minutetimeperiod.Theactivecolumnwilladvanceacrossthescreen
every2minutes.Iftheworkoutlastsformorethan30minutes,theactivecolumnisfixedonthefarthestcolumnontheright
and pushes the previous columns off the display.
1. Stand on the machine.
2. PushtheIncrease/DecreasebuttontoselectthecorrectUserprofile.IfyoudonothaveaUserprofilesetup,youcan
selectaUserprofilethathasnocustomizeddata(defaultvaluesonly).
3. PushtheQUICKSTARTbuttontostarttheManual program.
4. Tochangetheresistancelevel,pushtheResistanceIncrease/Decreasebuttons.Thecurrentintervalandfutureintervals
aresettothenewlevel.ThedefaultManualresistancelevelis4.Thetimewillcountupfrom00:00.
Note: IfaManualworkoutisperformedformorethan99minutesand59seconds(99:59),theunitsforTimewillshiftto
hoursandminutes(1hour,40minutes).
5. Whendonewithyourworkout,stoppedalingandpushPAUSE/ENDtopausetheworkout.PushPAUSE/ENDagainto
end the workout.
Note: TheworkoutresultsarerecordedtothecurrentUserProfile.
User Profiles
TheConsoleletsyoustoreanduse4Userprofiles.TheUserprofilesautomaticallyrecordtheworkoutresultsforeachworkout,
and allow the workout data to be reviewed.
TheUserprofilestoresthefollowingdata:
• Name—upto10characters
• Age
• Weight
• Height
• Gender
• PreferredWorkoutValues

32
Select a User Profile
EveryworkoutissavedtoaUserProfile.BesuretoselecttheproperUserProfilebeforestartingaworkout.ThelastUserthat
completed a workout will be the default user.
UserProfilesareassignedthedefaultvaluesuntiltheyarecustomizedbyediting.BesuretoedittheUserProfileformore
accurate calorie and heart rate information.
FromthePower-UpModescreen,pushtheIncrease()orDecrease()buttonstoselectoneoftheUserProfiles.The
ConsolewilldisplaythenameoftheUserProfileandtheUserProfileIcon.
Edit User Profile
1. FromthePower-UpModescreen,pushtheIncrease()orDecrease()buttonstoselectoneoftheUserProfiles.
2. PushtheOKbuttontoselecttheUserProfile.
3. TheConsoledisplayshowstheEDITpromptandthecurrentUserProfilename.PushOKtostarttheEditUserProfile
option.
ToexittheEditUserProfileoption,pushthePAUSE/ENDbuttonandtheconsolewillgobacktothePower-UpMode
screen.
4. TheConsoledisplayshowstheNAMEpromptandthecurrentUserProfilename.
Note:TheUsernamewillbeblankifthisisthefirstedit.ThenameofaUserProfileislimitedto10characters.
Thecurrentlyactivesegmentwillflash.UsetheIncrease/Decreasebuttonstomovethroughthealphabetandblankspace
(foundbetweenAandZ).Toseteachsegment,usetheLeft()orRight()buttonstoshiftbetweensegments.
PushtheOKbuttontoacceptthedisplayedUsername.
5. ToedittheotherUserdata(EDITAGE,EDITWEIGHT,EDITHEIGHT,EDITGENDER),usetheIncrease/Decreasebuttonsto
adjust,andpushOKtoseteachentry.
6. The Console display shows the SCAN prompt. This option controls how the workout values are displayed in the Lower
Displayduringaworkout.The“OFF”settingallowstheusertopushtheRIGHTorLEFTbuttonstoviewtheotherworkout
valuechannelswhendesired.The“ON”settingallowstheConsoletoautomaticallydisplaytheworkoutvaluechannels
every 6 seconds.
Thedefaultis“OFF”.
PushtheOKbuttontosethowtheworkoutvaluesaredisplayed.
7. TheConsoledisplayshowstheWIRELESSHRprompt.IfyouareusingtheConsolespeakersattheirhighersettingsand
/orusingalargersizedpersonalelectronicdevice,theConsolemayshowHeartRateinterference.Thisoptionallowsthe
TelemetryHeartRateReceivertobedeactivatedblockingtheinterference.
TheUpperDisplayshowsthecurrentvaluesetting:“ON”or“OFF”.PushtheIncrease()orDecrease()buttonsto
change the value.
Thedefaultis“ON”.
PushtheOKbuttontosettheTelemetryHeartRateReceivertoactive.
8. TheConsoledisplayshowstheEDITLOWERDISPLAYprompt.ThisoptionallowsyoutocustomizewhichWorkoutValues
are displayed during a workout.
TheLowerDisplaywillshowalloftheworkoutvalues,withtheactiveWorkoutValueflashing.TheUpperDisplayshows
theactivevaluesetting:“ON”or“OFF”.PushtheIncrease()orDecrease()buttonstohidetheactiveworkoutvalue,
andpushtheLeft()orRight()buttonstoshifttheactiveworkoutvalue.
NOTE:toshowahiddenworkoutvalue,repeatprocedureandchangeUpperDisplayvalueto“ON”forthatvalue.
WhendonewithcustomizingtheLowerDisplay,pushtheOKbuttontosetit.
Hr
33
9. TheConsolewillgotothePower-UpModescreenwiththeuserselected.
Reset a User Profile
1. FromthePower-UpModescreen,pushtheIncrease()orDecrease()buttonstoselectoneoftheUserProfiles.
2. PushtheOKbuttontoselecttheUserProfile.
3. TheConsoledisplayshowsthecurrentUserProfilenameandtheEDITprompt.PushtheIncrease()orDecrease()
buttons to change the prompt.
Note: ToexittheEditUserProfileoption,pushthePAUSE/ENDbuttonandtheconsolewillgobacktothePower-Up
Mode screen.
4. TheConsoledisplayshowstheRESETpromptandthecurrentUserProfilename.PushOKtostarttheResetUserProfile
option.
5. TheConsolewillnowconfirmtherequesttoresettheUserprofile(thedefaultselectionis‘NO’).PushtheIncrease()or
Decrease()buttonstoadjusttheselection.
6. PushOKtomakeyourselection.
7. TheConsolewillgotothePower-UpModescreen.
Changing Resistance Levels
PushtheResistanceLevelIncrease()orDecrease()buttonstochangetheresistancelevelatanytimeinaworkout
program.Torapidlychangetheresistancelevel,pushthedesiredResistanceLevelQuickButton.TheConsolewilladjustto
the selected resistance level of the quick button.
Changing Incline Levels
PushtheInclineLevelIncrease()orDecrease()buttonstochangetheinclineangleof
the rail assembly at any time in a workout program. To rapidly change the incline level,
pushthedesiredInclineLevelQuickButton.TheConsolewilladjusttotheselected
incline level of the quick button.
Besuretheareabelowthemachineisclearbeforelowering.FullylowertheIncline
Assembly after each workout.
Exerciseonthismachinerequirescoordinationandbalance.Besuretoanticipate
that changes in speed, incline angle and resistance level can occur during
workouts, and be attentive in order to avoid loss of balance and possible injury.
Note:Besurethattheworkoutspaceyouareutilizinghasadequateheight
clearance,takingintoconsiderationtheheightoftheuserandthemaximuminclineoftheellipticalmachine.Thoughthe
inclineanglechangestheexercisemotion,itdoesnotaffectthecalorievalues.
Profile Programs
Theseprogramsautomatedifferentresistanceandworkoutlevels.TheProfileProgramsareorganizedintoCategories(Fun
Rides,Mountains,andChallenges).
Note:OnceaUserviewsalltheCategories,theywillbeexpandedtodisplaytheProgramswithineachoftheCategories.
34
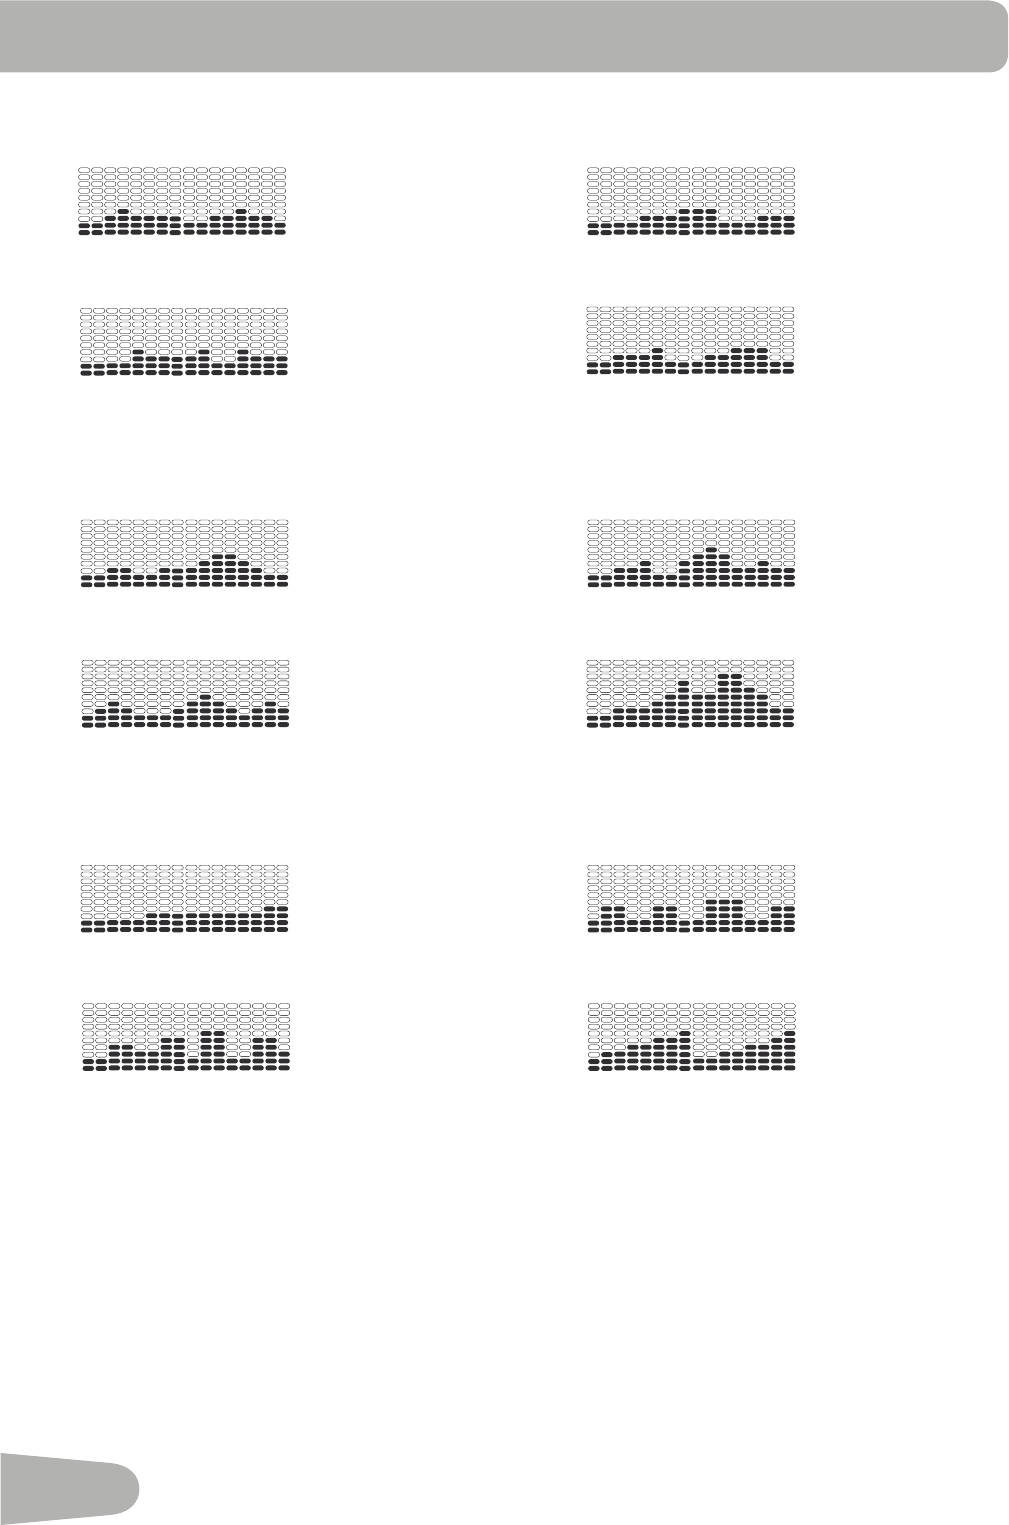
FUN RIDES
RollingHills RideinthePark
Secondary Case 6: Profile Programs
Rolling Hills
FUN RIDES
Ride in the Park Easy Tour
Pike’s Peak
MOUNTAINS
Mount Hood Pyramids
Uphill Finish
CHALLENGES
Cross-Training Interval
Stream Crossing
Summit Pass
Stairs
REVED : 122612
Secondary Case 6: Profile Programs
Rolling Hills
FUN RIDES
Ride in the Park Easy Tour
Pike’s Peak
MOUNTAINS
Mount Hood Pyramids
Uphill Finish
CHALLENGES
Cross-Training Interval
Stream Crossing
Summit Pass
Stairs
REVED : 122612
EasyTour StreamCrossing
Secondary Case 6: Profile Programs
Rolling Hills
FUN RIDES
Ride in the Park Easy Tour
Pike’s Peak
MOUNTAINS
Mount Hood Pyramids
Uphill Finish
CHALLENGES
Cross-Training Interval
Stream Crossing
Summit Pass
Stairs
REVED : 122612
Secondary Case 6: Profile Programs
Rolling Hills
FUN RIDES
Ride in the Park Easy Tour
Pike’s Peak
MOUNTAINS
Mount Hood Pyramids
Uphill Finish
CHALLENGES
Cross-Training Interval
Stream Crossing
Summit Pass
Stairs
REVED : 122612
MOUNTAINS
Pike’sPeak MountHood
Secondary Case 6: Profile Programs
Rolling Hills
FUN RIDES
Ride in the Park Easy Tour
Pike’s Peak
MOUNTAINS
Mount Hood Pyramids
Uphill Finish
CHALLENGES
Cross-Training Interval
Stream Crossing
Summit Pass
Stairs
REVED : 122612
Secondary Case 6: Profile Programs
Rolling Hills
FUN RIDES
Ride in the Park Easy Tour
Pike’s Peak
MOUNTAINS
Mount Hood Pyramids
Uphill Finish
CHALLENGES
Cross-Training Interval
Stream Crossing
Summit Pass
Stairs
REVED : 122612
Pyramids Summit Pass
Secondary Case 6: Profile Programs
Rolling Hills
FUN RIDES
Ride in the Park Easy Tour
Pike’s Peak
MOUNTAINS
Mount Hood Pyramids
Uphill Finish
CHALLENGES
Cross-Training Interval
Stream Crossing
Summit Pass
Stairs
REVED : 122612
Secondary Case 6: Profile Programs
Rolling Hills
FUN RIDES
Ride in the Park Easy Tour
Pike’s Peak
MOUNTAINS
Mount Hood Pyramids
Uphill Finish
CHALLENGES
Cross-Training Interval
Stream Crossing
Summit Pass
Stairs
REVED : 122612
CHALLENGES
UphillFinish Cross-Training
Secondary Case 6: Profile Programs
Rolling Hills
FUN RIDES
Ride in the Park Easy Tour
Pike’s Peak
MOUNTAINS
Mount Hood Pyramids
Uphill Finish
CHALLENGES
Cross-Training Interval
Stream Crossing
Summit Pass
Stairs
REVED : 122612
Secondary Case 6: Profile Programs
Rolling Hills
FUN RIDES
Ride in the Park Easy Tour
Pike’s Peak
MOUNTAINS
Mount Hood Pyramids
Uphill Finish
CHALLENGES
Cross-Training Interval
Stream Crossing
Summit Pass
Stairs
REVED : 122612
Interval Stairs
Secondary Case 6: Profile Programs
Rolling Hills
FUN RIDES
Ride in the Park Easy Tour
Pike’s Peak
MOUNTAINS
Mount Hood Pyramids
Uphill Finish
CHALLENGES
Cross-Training Interval
Stream Crossing
Summit Pass
Stairs
REVED : 122612
Secondary Case 6: Profile Programs
Rolling Hills
FUN RIDES
Ride in the Park Easy Tour
Pike’s Peak
MOUNTAINS
Mount Hood Pyramids
Uphill Finish
CHALLENGES
Cross-Training Interval
Stream Crossing
Summit Pass
Stairs
REVED : 122612
Workout Profile and Goal Program
TheConsoleletsyouselecttheProfileProgramandtypeofGoalforyourworkout(Distance,TimeorCalories),andsetthe
Goalvalue.
1. Stand on the machine.
2. PushtheIncrease()orDecrease()buttonstoselectthecorrectUserprofile.
3. PushthePrograms button.
4. PushtheLeft()orRight()buttonstoselect a Category of Workout.
5. Push the Increase()orDecrease()buttonstoselectaProfileWorkout,andpushOK.
6. UsetheIncrease()orDecrease()buttons to select a typeofGoal(Distance,TimeorCalories),andpushOK.

35
7. UsetheIncrease()orDecrease()buttons to adjust the workout value.
8. PushOKtobeginthegoal-orientedworkout.TheGOALvaluewillcountdownasthevalueforpercentcompleted
increases.
Note:DuringaCaloriesGoal,eachcolumnisfora2minutetimeperiod.Theactivecolumnwilladvanceacrossthescreen
every2minutes.Iftheworkoutlastsformorethan30minutes,theactivecolumnwillfixtothelastrightcolumnandpush
the previous columns off the display.
Fitness Test Program
TheFitnessTestmeasurestheimprovementsofyourphysicalfitnesslevel.Thetestcomparesyourpoweroutput(inWatts)to
your heart rate. As your fitness level improves, your power output will increase at a given heart rate.
Note:TheConsolemustbeabletoreadtheheartrateinformationfromtheContactHeartRate(CHR)sensorsorHeart
RateMonitor(HRM)toworkcorrectly.
YoucanstarttheFitnessTestfromtheFEEDBACKcategory.TheFitnessTestprogramfirstpromptsyoutoselectyourfitness
level—Beginner(“BEG”)orAdvanced(“ADV”).TheConsolewillusetheAgeandWeightvaluesfortheselectedUserProfile
to calculate the Fitness Score.
StarttoworkoutandholdtheHeartRateSensors.Whentheteststarts,theintensityoftheworkoutslowlyincreases.This
means you will work harder, and as a result, your heart rate increases. The intensity continues to increase automatically until
yourheartratereachesthe“TestZone”.Thiszoneisindividuallycomputedtobenear75percentofthemaximumheartrate
ofyourUserProfile.WhenyoureachtheTestZone,themachineholdstheintensitysteadyfor3minutes.Thisletsyoureach
astablecondition(whereyourheartratebecomessteady).Attheendofthe3minutes,theConsolemeasuresyourheart
rate and the power output. These numbers, along with information about your age and weight, are computed to produce a
“Fitness Score”.
Note:FitnessTestscoresshouldonlybecomparedtoyourpreviousscoresandnottootherUserProfiles.
Compare your Fitness Scores to see your improvement.
Recovery Test Program
RecoveryTestshowshowquicklyyourheartrecoversfromanexercisestatetoamorerestfulstate.Improvedrecoveryisan
indicator of increasing fitness.
Note:TheConsolemustbeabletoreadtheheartrateinformationfromtheContactHeartRate(CHR)sensorsorHeart
RateMonitor(HRM)toworkcorrectly.
Fromanelevatedheartrate,selecttheRecoveryTestProgram.TheConsolewillshow“STOPEXERCISING”andthegoal
willbegintocountdown.Stopexercisingbutcontinuetogripthecontactheartratesensors.After5seconds,thedisplaywill
show“RELAX”andwillcontinuetocountdownto00:00.Fortheentireminutetheconsolewillalsoshowyourheartrate.You
mustgriptheheartratesensorsforthedurationofthetestifnotusingaRemoteHeartRateMonitor.
Thedisplaywillcontinuetoshow“RELAX”andyourheartrateuntilthegoalreaches00:00.Theconsolewillthencalculate
your recovery score.
RecoveryScore=Yourheartrateat1:00(thebeginningofthetest)minusyourheartrateat00:00(theendofthetest).
The higher the Recovery Test score value, the quicker your heart rate is returning to a more restful state and is an indication of
improvingfitness.Byrecordingthesevaluesovertimeyoucanseethetrendtowardbetterhealth.
WhenyouselecttheRecoveryTestProgramandthereisnoheartratesignalordisplay,theConsolewillshow“NEEDHEART
RATE”.Thismessagewillshowfor5seconds.Ifnosignalisdetected,theprogramwillend.
HelpfulTip:Foramorerelevantscore,trytoobtainasteadyheartratefor3minutesbeforestartingtheRecoveryProgram.
This will be easier to achieve, and obtain the best result, in the Manual program so you can control the levels of resistance.

36
Heart Rate Control (HRC) Workout Programs
TheHeartRateControl(HRC)programsletyousetaheartrategoalforyourworkout.Theprogrammonitorsyourheartrate
inbeatsperminute(BPM)fromtheContactHeartRate(CHR)sensorsonthemachineorfromaHeartRateMonitor(HRM)
chest strap, and adjusts the workout to keep your heart rate in the selected zone.
Note:TheconsolemustbeabletoreadtheheartrateinformationfromtheCHRsensorsorHRMfortheHRCprogramto
work correctly.
TheTargetHeartRateprogramsuseyourageandotherUserinformationtosettheHeartRateZonevaluesforyourworkout.
Theconsoledisplaythengivespromptsforyoutosetupyourworkout:
1. SelecttheHeartRateControlworkoutlevel:BEGINNER(“BEG”)orADVANCED(“ADV”)andpushOK.
2. PushtheIncrease()orDecrease()buttonstoselectthepercentageofmaximumheartrate:50–60%,60–70%,70–
80%,80–90%.
Consultaphysicianbeforeyoustartanexerciseprogram.Stopexercisingifyoufeelpainortightnessinyourchest,
becomeshortofbreath,orfeelfaint.Contactyourdoctorbeforeyouusethemachineagain.Usethevaluescalculated
or measured by the machine’s computer for reference purposes only. The heart rate displayed on the console is an
approximationandshouldbeusedforreferenceonly.
3. Push the Increase()orDecrease()buttonstoselecttheGoaltype,andpushOK.
4. Push the Increase()orDecrease()buttonstosetthegoalvaluefortheworkout.
Note:Besuretoallowtimeforyourheartratetoreachthedesiredheartratezonewhensettingthegoal.
5. PushOKtostarttheworkout.
AUsercansetaHeartRatezoneinsteadofavaluebyselectingtheHeartRateControl-Userprogram.TheConsolewilladjust
theworkouttokeeptheUserinthedesiredHeartRatezone.
1. SelectHEARTRATECONTROL-USER,andpushOK.
2. PushtheIncrease()orDecrease()buttonstosettheHeartRatezonefortheworkout,andpushOK.TheConsole
showstheHeartRatezone(percent)ontheleft,andtheHeartRaterangefortheUserontherightsideofthedisplay.
Consultaphysicianbeforeyoustartanexerciseprogram.Stopexercisingifyoufeelpainortightnessinyourchest,
becomeshortofbreath,orfeelfaint.Contactyourdoctorbeforeyouusethemachineagain.Usethevaluescalculated
or measured by the machine’s computer for reference purposes only. The heart rate displayed on the console is an
approximationandshouldbeusedforreferenceonly.
3. Push the Increase()orDecrease()buttonstoselecttheGoaltype,andpushOK.
4. Push the Increase()orDecrease()buttonstosetthevaluefortheworkout.
5. PushOKtostarttheworkout.
Changing a Workout Program During a Workout
The Console allows a different Workout Program to be started from an active workout.
1. Fromanactiveworkout,pushPROGRAMS.
2. PushtheIncrease()orDecrease()buttonstoselectthedesiredworkoutprogram,andpushOK.
3. Push the Increase()orDecrease()buttonstoselecttheGoaltype,andpushOK.
4. Push the Increase()orDecrease()buttonstosetthevaluefortheworkout.
5. PushOKtostoptheactiveworkoutandstartthenewworkout.

37
ThepreviousworkoutvaluesaresavedtotheUserProfile.
Pausing or Stopping
TheConsolewillgointoPauseModeiftheuserstopspedalingandpushesPAUSE/ENDduringaworkout,orthereisno
RPMsignalfor5seconds(usernotpedaling).TheConsolewillcyclethroughaseriesofmessagesthatchangeevery4
seconds:
-WORKOUTPAUSED
-PEDALTOCONTINUE(ifabike)/STRIDETOCONTINUE(ifanelliptical)
-PUSHENDTOSTOP
Duringapausedworkout,youcanusetheIncrease/Decreasebuttonstomovethroughtheresultchannelsmanually.
1. StoppedalingandpushthePAUSE/ENDbuttontopauseyourworkout.
2. Tocontinueyourworkout,pushOKorstartpedaling.
Tostoptheworkout,pushthePAUSE/ENDbutton.TheConsolewillgointoResults/CoolDownmode.
Results / Cool Down Mode
AfteraworkouttheGOALdisplayshows03:00andthenstartstocountdown.DuringthisCoolDownperiod,theConsole
showstheWorkoutResults.AllworkoutsexceptQuickStarthavea3-minuteCoolDownperiod.
TheLCDdisplayshowstheCurrentWorkoutvaluesinthreechannels:
a.) TIME(total),DISTANCE(total),andCALORIES(total)
b.) SPEED(average),RPM(average),andHEARTRATE(average)
c.) TIME(average),LEVEL(average),andCALORIES(average).
PushtheLeft()orRight()buttonstomovethroughtheresultchannelsmanually.
DuringtheCoolDownperiod,theResistanceLevelwilladjusttoathirdoftheaverageLeveloftheworkout.TheCoolDown
resistancelevelcanbeadjustedwiththeResistanceIncreaseandDecreasebuttons,buttheConsolewillnotdisplaythe
value.
YoucanpushPAUSE/ENDtostoptheResults/CoolDownperiodandgobacktoPower-UpMode.IfthereisnoRPMorHR
signal, the Console automatically goes into Sleep Mode.

38
GOAL TRACK Statistics (and Achievements)
ThestatisticsfromeveryworkoutarerecordedtoaUserProfile.
TheSchwinnDualTrack™ConsoleshowstheGoalTrackworkoutStatisticsontheLowerDisplayinthreechannels:
a.) TIME(total),DISTANCE(total),andCALORIES(total)
b.) SPEED(average),RPM(average),andHEARTRATE(average)
c.) TIME(average),DISTANCE(average)/orLEVEL(average)*,andCALORIES(average)
*IftheGoalTrackStatisticisasingleworkout,LEVEL(average)isdisplayed.IftheGoalTrackStatisticisa
combinationofmultipleworkouts,DISTANCE(average)isdisplayedinsteadofLEVEL(average).
ToviewtheGOALTRACKstatisticsofaUserProfile:
1. FromthePower-Upscreen,pushtheIncrease()orDecrease()buttonstoselectaUserProfile.
2. PushtheGOALTRACKbutton.TheConsolewilldisplaytheLASTWORKOUTvaluesandactivatethecorresponding
Achievement light.
Note:GoalTrackstatisticscanbeviewedevenduringaworkout.PushGOALTRACKandtheLASTWORKOUTvalueswill
bedisplayed.TheworkoutvaluesforthecurrentworkoutwillbehiddenexceptfortheGOALdisplay.PushGOAL
TRACKagaintoreturntothePower-Upscreen.
3. PushtheIncrease()buttontomovetothenextGOALTRACKstatistic,“LAST7DAYS”.TheConsolewilldisplaythecalo-
riesburntonthedisplay(50caloriespersegment)fortheprevioussevendays,alongwiththeworkoutvaluetotals.Usethe
Left()orRight()buttonstomovethroughalltheworkoutstatisticchannels.
4. PushtheIncrease()buttontomoveto“LAST30DAYS”.TheConsolewilldisplaythetotalvaluesforthepreviousthirty
days.UsetheLeft()orRight()buttonstomovethroughalltheworkoutstatisticchannels.
5. Push theIncrease()buttontomovetothe“LONGESTWORKOUT”.TheConsolewilldisplaytheworkoutvalueswiththe
mostTimevalue.UsetheLeft()orRight()buttonstomovethroughalltheworkoutstatisticchannels.
6. Push theIncrease()buttontomovetothe“CALORIERECORD”.TheConsolewilldisplaytheworkoutvalueswiththe
mostCaloriesvalue.UsetheLeft()orRight()buttonstomovethroughalltheworkoutstatisticchannels.
7. Push theIncrease()buttontomoveto“BMI”,orBodyMassIndex.TheConsolewilldisplaytheBMIvaluebasedonthe
Usersettings.BesuretheheightvalueiscorrectforyourUserProfile,andtheweightvalueiscurrent.
TheBMIMeasurementisausefultoolthatshowstherelationshipbetweenweightandheightthatisassociatedwithbodyfat
andhealthrisk.ThetablebelowgivesageneralratingfortheBMIscore:
Underweight Below18.5
Normal 18.5–24.9
Overweight 25.0–29.9
Obesity 30.0andabove
Note: Theratingmayoverestimatebodyfatinathletesandotherswhohaveamuscularbuild.Itmayalsounderestimate
body fat in older persons and others who have lost muscle mass.
ContactyourdoctorformoreinformationaboutBodyMassIndex(BMI)andtheweightthatisappropriateforyou.Use
the values calculated or measured by the machine’s computer for reference purposes only.

39
8. PushtheIncrease()buttontomovetothe“SAVETOUSB-OK?”prompt.PushOK,andthe“AREYOUSURE?-NO”
prompt will display. Push the Increase()buttontochangeittoyesandpushOK.TheConsolewilldisplaythe“INSERT
USB”prompt.InsertaUSBFlashDriveintotheUSBPort.TheConsolewillrecordtheStatisticstotheUSBFlashDrive.
TheConsolewilldisplay“SAVING”,andthen“REMOVEUSB”whenitissafetoremovetheUSBFlashDrive.
Note:PushthePAUSE/ENDbuttontoforceanexitfromthe“SAVING”prompt.
9. PushtheIncrease()buttontomovetothe“CLEARWORKOUTDATA-OK?”.PushOK,andthe“AREYOUSURE?-NO”
prompt will display. Push the Increase()buttontochangetothe“AREYOUSURE?-YES”display,andpushOK. The
user workouts have been reset.
10. PushGOALTRACKtoreturntothePower-Upscreen.
WhenaUserperformsaworkoutthatsurpassesthe“LONGESTWORKOUT” or “CALORIERECORD” of the previous
workouts,theConsolewillcongratulatewithanaudiblesoundandtelltheUserthenewachievement.Thecorresponding
AchievementIndicatorLightwillalsobeactive.
www.SchwinnConnect.com
Gotothewww.SchwinnConnect.comwebsitetocreateanonlineprofile,uploadyourworkoutresultsusingaUSBFlash
Drive,andthenviewandtrackyourachievementsovertime.
www.SchwinnConnect.com also works with MyFitnessPal. Simply follow the prompts from the “Link to MyFitnessPal” button,
andyourworkoutresultswillbeavailablewithyourexistingMyFitnessPalprofile.

40
Console seTup mode
TheConsoleSetupModeletsyouinputthedateandtime,settheunitsofmeasurementtoeitherEnglishorMetric,change
themachinetype,controlthesoundsettings(on/off),orseemaintenancestatistics(ErrorLogandRunHours–forservice
technicianuseonly).
1. HolddownthePAUSE/ENDbuttonandRightbuttontogetherfor3secondswhileinthePower-UpModetogointothe
Console Setup Mode.
Note:PushPAUSE/ENDtoexittheConsoleSetupModeandreturntothePower-UpModescreen.
2. TheConsoledisplayshowstheDatepromptwiththecurrentsetting.Tochange,pushtheIncrease/Decreasebuttonsto
adjustthecurrentlyactivevalue(flashing).PushtheLeft/Rightbuttonstochangewhichsegmentisthecurrentlyactive
value(month/day/year).
3. PushOKtoset.
4. TheConsoledisplayshowstheTimepromptwiththecurrentsetting.PushtheIncrease/Decreasebuttonstoadjustthe
currentlyactivevalue(flashing).PushtheLeft/Rightbuttonstochangewhichsegmentisthecurrentlyactivevalue(hour/
minute/AMorPM).
5. PushOKtoset.
6. TheConsoledisplayshowstheUnitspromptwiththecurrentsetting.Tochange,pushOKtostarttheUnitsoption.Push
theIncrease/Decreasebuttonstochangebetween“MILES”(ImperialEnglishunits)and“KM”(metricunits).
Note:IftheunitschangewhenthereisdatainUserStatistics,thestatisticsconverttothenewunits.
7. PushOKtoset.
8. TheConsoledisplayshowstheSoundSettingspromptwiththecurrentsetting.PushtheIncrease/Decreasebuttonsto
changebetween“ON”and“OFF”.
9. PushOKtoset.
10. TheConsoledisplayshowstheTOTALRUNHOURSforthemachine.
11. Forthenextprompt,pushtheOKbutton.
12. TheConsoledisplayshowstheSoftwareVersionprompt.
13. Forthenextprompt,pushtheOKbutton.
14. TheConsolewilldisplaythePower-UpModescreen.

41
maInTenanCe
Readallmaintenanceinstructionsfullybeforeyoustartanyrepairwork.Insomeconditions,anassistantisrequiredtodothe
necessary tasks.
Equipmentmustberegularlyexaminedfordamageandrepairs.Theownerisresponsibletomakesurethatregular
maintenanceisdone.Wornordamagedcomponentsmustberepairedorreplacedimmediately.Onlymanufacturer
supplied components can be used to maintain and repair the equipment.
To reduce the risk of electrical shock or unsupervised usage of the equipment, always unplug the power cord
from the wall outlet and the machine and wait 5 minutes before cleaning, maintaining or repairing the machine. Place the
power cord in a secure location.
Daily: Beforeeachuse,examinetheexercisemachineforloose,broken,damaged,or
wornparts.Donotuseiffoundinthiscondition.Repairorreplaceallpartsatthe
first sign of wear or damage. After each workout, use a damp cloth to wipe your
machine and Console free of sweat.
Note:AvoidexcessivemoistureontheConsole.
Weekly: Check for smooth roller operation. Wipe the machine to remove dust, dirt, or
grime. Clean the rails and surface of the rollers with a damp cloth.
Note:Donotusepetroleumbasedproducts.
Monthly
or after 20 hours:
Make sure all bolts and screws are tight. Tighten as necessary.
NOTICE:Donotcleanwithapetroleumbasedsolventoranautomotivecleaner.BesuretokeeptheConsolefreeof
moisture.
42
Maintenance Parts
BB
CC
Z
DD
AA
Y
A
G
C
B
D
EF
H
J
O
P
Q
RM
N
V
W
XU
EE
HH
L
GG
JJ
II
KK
LL
T
S
O
FF
FF
I
K
K
I

43
A Console N Shroud, Right AA InclineMotorAssembly
B HeartRateCable,Upper O Roller BB Servo Motor
CHandlebar,Static P Leg, Right CC BrakeAssembly
D ConsoleCable,Upper Q Shroud Cap DD Fly Wheel
EArm Pivot Rod R Shroud,Upper EE Pedal Arm, Left
F Console Mast S Console Cable, Lower FF Transport Wheel
G WaterBottleHolder TInclineAssembly GG Front Stabilizer
H HandlebarArm,LowerRight U Rail Assembly HH Leg, Left
I HandlebarShroud,Outer V Frame Assembly II Power Cord
JHandlebarArm,UpperRight W Shroud, Left JJ MP3Cable
KHandlebarShroud,Inner X Crank Assembly, Left KK HandlebarArm,LowerLeft
L Pedal Arm, Right Y Speed Sensor Magnet LL HandlebarArm,UpperLeft
M Crank Assembly, Right ZSpeed Sensor

44
Condition/Problem Things to Check Solution
Nodisplay/partialdisplay/
unit will not turn on
Checkelectrical(wall)
outlet
Make sure unit is plugged into a functioning wall outlet.
Check connection at front
of unit
Connection should be secure and undamaged. Replace adapter
or connection at unit if either are damaged.
Check data cable integrity Allwiresincableshouldbeintact.Ifanyarevisiblycrimpedor
cut, replace cable.
Check data cable
connections/orientation
Besurecableisconnectedsecurelyandorientedproperly.Small
latch on connector should line up and snap into place.
Check console display for
damage
Check for visual sign that console display is cracked or otherwise
damaged. Replace Console if damaged.
ConsoleDisplay IfConsoleonlyhaspartialdisplayandallconnectionsarefine,
replace the Console.
Iftheabovestepsdonotresolvetheproblem,contactCustomer
Care for further assistance.
UnitoperatesbutContact
HRnotdisplayed
HRcableconnectionat
Console
BesurecableisconnectedsecurelytoConsole.
HRcableboxconnection BesurecablesfromhandlebarsandcabletoConsolearesecure
and undamaged.
Sensor grip BesurehandsarecenteredonHRsensors.Handsmustbekept
still with relatively equal pressure applied to each side.
Dryorcallousedhands Sensors may have difficulty with dried out or calloused hands.
Aconductiveelectrodecream(heartratecream)canhelpmake
better conduct. These are available on the web or at medical or
some larger fitness stores.
StaticHandlebar Iftestsrevealnootherissues,StaticHandlebarshouldbere-
placed.
UnitoperatesbutTelemet-
ricHRnotdisplayed
ChestStrap(optional) Strapshouldbe“POLAR®” compatible and uncoded. Make sure
strap is directly against skin and contact area is wet.
Interference Trymovingunitawayfromsourcesofinterference(TV,Micro-
wave,etc).
Replace Chest Strap IfinterferenceiseliminatedandHRdoesnotfunction,replace
strap.
Replace Console IfHRstilldoesnotfunction,replaceConsole.
UnitoperatesbutTelemet-
ricHRdisplayedincorrectly
Interference MakesurethattheHRreceiverisnotblockedbyapersonal
electronic device in the left side of the media tray.
Consoledisplays“E2”error
code
Check data cable integrity Allwiresincableshouldbeintact.Ifanyarecutorcrimped,
replace cable.
Check data cable
connections/orientation
Besurecableisconnectedsecurelyandorientedproperly.Small
latch on connector should line up and snap into place.
ConsoleElectronics Iftestsrevealnootherissues,contactCustomerCare.
TroublesHooTIng

45
Condition/Problem Things to Check Solution
Nospeed/RPMreading,
Console displays “Please
Stride” error code
Check data cable integrity Allwiresincableshouldbeintact.Ifanyarecutorcrimped,
replace cable.
Check data cable
connections/orientation
Besurecableisconnectedsecurelyandorientedproperly.Small
latch on connector should line up and snap into place.
Check magnet position
(requiresshroudremoval)
Magnet should be in place on pulley.
CheckSpeedSensor(re-
quiresshroudremoval)
Speed sensor should be aligned with magnet and connected to
data cable. Realign sensor if necessary. Replace if there is any
damage to the sensor or the connecting wire.
Consoleshutsoff(enters
sleepmode)whileinuse
Checkelectrical(wall)
outlet
Make sure unit is plugged into a functioning wall outlet.
Check connection at front
of unit
Connection should be secure and undamaged. Replace adapter
or connection at unit if either are damaged.
Check data cable integrity Allwiresinthecableshouldbeintact.Ifanyarecutorcrimped,
replace cable.
Check data cable
connections/orientation
Besurecableisconnectedsecurelyandorientedproperly.Small
latch on connector should line up and snap into place.
Reset machine Unplugunitfromelectricaloutletfor3minutes.Reconnectto
outlet.
Check magnet position
(requiresshroudremoval)
Magnet should be in place on pulley.
CheckSpeedSensor(re-
quiresshroudremoval)
Speed sensor should be aligned with magnet and connected to
data cable. Realign sensor if necessary. Replace if there is any
damage to the sensor or the connecting wire.
Fan will not turn on or will
not turn off
Check data cable integrity Allwiresincableshouldbeintact.Ifanyarecutorcrimped,
replace cable.
Check data cable
connections/orientation
Besurecableisconnectedsecurelyandorientedproperly.Small
latch on connector should line up and snap into place.
Reset machine Unplugunitfromelectricaloutletfor3minutes.Reconnectto
outlet.
Fan will not turn on, but
Console operates
Check for blockage of fan Unplugunitfromelectricaloutletfor5minutes.Removematerial
fromfan.Ifnecessary,detachtheConsoletohelpwithremoval.
Replace the Console if unable to remove blockage.
Unitrocks/doesnotsit
level
Check leveler adjustment Adjust levelers until machine is level.
Check surface under unit Adjustmentmaynotbeabletocompensateforextremelyuneven
surfaces. Move machine to level area.
Footpedalsloose/unitdif-
ficult to operate
Hardware TightlysecureallhardwareonthePedalArmsandHandlebar
Arms.

46
Condition/Problem Things to Check Solution
Drivetrainclick/ticknoise
once per full crank revolu-
tion
Checkcrank/pulleyas-
sembly
Disconnectleftandrightfootassembliesandrotatecrank.If
soundpersists,replacecrank/pulleyassembly.Ifsounddoes
notcomefromrotatingcrank,checkfootassembliesandupper/
lower handlebars.
Check foot assemblies, leg
assemblies, handlebar
assemblies
Manually move foot, leg, and handlebar assemblies to isolate
sound. Replace part making sound.
Squeaking noise that ap-
pears a few minutes into
a workout and normally will
get progressively worse as
the workout continues
Boltthatconnectsthe
swingarmstotheaxlerun-
ning through the console
mast
Loosen pivot rod bolt slightly until noise goes away. White lithium
greasecanalsobeappliedforatemporaryfix.ContactCustom-
er Care for assistance.

47
WarranTy
Who Is Covered
This warranty is valid only to the original purchaser and is not transferable or applicable to any other person(s).
What Is Covered
Nautilus, Inc. warrants that this product is free from defects in materials and workmanship, when used for the purpose intended, under normal conditions, and provided it receives
proper care and maintenance as described in the Product’s Assembly and Owner’s manual. This warranty is good only for authentic, original, legitimate machines manufactured by
Nautilus, Inc. and sold through an authorized agent and used in the United States or Canada.
Terms
• Frame 10 years
• Mechanical parts 2 years
• Electronics 1 year
• Labor 3 months
(Labor support does not include the installation of replacement parts involved in the initial product assembly and preventative maintenance services.)
How Nautilus Will Support the Warranty
Throughout the terms of the warranty coverage, Nautilus, Inc. will repair any machine that proves to be defective in materials or workmanship. Nautilus reserves the right to replace
the product in the event a repair is not possible. When Nautilus determines replacement is the correct remedy, Nautilus may apply a limited credit reimbursement toward another
Nautilus, Inc. brand Product, at our discretion. This reimbursement may be prorated based on length of ownership. Nautilus, Inc. provides repair service within major metropolitan
areas. Nautilus, Inc. reserves the right to charge the consumer for travel outside these areas. Nautilus, Inc. is not responsible for dealer labor or maintenance charges beyond the
applicable warranty period(s) stated herein. Nautilus, Inc. reserves the right to substitute material, parts or products of equal or better quality if identical materials or products are
not available at the time of service under this warranty. Any replacement of the product under the terms of the Warranty in no way extends the original Warranty period. Any limited
credit reimbursement may be prorated based on length of ownership. THESE REMEDIES ARE THE EXCLUSIVE AND SOLE REMEDIES FOR ANY BREACH OF WARRANTY.
What You Must Do
• Retain appropriate and acceptable Proof of Purchase.
• Operate, maintain, and inspect the Product as specified in the Product Documentation (Assembly, Owner’s Manuals, etc.).
• Product must be used exclusively for the purpose intended.
• Notify Nautilus within 30 days after detecting an issue with the Product.
• Install replacement parts or components in accordance with any Nautilus instructions.
• Perform diagnostic procedures with a trained Nautilus, Inc representative if requested.
What Is Not Covered
• Damage due to abuse, tampering or modification of the Product, failure to properly follow assembly instructions, maintenance instructions, or safety warnings as stated in the
Product Documentation (Assembly, Owner’s Manuals, etc), damage due to improper storage or the effect of environmental conditions such as moisture or weather, misuse,
mishandling, accident, natural disasters, power surges.
• A machine placed or used in a commercial or institutional setting. This includes gyms, corporations, work places, clubs, fitness centers and any public or private entity that
has a machine for use by its members, customers, employees or affiliates.
• Damage caused by exceeding maximum user weights as defined in the Product’s Owner’s manual or warning label.
• Damage due to normal usage and wear and tear.
• This warranty does not extend to any territories or countries outside the United States and Canada.
How to Obtain Service
For Products purchased directly from Nautilus, Inc. contact the Nautilus office listed on the Contacts page of the products Owner’s manual. You may be required to return the
defective component to a specified address for repair or inspection, at your expense. Standard ground shipping of any warranty replacement parts will be paid by Nautilus, Inc. For
products purchased from a retailer, you may be asked to contact your retailer for warranty support.
Exclusions
The preceding warranties are the sole and exclusive express warranties made by Nautilus, Inc. They supersede any prior, contrary or additional representations, whether oral or
written. No agent, representative, dealer, person or employee has the authority to alter or increase the obligations or limitations of this warranty. Any implied warranties, including
the WARRANTY OF MERCHANTABILITY and any WARRANTY OF FITNESS FOR A PARTICULAR PURPOSE, are limited in duration to the term of the applicable express warranty
provided above, whichever is longer. Some states do not allow limitations on how long an implied warranty lasts, so the above limitation may not apply to you.
Limitation of Remedies
EXCEPT AS OTHERWISE REQUIRED BY APPLICABLE LAW, THE PURCHASER’S EXCLUSIVE REMEDY IS LIMITED TO REPAIR OR REPLACEMENT OF ANY COMPONENT DEEMED BY
NAUTILUS, INC. TO BE DEFECTIVE UNDER THE TERMS AND CONDITIONS STATED HEREIN. IN NO EVENT WILL NAUTILUS, INC. BE LIABLE FOR ANY SPECIAL, CONSEQUENTIAL,
INCIDENTAL, INDIRECT OR ECONOMIC DAMAGES, REGARDLESS OF THE THEORY OF LIABILITY (INCLUDING, WITHOUT LIMITATION, PRODUCT LIABILITY, NEGLIGENCE OR OTHER
TORT) OR FOR ANY LOST REVENUE, PROFIT, DATA, PRIVACY OR FOR ANY PUNITIVE DAMAGES ARISING OUT OF OR RELATED TO THE USE OF THE FITNESS MACHINE EVEN IF
NAUTILUS, INC. HAS BEEN ADVISED OF THE POSSIBILITY OF SUCH DAMAGES. THIS EXCLUSION AND LIMITATION SHALL APPLY EVEN IF ANY REMEDY FAILS OF ITS ESSENTIAL
PURPOSE. SOME STATES DO NOT ALLOW THE EXCLUSION OR LIMITATION OF CONSEQUENTIAL OR INCIDENTAL TYPE DAMAGES SO THE ABOVE LIMITATION MAY NOT APPLY TO
YOU.
State Laws
This warranty gives you specific legal rights. You may also have other rights, which vary from state to state.
Expirations
If the warranty has expired, Nautilus, Inc. may assist with replacements or repairs to parts and labor, but there will be a charge for these services. Contact a Nautilus® office for
information on post-warranty parts and services. Nautilus® does not guarantee availability of spare parts after expiration of warranty period.
International Purchases
If you purchased your machine outside of the United States consult your local distributor or dealer for warranty coverage.

Nautilus®Bowex®Schwinn® Fitness Universal®
8002141.121513.F
EN
