Scientech Electronics TX3 Door Sensor/ Glass Break Detector/ Flood Detector User Manual
Scientech Electronics Co., Ltd. Door Sensor/ Glass Break Detector/ Flood Detector
Users Manual

ACCESSORIES
The LS-30 system includes a full range of accessories, so you can
customize many feature of your security system.
All the radio transmitters used in the LS-30 system, except the Remote
Controller, have a unique random code that is set by the factory with
16,777,216 combinations in total. Also with specially designed
transmission timing control, the LS-30 system can effectively prevent
mutual interference from other transmitters in the system. The Remote
Controller uses copy-preventing hopping-code technology, changing its
radio code every time you press the button. The combinations possible
through this hopping-code are up to 7.3 X 10¹⁹. To comply with the
regulations in most countries, radio power is limited to below 10mW, and
effective range is about 100 meters measured at open field. The range may
be somewhat less indoors, depending on the layout of building construction
and furniture.
You may enroll all the wireless accessories and change their related settings,
either through the guidance of the interactive LCD display on the Base Unit
explained in the “INSTALLATION” section that follows, or by using a
computer with the proprietary software “HyperSecureLink” through an
interface adapter, which offers a quicker and simpler way to perform the
installation in.
NOTE: The changes or modifications not expressly approved by the
party responsible for compliance could void the user’s authority to
operate the equipment.
The comply with the FCC RF exposure compliance requirements, this
device and its antenna must not be co-located or operating to conjunction
with any other antenna or transmitter.
This device complies with Part 15 of the FCC Rules. Operation is subject
to the following two conditions: (1) this device may not cause harmful
interference, and (2) this device must accept any interference received,
including interference that may cause undesired operation.

MAGNETIC CONTACT TRANSMITTER
INTRODUCTION
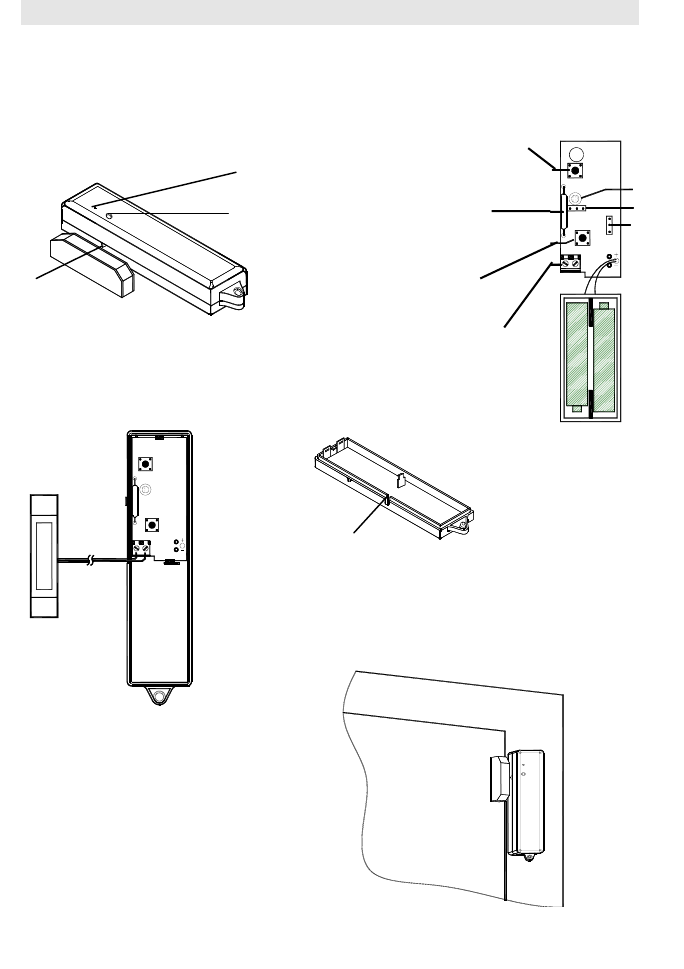
The TX-3DS is a fully supervised magnetic contact transmitter. With a built-in reed
switch it can be used to secure doors and windows.
Fig.3
Fig.5
Hole to reach TEST
button inside
Transmission
LED
Magnet
Location
Mark
Fig. 1
LED
JP3
Test Button
Tamper
Switch
Aux. Input
Terminals
Fig.2
Reed
Sensor
Wiring Inlet
Fig. 4
INSTALLATION
A. Enrolling Code
1. Loosen the screw of the TX-3DS, then open the upper case and insert two
AAA alkaline batteries.
Important Notice: In order to reset the microprocessor properly before changing
the batteries, please press TEST button for 5 seconds to discharge the
energy that remains in the capacitors of TX-3DS. Otherwise, it may not
restart after changing batteries.
2. Select “Installer Mode” on the Base Unit, and enter Installer Password to gain
access authority. Then select \Set Device\Enroll Device\Burglar Sensor\Enter
Zone No. to enroll the ID of the TX-3DS by pressing its TEST button, or do
an open/close action on the TX-3DS. You may change its various attributes
under \Set Device\Change Device Setting\Burglar Sensor Change, to fulfill
different requirements.
B. Mounting
1. It is recommended to attach the transmitter to the fixed frame, and the magnet
to movable part (namely door or window). Refer to Figure 5, and make sure
the gap between the magnet and the mark side of the transmitter is kept within
1 cm.
2. Use the base of TX-3DS as a template, and mark the points on the mounting
surface through two mounting holes. Then drill two holes and attach the
transmitter base with the 2 screws supplied.
3. Close the upper cover on the transmitter and tighten the screw.
4. Mount magnet near transmitter’s mark side. Keep the gap between within 1
cm when door/window is closed.
Note: - If the transmitter is mounted on a metal frame, the RF transmission range
will shrink due to radio signal attenuation. To avoid this effect, you may
connect an external reed sensor to the AUX. Input Terminals of transmitter
PC Board (as shown in Fig.3) and place the transmitter away from the metal
frame. After connecting the external reed sensor, please use a pair of pliers
or cutter to break the plastic of the wiring inlet (refer to Fig. 4), and place the
wire across the wiring inlet before closing the cover. .
- For quick mounting, you may use the supplied double-stick tape and Velcro
to attach magnet and transmitter.
C. Testing
1. Momentarily open the door/window, and verify the transmission LED lights,
showing that transmission is in progress.
2. If the TX-3DS has been enrolled in the LS-30 Base Unit, the Base Unit
will respond accordingly when the door or window is opened. After
testing, close the top cover of the transmitter and tighten it with the screw.
SPECIFICATIONS
Supervision: sends heartbeat signal at 60-minute interval. When Tamper or Low
Battery condition is detected, it reports automatically.
Power Source: two AAA alkaline batteries.
Current Drain: 5uA @ standby, 20mA @ operation
Estimated Battery Life: 3 years (@ actuated 10 times/day)
Transmitter Size: 20 x 29 x 123.5 mm
Transmitter Weight (w/o battery): about 34g

GLASS BREAK DETECTOR
INTRODUCTION
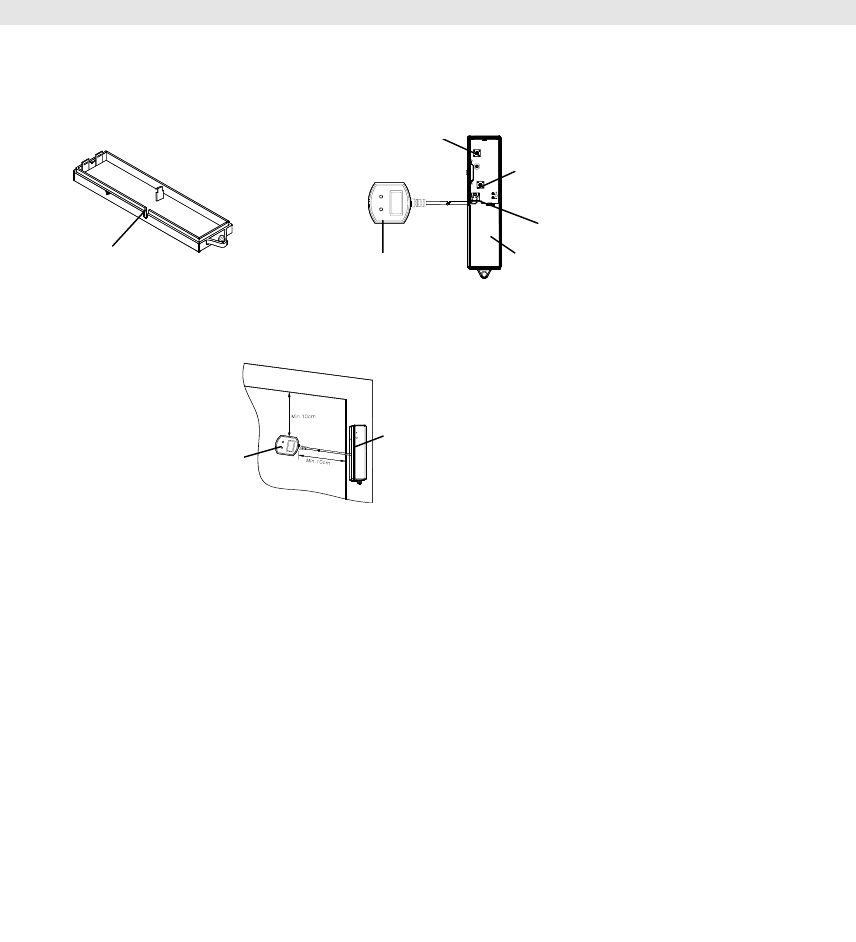
The Glass Break Detector is composed of radio transmitter TX-3GS and detector
GB. It sends an alarm signal to the Base Unit when the detector is triggered by the action of glass breaking.
Detector
Transmitte
Fig. 3
Test Button Tamper
Switch
Aux
Input
Transmitter
Fig. 2
Detector
Wiring Inlet
Fig. 1
INSTALLATION AND OPERATION
1. Loosen the screw of the radio transmitter TX-3GS, and open the cover. Use a pair of pliers or cutter to break the
plastic of wiring inlet (Fig. 1). Then connect the detector to the AUX Input Terminals of the transmitter PC
Board and insert two AAA alkaline batteries. Refer to Fig. 2.
Important Notice:
In order to reset the microprocessor properly, before replacing the batteries, hold the TEST button down for 5
seconds to discharge the energy that remains in the capacitors of the TX-3GS. Otherwise, it may not restart
properly.
2. Select “Installer Mode” on the Base Unit; and enter the Installer Password to gain access authority. Then select
\Set Device\Enroll Device\Burglar Sensor\Enter Zone No. to enroll the ID of the TX-3GS by pressing its TEST
button. You may change its various attributes under \Set Device\Change Device Setting\Burglar Sensor Change,
to fulfill different requirements.
3. Clean and dry the surface of the window, then remove the paper from the double-stick tape on the back of
detector, and attach the detector on the window glass. Keep it at least 10cm away from the window frame to get
better sensitivity. Refer to Fig. 3.
4. Use the base of transmitter as a template, and mark the points on the mounting surface through two mounting
holes. Then drill two holes and attach the transmitter base with the 2 screws supplied.
Note: - Avoid mounting the transmitter directly on the metal frame, since that would attenuate signal
transmission and shorten radio range. Keep the transmitter at least 5 cm away from the metal plate.
48
- For quick mounting, you may apply supplied Velcro to attach the transmitter to the mounting surface.
5. TEST: Press the TEST button of the TX-3GS, or gently tap the detector to check if this activates the Base Unit
properly. After testing, put the wire across the wiring inlet properly, then close the top cover of the
transmitter and tighten the screw.
SPECIFICATIONS
Supervision: Sends heartbeat signal at 60-minute intervals. When Tamper or
Low -Battery condition is detected, it reports automatically.
Power Source: two AAA alkaline batteries.
Current Drain: 3.5uA @ standby, 20mA @ operation.
Estimated Battery Life: 5 years
Transmitter Size: 20 x 29 x 123.5 mm
Transmitter Weight (w/o battery): about 34g

FLOOD DETECTOR TX-3FS
INTRODUCTION
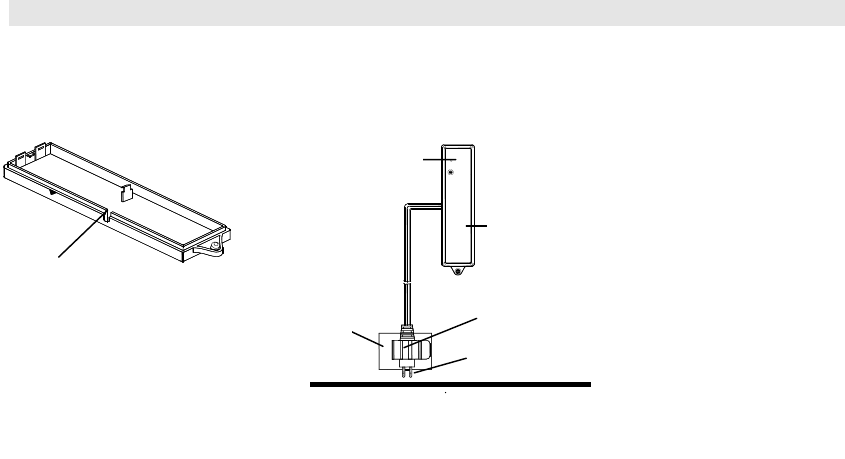
The Flood Detector is composed of Radio Transmitter TX-3FS and Detector FD.
It sends an alarm signal to the Base Unit when the sensing probes of the detector are immersed in the water.
Wiring Inlet
Fig. 1
Fig. 2
Floor
Wall
Transmitter
Detector
Holder
Se
n
s
in
g
p
r
obes
Test Button
Hole
INSTALLATION AND OPERATION
1. Loosen the screw of the radio transmitter TX-3FS and open the cover. Use a pair of pliers or cutter to break the
plastic of the wiring inlet (Fig. 1). Then connect the detector to the AUX Input Terminals of the transmitter PC
Board and insert two AAA alkaline batteries.
Important Notice:
In order to reset the microprocessor properly, before changing the batteries, please press the TEST button for
5 seconds to discharge the energy that remains in the capacitors of the TX-3FS. Otherwise, it may not restart
properly.
2. Select “Installer Mode” on the Base Unit, and enter Installer Password to gain access authority. Then select \Set
Device\Enroll Device\Special Sensor\Enter Zone No. to enroll the ID of the TX-3FS by pressing its TEST
button. You may change its various attributes under \Set Device\Change Device Setting\Special Sensor Change,
to fulfill different requirements.
3. Remove the paper from the double-stick tape on the back of detector’s holder, then attach the detector to the wall,
as close to the floor as possible where flooding may occur.
1. Use the base of the transmitter as a template, and mark the points on the mounting surface through the two
mounting holes. Then drill two holes and attach the transmitter base with the 2 screws supplied.
Note: - Avoid mounting the transmitter directly on the metal frame, since that would attenuate signal
transmission and shorten radio range. Keep the transmitter at least 5 cm away from the metal plate.
5. TEST: Dip the FD detector in a cup of water, or press the TEST button on the TX-3FS, to check if this activates
the Base Unit. After testing, put the wire across the wiring inlet properly, then close the top cover of the
transmitter and tighten the screw.
Note: - If the detector is tested using water, water may remain on the detector’s sensing probes, it must be
dried properly. After 1 minute, the detector can be tested with water again.
SPECIFICATIONS
Supervision: sends heartbeat signal at 60-minute interval. When Tamper or Low Battery condition is detected, it
reports automatically.
Power Source: two AAA alkaline batteries.
Current Drain: 3.5uA @standby, 20mA @activation
Estimated Battery Life: 5 years
Transmitter Size: 20 x 29 x 123.5 mm
Transmitter Weight (w/o battery): about 34g