Scientific Toys 2212-49R 49.82-49.90 MHz Wireless Remote Control Toy - RX User Manual OI 5728 ai
Scientific Toys Ltd 49.82-49.90 MHz Wireless Remote Control Toy - RX OI 5728 ai
Users Manual
BATTERY INSTALLATION
(For maximum performance, use alkaline batteries)
Remember to take out all batteries from vehicle and transmitter
after playing.
1. Do not mix old and new batteries.
2. Do not mix alkaline, standard (Carbon-Zinc), or rechargeable
batteries.
ATTENTION PARENTS
It is recommended that this toy and all accessories be periodically
examined for potential hazards and that any potentially hazardous
parts be repaired or replaced.
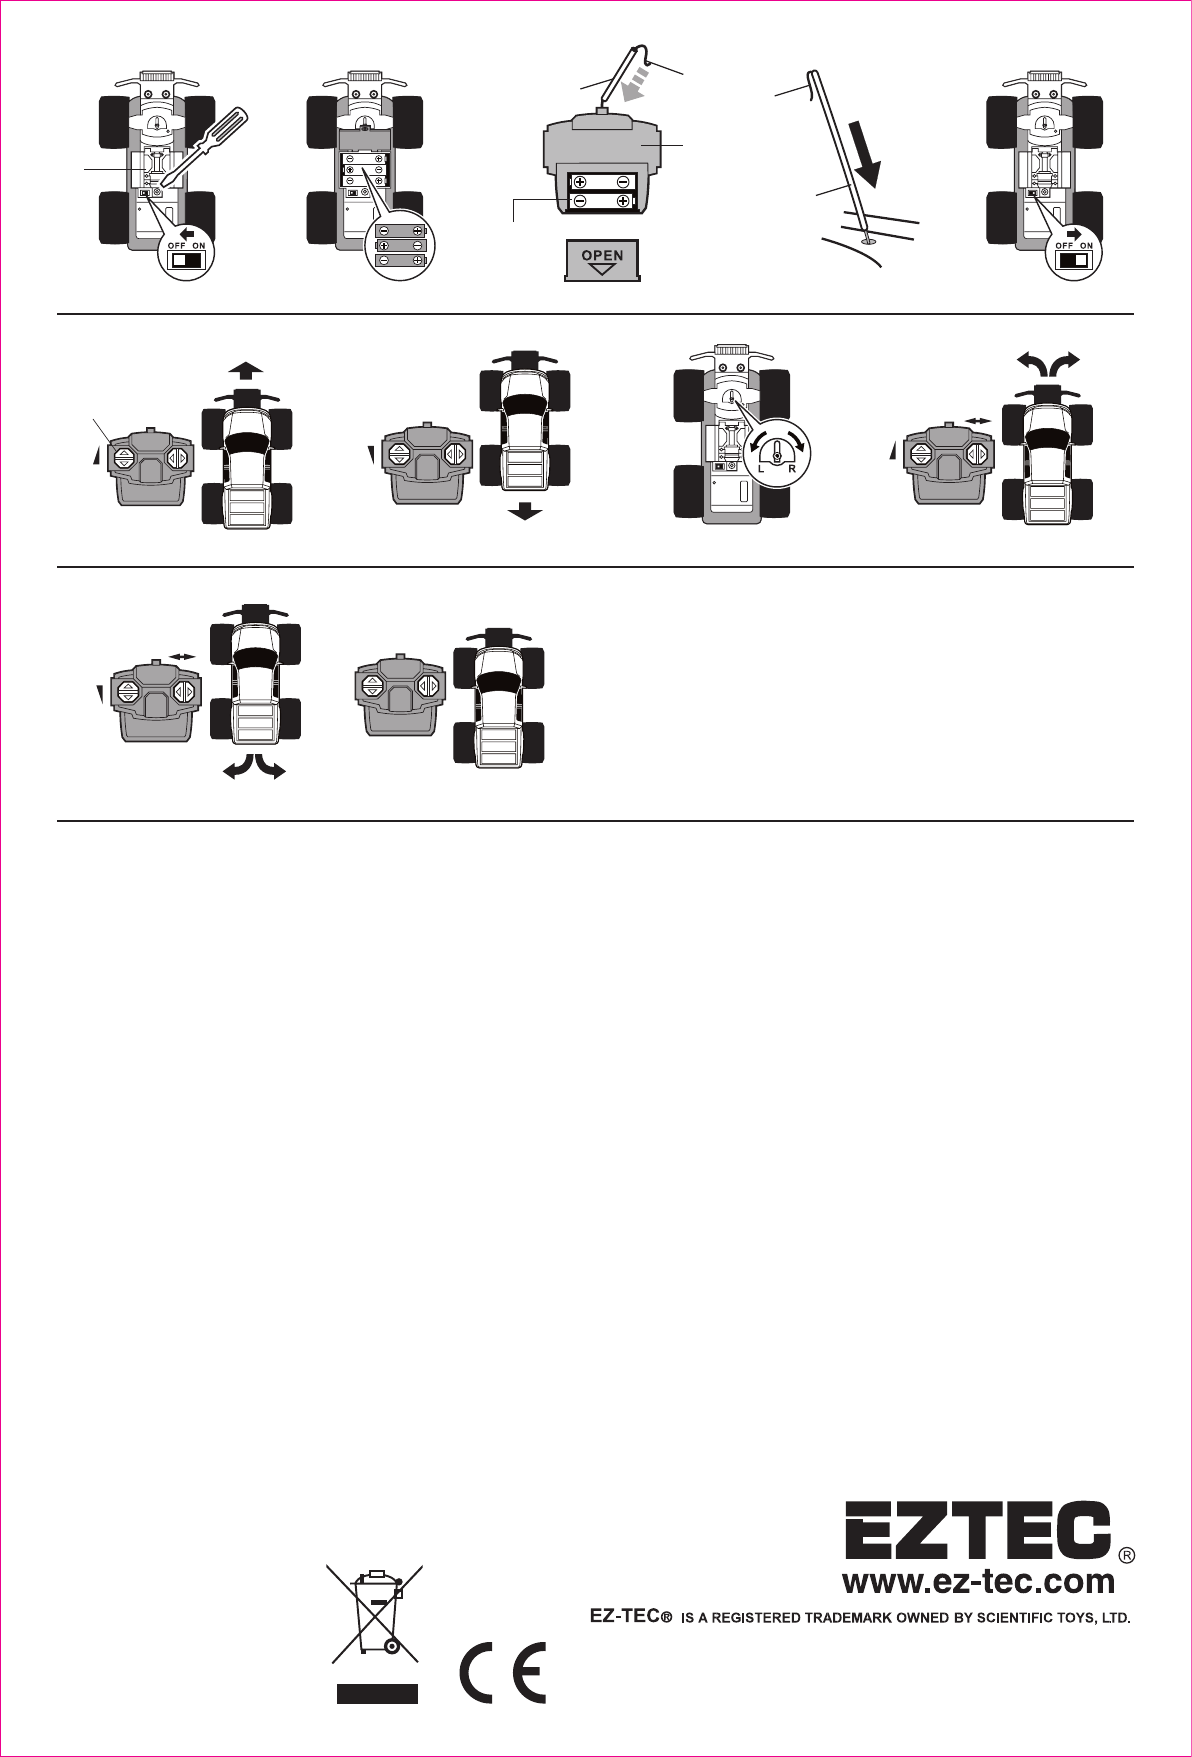
HOW TO INSTALL BATTERY IN VEHICLE
1. Make sure the “ON/OFF” switch at the underside of the vehicle
is at the “OFF” position. (See Diagram 1)
2. Open the battery cover. (See Diagram 1)
3. Insert 3 “AAA” batteries by matching the (+) and (–) signs as
indicated in the battery compartment. (See Diagram 2)
4. Replace the battery lid.
HOW TO INSTALL BATTERY IN TRANSMITTER
1. Remove battery cover and install 2"AA" batteries by matching
+ and – poles as indicated in the battery compartment.
(See Diagram #3)
2. Replace the battery cover.
Note: Remove battery after you have finished using your vehicle.
HOW TO PLAY
START TO PLAY
1. Build up antenna by passing the cable through the antenna
tube provided and plug into the vehicle tightly. Otherwise, the
vehicle will not work. (See Diagram #4)
2. Push the ON/OFF switch to the "ON" position of the vehicle.
(See Diagram #5)
FORWARD RUNNING
3. Push the Driving Control Stick forward for forward running.
(See Diagram #6).
REVERSE RUNNING
4. Pull the Driving Control Stick backward for reverse running.
(See Diagram #7)
FRONT WHEELS STEERING ADJUSTMENT
5. If the vehicle does not run straight forward, adjust the lever for
satisfactory alignment on the underside of the vehicle.
(See Diagram #8)
6. If the vehicle runs towards left, turn "Steering Alignment Lever"
towards "R".
7. If the vehicle runs towards right, turn "Steering Alignment Lever"
towards "L".
STEERING OPERATION
8. Turn the Steering Control Stick to the left or right while pushing
the Driving Stick forward at the same time the car will turn left
or right and run forward. (See Diagram #9)
9. Turn the Steering Control Stick to the left or right while pulling
the Driving Stick backward at the same time the car will turn left
or right and run backward. (See Diagram #10)
STOP OPERATION
10. Release both Control Sticks, the vehicle will stop.
(See Diagram #11)
BATTERY CAUTIONS
1. For maximum performance, use alkaline batteries.
2. Do not mix old and new batteries.
3. Do not mix alkaline, standard (carbon-zinc), or rechargeable
batteries.
4. Do not recharge non-rechargeable battery.
5. Ensure batteries are inserted with the correct polarity.
6. Remove batteries when toy is not in use.
7. Remove exhausted batteries from toy and dispose of in
accordance with the makers recommendation
8. Rechargeable batteries should only be charged under adult
supervision.
9. Remove rechargeable batteries from toy before charging.
10. The supply terminals are not to be short-circuited.
11. The antenna wires are not to be inserted into socket outlet.
This device complies with Part 15 of the FCC Rules.
Operation is subject to the following two conditions:
(1) this device may not cause harmful interference, and
(2) this device must accept any interference received, including interference that may cause undesired operation.
Warning: Changes or modifications to this unit not expressly approved by the party responsible for compliance could void the
user's authority to operate the equipment.
NOTE: This equipment has been tested and found to comply with the limits for a Class B digital device, pursuant to Part 15 of
the FCC Rules. These limits are designed to provide reasonable protection against harmful interference in a residential installation.
This equipment generates, uses and can radiate radio frequency energy and, if not installed and used in accordance with the
instructions, may cause harmful interference to radio communications. However, there is no guarantee that interference will not
occur in a particular installation. If this equipment does cause harmful interference to radio or television reception, which can be
determined by turning the equipment off and on, the user is encouraged to try to correct the interference by one or more of the
following measures:
• Reorient or relocate the receiving antenna.
• Increase the separation between the equipment and receiver.
• Connect the equipment into an outlet on a circuit different from that to which the receiver is connected.
• Consult the dealer or an experienced radio/TV technician for help.
NOT SUITABLE FOR CHILDREN UNDER 3 YEARS OF
AGE, DUE TO SMALL PARTS.
(Diagram #1) <1> On/Off switch
<2> Battery cover
<3> Unscrew to open
(Diagram #2) <4> 3 "AAA" battery
(Diagram #3) <5> Back Panel of transmitter
<6> 2 "AA" battery
(Diagram #4) <7> Cable
<8> Antenna tube
(Diagram #5) <9> Cable
<10> Antenna tube
(Diagram #6) <11> On
(Diagram #7) <12> Driving control stick
<13> Forward
<14> Forward
(Diagram #8) <15> Backward
<16> Reverse
(Diagram #9) <17> Steering alignment lever
(Diagram #10) <18> Steering Control Stick
(Diagram #11) <19> Steering Control Stick
(Diagram #12) <20> Stop
DIAGRAM #1 DIAGRAM #5DIAGRAM #2 DIAGRAM #3 DIAGRAM #4
(1)
(3)
(4)
(8) (7)
(5)
(6)
(2)
(11)
(14)
DIAGRAM #6
(13)
DIAGRAM #7
(15)
(16)
DIAGRAM #9
(18)
DIAGRAM #8
(17)
DIAGRAM #10
(19)
DIAGRAM #11
(20)
© 2014 SCIENTIFIC TOYS LTD. 1108, TOWER B,
14 SCIENCE MUSEUM ROAD, TSIMSHATSUI, HONG KONG.
PRINTED IN CHINA
O.I. NO.5728
SIZE: 210MM X 310MM PN#65-5728-000-0100
(12)
(10)
(9)