Scientific Toys 2970-27TT 26.96-27.28 MHz WIRELESS R/C TOY-TX User Manual OI 4757 99937F MONSTER ai
Scientific Toys Ltd 26.96-27.28 MHz WIRELESS R/C TOY-TX OI 4757 99937F MONSTER ai
Users Manual
ATTENTION PARENTS:
IT IS RECOMMENDED THAT THIS TOY AND
ALL ACCESSORIES BE PERIODICALLY
EXAMINED FOR POTENTIAL HAZARDS
AND THAT ANY POTENTIALLY
HAZARDOUS PARTS BE REPAIRED OR
REPLACED.
(DIAGRAM 1)
OPERATING INSTRUCTIONS:
BATTERY PACK CARE / CAUTIONS:
1. If battery pack and/or connectors are wet,
thoroughly dry before charging.
2. Unplug the battery pack if it is not going to be
used for several days.
3. Do not charge battery pack that is hot, wet or
shows signs of leakage or corrosion.
4. Do not expose to fire, as explosion may result.
5. Do not disassemble the battery pack.
BATTERY INSTALLATION:
THE RECHARGEABLE NI-MH BATTERY
PACK IS NOT CHARGED. PLEASE CHARGE
IT FOR 4 HOURS PRIOR TO USE.
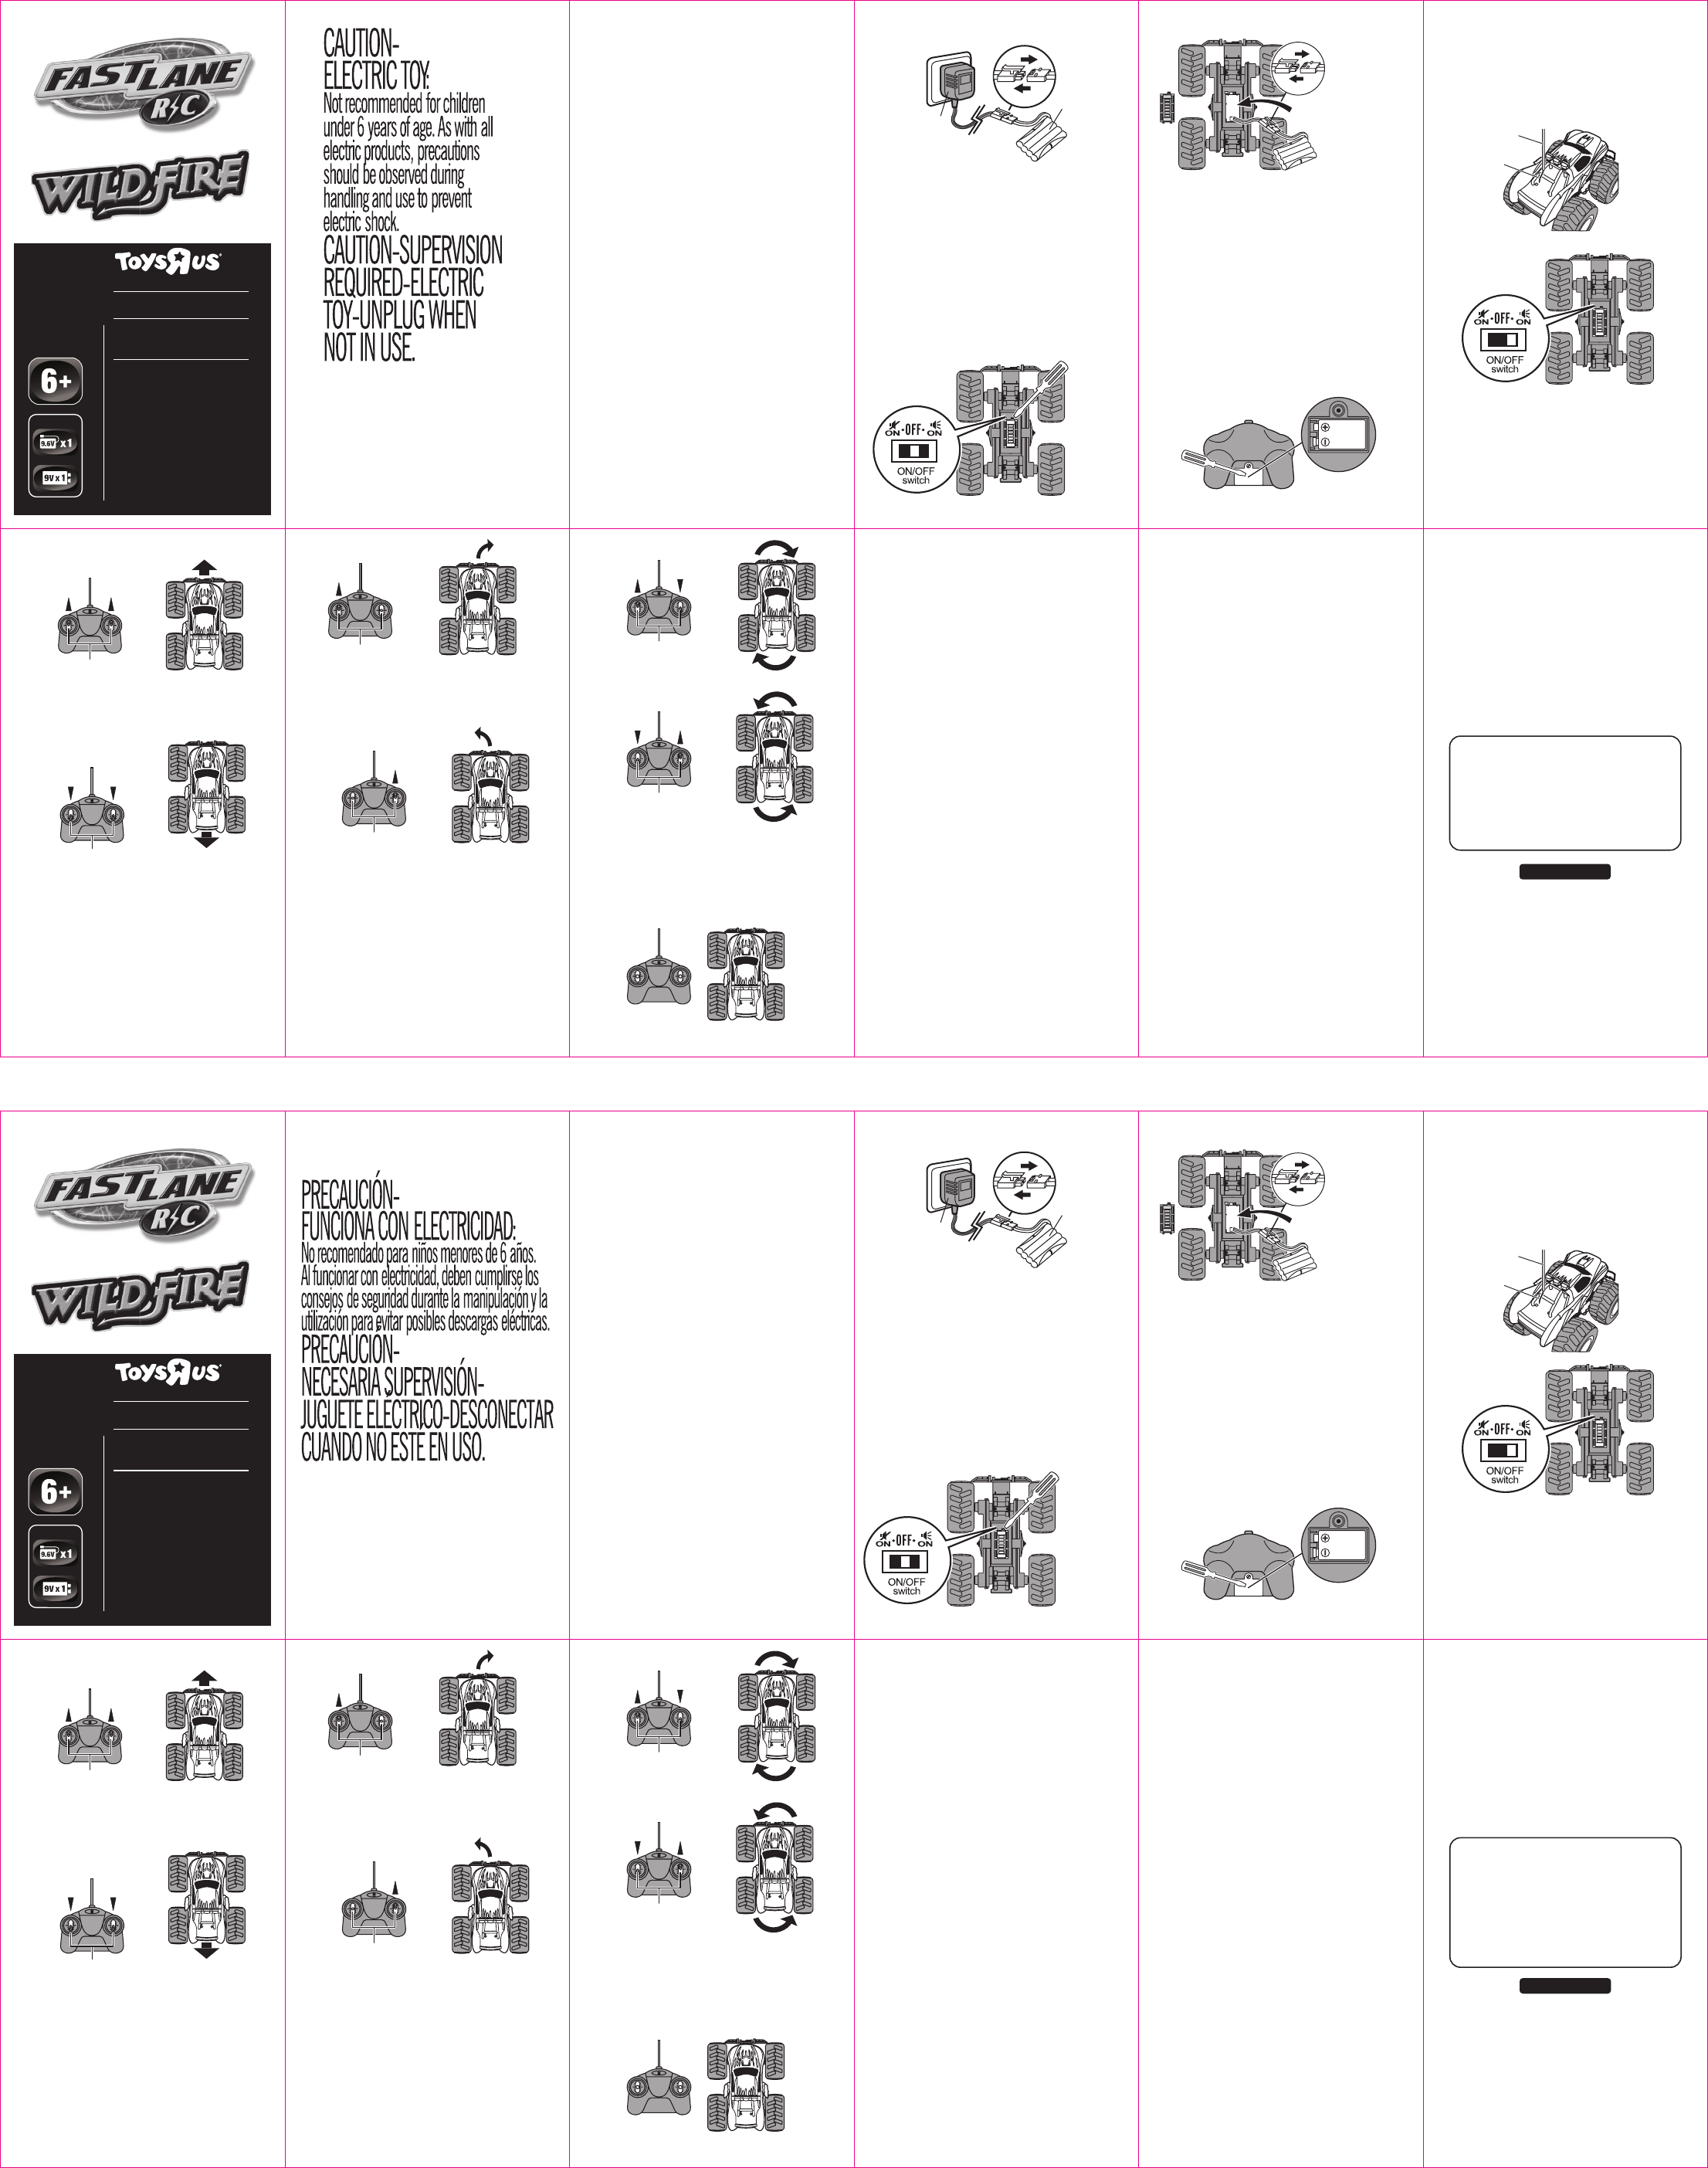
1. Plug the wall pack battery charger into
wall outlet.
2. Connect the battery pack and charger cables
by snapping together the jack and the socket
tightly. (See Diagram 1)
3. After charging for 4 hours, the battery pack
will be warm. This condition is normal for fully
charged batteries. If the speed of the car
slows down suddenly, it is time to recharge.
4. To disconnect cables, press down on the clip
and pull apart. (See Diagram 1)
5. After use, the battery pack will be hot! Wait at
least 20 minutes until it cools before
recharging.
6. Recharging a warm or hot battery pack will
greatly shorten battery life.
PERFORMANCE TIPS FOR VEHICLE
• Do not drive car on grass, sand or carpet.
• Do not drive car through water.
• Be sure to rest your vehicle for at least 30 minutes after
every 15 minutes of operation.
• Make sure ON/OFF switch on your vehicle is in the
“OFF” position when it is not in use.
• Do not bend the antenna.
• Electrical, CB interference, mobile phones, air
conditioning, elevators and steel girders in buildings will
affect the operation of your vehicle.
• Do not leave the vehicle or transmitter near sources
of heat or in direct sunlight for long periods of time.
• Remove the batteries from the vehicle and transmitter
when they are not in use.
This device complies with Part 15 of the FCC Rules.
Operation is subject to the following two conditions:
(1) this device may not cause harmful interference, and
(2) this device must accept any interference received,
including interference that may cause undesired operation.
Warning: Changes or modifications to this unit not expressly
approved by the party responsible for compliance could void
the user's authority to operate the equipment.
NOTE: This equipment has been tested and found to comply
with the limits for a Class B digital device, pursuant to
Part 15 of the FCC Rules. These limits are designed to
provide reasonable protection against harmful interference
in a residential installation. This equipment generates, uses
and can radiate radio frequency energy and, if not installed
and used in accordance with the instructions, may cause
harmful interference to radio communications.
However, there is no guarantee that interference will not occur
in a particular installation. If this equipment does cause harmful
interference to radio or television reception, which can be
determined by turning the equipment off and on, the user is
encouraged to try to correct the interference by one or more
of the following measures:
• Reorient or relocate the receiving antenna.
• Increase the separation between the equipment
and receiver.
• Connect the equipment into an outlet on a circuit different
from that to which the receiver is connected.
• Consult the dealer or an experienced radio/TV technician
for help.
TRANSMITTER:
1. Unscrew to open the battery cover at the
back and install a 9V battery by matching
the + and – signs as indicated in the
battery compartment. (See Diagram 4)
2. Replace the battery cover and tighten the
screw to secure the battery cover.
SIZE: 390MM X 241MM PN#65-4757-000-0100
INCLUDED
Do not mix old and new batteries.
Do not mix alkaline, standard(carbon-zinc),
or rechargeable batteries.
FAST LANE is a mark of Geoffrey, LLC,
a subsidiary of Toys“R”Us, Inc.
© 2010 Geoff rey, LLC
Made in China
Distributed in the United States by
Toys“R”Us, Inc., Wayne, NJ07470
Distributed in Australia by
Toys“R”Us (Australia) Pty Ltd.,
Regents Park NSW 2143
www.toysrus.com
ITEM #99937 O.I. NO. 4757
CONFORMS TO THE SAFETY
REQUIREMENTS OF ASTM F963.
Part of the “R” US Family of Brands.
VEHICLE:
A. Make sure the “ON/OFF” switch at the
underside of the vehicle is at the “OFF”
position. (See Diagram 2)
B. Unscrew to open the battery cover.
(See Diagram 2)
C. Plug the jack of the 9.6 rechargeable battery
pack into the socket of the battery
compartment, and put the battery pack inside
properly. (See Diagram 3)
D. Replace the battery cover and tighten the
screw to secure the battery cover.
FORWARD
FORWARD FORWARD
BACKWARD BACKWARD
DRIVING CONTROL
STICK
DRIVING CONTROL
STICK
(DIAGRAM 7)
(DIAGRAM 8)
REVERSE
FORWARD BACKWARD
RIGHT
LEFT
FORWARDBACKWARD
STOP
(DIAGRAM 11)
(DIAGRAM 12)
(DIAGRAM 13)
DRIVING CONTROL
STICK
DRIVING CONTROL
STICK
STEERING OPERATION
5. Push only the Left Driving Control Stick
forward to turn Right. (See Diagram 9)
6. Push only the Right Driving Control Stick
forward to turn Left. (See Diagram 10)
FORWARD
RIGHT
LEFT
FORWARD
(DIAGRAM 9)
(DIAGRAM 10)
DRIVING CONTROL
STICK
DRIVING CONTROL
STICK
360 DEGREE SPINS
7. Push the Left Driving Control Stick forward
while pulling the Right Driving Control Stick
backward at the same time. (See Diagram 11)
8. Push the Right Driving Control Stick forward
while pulling the Left Driving Control Stick
backward at the same time. (See Diagram 12)
STOP OPERATION
9. Release both Driving Control Sticks, the
vehicle will Stop. (See Diagram 13)
(DIAGRAM 4)
(DIAGRAM 2)
UNSCREW
TO OPEN
(DIAGRAM 3)
PRESS HERE
WHEN OPENING
9.6V
RECHARGEABLE
BATTERY PACK
PRESS HERE
WHEN OPENING
BATTERY
CHARGER
9.6V Ni-MH
BATTERY
PACK
HOW TO PLAY
1. Build up the antenna by passing the cable
through the antenna tube provided and plug
into the vehicle tightly. Otherwise, the vehicle
will not work. (See Diagram 5)
2. Push the ON/OFF switch to the “ON” position
of the vehicle. (See Diagram 6)
(DIAGRAM 5)
(DIAGRAM 6)
ANTENNA
TUBE
CABLE
FORWARD RUNNING
3. Push both the Driving Control Sticks forward
for forward running. (See Diagram 7)
REVERSE RUNNING
4. Pull both the Driving Control Sticks backward
for reverse running. (See Diagram 8)
(IMAGEN 1)
CONTROL REMOTO:
1. Desatornille para abrir la tapa de la batería
en la parte trasera e instale una batería de
9 V de manera que coincidan los signos + y –
tal como se indica en el compartimento de
la batería (ver imagen 4).
2. Vuelva a colocar la tapa del compartimento
de las pilas y apriete los tornillos.
VEHÍCULO:
A. Asegúrese de que el interruptor de
ENCENDIDO/APAGADO en la parte de abajo
del vehículo está en la posición de APAGADO
(ver imagen 2).
B. Desatornille la tapa del compartimento de las
pilas para abrirlo (Ver imagen 2).
C. Conecte la toma del paquete de batería
recargable 9.6 al enchufe del compartimento
de la batería y coloque adecuadamente el
paquete dentro (ver imagen 3).
D. Vuelva a colocar la tapa del compartimento
de las pilas y apriete los tornillos.
ADELANTE
ADELANTE ADELANTE
ATRÁS ATRÁS
MANDO DE CONTROL
DE LA CONDUCCIÓN
MANDO DE CONTROL
DE LA CONDUCCIÓN
(IMAGEN 7)
(IMAGEN 8)
ATRÁS
ADELANTE ATRÁS
DERECHA
IZQUIERDA
ADELANTEATRÁS
PARAR
(IMAGEN 11)
(IMAGEN 12)
(IMAGEN 13)
MANDO DE CONTROL
DE LA CONDUCCIÓN
MANDO DE CONTROL
DE LA CONDUCCIÓN
FUNCIONAMIENTO DE LA DIRECCIÓN
5. Pulse sólo el mando de control de la
conducción izquierdo para girar a la
derecha (ver imagen 9).
6. Pulse sólo el mando de control de la
conducción derecho para girar a la
izquierda (ver imagen 10).
ADELANTE
DERECHA
IZQUIERDA
ADELANTE
(IMAGEN 9)
(IMAGEN 10)
MANDO DE CONTROL
DE LA CONDUCCIÓN
MANDO DE CONTROL
DE LA CONDUCCIÓN
GIROS DE 360 GRADOS
7. Pulse el mando de control de la conducción
izquierdo hacia delante mientras pulsa el
mando de control de la conducción derecho
hacia atrás al mismo tiempo (ver imagen 11).
8. Pulse el mando de control de la conducción
derecho hacia delante mientras pulsa el
mando de control de la conducción izquierdo
hacia atrás al mismo tiempo (ver imagen 12).
OPERACIÓN DE PARADA
9. Suelte ambos mandos de control de la
conducción; el vehículo se detendrá
(ver imagen 13).
(IMAGEN 4)
(IMAGEN 2)
DESENROSCAR
PARA ABRIR
(IMAGEN 3)
PULSAR
AQUÍ AL ABRIR
PAQUETE DE
BATERÍA
RECARGABLE
DE 9,6 V
PULSE AQUÍ AL ABRIR EL
CARGADOR DE BATERÍA
CARGADOR
DE BATERÍA
PAQUETE DE
BATERÍA Ni-MH
de 9,6 V
CÓMO JUGAR
1. Asegure la antena pasando el cable a través
del interior de la antena proporcionada y
conéctela firmemente al vehículo. De lo
contrario, el vehículo no funcionará
(ver imagen 5).
2. Pulse el interruptor de ENCENDIDO/
APAGADO para colocarlo en la posición de
"ENCENDIDO" del vehículo (ver imagen 6).
(IMAGEN 5)
(IMAGEN 6)
ANTENA
TUBO
CABLE
MARCHA ADELANTE
3. Pulse ambos mandos de control de la
conducción hacia delante para la marcha
adelante (ver imagen 7).
MARCHA ATRÁS
4. Pulse ambos mandos de control de la
conducción hacia atrás para la marcha atrás
(ver imagen 8).
No mezcle pilas nuevas con pilas usadas.
No mezcle pilas alcalinas, estándar
(carbono-zinc) ni recargables.
CUMPLE CON LA NORMATIVA
DE SEGURIDAD ASTM F963.
FAST LANE is a mark of Geoffrey, LLC,
a subsidiary of Toys“R”Us, Inc.
© 2010 Geoffrey, LLC
Made in China
Distributed in the United States by
Toys“R”Us, Inc., Wayne, NJ 07470
Imported in Australia by Toys"R"Us
(Australia) Pty Ltd.
Regents Park NSW 2143
www.toysrus.com
ITEM #99937 O.I. NO. 4757
Forma parte de la marca de familia “R”US .
INCLUDED
ATENCIÓN A LOS PADRES:
SE RECOMIENDA EXAMINAR ESTE JUGUETE Y
TODOS LOS ACCESORIOS REGULARMENTE CON
EL FIN DE EVITAR POSIBLES PELIGROS. ASIMISMO,
SE RECOMIENDA SUSTITUIR O REPARAR LAS
PIEZAS QUE PUEDAN ENTRAÑAR ALGÚN
TIPO DE PELIGRO
CONSEJOS PARA OBTENER UN
MEJOR RENDIMIENTO DEL VEHÍCULO
• No conduzcas sobre hierba, arena o moqueta.
• Evita el contacto con el agua.
• Asegúrate de dejar descansar el vehículo al menos
30 minutos después de cada 15 minutos de
funcionamiento.
• Asegúrate de que el interruptor ON/OFF del vehículo
está en posición “OFF” cuando no esté en uso.
• No dobles la antena.
• Las interferencias eléctricas, de los disyuntores, los
teléfonos móviles, el aire acondicionado, los
ascensores y las vigas de acero de los edificios
pueden afectar al funcionamiento del vehículo.
• No dejes el vehículo o el transmisor cerca de una
fuente de calor o bajo la luz directa del sol durante un
largo periodo de tiempo.
• Retira las baterías del vehículo y el transmisor cuando
no se estén utilizando.
INSTRUCCIONES DE
FUNCIONAMIENTO:
CUIDADO DE LA BATERÍA / PRECAUCIONES:
1. Si los conectores de la batería o el cargador están
mojados, sécalos bien antes de proceder a cargar la
batería.
2. Desenchufa la batería si no vas a utilizarla durante
varios días.
3. No cargues la batería si está caliente, húmeda o
muestra signos de fuga o corrosión.
4. La betería puede explotar al entrar en contacto con
una llama.
5. No desmontes la batería.
INSTALACIÓN DE LA BATERÍA:
LA BATERÍA RECARGABLE DE NI-MH NO ESTÁ
CARGADA. CÁRGALA DURANTE 4 HORAS ANTES
DE COMENZAR A UTILIZAR ESTE JUGUETE.
1. Enchufa el cargador de la batería a una toma de
corriente.
2. Conecta los cables de la batería y el cargador de
manera que queden firmemente acoplados.
(ver imagen 1)
3. Después de cargar la batería durante 4 horas, estará
caliente. Esto es normal cuando las baterías están
completamente cargadas. Si la velocidad del vehículo
disminuye de repente, deberás volver a cargar la
batería.
4. Para desconectar los cables, presiona la pinza y tira
hacia fuera. (ver imagen 1)
5. Tras el uso, la batería estará caliente. Antes de volver
a cargar la batería, espera al menos 20 minutos para
que se enfríe.
6. Si cargas la batería cuando aún está caliente se
reducirá considerablemente la vida útil de la batería.
www.toysrus.com
CAUTION-ELECTRIC TOY:
Not recommended for children under 6 years of age.
As with all electric products, precautions should be
observed during handling and use to prevent
electric shock.
CAUTION- SUPERVISION REQUIRED-ELECTRIC
TOY-UNPLUG WHEN NOT IN USE.
INPUT: 120VAC, 60HZ, 9.5W ONLY.,
OUTPUT: 12VDC, 0.2A
www.toysrus.com
PRECAUCIÓN- FUNCIONA CON ELECTRICIDAD:
No recomendado para niños menores de 6 años.
Al funcionar con electricidad, deben cumplirse los
consejos de seguridad durante la manipulación y
la utilización para evitar posibles descargas eléctricas.
PRECAUCIÓN-NECESARIA SUPERVISIÓN-
JUGUETE ELÉCTRICO-DESCONECTAR
CUANDO NO ESTÉ EN USO.
ENTRADA: 120VAC, 60HZ, 9.5W ONLY.,
SALIDA: 12VDC, 0.2A
Este dispositivo cumple con la Parte 15 de las reglas
FCC. El uso queda sujeto a las siguientes
condiciones:
(1) este dispositivo no debe causar interferencias
perjudiciales y
(2) debe aceptar cualquier interferencia recibida,
incluyendo las interferencias que puedan causar
operaciones no deseadas.
Precaución: Los cambios o modificaciones efectuados
en la unidad no aprobados por la parte responsable
pueden hacer que el usuario no pueda utilizar el equipo.
NOTA: Este equipo ha sido probado y cumple con los
límites para los dispositivos digitales de Clase B,
incluidos en la Parte 15 de las reglas de FCC.
Estos límites están diseñados para proporcionar
una protección razonable contra interferencias
perjudiciales producidas en una Este equipo genera,
usa y irradia energía de radio frecuencia y, si no se
instala y usa siguiendo las instrucciones, puede causar
interferencias perjudiciales a otros aparatos de radio
televisión.
No obstante, no se garantiza que ocurran interferencias
en una instalación particular. Si este equipo causa
interferencias que perjudican la recepción de radio o
televisión, detectables alencender los equipos, se
anima a los usuarios a tratar de corregir la interferencia
con una o más de las siguientes medidas:
• Reorientar o recolocar la antena receptora.
• Aumentar la separación entre el equipo y elreceptor.
• Conectar el equipo a un enchufe de un circuito distinto
del que está conectado.
• Consultar el vendedor o un técnico experto enradio
televisión para pedir ayuda.