Scientific Toys 3548-274P 26.96-27.28 MHz WIRELESS R/C TOY-TX User Manual OI 4774 1 10 BUGGY ai
Scientific Toys Ltd 26.96-27.28 MHz WIRELESS R/C TOY-TX OI 4774 1 10 BUGGY ai
Users Manual
INSTRUCTION MANUAL
ATTENTION PARENTS
It is recommended that this toy and all accessories be periodically
examined for potential hazards and that any potentially hazardous
parts be repaired or replaced.
PRINTED IN CHINA
O.I. NO.4774
ATENCION PARA LOS PADRES
Se recomienda que este juguete y accesorios sean examinados periodicamente
para evitar problemas o daños en piezas para que puedan ser reparados o
reemplazados.
IMPRESO EN CHINA
O.I. NO.4774
COMO JUGAR
COMIENZO DEL JUEGO
1. Coloque la antena pasando el cable
a través del tubo incluido y conectelo
en el coche firmemente. Sino el
vehículo no fundionará.
(Ver Diagrama #5)
COMO COLOCAR LAS PILAS EN EL MANDO DE CONTROL
1. Asegúrese que está apagado en posición "OFF". Desatornille la tapa del
compartimiento de las pilas de la parte inferior del mando. (Ver Diagrama #4)
2. Instale la batería de 9V haciendo coincidir los polos (+) y (–) como se indica en el
compartimiento de la batería. (Ver Diagrama #4)
3. Vuelva a colocar la tapa de la batería.
Nota: Retire las pilas después de usar el vehículo.
IMPORTANT:
Please note the vehicle uses a 9.6V Rechargeable Battery Pack and the
Battery Pack is charged by a Charger .
BATTERY LOADING
(The rechargeable battery pack is not charged, please charge it for 8 hours
prior to use)
1. Plug the Battery Charger.
2. Connect the cables leading from the Battery Pack and the Charger together
by snapping the jack and the socket tightly. (See Diagram #1a)
3. To disconnect cables, press down on the clip and pull apart. (See Diagram #1a)
4. You should charge the battery pack for 8 hours the first two times. Then
subsequent charges will only require 4 hours.
5. After charging for 4 hours, the battery will be warm. This condition is normal
for fully charged batteries.
6. If the speed of the car slows down suddenly, it is time to recharge.
7. After use, the battery pack will be hot! Wait at least 20 minutes until it cools
before recharging. Recharging a warm or hot battery pack will greatly shorten
the use life of the battery.
8. The toy must be used with the recommended transformer.
9. The transformer is not a toy.
IMPORTANTE:
Por favor tenga en cuenta que el vehículo necesita un pack de pilas recargable
de 9.6V y éste debe ser recargado solamente con un Cargador.
COMO RECARGAR LAS PILAS
(El pack de pilas recargables no está recargado, por favor recarguelo 8 horas
antes de su uso)
1. Enchufe el cargador de las pilas.
2. Conecte los cables del pack de pilas con el cargador mediante las clavijas
firmemente. (ver Diagrama #1a)
3. Para desconectar los cables, presione el clip y estire hacia fuera.
(ver Diagrama #1a)
4. Debes recargar el pack de pilas durante 8 horas las primeras dos veces.
Las siguientes veces solo hará falta recargar durante 4 horas.
5. Después de recargar durante 4 horas, el pack estará caliente. Esto es normal
en los packs recargados.
6. Si la velocidad del coche disminuye derrepente, será el momento de volver a
recargar las pilas.
7. Después de usar, el pack de pilas estará caliente! Espere al menos 20
minutos hasta que se enfrie antes de volver a recargarlo. Recargar un pack de
pilas caliente o templado puede disminuir considerablemente la vida del pack.
8. El juguete debe ser usado solamente con el transformador recomendado.
9. El transformador no es un juguete.
COLOCACION DE LAS PILAS
COMO COLOCAR LAS PILAS EN EL VEHÍCULO
1. Asegúrese que el interruptor “ON/OFF” está en la posición “OFF”.
(Ver Diagrama #2)
2. Desatornille y quite la tapa del compartimiento de las pilas. (Ver Diagrama #2)
3. Conectar la toma de la batería recargable de 9.6V a la toma del compartimiento
de batería, luego insertar la batería. (Ver Diagrama #3)
4. Reemplace la tapa del compartimiento de pilas y apretar el tornillo
firmemente para cerrar.
SIZE: 210 X 481MM PN#65-4774-000-0100
DIAGRAM #5
DIAGRAM #2 DIAGRAM #3
DIAGRAM #4
9V
Battery
Unscrew
to open
HOW TO PLAY
START TO PLAY
1. Thread the antenna by passing the cable through the antenna tube provided
and plug into the vehicle tightly. Otherwise, the vehicle will not work.
(See Diagram #5)
HOW TO INSTALL BATTERY IN TRANSMITTER
1. Make sure the unit is "OFF". Unscrew the battery compartment lid at the
bottom of the transmitter. (See Diagram #4)
2. Install 9V battery by matching the polarity marks (+ & –) as indicated in the
battery compartment. (See Diagram #4)
3. Replace the battery cover.
Note: Remove all batteries after you have finished using your vehicle.
BATTERY INSTALLATION
HOW TO INSTALL BATTERY IN VEHICLE
1. Make sure the “ON/OFF” switch at the underside of the vehicle is at the “OFF”
position. (See Diagram #2)
2. Unscrew to open battery cover.(See Diagram #2)
3. Plug the jack of the 9.6V rechargeable battery pack into the socket of the
battery compartment, and put the battery pack inside properly. (See Diagram #3)
4. Replace the battery cover and tighten the screw to secure the
battery cover.
ON/OFF
switch
Unscrew
to open 9.6V
rechargeable
Battery pack
Press here
when
opening
CAUTION- ELECTRIC TOY
NOT RECOMMENDED FOR CHILDREN UNDER 6 YEARS OF AGE. AS WITH ALL
ELECTRIC PRODUCTS, PRECAUTIONS
SHOULD BE OBSERVED DURING HANDLING
AND USE TO PREVENT ELECTRIC SHOCK. INPUT: 120VAC, 60HZ 9.5W ONLY. OUTPUT:
12VDC, 0.2A
NO RECOMENDADO PARA NIÑOS MENORES DE 6 AÑOS. AL FUNCIONAR
CON ELECTRICIDAD, DEBEN CUMPLIRSE LOS CONSEJOS DE SEGURIDAD
DURANTE LA MANIPULACIÓN Y LA UTILIZACIÓN PARA EVITAR POSIBLES
DESCARGAS ELÉCTRICAS. ENTRADA: 120 V CA, 60 HZ 9,5 W SOLAMENTE.
SALIDA: 12 V CC, 0,2 A
PRECAUCIÓN: FUNCIONA CON ELECTRICIDAD
(DIAGRAM #1)
(DIAGRAM #1a)
Press here
when opening
Battery
Charger
9.6V battery pack
Battery
Cover
Antenna
tube
Cable
(DIAGRAMA #1)
(
DIAGRAMA
#1a)
Pulse aqui
para abrir
Cargador
de pilas
Paquete de
pilas de 9.6V.
DIAGRAMA
#2
DIAGRAMA
#3
Interruptor
“ON/ OFF”
Desatornillar
Para abrir
Desatornillar
Para abrir
Batería
recargable
de 9.6V
Pulse aqui
para abrir
Compartimento
de las pilas
DIAGRAMA #4
Pila de 9V
DIAGRAMA #5
Cable
Tubo
BATTERY CAUTIONS
1. Do not charge non-rechargeable batteries.
2. Remove rechargeable batteries from the toy before recharging.
3. Rechargeable batteries are to be recharged under adult supervision.
4. Different types of batteries, new and used batteries are not to be mixed.
5. Only batteries of the same or equivalent type as recommended are to be used.
6. Batteries are to be inserted with the correct polarity.
7. Exhausted batteries are to be removed from the toy.
8. The supply terminals are not to be short-circuited.
9. The transformer is not a toy.
10. The toy must be used with the recommended transformer.
11. This toy is not intended for children under 3 years old.
12. Do not charge battery pack that is hot, wet or shows leakage or corrosion.
13. The battery pack may explode if disposed of in fire.
14. Do not disassemble the battery pack.
15. If the battery pack and connectors are wet, thoroughly dry before charging.
16. Overcharging can damage the battery pack. Charge according to
recommended time.
17. This toy and all accessories must be periodically examined for potential
hazards, and that potentially hazardous parts must be repaired and replaced
before use.
WARNING: CHOKING HAZARD - SMALL PARTS, NOT FOR CHILDREN
UNDER 3 YEARS.
FCC Information
This equipment has been tested and found to comply with the limits for a Class B
digital device, pursuant to Part 15 of the FCC Rules. These limits are designed to
provide reasonable protection against harmful interference in a residential installation.
This equipment generates, uses and can radiate radio frequency energy and, if not
installed and used in accordance with the instructions, may cause harmful
interference to radio communications. However, there is no guarantee that
interference will not occur in a particular installation. If this equipment does cause
harmful interference to radio or television reception, which can be determined by
turning the equipment off and on, the user is encouraged to try to correct the
interference by one or more of the following measures:
· Reorient or relocate the receiving antenna.
· Increase the separation between the equipment and receiver.
· Connect the equipment into an outlet on a circuit different from that to which the
receiver is connected.
Consult your local retailer store or an experienced radio/TV technician for help.
If you cannot eliminate the interference, the FCC requires that you stop using your
product. Changes or modifications not expressly approved by the retailer may
cause interference and void the user’s authority to operate the equipment.
FCC Note: The antenna installed on the equipment is a unique one. Installation of
an unauthorized antenna on this equipment could void the user’s authority to
operate the equipment.
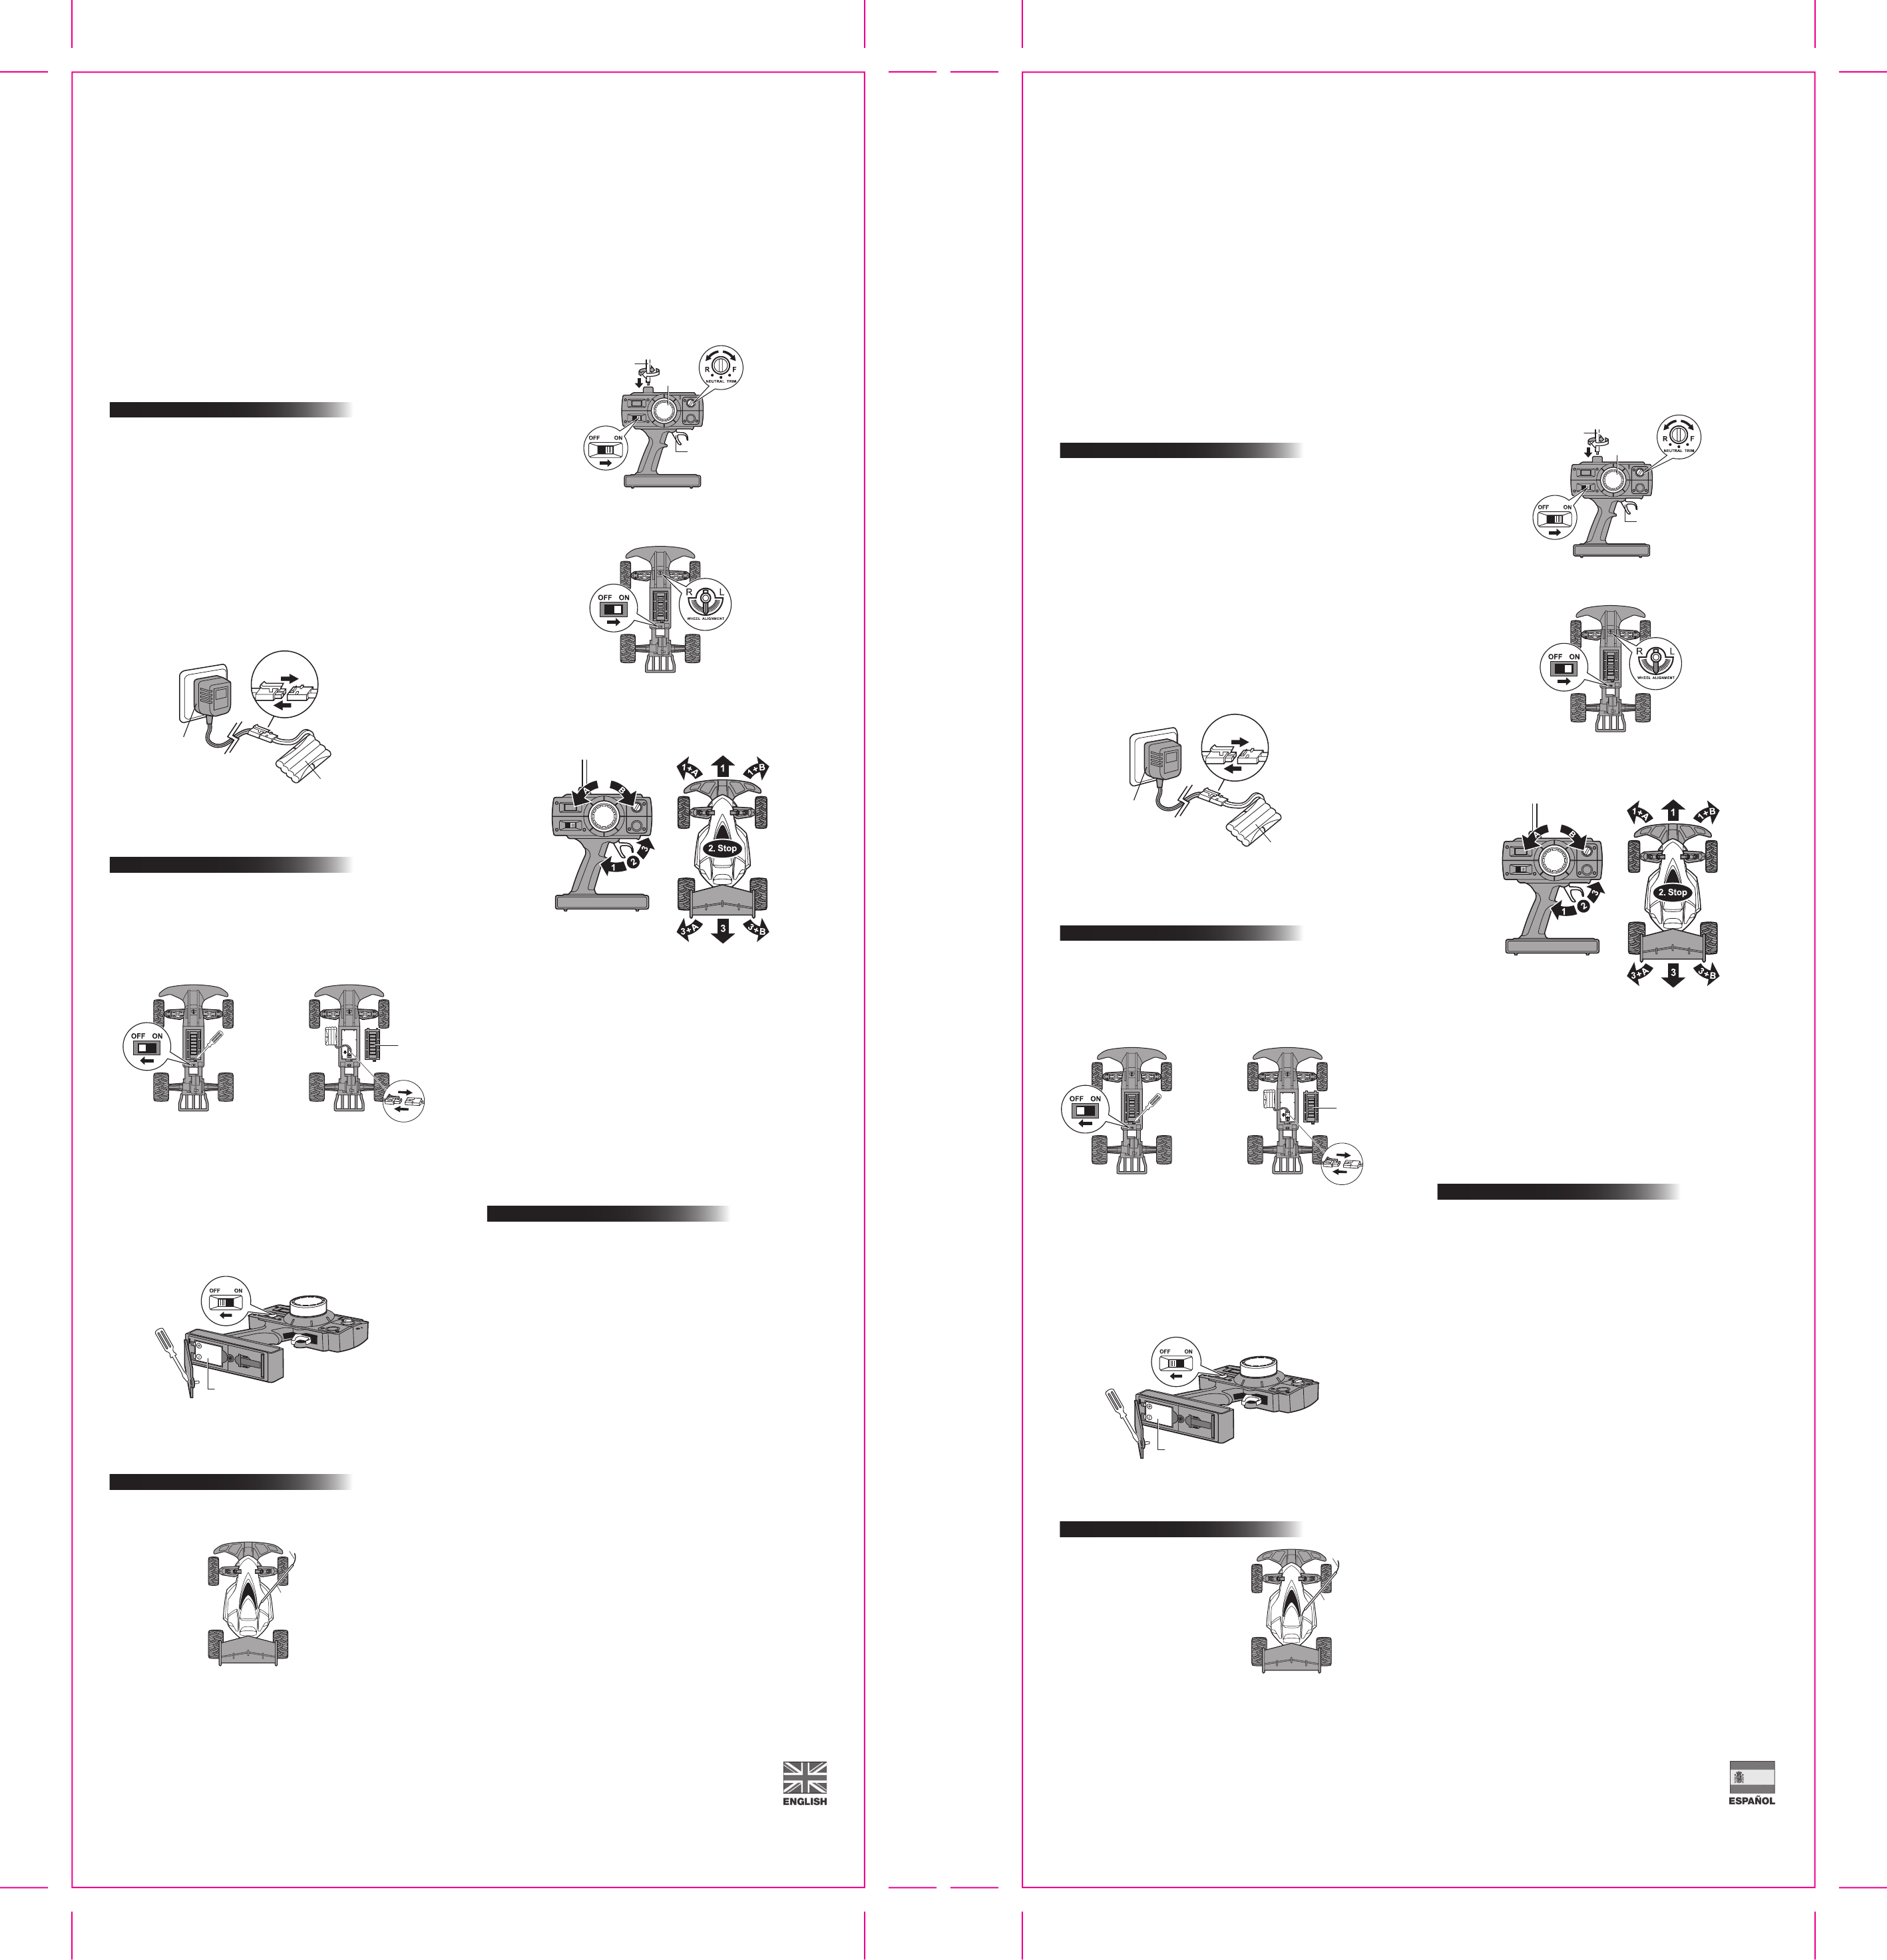
3. Slide the ON/OFF switch to the "ON" position of the vehicle. (See Diagram #7)
DIAGRAM #8
DIAGRAM #7
2. Screw the antenna onto the top of the transmitter and extend it to full length.
(See Diagram #6)
DIAGRAM #6
4. Operate the vehicle with the transmitter. (See Diagram #8)
5. After playing, slide the ON/OFF switches of the vehicle and the transmitter
to the "OFF" position.
Steering
control
wheel
Telescoping
antenna
Speed control
trigger
PILAS PRECAUCIONES
1. Las pilas no-recargables no deben ser recargadas.
2. Las pilas recargables deben ser retiradas del juguete antes de ser recargadas.
3. Las pilas recargables solo pueden recargarse bajo la supervisión de un adulto.
4. Los distintos tipos de pilas o pilas nuevas con usadas no deben ser mezcladas.
5. Solo pilas del mismo o tipo equivalente son recomendadas.
6. Las pilas deben ser colocadas correctamente según las polaridades.
7. Las pilas gastadas deben ser retiradas del juguete.
8. Los terminales de las pilas no deben ser cortocircuitados.
9. El transformador NO es un juguete.
10. El juguete debe ser utilizado con el transformador recomendado.
11. Este juguete no es adecuado para niños menores de 3 años.
12. No recargue el pack si está caliente, húmedo y muestra pérdida de líquido o
corrosión.
13. El pack recargable puede explotar si se tira al fuego.
14. No desmonte el pack recargable.
15. Si el pack y los conectores están húmedos, séquelos cuidadosamente
antes de recargar.
16. Sobre cargar puede dañar el pack de pilas. Cargar el tiempo recomendado.
17. Este juguete y todos sus accesorios deben ser examinados periódicamente
para evitar posibles peligros y las piezas reparadas o sustituidas en caso
necesario antes de su uso.
¡ADVERTENCIA!
PELIGRO DE ASFIXIA - CONTIENE COMPONENTES PEQUEÑOS.
NO PARA NIÑOS MENORES DE 3 AÑOS.
Información de la FCC
Este equipo ha sido probado y se ha determinado el cumplimiento del mismo con
respecto a los límites correspondientes a los dispositivos digitales de Clase B, de
conformidad con la Parte 15 de las Reglas de la FCC. Estos límites están
establecidos para proporcionar una protección razonable contra interferencias
dañinas en las residencias. Este equipo genera, utiliza y puede emitir energía de
radiofrecuencia, por lo cual, si no se instala y se emplea de conformidad con las
instrucciones, puede causar interferencia dañina en las comunicaciones de radio.
No obstante, no hay garantía de que tal interferencia no vaya a ocurrir en alguna
instalación en particular. Si este equipo causa interferencia dañina en la recepción
de las ondas de radio o de televisión, lo cual puede determinarse apagando y
encendiendo el equipo, se exhorta al usuario a tratar de corregir la interferencia
mediante una o más de las siguientes medidas:
• Cambie la orientación o ubicación de la antena receptora.
• Aumente la separación entre el equipo y el receptor.
• Conecte el equipo en una toma de corriente de un circuito diferente al cual está
conectado el receptor.
Si necesita ayuda, consulte al personal de cualquier tienda al detal de la localidad
o a un técnico de radio y televisión.
Si no puede eliminar la interferencia, la FCC le requiere dejar de utilizar el producto.
Todo cambio o modificación no aprobado expresamente por al detal puede causar
interferencia y anular la autorización otorgada al usuario para utilizar este equipo.
NOTA DE FCC:
LA ANTENA QUE SE SUMINISTRA ES EXCLUSIVA. EN CASO DE INSTALAR UNA
ANTENA NO AUTORIZADA EN ESTE EQUIPO, PODRÍA QUEDAR ANULADA LA
AUTORIDAD DEL USUARIO PARA OPERAR EL MISMO.
2. Enrosque la antena en la parte superior del mando de control y extiéndala a
su mayor longitud.(Ver Diagrama #6)
DIAGRAMA #6
DIAGRAMA #8
3. Coloque el interruptor ON/OFF del vehículo en la posición “ON”. (Ver Diagrama #7)
DIAGRAMA #7
4. Dirige el vehículo con el mando de control (Ver Diagrama #8).
5. Después de jugar, apague el vehículo y el mando de control colocando los
interruptores en posición "OFF".
Volante
control de
direccion
Telescoping
antenna
Gatillo control
de velocidad
AJUSTE DE LA DIRECCIÓN DE LAS RUEDAS DELANTERAS
6. Si el vehículo no corre en dirección recta hacia delante, ajuste la palanca para
un alineamiento satisfactorio en la parte inferior del vehículo. (Ver Diagrama #7)
7. Si el vehículo tiende a ir hacia la izquierda, gire la palanca de alineamiento de
dirección hacia la posición “R”.
8. Si el vehículo tiende a ir hacia la derecha, gire la palanca de alineamiento de
dirección hacia la posición “L”.
PALANCA DE AJUSTE DE ALINEACION
9. Si el vehículo corre hacia adelante o hacia atrás mientras el gatillo de
CONTROL DE VELOCIDAD está en posición de "STOP", ajuste el botón de
ALINEACION NEUTRAL para una correcta alineación del mando de control.
(Ver Diagrama #6). Si el vehículo corre en reversa, gire el boton "TRIM neutral"
hacia la posicion F (adelante) en sentido contrario a las agujas del reloj. Si
el vehículo tiende a correr hacia adelante, gire a la posicion R (reversa)
para corregir.
FRONT WHEELS STEERING ADJUSTMENT
6. If the vehicle does not run straight forward, adjust the Steering Alignment Lever
on the underside of the vehicle. (See Diagram #7)
7. If the vehicle runs towards left, turn Steering Alignment Lever towards "R".
8. If the vehicle runs towards right, turn Steering Alignment Lever towards "L".
TRIM LEVER ADJUSTMENT
9. If the vehicle runs forward or backward while the SPEED CONTROL
trigger is at the "STOP" position, adjust the NEUTRAL TRIM button for
satisfactory alignment on the transmitter. (See Diagram #6) If the vehicle
runs in reverse, rotate NEUTRAL TRIM auti-clockwise to F (forward).
If the vehicle tends to run forwards, rotate to R (reverse) to correct.