Scientific Toys 4817-24RR 2.4GHz Wireless Remote Control Device - TX Portion User Manual OI 6120 97157 MANUAL ai
Scientific Toys Ltd 2.4GHz Wireless Remote Control Device - TX Portion OI 6120 97157 MANUAL ai
Users manual
OUTPUT: 12V DC, 500mA
TOYS“R”US, INC., WAYNE, NJ 07470
TOYS“R”US (CANADA) LTD. (LTÉE),
2777 LANGSTAFF ROAD, CONCORD, ON L4K 4M5
DISTRIBUTED IN AUSTRALIA BY (DISTRIBUÉE EN
AUSTRALIE PAR/
DISTRIBUIDO EN AUSTRALIA POR) TOYS“R”US
(AUSTRALIA (AUSTRALIE)) PTY LTD.(LTÉE), REGENTS
PARK NSW 2143
IMPORTED BY (IMPORTÉ PAR/IMPORTADO EM)
O.I. NO. 6120 AD12504
CAUTION-ELECTRIC TOY:
Not recommended for children under 8 years of age.
As with all electric products, precautions should be
observed during handling and use to prevent
electric shock.
CAUTION- SUPERVISION REQUIRED-ELECTRIC
TOY-UNPLUG WHEN NOT IN USE.
PERFORMANCE TIPS FOR VEHICLE
• Do not drive car on grass, sand or carpet.
• Do not drive car through water.
• Be sure to rest your vehicle for at least 30 minutes after
every 15 minutes of operation.
• Make sure ON/OFF switch on your vehicle is in the “OFF”
position when it is not in use.
• Do not bend the antenna.
• Electrical, CB interference, mobile phones, air conditioning,
elevators and steel girders in buildings will affect the
operation of your vehicle.
• Do not leave the vehicle or transmitter near sources of heat
or in direct sunlight for long periods of time.
• Remove the batteries from the vehicle and transmitter when
they are not in use.
TRY ME UNIT:
Try Me button box is for demonstration
purpose only. Dispose of this unit by
detaching the wires connecting to the
car before playing.
TRY ME
UNIT
OPERATING INSTRUCTIONS:
BATTERY PACK CARE / CAUTIONS:
1. If battery pack and/or connectors are wet, thoroughly
dry before charging.
2. Unplug the battery pack if it is not going to be used
for several days.
3. Do not charge battery pack that is hot, wet or shows
signs of leakage or corrosion.
4. Do not expose to fire, as explosion may result.
5. Do not disassemble the battery pack.
6. Rechargeable battery pack is only to be charged
by adults.
BATTERY INSTALLATION:
IMPORTANT: FOR MAXIMUM PERFORMANCE,
YOU MUST FULLY CHARGE BATTERY PACK
BEFORE FIRST TIME USE.
THE RECHARGEABLE NI-MH BATTERY PACK IS
NOT CHARGED. PLEASE CHARGE IT FOR 3
HOURS PRIOR TO USE.
1. Plug the wall pack battery charger into wall outlet.
(See Diagram 1)
2. Click the battery pack into the charger. Make certain
the battery pack is secure in charger.
3. To disconnect, push the button of the charger
(See Diagram 1) and simultaneously slide battery
pack out.
4. Allow about 3 hours full-charge. The red light indicator
keeps light up continuously when charging is in
process.
5. The charging is complete when the red light keeps
flashing. Then unplug the charger and pull apart
the battery connectors.
6. After charging for about 3 hours, the battery will be
warm. This condition is normal for fully charged
batteries.
7. If the speed of the car slows down suddenly, it is time
to recharge.
8. After use, the battery pack will be hot! Wait at least
20 minutes until it cools before recharging.
Recharging a warm or hot battery pack will greatly
shorten the battery life.
STORMSTORM
CRUSHER CRUSHER
STORMSTORM
CRUSHER CRUSHER
STORM
CRUSHER
STORM
CRUSHER
TM
This device complies with Part 15 of the FCC Rules.
Operation is subject to the following two conditions:
(1) this device may not cause harmful interference, and
(2) this device must accept any interference received,
including interference that may cause undesired operation.
Warning: Changes or modifications to this unit not expressly
approved by the party responsible for compliance could void
the user's authority to operate the equipment.
NOTE: This equipment has been tested and found to comply
with the limits for a Class B digital device, pursuant to
Part 15 of the FCC Rules. These limits are designed to
provide reasonable protection against harmful interference
in a residential installation. This equipment generates, uses
and can radiate radio frequency energy and, if not installed
and used in accordance with the instructions, may cause
harmful interference to radio communications.
However, there is no guarantee that interference will not occur
in a particular installation. If this equipment does cause harmful
interference to radio or television reception, which can be
determined by turning the equipment off and on, the user is
encouraged to try to correct the interference by one or more
of the following measures:
• Reorient or relocate the receiving antenna.
• Increase the separation between the equipment and receiver.
• Connect the equipment into an outlet on a circuit different from
that to which the receiver is connected.
• Consult the dealer or an experienced radio/TV technician
for help.
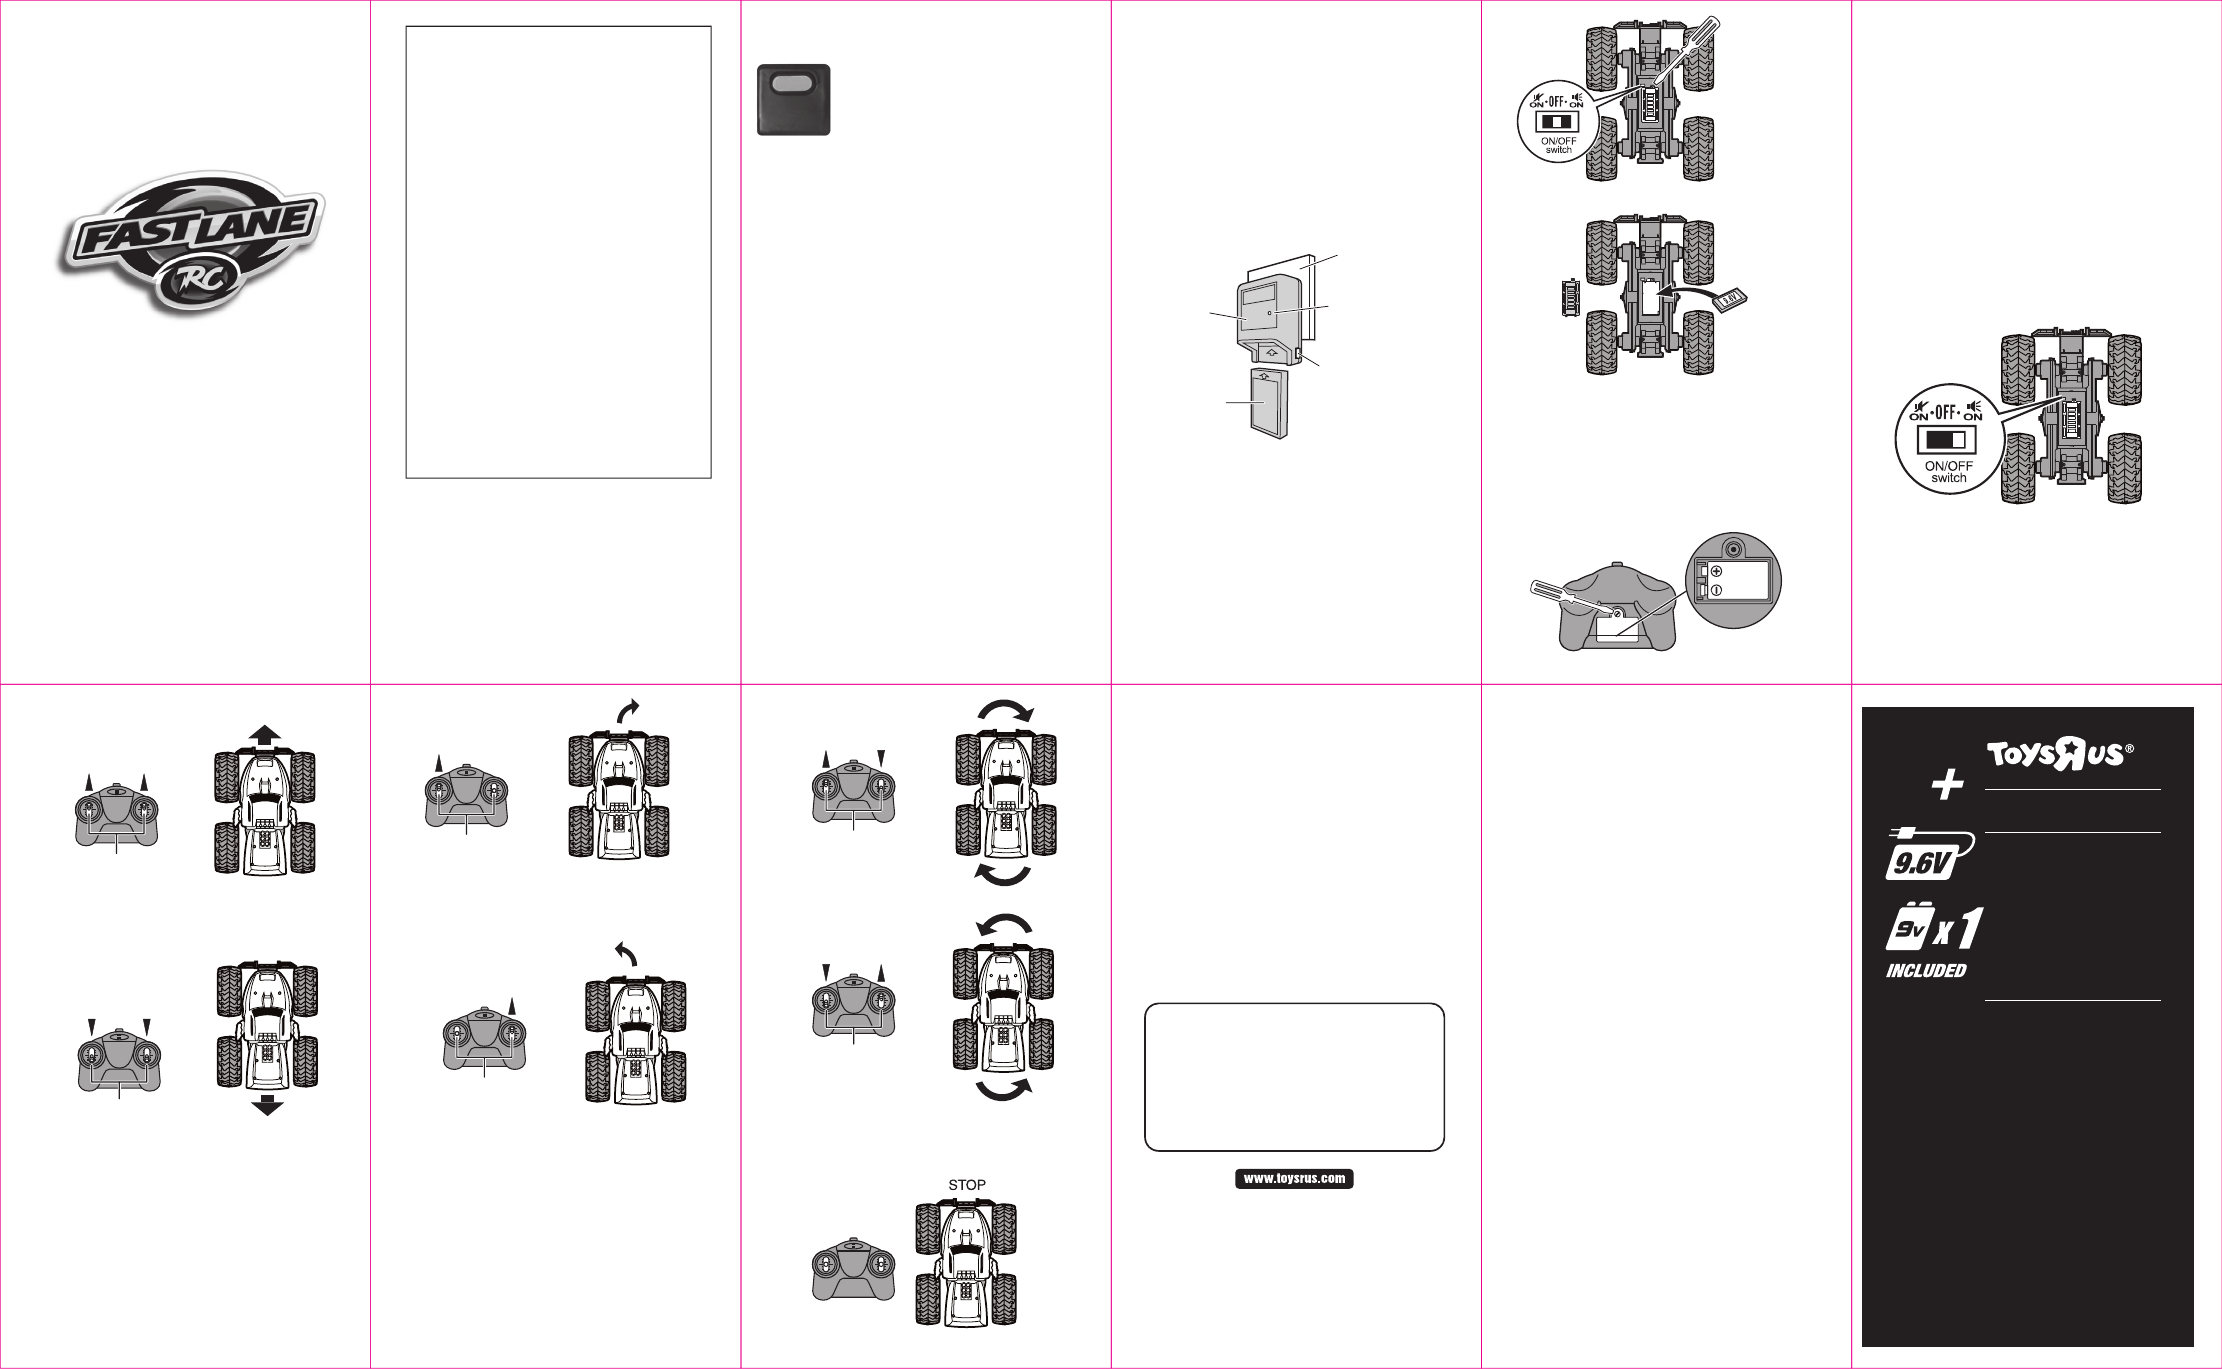
FORWARD RUNNING
6. Push both the Driving Control Sticks forward
for forward running. (See Diagram 6)
REVERSE RUNNING
7. Pull both the Driving Control Sticks backward
for reverse running. (See Diagram 7)
TRANSMITTER:
1. Unscrew to open the battery cover at the
back and install a 9V battery by matching
the + and – signs as indicated in the
battery compartment. (See Diagram 4)
2. Replace the battery cover and tighten the
screw to secure the battery cover.
(DIAGRAM 2)
(DIAGRAM 3)
(DIAGRAM 4)
(DIAGRAM 5)
(DIAGRAM 1)
9.6V Ni-MH
RECHARGEABLE
BATTERY PACK
UNSCREW
OPEN
BATTERY
CHARGER
9.6V Ni-MH
BATTERY
PACK
WALL OUTLET
PRESS BUTTON ON
SIDE OF CHARGER
TO RELEASE
BATTERY PACK
LED INDICATOR
HOW TO PLAY
START TO PLAY
PAIRING TRANSMITTER WITH VEHICLE
1. Turn ON the vehicle (See Diagram 5).
2. Install a 9V battery in the transmitter, the
pairing LED light on the transmitter will flash
3. If pairing is successful, the pairing LED light
will turn OFF.
4. You must pair the transmitter with the
vehicle within 45 seconds, after 45 seconds
you must push the control on the transmitter
to pair again.
5. You must repeat pairing again whenever
replacing the transmitter’s battery.
VEHICLE:
1. Make sure the “ON/OFF” switch at the
underside of the vehicle is at the “OFF”
position. (See Diagram 2)
2. Unscrew to open the battery cover.
(See Diagram 2)
3. Insert the 9.6V Ni-MH battery pack into
battery compartment. (See Diagram 3)
4. Replace the battery cover and tighten the
screw to secure the battery cover.
STOP OPERATION
12. Release both Driving Control Sticks, the
vehicle will Stop. (See Diagram 12)
STEERING OPERATION
8. Push only the Left Driving Control Stick
forward to turn Right. (See Diagram 8)
9. Push only the Right Driving Control Stick
forward to turn Left. (See Diagram 9)
360 DEGREE SPINS
10.Push the Left Driving Control Stick forward
while pulling the Right Driving Control Stick
backward at the same time. (See Diagram 10)
11. Push the Right Driving Control Stick forward
while pulling the Left Driving Control Stick
backward at the same time. (See Diagram 11)
IMPORTANT
If you experience any problems or issues with this item,
do not take it back to the store where you purchased.
Please email service@scientific.com.hk and we will be
happy to assist you in resolving any issues you may have.
We thank you for your purchase.
(DIAGRAM 10)
(DIAGRAM 11)
(DIAGRAM 8)
(DIAGRAM 9)
(DIAGRAM 6)
(DIAGRAM 7)
(DIAGRAM 12)
ATTENTION PARENTS:
IT IS RECOMMENDED THAT THIS TOY AND
ALL ACCESSORIES BE PERIODICALLY
EXAMINED FOR POTENTIAL HAZARDS AND
THAT ANY POTENTIALLY HAZARDOUS PARTS
BE REPAIRED OR REPLACED.
CAUTION-ELECTRIC TOY:
Not recommended for children under 8 years of
age. As with all electric products, precautions
should be observed during handling and use to
prevent electric shock.
CAUTION-SUPERVISION
REQUIRED-ELECTRIC TOY-
UNPLUG WHEN NOT IN USE.
INPUT: 120V AC, 60HZ, 300mA
OUTPUT: 12V DC, 500mA
DRIVING CONTROL
STICK
DRIVING CONTROL
STICK
FORWARD
RIGHT
LEFT
FORWARDBACKWARD
BACKWARD
RIGHT
LEFT
FORWARD
FORWARD
DRIVING CONTROL
STICK
DRIVING CONTROL
STICK
FORWARD
FORWARD FORWARD
BACKWARD BACKWARD
REVERSE
DRIVING CONTROL
STICK
DRIVING CONTROL
STICK
INPUT: 120V AC, 60Hz, 300mA
FAST LANE IS A MARK OF (EST UNE MARQUE DE/
ES UNA MARCA DE) GEOFFREY, LLC, A SUBSIDIARY OF
(UNE FILIALE DE/UNA SUBSIDIARIA DE) TOYS“R”US, INC.
© 2017 GEOFFREY, LLC
MADE IN CHINA (FABRIQUÉE EN CHINE/FABRICADO EN
CHINA)
AUX ÉTATS-UNIS PAR/DISTRIBUIDO EN LOS ESTADOS
UNIDOS POR)
DISTRIBUTED IN THE UNITED STATES BY (DISTRIBUÉE
www.toysrus.com www.toysrus.ca
CONFORMS TO THE SAFETY
REQUIREMENTS OF ASTM F963.
Contents and colors may vary.
Batteries are demonstration purposes only.
They should be replaced upon purchase for
optimal performance.
Do not mix old and new batteries.
Do not mix alkaline, standard (carbon-zinc),
or rechargeable batteries.
8