Scientific Toys 4871-24GR R/C Vehicle/Car User Manual OI 5969 BUGGY ai
Scientific Toys Ltd R/C Vehicle/Car OI 5969 BUGGY ai
User Manual
© 2016 SCIENTIFIC TOYS LTD. 1108, TOWER B,
14 SCIENCE MUSEUM ROAD, TSIMSHATSUI, HONG KONG.
PRINTED IN CHINA
O.I. NO.5969
INSTRUCTION MANUAL
ATTENTION PARENTS
It is recommended that this toy and all accessories be periodically
examined for potential hazards and that any potentially hazardous
parts be repaired or replaced.
IMPORTANT:
Please note the vehicle uses a 9.6V Rechargeable Battery Pack and
the Battery Pack is charged by a Charger .
BATTERY LOADING
(The rechargeable battery pack is not charged, please charge it for
8 hours prior to use)
1. Plug the wall pack battery charger into wall outlet. (See Diagram 1)
2. Click the battery pack into the charger. Make certain the battery
pack is secure in charger.
3. To disconnect, push the button of the charger (See Diagram 1) and
simultaneously slide battery pack out.
4. You should charge the battery pack for 8 hours the first two times.
Then subsequent charges will only require 4 hours.
5. After charging for 4 hours, the battery will be warm. This condition is
normal for fully charged batteries.
6. If the speed of the car slows down suddenly, it is time to recharge.
7. After use, the battery pack will be hot! Wait at least 20 minutes until
it cools before recharging. Recharging a warm or hot battery pack
will greatly shorten the battery life.
8. The toy must be used with the recommended transformer.
9. The transformer is not a toy.
SIZE: 210 X 297MM PN#65-5969-000-0100
DIAGRAM #1
Battery
Charger
9.6V battery pack
Press button on
side of charger
To release the
battery pack
Wall outlet
DIAGRAM #2
DIAGRAM #3
BATTERY INSTALLATION
HOW TO INSTALL BATTERY IN VEHICLE
1. Make sure the “ON/OFF” switch at the underside of the vehicle is at
the “OFF” position. (See Diagram #2)
2. Unscrew to open battery cover.(See Diagram #2)
3. Place the 9.6V battery pack inside securely and replace the battery
cover. (See Diagram #3)
4. Replace the battery cover and tighten the screw to secure the
battery cover.
ON/OFF
switch
Unscrew
to open
9.6V
rechargeable
Battery pack
Battery
Cover
BATTERY CAUTIONS
1. Do not charge non-rechargeable batteries.
2. Remove rechargeable batteries from the toy before recharging.
3. Rechargeable batteries are to be recharged under adult supervision.
4. Different types of batteries, new and used batteries are not to be
mixed.
5. Only batteries of the same or equivalent type as recommended are
to be used.
6. Batteries are to be inserted with the correct polarity.
7. Exhausted batteries are to be removed from the toy.
8. The supply terminals are not to be short-circuited.
9. The transformer is not a toy.
10. The toy must be used with the recommended transformer.
11. This toy is not intended for children under 3 years old.
12. Do not charge battery pack that is hot, wet or shows leakage or
corrosion.
13. The battery pack may explode if disposed of in fire.
14. Do not disassemble the battery pack.
15. If the battery pack and connectors are wet, thoroughly dry before
charging.
16. Overcharging can damage the battery pack. Charge according to
recommended time.
17. This toy and all accessories must be periodically examined for
potential hazards, and that potentially hazardous parts must be
repaired and replaced before use.
WARNING: CHOKING HAZARD - SMALL PARTS, NOT FOR
CHILDREN UNDER 3 YEARS.
FCC INFORMATION
This equipment has been tested and found to comply with the limits for
a Class B digital device, pursuant to Part 15 of the FCC Rules. These
limits are designed to provide reasonable protection against harmful
interference in a residential installation. This equipment generates,
uses, and can radiate radio frequency energy and, if not installed and
used in accordance with the instructions, may cause harmful
interference to radio communications. However, there is no guarantee
that interference will not occur in a particular installation. If this
equipment does cause harmful interference to radio or television
reception, which can be determined by turning the equipment off and
on, the user is encouraged to try to correct the interference by one or
more of the following measures:
• Reorient or relocate the receiving antenna.
• Increase the separation between the equipment and receiver.
• Connect the equipment into an outlet on a circuit different from that to
which the receiver is connected.
• Consult your local RadioShack store or an experienced radio/TV
technician for help.
If you cannot eliminate the interference, the FCC requires that you stop
using your equipment. Changes or modifications not expressly approved
by the party responsible for compliance could void the user’s authority
to operate the equipment. This device complies with Part 15 of the
FCC rules. Operation is subject to the following two conditions: (1) this
device may not cause harmful interference, and (2) this device must
accept any interference received, including interference that may cause
undesired operation.
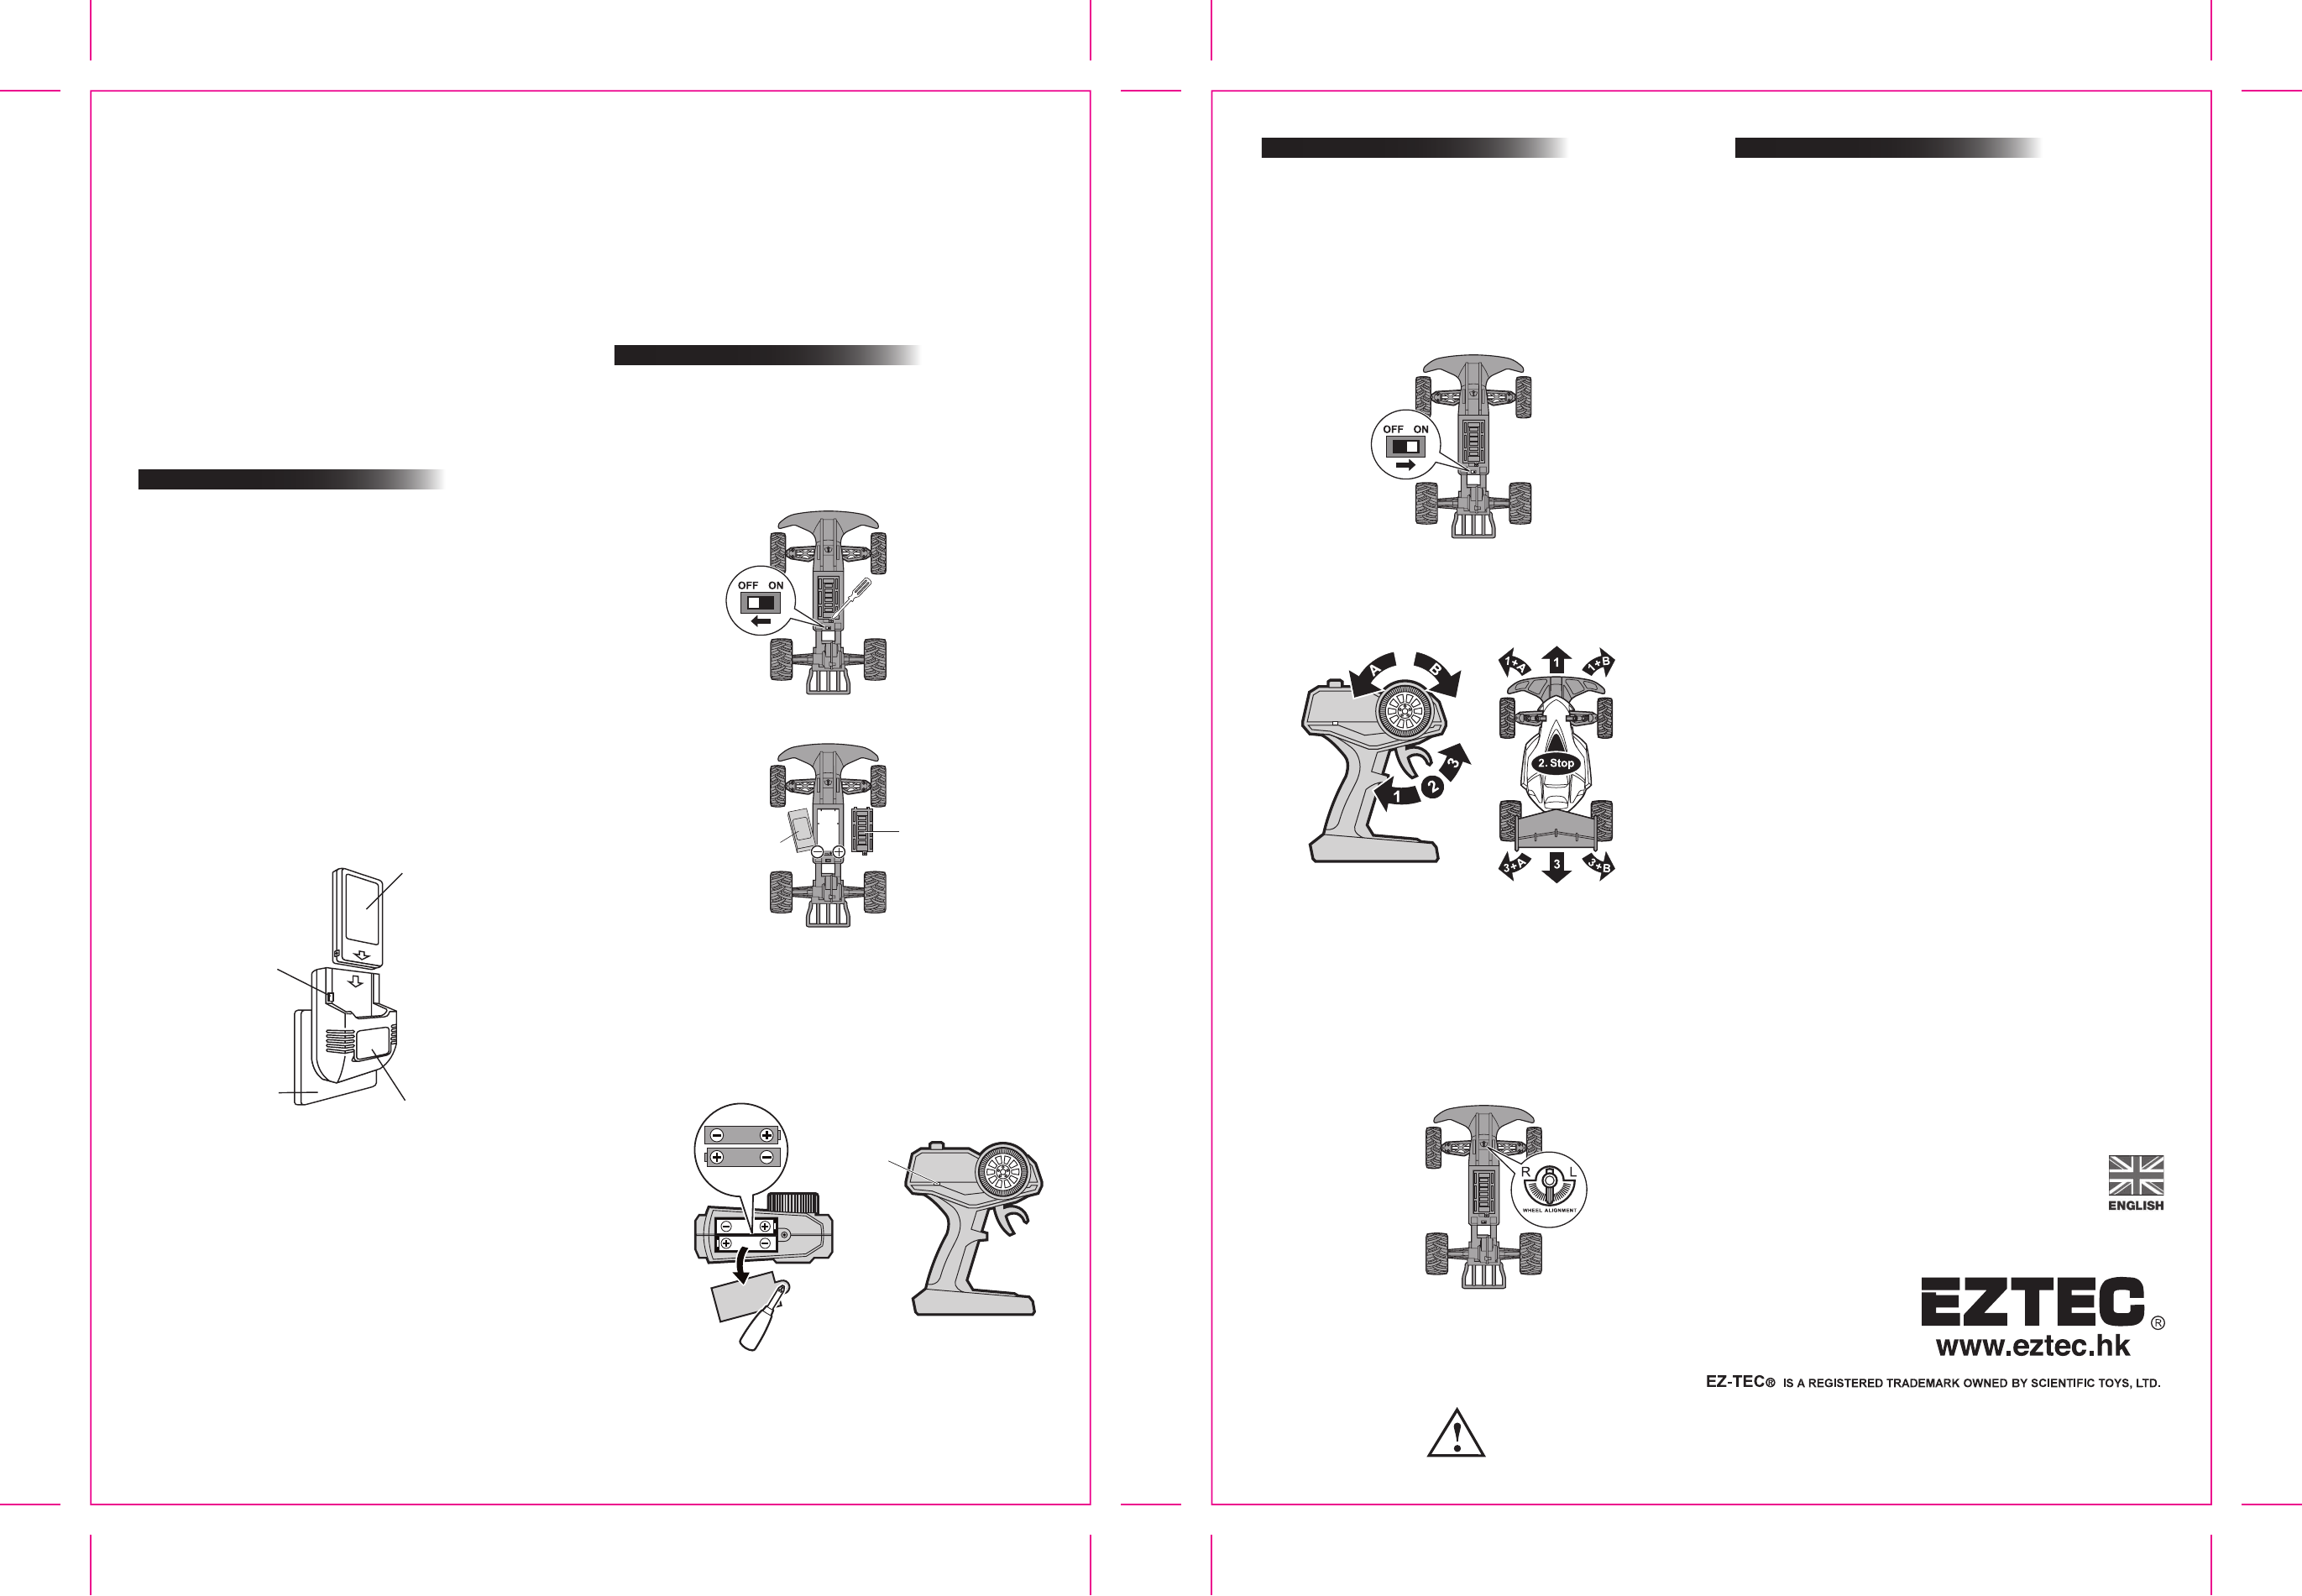
DIAGRAM #6
6. Operate the vehicle with the transmitter. (See Diagram #6)
7. After playing, slide the ON/OFF switch to the "OFF" position of
the vehicle.
HOW TO PLAY
START TO PLAY
PAIRING TRANSMITTER WITH VEHICLE
1. Turn ON the vehicle (See diagram #5).
2. Install 2 x AA battery in the transmitter, the pairing LED light on the
transmitter will flash (See diagram #4).
3. If pairing success, the pairing LED light will turn OFF
4. You must pairing the transmitter with the vehicle within 45 seconds,
after 45 seconds you must push the control on the transmitter to
pair again.
5. You must repeat pairing again when the transmitter needs to replace
new batteries.
DIAGRAM #5
ON
HOW TO INSTALL BATTERY IN TRANSMITTER
1. Unscrew to open the battery lid. Insert a new 2 x AA batteries.
(See diagram #4).
2. Replace battery cover.
Note: Remove battery after you have finished using your vehicle.
DIAGRAM #4
Unscrew to open
the battery cover
2 x AA
batteries LED
FRONT WHEELS STEERING ADJUSTMENT
8. If the vehicle does not run straight forward, adjust the Steering
Alignment Lever on the underside of the vehicle.
(See Diagram #7)
9. If the vehicle runs towards left, turn Steering Alignment Lever
towards "R".
10. If the vehicle runs towards right, turn Steering Alignment Lever
towards "L".
DIAGRAM #7
CAUTION-ELECTRIC TOY:
Not recommended for children under 6 years of age. As with all electric products, precautions should be observed during handling and use to prevent electric shock.
CAUTION-SUPERVISION REQUIRED-ELECTRIC TOY - UNPLUG WHEN NOT IN USE. INPUT: 120V AC,
60HZ, 10W OUTPUT: 12V DC, 350mA
WARNING:
CHOKING HAZARD-
Small parts, Not for chidren under 3 years