Scosche BT1200 Bluetooth Carkit User Manual IKQBT1200
Scosche Industries Inc Bluetooth Carkit IKQBT1200
Scosche >
IKQBT1200 User manual
• ElectronicsBox
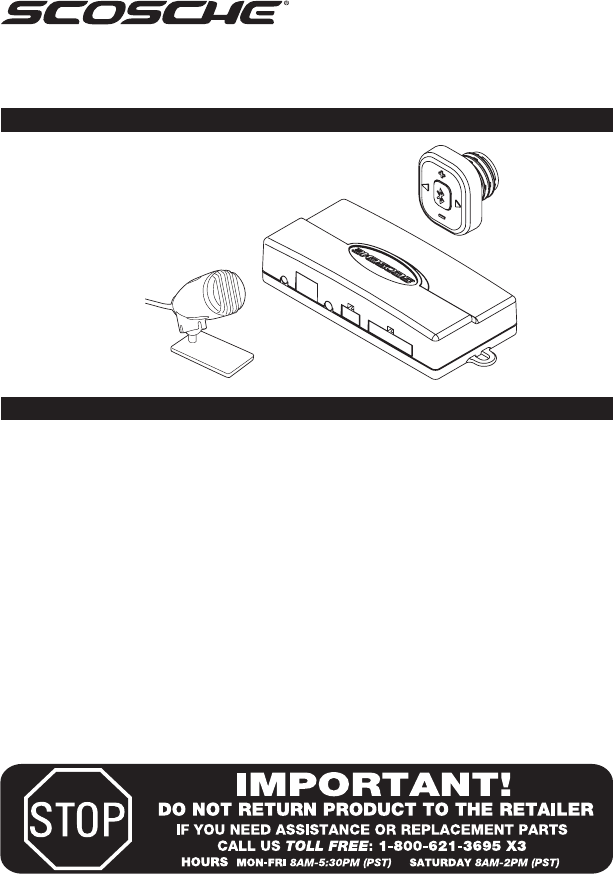
• KeypadControl
• Microphone
• Power/Speaker/Mute(ISOharness)
• Low-levelconnectionharness
• Instructionmanual
• Hardwarebag
BEFORE BEGINNING
Checkallvehiclemanufacturercautionsandwarningsregardingelectricalservice(AIRBAGS,ABS
BRAKES,ENGINE/BODYCOMPUTERANDBATTERY).
PLAN OUT YOUR INSTALLATION
Youshouldpre-determinethelocationofthemicrophone,keypadcontrollerandelectronicsbox.This
willsavetimeandeasetheinstallationprocess.
USE A VOLT/OHM METER
WerecommendtheuseofaVolt/Ohmmetertotestandlocateallconnections.Testlightscouldpossibly
damageavehicle’scomputersystemorcauseanairbagtodeploy.
DO NOT ROUTE ANY WIRING THAT MAY BECOME ENTANGLEDwiththebrake/gaspedals,
steeringcolumn,oranyothermovingpartsinthevehicle.
MICROPHONE
Forbestperformance,theBT1200microphonemustbepointedtowardthedirectionofthedriver’s
voice.Werecommendchoosingalocationbetweentherear-viewmirrorandsunvisor.Themicrophone
canalsobemountednearthetopoftheA-pillar(windshieldpost).
ELECTRONICS BOX
MounttheBT1200electronicsboxbehindthestereo.Donotmounttheelectronicsboxnearsourcesof
highheat,moistureormovingparts.HardwareisincludedtoattachtheBT1200boxtothevehicle.
KEYPAD CONTROLLER
Thekeypadisdesignedtoeasilymountinablankswitchplate,dashpanelorcenterconsole.Carefully
INSTALLATION CAUTIONS & WARNINGS
MICROPHONE
ELECTRONICS
BOX
KEYPAD
CONTROLLER
BT1200
BLUETOOTHTM HANDS-FREE
UNIVERSAL CAR KIT
©2010SCOSCHEINDUSTRIES,INC. 300BT120001/10
PARTS INCLUDED
1
2
3
FIGURE 1
2
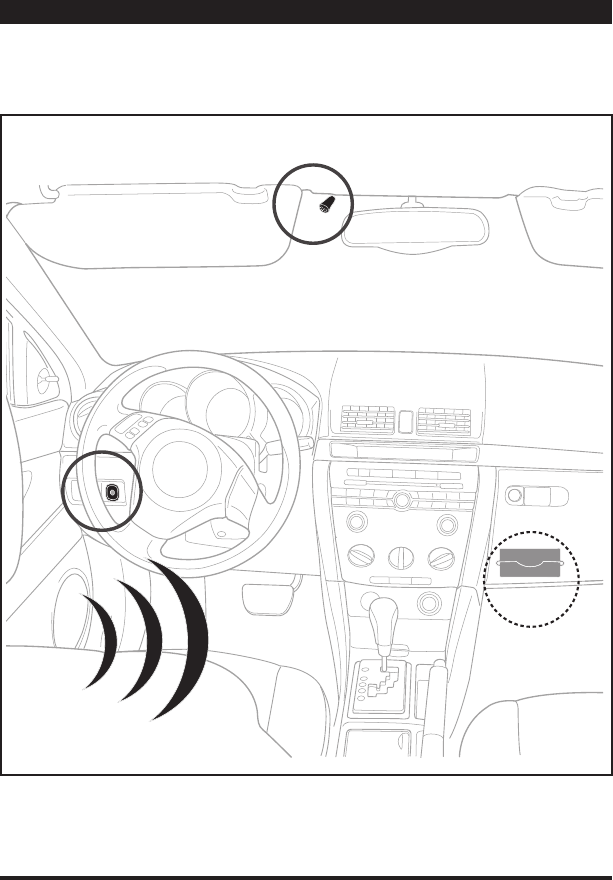
INSTALLATION OVERVIEW
LEGEND:
1. Handsfreemicrophone
2. Controlkeypad
3. Electronicsbox
CALLS HEARD THROUGH
FACTORY SPEAKERS
IMPORTANT: INSTALL THE ELECTRONICS BOX BEHIND THE GLOVE
COMPARTMENT OR BEHIND THE FACTORY RADIO. MAKE ALL PROPER
CONNECTIONS AND ROUTE ALL CABLES PRIOR TO HIDING THE
ELECTRONICS BOX.
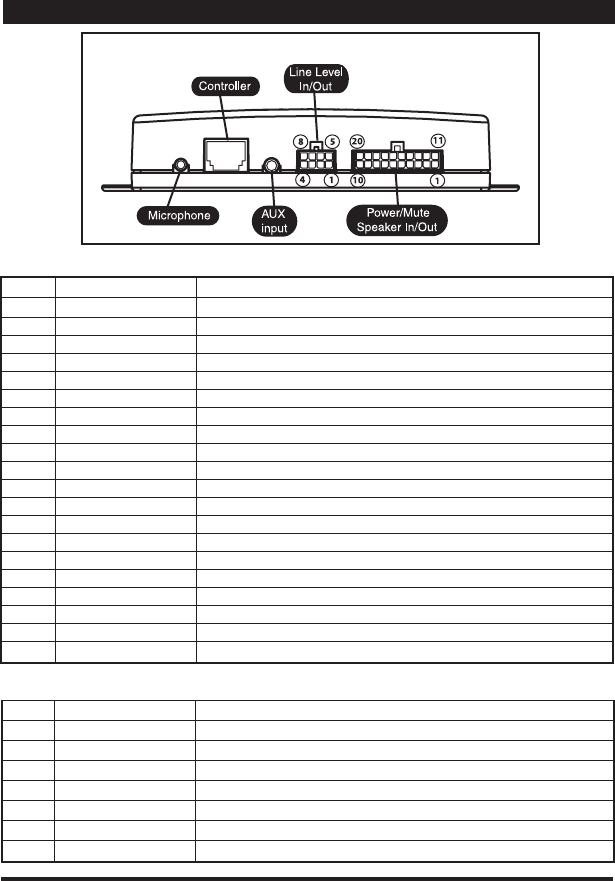
FIGURE 2
3
WIRE CHART (20-pin MOLEX to ISO Power, Mute and Speaker In/Out)
LOC. COLOR FUNCTION
P1 Brown Negative(-)Muteoutput
P2 Black Ground
P3 Gray/Black FrontRightNegative(-)speakerinput(Fromcarstereo)
P4 Gray FrontRightPositive(+)speakerinput(Tocarstereo)
P5 White/Black FrontLeftNegative(-)speakerinput(Tocarstereo)
P6 White FrontLeftPositive(+)speakerinput(Tocarstereo)
P7 Violet/Black RearRightNegative(-)speakerinput(Tocarstereo)
P8 Violet RearRightPositive(+)speakerinput(Tocarstereo)
P9 Green/Black RearLeftNegative(-)speakerinput(Tocarstereo)
P10 Green RearLeftPositive(+)speakerinput(Tocarstereo)
P11 Red +12vSwitchedAccessory(Fused2A)
P12 Yellow +12vBatteryConstant(Fused2A)
P13 Gray/Black FrontRightNegative(-)speakeroutput(Tocarspeaker)
P14 Gray FrontRightPositive(+)speakeroutput(Tocarspeaker)
P15 White/Black FrontLeftNegative(-)speakeroutput(Tocarspeaker)
P16 White FrontLeftPositive(+)speakeroutput(Tocarspeaker)
P17 Violet/Black RearRightNegative(-)speakeroutput(Tocarspeaker)
P18 Violet RearRightPositive(+)speakeroutput(Tocarspeaker)
P19 Green/Black RearLeftNegative(-)speakeroutput(Tocarspeaker)
P20 Green RearLeftPositive(+)speakeroutput(Tocarspeaker)
WIRE CHART (8-pin Preamp Line-Level Audio 2CH In/Out)
P1 Gray/Black RightChannelNegative(-)output(Tocaramplifier)
P2 Gray RightChannelPositive(+)output(Tocaramplifier)
P3 White LeftChannelPositive(+)output(Tocaramplifier)
P4 White/Black LeftChannelNegative(-)output(Tocaramplifier)
P5 Gray/Black RightChannelNegative(-)input(Tocarstereo)
P6 Gray RightChannelPositive(+)input(Tocarstereo)
P7 White LeftChannelPositive(+)input(Tocarstereo)
P8 White/Black LeftChannelNegative(-)input(Tocarstereo)
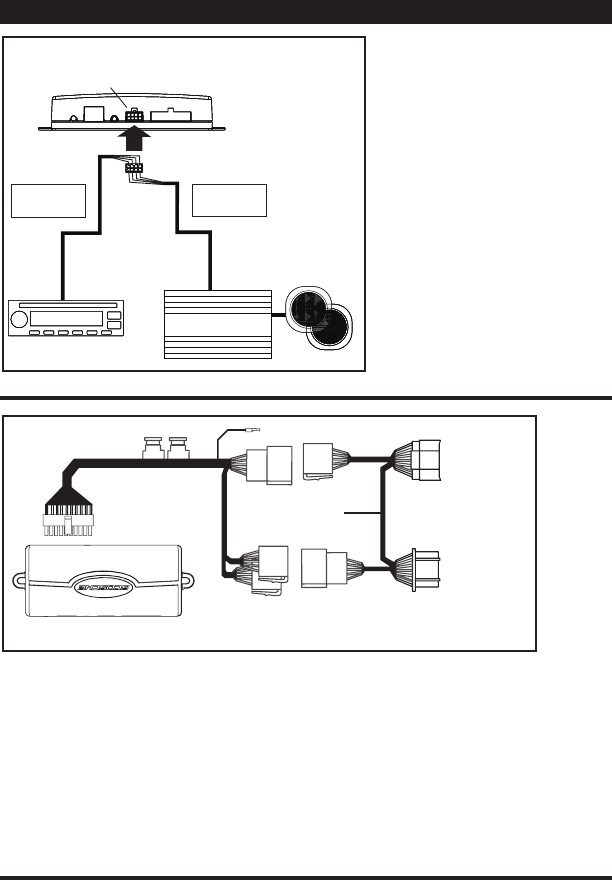
CONNNECTIONS

FIGURE 3
4
INSTALLATION
STANDARD INSTALLATION
UsetheSpeakerInput/Outputconnectionsonthe20-PINSpeaker/Power/MuteISO
connector.
NOTE:OptionISO-to-VehiclespecificharnessconnectorkitsareavailabletomaketheBT1200
aplugandplayinstallation.Theseharnessconnectorkitssoldseparatelyandnotincludedwith
theBT1200 (See T-Harness section on page 5).
1. Locatethe4speakersoutputsofthevehiclesstereo.
2. CutandconnectinputwiresoftheBT1200(Pin#3-#10)tothevehicle’sspeakeroutputs
comingdirectlyfromthestereoside.
3. ConnecttheBT1200speakeroutputwires(Pin#13-#20)totheremainingspeakerleadsthat
godirectlytothevehiclesfrontandrearspeakers.
OPTIONAL MUTE
CONNECTION
TheBT1200providesaNegative
(-)Muteoutputforusewithstereo’s
thathaveacompatibleNegative
(-)“Mute”inputtoattenuatethe
AudioduringHands-freekituse.See
theDIAGRAMfortypicalconnec-
tiontypes.TheBROWNMutewire
providesaNegative(-)outputwhen
thereisanactiveincomingoroutgo-
ingcall.
MUTE FUNCTION (BrownNegative
TriggerWire)
TheBT1200supportsmutefunc-
tionalityensuringthatthestereowill
notplayaudioduringcellularuse.If
you’veinstalledtheBT1200inthe
standardmethodusingtheinput/
outputspeakerwiresprovided,
thenyourstereoshouldautomati-
callybemutedbytheBT1200.If
youhaveaPremiumsoundsystem
withadditionalspeakerslikeoneor
moresubwoofers,youmaybeable
toutilizetheNegativeMUTEoutput
providedbytheBT1200.Checkyour
Stereo’sdocumentationtodetermine
whetherithasadesignatedNegative
MuteINPUT.Ifthisisthecase,then
taptheBrownwireoftheBT1200
totheMUTEwireofyourstereo.
DuringphonecallstheBT1200will
sendaNegativeGroundsignaltothe
BROWNwire.
MUTE
WIRE
FACTORY AMP
INPUT
OUTPUT
White: Audio Left +
White/Black: Audio Left -
Grey: Audio Right +
Grey/Black: Audio Right -
White: Audio Left +
White/Black: Audio Left -
Grey: Audio Right +
Grey/Black: Audio Right -
FACTORY RADIO
FACTORY
SPEAKERS
BT1200
8-PIN PRE-AMP LINE LEVEL
INSTALLATION HARNESS
FIGURE 4
INSTALLATION (cont’d)
5
LOW-LEVEL AUDIO INSTALLATION
UsetheLine-LevelInput/Outputcon-
nectionsonthe8-PINconnector.
NOTE:Thisoptionisforusewith
existing
Factory-amplifiedsoundsystems.
TheBT1200providesa2-channel
Low-levelinputoutputswitchingfor
pre-amplifierinstallation.
1. Locatethepre-ampaudiooutputs
ofthevehiclestereo.
2. Cutandconnectinputwiresofthe
BT12008-Pinharness(Pin#5-#8)to
thevehicle’saudiooutputscoming
directlyfromthestereoside.
3. ConnecttheBT1200low-levelout-
putwires(Pin#1-#4)totheremaining
audiosignalleadsthatgodirectlyto
thevehicle’samplifier.
“T”-HARNESS ACCESSORY
(Soldseparately)
TosimplifyBT1200installation,vehiclespecificT-HarnessesareavailabletoadapttheBT1200
ISOconnectorstoyourvehicle’sFactorywireharnessconnectors.T-harnessallowsyoutoeas-
ilyinstalltheBT1200systeminyourvehiclewithouttheneedforcuttingandsplicingwiring.
THarnessesaresoldseparatelyandavailableformostpopularvehiclemakesandmodels
includingGM,Ford,Chrysler,Toyota,Honda,Nissanandmore.CallScosche(800)621-3695or
gotowww.scosche.comtofindtherightharnessforyourvehicle.
TO RADIO
TO VEHICLE
T-HARNESS
(Sold separately)
BT1200
HARNESS
FUSE FUSE

DRILL HOLE PRECISELY
FOR BEST FIT.
FIGURE 6
or other at
surface
6
INSTALLATION (cont’d)
KEYPAD CONTROLLER
INSTALLATION STEPS
TheBT1200keypadcontrollerisdesignedtoeasilymountinablankswitchplate,dashpanel
orcenterconsole.Carefullychoosealocationthatiswithineasyreachofthedriver.Drillingis
requiredtomountthekeypad.Checkforclearanceorobstructionsbehindtheswitchlocation
toensuretherearenovitalvehiclecomponentsorwiringthatmightbecomedamagedbefore
drilling!Whenchoosingalocation,considerthe10ft.(3m)lengthofthecontrollercable.
1. Usea9/16''(15mm)drillforthekeypadcontroller.Drillaholeinthechosenlocation.
Thecontrollerkeypadisdesignedtolockitselfintoaproperlydrilledmountinghole.
2. Cleanthemountingsurfaceofdirtorgreasebeforemountingthecontroller.
3. Feedcablethroughthehole,peelthebackingpaperfromthecontrollerandpressthe
controllerintoplace.
MICROPHONE INSTALLATION STEPS
Forbestperformance,theBT1200microphonemustbepointedtowardthedirectionofthe
driver’svoice.Werecommendchoosingalocationbetweentherear-viewmirrorandsunvisor
(seeFig.1,page2).Whenchoosingalocation,considerthe10ft.(3m)lengthofthemicrophone
cable.Forbestresults,themountingsurfaceshouldbeflatandpreferablysmooth.The
microphoneholderhasaself-adhesivestripontheback.
1. Separatethemicfromitsholder(gentlypullapart)
2. Cleanthemountingsurfaceofdirtorgreasebeforemountingthemicholder.
3. Peelthebackingpaperfromtheadhesivestripandpressthemicholderontothemounting
surfaceandholdfor30seconds.
4. Pushthemicbackontotheroundpegandpoint(aim)towardsthedriver’sseat.
FIGURE 7
7
OPERATION
EASY PAIRING
Note:TheBT1200mustbepairedwithyourmobilephonebeforeuse.TheBT1200includesan
“Easy”pairingfeaturethatwillautomaticallyre-connectittothemostrecentlypaireddevice.Ifthe
mostrecentdeviceisnotpresentwithin10seconds,thentheBT1200willAUTOMATICALLYgo
intopairingmodeandyouwillheartheannouncement”Poweron”followedbytheannouncement
“Pairingphone,pleaseplaceyourphoneinpairingmodeandenterPINcode0000”.TheblueLED
withflashevery(1)second.
MANUAL PAIRING
1.PowerofftheBT1200.
2.PressandholdtheMulti-FunctionButton[MFB]for6secondsuntilyouhearthe
announcement“Pairingphone-pleaseputyourphoneinpairingmodeandenterPINcode
“0000”.TheblueLEDwillflasheverysecond.
3.ActivatetheBluetoothfeaturefromyourphone’smenu.ThephonewillsearchallBluetooth
deviceswithin10meters(30ft.)anddisplaythemasalist.
4.Select“BT1200”fromthelist.Enter“0000”topairandconnecttheBT1200toyourphone.If
youareusinganAppleiPhone,youcanjusthit“OK”topairtotheBT1200.
5.TheblueLEDwillblinkwhenbothdevicesaresuccessfullypaired,andyouwillhearthe
BT1200announce:“Pairingsuccessful”.Note:Ifthepairingcannotbecompletedwith2
minutesofpairingmodeactivationtheBT1200willpowerdown.TheBT1200willannounce
“Pairingfailed-pleaseputyourphoneinpairingmodeandtryagain.”Pleaserepeatsteps1
through4.
POWERING ON/OFF
The BT1200 will switch on
automaticallywhenyouturnON
theIgnitionkey.Youwillhearthe
systemspeak: “Power on”and
the Blue LED indicator in the
centerbuttonwillbegintoflash.
To turn off the Car kit, it will
turn off automatically when the
ignitionisoff.Tomanuallypower
offtheBT1200presstheMulti-
function button continuously for
10 Seconds. You will hear the
systemspeak:“Poweroff”.
TomanuallyturnONtheBT1200
presstheMFBfor3seconds.

OPERATION (cont’d)
8
CONNECTION
IftheBT1200andthemobilephonearedisconnected,theconnectionmayberestoredbythe
following:
1. IftheBT1200hasbeenswitchedoff,turnonpowerandtheconnectionwillberestored
automaticallyifsetasatrusteddeviceonyourmobilephone.
2. Ifthemobilephonehasbeenswitchedoff,turnonthemobilephoneandrestorethe
connectioneitherthroughthephone’smenuorbypressingtheMulti-FunctionButton[MFB]once.
3. IftheBT1200andphoneareoutofrange,makesurethedevicesarewithinworkingrange
(30Feet/10Meters)andpresstheMulti-FunctionButton[MFB]once.Note:Oncethe
connectionissuccessfultheBT1200willannounce“Phoneisreadyforuse,”andtheblue
LEDwillflashonceevery3seconds.Thisisknownas“STANDBYMODE”.
DISCONNECTION
IftheBT1200needstobedisconnectedfromthephoneconnection(Example:Toconnectyour
phonetoanotherdevice)thephonemaybedisconnectedusinganyofthefollowing:
1.TurnofftheBT1200orvehicle.
2.DisconnecttheBT1200usingthephone’sBluetoothmenu.
Note:OncedisconnectissuccessfultheBT1200willannounce“Disconnectcomplete.”The
BT1200willautomaticallyshutoffafterbeingdisconnectedfromapaireddeviceformorethan
10minutes.
PLACING CALLS
Youcaninitiatecallsfromyourmobilephone,ordirectlyfromyourBT1200Carkitusingvoice
dialingcommands(ifthisfeatureissupportedbyyourmobilephone)
Makingcallsusingvoicedialing:Ifyourmobilehandsetisvoicedialingenabled,pressandhold
the“FWD[Rightdirectionalsymbol]”buttononthecontrollerfor3seconds.Youhearabeep,
saythevoicetag.
IMPORTANT:Pleasemakesuretorecordvoicetagintothemobilehandsetbeforeusingvoice
dialingfunction.Thisfunctionisonlyapplicabletomobile
handsetswithBluetoothHands-FreeProfileANDVoiceDialingcapability.VoicedialingTAGS
arestoredonyourphoneandNOTbytheBT1200system.Functionalityvariesdepending
onthemobilehandsetmodelsyouhave.Pleaserefertoyourmobilehandsetuserguidefor
additionalinformation.Scoschehighlyrecommendsusingthevoicedialfeature(ifyourphone
isequipped)toreducehandsetusewhiledriving.Insomestateshandsetusagewhiledrivingis
illegal.(Checkyourlocalorstatemotorvehiclecode)
CALLING FROM YOUR MOBILE PHONE
Dialdirectlyfromyourmobilephone.ThecallisautomaticallyconnectedtotheBT1200
handsfreekit.
RECEIVING CALLS
Uponanincomingcall,youwillhearthecallerIDinformationannouncedthroughyourcarstereo
system:”Callfrom(NameorDigits)”;pressthe“FWD[Rightdirectionalsymbol]”buttononthe
Carkittoanswerthecall.
ENDING CALLS
Duringthecall,pressthe“BACK[Leftdirectionalsymbol]”buttonendthecall.Youwillhearthe
BT1200systemannounce:”Endcall”.
REJECTING CALLS
Uponanincomingcall,pressthe“BACK[Leftdirectionalsymbol]”buttontorejectthecalland
sendtoyourphone’svoicemail.TheBT1200systemwillannounce:”Rejectcallsuccessful”.
LAST NUMBER RE-DIALING
PresstheMulti-FunctionButton[MFB]twicetoredialthelastnumber;TheBT1200systemwill
announce:“Redialing”.

9
OPERATION (cont’d)
ADJUSTING CURRENT CALL VOLUME
Toincreasethevolumeduringthecall,pressthe“+”buttontoincreasevolumebyonelevel,
repeatthisprocedureuntilyouhavereachedthedesiredlevel.
Todecreasethevolumeduringthecall,Press“-”buttontodecreasethevolumebyonelevel,
repeatthisprocedureuntilyouhavereachedthedesiredlevel.
MUTE MICROPHONE
Duringacall,pressandholdthe“BACK[Leftdirectionalsymbol]”buttonfor3secondstomute
themicrophone.Pressandholdthe“BACK[Leftdirectionalsymbol]”buttonAGAINfor3
secondstoturntheMICbackON.
ANSWER or REJECT SECOND CALLS
Toanswerasecondincomingcall:Duringacall,whenanothercalloccurs,shortpressthe
“FWD”[Rightdirectionalsymbol]buttontopickupthecallandthefirstcallwillbeplacedon
hold.
Torejectasecondincomingcall:Duringacall,whenanothercalloccurs,shortpressthe“BACK
[Leftdirectionalsymbol]”buttontorejectthecallandsendittoyourphone’svoicemail.
SWAPPING CALLS
DuringaThree-waycall(youandtwoothers),pressthe“FWD”[Rightdirectionalsymbol]for
3secstoswapthecall
DuringaThree-waycall,shortpressthe“BACK[Leftdirectionalsymbol]”buttontoendthecur-
rentcallandanothercallwillbeactiveautomatically
TRANSFERRING CALLS
HandsfreekittoMobilePhone:
Duringacall,presstheMulti-FunctionButton[MFB]twice,andthecallisroutedtoyourmobile
phone.
MobilePhonetoHandsfreekit:
Pressthe“Multi-FunctionButton[MFB]”buttononcetoroutethecalltotheBT1200handsfree
kit.
TEXT-TO-SPEECH (Voice Announce) LANGUAGE
WhileNOTonaphonecall,pressandholdthe“+”buttonfor3secondsandtheHandsfreekit
announces“SelectLanguage”.Repeattheprocesstoselectthedesiredlanguageinthefollow-
ingorderofEnglish,French,Italian,GermanandSpanish.
ADJUSTING TEXT-TO-SPEECH (Voice Announce) VOLUME
Toincreasethevolume(Notduringaphonecall),Pressthe“+”buttontoincreaseText-To-
Speechvoicevolumeyouwillhear“Activated“.
Todecreasethevolumepressthe“-”buttontodecreaseText-To-Speechvoicevolumeyouwill
ehear“Activated“.Theword“Activated”meansnothing.Itisjustanannouncementprovided
todeterminethevolumeoutput.
TURNING ON/OFF TEXT-TO-SPEECH (Voice Announce)
Pressandholdthe“+”for6seconds(notduringaphonecall).“VoicePromptOn”or“Voice
PromptOff”isannouncedtodenotethecurrentstatus.
TRANSFERRING MOBILE PHONEBOOK TO HANDSFREE KIT
MakesuretohaveyourphoneconnectedtotheBT1200systembeforethisoperation.
1. Pressthe“-”buttonfor3secondsandtheBlueLEDlightindicatorcomeson.TheBT1200
systemwillannounce”Loadingphonebook.Pleasewait”,whenitbeginstoreceivephonebook
informationfromyourphone.
2. Icantakesometimetoloadyourphonescontacts.DuringtheprocesstheBT1200willan-
nounce:“Pleasewait”every30seconds.
3. Whentheprocessiscompleted,theBT1200systemsannounces“ContactsSaved”and
statesthenumberofcontactsreceivedfromyourmobilephonememoryorSIMmemory.

10
OPERATION (cont’d)
IMPORTANT PHONEBOOK NOTES:
The BT1200 can store up to 1000 contacts ONLY. When/if the memory is full, the system will
announce: ”Phonebook is full”. If there is a failure during the process, the car kit will announce:
”Loading phonebook failed”. Please check your phone to find out if it has phonebook support
or the ability to allow your contacts to be “pulled” from another Bluetooth device. The BT1200
system may NOT be compatible with your particular phonebook due to the wide range of contact
and object profiles available in today’s mobile device market.
DELETE CURRENT PHONEBOOK
The BT1200 does NOT support multiple phonebooks from more than one mobile phone. You may
therefore choose to delete the current phonebook so that another mobile phone’s can connected
to upload its phonebook. To Remove Phonebook Entries (not during a phone call), press
“-”
buttons for 6 seconds. The system will announce: “Phonebook Deleted”.
Entire phonebook memory in the BT1200 will be deleted.
RESTORE FACTORY DEFAULT SETTINGS
LISTENING TO MUSIC
WIRELESS MUSIC (With supported A2DP/AVRCP devices)
Listen to music from your mobile phone and/or other Bluetooth device is easy using the BT1200.
Read the following notes to become more familiar with how your BT1200 system integrates
between wireless music and phone operation.
3.5MM AUX INPUT
You can also listen to music via a wired connection from any portable device that has a standard
3.5mm headphone jack. (3.5mm cable is not included with BT1200) Note that a cable must be
run from the BT1200 electronics box to a conveniently accessible location in your vehicle.
A2DP/AVRCP NOTES:
If your phone is paired to the BT1200 and supports BOTH Hands free HFP and Streaming Audio
A2DP then playing music and handling call should operate seamlessly. If you choose to have a
second separate A2DP device transmit audio to the BT1200, it must be paired separately. In the
case of a second device for wireless audio, make sure your phone is not currently paired to the
BT1200’s A2DP profile otherwise you will not hear music from the secondary device.
CALLS DURING MUSIC
To answer an incoming call while the music is playing press the “FWD” [Right directional symbol]
to answer. Music is muted until you end the call.
PLAY/PAUSE MUSIC
Press the Multi-Function Button [MFB] to Play or Pause music playing
TRACK FF/RR
To track Forward Press the “FWD” [Right directional symbol] button to the next track (or tracks).
To track Backward Press the “BACK” [Left directional symbol] button to the previous track (or
tracks).
ADJUSTING MUSIC VOLUME
To increase volume (during music play), Press the “+” button to increase until desired level.
To decrease volume (during music play), Press the “-” button to decrease until desired level.
To restore your Car kit to its original settings, press and hold “V-” button for 10 seconds until the
blue LED light indication flashes rapidly. the Car kit will power off automatically. This process is
complete when Car kit announces “Set Factory Default Complete”.

11
LISTENING TO MUSIC (cont’d)
LISTENING TO MUSIC FROM EXTERNAL AUDIO DEVICE
Connectthe3.5mmjacktoyouraudiodeviceandtheBT1200electronicsbox.Pressandhold
“BACK”[Leftdirectionalbutton]for3secondstoswitchon“Linein”function.ARedLEDwill
illuminatefromtheBT1200controllerindicatingthatit’sin“Linein”mode.Ifyoureceivean
incomingcallwhilelisteningtotheLineinsource,pressthe“FWD[Rightdirectionalsymbol]”to
answerthecall.Musicismuteduntilyouendthecall.
Pressandholdthe“BACK”[Leftdirectionalsymbol]button3secondsagaintoswitchoffLinein
function.TheRedLEDwillturnoff.
WIRELESS MUSIC (With supported A2DP/AVRCP devices)
Listentomusicfromyourmobilephoneand/orotherBluetoothdeviceiseasyusingtheBT1200.
ReadthefollowingnotestobecomemorefamiliarwithhowyourBT1200systemintegrates
betweenwirelessmusicandphoneoperation.
3.5MM AUX INPUT
Youcanalsolistentomusicviaawiredconnectionfromanyportabledevicethathasastandard
3.5mmheadphonejack.(3.5mmcableisnotincludedwithBT1200)Notethatacablemustbe
runfromtheBT1200electronicsboxtoaconvenientlyaccessiblelocationinyourvehicle.
A2DP/AVRCP NOTES:
IfyourphoneispairedtotheBT1200andsupportsBOTHHandsfreeHFPandStreamingAudio
A2DPthenplayingmusicandhandlingcallshouldoperateseamlessly.Ifyouchoosetohavea
secondseparateA2DPdevicetransmitaudiototheBT1200,itmustbepairedseparately.Inthe
caseofaseconddeviceforwirelessaudio,makesureyourphoneisnotcurrentlypairedtothe
BT1200’sA2DPprofileotherwiseyouwillnothearmusicfromthesecondarydevice.
CALLS DURING MUSIC
Toansweranincomingcallwhilethemusicisplayingpressthe“FWD”[Rightdirectionalsymbol]
toanswer.Musicismuteduntilyouendthecall.
PLAY/PAUSE MUSIC
PresstheMulti-FunctionButton[MFB]toPlayorPausemusicplaying.
TRACK FF/RR
TotrackForwardPressthe“FWD”[Rightdirectionalsymbol]buttontothenexttrack(ortracks).
TotrackBackwardPressthe“BACK”[Leftdirectionalsymbol]buttontotheprevioustrack(or
tracks).
ADJUSTING MUSIC VOLUME
Toincreasevolume(duringmusicplay),Pressthe“+”buttontoincreaseuntildesiredlevel.
Todecreasevolume(duringmusicplay),Pressthe“-”buttontodecreaseuntildesiredlevel.

Scosche Industries Inc. warrants this product to be free from defects in material and workmanship for a period of 90 days
from purchase. This Scosche product is sold with the understanding that the purchaser has independently determined
the suitability of this product. This warranty is offered to the original purchaser of the product only. This warranty does not
cover the product if physically damaged, subject to negligence or misuse, abuse, alteration, accident, or an act of GOD.
This warranty does not apply to product which has water or physically damaged by accident or which has been misused,
disassembled or altered.
The original dated sales slip or proof of purchase will establish warranty eligibility. If the product should prove defective
within the warranty period, return the product with proof of purchase to Scosche Industries Inc. Scosche, at its option, will
replace or repair the product free of charge and return the product postage paid. In no event shall Scosche Industries, Inc.
be responsible for claims beyond the replacement value of the defective product, or in any way be liable or responsible
for consequential or incidental damages. No express warranties and no implied warranties, whether for fitness or any
particular use or otherwise, except as set forth above (which is made expressly in lieu of all other warranties) shall apply
to products sold by Scosche. Scosche Industries cannot be held responsible for discrepancies/inconsistencies that may
occur due to automotive manufacturing changes or option.
LIMITED WARRANTY
FCC STATEMENT
This equipment has been tested and found to comply with the limits for a Class B digital device, pursuant to part 15 of
the FCC rules. These limits are designed to provide reasonable protection against harmful interference in a residential
installation. This equipment generates, uses and can radiate radio frequency energy and, if not installed and used in
accordance with the instructions, may cause harmful interference to radio communications. Any changes or modification
not expressly approved by the party responsible could void the user’s authority to operate the device.
This Category II radio communication device complies with Industry Canada Standard RSS-310 for RX Siren.
This device complies with part 15 of the FCC Rules and RSS-210 for TX remote control. Operation is subject to the following
two conditions: (1) This device may not cause harmful interference, and (2) this device must accept any interference received,
including interference that may cause undesired operation.
Changes or modifications not expressly approved by the party responsible for compliance could void the user’s authority to
operate the equipment.
This equipment complies with FCC radiation exposure limits set forth for an uncontrolled environment. End user must follow
the specific operating instructions for satisfying RF exposure compliance. This transmitter must not be co-located or operating
in conjunction with any other antenna or transmitter.
To comply with FCC RF exposure requirements, the device and the antenna for this device must be installed to ensure a
minimum separation distance of 20 cm or more from a person's body. Other operating configurations should be avoided.
12
FCC ID: IKQBT1200
changes or modifications not expressly approved by the party responsible for compliance could void the user’s authority
to operate the equipment.
This device complies with Part 15 of the FCC Rules. Operation is subject to the following two conditions:(1) this device
may not cause harmful interference, and (2) this device must accept any interference received, including interference that
may cause undesired operation.
Changes or modifications not expressly approved by the party responsible for compliance could void the user’s authority
to operate the equipment.
To comply with FCC RF exposure requirements, the device and the antenna for this device must be installed to ensure a
minimum separation distance of 20 cm or more from a person's body. Other operating configurations should be avoided.