ScottCare DCDRX-1 8 Channel Capable, WMTS Receiver. User Manual 503130
ScottCare Corporation 8 Channel Capable, WMTS Receiver. 503130
Contents
- 1. Part15 Page Users Manual
- 2. User Manual
- 3. Service Manual
User Manual

TeleRehab™ 2004
Users Manual

CARDIOPULMONARY MONITORING SYSTEM
TELEREHAB 2004
Users Manual
Pub. No. PM-39002 (REV8/04)
Copyright 2004 by The ScottCare Corporation. All rights reserved.
U.S. Patent No. 5,474,090
The ScottCare Corporation
4791 West 150th Street
Cleveland, Ohio 44135
Phone (800) 243-9412
Phone (216) 362-0550
Fax (216) 267-6129
Omniprep™ and Nuprep™ are registered trademarks of
Weaver and Company, 565-C Nucla Way, Aurora, CO 80011

TeleRehab™ 2004 Cardiopulmonary Monitoring System Users Manual
-i-
PREFACE
DESIGN........................................................................................................................................................ 1
INTENDED USE.......................................................................................................................................... 1
DIAGNOSTIC USE WARNING.................................................................................................................. 1
DISCLAIMER OF LIABILITIES................................................................................................................. 2
FCC PART 15 INFORMATION .................................................................................................................. 2
FCC PART 68 INFORMATION .................................................................................................................. 3
INDISTRY CANADA INFORMATION ..................................................................................................... 4
IMPORTANT SAFETY INFORMATION................................................................................................... 5
WARNING: USE OF COMPUTER FOR OTHER SOFTWARE ................................................................ 5
TRANSTELEPHONIC EMERGENCIES .................................................................................................... 5
ACCIDENTAL DISCONNECTION DURING TRANSTELEPHONIC MONITORING........................... 5
TELEREHAB 2004 MONITORING STSTEM
OVERVIEW ................................................................................................................................................. 6
QRS DETECTION ....................................................................................................................................... 6
HEART RATE.............................................................................................................................................. 6
ARRHYTHMIA DETECTION .................................................................................................................... 6
ARTIFACT................................................................................................................................................... 6
CONTROL OF ARTIFACT ......................................................................................................................... 7
TELEREHAB 2004 MONITORING SYSTEM SET-UP
THE SERVER APPLICATION.................................................................................................................... 9
SERVER CONFIGURATIONS ................................................................................................................... 9
PROGRAM IDENTIFICATION ................................................................................................................ 10
CONFIGURATION SETTINGS ................................................................................................................ 10
BACKING UP THE DATABASE .............................................................................................................. 11
DEACTIVATING THE SERVER.............................................................................................................. 14
REBUILDING PATIENT LISTS ............................................................................................................... 15
SETTING SCREEN COLORS ................................................................................................................... 16
SETTING THE NUMBER OF SCREENS UTILIZED. ............................................................................. 16
ACTIVATION OF REMOTE MONITORS ............................................................................................... 16
SETTING THE NUMBER OF CHANNELS UTILIZED .......................................................................... 16
ASSIGNING TRANSMITTER CHANNELS ............................................................................................ 17
START-UP OPTIONS................................................................................................................................ 17
SETTING/CHANGING A PASSWORD ................................................................................................... 17
SETTING UP THE WORKPLACE SCREENS AND REPORT LINKS ................................................... 18
PROGRAM DATA LINKS ........................................................................................................................ 20
PERSONAL DATA LINKS ....................................................................................................................... 21
SINGLE SESSION LINKS......................................................................................................................... 23
MULTI SESSION LINKS .......................................................................................................................... 24
SETTING THE NETWORK COMMUNICATION PARAMETERS........................................................ 25
SETTING UP THE DIALING PREFIX FOR TRANSTELEPHONICS .................................................... 26
SYSTEM I.D. CODE .................................................................................................................................. 26
SETTING THE FULL DISCLOSURE PATH............................................................................................ 26

TeleRehab™ 2004 Cardiopulmonary Monitoring System Users Manual
-ii-
SETTING THE MONITORING AND PROTOCOL OPTIONS................................................................ 26
AUTOMATIC MONITORING FUNCTIONS........................................................................................... 27
SCHEDULING OPTIONS ......................................................................................................................... 28
RPE OPTIONS ........................................................................................................................................... 28
SETTING THE DISPLAY DEFAULTS .................................................................................................... 28
SETTING THE LIST OF PATIENTS TO BE DISPLAYED IN THE MONITORING SCREEN ............. 29
SETTING THE ALARM SOUNDS ........................................................................................................... 29
SETTING UP THE MONITORING STATUS LINE ................................................................................. 29
SETTING UP THE CUSTOM MONITORING BUTTON ........................................................................ 30
SUMMARY ITEM BUTTONS .................................................................................................................. 32
SETTING THE IN-SESSION EDITING PARAMETERS......................................................................... 32
ADDING OR CHANGING RESOURCE DATA ELEMENTS ................................................................. 34
SINGLE LINE TEXT ITEMS..................................................................................................................... 35
ADDING SINGLE LINE TEXT RESOURCES ......................................................................................... 36
DELETING SINGLE LINE TEXT RESOURCES..................................................................................... 37
CHANGING THE NAME OF A SINGLE LINE TEXT RESOURCE....................................................... 37
MULTILINE TEXT ITEMS....................................................................................................................... 37
ADDING MULTILINE TEXT RESOURCES ........................................................................................... 38
DELETING MULTILINE TEXT RESOURCES ....................................................................................... 39
CHANGING THE NAME OF A MULTILINE TEXT RESOURCE ......................................................... 39
GENERAL NUMERIC ITEMS.................................................................................................................. 39
ADDING GENERAL NUMERIC RESOURCES ...................................................................................... 40
DELETING GENERAL NUMERIC RESOURCES .................................................................................. 41
CHANGING THE NAME OF A GENERAL NUMERIC TEXT RESOURCE ......................................... 41
BLOOD PRESSURE ITEMS ..................................................................................................................... 41
ADDING BLOOD PRESSURE RESOURCES.......................................................................................... 42
DELETING BLOOD PRESSURE RESOURCES...................................................................................... 43
CHANGING THE NAME OF A BLOOD PRESSURE RESOURCE........................................................ 43
DATE (MM/DD/YYYY) ITEMS ............................................................................................................... 44
ADDING DATA TYPE RESOURCES ...................................................................................................... 44
DELETING DATA TYPE RESOURCES .................................................................................................. 45
CHANGING THE NAME OF A DATA TYPE RESOURCE .................................................................... 46
CHECK BOX (Y OR N) ITEMS ................................................................................................................ 46
ADDING CHECK BOX TYPE RESOURCES ..........................................................................................46
DELETING CHECK BOX TYPE RESOURCES....................................................................................... 47
CHANGING THE NAME OF A CHECK BOX TYPE RESOURCE ........................................................ 48
SELECTOR GROUP TYPE ITEMS .......................................................................................................... 48
ADDING SELECTOR GROUP TYPE RESOURCES............................................................................... 48
DELETING SELECTOR GROUP TYPE RESOURCES........................................................................... 51
CHANGING THE NAME OF A SELECTOR GROUP TYPE RESOURCE............................................. 52
CHANGING THE CONTENT OF A SELECTOR GROUP ...................................................................... 52
EXERCISE PROTOCOLS ......................................................................................................................... 52
DEFINING MODALITIES AND EXERCISE DEVICES ......................................................................... 53
ADDING A DEVICE..................................................................................................................................55
CHANGING ANY PARAMETER OF A MODE...................................................................................... 56
GENERATING PROTOCOL TEMPLATES ............................................................................................. 56
ADDING PROTOCOL TEMPLATES ....................................................................................................... 57
EDITING PROTOCOL TEMPLATES....................................................................................................... 58
DELETING PROTOCOL TEMPLATES ................................................................................................... 60

TeleRehab™ 2004 Cardiopulmonary Monitoring System Users Manual
-iii-
PATIENT MONITORING
THE MONITORING SCREEN .................................................................................................................. 62
ENTERING A PATIENT NAME INTO THE MONTORING SCREEN................................................... 64
STARTING THE DISPLAYS .................................................................................................................... 66
MONITORING PATIENTS ....................................................................................................................... 67
ALARM INDICATION.............................................................................................................................. 68
KEEPING TRACK OF TIME..................................................................................................................... 68
THE HOLD FEATURE .............................................................................................................................. 69
ADJUSTING THE DISPLAY SETTINGS................................................................................................. 70
ALARM SETTINGS .................................................................................................................................. 70
DISPLAYED INFORMATION.................................................................................................................. 71
THE MONITORING DISPLAY AREA..................................................................................................... 71
THE MONITORING STATUS LINE ........................................................................................................72
SAVING STRIPS ....................................................................................................................................... 73
ENTERING/EDITING INFORMATION WHILE MONITORING .......................................................... 74
ENTERING/EDITING CURRENT BLOOD PRESSURE READINGS.................................................... 74
EDITING THE SESSION TARGET HEART RATE................................................................................. 75
ENTERING TIMED COMMENTS............................................................................................................75
ENTERING/EDITING EXERCISE FUNCTIONS .................................................................................... 76
CHANGING EXERCISE MODALITIES .................................................................................................. 76
CHANGING WORK LOAD ...................................................................................................................... 77
CHANGING MET'S ................................................................................................................................... 77
ENTERING/CHANGING TIME................................................................................................................ 77
ENTERING/CHANGING RPE .................................................................................................................. 78
EDITING ITEMS IN THE MONITORING STATUS LINE...................................................................... 78
EDITING THE RESTING BLOOD PRESSURE VALUE......................................................................... 78
ENTERING THE RESTING HEART RATE VALUE............................................................................... 78
EDITING THE CURRENT SP02 VALUE................................................................................................. 79
EDITING THE CURRENT SESSION NUMBER ..................................................................................... 79
ENTERING/EDITING USER DEFINED MODALITY DATA ................................................................ 79
ENTERING/EDITING USER DEFINED SUMMARY DATA ................................................................. 80
MONITORING TRANSTELEPHONIC PATIENTS................................................................................. 81
IDENTIFYING TRANSTELEPHONIC PATIENTS................................................................................. 81
CALLING THE TRANSTELEPHONIC PATIENT .................................................................................. 82
MONITORING THE TRANSTELEPHONIC PATIENT .......................................................................... 83
COMMUNICATION USING THE TRANSTELEPHONIC PATIENT .................................................... 83
EDITING A SESSION WHILE MONITORING ....................................................................................... 84
EDITING SAVED RHYTHM STRIPS ...................................................................................................... 85
PRINTING SAVED RHYTHM STRIPS TO THE STRIP CHART RECORDER..................................... 85
REVIEWING RHYTHM STRIPS FROM PREVIOUS SESSIONS .......................................................... 86
PRINTING RHYTHM STRIPS FROM PREVIOUS SESSIONS TO THE STRIP CHART
RECORDER ............................................................................................................................................... 86
REVIEW/EDIT SESSION SUMMARY DATA ........................................................................................86
REVIEW/EDIT SESSION MODALITY DATA........................................................................................ 87
REVIEW/EDIT SESSION TIMED COMMENTS..................................................................................... 87
REVIEW/EDIT POST SESSION COMMENTS........................................................................................ 88
REVIEWING PREVIOUSLY RECORDED SESSION WHILE MONITORING..................................... 89
EDITING PATIENT INFORMATION WHILE MONITORING.............................................................. 90
EDITING DEMOGRAPHIC INFORMATION WHILE MONITORING ................................................. 91
EDITING MEDICAL INFORMATION WHILE MONITORING ............................................................ 91

TeleRehab™ 2004 Cardiopulmonary Monitoring System Users Manual
-iv-
EDITING PROTOCOL SCREEN WHILE MONITORING ...................................................................... 92
EDITING FACE SHEET WHILE MONITORING.................................................................................... 92
EDITING PATIENT INFORMATION ON PATIENTS NOT CURRENTLY BEING
MONITORED ............................................................................................................................................ 92
EDITING PATIENT INFORMATION ...................................................................................................... 93
EDITING MEDICAL INFORMATION..................................................................................................... 93
EDITING PROTOCOL INFORMATION.................................................................................................. 94
EDITING FACE SHEET INFORMATION ............................................................................................... 94
VIEWING/EDITING REPORT DATA ON PREVIOUSLY MONITORED PATIENTS ......................... 95
PROGRAM MANAGEMENT
PROGRAM DATA..................................................................................................................................... 97
DAILY SCHEDULES ................................................................................................................................ 97
PRINTING OPTIONS FOR DAILY SCHEDULE..................................................................................... 97
PATIENT LISTS ........................................................................................................................................ 97
PRINTING OPTIONS FOR LISTS ............................................................................................................ 97
MAILING LABELS ................................................................................................................................... 98
PRINTING OPTIONS FOR MAILING LABELS...................................................................................... 98
COMPLIANCE REPORTS ........................................................................................................................ 98
EXPORTING COMPLIANCE REPORT INFORMATION .................................................................... 101
USING THE SCHEDULER ..................................................................................................................... 102
ADDING OR CHANGING CLASS TIMES ............................................................................................ 103
MOVING OR CHANGING PATIENTS TO A DIFFERENT DAY OF THE WEEK.............................. 103
MOVING PATIENTS TO A DIFFERENT TIME OF THE DAY............................................................ 104
PRINTING A SCHEDULER.................................................................................................................... 104
LEAVING THE SCHEDULER................................................................................................................ 104
PERSONAL DATA.................................................................................................................................. 104
OPTIONS AVAILABLE FOR PHASE 2, PHASE 3, PULMONARY, OTHER AND INACTIVE
PATIENTS................................................................................................................................................ 105
PATIENT INFORMATION ..................................................................................................................... 105
MEDICAL INFORMATION.................................................................................................................... 107
SESSION PROTOCOL ............................................................................................................................ 107
FACE SHEET ........................................................................................................................................... 108
ADD NEW NAME ................................................................................................................................... 109
CHANGE CATEGORY ........................................................................................................................... 109
DELETE NAME....................................................................................................................................... 110
PRINT REPORT....................................................................................................................................... 111
OPTIONS AVAILABLE FOR GENERAL MAILING LIST................................................................... 111
PATIENT INFORMATION ..................................................................................................................... 111
ADD NEW NAME ................................................................................................................................... 112
CHANGE CATEGORY ........................................................................................................................... 112
DELETE NAME....................................................................................................................................... 112
PRINT REPORTS..................................................................................................................................... 112
OPTIONS AVAILABLE FOR STAFF LIST, OTHER MAIL LIST, AND PHYSICIAN LIST ............. 112
SINGLE SESSION REPORTS................................................................................................................. 113
VIEWING AND EDITING DAILY SESSION REPORTS...................................................................... 113
THE CONDENSED DAILY REPORT .................................................................................................... 115

TeleRehab™ 2004 Cardiopulmonary Monitoring System Users Manual
-v-
EDITING STRIP INFORMATION.......................................................................................................... 120
PRINTING THE REPORT ....................................................................................................................... 121
THE STANDARD DAILY REPORT....................................................................................................... 122
EDITING STRIP INFORMATION.......................................................................................................... 129
PRINTING THE STANDARD DAILY REPORT ...................................................................................130
MULTI-SESSION REPORTS .................................................................................................................. 130
VIEWING AND EDITING MULTI-SESSION REPORTS ..................................................................... 131
THE STANDARD MONTHLY REPORT ............................................................................................... 132
THE STANDARD DISCHARGE SUMMARY REPORT ...................................................................... 133
EDITING STRIP INFORMATION.......................................................................................................... 135
PRINTING THE STANDARD DISCHARGE SUMMARY REPORT.................................................... 137

TeleRehab™ 2004 Cardiopulmonary Monitoring System Users Manual
-6-
PREFACE
Design
The ScottCare TeleRehab 2004 Cardiopulmonary Monitoring System is designed to
allow monitoring and recording of electrocardiograph (ECG) rhythm strips and related
information for patients undergoing an exercise therapy program. Patients are monitored
via the use of medical telemetry exercise monitoring (TEM) equipment. This feature
allows patients to comply with exercise prescriptions while exercising at a
medical/rehabilitation facility near their home, or by returning to the primary medical
facility to participate in an in-house cardiopulmonary rehabilitation program. The
TeleRehab 2004 Cardiopulmonary Monitoring System includes a Program Management
module that provides the means to print reports of exercise sessions, cumulative patient
progress, and compliance.
Intended Use
The ScottCare TeleRehab 2004 Cardiopulmonary Monitoring System is intended for use
as a group rhythm strip-monitoring device for remote and/or in hospital cardiac
rehabilitation patients. The system is comprised of the computerized central unit located
at the monitoring site, and the RF or Transtelephonic transmitting equipment being used
by the patient.
The RF transmitting equipment is intended for use by a cardiac rehabilitation patient
enrolled in a group rhythm strip-monitoring program. These transmitters are only to be
used under the instruction and supervision of qualified personnel. Federal law restricts
this device to sale by or on the order of a physician. (Qualified personnel are defined
as hospital or clinical personnel who have received training in the proper application and
use of this equipment).
Diagnostic Use Warning
ScottCare Patient Equipment is designed to amplify and process rhythm strips. The
shape of transmitted ECG waveforms may be affected by body movement causing
intermittent electrode contact or by other factors external to the Transmitter module.
ACCORDINGLY, SCOTTCARE MAKES NO CLAIMS OR WARRANTIES,
EXPRESS OR IMPLIED (INCLUDING WARRANTIES OF MERCHANTABILITY
AND FITNESS FOR A PARTICULAR PURPOSE), AS TO THE QUALITY OF THE
ECG SIGNAL RECEIVED, OR AS TO ITS EFFECTIVENESS AS A DIAGNOSTIC
TOOL.
TeleRehab™ 2004 Cardiopulmonary Monitoring System Users Manual
-7-
System Limitations:
The ScottCare TeleRehab Advantage monitoring system is capable of multi tasking,
however, as with all computer systems, there are limitations. Changes to the TeleRehab
Advantage configuration files should not be accomplished if any component of the
system is in use, whether a monitoring terminal or a work station being utilized for use of
the program management applications.
The ScottCare TeleRehab Advantage monitoring system is designed to extensively utilize
the multi tasking capabilities of the Windows XP Professional operating system. As a
result, it is possible that events may occur that cause what appear to be software
anomalies that, in reality, are a result of the interaction between the Advantage system
software and the operating system. Although rare, these idiosyncrasies can be a source of
frustration for the equipment operator.
Examples include:
• When using the mouse and/or touchscreen to provide manipulation of the
Advantage system, it is possible to provide commands via clicking of the
mouse or touching of the touch screen monitor, faster than the system can
respond. In a small number of cases, the operating system will overload
with a backup of input commands producing undesirable results. Although
the software has been ‘hardened’ to ignore commands when too many
commands are backed up, system crashes are still a possibility.
To avoid these undesirable results, one should be patient when
manipulating the Advantage system, and not provide a new command
until the last command has been satisfied.
• It is possible for the interaction between the Advantage software and the
operating system to cause the random discontinuation of the recording of
one or more sessions when monitoring several patients at once. The
Advantage system continuously checks the recording function to verify
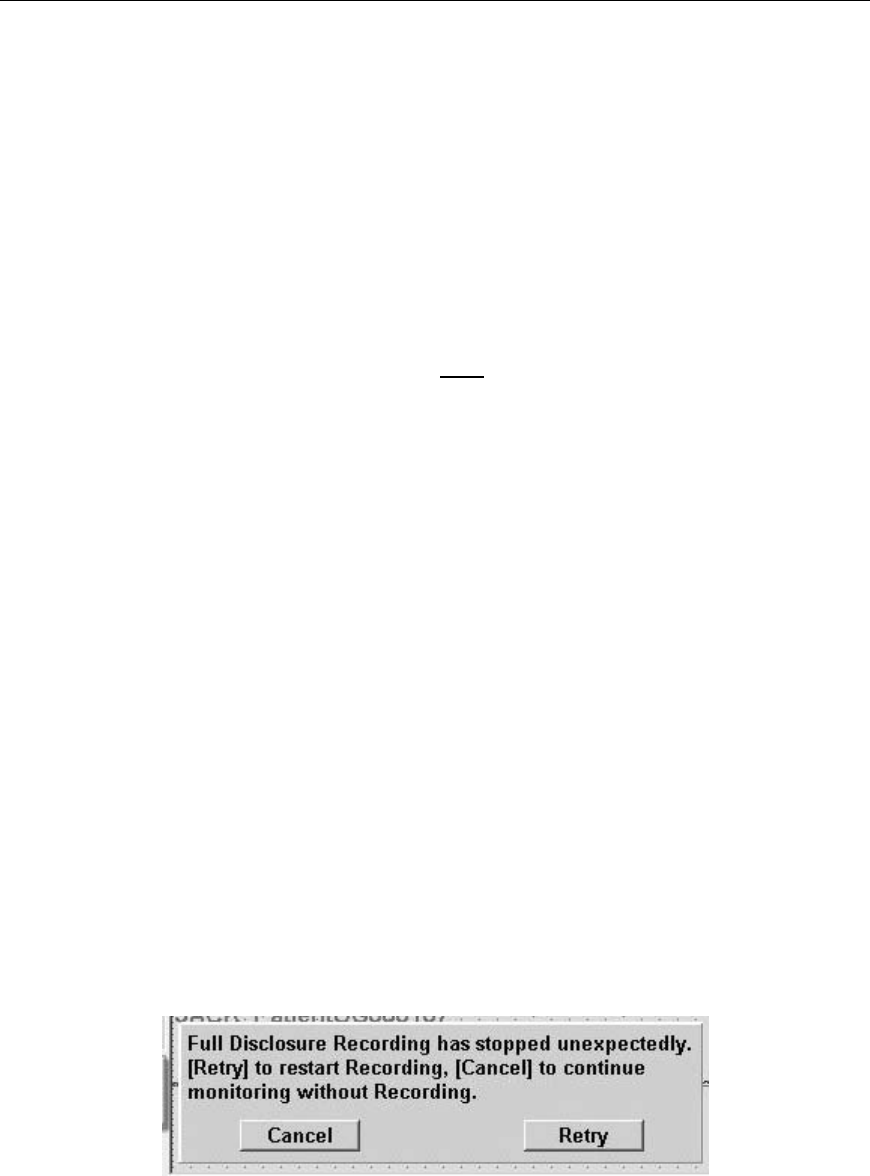
that the recording of each session is taking place. When a discontinuation
occurs, the system will provide notification as follows:
If you wish to continue monitoring without recording, left click on the
‘Cancel’ button.

TeleRehab™ 2004 Cardiopulmonary Monitoring System Users Manual
-8-
If left clicking on the ‘Retry’ button only results in this window being
displayed again, call ScottCare customer service (800-243-9412) for
assistance.

TeleRehab™ 2004 Cardiopulmonary Monitoring System Users Manual
-9-
Disclaimer of Liabilities
The ScottCare Corporation, its parent, affiliates, agents, officers and employees, shall not
be liable for special, incidental, or consequential loss or damages of any kind resulting
from or caused by any defect, failure or malfunctioning of the equipment described
herein, whether a claim for such loss or damages is based upon warranty, contract or
otherwise. The ECG/Receiver system, manufactured by The ScottCare Corporation, is
designed to amplify and transmit Rhythm Strips and THE SCOTTCARE
CORPORATION MAKES NO CLAIMS OR WARRANTIES, EXPRESS OR IMPLIED
(INCLUDING WARRANTIES OF MERCHANTABILITY AND FITNESS FOR A
PARTICULAR PURPOSE) AS TO ITS EFFECTIVENESS AS A DIAGNOSTIC, LIFE
SAVING OR LIFE SUPPORT TOOL.
FCC Part 15 Information
The Telemetry Transmitter provided complies with the limits for a biomedical telemetry
device pursuant to Part 15 of the FCC Rules. These limits are designed to provide
reasonable protection against harmful interference in a residential installation.
Operation of the Telemetry equipment is subject to the following two conditions:
1. The Telemetry Transmitter may not cause harmful interference.
2. The Telemetry Transmitter must accept any interference received,
including interference that may cause undesired operation.
Any changes or modification not expressly approved by ScottCare could void the user’s
authority to operate the telemetry equipment.
The ScottCare Corporation
4791 West 150th Street
Cleveland, OH 44135
(216) 362-0550
(800) 243-9412
Important Safety Information
Read all of these instructions before operating the equipment, and save these instructions
for later reference. There are many instructions that relate to your safety.
WARNING: Use of Computer for Other Software
The Computer(s) used with the Tele-Rehab 2004 Cardiopulmonary Monitoring System
have excess capacity that might be used to run other software applications. It should be
noted that the installation and use of software or hardware other than that installed by

TeleRehab™ 2004 Cardiopulmonary Monitoring System Users Manual
-10-
ScottCare might compromise system performance or cause system failure. ScottCare
recommends against using any workstation as a common computer, and is not
responsible for any problems or system failure caused by use of other software not
expressly approved in writing by ScottCare for use on its systems.
WARNING.PACEMAKER PATIENTS.
Rate meters may continue to count the pacemaker rate during occurrences of cardiac
arrest or some arrhythmias. Do not rely entirely upon rate meter alarms. Keep pacemaker
patients under close surveillance. See this manual for disclosure of the pacemaker pulse
rejection capability of this instrument.
TELEREHAB 2004 MONITORING SYSTEM
Overview
The ScottCare TeleRehab Monitoring System Software is a comprehensive software
package for use on the TeleRehab 2004 computer based cardiopulmonary monitoring
system designed to provide monitoring capability specifically for patients involved in an
exercise schedule prescribed as a part of a cardiac or pulmonary rehabilitation program.
Monitoring takes place while the patient exercises locally within an exercise facility via
the use of telemetry.
QRS Detection
The TeleRehab 2004 Monitoring System software detects QRS complexes in accordance
with the AAMI standard for Cardiac Monitors, Heart Rate Meters and Alarms (EC-13).
Heart Rate
The TeleRehab™ 2004 Monitoring System software detects the patient heart rate by
counting the QRS complexes detected and displaying a running average of the last four
(4) intervals. Sampling occurs constantly and the display is adjusted with each interval. If
the patient’s heart rate exceeds a prescribed high limit value or drops below a prescribed
low limit value, the QRS complex and rate indication will turn RED and an alarm will
sound to alert the system operator that the rate limit has been violated.
Arrhythmia Detection
Rate related arrhythmias generally create a change in the R-to-R interval that is
detectable by the system. As the Tele-Rehab 2004 Monitoring System software monitors
the interval between QRS complexes, a change in R-to-R interval of greater than 25%
will cause the displayed QRS complex to turn blue and an alarm to sound to alert the
system operator that an event has occurred that might require attention. Rates displayed
while the heart rate indicator is blue will not be accurate heart rates.

TeleRehab™ 2004 Cardiopulmonary Monitoring System Users Manual
-11-
Artifact
In order for the heart rate detection system and arrhythmia detection systems to perform
at optimum efficiency, artifact must be minimized. Detected intervals that make no sense
to the system will cause the display grid and rate indication to turn orange. Rates
displayed while the display is orange will not be accurate. Some forms of artifact are of a
type that will be detected by the system as potential arrhythmia in which case the QRS
complex will turn blue and a soft alarm will sound giving a false indication of
arrhythmia. Rates displayed while the QRS complex is blue will not be accurate.
Control of Artifact
It is essential that artifact be minimized to keep from interfering with the monitoring of
the exercising patient. Some types of artifact can cause the system to react as though it
were seeing ectopy, and other types cause the system to identify as erroneous, data
generated when artifact is detected. In general, artifact can be controlled. There is always
the patient who generates artifact no matter what you do; however, those are normally
few and far between.
Several parameters can be involved in the production of artifact. Following are some
causes and cures:
Preparation of the Patient - The greatest cause of artifact is inadequate contact between
the patient and the electrodes. This condition is evident when artifact disappears when the
transmitter is attached to a patient simulator where optimum contact is assured. Some
causes of inadequate contact include the use of outdated pre-gelled electrodes where the
conducting medium is dried out, or inadequate preparation of the area where the electrode
is to be placed.
Alcohol is a commonly used means of patient prep. Although alcohol kills bacteria and
cleans the area, alcohol tends to dry out the skin thereby increasing the skins electrical
resistance. Roughing the area by rubbing with a gauze pad or terry cloth towel often helps
to reduce skin resistance when alcohol is to be used as the prep medium.
The best prep is usually done for stress test patients and is normally extensive in that the
skin is severely stressed before application of electrodes.
ScottCare recommends that a commercially available prep medium such as
"Omniprep™" or "Nuprep™" be used with the cardiopulmonary rehab patient. When
adequately prepped, artifact is rarely a problem.
Electrode Position - Often electrodes are placed on the patient’s chest area over the
pectoral muscle and/or over the soft area under the rib cage. Artifact is then created when
the patient exercises due to the contraction of the pectoral muscle.

TeleRehab™ 2004 Cardiopulmonary Monitoring System Users Manual
-12-
ScottCare recommends that electrodes be placed above the pectoral muscle just under the
clavicle for the right arm and left arm leads, and on the lower rib area for the Left Leg
and/or Right Leg lead. This placement will not normally have a significant effect the
QRS complex but will eliminate motion artifact caused by muscle movement.
Cable Position - Patient Cables are frequently run from the patient transmitter, under the
shirt, to the electrode site. When the lead wires are against the skin, it is possible for
artifact to be introduced due to the rubbing of the wire against the skin during exercise.
ScottCare recommends that wires be run in such a manner as to minimize contact
between the skin and the patient lead wire.
Transmitter/Cable Motion – Transmitters are provided with belt clips and can be worn
on the belt line, placed in a pocket, placed in a pouch, or worn wherever comfortable and
well supported. Transmitters that are not well supported can move about freely which can
create motion artifact.
ScottCare recommends that transmitters be attached to the belt line off the hip to the rear
in order to minimize jostling by the leg during exercise. If a pouch is used, it should be
secured to the patient in a location least susceptible to jarring during exercise such as the
center of the upper chest area.
Out of Range or Low Battery – Depending upon the specific type of transmitter in use,
transmitter range is approximately 100 feet depending upon the environment and what
material is between the transmitter and receiver. If the patient is “out of range” or if the
battery voltage drops below an acceptable level, the QRS signal will be diminished and
may be over written by artifact. Normal battery life is approximately 70 hours. When
artifact appears as though the transmitter is not connected, try changing the battery and
patient lead in that order. If artifact persists, call ScottCare for assistance. Refer to the
section in the service manual regarding the specific transmitter in use for more
information.
TeleRehab™ 2004 Cardiopulmonary Monitoring System Users Manual
-13-
TELEREHAB 2004 MONITORING SYSTEM SET-UP
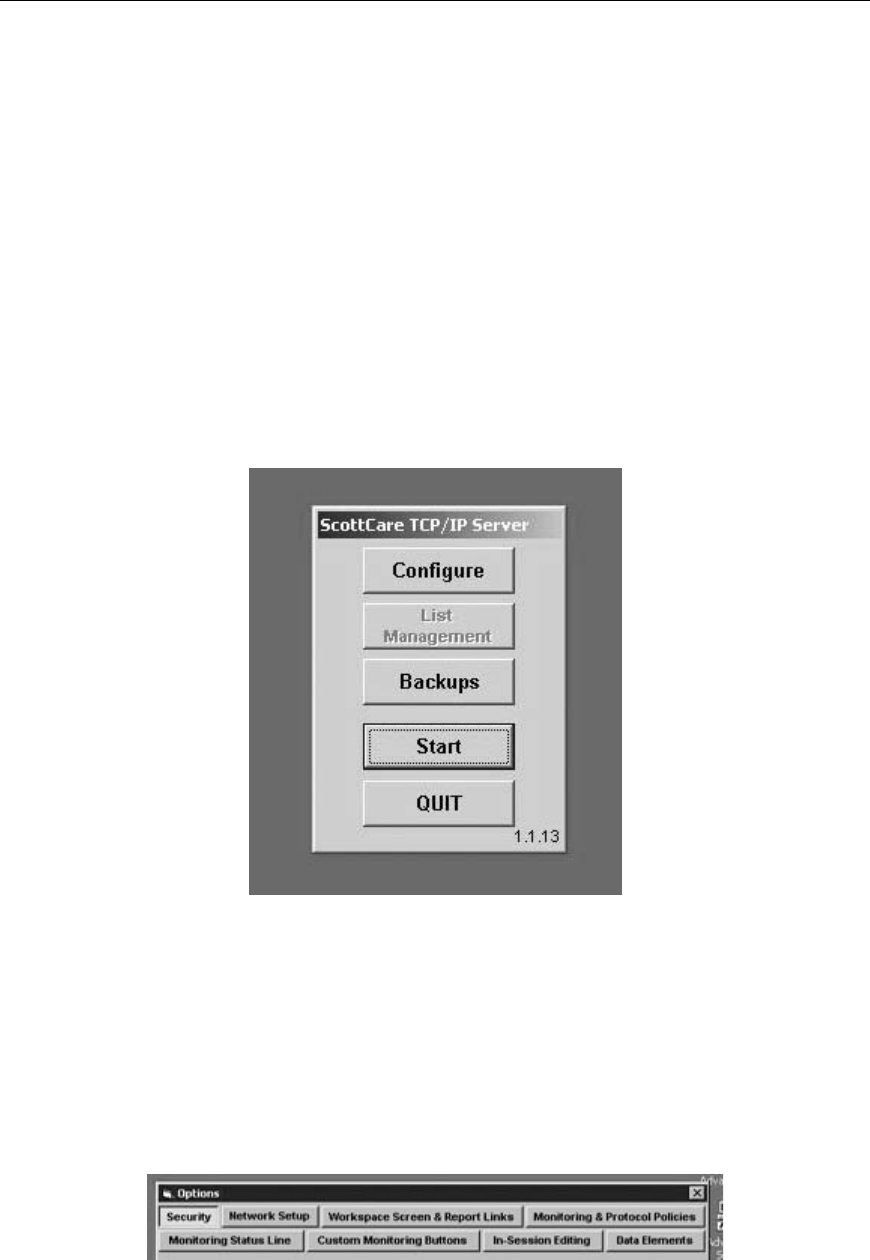
The Server Application
The Server application manages network communication, allows management of name
lists, provides the back up utility, and contains some of the system configuration utilities.
If the TeleRehab 2004 Monitoring System is to run on a customer network, the Server
Application will be installed on a designated server computer.
If the TeleRehab 2004 Monitoring System is to function as a closed network, the Server
application will be installed on the computer designated as the primary
workstation/server.
Configuring the Server
Left click on ‘Configure’ to enter the Options Screens. The tab section across the top of
the screen will allow access to the various configuration options.
TeleRehab™ 2004 Cardiopulmonary Monitoring System Users Manual
-14-
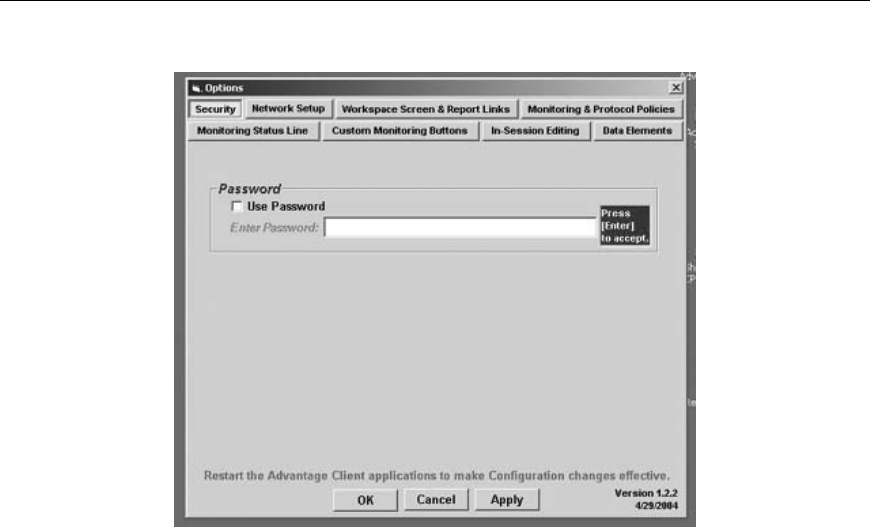
• Security
Establishing a Password: The security option provides the ability to use a password to
grant access to the other Server configuration options. To use the Server password
feature, left click on the ‘Use Password’ block inserting a check mark. Enter the
password to be used in the ‘Enter Password’ block, and press the <Enter> key. Left click
the ‘Apply’ button to register the password within the system.
The next time the Options Screens area is displayed, it will be necessary to enter the
password to access any of the server configuration options.
Changing the password: To change the password, enter the existing password, and left
click on the ‘Use Password’ block to remove the check mark. Left click on the ‘Apply’
button. Next, left click again on the ‘Use Password’ block inserting a check mark. Enter
the new password to be used in the ‘Enter Password’ block, and press the <Enter> key.
Left click the ‘Apply’ button to register the new password within the system.
The next time the Options Screens area is displayed, it will be necessary to enter the new
password to access any of the server configuration options.
When finished with the password option, left click on ‘OK’ to leave the security
configuration screen and start the server application.
You can leave the security configuration screen at any time by clicking on the ‘Cancel’
bar.
You can activate the security configuration screen at any time by clicking on the ‘Server’
bar at the bottom of the screen, and then click on ‘Configure’.
TeleRehab™ 2004 Cardiopulmonary Monitoring System Users Manual
-15-
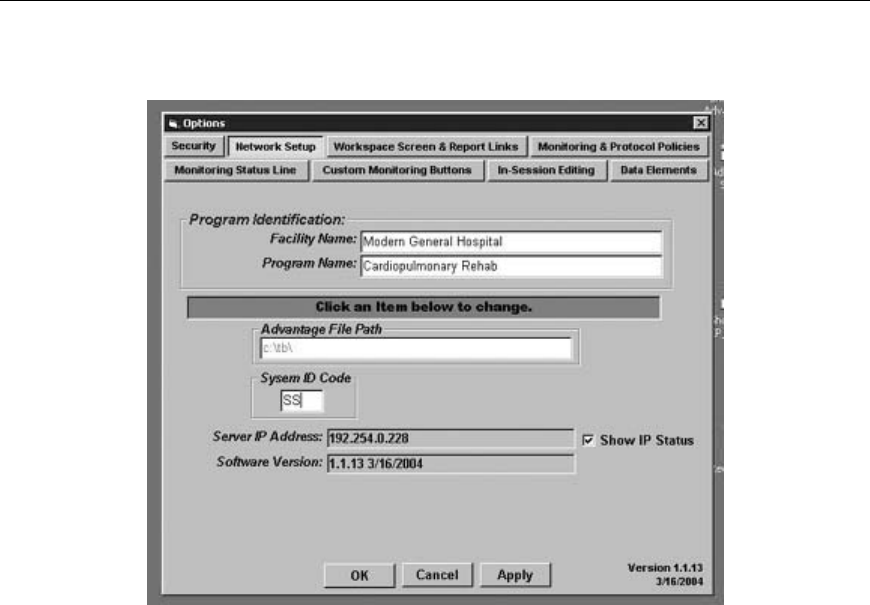
• Network Setup
The upper portion of this screen is the program identification area. The Program
Identification area allows user identification that will appear on the various screens and
reports:
Left click in the block following ‘Facility Name’, and type in the name of the user
facility. (e.g. Modern General Hospital).
Left click in the block following ‘Program Name’, and type in the name of the program.
(e.g. ‘Cardiopulmonary Rehabilitation’ or ‘Healthy Hearts’).
The lower portion of this screen is the configuration area. The first line is entitled ‘File
Path’ and asks for the location of the patient database. During factory setup of the
ScottCare 2004 System software, a default directory entitled TB is installed. If the
standard ScottCare database is to be used, the block under the ‘File Path’ should indicate
the path to the TB directory. E.g. C:\TB, or F:\TB.
The System ID Code identifies the system on which patient files are created, and
defaults to SS.
The line entitled ‘Server IP address:’ displays the IP address of the computer on which
the server application is located.
The line entitled ‘Software Version:’ displays the current software version and date of
release.
TeleRehab™ 2004 Cardiopulmonary Monitoring System Users Manual
-16-
The check box labeled ‘Show IP Status’ is used to determine whether or not the status of
the server will be displayed on the computer screen (in the background) while the
computer is in use. This feature is factory set and should not be changed without direction
from ScottCare.
Once the appropriate data has been entered, click on ‘Apply’. Click on ‘OK’ to leave the
configuration screen.
You can leave the configuration screen at any time by clicking on the ‘Cancel’ bar.
You can activate the configuration screen at any time by clicking on the ‘Server’ bar at
the bottom of the screen, and then click on ‘Configure’.
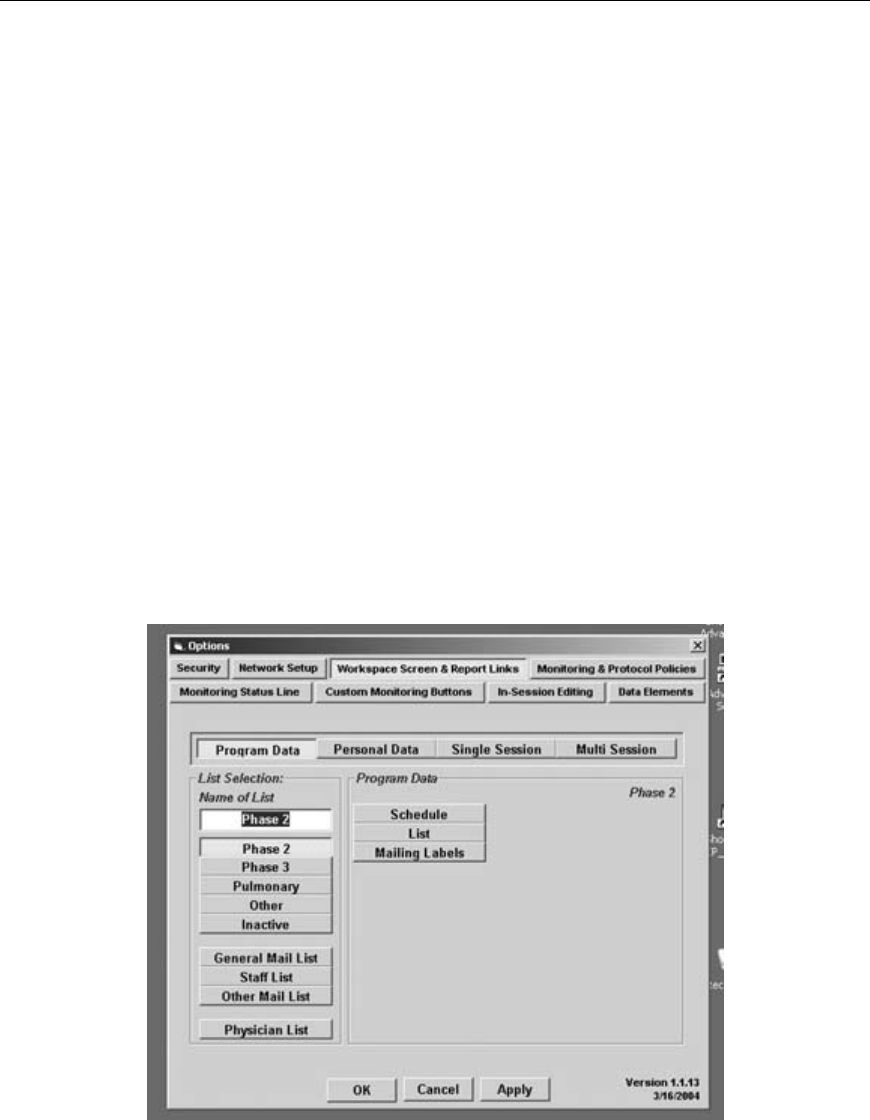
• Workspace Screen and Report Links
The Workspace Screen and Report Links tab provides access to the utility that allows
the user to define the labels to be used in identification of the various lists and report
links for each data handling area within the system. It also provides the means to identify
what screen or report will be printed or displayed when that specific area is selected for
use.
The Workspace screen & report links utility screen displays blocks with labels for the
four data handling areas provided by the system:
TeleRehab™ 2004 Cardiopulmonary Monitoring System Users Manual
-17-
Program Data – This area provides functions that are related to the overall program as
opposed to an individual. Schedules and lists are available in this area as well as
compliance reports.
Personal Data – This area provides the means of entering and editing personal
information on patients and/or other personnel when it is desired to maintain personal
data within the system. Entering new patient data, changing status, and the ability to print
a data sheet containing personal data is also provided by this area.
Single Session – This area contains information relating to the daily report function
including unmonitored reports and full disclosures of recorded sessions.
Multi Session – This area allows the collation of data to prepare reports involving data
collected in more than one daily session report.
Links are established for each of the four major areas based on the type of data to be
entered and reports to be generated.
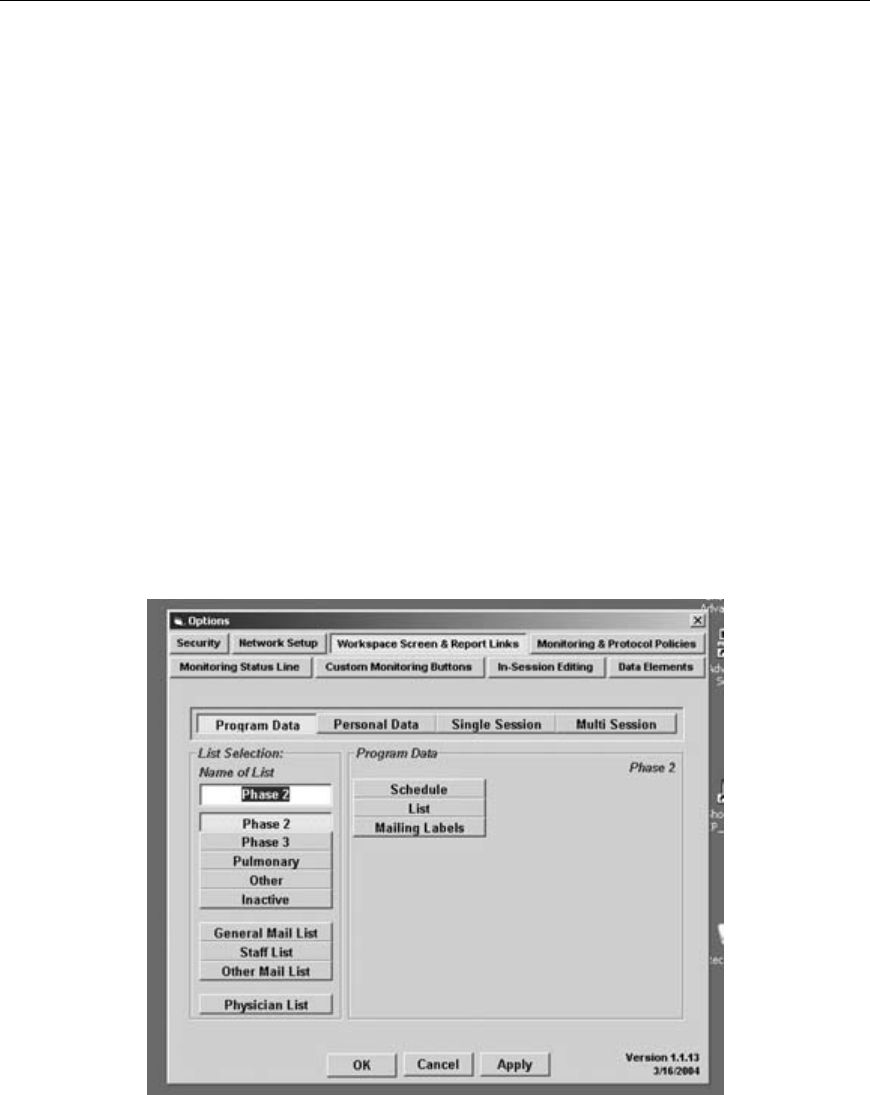
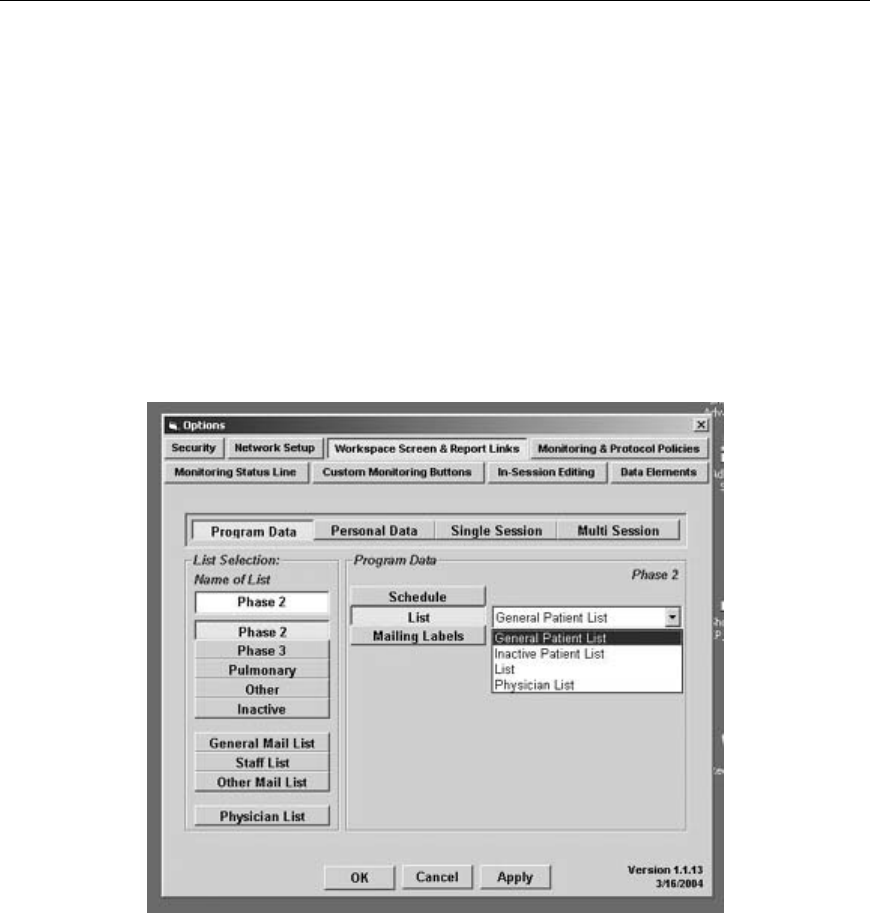
Program Data Links
The List Selection area provides names for each of the lists maintained by the system.
Names can be changed to accommodate your program needs. To change a list name, left
click on the name that you wish to change.
The current name will appear in the white block at the top of the list and will be
highlighted in black.
TeleRehab™ 2004 Cardiopulmonary Monitoring System Users Manual
-18-
Type the name desired to identify the selected list and press the <Enter> key. The new
name will appear in the selected block.
The Program Data area identifies the activities available for the selected list. Left
clicking on one of the program data buttons will cause a third block to appear with a drop
down window. The list provided on the drop down window is a list of forms available for
selection. (See the section on Utilities and Design for more information on report forms).
The report form selected for each area will be the default form. When the system is asked
to print a schedule, a list, or mailing labels for a group of patients, the form used will be
determined by the settings in this utility.
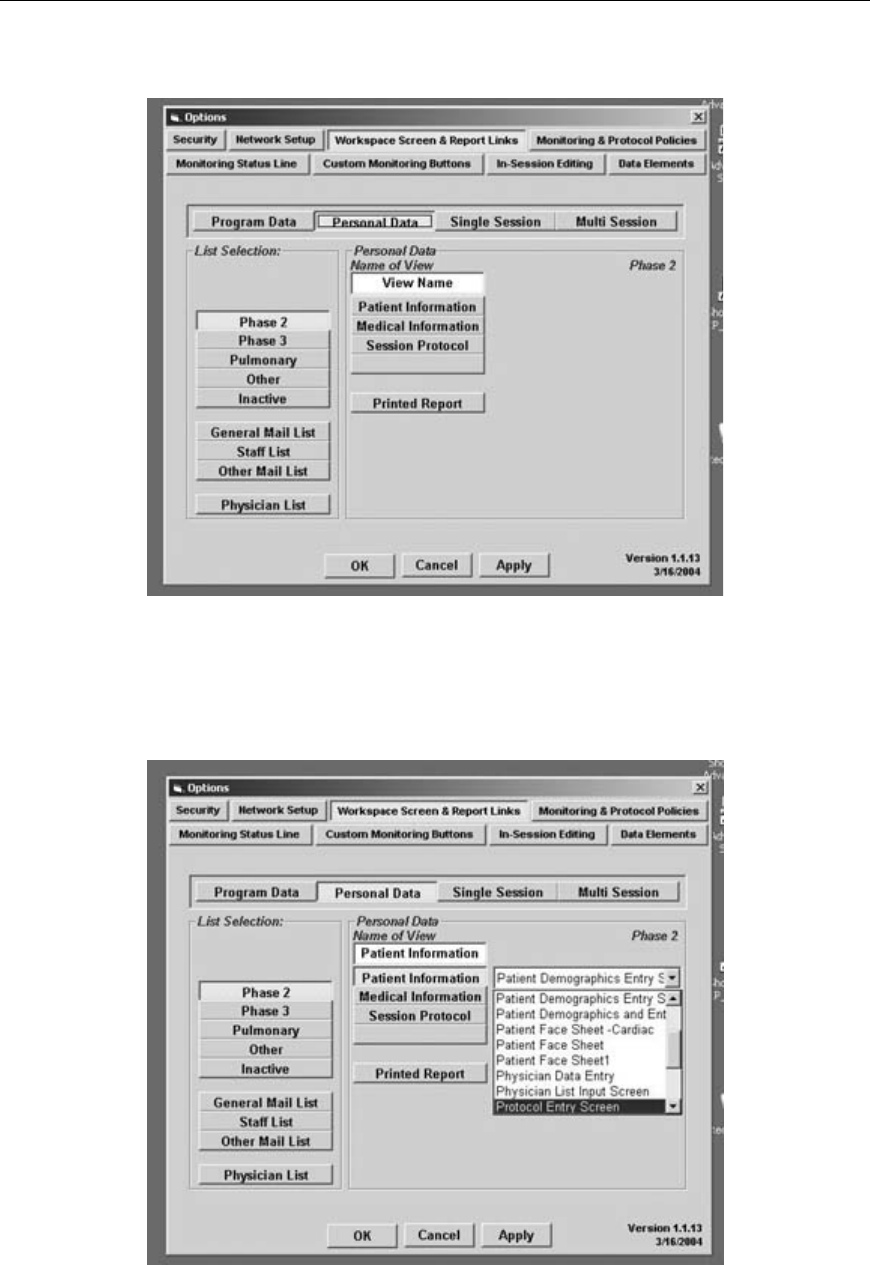
Personal Data Links
The List Selection area provides buttons for each of the lists maintained by the system.
The Personal Data area provides names for the various screen views available for input
of personal data. Names can be changed to accommodate your program needs. To change
a view name, left click on the name that you wish to change.
The current name will appear in the white block at the top of the list and will be
highlighted in black. This feature functions the same as list selection in program data
links.
TeleRehab™ 2004 Cardiopulmonary Monitoring System Users Manual
-19-
Type the name desired to identify the selected list and press the <Enter> key. The new
name will appear in the selected block.
Left clicking on one of the four personal data buttons will cause a third block to appear
with a drop down window. The list provided on the drop down window is a list of forms
available for selection (See the section on Utilities and Design for more information on
report forms).
TeleRehab™ 2004 Cardiopulmonary Monitoring System Users Manual
-20-
The report form selected for each area will be the default form. When entering data into
the system, the screens viewed for data entry will be determined by the form selected in
this utility.
Left clicking on the button labeled ‘Printed Report’ will also cause a third block to appear
with a drop down window. The list provided on the drop down window is a list of forms
available for selection (See the section on Utilities and Design for more information on
report forms).
The report form selected for this area will determine the report form to be utilized as the
‘Patient Face Sheet’ or ‘Patient Information Report’. When asking the system to print
patient data, the report form printed will be determined by the form selected in this
utility.
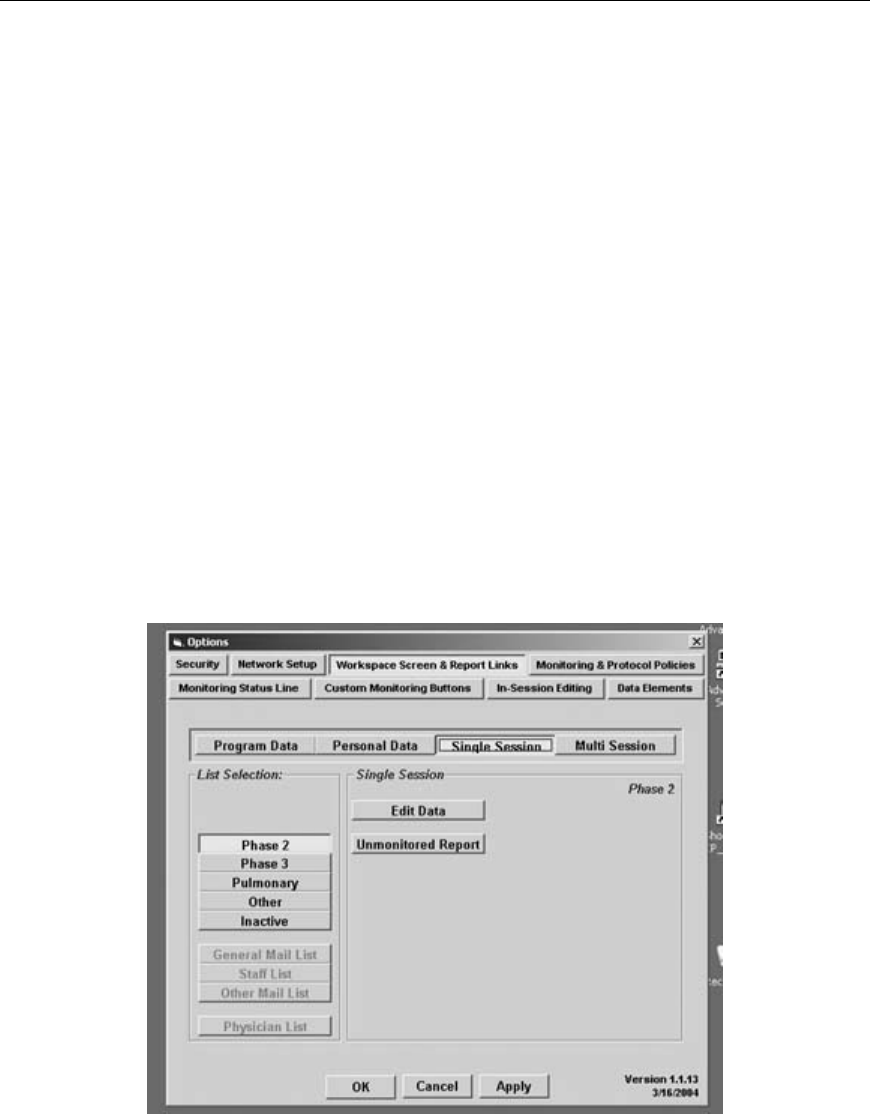
Single Session Links
The List Selection area provides buttons for each of the lists maintained by the system.
Only those that are applicable to single session reporting are available for selection.
The Single Session area provides a button for editing report data and a second button to
identify the form to be used when preparing an unmonitored report.
Left clicking on the ‘Edit Data’ button will provide a drop down window with a list of
single session report forms available for use. The report form selected for this area will
be assigned to all new patients in the selected list and will appear the first time a session
is edited for that patient.
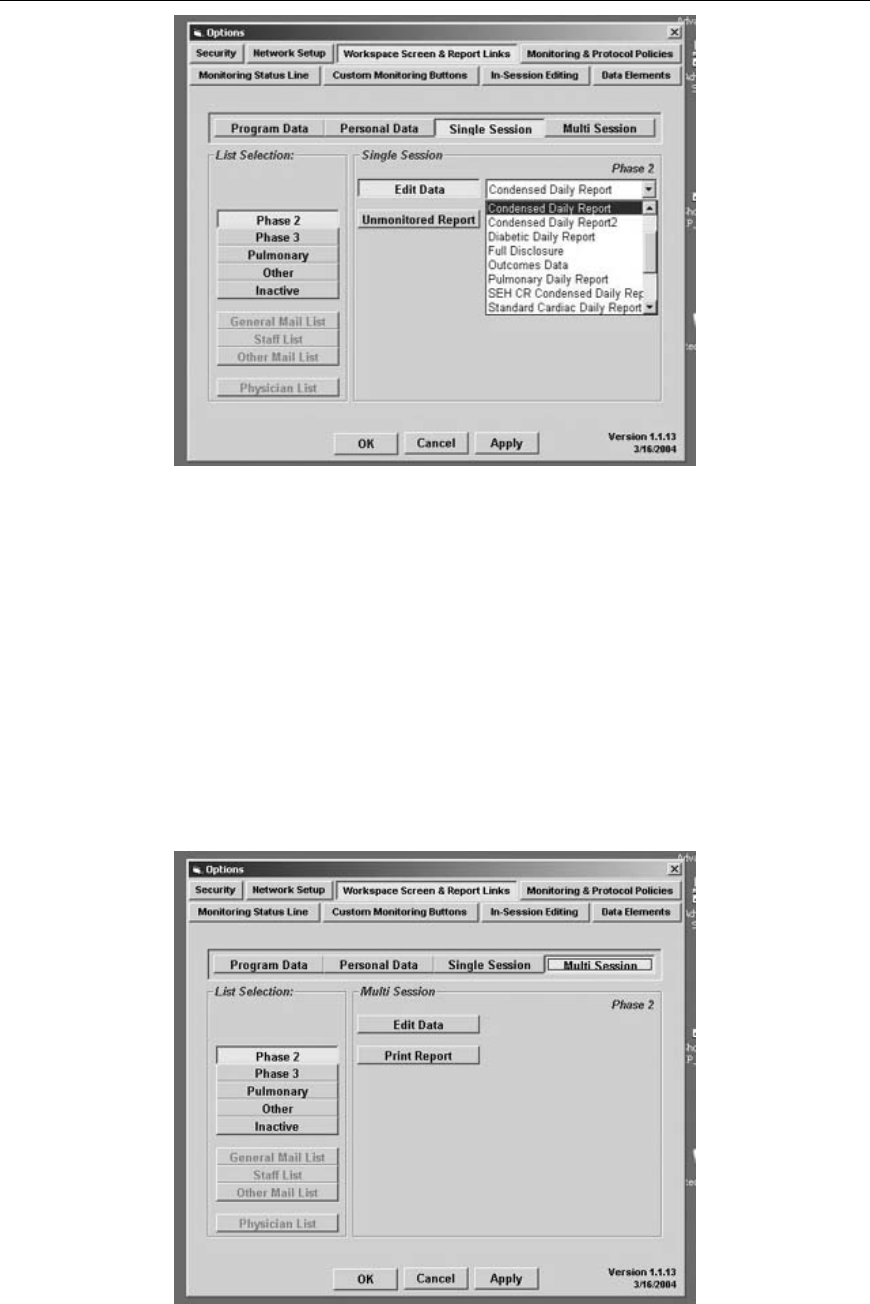
TeleRehab™ 2004 Cardiopulmonary Monitoring System Users Manual
-21-
Left clicking on the ‘Unmonitored Report’ button will also provide a drop down window
with a list of single session report forms available for use. The report form selected will
be identified as the form to use each time the system is asked to provide an unmonitored
report on any patient in the selected list.
Multi Session Links
The List Selection area provides buttons for each of the lists maintained by the system.
Only those that are applicable to multi session reporting are available for selection.
The Multi Session area provides a button for editing report data and a second button to
identify the default form to be used when preparing a multi session report.
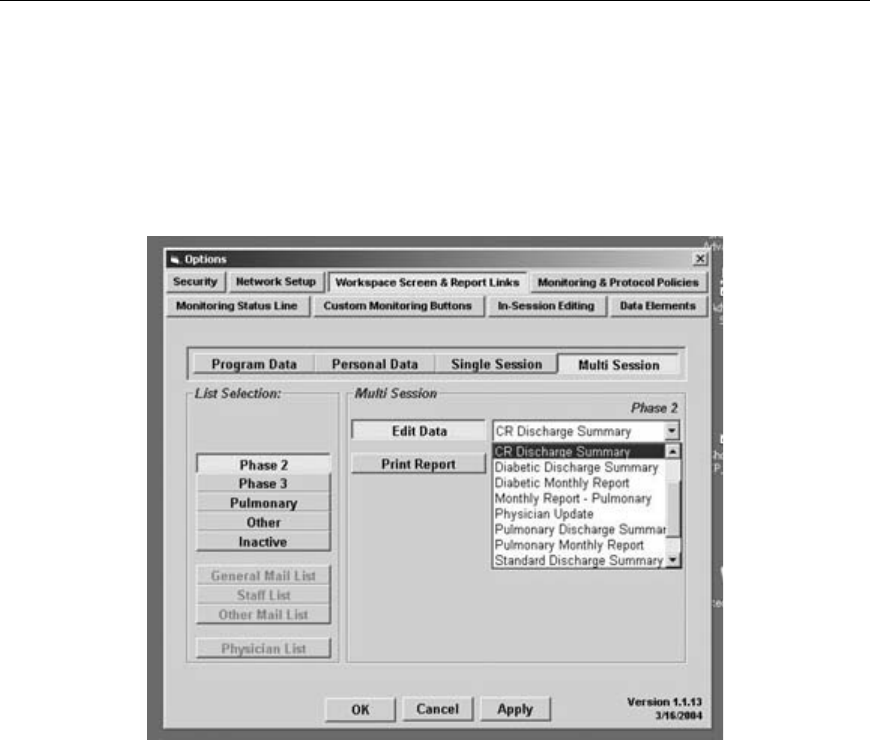
TeleRehab™ 2004 Cardiopulmonary Monitoring System Users Manual
-22-
Left clicking on the ‘Edit Data’ button will provide a drop down window with a list of
multi session report forms available for use. The report form selected for this area will be
assigned to all new patients in the selected list and will appear the first time a session is
edited for that patient.
Left clicking on the ‘Print Report’ button will also provide a drop down window with a
list of multi session report forms available for use. The report form selected will be the
default form to be printed each time the system is asked to provide a multi session report
on any patient in the selected list.
Once the appropriate data has been entered, click on ‘Apply’. Click on ‘OK’ to leave the
configuration screen.
You can leave the configuration screen at any time by clicking on the ‘Cancel’ bar.
You can activate the configuration screen at any time by clicking on the ‘Server’ bar at
the bottom of the screen, and then click on ‘Configure’.
TeleRehab™ 2004 Cardiopulmonary Monitoring System Users Manual
-23-
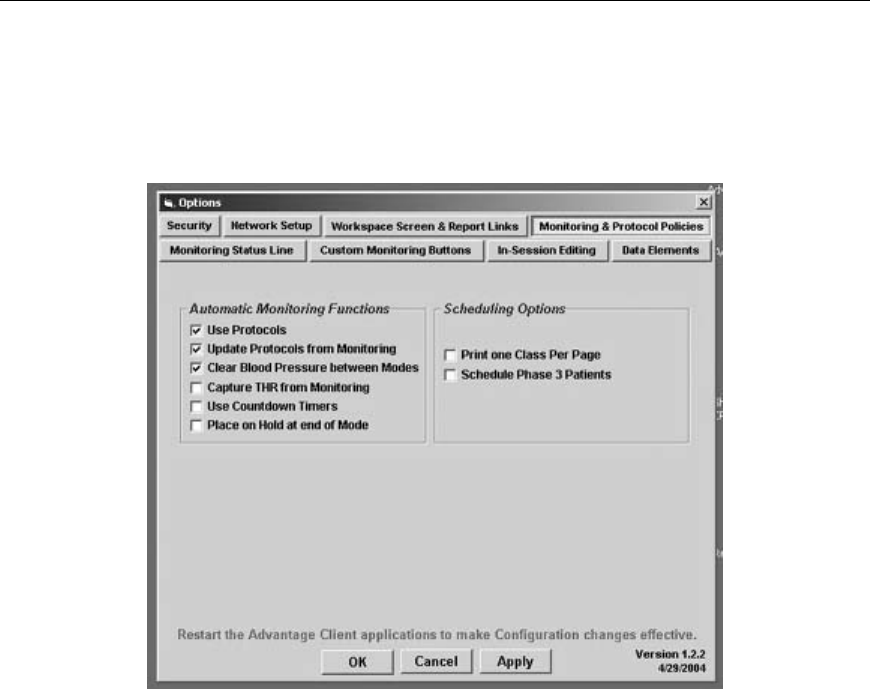
• Monitoring and Protocol Policies
The Monitoring and Protocol Policies tab provides entry into the utility that establishes
a set of rules regarding use or non-use of many of the features of the system.
The Monitoring and Protocol Policies screen contains a number of check blocks and
features that allow the selection of various options available in the system.
Automatic Monitoring Functions
Use Protocols – If selected, this option will allow the system to interrogate a patient
protocol for workload values for each modality. The value indicated in the patient
protocol will be used as the default when a patient is indicated to be initiating exercise on
an exercise device listed in the protocol.
Update Protocols from monitoring – If selected, this option allows the system to update
workloads indicated in the patient protocol during the monitoring process. It should be
noted that the system must be recording a session, and the protocol must be being
followed for this function to work properly.
Clear Blood Pressure Between Modes – If selected, the system insures that no blood
pressure values are displayed as values taken during exercise on a specific modality
unless entered while the patient is indicated to be exercising on that specific modality.

TeleRehab™ 2004 Cardiopulmonary Monitoring System Users Manual
-24-
Capture THR from Monitoring – If selected, The target heart rate values indicated in the
patient protocol when the patient starts a recorded session will be replaced by the target
heart rate calculated by the system for the current session. NOTE: Target heart rates such
as R+30 or a target heart range will not be allowed.
Use Countdown Timers – If selected, the system will interrogate the patient session
protocol for the exercise time prescribed for an exercise device and when that device is
selected as the device currently to be used by the patient, Start the timing indicator at that
number and count down to 0.
Place on Hold at End of Mode – If selected, the system will automatically cause the
system to stop timing as active exercise time and indicate that such timing has halted.
Indication is accomplished by displaying that the timer is in ‘HOLD’, when the exercise
time indicated in the patient protocol for a device terminates.
Scheduling Options
Print One Class Per Page – If selected, the system will group patients together by
scheduled starting times and print them together as a separate report. E.g. All 8AM
patients will be printed out separately from any of the 9AM patients.
Schedule Phase 3 Patients – If selected, the system will provide scheduling for phase 3
patients.
• Monitoring Status Line
The Monitoring Status Line tab provides entry into the utility that allows identification
of the resources to appear in the monitoring status line on the monitoring screen.

TeleRehab™ 2004 Cardiopulmonary Monitoring System Users Manual
-25-
This utility allows the user to identify the data elements that are to be displayed on the
monitoring screen relating to a patient who is being monitored. The layout of the utility
includes:
Monitoring Status Line – a representation of what will appear on the monitoring screen
during monitoring.
Items Available for Status Line – a block containing a list of data items eligible for
inclusion in the Monitoring Status Line.
# of Characters in Data – allows the reservation of space for the information that is to be
displayed.
Label – Allows the name of the displayed data to be abbreviated or otherwise changed.
The system is provided with a monitoring status line preset at the factory.
To delete an item from the Monitoring Status Line, left click in the Monitoring Status
Line on the data element you wish to delete and then lift click on the Delete button. The
data item will be removed from the Monitoring Status Line.
To add an item to the Monitoring Status Line, left click in the ‘Items Available for Status
Line’ on the data element that you wish to add. The current item name will appear in the
block after ‘Label’. Edit the name of the item if desired to define the label to be used for
this data element in the Monitoring Status Line.
Enter the number of characters to be reserved for data in the block after ‘# of Characters
in ‘Data’ block.
Left click on the Add block, and the new data element label will be placed in the
Monitoring Status Line.
Left click and hold the new data element label and move it to the desired location.
To change an item in the Monitoring Status Line, left click in the Monitoring Status Line
on the data element you wish to change and then lift click on the Change button.
Left click in the ‘Items Available for Status Line’ on the data element that you wish to
change to. The new data element will replace the selected data element in the Monitoring
Status Line.
Changes to the new data element label and # of characters in Data blocks can still take
place as described above.
TeleRehab™ 2004 Cardiopulmonary Monitoring System Users Manual
-26-
When you are satisfied with the contents of the Monitoring Status Line, left click on the
‘Apply’ button at the bottom of the screen.
Left click on the ‘OK’ button to leave the Monitoring Status Line Utility.
Left click on the ‘Cancel’ button to leave the Monitoring Status Line Utility at any time.
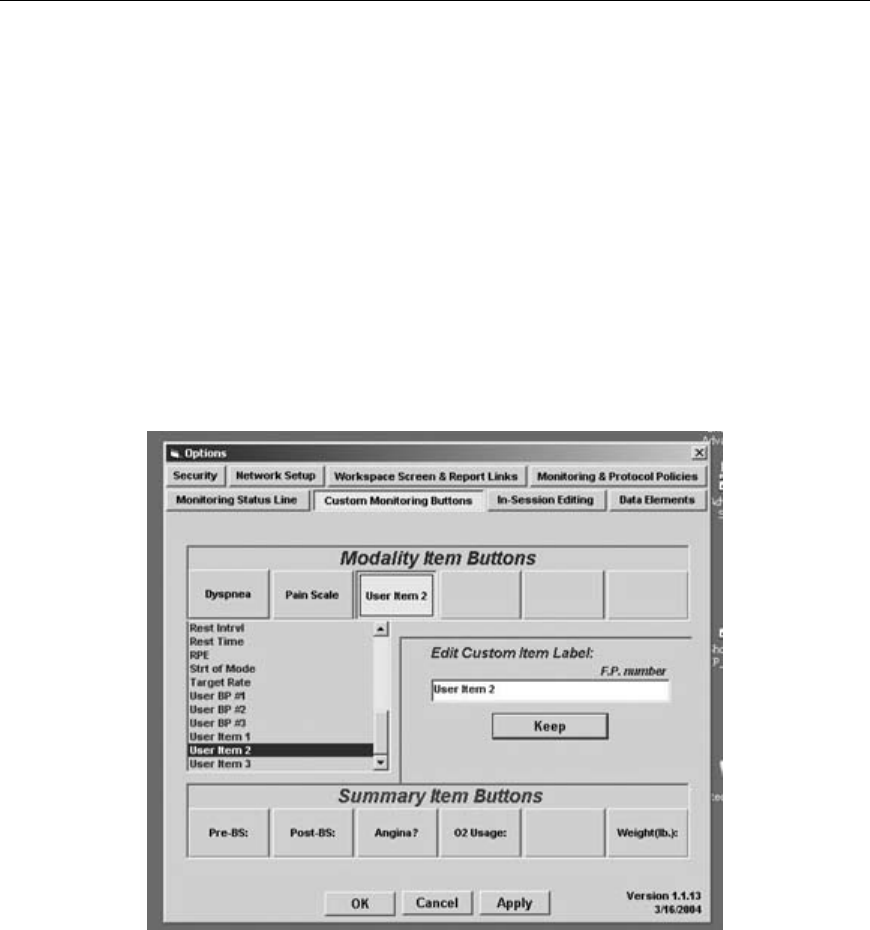
• Custom Monitoring Buttons
The Custom Monitoring Buttons tab provides entry into the utility that allows the user
to define both Summary and Modality data elements that can be entered during a
monitoring session through the use of touch buttons.
Modality Item Buttons – There are six modality buttons available for customization.
To Add a label to a modality button, left click on the blank button to be modified and the
list of modality data items available for use appears.
Left click on the modality data element to be used in the modality button and the name of
the data item will appear on the button.
To Delete a label from a custom modality button, left click on the item to be deleted and
press the ‘Del’ key. The label will be removed from the button.

TeleRehab™ 2004 Cardiopulmonary Monitoring System Users Manual
-27-
To Change a label on a custom modality button, left click on the button to be changed
and then left click on the desired data element label in the list of data items available. The
new data label will appear in the custom modality button.
Note that the list of modality data items available for use includes several labels
indicating ‘User Defined’. There are three categories of user-defined items:
User BP items – to be utilized for blood pressure style data entry.
User Integer – to be utilized for numeric style data entry.
User Item – to be utilized for alphanumeric style data entry.
To rename a User label, left click on the label to be renamed and then left click on the
‘Edit Custom Item Label’ block that appears.
Type in the name to be used and left click on the ‘Keep’ button. The new label will
appear in place of the ‘User’ label. The newly named data element can be added,
changed, or deleted as described above.
Summary Item Buttons
There are six summary buttons available for customization.
To Add a label to a summary button, left click on the blank button to be modified and the
list of summary data items available for use appears.
Left click on the summary data element to be used in the summary button and the name
of the data item will appear on the button.
To Delete a label from a custom summary button, left click on the item to be deleted and
press the ‘Del’ key. The label will be removed from the button.
To Change a label on a custom summary button, left click on the button to be changed
and then left click on the desired data element label in the list of data items available. The
new data label will appear in the custom summary button.
When you are satisfied with the contents of the Custom Monitoring Buttons, left click on
the ‘Apply’ button at the bottom of the screen.
Left click on the ‘OK’ button to leave the Custom Monitoring Buttons Utility.
Left click on the ‘Cancel’ button to leave the Custom Monitoring Buttons Utility at any
time.
TeleRehab™ 2004 Cardiopulmonary Monitoring System Users Manual
-28-
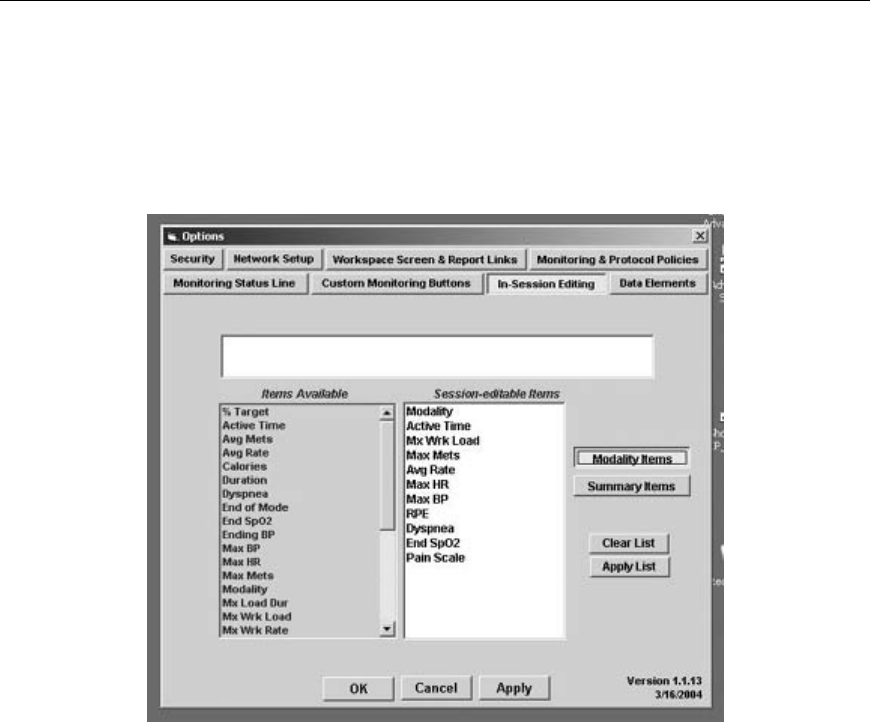
• In-Session Editing
The In-Session Editing tab provides access to the utility that allows the user to define
both Summary and Modality data elements that can be edited from the monitoring screen
while monitoring a session.
To identify the modality items to be available for editing while monitoring:
Left click on the Modality Items button.
Select items to be made available for editing from the list of items available by double
left clicking on the name of the data item. The item will be transferred to the Session-
Editable Items window.
To remove an item from the Session-editable Items window, left click on the item to be
deleted and press the ‘Del’ key. The item will be deleted from the list.
To completely clear the list and start over, left click on the ‘Clear List’ Button.
When you are satisfied with the list of Session-Editable items, left click on ‘Apply List’.
TeleRehab™ 2004 Cardiopulmonary Monitoring System Users Manual
-29-
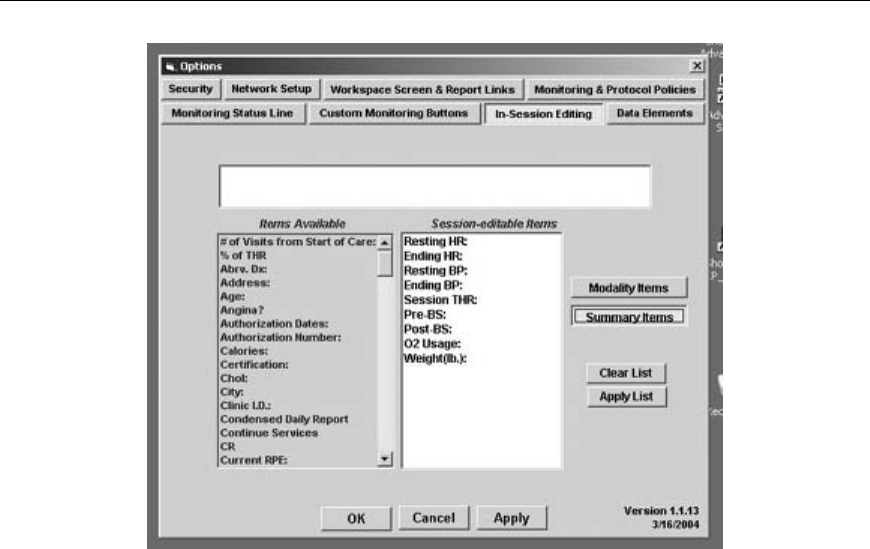
To identify the summary items to be available for editing while monitoring:
Left click on the Summary Items button.
Select items to be made available for editing from the list of items available by double
left clicking on the name of the data item. The item will be transferred to the Session-
Editable Items window.
To remove an item from the Session-editable Items window, left click on the item to be
deleted and press the ‘Del’ key. The item will be deleted from the list.
To completely clear the list and start over, left click on the ‘Clear List’ Button.
When you are satisfied with the list of Session-Editable items, left click on ‘Apply List’.
When you are satisfied with the contents of the In-Session Editing Utility, left click on
the ‘Apply’ button at the bottom of the screen.
Left click on the ‘OK’ button to leave the In-Session Editing Utility.
Left click on the ‘Cancel’ button to leave the In-Session Editing Utility at any time.
TeleRehab™ 2004 Cardiopulmonary Monitoring System Users Manual
-30-
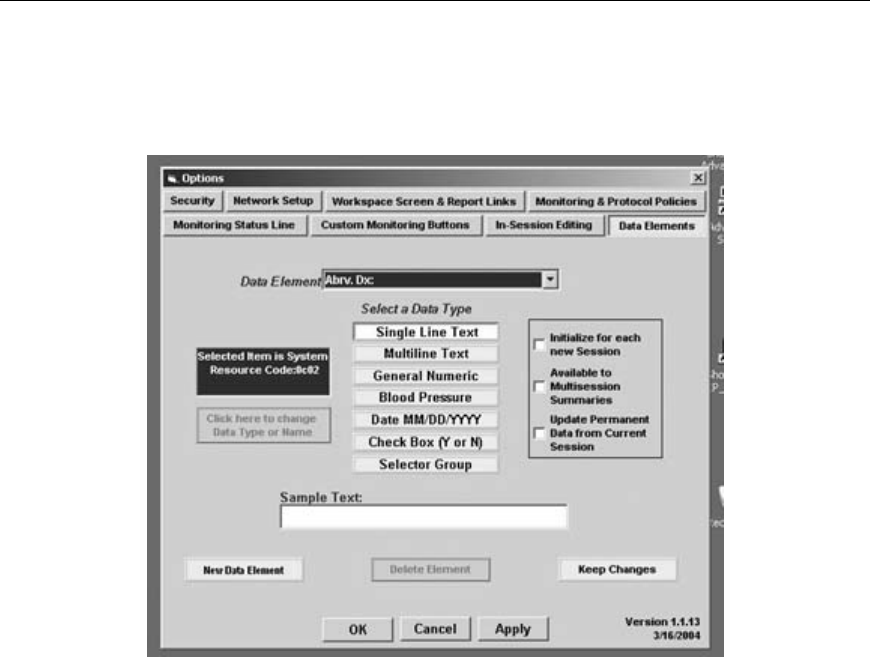
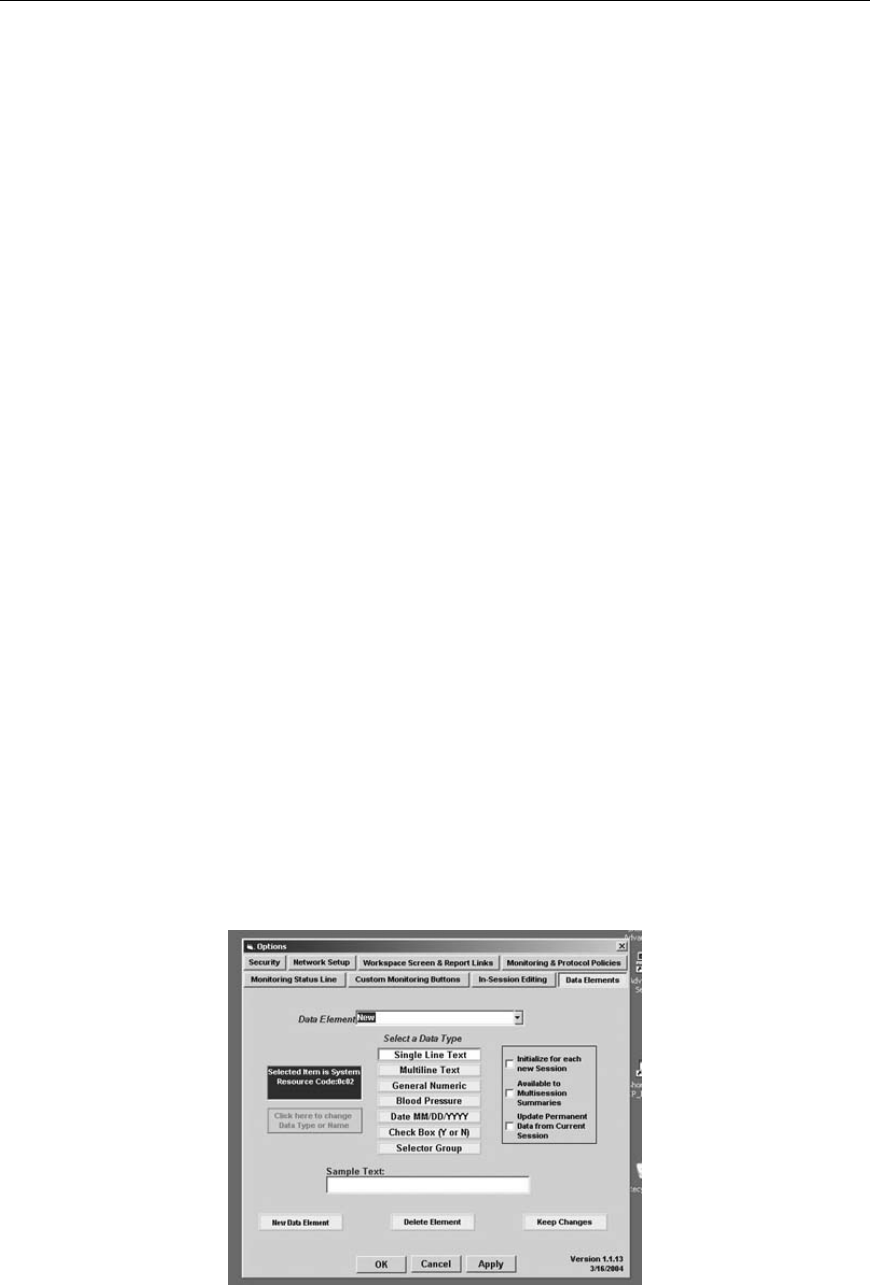
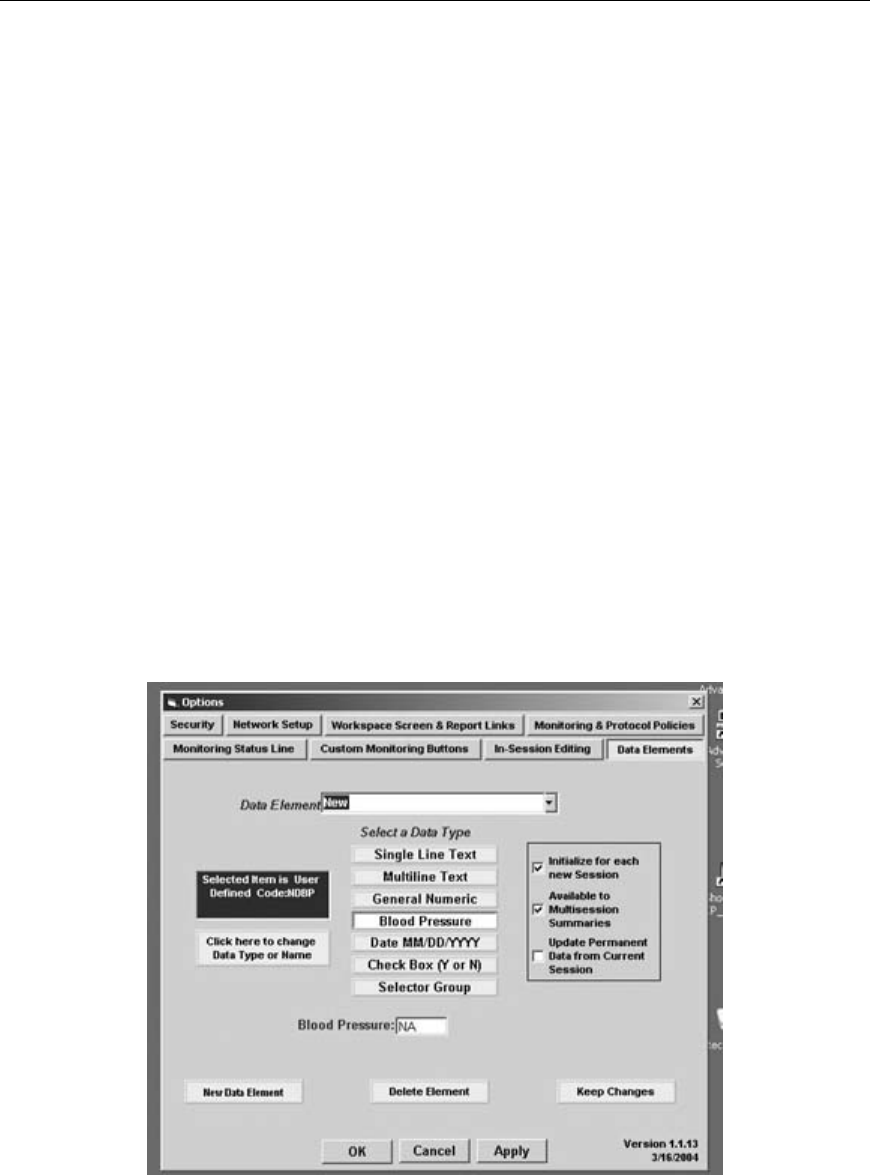
• Data Elements
The utility that maintains a list of the data elements that can be used in the various reports
and screens is called the Data Element Editor.
At the top is the ‘Data Element’ window. The drop down feature will list all of the
accessible resources in the system of the selected type. The item appearing in the window
is the current active data element.
Down the middle is a list of buttons indicating the various data types that can be created
and used by the system.
To the left in the darker box is information regarding the selected resource item.
Below the information box is a button allowing you to change data type or data element
name.
To the right are check boxes allowing specific use for each data item.
Caution: Once resource elements are created, moving them between resource types may
cause data elements that no longer make sense. ScottCare recommends that resource
elements that require change of resource type be done under the guidance of ScottCare
technical support.
TeleRehab™ 2004 Cardiopulmonary Monitoring System Users Manual
-31-
Single Line Text Items
Single Line Text data items offer the greatest utility due to their ability to deal with
diverse data. Data to be entered can be alpha or numeric and should be short text items
that utilize a single line of space.
Single Line Text Resources can be identified to reset to a blank space at the start of each
session. To do so, be sure that the ‘Single Line Text’ button is selected and click on the
drop down window to display the list of single line text resources available. Left click on
the resource whose name you desire to work with so it is displayed in the Data Element
window. Click on the box labeled ‘Initialize for each new Session’ so that a check mark
appears in the box. Note: If a resource is identified to reset to a blank space at the
start of each session, it cannot be identified for use to update a patient data file as
described below.
Single Line Text Resources are not allowed for use in Multisession Summaries and will
not be available whether the block labeled ‘Available to Multisession Summaries’ is
checked or not.
Single Line Text Resources used in the patient’s data file can be updated from a current
session. To allow the exchange of data, be sure that the ‘Single Line Text’ button is
selected and click on the drop down window to display the list of single line text
resources available. Left click on the resource whose name you desire to work with so it
is displayed in the Data Element window. Click on the box labeled ‘Update Permanent
Data from Current Session’ so that a check mark appears in the box. Note: If a resource
is identified to update a patient data file, it cannot be identified to start each session
blank as described above.
Adding Single Line Text Resources
Be sure that the ‘Single Line Text’ button is selected and left click on the ‘New Data
Element’ button to get the screen below.
TeleRehab™ 2004 Cardiopulmonary Monitoring System Users Manual
-32-
Type in the name of the new resource element and left click on ‘Keep Changes’.
The new element will be added to the list of single line text data elements.
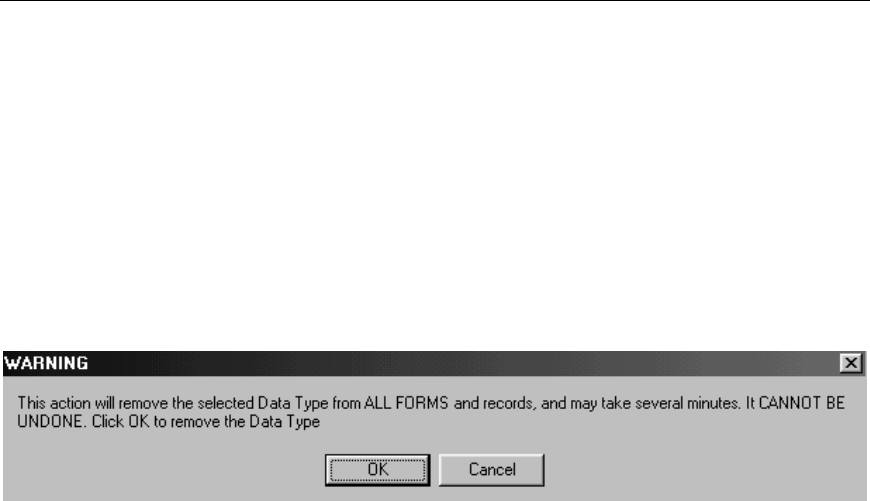
Deleting Single Line Text Resources
Be sure that the ‘Single Line Text’ button is selected and click on the drop down window
to display the list of single line text resources available. Left click on the resource that
you desire to delete so it is displayed in the Data Element window.
Click on ‘Delete Element’ and the system will present the following warning:
Click on OK to complete the removal of the selected resource.
Cancel will abort the removal process and return to the previous screen.
Changing the Name of a Single Line Text Resource
Be sure that the ‘Single Line Text’ button is selected and click on the drop down window
to display the list of single line text resources available. Left click on the resource whose
name you desire to change so it is displayed in the Data Element window.
Left click on the button labeled ‘Click here to change Data Type or Name’.
Type the new name for the resource and click on ‘Keep Changes’.
The resource will now appear on the list as the new item.
Multiline Text Items
Multiline text data items allow entry of multiple lines of data, either alpha or numeric.
These data items are most often used for comment types of data.
Multiline Text Resources can be identified to reset to a blank space at the start of each
session. To do so, be sure that the ‘Multiline Text’ button is selected and click on the
drop down window to display the list of multiline text resources available. Left click on
the resource whose name you desire to work with so it is displayed in the Data Element
window. Click on the box labeled ‘Initialize for each new Session’ so that a check mark
appears in the box. Note: If a resource is identified to reset to a blank space at the
TeleRehab™ 2004 Cardiopulmonary Monitoring System Users Manual
-33-
start of each session, it cannot be identified for use to update a patient data file as
described below.
Multiline Text Resources are not allowed for use in Multisession Summaries and will not
be available whether the block labeled ‘Available to Multisession Summaries’ is checked
or not.
Multiline Text Resources used in the patient’s data file can be updated from a current
session. To allow the exchange of data, be sure that the ‘Single Line Text’ button is
selected and click on the drop down window to display the list of single line text
resources available. Left click on the resource whose name you desire to work with so it
is displayed in the Data Element window. Click on the box labeled ‘Update Permanent
Data from Current Session’ so that a check mark appears in the box. Note: If a resource
is identified to update a patient data file, it cannot be identified to start each session
blank as described above.
Adding Multiline Text Resources
Be sure that the ‘Multiline Line Text’ button is selected and left click on the ‘New Data
Element’ button to get the screen below.
Type in the name of the new resource element and left click on ‘Keep Changes’
The new element will be added to the list of multiline text data elements.

TeleRehab™ 2004 Cardiopulmonary Monitoring System Users Manual
-34-
Deleting Multiline Text Resources
Be sure that the ‘Multiline Text’ button is selected and click on the drop down window to
display the list of multiline text resources available. Left click on the resource that you
desire to delete so it is displayed in the Data Element window.
Click on ‘Delete Element’ and the system will present the following warning:
Click on OK to complete the removal of the selected resource.
Cancel will abort the removal process and return to the previous screen.
Changing The Name of a Multiline Text Resource
Be sure that the ‘Multiline Text’ button is selected and click on the drop down window to
display the list of multiline text resources available. Left click on the resource whose
name you desire to change so it is displayed in the Data Element window.
Left click on the button labeled ‘Click here to change Data Type or Name’.
Type the new name for the resource and click on ‘Keep Changes’.
The resource will now appear on the list as the new item.
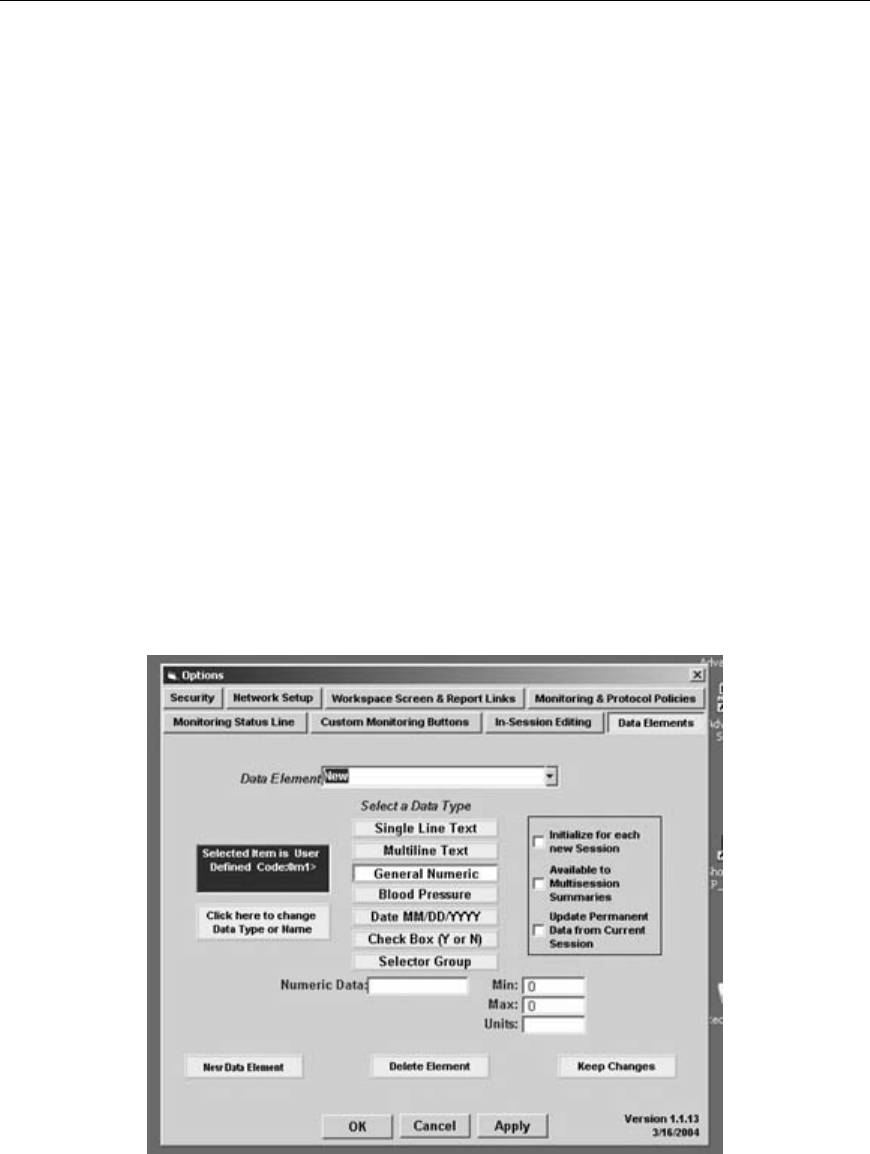
General Numeric Items
General Numeric data items offer a means of entering numeric information only. The
advantage of this type of data element is that numeric data can be used in calculations,
manipulated and graphed. Data to be entered must be numeric and will have short entry
fields.
General Numeric Resources can be identified to reset to a blank space at the start of each
session. To do so, be sure that the ‘General Numeric’ button is selected and click on the
drop down window to display the list of general numeric resources available. Left click
on the resource whose name you desire to work with so it is displayed in the Data
Element window. Click on the box labeled ‘Initialize for each new Session’ so that a
check mark appears in the box. Note: If a resource is identified to reset to a blank
space at the start of each session, it cannot be identified for use to update a patient
data file as described below.
TeleRehab™ 2004 Cardiopulmonary Monitoring System Users Manual
-35-
General Numeric Resources can be identified for use in Multisession Summaries. If not
identified at this level, these resource items will not be listed for use in the development
of multisession reports. To identify a General Numeric item for use in Multisession
Summaries, be sure that the ‘General Numeric’ button is selected and click on the drop
down window to display the list of general numeric resources available. Left click on the
resource whose name you desire to work with so it is displayed in the Data Element
window. Click on the box labeled ‘Available to Multisession Summaries’ so that a check
mark appears in the box.
General Numeric Resources used in the patient’s data file can be updated from a current
session. To allow the exchange of data, be sure that the ‘General Numeric’ button is
selected and click on the drop down window to display the list of general numeric
resources available. Left click on the resource whose name you desire to work with so it
is displayed in the Data Element window. Click on the box labeled ‘Update Permanent
Data from Current Session’ so that a check mark appears in the box. Note: If a resource
is identified to update a patient data file, it cannot be identified to start each session
blank as described above.
Adding General Numeric Resources
Be sure that the ‘General Numeric’ button is selected and left click on the ‘New Data
Element’ button to get the screen below.
Type in the name of the new resource element and left click on ‘Keep Changes’.
The new element will be added to the list of general numeric data elements.

TeleRehab™ 2004 Cardiopulmonary Monitoring System Users Manual
-36-
Deleting General Numeric Resources
Be sure that the ‘General Numeric’ button is selected and click on the drop down window
to display the list of general numeric resources available. Left click on the resource that
you desire to delete so it is displayed in the Data Element window.
Click on ‘Delete Element’ and the system will present the following warning:
Click on OK to complete the removal of the selected resource.
Cancel will abort the removal process and return to the previous screen.
Changing the Name of a General Numeric Text Resource
Be sure that the ‘General Numeric’ button is selected and click on the drop down window
to display the list of general numeric resources available. Left click on the resource
whose name you desire to change so it is displayed in the Data Element window.
Left click on the button labeled ‘Click here to change Data Type or Name’.
Type the new name for the resource and click on ‘Keep Changes’.
The resource will now appear on the list as the new item.
Blood Pressure Items
Blood Pressure data items offer a means of entering numeric information in a blood
pressure format (###/###). The 2004 of this type of data element is that data entered in
the blood pressure format can be graphed differently. Data to be entered must be numeric
and in the format of a number / a number.
Blood Pressure Resources can be identified to reset to a blank space at the start of each
session. To do so, be sure that the ‘Blood Pressure’ button is selected and click on the
drop down window to display the list of blood pressure resources available. Left click on
the resource whose name you desire to work with so it is displayed in the Data Element
window. Click on the box labeled ‘Initialize for each new Session’ so that a check mark
appears in the box. Note: If a resource is identified to reset to a blank space at the
start of each session, it cannot be identified for use to update a patient data file as
described below.
TeleRehab™ 2004 Cardiopulmonary Monitoring System Users Manual
-37-
Blood Pressure Resources can be identified for use in Multisession Summaries. If not
identified at this level, these resource items will not be listed for use in the development
of multisession reports. To identify a Blood Pressure item for use in Multisession
Summaries, be sure that the ‘Blood Pressure’ button is selected and click on the drop
down window to display the list of blood pressure resources available. Left click on the
resource whose name you desire to work with so it is displayed in the Data Element
window. Click on the box labeled ‘Available to Multisession Summaries’ so that a check
mark appears in the box.
Blood Pressure Resources used in the patient’s data file can be updated from a current
session. To allow the exchange of data, be sure that the ‘Blood Pressure’ button is
selected and click on the drop down window to display the list of blood pressure
resources available. Left click on the resource whose name you desire to work with so it
is displayed in the Data Element window. Click on the box labeled ‘Update Permanent
Data from Current Session’ so that a check mark appears in the box. Note: If a resource
is identified to update a patient data file, it cannot be identified to start each session
blank as described above.
Adding Blood Pressure Resources
Be sure that the ‘Blood Pressure’ button is selected and left click on the ‘New Data
Element’ button to get the screen below.
Type in the name of the new resource element and left click on ‘Keep Changes’
The new element will be added to the list of blood pressure data elements.
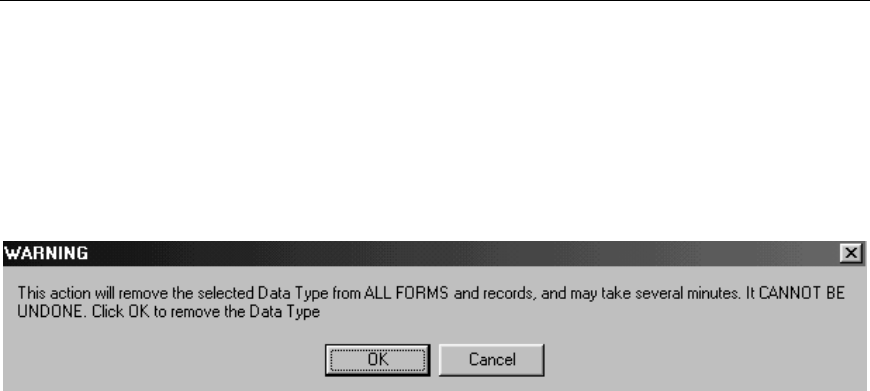
TeleRehab™ 2004 Cardiopulmonary Monitoring System Users Manual
-38-
Deleting Blood Pressure Resources
Be sure that the ‘Blood Pressure’ button is selected and click on the drop down window
to display the list of blood pressure resources available. Left click on the resource that
you desire to delete so it is displayed in the Data Element window.
Click on ‘Delete Element’ and the system will present the following warning:
Click on OK to complete the removal of the selected resource.
Cancel will abort the removal process and return to the previous screen.
Changing the Name of a Blood Pressure Resource
Be sure that the ‘Blood Pressure’ button is selected and click on the drop down window
to display the list of blood pressure resources available. Left click on the resource whose
name you desire to change so it is displayed in the Data Element window.
Left click on the button labeled ‘Click here to change Data Type or Name’.
Type the new name for the resource and click on ‘Keep Changes’.
The resource will now appear on the list as the new item.
Date (MM/DD/YYYY) Items
Date type data items offer a means of entering dates in a form recognized by most forms
of database. Although rarely used, this type of data element responds well to export such
as used in the ScottCare Outcomes program.
Date type resources can be identified to reset to a blank space at the start of each session.
To do so, be sure that the ‘Date (MM/DD/YYYY)’ button is selected and click on the
drop down window to display the list of date type resources available. Left click on the
resource whose name you desire to work with so it is displayed in the Data Element
window. Click on the box labeled ‘Initialize for each new Session’ so that a check mark
appears in the box. Note: If a resource is identified to reset to a blank space at the
start of each session, it cannot be identified for use to update a patient data file as
described below.
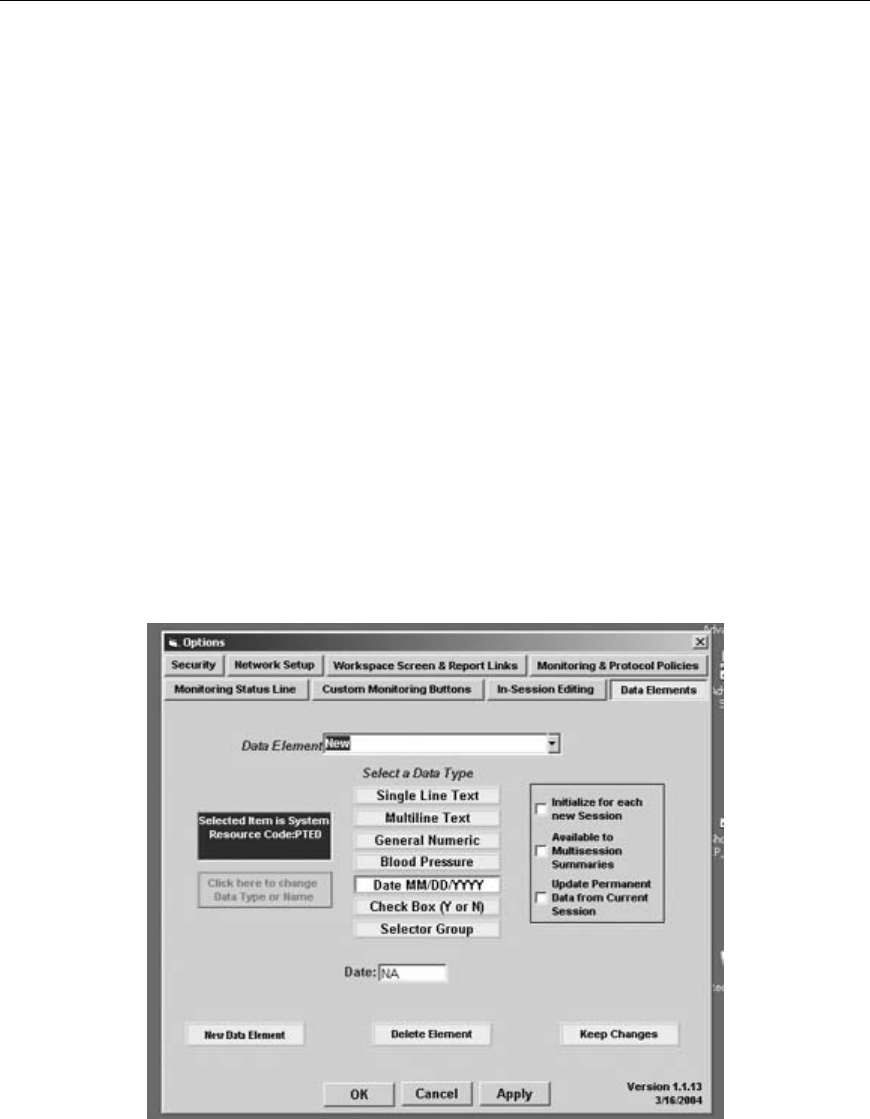
TeleRehab™ 2004 Cardiopulmonary Monitoring System Users Manual
-39-
Date type resources can be identified for use in Multisession Summaries. If not identified
at this level, these resource items will not be listed for use in the development of
multisession reports. To identify a Date item for use in Multisession Summaries, be sure
that the ‘Date (MM/DD/YYYY)’ button is selected and click on the drop down window
to display the list of date type resources available. Left click on the resource whose name
you desire to work with so it is displayed in the Data Element window. Click on the box
labeled ‘Available to Multisession Summaries’ so that a check mark appears in the box.
Date type resources used in the patient’s data file can be updated from a current session.
To allow the exchange of data, be sure that the ‘Date (MM/DD/YYYY)’ button is
selected and click on the drop down window to display the list of date type resources
available. Left click on the resource whose name you desire to work with so it is
displayed in the Data Element window. Click on the box labeled ‘Update Permanent
Data from Current Session’ so that a check mark appears in the box. Note: If a resource
is identified to update a patient data file, it cannot be identified to start each session
blank as described above.
Adding Date Type Resources
Be sure that the ‘Date (MM/DD/YYYY)’ button is selected and left click on the ‘New
Data Element’ button to get the screen below.
Type in the name of the new resource element and left click on ‘Keep Changes’.
The new element will be added to the list of date type data elements.

TeleRehab™ 2004 Cardiopulmonary Monitoring System Users Manual
-40-
Deleting Date Type Resources
Be sure that the ‘Date (MM/DD/YYYY)’ button is selected and click on the drop down
window to display the list of date type resources available. Left click on the resource that
you desire to delete so it is displayed in the Data Element window.
Click on ‘Delete Element’ and the system will present the following warning:
Click on OK to complete the removal of the selected resource.
Cancel will abort the removal process and return to the previous screen.
Changing the Name of a Date Type Resource
Be sure that the ‘Date (MM/DD/YYYY)’ button is selected and click on the drop down
window to display the list of date type resources available. Left click on the resource
whose name you desire to change so it is displayed in the Data Element window.
Left click on the button labeled ‘Click here to change Data Type or Name’.
Type the new name for the resource and click on ‘Keep Changes’.
The resource will now appear on the list as the new item.
Check Box (Y OR N) Items
Check Box data items allow easy entry of yes or no data through the use of a simple
check box.
Check Box Resources can be identified to reset to a blank block at the start of each
session. To do so, be sure that the ‘Check Box (Y or N)’ button is selected and click on
the drop down window to display the list of check box type resources available. Left click
on the resource whose name you desire to work with so it is displayed in the Data
Element window. Click on the box labeled ‘Initialize for each new Session’ so that a
check mark appears in the box. Note: If a resource is identified to reset to a blank
space at the start of each session, it can not be identified for use to update a patient
data file as described below.
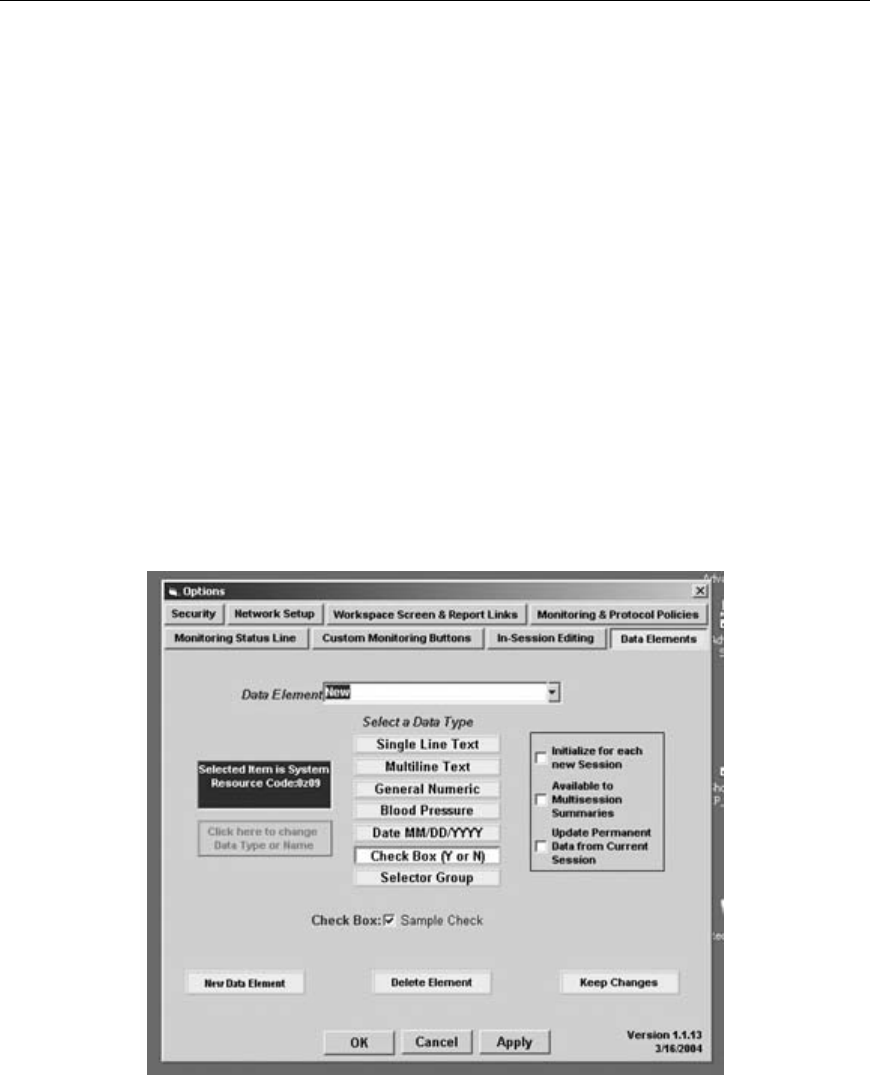
TeleRehab™ 2004 Cardiopulmonary Monitoring System Users Manual
-41-
Check Box type resources are not allowed for use in Multisession Summaries and will
not be available whether the block labeled ‘Available to Multisession Summaries’ is
checked or not.
Check Box type resources used in the patient’s data file can be updated from a current
session. To allow the exchange of data, be sure that the ‘Check Box (Y or N)’ button is
selected and click on the drop down window to display the list of check box type
resources available. Left click on the resource whose name you desire to work with so it
is displayed in the Data Element window. Click on the box labeled ‘Update Permanent
Data from Current Session’ so that a check mark appears in the box. Note: If a resource
is identified to update a patient data file, it cannot be identified to start each session
blank as described above.
Adding Check Box Type Resources
Be sure that the ‘Check Box (Y or N)’ button is selected and left click on the ‘New Data
Element’ button to get the screen below.
Type in the name of the new resource element and left click on ‘Keep Changes’
The new element will be added to the list of check box type data elements.

TeleRehab™ 2004 Cardiopulmonary Monitoring System Users Manual
-42-
Deleting Check Box Type Resources
Be sure that the ‘Check Box (Y or N)’ button is selected and click on the drop down
window to display the list of check box type resources available. Left click on the
resource that you desire to delete so it is displayed in the Data Element window.
Click on ‘Delete Element’ and the system will present the following warning:
Click on OK to complete the removal of the selected resource.
Cancel will abort the removal process and return to the previous screen.
Changing the Name of a Check Box Type Resource
Be sure that the ‘Check Box (Y or N)’ button is selected and click on the drop down
window to display the list of check box type resources available. Left click on the
resource whose name you desire to change so it is displayed in the Data Element
window.
Left click on the button labeled ‘Click here to change Data Type or Name’.
Type the new name for the resource and click on ‘Keep Changes’.
The resource will now appear on the list as the new item.
Selector Group Type Items
Selector Groups can be used when selection from a pre defined group of items is desired.
This resource allows display of the entire selector group or of only the item selected
depending on location of use and desired format.
Selector Groups can be identified to reset to a ‘none selected’ state or to a default state at
the start of each session. To do so, be sure that the ‘Selector Group’ button is selected and
click on the drop down window to display the list of selector group type resources
available. Left click on the resource whose name you desire to work with so it is
displayed in the Data Element window. Click on the box labeled ‘Initialize for each new
Session’ so that a check mark appears in the box. Note: If a resource is identified to
reset to a blank space at the start of each session, it cannot be identified for use to
update a patient data file as described below.
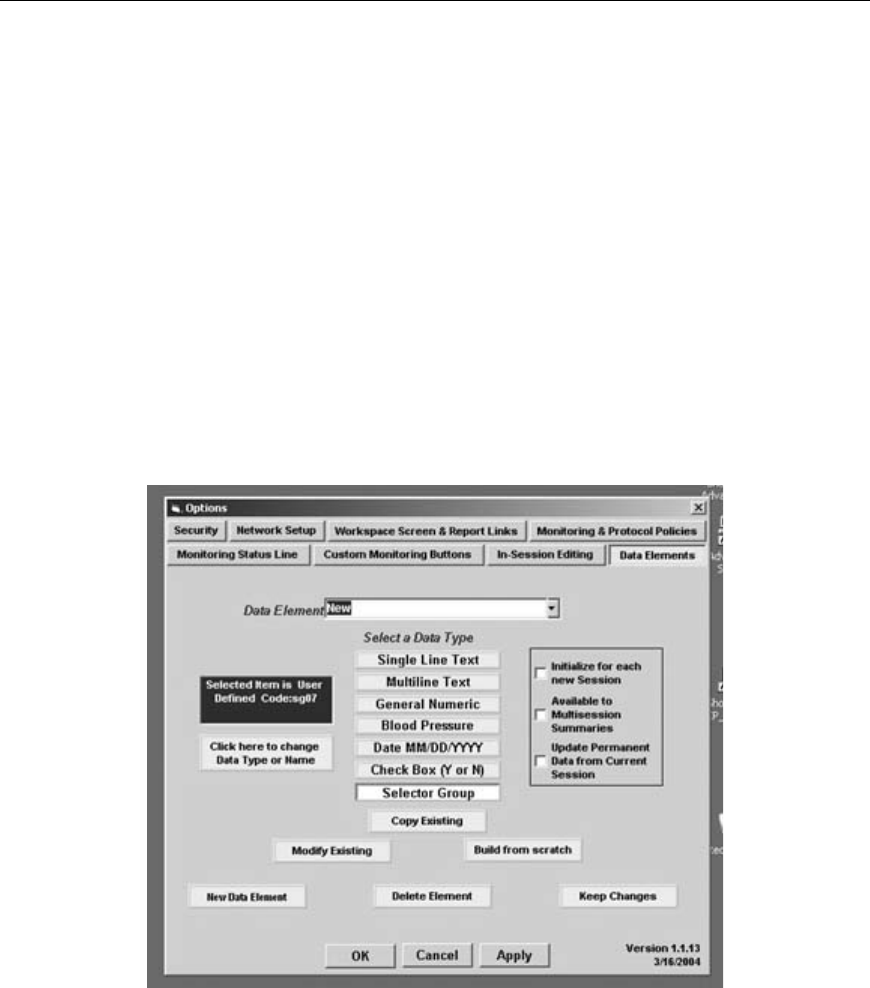
TeleRehab™ 2004 Cardiopulmonary Monitoring System Users Manual
-43-
Selector Group type resources are not allowed for use in Multisession Summaries and
will not be available whether the block labeled ‘Available to Multisession Summaries’ is
checked or not.
Selector Groups used in the patient’s data file can be updated from a current session. To
allow the exchange of data, be sure that the ‘Selector Group’ button is selected and click
on the drop down window to display the list of check box type resources available. Left
click on the resource whose name you desire to work with so it is displayed in the Data
Element window. Click on the box labeled ‘Update Permanent Data from Current
Session’ so that a check mark appears in the box. Note: If a resource is identified to
update a patient data file, it cannot be identified to start each session blank as
described above.
Adding Selector Group Type Resources
Be sure that the ‘Selector Group’ button is selected to get to the screen below.
Left Click on the ‘Build from scratch’ button to bring up the Selector Group Designer
screen shown below:

TeleRehab™ 2004 Cardiopulmonary Monitoring System Users Manual
-44-
Click on the block labeled ‘New Group’ and type in the name to be assigned to the
selector group. In this example, we will use the name “ICE CREAM”.
If you want a name to appear as a label for the selector group when used, click on the
‘Caption Text for Group’ block and type in the name that you want to appear.
In this case, we will want “Ice Cream” to appear as the selector group caption.
To change the font used on the various selector buttons, click the drop down window
under ‘Font for Buttons’ and select the desired font. Likewise, to change the size of the
font selected, click the drop down window under ‘Button Font Size’ and select the
desired size.
If desired, select either or both Bold and/or Italic by clicking on the appropriate box to
change the look of the buttons.
When making changes after buttons have been defined, click on the ‘Change Font Now’
button to incorporate the changes and see the results.
Type the caption to appear as the selector button in the box labeled ‘Button Caption’.
Enter a button value if desired. The button value can be any type of value including
numeric, and describes the information that is saved as the resource content if this button
is selected.
The ‘Use Custom Data Values’ block must be selected to use values other than default,
and the ‘This is the Group Default Selection’ button identifies the default button for the
group.
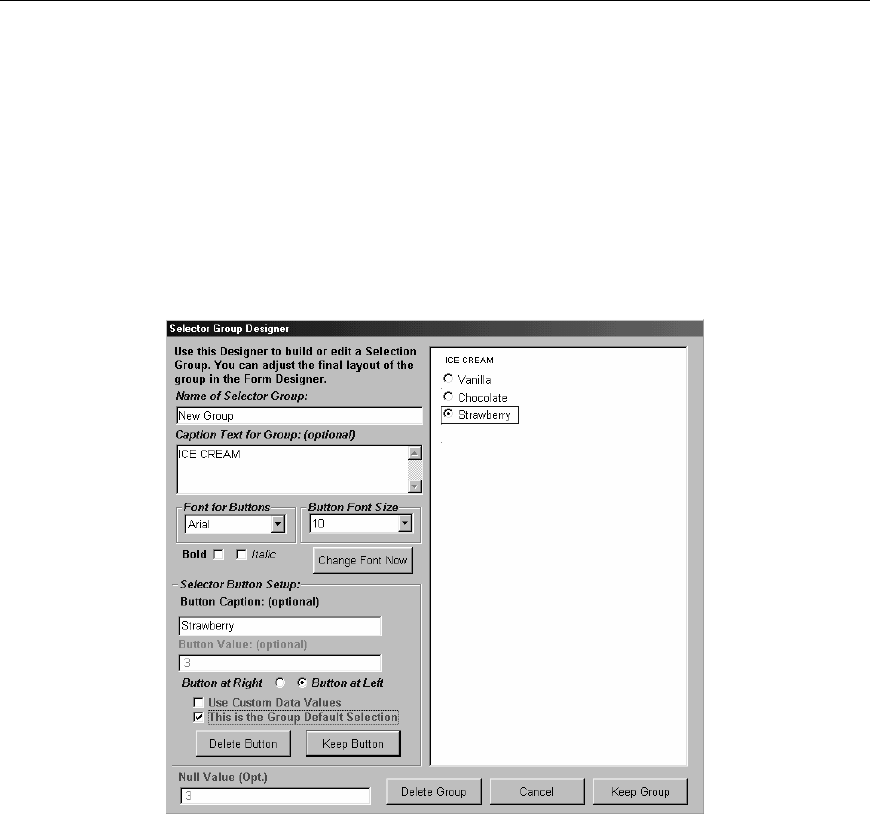
TeleRehab™ 2004 Cardiopulmonary Monitoring System Users Manual
-45-
Once all button data has been identified, click on the ‘Keep Button’ block to make it a
part of the selector group, or click on ‘Delete Button’ to remove it from the selector
group.
The ‘Null Value’ area is used to define the resource content of the selector group when
no button is selected and none have been defined as the default.
Following is the example of the ICE CREAM selector group:
Click on the ‘Keep Group’ button to make this selector group a part of the resource list.
Click ‘Cancel’ to abort the selector group design.
Click ‘Delete Group’ to remove a group from the defined resource.
Deleting Selector Group Type Resources
Be sure that the ‘Selector Group’ button is selected and click on the drop down window
to display the list of Selector Group type resources available. Left click on the resource
that you desire to delete so it is displayed in the Data Element window.
Click on ‘Delete Element’ and the system will present the following warning:

TeleRehab™ 2004 Cardiopulmonary Monitoring System Users Manual
-46-
Click on OK to complete the removal of the selected resource.
Cancel will abort the removal process and return to the previous screen.
Changing the Name of a Selector Group Type Resource
Be sure that the ‘Selector Group’ button is selected and click on the drop down window
to display the list of selector group type resources available. Left click on the resource
whose name you desire to change so it is displayed in the Data Element window.
Left click on the button labeled ‘Click here to change Data Type or Name’.
Type the new name for the resource and click on ‘Keep Changes’.
The resource will now appear on the list as the new item.
Changing the Content of a Selector Group
Click on the ‘Selector Group’ button and then click on the drop down window to display
the list of selector group type resources available. Left click on the resource whose
content you desire to change so it is displayed in the Data Element window.
Left click on the button labeled ‘Modify Existing’, and the existing selector group
designer window will appear. Make your changes in accordance with the instructions
above under ‘Adding a Selector Group Type Resource’.
Use the ‘Copy Existing’ button to simplify creation of a new resource by simply
changing the content of a selector group that already exits.
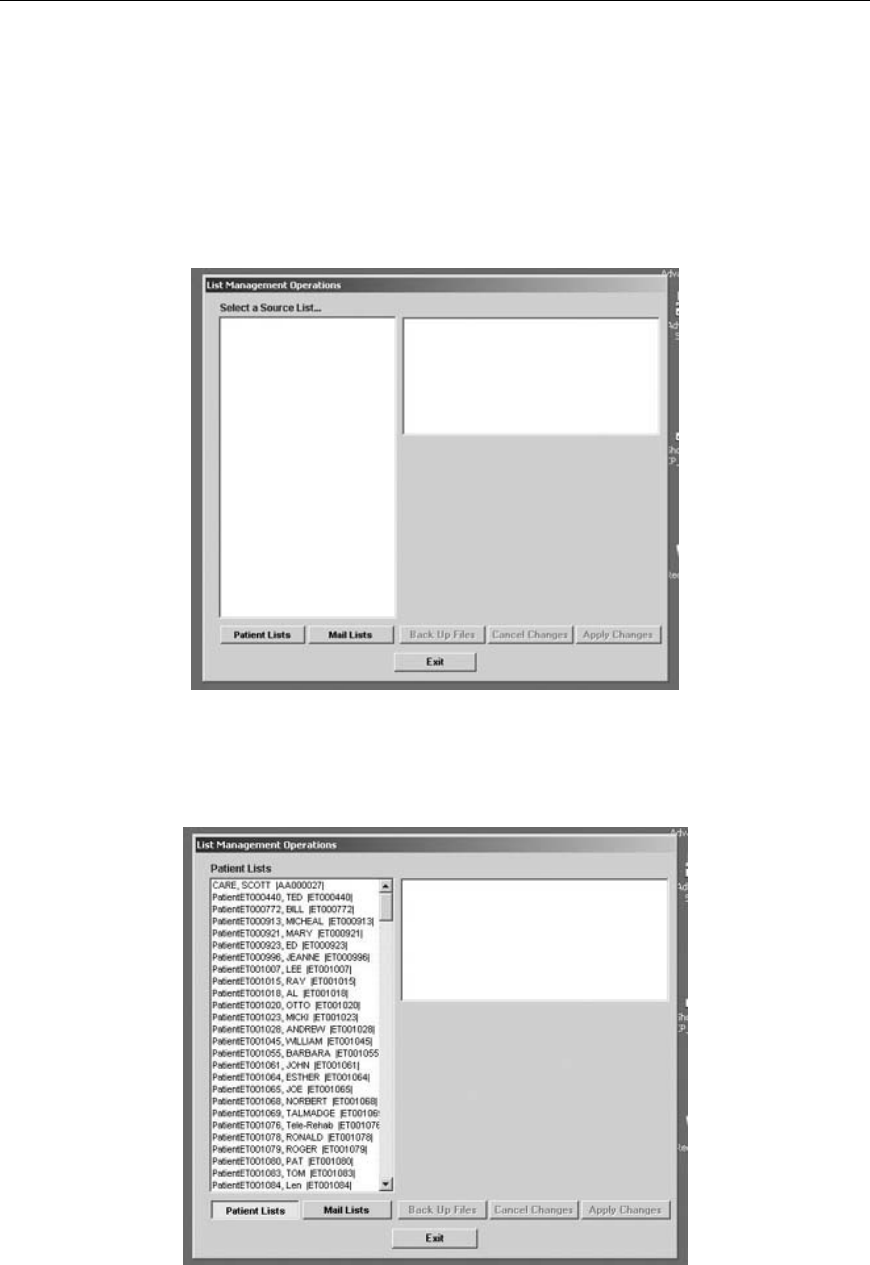
TeleRehab™ 2004 Cardiopulmonary Monitoring System Users Manual
-47-
List Management
The list management utility provides the means of removing patients from the system
database. It also facilitates moving patients from lists of participating patients to mailing
lists, and moving names from mailing lists to participating patient lists.
To access the utility, left click on the ‘List Management’ button to get to the following
‘List Management Operations’ utility:
Left click on the list that you want to deal with (Patient Lists or Mail Lists), and a list of
all names included on the associated lists will appear in alphabetical order.
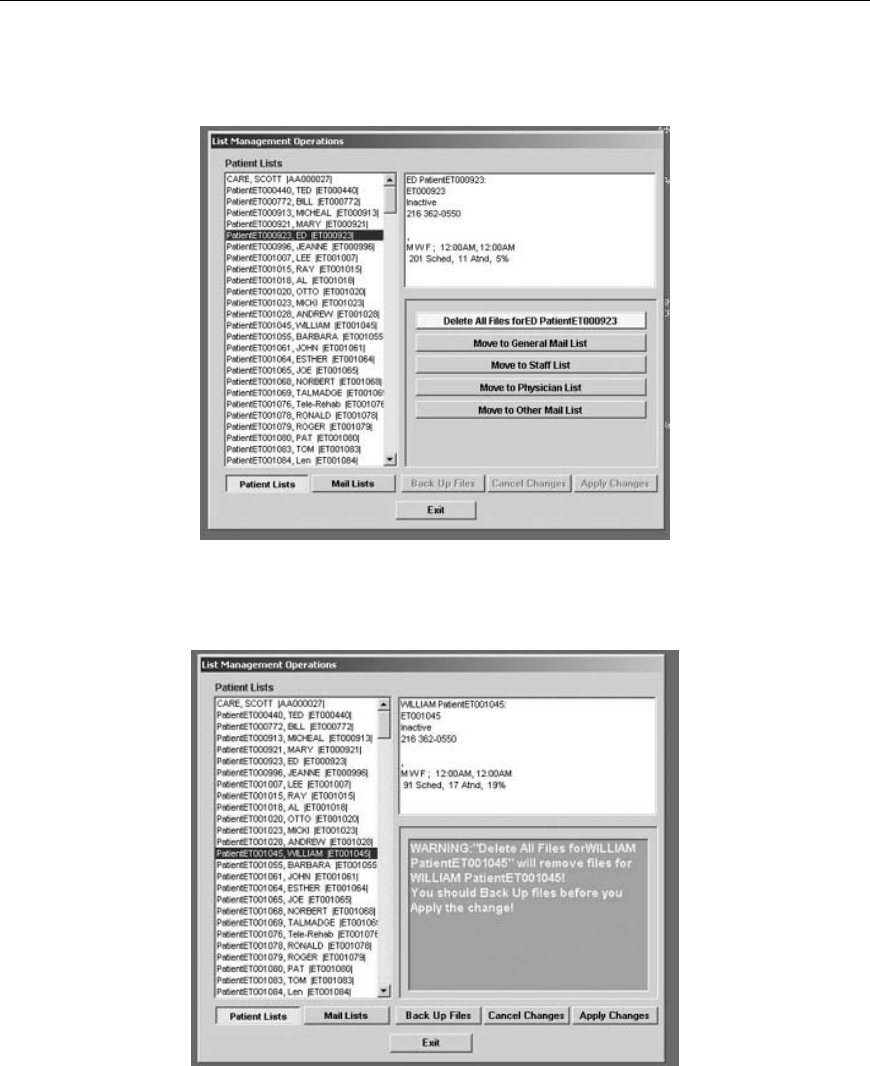
TeleRehab™ 2004 Cardiopulmonary Monitoring System Users Manual
-48-
Select the name of the person to be addressed by left clicking on their name. Basic
information regarding the selected name will appear in the box on the right and available
options will be provided for selection.
Selecting an action from the buttons on the left will cause the system to provide a
warning about potential data loss, and make the remaining three buttons available for use.
To back up data before making the change, left click on the ‘Back Up Files’ button.
To cancel this action, left click on the ‘Cancel Changes’ button.
To complete the proposed transaction, left click on the ‘Apply Changes’ button.
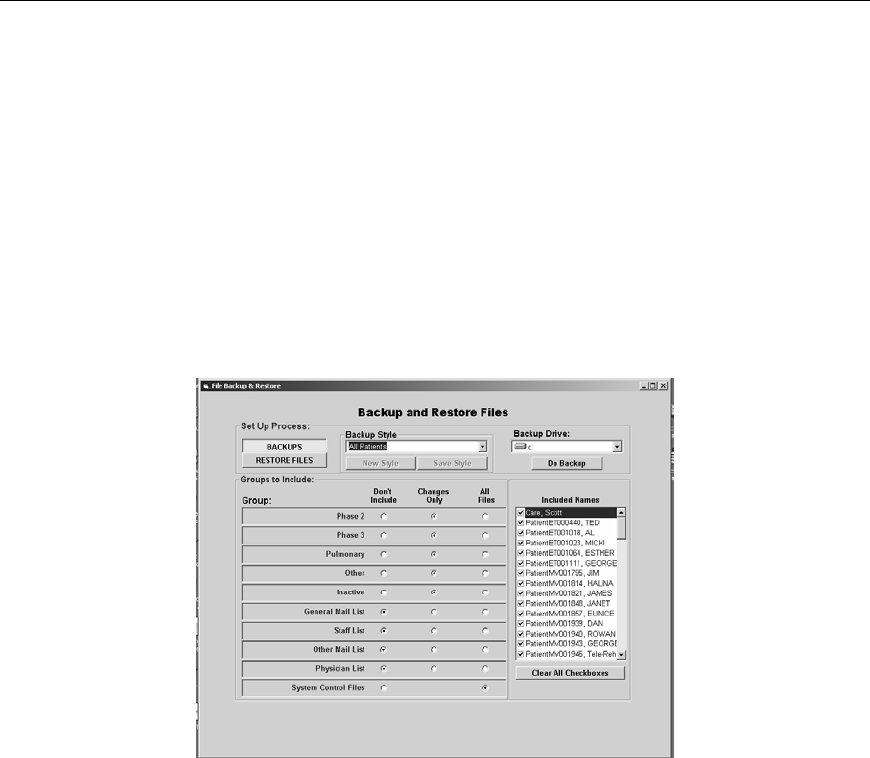
TeleRehab™ 2004 Cardiopulmonary Monitoring System Users Manual
-49-
Backing up the Database
The “Back up” process is an extremely important function designed to prevent the loss of
information should something occur to the system that causes data to be destroyed or lost.
The system provides a utility to allow the user to define the back up methodology and to
identify the specific data to be backed up or restored from the back up medium.
ScottCare recommends backing your system up at least once each week, preferably every
day.
To access the Backup Utility, click on the ‘Backups’ button to get to the following
‘Backup and Restore Files’ utility:
Backup is designed to take place so that data is saved on a zip disk to expedite the
process, however the utility allows the user to define where backup files are to be saved if
so desired.
Unique back up requirements can be identified with the utility and then saved as a
‘Backup Style’. Clicking on the drop down window under ‘Backup Style’ will provide a
list of saved styles.
Clicking the drop down window under ‘Backup Drive’ will allow selection of the drive
where the backup is to be saved. ScottCare recommends the use of the zip drive.
The area under ‘Groups to Include’ allows identification of which patient or other group
is to be included in the backup process and whether all files need to be backed up or only
changed files. The backup process is not a “snap shot” of the condition of the files at the
time of backup, rather it is a cataloging type of backup. Once something is backed up, it
is not erased, only changed. This process insures that data is available for restoration as
far back as the first time the system was used.
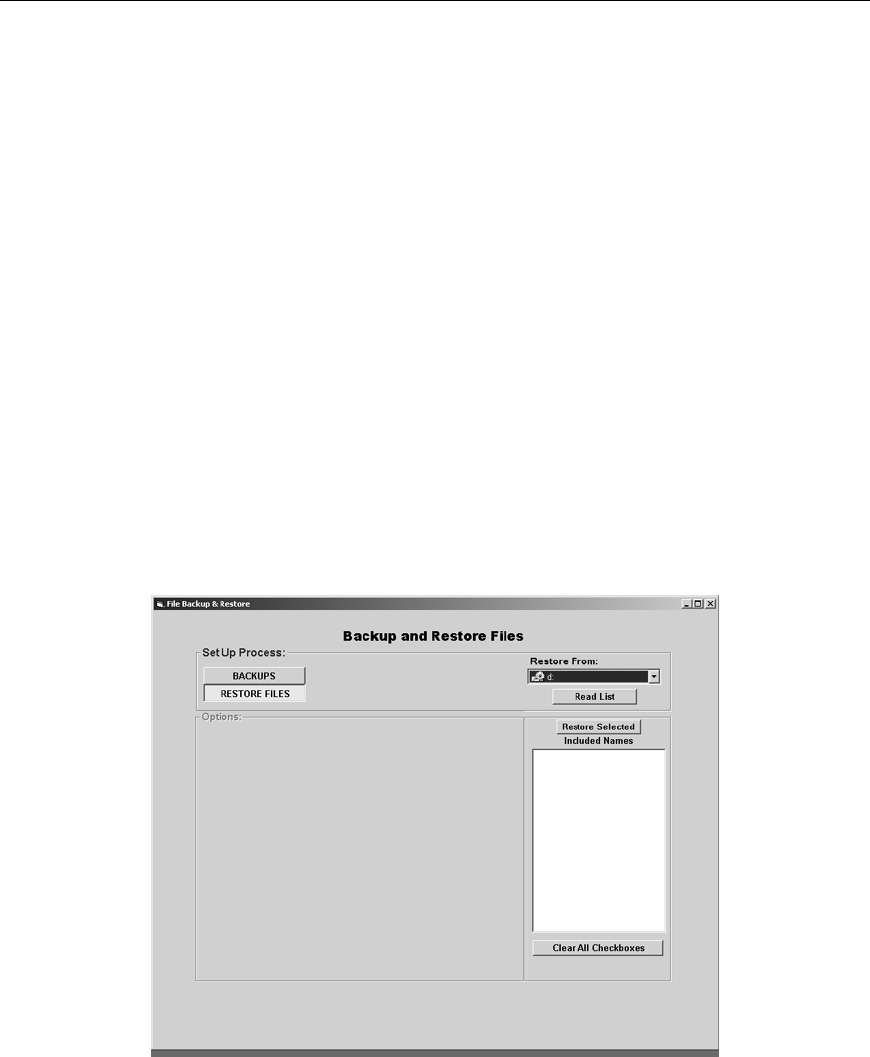
TeleRehab™ 2004 Cardiopulmonary Monitoring System Users Manual
-50-
The ‘Included Names’ area lists all the names of patients currently in the system.
Individual names can be selected by clicking on the ‘Clear All Checkboxes’ bar and then
checking the names of patients whose data is to be included in the backup.
At installation, a complete backup is accomplished to get the process started. ScottCare
recommends that backups beyond that point include changes only in patient files, and
other lists only if there have been changes. The system control files should be backed up
each time a backup is done.
Clicking on the ‘Do Backup’ bar will cause the system to perform the backup process
based on the selected settings to the selected drive.
Exit this screen by clicking on the x in the upper right corner.
Restoring From Backup
To restore information from a backup disk, access the ‘Backup and Restore Files’ utility
as described above.
Click on the ‘RESTORE FILES’ button to access the following screen:
Click on the drop down window under ‘Restore From’ and select the drive containing the
medium with the backed up information to be restored and click on the ‘Read List’
button.
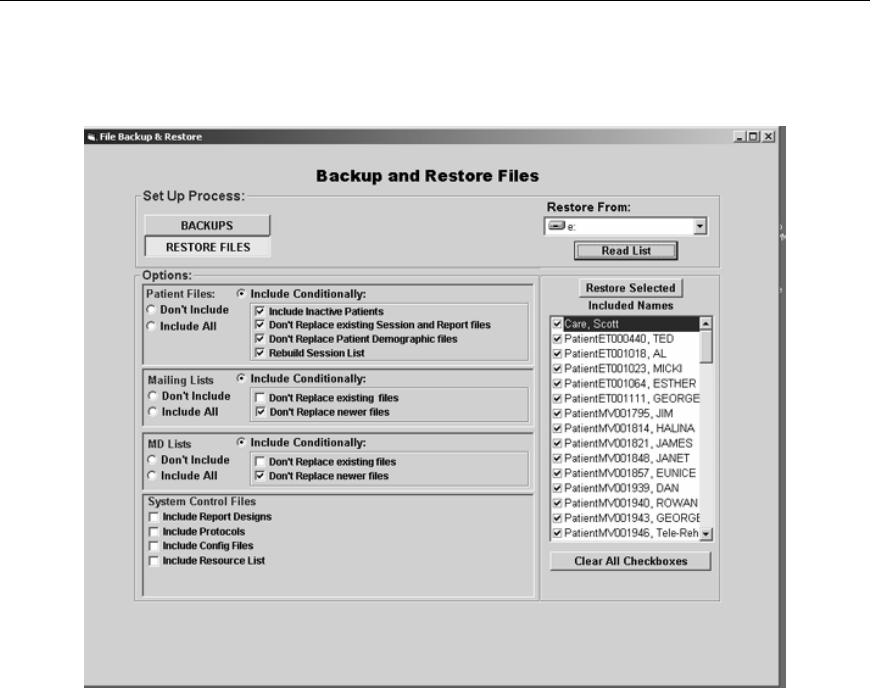
TeleRehab™ 2004 Cardiopulmonary Monitoring System Users Manual
-51-
Once the data on the drive has been read, the following screen will appear:
The area under ‘Options’ provides a means of detailing the selections of data to be
restored from the backup disk. Click on those that apply.
To identify a specific patient, click on the ‘Clear All Checkboxes’ bar and then click on
the checkbox for the patient(s) whose data you want to restore.
Once all selections have been made, click on the ‘Restore Selected’ bar to complete the
restoration process.
Exit this screen by clicking on the “X” in the upper right corner.
Deactivating the Server
To deactivate the server software at any time, click on the ‘Server’ bar at the bottom of
the screen and click on the ‘Quit’ bar in the resulting Server Window. NOTE: In systems
provided by ScottCare, the Server software is set up to automatically start at boot up. If
stopped for any reason, you must restart it by double clicking on the desktop icon for the
Server. If the Server software is already running, it will not start a second time.
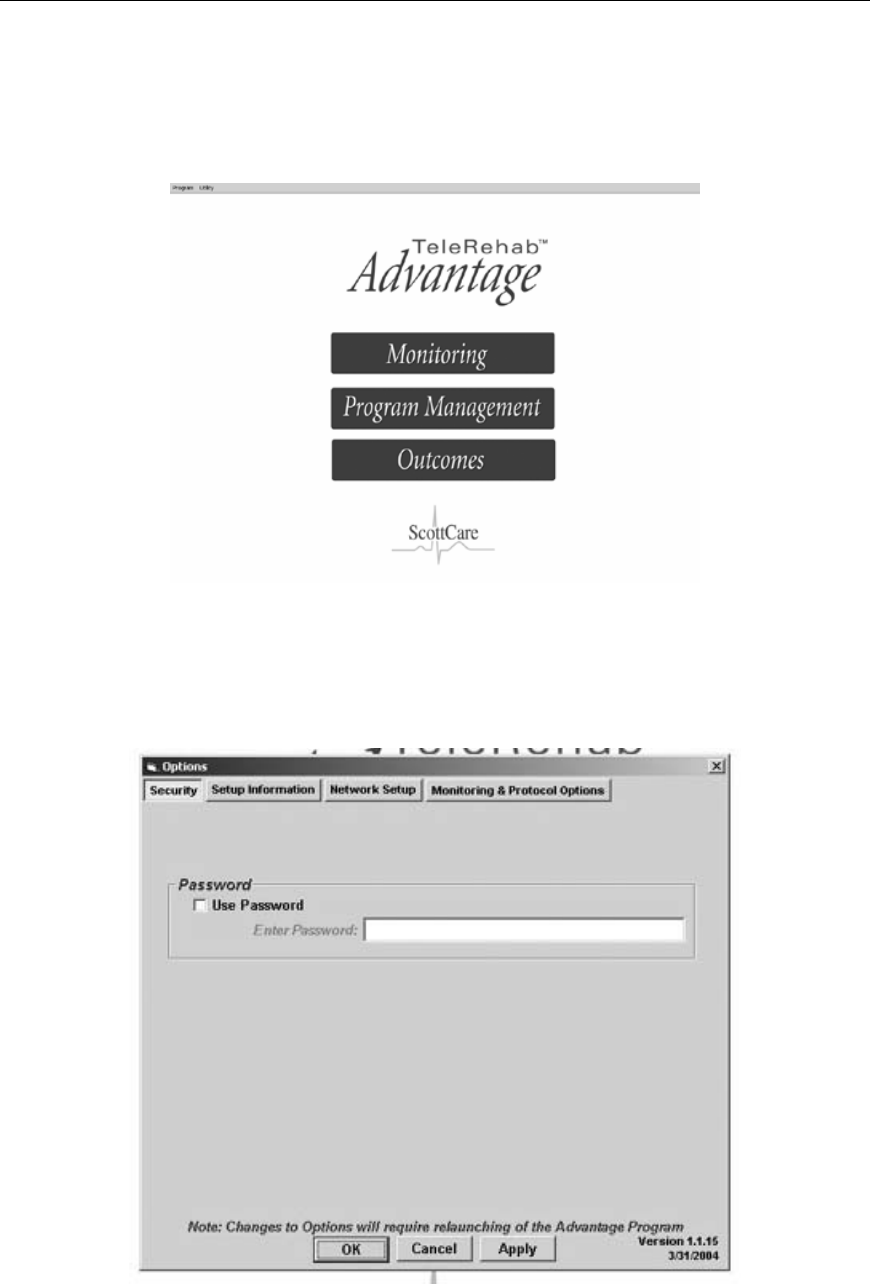
TeleRehab™ 2004 Cardiopulmonary Monitoring System Users Manual
-52-
The 2004 Client Application:
The TeleRehab 2004 Cardiopulmonary Monitoring System setup is accomplished
through the Options screens. To access the Options screens, you must be displaying the
TeleRehab 2004 Launcher Screen as follows:
Left click on ‘Utility’ in the upper left corner and select Options. The Options screen will
appear as follows:

TeleRehab™ 2004 Cardiopulmonary Monitoring System Users Manual
-53-
• Security
Setting/Changing a Password
The Password feature sets the system to require the use of a password to allow entry into
the Patient Data Management Database.
To activate the “Password” option, left click on the box labeled ‘use password’ to place a
check mark in the box.
Left click on the block following ‘Enter Password’, and type in the desired password. Be
sure to press the <Enter> key to complete the password entry. NOTE: the ‘Enter
Password’ block will not be accessible unless the ‘use password’ box has been checked.
To change a password, access the site information screen as described above. Note that
the Use Password block is not accessible.
Left click on the block following ‘Enter Password’, and type in the current password. Be
sure to press the <Enter> key to complete the password entry. The ‘Use Password’ block
will now be accessible.
Left click on the ‘Use Password’ block to remove the check mark.
To activate a new password, left click on the box labeled ‘Use Password’ to place a check
mark in the box.
Left click on the block following ‘Enter Password’, and type in the desired password. Be
sure to press the <Enter> key to complete the password entry. NOTE: the ‘Enter
Password’ block will not be accessible unless the ‘use password’ box has been checked.

TeleRehab™ 2004 Cardiopulmonary Monitoring System Users Manual
-54-
• Setup Information
The Setup Information tab provides access to the utility utilized to identify the screen
colors to be utilized as well as screen configuration settings.
Setting Screen Colors
The Color Sets area allows selection of the color set to be used with the monitoring
terminal. The color set is selected by clicking on the desired color set bar. This is the only
place where the color set can be changed.
Setting the Number of Screens Utilized
The Screen Setup area provides a means of utilizing either one or two screens for display
during monitoring. The Two Screens box, if checked, will cause the system to split the
monitoring channels selected between 2 screens tied to the same computer. A selector
box will appear allowing selection of either using both screens for monitoring, or display
the Program Management System on the second screen. Otherwise, all channels will be
displayed on the single display.
TeleRehab™ 2004 Cardiopulmonary Monitoring System Users Manual
-55-
Activation of Remote Monitors
The Remotes Displays Always On box, if checked, causes all displays to be displayed on
both the monitoring screen and the remote screen. Otherwise, only displays identified by
the equipment operator will show up on the remote monitor.
Start-up Options
The Start-up Options area allows determination of what screen will be displayed when
the system is started. The Launcher Screen allows selection of Monitoring, Program
Management, or Outcomes. Selection of ‘Show Monitoring Screen’ will cause the system
to start at the monitoring screen, and selection of ‘Show PMS Screen’ will cause the
system to start at the Program Management Screen.
• Network Setup
The Network Setup tab provides access to the utility utilized to identify the source
and/or destination of data via their specific network (TCP/IP) address.
TeleRehab™ 2004 Cardiopulmonary Monitoring System Users Manual
-56-
The IP addresses will initially be set at the factory as follows:
The Server IP will be the TCP/IP address of the computer where the server software is
running (must be the same location as the TB directory containing patient files).
The Telemetry Source IP will be the address of the telemetry receiver module.
The Strip Chart IP will be the address of the strip chart recorder.
The Remote Display IP will be the address of the Remote Display.
It should be noted that no IP address will be entered for items not being utilized by the
system.
The System ID Code is pre-defined based on the server application set up. The Full-
Disclosure Path establishes where the full disclosures will be recorded during
monitoring. (The example above shows a folder called “d” on the c: drive). The full
disclosure will be copied to the patient sub-directory in TB at the end of the session, and
it will NOT be erased from the location where it was originally written until the patient is
recorded again. The Local Full-Disclosure Path will initially be set at the factory.
The block near the bottom of the screen displays the IP address of the computer in use.
• Monitoring & Protocol Options
The Monitoring and Protocol Options tab provides entry into the utility that establishes
a set of rules regarding use or non-use of many of the features of the system.

TeleRehab™ 2004 Cardiopulmonary Monitoring System Users Manual
-57-
The Monitoring Channels section provides a means of setting the number of channels to
be displayed on the monitoring screen. The number can range from 1 to 16.
The Automatically Assign Transmitters box, if checked, causes the system to
sequentially number the individual channels on the screen starting with the channel
number indicated in the ‘First Display Channel Number:’ box.
The Manually Assign Transmitters box, if checked, causes the system to set all channel
numbers to 0, and channel numbers are assigned based on the transmitter being used by a
patient as their names are put on the monitoring screen.
The ‘First Channel Transmitter Number:’ box is used to identify the number of the
first transmitter that will be used with this terminal as defined by the telemetry interface
unit. E.g. if this is the second display of a 12 channel system using a single IP address for
the telemetry interface, the first channel transmitter number would be 6 (provided there
were 6 channels per display). If the telemetry interface only dealt with the second 6
channels, the first channel transmitter number would be 1.
The Digital Transmitters block indicates whether digital or analog transmitters are being
utilized with this system.
The Five Leads block will only be available if the Digital Transmitters block is selected,
and indicates whether the digital transmitters being utilized are configured as 3 wire or 5
wire transmitters. Currently only 3 lead transmitters are employed.
The Display Setting Defaults area determines the speed of the trace and the gain.
Defaults will be set at the factory of a speed equivalent to 25mm/sec and a gain of 1mv.
Options for speed are ½ - equivalent to 25 mm/sec, 1 – equivalent to 50 mm/sec, and ¼ -
equivalent to 12.5 mm/sec. Options for Gain are x1 – 1mv, x2 = 2mv, and x4 = 4mv.
Wave forms cannot be made smaller than 1mv. Only defaults are set here. These features
can also be changed from the monitoring screen.
The Trace area allows selection of whether the display is black trace on a white
background or white trace on a black background. Again, only the default is set in this
area. This display feature can be controlled from the monitoring screen.
The Included Patient Lists area allows the customer to identify which patients are to be
displayed on the monitoring screen for selection for monitoring. This feature can be set
up at the time of installation and can easily be changed by the user.
The Default Alert Sounds area provides a means to have Rate Alarm, Arrhythmia Rate
Alarm, and Overtime audible alarms either on or off. This area sets the default only, both
rate alarm and arrhythmia alarm sounds can be controlled from the monitoring screen.

TeleRehab™ 2004 Cardiopulmonary Monitoring System Users Manual
-58-
Exercise Protocols
Exercise protocols are intended as prescriptions, or 'guides' for patient exercise activity
during a session. The exercise prescription portion of the protocol can be printed on the
patient schedule, and normally includes a sequence of exercise events with anticipated
workloads.
The use of exercise protocols is not a mandatory function of the ScottCare 2004 Monitoring
System. Exercise information can be entered manually for each patient as the session
progresses, however the system has the ability to allow the equipment operator to cycle
through a predefined patient exercise protocol for a session if desired.
To use this option, a specific exercise agenda must be indicated for the patient including
specific exercise media, load settings, and times. As the patient moves from one mode to the
next, the equipment operator simply touches 'NEXT' on their monitoring terminal screen to
indicate that the patient has begun the next phase of their exercise regimen. The system will
move the patient to the next exercise medium, calculate and display METS, and start timing
automatically. This automatic cycle can be interrupted with a manual entry at any time if the
assigned protocol is changed during the session.
The 2004 Program Management System allows you to develop generic protocols, or
Protocol Templates, that are stored in the system for use when patients are first entering the
program. Several Protocol Templates can be developed to accommodate patients of various
abilities. Detailed instructions for developing generic protocols can be found under
Generating Protocol Templates below.
A default protocol is automatically assigned to a new patient if no protocol template is
selected. This basic protocol can be altered to develop a unique session protocol for each
patient. Once developed, the system will treat this unique session protocol in the same way
as a protocol template in allowing the equipment operator to cycle through the exercise
agenda during the patient exercise session. Detailed instructions for developing patient
protocols can be found under Session Protocols below.
Defining Modalities and Exercise Devices
A key element in the development of an exercise protocol is the exercise device being
utilized along with an appropriate workload. Several different devices, along with the ability
to calculate MET levels for those devices, have been pre-installed in the 2004 Program
Management System. Additional devices can be added to the list to customize the system to
an individual program.
The utility that maintains both the list of exercise devices available for use within the session
protocols as well as the list of predefined exercise protocols is called the Protocol Template
Editor. This Protocol resource utility is accessible through the TeleRehab 2004 Launcher
Screen as follows:
TeleRehab™ 2004 Cardiopulmonary Monitoring System Users Manual
-59-
Left click on ‘Utility’ in the upper left corner and select Edit Protocols. The Protocol
Template Editor will appear as follows:

TeleRehab™ 2004 Cardiopulmonary Monitoring System Users Manual
-60-
The Protocol Template Editor screen is divided into two parts. The right side of the
screen provides access to modalities and exercise devices while protocol templates are
managed on the left.
The Modalities & Exercise Devices section is arranged as follows:
The ‘Modality’ block provides a drop down window listing all of the current exercise
devices available on the system.
The ‘Mode Name’ block provides a means of changing the name of an exercise device.
The ‘Short (4 Char.) Name’ block provides a means of identifying the name of the
exercise device to be used in multi-session reports.
The ‘Device Type’ block provides a drop down window listing the various methods of
displaying workloads and providing METS calculations, if available.
The ‘METS’ and ‘Load’ blocks provide a means of setting default values if you choose
not to include workloads when utilizing the selected device type in a protocol.
Click on the drop down window in the Modality box to see a list of current exercise
modalities. Select a device and note that the information in the ‘Device Type:’ window
will change to display the device type identified for the device selected.
To Add A Device to your program:
At the end of the list of modalities are several items identified as UNUSED MODE. Click
on the first UNUSED MODE on the list.
Click on the ‘Mode Name’ block, and using the keyboard, type in the name of the new
exercise mode. Press the <Enter> key.
Click on the ‘Short (4 Char.) Name’ block, and using the Keyboard, type in the four
character code to be printed on multiple session reports to identify the new exercise
mode. Press the <Enter> key.
Click on the drop down window in the Device Type block. Select the type of device or
method of displaying workload that applies to the new mode. (Note that the Device Type
determines what formula will be used by the system to calculate METS during the
exercise session.)
Click the ‘METS’ block to enter a default value to be used if no workload or MET value
is otherwise entered when this exercise modality is used.
Click the ‘Load’ block to enter a default load value to be used if no workload or MET
value is otherwise entered when this exercise modality is used. Note that there are two

TeleRehab™ 2004 Cardiopulmonary Monitoring System Users Manual
-61-
blocks identified as ‘Load’. The second block is used when a workload is indicated by
more than one item. E.g. Treadmill uses Speed and Slope, or a Stepper might use Rate
and Height.
Click the ‘Keep Changes’ block to complete the process and save the changes.
NOTE: The list defined by this utility is used on the monitoring terminal to allow
selection of devices while a patient is being monitored. The list displayed on the
monitoring terminal will display items on the list down to (but not including) the FIRST
UNUSED MODE and not beyond. If you modify the list to have an UNUSED MODE in
the middle of your list, the resulting list will not display all available exercise devices for
selection on your monitoring terminal.
NOTE: The list defined by this utility is used by every session report to identify the
exercise devices utilized by a patient during the exercise session. Changing the order in
which exercise devices appear on this list will potentially change some or all session
reports for some or all-patient sessions completed before the change in the list is
implemented.
Changing Any Parameter of a Mode
Click on the drop down window in the ‘Modality’ block and select the modality to be
changed.
If the mode name is to be changed, click on the ‘Mode Name:’ block and use the
keyboard to type in the new mode name. Press the <Enter> key.
If the short name is to be changed, click on the ‘Short (4 Char.) Name’ block and use the
Keyboard to type in the new four character code to be printed on multiple session reports
to identify the exercise mode. Press the <Enter> key.
If the device type is to be changed, click on the drop down window in the ‘Device Type’
block Select the type of device or method of displaying workload that applies to the
mode. (Note that the Device Type determines what formula will be used by the system to
calculate METS during the exercise session).
To change default settings, click on the default value block that is to be changed and
enter the correct information.
WARNING: The accuracy of the entries in this utility will impact directly on data you
will be able to save during a monitoring session. If, for example, you have selected
TREADMILL to have a TYPE of NONCALC, you will not have the option of entering
slope and speed to have the system calculate METS for you.
TeleRehab™ 2004 Cardiopulmonary Monitoring System Users Manual
-62-
Generating Protocol Templates
Protocol Templates are protocols that are developed and stored in the program management
system for use when adding a new patient to the system. The system is shipped with 2 or
more predefined protocol templates that can be modified for use with your program.
To access the Protocol Template Editor, left click on ‘Utility’ at the top of the screen and
then left click on ‘Edit Protocols’.
The Protocol Template Editor screen is divided into two parts. The right side of the
screen provides access to modalities and exercise devices while protocol templates are
managed on the left.
The Protocol Templates section is arranged as follows:
The upper section contains data concerning the patient’s schedule.
Also indicated are the high and low rate alarm limits.
The patient’s target heart rate is shown along with the monitoring mode and most recent
session number.
The above items are generally unique to individual patients and will be changed once the
protocol template is assigned to the patient.
TeleRehab™ 2004 Cardiopulmonary Monitoring System Users Manual
-63-
Finally, the exercise prescription displaying the patient’s exercise sequence, workload, and
duration will appear.
Adding Protocol Templates
Click on the block labeled ‘Create New’ near the bottom of the Protocol Template Editor
utility.
The system will use the currently displayed Protocol Template as a pattern and copy it with
the name ‘New Protocol’.
A new template now exists, however it must be edited to contain the desired information.
Editing Protocol Templates
The first step in editing protocol templates is to select the template to be edited. In this case,
we will edit the newly added template currently called ‘New Protocol’. To view a list of
current existing protocol templates, click on the drop down window in the protocol name
block.
To change the name of the Protocol Template, click on the block containing the name to be
changed, and type in the desired name.
All of the session information, including session time, days, target heart rate, and high and
low rate limits can be left unchanged since these data will be entered for each individual
patient once the protocol is identified for use. Until then, the system will use default
information.
TeleRehab™ 2004 Cardiopulmonary Monitoring System Users Manual
-64-
To edit a line of the Exercise Prescription, simply click on the item to edited.
Clicking on a modality will cause a drop down window to appear. Click on the drop down
window and select the modality desired from the resulting list.
Clicking on the ‘METS’ block will allow you to enter a MET value. This should only be
done if the system is not expected to calculate the MET value based on the workload and
you know the MET value that should appear.
Clicking on the ‘Load’ block will allow entry of the prescribed load based on the Device
Type and what settings have been selected for that device. For example, the Air dyne can
require either RPM or Load based on which Device Type has been selected.
The second block after load with a blank heading is for the second part of a load when
required. For example, Treadmill required both speed and slope. Speed appears in the first
block and Slope in the second.
When the Load is entered, the system will calculate and display the MET value in the METs
block based on the Device Type identified for the device selected. Changing the MET value
will cause a corresponding change in the load to satisfy the formula being used.
Clicking on a Duration block will cause a drop down window to appear. Click on the drop
down window and select the Duration identifier.
TeleRehab™ 2004 Cardiopulmonary Monitoring System Users Manual
-65-
Click on the Duration block again to enter the appropriate duration.
To add a line item to the exercise prescription, hold down the <Shift> key and left click
on the number of the line where the new line is to appear. The existing line will be
duplicated.
Edit the new line of the session protocol in accordance with editing instructions above.
Example:
To enter a line indicating that we want to have the patient work on the treadmill at a speed of
2.8 mph slope 5% for 20 minutes.
Hold down the <Shift> key and left click on the block where the new item is to be added.
Click on the newly created Modality block, click on the drop down window, and select
Treadmill from the list.
Enter a 2.8 in the first Load block.
Enter a 5 in the second load block.
Note that the METs have been calculated and are displayed in the METs block.
Click on the Duration block and verify that ‘Time:’ is highlighted in the drop down window
box. If not, click on the drop down window and select ‘Time:’
Enter 20 into the Duration block.
To remove a line item from the exercise prescription, hold down the <Ctrl> key and left
click on the number of the line to be removed.
Once you are satisfied that each column indicates the desired entry, click on the block
labeled ‘Keep Protocol’ and the new protocol will be added to the list.
TeleRehab™ 2004 Cardiopulmonary Monitoring System Users Manual
-66-
Deleting Protocol Templates
First, access the Protocol Template Editor by left clicking on ‘Utility’ at the top of the
screen and then left clicking on ‘Edit Protocols’.
Click on the drop down window in the protocol name block and select the protocol name
to be deleted.
Click on the ‘Delete Protocol’ block and the selected protocol will be removed from the
list of Protocol Templates.
To exit from the Protocol Template Editor Utility, click on the “X” at the upper right
corner of the Protocol Template Editor screen.
Session protocols are protocols that are developed and stored in the program management
system as protocols unique to a given patient. Session protocols are defined in the Protocol
Input Screen assigned to a patient when he/she is added to the system. Initially, the system
will assign the default protocol defined in protocol templates to any new patient when added
to the system. The default protocol is then modified to become the unique protocol for the
patient being added.
See the section on the Session Protocol Input Screen for further information on the
development and use of Session Protocols.
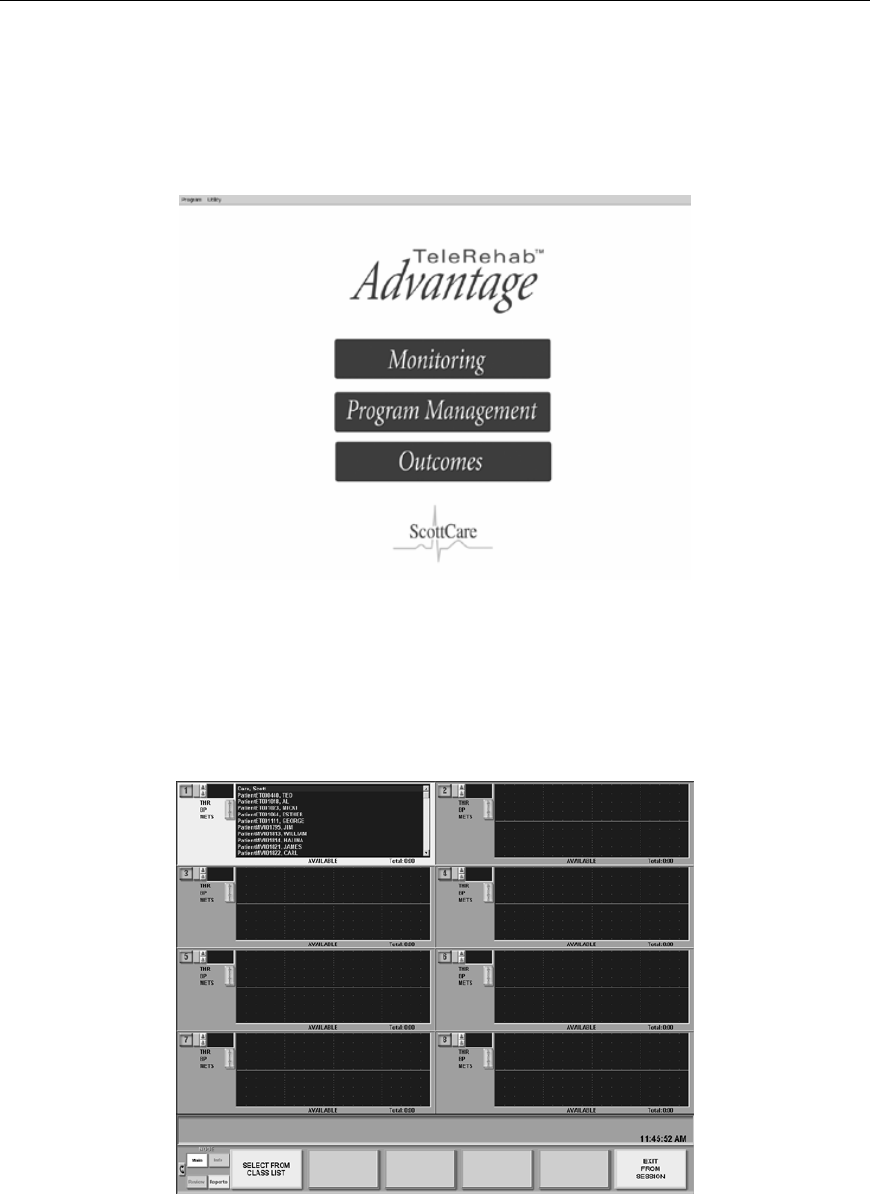
TeleRehab™ 2004 Cardiopulmonary Monitoring System Users Manual
-67-
PATIENT MONITORING
The TeleRehab 2004 Monitoring area is accessed from the Launcher Screen.
Left click on the Monitoring Bar. The monitoring screen will appear as follows
The Monitoring Screen
When the monitoring section is started, the Monitoring Screen will appear as below:
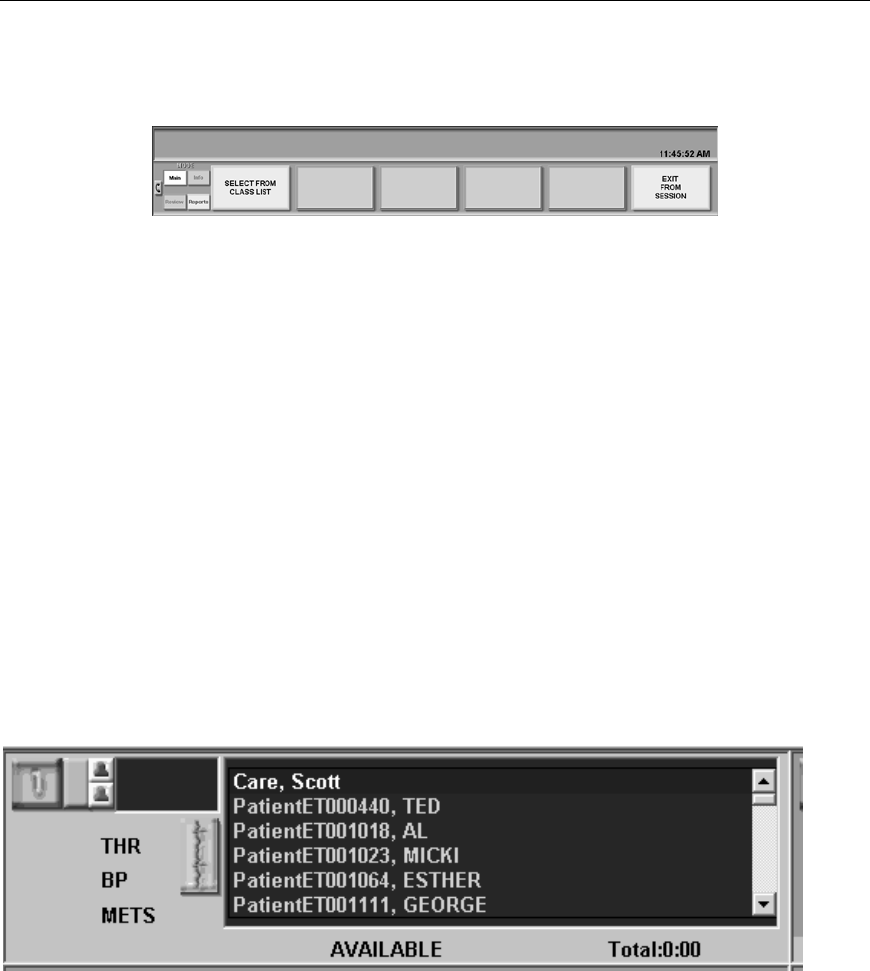
TeleRehab™ 2004 Cardiopulmonary Monitoring System Users Manual
-68-
The monitoring control center is across the bottom of the screen:
The 4 modes available include:
• Main – displayed above in startup mode. Allows you to enter a group of
patients by selecting from class list schedule. Left click on the SELECT
FROM CLASS LIST button to get a list of days and class times for the week.
The EXIT FROM SESSION block will close the Monitoring Screen.
• Info – With no patients on the screen, button not available.
• Review – With no patients on the screen, button not available.
• Reports – Allows access to the reports section as described later in this
manual.
In the initial screen, the individual monitoring blocks are blank with the exception of the
first channel that has the list of patients identified as available for monitoring.
To move the list of names to a different available channel, left click (or touch) anywhere
on the desired available channel.
The number to the left is the channel number indicator. Channel numbers may or may not
be pre assigned based on the option selected during system setup. To the right of the
channel number indicator is a blank block indicating that at least one transtelephonics
channel is activated in Setup. If no transtelephonics channels are activated, the block will
not be there.
To the Right of the channel number indicator are the bell shaped alarm indicators, red for
rate and blue for arrhythmia rate.
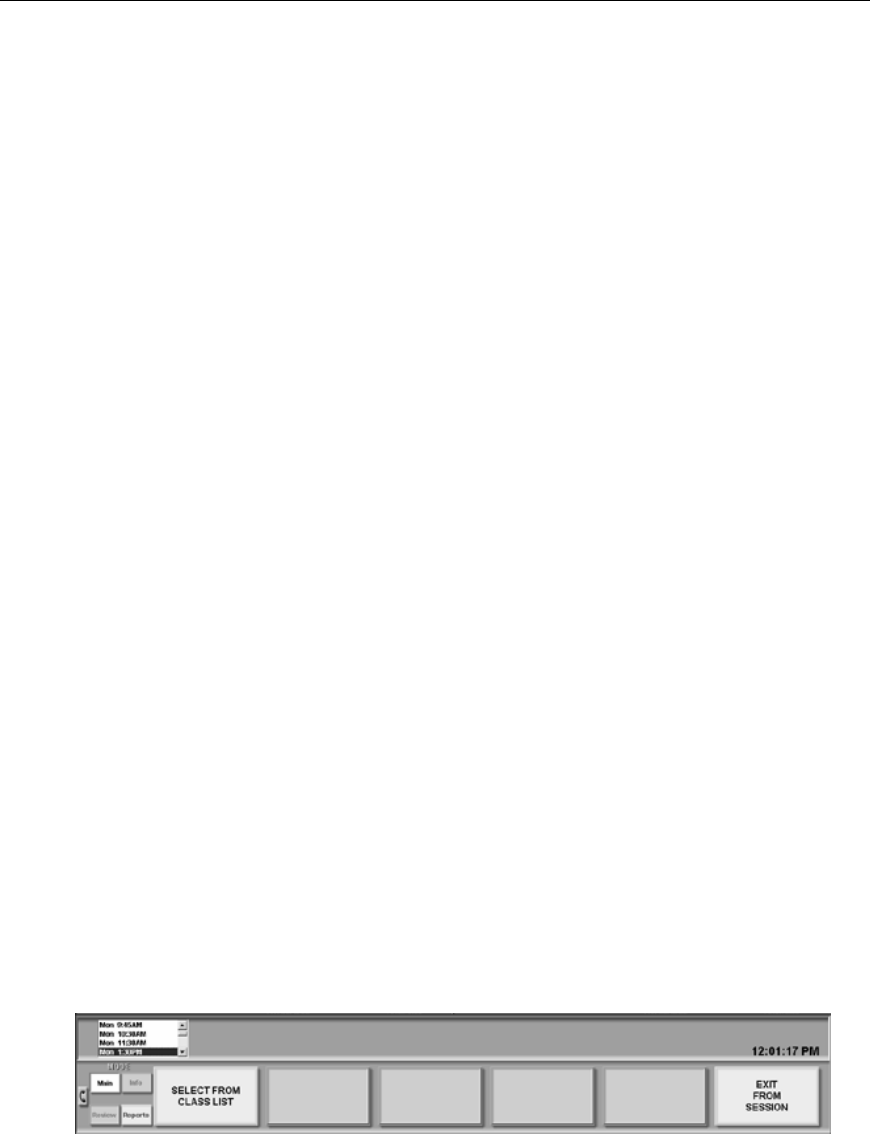
TeleRehab™ 2004 Cardiopulmonary Monitoring System Users Manual
-69-
The box to the right of the alarm indicators is where the heart rate will be displayed.
Below the Heart Rate box is displayed the THR (Target Heart Rate), BP (Current Blood
Pressure Reading), and METS (most recent value). In the start up screen the values for
these items are blank, but the display is activated when a patient is selected (See below).
To the right of the data area is a strip indicator activated only when a patient is entered on
the screen for monitoring, and the display has been started.
Below the monitoring window, the word AVAILABLE appears to indicate that the
channel is not in use. This area will display the modality in use along with a timer
indicating how long the modality has been in use once a session is started.
To the far right of the modality indication area is a timer. This timer will start when the
session recording starts and will stop when recording stops to indicate the total recorded
session time.
The list of names of all patients available for monitoring based on the settings in the
Setup area will appear in the monitoring area window. A scroll bar appears to the right of
the window when the list of names exceeds the viewing space available in the window.
The vertical size of the window will change based on how many channels are being
displayed on the screen. (Number of channels is selected in the Setup screen).
Entering a Patient Name into the Monitoring Screen
Patient names can be entered into monitoring channels in three different ways.
Move the list of names to the desired channel and double left click on the desired patient
name.
Touch the list of names to highlight a name and press the <Enter> key.
Click on the ‘SELECT FROM CLASS LIST’ button to get a drop down window with the
schedule for the week.
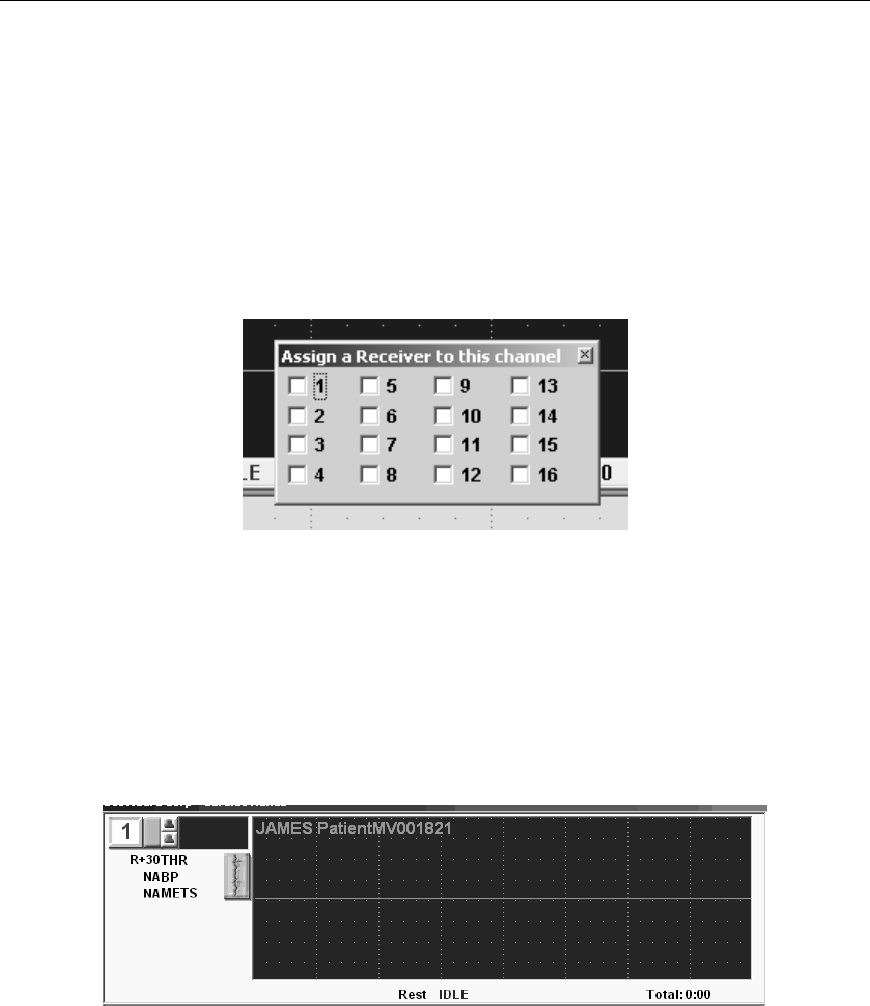
TeleRehab™ 2004 Cardiopulmonary Monitoring System Users Manual
-70-
Select the class day and time and the names of patients scheduled for monitoring as a
member of that class will be sequentially entered in up to the maximum number of empty
channels.
Once a name (or names) is/are loaded into monitoring channels, if channel numbers are
not pre defined, channel numbers will need to be assigned before the ECG trace is
started.
To assign a channel number to a channel, right click on the channel number block to view
the following selector screen:
Left click on the box next to the channel you wish to assign to the selected area based on
the transmitter number being used by the patient. (Note: this feature is most useful when
coupled with the load class list feature).
Once patients are loaded and channel numbers assigned if needed, additional information
will appear in each channel where a patient name has been loaded, and additional options
are made available in the monitoring control center.
Once a name is displayed and before the ECG trace is started, the following information
is available in the individual monitoring screen:
• THR (Target Heart Rate). This value will be whatever is in the patient file protocol
section, and can be changed by right clicking on the value. A window will appear
allowing entry of a new THR.
• BP (Current Blood Pressure Reading). This value will read NA until a blood pressure
is entered for the patient.
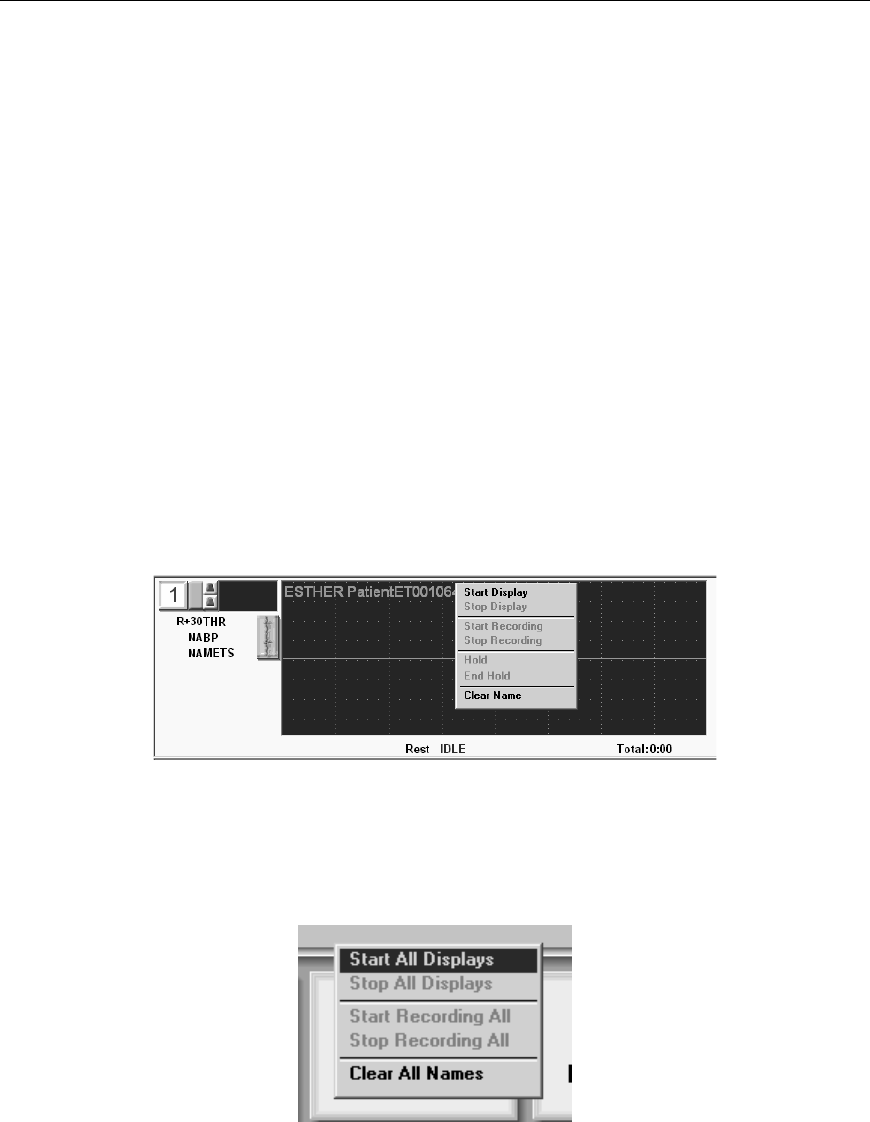
TeleRehab™ 2004 Cardiopulmonary Monitoring System Users Manual
-71-
• METS (Most recent value). This value will read NA until a METS value is either
entered or calculated by the system.
• Below the monitoring window, the word IDLE appears with the first modality
indicated in the patient protocol just to the left. (The example is REST). This
indicates that the session has not yet begun. This area will display the modality in use
along with a timer indicating how long the modality has been in use once a session is
started.
Starting the Displays
Displays can be started in three different ways.
1. Select the channel whose display is to be started and left click (or touch) the
‘Start Display’ button at the bottom of the screen. This will start the display
for the selected channel.
2. Right clicking on the word IDLE brings up the individual display menu
below:
Left click on the Start Display line to start the display for this channel.
3. Right click on one of the buttons across the bottom of the screen, and a menu
will be displayed as below:
Left click on the Start All Displays line to start the displays for all channels
not previously started.
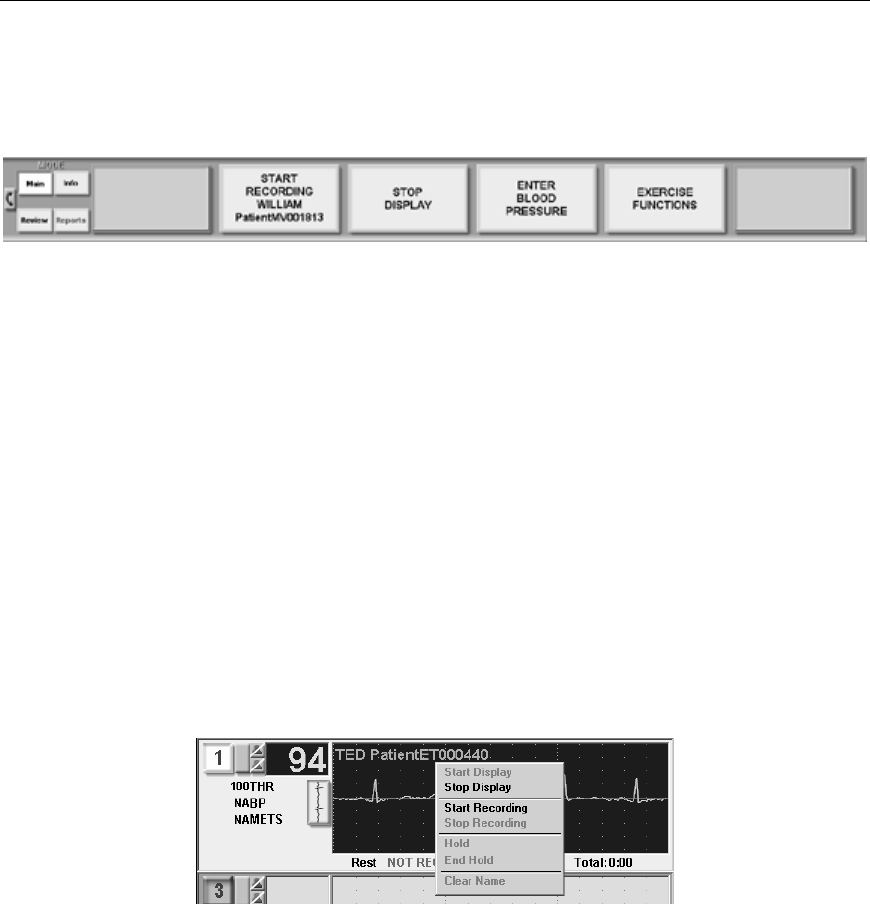
TeleRehab™ 2004 Cardiopulmonary Monitoring System Users Manual
-72-
Monitoring Patients
Once the patient name(s) have been added to the monitoring area, and the display(s) have
been started, the monitoring center options will change as shown below.
Once the patient name is entered, the features of the system in terms of collecting
information for report preparation are functional, however not all data is saved to appear
in a report.
Rhythm data is not being saved at this point, and reports produced will be without strips
and without graphic representation of the session.
In order to produce acceptable monitored reports, the session must be recorded.
You can start the recording process in three different ways.
1. Select the channel whose display is to be started and left click (or touch) the
START RECORDING (PATIENT NAME) Button at the bottom of the
screen. This will start the recording process for the selected channel.
2. Right clicking on the words NOT RECORDING brings up the individual
display menu below:
Left click on the Start Recording line to start the recording process for this
channel.
3. Right click on one of the buttons across the bottom of the screen, and a menu
will be displayed as below:
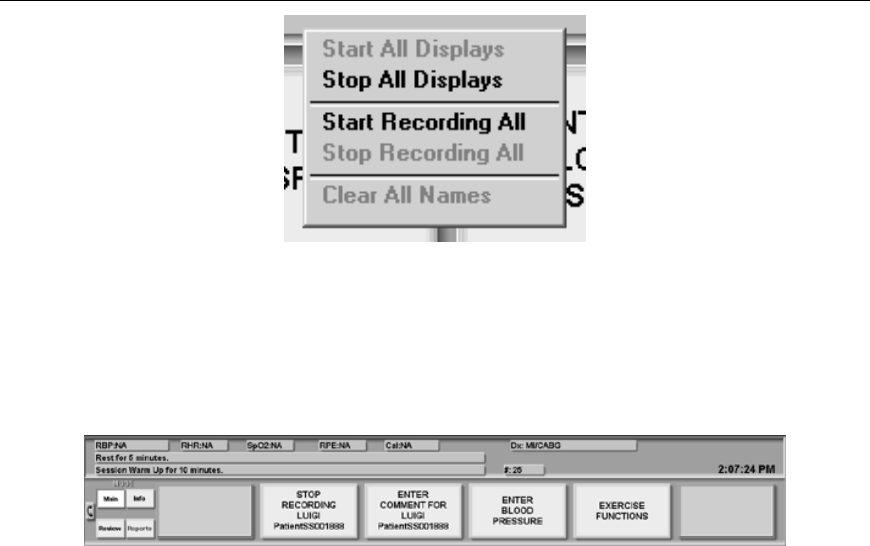
TeleRehab™ 2004 Cardiopulmonary Monitoring System Users Manual
-73-
Left click on the Start Recording All line to start the recording process for all
channels not previously started.
Once the recording process is implemented, the monitoring center options will change as
shown below, and channel numbers being recorded will turn green.
Alarm Indication
The system is equipped with 3 different audible and visual alarms:
• The Rate Alarm – When the patient’s heart rate falls outside the established range, the
trace will turn red, and an audible alarm will sound. The default rate range is
established during setup and can be changed during monitoring. See Alarm Settings
for more information.
• The Arrhythmia Alarm – When an arrhythmia rate, or any other anomaly occurs that
causes a significant change in R-to-R interval, the trace will turn blue, and an audible
alarm will sound. See Alarm Settings for more information.
• The Overtime Alarm – When the time of exercise defined in a patient’s protocol
(duration) is exceeded, an audible alarm will sound while the device time indicator
flashes.
Keeping Track of Time
To the right of the modality indication in the monitoring area is a timer. When a session
begins, this timer will keep track of the time spent on the indicated modality. The timer
can be either a standard timer (shown) or a countdown timer depending on the selection
made during setup. The timer will reset each time the modality is changed.
NOTE: Protocols should be entered and used if countdown timers are to be used.
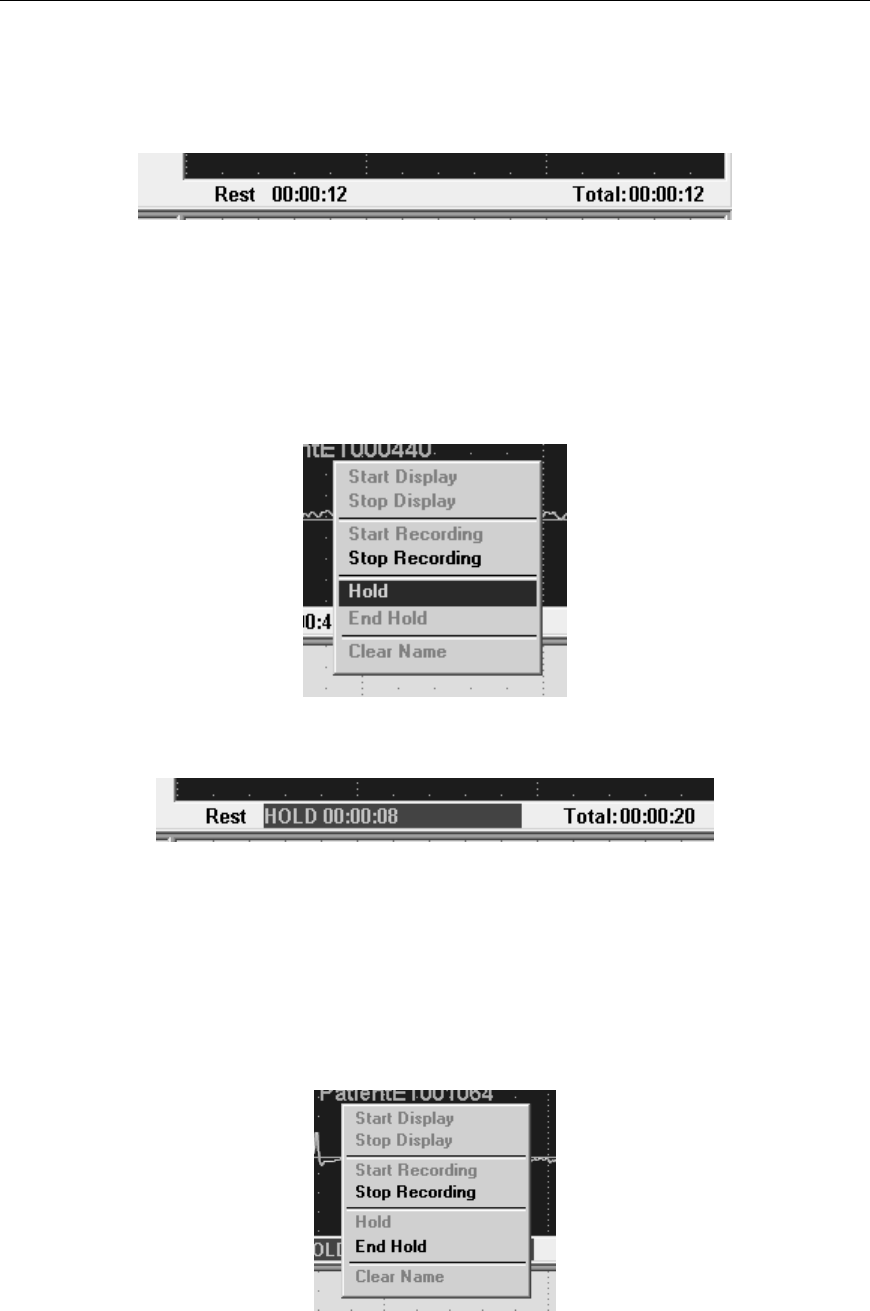
TeleRehab™ 2004 Cardiopulmonary Monitoring System Users Manual
-74-
In the lower right corner is a second timer. This timer will start when recording starts, and
will stop when recording stops to indicate the total recorded session time.
The Hold Feature
The timer on a modality may also be placed in a ‘Hold’ mode if desired to avoid counting
idle time as exercise time. To place the timer on ‘Hold’, right click on the time indicator
to see the selector window shown below.
Left click on the Hold bar to place the timer on hold.
The timer will restart and keep track of the time that the system was in the ‘Hold’ mode.
The system can be configured to automatically go into Hold mode at the end of a
prescribed time if that selection is made during setup. See the section on system setup for
further information.
To take the system out of ‘Hold’ mode, right click on ‘Hold’ to bring up the selector
window.
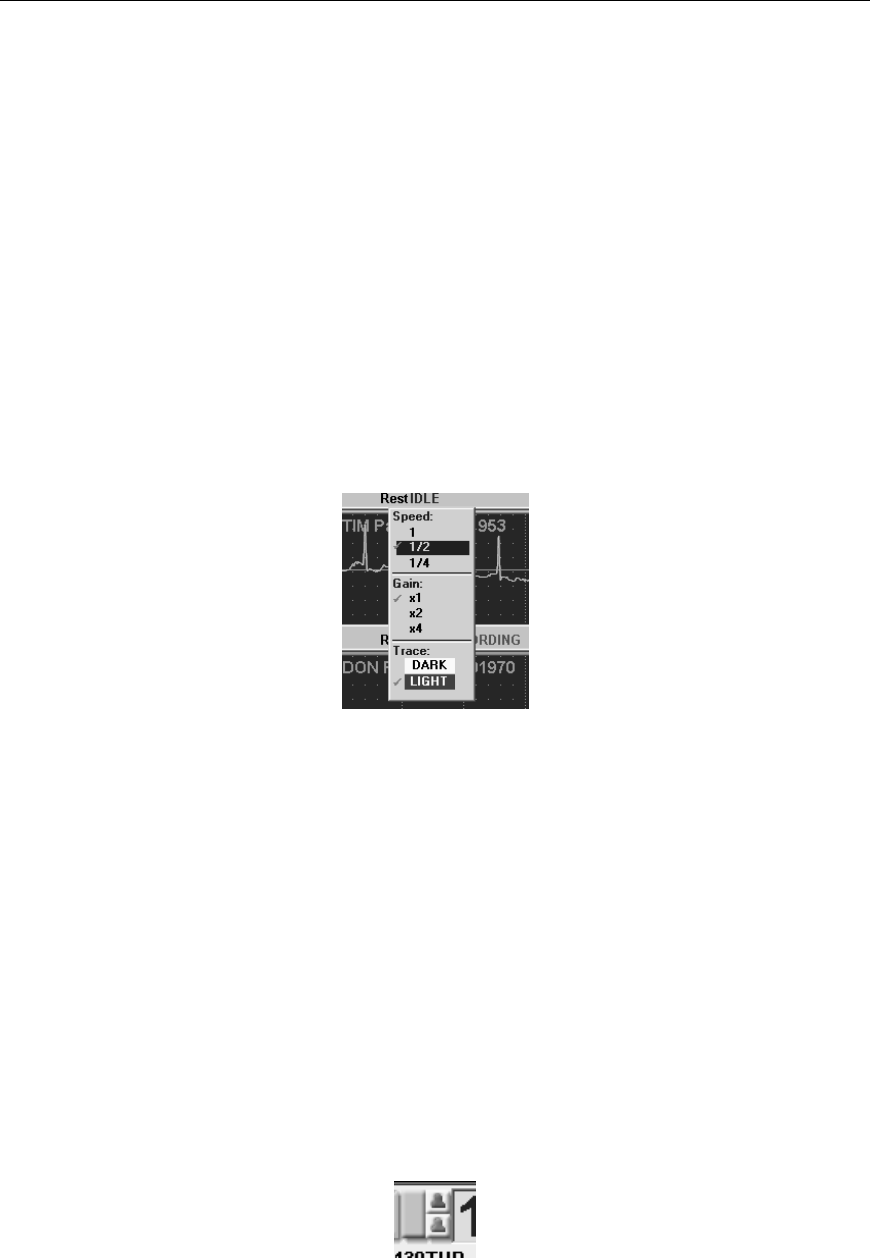
TeleRehab™ 2004 Cardiopulmonary Monitoring System Users Manual
-75-
Click on “End Hold” to resume timing exercise on a given modality.
Changing modalities will also cause the system to reset the timer and resume normal
timing of exercise.
Adjusting the Display Settings
The system provides a means to adjust display speed, display size, and whether the
display is a black trace on a white background or a white trace on a black background
while monitoring. These features are defined in the setup section where the default
settings are selected.
Right clicking on the monitoring window will bring up a channel control menu as
follows: (Note: This feature is active as long as a patient name is on the screen, including
while a trace is being displayed and recorded).
Defaults will be set at the factory of a speed equivalent to 25mm/sec and a gain of 1mv.
Options for speed are ½ - equivalent to 25 mm/sec, 1 – equivalent to 50 mm/sec, and ¼ -
equivalent to 12.5 mm/sec. Options for Gain are x1 – 1mv, x2 = 2mv, and x4 = 4mv. The
waveforms cannot be made smaller than 1mv.
The Trace area allows selection of whether the display is black trace on a white
background or white trace on a black background.
Current settings are indicated by a check mark to the left of the setting. To change any
setting, click on the desired setting and the change will take effect automatically.
Alarm Settings
To the Right of the channel indicator are the alarm indicators, red for rate and blue for
arrhythmia rate.
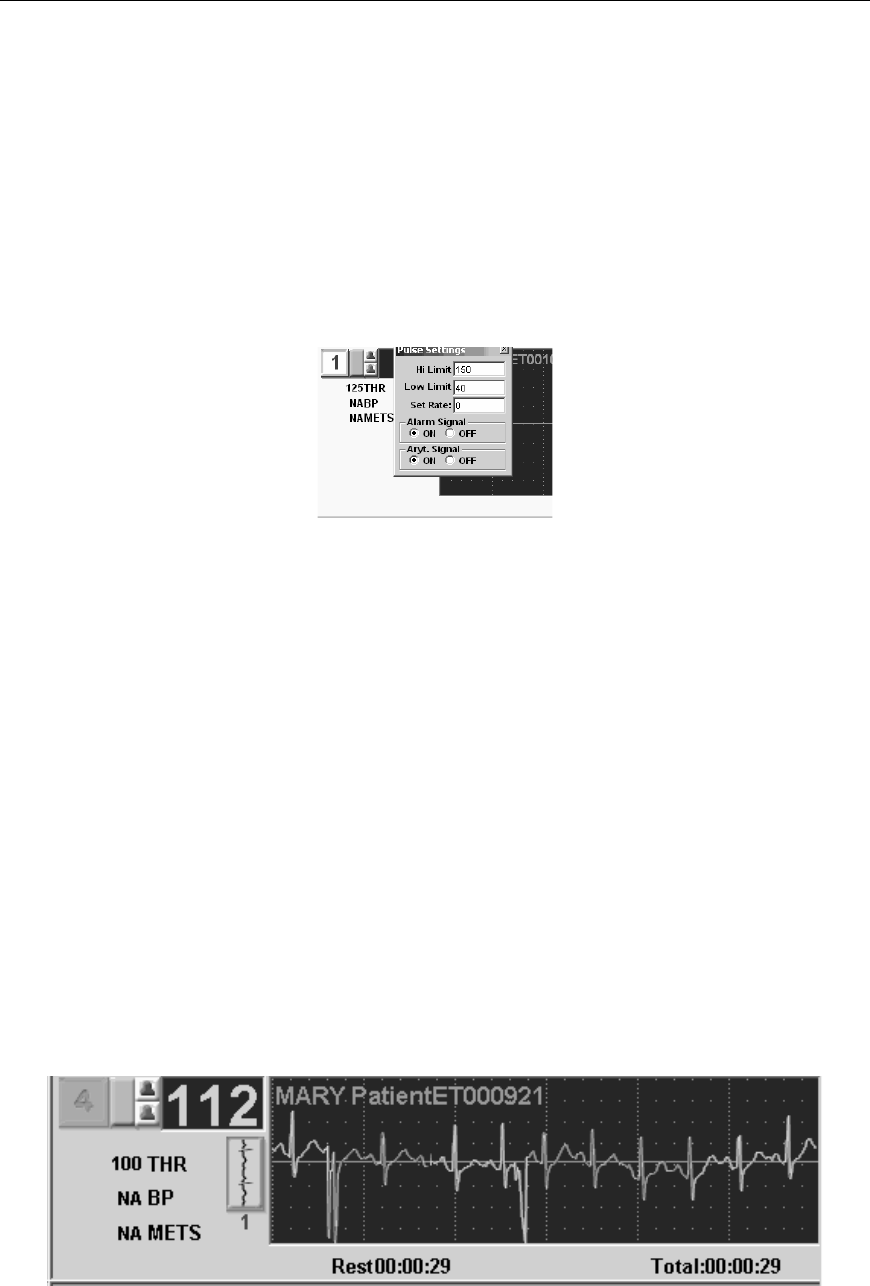
TeleRehab™ 2004 Cardiopulmonary Monitoring System Users Manual
-76-
Left clicking on one of the indicators will deactivate the alarm for the channel. A slash
will appear across the symbol to indicate deactivation. Left clicking the symbol again will
reactivate the alarm.
Right clicking on the alarm indicator will deactivate the alarm for all channels. Right
clicking a second time will reactivate the alarms for all channels.
The box to the right of the alarm indicators is where the heart rate is being displayed.
Right clicking on this box will provide the following option screen:
Hi and Low Limit boxes indicate the cut off values to activate the rate alarm (RED).
The Set Rate option allows manual entry of a heart rate that will be displayed and used in
reports in lieu of rates determined by the computer.
The rate alarm and/or arrhythmia alarm can be activated or deactivated here as well.
Displayed Information
A great deal of information is displayed and saved during the monitoring session. Some
of this information is displayed on the screen during the session while other information
is saved for use in various reports. Information is displayed both in the monitoring area
and in the monitoring status line.
The Monitoring Display Area
Once the trace is started and recording is under way, the monitoring display area will
appear as follows:

TeleRehab™ 2004 Cardiopulmonary Monitoring System Users Manual
-77-
The channel number will be Green to indicate that the channel is being recorded.
• Current Heart Rate. This value is displayed in large numbers between the alarm
indicators and the patient’s name. The heart rate displayed is an 8 beat running
average, and the number is updated approximately every 4 seconds.
• THR (Target Heart Rate). This value will initially be whatever is in the patient file
protocol section. The THR for this session is determined by the format used to define
the patient’s THR. If a whole number is assigned, that number will be identified as
the session THR. If a range is assigned, the entire range is identified as the session
THR, and if rest + a number is assigned, the session THR will be calculated using the
heart rate appearing on the first saved strip. (The system assumes that the first strip
saved is the resting strip).
• BP (Current Blood Pressure Reading). This value will read NA until a blood pressure
is entered for the patient. The most recently entered BP will be displayed in this area.
• METS (Most recent value). This value will read NA until a METS value is either
entered or calculated by the system. The value displayed will be related to the
exercise device being used. The system will automatically calculate and display the
MET value based on the workload settings for the device being used provided the
formula necessary for the calculation is resident in the system. Manually entered
MET values will be accepted and displayed for those devices where no formula is
present or where the formula is not identified for use.
• Below the monitoring window, the word IDLE appears with the first modality
indicated in the patient protocol just to the left. (The example is REST). This
indicates that the session has not yet begun. This area will display the modality in use
along with a timer indicating how long the modality has been in use once a session is
started.
The Monitoring Status Line
The area below the monitoring area (Monitoring Status Line) will display data on the
patient whose channel is selected as defined by the setup of the monitoring status line in
the System Setup Section.
• The RBP (Resting Blood Pressure) is assumed by the system to be the first blood
pressure value entered on a given patient. That value will be displayed unless changed
by the user. (See entering Information While Monitoring below for further
information).

TeleRehab™ 2004 Cardiopulmonary Monitoring System Users Manual
-78-
• RHR (Resting Heart Rate) is assumed by the system to be the heart rate indicated by
the first strip saved on a given patient. That value will be displayed unless changed by
the user. (See entering Information While Monitoring below for further information).
• SpO2 (Blood Oxygen Level) the most recently entered value is displayed.
• RPE (Rate of Perceived Exertion) the most recently entered value is displayed.
• Cal (Calories) the accumulated number of calories expended based on the work done
for each completed exercise device is displayed.
• Dx (Abbreviated Diagnosis) the abbreviated diagnosis entered into the patient record
is displayed.
• The long line down the center of the status bar displays the current exercise device
information including the device, workload, and time of activity assigned.
• The long line near the bottom of the status bar displays information regarding the next
exercise device expected to be utilized by the patient. If the patient’s exercise
protocol has been interrupted, or no exercise device is assigned following the current
device, NA will be displayed in this area.
• # (Session number) The current session number is displayed.
• The time of day is displayed in the lower right corner of the status bar.
Saving Strips
Rhythm strips can be saved in several different ways.
• A left click on the icon next to the monitoring area will cause the strip chart recorder
to begin printing the displayed rhythm strip. The strip chart recorder will continue to
run until stopped by left clicking a second time on the same icon. The first 6 seconds
of the rhythm strip so saved will be marked for inclusion in the daily session report.
• Double left clicking on the icon next to the monitoring area will cause the strip chart
recorder to print a six second strip. The printed rhythm strip is also identified for
inclusion in the daily session report.
• Touching a strip (if a touchscreen is in use) will cause the system to identify or
‘mark’ the touched strip for inclusion in the daily session report without physically
printing a rhythm strip to the strip chart recorder.
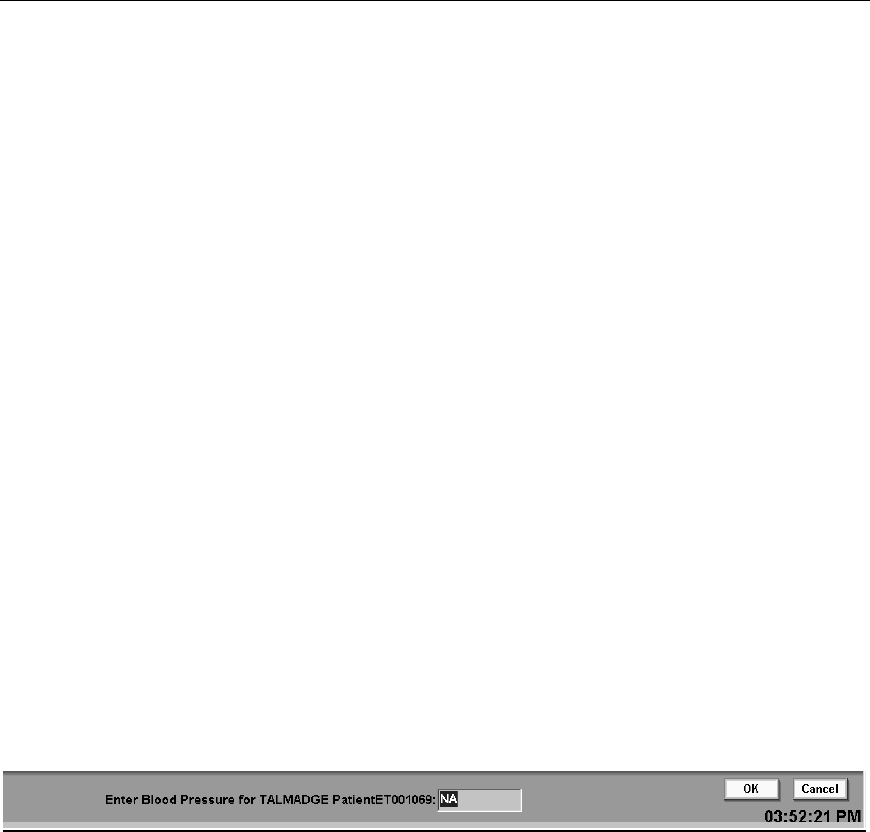
TeleRehab™ 2004 Cardiopulmonary Monitoring System Users Manual
-79-
• Left clicking a strip will cause the system to identify or ‘mark’ the identified strip for
inclusion in the daily session report without physically printing a rhythm strip to the
strip chart recorder.
• Right clicking on the icon next to the monitoring area will cause the system to
identify or ‘mark’ the current rhythm strip for inclusion in the daily session report for
all patients currently being monitored.
NOTE: Once a strip is saved while the patient is on a specific device, the strip icon will
be green indicating that a strip has been saved for the device currently in use. When the
device is changed, the icon will turn cream white again to indicate that no strip has yet
been saved for the now current device.
Entering/Editing Information While Monitoring
Various means of entering information are provided based on data type and how it is
used. User defined information is included, and specific areas have been incorporated to
allow input and/or editing of user defined information.
Entering/Editing Current Blood Pressure Readings
There are two ways to enter current blood pressure values:
Left clicking on (or touching) ENTER BLOOD PRESSURE button near the bottom of
the screen brings up a box allowing you to enter the current blood pressure for the patient
whose monitoring area is selected.
Enter the blood pressure in the block and press the <Enter> key or click OK to save the
information and exit this utility input screen. The newly entered value will be displayed
in the monitoring area.
The cancel button is self-explanatory.
Right clicking on the blood pressure value being displayed in the monitoring area of the
patient whose current blood pressure is to be entered will cause the blood pressure entry
box to appear in the monitoring area selected.
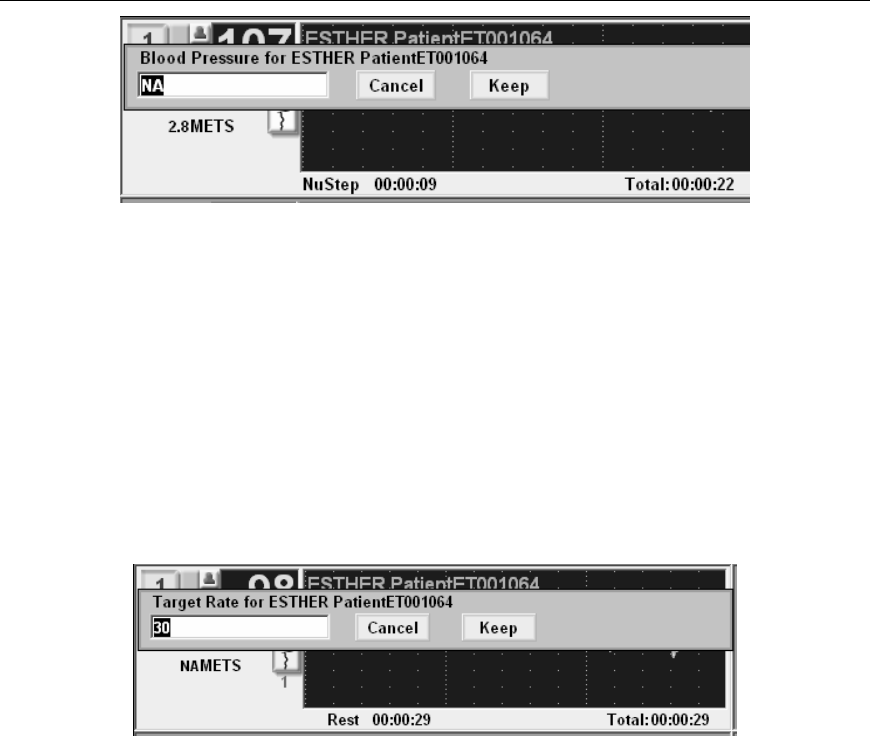
TeleRehab™ 2004 Cardiopulmonary Monitoring System Users Manual
-80-
Enter the current blood pressure in the block and press the <Enter> key or click Keep to
save the information and exit this utility input screen. The newly entered value will be
displayed in the monitoring area.
The cancel button is self-explanatory.
Editing the Session Target Heart Rate
Right clicking on the THR value being displayed in the monitoring area of the patient
whose session target heart rate is to be changed will cause the Target Rate entry box to
appear in the monitoring area selected.
Enter the correct session target heart rate in the block and press the <Enter> key or click
Keep to save the information and exit this utility input screen. The newly entered value
will be displayed in the monitoring area.
The cancel button is self-explanatory.
Entering Timed Comments
Timed comments are comments that can be entered during the monitoring process that
will be displayed in a report based on the time that they were entered. They may also be
used to augment session comments.
Click on (or touch) the ENTER COMMENT FOR (PATIENT NAME) button near the
bottom of the screen to enter a timed comment for that patient. The patient name that
appears on the labels is determined by the name on the channel currently selected. The
following screen will be made available:
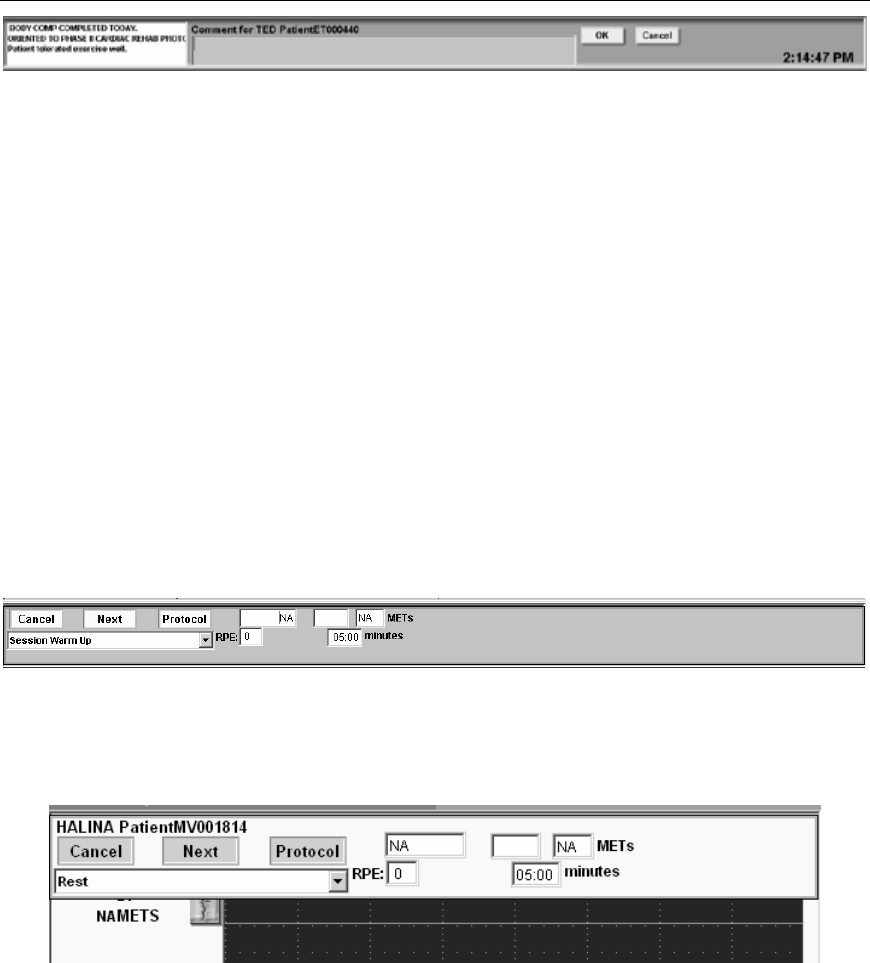
TeleRehab™ 2004 Cardiopulmonary Monitoring System Users Manual
-81-
The Phrase Library is made available on the left.
To move a comment from the phrase library to the comment area, double click on the
phrase to be moved, OR - Type in the comment desired to appear in the report.
Click the OK button to save the comment.
Click the Cancel button to leave this screen without entering a comment.
Entering/Editing Exercise Functions
Exercise functions involve several different parameters including Exercise Modality,
Workload, METs, RPE, and Time that the patient is to participate in a given modality.
Left clicking on (or touching) EXERCISE FUNCTIONS button near the bottom of the
screen brings up a protocol entry utility allowing changing of modality, workload
information, RPE, and/or time for the selected patient.
A right click on either the METs value or on the Current Modality item in the monitoring
area of the patient whose exercise functions you wish to address will produce the
following screen:
Changing Exercise Modalities
The Next button will change the modality to the next item in the patient protocol. If no
additional modalities are listed in the patient protocol, the Next label will change to
Keep, and it can no longer be used to change the modality.
If the patient is not following their protocol, and the Next button is not being used, there
are two ways to select modalities.
First, there is a drop down window that lists all modalities available as defined by the
Protocols Utility in the Program Management files. An exercise modality can be selected

TeleRehab™ 2004 Cardiopulmonary Monitoring System Users Manual
-82-
from that list by clicking the drop down window, and highlighting the desired device to
be used as the exercise modality. When a modality is selected, the Next label will change
to Keep. If the modality selected is also a part of the patient’s protocol with assigned
workloads and time, that information will appear in the Load, METs, and time blocks. If
the modality selected is NOT a part of the patient’s protocol, no information will appear
in the Load, METs, or time block and appropriate data will have to be entered. Click on
the Keep label and the selected exercise modality will appear as the current exercise
modality.
It should be noted that once the protocol sequence is broken, the Next button would no
longer be available for use for the balance of the session.
Second, clicking on the Protocol label will bring up a window containing the patient’s
protocol. A checkbox appears to the left of each modality, and a check mark will appear
in the box if the modality has been used. Clicking on any of the modalities listed will
cause that modality to appear in the drop down window and the assigned workloads and
time will appear in the appropriate blocks. The Next label will change to Keep, and left
clicking on Keep will cause the selected exercise modality to appear as the current
exercise modality.
Changing Work Load
To change the workload for the modality currently in use, enter the new workload in the
boxes provided between the Protocol button and the METs block. In those instances
where there are two components to the workload, the first block is used for the primary
component and the second block contains the secondary component. For example,
Treadmill Speed would appear in the first block while slope would appear in the second.
When the workload block is activated, the Next button will change to Keep, and left
clicking on Keep will cause the newly entered workload to be saved and used in the
METs calculation.
Changing MET’s
To change the MET’s value for the modality currently in use, enter the new MET’s value
in the box provided.
When the MET’s block is activated, the Next button will change to Keep, and left
clicking on Keep will cause the newly entered METs to be saved. The workload value
will be adjusted based on the new METs value.
Entering/Changing Time
To enter or change the Time for an exercise modality currently in use, enter the new time
in the box provided.
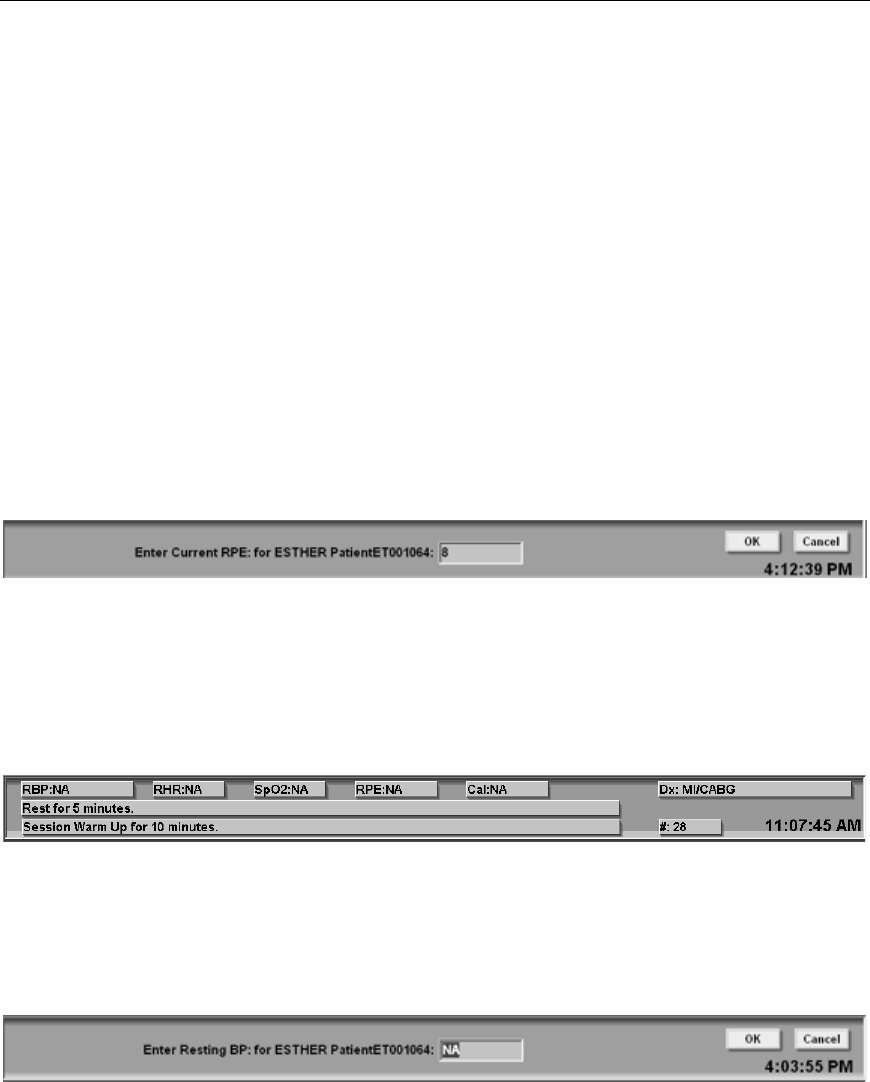
TeleRehab™ 2004 Cardiopulmonary Monitoring System Users Manual
-83-
Due to the way time is utilized and displayed by the system, Time must be entered using
a colon to distinguish between seconds and minutes. An entry without a colon identifies
the time as seconds while a colon after the number entered identifies the time as minutes.
Entering/Changing RPE
To enter or change the RPE value for the exercise modality currently in use, enter the
new RPE value in the box provided.
When the RPE box is activated, the Next button will change to Keep, and left clicking on
the Keep button will cause the newly entered RPE value to be saved as a part of the
session data file.
The RPE can also be entered or changed by editing the RPE value displayed in the
Monitoring Status Line.
Right click on the RPE value displayed and the following screen will be made available:
Enter the correct RPE value and left click on the OK button to save the new number.
Editing Items in the Monitoring Status Line
Some items displayed in the monitoring status line are eligible for editing.
Editing the Resting Blood Pressure Value
The RBP (Resting Blood Pressure) is assumed by the system to be the first blood
pressure value entered on a given patient. If the existing value is incorrect, right click on
the value following RBP to get the following screen:
Enter the correct RBP value and left click on the OK button to save the new information.
Entering the Resting Heart Rate Value
The RHR (Resting Heart Rate) is assumed by the system to be the heart rate indicated by
the first strip saved on a given patient. If the value displayed is incorrect, right click on
the existing value to get the following screen:
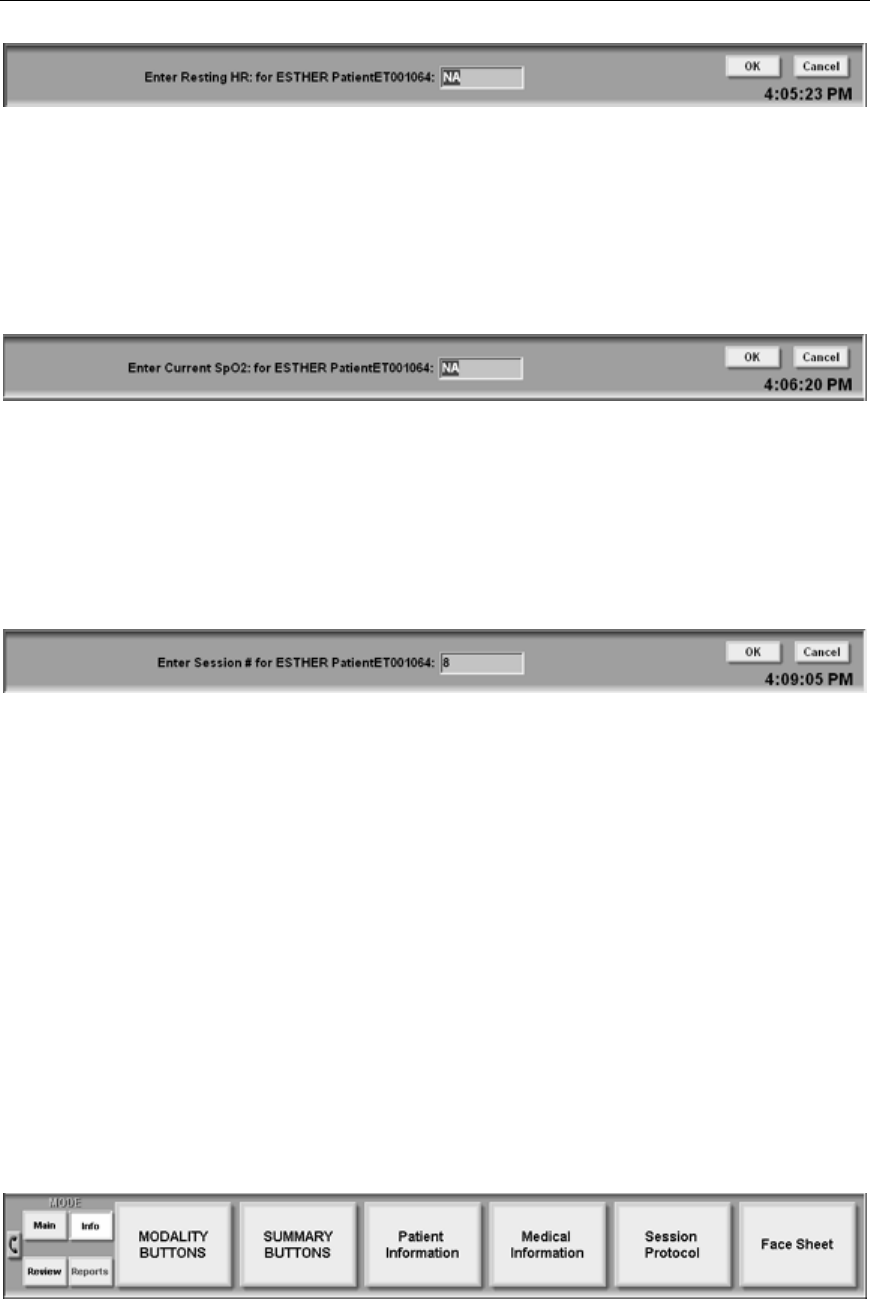
TeleRehab™ 2004 Cardiopulmonary Monitoring System Users Manual
-84-
Enter the correct RHR value and left click on the OK button to save the new information
Editing the Current SpO2 Value
The SpO2 (Blood Oxygen Level) displayed is the most recently entered value. If the
displayed value is incorrect, right click on the existing value to get the following screen:
Enter the correct SpO2 value and left click on the OK button to save the new information.
Editing the Current Session Number
The # (Session number) displayed is the current session number. If the displayed number
is incorrect, right click on the existing number to get the following screen:
Enter the correct session number and left click on the OK button to save the new
information.
NOTE: There may be other user-defined resources displayed in this area that are also
eligible for editing. In all cases, a right click on the value to be edited allows access to the
Editing utility.
Entering/Editing User Defined Modality Data
The system provides an area designed to allow entry of user defined modality data. The
items included are defined during system setup (See Setting up the Custom Monitoring
Buttons in the Setup Section).
To access the Modality buttons, left click on (or touch) the Info button to the left of the
Monitoring Control Center to access the Info buttons.
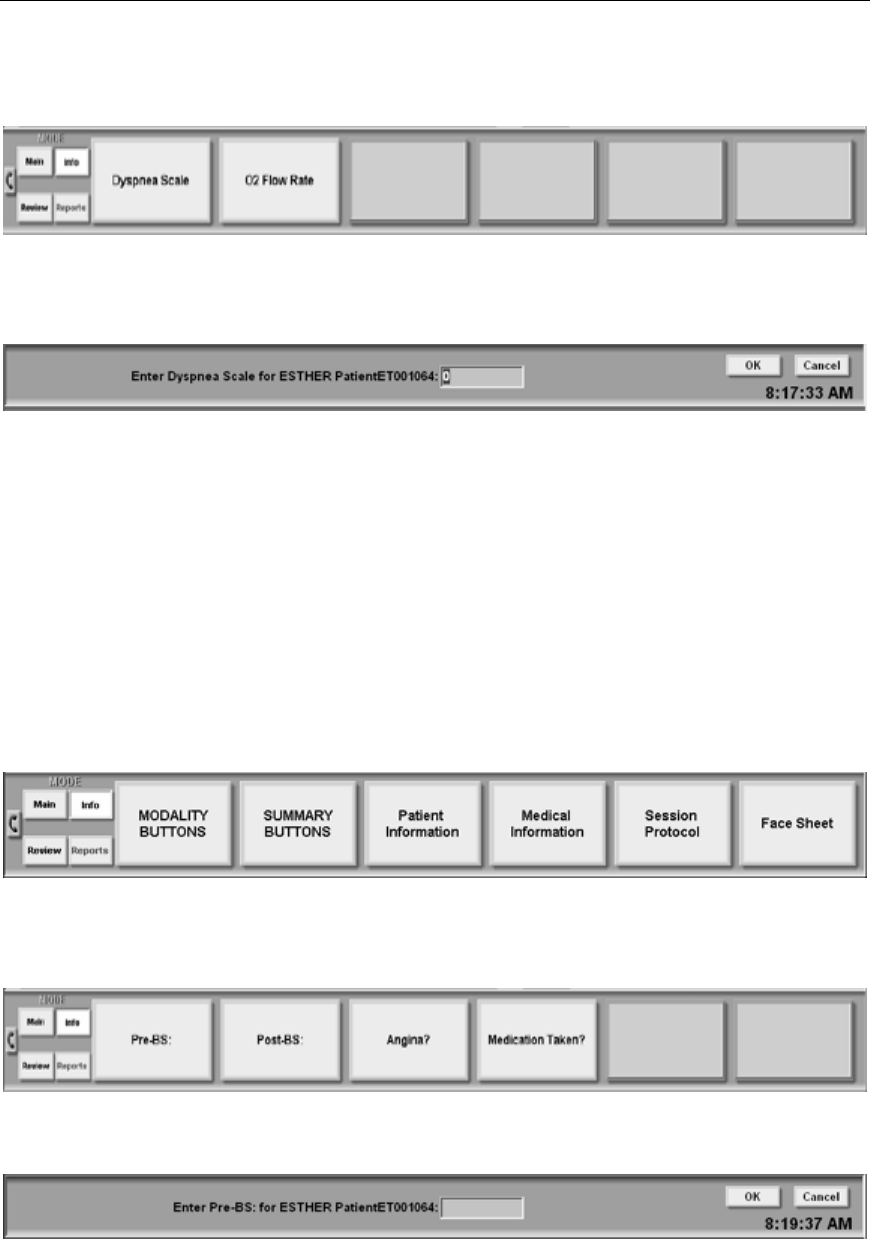
TeleRehab™ 2004 Cardiopulmonary Monitoring System Users Manual
-85-
Left click on (or touch) the button labeled MODALITY BUTTONS to access the user
defined modality input screen below:
Left click on (or touch) the desired modality button to access the input screen:
Enter the correct data and left click on the OK button to save the new information.
Entering/Editing User Defined Summary Data
The system provides an area designed to allow entry of user defined summary data. The
items included are defined during system setup. (See Setting up the Custom
Monitoring Buttons in the Setup Section).
To access the Summary buttons, left click on (or touch) the Info button to the left of the
Monitoring Control Center to access the Info buttons.
Left click on (or touch) the button labeled SUMMARY BUTTONS to access the user
defined summary input screen below:
Left click on (or touch) the desired summary button to access the input screen:
Enter the correct data and left click on the OK button to save the new information.
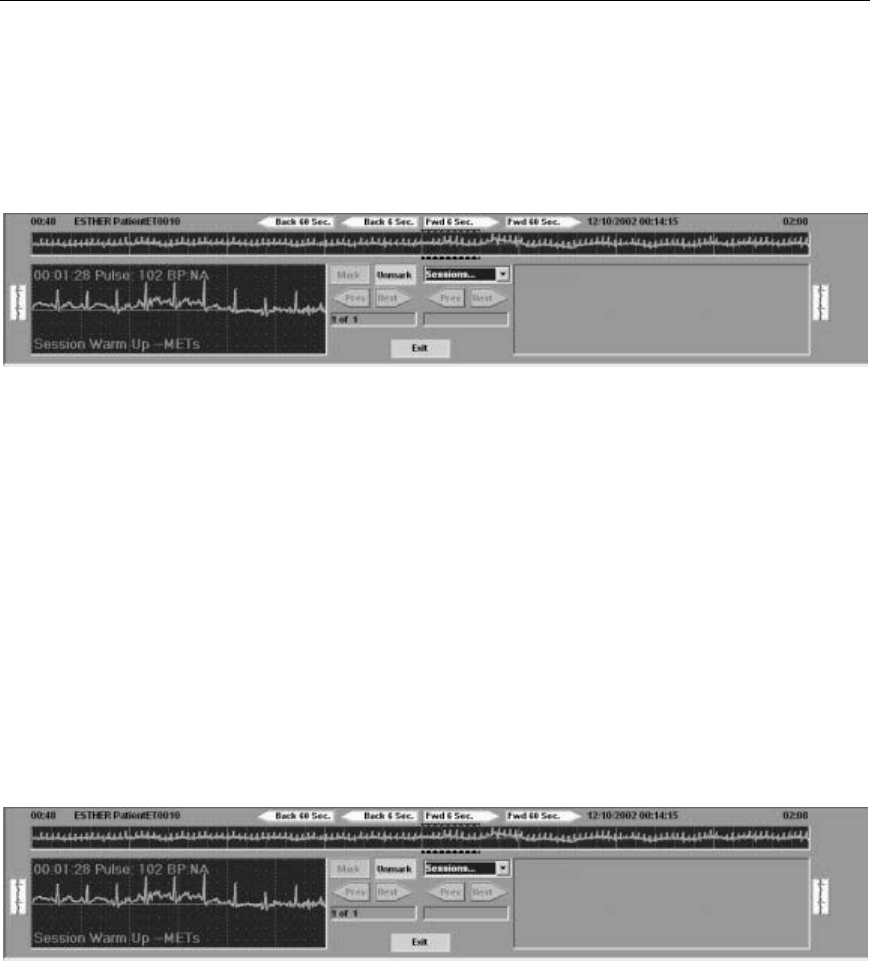
TeleRehab™ 2004 Cardiopulmonary Monitoring System Users Manual
-86-
Editing Saved Rhythm Strips
Left clicking (or touching) the SHOW SELECTED STRIPS button allows review of the
full disclosure to the point in time when this utility is activated. It also provides access to
strips saved during this session as well as any strip that has been saved in previous
sessions.
The time indicators at the top left and right corners indicate the time span being displayed
by the full disclosure strip.
The patient name appears in the upper left area of the box, with the date and time of
session appearing to the right of the box.
Left clicking on the arrow tabs at the top of the box will move the full disclosure strip as
indicated by the box (e.g. Back 60 sec. Or Fwd 6 sec.)
When first activated, the first strip saved will appear in the larger box at the lower left of
the screen. The small flat box inside near the center will indicate which strip you are
viewing (e.g. 2 of 4). View each of the strips saved by left clicking on either Prev for
previous strips or Next for the next strip saved.
Left clicking anywhere on the full disclosure will cause that 6-second strip to appear in
the large box at the lower left of the screen in place of a saved strip. To save an unsaved
strip, left click on the Mark block. To unsave a strip, left click on the Unmark block.
Printing Saved Rhythm Strips to the Strip Chart Recorder
To print a strip on the strip chart recorder, left click on the strip icon to the left of the strip
box. The strip shown in the box will print to the strip chart recorder.
Reviewing Rhythm Strips from Previous Sessions
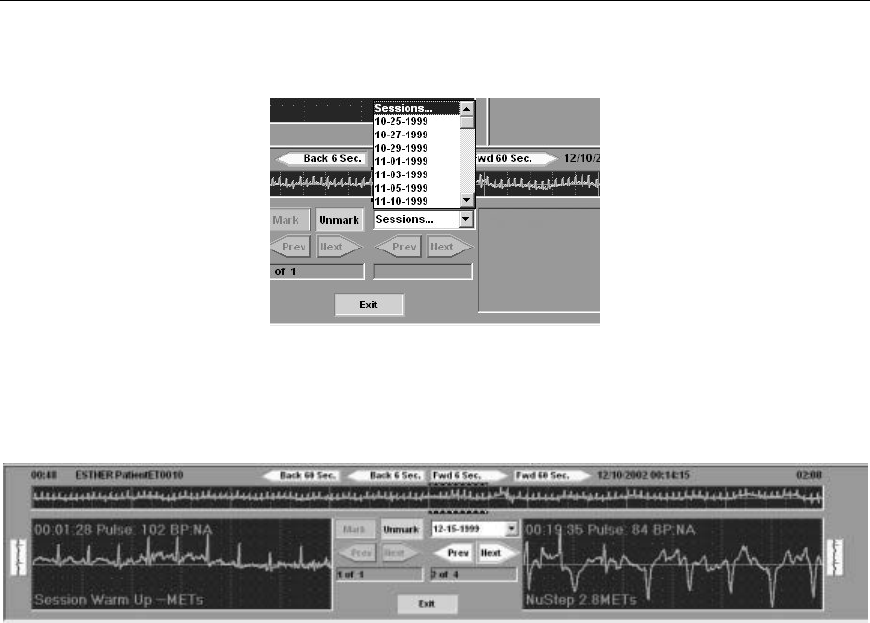
TeleRehab™ 2004 Cardiopulmonary Monitoring System Users Manual
-87-
To view strips saved in previous sessions, left click on the drop down window box
labeled Sessions, and a list of session dates will appear.
Double click on the date of the session whose strips you wish to view, and the first of the
saved strips in that session will appear in the strip box to the right of the screen.
The small flat box inside near the center right will indicate which strip you are viewing
(e.g. 2 of 4). View each of the strips saved by left clicking on either Prev for previous
strips or Next for the next strip saved.
Printing Rhythm Strips from Previous Sessions to the Strip Chart
Recorder
To print a strip on the strip chart recorder, left click on the strip icon to the right of the
strip box. The strip shown in the box will print to the strip chart recorder.
Left click on the Exit box to leave this screen.
Review/Edit Session Summary Data
Left clicking (or touching) the EDIT SESSION SUMMARY DATA button at the review
menu allows review of the summary information identified to appear in the daily session
report.

TeleRehab™ 2004 Cardiopulmonary Monitoring System Users Manual
-88-
The items appearing in this screen are defined in the program management application.
To change an item, click on the appropriate box and enter the desired information.
When done, left click on the box to the right that identifies the action you wish to take:
Exit and Keep Changes will keep your changes for the daily session report.
Exit Unchanged will ignore your changes and keep the initial information.
Revert to Initial Data will return all values to their original number.
Review/Edit Session Modality Data
Left clicking (or touching) the EDIT SESSION MODALITY DATA button at the review
menu allows review of the modality information to appear in the daily session report.
The items appearing in this screen are defined in the program management application.
To change an item, left click on the appropriate box and enter the desired information.
The modality items will provide a drop down window for selection. Duration must be
entered as a time including the colons. Workloads may require entry of two items (e.g.
speed and slope). All other blocks will accept numeric information.
Exit and Keep Changes will keep your changes for the daily session report.
Exit Unchanged will ignore your changes and keep the initial information.
Revert to Initial Data will return all values to their original number.
Review/Edit Session Timed Comments
Left clicking (or touching) the EDIT TIMED COMMENTS button at the review menu
allows review of comments that were entered during a session.
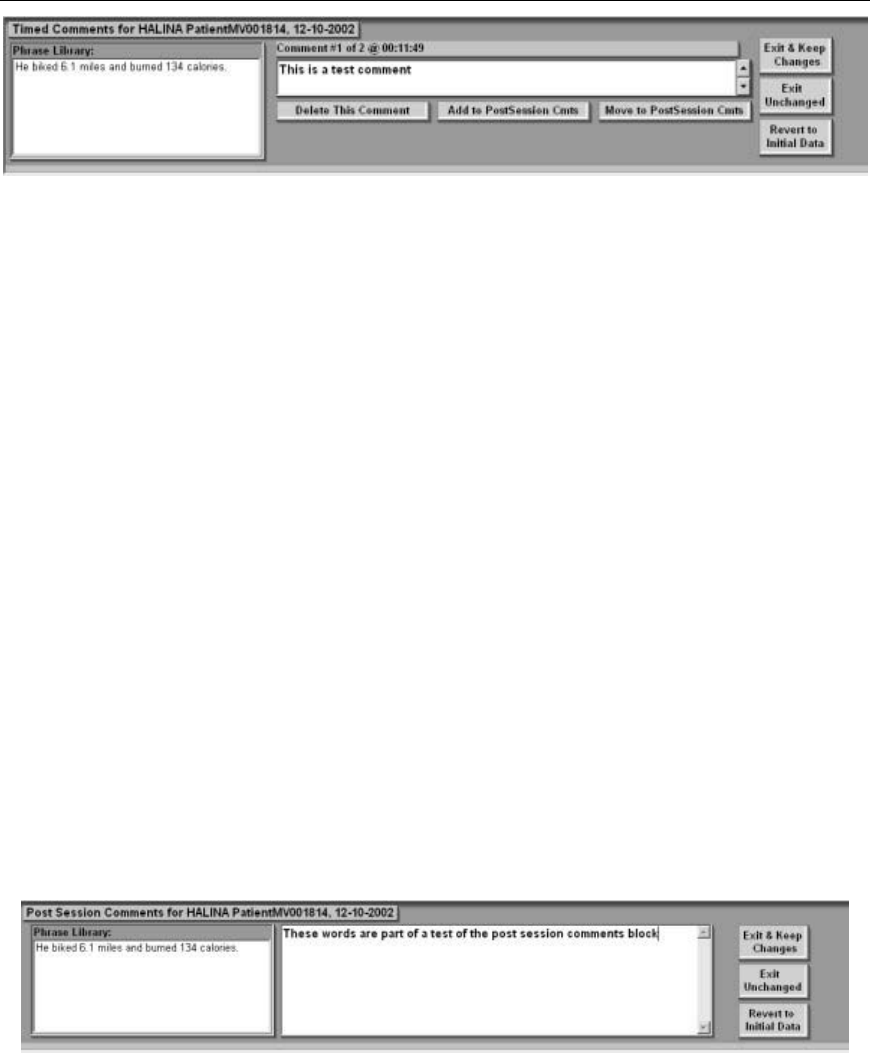
TeleRehab™ 2004 Cardiopulmonary Monitoring System Users Manual
-89-
Modify a timed comment by double clicking on a phrase from the phrase library, or by
clicking into the comment itself and making desired changes.
View other timed comments by clicking the up or down arrow to the right of the
comment block.
To delete a timed comment, click on the Delete This Comment block.
Clicking on the Add to PostSession Cmts block will add the comment to the post
session comments area and maintain the comment as a timed comment as well.
Clicking on the Move to PostSession Cmts block will add the comment to the post
session comments area and remove the comment from the timed comments area.
Exit and Keep Changes will keep your changes for the daily session report.
Exit Unchanged will ignore your changes and keep the initial information.
Revert to Initial Data will return all values to their original number.
Review/Edit Post Session Comments
Left clicking (or touching) the POST SESSION COMMENTS button at the review menu
allows entry as well as review of post session comments that are entered during a session.
Modify the post session comments by double clicking on a phrase from the phrase
library, or by clicking into the comment itself and making desired changes.
Exit and Keep Changes will keep your changes for the daily session report.
Exit Unchanged will ignore your changes and keep the initial information.
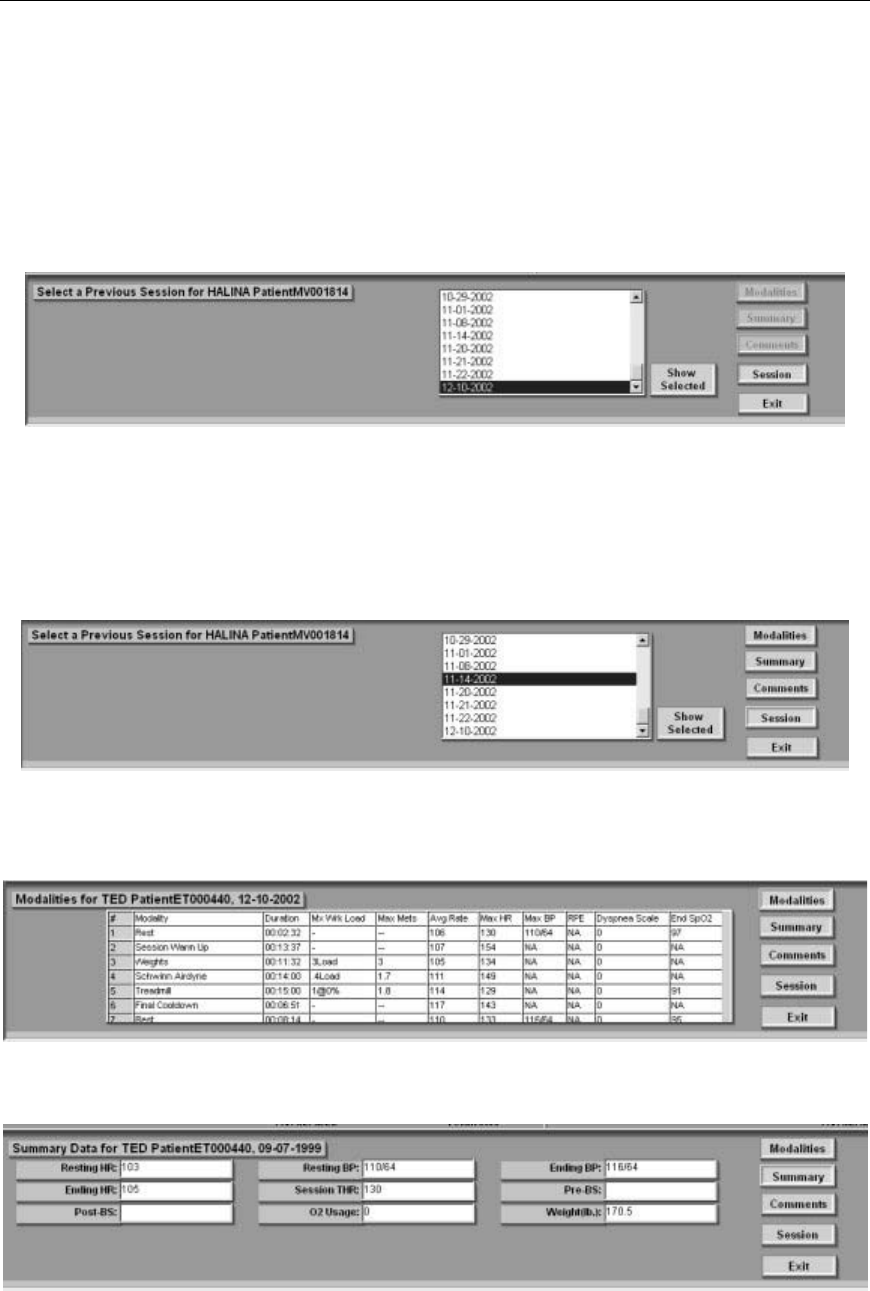
TeleRehab™ 2004 Cardiopulmonary Monitoring System Users Manual
-90-
Revert to Initial Data will return all values to their original number.
Reviewing a Previously Recorded Session While Monitoring
Left clicking (or touching) the REVIEW PREVIOUS SESSION button at the review
menu allows review of data entered in any previous session for the selected patient.
(Note: Strips can be reviewed by using the SHOW SELECTED STRIPS Option).
A list of session dates is made available for selection. To select a date, click on the date
and then click on the Show Selected box.
The section boxes will become available to bring up the various sections of the reports.
Left click the Modalities block to view the modalities section of the selected report.
Left click the Summary block to view the Summary section of the selected report.
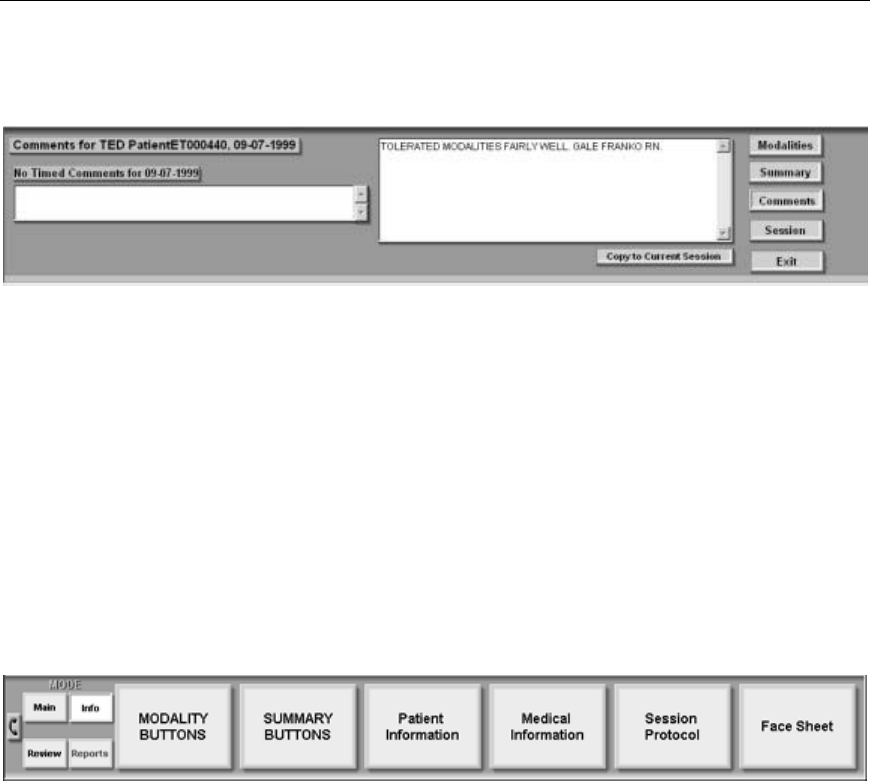
TeleRehab™ 2004 Cardiopulmonary Monitoring System Users Manual
-91-
Left click the Comments block to view the comments (both timed and post session)
sections of the selected report.
Note that comments can be copied to the current session by high lighting the comments
desired to copy and clicking on the block labeled Copy to Current Session.
Clicking on the Session button will return to the screen showing the list of sessions
available.
Click on the Exit button to leave this utility.
Editing Patient Information While Monitoring
Left clicking on the Info button during a session will bring up the following selections at
the monitoring control center:
Keep in mind that the various functions will apply to the patient whose name is on the
highlighted channel on the monitoring screen.
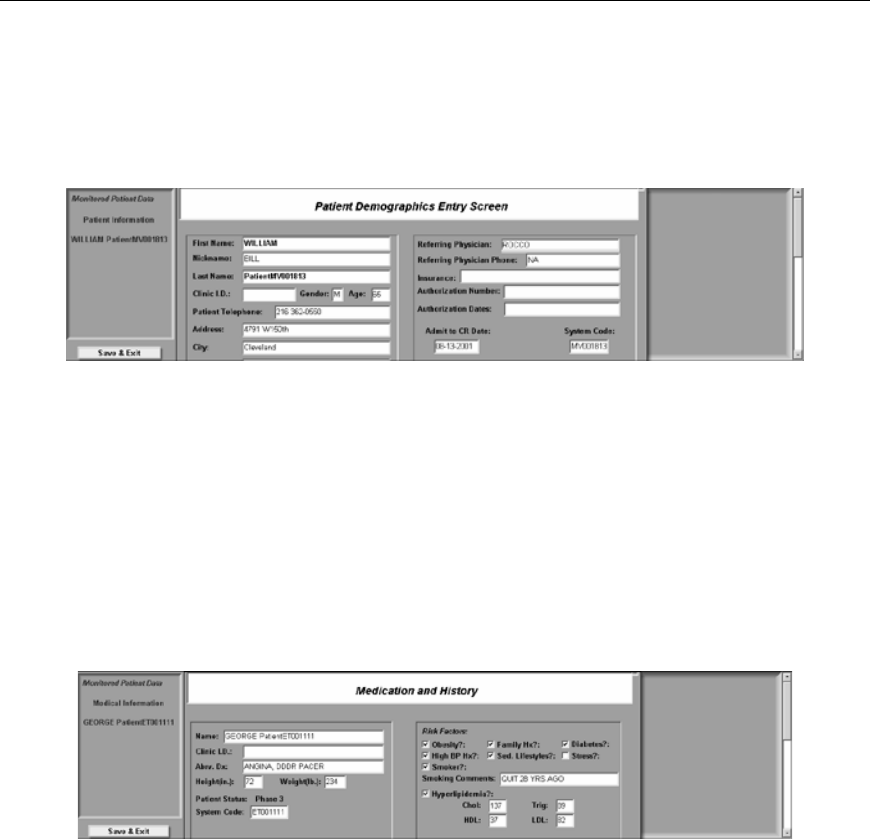
TeleRehab™ 2004 Cardiopulmonary Monitoring System Users Manual
-92-
Editing Demographic Information While Monitoring
Left clicking (or touching) the Patient Information Button will cause the system to display
the patient information input screen as defined in the program management section.
Through the use of this screen, data can be entered/edited directly into the patient file. Use
the scroll bar on the right hand side to scroll through the entire screen.
Left click on the Save and Exit button when editing is complete.
Editing Medical Information While Monitoring
Left clicking (or touching) the Medical Information Button will cause the system to
display the medical information input screen as defined in the program management section.
Through the use of this screen, data can be entered/edited directly into the patient file. Use
the scroll bar on the right hand side to scroll through the entire screen.
Left click on the Save and Exit button when editing is complete.
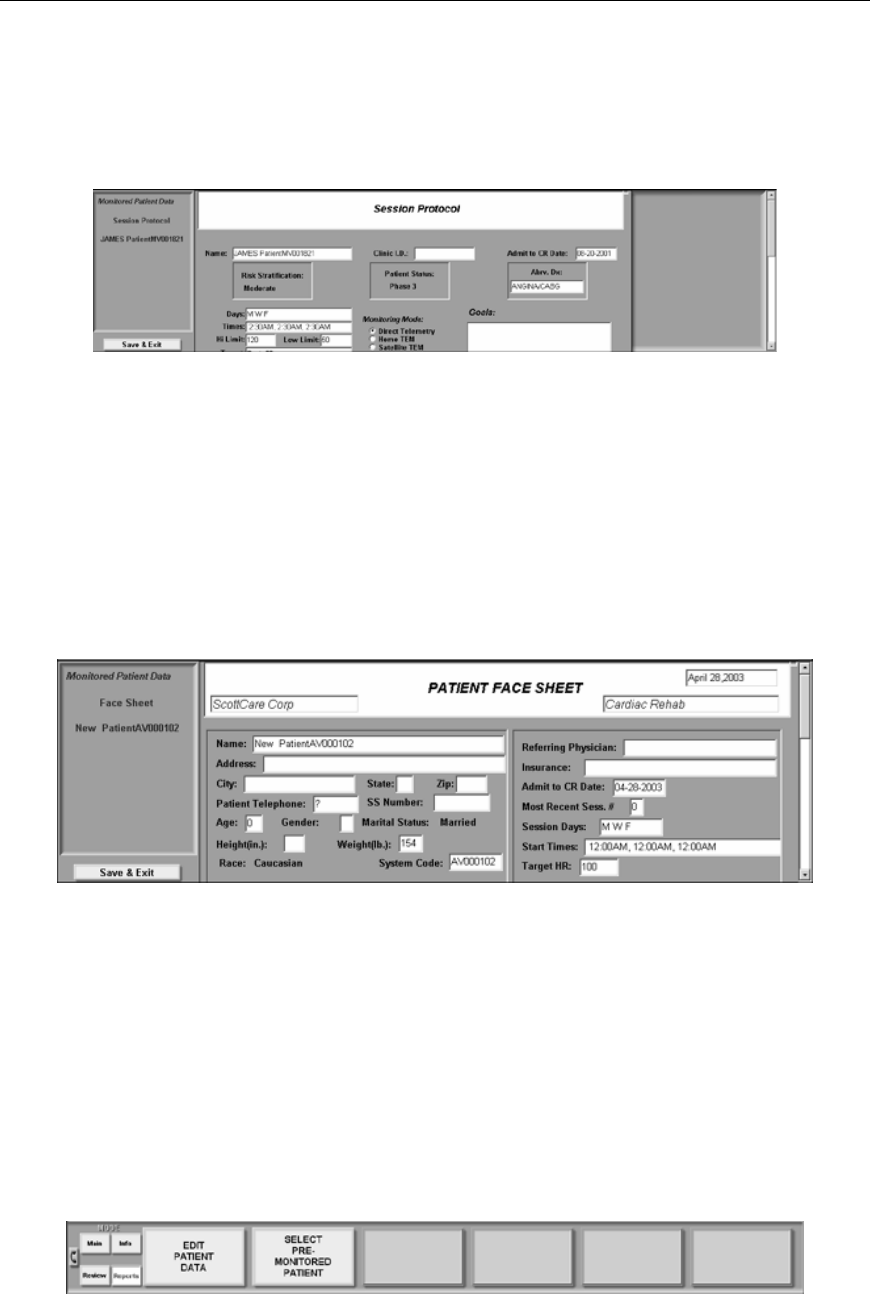
TeleRehab™ 2004 Cardiopulmonary Monitoring System Users Manual
-93-
Editing the Protocol Screen While Monitoring
Left clicking (or touching) the Session Protocol Button will cause the system to display the
session protocol input screen as defined in the program management section.
Through the use of this screen, data can be entered/edited directly into the patient file. Use
the scroll bar on the right hand side to scroll through the entire screen.
Left click on the Save and Exit button when editing is complete.
Editing the Face Sheet While Monitoring
Left clicking (or touching) the Face Sheet Button will cause the system to display the
patient face sheet input screen as defined in the program management section.
Through the use of this screen, data can be entered/edited directly into the patient file. Use
the scroll bar on the right hand side to scroll through the entire screen.
Left click on the Save and Exit button when editing is complete.
Editing Patient Information on Patients Not Currently Being Monitored
Left clicking on the Reports button while monitoring will provide access to the utilities
that provide a means of entering/editing patient information on patients that are not
currently being monitored.
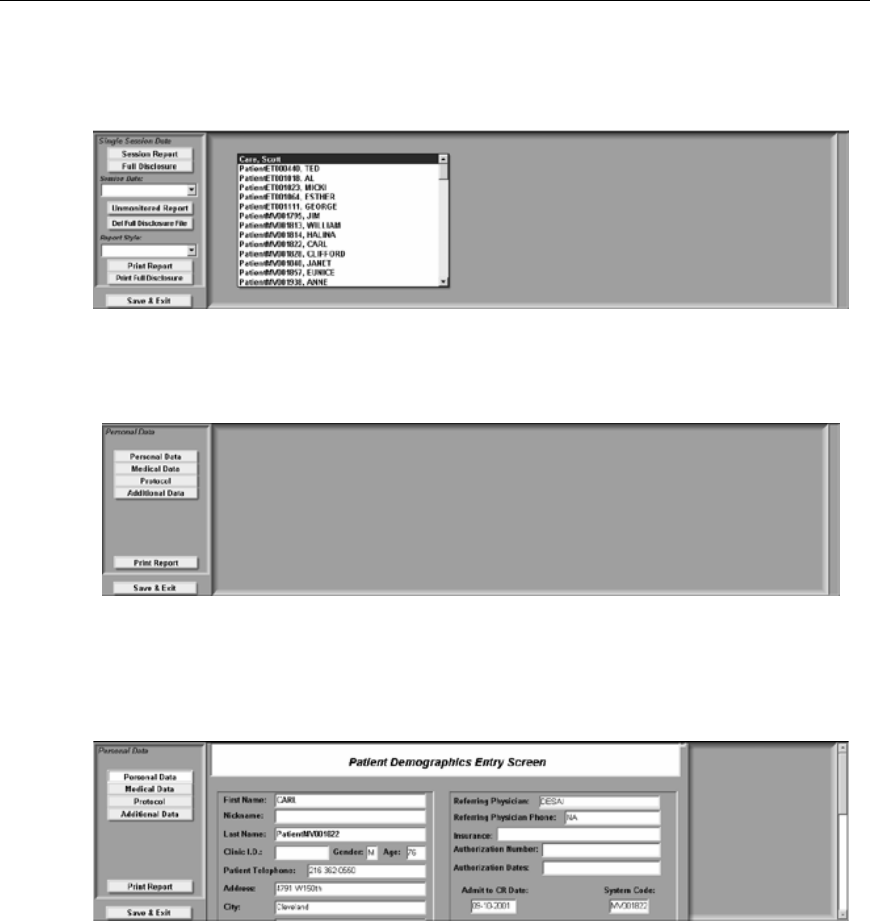
TeleRehab™ 2004 Cardiopulmonary Monitoring System Users Manual
-94-
From this control center, you can view/edit patient data on any patient in the system by
left clicking on the Edit Patient Data button.
Highlight the name of the patient whose data you want to review/edit and press the <enter>
key.
Editing Patient Information
Left click on the Patient Information bar to view the patient information input screen.
Through the use of this screen, data can be entered/edited directly into the patient file. Use
the scroll bar on the right hand side to scroll through the entire screen.
To print the contents of this screen, left click on the Print Report bar.
Left click on the Save and Exit button when editing is complete.
Editing Medical Information
Left click on the Medical Information bar to view the medical information input screen.
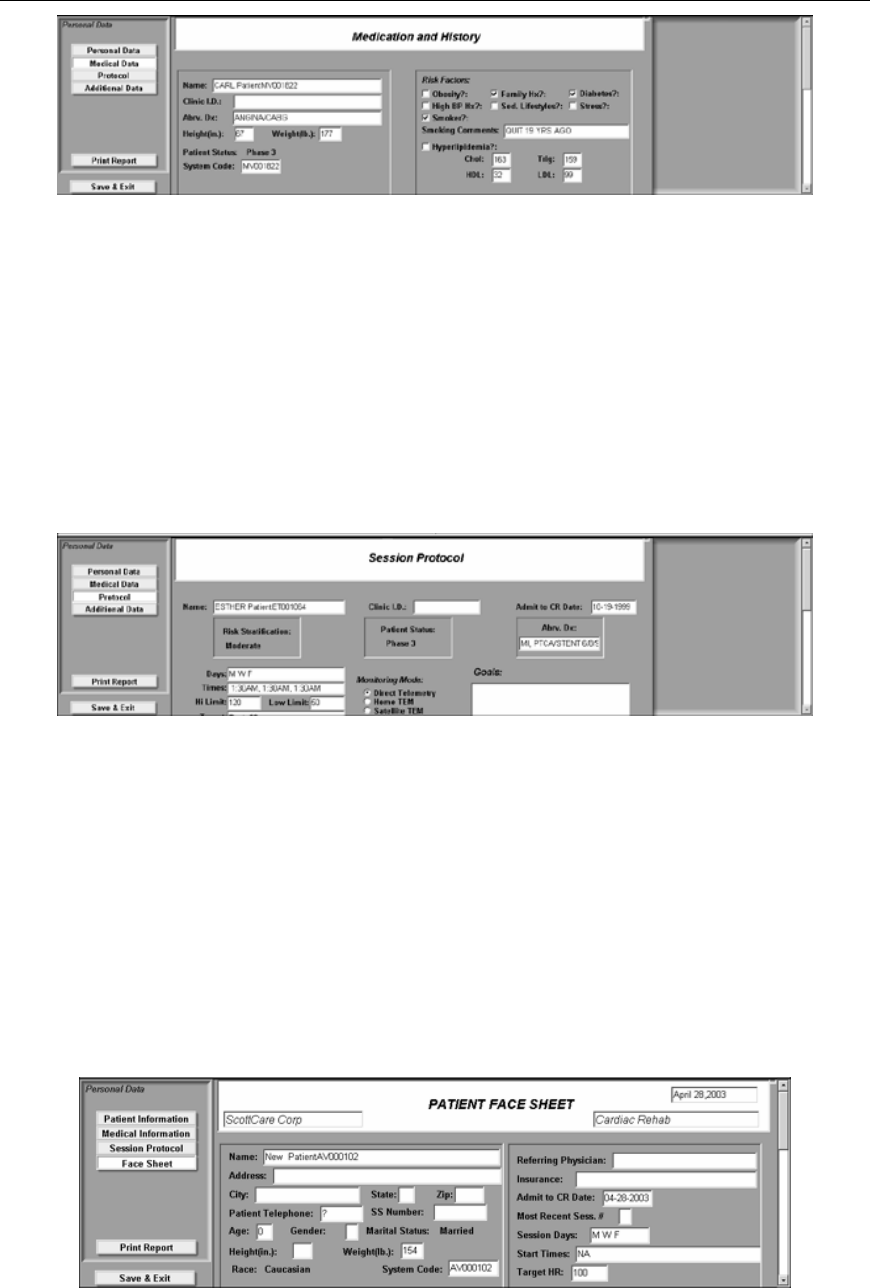
TeleRehab™ 2004 Cardiopulmonary Monitoring System Users Manual
-95-
Through the use of this screen, data can be entered/edited directly into the patient file.
Use the scroll bar on the right hand side to scroll through the entire screen.
To print the contents of this screen, left click on the Print Report bar.
Left click on the Save and Exit button when editing is complete.
Editing Protocol Information
Left click on the Session Protocol bar to view the session protocol input screen.
Through the use of this screen, data can be entered/edited directly into the patient file.
Use the scroll bar on the right hand side to scroll through the entire screen.
To print the contents of this screen, left click on the Print Report bar.
Left click on the Save and Exit button when editing is complete.
Editing Face Sheet Information
Left click on the Face Sheet bar to view the patient face sheet screen.
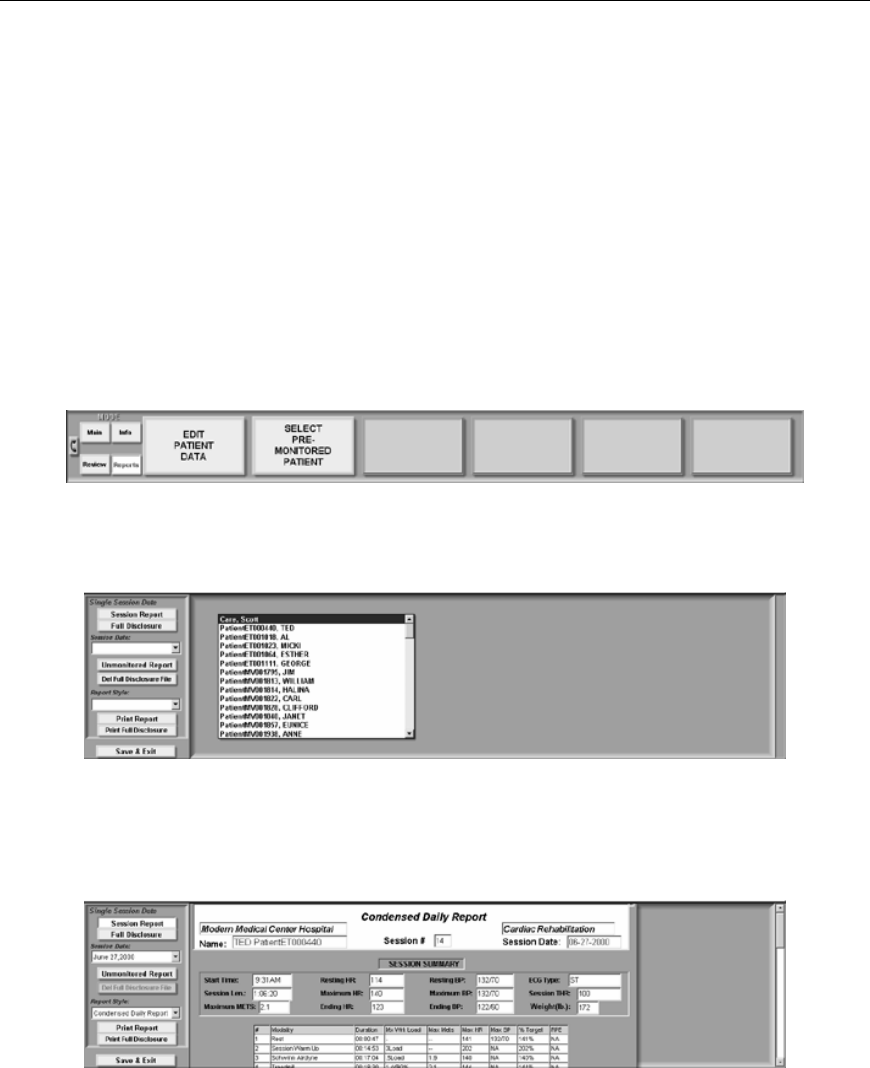
TeleRehab™ 2004 Cardiopulmonary Monitoring System Users Manual
-96-
Through the use of this screen, data can be entered/edited directly into the patient face
sheet. Use the scroll bar on the right hand side to scroll through the entire screen.
To print the contents of this screen, left click on the Print Report bar.
Left click on the Save and Exit button when editing is complete.
Viewing/Editing Report Data On Previously Monitored Patients
Left clicking on the Reports button while monitoring will provide access to the utilities
that provide a means of viewing/editing reports on patients not currently being
monitored.
From this control center, you can view/edit report data on any patient in the system by
left clicking on the SELECT PRE MONITORED PATIENT button.
Highlight the name of the patient whose report data you want to review/edit and press the
<enter> key.
Refer to the section on single session reports for complete instruction on reviewing and
editing single session reports.
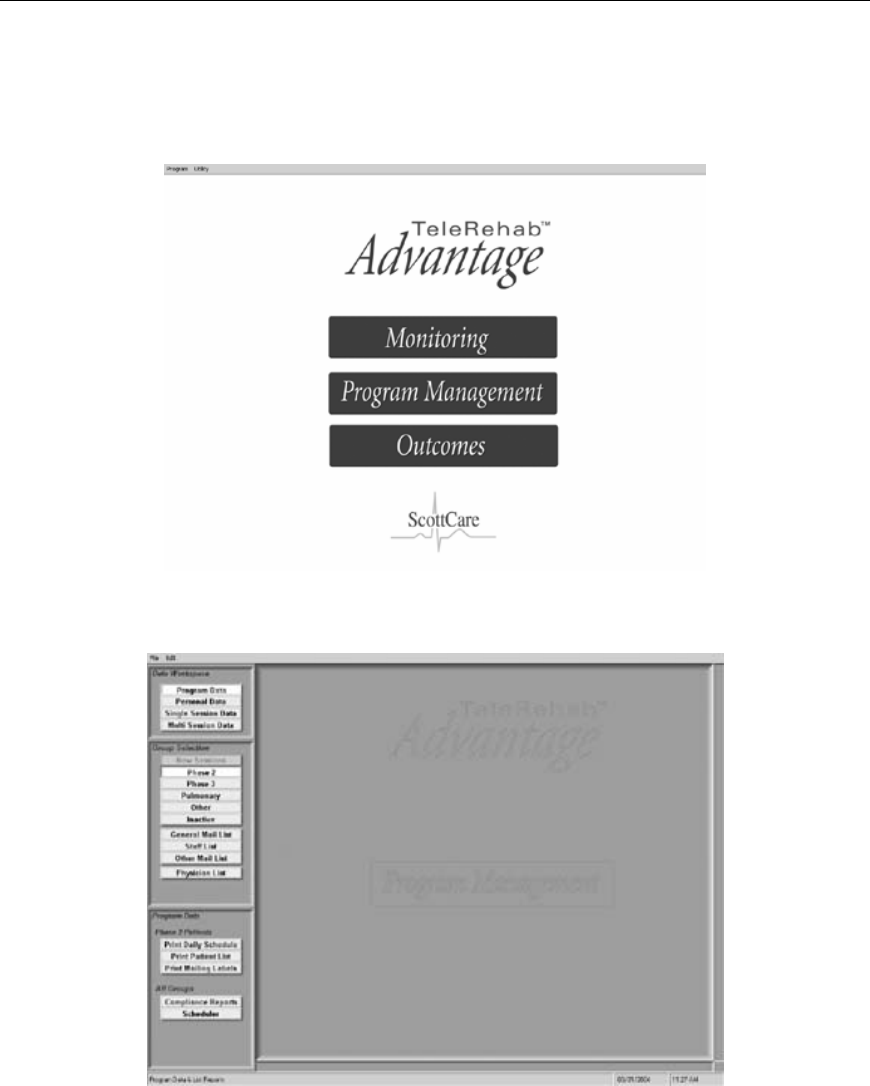
TeleRehab™ 2004 Cardiopulmonary Monitoring System Users Manual
-97-
PROGRAM MANAGEMENT
The TeleRehab 2004 Monitoring area is accessed from the Launcher Screen.
Left click on the Program Management Bar. The program management screen will
appear as follows:
The Patient Data area allows access to the following four major areas:
1. Program Data
2. Personal Data
3. Single Session Data
4. Multi Session Data

TeleRehab™ 2004 Cardiopulmonary Monitoring System Users Manual
-98-
Program Data
The Program Data area provides the ability to print schedules, lists, mailing labels, and
program compliance reports. This area also provides a “Scheduler” that can be used as a
master schedule for all patients.
Daily Schedules
The system monitors each patient file and identifies those patients scheduled each day
when the system is turned on. Phase 2, Pulmonary, and Other patients are automatically
scheduled based on the data entered in their protocol. Phase 3 patients will be scheduled
based on the data entered in their protocol only if they have been identified for
scheduling. See the section on 2004 System Setup, Monitoring and Protocol Options.
Printing Options for Daily Schedule
To print a daily schedule from the Patient Data screen:
First select the group of patients that you want to print today’s schedule for by left
clicking on the appropriate bar under Group Selection.
Once the group has been selected, click on ‘Print Daily Schedule’, and the system will
print the schedule.
Classes will be printed either chronologically by time scheduled, or by class times on
separate pages depending on the option selected during setup. See the section on 2004
System Setup, Monitoring and Protocol Options.
The format utilized for the Schedule being printed is defined in the Workspace Screen &
Report Links area during system setup, and it is possible to have a different schedule
format for each patient group.
Patient Lists
The system has the ability to print a list of patients for each category within the Group
Selection area. Lists available include not only patient categories, but list can be printed
for the General Mail List, Staff List, Other Mail List, and the Physician List as well.
Printing Options for Lists
To print a patient list from the Patient Data screen:

TeleRehab™ 2004 Cardiopulmonary Monitoring System Users Manual
-99-
First select the group of patients that you want to print a list for by left clicking on the
appropriate bar under Group Selection.
Once the group has been selected, click on ‘Print Patient List’, and the system will print
the list.
Names will be printed alphabetically in the format defined in the Workspace Screen &
Report Links area during system setup, and it is possible to have a different list format
for each patient group.
Mailing Labels
The system has the ability to print mailing labels for patients for each category within the
Group Selection area. Mailing labels can be printed not only for patient categories, but
list can be printed for the General Mail List, Staff List, Other Mail List, and the Physician
List as well.
Printing Options for Mailing Labels
To print mailing labels from the Patient Data screen:
First select the group of patients that you want to print mailing labels for by left clicking
on the appropriate bar under Group Selection.
Once the group has been selected, click on ‘Print Mailing Labels’, and the system will
print the mailing labels.
Names will be printed alphabetically in the format defined in the Workspace Screen &
Report Links area during system setup, and it is possible to have a different mailing label
format for each patient group.
Compliance Reports
Compliance Reports are reports that reflect the number of sessions attended versus the
number scheduled. Reports can be produced reflecting compliance for scheduled patients
over a selected time frame as well as an over all compliance for the cardiac rehab
program. A utility is provided to define the data that is to appear in the report. To access
the Compliance Report Utility, click on the ‘Compliance Report’ button to get the
following ‘Program Compliance Report’ screen.
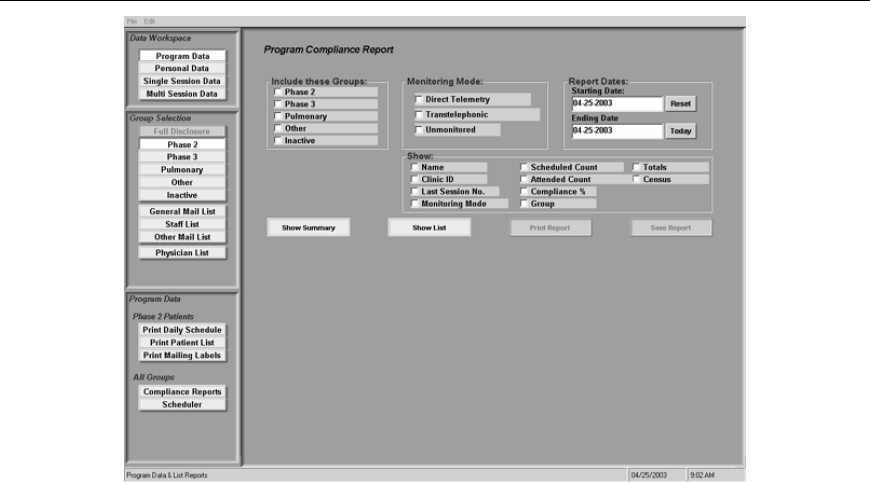
TeleRehab™ 2004 Cardiopulmonary Monitoring System Users Manual
-100-
Identify the patient group(s) to be included in the report by checking the appropriate boxes
available under ‘Include These Groups’.
Select the type of monitoring to be considered by checking the appropriate boxes
available under ‘Monitoring Mode’.
Enter the starting and ending dates to be considered in the appropriate blocks under
‘Report Dates’.
Finally, Check the blocks identifying items to be included in the report under the ‘Show’
area.
Once all desired blocks have been selected, click on ‘Show Summary’ to get a
summarization of data displayed on the screen. Following is an example:
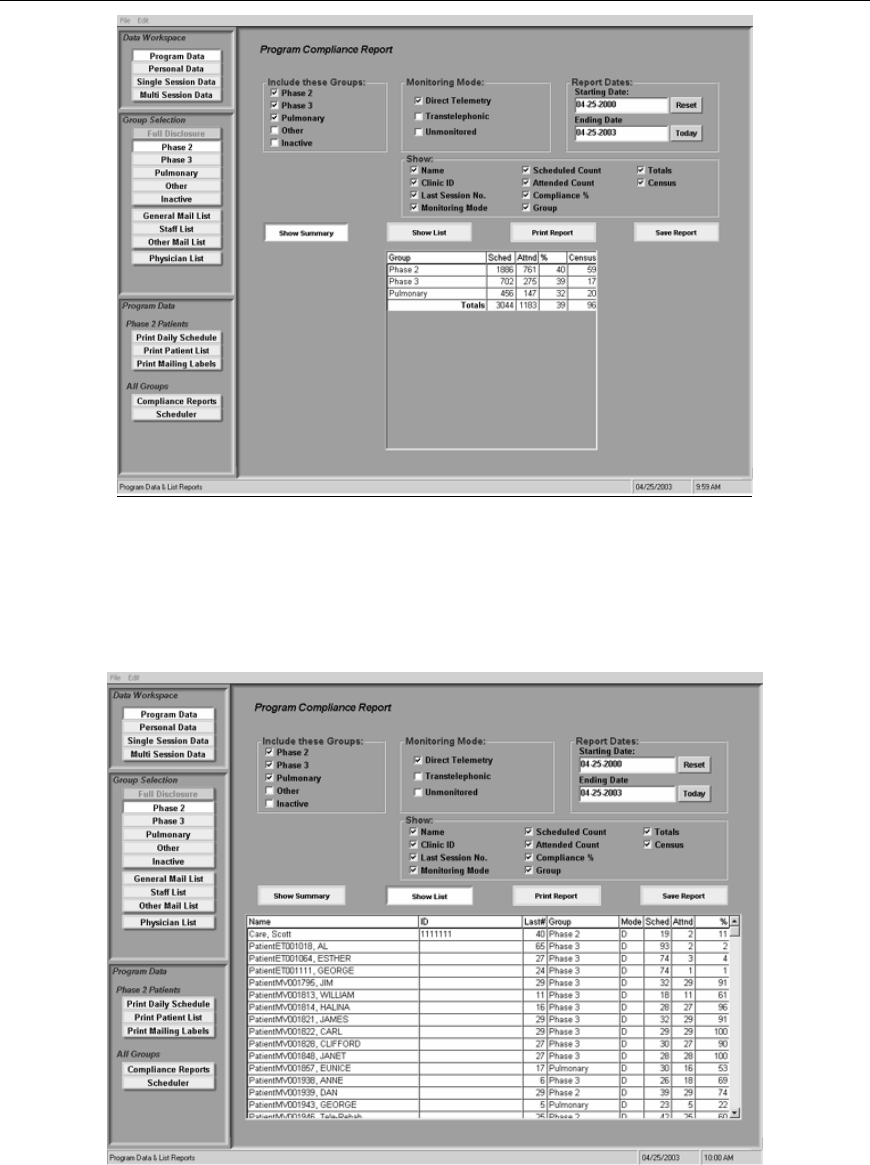
TeleRehab™ 2004 Cardiopulmonary Monitoring System Users Manual
-101-
To print the summary report, click on the ‘Print Report’ Button.
To view the more detailed list of data, click on the ‘Show List’ button to get the
following screen.
To print the detailed report, click on the ‘Print Report’ Button.
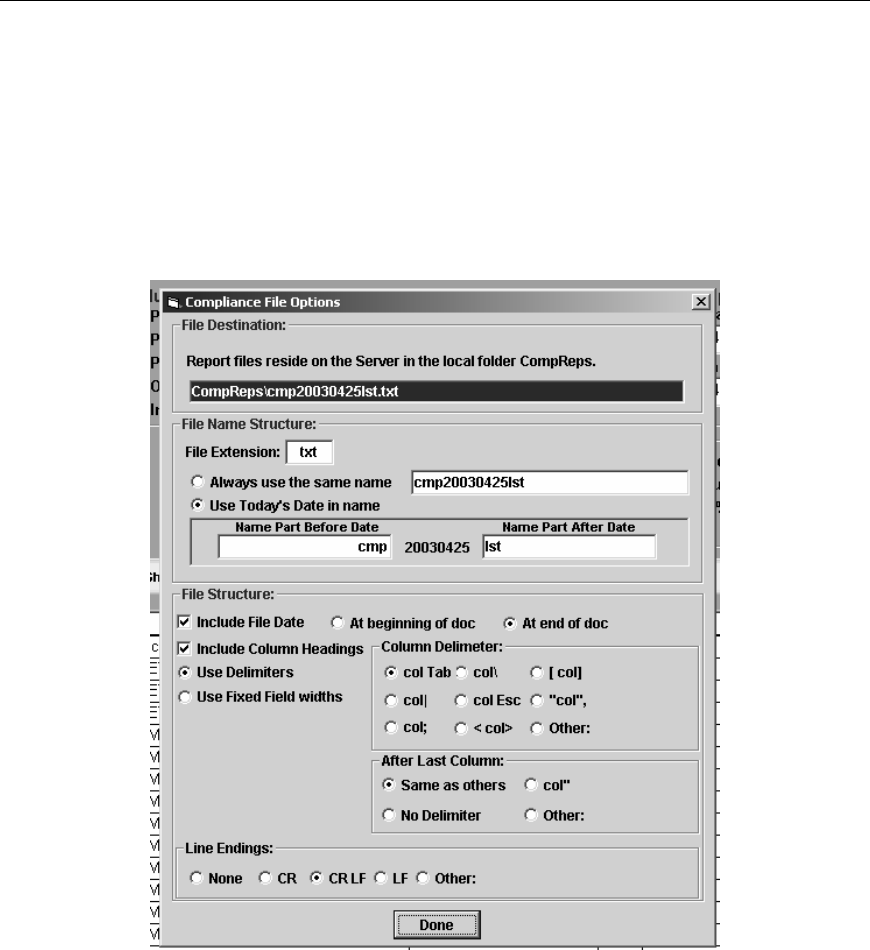
TeleRehab™ 2004 Cardiopulmonary Monitoring System Users Manual
-102-
Exporting Compliance Report Information
The system allows the export of compliance reports to a file that can be saved on a floppy
disk for archive purposes or used to move compliance data from the 2004 Program
Management System to another application. The export function is accomplished through
the use of the Compliance File Options utility. To access the Compliance File Options
utility, click the ‘Save’ button to get the following screen:
This utility allows the user to define the name and extension of the file to be created, and
how the file is to be constructed. The idea is to create a file that can be imported into
another application by designing the file to meet the specifications of the destination
application.
The file will be saved in the location indicated in the File Destination window. In other
words, all compliance report files will be stored on the C drive of the computer housing
the Server application in a folder identified as ‘CompReps’.
To set up the file name and file name structure, work in the ‘File Name Structure’ area.
Enter the File Extension to be used in the ’File Extension’ block.
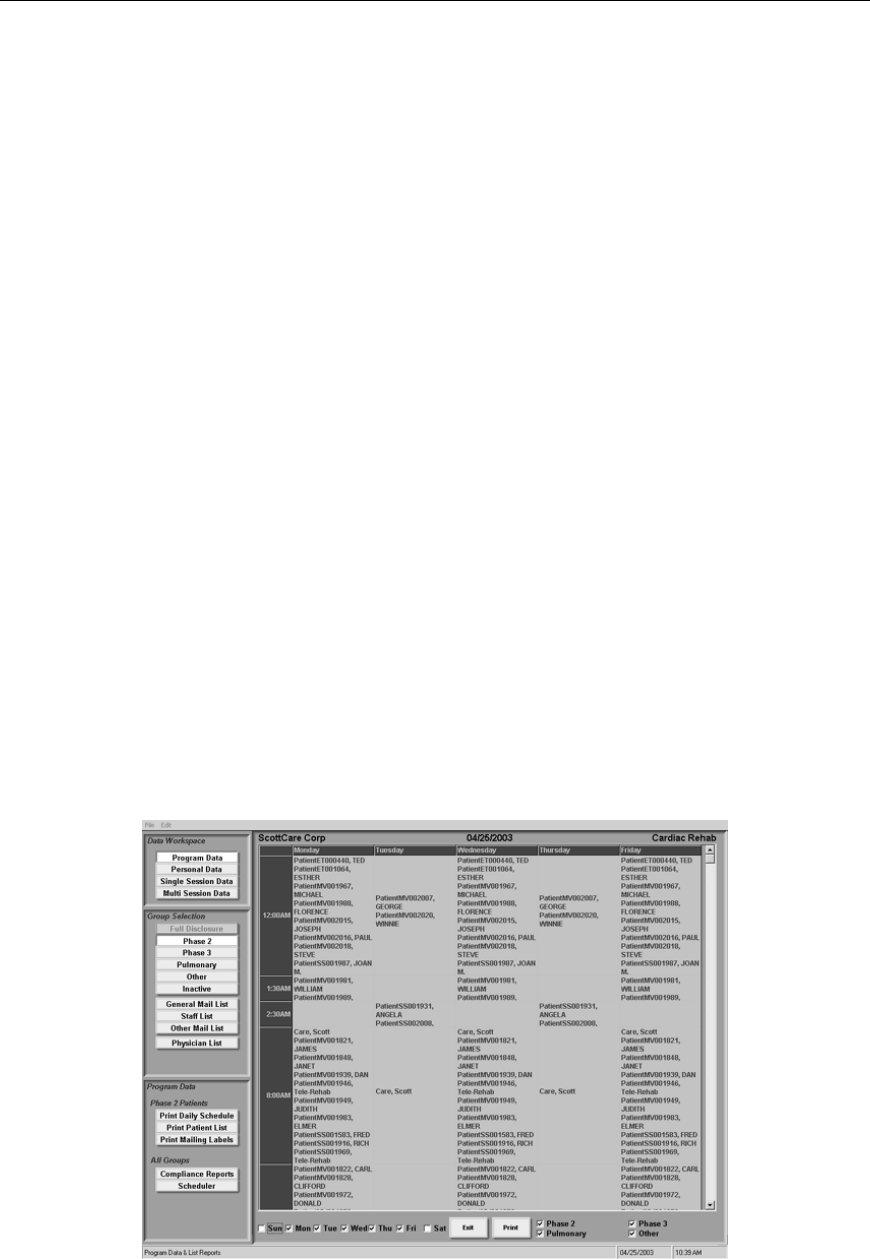
TeleRehab™ 2004 Cardiopulmonary Monitoring System Users Manual
-103-
If you want to always have the file export with the same name, click on ‘Always use the
same name’.
If you want a unique name for each file, click on ‘Use Today’s Date in name’. Enter what
is to appear before the date in the block labeled ‘Name Part Before Date’, and enter what
is to appear after the date in the block labeled ‘Name Part After Date’. In this mode, the
file name will change each day based on today’s date.
To define the structure of the file to be saved, select the appropriate items in the ‘File
Structure’ area. If delimiters are to be used, define which ones are needed in the ‘Column
Delimiter’ area. Also define what is to happen after the last column in the ‘After Last
Column’ area, and what occurs at the end of a line in the ‘Line Endings’ area.
Once the file has been defined, export it by clicking on the ‘Done’ button at the bottom of
the ‘Compliance File Options’ screen. The file will be created and saved to the place
identified in the ‘File Destination:’ area.
Using the Scheduler
The system provides a master list of all patients in the system that are scheduled for an
exercise session in the form of a Scheduler. The Scheduler can be used as a master utility
to manipulate the schedule of individual patient or groups of patients as needed. Changes
effected through the scheduler are passed on to a patient file to assure that current
scheduling information is maintained.
To activate the ‘Scheduler’ utility, click on the ‘Scheduler’ button to activate the
following screen:
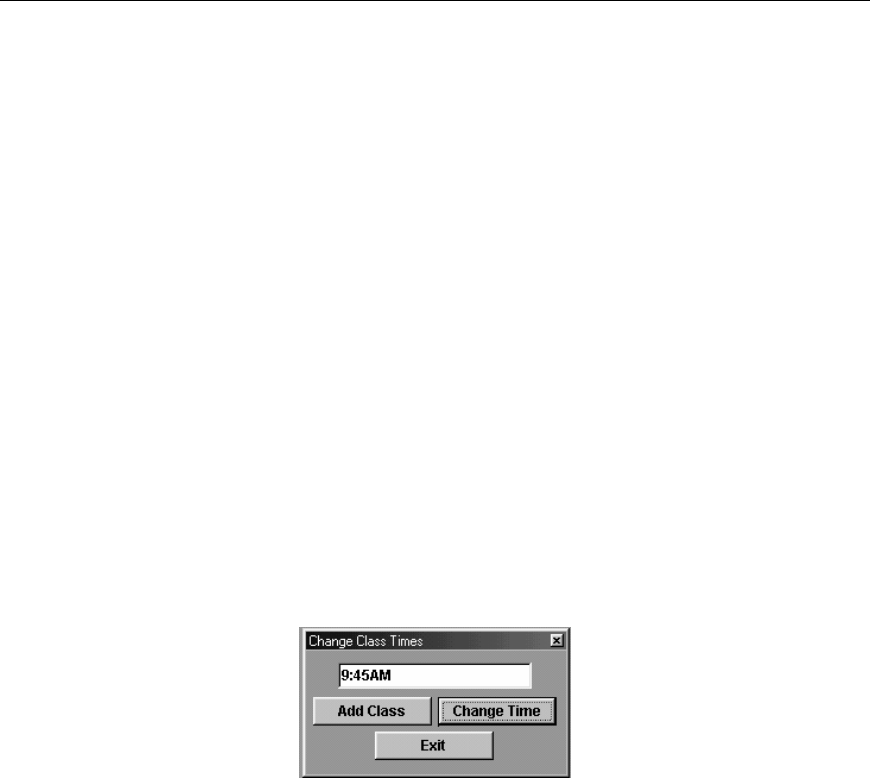
TeleRehab™ 2004 Cardiopulmonary Monitoring System Users Manual
-104-
The Scheduler can easily be formatted to display any or all of a weekly schedule by
selecting the days of the week at the bottom left of the screen. Data will be displayed for
each day checked. The groups of patients included are determined by selecting the
desired patient groups at the lower left of the screen. Data will be included in the display
for each group checked.
The information displayed includes the day of the week at the top of each column. The
number of columns will correspond to the days of the week checked for display.
Time of day is indicated along the left with patient names grouped based on the time of
day that they are scheduled.
Remember that changes made through the scheduler utility will be reflected in all
patient files of those patients affected by the change. Following are the allowable
changes that can be accomplished through the Scheduler utility:
Adding or Changing Class Times
To add a new class time, click on any of the time blocks and a small window will appear
as follows:
To add a new class time, enter the time and click on the ‘Add Class’ button. The new time
will be added to the list on the left hand side of the screen.
To change the time of an established class, click on the class time to be changed and
access the above window. Change the time to the desired time and click on the ‘Change
Time’ button. The time will be changed as displayed on the left side of the screen.
(Remember that changing a class time will change the scheduled time of all patients
included in that class).
Moving Patients To a Different Day of The Week
To move a patient to a different day of the week:
• left click on the block where the patient name currently resides
• left click on the patient name (highlights the name)
• left click on the block under the new day of the week where the name is to go

TeleRehab™ 2004 Cardiopulmonary Monitoring System Users Manual
-105-
• The name will now be scheduled at the newly selected day and time
Note that if a patient is scheduled on several different days, only the one selected will
be changed.
Moving Patients To a Different Time of Day
To move a patient to a different time of day:
• Left click on the block where the patient name currently resides
• Left click on the patient name (highlights the name)
• Left click on the block for the time of day where the name is to go
• The name will now be scheduled at the newly selected time
Note that if a patient is scheduled on several different days, they will be scheduled at the
new time on all days that they are scheduled!
To Move a Patient to a Different Time of Day (FOR ONE DAY ONLY):
• Left click on the block where the patient name currently resides
• Left click on the patient name (highlights the name)
• Right click on the highlighted patient name
• Left click on the block for the time of day where the name is to go
• The name will now be scheduled at the newly selected time FOR THAT
DAY ONLY.
Printing a Scheduler
The Scheduler can be printed by clicking on the ‘Print’ button in the lower right hand
corner of the screen.
Leaving The Scheduler
Leave the Scheduler screen by clicking on the ‘Exit’ button in the lower center of the
screen.
Personal Data
The personal data area provides the ability to enter and edit patient information, medical
information, session protocol information, add new patients, change the category of a
patient, delete a patient name from the system, and print patient reports. These personal
data options are available for Phase 2, Phase 3, Pulmonary, Other, and Inactive patients.

TeleRehab™ 2004 Cardiopulmonary Monitoring System Users Manual
-106-
The personal data options change when selecting General Mail List, Staff List, Other
Mail List, and Physician List. When selecting General Mail List, the following options
become available: patient information, add new name, change category, delete name and
print report. When selecting Staff List, Other Mail List, and Physician List, the following
options become available: general information, add new name, change category, delete
name, and print report.
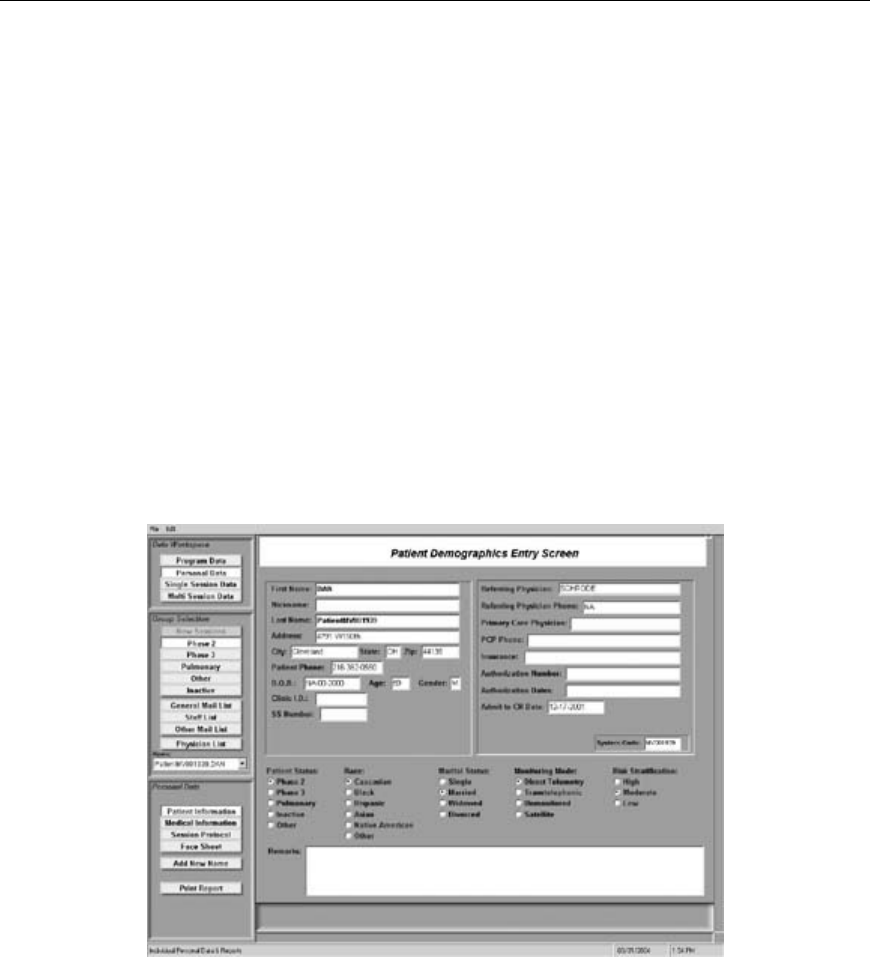
TeleRehab™ 2004 Cardiopulmonary Monitoring System Users Manual
-107-
Options available for Phase 2, Phase 3, Pulmonary, Other, and Inactive
Patients
Patient Information
Patient information is to be selected when adding a new name to the system or for the
purpose of editing information already entered into the system.
To enter a new patient into the system:
1. Under Data Workspace, confirm that Personal Data is selected.
2. Under the section labeled Personal Data, select Add New Name. The
program will automatically default to the Patient Information screen defined
by the user.
3. Enter patient information. Only the patient name is required to establish a
record, however, all data entered can appear on various reports.
NOTE: Data is entered into blocks designed to accept either a small amount of
information on a single line (single line text) or a large amount of information on
several lines (mulit-line text). When entering data into single line blocks, simply
enter the information and press the <Enter> key to move down a block, the
<Tab> key to move one block to the right, or select the new block using your
mouse. When entering data into multi-line text block, the <Enter> Key will move
the arrow down a line within the block, and the <Tab> key will function as a
normal Tab within the multi-line text block. When you are done entering data into
multi-line text block, you must use the down arrow key to move to the next block.
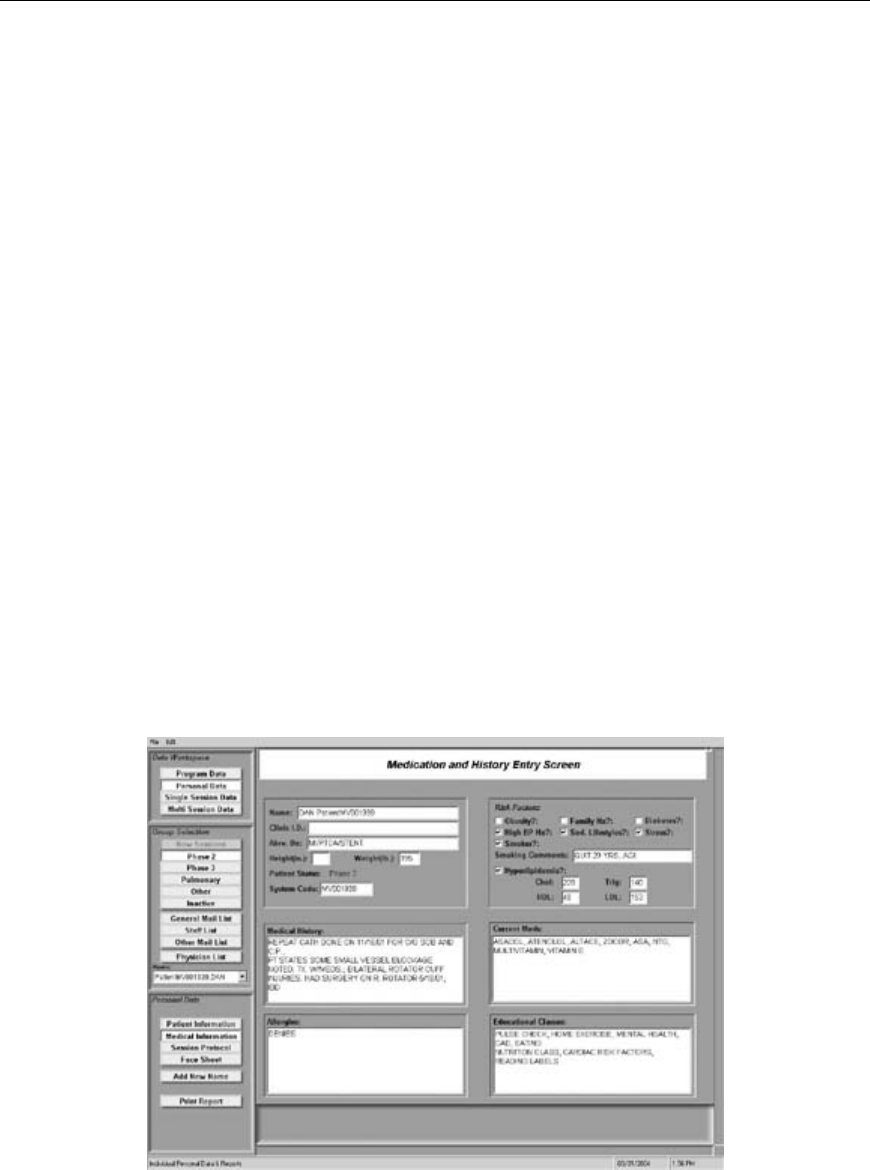
TeleRehab™ 2004 Cardiopulmonary Monitoring System Users Manual
-108-
To make changes to a patient already entered into the system:
1. Under Data Workspace, confirm that Personal Data is selected.
2. Under the section labeled Group Selection, select Phase 2, Phase 3,
Pulmonary, Other, or Inactive as dictated by the status of the patient you
intend to edit.
3. Under the section labeled Name, use the drop down box to select the patient.
Once the patient name has been selected, the screen will default to the Patient
Information Screen defined by the user. The screen will be the same as the
one shown above with patient information already entered.
4. Edit patient information.
Medical Information
Medical information can be selected once a patient name has been entered into the system
or for the purpose of editing information already entered into the system.
Once a patient name has been entered into the system:
1. Under Personal Data, select Medical Information.
2. Enter the medical information. All data entered can appear on various reports.
To make changes to a patient already entered into the system:
1. Under Data Workspace, confirm that Personal Data is selected.
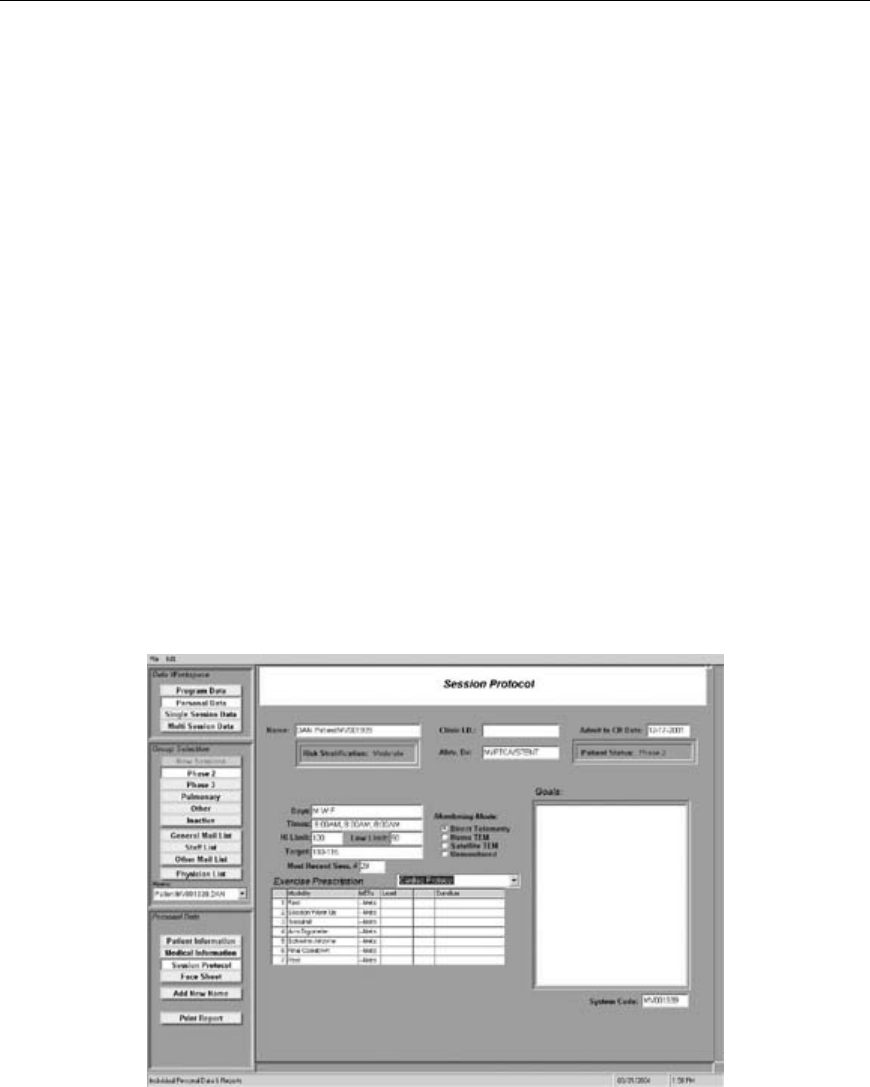
TeleRehab™ 2004 Cardiopulmonary Monitoring System Users Manual
-109-
2. Under the section labeled Group Selection, select Phase 2, Phase 3,
Pulmonary, Other, or Inactive as dictated by the status of the patient you
intend to edit.
3. Under the section labeled Name, use the drop down box to select the patient.
Once the patient name has been selected, the screen will default to the Patient
Information Screen defined by the user.
4. Left click on the ‘Medical Information’ block to get the Medications and
History Screen.
5. Edit Patient Medical Information.
Session Protocol
Session protocol can be selected once a patient name has been entered into the system or
for the purpose of editing information already entered into the system.
Once a patient name has been entered into the system:
Under Personal Data, select Session Protocol.
Enter the protocol information. All data entered can appear on various reports.
To make changes to a patient already entered into the system:
Under the section labeled Data Workspace, confirm that Personal Data is selected.
Under the section labeled Group Selection, select Phase 2, Phase 3, Pulmonary, Other, or
Inactive as dictated by the status of the patient you intend to edit.

TeleRehab™ 2004 Cardiopulmonary Monitoring System Users Manual
-110-
Under the section labeled Name, use the drop down box to select the patient. Once the
patient name has been selected, the screen will default to the Patient Information Screen
defined by the user.
Select Session Protocol and make the necessary edits.
Face Sheet
The patient Face Sheet can be selected once a patient name has been entered into the
system or for the purpose of editing information already entered into the system.
Once a patient name has been entered into the system:
Under Personal Data, select Face Sheet.
Enter the face sheet information. All data entered can appear on various reports.
To make changes to a patient already entered into the system:
1. Under the section labeled Data Workspace, confirm that Personal Data is
selected.
2. Under the section labeled Group Selection, select Phase 2, Phase 3,
Pulmonary, Other, or Inactive as dictated by the status of the patient you
intend to edit.
3. Under the section labeled Name, use the drop down box to select the patient.
Once the patient name has been selected, the screen will default to the Patient
Information Screen defined by the user.

TeleRehab™ 2004 Cardiopulmonary Monitoring System Users Manual
-111-
4. Select Face Sheet and make the necessary edits.
Add New Name
This option is selected when entering a new patient into the system. See # 2 in the section
labeled Patient Information above.
Print Report
This option allows you to print a hard copy of any of the screens displayed in the
personal options area.
To print a screen:
1. Under Data Workspace, confirm that Personal Data is selected.
2. Under the section labeled Group Selection, select Phase 2, Phase 3,
Pulmonary, Other, or Inactive as dictated by the status of the patient for which
you intend to make printed reports.
3. Under the section labeled Name select the patient.
4. Select the screen displaying the report to be printed. (Patient Information,
Medical Information, Session Protocol, or Face Sheet.)
5. Select Print Report.
NOTE: The report that will be printed will be the report displayed on the screen.
Options Available for General Mailing List
The following are the only options available when General Mailing List is selected from
Group Selection. All options contain the same functions as stated in the previous section
titled “Options available for Phase 2, Phase 3, Pulmonary, Other, and Inactive Patients.”
Any additional information needed per option is stated below.
Patient Information
When a patient is selected from the General Mailing List, the default screen will display
the Mail List Personal Data screen defined by the user.
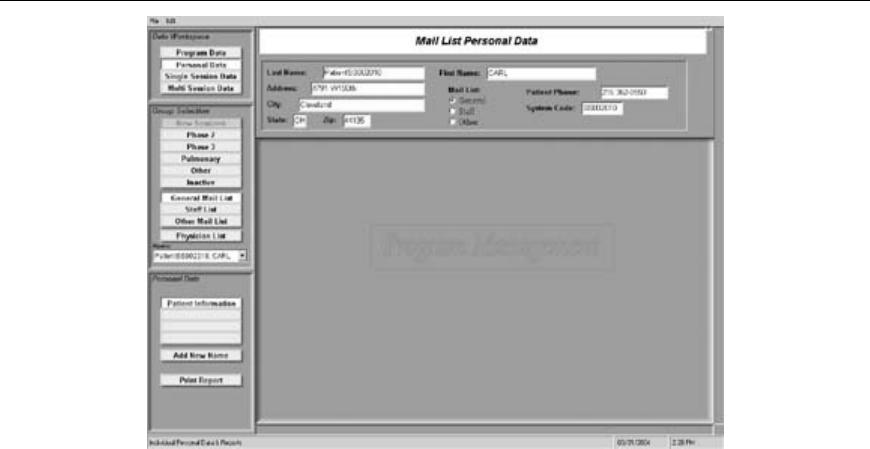
TeleRehab™ 2004 Cardiopulmonary Monitoring System Users Manual
-112-
Add New Name
When a new name is to be entered into the General Mailing List:
1. Under Data Workspace, confirm that Personal Data is selected.
2. Under Group Selection, select General Mailing List.
3. Under Personal Data, select Add New Name.
Print Reports
Refer to the previous section for description and functions.
Options Available for Staff List, Other Mail List, and Physician List
The following are the only options available when Staff List, Other Mail List, and
Physician List are selected from Group Selection. All options contain the same functions
as stated in the previous section titled “Options available for Phase 2, Phase 3,
Pulmonary, Other, and Inactive Patients” and “Options available for General Mailing
List.”
NOTE: General Information replaces Patient Information.
Add New Name
Print Report
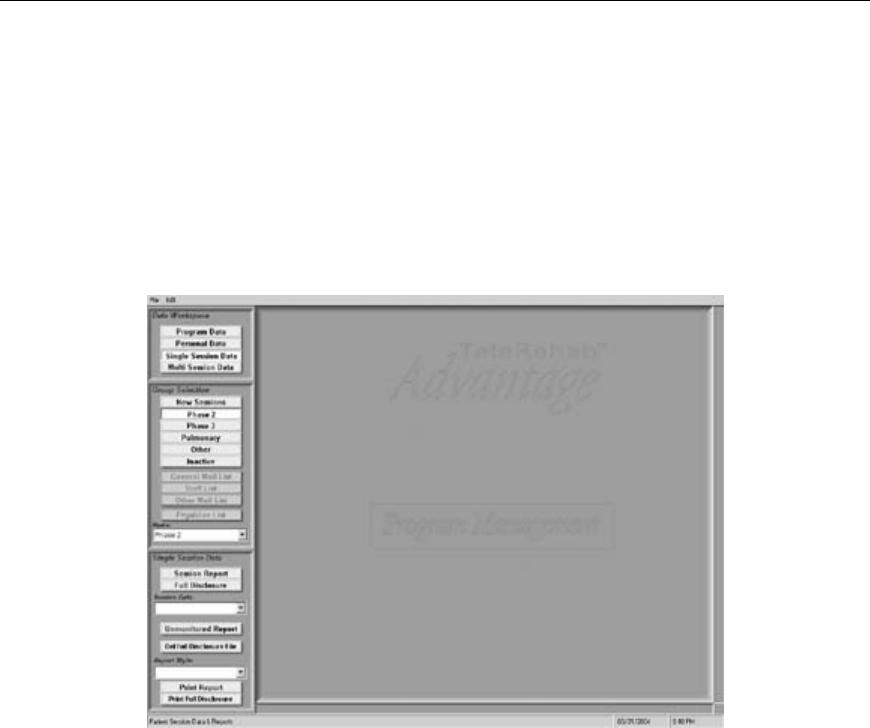
TeleRehab™ 2004 Cardiopulmonary Monitoring System Users Manual
-113-
Single Session Reports
The single Session Data area provides the ability to Create, Review, Edit, and Print, daily
session reports of either non-monitored sessions or sessions that have been monitored,
and data saved during the monitoring process.
Click on the ‘Single Session Data’ bar to get to the following Patient Data screen.
From the above screen, you can view and edit today’s session report, or any session
report ever done on any patient in the system.
Viewing and Editing Daily Session Reports
The following descriptions and procedures for editing apply to all session reports saved
on a patient. All recorded sessions will be available for review and editing on the system
in the form of a full disclosure as well as a session report.
There are two ways to view the most recent recorded session on any patient residing in
the active portion of the system (Phase 2, Phase 3, Pulmonary, Other, or Inactive).
1. Under Group Selection, click on the ‘New Sessions’ bar.
a. Click on the drop down window under Name, and a list of names will
appear of all patients with a sessions on file that have not been printed.
b. Left click on the name of the patient whose report data you wish to
review, and the report data will be displayed on the screen.

TeleRehab™ 2004 Cardiopulmonary Monitoring System Users Manual
-114-
OR
2. Under Group Selection, click on the category of the patient whose data you want
to review.
a. Click on the drop down window under Name, and a list of names of all
patients in the selected category will appear.
b. Left click on the name of the patient whose data you want to review, and
the most recent report data will be displayed on the screen.
The first time a report style is displayed, the format is determined by what is defined in
the Workspace and Report Forms Links section in Setup. Once a report is saved on a
patient, the report style being displayed at the time of saving is made a part of the session
data file, and it will be used when the same report is displayed again.
The system provides several predefined report styles. Additional report styles can be
created and made available through the use of the internal Utilities and Design
Functions described elsewhere in this manual. To view the report in a different style,
left click on the drop down window lower left of the screen labeled Report Style and a
list of available report styles will appear. Left click on the desired style and the session
data will be displayed in the selected report style.
Any report done on a patient is available for review. To access a report other than the
most recent report, under Group Selection, click on the category of the patient whose
data you want to review.
Click on the drop down window under Name, and a list of names of all patients in the
selected category will appear.
Left click on the name of the patient whose data you want to review, and the most recent
report data will be displayed on the screen.
Left click on the drop down window under Session Date, and a list of dates of sessions on
file will be displayed.
Left click on the date of the session to be reviewed, and that session report will be
displayed on the screen.
NOTE: The system displays data in some areas of the Session Summary area based on
data in the Modality Section. For example, the Maximum Heart Rate for the session that
is displayed in the Session Summary area comes from the Maximum HR column in the
Modality Area. Changing data in the Modality Area will automatically cause it to change
in the Session Summary Area. Further, when viewing the Full Disclosure, the system
assumes that the viewing is being used to select additional strips for the report.
Therefore, when leaving the Full Disclosure area, the system rebuilds the strips file to
include any new strips to be included and will replace those displayed prior to entering
the Full Disclosure area.
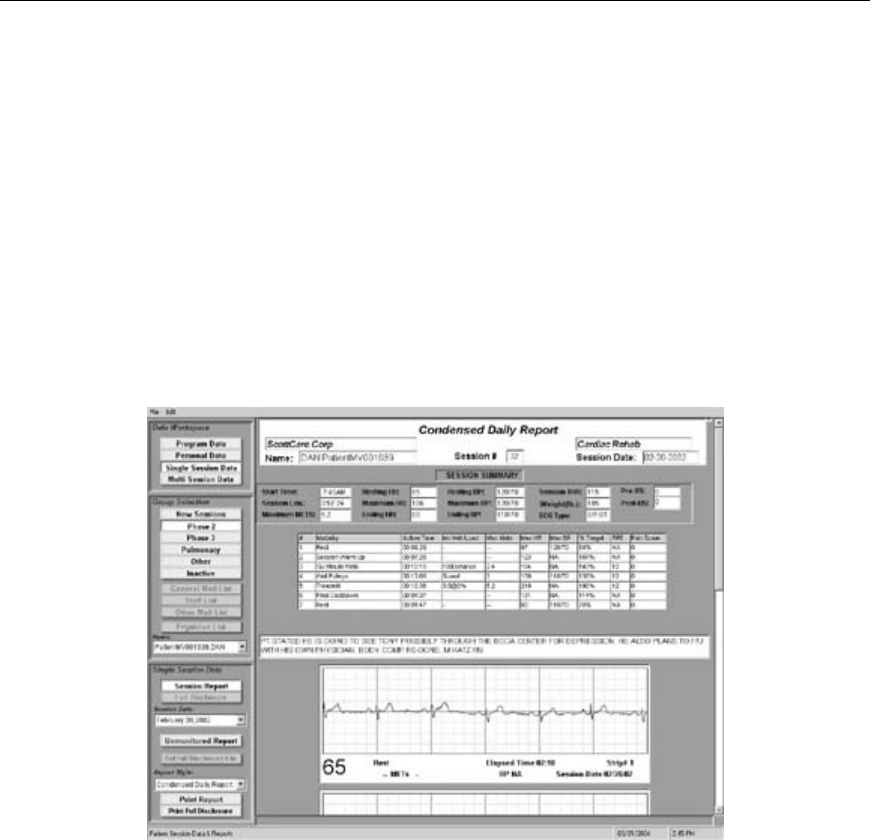
TeleRehab™ 2004 Cardiopulmonary Monitoring System Users Manual
-115-
For these reasons, ScottCare recommends the following sequence be used in reviewing and
editing of Session Reports.
1. View the Full Disclosure and select any additional strips that you wish to
include in the report.
2. Edit the Modality Section of the Session Report.
3. Edit the balance of the Session Report.
The Condensed Daily Report
Following are screens depicting a Condensed Daily Report. Samples of various session
reports appear in at the end of this section.
The Condensed Daily Report is designed to allow reporting of minimal information and
up to three saved strips on a single page. It consists of a Report Header, Session
Summary Data area, Modality Data area, Post Session Comments and Timed
Comments area, and a series of saved Strips.
The first step in the editing process should be to review the full disclosure and identify
any strips desired to be a part of the report in addition to or in lieu of those already saved.
(Most recent session only).
Left click on the Full Disclosure bar under Single Session Data on the left of the screen.
The full disclosure will appear as below.

TeleRehab™ 2004 Cardiopulmonary Monitoring System Users Manual
-116-
Left click in the display area, and the corresponding strip will appear in the strip block
near the bottom of the page.
The blue box on the eighth line down is the selected area and the strip appearing in the
area at the bottom of the page is the area inside the blue box.
Normal rhythms are displayed in black, while areas of the full disclosure in Red indicate
a rate alarm, and Blue indicates either arrhythmia or artifact. If a strip was saved during
the session by printing from the strip chart recorder, there will be a Green area at the
point where the strip was saved. Yellow areas indicate areas where the system could not
decipher any useful information.
The shaded block near the top of the page indicates a strip that is already included in the
session report.
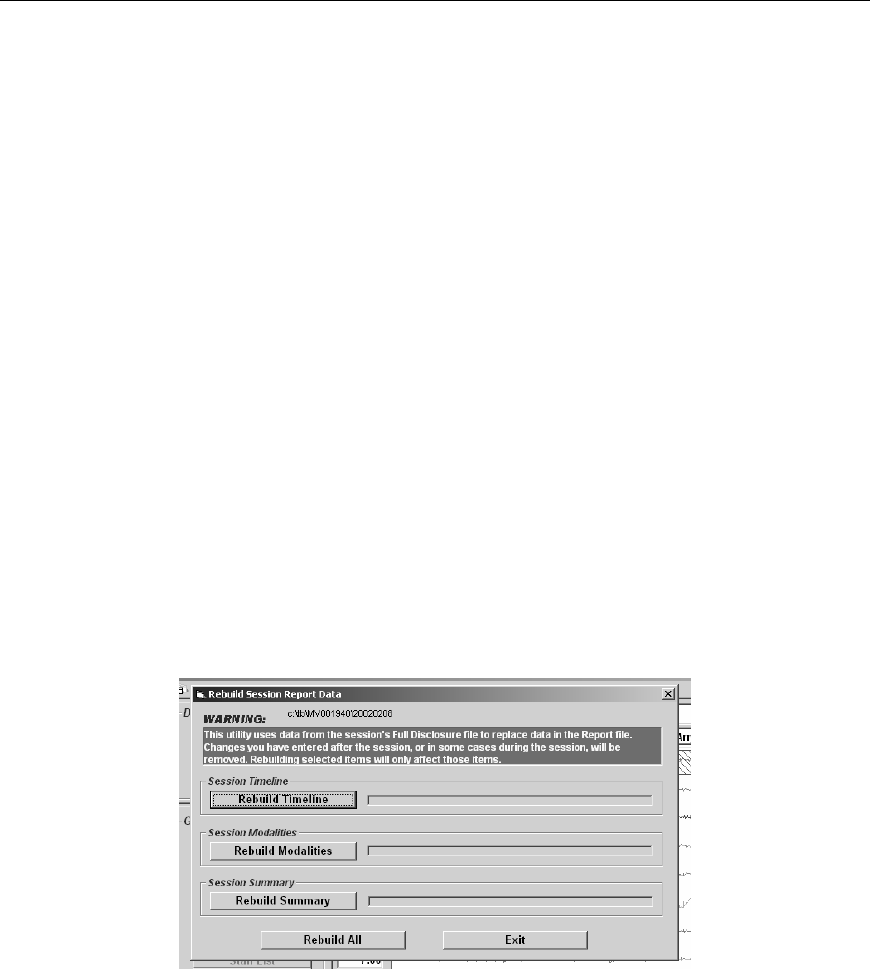
TeleRehab™ 2004 Cardiopulmonary Monitoring System Users Manual
-117-
The time into the session is indicated in the blocks on the left side of the full disclosure
allowing one minute of information per line.
Scroll through the full disclosure by using the arrows on the right hand side of the screen.
To Add a Strip to the report, left click on the Add Strip bar. The strip being displayed in
the box at the bottom of the screen will be added to the report.
To Delete a Strip from the report, insure that the strip selected is one already included in
the report. The bar currently labeled ‘Add Strip’ will change to ‘Delete Strip’. Left click
on the ‘Delete Strip bar to remove the strip from the report.
Left clicking on the ‘Mark for Multi Session’ bar will identify the displayed strip for
inclusion in Multi Session reports. See the section on Multi Session Reports for further
information.
Left clicking on the ‘Delete All Strips’ bar will cause the system to remove all strips from
the report.
Left clicking on the ‘Rebuild Report’ bar will cause the system to display a rebuild
utility. This utility is designed to remove any editing that has been done and restore the
report to its original condition based on the data entered and saved during the recording
of the session.
Left click on the bar corresponding to the area of the report you wish to rebuild.
1. ‘Rebuild Timeline’ will rebuild the Session Graph.
2. ‘Rebuild Modalities’ will rebuild only the Modality Section.
3. ‘Rebuild Summary’ will rebuild only the Summary Section.
4. ‘Rebuild All’ will rebuild all of the above.
(Note: The Saved Strip File is rebuilt any time you leave the full disclosure screen).
To leave the utility, left click on the ‘Exit’ bar.

TeleRehab™ 2004 Cardiopulmonary Monitoring System Users Manual
-118-
To Leave the Full Disclosure area, left click on the bar labeled ‘Session Report’ in the
Single Session Data area on the left hand side of the screen.
If desired, the Full Disclosure can also be printed by left clicking on the ‘Print Full
Disclosure’ button on the lower left hand side of the screen.
The Modality Area of the report allows some different editing applications during the
editing process:
To add a line to the modality section, hold down the Shift Key and left click on the
number of the line above where you want to add a line. The new line will appear
duplicating the line above.
To remove a line from the modality section, hold down the Ctrl key and left click on the
line that is to be deleted. The line will be removed from the modality section.
To change the name of the modality, left click on the modality to be changed and then
left click on the drop down window to view a list of all modalities available in the
system. Left click on the modality name desired.
The Duration block is a time block. Left click on the block to be changed and enter the
time information. Be sure to include the colons for the times to appear properly.
The Max Mets and Mx Wrk Load blocks only require that you enter the correct data.
Note that the Max Workload will be recalculated automatically if you change the Max
Mets value, and the Max Mets value will be recalculated automatically if you change the
Max Workload.
Max HR is changed by entering the correct number. Note that the % Target will
automatically adjust if the Max HR is changed.
Max BP is changed by entering the correct numbers.
Although % Target can be changed if desired, the number will be correct based on the
Max HR and the Session Target Heart Rate calculation.
RPE is changed by entering the desired number.
Editing of other items that might appear in the Modality area of the report will follow the
same logic as those shown above.
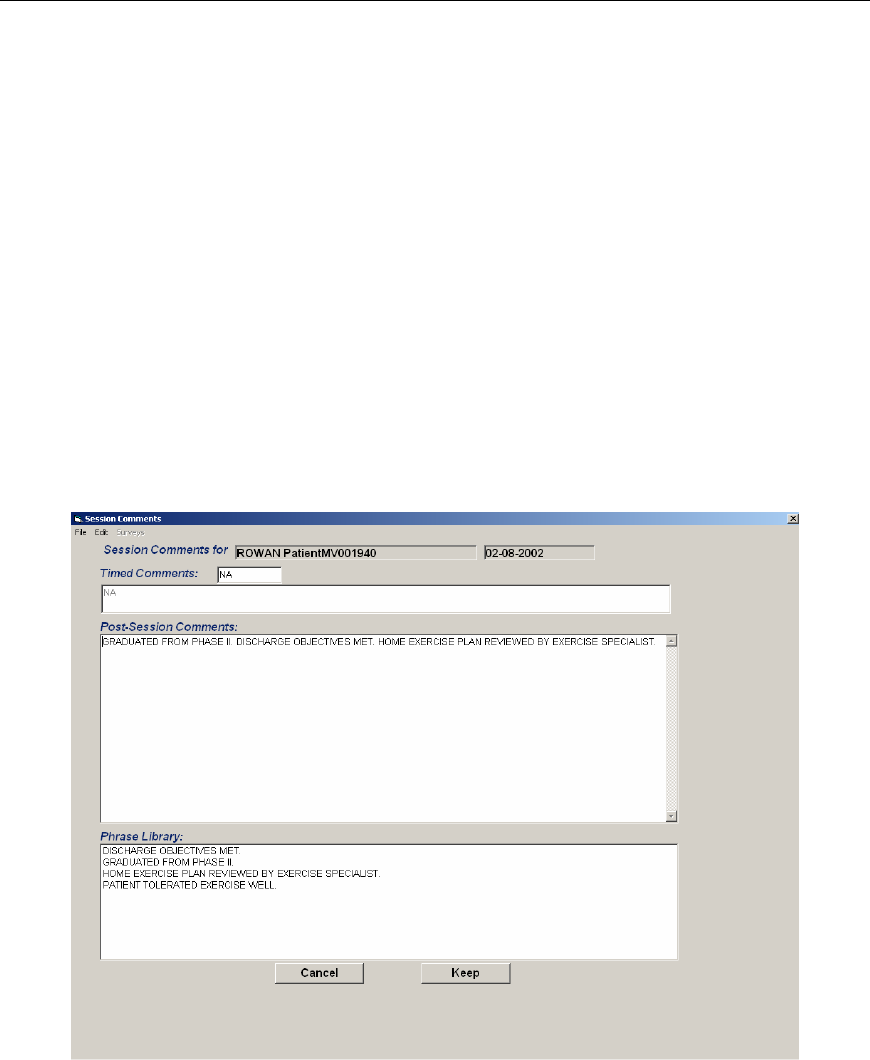
TeleRehab™ 2004 Cardiopulmonary Monitoring System Users Manual
-119-
The only thing editable in the Report Header is the session number. The program
information is taken from whatever is entered in the program information area during
setup as described elsewhere in this manual. The Name block is not an editable field. You
must change either the Last Name or the First Name in their respective fields in order to
edit the patient name. The session date is the date that the session was done, and cannot
be changed.
The Session Summary area contains data relating to the overall session. To edit data in
the Session Summary area, left click on the block containing the information to be
changed and enter the correct information. Some items appearing in the Session
Summary area are controlled by the data in the Modality area. These items include,
Maximum Heart Rate, Maximum Blood Pressure, and Maximum METs. Although those
items can be edited and will keep any entered data, if the Modality area is reentered for
any reason, data in those items will change to whatever is displayed in the Modality area.
The Post Session Comments and Timed Comments can be edited by left clicking on the
Post Session Comments area. The Session Comments screen will appear as follows:
If Timed Comments were saved during the session, they will appear in the smaller block
near the top of the page. Timed comments are comments that were entered during
monitoring and appear in the report chronologically by time entered.
Timed comment content can be edited by left clicking in the Timed Comments block and
making the desired changes to the comment appearing there.

TeleRehab™ 2004 Cardiopulmonary Monitoring System Users Manual
-120-
Timed Comments cannot be added to a report.
To Delete a Timed Comment, Highlight the comment by left clicking and holding the
button down while you move the cursor over the complete comment. Once the comment
is highlighted, release the mouse button and press the <Delete> key. The comment will
be removed from the session report.
To copy all or part of a Timed Comment into the Post Session Comments block, highlight
what is to be copied as described above. Once the highlight function is complete, release
the mouse button. Left click the highlighted area again holding the button down and drag
the area into the Post Session Comments block. Release the mouse button, and the area
moved will appear as part of the Post Session Comments.
Post Session Comments can be added by typing comments directly in to the Post Session
Comments block, copying Timed Comments as described above, or by using the Phrase
Library.
The Phrase Library is a collection of commonly used phrases that are used routinely as
Post Session Comments. The Phrase Library is established as follows:
Highlight a comment or phrase in the Post Session Comments area by left clicking and
holding the button down while you move the cursor over the complete comment or
phrase. Once the comment or phrase is highlighted, release the mouse button. Left click
the highlighted area again holding the mouse button down and drag the area into the
Phrase Library area. Release the mouse button, and the comment or phrase moved will
appear as part of the Phrase Library.
To use the Phrase Library, reverse the above procedure.
Once the Timed and Post Session Comments are entered and/or edited to the users
satisfaction, left click on the Keep button to exit the screen and keep changes.
The Cancel button will exit the screen without keeping the changes.
Editing Strip Information
Strips saved during the recorded session appear at the bottom of the Daily Session
Report.
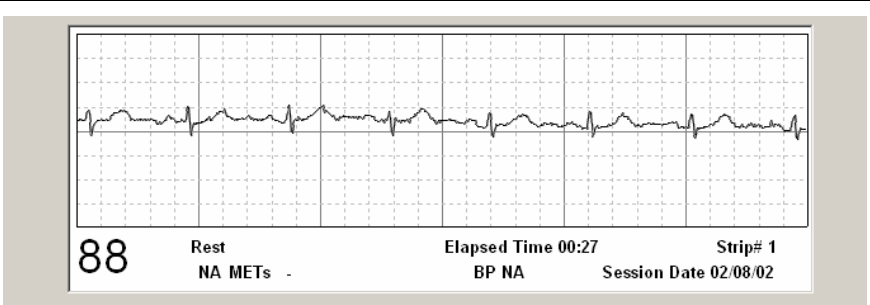
TeleRehab™ 2004 Cardiopulmonary Monitoring System Users Manual
-121-
Some information appearing on a saved strip can be changed including the heart rate,
exercise modality being used when the strip was saved, METs at the time the strip was
saved, and the blood pressure at the time the strip was saved.
To change the Heart Rate, left click on the strip and two red lines will appear. Using the
mouse cursor, place the cursor over the red line on the right. When you see the ‘double
arrow’, left click, hold, drag and drop the red line to an R wave peak. Move the red line
on the left in the same way to an R wave peak 2 intervals to the left of the first red line.
The heart rate will change to the rate calculated for those two intervals. You can use any
of the two interval areas on the strip, and the heart rate will be recalculated accordingly.
Note: A right click on the strip will result in two green lines with an indication of the
distance between them. Using the technique described above, moving the green lines so
that they line up on the P wave and corresponding R wave, the PR interval in
milliseconds can be identified. This utility can be used to identify any interval on the
strip.
To change the Exercise Device, left click on the exercise device name and then on the
drop down window. Select the desired device from the modality list that appears.
To edit the METs level, left click on the METs value displayed (e.g. in the above
example, NA), and a block will be made available to enter the correct Mets value.
To edit the BP value, left click on the BP value displayed (e.g. in the above example,
NA), and a block will be made available to enter the correct BP value.
To Delete a strip from the report, left click on the strip and press the <Delete> key. The
strip will be removed from the report.
To Add a strip to the report, use the Full Disclosure as previously described.
Printing The Report
Once all editing has been accomplished, left click on the ‘Print Report’ button at the
lower left of the screen and the report will print in the displayed format.
TeleRehab™ 2004 Cardiopulmonary Monitoring System Users Manual
-122-
The Standard Daily Report
Following are screens depicting a Standard Daily Report.
When the standard daily report is displayed, the first editing page appears as shown
below. Use the scroll bar on the right to scroll through the report for further viewing.
TeleRehab™ 2004 Cardiopulmonary Monitoring System Users Manual
-123-
The first step in the editing process should be to review the full disclosure and identify
any strips desired to be a part of the report in addition to or in lieu of those already saved
(most recent session only).
Left click on the Full Disclosure bar under Single Session Data on the left of the screen.
The full disclosure will appear as below.
Left click in the display area, and the corresponding strip will appear in the strip block
near the bottom of the page.
The blue box on the eighth line down is the selected area and the strip appearing in the
area at the bottom of the page is the area inside the blue box.
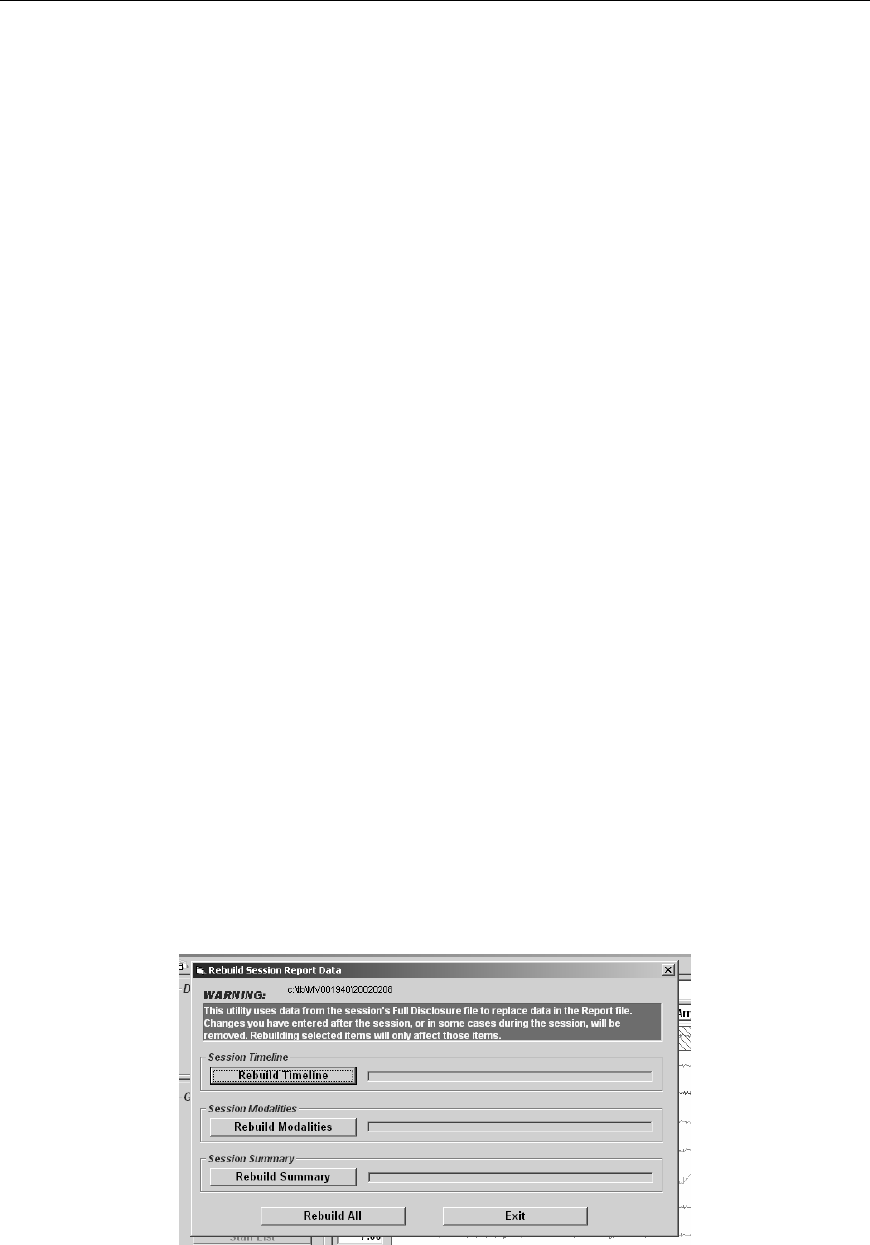
TeleRehab™ 2004 Cardiopulmonary Monitoring System Users Manual
-124-
Normal rhythms are displayed in black, while areas of the full disclosure in Red indicate
a rate alarm, and Blue indicates either arrhythmia rate or artifact. If a strip was saved
during the session by printing from the strip chart recorder, there will be a Green area at
the point where the strip was saved. Yellow areas indicate areas where the system could
not decipher any useful information.
The shaded block near the top of the page indicates a strip that is already included in the
session report.
The time into the session is indicated in the blocks on the left side of the full disclosure
allowing one minute of information per line.
Scroll through the full disclosure by using the arrows on the right hand side of the screen.
To Add a Strip to the report, left click on the Add Strip bar. The strip being displayed in
the box at the bottom of the screen will be added to the report.
To Delete a Strip from the report, insure that the strip selected is one already included in
the report. The bar currently labeled ‘Add Strip’ will change to ‘Delete Strip’. Left click
on the ‘Delete Strip bar to remove the strip from the report.
Left clicking on the ‘Mark for Multi Session’ bar will identify the displayed strip for
inclusion in Multi Session reports. See the section on Multi Session Reports for further
information.
Left clicking on the ‘Delete All Strips’ bar will cause the system to remove all strips from
the report.
Left clicking on the ‘Rebuild Report’ bar will cause the system to display a rebuild
utility. This utility is designed to remove any editing that has been done and restore the
report to its original condition based on the data entered and saved during the recording
of the session.

TeleRehab™ 2004 Cardiopulmonary Monitoring System Users Manual
-125-
Left click on the bar corresponding to the area of the report you wish to rebuild.
‘Rebuild Timeline’ will rebuild the Session Graph.
‘Rebuild Modalities’ will rebuild only the Modality Section.
‘Rebuild Summary’ will rebuild only the Summary Section.
‘Rebuild All’ will rebuild all of the above.
(Note: The Saved Strip File is rebuilt any time you leave the full disclosure screen).
To leave the utility, left click on the ‘Exit’ bar.
To Leave the Full Disclosure area, left click on the bar labeled ‘Session Report’ in the
Single Session Data area on the left hand side of the screen.
If desired, the Full Disclosure can also be printed by left clicking on the ‘Print Full
Disclosure’ button on the lower left hand side of the screen.
The Modality Area of the report allows some different editing applications during the
editing process:
To add a line to the modality section, hold down the Shift Key and left click on the
number of the line above where you want to add a line. The new line will appear
duplicating the line above.
To remove a line from the modality section, hold down the Ctrl key and left click on the
line that is to be deleted. The line will be removed from the modality section.
To change the name of the modality, left click on the modality to be changed and then
left click on the drop down window to view a list of all modalities available in the
system. Left click on the modality name desired.
The Duration block is a time block. Left click on the block to be changed and enter the
time information. Be sure to include the colons for the times to appear properly.
The Max Mets and Mx Wrk Load blocks only require that you enter the correct data.
Note that the Max Workload will be recalculated automatically if you change the Max
Mets value, and the Max Mets value will be recalculated automatically if you change the
Max Workload.
Max HR is changed by entering the correct number. Note that the % Target will
automatically adjust if the Max HR is changed.
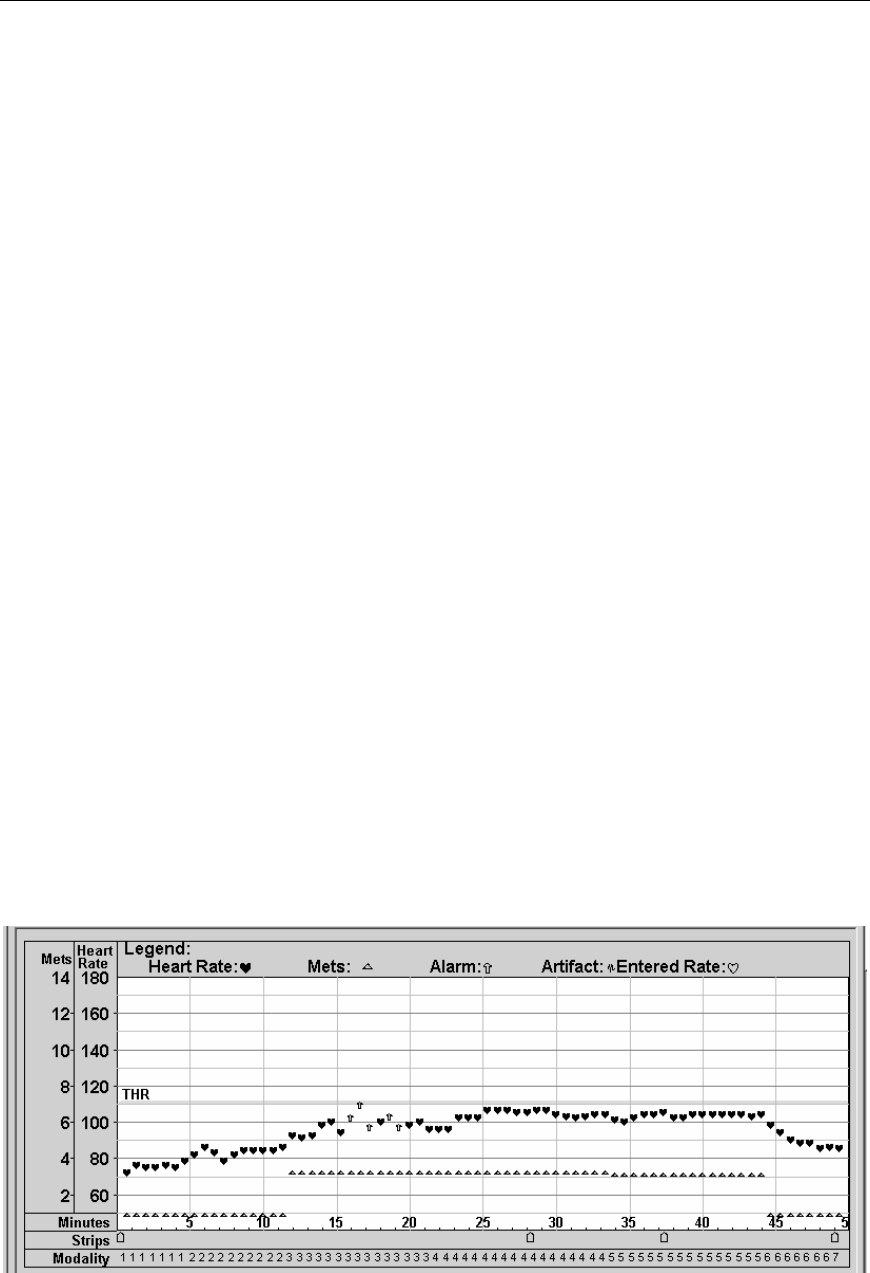
TeleRehab™ 2004 Cardiopulmonary Monitoring System Users Manual
-126-
Max BP is changed by entering the correct numbers.
Although % Target can be changed if desired, the number will be correct based on the
Max HR and the Session Target Heart Rate calculation.
RPE is changed by entering the desired number.
Editing of other items that might appear in the Modality area of the report will follow the
same logic as those shown above.
The only thing editable in the Report Header is the session number. The program
information is taken from whatever is entered in the program information area during
setup as described elsewhere in this manual. The Name block is not an editable field. You
must change either the Last Name or the First Name in their respective fields in order to
edit the patient name. The session date is the date that the session was done, and cannot
be changed.
The Medical Data area contains data relating to the overall condition of the patient. To
edit data in the Medical Data area, left click on the block containing the information to be
changed and enter the correct information.
The Session Summary area contains data relating to the overall session. To edit data in
the Session Summary area, left click on the block containing the information to be
changed and enter the correct information. Some items appearing in the Session
Summary area are controlled by the data in the Modality area. These items include,
Maximum Heart Rate, Maximum Blood Pressure, and Maximum METs. Although those
items can be edited and will keep any entered data, if the Modality area is reentered for
any reason, data in those items will change to whatever is displayed in the Modality area.
The Session Graph is generally not editable, although the small hearts can be moved if
desired. The graph provides a graphic representation of the entire recorded session.

TeleRehab™ 2004 Cardiopulmonary Monitoring System Users Manual
-127-
The scales for both Mets and Heart Rate appear on the left, while time appears along the
bottom of the graph. Mets is indicated by a small triangle, and Heart rate is indicated by
the small hearts.
The Target Heart Rate is indicated as a line (if the Target Heart Rate is a single number)
or a shaded area (if the Target Heart Rate is a range) horizontally across the graph.
An alarm condition is indicated by a small arrow. The alarm condition can be either a rate
alarm or an arrhythmia alarm.
When a strip is saved during the session, a wide arrow appears on the line under the
graph labeled ‘Strips’. The arrow will appear at the time the strip was taken.
The ‘Modality’ line indicates the exercise modality in use during the indicated time based
on its position in the list of modalities utilized during the session. The number 1 would
indicate the first thing in the list of modalities used, generally rest or session warm up.
The number 2 would indicate the second thing on the list, and so on.
The Modality Area of the report allows some different editing applications during the
editing process:
To add a line to the modality section, hold down the Shift Key and left click on the
number of the line above where you want to add a line. The new line will appear
duplicating the line above.
To remove a line from the modality section, hold down the Ctrl key and left click on the
line that is to be deleted. The line will be removed from the modality section.
To change the name of the modality, left click on the modality to be changed and then
left click on the drop down window to view a list of all modalities available in the
system. Left click on the modality name desired.
The Duration block is a time block. Left click on the block to be changed and enter the
time information. Be sure to include the colons for the times to appear properly.
The Max Mets and Mx Wrk Load blocks only require that you enter the correct data.
Note that the Max Workload will be recalculated automatically if you change the Max
Mets value, and the Max Mets value will be recalculated automatically if you change the
Max Workload.
Max HR is changed by entering the correct number. Note that the % Target will
automatically adjust if the Max HR is changed.
Max BP is changed by entering the correct numbers.
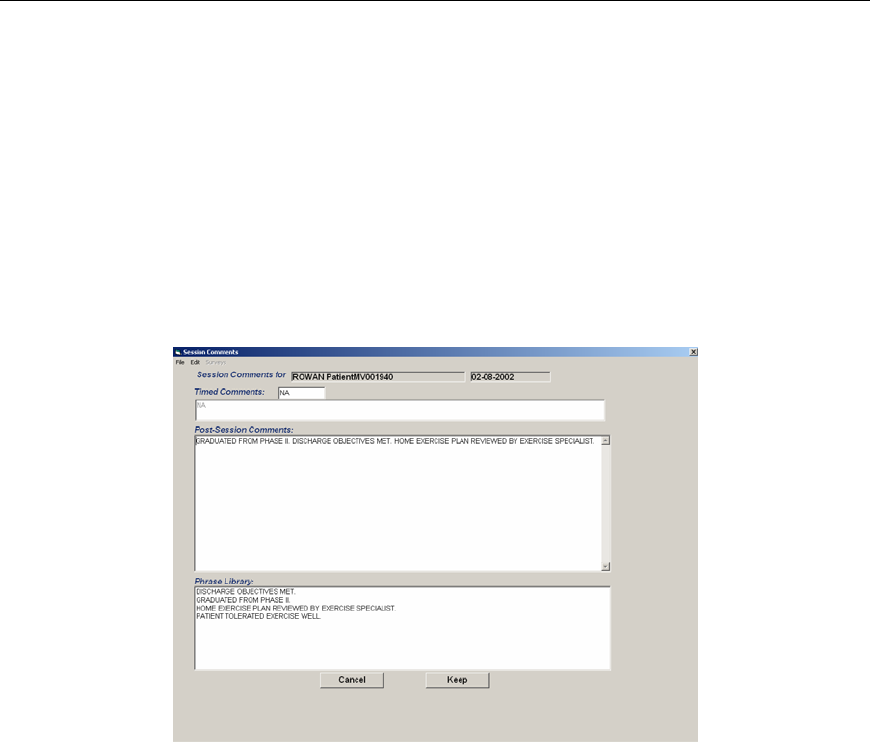
TeleRehab™ 2004 Cardiopulmonary Monitoring System Users Manual
-128-
Although % Target can be changed if desired, the number will be correct based on the
Max HR and the Session Target Heart Rate calculation.
RPE is changed by entering the desired number.
Editing of other items that might appear in the Modality area of the report will follow the
same logic as those shown above.
The Post Session Comments and Timed Comments area can be edited by left clicking on
the Post Session Comments area. The Session Comments screen will appear as follows:
If Timed Comments were saved during the session, they will appear in the smaller block
near the top of the page. Timed comments are comments that were entered during
monitoring and appear in the report chronologically by time entered.
Timed comment content can be edited by left clicking in the Timed Comments block and
making the desired changes to the comment appearing there.
Timed Comments cannot be added to a report.
To Delete a Timed Comment, Highlight the comment by left clicking and holding the
button down while you move the cursor over the complete comment. Once the comment
is highlighted, release the mouse button and press the <Delete> key. The comment will
be removed from the session report.
To copy all or part of a Timed Comment into the Post Session Comments block, highlight
what is to be copied as described above. Once the highlight function is complete, release
the mouse button. Left click the highlighted area again holding the button down and drag
the area into the Post Session Comments block. Release the mouse button, and the area
moved will appear as part of the Post Session Comments.
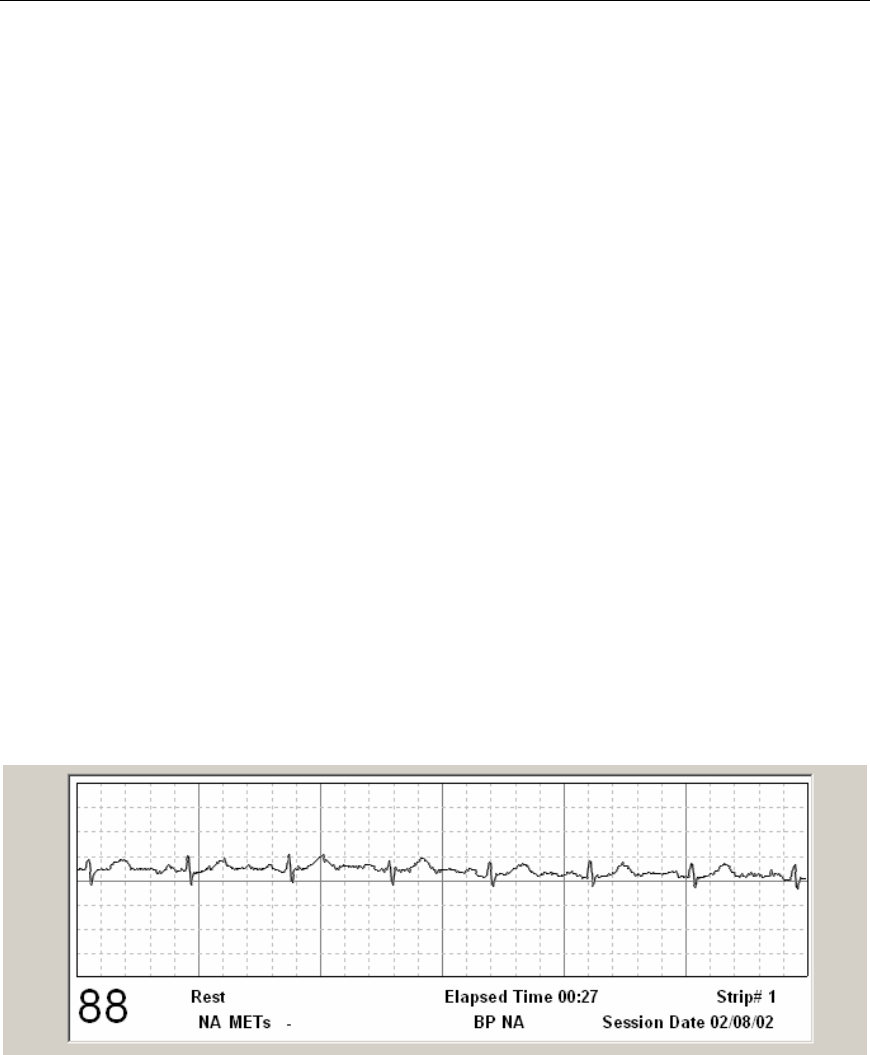
TeleRehab™ 2004 Cardiopulmonary Monitoring System Users Manual
-129-
Post Session Comments can be added by typing comments directly in to the Post Session
Comments block, copying Timed Comments as described above, or by using the Phrase
Library.
The Phrase Library is a collection of commonly used phrases that are used routinely as
Post Session Comments. The Phrase Library is established as follows:
Highlight a comment or phrase in the Post Session Comments area by left clicking and
holding the button down while you move the cursor over the complete comment or
phrase. Once the comment or phrase is highlighted, release the mouse button. Left click
the highlighted area again holding the mouse button down and drag the area into the
Phrase Library area. Release the mouse button, and the comment or phrase moved will
appear as part of the Phrase Library.
To use the Phrase Library, reverse the above procedure.
Once the Timed and Post Session Comments are entered and/or edited to the users
satisfaction, left click on the Keep button to exit the screen and keep changes.
The Cancel button will exit the screen without keeping the changes.
Editing Strip Information
Strips saved during the recorded session appear at the bottom of the Daily Session
Report.
Some information appearing on a saved strip can be changed including the heart rate,
exercise modality being used when the strip was saved, Mets at the time the strip was
saved, and the blood pressure at the time the strip was saved.
To change the Heart Rate, left click on the strip and two red lines will appear. Using the
mouse cursor, move the red line on the right to an R wave peak. Move the red line on the

TeleRehab™ 2004 Cardiopulmonary Monitoring System Users Manual
-130-
left to an R wave peak 2 intervals to the left of the first red line. The heart rate will
change to the rate calculated for those two intervals. You can use any of the two interval
areas on the strip, and the heart rate will be recalculated accordingly.
Note: A right click on the strip will result in two green lines with an indication of the
distance between them. By moving the green lines so that they line up on the P wave and
corresponding R wave, the PR interval can be identified. This utility can be used to
identify any interval on the strip.
To change the Exercise Device, left click on the exercise device name and then on the
drop down window. Select the desired device from the modality list that appears.
To edit the METs level, left click on the METs value displayed (e.g. in the above
example, NA), and a block will be made available to enter the correct Mets value.
To edit the BP value, left click on the BP value displayed (e.g. in the above example,
NA), and a block will be made available to enter the correct BP value.
To Delete a strip from the report, left click on the strip and press the <Delete> key. The
strip will be removed from the report.
To Add a strip to the report, use the Full Disclosure as described earlier.
Printing The Standard Daily Report
Once all editing has been accomplished, left click on the ‘Print Report’ button at the
lower left of the screen and the report will print in the displayed format.
Multi Session Reports
The Multi Session Data area provides the ability to Create, Review, Edit, and Print,
reports containing data from either non-monitored sessions or sessions that have been
monitored, and data saved during the monitoring process. The Multi Session report
provides a summary of data collected over a number of sessions and includes graphic
information as well as strips identified as significant during the monitoring process.
Click on the ‘Multi Session Data’ bar to get to the following Patient Data screen:
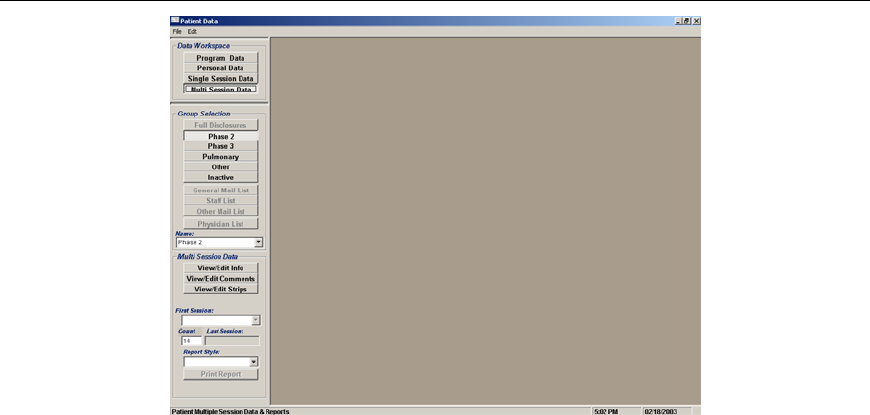
TeleRehab™ 2004 Cardiopulmonary Monitoring System Users Manual
-131-
From the above screen, you can view and edit Multi Session reports. There are two
different primary styles of Multi Session report, the 14 session or monthly style, and the
36-session or discharge summary style. Reports can be generated for any patient
residing in the active portion of the system (Phase 2, Phase 3, Pulmonary, Other, or
Inactive).
Viewing and Editing Multi Session Reports
The following descriptions and procedures for editing apply to all multi session reports
created on a patient.
Under Group Selection, click on the category of the patient whose data you want to
review.
Click on the drop down window under Name, and a list of names of all patients in the
selected category will appear.
Left click on the name of the patient whose data you want to review. Next, left click on
the Count block and enter the number of sessions to be included in the report. Finally, left
click on the First Session block and a list of sessions will appear. Left click on the
starting session number/date, and a report will be displayed covering the number of
sessions selected starting with the session number/date selected.
The format of the report is determined by what is defined in the Workspace and Report
Forms Links section in Setup. To view the report in a different style, left click on the
drop down window lower left of the screen labeled Report Style and a list of available
report styles will appear. Left click on the desired style and the Multi Session data will be
displayed in the selected report style.
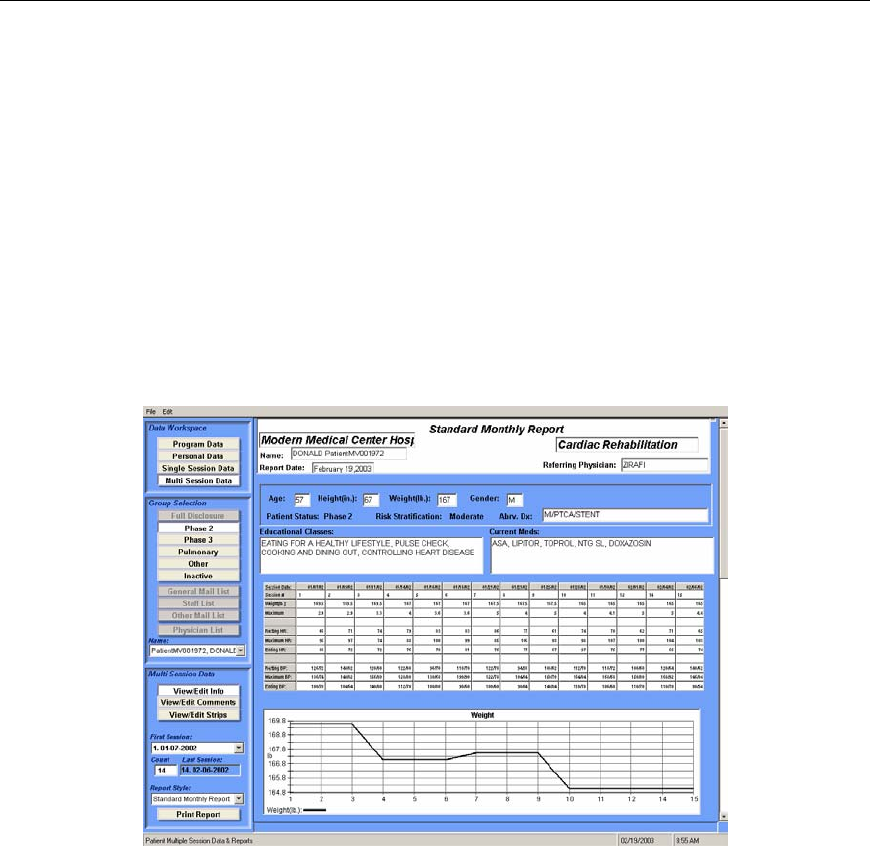
TeleRehab™ 2004 Cardiopulmonary Monitoring System Users Manual
-132-
The system provides several predefined report styles. Additional report styles can be
created and made available through the use of the internal Utilities and Design Functions
described elsewhere in this manual.
NOTE: Multi Session reports are designed to deal with up to 14 sessions, or up to 36
sessions. Generally, 14 session styles are used as monthly or periodic reports while 36
session styles are used as discharge summaries or final reports.
The Standard Monthly Report
Following are screens depicting a Standard Monthly Multi Session Report. Samples of
various Multi Session reports appear in at the end of this section.
The Standard Monthly Report is designed to display data for up to 14 sessions. It consists
of a Report Header, Patient Information area, Session Summary Data area, and a
series of Graphs, Comments, and a series of saved Strips.
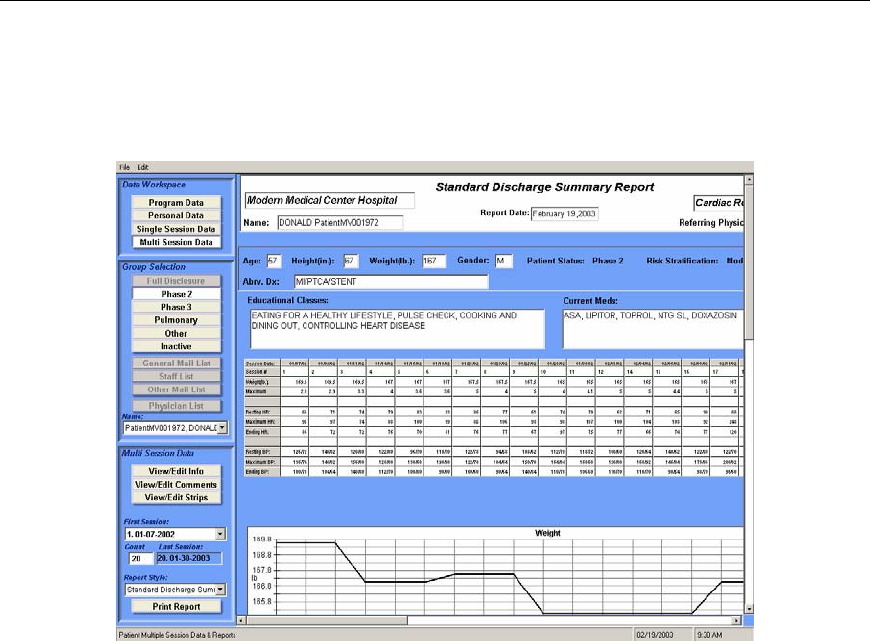
TeleRehab™ 2004 Cardiopulmonary Monitoring System Users Manual
-133-
The Standard Discharge Summary Report
Following are screens depicting a Standard Discharge Summary Report.
The Standard Discharge Summary Report is designed to display data for up to 36
sessions. It consists of a Report Header, Patient Information area, Session Summary
Data area, a series of Graphs, Comments, and a series of saved Strips.
The only difference in the standard 14 session reports and the 36 session reports is the
screen layout and the way that the report is printed.
The 36 session report styles are laid out and printed in landscape mode and require the
use of a horizontal slider bar to allow review and edit of the entire report.
The editing features are identical for the 14 and/or 36 session report style.
In the above examples, the only thing editable in the Report Header is the Referring
Physician. The program information is taken from whatever is entered in the program
information area during setup as described elsewhere in this manual. The Name block is
not an editable field. You must change either the Last Name or the First Name in their
respective fields in order to edit the patient name. The report date is the date that the
report was created, and cannot be changed.
The Patient Information area normally contains demographic data relating to the patient
taken from his/her patient data file. To edit data in the Patient Information Data area, left
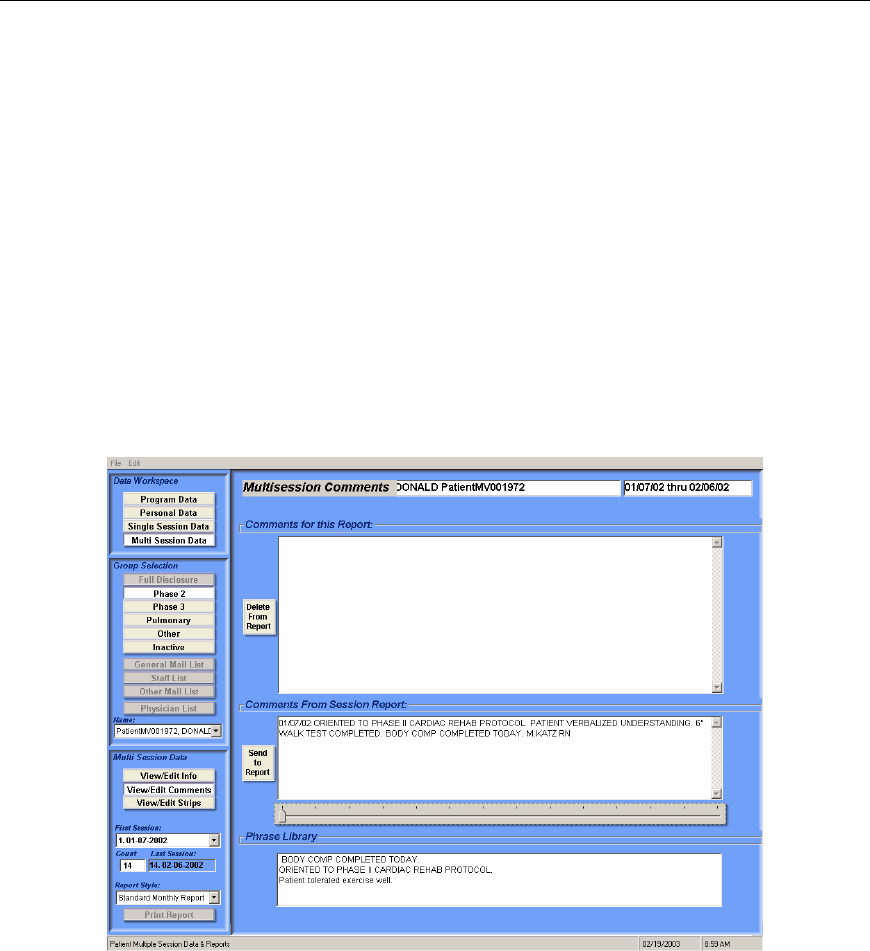
TeleRehab™ 2004 Cardiopulmonary Monitoring System Users Manual
-134-
click on the block containing the information to be changed and enter the correct
information.
The Session Summary table contains data relating to each of the sessions included in the
report. This area is NOT EDITABLE. Data displayed in this area is taken from the
individual sessions that are included in this Multi Session report, and any changes must
originate in the individual session report involved.
The Graphs included in the report are also not editable. The graphs are derived from
numerical summary information. What graphic data is included in the report is defined at
the time the report is designed. See the section on Utilities and Design for more
information.
The Comments area is accessed by left clicking on the button labeled View/Edit
Comments. The following screen will be displayed:
The Comments utility allows manual entry of comments directly into the Comments for
this Report block, transfer of comments from individual sessions, or transfer of items
from the phrase library.
Comments residing in the individual sessions included in this report can be reviewed for
possible inclusion in whole or in part by moving the slider under the block labeled
Comments From Session Reports to the right or left. Each comment will be preceded by
the date of the session report where the comment is stored.

TeleRehab™ 2004 Cardiopulmonary Monitoring System Users Manual
-135-
To use a complete session comment as a part of Comments for This Report, left click on
the button labeled Send to Report. The comment displayed will copy to the Comments
for This Report block.
To copy a portion of a session comment, highlight the portion of the comment to be
copied by left clicking and holding the button down while you move the cursor over the
comment area. Once the desired comment area is highlighted, release the mouse button.
Left click the highlighted area again holding the button down, and drag the area into the
Comments for This Report block. Release the mouse button, and the area moved will
appear as part of the Comments for This Report. Control where the comment appears by
the cursor position when the mouse button is released.
The Phrase Library is a collection of commonly used phrases that are used routinely as
Comments. The Phrase Library is normally established through the session report
comments utility, however phrases/comments used in Multi Session reports can be
included as follows.
Highlight a comment or phrase in the Comments for This Report area by left clicking and
holding the button down while you move the cursor over the complete comment or
phrase. Once the comment or phrase is highlighted, release the mouse button. Left click
the highlighted area again holding the mouse button down and drag the area into the
Phrase Library area. Release the mouse button, and the comment or phrase moved will
appear as part of the Phrase Library.
To use the Phrase Library, left click on the phrase/comment to be copied and it will be
highlighted. Left click the highlighted area again holding the button down, and drag the
area into the Comments for This Report block. Release the mouse button, and the area
moved will appear as part of the Comments for This Report. Control where the comment
appears by the cursor position when the mouse button is released.
To remove a phrase/comment from the Comments for This Report block, highlight a
comment or phrase in the Comments for This Report area by left clicking and holding the
button down while you move the cursor over the complete comment or phrase. Once the
comment or phrase is highlighted, release the mouse button. Left click on the Delete
From Report button, and the highlighted phrase/comment will be removed.
Leave the Comment utility by left clicking on either View/Edit Info to return to the report
screen, or View/Edit Strips to move to the strip utility. The comments area will
automatically be saved upon exit.
Editing Strip Information
Left click on the button labeled View/Edit Strips to enter the strip editing utility.
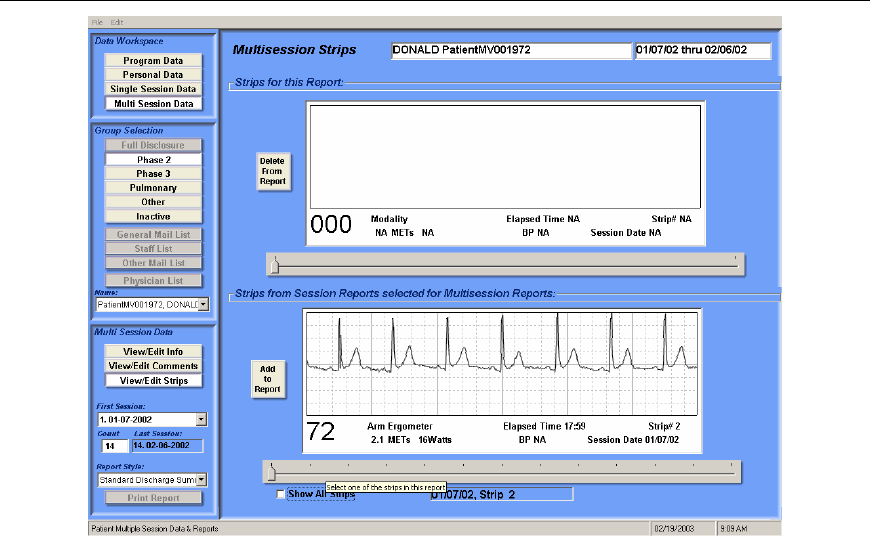
TeleRehab™ 2004 Cardiopulmonary Monitoring System Users Manual
-136-
Initially, the Strips for this Report area will be blank as shown above. Strips ultimately
identified to be a part of this report would appear in the upper box. Scroll through those
identified by using the slider bar under the strip area.
The strips appearing in the lower box are those that were identified for inclusion in a
multi session report during the editing process of the session report. Clicking on the small
box labeled Show all Strips will cause all strips saved in each session report to be made
available for review. Scroll through available strips by using the slider bar under the strip
area.
To select a strip to appear in this report, left click on the box labeled Add to Report. The
strip shown in the lower box will be copied to the upper box.
To remove a strip from those selected to appear in this report, left click on the box
labeled Delete from Report. The strip will be deleted from the group saved for this report.
Strip data is not editable in Multi Session reports; it is merely a copy of what appears in
the individual session report. If changes are indicated, edit the strip in the single session
report area.
Printing The Standard Discharge Summary Report
Once all editing has been accomplished, left click on the ‘Print Report’ button at the
lower left of the screen and the report will print in the displayed format.
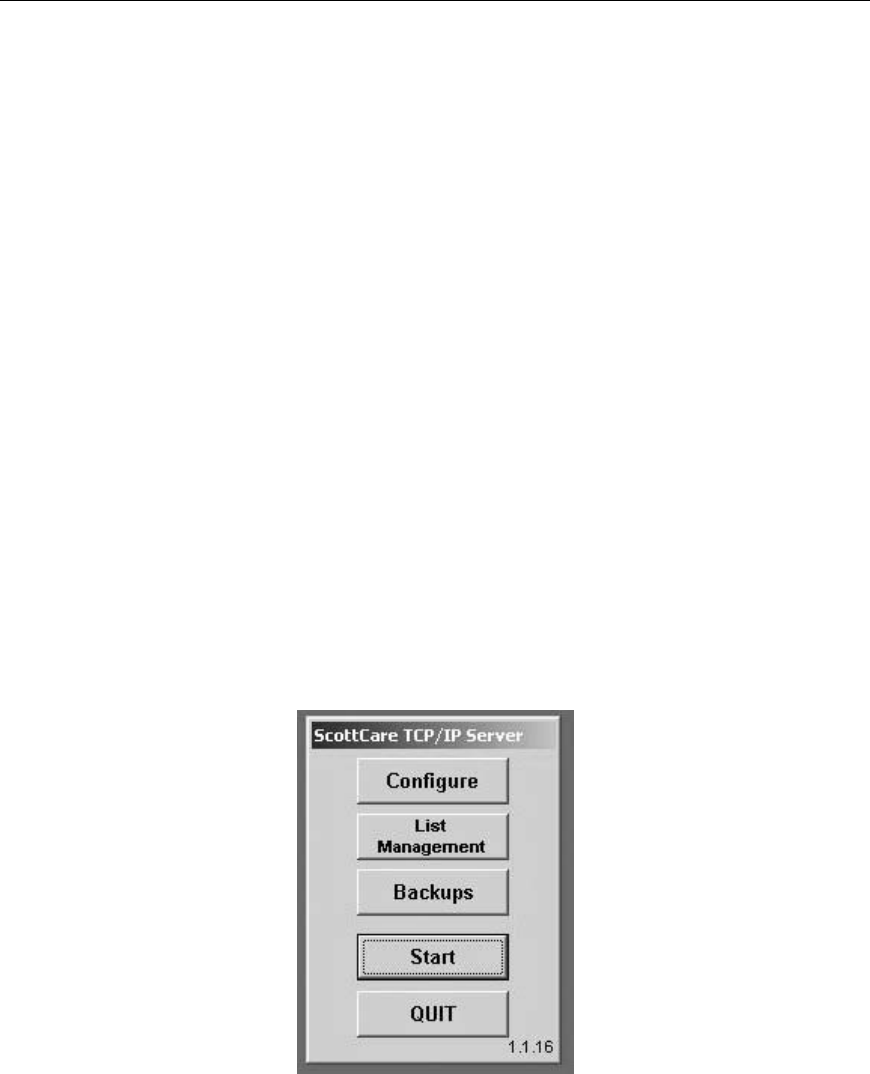
TeleRehab™ 2004 Cardiopulmonary Monitoring System Users Manual
-137-
HL7 Interface:
The HL7 Interface module allows the transfer of session information from the TeleRehab
cardiopulmonary monitoring system to a repository where that information can be
disseminated and utilized as desired by the hospital information system or other network
entities. The information is converted from the proprietary means of storage within the
TeleRehab monitoring system to a HL7 format when stored in the repository.
The session information transfer consists of 84 fixed data elements and a number of user
defined data elements if desired. A list of included data elements appears as attachment 1.
A session report saved as a .PDF file is also included if desired.
The HL7 Interface also allows the importation of patient demographic information from
the hospital information system as a means of entering patient data into the TeleRehab
cardiopulmonary monitoring system.
Activating the HL7 Interface:
The HL7 configuration screen allows the operator to enable the HL7 software and to
identify user defined data that is to be a part of the exported HL7 information file. The
configuration screen is accessed through the TeleRehab Advantage Server as follows:
Bring up the TeleRehab Advantage Server menu:
Hold down the Alt and Ctrl keys and right-click in the right or left margin. The following
configuration screen will appear:
TeleRehab™ 2004 Cardiopulmonary Monitoring System Users Manual
-138-
Place a check mark in a box or remove it by left clicking on the box.
“Enable HL7” will cause the export and import functionality to be activated.
“Include Custom Resource Codes in HL7 Messages” will make a list of user defined data
elements available for selection to be a part of the exported data file.
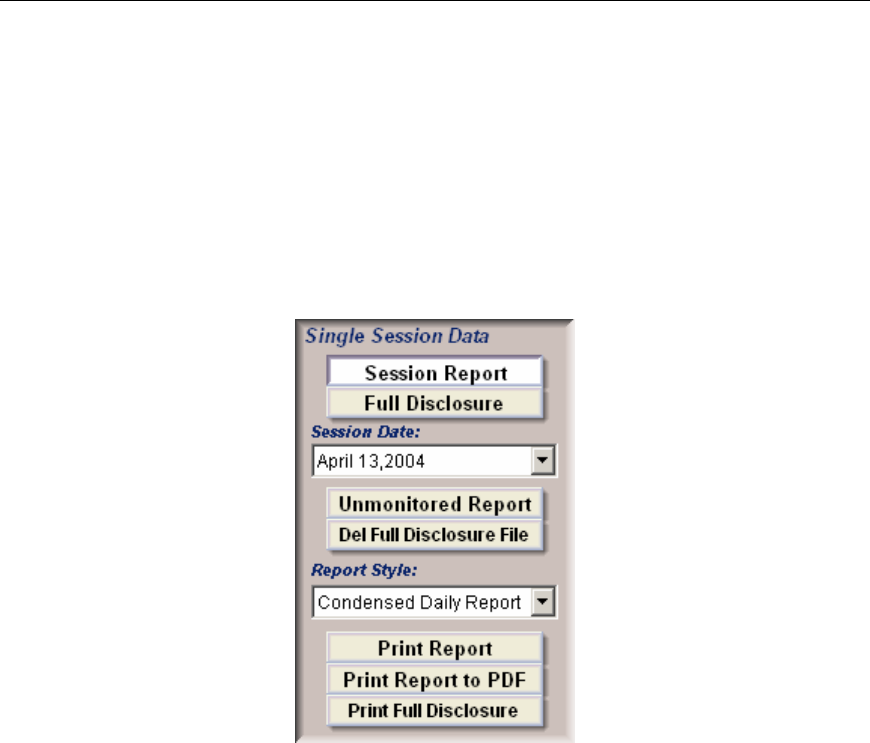
TeleRehab™ 2004 Cardiopulmonary Monitoring System Users Manual
-139-
The export function:
The process of transferring information is invisible to the equipment operator. When a
patient name is removed from the monitoring screen, the session information saved by
the system is exported to the repository. A full set of session information is exported,
however, the information actually utilized by the hospital system is defined during
installation and configuration of the application.
Information can also be manually exported once a report is defined and edited. A new
button will appear in the single session data area called “Print Report to PDF”.
Left click on the “Print Report to PDF” button to cause the system to create a .PDF file of
the selected report, and export the session data file along with the .PDF file to the HL7
repository.
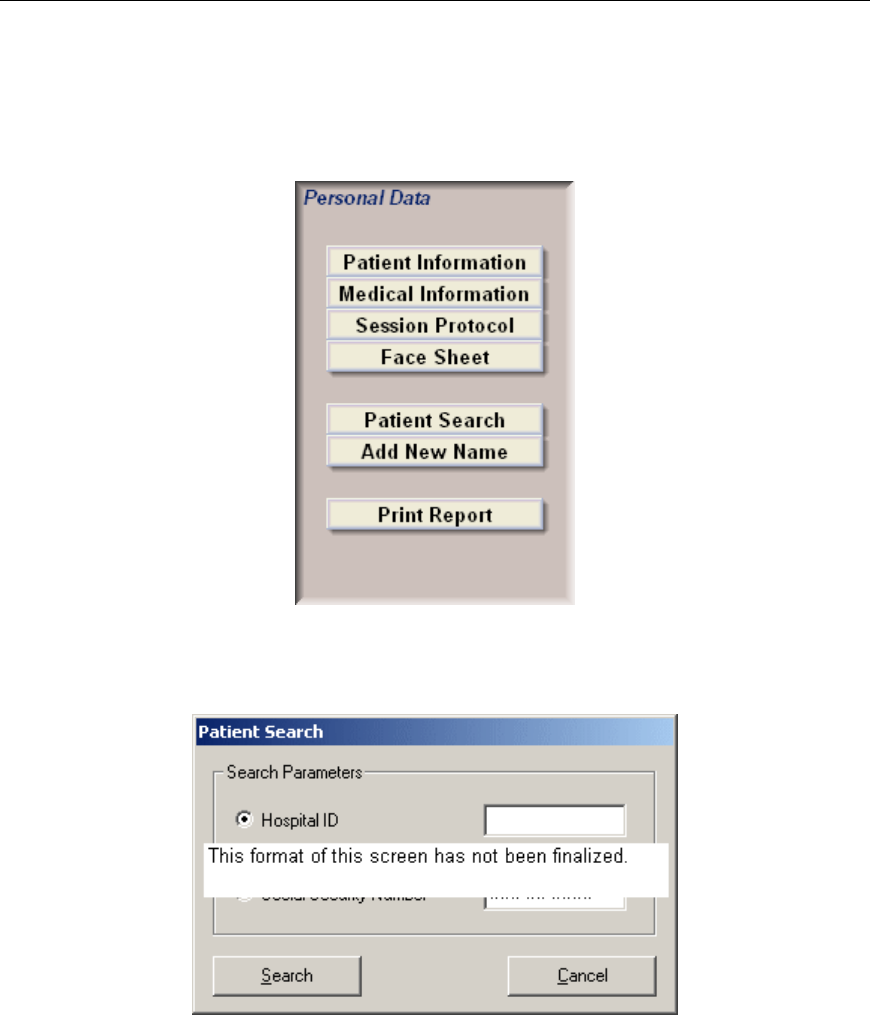
TeleRehab™ 2004 Cardiopulmonary Monitoring System Users Manual
-140-
The Import Function:
Patient demographic information can be imported from the Hospital Information System
for use in creating a patient file within the TeleRehab Advantage system. A new button
will appear in the personal data area call “Patient Search”.
Left click on the “Patient Search” button to bring up the HL7 search screen:
Enter the requested information and left click on the ‘Search’ button. The system will
retrieve the patient demographic information from the hospital information system and
create a patient data file.

TeleRehab™ 2004 Cardiopulmonary Monitoring System Users Manual
-141-
ATTACHMENT 1
MPDV=Max. BP Mode mNPE=RPE
PTPI=Comments PTPH=Patient Phone
MMDV=Mode PTMH=Medical History
0c21=Risk Stratification PTNN=Nickname
PTLN=Last Name PTCT=City
PTED=Admit to CR Date PTFC=System Code
PTSA=Address PTRM=Remarks
PTPZ=Status PTHD=Clinic I.D.
PTHT=Height(in.) MHDV=Max. HR Mode
PTFN=First Name PTFS=First Session
MDTE=Report Date 0c07=High BP Hx?
0c06=Family Hx? 0c08=Sed. Lifestyles?
0c10=Smoker? 0c09=Stress?
0c02=Abrv. Dx 0c01=Obesity?
0c03=Educational Classes 0c05=Diabetes?
0c04=Insurance 0c11=Hyperlipidemia?
0c17=Pre-BS 0c16=LDL
0c18=Post-BS 0c20=Race
0c19=Marital Status 0c13=Chol
0c12=Smoking Comments STHR=Target HR
0c15=HDL 0c14=Trig
0z04=Referring Diagnosis and ICD 9 0z02=Goals
0z05=Authorization Number 0z07=Referring Physician Phone
0z06=Authorization Dates DCPH=MD Phone
SMED=Current Meds DCNM=Referring Physician
0z01=Allergies RHRT=Resting HR
0z08=ECG Type 0z14=SpO2 Low
DCLN=MD Last Name 0z15=SpO2 High
RSBP=Resting BP DCFN=MD First Name
0z10=Medication Taken? 0z09=Angina?
PCMT=Post-Session Comments SDYS=Session Days
0z12=O2 Usage MXPE=Maximum P.E. Level used
MXMT=Maximum METS NDBP=Ending BP
NTHR=Session THR NDHR=Ending HR
PTSS=SS Number PTSL=Session List
PTST=State MXHR=Maximum HR
MXBP=Maximum BP PTSX=Gender
PTZP=Zip SNLN=Session Len.
SNDT=Session Date PTAG=Age
DST6=Distance (feet) SNTM=Start Time
PTWN=Name LSSN=Most Recent Sess. #
SNNO=Session # PTWT=Weight(lb.)