Se Jin Electron SWR-220U Receiver User Manual SWR 220U UserMa
Se Jin Electron Inc Receiver SWR 220U UserMa
users manual
Receiver MANUAL
(SWR-220U)
Sejin Electron Inc.

FCC NOTICE
THIS DEVICE COMPLIES WITH PART 15 OF THE FCC RULES.
OPERATION IS SUBJECT TO THE FOLLOWING TWO CONDITION:
(1) THIS DEVICE MAY NOT CAUSE HARMFUL INTERFERENCE, AND
(2) THIS DEVICE MUST ACCEPT ANY INTERFERENCE RECEIVED,
INCLUDING INTERFERENCE THAT MAY CAUSE UNDERSIRED
OPERATION.
This equipment has been tested and found to comply with the limits for a Class B digital
device, pursuant to part 15 of the FCC Rules. These limits are designed to provide
reasonable protection against harmful interference in a residential installation. This
equipment generates, uses and can radiate radio frequency energy and, if not installed and
used in accordance with the instructions, may cause harmful interference to radio
communication. However, there is no guarantee that interference will not occur in a
particular installation. If this equipment does cause harmful interference to radio or
television reception, which can be determined by turning the equipment off and on, the user
is encouraged to try to correct the interference by one or more of the following measures :
- Reorient or relocate the receiving antenna.
- Increase the separation between the equipment and receiver.
- Connect the equipment into an outlet on a circuit difference from that to which
the receiver is connected.
- Consult the dealer of an experienced radio/TV technician for help.
NOTE : The manufacturer is not responsible for any radio or TV interference caused by
unauthorized modifications to this equipment. Such modifications could void the user’s
authority to operate the equipment.
Contents
1 General Specification...................................................................................................... 4
1.1 USB Standard .........................................................................................................4
1.2 System requirements...............................................................................................4
1.3 Electrical Specification.............................................................................................4
2 Receiver settings ............................................................................................................. 5
2.1 User ID setting.........................................................................................................5
2.1.1 User ID setting incase an EEPROM equipped on the receiver ...............................5
2.1.2 User ID setting incase no EEPROM equipped on the receiver ...............................7
3 Schematic diagram ......................................................................................................... 8
3.1 Schematic diagram with 18 Pin DIP type package ......................................................8
3.2 Photo Module for different carrier frequencies..............................................................8
3.3 Language option jumper setting.................................................................................9

1 General Specification
1.1 USB Standard
The USB IR receiver is a bus powered composite device. It is complied with USB standard version 1.1
and HID standard version 1.1. The USB transmission speed is 1.5Mbps, which is low speed USB. The
USB related spec is available on the web page http://www.usb.org/
1.2 System requirements
The followings are the requirements for using the USB IR receiver.
1. An available USB Downstream port with “A” type connector.
2. Operating system with USB compliant device driver and HID device support. (Windows 98
Second Edition /ME/2000/XP or lather version is recommended). Note: The Windows 98
Second Edition /ME/2000 and Windows XP are registered trademark of Microsoft Corporation.
3. One or more Application program for using consumer control buttons. (Without the application
program, only a few remote control buttons, Keyboard and Mouse operation will work.)
1.3 Electrical Specification
Connector “A” Type USB connector
USB speed Low speed (1.5MBPS)
Operating voltage range 4.4~5.5V
Operating current Max 100mA
Operating temperature 0 ~ 40℃
Storage temperature -40 ~ 60℃
Operating humidity 0~90% RH non-condensing
Storage humidity 0~95% RH non-condensing

2 Receiver settings
2.1 User ID setting
There are two options for user ID setting. First one is in case the receiver has an optional serial
EEPROM.
Second one is in case the receiver has no the optional serial EEPROM.
2.1.1 User ID setting incase an EEPROM equipped on the receiver
If the receiver has an optional serial EEPROM on the receiver board, the receiver keeps user ID even
though the system power down.
User ID setting procedure:
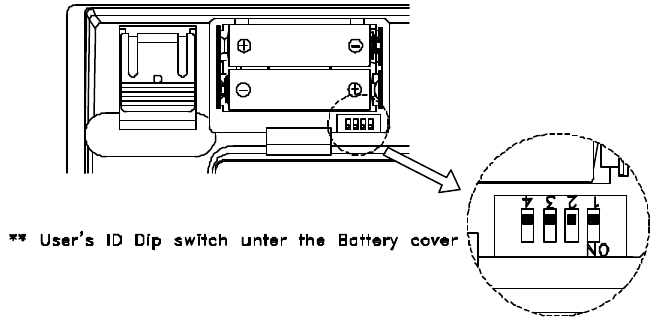
1. Set the User ID 4 bit Dipswitch located under battery cover on the keyboard side after removing
batteries. To use both the keyboard and the remote control with single receiver, the user must
set the same user ID number for both on the keyboard and on the remote.
2. Press any key or button a few times to discharge internal capacitor and than reinsert batteries.

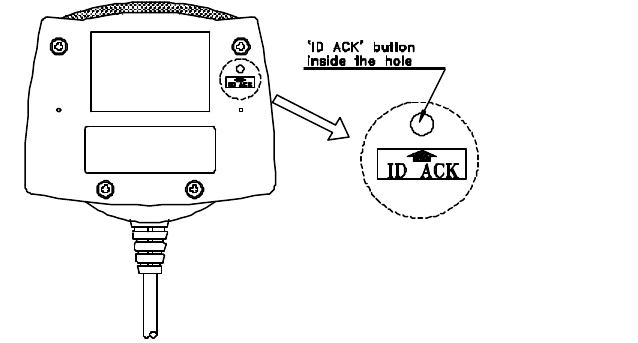
3. Push the `ID ACK’ button located inside the small hole on the bottom side using an
appropriate pin, the DATA indication LED will blink in every a second.
4. Aim the keyboard to the IR lens of Receiver and press any key other than the Left-Control, Left-
Shift, Right-Shift and Esc key or move mouse. Alternately, aim the remote control to the IR
lens of Receiver and press any button. The four-key combination, Left-Control, Left-Shift, Right-
Shift and Esc key is used to enter Matrix ID setting and Country code setting mode.
5. When a valid input detected the receiver stores the new user ID into the serial EEPROM. Once
the user ID setting is done, the receiver automatically returns back to its normal operation
mode.
2.1.2 User ID setting incase no EEPROM equipped on the receiver
1. If the receiver has no the optional serial EEPROM or if the stored data and the CRC value in
the EEPROM is not valid, the receiver blinks the DATA indication LED in every a second when
Power up time. Operate any input device, keyboard, mouse or remote control, the receiver no
longer blinking the DATA indication LED except a valid IR data indication blinking. When an IR
data received except the data for Left-Control, Left-Shift, Right-Shift and Esc key, the receiver
set the user ID with the user ID number in the first received IR data packet as a default user ID.
Once the user ID has been set, the receiver receives only the data that has as same user ID
number as its internal user ID number. The four-key combination, Left-Control, Left-Shift, Right-
Shift and Esc key is used to enter Matrix ID setting and Country code setting mode. When a
user use both the keyboard and the remote control with a receiver, the user must set the same
user ID number on the keyboard and on the remote. The stored user ID number will be lost
when system power down. Every power on time it

3 Schematic diagram
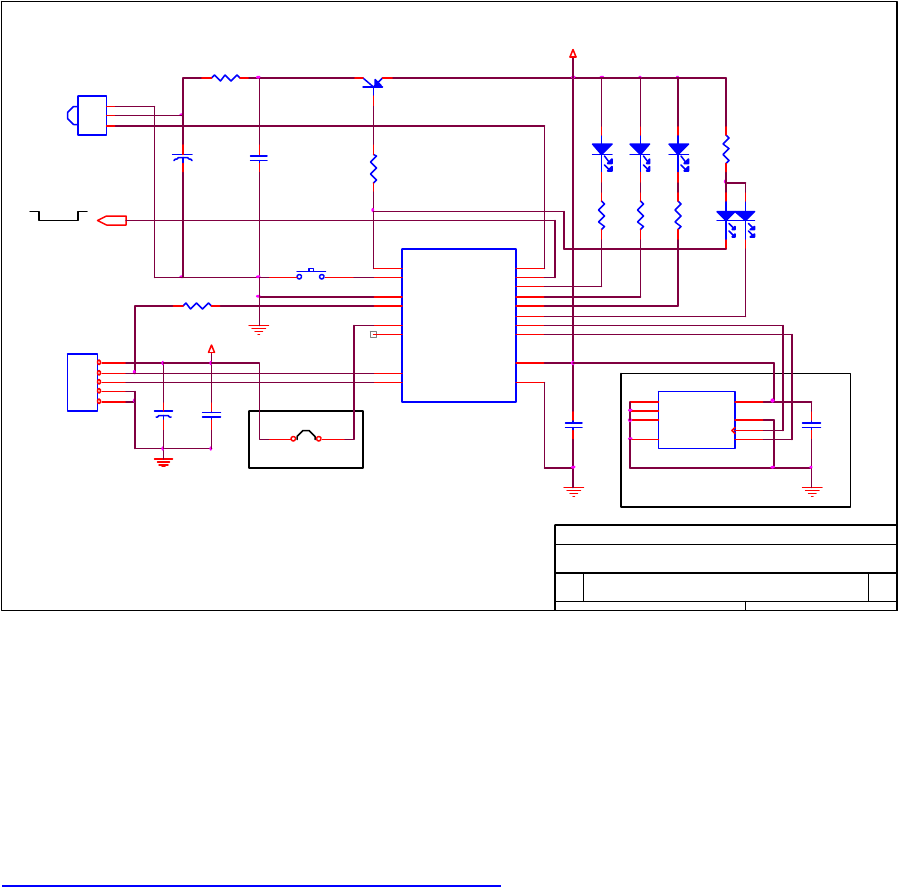
3.1 Schematic diagram with 18 Pin DIP type package
3.2 Photo Module for different carrier frequencies
A Vishay Telefunken’s TSOP1156 photo module should be used for Sejin 4PPM wireless products with
56KHz carrier frequency as an IR detector. A Vishay Telefunken’s TSOP1138 photo module should be
used for Sejin 4PPM wireless products with 38KHz carrier frequency as an IR detector.
The data sheets for the components are available on below web page.
http://www.vishay.com/brands/telefunken/photomods.html
Note: In order not to reduce the sensitivity of the photo module by power line noise or ripple, the 47uF
capacitor C1 on the schematic diagram must be placed as close as possible to the GND pin and the
VCC pin of the photo module.
TBD 1
USB IR Receiver
A
1 1Wednesday, August 29, 2001
(C) 2001 Sejin Electron Inc.
C:\ORCADWIN\CAPTURE\DESIGN\CYIR_RX.DSN
Title
Size Document Number Rev
Date: Sheet of
VCC
VCC
Caps Scrl
Data (RED)
Num
Power
(Green)
GND
VCC
Shield
D+
USB Cable
D-
User ID & Country Code Option
Note for Photo Module
TSOP1156 : for 56KHz carrier frequency
TSOP1138 : for 38KHz carrier frequency
Photo Module
C5
104
D1
LED
D2
LED
D3
LED
D4
R2
330
Q1
2N3906
R3
1K
C2
104
C6
104
2 Color LED
R6
330
R5
330
S1
ID set/Wakeup
R4
330
R1 330
C1
47uF
Y1
TSOP1156/1138
GND
VCC
OUT
1
2
3
U1
CY7C63723
P1.0
5
VPP
7
P0.0 1
VREG
8
P1.1
14
XtalIn/P2.1
9
P0.1 2
XtalOut
10
P0.2 3
D-/SDATA
12
D+/SCLK
13
P0.3 4
VSS 6
VCC 11
P0.7 15
P0.6 16
P0.5 17
P0.4 18
JP1
HEADER 5
1
2
3
4
5
R7 1.3K
C4
104
C3
4.7uF
U2
24C01A
A0
1
A1
2
SDA 5
A2
3
VCC 8
WP 7
SCL 6
GND
4
JP2
Non US Language Option
Power Control Option
3.3 Language option jumper setting
When the optional serial EEPROM is not equipped on the receiver, the jumper JP2 on the schematic
diagram is used for matrix ID selection. In the case, the Country code value in the HID descriptor table
on chapter is always zero, which indicates not localized. The jumper JP2 must be ON for all non-US
language version keyboards except the keyboards that use US matrix sheet. The jumper JP2 must be
removed for the keyboards that use US matrix sheet, which are currently US and Chinese language
version. When the optional serial EEPROM is equipped on the receiver, the non-US language option
jumper JP2 is ignored.