Sears 608 718571 Users Manual
608718571 608718571 SEARS BATTERY CHARGER - Manuals and Guides L1005081 View the owners manual for your SEARS BATTERY CHARGER #608718571. Home:Tool Parts:Sears Parts:Sears BATTERY CHARGER Manual
608.718571 L1005081
608.718571 to the manual 4305cf91-e399-4f4e-a0e9-276b32197890
2015-02-05
: Sears Sears-608-718571-Users-Manual-398737 sears-608-718571-users-manual-398737 sears pdf
Open the PDF directly: View PDF ![]() .
.
Page Count: 6
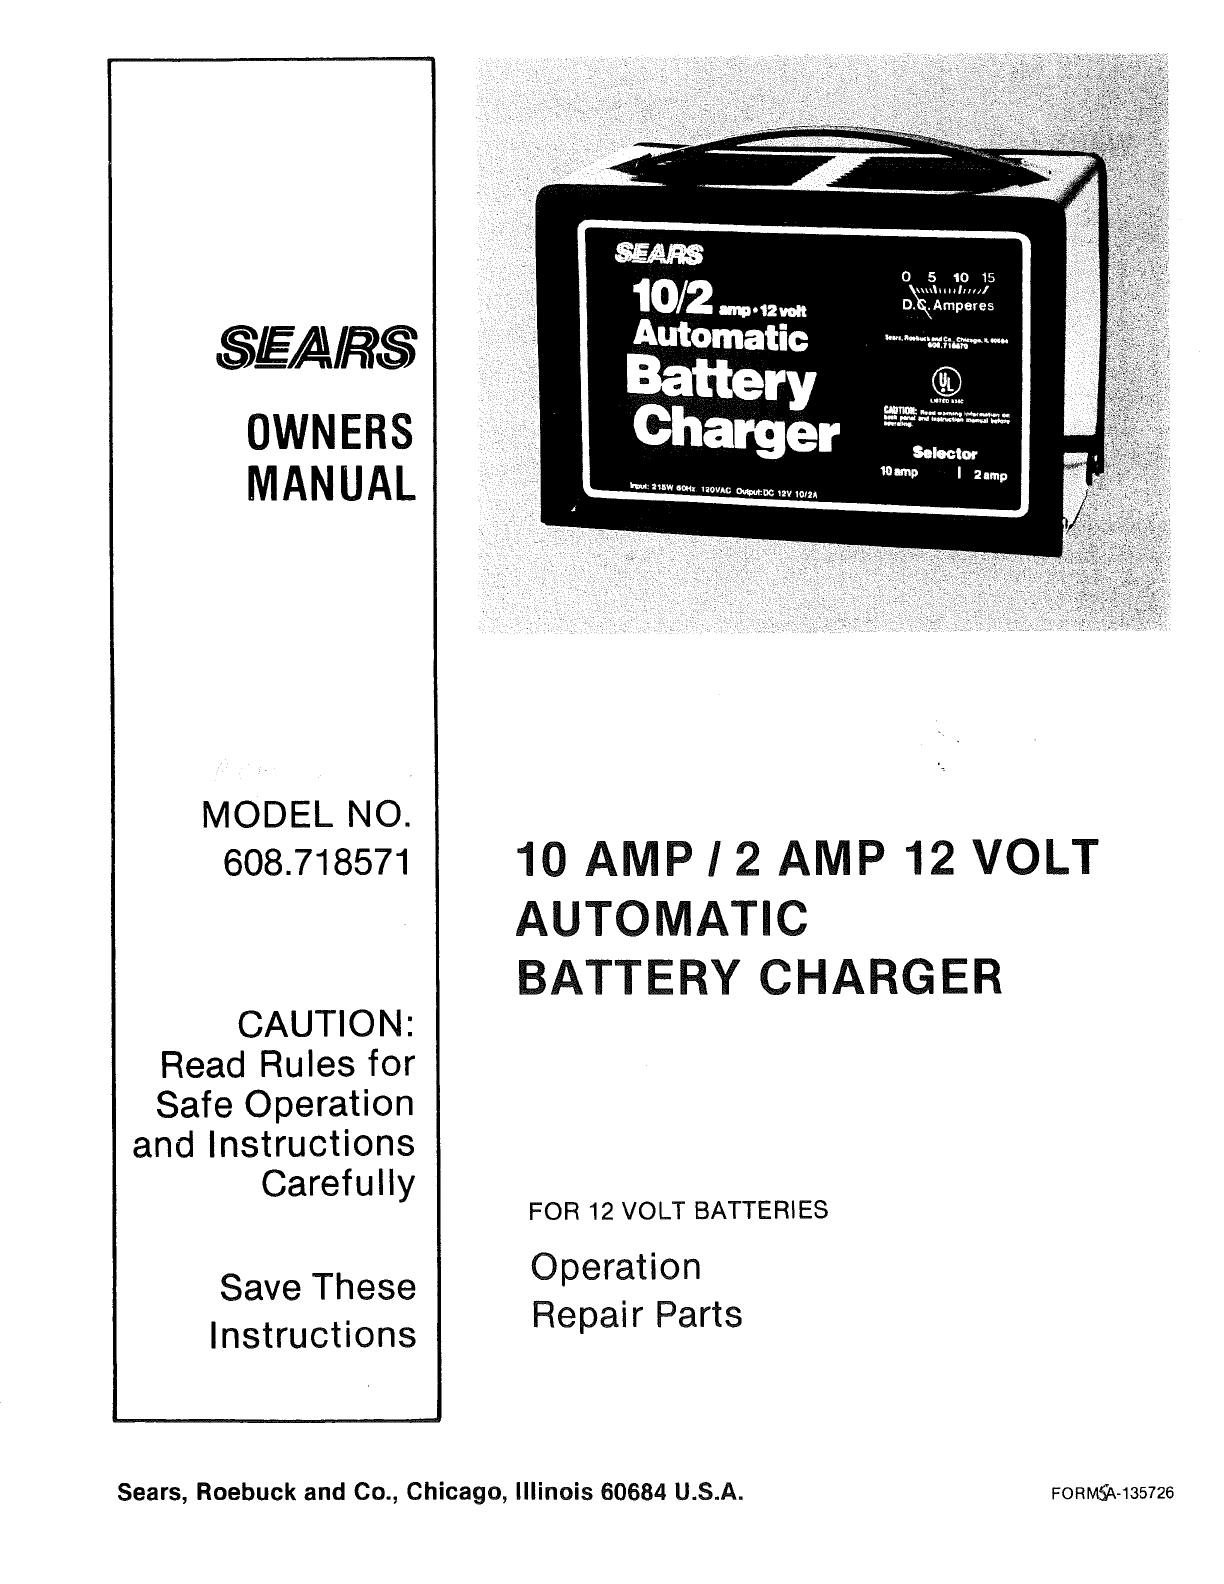
SEARS
OWNERS
MANUAL
MODEL NO.
608.718571
CAUTION:
Read Rules for
Safe Operation
and Instructions
Carefully
Save These
Instructions
1A P i2AMP 12 VOLT
AUTOMATIC
BATTERY CHARGER
FOR 12 VOLT BATTERIES
Operation
Repair Parts
Sears, Roebuck and Co., Chicago, Illinois 60684 U.S.A. FORM_-135726
THIS MANUALWILL HELPYOUUSEYOURSEARSBATTERYCHARGER
SAFELYANDEFFICIENTLY
WARNING:WORKINGWITHORNEARLEADACID BATTERIESIS DANGEROUS.BATTERIESCONTAINSULFURICACIDAND
PRODUCEEXPLOSIVEGASES.A BATTERYEXPLOSIONCOULDRESULTIN LOSSOF EYESIGHTOR SERIOUS
BURNS.PLEASEREADTHIS ENTIREMANUALCAREFULLYBEFOREUSINGYOURCHARGER.
...................................... ':' FULL12 MONTHWARRANTY,:"................... .'..
ii
j f, withintwelvemonthsfromdateof purchase,thisbatterychargerfailsdueto a defectin materialsorworkmanship, I
isimplyreturnit tothe nearestSearsstorethroughouttheUnitedStates,andSearswillrepairorreplaceit, freeof charge. !
Thiswarrantygivesyouspecificlegalrights,andyoumayalsohaveotherrightswhichvaryfromstateto state.
L_ Sears,RoebuckandCompany,Dept. 698/731A, Sears IL 60684 I
Y
Tower,Chicago,
.!
IMPORTANTSAFETYINSTRUCTIONS
SAVETHESE INSTRUCTIONS
1. This manual contains important safety and operating instructionsapplicable to the use of battery charger model number
608.718571.
2. Do not exposecharger to rain or snow.
3. Useof an attachmentnot recommendedor sold by the batterycharger manufacturermayresult in a risk of fire, electric shock, or
injury of persons.
4. To reducerisk of damageto electric plug and cord, pull by plug rather than cord when disconnectingcharger.
5. An extensioncord should not beused unlessabsolutelynecessary.Useof improperextensioncord could result in a risk of fire or
electric shock. If extensioncord must be used, makesure:
a. That pins on plug of extensioncord are the samenumber, size, and shapeof those of plug on charger;
b. That extensioncord is properly wired and in goodelectrical condition; and
c. Thatwire in cord is propersizeas follows: Minimum recommendedAWGwire size for variouslength extensioncords usedwith
this charger: Length of Cord, Feet 25 50 100 150
AWGSize 18 18 16 14
6. Do not operatecharger with damagedcord or plug. Replacethem immediately.
7. Donot operatechargerif it hasreceiveda sharp blow, beendropped, or otherwisedamagedinany way; take it to the nearestSears
ServiceCenter.
8. Do not disassemblecharger; take it to the nearestSearsServiceCenterwhen serviceor repairis required. Incorrectreassembly
may result in a risk of electric shock or fire.
9. To reduce risk of electric shock, unplug charger from outlet beforeattemptingany maintenanceor cleaning.Turning off controls
will not reducethis risk. PERSONALPRECAUTIONS
1. Removepersonal metalitems such as rings, bracelets,
necklaces,and watcheswhen working with a lead-acid
battery. A lead-acid battery can produce a short circuit
current high enoughto weld jewelry to metal, causing a
severeburn.
2. Someoneshould be within range of your voice or close
enoughto cometo your aid when you work neara lead-
acid battery.
3. Haveplenty of fresh waterand soap nearbyin casebat-
tery acid contacts skin, clothingor eyes.
4. Wear complete eye protection and clothing protection.
Avoid touching eyeswhile working nearbattery.
5. Clothingwill bedamagedif it comesin contactwith bat-
tery acid.
6. If batteryacid contactsskin or clothing, washimmediate-
ly with soapand water. If acid contactseyes, immediate-
ly flood eyes with running cold water for at least 15
minutes and get medicalattention immediately.
7. NEVERsmokeor allowa spark or flamein vicinity of bat-
tery or engine.
8. Beextra cautiousto reduce risk of dropping a metaltool
onto battery. It might spark or short-circuit battery or
other electrical parts that maycauseexplosion.
9. Usechargerfor charging a LEAD-ACIDbatteryonly. It is
10.
not intended to supply power to a low-voltageelectrical
system other than in an automotiveapplication. Do not
use battery charger for charging dry-cell batteriesthat
are commonlyused with homeappliances. These bat-
teriesmayburst andcauseinjury to personsanddamage
to property.
DONOTATTEMPTTOCHARGEA FROZENBATTERY...
If the caseis not cracked, removethe batteryto a warm
area until the ice has completelymeltedbefore attemp-
ting to charge.
WARNING-- RISK OF EXPLOSIVE GASES.
1. WORKINGIN VICINITYOF A LEAD-ACIDBATTERYIS
DANGEROUS. BATTERIES GENERATE EXPLOSIVE
GASESDURINGNORMALBATTERYOPERATION.FOR
THIS REASON,IT IS OF UTMOSTIMPORTANCETHAT
EACHTIME BEFOREUSINGYOURCHARGER,YOUREAD
THIS MANUALAND FOLLOWTHE INSTRUCTIONSEX-
ACTLY.
2. To reduce risk of battery explosion,follow theseinstruc-
tions and those published by battery manufacturerand
manufacturer of any equipment you intend to use in
vicinity of battery. Reviewcautionarymarking on these
products and on engine.
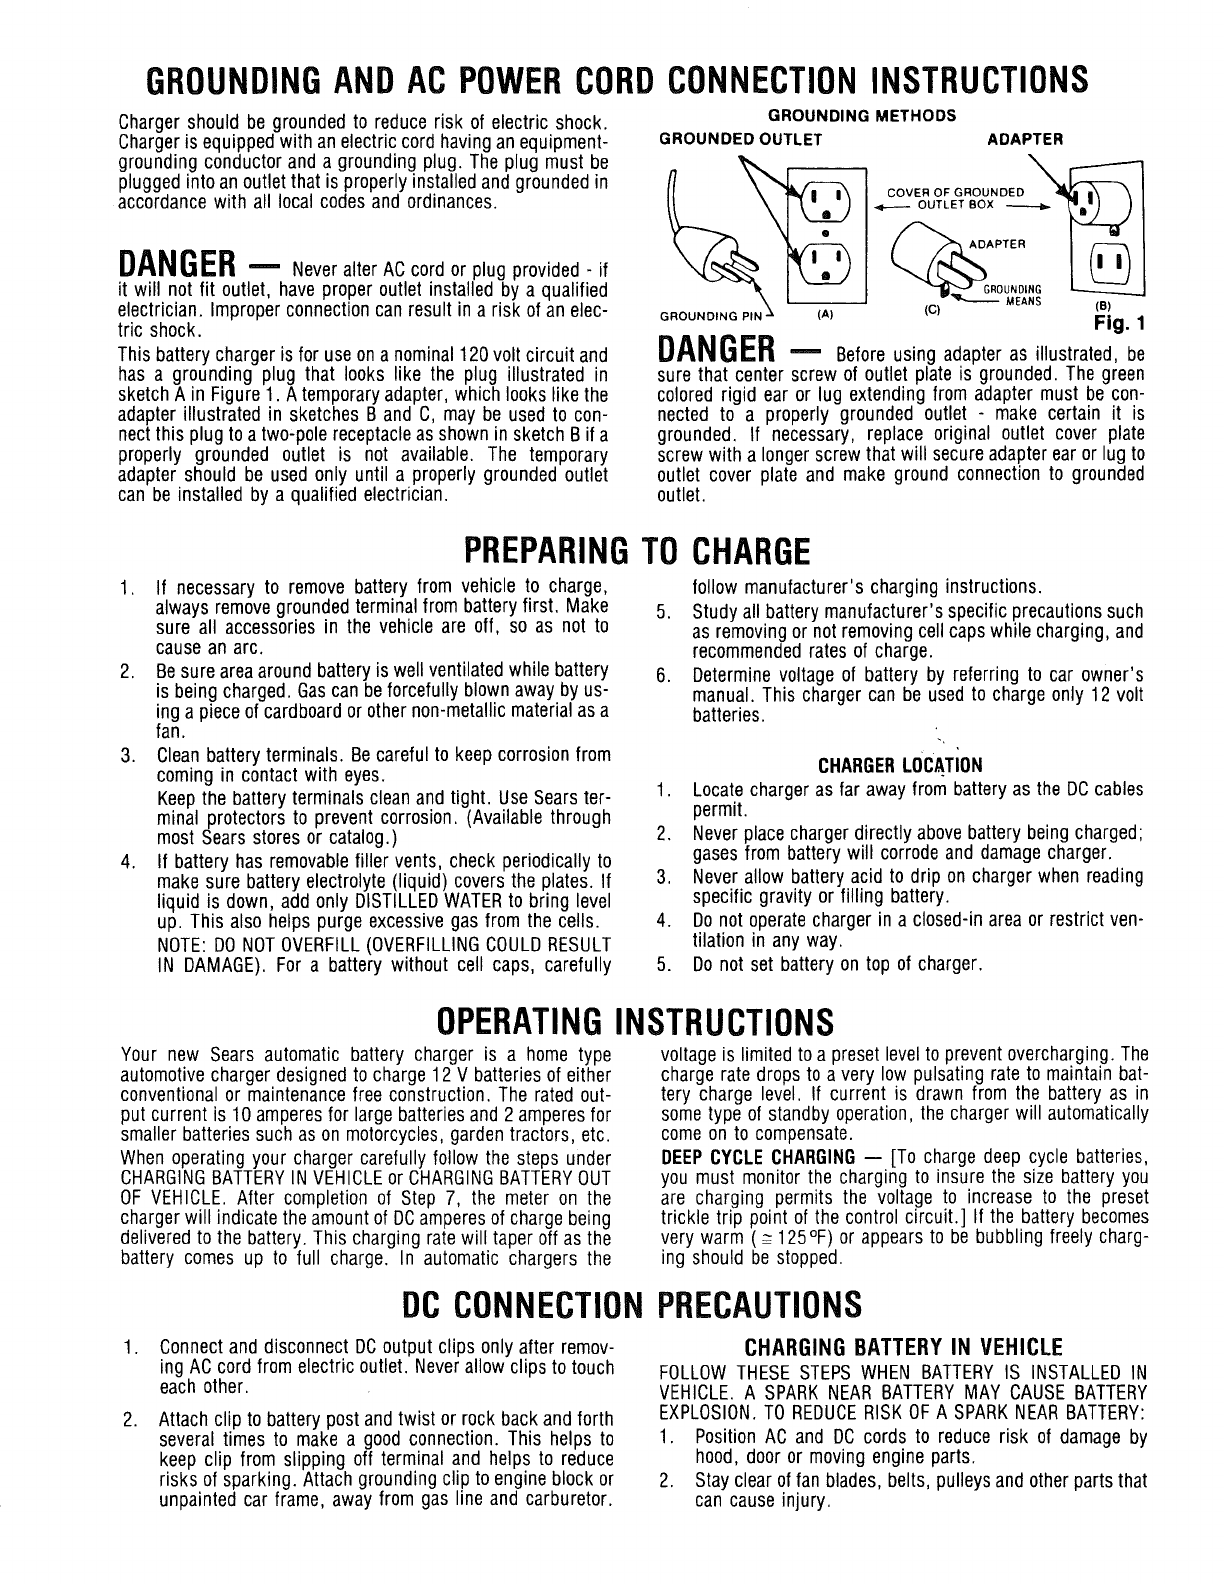
GROUNDINGANDAC POWERCORD
Charger should be grounded to reduce risk of electric shock.
Chargeris equippedwith an electric cord having anequipment-
grounding conductor and a grounding plug. The plug must be
plugged into an outlet that is properly installedand groundedin
accordance with all local codes and ordinances.
DANGER-- Neveralter AC cord or plug provided-if
it will not fit outlet, have proper outlet installed by a qualified
electrician. Improper connectioncan result in a risk of an elec-
tric shock.
This battery charger is for use on a nominal 120volt circuit and
has a grounding plug that looks like the plug illustrated in
sketch A in Figure 1. Atemporary adapter, which looks like the
adapter illustratedin sketches B and C, may be used to con-
nectthis plug to a two-pole receptacleas shown in sketch B if a
properly grounded outlet is not available. The temporary
adapter should be used only until a properly grounded outlet
can be installed by a qualified electrician.
CONNECTIONINSTRUCTIONS
GROUNDING METHODS
GROUNDED OUTLET ADAPTER
COVER OF GROUNDED _
OUTLET BOX
DAPTER
"-'_--"_ GROUNDING
MEANS
(c) (B)
Fig. 1
DANGER-- Before using adapter as illustrated, be
sure that center screw of outlet plate is grounded. The green
colored rigid ear or lug extending from adapter must be con-
nected to a properly grounded outlet - make certain it is
grounded. If necessary, replace original outlet cover plate
screw with a longerscrew that will secureadapter ear or lug to
outlet cover plate and make ground connection to grounded
outlet.
PREPARINGTO CHARGE
1. If necessary to remove battery from vehicle to charge,
always removegroundedterminal from battery first. Make
sure all accessories in the vehicle are off, so as not to
cause an arc.
2. Besure areaaroundbattery is well ventilated while battery
is being charged. Gascan beforcefully blown away by us-
ing a piece of cardboardor other non-metallicmaterialas a
fan.
3. Clean battery terminals. Be careful to keep corrosion from
coming in contact with eyes.
Keepthe battery terminals clean and tight. Use Searster-
minal protectors to prevent corrosion. (Available through
most Sears stores or catalog.)
4. If battery has removablefiller vents, check periodically to
make sure battery electrolyte (liquid) covers the plates. If
liquid is down, add only DISTILLEDWATERto bring level
up. This also helps purge excessive gas from the cells.
NOTE:DONOTOVERFILL(OVERFILLINGCOULDRESULT
IN DAMAGE). For a battery without cell caps, carefully
follow manufacturer's charging instructions.
5. Study all battery manufacturer's specific precautionssuch
as removingor not removingcell caps while charging, and
recommendedrates of charge.
6. Determine voltage of battery by referring to car owner's
manual. This charger can be used to charge only 12 volt
batteries.
CHARGERLOCATION
1. Locate charger as far away from battery as the DCcables
permit.
2. Never place charger directly above battery being charged;
gases from battery will corrode and damagecharger.
3. Never allow battery acid to drip on charger when reading
specific gravity or filling battery.
4. Do not operate charger in a closed-in area or restrict ven-
tilation in any way.
5. Do not set battery on top of charger.
OPERATINGINSTRUCTIONS
Your new Sears automatic battery charger is a home type
automotivecharger designed to charge 12 V batteries of either
conventional or maintenancefree construction. The rated out-
put current is 10 amperesfor large batteries and 2 amperesfor
smaller batteries such as on motorcycles, gardentractors, etc.
When operating your charger carefully follow the steps under
CHARGINGBATTERYIN VEHICLEor CHARGINGBATTERYOUT
OF VEHICLE. After completion of Step 7, the meter on the
charger will indicate the amountof DCamperesof charge being
delivered to the battery. This charging rate will taper off as the
battery comes up to full charge. In automatic chargers the
voltage is limited to a preset levelto prevent overcharging. The
charge rate drops to a very low pulsating rate to maintain bat-
tery charge level. If current is drawn from the battery as in
some type of standby operation, the charger will automatically
come on to compensate.
DEEPCYCLECHARGING-- [To charge deep cycle batteries,
you must monitor the charging to insure the size battery you
are charging permits the voltage to increase to the preset
trickle trip point of the control circuit.] If the battery becomes
very warm (_ 125°F) or appears to be bubbling freely charg-
ing should be stopped.
DC CONNECTIONPRECAUTIONS
.
.
Connectand disconnect DCoutput clips only after remov-
ing AC cord from electric outlet. Neverallow clips to touch
each other.
Attach clip to battery post and twist or rock back and forth
several times to make a good connection. This helps to
keep clip from slipping off terminal and helps to reduce
risks of sparking. Attach grounding clip to engine block or
unpainted car frame, away from gas line and carburetor.
CHARGINGBATTERYIN VEHICLE
FOLLOWTHESE STEPSWHEN BATTERYIS INSTALLEDIN
VEHICLE. A SPARK NEAR BATTERYMAY CAUSEBATTERY
EXPLOSION.TO REDUCERISKOF A SPARKNEARBATTERY:
1. Position AC and DC cords to reduce risk of damage by
hood, door or moving engine parts.
2. Stay clear of fan blades, belts, pulleysand other parts that
can cause injury.

k ¸
3. Check polarity of battery posts. POSITIVE(POS, P, +)
battery post usually has a larger diameterthan NEGATIVE
(NEG, N, -) post.
4. Determinewhich post of battery is grounded (connected)
to the chassis, tf negative post is grounded to chassis (as
in most vehicles), see item 5. If positive post is grounded
to chassis, see item 6.
5. For common negative-grounded vehicle, connect POS!-
TIVE(RED)clip from battery charger to POSITIVE(POS,P,
+) ungrounded post of battery. Connect NEGATIVE
(BLACK) clip to vehicle chassisor engineblock awayfrom
battery. Do not connect clip to carburetor, fuel lines, or
sheet-metal body parts. Connect to a heavy gage metal
part of the frame or engine block.
6. For positive-groundedvehicle, connect NEGATIVE(BLACK)
clip from battery charger to NEGATIVE(NEG, N, -) un-
grounded post of battery. Connect POSITIVE(RED)clip to
vehicle chassis or engine block away from battery. Do not
connect clip to carburetor, fuel lines, or sheet-metalbody
parts. Connectto a heavygage metal part of the frame or
engine block. Set control to 10 amp or 2 amp.
7. ONLY - After completing steps 1 through 6, plug the
power cord of the charger into grounded 120 volts, 60 Hz
outlet.
PROPERDISCONNECTPROCEDURE
1. ALWAYS unplug the charger power cord before doing
anything else.
2. Then disconnect the grounded clamp from the engine
block or framework.
3. Finally, disconnect the remaining clamp from the battery
terminal.
CHARGINGBATTERYOUT OF VEHICLE
FOLLOWTHESESTEPSWHEN BATTERYIS OUTSIDEVEHI-
CLE. A SPARK NEARTHE BATTERYMAY CAUSE BATTERY
EXPLOSION.TO REDUCERISKOFA SPARKNEARBATTERY:
1. Check polarity of battery posts. POSITIVE(POS, P, +)
battery post usually has a larger diameter than NEGATIVE
(NEG, N, -) post.
2. Attach at least a 24-inch-long 6-gauge (AWG) insulated
battery cable to NEGATIVE(NEG, N, -) battery post.
(This can bea standardautomobilebattery cable available
through your Sears Auto Centeror other auto parts store.)
3. Connect POSITIVE(RED)charger clip to POSITIVE:(POS,
P, +) post of battery.
4. Positionyourself and free end of cable as far awayfrom the
battery as possible - then connect NEGATIVE(BLACK)
charger clip to free end of cable.
5. Do not face battery when making final connection. Set
control to desired current 10 or 2 amp.
6. ONLY- After completing steps 1 through 5, insert power
cord to a grounded outlet of 120 volts, 60 Hz.
7. A marine (boat) battery must be removedand charged on
shore. To charge it on boardrequires equipment specially
designed for marine use.
PROPERDISCONNECTPROCEDURE
1. ALWAYS unplug the charger power cord before doing
anything else.
2. Then disconnect the negative(black) lead from the end of
the 24 inch cable.
3. Finally, disconnect positive (red) lead from battery post.
CHARGEROVERLOADPROTECTION
Your Sears battery charger is protected from power overloadby
two automatic heat sensing switches. One is in the DCoutput
circuit (item 7 on your parts list), the other is built on the
transformer. The first will operatewhen a short circuit, reverse
connections, or too long engine cranking overloads the
charger. The protector will openwith a click sound and reclose
in a few seconds. The second protector will operate when a
prolongedoverloaddueto a defectivebattery or other excessive
loadcauses the transformer to overheat. It is a onetime device
and once it functions the transformer must be replaced.
TIME REQUIREDTO CHARGE
1. A battery is fully charged when:
a. A hydrometer readingof the electrolyte liquid reaches
1.250 or above(all cells should haveapproximatelythe
same reading).
b. The charger rate drops to a very low pulsating rate to
maintain battery charge level. (3-5) hours for most 12
volt batteriesor (5-8) hoursfor smaller 12 volt batteries
at 2 amperes.
2. OVERCHARGINGOFBATTERIESSHOULDBEAVOIDEDAS
MUCH AS POSSIBLE. Overcharging causes excessive
gassing, loss of water, and eventual damage to the bat-
tery. Charging should be stopped if battery becomesvery
warm (over about 125 DegreesFahrenheit)or appears to
be bubbling freely.
POSSIBLECHARGINGPROBLEMS
1. Meter needle swings to far right side of meter:
Your new battery charger has been equipped with an
automatic reset circuit breaker. This protects the charger
from temporaryoverloadconditions. A severelydischarged
battery, a battery with shorted cells, or reversed charger
connectionsat the battery will causethis protectivedevice
to operate.
Under these overload conclitions, the circuit breaker will
open, and when cooled down will reset automatically.
This cycling processcan be identified by a clicking sound
made during the opening and closing of the circuit
breaker.
a. Check for reverse polarity connections.
b. If battery is severely discharged, charge meter needle
will start to cycle up and down, and will stabilize after
15 to 20 minutes.
c. Battery may have one or more shorted cells. Cycling
will start immediatelyand continue indefinitely. If cycl-
ing has not stopped as outlined in (b), disconnect
charger (AC power cord first) and have battery tested.
2. No meter reading:
a. Check connections to battery and engine block or car
frame. Be sure polarity is correct (red clip to positive).
"Rock" the clips to bite through any dirt or corrosion.
If in a vehicle, be sure terminals on battery are clean
and tight.
b. Check AC outlet or extension cord connections.
c. Oneor more cells may be shorted. Thermal switch in
charger may cycle (click on and off).
MAINTENANCEAND CLEANING
Very little maintenance is required. As with any appliance or
tool, a few commonsenserules will prolongthe life of your bat-
tery charger.
ALWAYS BE SURECHARGERIS UNPLUGGEDBEFOREDOING
ANY MAINTENANCEOR CLEANING.
1. Store in a clean, dry place.
2. Coil up cords when not in use.
3. Clean caseand cords with a dry or slightly damp cloth.
4. Cleanany corrosion from clips with a solution of water and
baking soda.
5. Examinecords periodically for cracking or other damage.
Have them replaced if necessary.
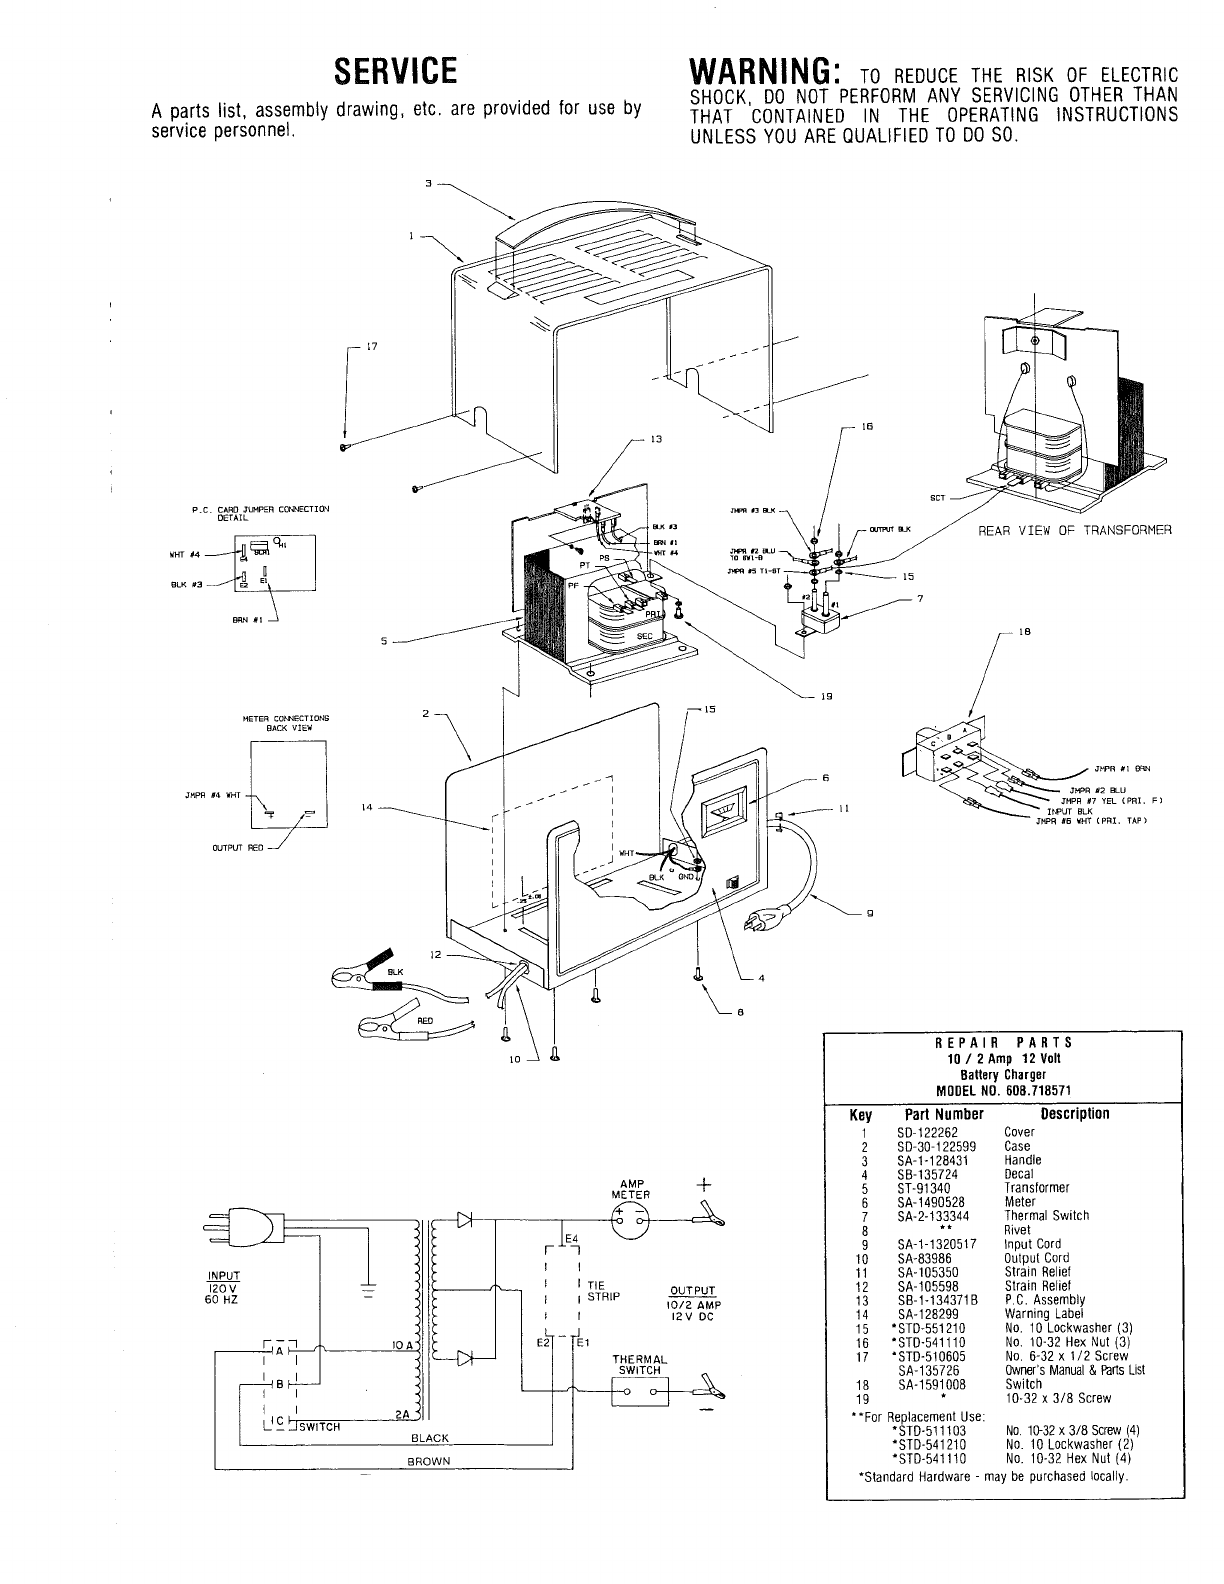
SERVICE
A parts list, assembly drawing, etc. are provided for use by
service personnel.
WARNING:TO REDUCETHE RISK OF ELECTRIC
SHOCK, DO NOT PERFORMANY SERVICINGOTHERTHAN
THAT CONTAINED IN THE OPERATINGINSTRUCTIONS
UNLESSYOU AREQUALIFIEDTO DO SO.
-- I?
le
P.o. CAR(] 3UHPER CONNECTION
OETAIL
WHT #4 _L_ _]10Ht
_#1_
METER CONNECTIONS 2
BACK VIEW \
OUTPUT RED
REAR VIEW OF TRANSFORNER
&
INPUT
120 V
60 HZ
I LIC_Ij SWITCH
i
AMP -F
METER
I0_
2A
BL
BROWN
REPAIR PARTS
10/2Amp 12 Volt
Battery Charger
MODELNO. 608.718571
Key Part Number Description
1 SD-t22262 Cover
2 SD-30-122599 Case
3 SA-I-128431 Handle
4 SB-135724 Decal
5 ST-91340 Transformer
6 SA-1490528 Meter
7 SA-2-!33344 Thermal Switch
8 ** Rivet
9 SA-l-1320517 Input Cord
10 SA-83986 Output Cord
11 SA-t05350 Strain Relief
12 SA-105598 Strain Relief
13 SB-1-134371B P,C. Assembly
14 SA-128299 Warning Label
15 *STD-551210 No. 10 Lockwasher (3)
16 *STD-541110 No. 10-32 Hex Nut (3)
17 *STD-510605 No. 6-32 x 1/2 Screw
SA-135726 Owner'sManual& PartsList
18 SA-1591008 Switch
19 * 10-32 x 3/8 Screw
**For Replacement Use:
*STD-511103 No.10-32x 3/8 Screw(4)
*STD-541210 No. 10 Lockwasher (2)
*STD-541110 No. 10-32 Hex Nut (4)
*Standard Hardware - may be purchased locally.
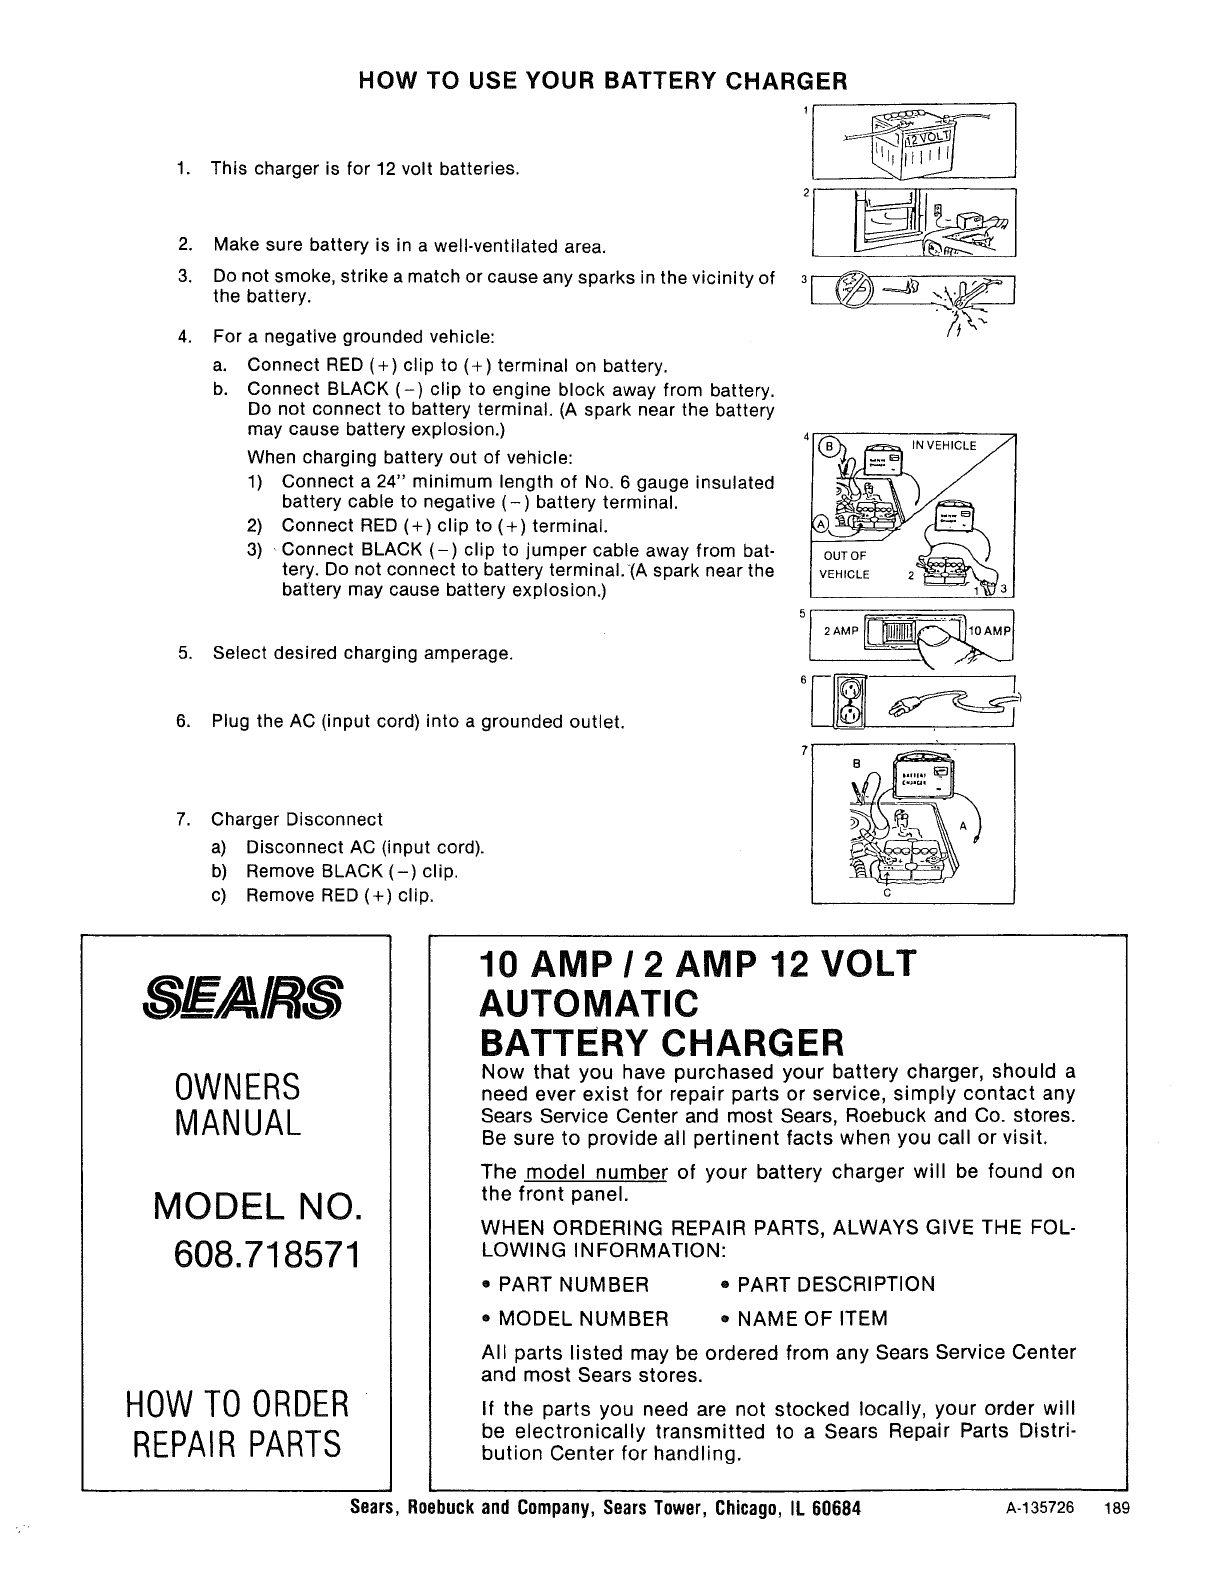
HOW TO USE YOUR BATTERY CHARGER
1. This charger is for 12 volt batteries.
2.
3.
Make sure battery is in a well-ventilated area.
Do not smoke, strike a match or cause any sparks in the vicinity of
the battery.
4. For a negative grounded vehicle:
a,
b.
Connect RED (+) clip to (+) terminal on battery.
Connect BLACK (-) clip to engine block away from battery.
Do not connect to battery terminal. (A spark near the battery
may cause battery explosion.)
When charging battery out of vehicle:
1) Connect a 24" minimum length of No. 6 gauge insulated
battery cable to negative (-) battery terminal.
2) Connect RED (+) clip to (+) terminal.
3) Connect BLACK (-) clip to jumper cable away from bat-
tery. Do not connect to battery terminal.-(A spark near the
battery may cause battery explosion.)
5. Select desired charging amperage.
6. Plug the AC (input cord) into a grounded outlet.
7, Charger Disconnect
a) Disconnect AC (input cord).
b) Remove BLACK(-) clip.
c) Remove RED (+) clip.
OUTOF
VEHICLE
IN VEHICLE
C
S _AIRS
OWNERS
MANUAL
MODEL NO.
608.718571
HOWTOORDER
REPAIRPARTS
10 AMP /2AMP 12 VOLT
AUTOMATIC
BATTERY CHARGER
Now that you have purchased your battery charger, should a
need ever exist for repair parts or service, simply contact any
Sears Service Center and most Sears, Roebuck and Co. stores.
Be sure to provide all pertinent facts when you call or visit.
The model number of your battery charger will be found on
the front panel.
WHEN ORDERING REPAIR PARTS, ALWAYS GIVE THE FOL-
LOWING INFORMATION:
°PART NUMBER ° PART DESCRIPTION
° MODEL NUMBER " NAME OF ITEM
All parts listed may be ordered from any Sears Service Center
and most Sears stores.
If the parts you need are not stocked locally, your order will
be electronically transmitted to a Sears Repair Parts Distri-
bution Center for handling.
Sears, Roebuckand Company,Sears Tower,Chicago,IL 60684 A-135726 189
