Sears Kenmore 385 1254180 Users Manual
3851254180 3851254180 KENMORE KENMORE SEWING MACHINE - Manuals and Guides L0707102 View the owners manual for your KENMORE KENMORE SEWING MACHINE #3851254180. Home:Laundry & Garment Care Parts:Kenmore Parts:Kenmore KENMORE SEWING MACHINE Manual
KENMORE Mechanical Sewing Manual L0707102 KENMORE Mechanical Sewing Owner's Manual, KENMORE Mechanical Sewing installation guides
385. 1264180 to the manual 992c1db2-dab7-4996-a928-d686e3798067
2015-02-05
: Sears Sears-Kenmore-385-1254180-Users-Manual-399449 sears-kenmore-385-1254180-users-manual-399449 sears pdf
Open the PDF directly: View PDF ![]() .
.
Page Count: 56

OWNER'_ MANUAL
MODELS 385. 1274180
385. 1264180
Or
385. 1254180
SEARS. ROEBUCK AND CO.
Dear Customer;
You have just {nvested m a very fine zigzag sewing machine. Before using your new Kenmore machine,
please pause for a moment and carefully read this booklet which contains instructions on how to operate
and care for your machine.
Specific instructions are g_ven on threading, tension adiustments, cleamng, oiling, etc. This will help you
obtain the best sewing results and avoid unnecessary service expense for conditions beyond our control.
Advice on the operation and care of your machine is always available at your nearest Sears Retail Store.
Please remember, if you have questions about your machine or need parts and servlce_ always mention
the model number and seria_ number when you inquire.
Kenmore Sewing Machine
Record in space provEded below the model number and serial
number of th_s appliance, The model number and sofia! number
are located on the nomenclature plate_ as _dentified on Page 3 of
this booklet.
Model No. 385. Serial No.
Retain these numbers for future reference.
THIS MODEL IS A CENTER NEEDLE, LOW BAR SEWING MACHINE.
TABLEOFCONTENTS
SECTION 1.
SECTION 2.
SECTION 3.
t<NOW YOUR MACHINE
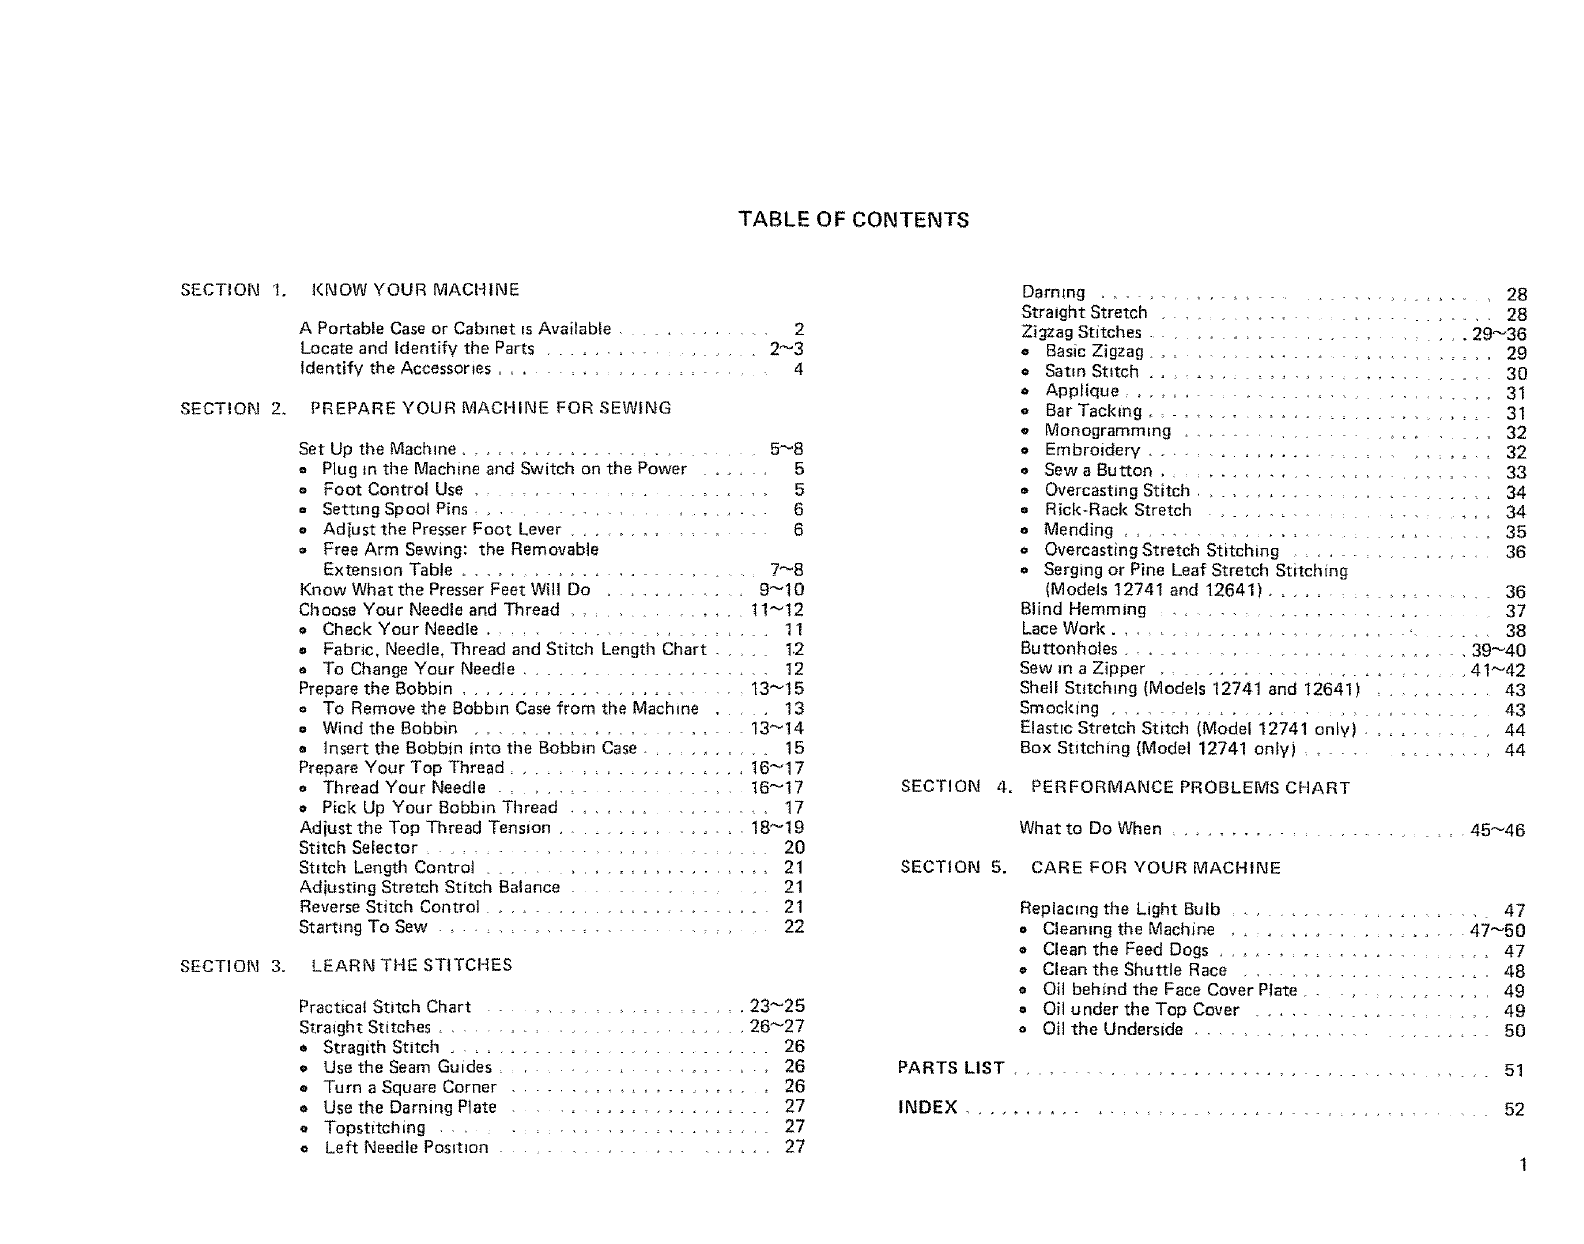
A Portable Case or Cabinet is Available .......... 2
Locate and Identify the Parts .............. 2_3
Identify the Accessories ................. 4
PREPARE YOUR MACHINE FOR SEWING
Set Up the Machtne ................... 5_8
o Plug in the Machine and Switch on the Power ..... 5
o Foot Control Use ................... 5
a Setting Spool Pins ........................... 6
oAdiust the Presser Foot Lever .......... 6
o Free Arm Sewing: the Removable
Extens}on Table ..................... 7_8
Know What the Presser Feet Will Do .......... 9_10
Choose Your Needle and Thread .............. 1!_12
• Check Your Needle .................... 11
s Fabric, Needle, Thread and Stitch Length Chart 12
• To Change Your Needle ................ 12
Prepare the Bobbin .................... t3_15
a To Remove the Bobbin Case from the Machine .... 13
o Wind the Bobbin .................... 13_14
. tnsert the Bobbin into the Bobbin Case ........... 15
Prepare Your Top Thread .................. 16_17
o Thread Your Needle ................... 16_17
oPick Up Your Bobbin Thread ............... 17
Adiust the Top Thread Tension .............. 18_19
Stitch Selector .................... 20
Stitch Length Controt ...................... 21
Adiusting Stretch Stitch Balance ................ 21
Reverse Stitch Control ....................... 21
Starting To Sew ....................... 22
LEARN THE STITCHES
Practical Stitch Chart ................... 23_25
Straight Stitches .................... 26_27
• Stragith Stitch .......... 26
o Use the Seam Guides ....................... 26
Turn a Square Corner ................... 26
o Use the Darning Plate .................. 27
a Topstitching ......................... 27
o Left Needle Posltlon ...................... 27
Darnmg ........................... 28
Straight Stretch .......................... 28
Zigzag Stitches .................... 29_36
o Basic Zigzag ........................ 29
e Satin Stitch ......................... 30
e Applique .......................... 31
e Bar Tacking ........................ 31
Monogramming ................... 32
o Embroidery .......................... 32
e Sew a Button ......................... 33
• Overcasting Stitch ...................... 34
o Rick-Rack Stretch ...................... 34
oMending ........................... 35
o Overcasting Stretch Stitching ................ 36
o Serging or Pine Leaf Stretch Stitching
(Mode_s 12741 and 12641) .................. 36
Blind Hemming .................... 37
Lace Work ....................... ,...... 38
Buttonholes .......................... 39_40
Sew in a Zipper ...................... 41_42
Shell Stitching (Models 12741 and 12641) .......... 43
Smocking ....................... 43
Elastic Stretch Stitch (Model 12741 only) ........... 44
Box Stitching (Model 12741 only) ............ 44
SECTION 4. PERFORMANCE PROBLEMS CHART
What to Do When ....................... 45_46
SECTION 5. CARE FOR YOUR MACHINE
Replacing the Light Bulb ................. 47
oCleaning the Machine ................ 47_50
o Clean the Feed Dogs ...................... 47
o Clean the Shuttle Race ................... 48
o Oil behind the Face Cover Plate ............. 49
o Oil under the Top Cover ................. 49
o Oil the Underside ..................... 50
PARTS LIST ............................... 51
INDEX ...................................... 52
A:Portable Case OtCabinet is Avaiiasie :
A full line of sewing cabinets is available at your
nearest Sears retail store or through our general
catalog.
Another option , , _ buy aCarrying Case , , , then
your Kenmore goes anywhere, can be stored any-
where.
--__"-_ ;__
2
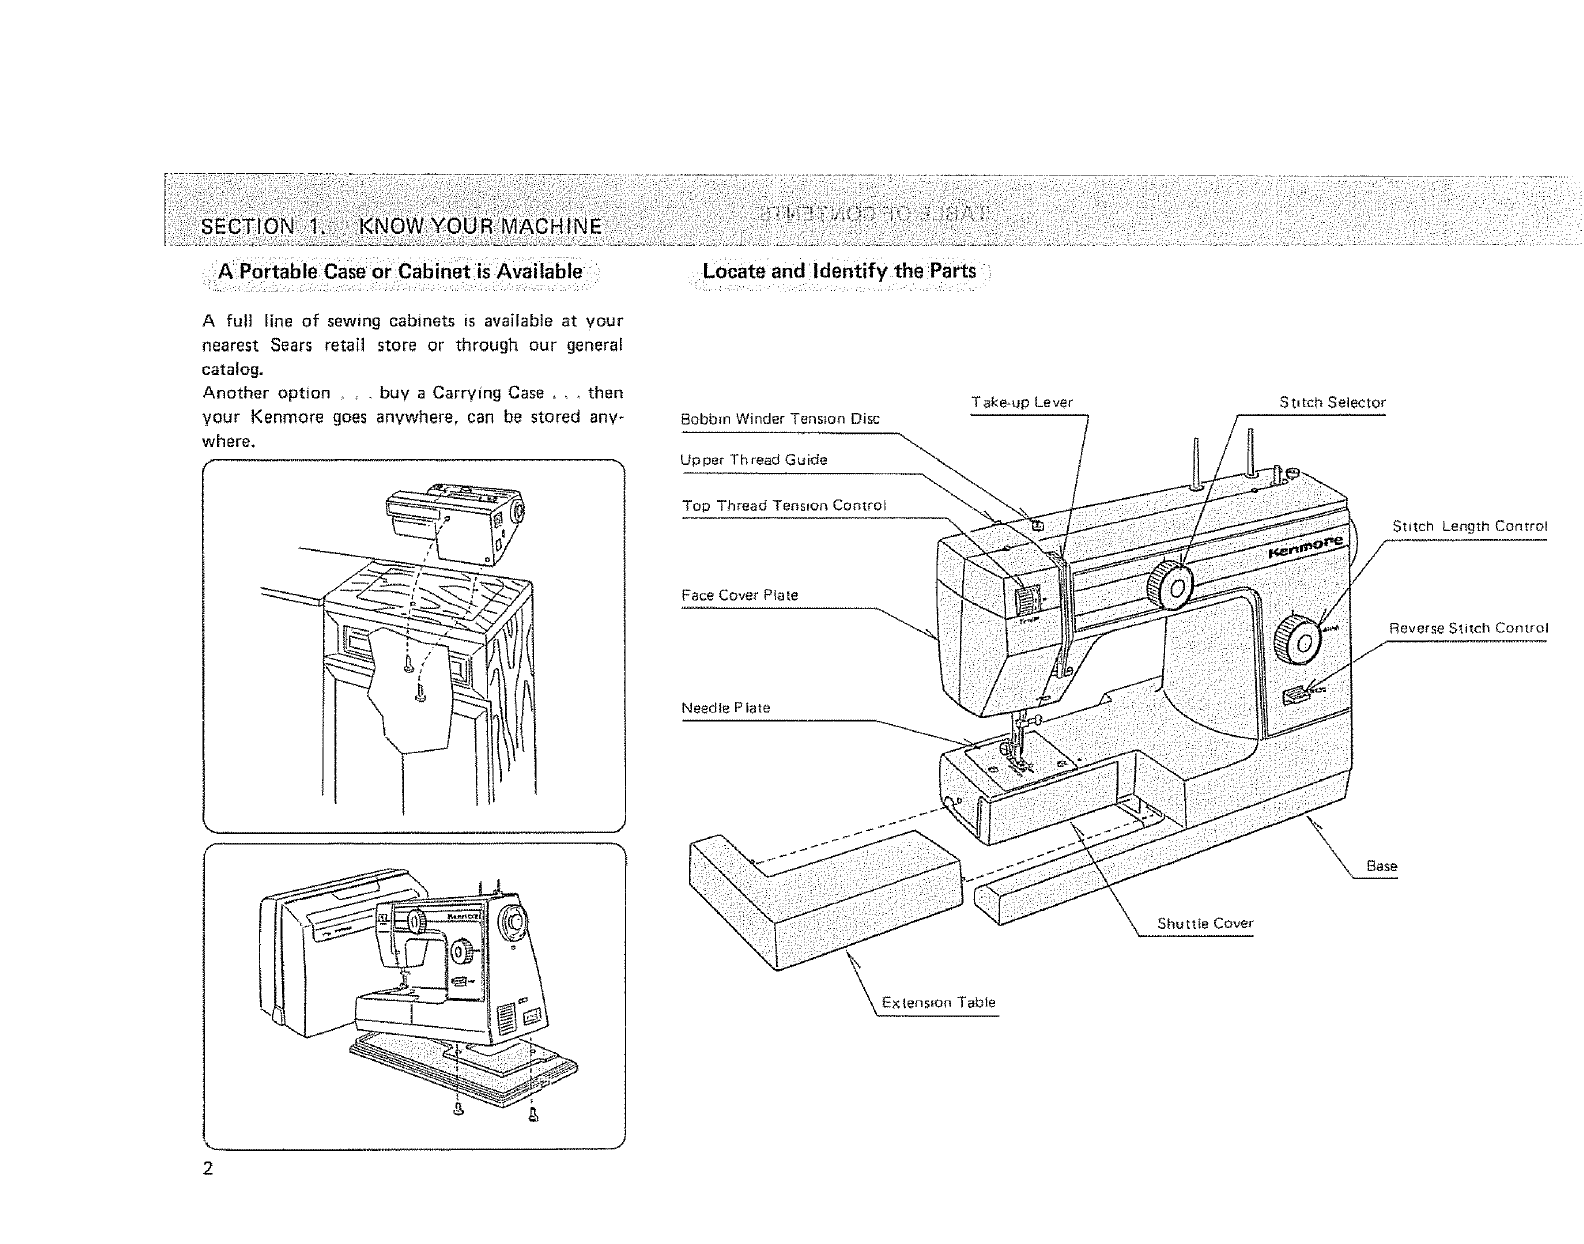
LoCate and identify the Parts
Bobbin Winder Tension Disc
Upper Thread Guide ,..
Top Thread Tension Control
Face Cover Pla_.e
Needle Piate
Take-up Lever
ShuttSe Cover
Stitch Selector
Stitch Length Control
Reverse Stitch Control
ClutchKnob
Hand W heel
L_gllt and
Power Sw_tet_
Ptug Conneclor
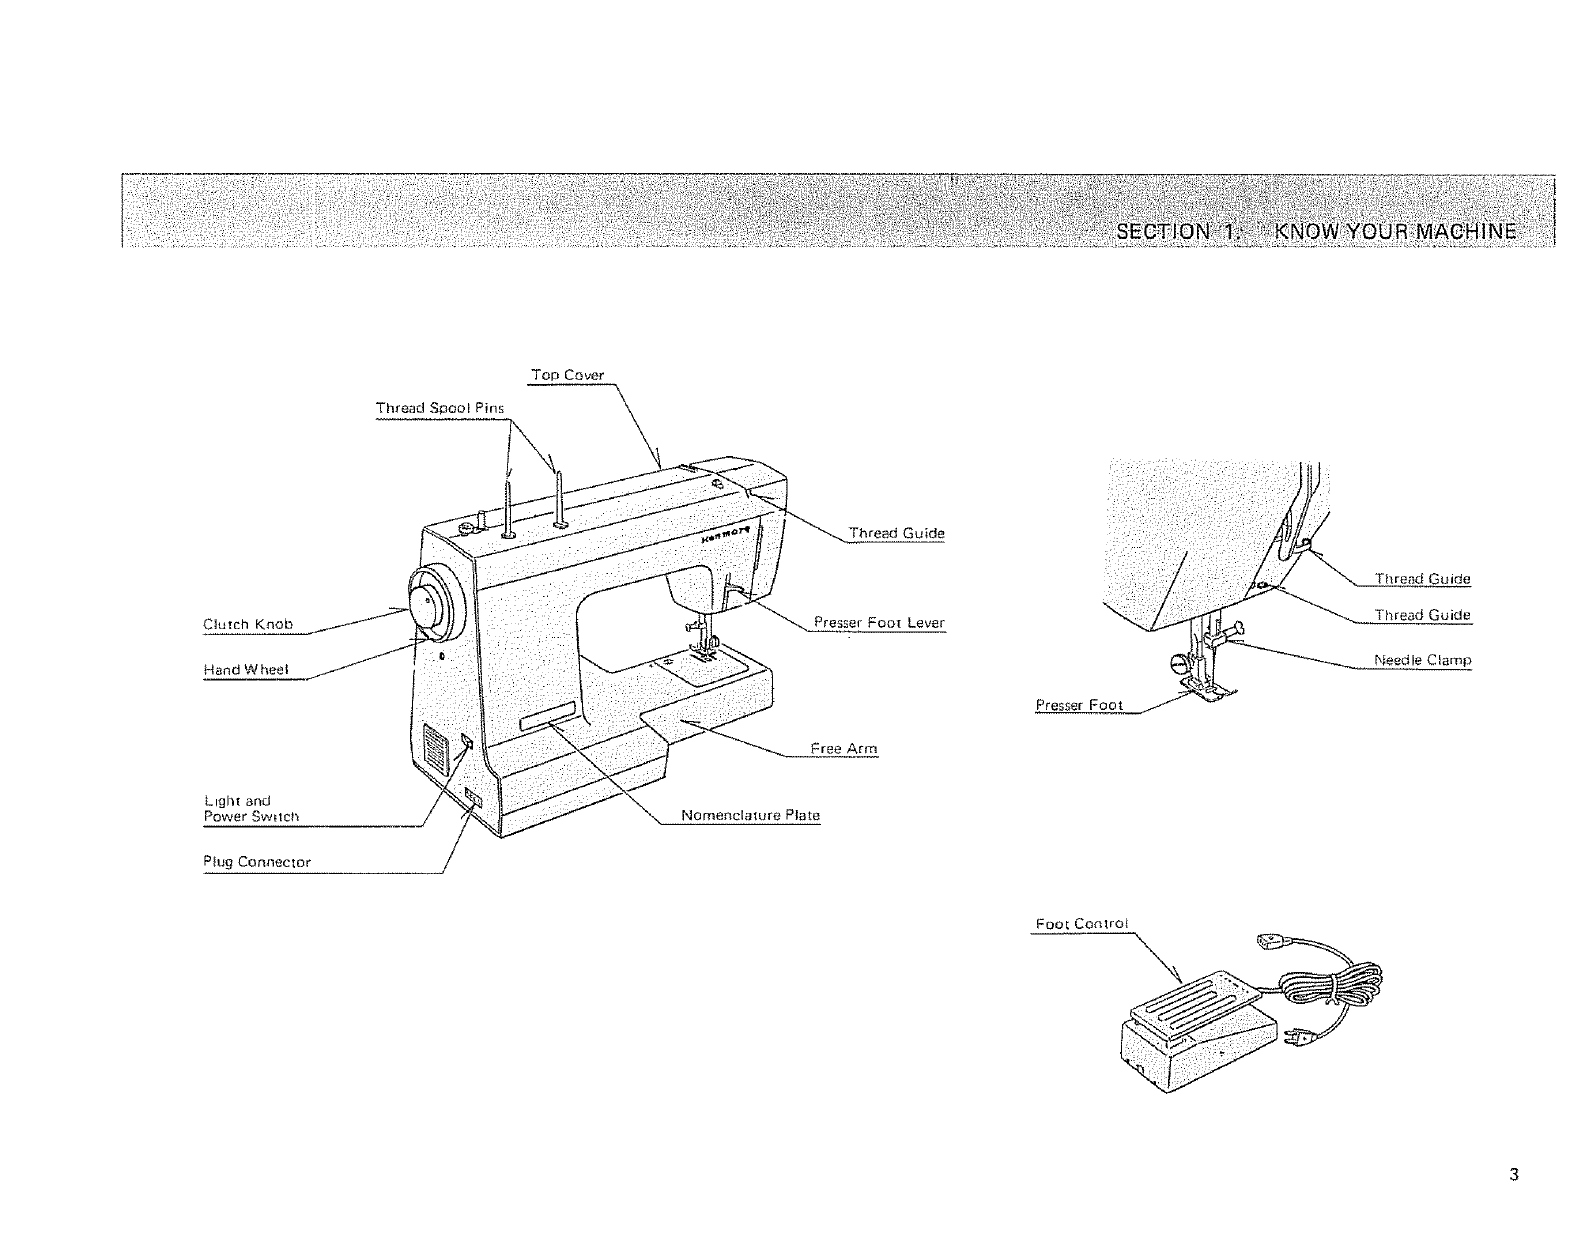
Thread Spool Pins
Top Cover \
Nomenclature Plate
Thread Guide
Presser Fool Lever
Free Arm
Presser Foot
Foot Con_ro_
Thread Guide
Thread Guide
Needle Clamp
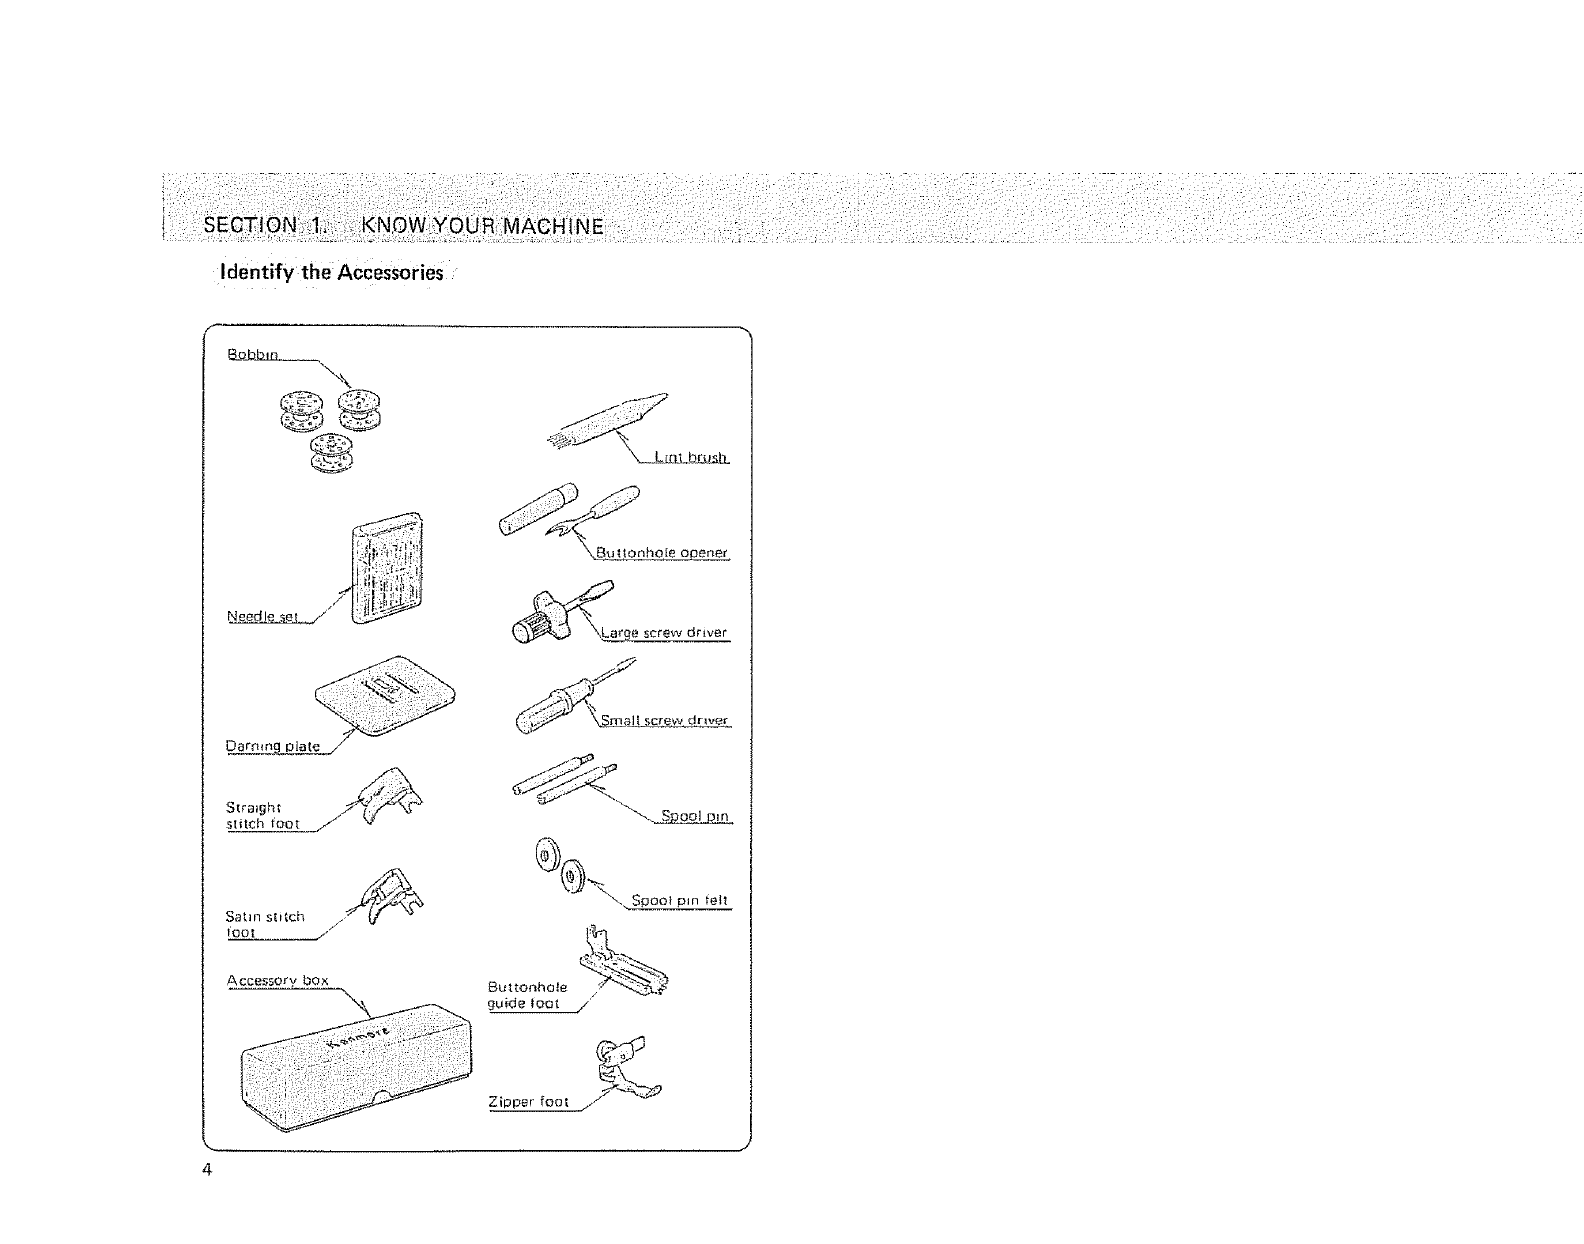
Identify the AcCeSsories
_Bu tonho[e opener
__LLarge screw driver
4
Slrmgh_
stitch Hoot
\. Spool pm tell
Buttonhole {_
%_
Zipper fool /1
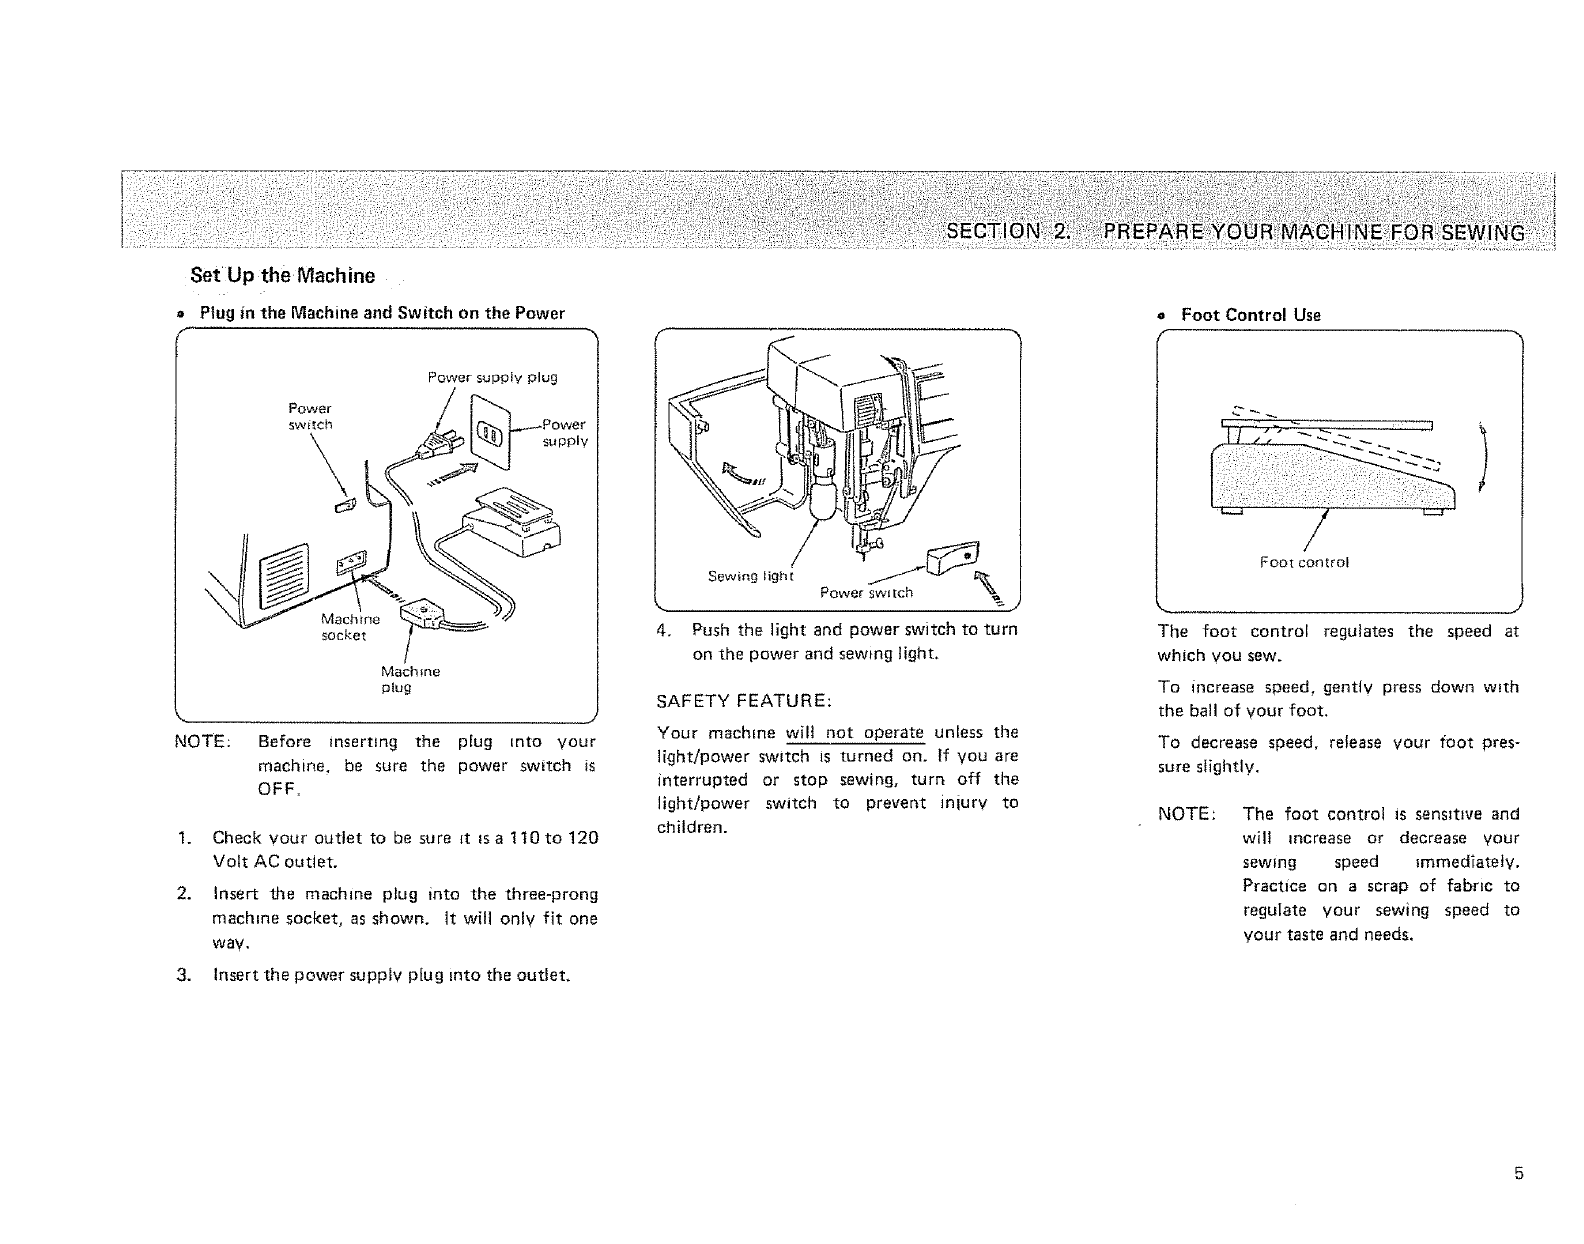
Set Up the Machine
=Plug in the Machine and Switch on the Power
f-
swRch
\
Power supply plug
supply
Machine
socket
Machfne
plug
NOTE: Before insarUng the plug into your
machine, be sure the power switch is
OFF,
I. Check your outlet to be sure st Is a 110 to 120
Volt AC outlet.
2. Insert the machine plug into the three-prong
machine socket, as shown, it will only fit one
way.
3. Insert the power supply plug into the outlet.
4. Push the light and power switch to turn
on the power and sewing light,
SAFETY FEATURE:
Your machine wil! not operate unless the
light/power switch is turned on. If you are
interrupted or stop sewing, turn off the
light/power switch to prevent injury to
children.
o Foot Control Use
,
Foot control
The foot control regulates the speed at
which you sew.
To increase speed, gendv press down with
the ball of your foot.
To decrease speed, release your foot pres-
sure slightly.
NOTE: The foot control is sensitive and
will increase or decrease your
sewing speed _mmed[atety.
Practice on a scrap of fabric to
regulate your sewing speed to
your taste and needs.

set Upthe Macine (Continued)
Setting Spool Pins
Spool pin
Spool Pins are packed _n accessory box.
Screw thread spool pins in place securely
with ascrew driver.
Position spool pin felts as shown _n illustra-
tion.
For winding the bobbin while your machine
is threaded, you can use an extra spool pm
without unthreading the macine.
Adjust the Presser Foot Lever
The Presser Foot Lever raises and lowers
your presser foot.
You can raise Lt about 1/4" higher for easy
removal of the presser foot or to help you
place heavy fabrics under the presser foot,
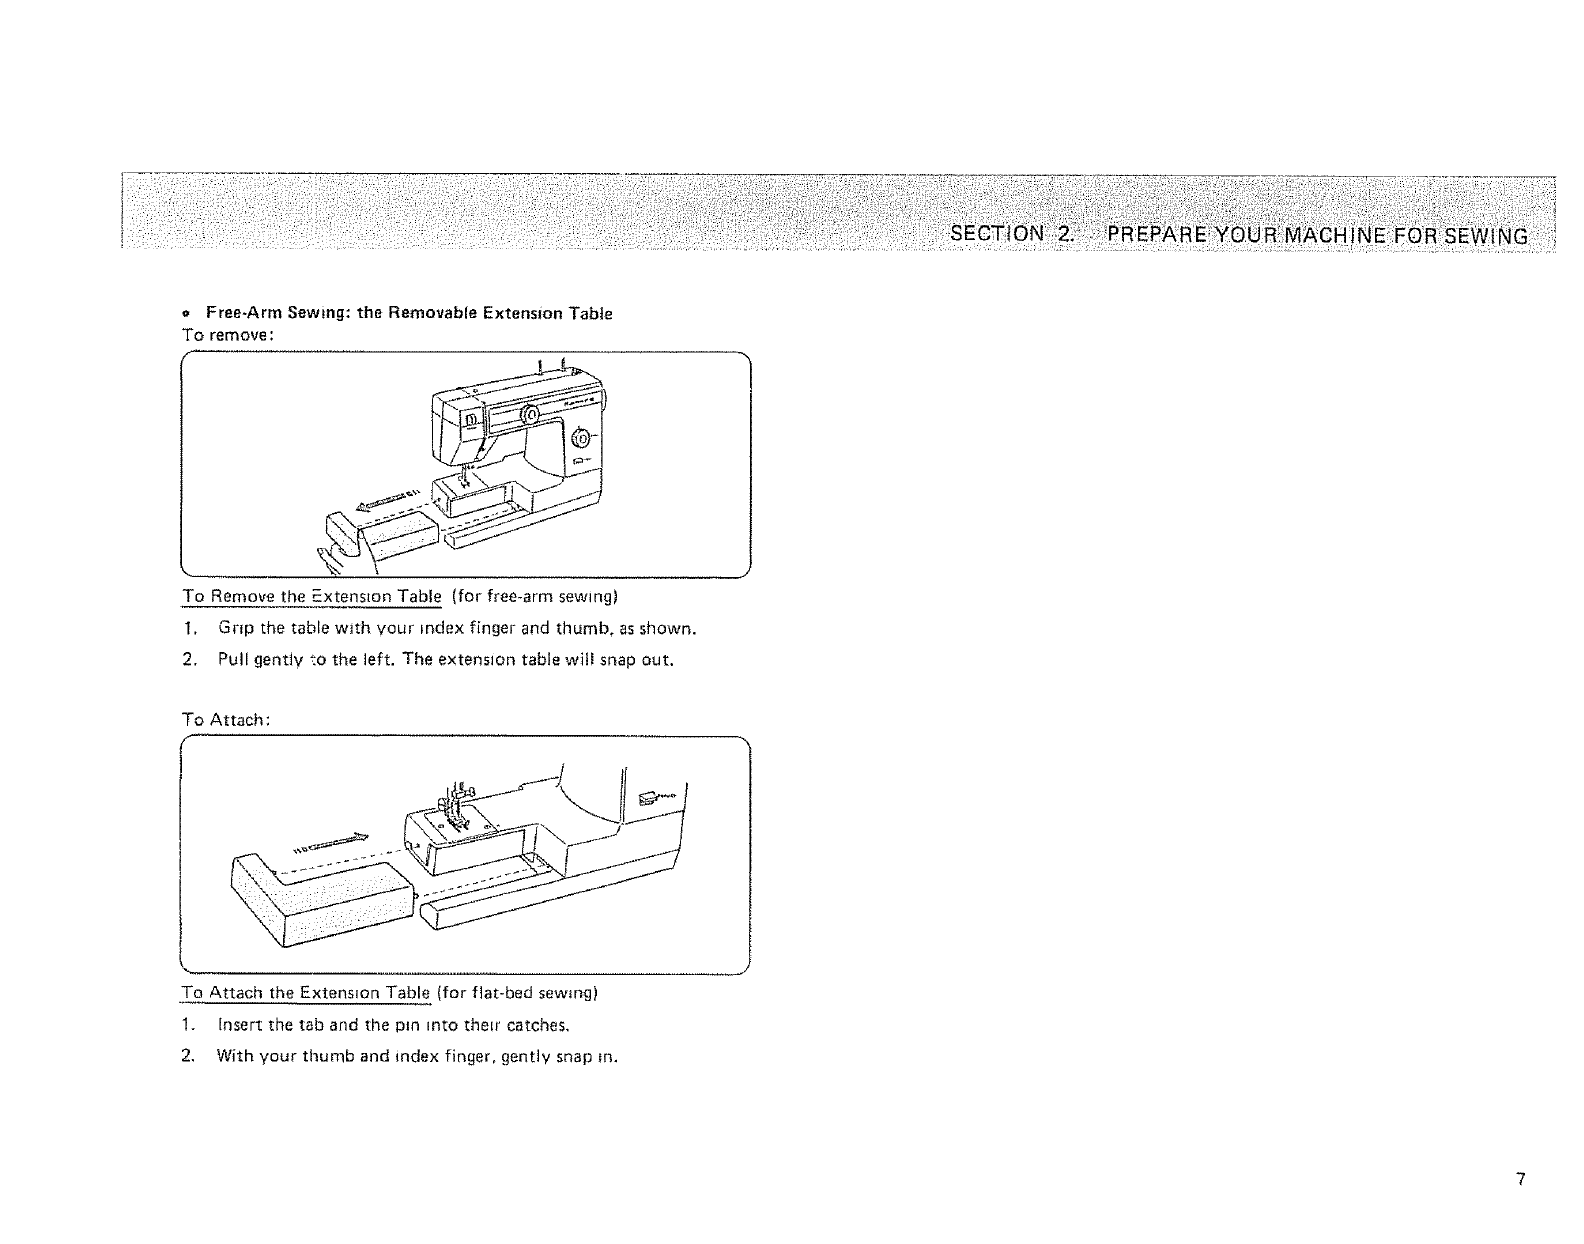
•Free-Arm Sewing: the Removable Extension Table
To remove :
To Remove the Extension Table (for free-arm sewing)
1. Grzp the table with your index finger and thumb, as shown.
2, Pull gent_y to the left. The extension table wilt snap out,
To Attach:
To Attach the Extension Table (for fiat-bed sewing)
1. Insert the tab and the pm into their catches,
2, With your thumb and index finger, gently snap m.

:setl Up the MaChine (Continued}: ....
=Free-Arm Sewing (Continued)
Your sewing machine can do free arm sewing.
This feature makes sewing easy for:
bar tacking to reinforce pockets. * stitching sleeves, waistbands, pant
belt toops and waistline on ready- legs, or any circutar garment area.
made or homemade garments to
avoid fabric bunching around the
needle.
* darning socks or mending knees,
elbows, or areas of wear in child-
ren's clothes.
* sewing buttons on sleeves, wrest-
bands, etc.
ThePresserfeetarean_mportantfeatureofth_smachine.Youneedtoknowwhateachfootdoesinordertouse them effectivefv.
a Change the Presser Foot
Use the correct presser foot for tile st=tch
you w_sh to sew. Consult the practical
Stitch Chart on pages 23 _ 25 and the
detailed directions for sewing with the
various presser feet.
To change the various presser feet, raise the
presser bar to its highest pos_tton by lifting
the presser foot lever. Loosen the presser
foot thumb screw, choose the proper foot,
insert from the bottom. Tighten the screw
using the large screw drover to make certain
the foot is secure.
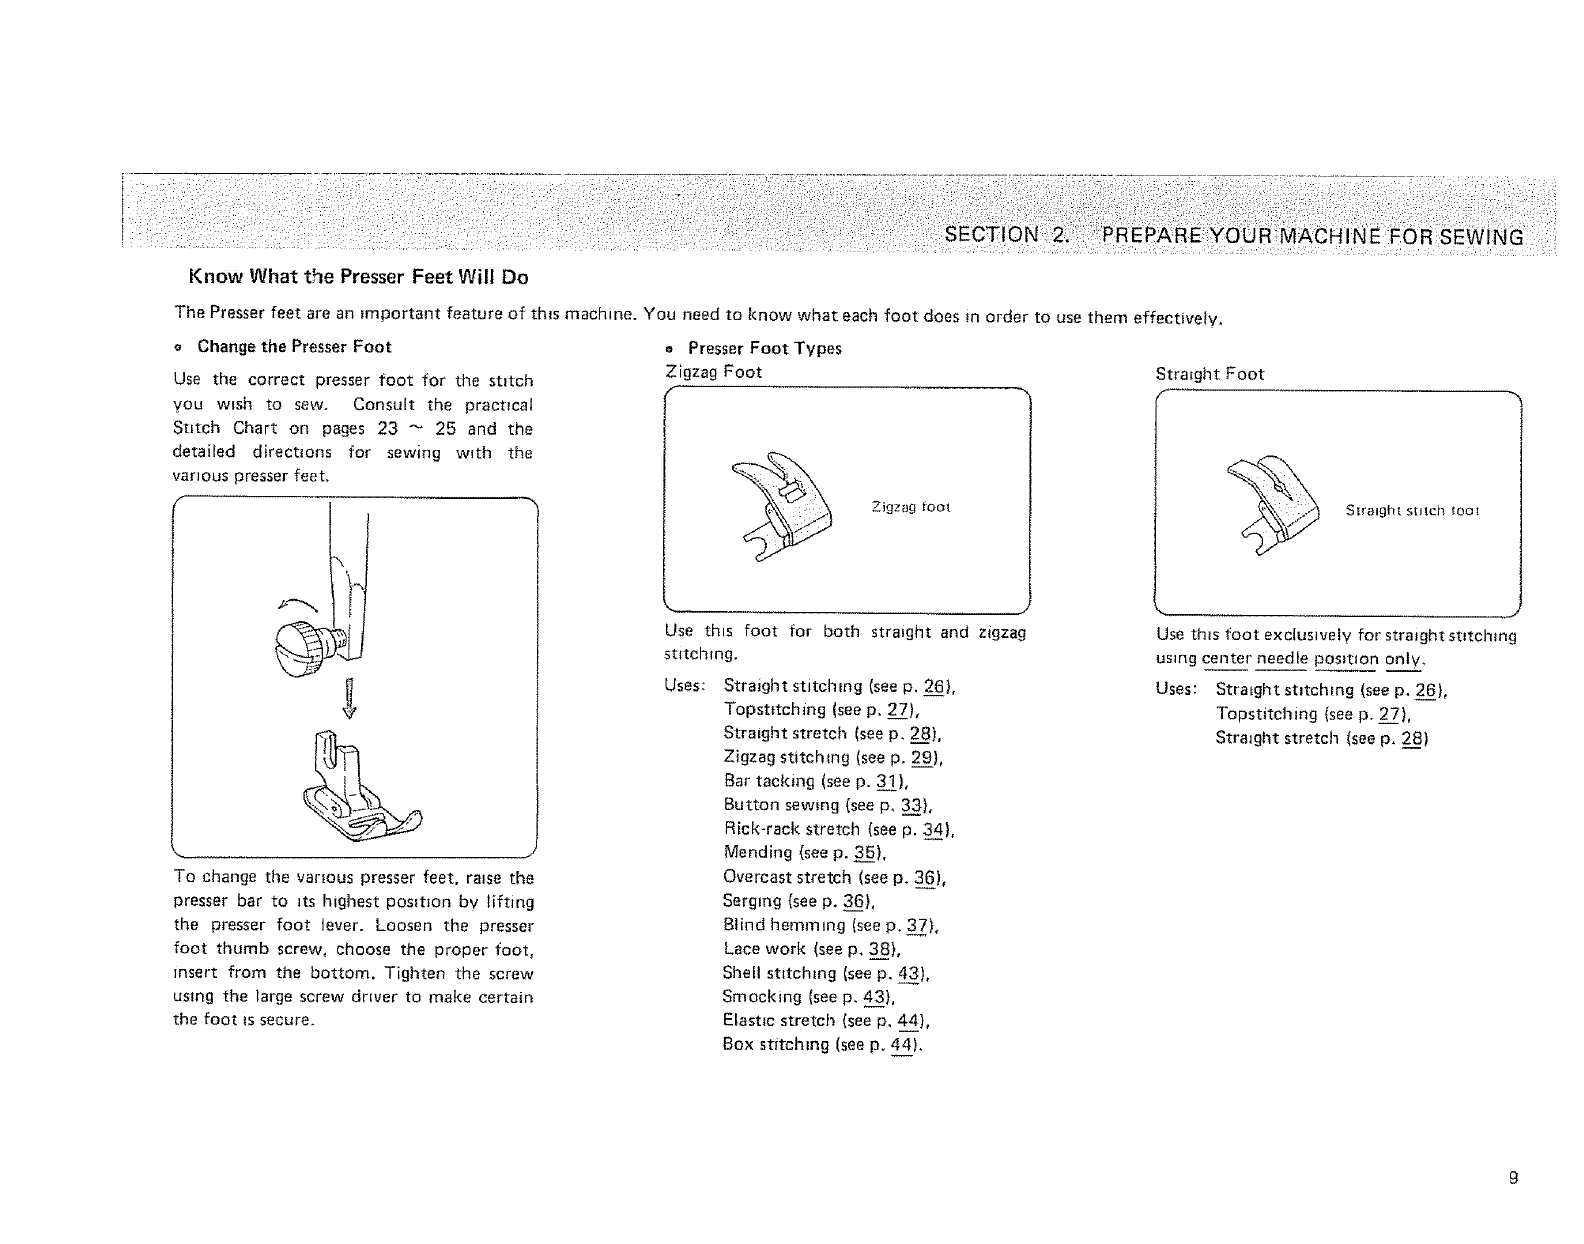
oPresser Foot Types
Zigzag Foot Strmght Foot
Zigzag toot
Use this foot for both straight and zigzag
stitching.
Uses: Straight stitchtng {see p. 26},
Topst_tchmg (see p. 27_),
Straight stretch (see p, 2__8),
Zigzag stitching (see p. 29),
Bar tacking (see p. 31),
Button sewing (see p. 333),
Rick-rack stretch (see p. 344),
Mending {see p. 35},
Overcast stretch (see p. 366),
Serglng {see p. 366).
Blind hemming (see p. 377)o
Lace work (see p, 38},
Shell stitching (see p, 43),
Smocking (see p. 43),
Elastm stretch (see p. 4_44),
Box stitching (see p. 444).
Stralgh[ s[J[ch tool
Use this foot exclusively for straight stitching
using center needle position only.
Uses: Straight stitching (see p. 266),
Topstitching (see p. 27),
Straight stretch (see p. 28)
Know What the Presser Feet Will:Do (Continued)
oPresser Foot Types (Continued)
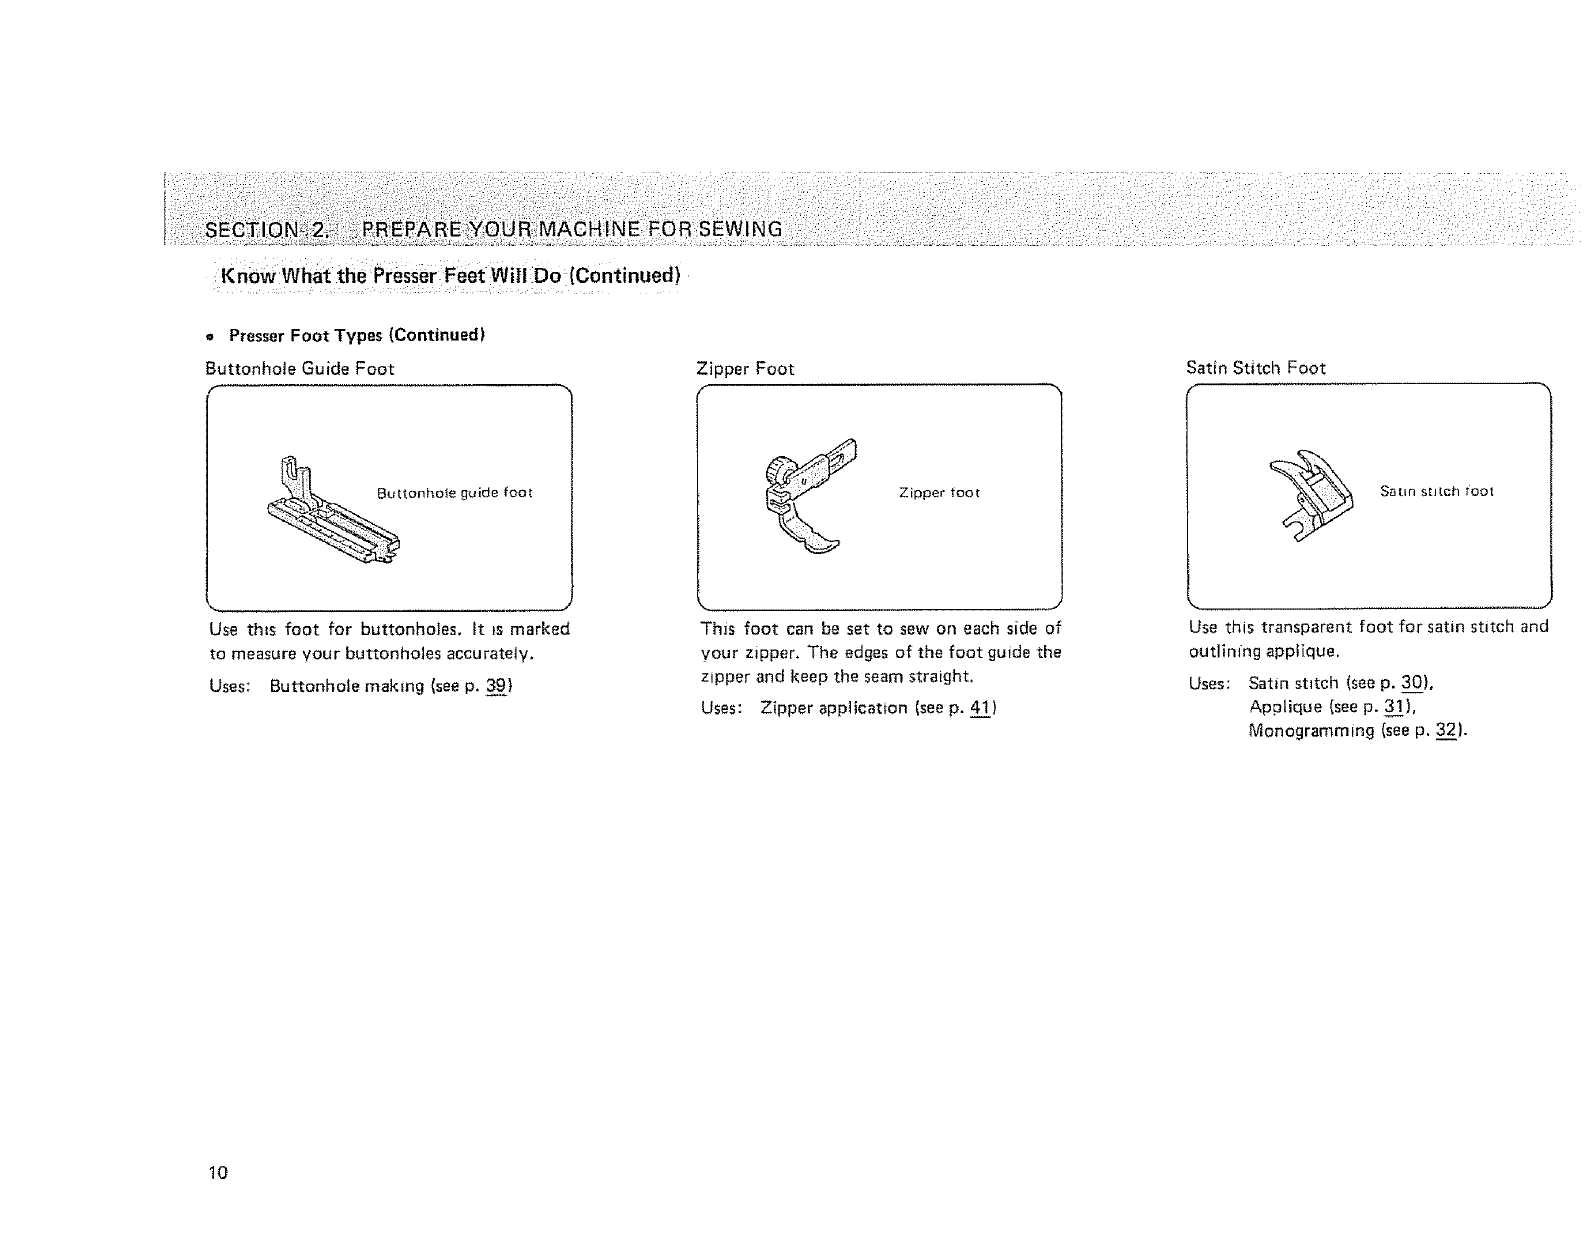
Buttonhole Guide Foot
f
Bu;_onho_e guide foot
Use thts foot for buttonholes, it is marked
to measure your buttonholes accurately,
Uses: Buttonhole making (see p. 39}
Zipper Foot
Zipper toot
This foot can be set to sew on each side of
your zipper, The edges of the foot guide the
zipper and keep the seam straight,
Uses: Zipper application (see p. 41)
Satin Stitch Foot
Use this transparent foot for satin stitch and
outlining applique.
Uses: Satin stitch (see p, 3_00),
Applique {see p. 31),
Monogramming (see p. 3_22).
10
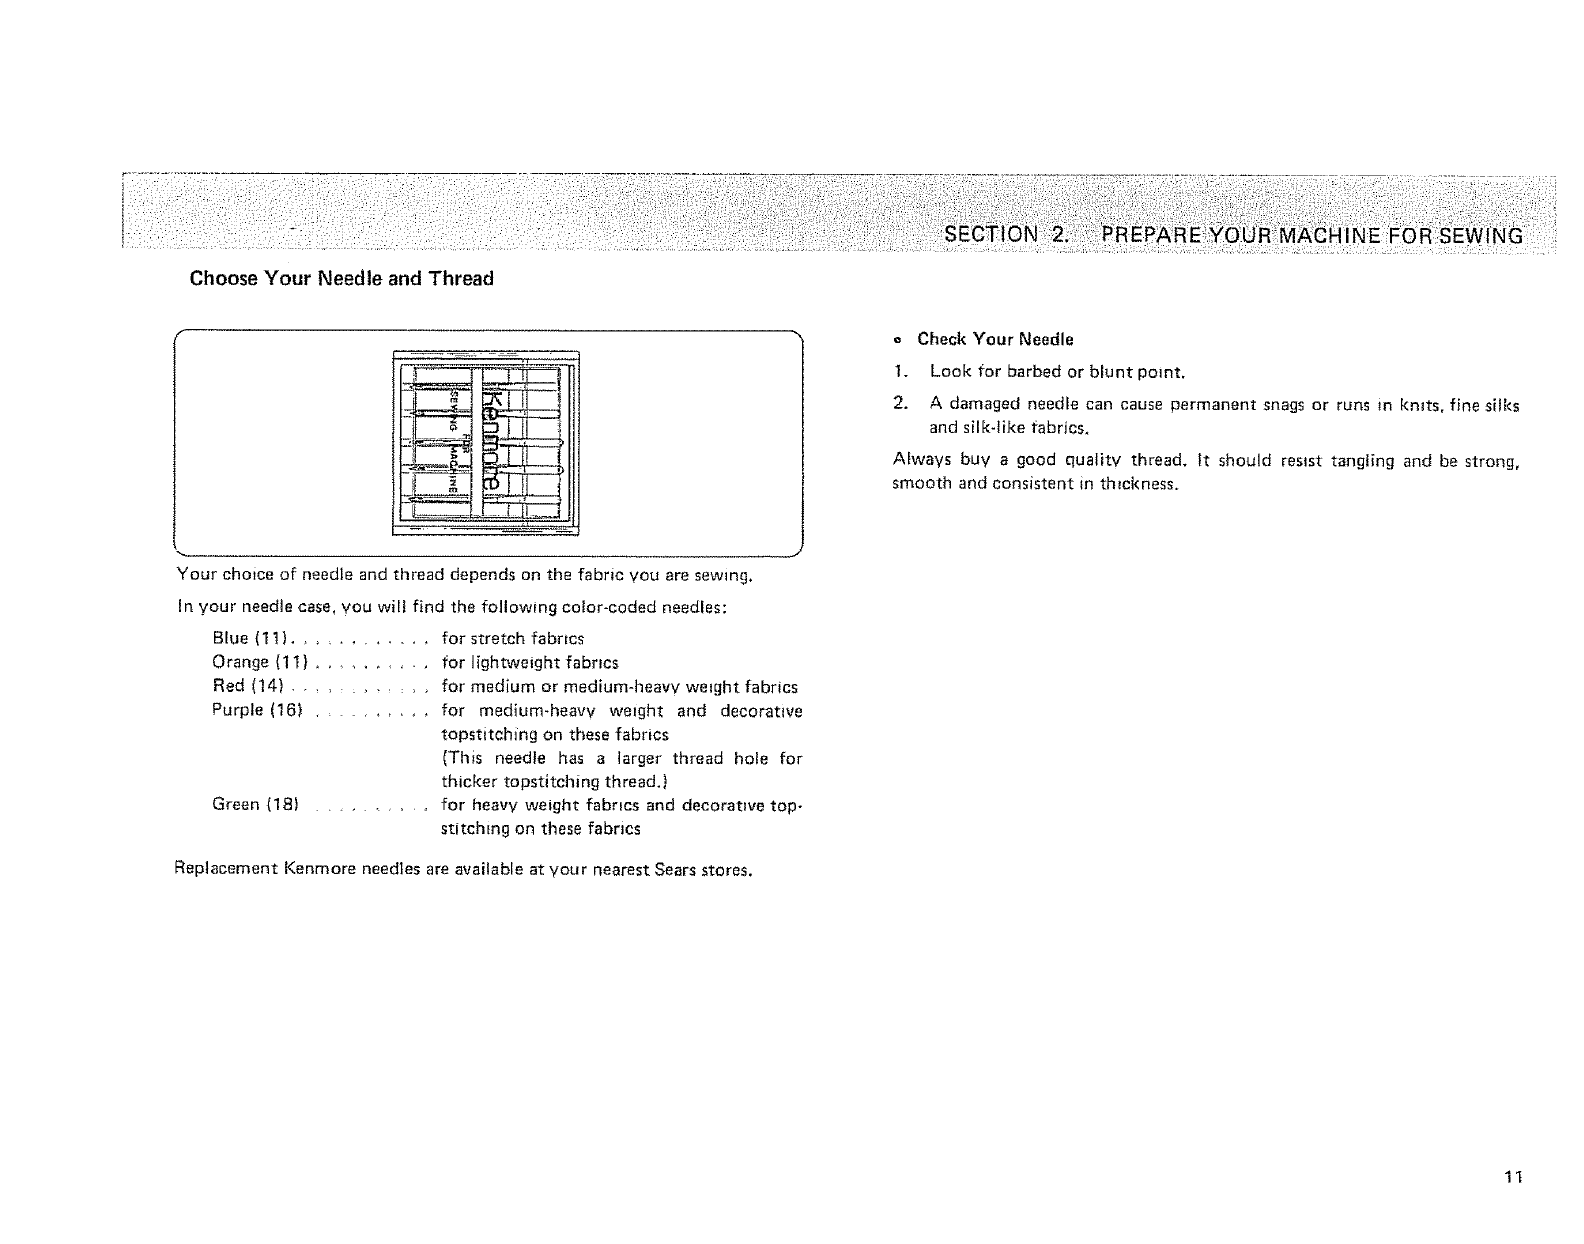
Choose Your Needle and Thread
Your choice of needle and thread depends on the fabric you are sewing
in your needle case, you will find the following color-coded needles:
Blue (1 1 ) ........... for stretch fabrics
Orange (11 ) ....... for lightweight fabrics
Red (14) ............ for reed;urn or medium-heavv weight fabrics
Purple (16} ........ for medium-heavv weight and decorative
topstitchmg on these fabrics
(This needle has a larger thread hole for
thicker topstltching thread.)
Green (18) ....... for heavy weight fabrics and decorative top-
stitching on these fabrics
Replacement Kenmore needles are available at vour nearest Sears stores.
o Check Your Needle
1. Look for barbed or blunt point.
2. A damaged needle can cause permanent snags or runs in knits, fine silks
and silk-like fabrics.
Always buy a good quality thread. It should resist tangling and be strong,
smooth and consistent in th=ckness.
11
Choose :Your Needle and Thread (Continued)
Fabric, Needle. Thread and Stitch Length Chart
FABRIC
Lightwe=ght:
Batiste, Dimity, Chiffon,
Silks, Fine Lace, Organza,
Crepe_ Taffeta, Voile,
Organdy
Medium Weight:
Cotton, Cotton Blends,
Percale. Gingham,
Shantung, Pique,
Seersucker, Satin. Knits,
Vinyl Suitmgs, Linen,
Wool Crepe. Leather
Medium Heavy Weight:
Corduroy, Denim, Wool,
Sailcloth, Woo! Flannel,
Gabardine. Velvets,
Leather
Heavv Weight:
Coatfngs. Upholstery
Cotton Duck, Heavv
Twills. Canvas
NEEDLE
SIZE AND
COLOR
11*ORANGE
!4.RED
RECOMMENDED
STITCH LENGTH
SETTING
THREAD SIZE
Pofvester Core/Cotton
Wrap
Fine Mercerized Cotton
Silk A
50 Mercer=zed Cotton
Pc!vaster Core/Cotton
Wrap
Silk A
50 Mercerzzed Cotton
Mercerized Heavy-Duty
Polyester Core/Cotton
Wrap
Silk A
Heavy Duty Mercerized
Cotton
Polyester Core/Cotton
Wrap
Silk A
12 stitches per
_nch
10 ~ t2 stitches
per inch
14-RED 8 _ 10 stitches
or per inch
1B-PURPLE
8 stitches per
18-GREEN tnch
Decorative top.stitching 16-PURPLE Buttonhole Twist 6 _ 8 stitches per
on all types of fabric 18-GREEN (Use as top thread only) inch
Stretch Fabrlc; 11 -BLUE
Polyester Double Knits, {STRETCH Polyester Core/Cotton 10 _ 12 stitches
NvJon Tricot. Jersey, FABRIC Wrap
Stretch Terry, Spande×, NEEDLE) 50 Mercerized Cotton per inch
Cite Tricot with "Q FOOT"
12
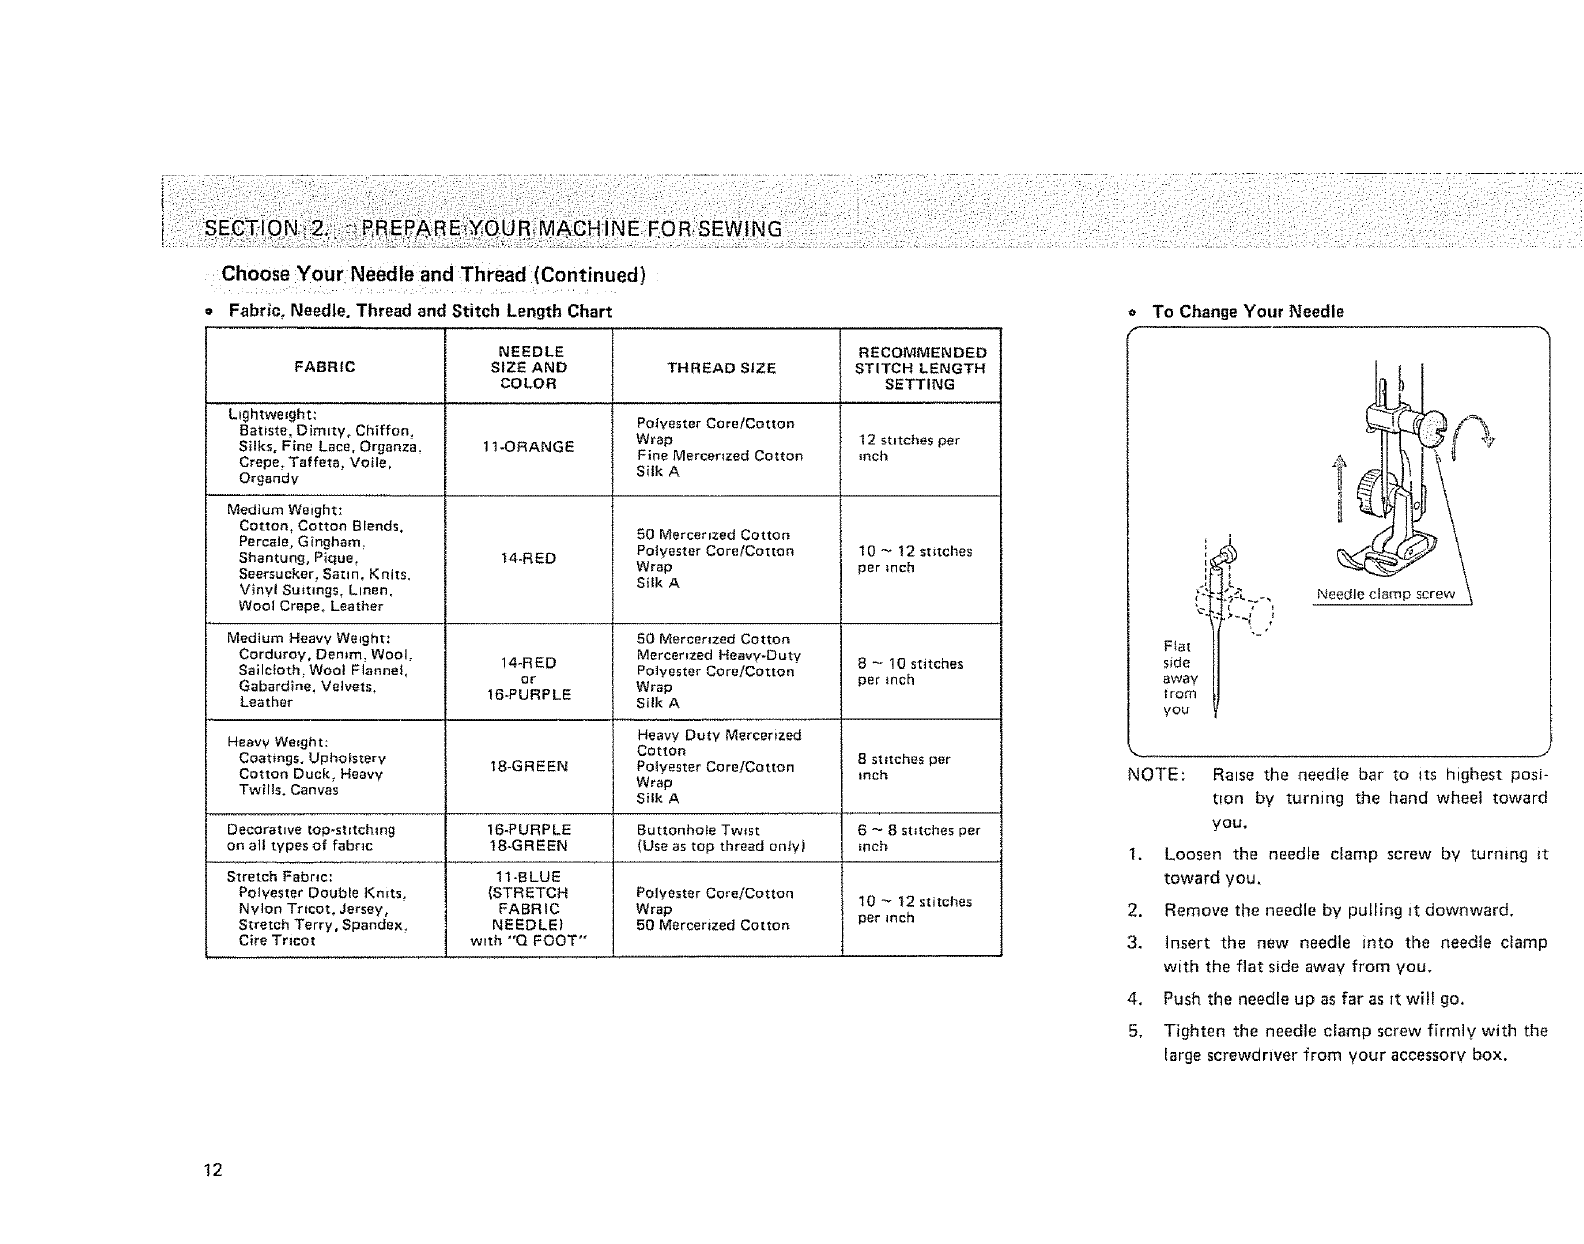
oTo Change Your Needle
t
,!
F_at
side
away
I rorn
you
Needle clamp screw
NOTE: Raise the needle bar to Its highest posi-
tion by turning the hand wheel toward
you,
I. Loosen the needle clamp screw by turning it
toward you,
2. Remove the needle by pulling it downward.
3. Insert the new needle into the needle clamp
with the fiat side away from VOU,
4. Push the needle up as far as it will go,
5, Tighten the needle clamp screw firmly with the
large screwdriver from your accessory box.
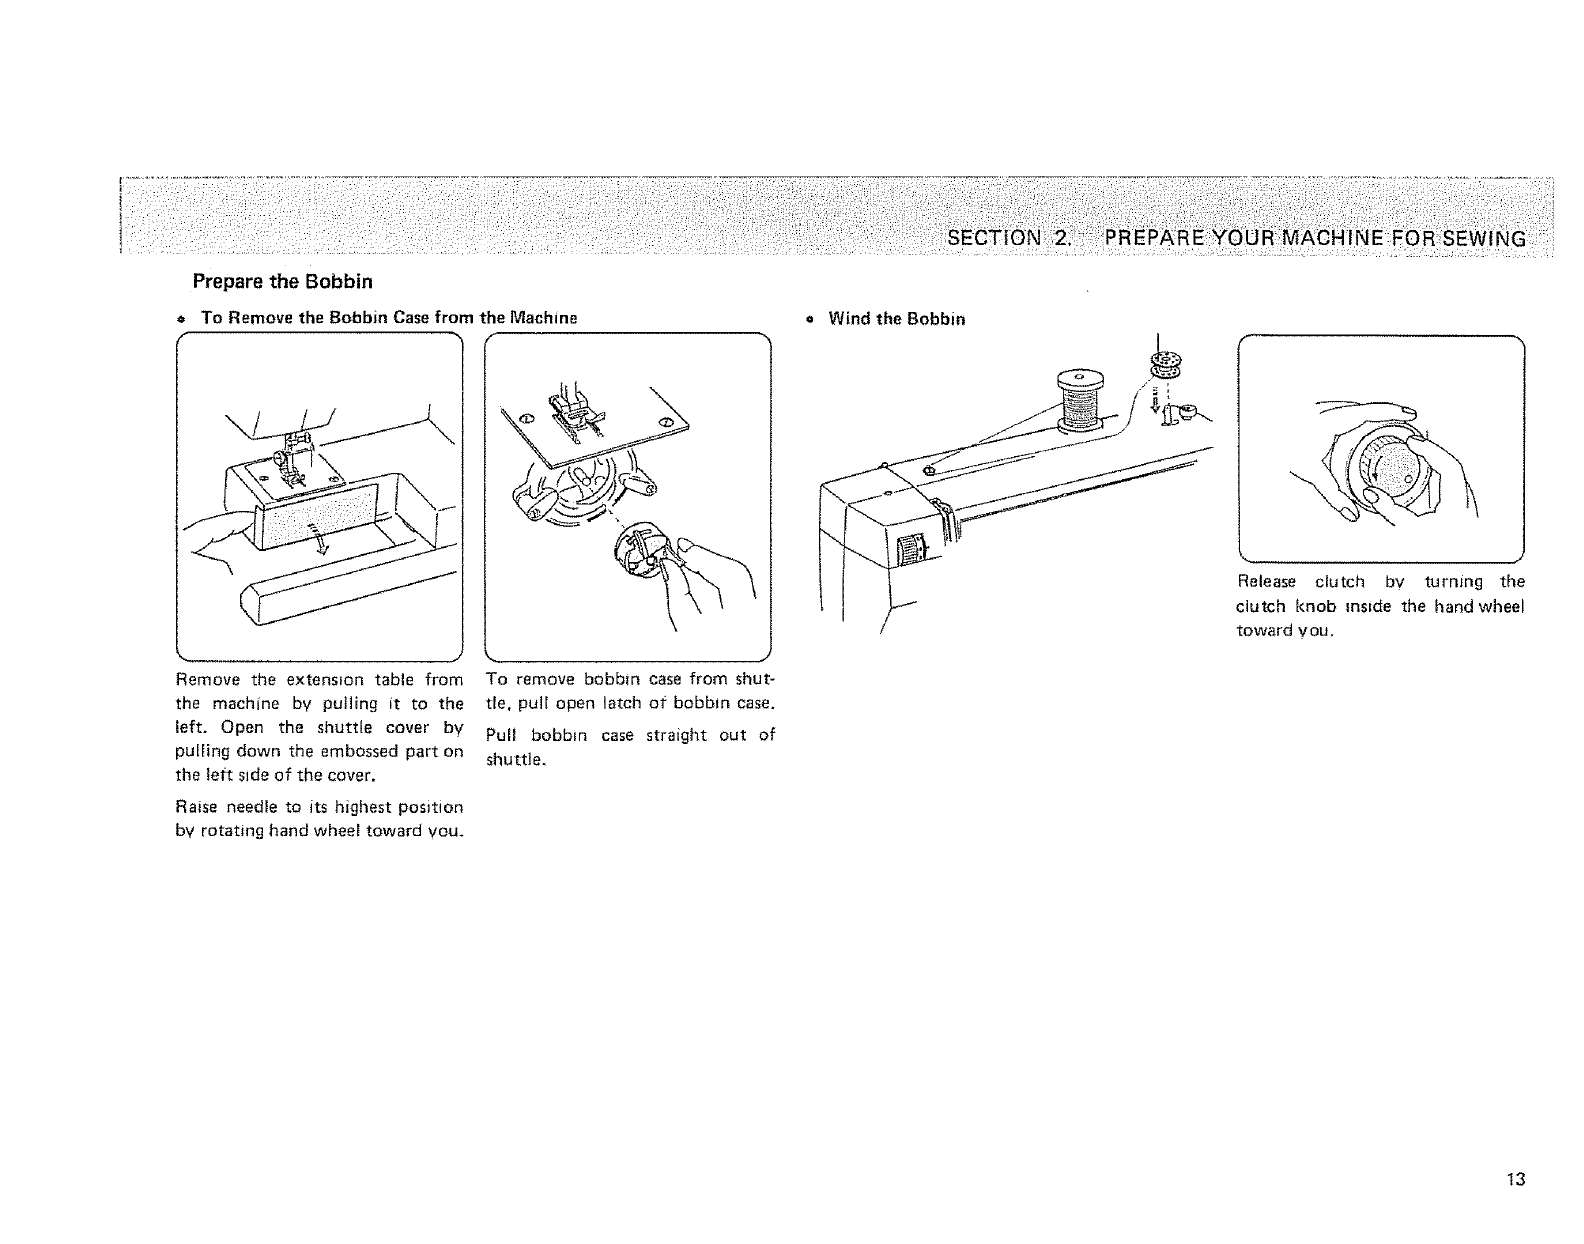
Prepare the Bobbin
oTo Remove the Bobbin Case from the Nlachine
Remove the extension table from
the machine by pulling it to the
left. Open the shuttle cover by
purling down the embossed part on
the left rode of the cover.
Ra+se needle to its highest pos+tlon
bv rotat+ng hand wheel toward you.
To remove bobb+n case from shut-
tle, pull open latch of bobbin case.
Pull bobbin case straight out of
shuttle.
oWind the Bobbin
Release clutch by turning the
ctutch knob mmde the hand wheet
toward you,
!3
Prepare the Bobbin :(Continued)
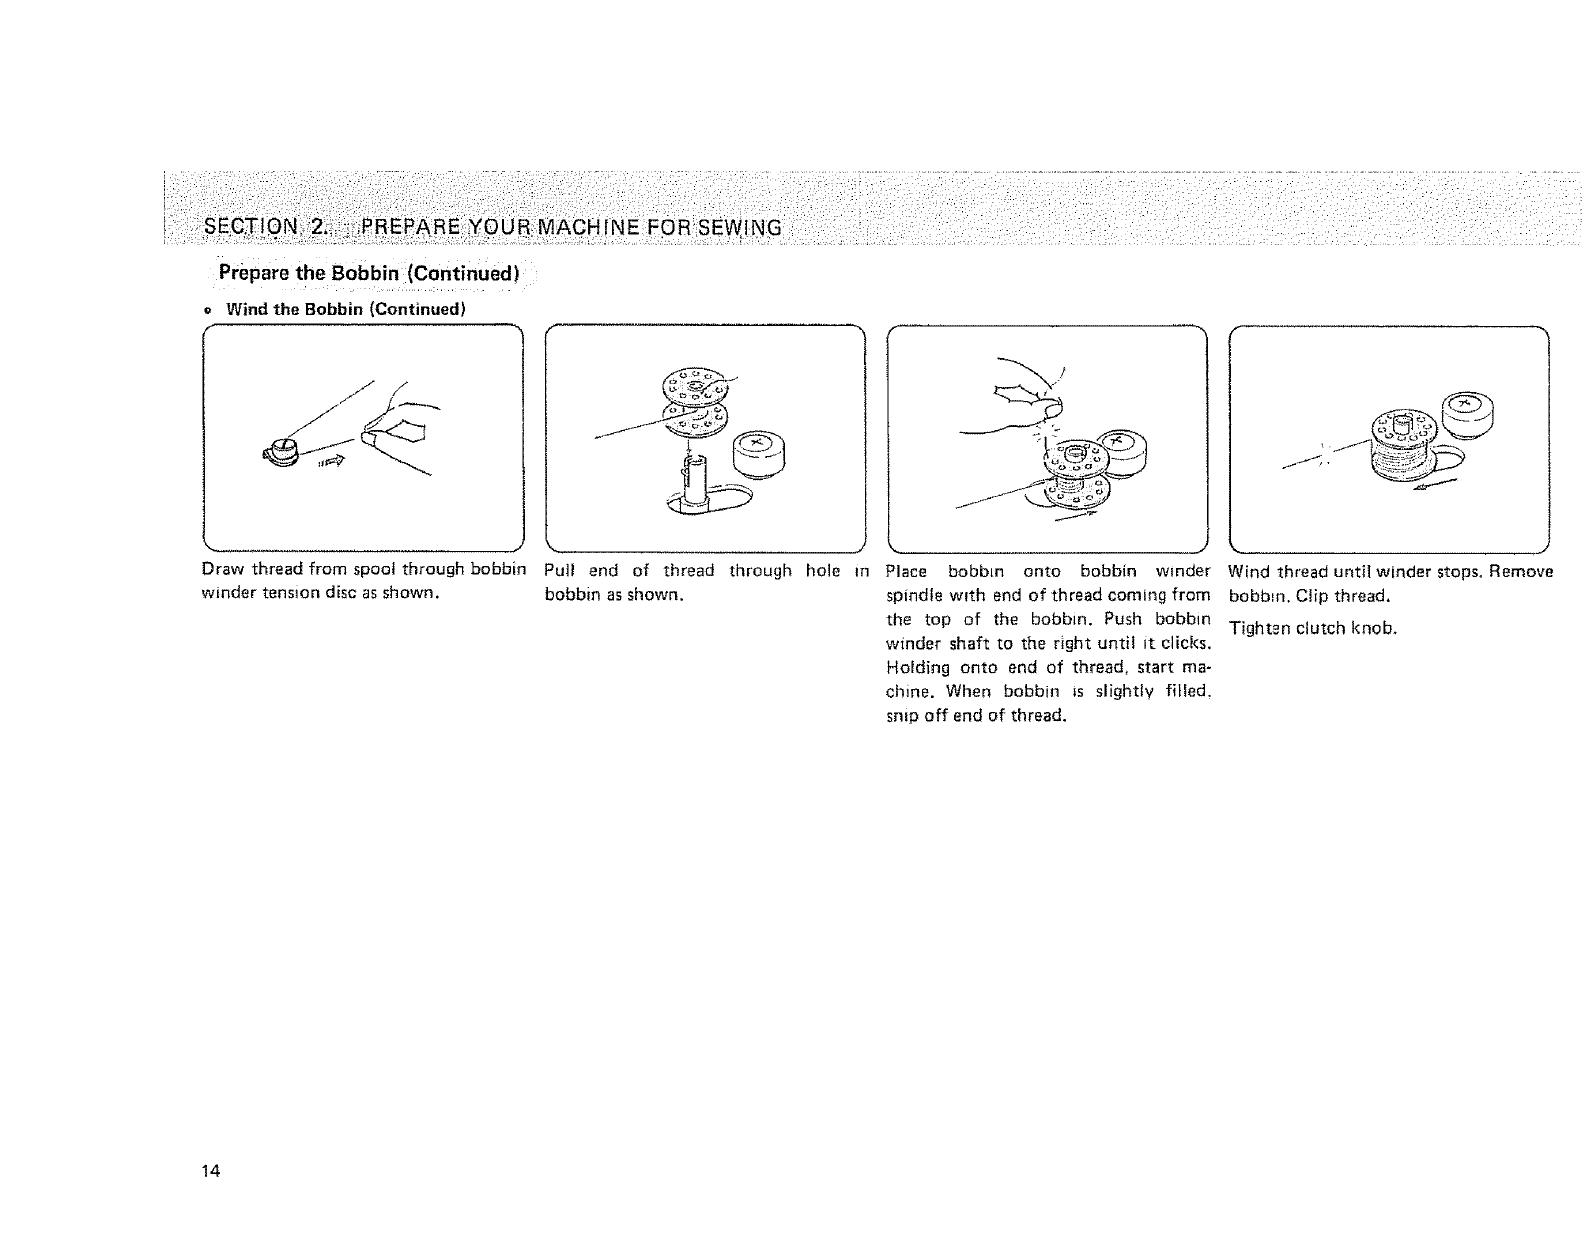
=Wind the Bobbin (Continued)
f
j/
Draw thread from spool through bobbin
winder tension disc as shown.
......... i¸¸ iiiii!!iiiii: i d¸ii
Putl end of thread through hole
bobbin as shown,
7
in Place bobbin onto bobbin winder
spindle with end of thread coming from
the top of the bobbin. Push bobbin
winder shaft to the right until it dicks.
Holding onto end of thread, start ma-
chine. When bobbin is slighttv filled,
snip off end of thread.
Wind thread unti! winder stops. Remove
bobb,,n. Clip thread.
Tighten clutch knob.
14

=insert the Bobbin into the Bobbin Case
\
Place bobbin _n bobbin case Pull thread through slot of case Pull thread under tension Holding latch open. positlon Case should loci< into place
making sure thread feeds clock- as shown, spring and through the opening case into shuttle and release when latch is released,
wise and Js coming from as shown above, latch.
bobbin as shown.
15
Prepare Your Top Thread
€Thread Your Needle
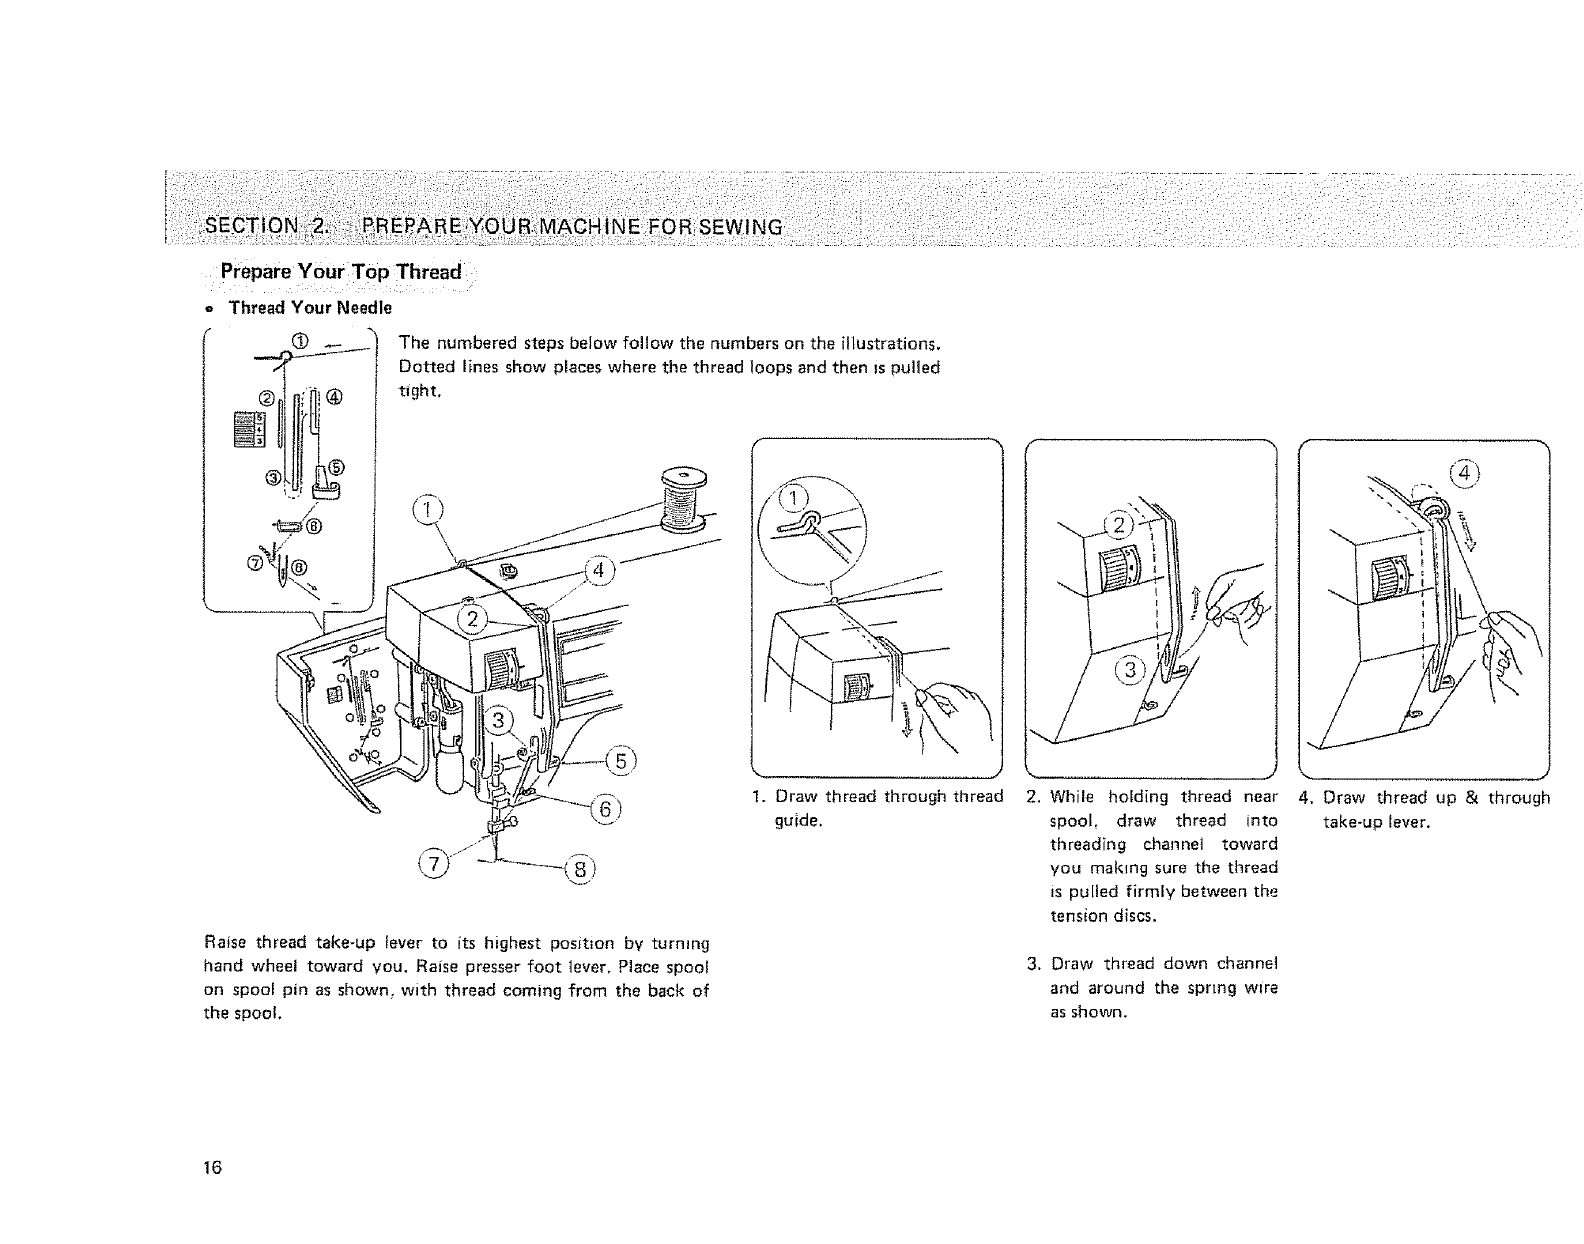
@The numbered steps below follow the numbers on the illustrations.
Dotted lines show places where the thread loops and then is pulled
tight,
Raise thread take-up lever to its highest position by turning
hand wheel toward you. Raise presser foot _ever, Place spool
on spool pin as shown, with thread coming from the back of
the spool.
2, While holding thread near
spool, draw thread into
threading channel toward
you making sure the thread
_s pulled firmly between the
tension discs,
3, Draw thread down channel
and around the spr=ng wlra
as shown.
4. Draw thread up & through
take-up lever.
16
i¸¸ii i!ii!!i¸iiiiiiiii ii i!iii i!il! = _EFo1R SE
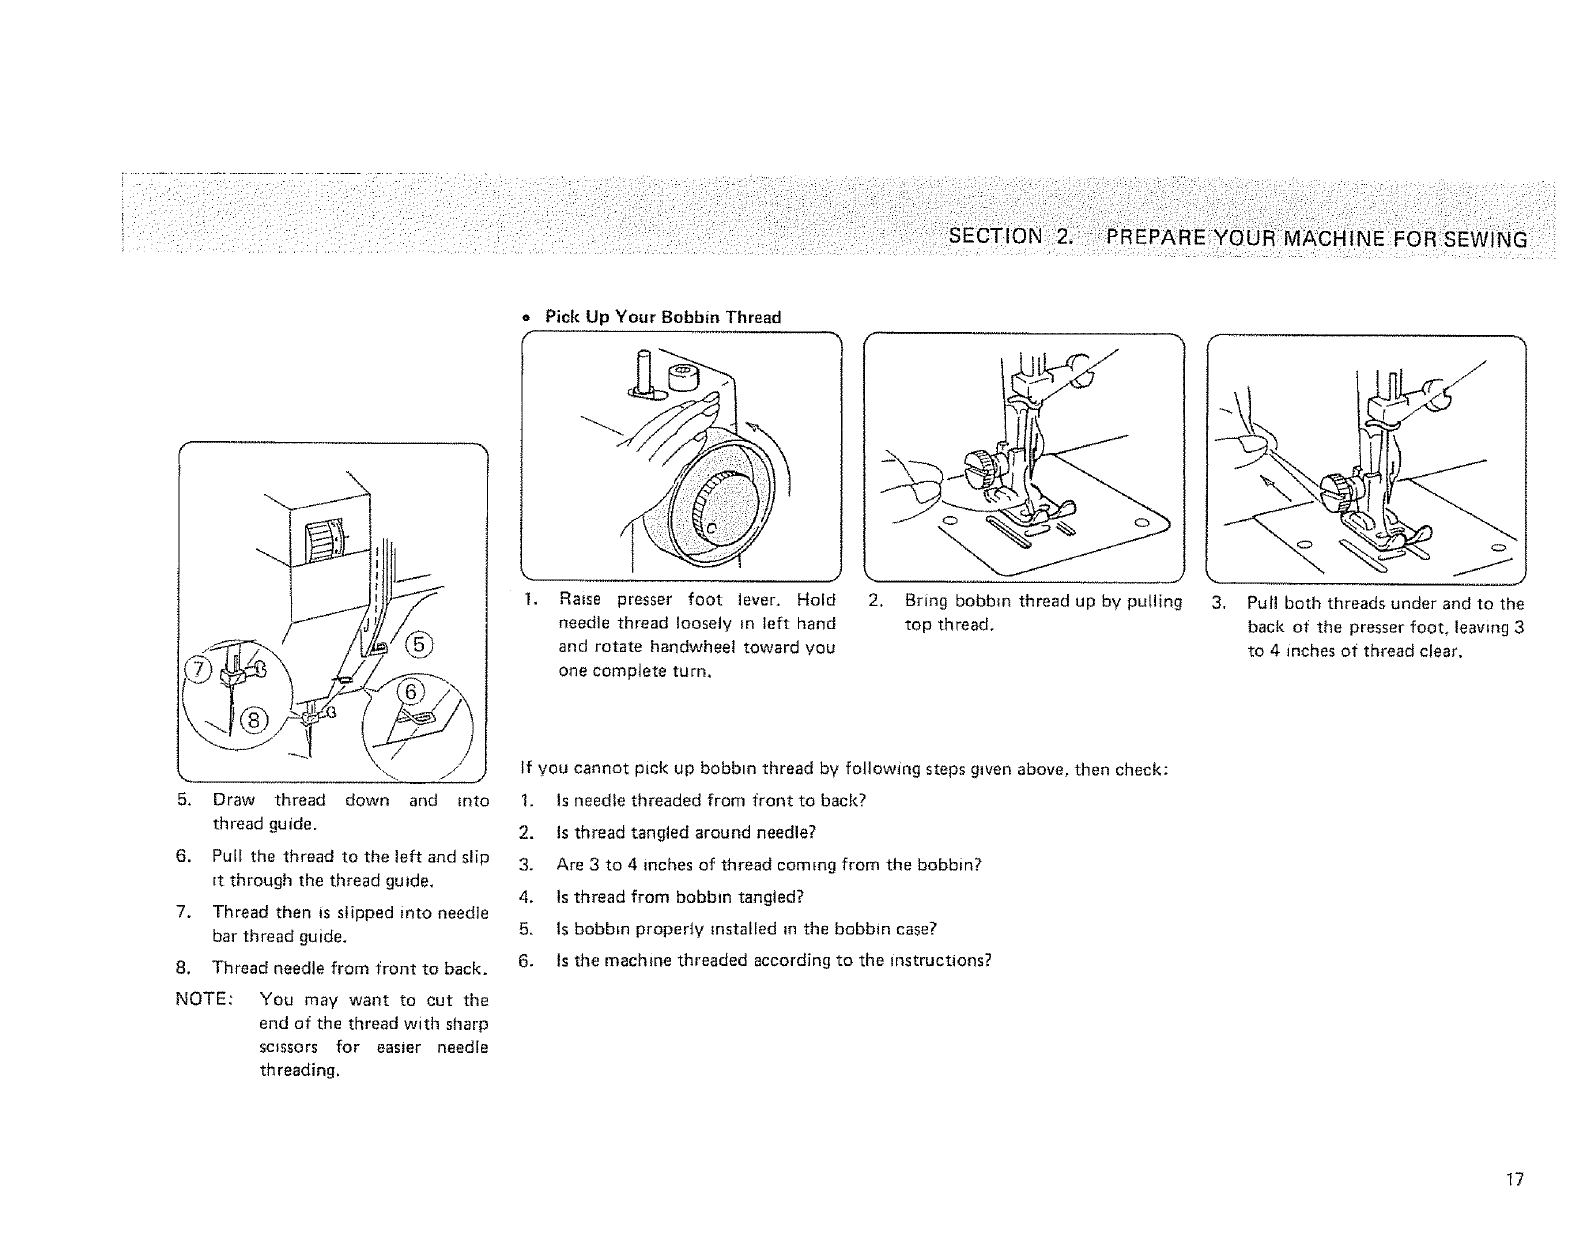
5, Draw thread down and Into
th read gu ida.
6. Pull the thread to the left and slip
_t through the thread guide,
7. Thread then is slipped into needle
bar thread guide.
8. Thread needle from front to back.
NOTE: You may want to cut the
end of the thread with sharp
scissors for eas_er needle
threading.
®
Pick Up Your Bobbin Thread
Raise presser foot lever, Hold
needle thread loosely in left hand
and rotate handwhee! toward you
one compJete turn,
2, Bring bobbin thread up by pulling
top thread.
If you cannot pick up bobbin thread by following steps gtven above, then check:
1. Is needle threaded from front to back?
2. Is thread tangled around needle?
3. Are 3 to 4 inches of thread coming from the bobbin?
4, Is thread from bobbin tangled?
5. Is bobbin property installed in the bobbin case?
6. Is the machine threaded according to the instructions?
\
3, Pull both threads under and to the
back of the presser foot, leaving 3
to 4 inches of thread clear,
17
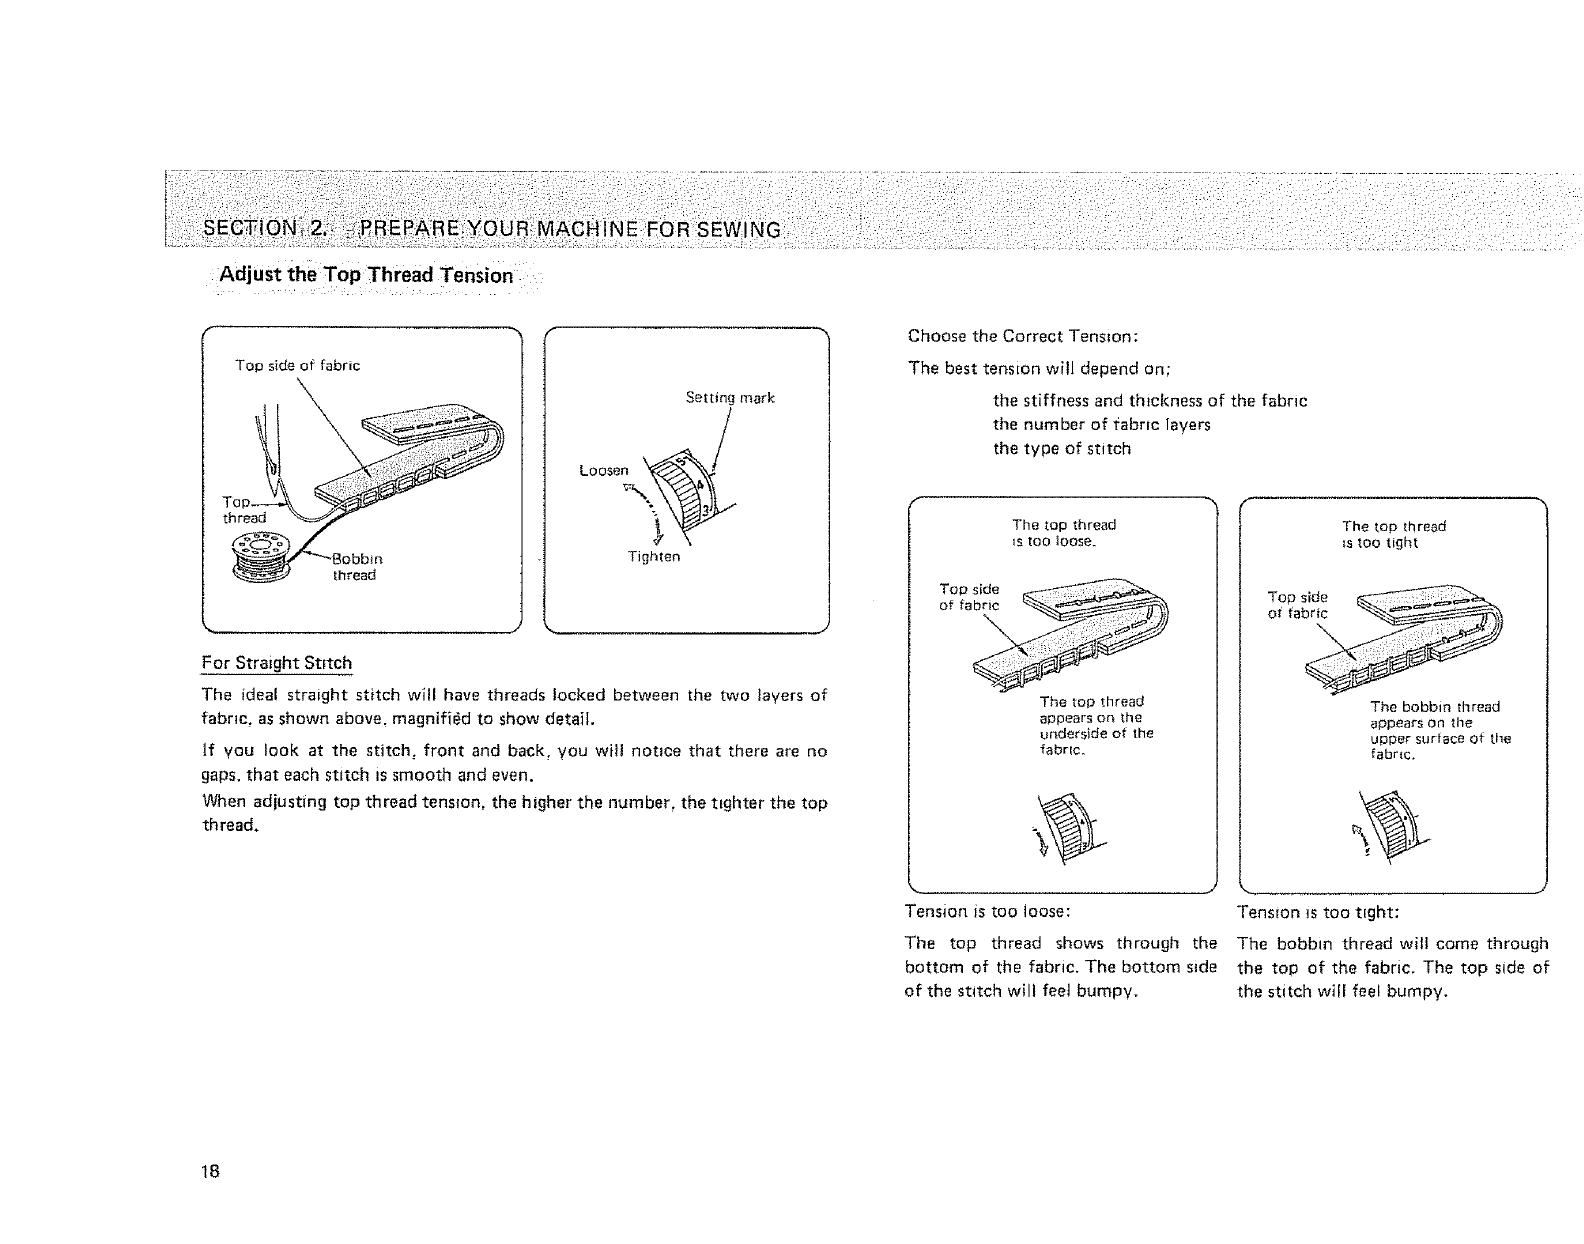
Adjust the Top Thread Tension i
Top side of fabric
thread
Setting mark
Loose__
Tighten
For Straight Stitch
The ideal straight stitch will have threads locked between the two layers of
fabric, as shown above, magnified to show detail.
if you look at the stitch, front and back, you wiJl notice that there are no
gaps. that each stitch _s smooth and even.
When adjusting top thread tens,on, the higher the number, the t=ghter the top
thread.
Choose the Correct Tension:
The best tension will depend on;
the stiffness and thickness of the fabric
the number of fabric layers
the type of stitch
The top thread
_stoo _oose.
Top side
of fabric
The top thread
appears on the
underside of the
fabric.
Tension is too loose:
The top thread shows through the
bottom of the fabric. The bottom side
of the stitch will feet bumpy.
f
The top thread
is too tight
The bobbin thread
appears on tile
upper surface ot tile
fabric.
Tension _s too t_ght:
The bobbin thread will come through
the top of the fabric. The top side of
the stitch will feel bumpy.
18
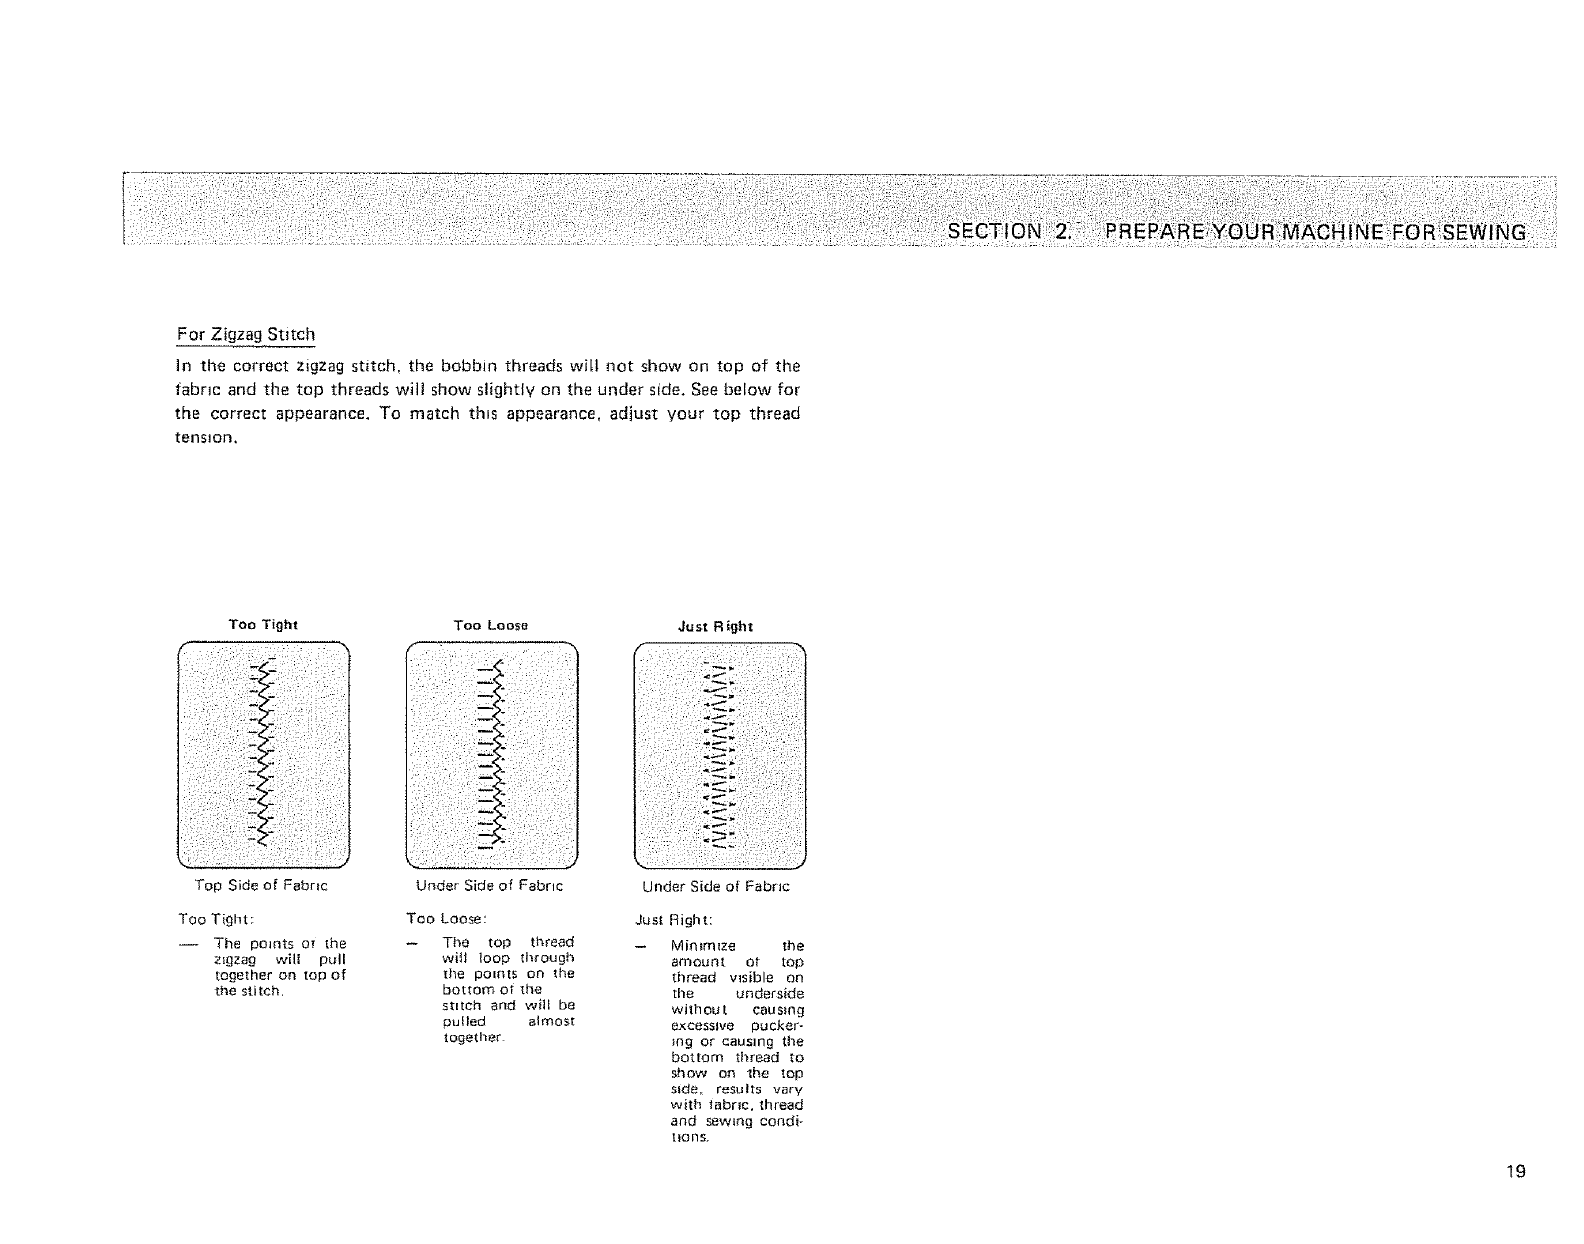
For Zigzag Stitch
In the correct zigzag stitch, the bobbin threads witl not show on top of the
fabric and the top threads will show slighttv on the under side, See below for
the correct appearance, To match thts appearance, adjust your top thread
tension,
Too Tight Too Loose Just R ight
Top Side of Fabr{e Under Side of Fabric Under Side of Fabric
Too Tight; Too Loose: Just
-- The poants or the -- The top thread _
zlgzag will pull will loop dlrough
together on top of tl_e points on the
the stitch, bottom ot the
stitch and will be
pulled almost
togetl_er
Right:
M in _rn_ze the
amount of top
thread vmible on
tl_e underside
without causing
excessive pucker-
_ng or causing the
bottom thread to
show on the top
side, results vary
with fabric, _hread
and sewing condi-
lions.
19

Stitch Selector
IVlode___l12741 Model 12641 Model 12541
Se_[mg mark Setting mark Setting rnarkx.Nk
The stitch selector control not onty determines the statch you select, but also regulates the stitch width for regular zigzag and
rick rack stretch stitches.
The different types of stitches are designated by cotor.
Straight, Zigzag and Utility Stitches are orange.
Stretch Stitches are gold.
Buttonhole Settings are biue.
NOTE: To avoid needle or fabrtc damage, be sure your needle is up and out of fabric when adjusting this control.
20
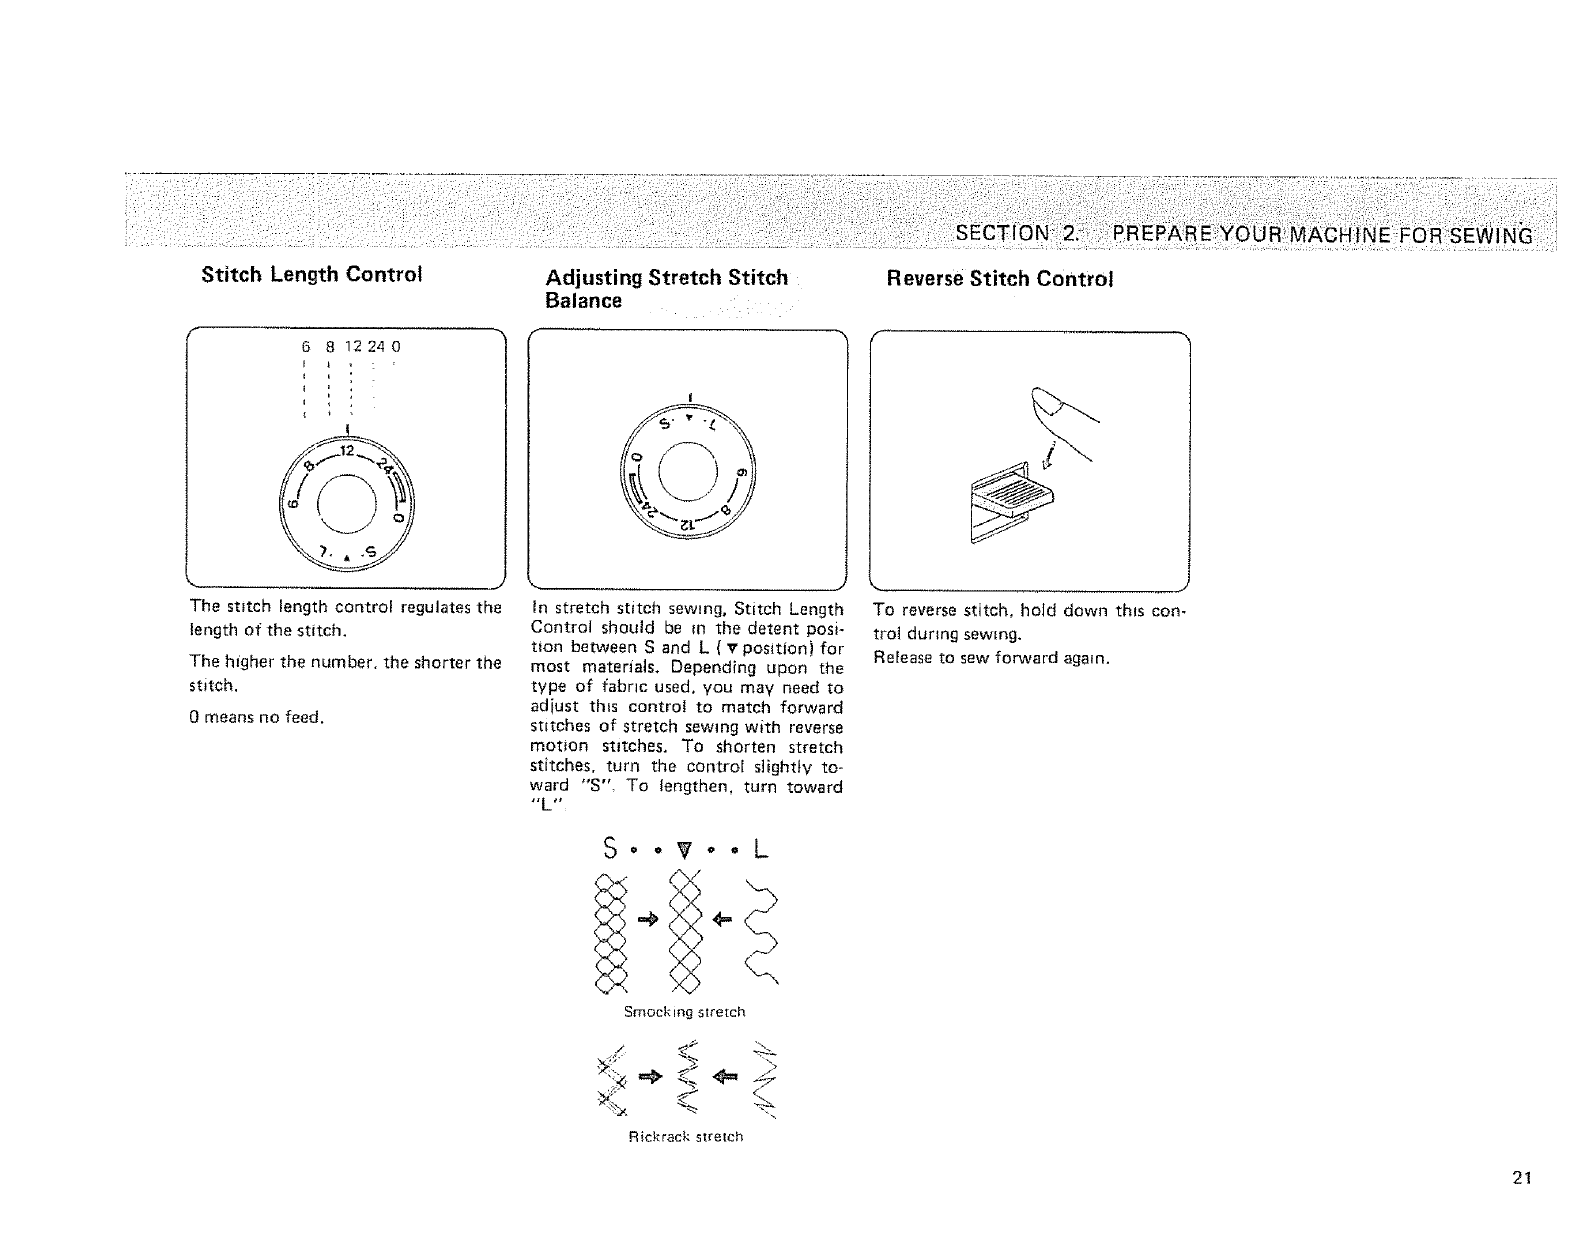
Stitch Length Controt Adjusting Stretch Stitch
Balance
Reverse Stitch Control
6 8 12240
i i
The stitch length control regulates the
length of the stitch.
The htgher the number, the shorter the
stitch.
0 means no feed.
in stretch stitch sewing, Stitch Length
Control should be tn the detent posi-
tion between S and L ( v position) for
most materials. Depending upon the
type of fabnc used, you may need to
adiust th_s control to match forward
stttches of stretch sewing with reverse
motion stitches. To shorten stretch
stitches, turn the control slightly to-
ward "S", To lengthen, turn toward
"L"
SooVooL
Smock ing stretch
Rlckrack stretch
To reverse stitch, hold down this con.
trot during sewing.
Release to sew forward again.
21
Starting To Sew
Now that you are familiar with the controls on your machine and with the accessories provided for the machine, you are readv to start to sew with your new
Kenmore sewing machine, Below are some good habits to foNow each time you sit down to sew:
1. Inspect the needle. It should be straight, properly set and sharp on the point. It should be the correct size for the fabric and thread being used. Do not be
afraid to change your needle frequently, Many of the new fabrics made of synthetic blends tend todull the needles more easily than fabrics made of natural
fibers.
2. Before placing the material on the machine, see that the ends of the threads have been drawn about 4 inches to the rear of the machine. Hold on to threads
during the sewing of the first 3 or 4 stitches of the seam.
3, Test the machine stitch on a scrap of fabric you plan to use, The fabric should be double thickness. Adjust the machine for the tength of stitch and tension
suitable to your fabric.
4. Fabric should be placed under the presser foot with the bull< of the material to the left of the needle and the right edge of the material placed on the 5/8"
seam marking on the needle plate when making a simple seam,
5. Run the machine at a slow even speed, The more pressure you put on the foot control the faster the machine will sew.
6. Fasten each seam by back tacking at the beginning and end of the seam.
7, Always finish sewing each seam with the needle at its h_ghest point.
8. Guide the fabric gently with your hand in front of the needle. Never pull or hold the fabric in such a way that the normal feeding is altered.
g. When turning the hand wheel manually, always turn it toward you.
22
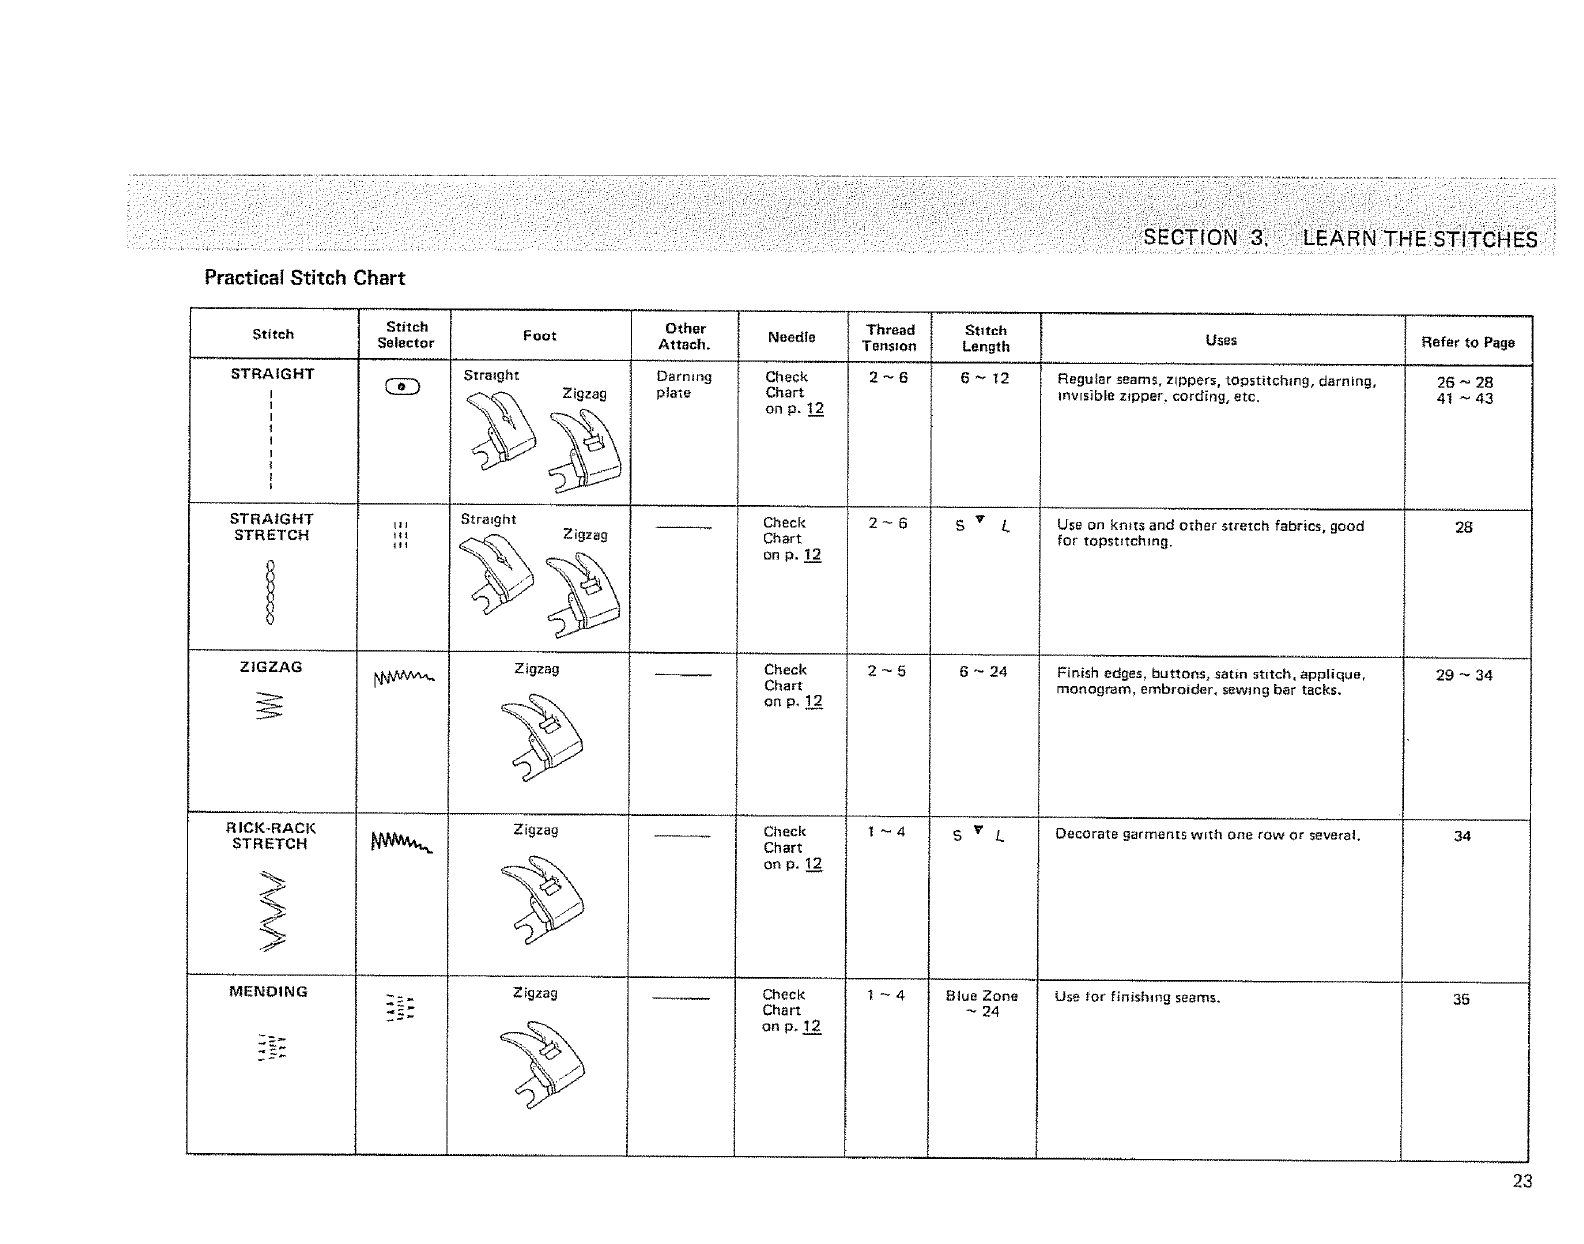
Stitch Foot Other Thread Stttch Uses Refer to Page
Stitch Selecto r Attach. Tens=on Length
Darmng 2 _ 66 _ 12 Regular seams, zippers, topstitchlng, darning, 26 _ 28
STRAIGHT (_ plate mvmible z_pper, cording, etc. 41 ~ 43
STRAIGHT
STRETCH
ZIGZAG
RICK-RACK
STRETCH
MENDING
IH
Straight
Zigzag
Straight Zigzag
Zigzag
Zigzag
Zigzag
Needle
Check
Chart
on p. 12
Check
Chart
on p. !22
Check
Chert
on p. 12
Check
Chart
on p. l!
Check
Chart
on po I_&2
2~6
2-5
1~4
Sv L
6 _ 24
BY L
Btue Zone
24
Use on kn_ts and other stretch fabrics, good
for topst_tchmg,
Finish edges buttons, satin stitch, applique,
monogram, embroider, sewing bar tacks.
Decorate garments with one row or severe!.
Use for finishing seams.
28
29 ~ 34
34
35
23
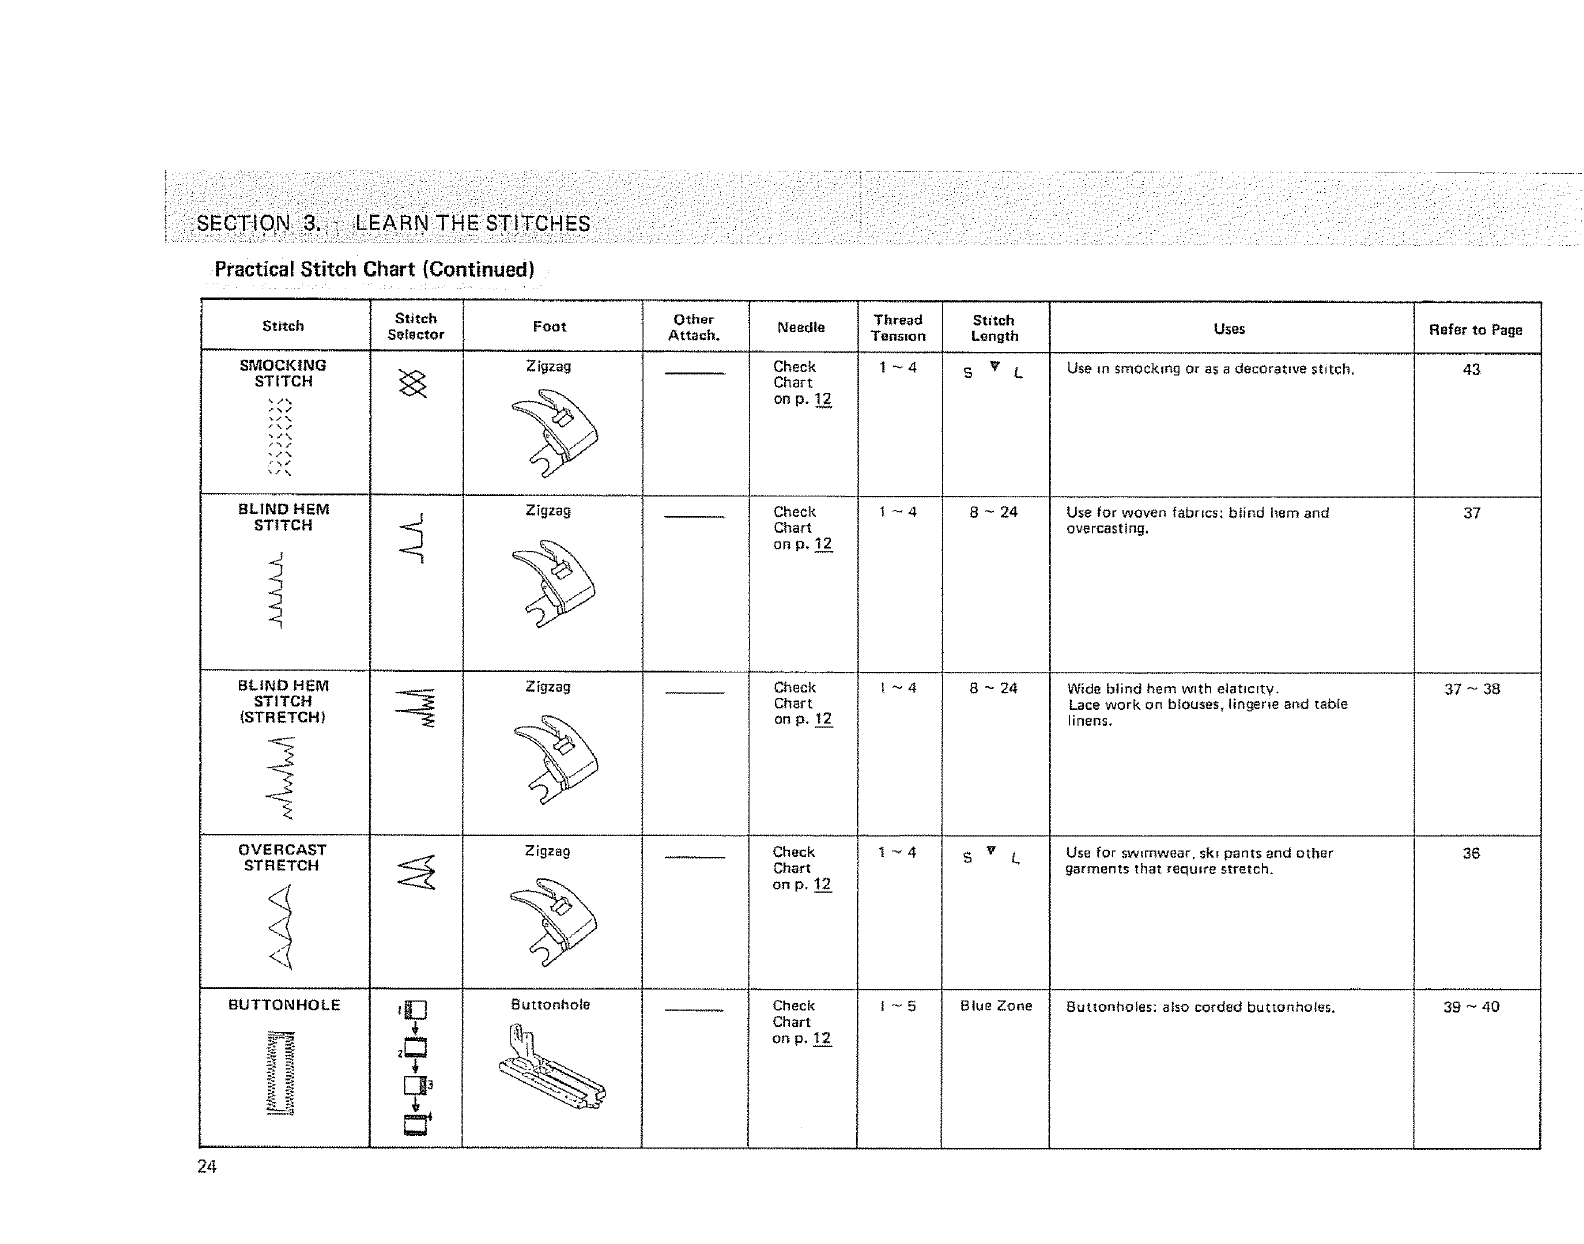
Practical Stitch Chart (Continued)
Stitch Other Needle Thread Stitch
Selector Attach. Tens=on Length
1_4 SVLUse m smocking or as edecorat=ee stitch,
Stitch
SMOCKING
STITCH
BLIND HEM
STITCH
BLIND HEM
STITCH
(STRETCH)
OVERCAST
ST R ETCH
BUTTONHOLE
24
,[3
Foot
Zigzag
Zigzag
Zigzag
Buttonhole
Check
Chart
on p. 12 ,
Cheek
Chart
on p, 12
Check
Chart
on p. 12
Check
Chart
on p. 12
Check
Chart
on p, 1:2
l_4
_4
1_4
8 ~ 24
8 _ 24
SvL
Btue Zone
Use for woven fabrics: btind hem and
overcasting,
Uses Refer to Page
43
37
Wide bIind hem wlth elatJclty. 37 _ 38
Lace work on blouses, lingerie arid table
linens.
Use for sw_mwear, sk_ pants and other
garments that require stretch.
Buttonholes: atso corded buttonholes,
36
39 ~ 40
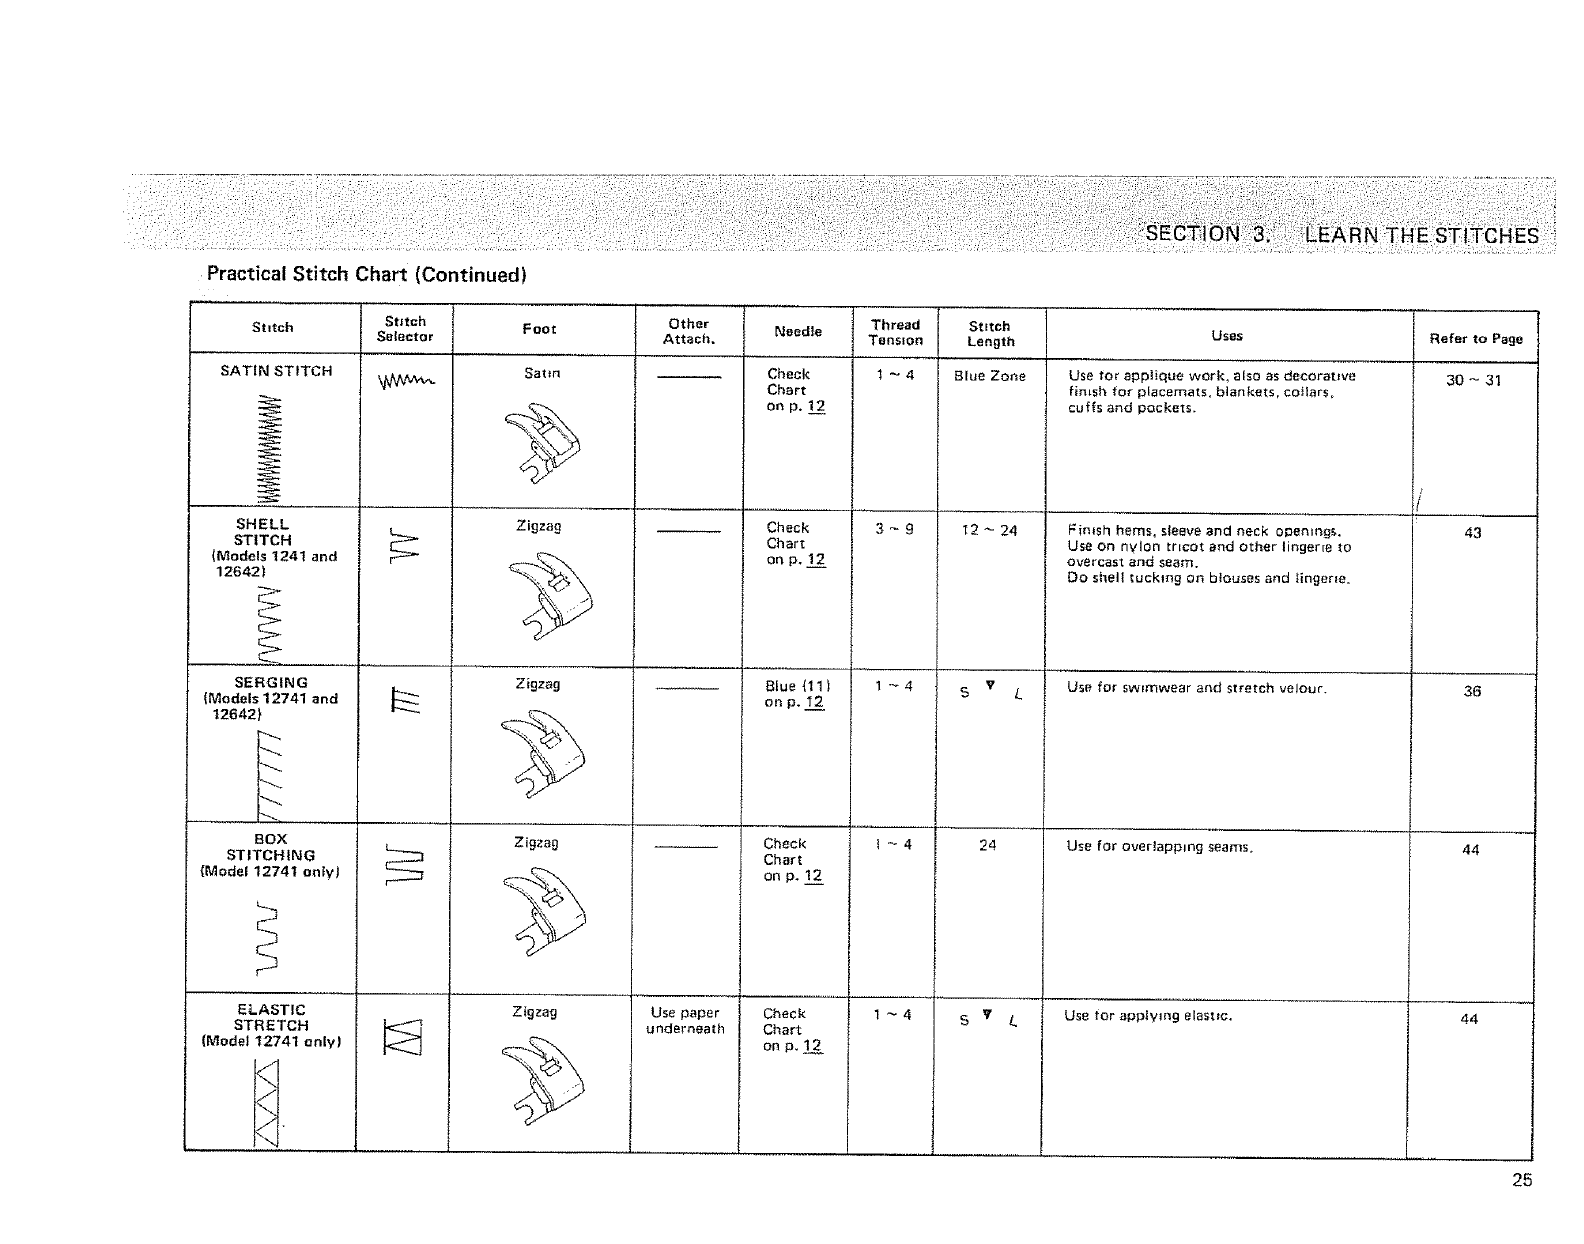
Practical Stitch Chart (Continued)
Stitch
SATIN STITCH
SHELL
STITCH
(Models1241and
12642)
SERGING
(Models 12741 and
12642)
BOX
STITCHING
{Model 12741 ontV)
ELASTIC
STRETCH
(Model 12741 onlvl
Stitch
Selector Foot
Satin
Zigzag
Zigzag
Zigzag
Zigzag
Other
Attach.
Use paper
underneath
Needle
Check
Chart
on p. 1_22
Check
Chart
on p. 1_22
Blue (11
onp. 12
Check
Chart
on p. 1!
Check
Chart
on p. 122
Thread
Tensmn
1_4
3~9
!_4
1_4
Stitch
Length
Blue Zone
I2 _ 24
S 'v L
24
S V L
Uses
Use for applique work, also as decorative
fimsh for placemats, blankets, collars,
cuffs and pockets.
Fimsh hems, sleeve and neck opemngs.
Usa on nylon tricot and other lingerie to
overcast and seam,
Do shell _uckmg on blouses and lingerie,
Use for swJmwear and stretch velour.
Use for overlapping seams.
Use tor apptymg elastic.
Refer to Page
30 _31
43
36
44
44
J
25
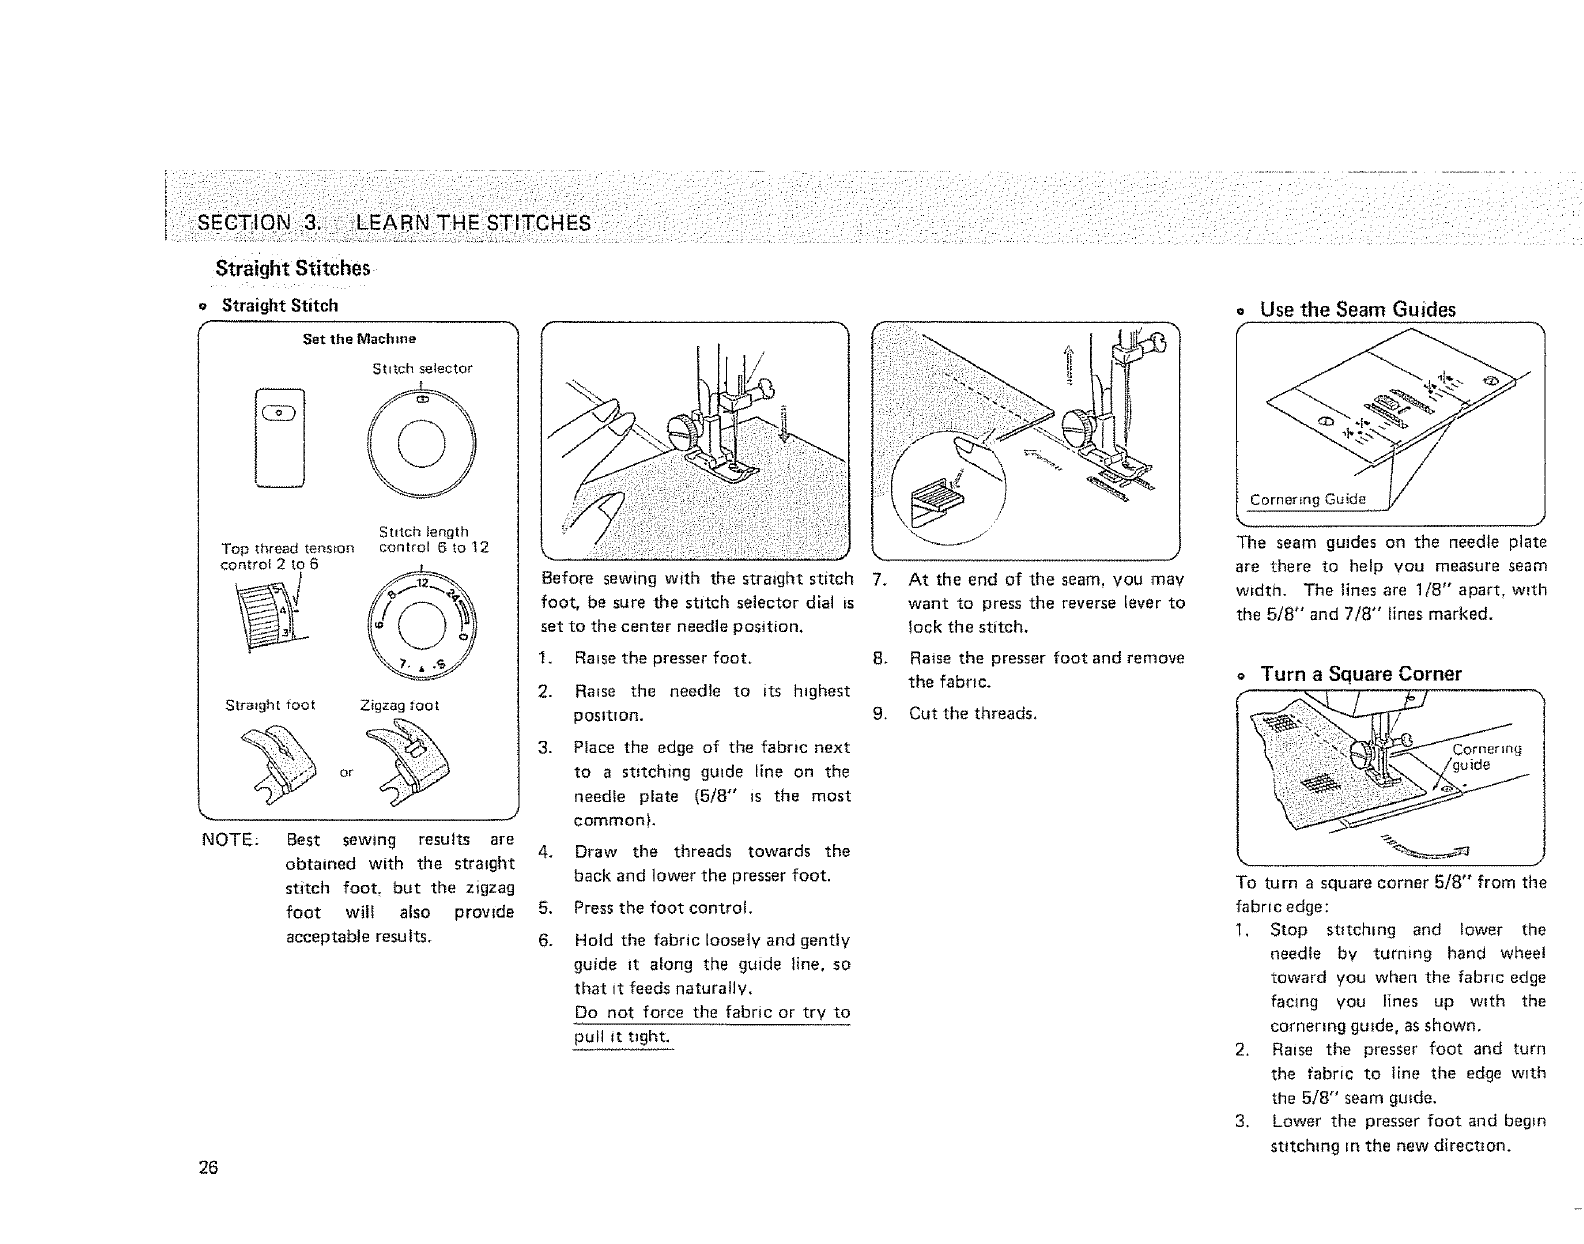
Straight Stitches
Straight Stitch
Set the Machine
StItch sr_lector
U
Stitch length
Top thread tension control 6to 12
control 2 to 6 /S_
Straight toot Zigzag toot
NOTE_ Best sewing results are
obtained with the strmght
stitch foot, but the zigzag
foot will also provide
acceptable results.
26
Before sewing with the straight stitch
foot, be sure the stitch selector dial is
set to the center needle position,
I. Raise the presser foot.
2. Rinse the needle to its highest
pos_t_on.
3. Place the edge of the fabric next
to a stitching guide line on the
needle plate (5/8" is the most
common}.
4. Draw the threads towards the
back and lower the presser foot.
5. Press the foot control.
6. Hold the fabric loosely and gently
guide it along the guide line, so
that it feeds naturally.
Do not force the fabric or try to
pull it t_ght.
7.
8.
9.
At the end of the seam, you may
want to press the reverse lever to
lock the stitch,
Raise the presser foot and remove
the fabNc+
Cut the threads,
Use the Seam Guides
Cornering Guide
The seam guides on the needle plate
are there to help you measure seam
width. The lines are 1/8" apart, with
the 5/8" and 7/8" lines marked.
o Turn a Square Corner
To turn a square corner 5/8" from the
fabric edge:
1, Stop stitching and lower the
needle by turmng hand wheel
toward you when the fabric edge
facing you lines up w_th the
cornering guide, as shown.
2, Raise the presser foot and turn
the fabric to line the edge with
the 5/8" seam guide.
3. Lower the presser foot and begin
stitching m the new direction.
a
f
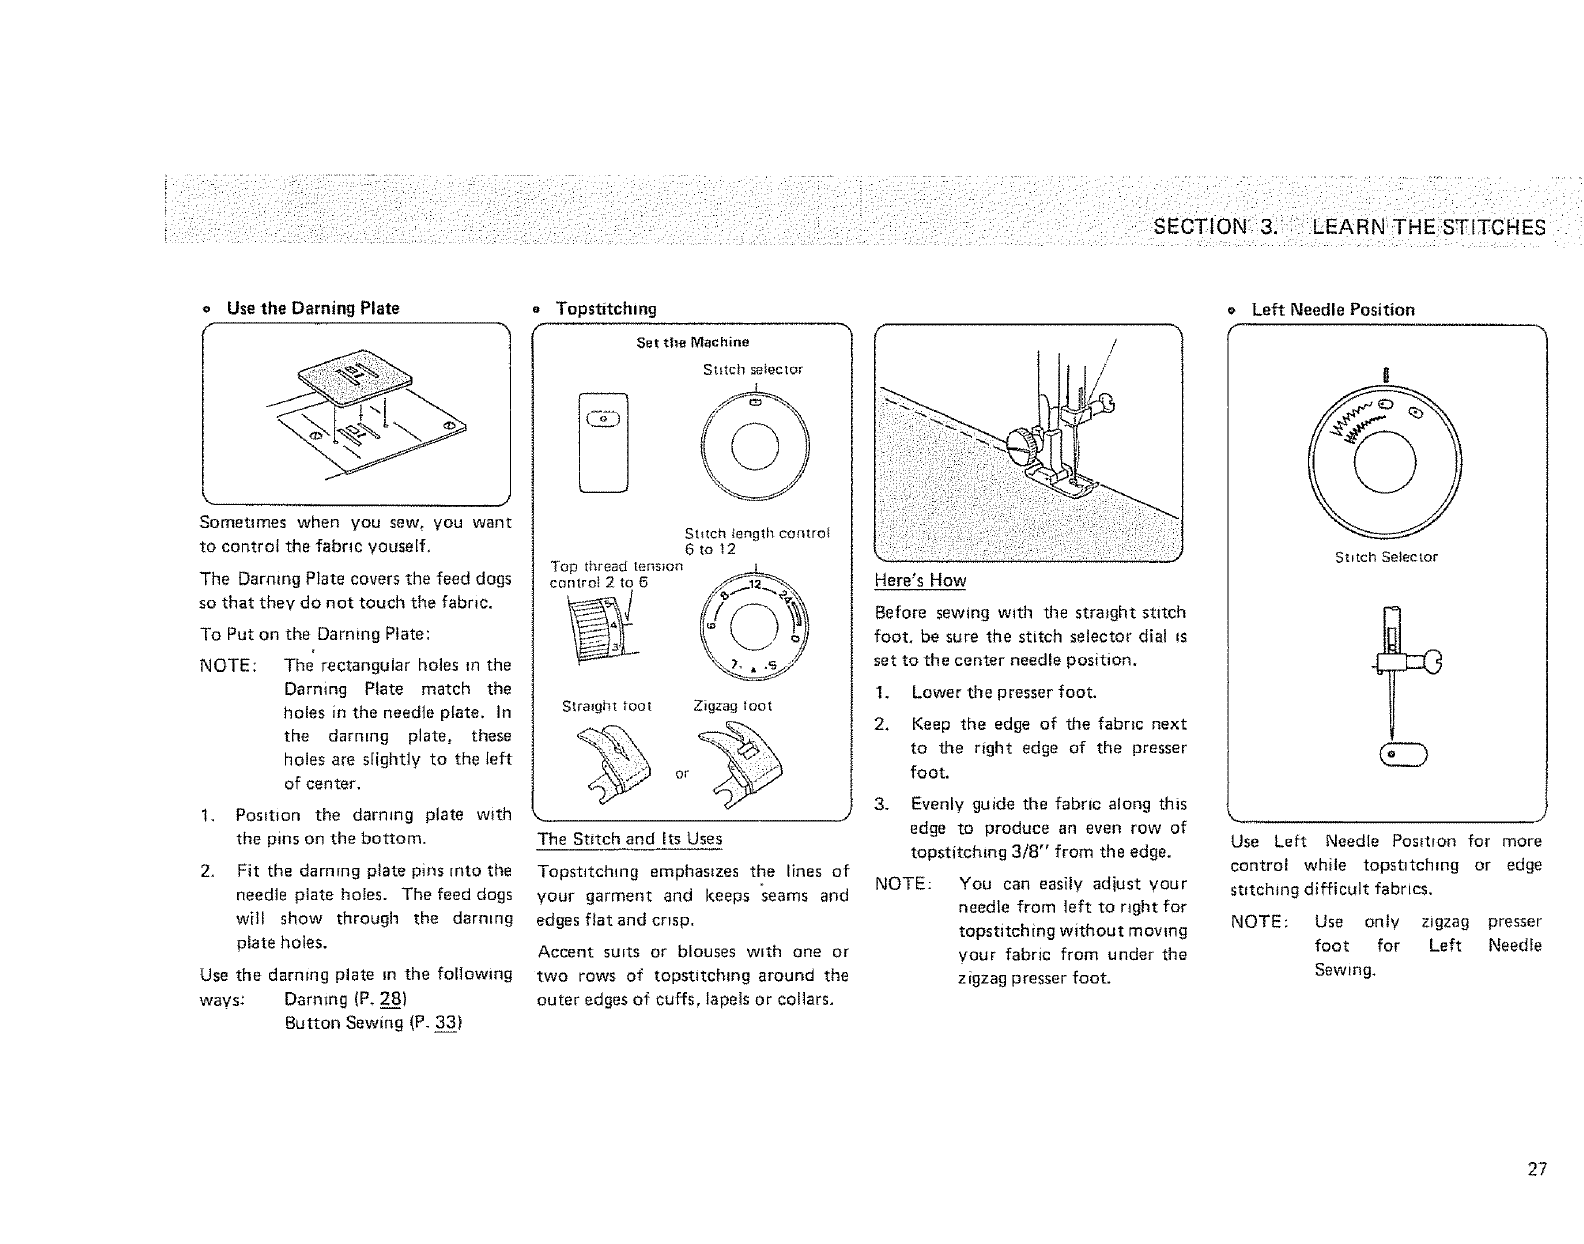
Use the Darning Plate
Sometimes when you sew, you want
to controt the fabric Vouself.
The Darning Plate covers the feed dogs
so that they do not touch the fabric.
To Put on the Darning Plate:
NOTE: The rectangular holes in the
Darning Plate match the
holes in the needle plate. In
the darning plate, these
holes are slightly to the left
of center,
1, Position the darning plate with
the pins on the bottom,
2. Fit the darning plate pins into the
needte plate holes. The feed dogs
wilt show througl_ the darning
plate holes.
Use the darning plate _n the foflowing
ways: Darning (P. 2__88)
Button Sewing (P_ 333)
Top stitch i ng
Set tile Machine
Stitch selector
Stitch fength con_.ro{
6to t2
Top thread tension
control 2 to 6 ,"./-
Straight toot Zigzag loot
The Stitch and Its Uses
TopstJtchmg emphasizes the lines of
your garment and keeps seams and
edges flat and crisp.
Accent suits or blouses w_th one or
two rows of topstitchmg around the
outer edges of cuffs, lapels or collars.
Here's How
Before sewing with the straight stitch
foot. be sure the stitch selector dial ts
set to the center needle position.
1. Lower the presser foot.
2_ Keep the edge of the fabric next
to the right edge of the presser
foot.
Left Needle Position
O
Stitch Setector
3. Evenly guide the fabric along this
edge to produce an even row of Use Left Needle Position for more
topstitching 3/8" from the edge. control while topstttchmg or edge
NOTE: You can easily adiust your stitching difficult fabrics,
needle from left to rtght for
topstitching without moving NOTE: Use ontv zigzag presser
your fabric from under the foot for Left Needle
zigzag presser foot. Sewing,
27
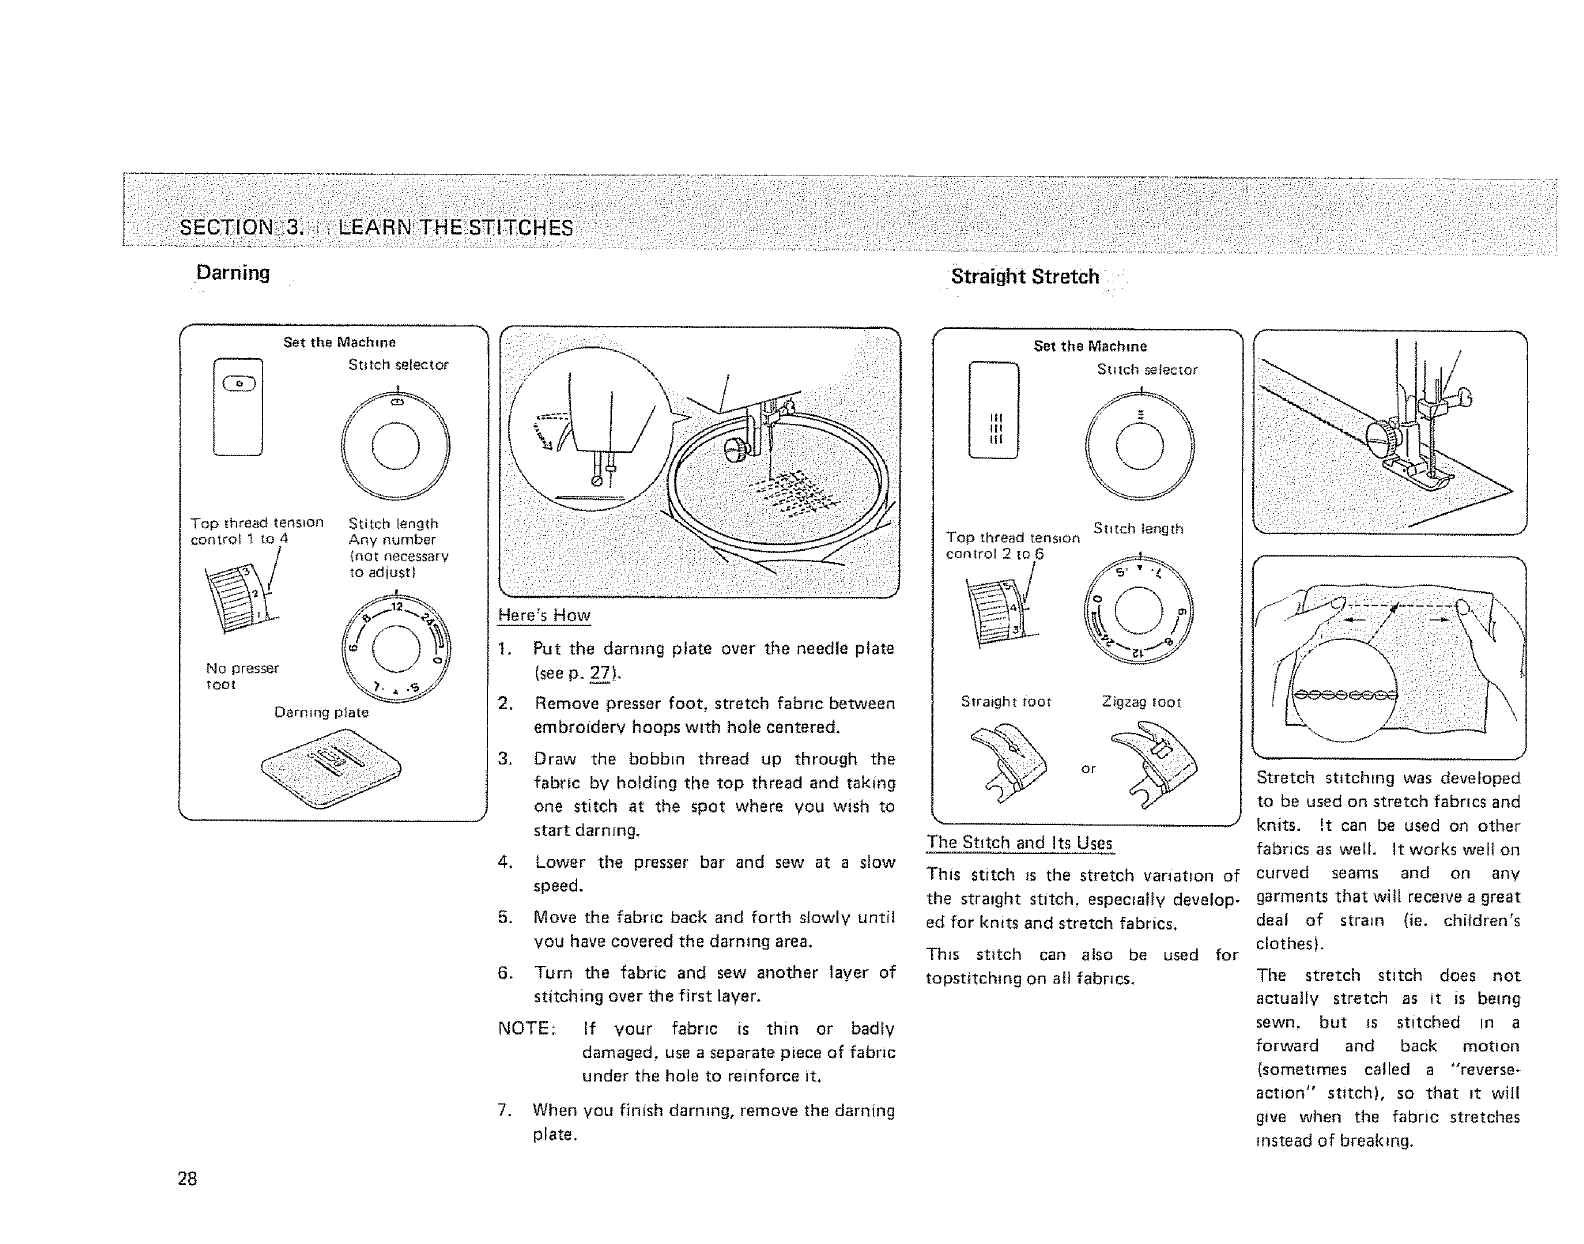
Darning
Set the Machine
Stitch selector
Top thread tension
control 1 to 4
No presser
tOO[
Stitch length
Any number
{not necessary
tO adiust)
Darning pJate
Here's How
1.
2.
3,
4,
5.
6.
NOTE:
Put the darmng plate over the needle plate
(see p. 27),
Remove presser foot, stretch fabnc between
embroidery hoops with hole centered.
Draw the bobbin thread up through the
fabric by holding the top thread and taking
one stitch at the spot where vou wish to
start darntng.
Lower the presser bar and sew at a slow
speed.
Move the fabric back and forth slowly until
you have covered the darmng area,
Turn the fabric and sew another layer of
stitching over the first laver,
If your fabric is thin or badfv
damaged, use a separate piece of fabric
under the hole to reinforce it,
7. When you finish darmng, remove the darning
plate.
28
Straight Stretch
Set the Machine
Stltc_ selector
Stitch (eng th
Top thread tension
control 2 [o 6 _j_m_/.._L_
Straight _oot Zigzag toot
The Stitch and Its Uses
This stitch m the stretch variatEon of
the straight stitch, especially develop.
ed for knits and stretch fabrics,
This stitch can also be used for
topstitching on aH fabrics.
Stretch stitching was developed
to be used on stretch fabrics and
knits. !t can be used on other
fabrics as well, it works well on
curved seams and on any
garments that will receive a great
deal of strmn {ie. chi|dren's
clothes),
The stretch stitch does not
actually stretch as it is being
sewn, but is stitched In a
forward and back motion
(sometimes called a "reverse-
action" stitch), so that Jt will
g_ve when the fabric stretches
mstead of breaking.
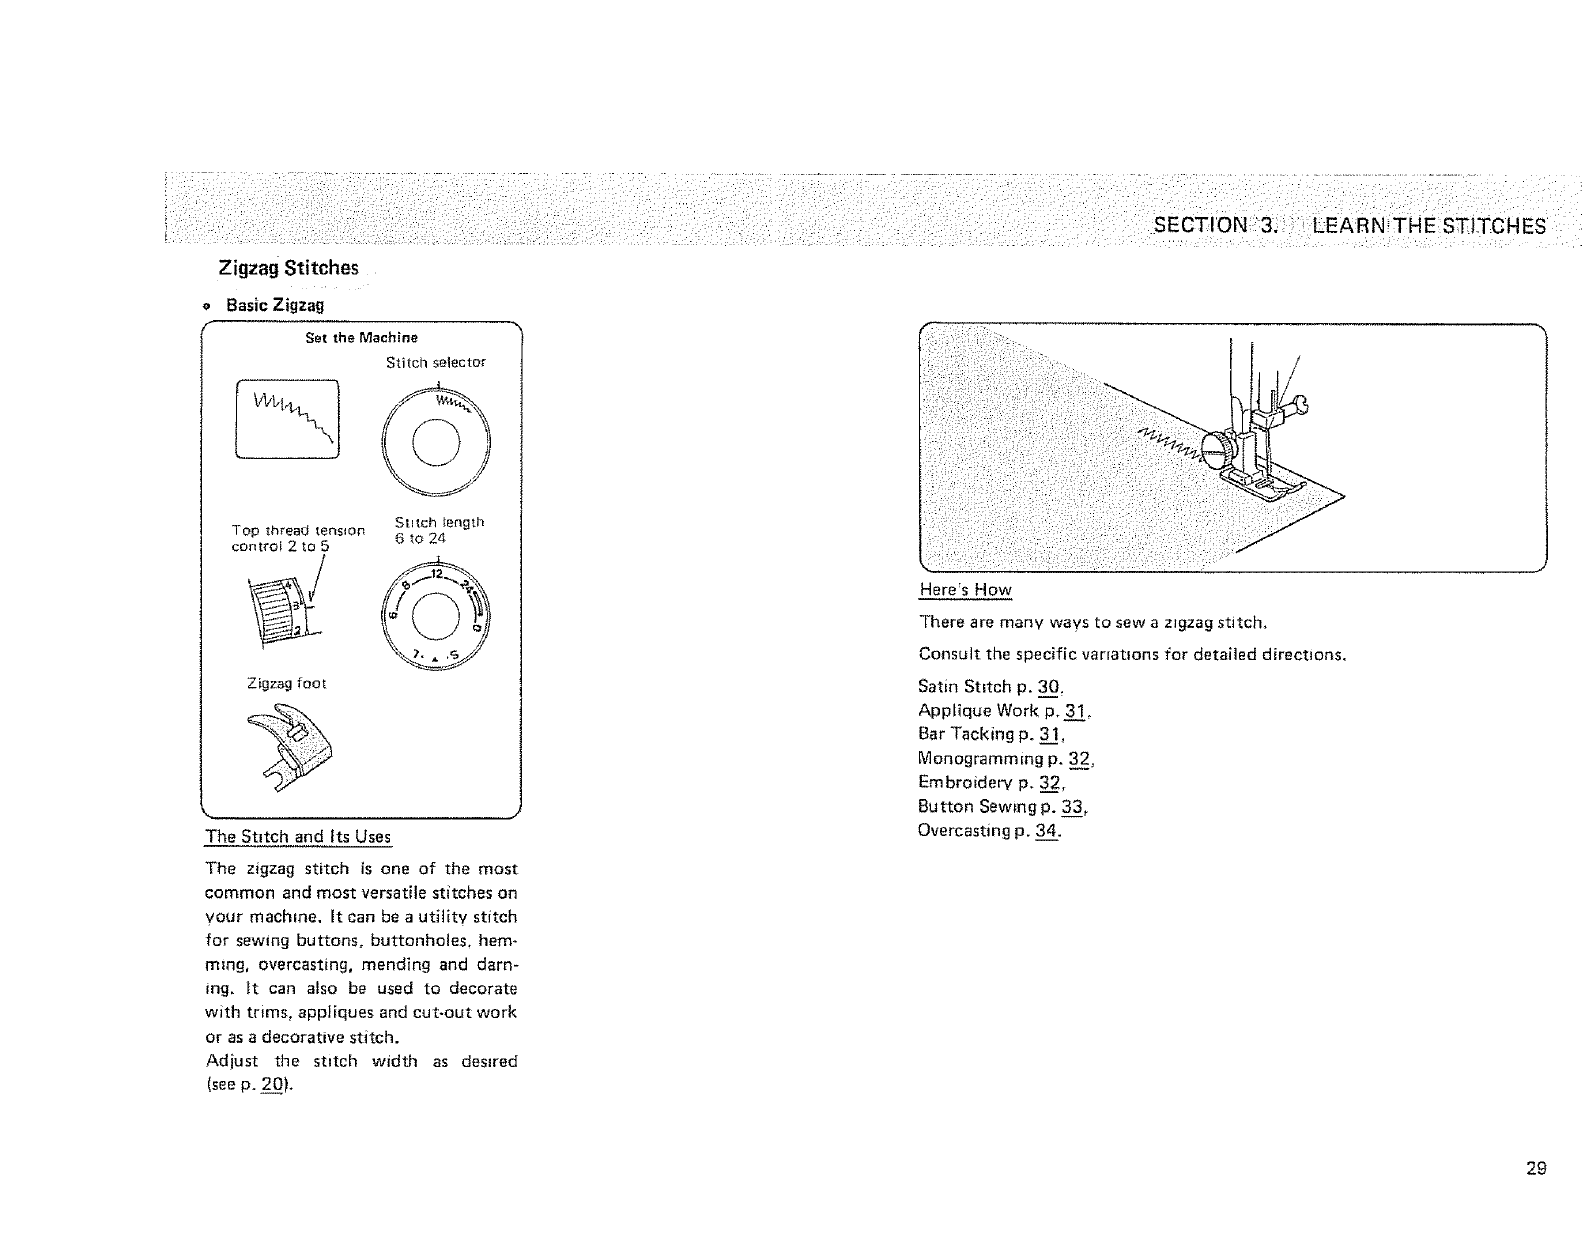
Zigzag Stitches
Basic Zigzag
Set the Machine
Stitch setector
Top thread tension
control 2 to 5
Zigzag foot
Stitch length
6 to 24
The Stitch and its Uses
The zigzag stitch is one of the most
common and most versatile stitches on
your machine, It can be autilitv stitch
for sewmg buttons, buttonholes, hem-
ming, overcasting, mending and darn-
ing, it can a_so be used to decorate
with trims, appliques and cut-out work
or as a decorative stitch.
Adiust the stitch width as desired
(seep. 2£01.
Here's How
There are many ways to sew a zfgzag stitch.
Consult the specific varfat_ons for detailed directions.
Satin Stitch p. 3__00.
AppLique Work p. 31.
Bar Tacking p. 3_]1.
Monogramming p. 32,
Em broidery p. 3__2,
Button Sewing p. 33,
Overcasting p. 34.
29
SECTION N THE STITC
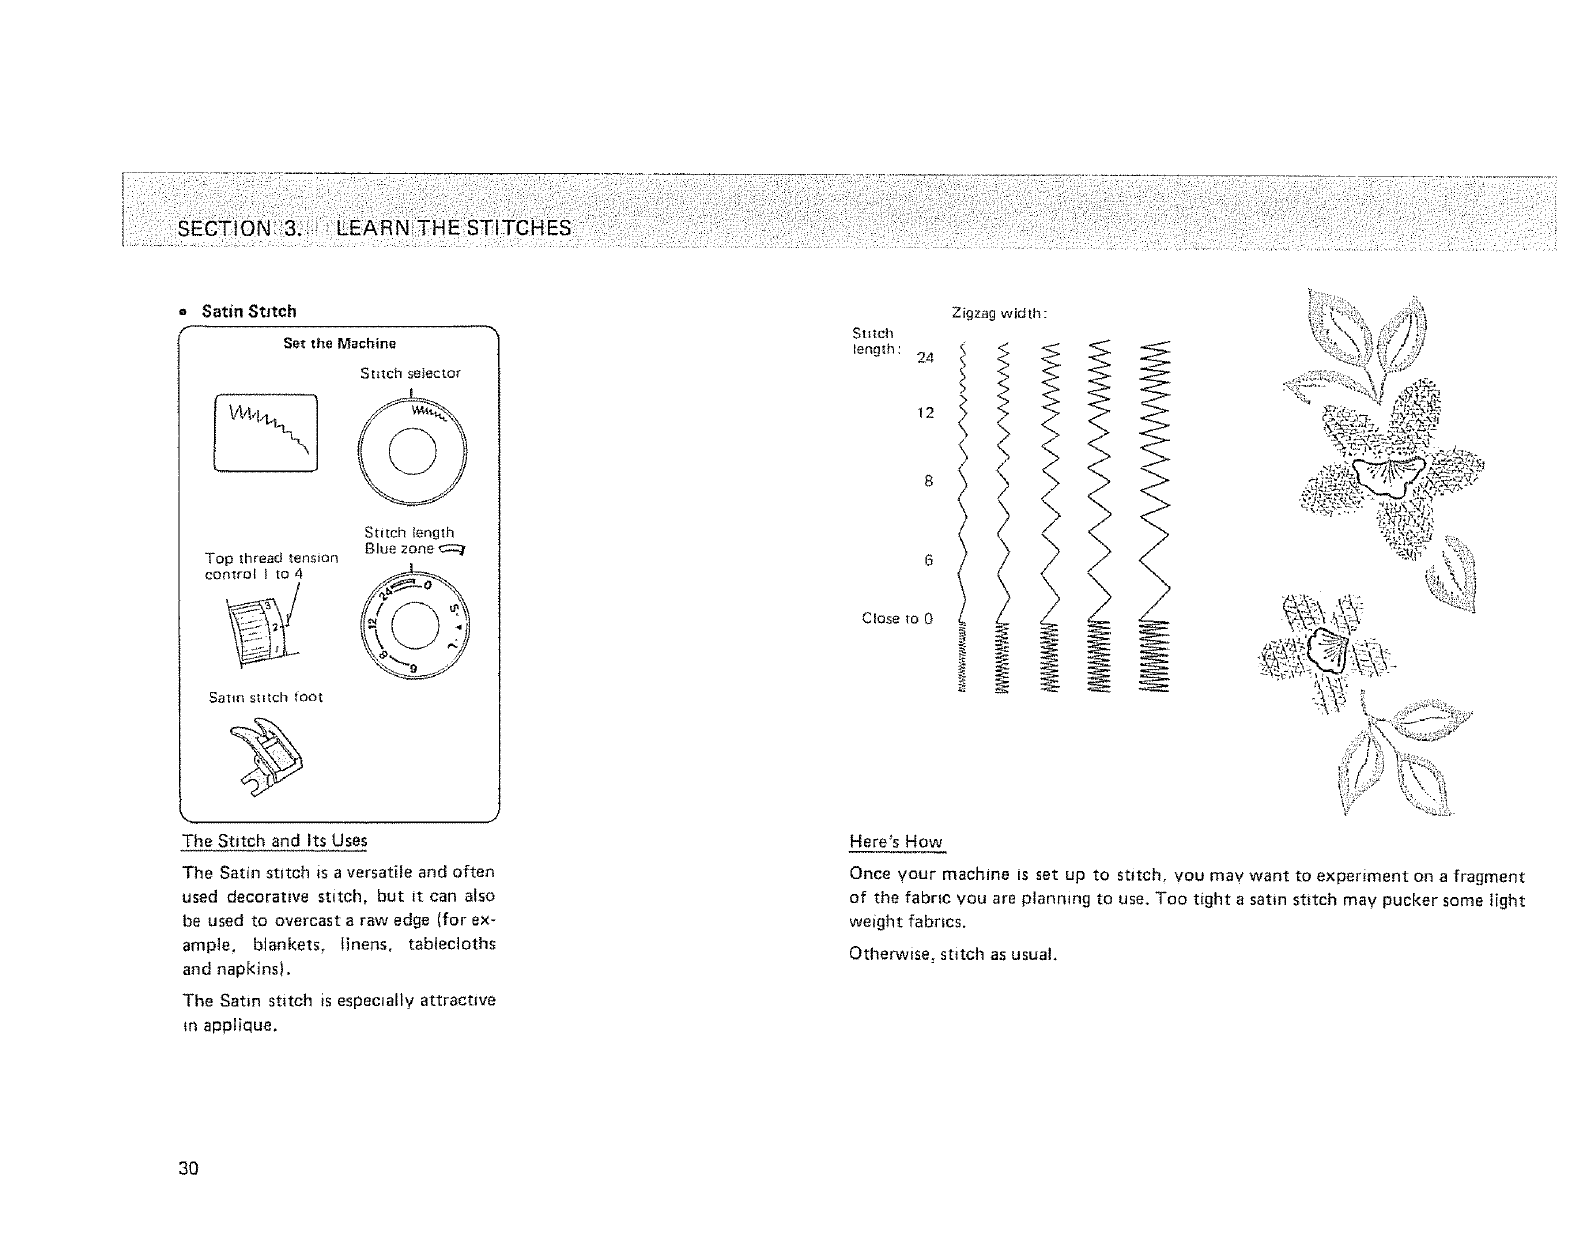
= Satin Stitch
fSet the Machine
[Stitch selector
Top thread tension
control I to 4
Stitch length
Blue zone
The Stitch and Its Uses
The Satin stitch is a versatile and often
used decorative stitch, but it can also
be used to overcast a raw edge (for ex-
ample, bJankets, linens, tablecloths
and napkins).
The Satin stitch is especially attractive
in applique.
3O
Ststch
length : 24
12
Close to 0
Zigzag width :
Here's How
Once vour machine is set up to stitch, vou may want to experiment on a fragment
of the fabric you are planning to use. Too tight a satin stitch may pucker some light
weight fabrics.
Otherwise, stitch as usual.
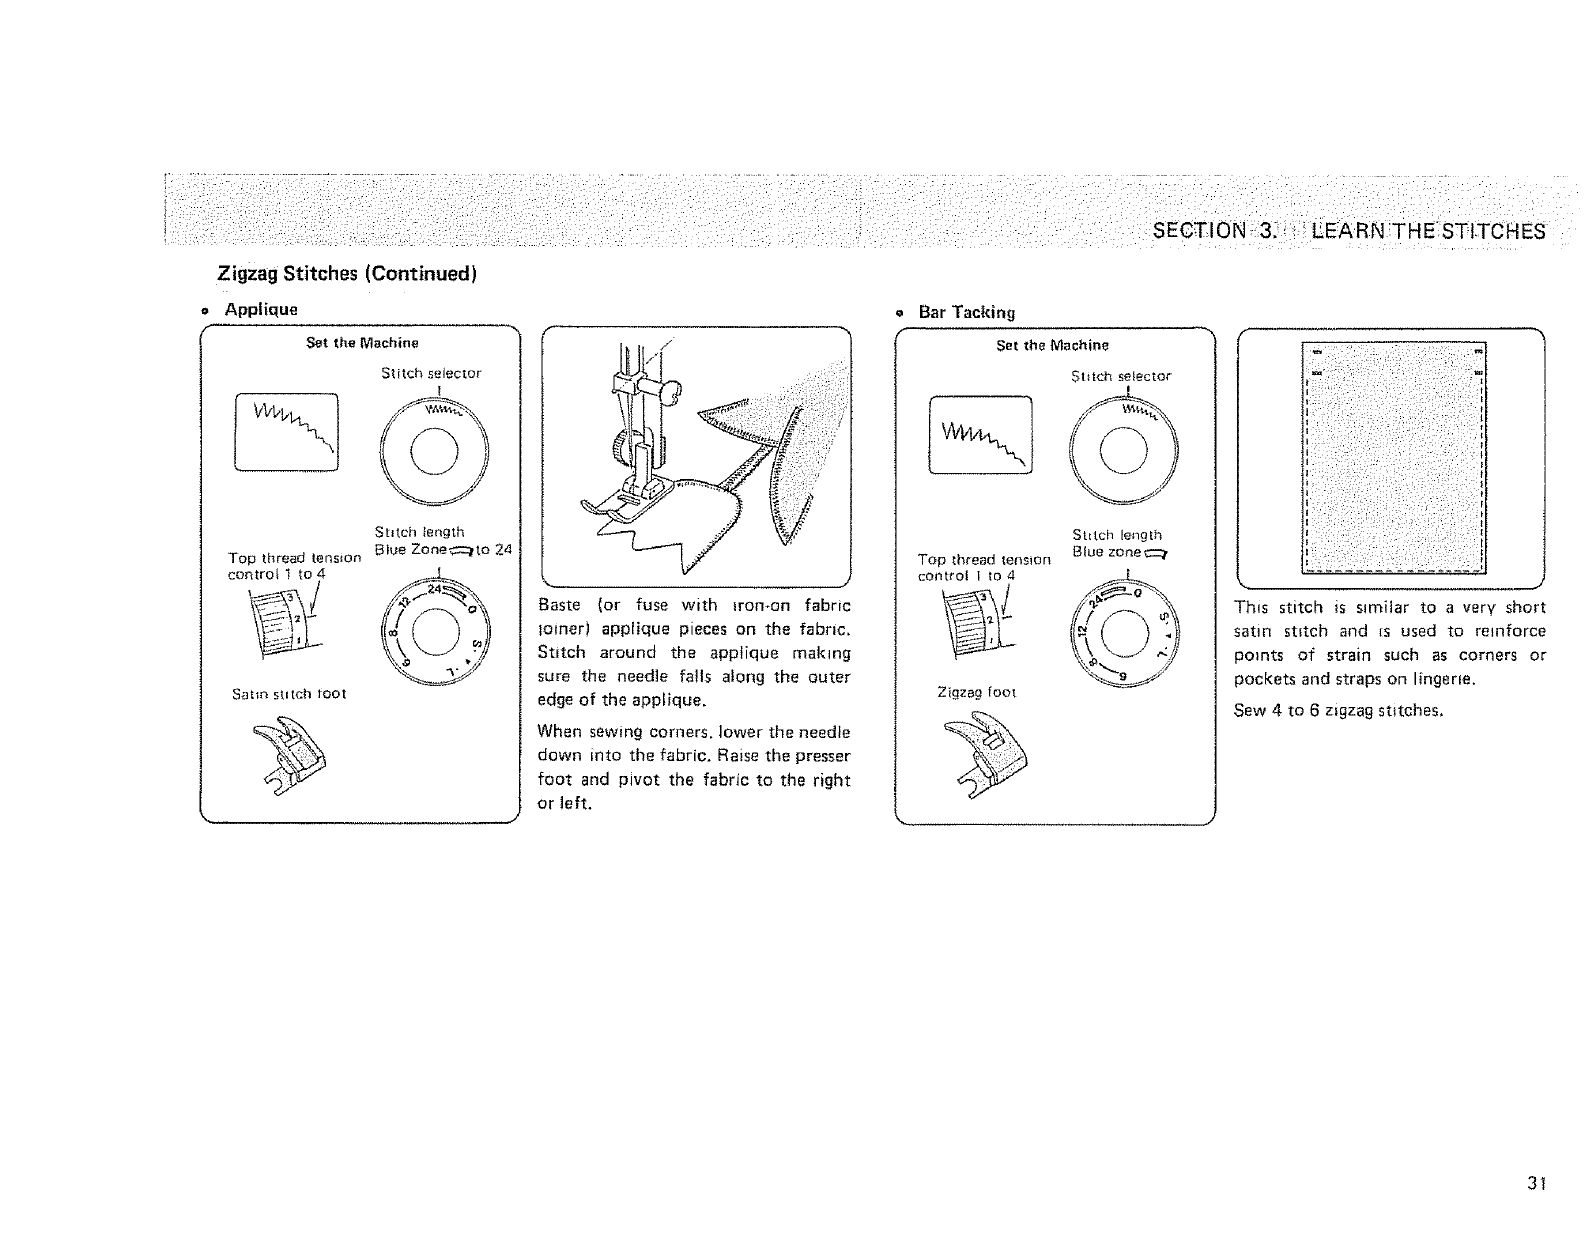
Zigzag Stitches (Continued)
=Applique
Set the Machine
Stitch selector
!
Stitch length
Biue Zonec_=:tto 2_
Top threadtension
CoP, tFOI 1to 4 _.J_ _°_
Sattr_ sUtch toot
/
Baste {or fuse with _romon fabric
Ioiner) appiique pieces on the fabric,
Stitch around the applique making
sure the needle falls atong the outer
edge of the applique.
When sewing corners, lower the needle
down into the fabric. Raise the presser
foot and pivot the fabric to the right
or left.
= Bar Tacking
Set the Machine
Stitch selector
Stitch le_g tl'_
Top thread tension Blue zone¢::?
control I to 4
Zigzag foot
This stitch is stmilar to a very short
satin stitch and [s used to reinforce
points of strain such as corners or
pockets and straps on lingerie.
Sew 4 to 6 zigzag stitches,
31
Zigzag Stitches (Continued)
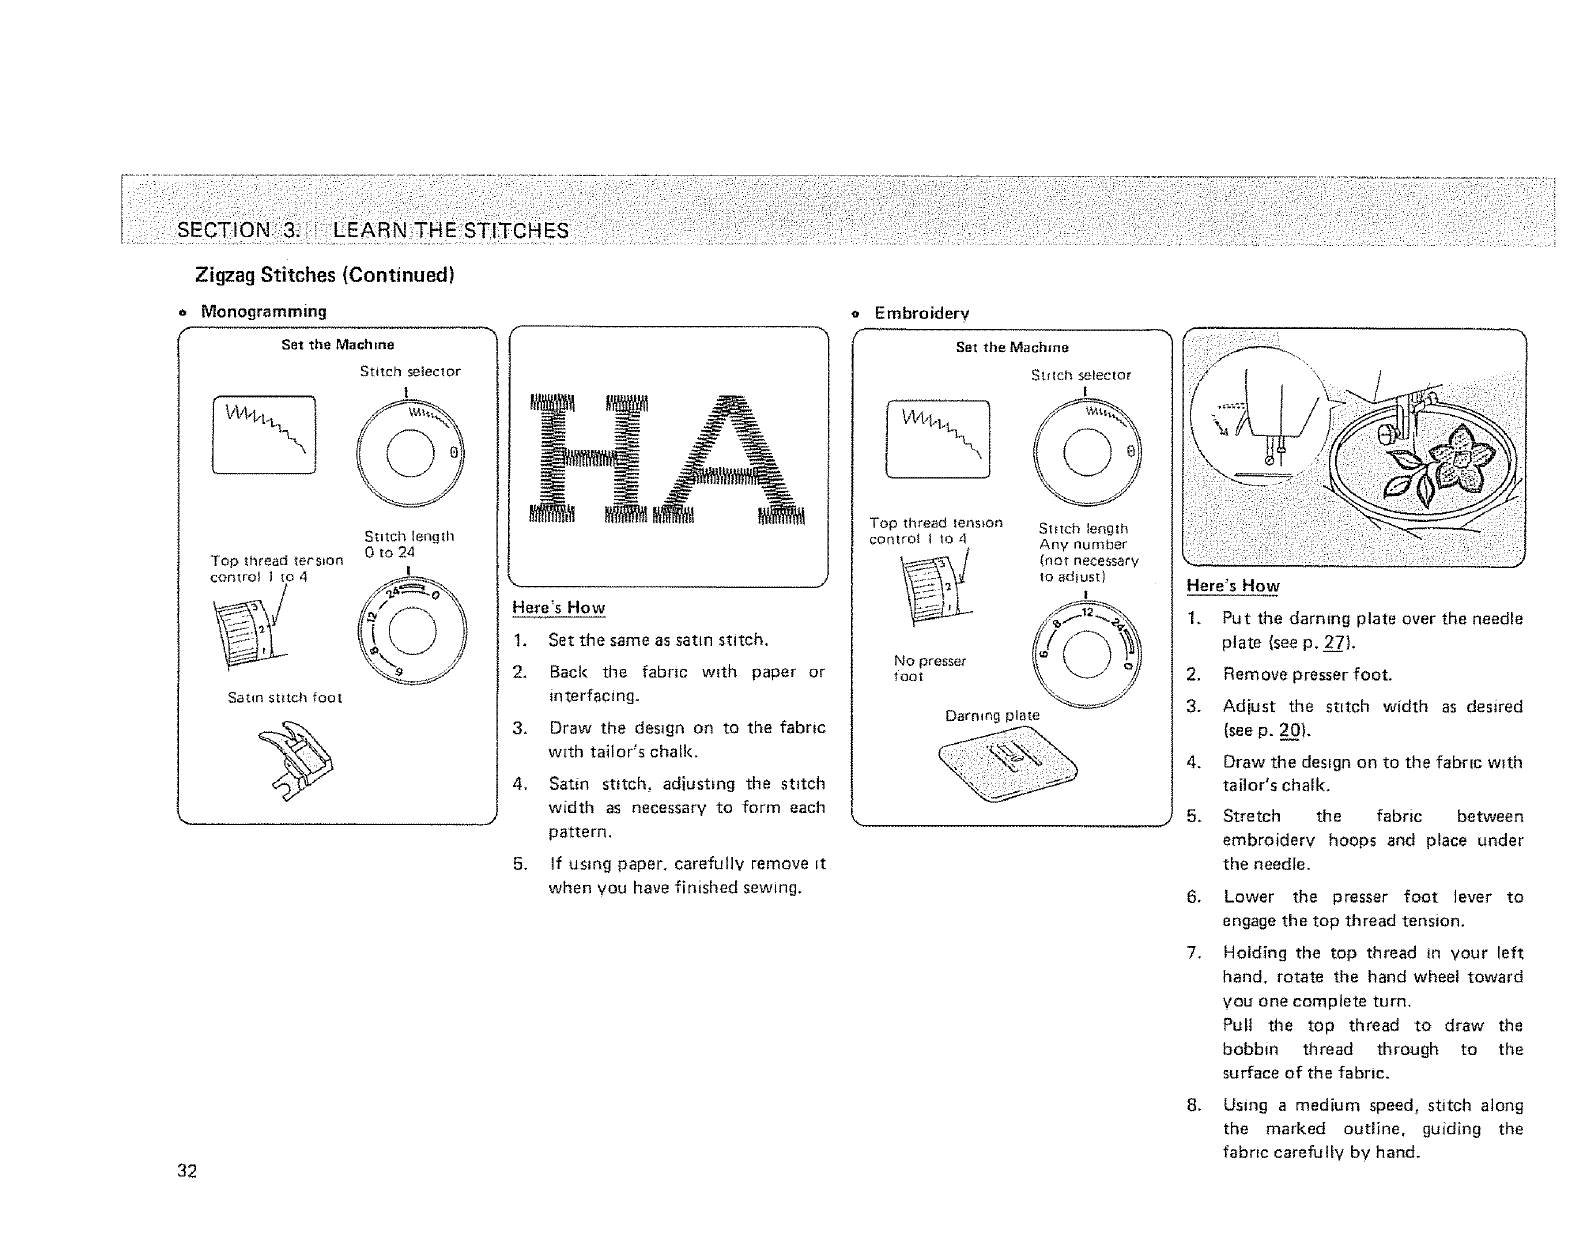
oMonogramming
Set the Math+he
St+tch selector
!
Top thread tecs_on
¢ontro_ ]to 4
Stitch length
0 to 24
!
Sa_+n stitch foot
32
3,
Set the same as satin stitch,
Here's How
1.
2. Back the fabric with paper or
interfacing.
Draw the demgn on to the fabr+c
with tailor's chalk.
4. Satin stitch+ adjusting the stitch
width as necessary to form each
pattern,
5. If us+ng paper, carefully remove it
when you have finished sewing.
oEmbroidery
Set the Machine
Top thread tens+on
contro+ + to 4
No presser
toot
Stitch lenglh
Any number
(not necessary
toadiust)
I
C
Darmng plate
Here's How
1. Put the darning plate over the needle
plate (see p. 27).
2. Remove presser foot.
3. Adiust the stLtch width as desired
(see p. 200).
4. Draw the demgn on to the fabric w+th
tailor's chalk+
5. Stretch the fabric between
embroiderv hoops and place under
the needle.
6.
7,
Lower the presser foot lever to
engage the top thread tension.
Hotd_ng the top thread in your left
hand, rotate the hand wheel toward
vou one complete turn,
Pull the top thread to draw the
bobbin thread through to the
surface of the fabric.
8+ Using a medium speed, stitch along
the marked outline, guiding the
fabric carefultv by hand.
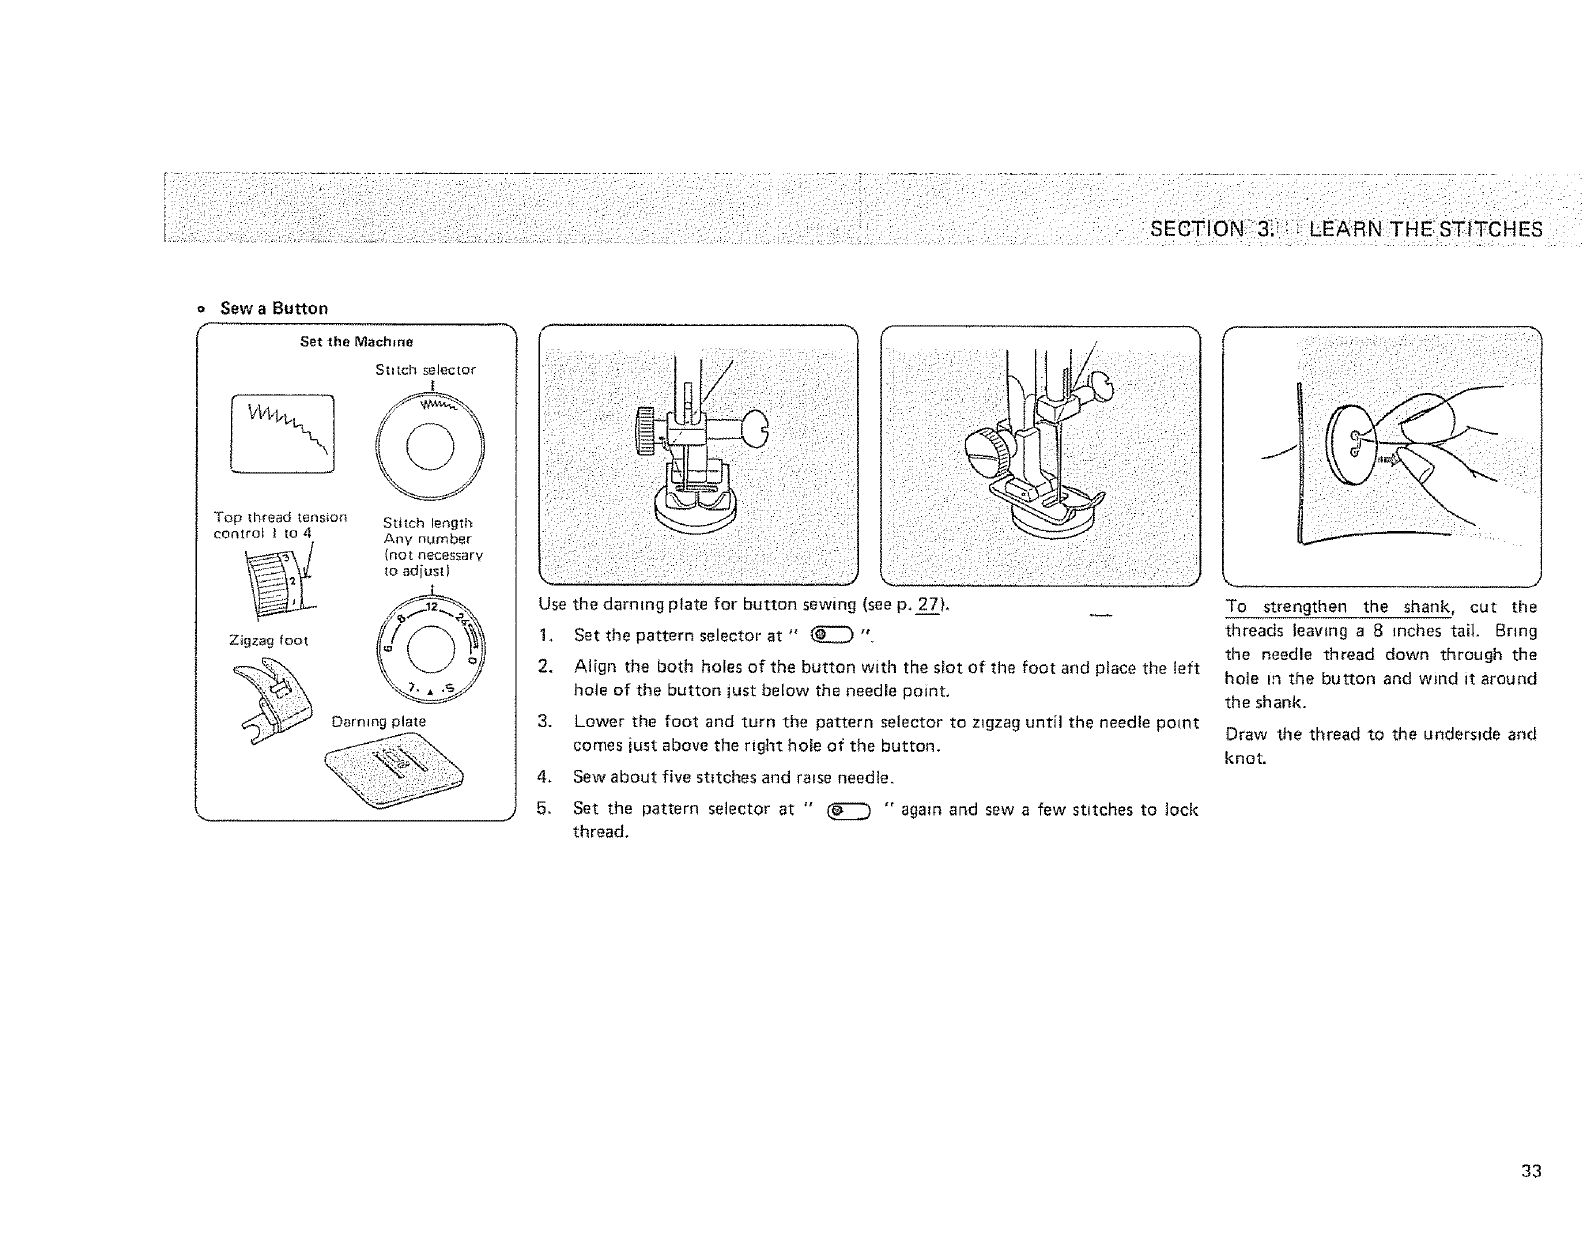
oSewa Button
Set the Machine
St _[chselector
I
"Top thread tension Stitch length
control I [o 4 Any number
(not necessary
_,oadiusd
Z_gzag foot "i__
Darning plate
Use the darning plate for button sewing (see p, 27),
1,
2.
3.
4.
5.
Set the pattern selector at " @ "
Align the both holes of the button with the slot of the foot and place the left
hote of the button iust below the needle point,
Lower the foot and turn the pattern selector to zigzag untit the needle point
comes iust above the right hote of the button.
Sew about five stitches and raise needle.
Set the pattern setector at " @ " again and sew a few stitches to tock
thread.
To strengthen the shank, cut the
threads leawng a 8 inches tail. Bring
the needle thread down through the
hole in the button and wind it around
the shank.
Draw the thread to the underside and
knot
33
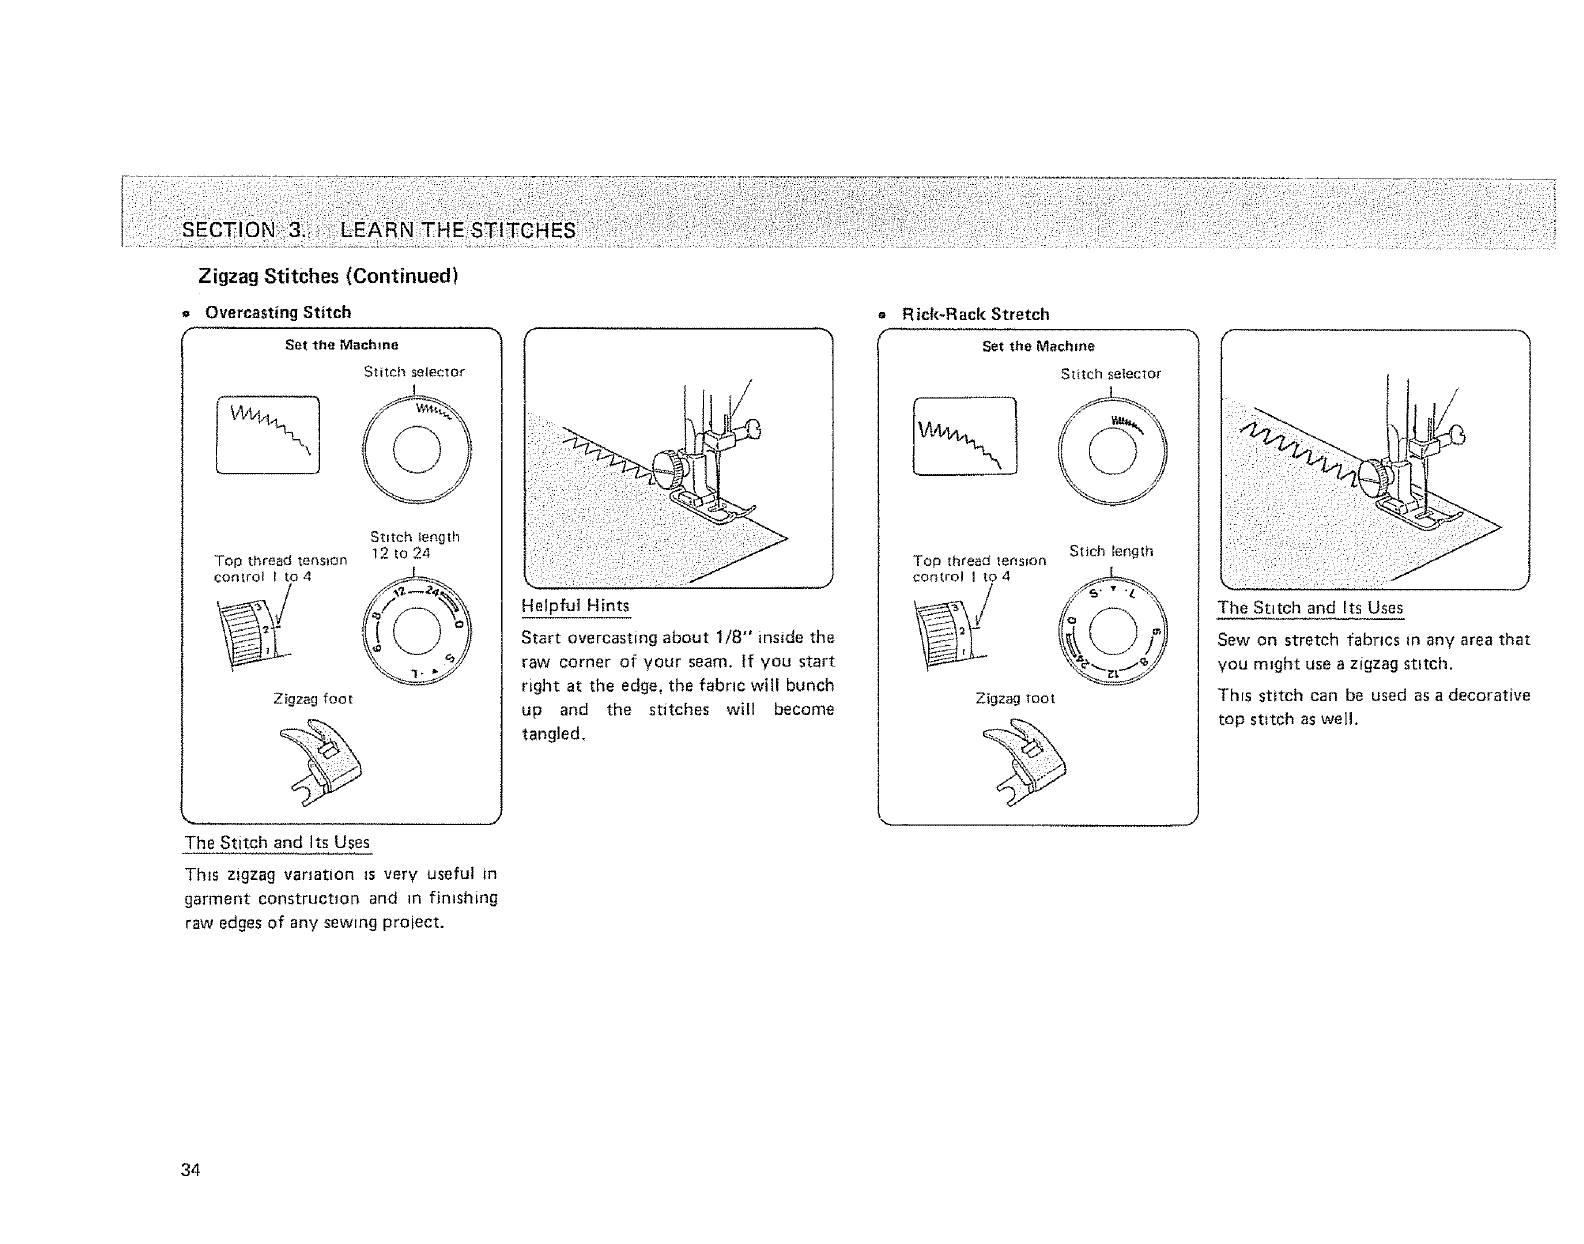
Zigzag Stitches (Continued)
=Overcasting Stitch
Set the M_chme
Stitch selector
I
Stitch leoglh
Top thread tension 12 to 24
controt !to 4 ._
@
Zigzag foot
The Stitch and Its Uses
This zigzag variation ]s very useful in
garment construction and _n finishing
raw edges of any sewing proiect.
Helpful Hints
Start overcasting about 1/8" inside the
raw corner of your seam. If you start
right at the edge, the fabnc will bunch
up and the stitches will become
tangled.
o Rick-Rack Stretch
Set the Machine
Stitch setector
Stich length
Top thread tension
control I to 4 __
Zigzag toot
The Stitch and Its Uses
Sew on stretch fabrics In any area that
you m_ght use a zigzag stttch.
This stitch can be used as a decorative
top stttch as well.
34
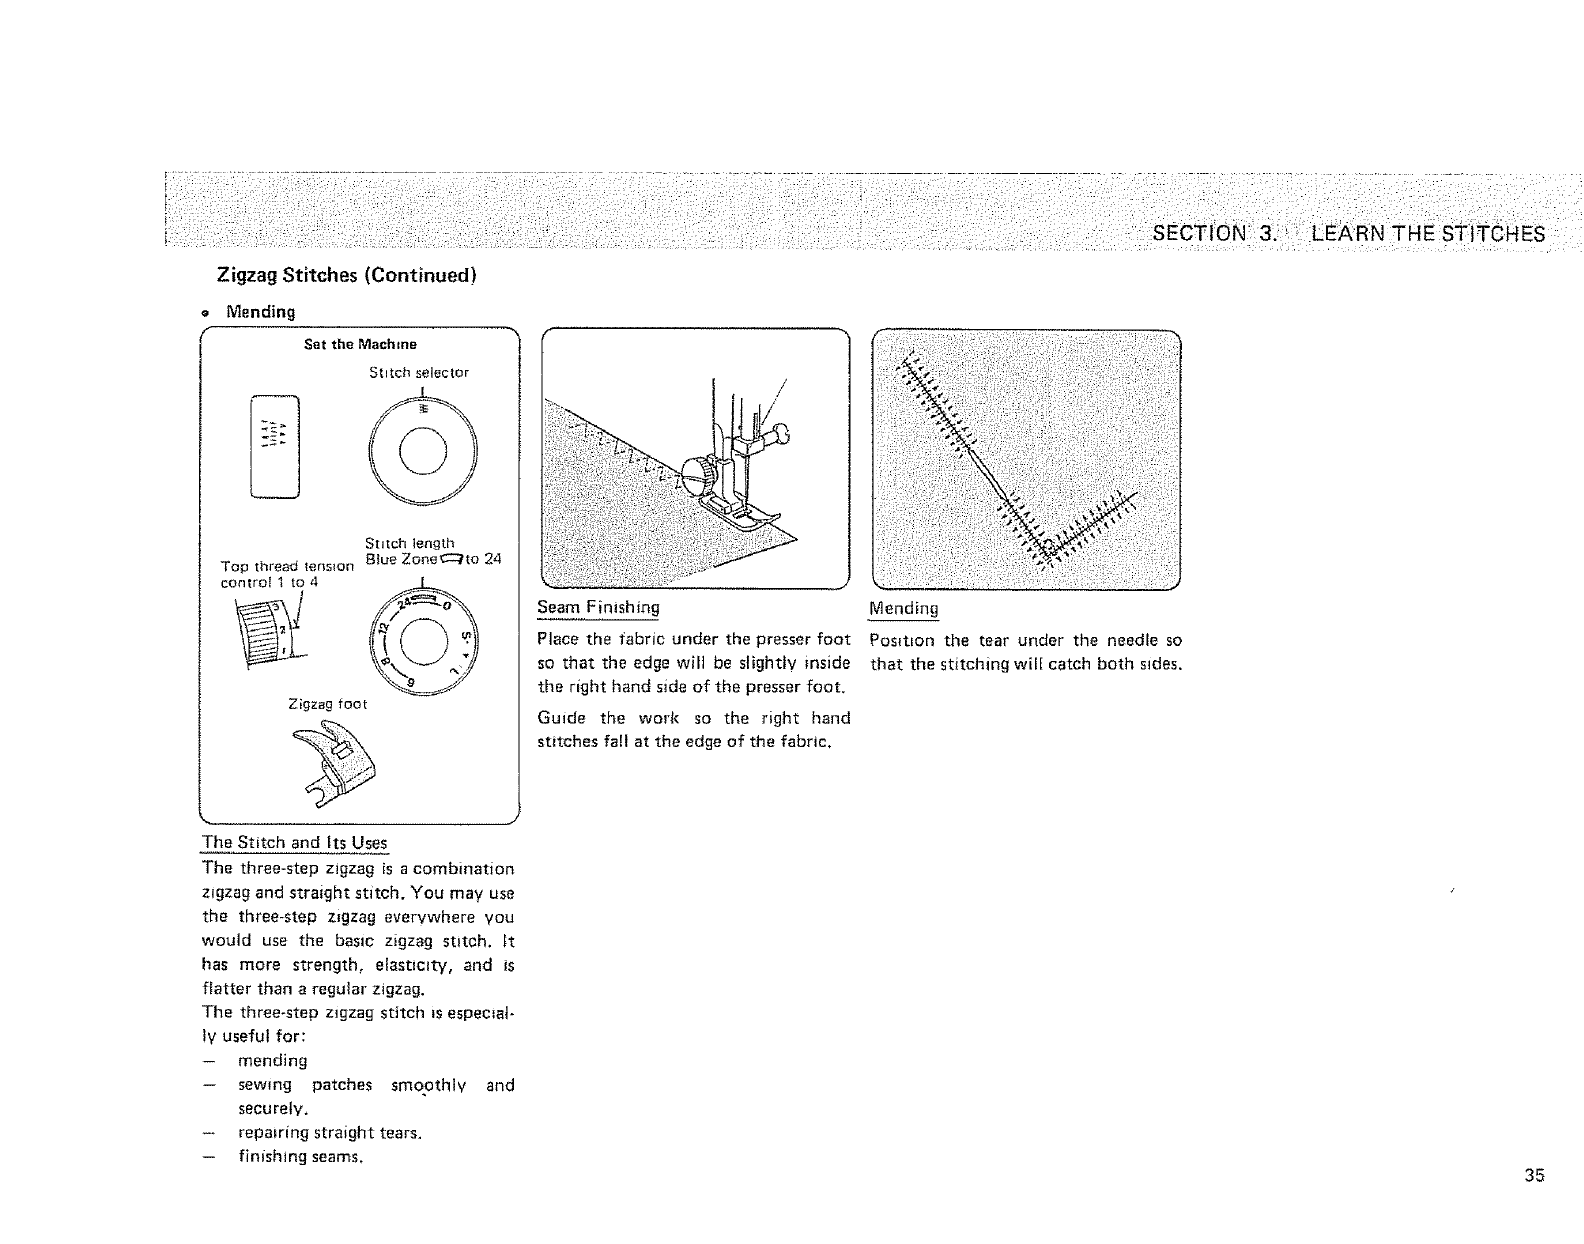
Zigzag Stitches (Continued)
Mending
Set the Machine
Stitch selector
Top thread tension
control 1 to 4
Stitch length
Blue ZoneC::tto 24
Zigzag foot
The Stitch and Its Uses
The three-step zigzag is a combination
zigzag and straight stitch. You may use
the three-step z_gzag everywhere you
would use the basic zigzag stitch. It
has more strength, elastimty, and is
flatter than a regular zigzag.
The three-step z_gzag stitch Is especial-
ly useful for:
-- mending
-- sewing patches smoothly and
securely.
-- repairing straight tears,
-- finishing seams,
Seam Finishing Mending
Place the fabric under the presser foot Position the tear under the needle so
so that the edge wilt be slightly inside that the stitching wil[ catch both sides.
the right hand side of the presser foot,
Guide the work so the right hand
stitches fall at the edge of the fabric.
35
iii! i !
: i!iiiil ii! ! i i i ii i
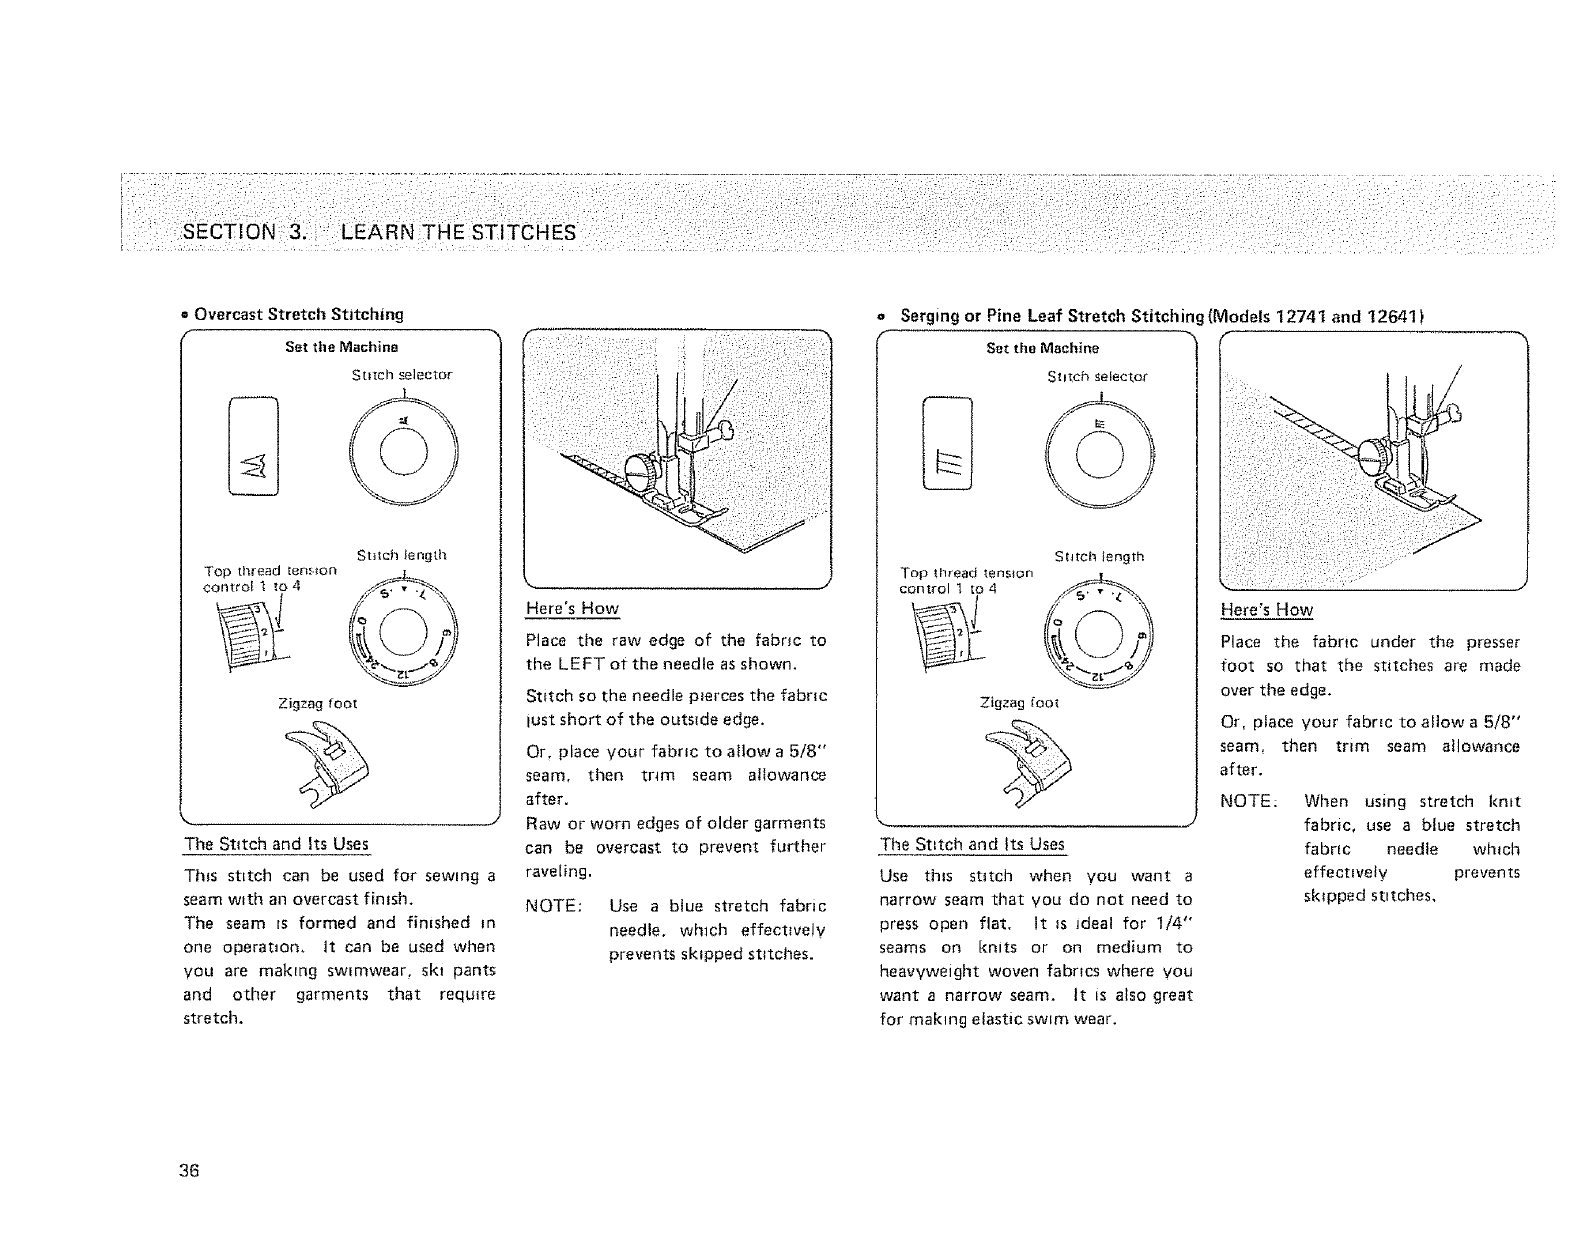
Overcast Stretch Stitching
Setthe Machine
St}tct_ length
control 1 to 4 ...._._.4_ -,,
Zigzag loot
The Stitch and its Uses
Th_s stitch can be used for sewing a
seam with an overcast finish.
The seam is formed and finished m
one operat_om It can be used when
VOU are making swimwear, ski pants
and other garments that require
stretch.
Here's How
Place the raw edge of the fabric to
the LEFT of the needle as shown.
Stitch so the needle pierces the fabric
lust short of the outside edge.
Or, place your fabric to ailow a 5/8"
seam. then thin seam allowance
after.
Raw or worn edges of older garments
can be overcast to prevent further
raveling.
NOTE: Use a blue stretch fabric
needle, which effectively
prevents skipped stitches.
Serging or Pine Leaf Stretch Stitchim
Set the Machine
Sl=tCh selector
Stitch Iength
Top _flreed tension _L
control 1 to 4
Zigzag foot
The Stitch and Its Uses
Use this stitch when you want a
narrow seam that you do not need to
press open flat. It _s ideal for 1/4 ,°
seams on knits or on medium to
heavyweight woven fabrics where vou
want a narrow seam. It is also great
for making elastic swim wear,
(Models 12741 and 12641 )
Here's How
Place the fabric under the presser
foot so that the stitches are made
over the edge.
Or, piece your fabric to allow a 5/8"
seam, then tr_m seam allowance
after.
NOTE: When using stretch kmt
fabric, use a blue stretch
fabric needle which
effectively prevents
skipped stretches,
36
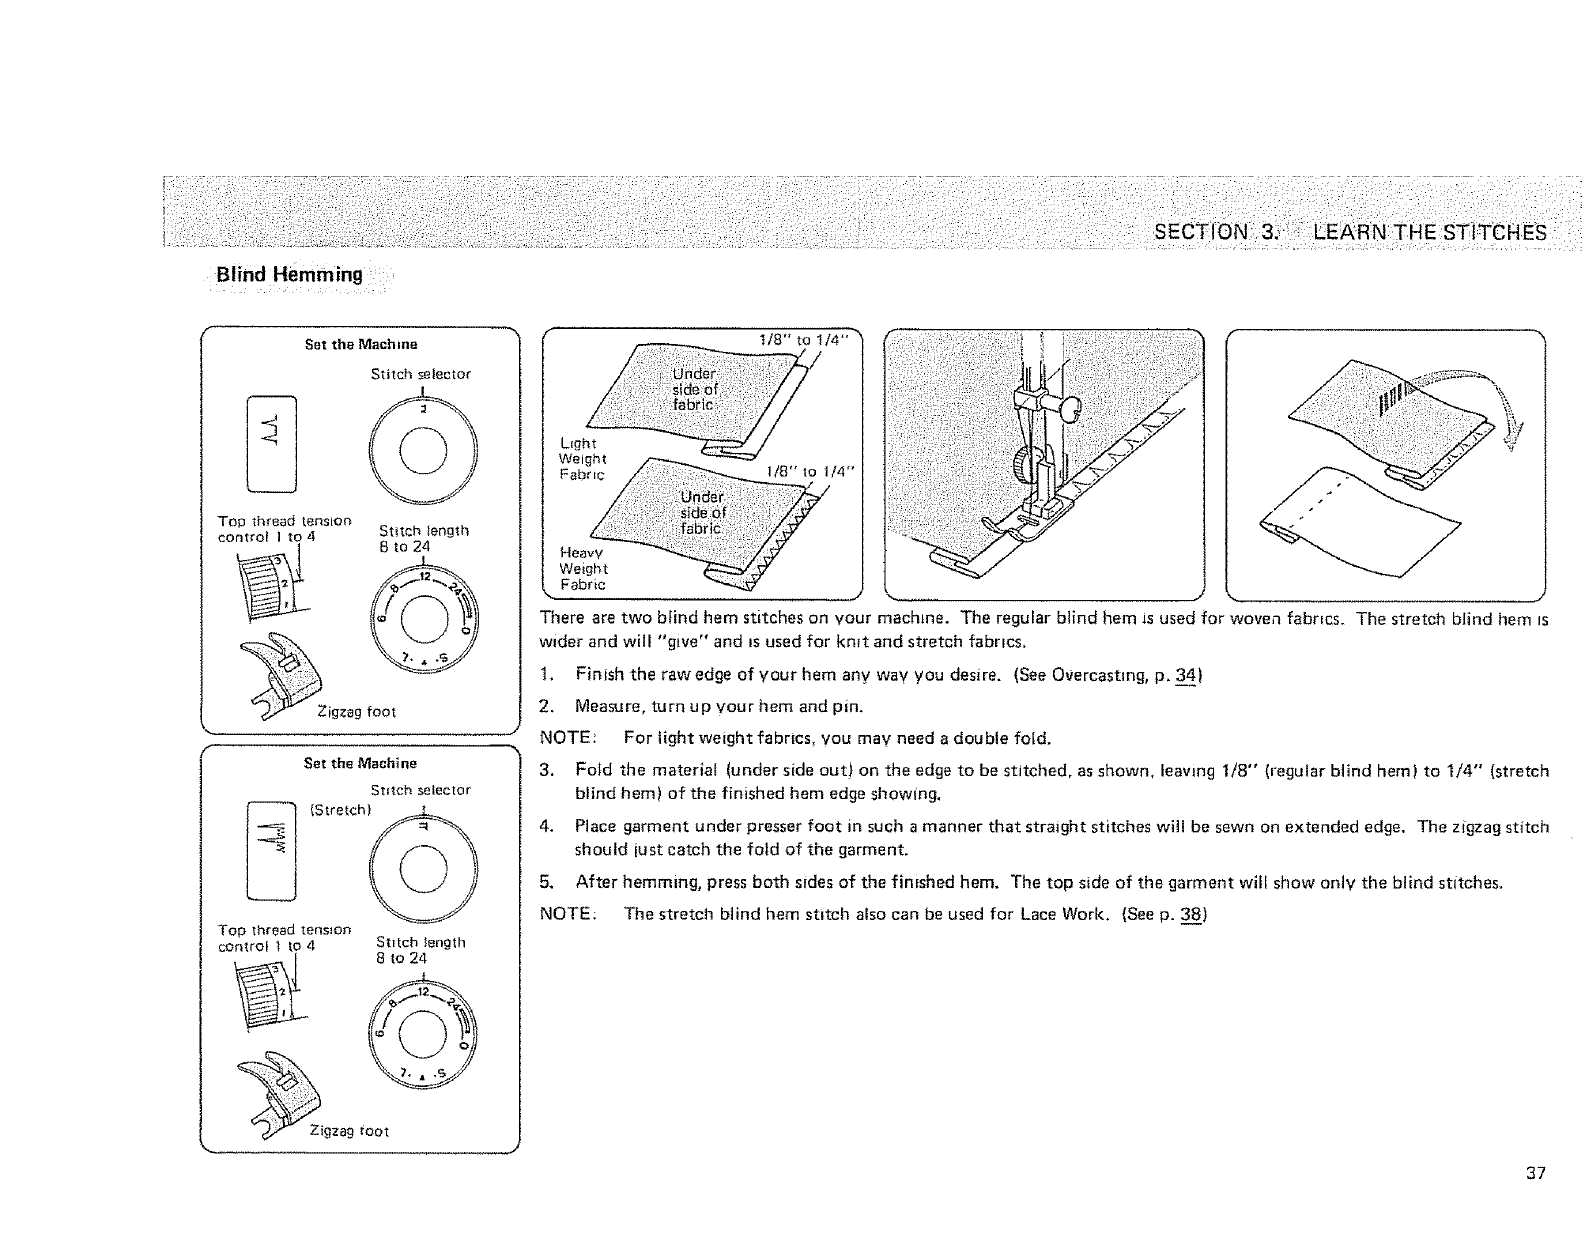
Blind Hemming
Set the Machine
Stitch selector
Top thread tension
control 1 to 4 Stitch length
Set the Machine
St=rob selector
_ {Stretch}
Top thread tension
control 1 to 4 Stitch length
8 to2_
_Z_gzag foot
L_ght
Weight
Fabric 1/8"to 114"
Heavv
Weight
Fabric
There are two blind hem stitches on your machine. The regular blind hem is used for woven fabrics. The stretch blind hem is
wider and will "give" and _sused for kmt and stretch fabrics.
1. Finish the raw edge of your hem any way you desire. (See Overcasting, p. 3__441
2. Measure, turn up your hem and pin.
NOTE: For light weight fabrics you may need a double fold.
3. Fold the material (under side out} on the edge to be stitched, as shown, leaving 1/8" (regular blind hem) to 1/4" (stretch
blind hem) of the finished hem edge showing.
4. Place garment under presser foot in such a manner that straight stitches will be sewn on extended edge. The zigzag stitch
should iust catch the fold of the garment.
5. After hemming, press both sides of the finished hem. The top side of the garment wilf show only the blind stitches.
NOTE; The stretch blind hem stitch also can be used for Lace Work. (See p. 3_88)
37
;ECTION
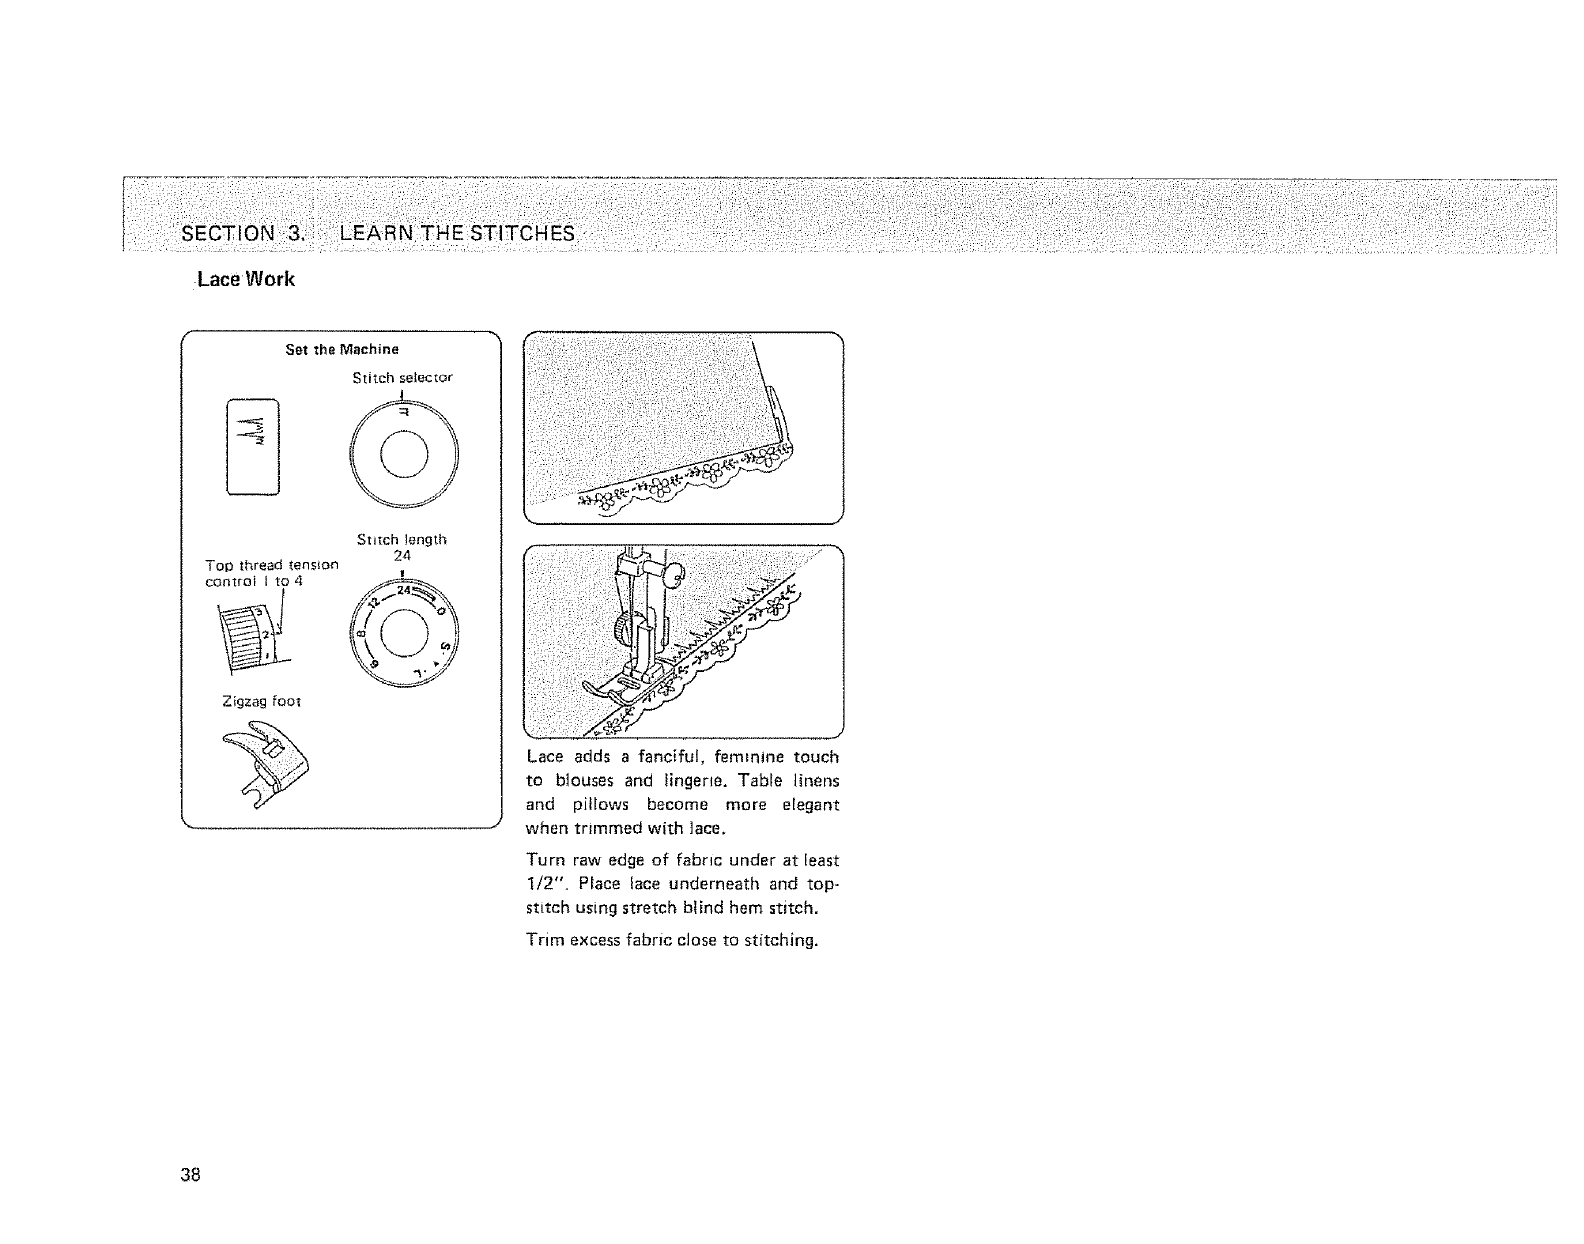
LaceWork
Set the Machina
Stitch selector
Stitch length
24
Top thread tension
controt I to 4
Zigzag foot
Lace adds a fanciful, femtnine touch
to blouses and lingerte. Table linens
and pillows become more elegant
when trimmed with ]ace.
Turn raw edge of fabric under at least
1/2". Place lace underneath and top-
stitch using stretch blind hem stitch.
Trim excess fabric close to stitching,
38
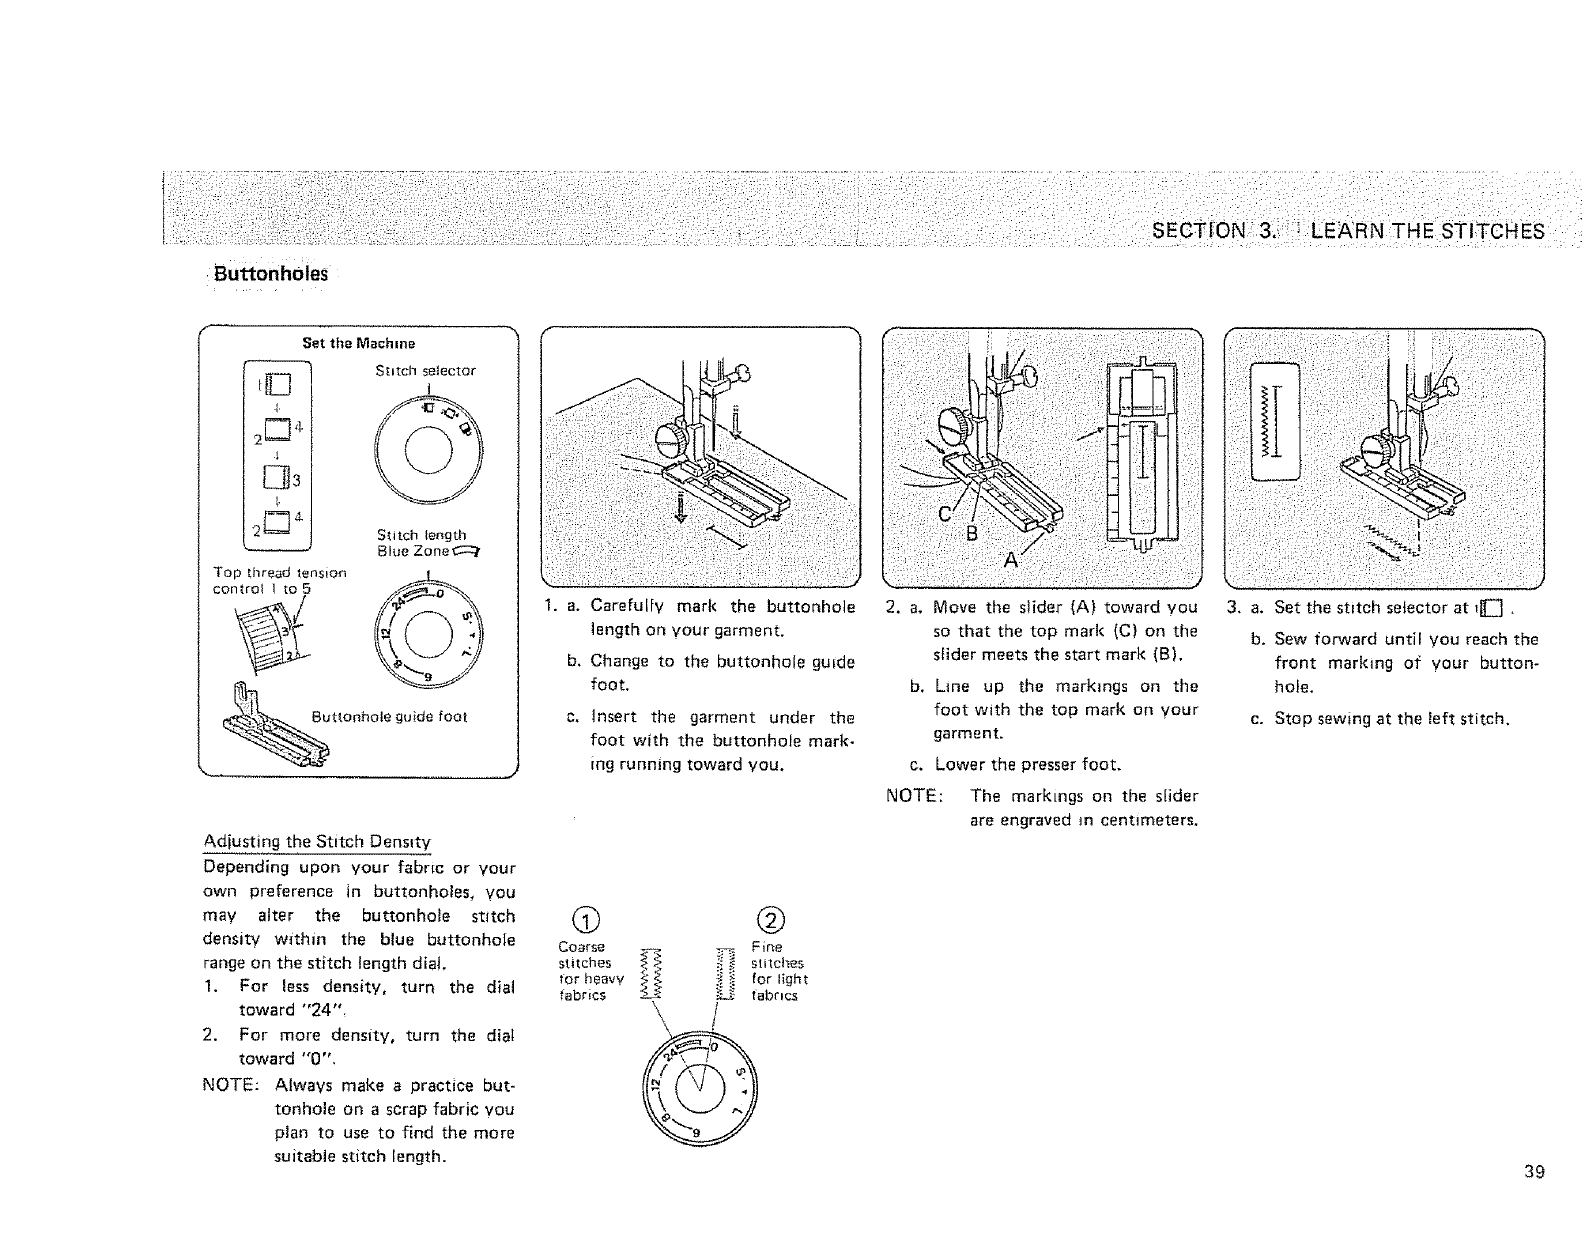
Buttonholes
Set the Machine
,D
2 _4"
4
Top thread tension
controt ] to 5
Shtch selector
1
Stitch tength
Blue Zone G:::/
0
£_%ttonhole guide foot
Adjusting the Stitch Density
Depending upon your fabric or your
own preference in buttonholes, you
may alter the buttonhole stitch
density within the blue buttonhole
range on the stitch length dial.
1. For less density, turn the diat
toward "24"
2. For more density, turn the dial
toward "0",
NOTE: Always make a practice but-
tonhole on a scrap fabric you
plan to use to find the more
suitable stitch length.
1. a. Carefulfy mark the buttonhole
length on your garment,
b. Change to the buttonhole guide
foot.
c, insert the garment under the
foot with the buttonhole mark-
ing running toward you,
@
Coarse
stitches
lot heavv
tabrics
@
Fine
_ stitches
for light
_ labncs
\/
@
2. a. Move the slider (A) toward you
so that the top marl{ {C) on the
slider meets the start mark (B),
b. Line up the markings on the
foot with the top mark on your
garment.
c. Lower the presser foot.
NOTE: The markings on the slider
are engraved m centimeters.
3. a. Set the stitch selector at tiE] ,
b, Sew forward until you reach the
front marking of your button-
hole.
c. Stop sewing at the left stitch,
39
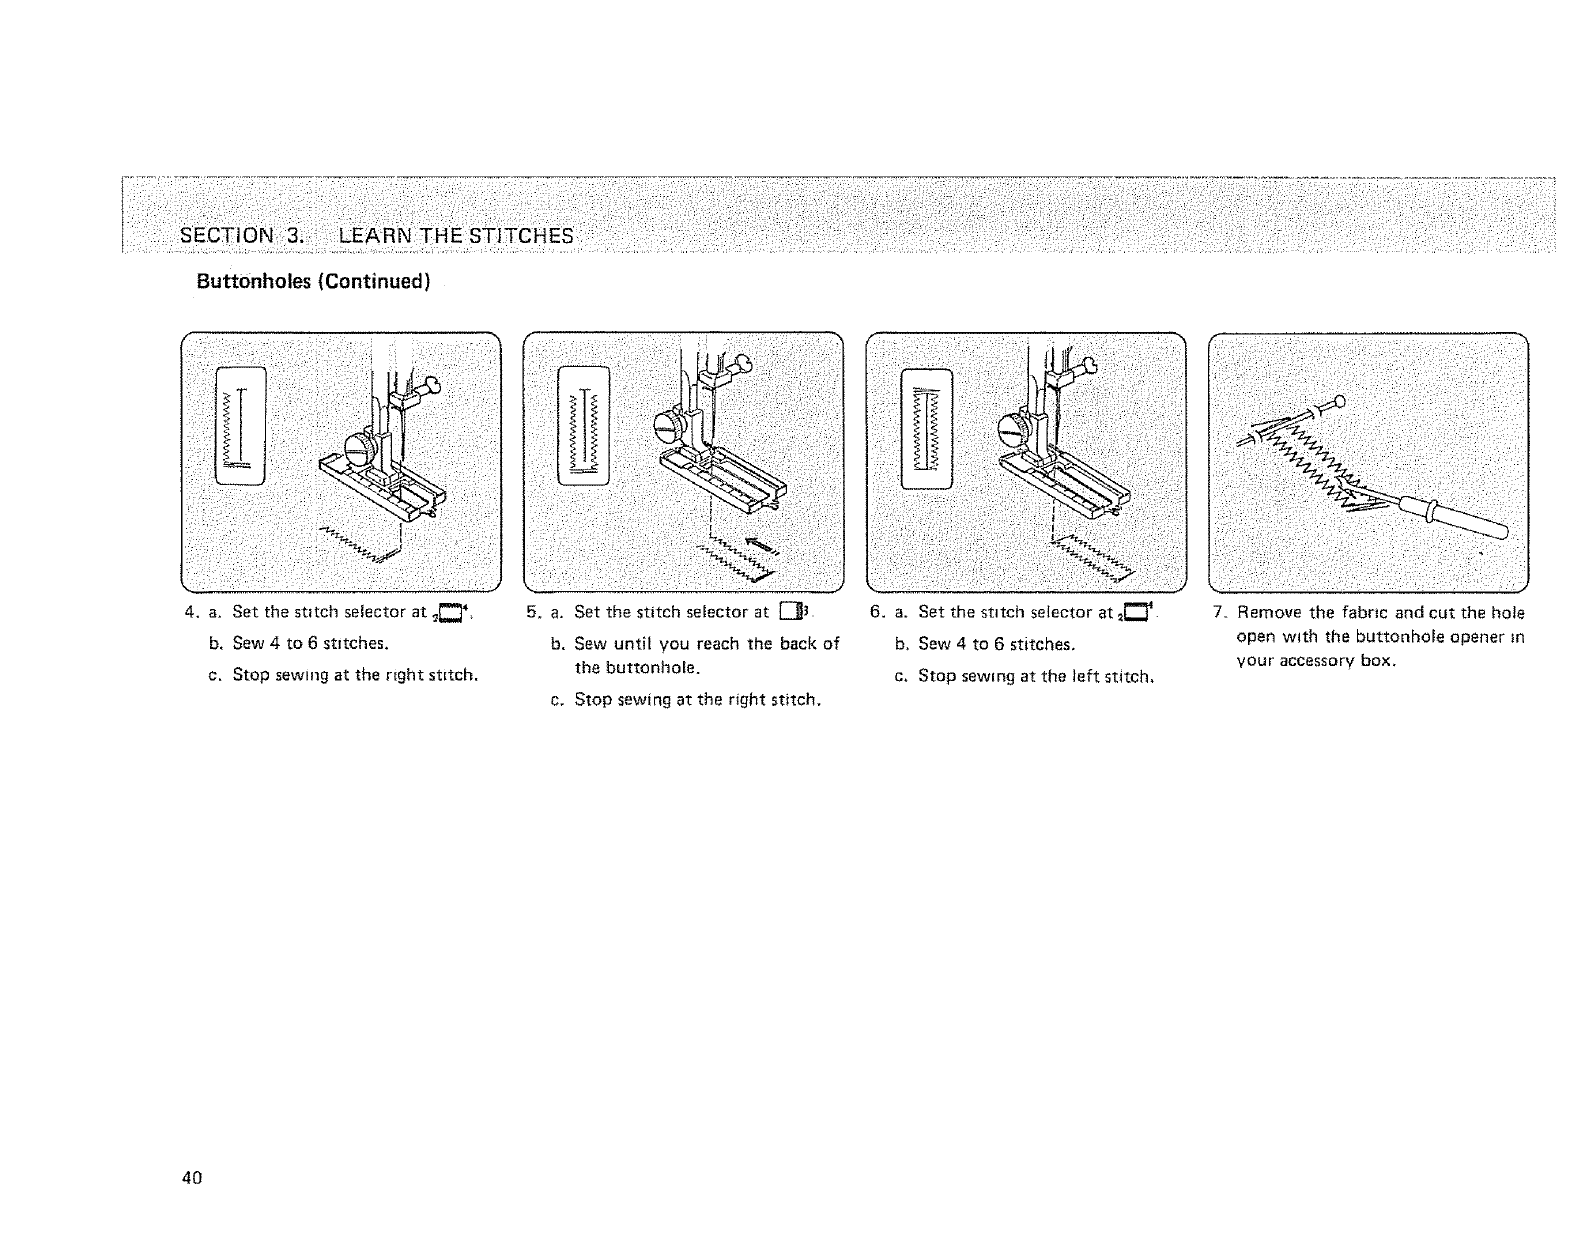
Buttonholes (Continued)
4, a. Set the stitch selector at _"_14
b. Sew 4 to 6 stitches.
c, Stop sewing at the rtght stitch.
5, a, Set the stitch selector at [_L
b, Sew until you reach the back of
the buttonhole.
c. Stop sewing at the right stitch,
6. a. Set the stitch selector at=_.
b, Sew 4 to 6 stitches,
c, Stop sewing at the left stitch,
7. Remove the fabric and cut the hole
open with the buttonhole opener in
your accessory box,
4O
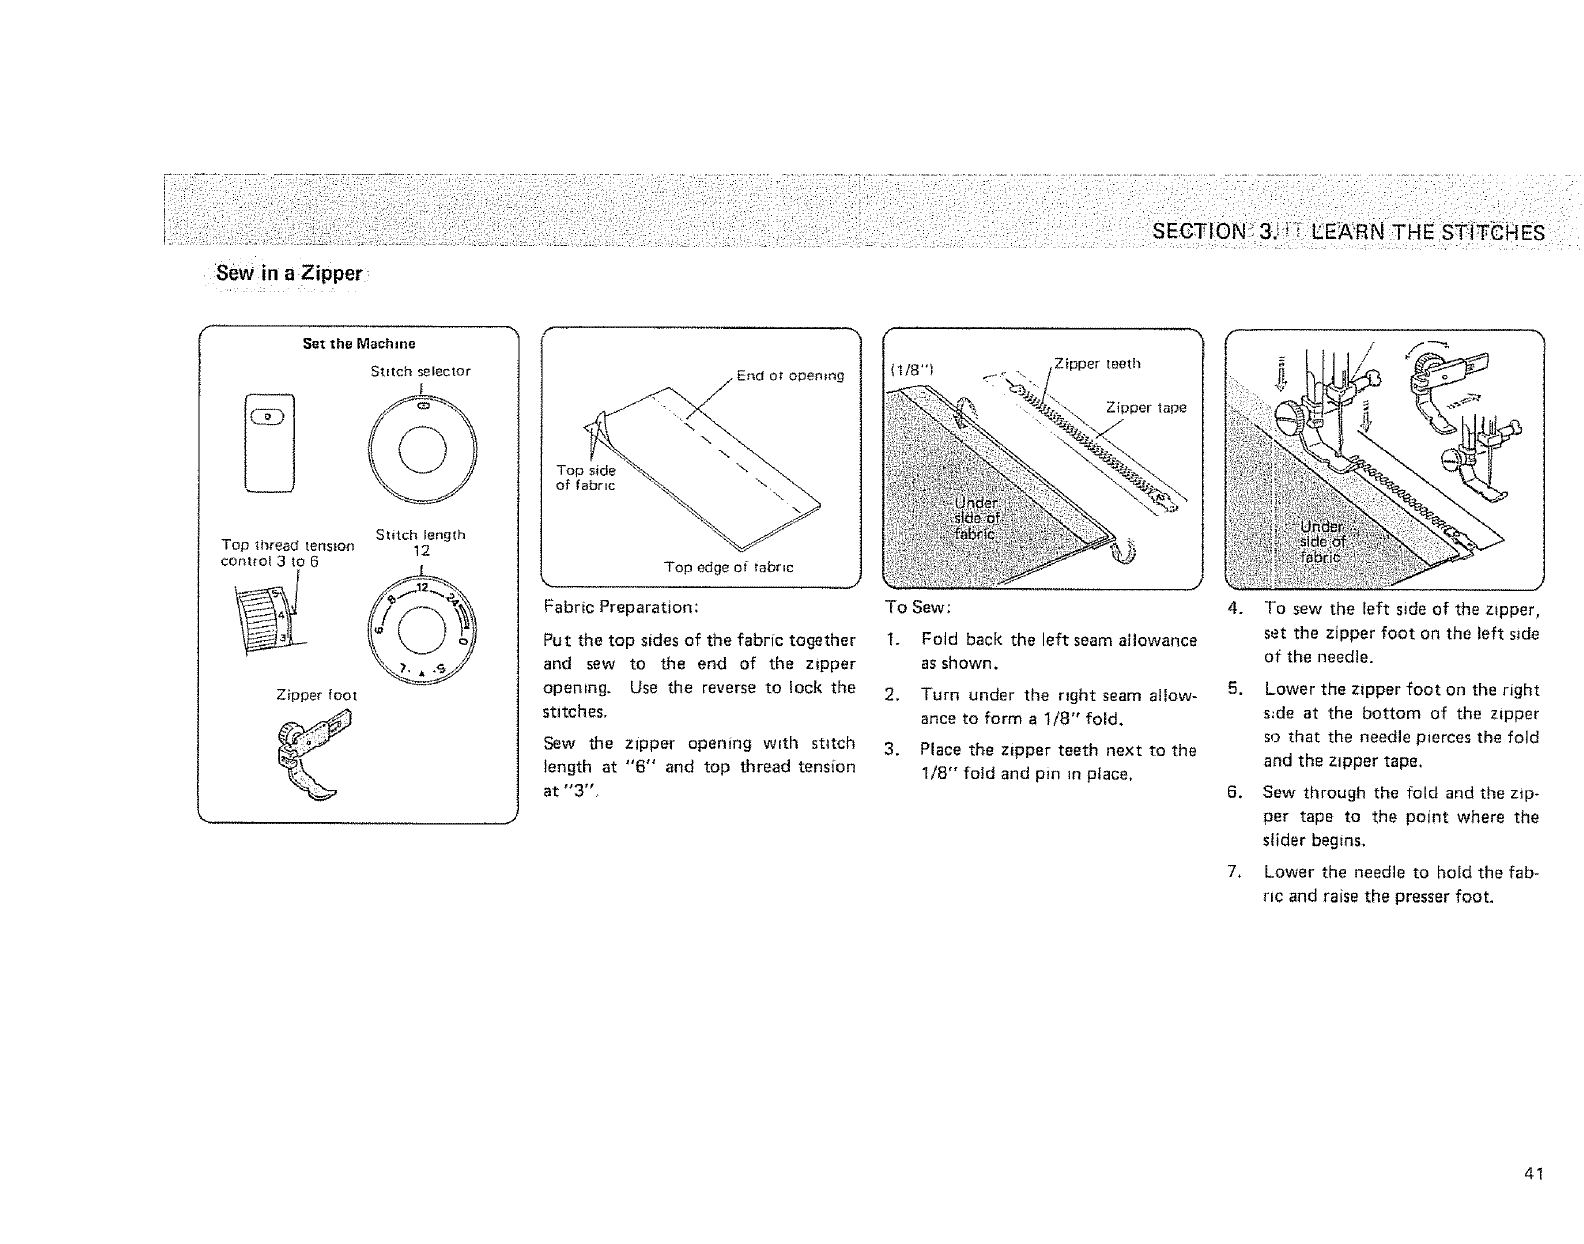
Sew in a Zipper:
Set the Machme
St=tch selector
Top thread tenstot_
control 3 tO 6
Stitch length
12
ot openmg
Top edge of fabric
Fabric Preparation:
Put the top sides of the fabric together
and sew to the end of the zipper
opemng, Use the reverse to iock the
stitches.
Sew the zipper opening wroth stitch
length at "6" and top thread tension
at "3",
To Sew:
1.
Zipper tape
Fold back the left seam allowance
as shown.
2, Turn under the r_ght seam allow-
ance to form a 1/8" fold,
3. Place the z_pper teeth next to the
1/8" fotd and pin m place,
4. To sew the left side of the ztpper,
set the zipper foot on the left side
of the needle.
5, Lower the zipper foot on the right
s_de at the bottom of the zipper
so that the needle pierces the fold
and the zipper tape.
6. Sew through the fold and the zip-
per tape to the point where the
slider begins,
7, Lower the needle to hold the fab-
ric and raise the presser foot.
41
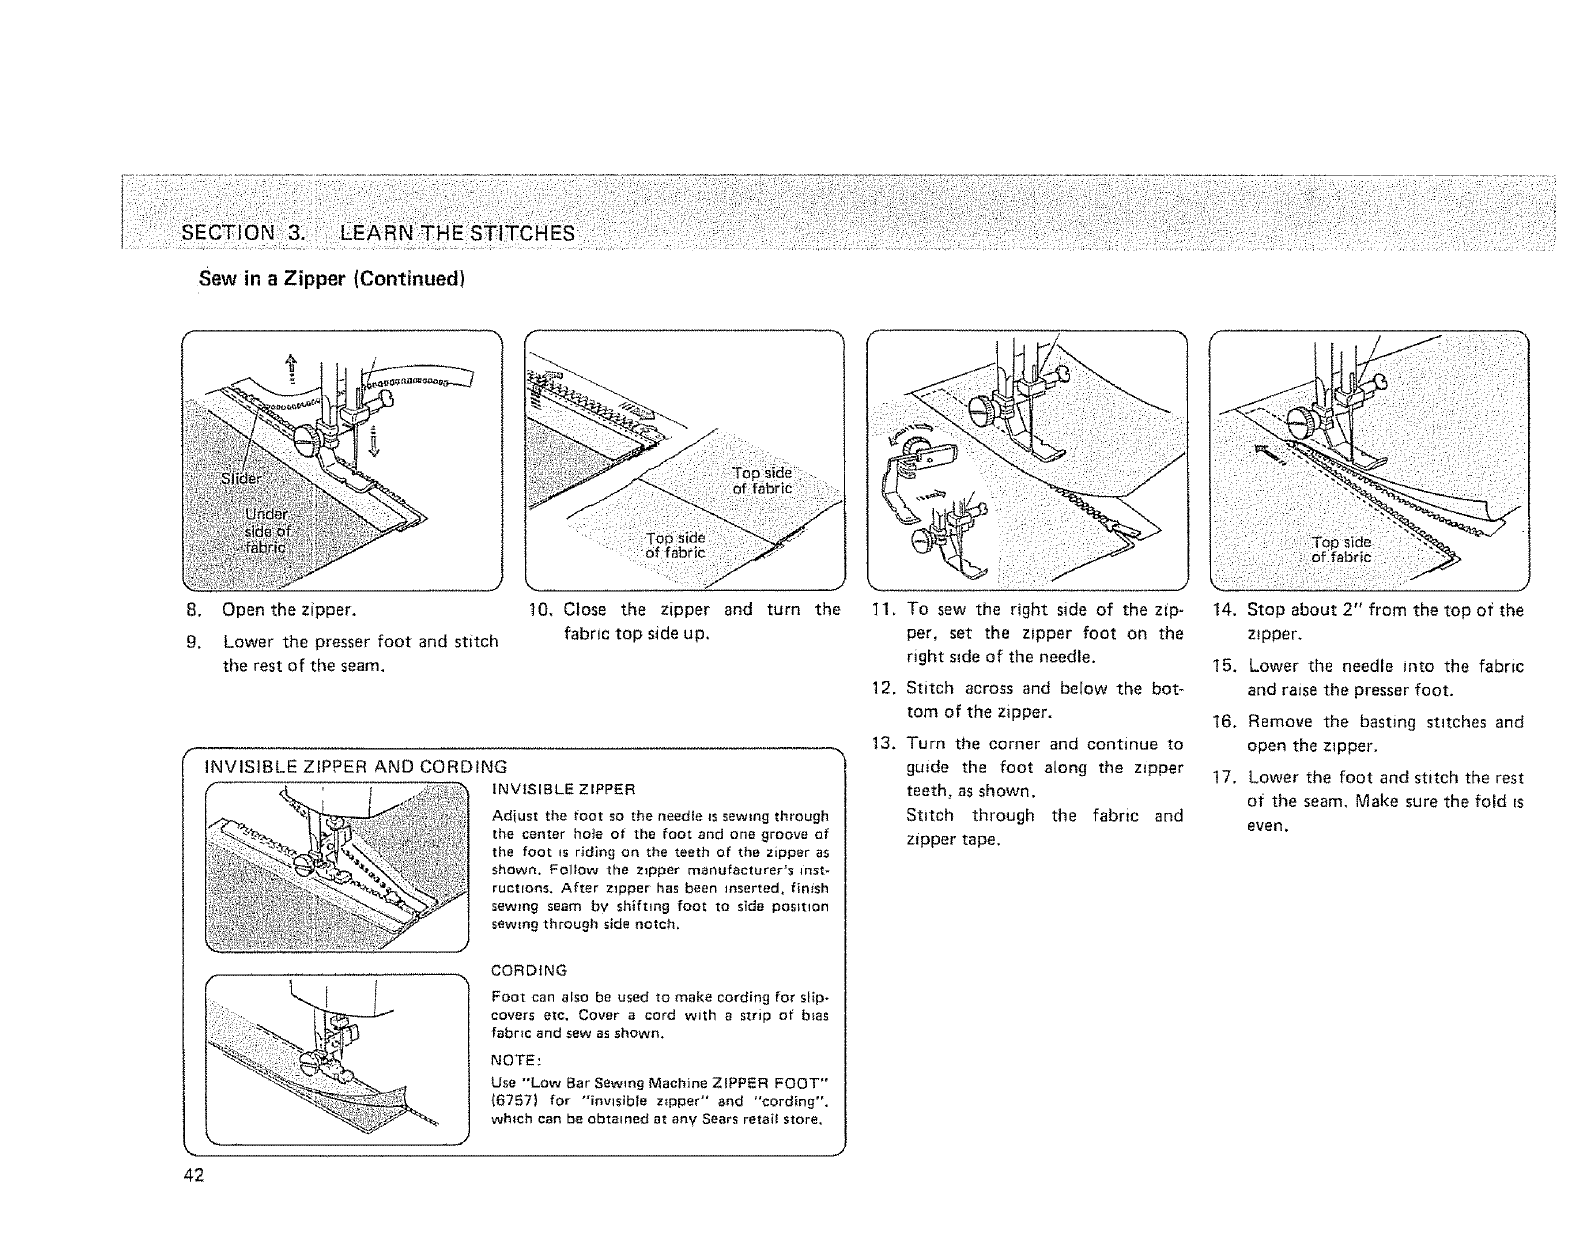
Sew in a Zipper (Continued)
8. Open the zipper.
9, Lower the presser foot and stitch
the rest of the seam.
42
J
10, Close the zipper and turn the
fabric top side up.
INVISIBLE ZIPPER AND CORDING
INVISIBLE ZIPPER
Adiust the toot so the needle _ssewing through
the center hole ot the foot and one 8roove of
the foot ts riding on the teeth of the zipper as
shown. Follow the zipper manufacturer's inst-
ructfons, After zipper has been inserted, f_nish
sewing seam by shifting foot to side pos_tlon
sewing through side notch,
\CORDING
Foot can also be used to make cording for slip*
covers etc, Cover a cord with 8 strip of b_as
fabric and sew as shown.
NOTE'.
Use "Low Bar Sewing Machine ZIPPER FOOT"
{6757) for "qnvlsib|e z_pper'" and "cording",
which can be obtained at any Sears retait store.
I1, To sew the right side of the zip-
per, set the zipper foot on the
right side of the needle.
12. Stitch across and below the bot-
tom of the z_pper.
13, Turn the corner and continue to
guide the foot along the zipper
teeth_ as shown,
Stitch through the fabric and
zipper tape,
14. Stop about 2" from the top of the
z!pper.
15, Lower the needle into the fabric
and raise the presser foot,
16, Remove the basting stitches and
open the ztpper.
17, Lower the foot and stitch the rest
of the seam, Make sure the fold Is
even.
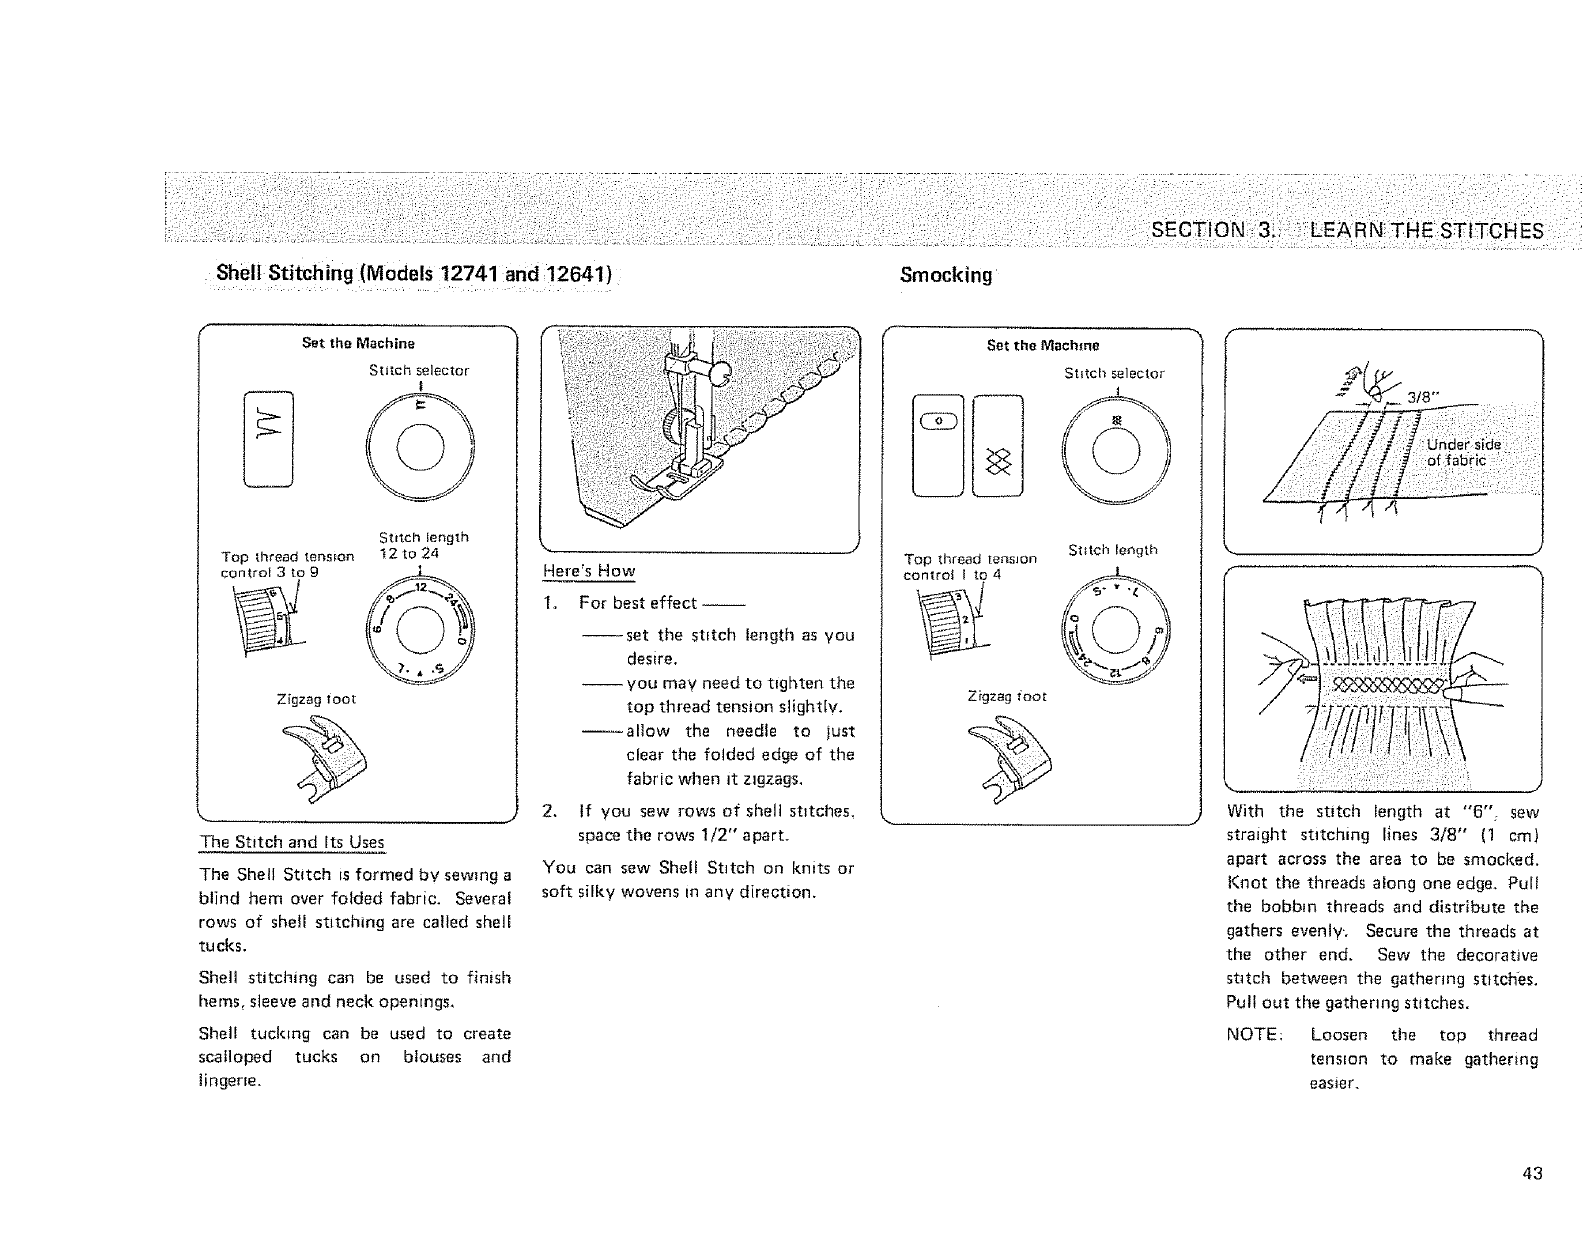
Shell Stitch ing (M odels 12741 and ;12641)
Set the Machine
Stitch selector
1
Top thread tension
control 3to 9
Zigzag foot
Strtch length
t 2 to 24
The Stitch and Its Uses
The Shell Stitch is formed by sewing a
blind hem over folded fabric. Several
rows of shell stitching are called shell
tucks.
Shell stitching can be used to finish
hems_ s_eeve and neck openings,
She_! tucking can be used to create
scalloped tucks on blouses and
linger_e,
!
Here's How
1. For best effect--
--set the stitch length as you
desire,
--you may need to tighten the
top thread tension slightly,
--allow the needle to just
clear the fotded edge of the
fabric when it zigzags.
2, tf you sew rows of shell stitches,
space the rows 1/2" apart,
You can sew Shell Stitch on knits or
soft silky wovens in any direction.
Set the Machine
Stitch selector
0
Top thread ter_sJon
control I to 4
Zigzag foot
Stitch length
With the stitch length at "6"_ sew
straight stitching lines 3/8" (1 cm)
apart across the area to be smocked,
Knot the threads along one edge, Pull
the bobbin threads and distribute the
gathers evenly,. Secure the threads at
the other end. Sew the decorative
stitch between the gathering stitches.
Pull out the gathering stitches.
NOTE; Loosen tile top thread
tensEon to make gathering
easier.
43
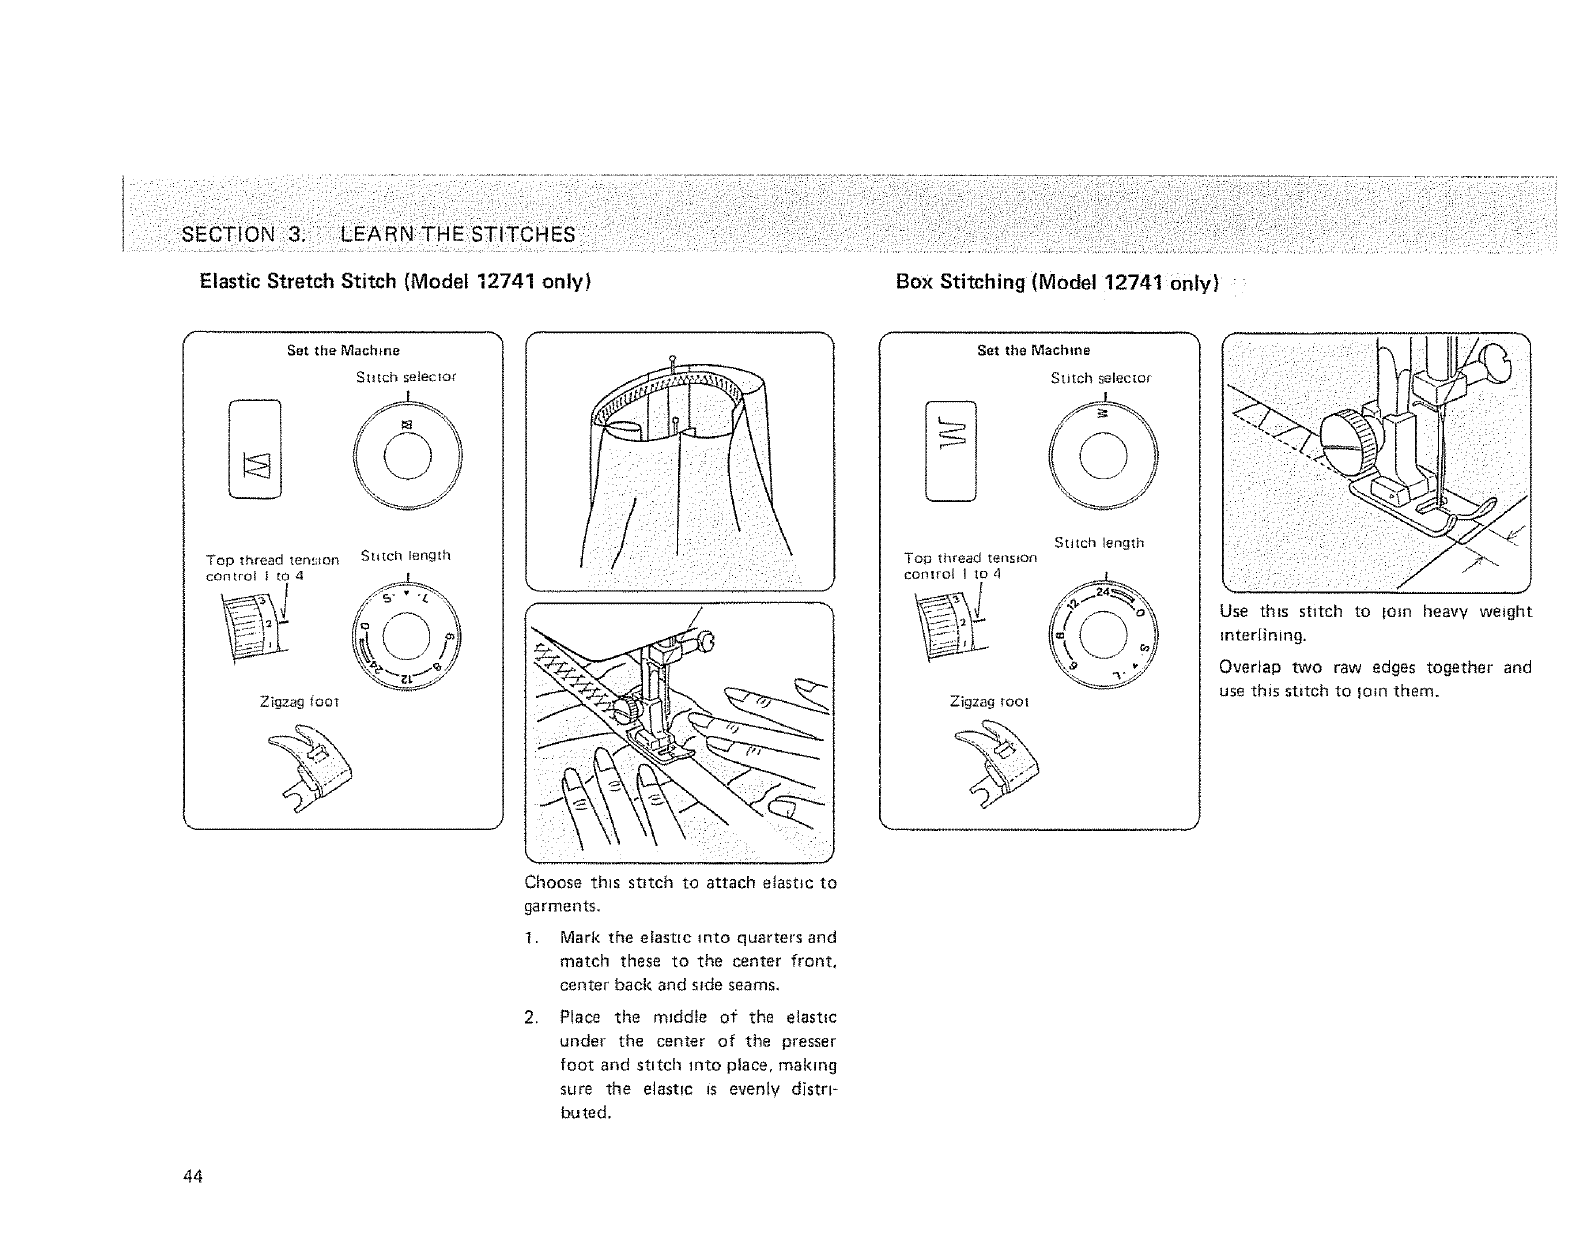
Elastic Stretch Stitch (Model 12741 only)
Set the Machine
Top thread ten_;_on S[_[eh length
eon[roI i [0 4
Zigzag foot
Choose tf_ls stitch to attach elastic to
garments.
1. Mark the eSastlc into quarters and
match these to the center front,
center back and stale seams,
2. Place the m_ddle of the elastic
under the center of the presser
foot and stitch into place, malqng
sure the elastic _s evenly distr,-
buted.
44
Box Stitching (Model 12741 only)
Set the Machine
Stitch selec[or
Too thread tension!
control 1 to 4
Zigzag Too_
Stitch length
Use this stitch to [am heavy weight
interlining.
Overlap two raw edges together and
use this stitch to Iota them.
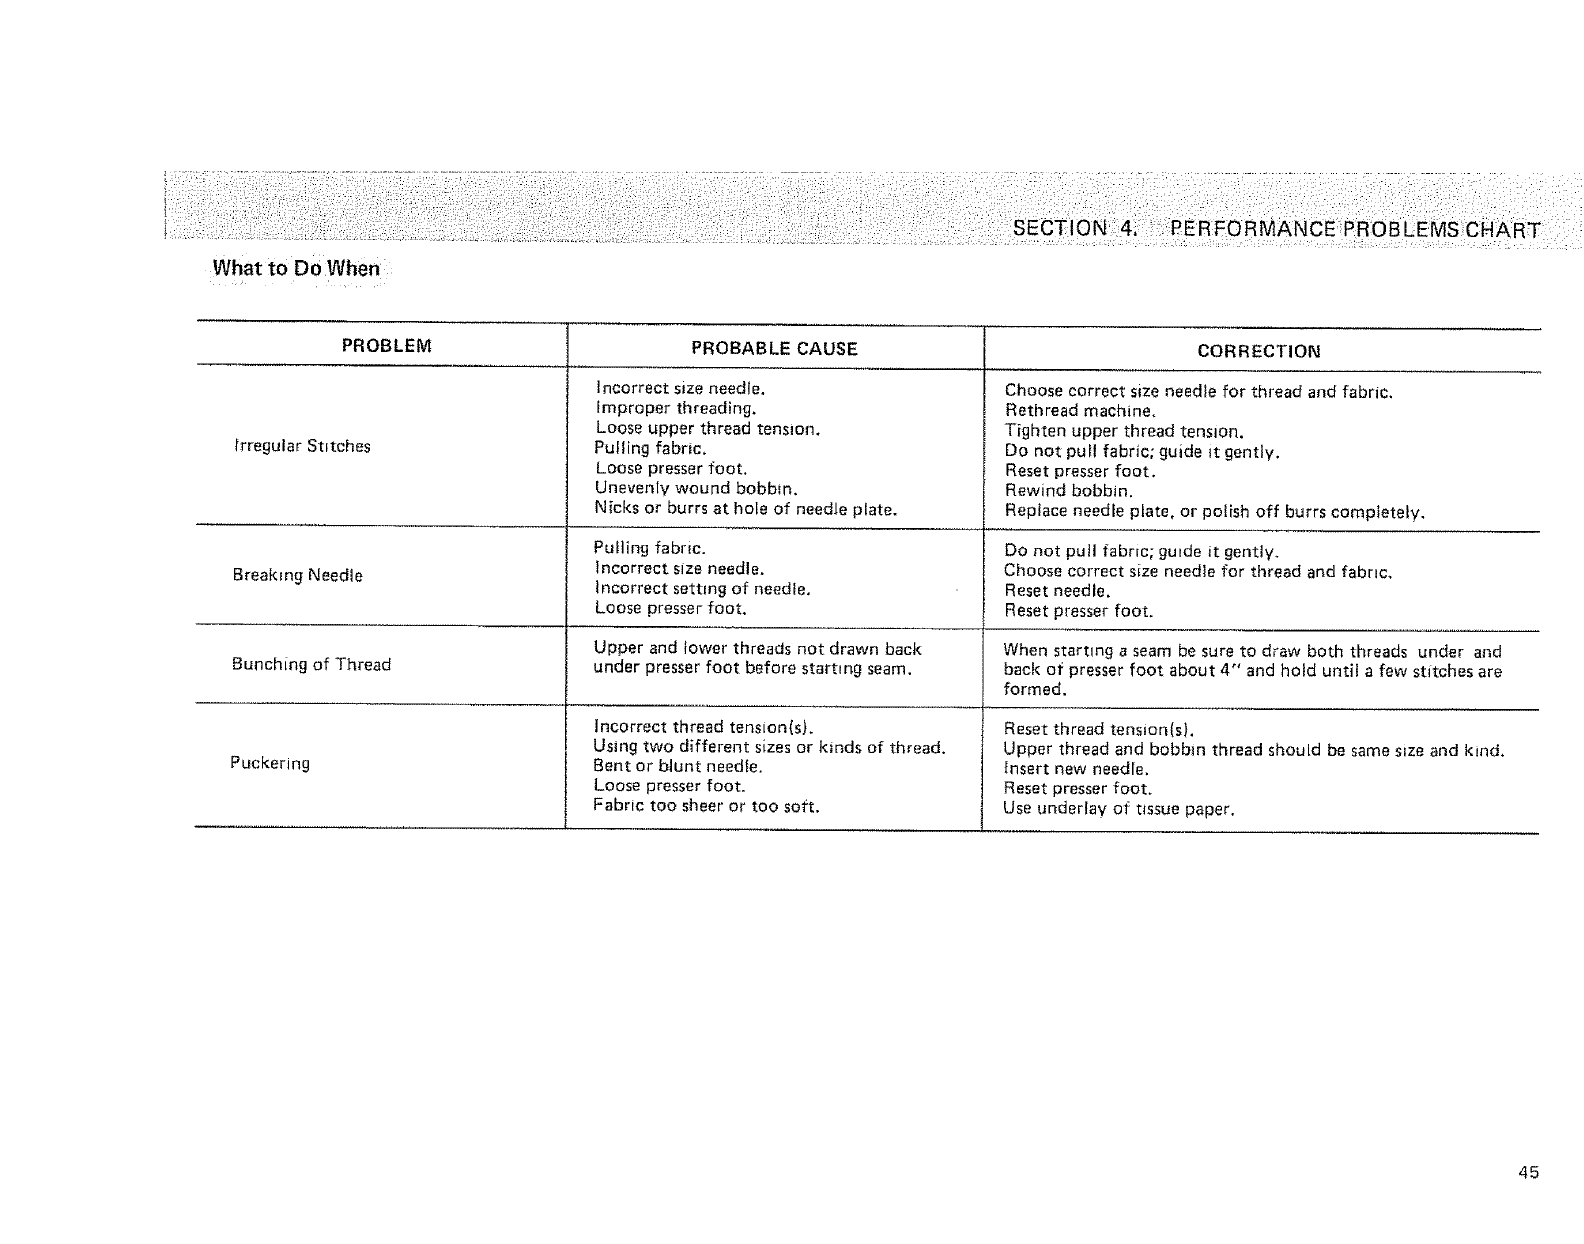
What to Do When
PROBLEM
irregular Stitches
Breaking Needle
Bunching of Thread
Puckering
i
iPROBABLE CAUSE
Incorrect size needle.
Improper threading.
Loose upper thread tension.
Pulling fabric.
Loose presser foot.
Unevenly wound bobbin,
Nicks or burrs at hole of needle plate.
Pulling fabric.
Incorrect size needle.
Incorrect setting of needle.
Loose presser foot.
Upper and lower threads not drawn back
under presser foot before starting seam.
Incorrect thread tension(s).
Using two different sizes or kinds of thread.
Bent or blunt needle.
Loose presser foot.
Fabric too sheer or too soft.
CORRECTION
Choose correct size needle for thread and fabric.
Rethread machine.
Tighten upper thread tension.
Do not pull fabric; guide it gently.
Reset presser foot.
Rewind bobbin.
Replace needle plate, or polish off burrs completely.
Do not pull fabric; guide it gently.
Choose correct size needle for thread and fabric+
Reset needle.
Reset presser foot.
When starting a seam be sure to draw both threads under and
back of presser foot about 4" and hold until a few stitches are
formed.
Reset thread tension(s).
Upper thread and bobbin thread should be same size and kind.
Insert new needle.
Reset presser foot.
Use underlay of tissue paper.
45
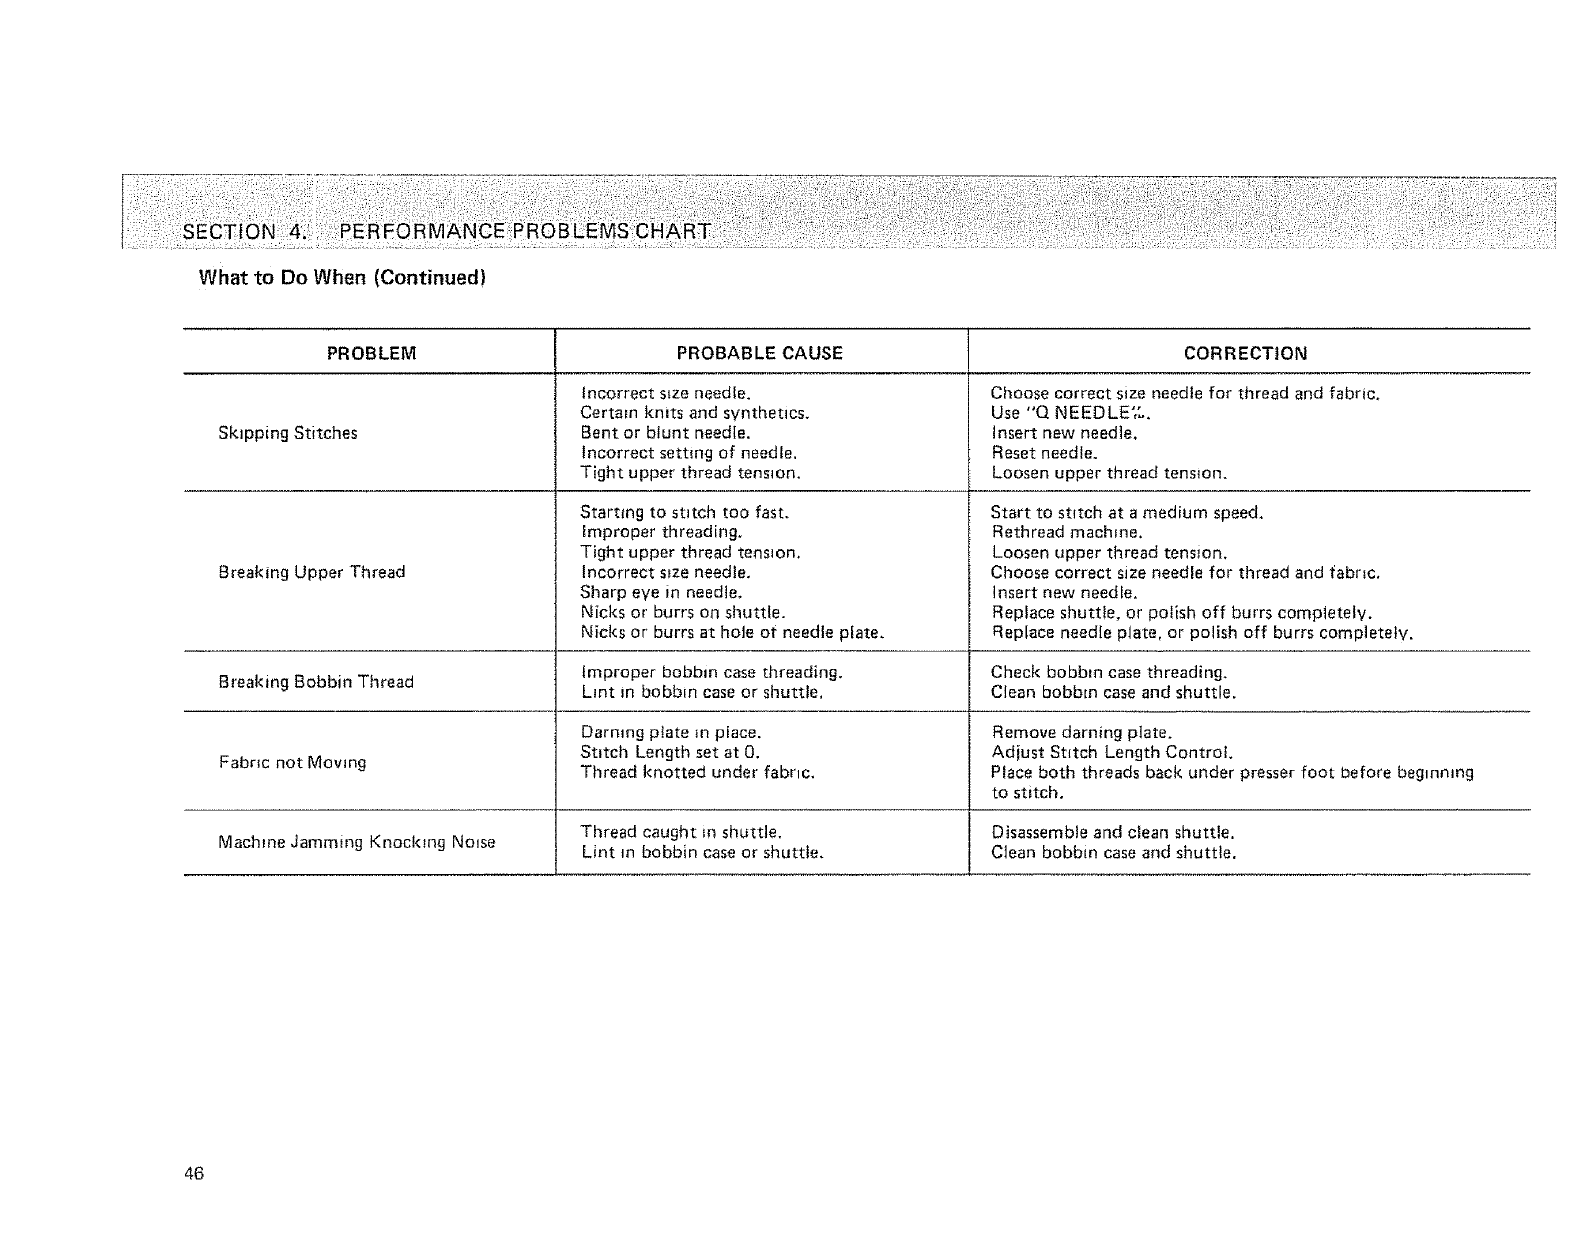
What to Do When (Continued)
PROBLEM PROBABLE CAUSE !CORRECTION
Incorrect s_ze needle. Choose correct size needle for thread and fabric.
Certain knits and synthetics. Use "Q NEEDLE'/.,
Skipping Stitches Bent or blunt needle, insert new needle,
Incorrect setting of needle, Reset needle.
Tight upper thread tension. Loosen upper thread tension.
Breaking Upper Thread
Starting to stitch too fast.
Improper threading.
Tight upper thread tension.
Incorrect s_ze needle.
Sharp eve in needle.
Nicks or burrs on shuttle.
Nicks or burrs at hole of needle plate.
Start to stitch at a medium speed,
Rethread machine.
Loosen upper thread tension.
Choose correct size needle for thread and fabric,
Insert new needle.
Replace shuttle, or polish off burrs completely.
Replace needle plate, or polish off burrs completely,
Breaking Bobbin Thread Improper bobbin case threading. Check bobbin case threading.
Lint in bobbin case or shuttle, Clean bobbin case and shuttle.
Darmng ptate in place. Remove darning plate.
Fabric not Mowng Stitch Length set at 0. Adiust St{tch Length Control.
Thread knotted under fabnc. Place both threads back under presser foot before beginning
to stitch.
Thread caught in shuttle. Disassemble and clean shuttle.
Machine Jamming Knocking Noise Lint m bobbin case or shuttle. Ctean bobbin case and shuttle,
46

Replace the Light Bulb Cleaning the Machine
i t
1. Unplug the machine and open the
face cover.
CAUTION! The tight bulb will be
HOT, Protect your
fingers when you
handle it,
2.
3.
Push the bulb up and turn the
bulb counter-clockwise to remove
it.
Put the new bulb mbv pushing it
up and turning it clockwise.
To insure that your machine operates at its best, VOU need to keep the essential parts clean at all times.
The feed dogs and shuttle race areas can attract dust and lint. Your machine can become sluggfsh or knock loudly if a thread
Is caught.
Check and clean those areas about every three months under normal use.
If you sew frequently, clean more often.
NOTE: Unplug machine befor cleaning.
o Clean the Feed Dogs
Follow these direction :
1. Using a screw driver, remove 2. Use a lint brush and clean the feed
needle plate, dogs.
3. Reptace needle plate.
/
47
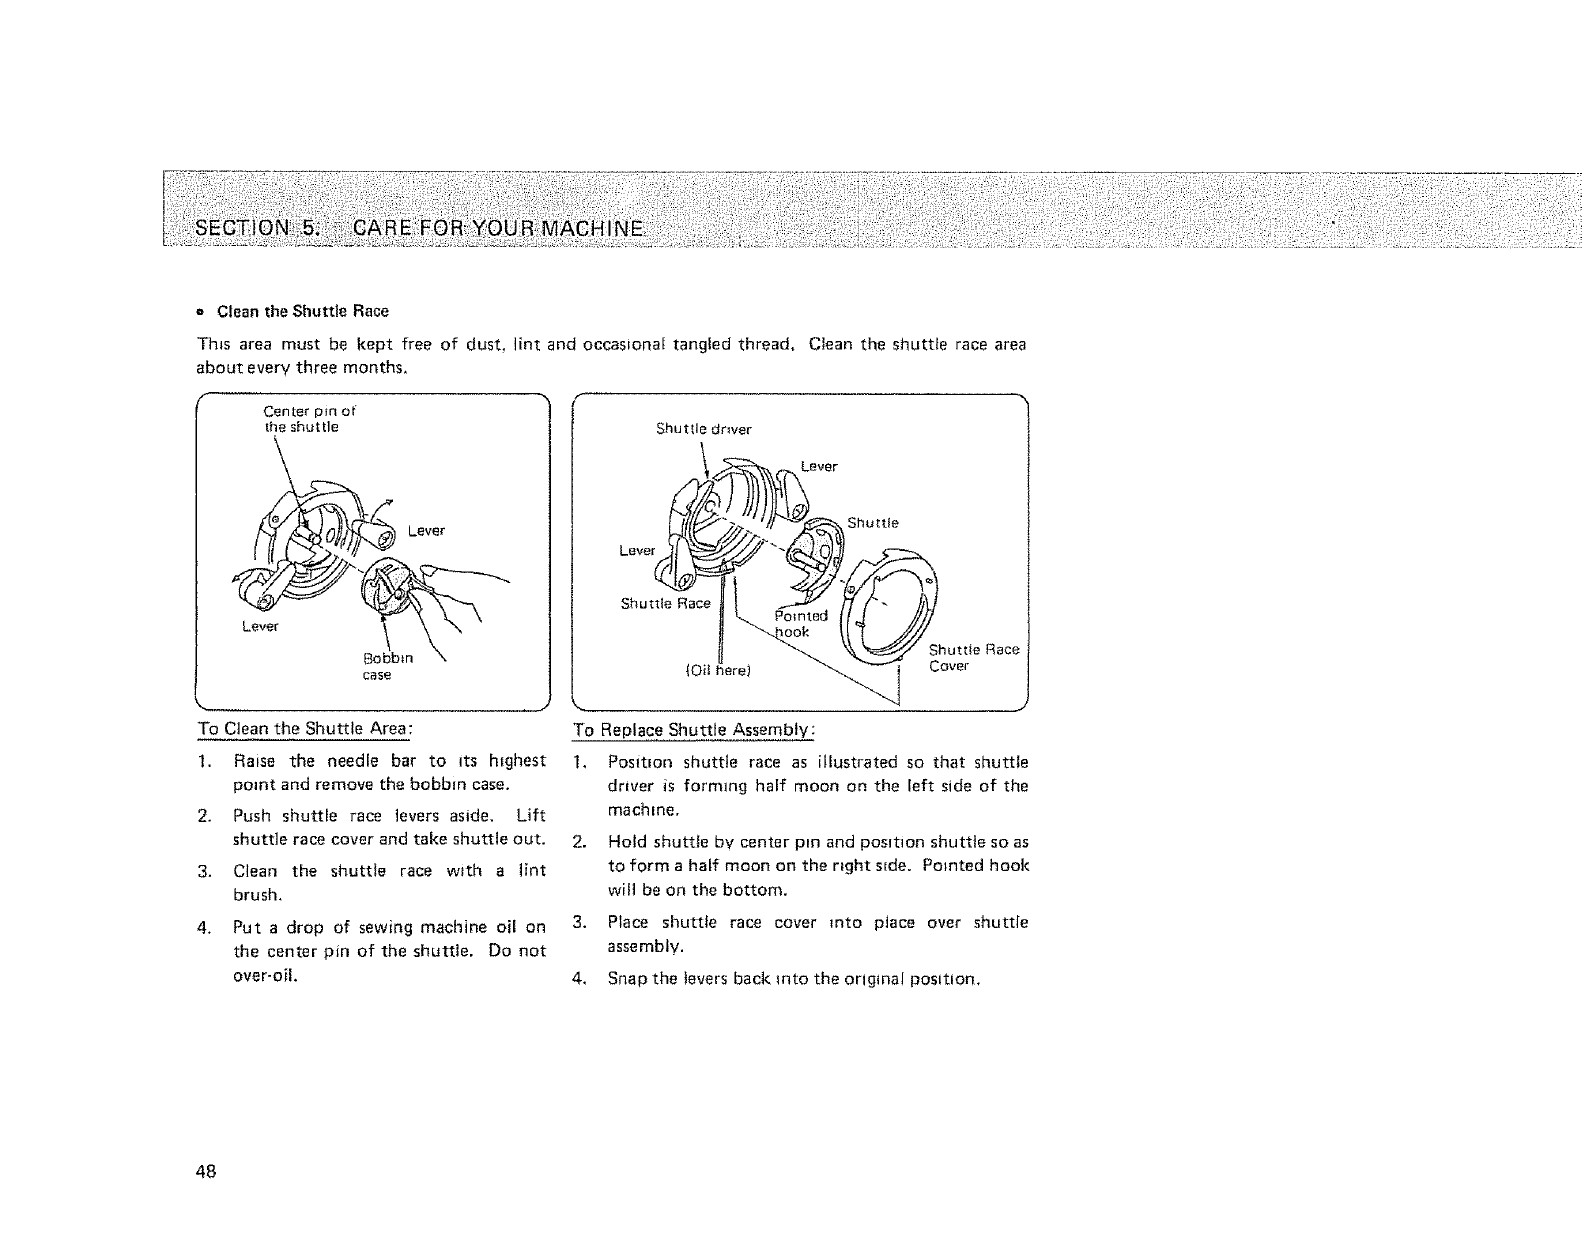
=Clean the Shuttle Race
This area must be kept free of dust, lint and occasional tangied thread, Ctean the shuttle race area
about every three months,
Center pm of
the shuttle
v r
case
J
To Ctean the Shuttle Area:
1. Raise the needle bar to its h_ghest
point and remove the bobbin case.
2. Push shuttle race levers aside. Lift
shuttle race cover and take shuttle out.
3. Clean the shuttle race with a lint
brush,
4. Put a drop of sewing machine oii on
the center pin of the shuttle. Do not
over-oil.
Shut[la dr_ver
Lever_
Shuttle Race
(Oil ._re)
Lever
Shu[tie
Shuttle Race
Cover
To Replace Shuttle Assembly:
1, Position shuttle race as illustrated so that shuttle
driver is forming half moon on the left side of the
machme,
2. Hold shuttle by center pin and position shuttle so as
to form a half moon on the right s_de. Pointed hook
will be on the bottom.
3, Place shuttle race cover into place over shuttle
assembly.
4. Snap the tevers back rote the original position.
48
Oilingthe Machine
!:: : =: ..... ....
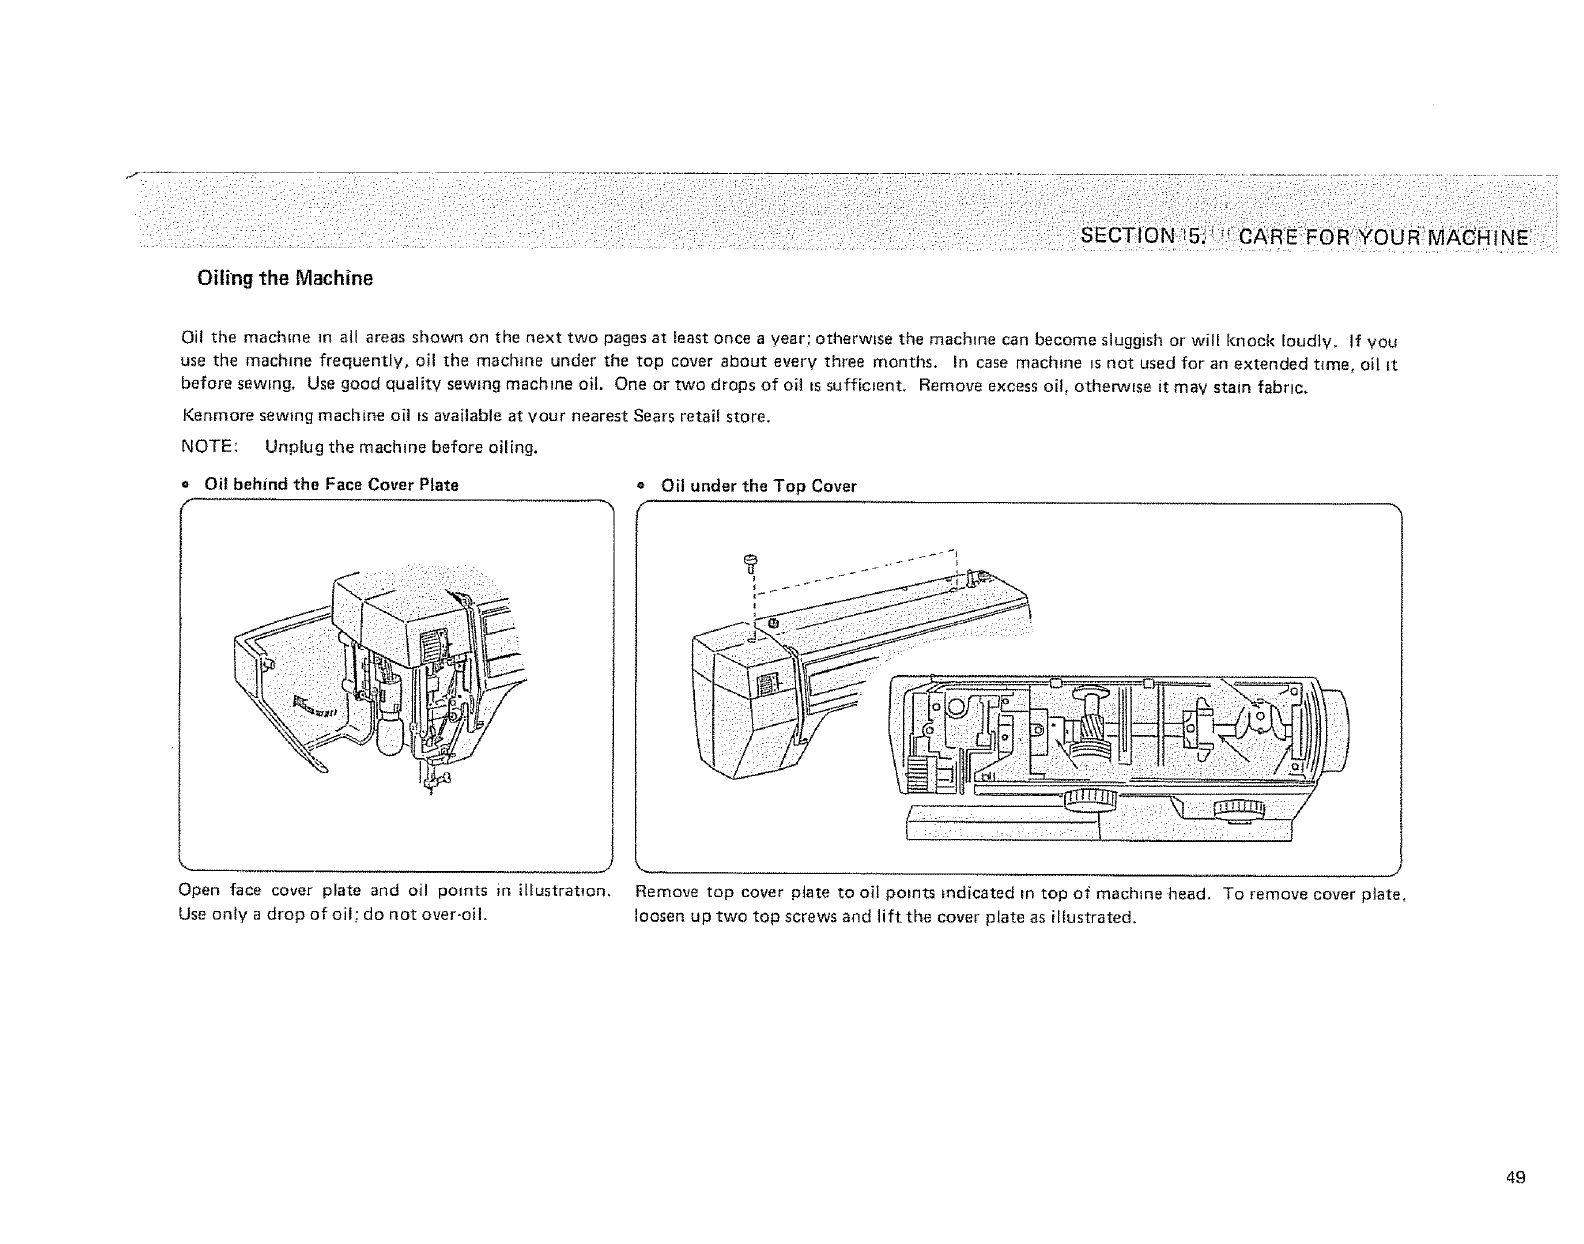
Oil the machine m all areas shown on the next two pages at least once a year; otherwise the machine can become sluggish or will knock loudly, tf you
use the machine frequently, oil the machine under the top cover about every three months, In case machne _s not used for an extended t_meo oil It
before sewing. Use good quality sewing machine oil. One or two drops of oil ts sufficient. Remove excess oil, otherwise it may stain fabric,
Kenmore sewing machine oil _savailable at vour nearest Sears retail store.
NOTE: Unplug the machine before oiling.
Oil behind the Face Cover Plate
Open face cover plate and oil points m ilfustrat_on.
Use only a drop of oil; do not over-oil.
Oil under the Top Cover
Remove top cover plate to oil potnts indicated in top of machine head. To remove cover plate,
loosen up two top screws and lift the cover plate as illustrated.
49
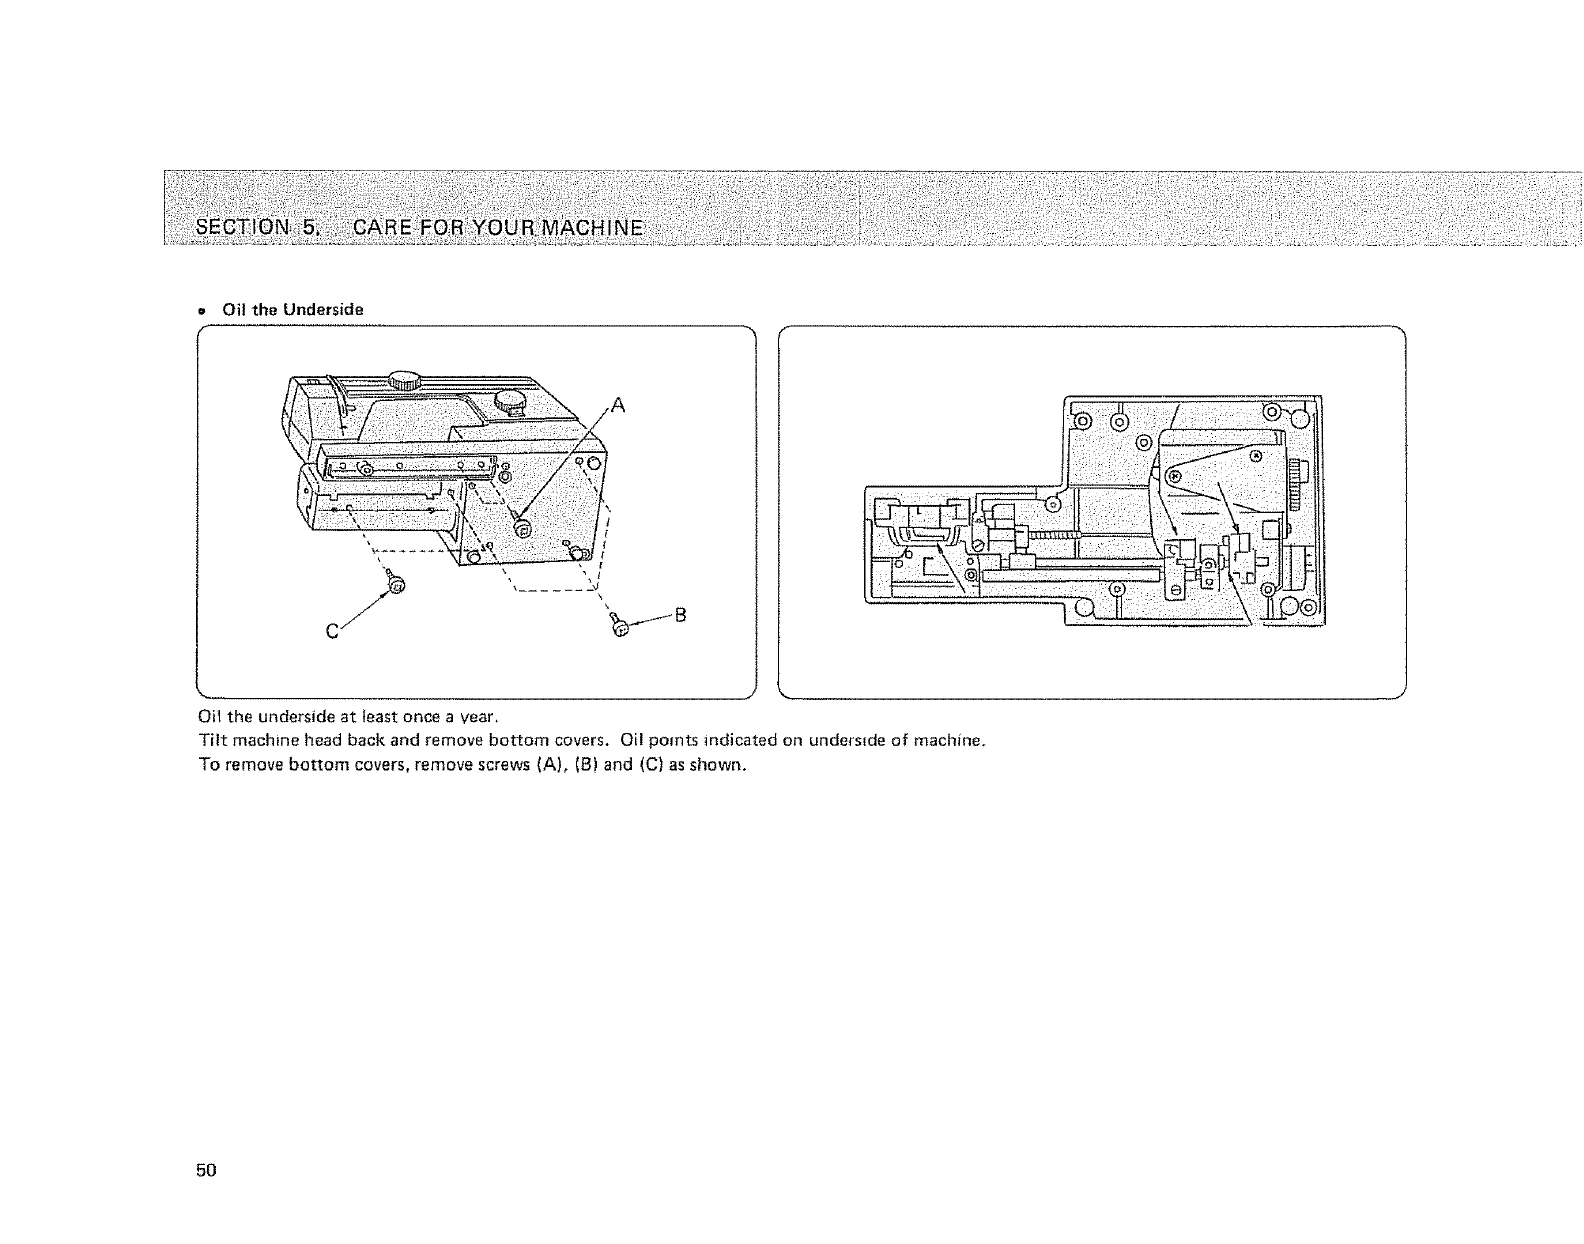
Oil the Underside
\
t
t
!i,lili_ii!i_I!_'I!!i° _! _!!_,!ii_ii'i_
i_ii_ii_!_i,i_i_i_'!_, _ _
Oit the underside at least once a year.
Tilt machine head back and remove bottom covers. Oil points indicated on underside of machine.
To remove bottom covers, remove screws (A), (B) and (C) as shown.
5O
PARTS LIST
1 2
7 3 9 10 tl 12
14 !5
21 22
16 17 18
6
23
13
19 20
7
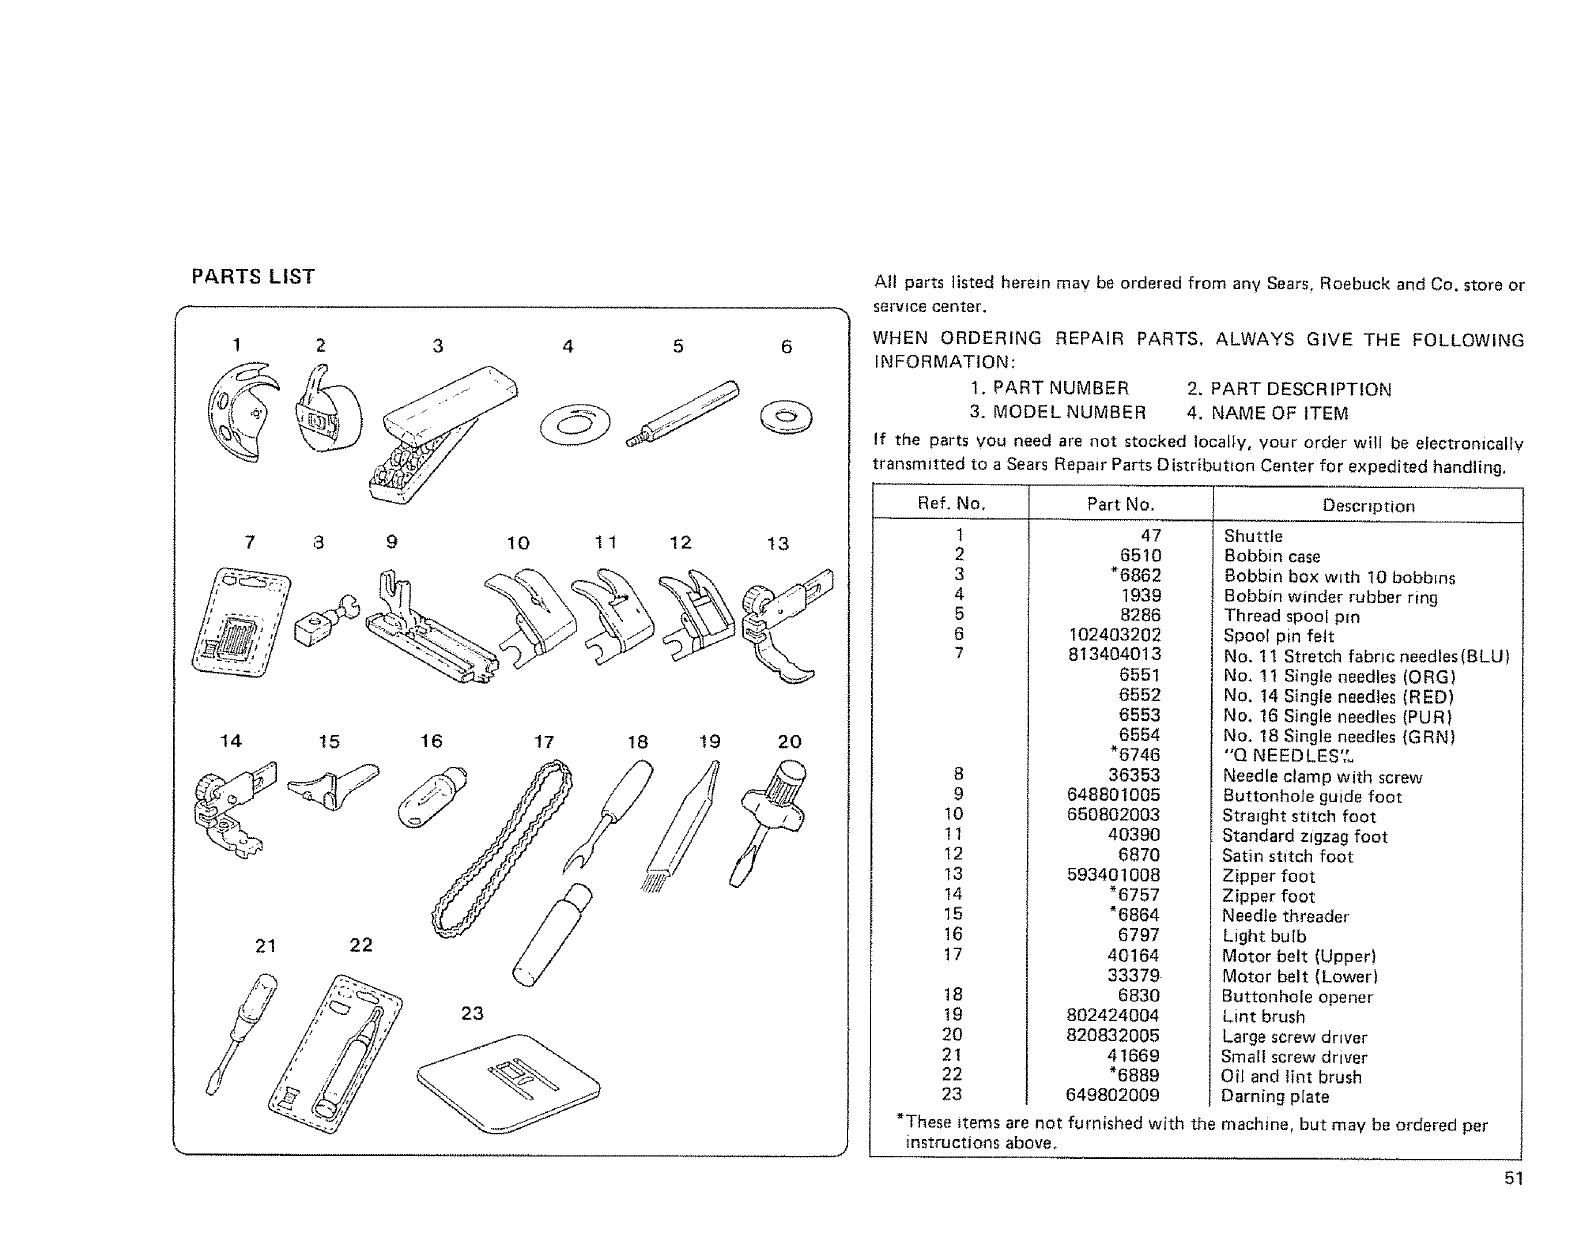
All parts listed herein may be ordered from any Sears, Roebuck and Co, store or
serv{ce center.
WHEN ORDERING REPAIR PARTS, ALWAYS GIVE THE FOLLOWING
INFORMATION:
1. PART NUMBER 2, PART DESCRIPTION
3. MODEL NUMBER 4. NAME OF ITEM
If the parts you need are not stocked locally, your order wilt be electronically
transmitted to a Sears Repair Parts Distribution Center for expedited handling.
Ref, No. Part No. DescNption
t
2
3
4
5
6
7
8
9
10
!1
t2
t3
14
t5
16
17
18
19
20
21
22
23
*These items are not furnished with the
instructions above.
47
6510
*6862
1939
8286
1O24O3202
813404013
6551
6552
6553
6554
*6746
36353
648801005
650802003
40390
6870
593401008
*6757
_6864
6797
40164
33379
6830
802424004
820832005
41669
*6889
649802009
Shuttle
Bobbin case
Bobbin box with 10 bobbins
Bobbin winder rubber ring
Thread spool pin
Spool pin felt
No. 11 Stretch fabric needles(BLU)
No. 1 1 Single needles (ORG)
No. 14 Single needles (RED)
No. 16 Single needles (PUR)
No. 18 Single needles {GRN)
"Q NEEDLES';.
Needle damp with screw
Buttonhole guide foot
Straight stitch foot
Standard zigzag foot
Satin stitch foot
Zipper foot
Zipper foot
Needle threader
Light bulb
Motor belt (Upper)
Motor belt (Lower)
Buttonho{e opener
Lint brush
Large screw driver
Small screw driver
Oil and lint brush
Darning plate
machine, but may be ordered per
51
INDEX
A
Appliqueing ................... 25, 31
B
Bar tacking ................. 23, 31
Base .......................... 2
Basic zigzag ................ 21.29
Blind hemming ................. 24, 37
Bobbin ................ 4, 13_15, 51
Bobbin case ............... t3. 15,48, 51
Bobbin thread ................ 17_18
Bobbin winding ............ !3_14
Box stitching ..................... 25, 44
Buttonhole ................ 24, 39_40
Buttonhole guide foot ,,. 4, 10, 24, 39_40, 51
Buttonhole opener ............ 4, 40, 51
Button sewing ................ 23, 33
C
Cabinet ......................... 2
Changing presser foot ............. 9_t0
Cteanfng feed dogs and shuttle race 47_48
Ciutch knob ................... 3.13
Cording ...................... 23.42
Cornering guide ................... 26
D
Darnig .................. 23.28
Darning plate ........ 4, 27_280 32_33, 51
E
Elastic stretch stitching ........... 25° 44
Embroidery ................... 23, 32
Extension table ................. 2, 7
F
Fabric, needle; thread and
stitch length chart ........... 12
Face cover plate ................. 2, 49
Feed dogs ...................... 47
Foot control .................. 3.5
Free arm sewing .................. 7_8
H
Hand wheel ....................... 3, 17
I
Invisible zipper ..................... 42
L
Lace work .................. 24, 38
Light and power switch ............. 3, 5
Light bulb .................. 5.47,51
Lint brush ................... 4, 47, 51
M
Mending ................... 23, 35
Monogramming ........... 23, 32
N
Needle .................. 1 !_12
Needle clamp ............. 3, 12, 51
Needle plate ............... 2, 47
Needle, thread and fabric chart ....... 12
O
Oiling .................. 49_50
Overcasting stitch ................. 34
Overcast stretch stitching ........ 24.36
P
Parts list ................ 51
Performance problems ........... 45_46
Pine leaf stretch stitching .......... 36
Plug connector ................ 3, 5
Portable case ................ 2
Power switch ................... 5
Practical stitch chart ............ 23_25
Presser foot .................... 3.9_10
Presser foot lever ................. 3, 6
R
Replacing bobbin case ............. 13, 15
Reverse stitch control ........ 2, 21, 26
Rick rack stretch stitching ......... 23, 34
S
Satin stitch foot ...... 4, 10. 25, 30"32. 51
Satin stitching ................ 25, 30
Seam guides ..................... 26
Serging .................... 25, 36
Sewing light ..................... 5
Shell stitching ............. 25, 43
Shuttle .................. 48. 51
Shuttle cover ................ 2, 13
Shuttle race ........... 48
Smockfng ................ 24.43
Spool pin felt ............... 4, 6, 51
Spool pins .............. 3, 4, 6, 51
Stitch length adjustment ............. 21
Stitch length control ............... 21
Stitch selector .................. 20
Stragith stitching .... 23, 25_28, 41_42, 43
Straight stitch foot ...... 4.9, 23.26_28, 51
Stralgth stretch stitching ........... 23, 28
T
Thread guide ........... 2_3, 16_17
Thread take-up tever ............. 2, 16
Thread tenslor_s ................ 18_19
Top cover ...................... 3, 49
Topstitching ................... 23, 27
Top thread .................... 16"-17
Top thread tension ............ 18_19
Turning a square corner ............. 26
Z
Zigzag foot .... 9, 23_29, 3t_38, 43_44, 51
Zigzag stitching ............. 23.29_34
Zigzag overcasting ............. 34
Zipper application ............. 41_42
Zipper foot ........... 4. 10, 41_42, 51
52

WARRANTY
FULL 25-YEAR WARRANTY ON SEWING MACHINE HEAD
For 25 years from the date of purchase, Sears wi!l. free of charge, repair defects in mater_al or workmanship which appear
{)_ in the mechanical components of the sewing machine head.
# #
FULL TWO YEAR WARRANTY ON ELECTRICAL EQUIPMENT OF SEWING MACHINE _
For two years from the date of purchase, Sears will, free of charge, repair defects in material or workmanship which
appear in the electrical equipment of the sewing machine including electromc components, motor, w_rlng, switch and !l
speed control,
FULL 90-DAY WARRANTY ON ALL PARTS AND MECHANICAL ADJUSTMENTS
#
For 90 days from the date of purchase. Sears will, free of charge, replace any parts and provide mechanical service
necessary for proper operation of the sewing machine, except for normal maintenance,
WARRANTY SERVICE tS AVAILABLE BY RETURNING THE SEWING MACHINE TO THE NEAREST SEARS SERVICE #
{) CENTER/DEPARTMENT IN THE UNITED STATES. #
Thps warranty gives you specific legal rights, and you may also have other rights which vary from state to state.
##
SEARS. ROEBUCK AND CO., Dept. 698/731A, Sears Tower, Chicago, IL 60684

SEWING MACHINE
Now that you have purchased your Kenmore Sewing Machine, should a need ever exist for repair parts
on service, simply contact your nearest Sears Service Center. Be sure to provide all pertinent facts when
you call or visit.
The model number of your Sewing Machine will be shown on your nomenclature plate on the back of
your Sewing Machine. See page 3 for location.
WHEN ORDER ING REPAIR PARTS, ALWAYS GIVE THE FOLLOWING INFORMATION:
*MODEL NUMBER *NAME OF ITEM *PART DESCRIPTION
if the parts you need are not stocked locally, your order will be electronically transmitted to a Sears
Repair Parts Distribution Center for handling.
SEARS, ROEBUCK AND CO., Chicago. IL60684 U.S.A.
S-385 Printed in Taiwan Part No. 649800074 @
