Secure Wireless 433RDW Recessed Door Window Sensor User Manual
Secure Wireless, Inc Recessed Door Window Sensor
User Manual

AT&T Model SW-ATT-RDW, RECESSED DOOR/WINDOW TRANSMITTER
Description
The AT&T model number SW-ATT-RDW is a fully supervised door/window
transmitter that reports to the Digital Life Controller. The detection portion of the
device is imbedded into the door or window frame while the integral magnet that
is imbedded into the door or window.
Opening the door or window will cause the radio transmitter to send an alarm
report. Closing the door or window will cause the radio transmitter to send a
restore code that indicates that the door or window is closed. Should the battery
voltage drop below a prescribed level the SW-ATT-RDW will send a low battery
report indicating that the devices battery requires changing. (Consult the
“installing the battery” section for information about changing the battery.)
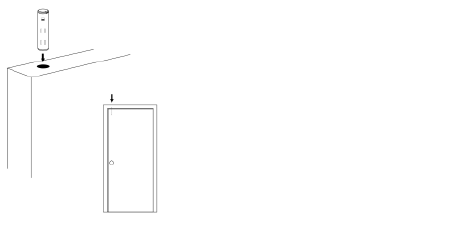
Locating the Transmitter
For Door Installation: Select the location where the SW-ATT-RDW is to be
mounted. Two locations are preferred. The transmitter can be located in the top
portion of the door jam, near the side where the door opens, or it can be located
near the top of the door jam on the side where the door opens. The integral
magnet will be mounted in the door.
For Window Installation: Select the location where the SW-ATT-RDW is to be
located. Mount the transmitter in the window jam near the top of the section of
the window to be protected. The integral magnet should be mounted in the
window.
CAUTION: many windows may not accept the magnet which is
approximately 5/8 of an inch deep. Careful consideration should be given
before using the SW-ATT-RDW in a window application. Use the SW-ATT-
V2 in these applications.
CAUTION: do not use the SW-ATT-RDW if the door or window jams are
made of metal. The metal will severely limit the performance of the
transmitter portion of the device.
Mounting
1. Using an 11/16 in drill bit
slowly drill a hole for the
magnet
2. Drill the mating hole for the
sensor. Use either the
flush mount cap for a snug
fit or flanged cap for a door
or window frame.
Mounting the Transmitter
The hardware kit for the SW-ATT-RDW provides additional plastic parts for
securing the transmitter to the door jam.
1. Locate the position where the
transmitter section will be located on
the door or window jam and mark the
location with a pencil.
2. Based upon this mark, locate the
position for the integral magnet in the
door or window and mark the location
with a pencil.
3. Drill a ¾” inch hole into the door or window jam.
4. Remove the round transmitter cap.
5. Carefully remove the transmitter assembly from its housing.
6. Install the battery making sure that you observe the battery polarity. + is
nearest the printed circuit board.
If you are mounting the transmitter on the top portion of the door jam, go to step
7. Otherwise, move to step 10
7. Replace the transmitter cap with the cap from the accessories package
that includes the two screw holes.
8. Slide the transmitter assembly into the ¾” inch hole.
9. Using the screws provided, secure the assembly into the door jam.
If you are mounting the transmitter into the side of the door jam, proceed as
follows.
10. Slide the transmitter assembly into the ¾” inch hole.
Mounting the Magnet Assembly
The integral magnet assembly must be aligned with the SW-ATT-RDW
transmitter assembly.
1. Locate the mark previously made for the magnet position.
2. Drill a 11/16” inch hole into the door or window.
3. Insert the magnet assembly into the drilled hole.
Installing or Changing the Battery
The SW-ATT-RDW includes low battery reporting. When the system indicates a
low battery condition on the recessed door/window transmitter, replace the
battery as follows.
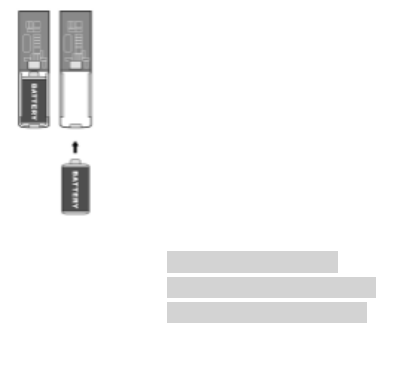
Using a flat head screwdriver
pop off the top cap. Pull the
units out of the case.
Replace with new battery. ( + )
or positive polarity should be
facing up. Slide unit back into
the case
Replace Cover
Note: Make sure you
properly slide the unit into
the channel for proper fit
1. Remove the transmitter assembly from the door or window jam.
2. Remove the cap from the transmitter
assembly.
3. Carefully remove the transmitter circuit board
from its housing.
4. Remove the depleted battery and dispose of it
as required by local laws.
5. Insert the replacement battery paying careful
attention to the battery polarity. + is the side nearest the
transmitter printed circuit board.
6. Reinsert the transmitter assembly into its housing.
7. Replace the cap for the transmitter assembly.
8. Insert the transmitter assembly into the door or window jam.
9. Install the screws for securing the transmitter (if they were used in the
initial installation process.)
10. Test the SW-ATT-RDW to assure that it is working properly.
Enrolling the Transmitter
(Per AT&T requirements)
Verifying the programming and RF communications
(Per AT&T requirements)
General Specifications
Operating Temperature: 32° to 120° F (0° to 49° C)
Operating Rel. Humidity: 5 to 95%, non-condensing
Operating Frequency: 433.92 MHz
Battery Type: 3-Volt CR2 Lithium Battery
IMPORTANT INFORMATION ABOUT RADIO DEVICES
1. AT&T radio controls provide a reliable communications link and fill an important
need in portable wireless signaling. However, there are some limitations which
must be observed.
2. For US installations only: the radios are required to comply with FCC rules and
regulations including FCC part 15 devices. As such, they have limited transmitter
power and therefore limited range.
3. A receiver cannot respond to more than one transmitted signal at a time and may
be blocked by radio signals that occur on or near their operating frequencies
regardless of code settings.

4. Changes or modifications to the device may void FCC compliance
5. Infrequently used radio links should be tested regularly to protect against
undetected interference or fault.
6. RF signals can be affected by metal objects including metal doors or large mirrors.
Care should be taken to avoid these objects during installation as they can interfere
with proper operation.
FCC compliance statement
This device complies with FCC Rules and Regulations as Part 15 devices as well as
Industry Canada Rules and Regulations. Operation is subject to the following two
conditions:
1. This device may not cause harmful interference.
2. This device must accept any interference received, including interference that may
cause undesired operation.
Conformité Réglementaire
Ce dispositif est conforme à la réglementation de la IC et (Partie 15) de la FCC.
Son fonctionnement est soumis à deux conditions : (1) ce dispositif ne doit pas
causer d’interférences nuisibles, et (2) ce dispositif doit accepter toute
interférence reçue, y compris les interférences pouvant entraîner des conditions
de fonctionnement indésirables.
WARNING: The polarity of the battery must be observed, as shown (See
Figure 4). Improper handling of lithium batteries may result in heat
generation, explosion or fire which may lead to personal injuries. Replace
only with the same or equivalent type of battery as recommended by the
manufacturer.
Batteries should not be recharged, disassembled or disposed of in fire.
Disposal of used batteries must be made in accordance with the waste recovery
and recycling regulations in your area.
Notice to users in California—This Percolate warning applies only to
Manganese Dioxide Lithium cells sold or distributed only in California,
USA. Percolate Material special handling may apply. See
www.dtsc.ca.gov.hazardouswaste/perchlorate.
Warranty Statement: This is shown as an example of the SW warranty
statement and is not meant to imply that this is the warranty for the product.
AT&T may have its own warranty terminology

SECURE WIRELESS LIMITED WARRANTY - Example
This SECURE WIRELESS product is warranted against detects in material and
workmanship for a period of ______years. This warranty extends only to wholesale
customers who buy direct from SECURE WIRELESS or through SECURE
WIRELESS’s normal distribution channels. SECURE WIRELESS does not warrant
this product to consumers. Consumers should inquire from their selling dealer as to the
nature of the dealer’s warranty. There are no obligations or liabilities on the part of
SECURE WIRELESS for consequential damages arising out of or in connection with
use or performance of this product or other indirect damages with respect to loss of
property, revenue, or profit, or cost of removal, installation or reinstallation. All
implied warranties, including implied warranties for merchantability and implied warranties
for fitness, are valid only until the warranty expires. This SECURE WIRELESS Warranty
is in lieu of all other warranties express or implied.
All products returned for warranty service require a Return Product Authorization Number
(RPA#). Contact SECURE WIRELESS Technical Support at 1-866-966-9473 or at
www.mysecurewireless.com for an RPA # and other important details.