Securitron 500 12600_F EEB2, EEB3N Installation And Operating Instructions EEB2 IO 12600 F
EEB2 Installation Manual EEB2-InstallationManual EEB2 - Securitron
User Manual: Securitron EEB2, EEB3N Installation and Operating Instructions Installation Instructions
Open the PDF directly: View PDF ![]() .
.
Page Count: 2
PN# 500-12600
Page 1 Rev. F, 01/15
SECURITRON EEB2, EEB3N EXIT BUTTON WITH INTEGRATED TIMER
INSTALLATION AND OPERATING INSTRUCTIONS
DESCRIPTION
Model EEB2 is a two-inch square, exit button, mounted on a stainless steel (S.S.), single gang key plate. Model EEB3N
is a rectangular exit button, mounted on a 1 3/4” S.S. narrow stile key plate. Both EEB2 and EEB3N have a 3A switching
capacity and a timer set for 30 seconds. These units are intended only for release of a magnetic lock from the inside of a
door. When the button is pressed, the lock releases for 30 seconds. If pressed again during the 30-second lock release
period, the unit will “retrigger” starting a new 30-second lock release period. These buttons are specifically intended for
installation on access controlled egress doors, as described in the Building Officials and Code Administrators (BOCA)
code. A motion detector, such as the Securitron Model XMS, is the primary means of magnetic lock release on the door.
The EEB2 or EEB3N exit button is employed as a backup means of releasing the lock in case of a problem with the
motion detector. It should be noted that the exact release time will vary with temperature, but it will not be less than 30
seconds.
UL294 ACCESS CONTROL PERFORMANCE LEVELS
The following are the UL294 access control performance levels:
• Destructive Attack = Level 1
• Line Security = Level 1
• Endurance = Level 1 (6,000 cycles)
• Standby Power = Level 1
MOUNTING THE EEB2 AND EEB3N EXIT BUTTONS
1. MOUNT the EEB2 using its included mounting device.
NOTE: The aluminum door frame must be sufficiently routed out to accommodate the EEB3N components.
2. MOUNT the EEB3N directly on a narrow stile aluminum door frame.
WIRING THE EEB2 AND EEB3N
CAUTION
THE EEB2 and EEB3N can be damaged if operated on 24 VDC with the jumper in place, or operated on a power
supply different than what is operating the magnetic lock.
NOTE 1: The EEB2 and EEB3N operate on 12 VDC or 24 VDC, and can accept the use of full-wave rectified DC
(transformer and bridge rectifier).
NOTE 2: EEB2 and EEB3N are factory shipped with the jumper in place (12 VDC). If jumper is removed, unit operates
on 24 VDC.
NOTE 3: EEB2 and EEB3N draw no current when at rest, and only draw 28 mA at 12 VDC or 38 mA at 24VDC when
releasing the lock.
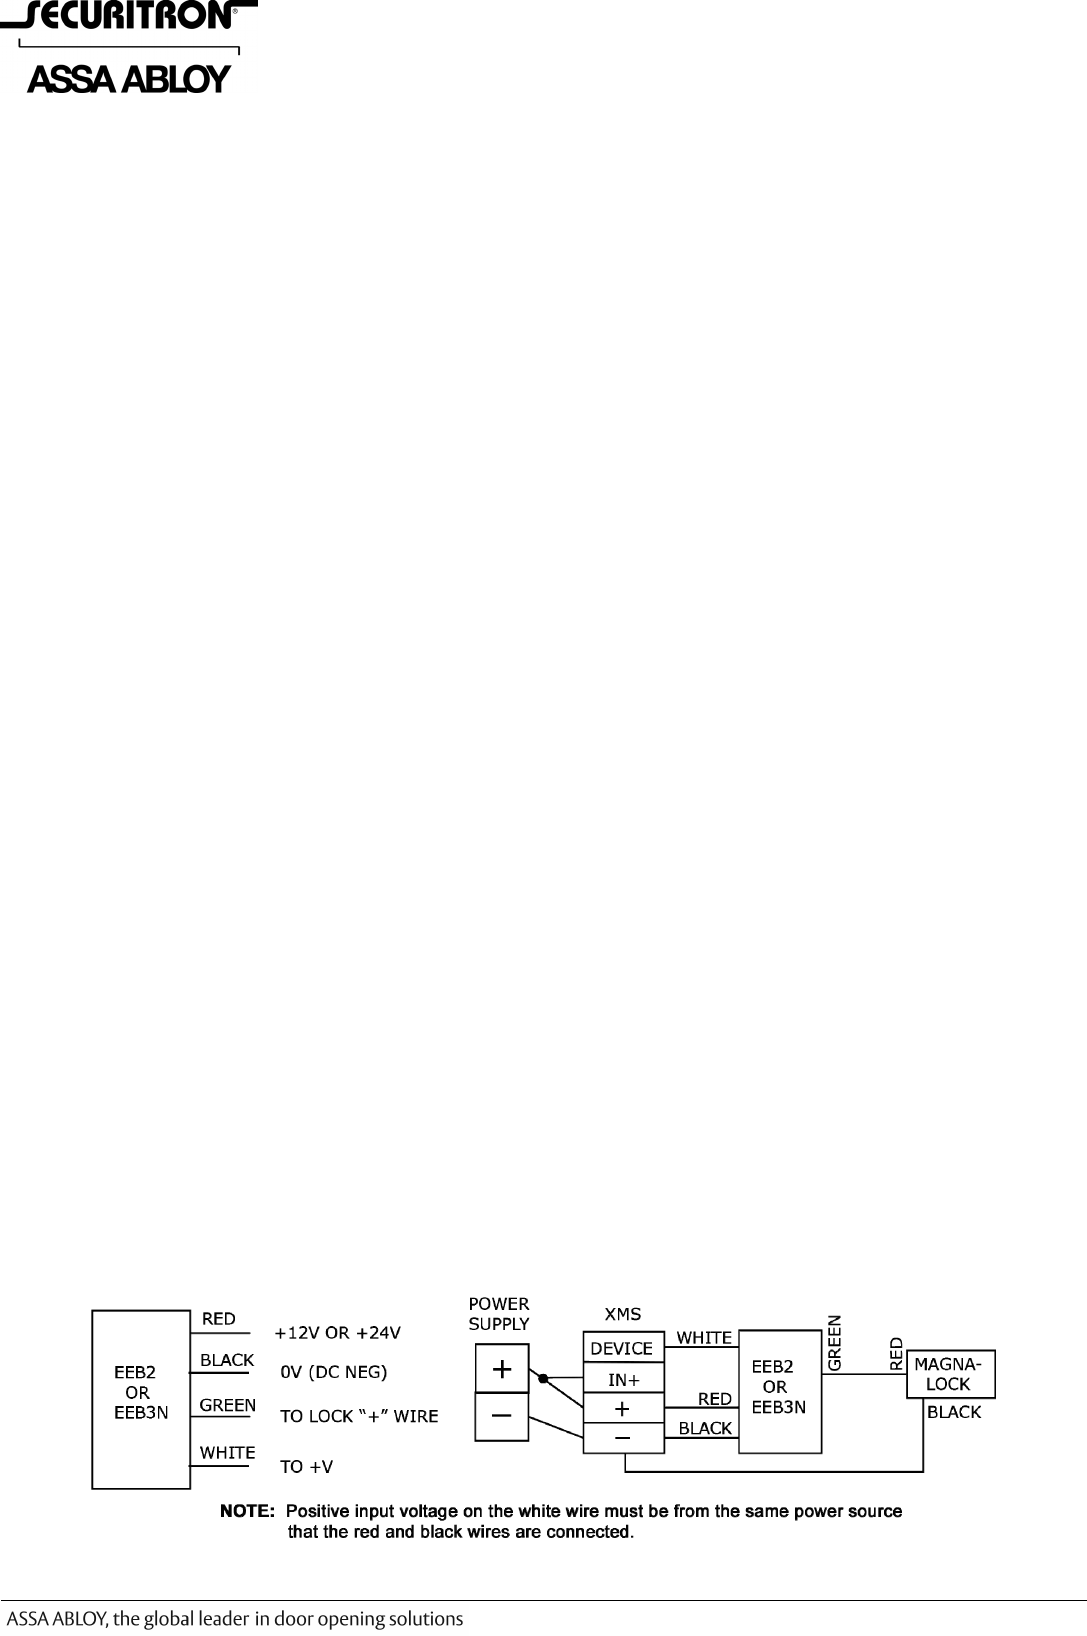
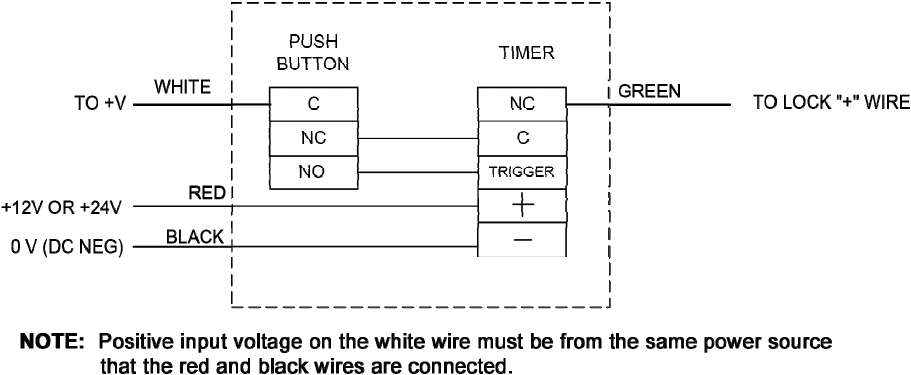
1. WIRE the EEB2 or EEB3N in accordance with Figure 1, “Wire Identification and Typical Connection,” and Figure 2,
“Internal Schematic.”
Figure 1. Wire Identification and Typical Connection
Securitron
10027 S. 51st St., Ste. 102, Phoenix, AZ 85044
Tel: 1.800.624.5625
Mon-Fri: 6:00am - 4:00pm PDT
techsupport@securitron.com www.securitron.com
© 2015, Hanchett Entry Systems, Inc., an ASSA ABLOY Group Company. PN# 500-12600
Page 2 Rev. F, 01/15
Figure 2. Internal Schematic
CHANGING THE ALTERNATE LENS ON THE EEB2
1. GRASP and TURN OVER the keyplate.
2. From the back, ROTATE the white contact block of the switch counterclockwise to the 11:00 o’clock position, and PULL
straight back to remove.
3. SLIDE a slender smooth-ended object, such as a marker pen, inside the switch body up against the lens.
4. PLACE the object on a smooth surface with the keyplate on top, and TAP the keyplate up and down on the object to
pop off the lens.
5. REMOVE the lens and insert.
6. TURN OVER the keyplate and PLACE a new insert onto the front of switch.
7. ENSURE that the the text on the insert is correctly reading to the keyplate, and PLACE the matching colour lens on top
of insert.
8. PRESS around all edges of the lens until it snaps in place.
9. DEPRESS lens several times to ensure smooth operation and the lens is not binding.
10. With the terminals upward, INSERT the contact block back into the back of the switch at the 11:00 o’clock position and
ROTATE clockwise until it stops straight up and down.
CHANGING THE ALTERNATE LENS ON THE EEB3N
1. While holding keyplate, GRASP the top and bottom of the lens and PULL straight out from the keyplate.
2. PLACE a new lens over the switch face, and ENSURE the text on the lens is correctly reading to the keyplate.
3. PRESS completely until it snaps into place.
4. DEPRESS the lens several time to ensure smooth operation and the lens is not binding.
MAGNACARE
®
WARRANTY
LIFETIME - NO FAULT – TOMORROW
• Lifetime - We guarantee our products, and since we've been making Magnalocks for over 35 years that’s a promise you
can trust
• No Fault - for any reason, including but not limited to installation error, vandalism or act of God
• Tomorrow - replacement product is shipped at Securitron's expense, next day air if needed
• Hassle Free - No product registration is required
www.securitron.com/warranty
