Security Hirsch Guide Corporate User Manual
2017-08-09
User Manual: Security Hirsch-Guide Hirsch-Guide uploads wp-content
Open the PDF directly: View PDF ![]() .
.
Page Count: 16

Vicon part number 8009-8191-20-01 Rev 511
XX191-20-01
VN-HIRSCH-INTV5
ViconNet ver 5.6/Hirsch
Integration Software
Product specifications subject to change without notice.
Copyright © 2011 Vicon Industries Inc. All rights reserved.
Vicon, ViconNet, Kollector and their logos are registered trademarks of Vicon Industries Inc.
VICON INDUSTRIES INC., 89 ARKAY DRIVE, HAUPPAUGE, NEW YORK 11788
TEL: 631-952-CCTV (2288) FAX: 631-951-CCTV (2288) TOLL FREE: 800-645-9116
24-Hour Technical Support: 800-34-VICON (800-348-4266)
UK: +44 (0) 1489 566300 WEB: www.vicon-cctv.com
Guide for Configuring ViconNet ver 5.6 and Hirsch Velocity |1
Guide for Configuring and Using
ViconNet ver 5.6 and Hirsch Velocity
This guide provides a step-by-step procedure for connecting a Hirsch
Velocity system to a ViconNet 5.6 system. Refer to the ViconNet® manual for
detailed information. This document assumes that the Hirsch system is
installed and operating properly and that ViconNet is at least version 5.6b.
Hirsch configuration instructions are on page 9.
ViconNet 5.6b Settings
The ViconNet device connecting to the Hirsch system to receive events
must have the “Events Management” system registered (licensed) and
working; this is verified in the unit’s setup menu that shows the “Events
Management” button enabled (not grayed out).
2 | Guide for Configuring ViconNet ver 5.6 and Hirsch Velocity
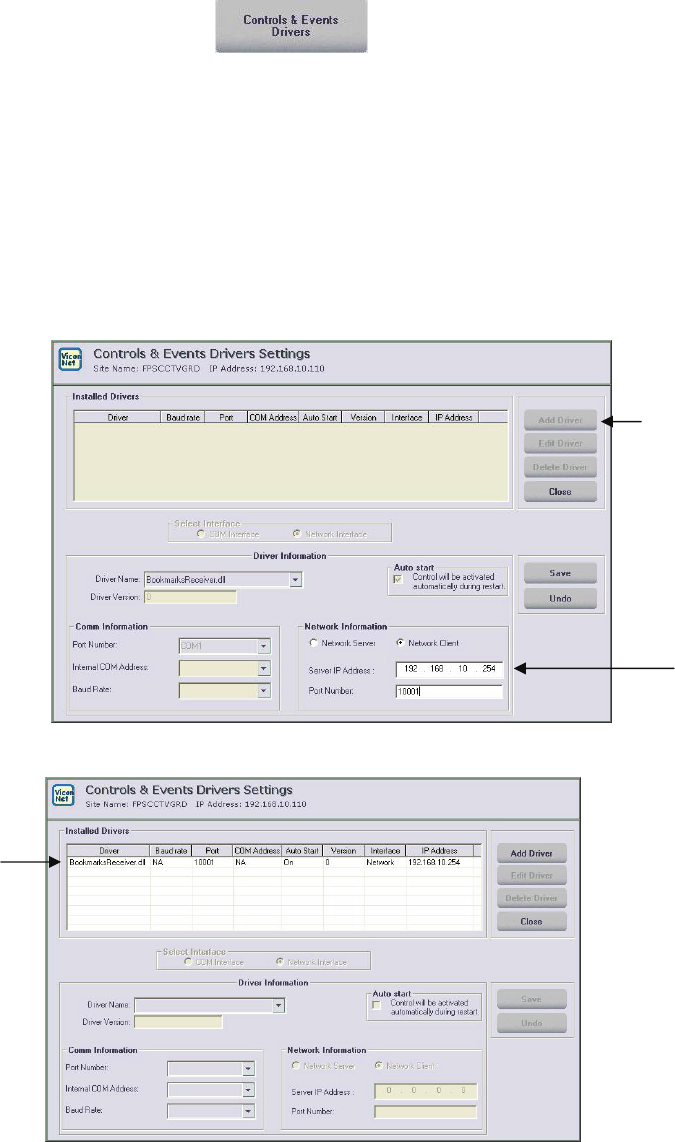
Defining the Control Driver
• Click on in System Settings.
• Click on the Add Driver button.
• Select BookmarksReceiver.dll from the Driver Name dropdown list.
• Enter the IP address and port for the Hirsch system sending the
events. Note that the configuration of the server port must be done on
the Hirsch (XML writer) system in advance (see page 9). Make sure
to check the “Network Client” box for this integration.
• The ViconNet application must be restarted for the control to load.

Guide for Configuring ViconNet ver 5.6 and Hirsch Velocity |3
Configuring Events Management
• Click on in System Settings. The following screen
displays.
The next steps define the basic configurations in the various screens of
Events Management that allow for the integration specifically with Hirsch.
Refer to the ViconNet manual for any additional required configuration
screens.
Events Database Configuration
The Events Database Configuration screen allows the addition of fields as
they are sent by the Hirsch system. These fields will only exist if the systems
have been configured properly and there is good IP communication. If the
Hirsch fields do not display, make sure the link is working properly before
proceeding (i.e., check IPs, ports, firewalls, etc.).
• Check Motion Enable. The motion Profile displays.
4 | Guide for Configuring ViconNet ver 5.6 and Hirsch Velocity
• Click on .
• Click the Add button to open the Events DB Field dialog box.
• Hirsch Velocity sends only one field and it should show as
VelocityXML; you must select it from the dropdown list. Add your
own, as required. Define the type, search privileges and behavior.
This screen also allows customization of the design of the pop-up
message and the list “look.”
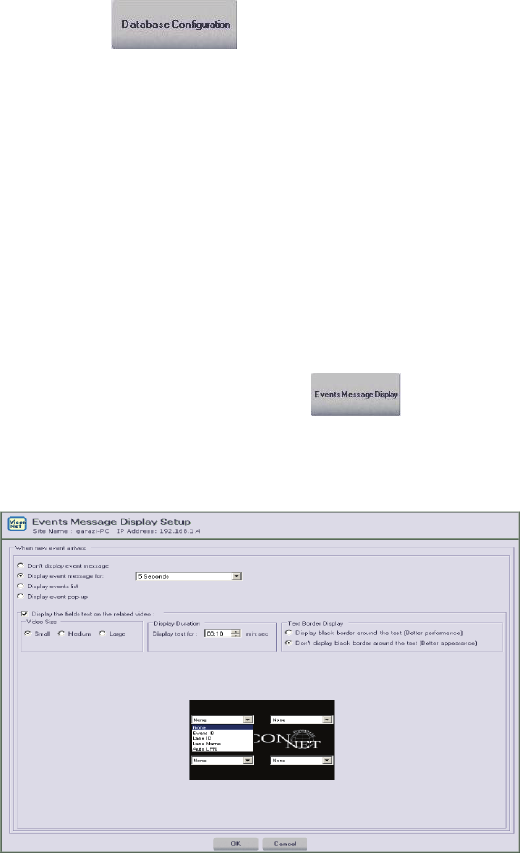
Events Message Display
The Events Message Display screen ( ) configures the way events
are seen when they are received by ViconNet, including the on-screen
display of various fields as desired. It is recommended to use a temporary
message that can be clicked on to see the full event entry.
Guide for Configuring ViconNet ver 5.6 and Hirsch Velocity |5
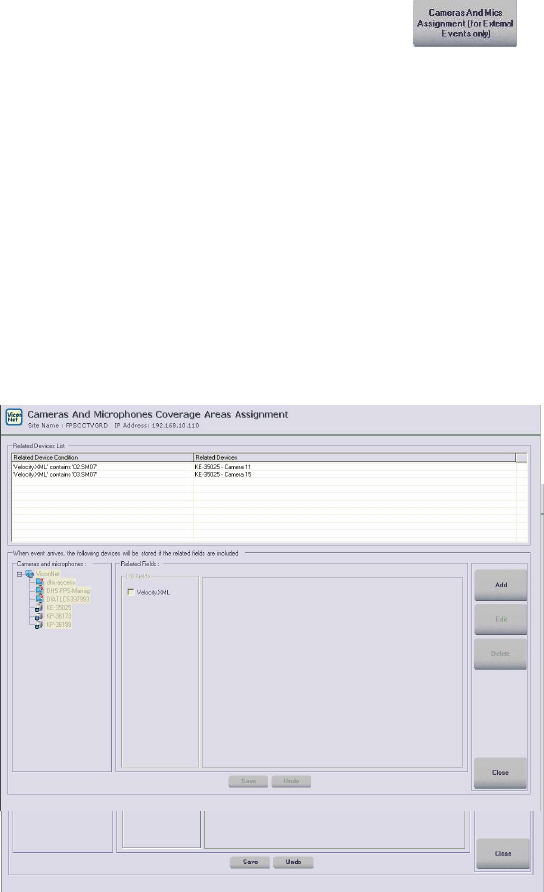
Events Cameras And Mics Assignment
Use the Cameras And Mics Assignment screen ( ) to create the
logical connection between cameras and the doors; this can be done for any
field, as needed.
• Click the Add button to create the link.
• Select the camera or microphone (up to 4) to link.
• Check the box of the related field to create the link.
• Define the terms VelocityXML contains… Door XXX (equals, not
equals are also an option but because Hirsch sends only one string,
contains is usually what you will need) and the parameters; create
multiple fields linked by using “And”
A typical Hirsch integration links cameras to door numbers to use for an
event. This step is important as it will determine which cameras will be
associated with readers and door later on for macro. Make sure to define all
the points.
6 | Guide for Configuring ViconNet ver 5.6 and Hirsch Velocity
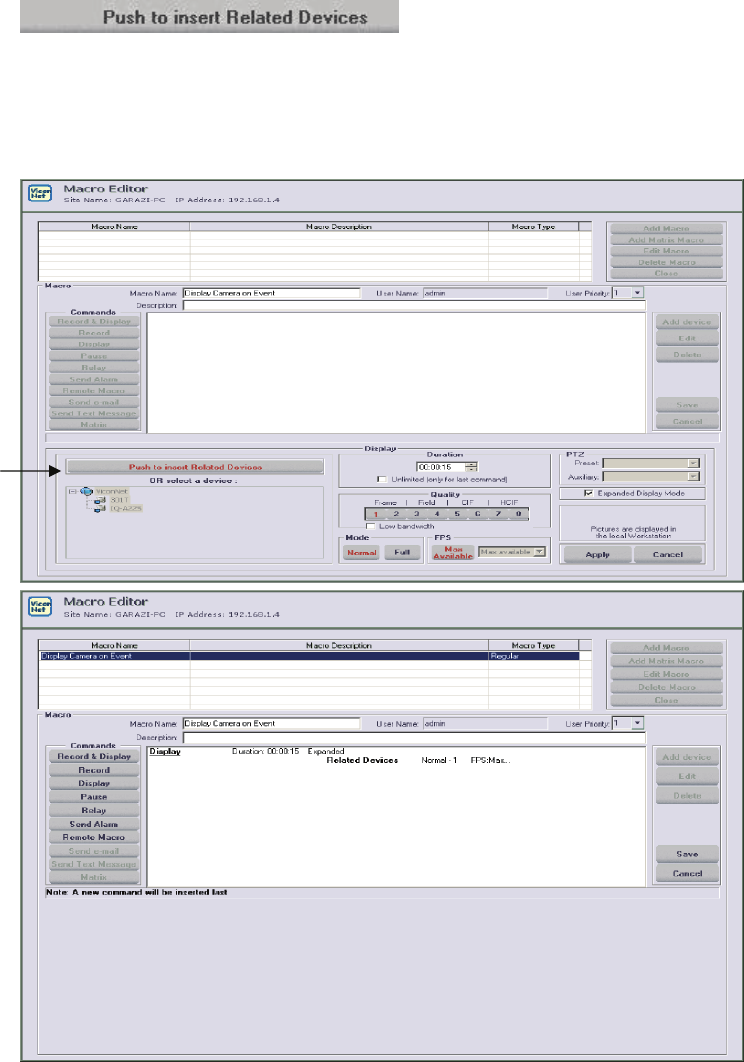
Configure Macros
For an alarm or macro to be generated when specific events occur, it is
necessary to define what part of the event message triggers the macro or
alarm. The macro must be written prior to defining the triggers. For example,
a macro is written to display the cameras that were correlated to a door for
15 seconds. This is done by clicking on the Push to insert Related Devices
( ) button on the Macro screen; this
will have the macro take the camera from the event correlation, eliminating
the need to specify a camera in this screen. (As an alternative, the camera
can be specified and separate macros per event can be used.) Refer to the
ViconNet manual for configuring macros as needed. A sample Macro Editor
screen is below.
Guide for Configuring ViconNet ver 5.6 and Hirsch Velocity |7
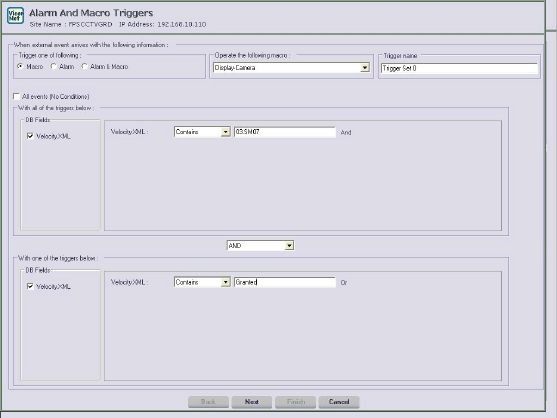
Configure Alarms and Triggers
Select Alarm and Macro Triggers ( ) from Events Management to
open that screen.
• Click the Add button to create a trigger.
• Enter the term of the trigger (equals, not equals, contains) and select
the macro to run when the trigger is met.
• Name the trigger with any logical name. Use whatever fields required
to fine tune the trigger.
Note
The trigger configuration is case sensitive; make sure that the Caps Lock
function is not active when configuring triggers to avoid problems.
• Click Next to set the schedule for the specific trigger; this allows
setting different times for different triggers, as needed.
Typically when integrating with Hirsch, you will need to define the terms that
will trigger the macro. For example:
VelocityXML contains Door1
AND
VelocityXML contains access denied
will run a display macro for related devices. The cameras that will be
displayed are the ones you assigned to Door1 on page 5 of this manual.
8 | Guide for Configuring ViconNet ver 5.6 and Hirsch Velocity
Guide for Configuring ViconNet ver 5.6 and Hirsch Velocity |9
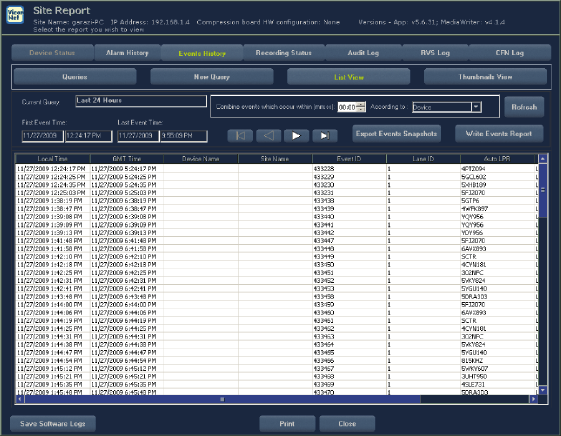
Reports
The events are stored and accessed through the Reports menu on the unit
collecting the events.
• Click Reports on the ViconNet Main screen.
• Select the ViconNet unit and click on the Events History tab. An
Events list, a thumbnail view or a Query screen are available to
search for an event.
• Double click any event in the list to open the event entry.
• Right click any event in the list to view live video from the correlated
camera or playback video from the time of the event or before it
occurred.
Note: This screen also provides access to the event report editor to
create a text file and export an event thumbnail and text details from the
event.
10 | Guide for Configuring ViconNet ver 5.6 and Hirsch Velocity
Setting Up the Hirsch Velocity System Running ViconNet
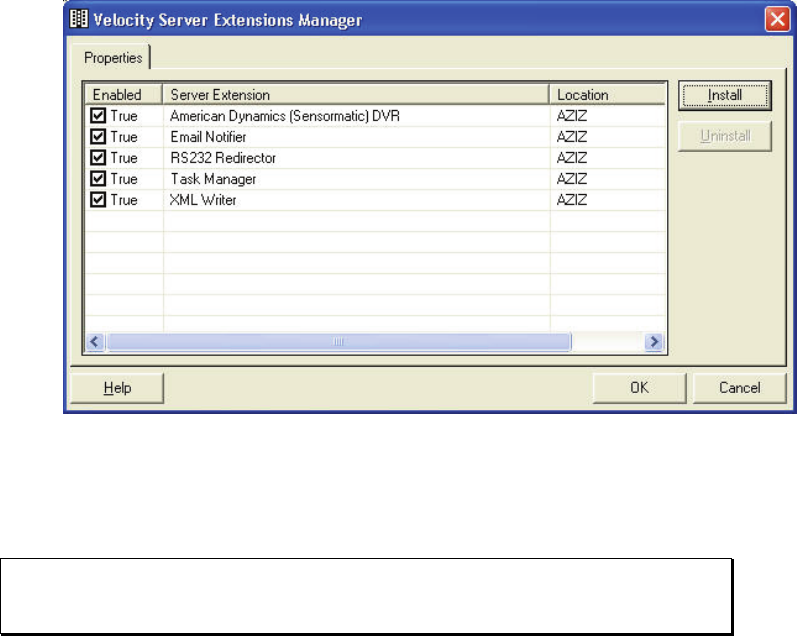
Add the XML Writer
The Video Service will connect to the Velocity XML Writer interface to receive
event messages from Velocity. The XML Writer interface is not automatically
installed during the Velocity software installation. To install the interface:
• Use the Velocity Add-ins -> Server Extensions… command to open the
Velocity Server Extensions Manager dialog box.
• Click the Install button to open an Explorer window.
• Select the ‘XML Writer.HEX’ file in the Velocity directory.
After it is installed, the XML Writer interface will appear in the Manager
window.
Extension Manager Screen
Enabling the Web Server
Note: It is important that the Velocity Server will not be running a web server
locally (hosting a website). The web server is required for the integration to
work.
On the system running Velocity, go to the Velocity Service Control Manager
on the task bar on the bottom.

Guide for Configuring ViconNet ver 5.6 and Hirsch Velocity |11
Right click on the icon and select Settings to open the setting screen.
Select Web Server from the list on the left and verify that the Enable web
server box is checked.
You will be asked to restart the Velocity services when done.
Important!!!
If the Velocity server has a firewall, make sure port 80 is open!
12 | Guide for Configuring ViconNet ver 5.6 and Hirsch Velocity
Hirsch Setup
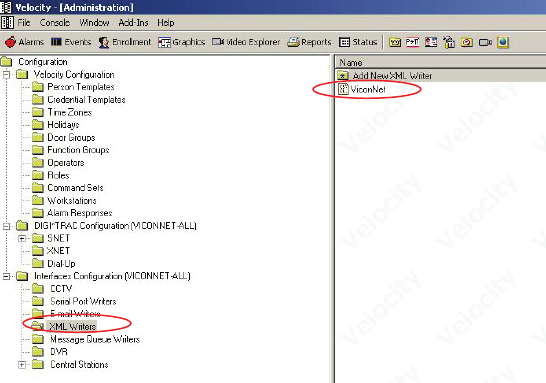
Create New XML Interface
From the Velocity Administration window, add an XML interface for the Video
Viewer/Service:
• Open the Interfaces Configuration – XML Writers folder.
• Open the Add New XML Writer folder.
• Name the interface (use “ViconNet” as the name of the interface) and
select all the events that will be required to trigger video display. The
XML properties page follows.
• Use “10001” as the port number.
• Open the firewall port to allow access to it.
• Select “Always” for the active duration time zone option.
• Check ALL the events.
• Make sure “Enabled” is checked.
• Click OK.
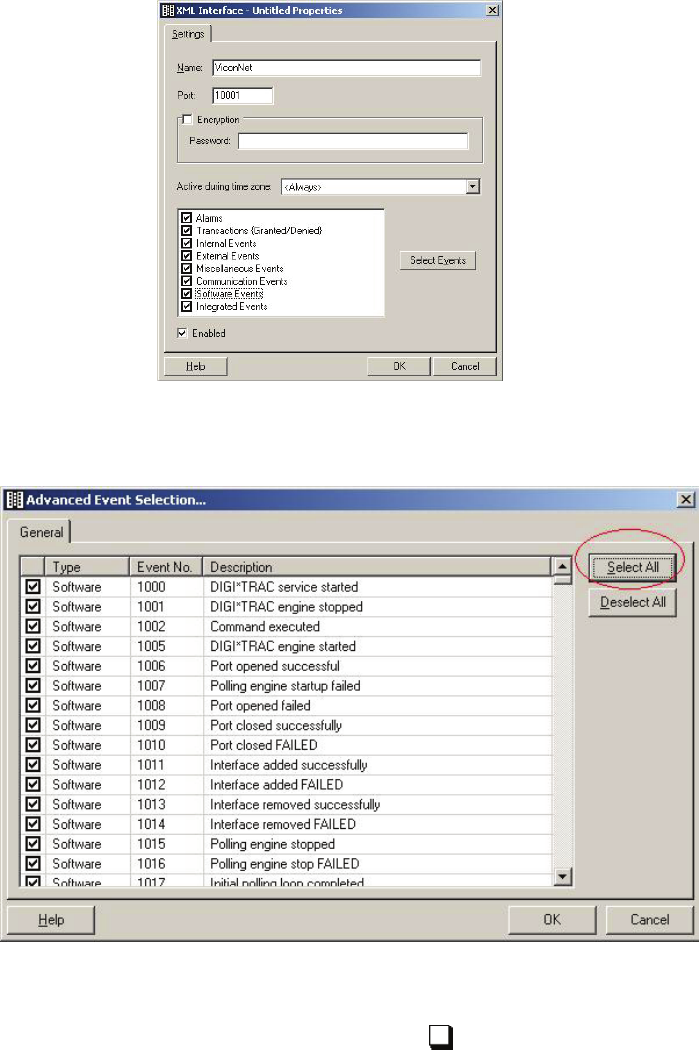
Guide for Configuring ViconNet ver 5.6 and Hirsch Velocity |13
• Click on “Select Events” button and check all events check boxes
(click Select All). Click OK.
You may choose not to select all the events and decide which ones you
want to report and which not by checking the .

Vicon Industries Inc.
Corporate Headquarters
89 Arkay Drive
Hauppauge, New York 11788
631-952-2288 800-645-9116
Fax: 631-951-2288
Vicon Europe
Headquarters
Brunel Way
Fareham, PO15 5TX
United Kingdom
+44 (0) 1489 566300
Fax: +44 (0) 1489 566322
Vicon Germany
Kornstieg 3
D-24537 Neumuenster
Phone: +49 (0) 4321 8790
Fax: +49 (0) 4321 879 97
Far East Office
Unit 5, 17/F, Metropole Square
2 On Yiu Street, Shatin
New Territories,
Hong Kong
(852) 2145-7118
Fax: (852) 2145-7117
Internet Address: www.vicon-security.com
