Security Webviewerv6 Userguide User Manual Web Viewer V6 Guide
Webviewerv6-Userguide WebViewerV6-UserGuide WebViewerV6-UserGuide software_manual Products English-US s Collateral
2017-08-09
User Manual: Security Webviewerv6-Userguide WebViewerV6-UserGuide uploads wp-content
Open the PDF directly: View PDF ![]() .
.
Page Count: 14
www.vicon-security.com
User Guide
XX220-00-00
Web Viewer
Vicon Industries Inc. does not warrant that the functions contained in this equipment will meet your requirements or that the
operation will be entirely error free or perform precisely as described in the documentation. This system has not been designed
to be used in life-critical situations and must not be used for this purpose.
Vicon Industries Inc., 89 Arkay Drive, Hauppauge, New York 11788
Tel: 631-952-2288 Fax: 631-951-2288 Toll Free: 800-645-9116
24-Hour Technical Support: 800-34-VICON (800-348-4266) UK: 44/(0) 1489-566300
Document Number: 8009-8220-00-00
Product specications subject to change without notice.
Issued: 1010
Copyright © 2010 Vicon Industries Inc. All rights reserved.

ViconNet Web Viewer User Manual
Topic Page
General 3
ViconNet Setup 4
Connection and Login 5
Main Screen 6
Vicon, ViconNet, Kollector and I-Onyx and their logos are registered trademarks of Vicon Industries Inc.
Microsoft and Silverlight are registered trademarks of Microsoft Corporation. Other company and brand products
and service names are trademarks or registered trademarks of their respective holders
ViconNet Web Viewer User Manual | 3
General
This manual provides information for using the ViconNet Web Viewer
(Client). Read this manual through completely before attempting to use the
Web Viewer.
With the ViconNet® Web Viewer, a user has the convenience of accessing
the ViconNet Video Management System over LAN, WAN or the Internet,
from any approved browser (refer to Web Viewer datasheet); there is even
support for mobile device browsers. It allows remote clients to view live video
streams and get playback of recorded cameras and microphones over the
network.
The ViconNet Web application enables the use of cameras and microphones
that are using the same ViconNet Nucleus site as the Web Viewer server.
The user can select up to 16 cameras for live display, control PTZ cameras
and receive alarm notifications, as well as playback recorded video and audio
from select times or various storage locations (refer to the list of playback
limitations in the Playback section of this manual). Additionally, the display
mode can be selected (from single to 16-camera view, including full screen),
the aspect ratio correction (4:3 or 16:9) can be enabled or disabled and there
is the ability to write to a log file for support purposes.
4 | ViconNet Web Viewer User Manual
ViconNet Setup
Before the Web Viewer can be used, a Web Server must be setup. There are
two options for the server deployment, either run it on the system Nucleus
(assumes a dedicated Nucleus PC and up to 10 concurrent web viewers) or
on its own dedicated server as a full service. Refer to the manual XX220-10
on how to configure the Web Server.
Note that activating the Web Server will impact on certain performance
criteria; the Web Viewer requires more CPU resources for video display
compared to ViconNet for the same operation. Additionally, the Web Viewer
and ViconNet application cannot be activated simultaneously on the same
system.
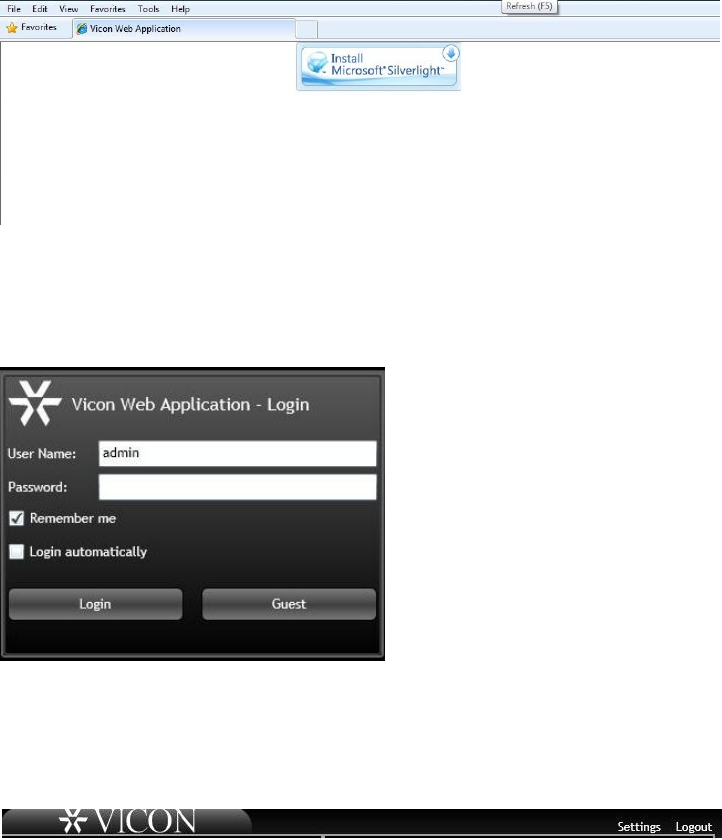
Note that the ViconNet Web Viewer requires Microsoft® Silverlight® to run. If
Silverlight is not installed, the application will prompt the user to install it on
the first attempt to browse to the server.
ViconNet Web Viewer User Manual | 5
Connection and Login
Browse to the IP address or DNS name of the system running the Web
Server, whether it is the system’s Nucleus or a dedicated Web Server. There
is no need to browse to the NVRs or cameras separately.
If Silverlight has not been installed, the following message will display.
Click to install Silverlight and follow the on-screen prompts; this is required to
use the Web Viewer.
Once connection with the Web Viewer has been established, the login
prompt will display.
The user can login as a guest or as a user that exists in the Nucleus. There is
the option to have the Viewer remember the user name and to have the
Viewer log in automatically using the entered user and password; check the
boxes as needed. To change users, first click Logout from the top right of the
screen and login again.
If a user tries to perform an unauthorized action, the Request Failed error
will display.
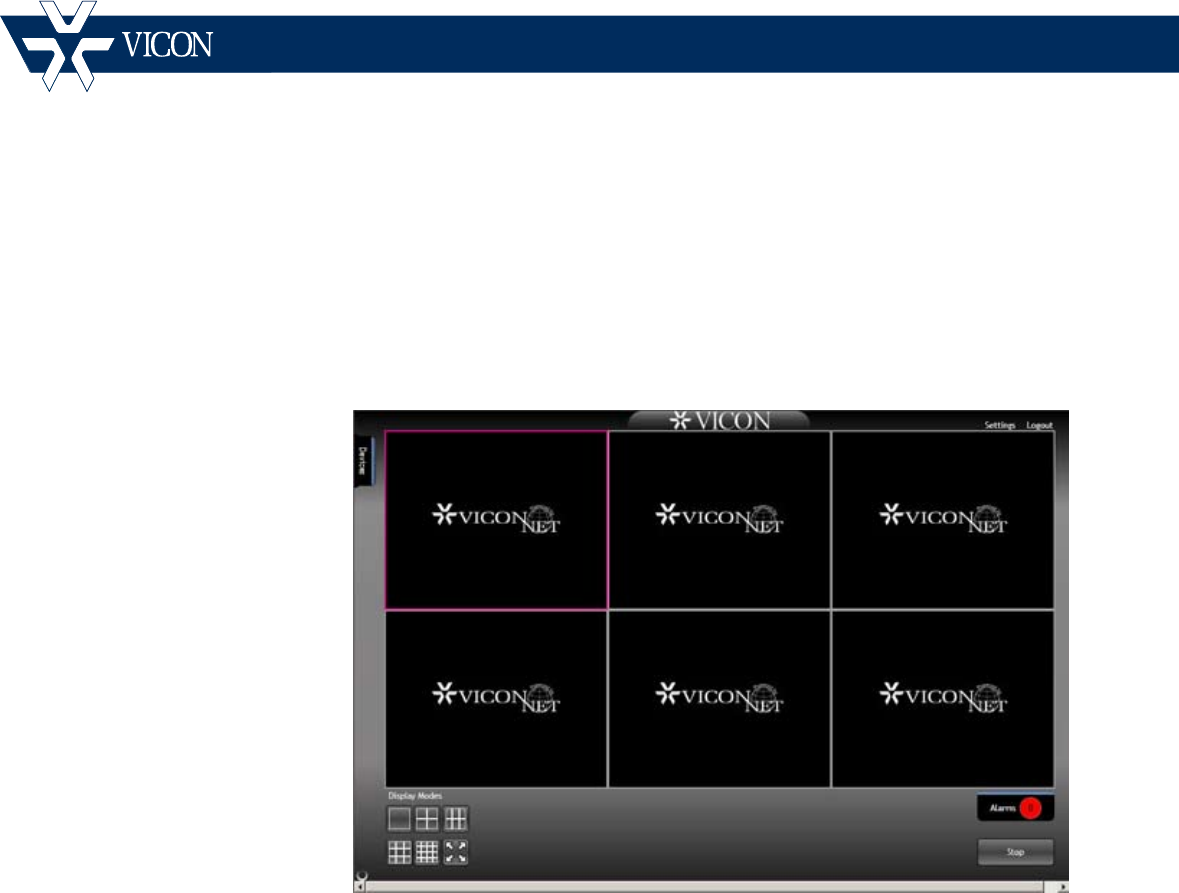
Click the Login button. The Web Viewer Main screen will display.
6 | ViconNet Web Viewer User Manual
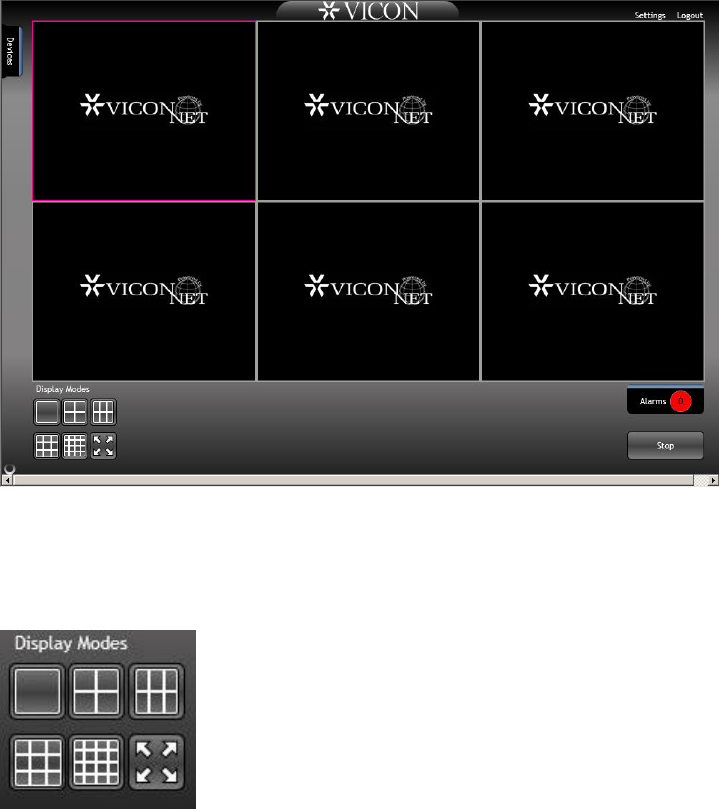
Main Screen
The Web Viewer Main screen provides all the tools needed to work with the
ViconNet system.
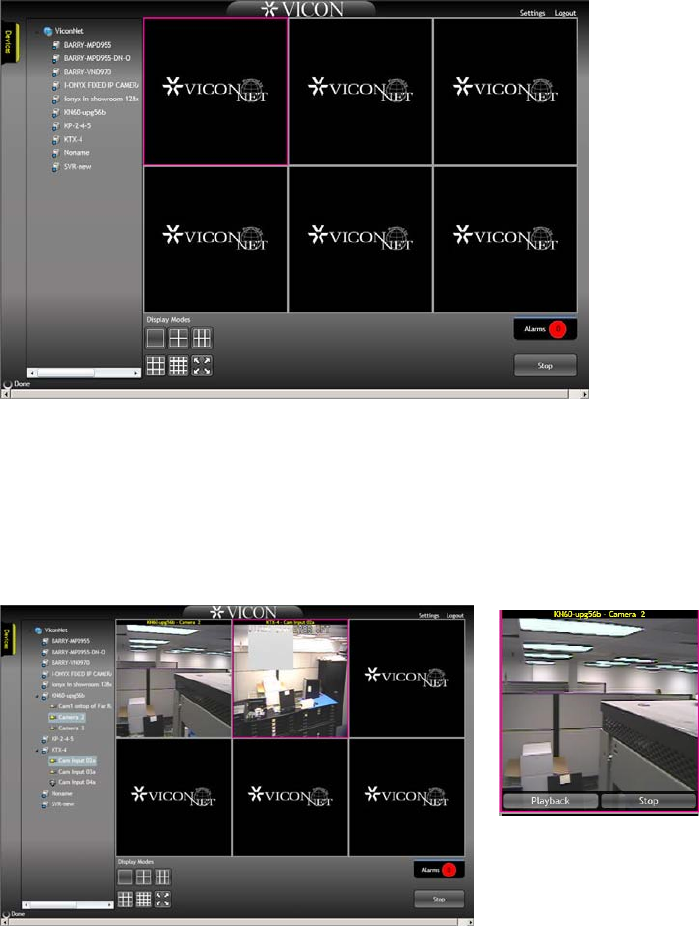
Display Modes
The Main screen can display video in a choice of display modes: single, quad
(2x2), six (3x2), nine (3x3), sixteen (4x4) and full screen. If full screen is
selected, press the Esc key to return to the Web Viewer Main screen.
Single, Quad, Six
Nine, Sixteen, Full Screen
ViconNet Web Viewer User Manual | 7
Live Video and Audio
Click the Device tab on the upper left to view the list of devices that can be
accessed. The content of the list depends on the Nucleus that the Web
Viewer server is connected to; the quality of the video is dependent on how it
is setup on the Nucleus or primary site.
Click the site to open the list of cameras associated with it. To view live video
or listen to audio, select the camera or microphone from the Device list. Click
on the device and drag the icon to the location on the screen for display. As
an alternative, click on the desired rectangle to mark it with a pink frame and
then click on the camera to open it in that rectangle. To stop the video
display, hover over the video and click the Stop tab; use the Stop button at
the bottom of the screen to stop all video displays.
The currently selected camera’s video is outlined in pink.
Notes: 1. MPEG-4 video from any IP camera will not be displayed;
attempting to activate this type of camera will produce an error message.
2. In order to produce a smooth stream, there may be a few second
delay in displaying H.264 video streams, depending on the network.
8 | ViconNet Web Viewer User Manual
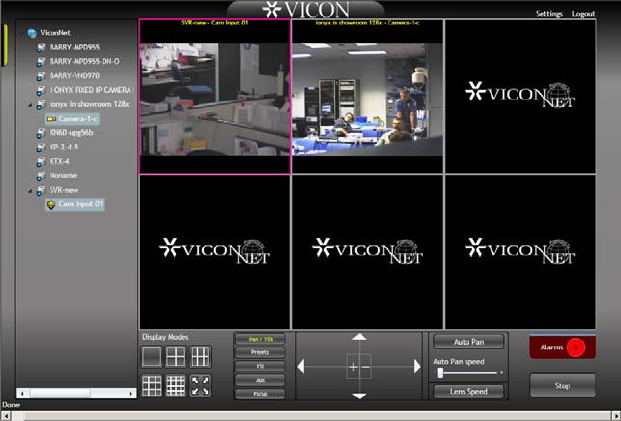
PTZ Controls
If the camera selected for display is a PTZ, those controls become available
at the bottom of the screen.
Use the arrows to pan and tilt in that direction; use + and – to zoom in and
out. An Auto Pan button is provided to enable the camera to automatically
rotate around 360° while displaying the video; a speed control bar is provided
to increase speed (+) or decrease speed (–). A Lens Speed button is also
provided.
Using the Preset button offers 99 presets. Position the camera as required
and press Set Preset; the button turns red and the preset is stored. Once set,
this preset can be selected to move the camera dome to the set position.
The Iris button provides the option to Open Iris (more light), Close Iris (less
light) or engage Auto Iris (automatically adjust light level). The Aux button
offers six auxiliary functions for configuring internal PTZ settings. Focus Near
and Focus Far are provided from the Focus button.
ViconNet Web Viewer User Manual | 9
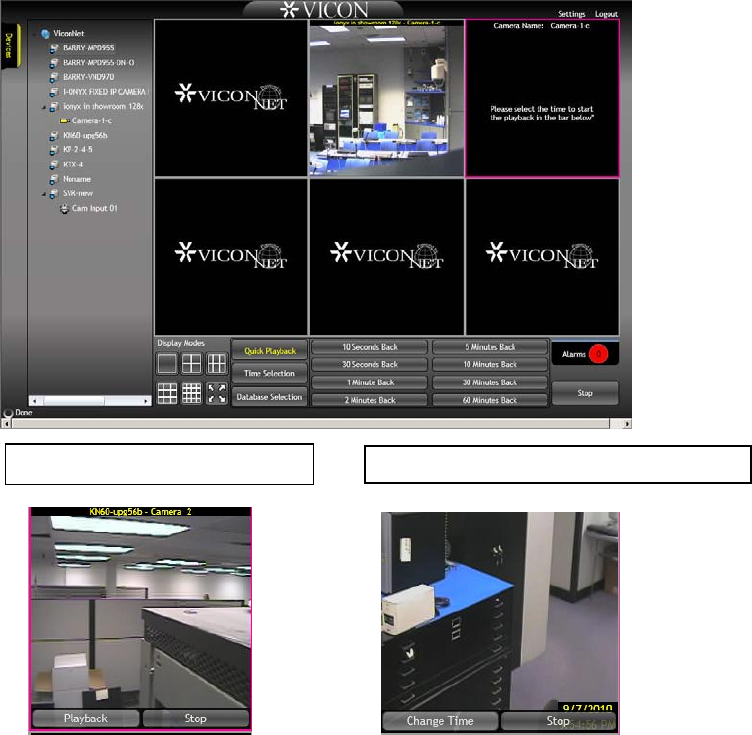
Playback
The option to play back recorded video is accessed through a tab that
displays under the live video display; hover over the video and click the
Playback tab. Clicking Playback provides a number of playback options that
display at the bottom of the screen. The playback video is displayed in the
next to the live video. The tabs of the video become Change Time or Stop.
The default option is Quick Playback; there are several playback time options
to select, from 10 seconds back to 60 minutes back. Additionally, a specific
Time Selection for playback can be chosen, as well as selecting video from a
specific storage source (Database Selection) that will allow playback of any
supported device (refer to Playback Limitations list).
Playback video from Live display Change Time selection of Playback video
10 | ViconNet Web Viewer User Manual
Note: Playback Limitations:
• As in ViconNet, Quick Playback is only available for Kollector® DVRs
and ViconNet-based IP devices and is not supported for I-Onyx® 9xx
or 3rd party cameras at this time. These other devices must select a
database to play back from.
• No playback of megapixel images 2 megapixel (1920 x 1080) and up.
• For audio playback, there must first be a camera in playback (there is
no way to playback just audio); then select the desired microphone
from the list and drag and drop it onto the video to be played back.
• Video and audio are not synchronized during playback.
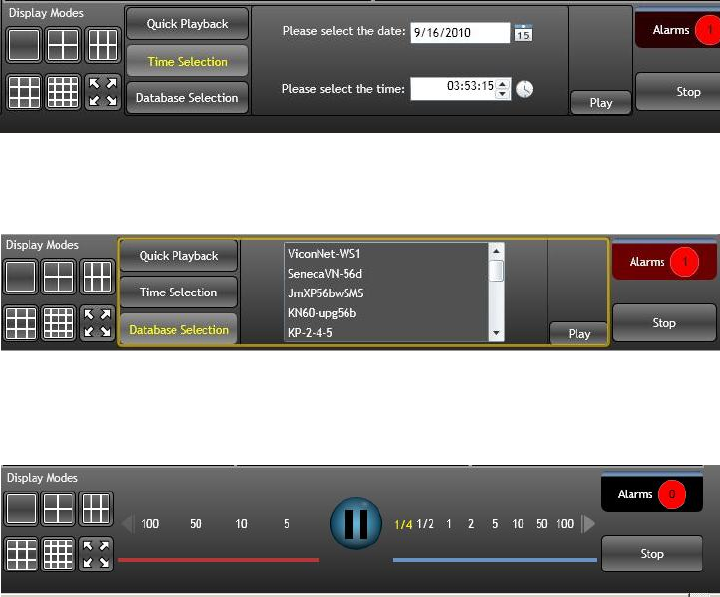
For Time Selection, use the calendar next to the date and the clock next to
the time to select the time and date to playback video from. Then click the
Play button.
For Database Selection, select the storage location (the unit whose database
is to be played back from) from the list and click Play. The recorded video will
display.
When the playback video is selected, the Fast Forward and Rewind bar
displays at the bottom of the screen. Use this to Pause the video, rewind at a
selected speed or fast forward at a selected speed.
ViconNet Web Viewer User Manual | 11
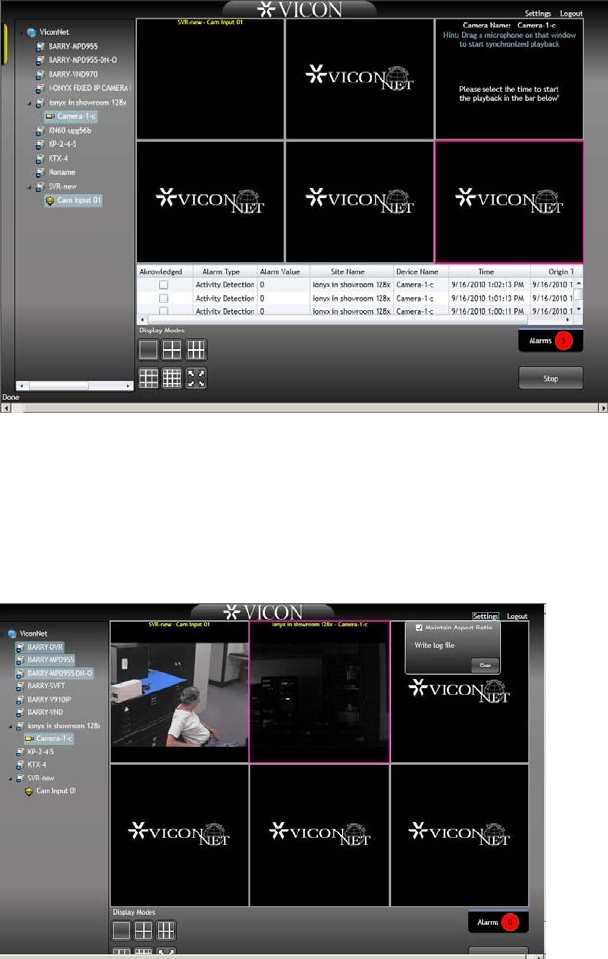
Alarms
The Web Viewer notifies the user of alarms that were received by the system
running the Web Server. A number in the Alarms button indicates the number
of new alarms. Clicking the Alarm button opens the alarm list, with details, at
the bottom of the screen. There is an option to acknowledge alarms from this
list. Clicking the Alarm button again will close the alarm list.
Note: If it is required that alarms be seen by the web viewers, they must be
sent to the Web Server so it will publish them to the viewers (all viewers will
get the alarms).
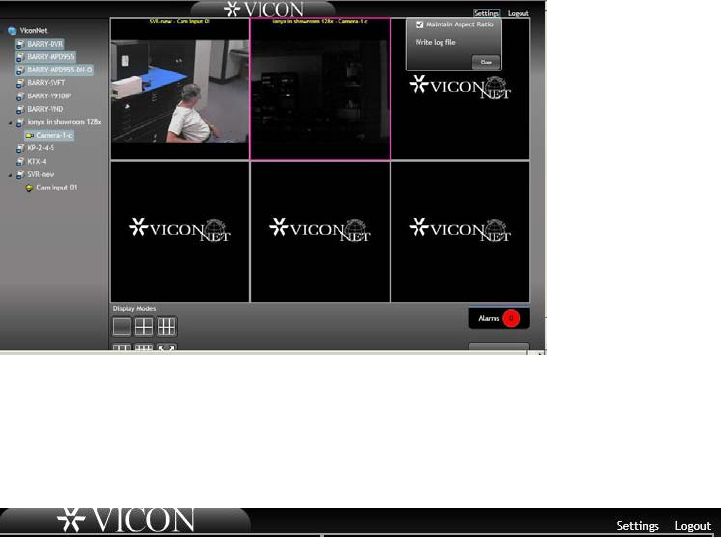
Writing to Log File
The option to create/write into a log file is activated from the Settings menu.
Clicking Write log file opens the screen to save the log file with a user
selected name. This option should only be used for debugging if instructed to
do so by Vicon Technical support. Click the Close button to close the
Settings box.
12 | ViconNet Web Viewer User Manual
Aspect Ratio
From the Settings menu, there is the option to maintain (or not maintain) the
aspect ratio of the displayed video. This option is used because the Web
Viewer supports a variety of video formats (4:3 as well as wide format 16:9)
from various types of ViconNet and third party cameras. If maintaining the
aspect ratio is not selected, the browser will fill the whole video rectangle
instead of adding the appropriate black bars (letter box or pillar box bars).
Note that MPEG-4 is not supported. Click the Close button to close the
Settings box.
Logout
To logout of the Web Viewer, click Logout in the top right corner of the Main
screen.

Vicon Industries Inc.
Corporate Headquarters
89 Arkay Drive
Hauppauge, New York 11788
631-952-2288 800-645-9116
Fax: 631-951-2288
Vicon Europe
Headquarters
Brunel Way
Fareham, PO15 5TX
United Kingdom
+44 (0) 1489 566300
Fax: +44 (0) 1489 566322
Vicon Germany
Kornstieg 3
D-24537 Neumuenster
Phone: +49 (0) 4321 8790
Fax: +49 (0) 4321 879 97
Far East Office
Unit 5, 17/F, Metropole Square
2 On Yiu Street, Shatin
New Territories,
Hong Kong
(852) 2145-7118
Fax: (852) 2145-7117
Internet Address: www.vicon-security.com
