Seeed Technology RESPEAKERV2 An Open Modular Voice Interface to Hack Things User Manual
Seeed Technology Co., Ltd. An Open Modular Voice Interface to Hack Things Users Manual
Contents
- 1. User Manual
- 2. Users Manual
Users Manual
Seeed Technology Co., Ltd ReSpeaker Core v2 User Guid
ReSpeaker Core v2.0 User Manual
Seeed’s ReSpeaker Core v2.0 is designed for voice interface applications. It is based on the
Rockchip RK3229, a quad-core ARM Cortex A7, running up to 1.5GHz, with 1GB RAM. The
board features a six microphone array with speech algorithms including DoA (Direction of
Arrival), BF (Beam-Forming), AEC (Acoustic Echo Cancellation), etc.
ReSpeaker Core v2.0 runs a GNU/Linux operating system. It benefits from a powerful and active
community allowing for the use of existing software and tools for development, testing, and
deployment, enabling rapid product development.
ReSpeaker Core v2.0 is designed as a feature rich development board for businesses to
evaluate. To this end the board consists of two main sections, the first being the center core
module containing the CPU, Memory (RAM), and PMU. The second section is the outer carrier
board which contains the peripherals such as the eMMC, connectors, and wireless connectivity
components. Either section or both can be customized through Seeed’s customization services.

Seeed Technology Co., Ltd ReSpeaker Core v2 User Guid
Features
All-in-One Solution w ith High Performance SoC
1GB RAM & 4GB eMMC
6 Microphone Array
USB OTG, USB device
WiFi b/g/n and Bluetooth V4.1 dual mode
Detect range: ~5 meters
Grove socket for other sensor
3.5mm audio jack & JST2.0 connector
8 channel ADCs for 6 microphone array and 2 loopback (hardw are loopback)
Debian-based Linux system
C++ SDK and Python w rapper
SDK for speech algorithm w ith Full documents
Speech algorithms and features:

Seeed Technology Co., Ltd ReSpeaker Core v2 User Guid
Specification
Soc(Rockchip RK3229)
CPU
Quad-Core Cortex-A7,up to 1.5GHz
GPU
Mali400MP, Support OpenGL ES1.1/2.0
Memory
1GB RAM(Core Module includes RAM and PMU)
System
Operating Voltage:3.6-5V
80 pins on-module
PMU on-module
Peripheral
Networks
WiFi b/g/n;
Bluetooth V4.1 dual mode;
Ethernet
USB
2 x USB Host; 1 x USB OTG; 1 x USB power
Grove
1 x Grove socket (I2C and Digital)
Vedio
HDMI 2.0 with HDCP 1.4/2.2, up to 4K/60Hz
Audio
6 Microphone Array;
3.5mm Audio Jack;
JST2.0 Audio output connector
Storage
4GB eMMC on-board;
SD slot
Others
12 x RGB LEDs;
8 GPIO pins
Power Consumption
Standby Mode
200mA /5V
Work with Algorithm Mode
330mA /5V

Seeed Technology Co., Ltd ReSpeaker Core v2 User Guid
Hardware Overview
Interface and storage
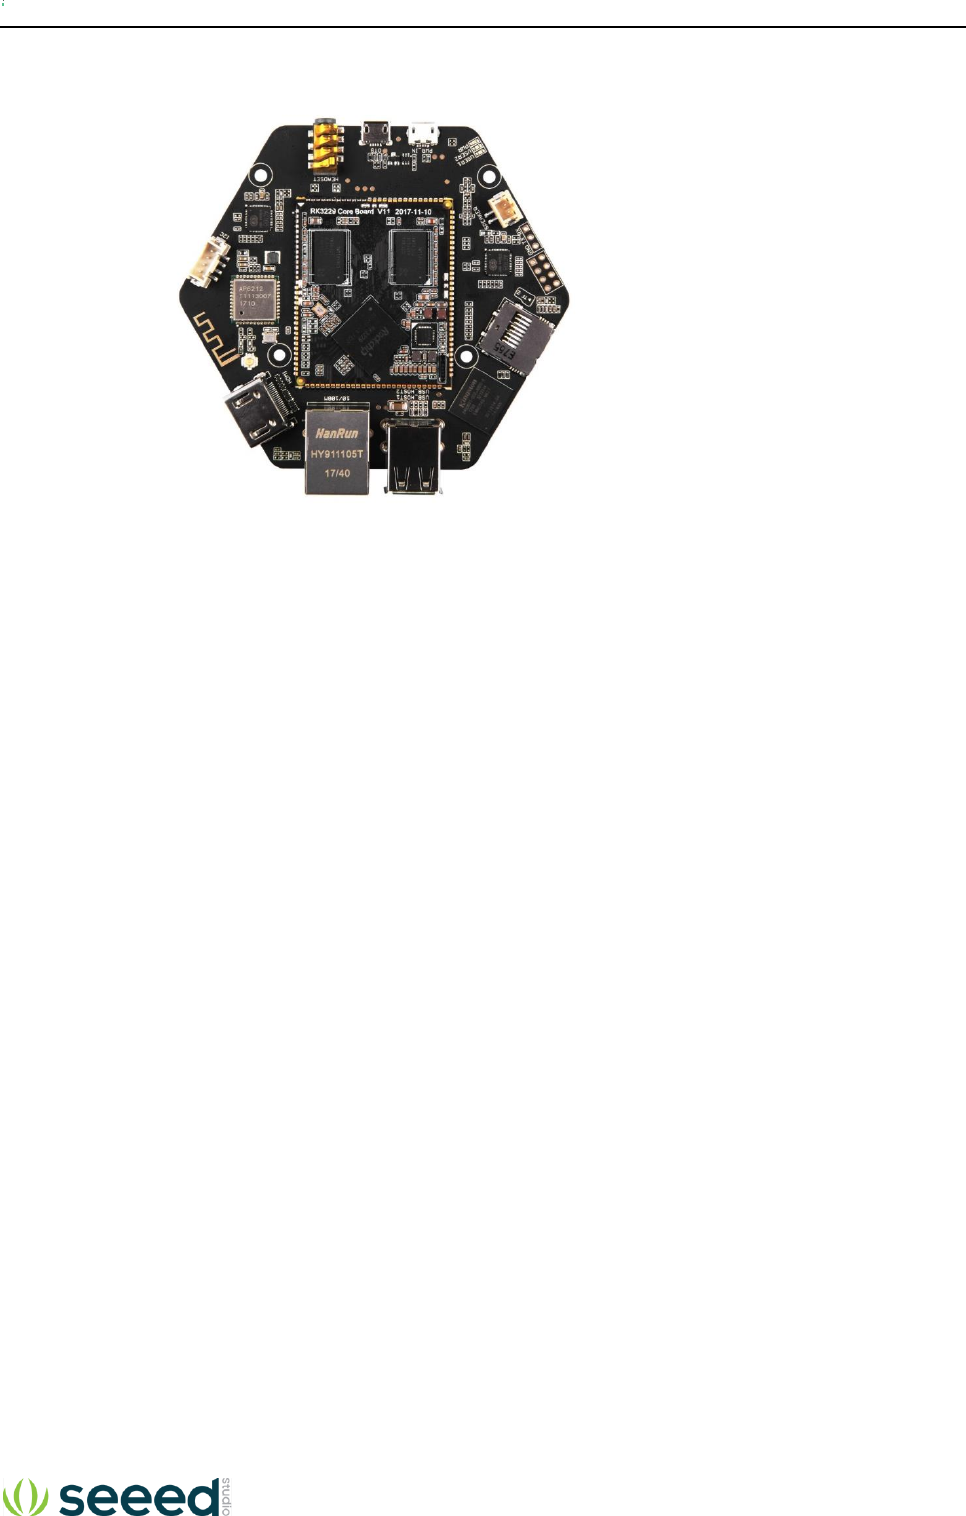
① 3.5mm Headphone jack: Output audio. You can plug active speakers or Headphones into this port.
② USB OTG: This USB Port is used to connect to your computer via serial mode of putty (or other serial tools).
③ USB Power Input: This port is used to provide power for Respeaker Core v2.0.
④ Speaker Jack: Output audio for passive speakers. Jst 2.0 Socket.
⑤ UART: You also can connect the ReSpeaker Core v2.0 with your computer via this UART port.
⑥ 8 Pins GPIO: General Purpose Input Output interface for extended applications.
⑦ SD Card Slot: To plug in micro-SD card.
⑧ eMMC: You can burn the image into eMMC, so that the ReSpeaker Core v2.0 can boot from the eMMC.
⑨ USB Host: You can plug USB device, such as USB mouse, USB keyboard and USB flash disk.
Ⓐ Ethernet: Access to the Internet.
Ⓑ HDMI: Output video.
Ⓒ Bluetooth and WIFI Antenna: The onboard Antenna is for WIFI and Bluetooth.
Ⓓ Grove Socket: Grove Socket for digital or I2C
Attention
USB terminal output: loaded with 5 Vd.c. / 0.5 A x 2;
Speaker port: 4 Ω;
OTG port: 5 Vd.c. / 0.3 A;
I2C port: 3.3 Vd.c., 0.2 A;
Seeed Technology Co., Ltd ReSpeaker Core v2 User Guid
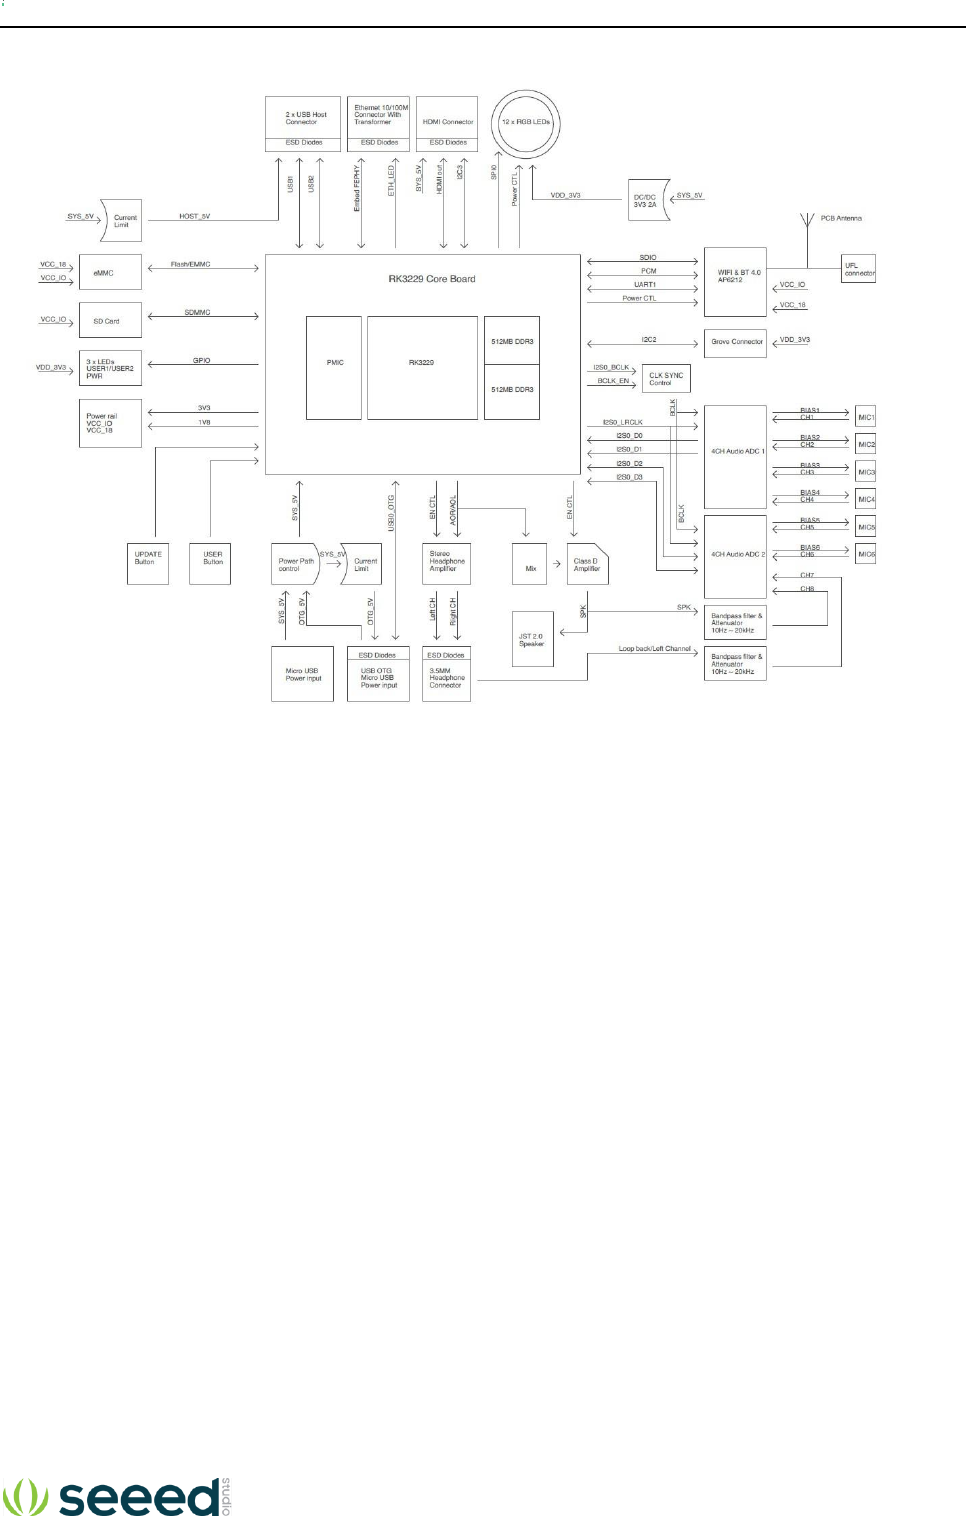
System Diagram
Seeed Technology Co., Ltd ReSpeaker Core v2 User Guid
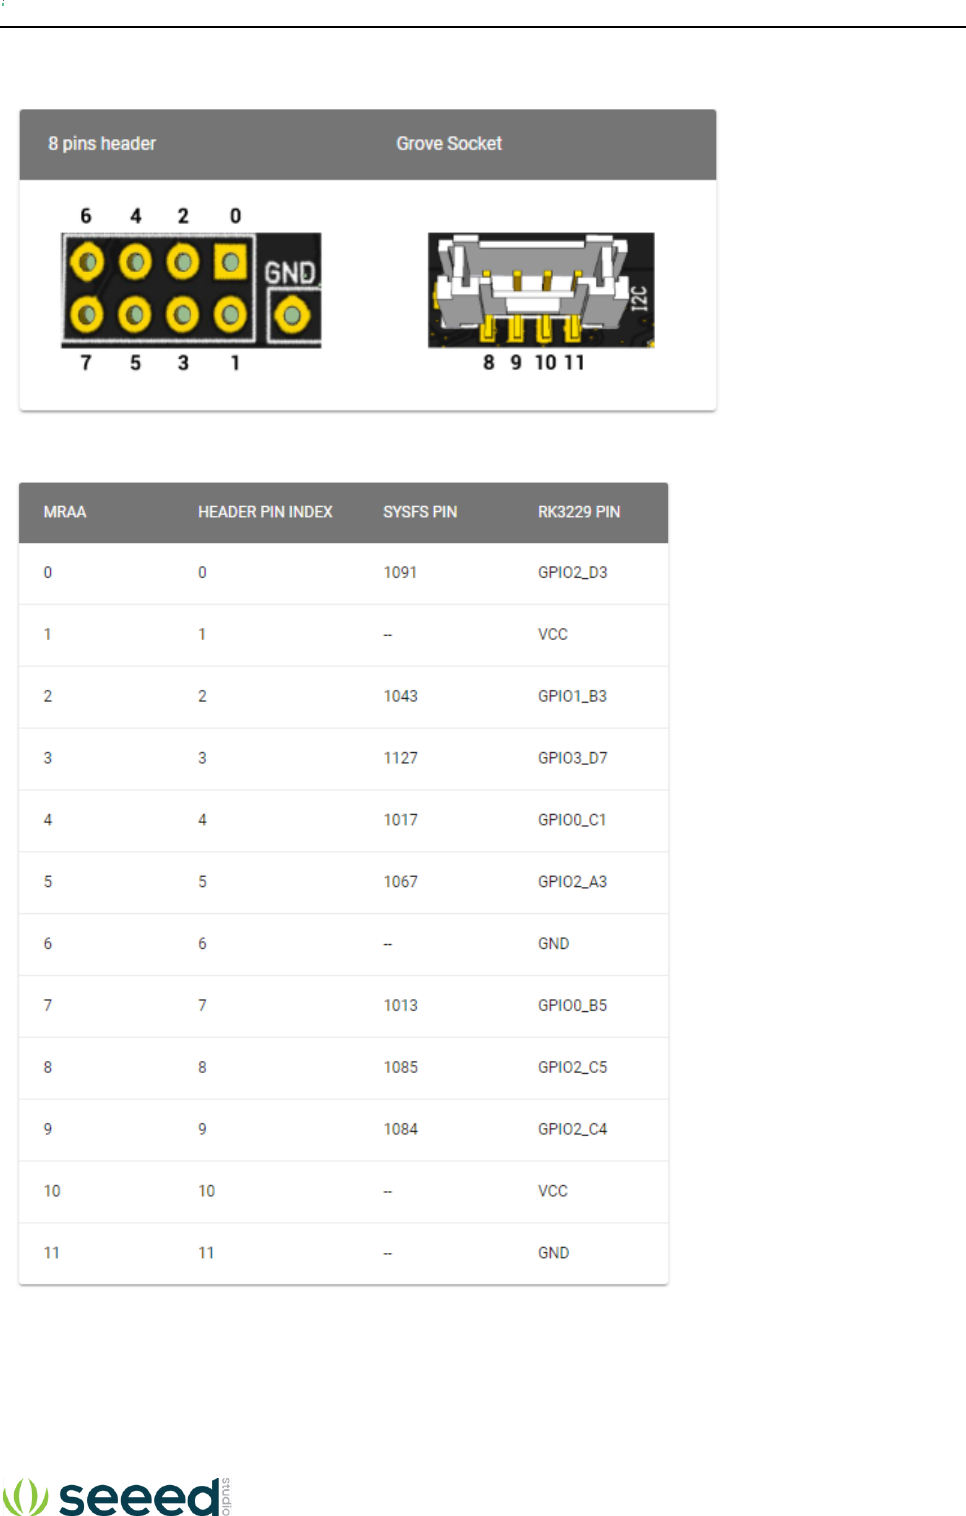
Pin Out
Pin index definition for headers
GPIO Pins
Seeed Technology Co., Ltd ReSpeaker Core v2 User Guid
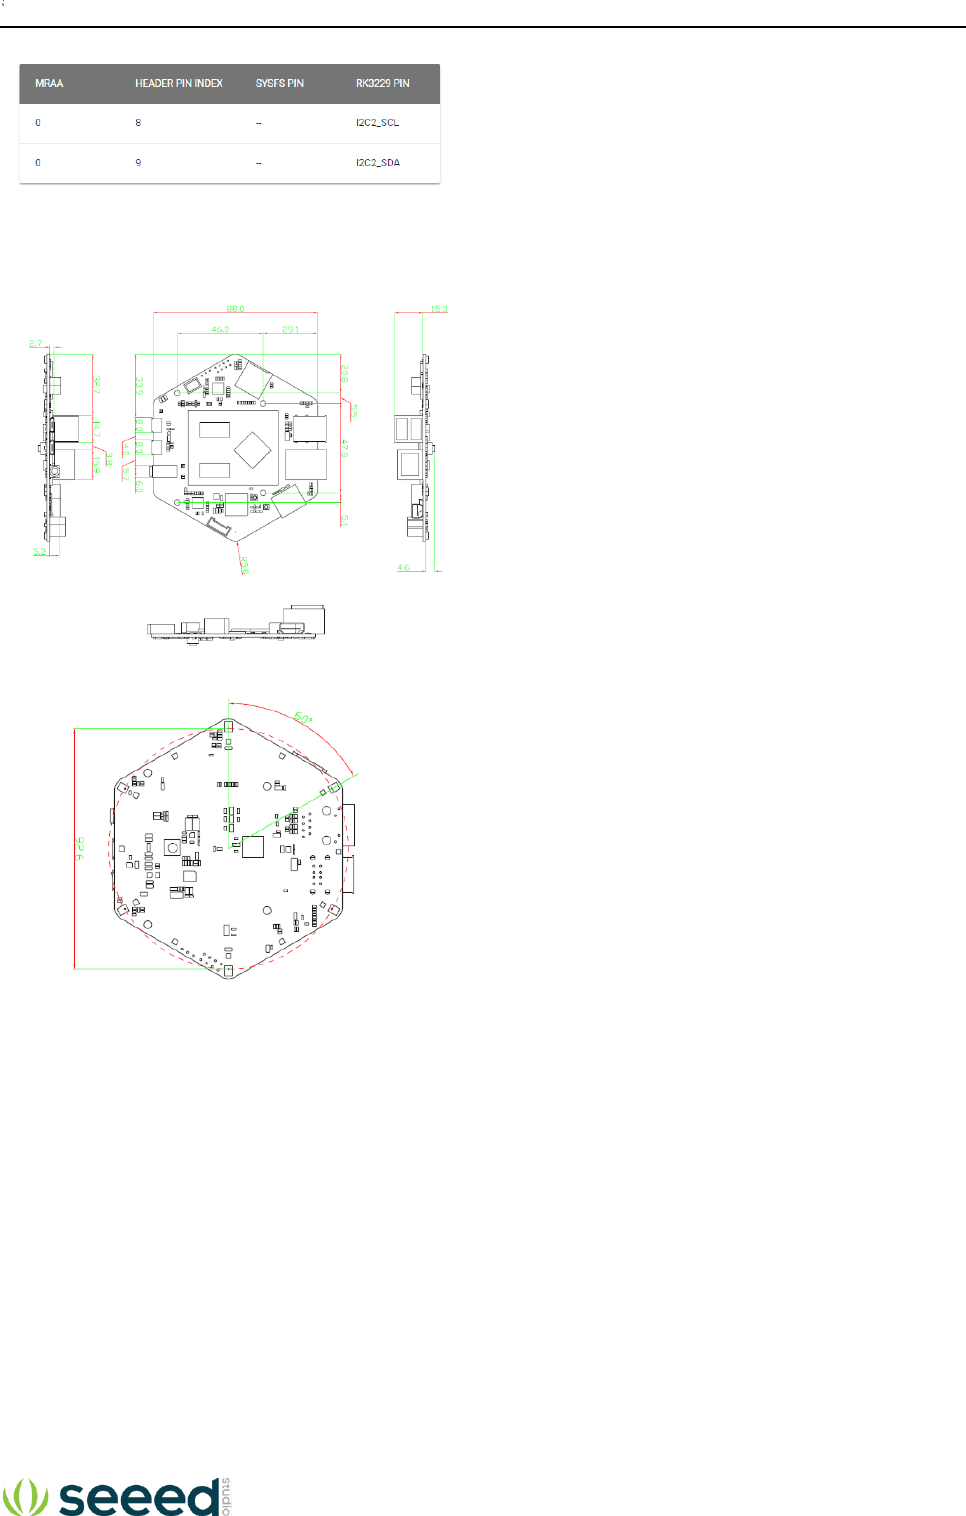
I2C Pins
Dim ensions
Applications
Smart speaker
Intelligent voice assistant systems
Voice recorders
Voice conferencing system
Meeting communicating equipment
Voice interacting robot
Car voice assistant
Other scenarios need voice command

Seeed Technology Co., Ltd ReSpeaker Core v2 User Guid
Getting Started
Preparation
How to install image
How to access the serial console
How to set up WiFi
How to connect to SSH & VNC
How to set up Bluetooth
Audio record and play test
Prerequisites
ReSpeaker Core V2.0
Wi-Fi Network
4GB (or more) SD card and SD card reader
PC or Mac
USB To Uart Adapter (Optional)
5V 1A Micro USB adapter for power (Optional)
two Micro-USB cables
Grove Cable with ferrite
Note: the ferrite shall be placed within 10cm to ReSpeaker Core V2.
Caution
Please plug the USB cable gently, otherwise you may damage the interface. Please use the USB cable
with 4 wires inside, the 2 wires cable can't transfer data. If you are not sure about the wire you have, you
can click here to buy
Image Installation
Similar to the Raspberry Pi, you need to install the ReSpeaker Core v2.0 image from an SD card to get up and
running. We offer two ways to boot the Respeaker core v2.0. You can either boot from the SD card or boot
from the eMMC
Seeed Technology Co., Ltd ReSpeaker Core v2 User Guid
A. Boot from the SD card
Step 1. Click the OneDrive icon above to download our latest image zip files: respeaker-debian-9-lxqt-
sd-********-4gb.img.xz or respeaker-debian-9-iot-sd-********-4gb.img.xz.
Step 2. Plug the SD card into your PC or MAC with an SD card reader. You need an SD card with a
capacity of more than 4G.
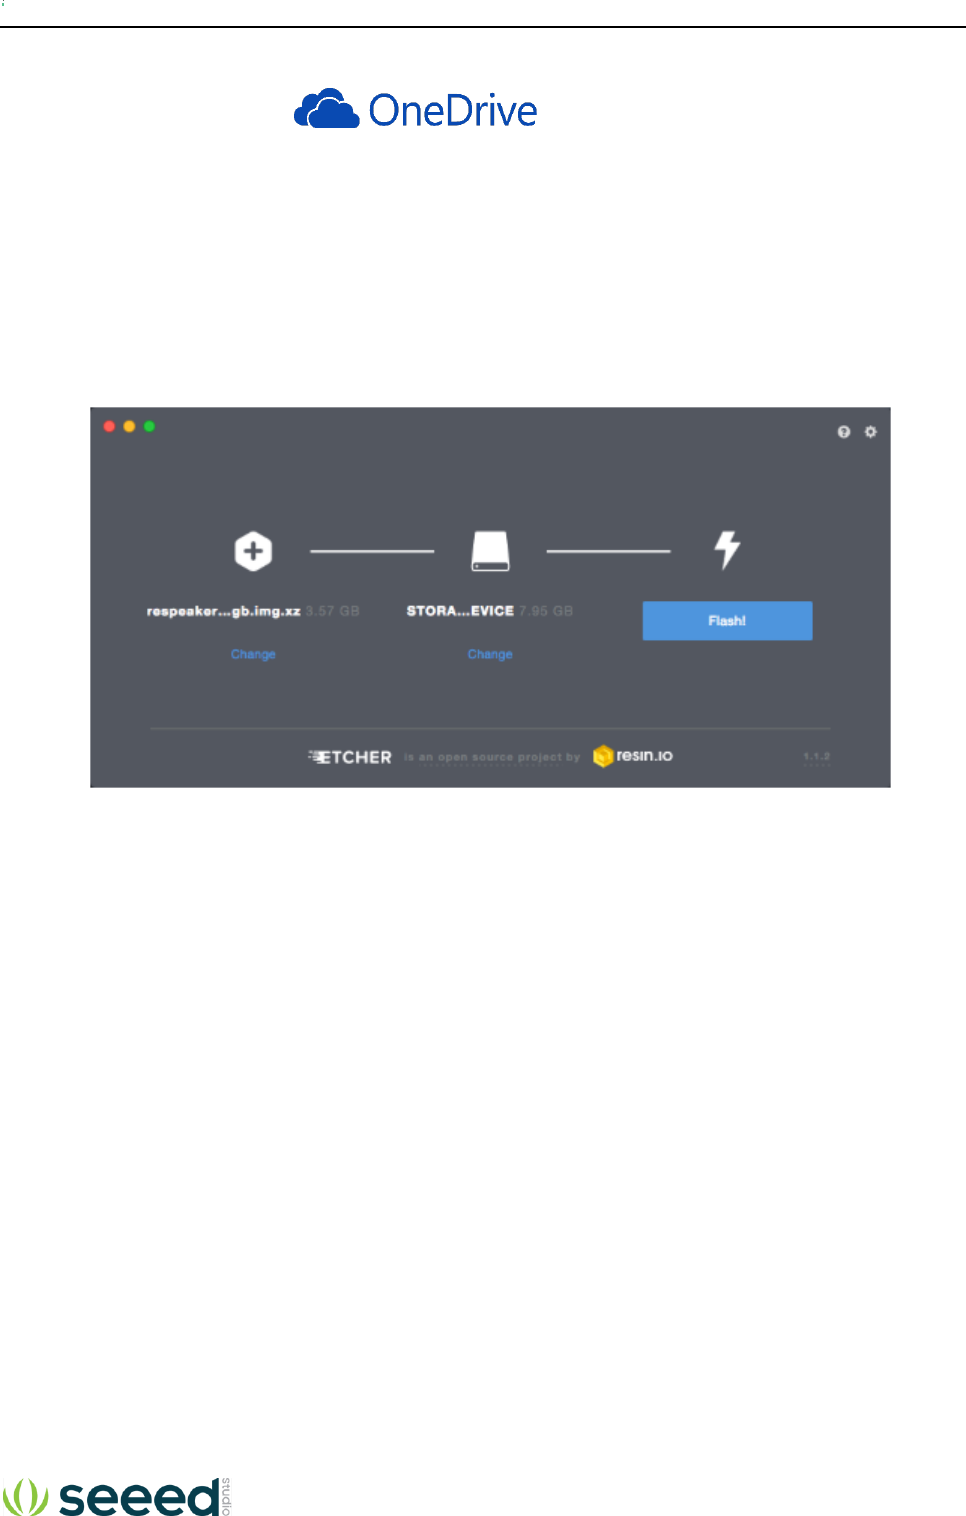
Step 3. Click to download Etcher here, and burn the *.img.xz file directly to your SD card with Etcher. Or
unzip the *.img.xz file to a *.img file, then burn it to SD card with other image writing tools.
Click the Plus icon to add the image you just download, the software will automatically select the SD
card you plug.Then click Flash! to start burning. It will take about 10 minutes to finish.
Step 4. After writing the image to the SD card, insert the SD card in your ReSpeaker Core v2.0. Power
the board using the PWR_IN micro usb port and DO NOT remove the SD card after powering on.
ReSpeaker Core v2.0 will boot from the SD card, and you can see USER1 and USER2 LEDs light up.
USER1 is typically configured at boot to blink in a heartbeat pattern and USER2 is typically configured at
boot to light during SD card accesses. Now, you should go to the next part: Serial Console.
Seeed Technology Co., Ltd ReSpeaker Core v2 User Guid
B. Boot from the eMMC
There is no firmware in the EMMC when leaving the factory, you can flash the ReSpeaker image files to the
ReSpeaker's eMMC (onboard flash memory) by using your PC or Mac. Then the ReSpeaker will boot from it's
eMMC (onboard flash memory) and not from the SD card.
Step 1. Download our latest image zip file respeaker-debian-9-iot-flasher-********-
4gb.img.xz or respeaker-debian-9-lxqt-flasher-********-4gb.img.xz at OneDrive. The lxqt version
comes with Debian desktop and the iot version does not. And the flasher version is for flashing eMMC,
and the sd version is for booting from SD card.
Step 2. Burn the *.img.xz file directly to SD card with Etcher, or unzip the *.img.xz file to a *.img file, then
burn it to SD card with other image writing tools.
Step 3. After burning SD card, insert the SD card in the ReSpeaker Core v2.0. Power the board using the
PWR_IN micro USB and do not remove the SD card while it's flashing.
During the flashing process, you'll see the USER1 and USER2 LEDs blink alternately. It will take about 10
minutes to complete. When the LEDs turn off, you can power off the board, pull out the SD card and power
again. If the LEDs light up, that means the image was flashed to the eMMC correctly.
You can also check the image version with this command: cat /etc/issue.net.
Serial Console
Now your ReSpeaker Core v2.0 can boot, you might want to get access to the Linux system via a console, to
setup the WiFi, etc. You have two ways to get the console:
A. The OTG USB port - This requires a running Linux system on the board
B. The UART port - This is the hard way to access the console, it can be used for debugging low level issues
Connection via OTG
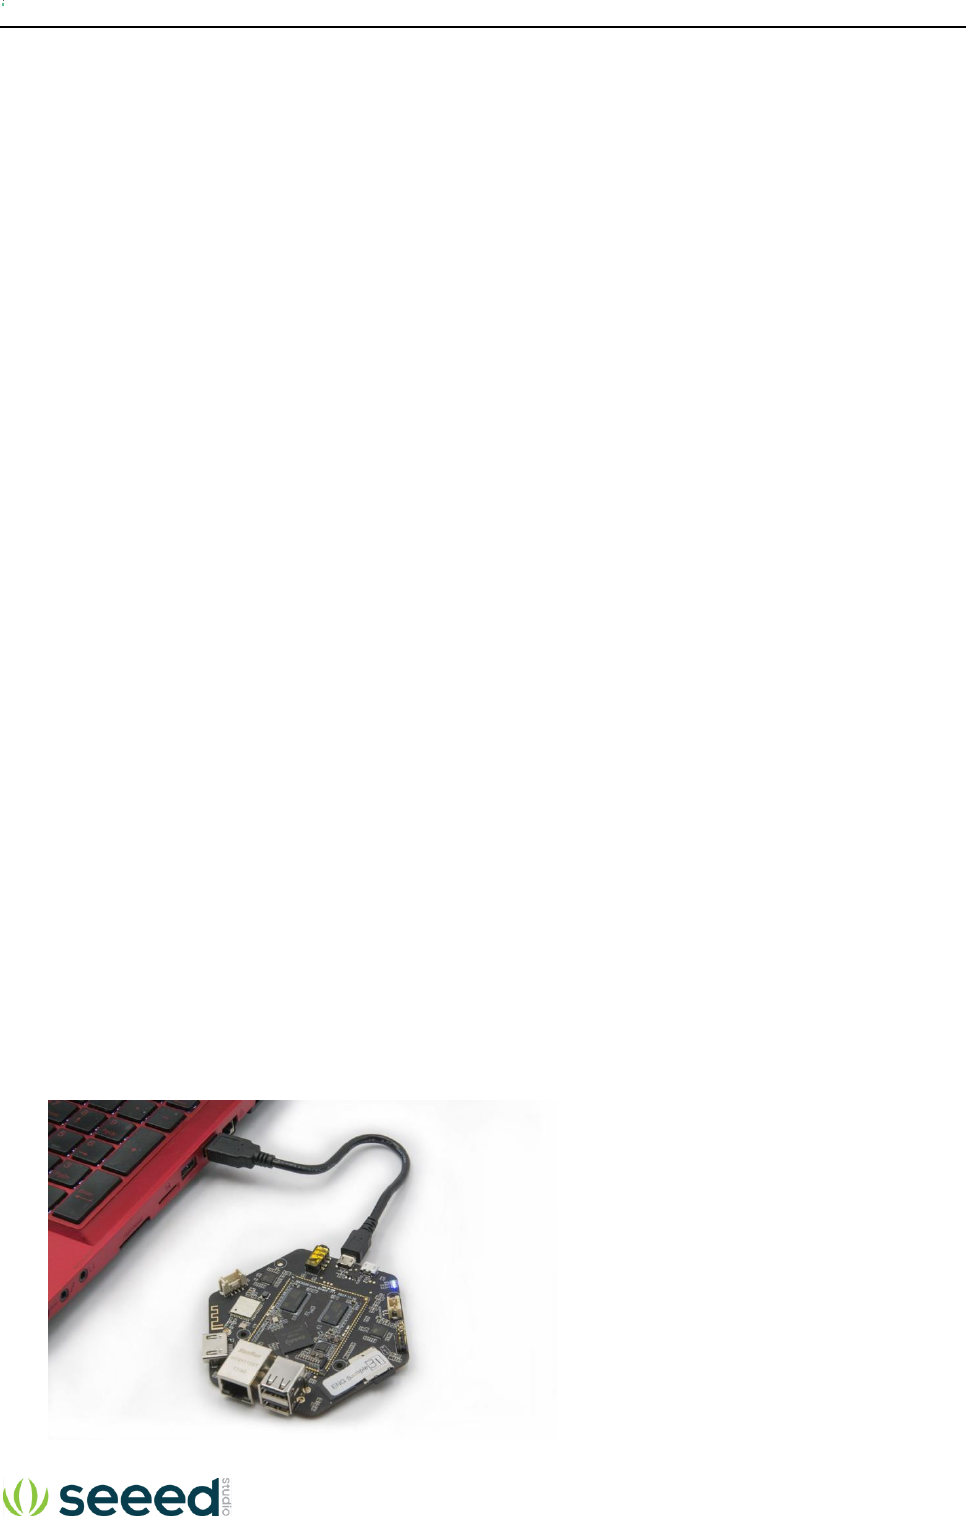
Step 1. Find a micro USB cable, and please make sure it's a data cable (not just a power cable), plug the
micro USB end to the ReSpeaker's OTG micro USB port (There're two micro USB ports on the ReSpeaker
board, which are labeled with different silk-screen, one is PWR_IN and another is OTG), then plug another
end of this cable into your computer.

Seeed Technology Co., Ltd ReSpeaker Core v2 User Guid
Step 2. Check at your computer if the serial port has risen:
Windows: check the device manager, there should be new serial deviced named COMx which x is an
increasing number. If you use windows XP/⅞, maybe you need install windows CDC drivers.
Linux: ls /dev/ttyACM*, you should get /dev/ttyACMx where x will vary depending on which USB port
you used.
Mac: ls /dev/cu.usb*, you should get /dev/cu.usbmodem14xx where xx will vary depending on which
USB port you used.
Step 3. Use your favorite serial debugging tool to connect the serial port, the serial has: 115200 baud rate,
8Bits, Parity None, Stop Bits 1, Flow Control None. For examples:
Windows: use PUTTY, select Serial protocol, fill in the correct COM port of ReSpeaker Core
v2.0, 115200 baud, 8Bits, Parity None, Stop Bits 1, Flow Control None.
Linux: Depend on your USB To TTL Adapter, it could be screen /dev/ttyACM0(,1, and so on) 115200
or screen /dev/ttyUSB0(,1, and so on) 115200
Mac: Depend on your USB To TTL Adapter, it could be screen /dev/cu.usbserial1412(,1422, and so on)
115200 or screen /dev/cu.usbmodem1412(,1422, and so on) 115200
Step 4. The default user name is respeaker, and password is respeaker too.
Connection via The UART port
In this section we will guide you how to establish a connection from your computer to your ReSpeaker using
your USB to TTL adapter which will be connected to the ReSpeaker's Uart port (Uart port located just to the left
of the ReSpeaker speaker plug).
Step 1. Connect Uart port and your PC/Mac with an USB To TTL Adapter. Note that the voltage of RX/TX
are 3.3V. If you don't have an USB To TTL Adapter, you can click here to get one.
Step 2. Use the following Serial debugging tools with 115200 baud:
Windows: use PUTTY, select Serial protocol, fill in the correct COM port of ReSpeaker Core v2.0,
115200 baud, 8Bits, Parity None, Stop Bits 1, Flow Control None.
Linux: Depend on your USB To TTL Adapter, it could be screen /dev/ttyACM0(,1, and so on)
115200 or screen /dev/ttyUSB0(,1, and so on) 115200.
Mac: Depend on your USB To TTL Adapter, it could be screen /dev/cu.usbserial1412(,1422, and so on)
115200 or screen /dev/cu.usbmodem1412(,1422, and so on) 115200.
Step 3. The login user name is respeaker, and password is respeaker too.
Step 4. If you do not have a USB to TTL Adapter, you may also use an Arduino. If using an Arduino,
connect one end of a jumper wire to the RESET pin on the Arduino and the other end to the GND pin on
the Arduino. This will bypass your Arduino's ATMEGA MCU and turn your Arduino into a USB to TTL
adapter, see video tutorial here. Now connect the GND pin on the Arduino to the GND pin on the Uart
port of the Respeaker. Connect the Rx pin on the Arduino to the Rx pin on the Uart port of the Respeaker.
Connect the Tx pin on the Arduino to the Tx pin on the Uart port of the Respeaker. And lastly, connect the
Arduino to your PC/Mac via the Arduino's USB cable. Now check that your Mac or Linux PC finds your
Arduino by typing this command.
ls /dev/cu.usb* (Mac)
ls /dev/ttyACM* (Linux)
You should get back something like:
/dev/cu.usbmodem14XX where XX will vary depending on which USB port you used (on Mac)
/dev/ttyACMX where X will vary depending on which USB port you used (on Linux)
Seeed Technology Co., Ltd ReSpeaker Core v2 User Guid
Now follow step 2 above to connect to your Respeaker over this serial connection. And note this is a one
time procedure as you'll next setup your Respeaker for Wi-Fi connectivity and then connect via ssh or
VNC going forward.
Netw ork Setting Up
A.Wi-Fi Setting Up
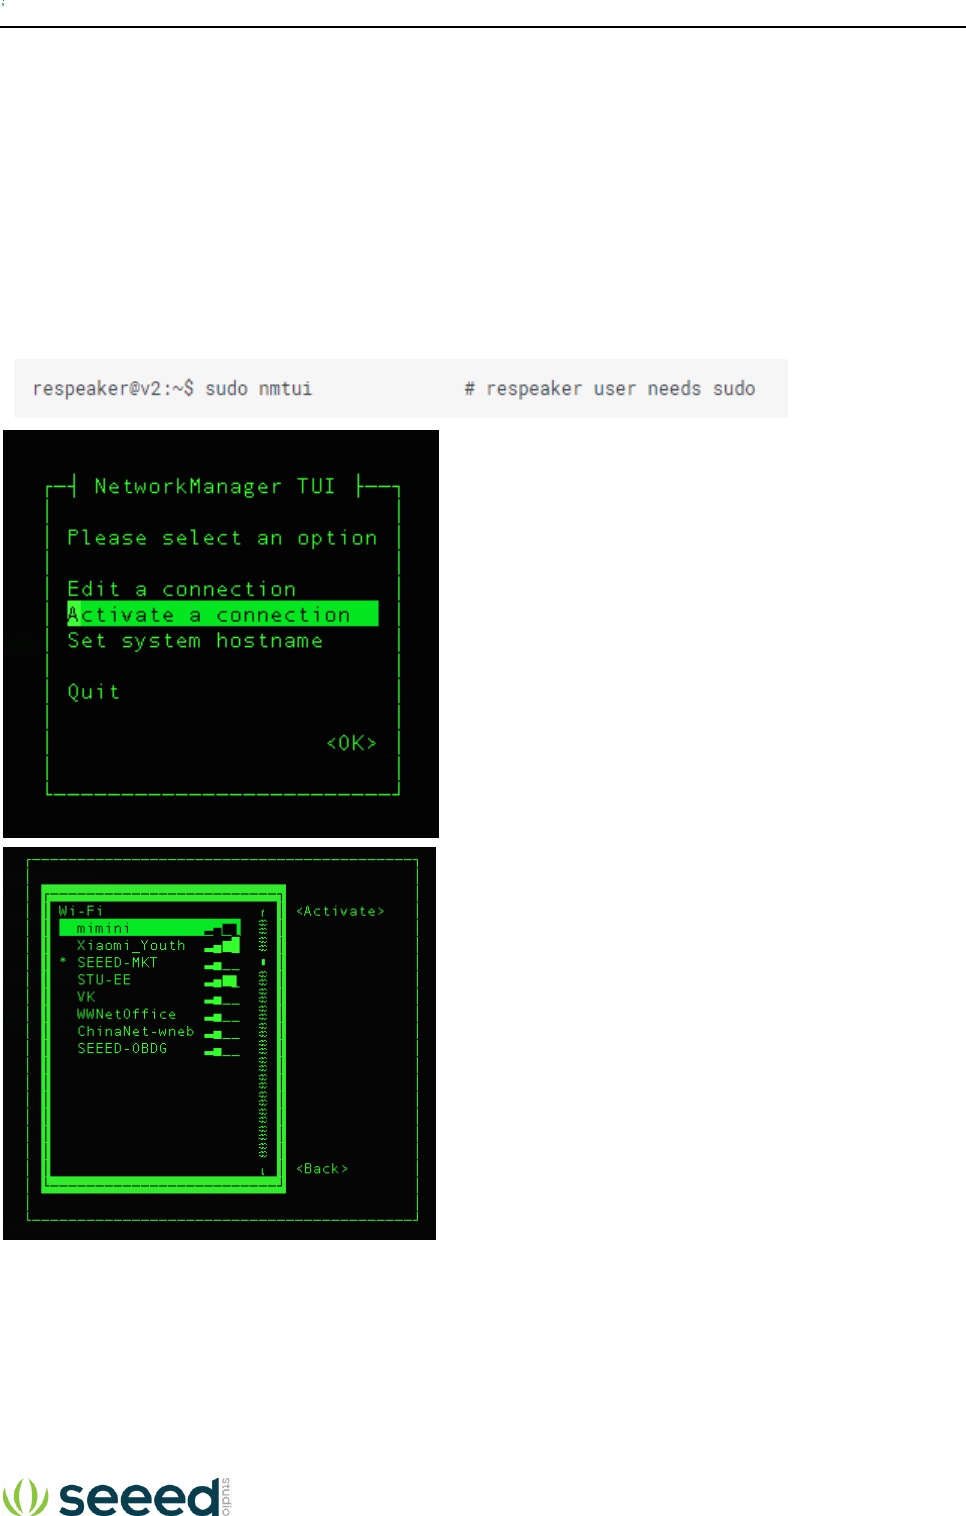
Configure your ReSpeaker's network with the Network Manager tool, nmtui. nmtui will already be installed on the
ReSpeaker image.
Select your Wi-Fi for ReSpeaker v2.0, and type your Wi-Fi password and press Enter Key again.
When you see a “*” mark, it means that your ReSpeaker has successfully connected to your Wi-Fi network.
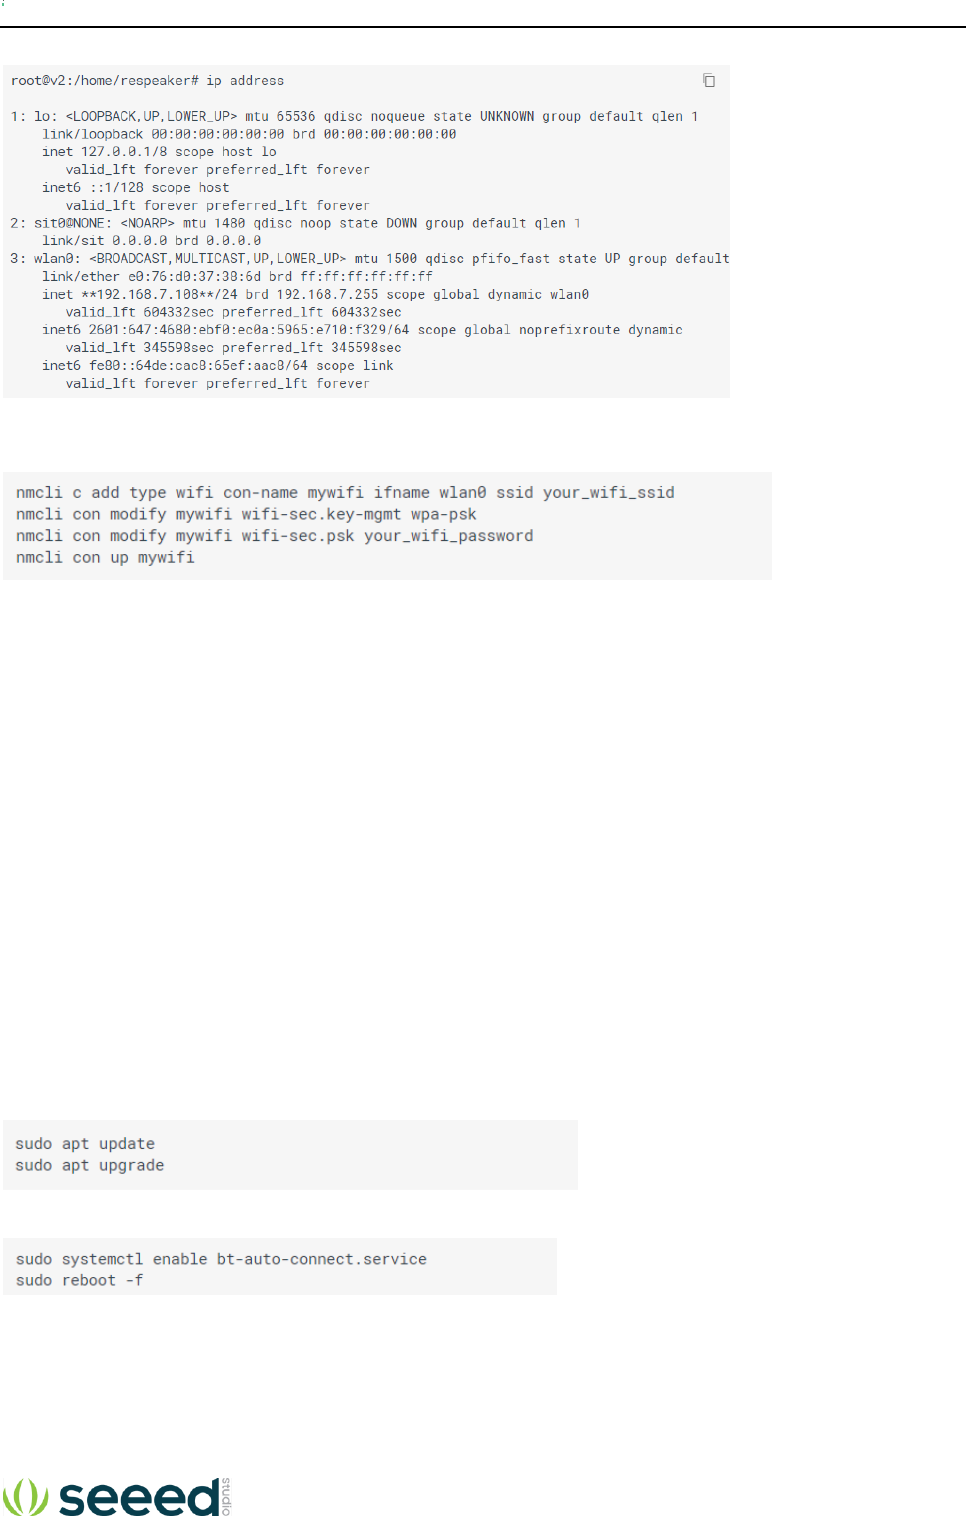
Now find the IP address of your ReSpeaker by using the command below.
Seeed Technology Co., Ltd ReSpeaker Core v2 User Guid
In addition to the Networ Manager GUI interface, Network Manager also has a command line tool. If you are
connecting to a hidden Wi-Fi network, you'll need to use this command line tool:
B. Ethernet Connectivity
You can connect to a network using an Ethernet cable. Just plug the Ethernet cable which has connected to the
Internet will be OK.
B. Connect to Speaker or Headset
The board uses the built-in codec of the SOC to render playback. Both the JST speaker port and the headset port
are driven by their own amplifier, and both amplifiers are connected to the same codec of the SOC. The sound
card driver that SEEED implemented drives both the capture device and the playback device. So there's no discrete
capture or playback sound card in ALSA device list. They're all named seeed-8mic-voicecard.
The simplest way to heard sound from the board is to plug in a headset. If you prefer loud speaker, the board can
output up to 8W of drive capability.
C. Bluetooth Setting Up
Activate the Bluetooth
Please tap the commands below to update and activate the Bluetooth of ReSpeaker Core v2.0:
Then activate the bluetooth by the command:
Using the ReSpeaker Core v2.0 as a Bluetooth Speaker-Slave Device
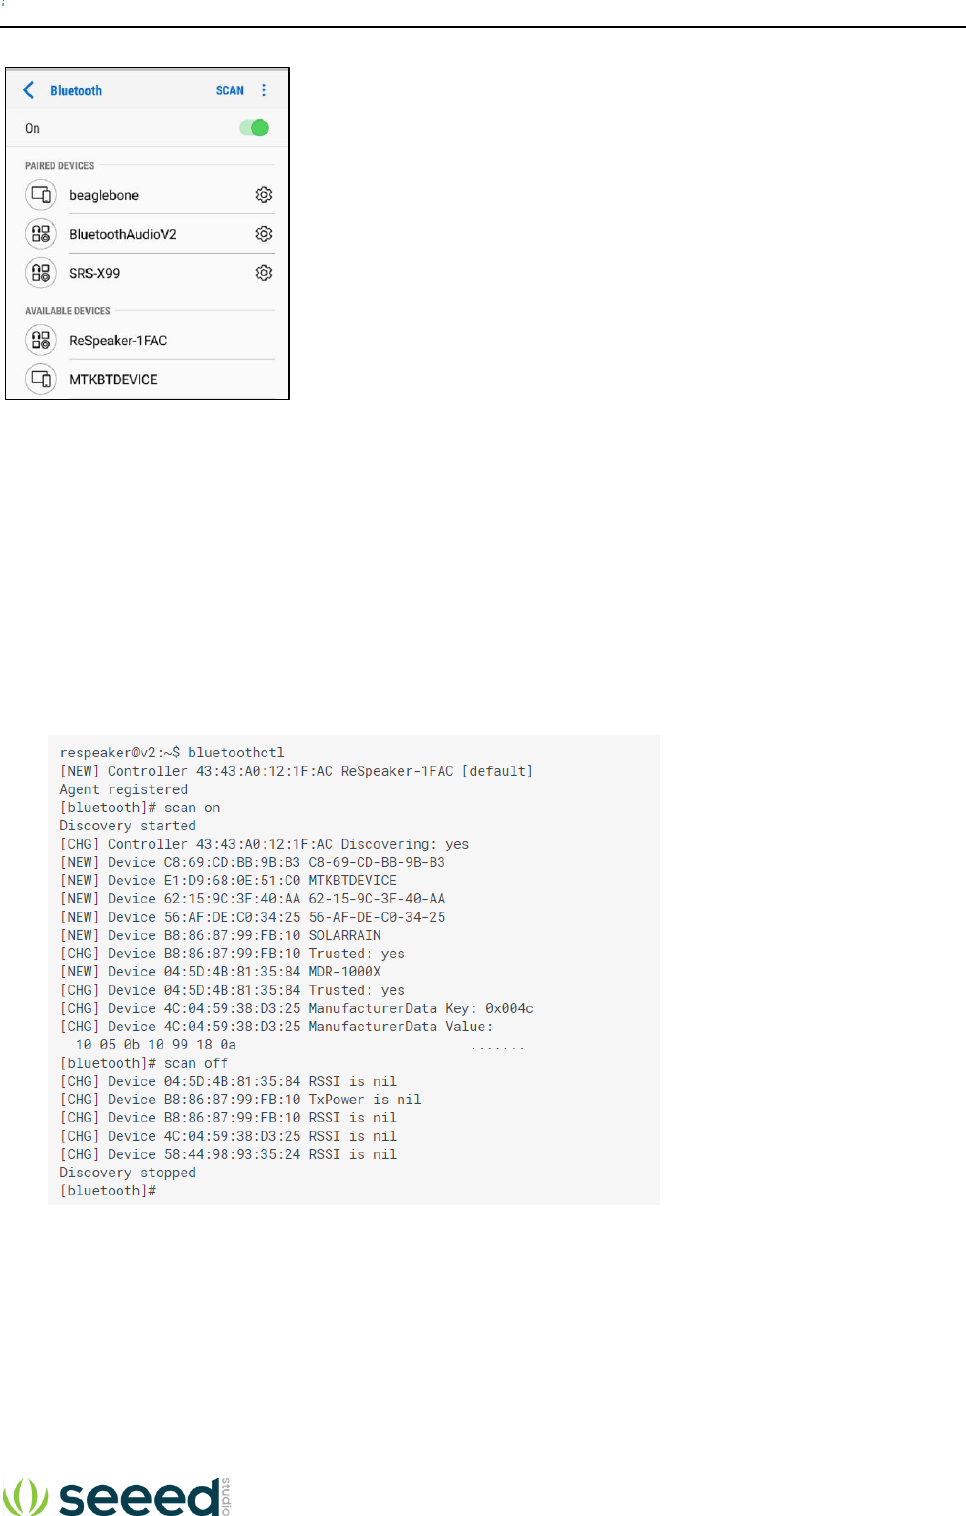
When the ReSpeaker Core v2.0 restart, open the bluetooth of your phone or computer, you will find a bluetooth
device called ReSpeaker-xxxx. Choose and connect to it. Plug a speaker or headset into the ReSpeaker Core v2.0
then play music and enjoy your bluetooth speaker.
Seeed Technology Co., Ltd ReSpeaker Core v2 User Guid
Using the ReSpeaker Core v2.0 as a Bluetooth Player-Master Device
In addition to just working as a bluetooth speaker, it can also serve as a bluetooth player to hack your bluetooth
headset or bluetooth speaker. OK, let's hacking.
Step 1. Tap bluetoothctl to open the bluetooth shell.
Step 2. Tap scan on to scan your bluetooth device.
Step 3. When the ReSpeaker Core v2.0 find your target device, tap scan off. For this wiki, say, MDR-1000X
headset is our target, mark the device ID Device 04:5D:4B:81:35:84.
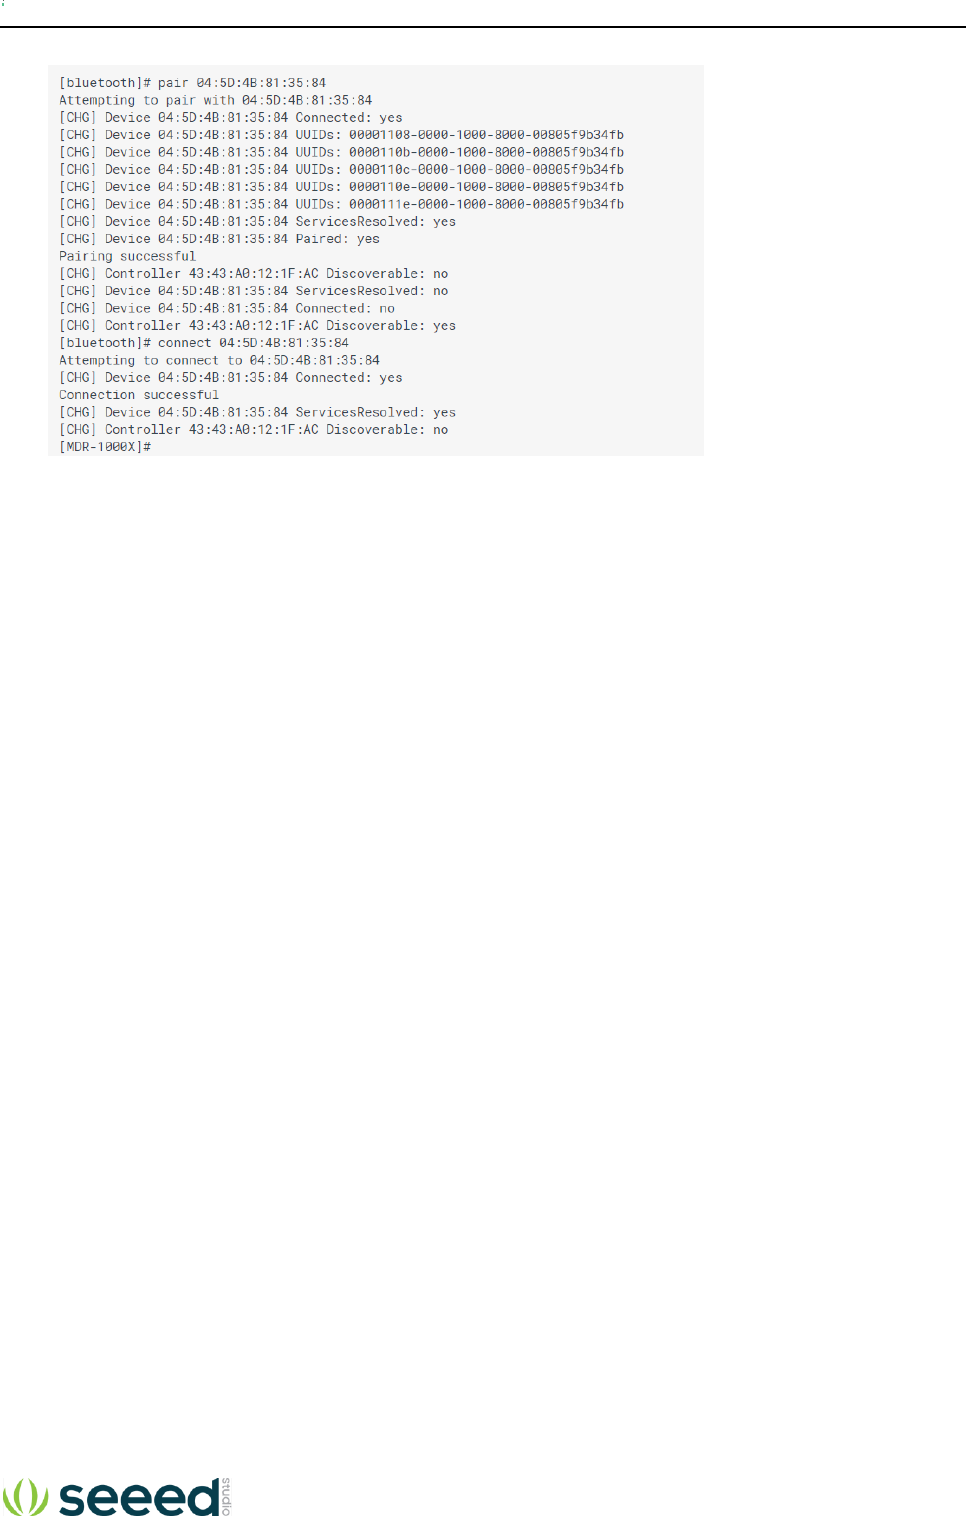
Step 4. Now using the command pair + device ID to match bluetooth device with the ReSpeaker Core v2.0.
Step 5. When you see the messega Pairing successful, tap connect + device ID.
Seeed Technology Co., Ltd ReSpeaker Core v2 User Guid
If Connection successful pops up, configuration!

Seeed Technology Co., Ltd ReSpeaker Core v2 User Guid
Notice to Host Manufacturer
Host Manufacturer who integrate this transmitter into a non-accessible enclosure, it’s acceptable to label the
device with the FCC identifier such as “This product contains transmitter FCC ID Z4T-RESPEAKERV2.” to
avoid duplicated FCC Equipment Authorization Procedure when following conditions are satisfied:
--The transmitter is limited to installation in mobile application, a separate approval is required for all other
operating configurations, including portable configurations with respect to Part 2.1093.
--No any modifications done to the transmitter when the end-user device integrate this transmitter into it.
--Only antennas already approved with this device are used, and shall be in accordance with all grant
conditions and installation requirements.
--Host manufacturer shall apply SDoC testing to ensure that the device still complies corresponding FCC
Rules. SDoC compliance statement set out in Section 2.1077 shall be implemented properly.
--Host manufacturer provides appropriate Part 15 user and labeling information including any appropriate RF
exposure warnings:
Labeling Instruction for End User Device Integrator
Section 15.19 Labelling requirements shall be complied on end user device. Integrator shall bear the
following statement in a conspicuous location on the device:
This device complies with part 15 of the FCC Rules. Operation is subject to the following two conditions: (1)
This device may not cause harmful interference, and (2) this device must accept any interference received,
including interference that may cause undesired operation.
Labelling rules for special device( too small or limitation of nature, please refer to §2.925, § 15.19 (a)(5).
For E-label, please refer to §2.935.
Instruction for indicating compliance info in End-user Device manual
Information to user required in Section 15.105 and Section 15.21 shall be included in user’s manual or
instruction manual of Final product properly.

Seeed Technology Co., Ltd ReSpeaker Core v2 User Guid
FCC regulatory compliance information
This device complies with Part 15 of the FCC Rules. Operation is subject to the following two conditions: (1)
this device may not cause harmful interference, and (2) this device must accept any interference received,
including interference that may cause undesired operation.
Warning: changes or modifications not expressly approved by the party responsible for compliance could
void the user’s authority to operate the equipment.
Note: This equipment has been tested and found to comply with the limits for a Class B digital device,
pursuant to Part 15 of the FCC Rules. These limits are designed to provide reasonable protection against
harmful interference in a residential installation. This equipment generates, uses and can radiate radio
frequency energy and, if not installed and used in accordance with the instructions, may cause harmful
interference to radio communications. However, there is no guarantee that interference will not occur in a
particular installation.
If this equipment does cause harmful interference to radio or television reception, which can be determined
by turning the equipment off and on, the user is encouraged to try to correct the interference by one or more
of the following measures:
-- Reorient or relocate the receiving antenna.
-- Increase the separation between the equipment and receiver.
-- Connect the equipment into an outlet on a circuit different from that to which the receiver is connected.
-- Consult the dealer or an experienced radio/TV technician for help.
This equipment complies with FCC radiation exposure limits set forth for an uncontrolled environment. This
equipment should be installed and operated with minimum distance 20cm between the radiator and your
body. This transmitter must not be co-located or operating in conjunction with any other antenna or
transmitter.
Manufacturer Information
Company Name: Seeed Technology Co., Ltd.
Company Address: 1F, Tower B, Building 2, Shanshui Building, NanshanYungu Innovation
Industry Park, Liuxian Ave, Nanshan District, Shenzhen, Guangdong, PRC.
Zip:518055
Tel:0086 755 86524359
Fax:0086 755 26978025