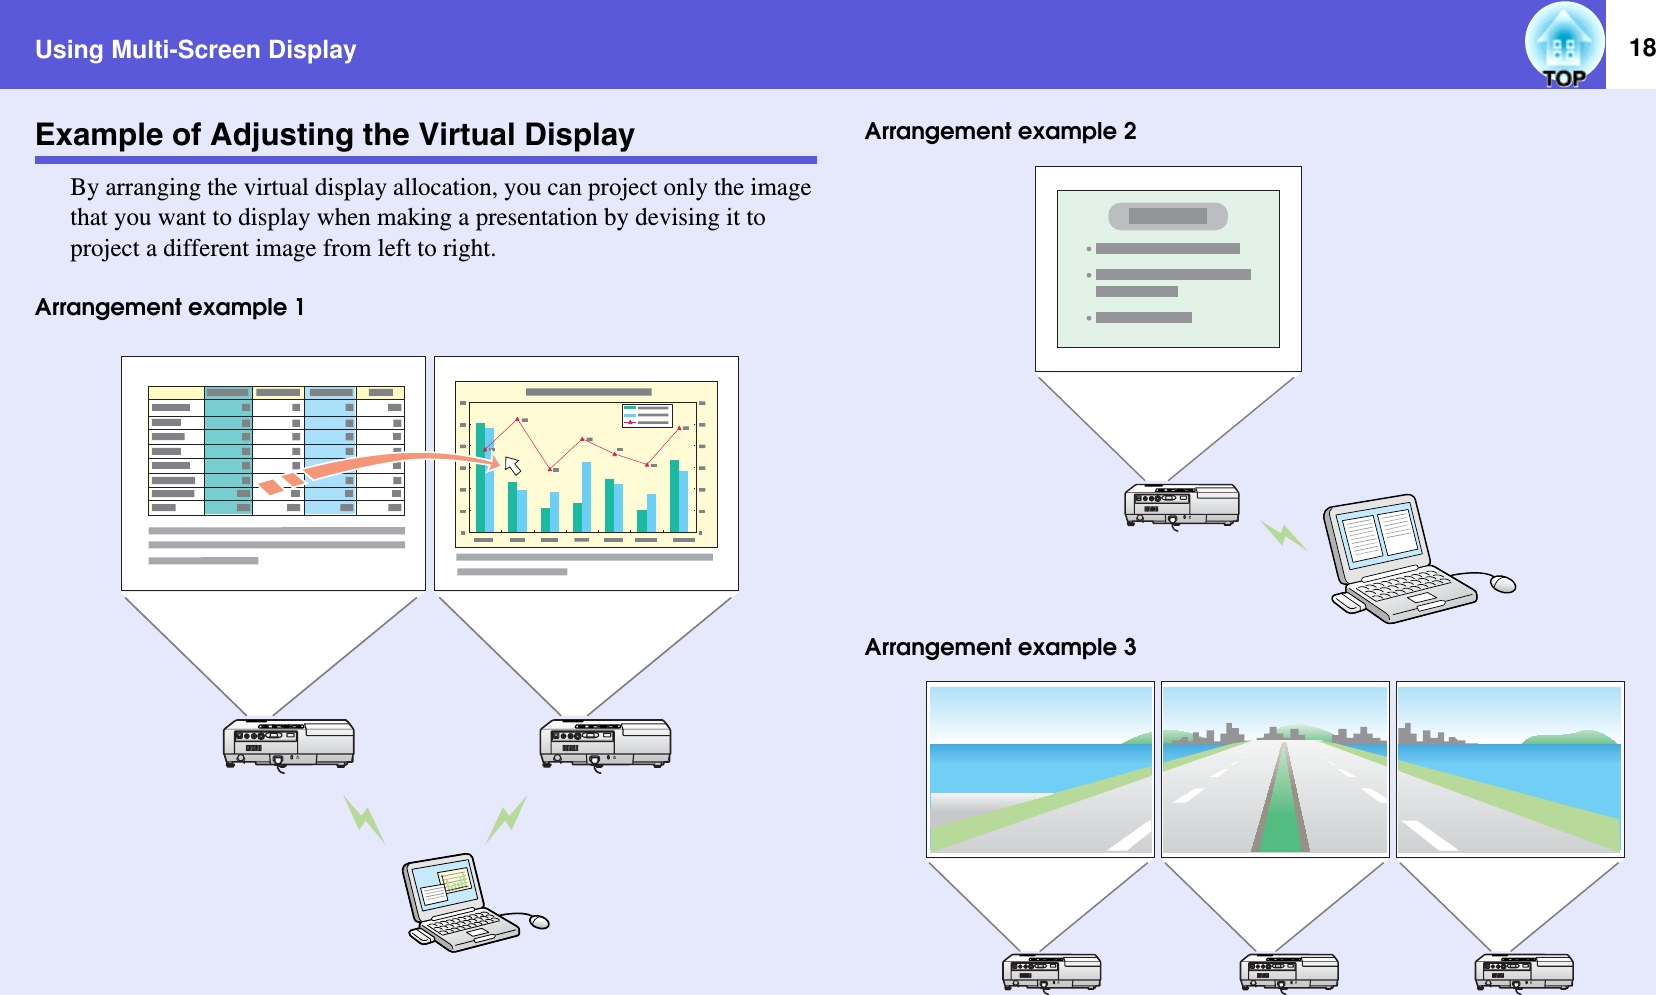
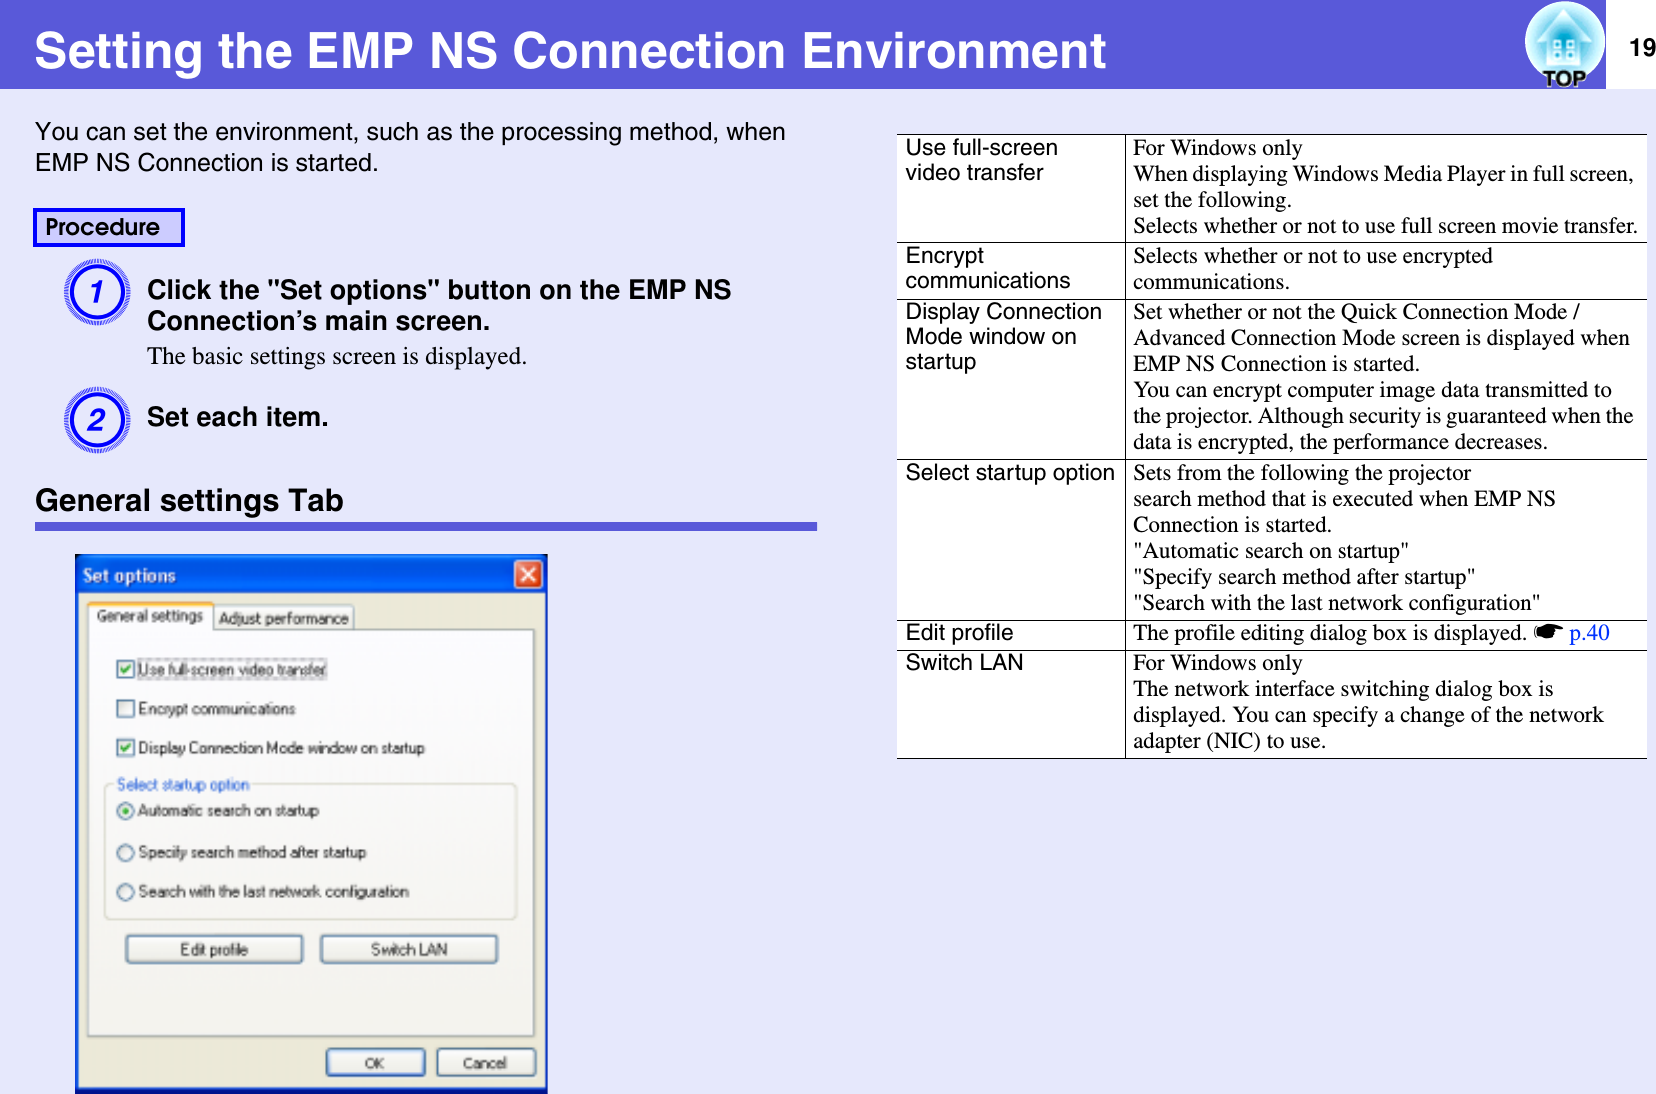
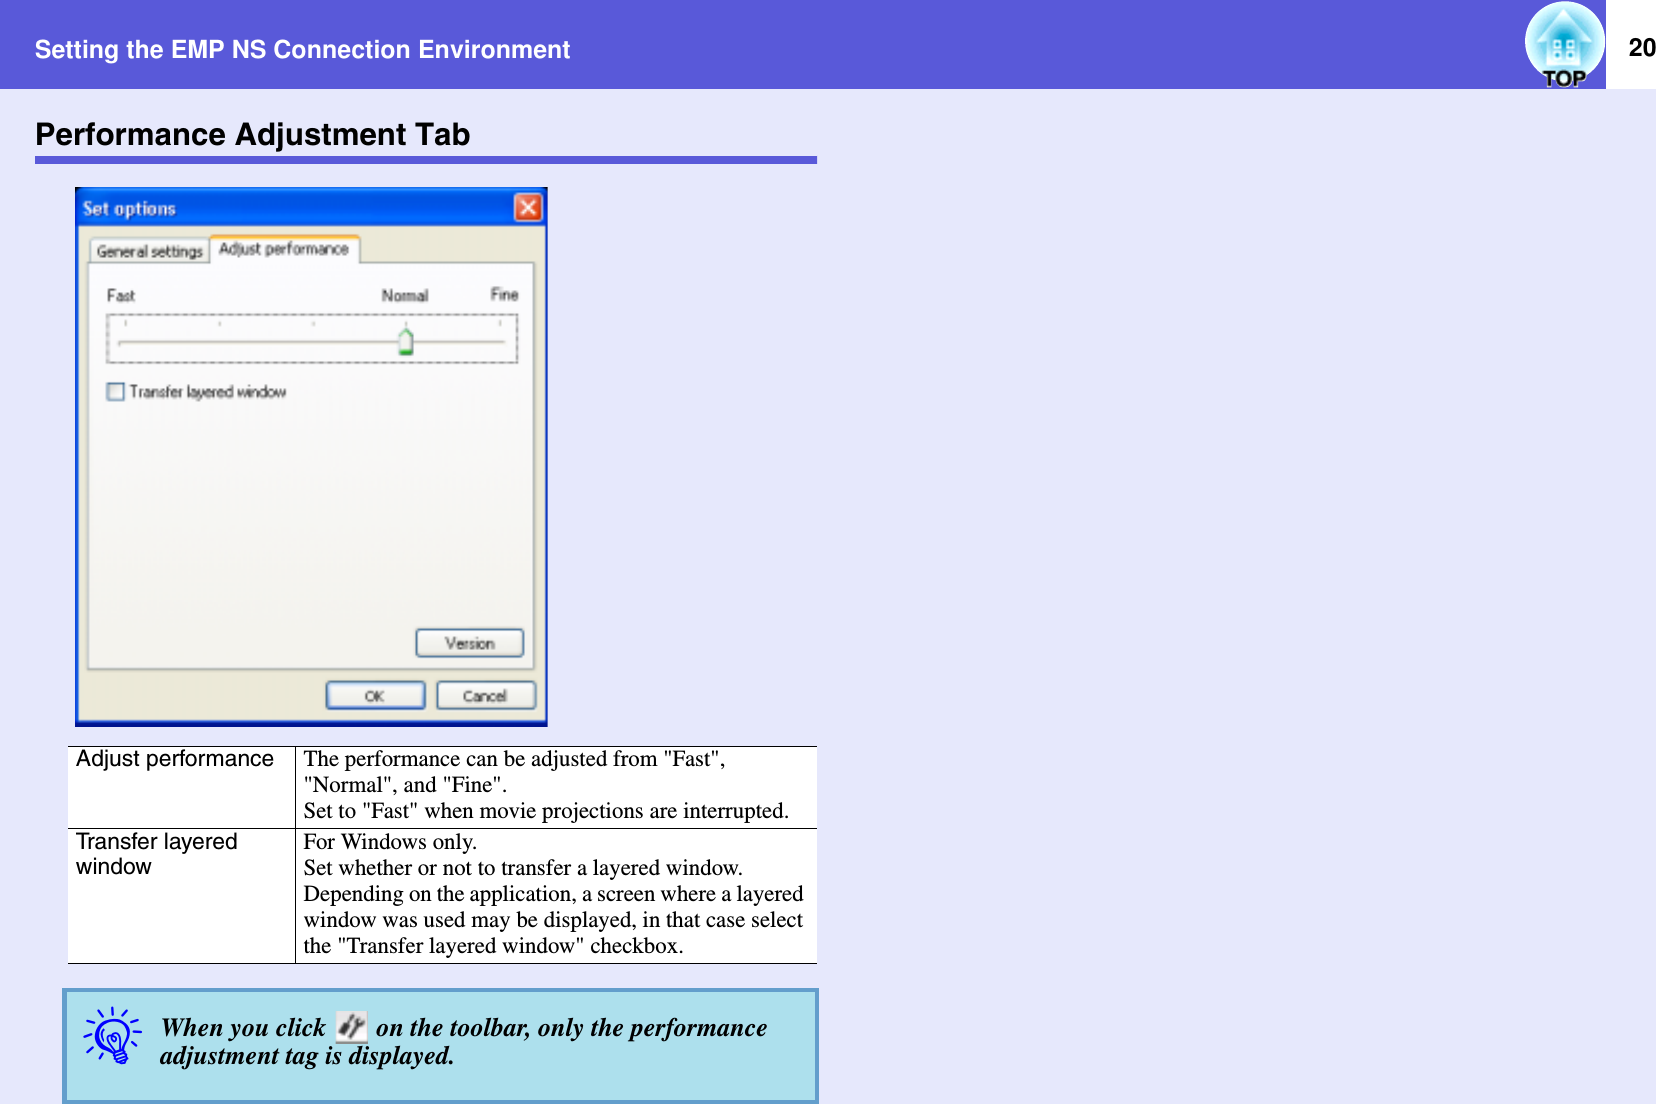
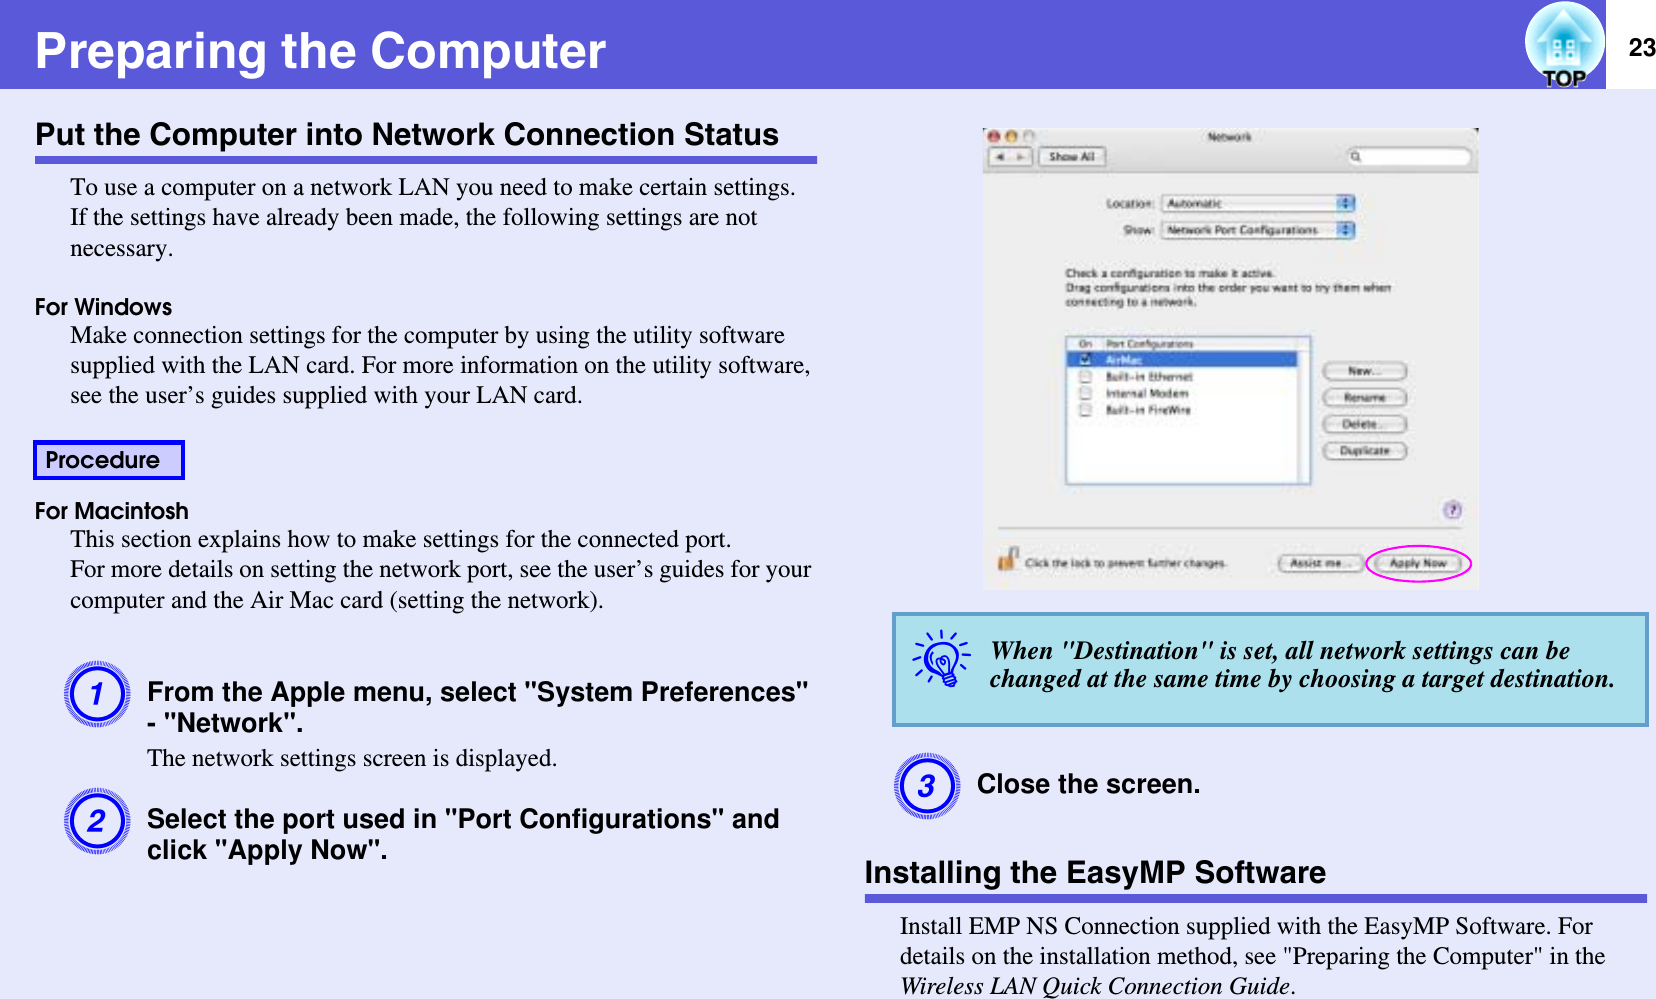
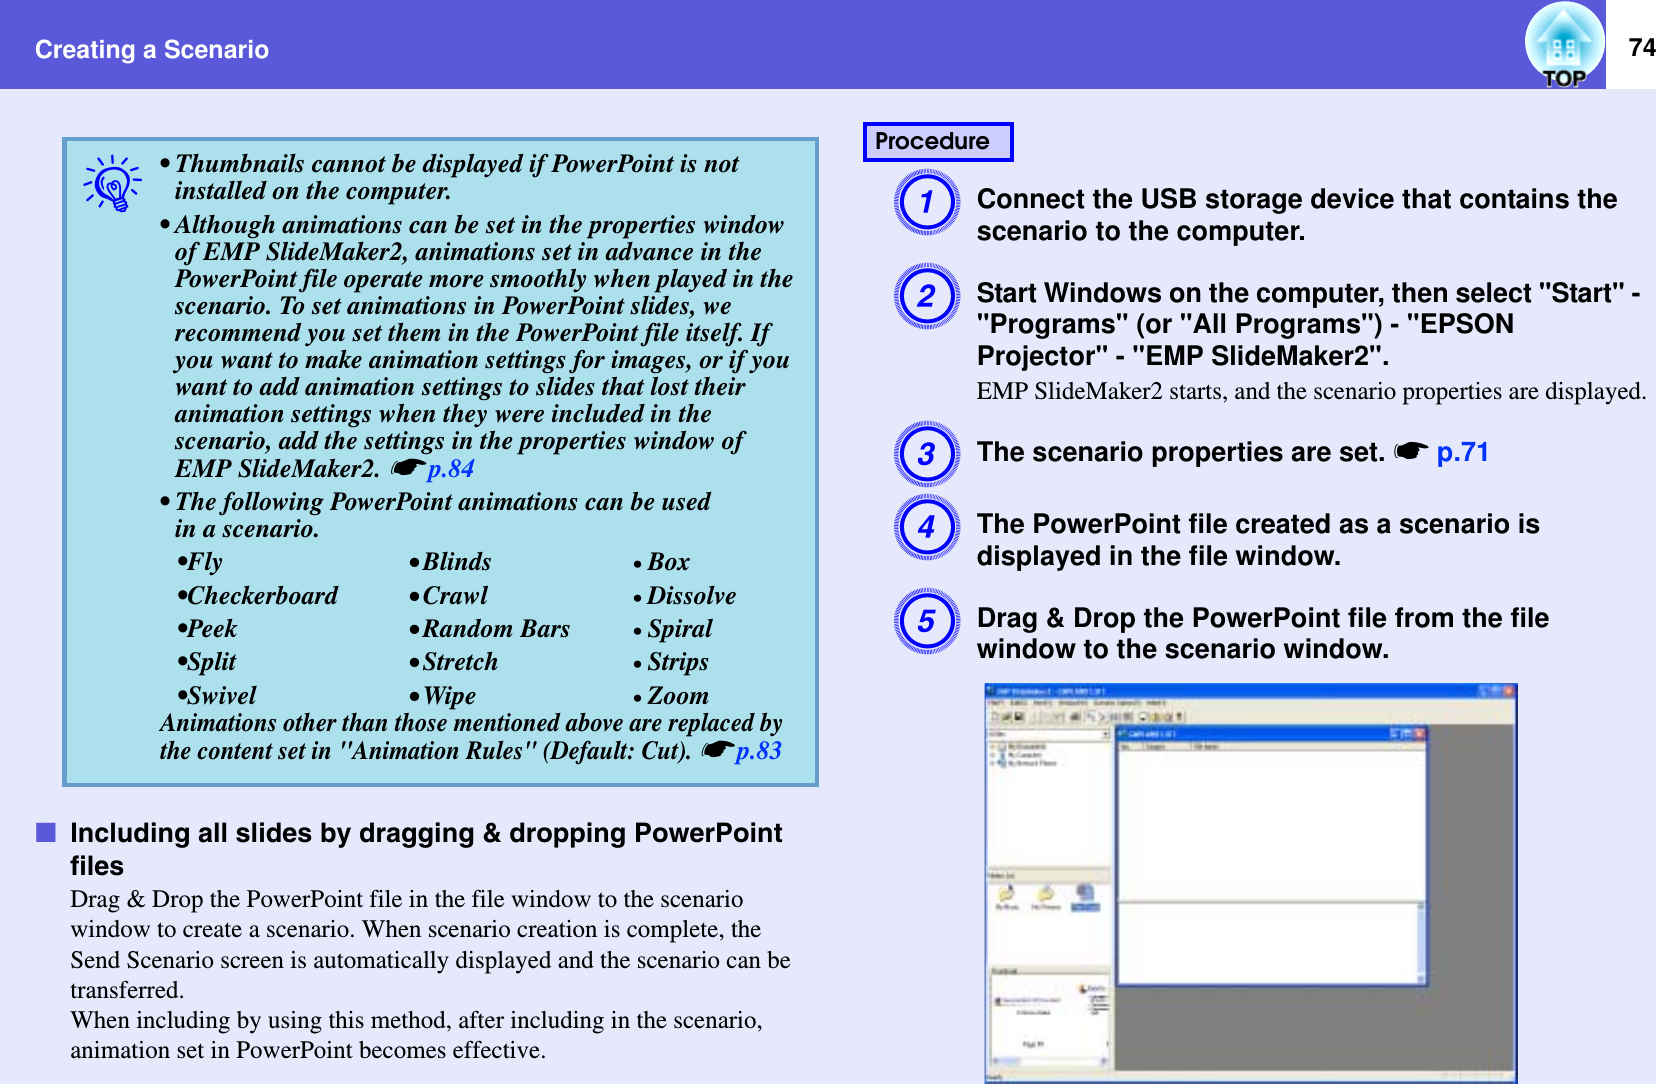
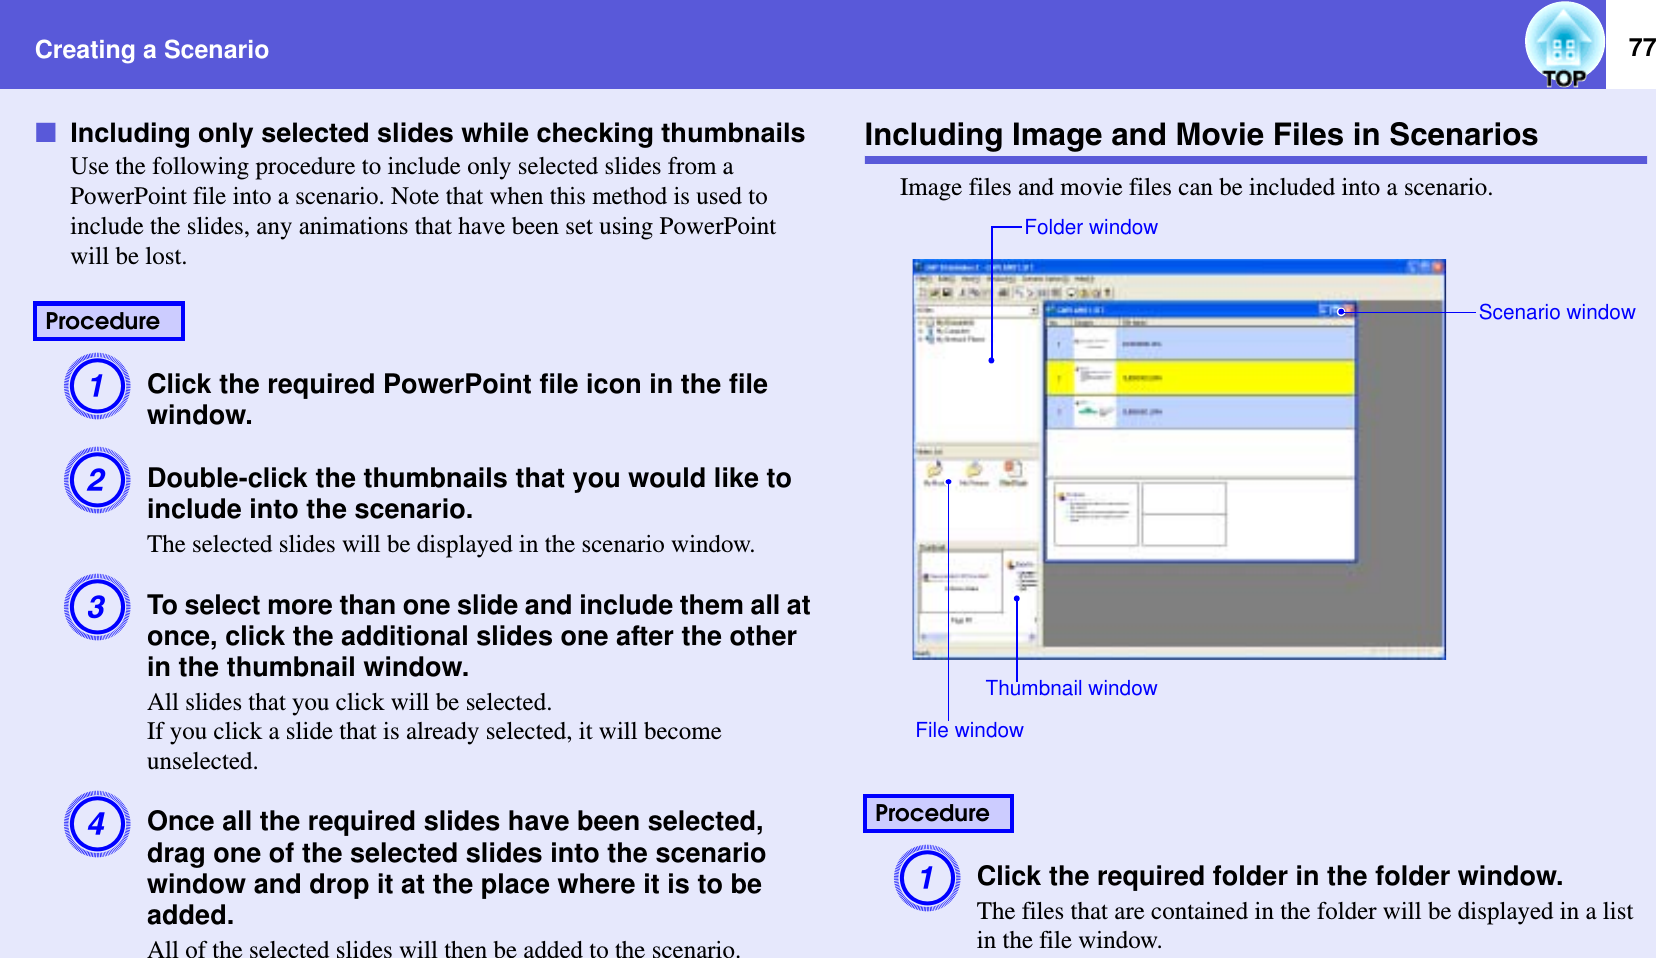
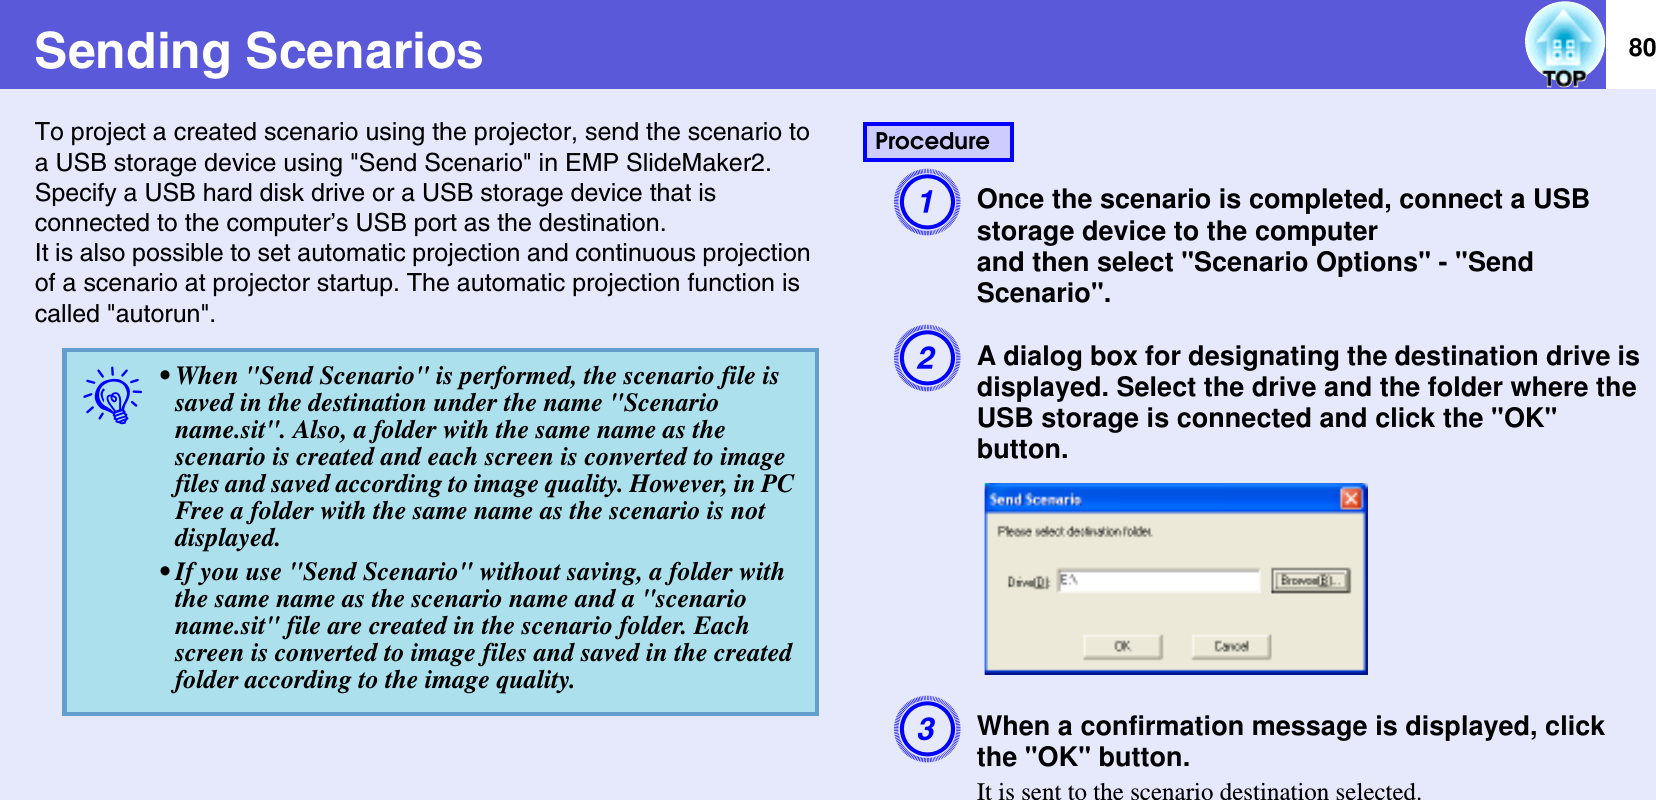
Seiko Epson WN6501C 802.11a/b/g Module User Manual Epson Projector Manual 1
Seiko Epson Corporation 802.11a/b/g Module Epson Projector Manual 1
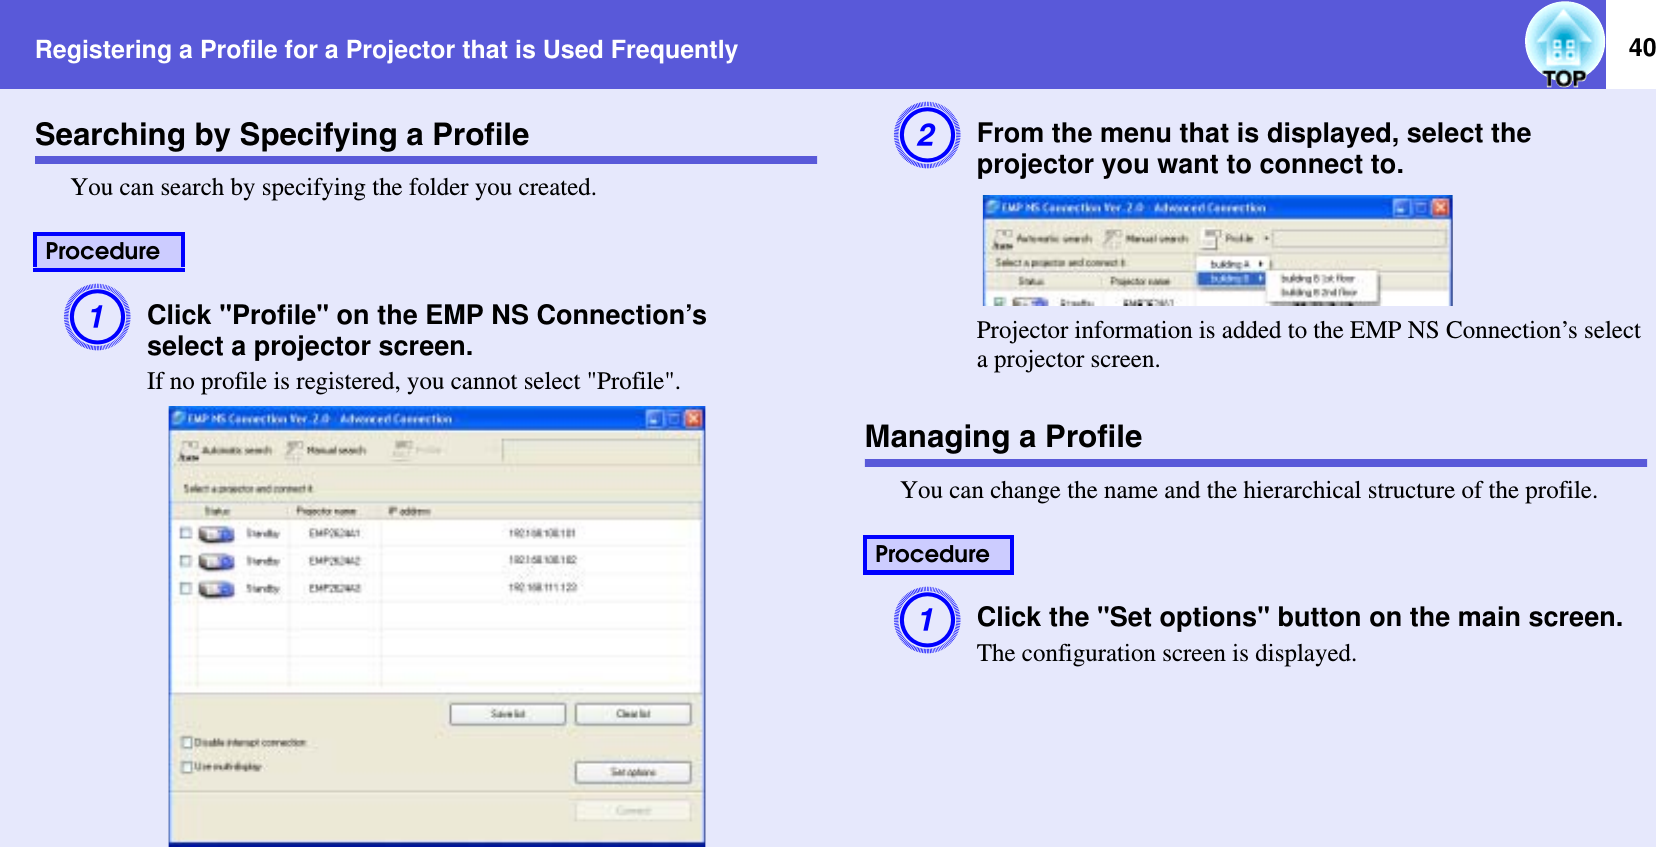
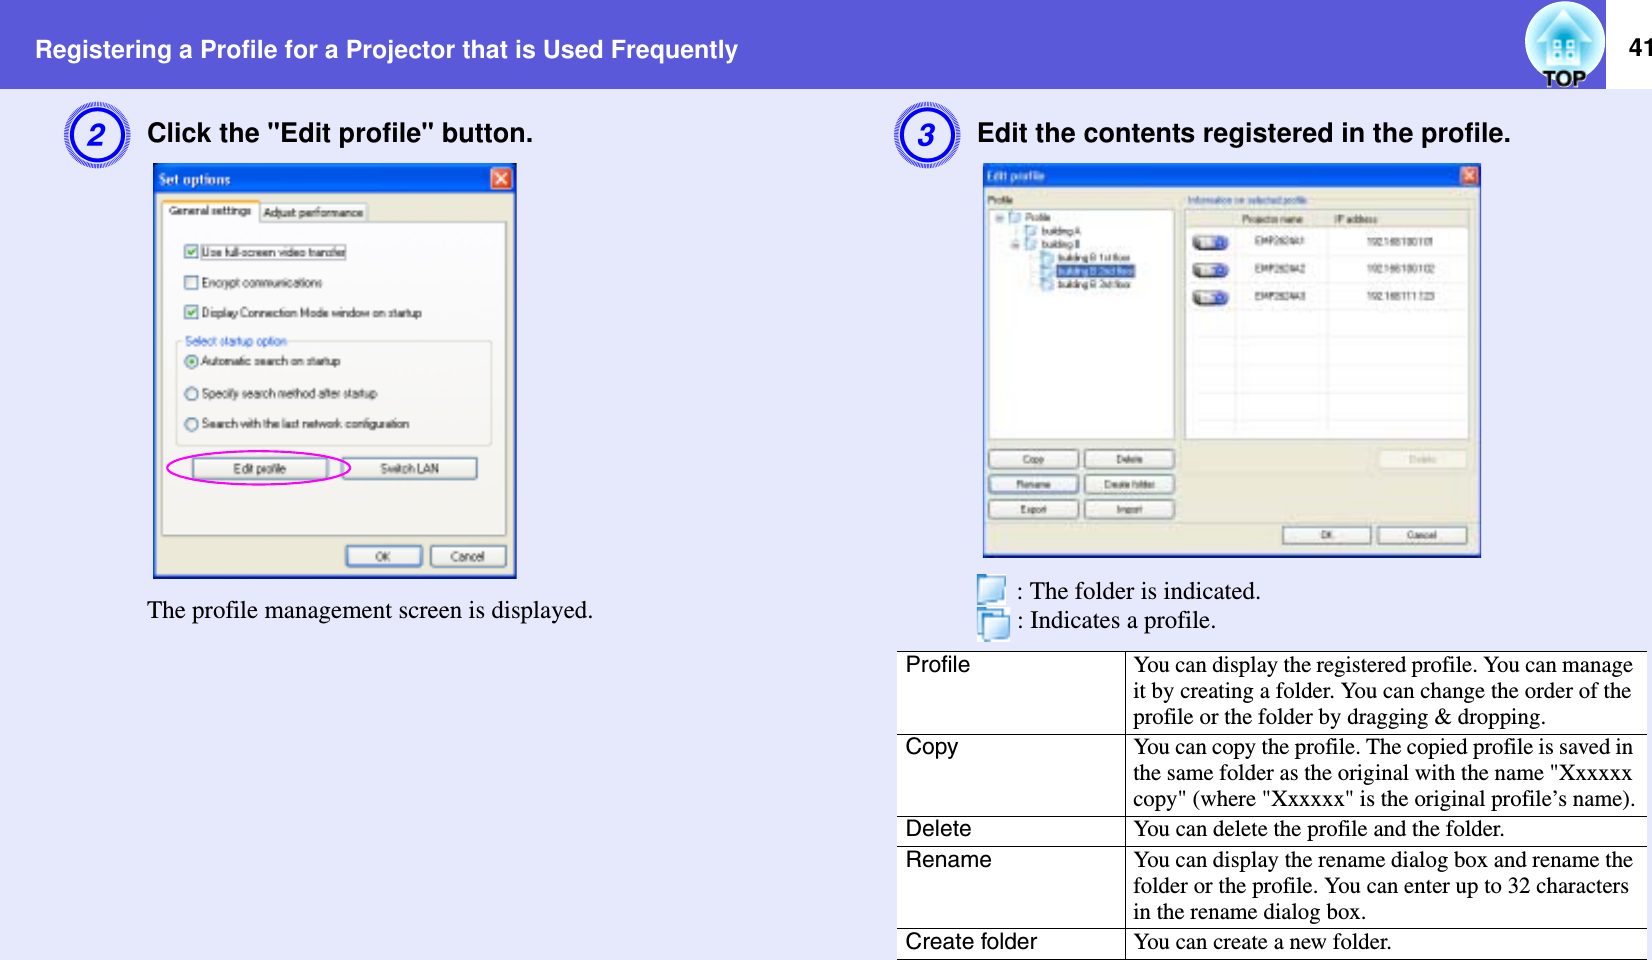
UserManual.wiki
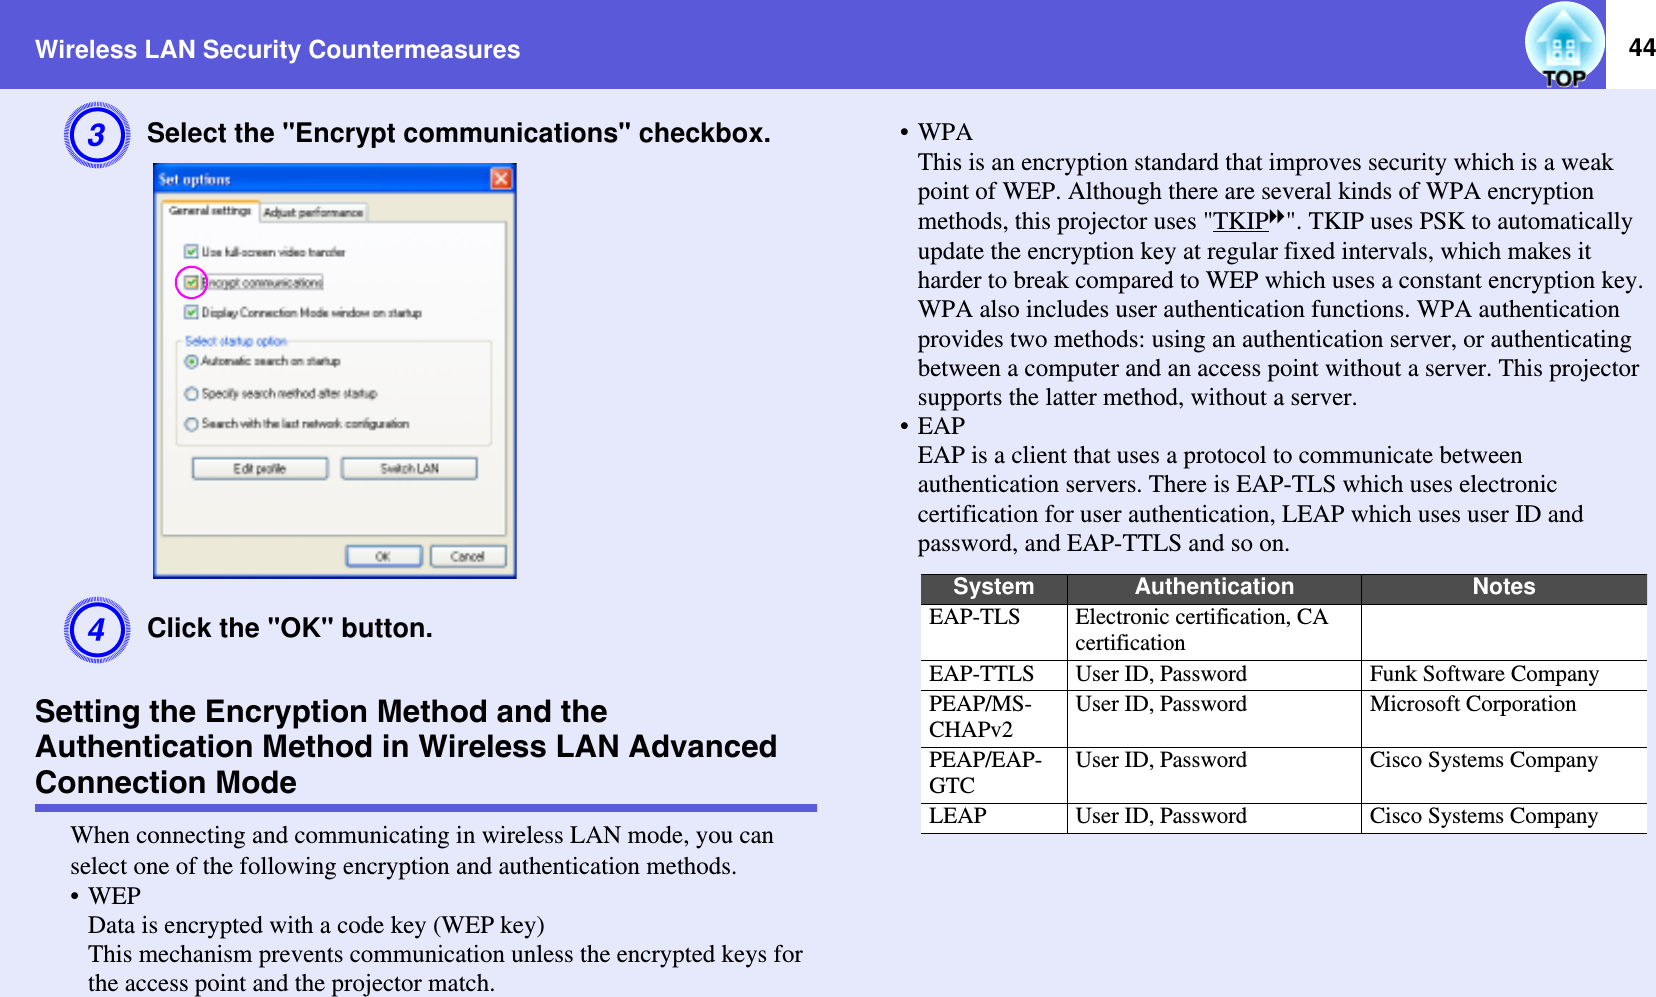
>
Seiko Epson
>
WN6501C User Manual
>
Epson Projector Manual 1
Contents
1.
Epsom Projector Manual 1
2.
Epsom Projector Manual 2
3.
Prelim OEM Integrator Manual
4.
Epson Projector Manual 1
5.
Epson User Manual 2
6.
Revised Manual
Epson Projector Manual 1
Navigation menu
Upload a User Manual
Namespaces
Wiki Guide
HTML
PDF
Info
Views
User Manual
Discussion / Help
Navigation
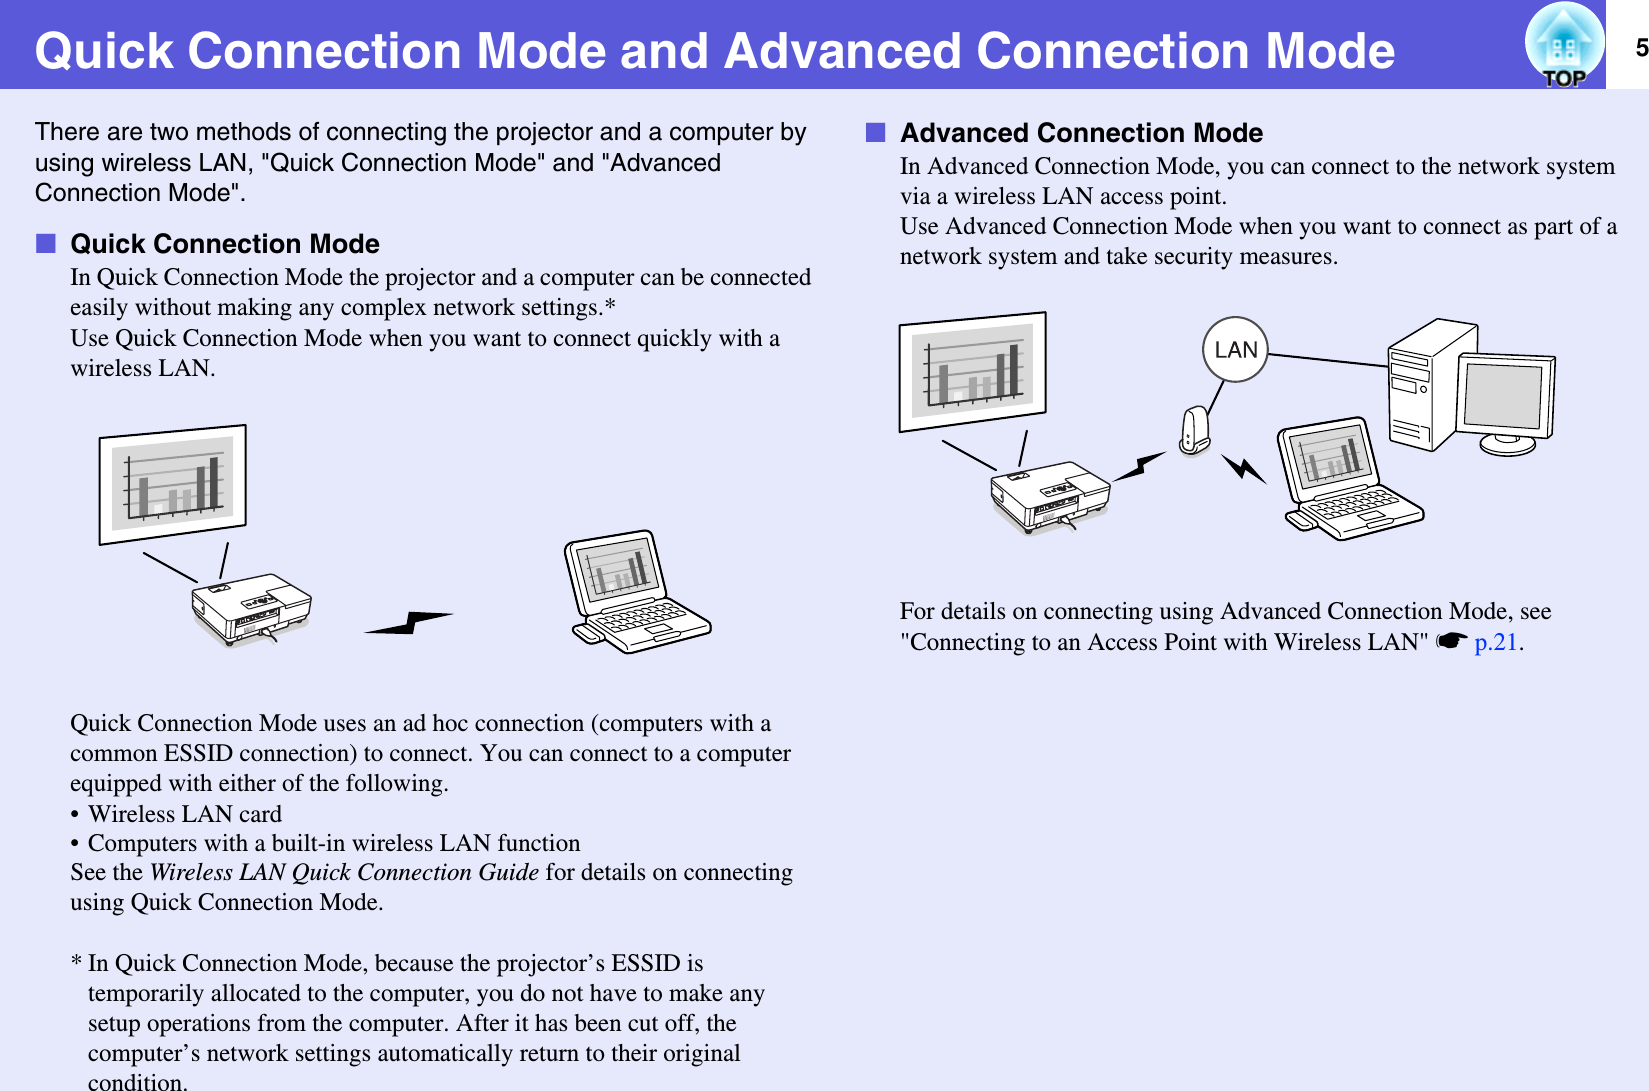


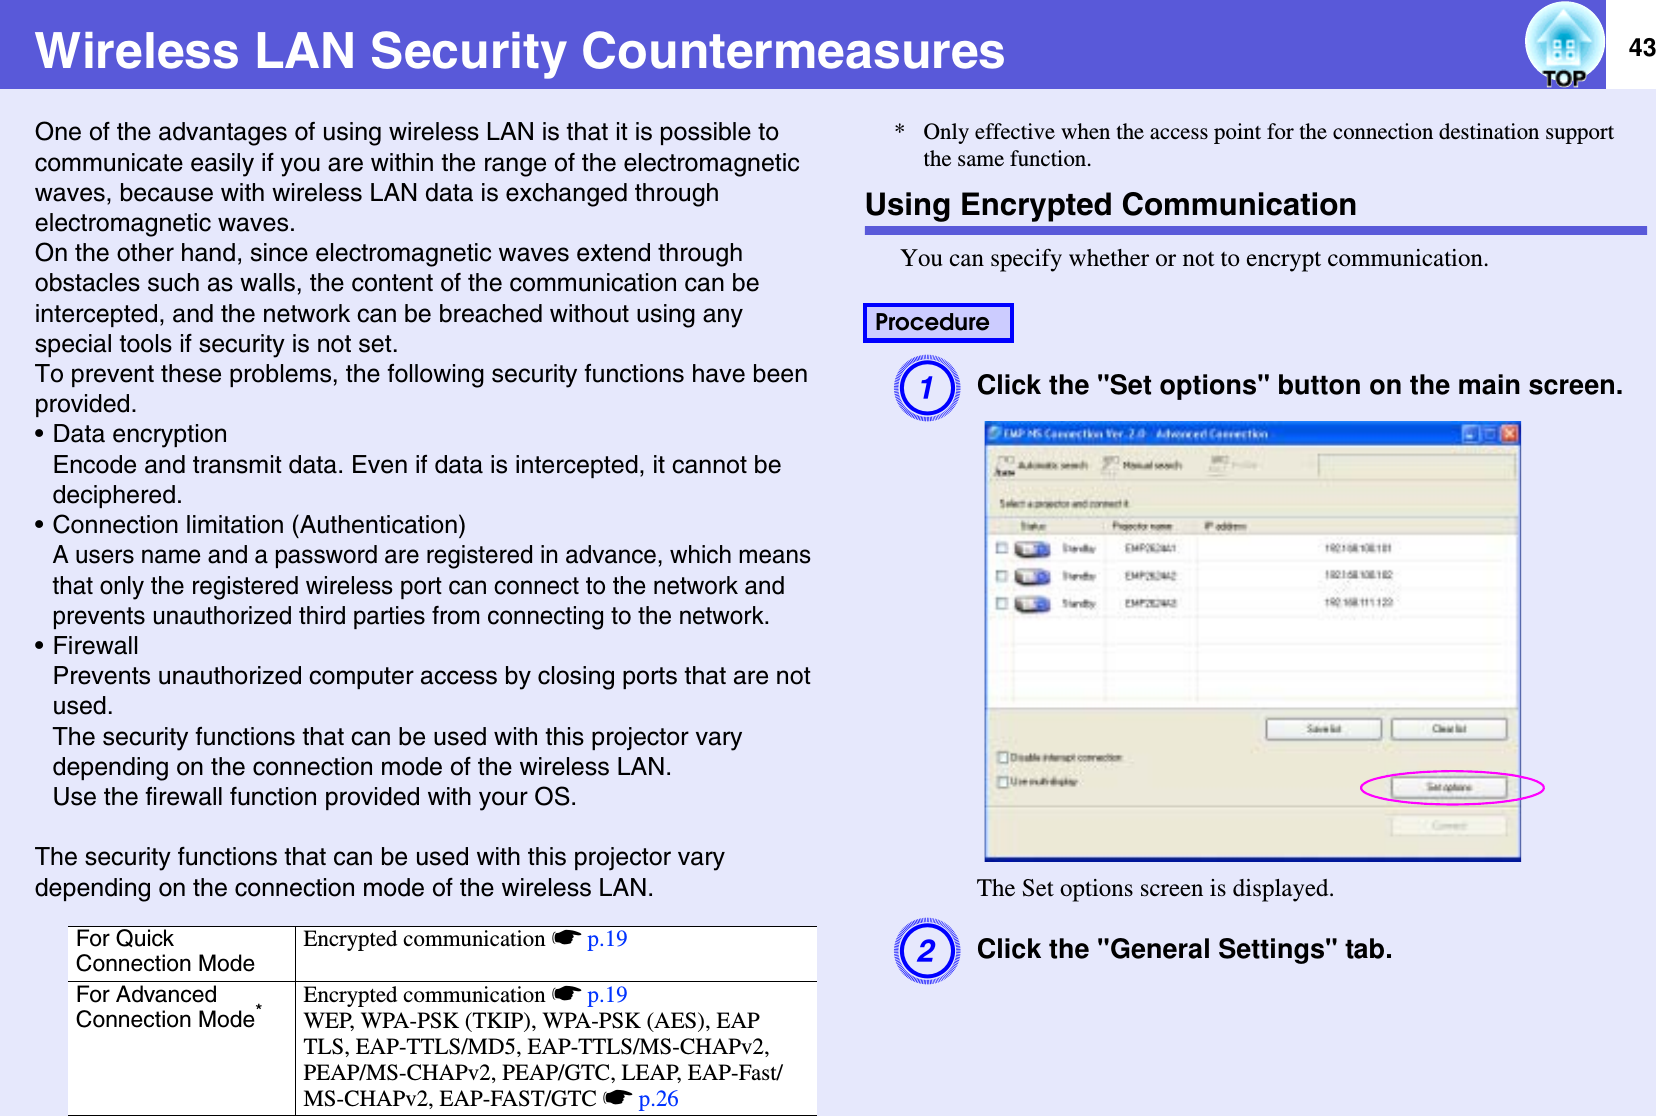
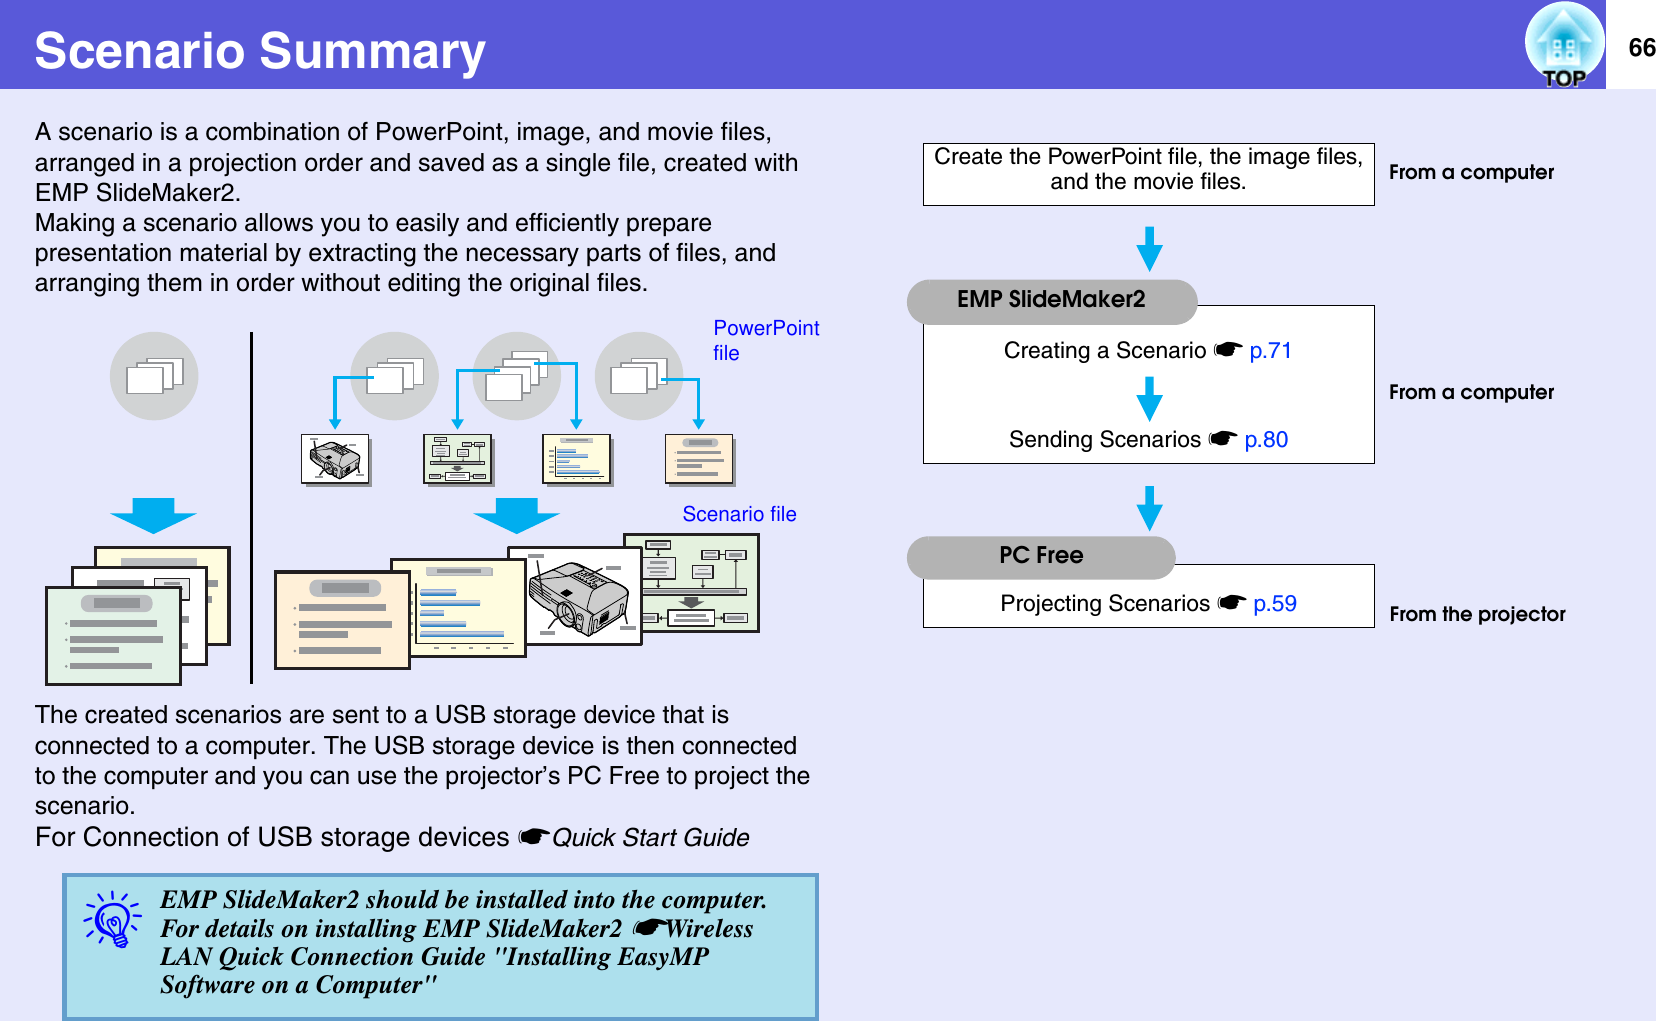
![24Preparing the ProjectorProjector Network SettingsThis section explains how to make network settings to connect using Advanced Connection Mode. Make network settings by using the projector’s configuration menu.APress the [Power] button on the remote control to turn the power on.BPress the [Menu] button.The configuration menu is displayed.CTilt the [h] button on the remote control to move the cursor to "Network", and then press the [Enter] button.DTilt the [h] button on the remote control to move the cursor to "To Network Settings", and then press the [Enter] button.The network settings screen is displayed.EMove the cursor to the item you want to set, and press the [Enter] button on the remote control to set the item.For more details on setting items, see "Network Settings Function List" sp.25.FTilt the [h] button on the remote control to move the cursor to "Complete Settings", and then press the [Enter] button.It return to the configuration menu.GPress the [Menu] button on the remote control.It returns to the EasyMP screen. The network information you set is displayed at the bottom left of the screen. When "Projector Keyword" is set to "ON", the keyword is also displayed.q• Once network settings have been made once, they do not need to be made a second time.• This section explains how to make settings by using the remote control, however after connecting once in "Quick Connection Mode" you can then make settings using the computer’s Web browser. You can make settings easily by using a keyboard when making settings from a Web browser. s"Changing Settings Using a Web Browser (Web Control)" p.47• You can operate the [Enter] button, the [Esc] button, the [w] and [v] buttons, and the [a] and [b] buttons on the projector’s control panel.• For network settings, follow the directions from the network administrator for your network.Procedureq• You can set the projector’s keyword to ON/OFF from configuration menu Network settings from the Basic Settings menu. sp.25• When you turn the projector’s power supply off, the next time you turn it on, the projector keyword changes. Make sure you enter it after checking the keyword displayed on the EasyMP screen when connecting with a computer. If the previous keyword is entered, you cannot connect.](https://usermanual.wiki/Seiko-Epson/WN6501C.Epson-Projector-Manual-1/User-Guide-679885-Page-24.png)
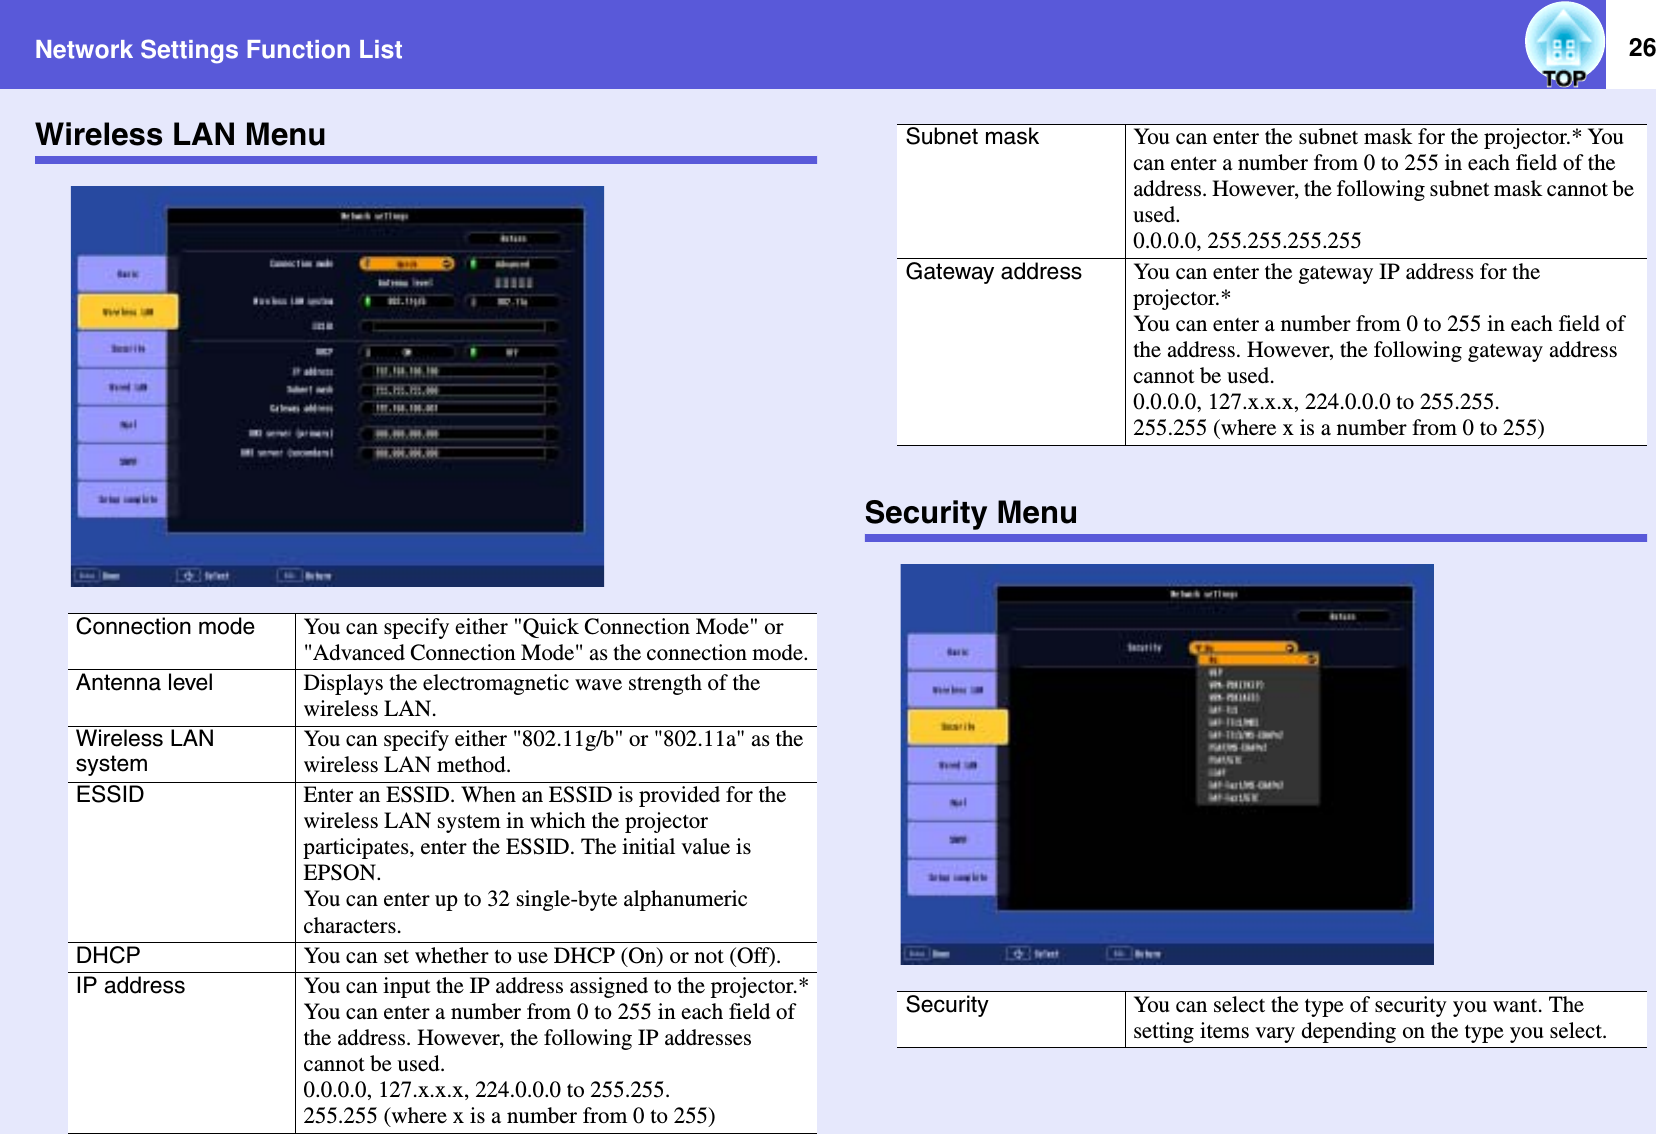
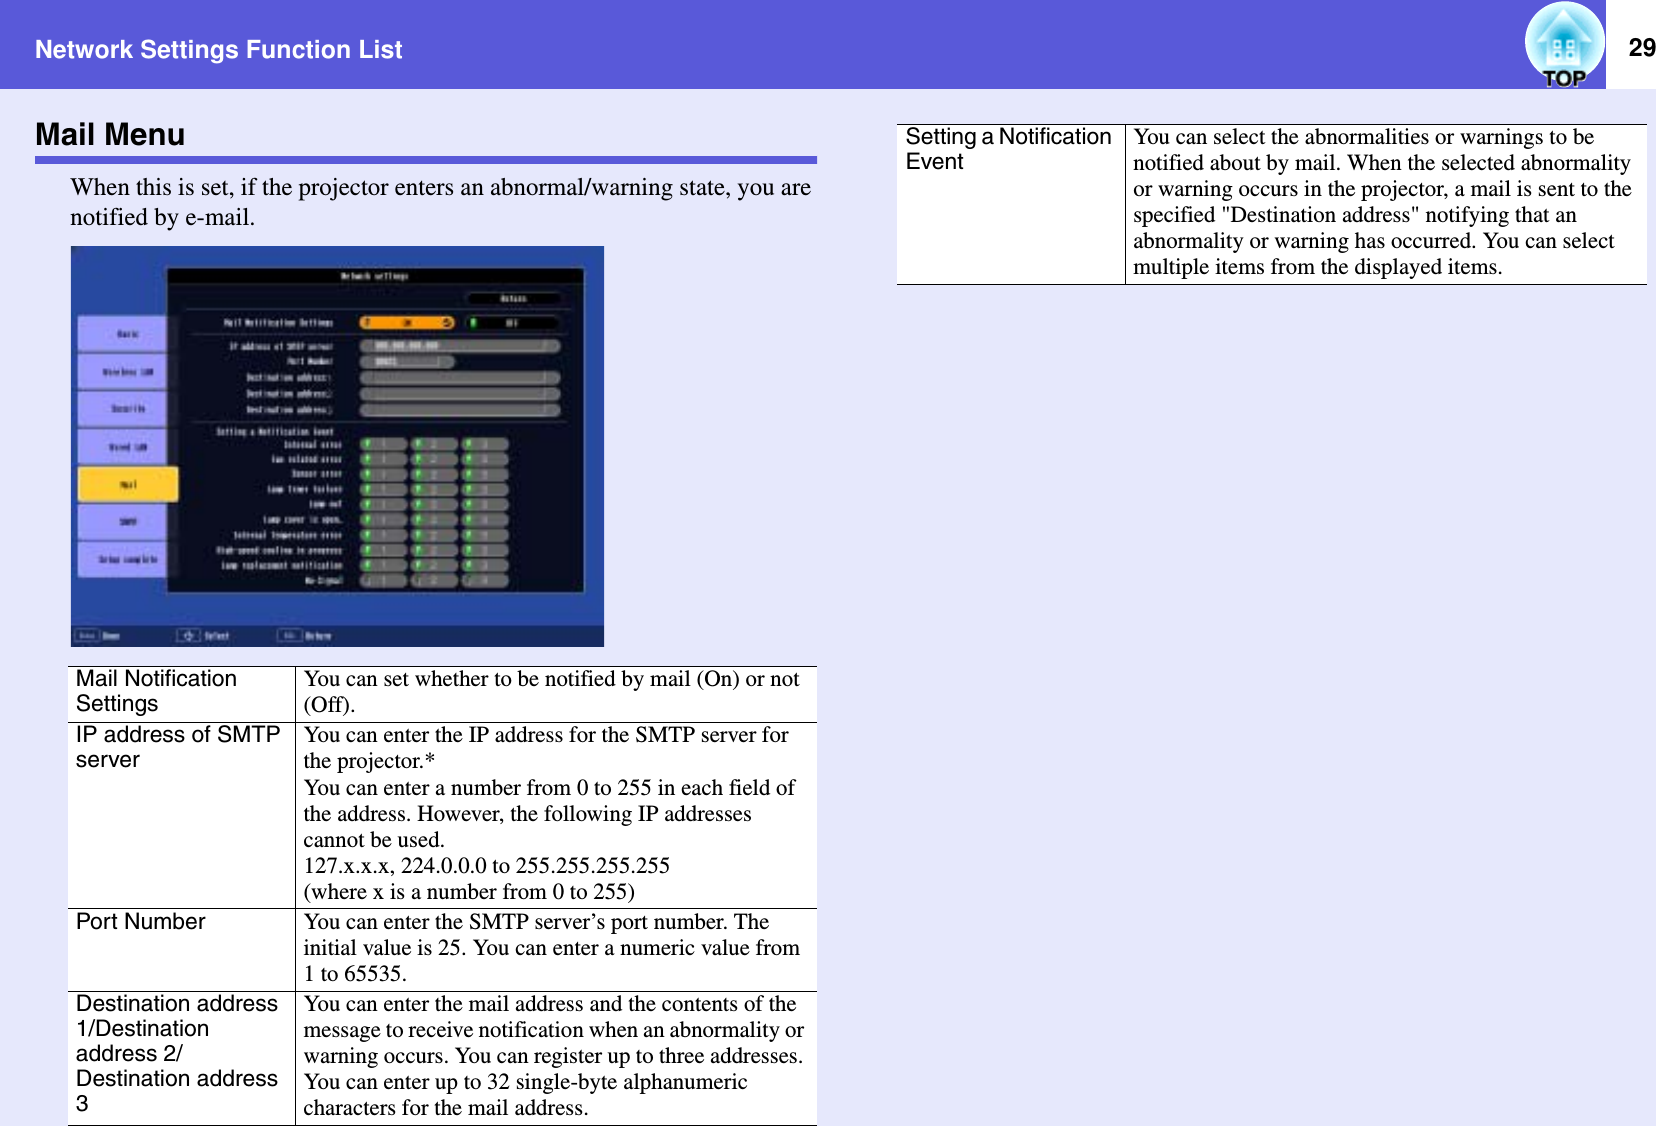
![25Network Settings Function ListBasic Menu* When entering numbers and passwords a software keyboard is displayed. Tilt the [h] button on the remote control to move the cursor to the target key, and then press the [Enter] button.Projector name You can enter a name for the projector. When connected to a network, this name is used to identify the projector. The initial value is "EMPxxxxxx" (where xxxxxx are the last six digits of the MAC Address). You can enter up to 16 single-byte alphanumeric characters.PJLink Password Enter a password to use when you access the projector using compatible PJLink software. sUser’s Guide"PJLink"You can enter up to 32 single-byte alphanumeric characters.Web Control PasswordEnter a password to use when making settings and controlling the projector using Web control.* You can enter up to 8 single-byte alphanumeric characters. Web control is a computer function that lets you set and control the projector by using a computer’s Web browser.sEMP Monitor Operation GuideProjector keyword When projector keyword is set to "ON", you have to enter the keyword when you try to connect to a network. When using this function, you can prevent presentations from being interrupted by unscheduled connections from the computer.Normally this should be set to "ON".](https://usermanual.wiki/Seiko-Epson/WN6501C.Epson-Projector-Manual-1/User-Guide-679885-Page-25.png)
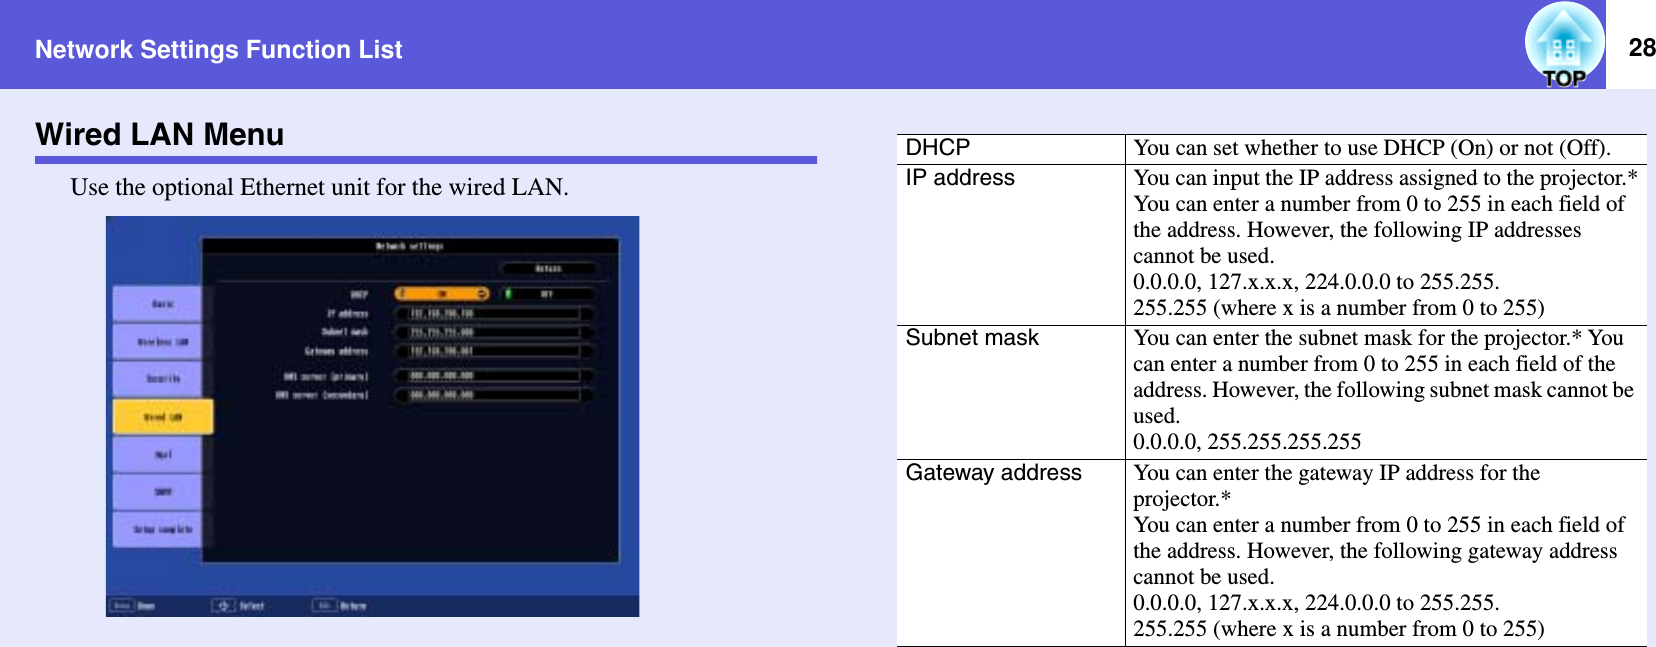
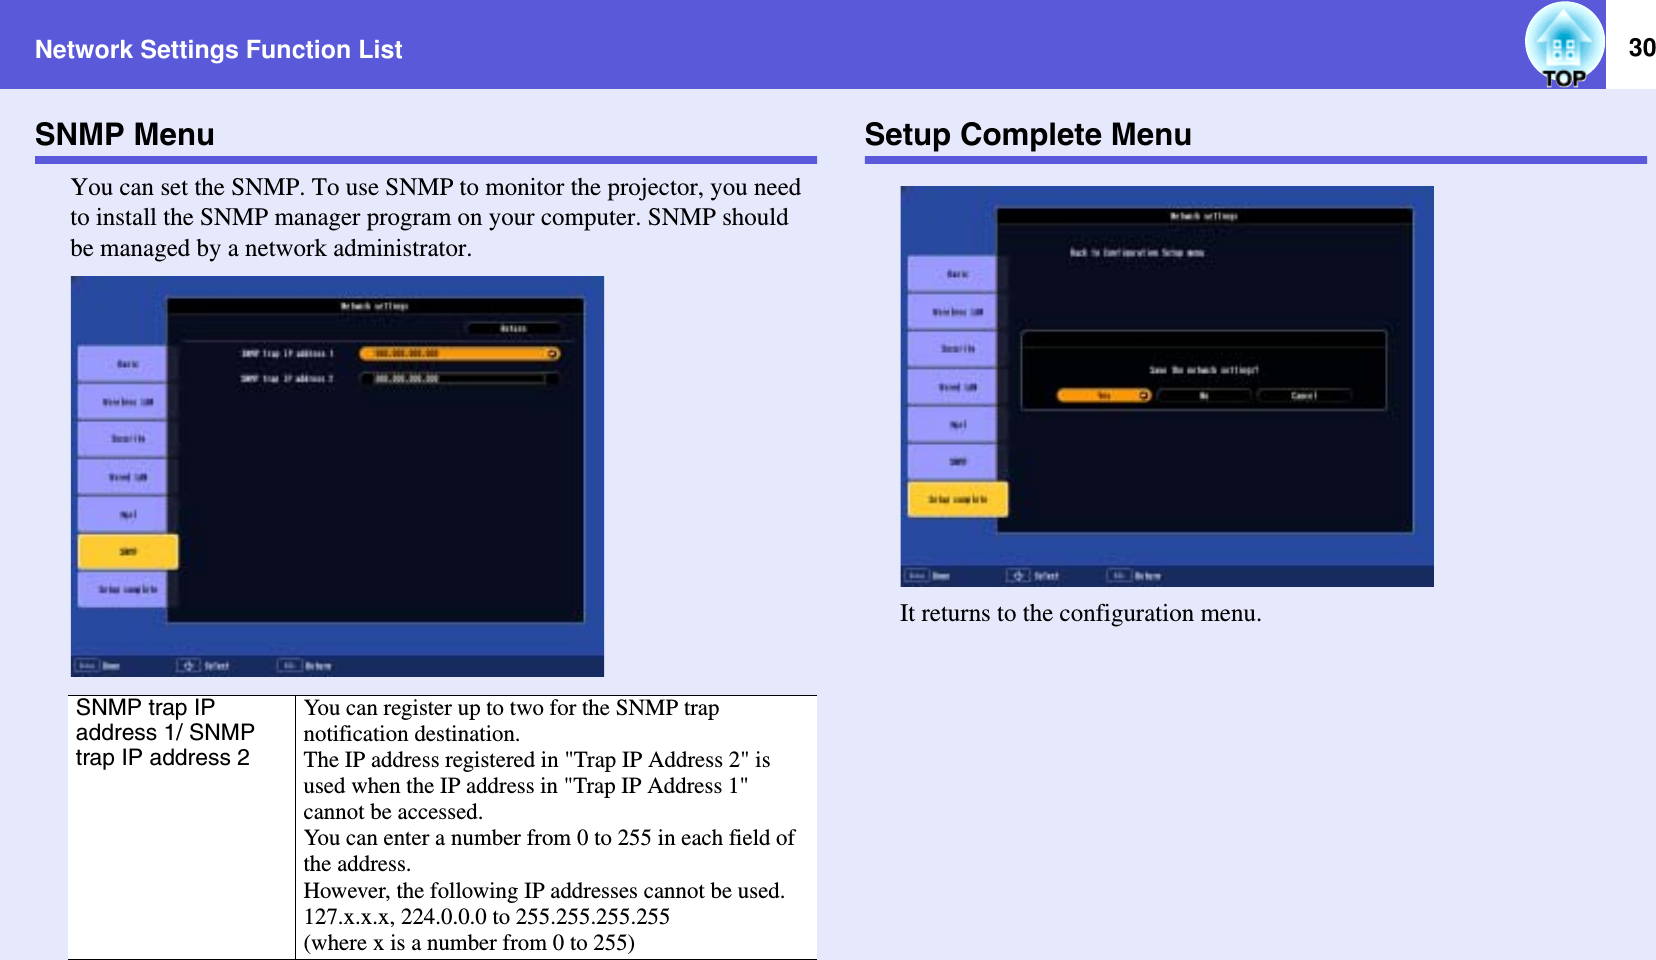
![Network Settings Function List 27fWhen WEP is selected fWhen WPA-PSK (TKIP) or WPA2-PSK (AES) are selectedfWhen EAP-TLS is selectedfWhen EAP-TTLS/MD5, EAP-TTLS/MS-CHAPv2, PEAP/MS-CHAPv2, PEAP/GTC, LEAP, EAP-Fast/MS-CHAPv2 or EAP-FAST/GTC are selectedWEP encryption You can set the encryption for WEP encoding."128 bit" : Uses 128 (104) bit encoding"64 bit" : Uses 64 (40) bit encodingFormat You can set the input method for the WEP encrypted key."ASCII" : Text inputThe method of inputting the encrypted WEP with text differs depending on the access point. Check with the network administrator for the network in which the projector participates, and then set to "ASCII"."HEX" : HEX (hexadecimal) inputKey ID You can select "1", "2", "3", or "4" as the WEP encrypted ID.Encryption key 1/Encryption key 2/Encryption key 3/Encryption key 4You can enter the key used for WEP encryption. Enter the key in single-byte characters following instructions from the network administrator for the network in which the projector participates. The type of character and the number that can be entered differ according to the "WEP Encryption" and "Input Method" settings.If the number of characters you enter is shorter than the required character length, it is not encrypted. Also, if the number of characters you enter is longer than the required character length, characters that exceed the permitted number are not encrypted."128 bit" - when "ASCII": alphanumeric characters, up to 13 characters"64 bit" - when "ASCII": alphanumeric characters, up to 5 characters"128 bit" - when "HEX": 0 to 9 and A to F, up to 26 characters"64 bit" - when "HEX": 0 to 9 and A to F, up to 10 charactersPSK (Encryption key)You can enter a PreSharedKey (encrypted key) in single-byte alphanumeric characters. Enter at least 8 and up to 64 characters. When the PreSharedKey is entered and the [Enter] button is pressed, the value is set and displayed as an asterisk (*).You cannot enter more than 32 characters on the option settings menu. When setting from Web control, you can enter more than 32 characters. sp.51Issued to/Issued by/Validity periodInformation in the certificate is displayed. You cannot enter.User Name You can enter a user name to be used for authentication in single-byte alphanumeric characters (no spaces). You can enter up to 64 characters.You cannot enter more than 32 characters on the configuration menu. When setting from Web control, you can enter more than 32 characters. sp.51Password You can enter an authentication password in single-byte alphanumeric characters. You can enter up to 64 characters. When the password is entered and the [Enter] button is pressed, the value is set and displayed as an asterisk (*).You cannot enter more than 32 characters on the configuration menu. When setting from Web control, you can enter more than 32 characters. sp.51](https://usermanual.wiki/Seiko-Epson/WN6501C.Epson-Projector-Manual-1/User-Guide-679885-Page-27.png)
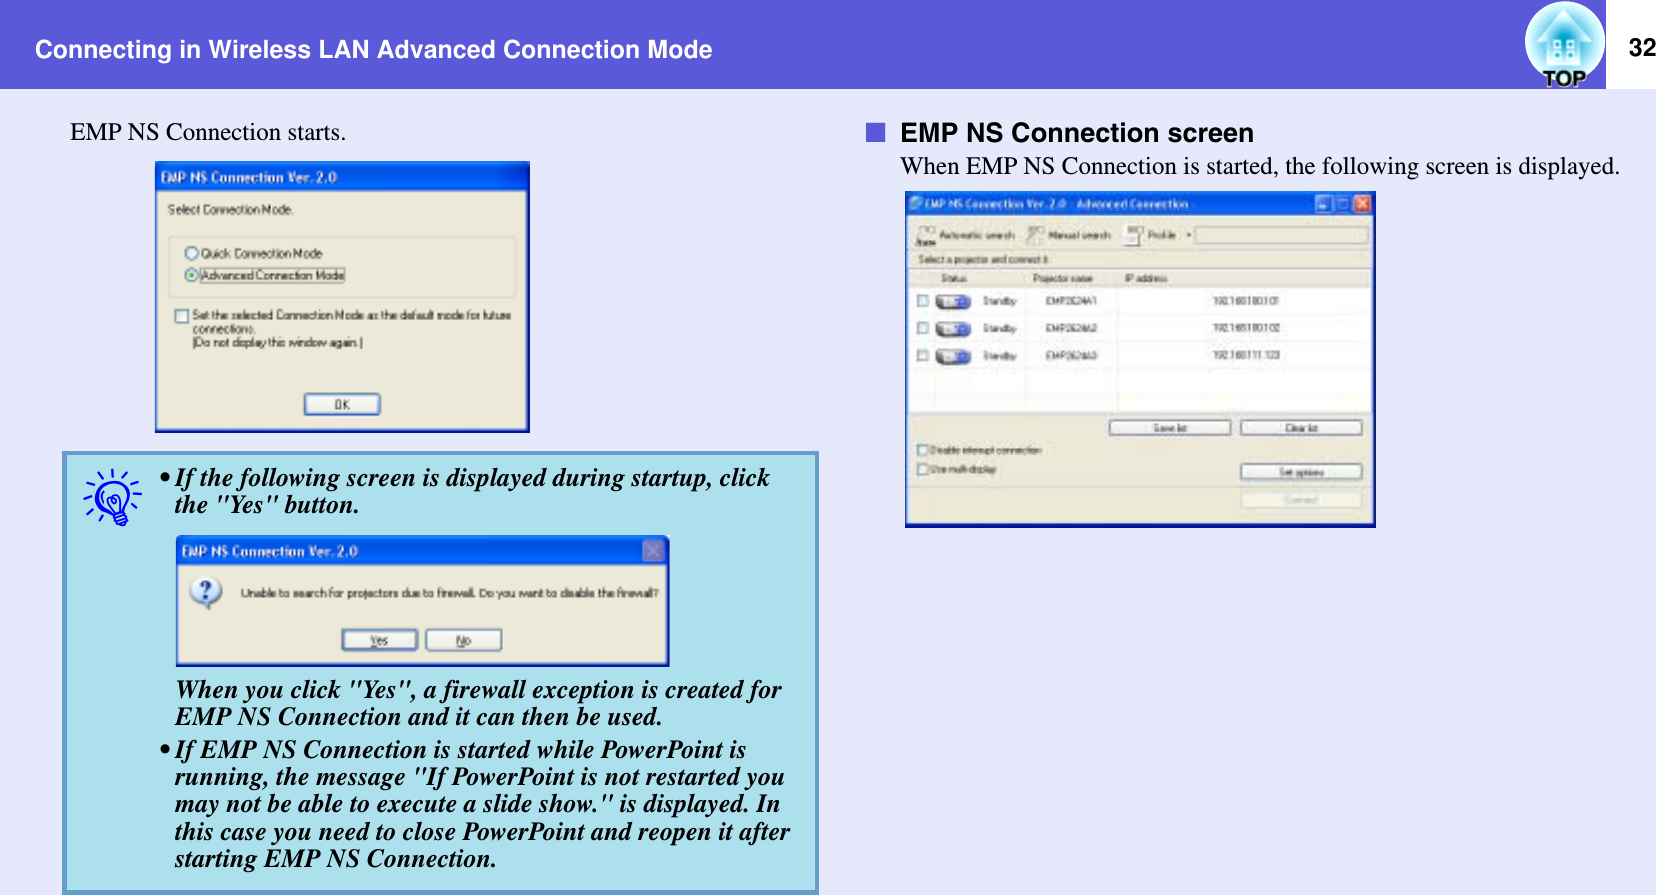
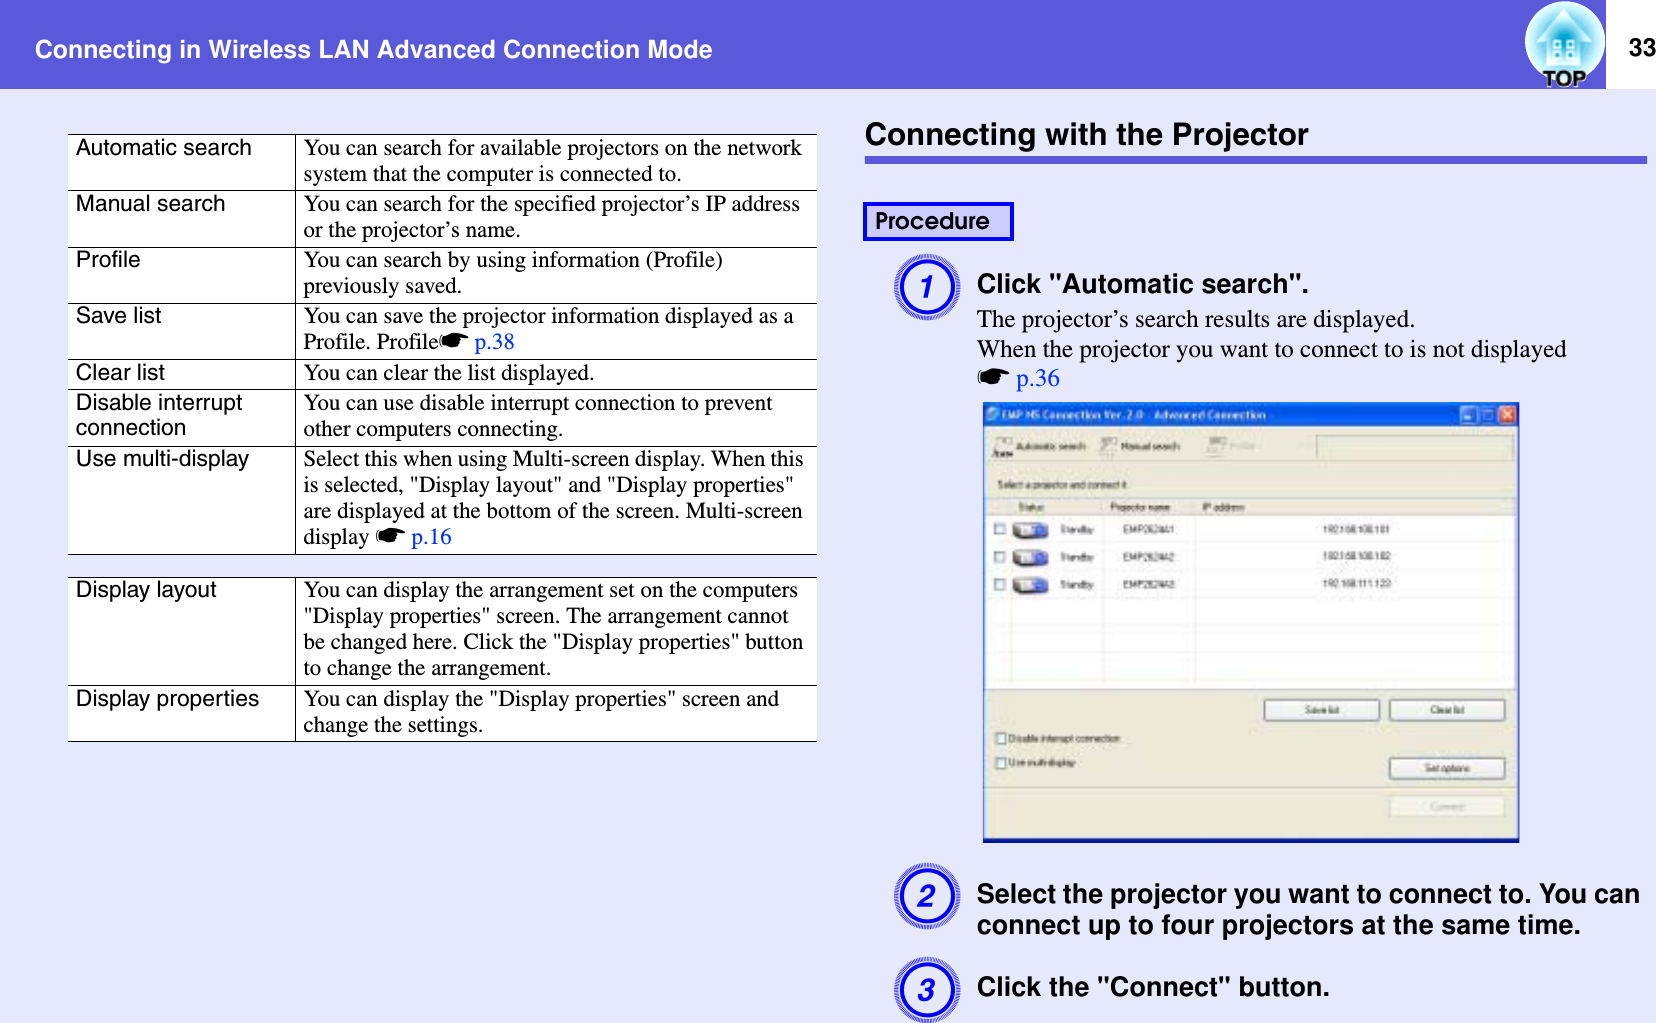
![31Connecting in Wireless LAN Advanced Connection ModeWhen you finish making connection settings, start EMP NS Connection on the computer, and connect it with the projector. Once the network settings for the projector have been set once, all you have to do is connect a computer and the projector from the next time.Putting the Projector in Connection Standby StatusAPress the [Power] button on the remote control to turn the power on.BPress the [EasyMP] button on the remote control to display the EasyMP screen.Check that the network information of Network Presentation on the screen looks like the following.Starting EMP NS Connection from the ComputerIn the following explanations, unless otherwise noted, Windows screen shots are used.You see a similar screen even when using Macintosh.For WindowsSelect "Start" - "Programs" (or "All Programs") - "EPSON Projector" - "EMP NS Connection".For MacintoshAClick the communication icon at the top right of the computer screen, and check that the following is displayed.BDouble-click the "Applications" folder of the hard drive volume in which EMP NS Connection is installed, and then double-click the EMP NS Connection icon.ProcedureDisplays the projector’s network information.ProcedureAirPort: OnYou can connect with a Wireless LAN.](https://usermanual.wiki/Seiko-Epson/WN6501C.Epson-Projector-Manual-1/User-Guide-679885-Page-31.png)
![Connecting in Wireless LAN Advanced Connection Mode 34DWhen "Projector Keyword" is set to "ON", enter the projector’s keyword when the projector’s EasyMP screen is displayed and click the "OK" button.A computer and the projector are connected through a network and the computer’s screen is displayed.The EMP NS Connection toolbar is displayed on the computer screen. Use this toolbar to operate the projector and make settings and disconnect the network connection.For details on using the toolbar, see "Using the Toolbar" sp.10.q• When you select a projector that is connected to another computer, the computer that it was connected to is cut off, and the image of the computer connecting now is projected.• After connecting, you cannot add another connected projector.q• You can minimize the toolbar if you find it is inconvenient when making a presentation. In this case, you can operate the projector and make settings by using the remote control. sUser’s Guide "Part Names and Functions" "Remote Control"When projecting a PowerPoint file, you can return to the previous slide or move on to the next slide by pressing the [[] or []] buttons.• When changing presenters and so on and when continuously connecting from another computer, start EMP NS Connection from the computer you want to connect. The connection to the computer that is currently connected is cut off, and it is connected with the computer that is trying to connect now.• When projecting computer images by using Network Presentation, see "Connection Limitations" sp.8 for details on restricted items of compatible resolution or display colour and so on.](https://usermanual.wiki/Seiko-Epson/WN6501C.Epson-Projector-Manual-1/User-Guide-679885-Page-34.png)
![35Disconnecting the Network ConnectionYou can disconnect the connection between the computer and the projector.When a computer that is connected to multiple projectors is disconnected, the connection to all of the projectors is disconnected.fDisconnecting from the computerClick "Disconnect" or " " on the toolbar.For WindowsFor MacintoshfDisconnecting from the projectorAPress the [Esc] button on the remote control.The Exit menu is displayed.BSelect the "Exit" button and press the [Enter] button on the remote control.The message "The connected projector has been cut off from the projector." is displayed on the screen of the computer to be disconnected.ProcedureDisconnect/Exit: The network connection is cut off and it returns to the projector selection screen.Disconnect/Exit: The network connection is cut off and it returns to the projector selection screen.Procedure](https://usermanual.wiki/Seiko-Epson/WN6501C.Epson-Projector-Manual-1/User-Guide-679885-Page-35.png)

![47Changing Settings Using a Web Browser (Web Control)You can set up and control the projector from a computer by using the Web browser of a computer that is connected to the projector via a network. Setup and control operations can be performed remotely if this function is used. In addition, since you can use the computers keyboard, entering characters required for the setup is easier than using the remote control.Use Microsoft Internet Explorer 6.0 or later as the Web browser.If using a Macintosh, you can also use Safari. However,if using Safari under Macintosh 10.2.8, some of the Web control radio buttons may not display properly.Displaying Web ControlDisplay Web control the following procedure.fEntering the IP address of the projectorWeb control can be opened by specifying the IP address of the projector as follows when connecting using the optional Ethernet unit or when using Advanced Connection Mode of wireless LAN.AStart the Web browser on the computer.BEnter the IP address of the projector in the address input box of the Web browser, and press the [Enter] key on the computer’s keyboard.Web Control is displayed.Projector SetupYou can set the projector’s configuration menu setting items. The contents set are reflected in the configuration menu.fConfiguration menu items that cannot be set by the web browserAll configuration menu items can be set with the exception of the following items.• "Settings" - "Pointer Shape", "EasyMP Audio Out"• Registering a user’s logo using "Extended" - "User’s Logo"• "Extended" - "Operation" - "High Altitude Mode"• "Extended" - "Link21L", "Language"• "Reset" - "Reset All", "Reset Lamp Hours"The items available on each menu are the same as the configuration menu of the projector.sUser’s Guide "Configuration Menu" "List of Functions" s"Network Settings Function List" p.25The "MAC Address" is not displayed.qSetup and control are possible using a Web browser if "Standby Mode" is set to "Network ON" in the "Extended" menu of the projector’s configuration menu, even if the projector is in standby mode (when the power is off).qIf the Web browser you are using is set up to connect via a proxy server, Web control cannot be displayed. To use Web control, you need to make network connection settings with other than a proxy server.Procedure](https://usermanual.wiki/Seiko-Epson/WN6501C.Epson-Projector-Manual-1/User-Guide-679885-Page-47.png)
![53PC Free Basic OperationsPC Free lets you play back and project scenarios, image files, and movie files that are stored in USB storage devices and images in digital cameras.This section explains the basic operation of PC Free.Starting and Closing PC FreefStarting PC FreeAConnect either of the following to the projectors [USB Type A] port.• A digital camera or a USB storage device• USB MultiCard reader (when USB storage is set) sQuick Start GuideBPress the [EasyMP] button on the remote controland confirm that "EasyMP" is displayed on the screen.PC Free will start and display the contents of the digital camera or USB storage device.When multiple USB storage devices are connected, multiple USB storage icons are displayed on the EasyMP screen. Tilt the [h]button on the remote control to move the cursor to the USB storage device, and then press the [Enter] button.JPEG files and MPEG files are displayed as thumbnails (file contents are displayed as small images). Other files or folders are displayed as icons.Procedure](https://usermanual.wiki/Seiko-Epson/WN6501C.Epson-Projector-Manual-1/User-Guide-679885-Page-53.png)
![PC Free Basic Operations 54Files that cannot be displayed as thumbnails are displayed as the following icons.Icon File Type Icon File TypeScenario file JPEG fileDigital camera formatPNG fileQuickTime(Motion-JPEG)Electronic certificate fileMPEG fileBMP fileGIF fileq• If the USB storage device contains a scenario that is set for autorun, this scenario will be played back as the highest priority. If you want to stop it from playing back, press the [Esc] button on the remote control.• If the projector and the digital camera or USB storage device are not connected, the following screen is displayed. If this happens, connect a digital camera or USB storage device to display the screen shown in procedure 3.• Some JPEG files may be displayed as icons instead of thumbnails. In this event, a file icon is displayed.](https://usermanual.wiki/Seiko-Epson/WN6501C.Epson-Projector-Manual-1/User-Guide-679885-Page-54.png)
![PC Free Basic Operations 55fClosing PC FreeATilt the [h] button on the remote control up to point the cursor to the "Exit" button.BPress the [Enter] button on the remote control.PC Free shuts down and the following screen is displayed.CAfter turning off the power supply to the digital camera or the USB storage device, disconnect it from the projector’s [USB Type A] port.Guide Mode and Quick ModeIn Guide Mode, when the folder and the file are selected, the sub menu to specify the next operation is displayed.In Quick Mode, file projection starts immediately without displaying the sub menu. When the folder is selected, the folder opens."Guide Mode" is the default setting. In Guide Mode and Quick Mode, the following operations differ.When a folder is selected and the [Enter] button is pressedProcedureqIf you leave the USB storage device connected when you close PC Free and the EasyMP standby screen is displayed, disconnect the USB storage device and reconnect it before starting PC Free again.For Guide Mode For Quick ModeThe following sub menus are displayed. The folder opens.Open FolderPlay Slideshow sp.62Options sp.64](https://usermanual.wiki/Seiko-Epson/WN6501C.Epson-Projector-Manual-1/User-Guide-679885-Page-55.png)
![PC Free Basic Operations 56When a file is selected and the [Enter] button is pressedTo set the operation mode, see "Setting Image and Movie File Display Conditions and Operation Mode". sp.64PC Free Basic Operations (Guide Mode)This section describes the procedures for playing scenarios, images, and movies using Guide Mode.ATilt the [h] button on the remote control to position the cursor on the file or folder you want to access.For Guide Mode For Quick ModeDepending on the file type, one of he following sub menus is displayed.The file starts to play back.View Image sp.61Play Movie sp.61Play Scenario sp.59ProcedureqIf all files and folders cannot be displayed at the same time in the current window, press the [[] button on the remote control or move the cursor to the "Next page" button and press the [Enter] button on the remote control.To return to the previous screen, press the []] button on the remote control, or position the cursor on the "Previous page" button and press the [Enter] button on the remote control.cursor](https://usermanual.wiki/Seiko-Epson/WN6501C.Epson-Projector-Manual-1/User-Guide-679885-Page-56.png)
![PC Free Basic Operations 57BPress the [Enter] button on the remote control.The sub menu is displayed.CSelect the following operation from the display menu and press the [Enter] button on the remote control.When scenario is selectedWhen an image file is selectedWhen a movie file is selectedWhen a folder is selectedPC Free Basic Operations (Quick Mode)The main functions can be executed directly by selecting the file in Quick Mode and pressing the [Enter] button.When selecting a fileThe file starts to play back.When selecting a folderThe folder opens.Rotating the ImageYou can rotate images in JPEG format in 90° increments when playing them with PC Free. The rotating function is also available during the slide show.Rotate JPEG images in the following way.Play scenario Plays the scenario. sp.59View image Plays the image. sp.61Play Movie Plays the movie. sp.61Sub MenuOpen Folder Opens a folder and displays the files within the folder. Select "Return" in the screen that opened and press the [Enter] button to return to the previous screen.PlaySlideshowPlays the image or movie files in the folder in order. sp.62Options Displays the options setting screen. Set whether to start in Guide Mode or Quick Mode when PC Free starts, and set the slide show operation for playing files and movie files in order. sp.64](https://usermanual.wiki/Seiko-Epson/WN6501C.Epson-Projector-Manual-1/User-Guide-679885-Page-57.png)
![PC Free Basic Operations 58APlay images or scenarios in JPEG format, or perform a slide show.To play JPEG format images s"Projecting Images and Movies" p.61To play scenarios s"Playing a Scenario" p.59To play slide shows s"Projecting all Image and Movie Files in a Folder in Sequence (Slide show)" p.62BWhile projecting a JPEG image, tilt the [h] button on the remote control to the left or right.The image rotates when the [h] button is tilted in a certain direction as shown below.ProcedureRight Left RightLeftRightLeftRightLeft](https://usermanual.wiki/Seiko-Epson/WN6501C.Epson-Projector-Manual-1/User-Guide-679885-Page-58.png)
![59Projecting ScenariosThis section describes the method for playing scenarios stored in a USB storage device and the operations during scenario playback.Preparing a ScenarioCreate the scenario beforehand by using EMP SlideMaker2, and then transfer to a USB storage device by using "Send Scenario". sp.80Playing a ScenarioAStart PC Free. sp.53The contents of the USB storage device are displayed.BTilt the [h] button on the remote control up to position the cursor on the target scenario folder.CPress the [Enter] button on the remote control.In Quick Mode, the file starts to play back.In Guide Mode, the sub menu is displayed and you can tilt the [h]button on the remote control to move the cursor to "Play Scenario", and then press the [Enter] button. The scenario starts to play back.DIf "Advance" is set to "Automatically after", once play has reached the end, control returns to the file list screen. If "Repeat" is selected, the scenario is repeated from the beginning. See "Operating During a Presentation" for how to operate the scenario when "Advance" is set to "On mouse click", and how to stop and cancel.qWhile transferring the scenario you can set autorun and continuous play. sp.80Procedureq• You can rotate JPEG format images in the scenario while they are being projected. sp.57• The movie files that are included in scenarios can be fast-forwarded, rewound and paused during playback. sp.62• The slide changing time for scenarios can be set using the "Advance" command in EMP SlideMaker2. sp.64Scenario file](https://usermanual.wiki/Seiko-Epson/WN6501C.Epson-Projector-Manual-1/User-Guide-679885-Page-59.png)
![Projecting Scenarios 60Operating During a PresentationThe following operations using the remote control are possible while playing a scenario.The following functions of the projector can be used when projecting a scenario or image file with PC Free.• Freeze • A/V Mute • E-ZoomFor details concerning the various functions s"Freeze Function", "A/V Mute Function", and "E-Zoom Function" in the User’s GuideScreenSwitchingProceed to the next screen by pressing [Enter] or []].Return to the previous screen by pressing [[].StoppingPlayingThe message "Do you want to quit playing the scenario?" is displayed when you press the "Esc" button. Close by selecting the "Exit" button and pressing the "Enter" button. Continue play by selecting the "Return" button and pressing the "Enter" button.](https://usermanual.wiki/Seiko-Epson/WN6501C.Epson-Projector-Manual-1/User-Guide-679885-Page-60.png)
![61Projecting Image and Movie FilesImage files from a digital camera and image files and movie files that are stored on a USB storage device can be projected using PC Free by either of the following two methods.• Projecting image and movie filesThis is a function to project single files.• Sequential projection of image and movie files in a folder (slide show).This is a function for projecting the file contents of a folder in order, one file at a time.Projecting Images and MoviesAStart PC Free. sp.53The content of the connected digital camera or USB storage device is displayed.BTilt the [h] button on the remote control to move the cursor to the image file or movie file to be projected.CPress the [Enter] button on the remote control.In Quick Mode, the image or movie starts to play back.In Guide Mode, the sub menu is displayed and you can select "View Image" or "Play Movie", and then press the [Enter] button. The image or movie starts to play back.DIf the [Enter] button or the [Esc] button on the remote control are pressed while projecting an image or movie, it returns to the file list screen.AttentionThe USB storage device is accessed frequently when playing back movie files. Do not disconnect the USB storage device at this time, PC Free may not operate correctly.ProcedureImage file](https://usermanual.wiki/Seiko-Epson/WN6501C.Epson-Projector-Manual-1/User-Guide-679885-Page-61.png)
![Projecting Image and Movie Files 62Projecting all Image and Movie Files in a Folder in Sequence (Slide show)You can project the image and movie files in a folder in order, one at a time. This function is called "Slide show". Execute the slide show by the following procedure.AStart PC Free. sp.53The content of the connected digital camera or USB storage device is displayed.BTilt the [h] button on the remote control to position the cursor on the folder to perform the slide show.For Quick Mode(1) The folder opens.(2) Select Slide show at the bottom right and press the [Enter] buttonFor Guide Mode(1) The sub menu is displayed.(2) Select "Play Slide Show" and press the [Enter] button.q• JPEG format images can be rotated during projection. sp.57• You can make the following operations using the remote control while playing movie files. However, you cannot fast-forward and rewind MPEG1 movie images.Fast-forward: Tilt the [h] button to the rightRewind: Tilt the [h] button to the leftFreeze (Pause): Tilt the [h] button downThree fast-forward/rewind speeds are available, and the speed changes each time the button is pressed.To return to normal play back, press the [Enter] button. Audio is not output while fast-forwarding, rewinding, or pausing is in progress.qYou can set the files to be projected repeatedly, and also set display conditions such as what effects to display while files are being switched. To change the movie files and image files automatically when you run Slide show, set the screen switching time in the PC Free option menu to anything other than "No". Default setting: "No" sp.64Procedure](https://usermanual.wiki/Seiko-Epson/WN6501C.Epson-Projector-Manual-1/User-Guide-679885-Page-62.png)
![Projecting Image and Movie Files 63CThe slideshow will be run and the image and movie files in the folder will be projected in sequence one by one.When the last file is projected, the file list will be displayed again automatically. If you set "Repeat Play back" to "ON" in the Options window, projection will start from the beginning again when the endis reached. sp.64Just as with a scenario, you can proceed to the next screen, return to the previous screen, or stop play back during projection of a slide show. s"Operating During a Presentation" p.60qIf the screen switching time setting has been set to "No", the files will not change automatically when you run a slideshow. Press the [Enter] or []] button on the remote control to continue to the next file.](https://usermanual.wiki/Seiko-Epson/WN6501C.Epson-Projector-Manual-1/User-Guide-679885-Page-63.png)
![64Setting Image and Movie File Display Conditions and Operation ModeYou can set the display conditions and operation mode for when playing back image or movie files as a slideshow in PC Free.ATilt the [h] button on the remote control to position the cursor on the folder where display conditions are to be set.For Quick Mode(1) The folder opens.(2) Select "Option Settings" at the bottom left and press the [Enter] buttonFor Guide Mode(1) The sub menu is displayed.(2) Select "Options" and press the [Enter] button.BSet each of the items.Enable settings by positioning the cursor on the desired item and pressing the [Enter] button on the remote control.Details of the items are given below.CTilt the [h] button on the remote control up to position the cursor on the "OK" button, and then press the [Enter] button.The settings are applied.If you do not want to apply the settings, position the cursor on the "Cancel" button and press the [Enter] button.ProcedureMode switching You can change the operation mode for PC Free to "Guide Mode" or "Quick Mode".The initial setting is "Guide Mode".s"Guide Mode and Quick Mode" p.55Display order You can set the order of the files to be displayed.Continuous PlayYou can determine whether to repeat the slideshow.Screenswitching timeYou can set the time for a single file to be displayed when running a slide show. Once the time set here has passed, the next file is displayed automatically. If set to "No", the files do not change automatically when you run a slide show. When set to "No", press the [Enter] or []] button on the remote control to continue to the next file.Effect This sets the transition effects between files.](https://usermanual.wiki/Seiko-Epson/WN6501C.Epson-Projector-Manual-1/User-Guide-679885-Page-64.png)
![Creating a Scenario 75FCheck the message and click the "Continue" button.GCheck the message and click the "Start" button.The conversion to a scenario starts and the slide show plays automatically.If the [Esc] key on the keyboard is pressed during the slide show, the slide show is canceled. In that case, the scenario closes before it can be created.HWhen the slide show ends, click the screen.The scenario transfer destination dialog box is displayed.ISelect the drive and the folder where the USB storage is connected and click the "OK" button.Go to procedure three from "Sending Scenarios" sp.80.fIncluding all slides in a PowerPoint fileUse the following procedure to include all slides in a PowerPoint file into a scenario. When this method is used to include the slides, any animations that have been set using PowerPoint will be retained after the slides have been imported into the scenario.qWhen creating a scenario with only one PowerPoint file, you can do that easily by a drag and drop operation. sp.69](https://usermanual.wiki/Seiko-Epson/WN6501C.Epson-Projector-Manual-1/User-Guide-679885-Page-75.png)
![Creating a Scenario 76ADouble-click the required PowerPoint file icon in the file window.BCheck the message and click the "OK" button.The slideshow will run automatically.If you press the [Esc] key on the computer’s keyboard while the slideshow is running, the slideshow will be paused. If you do this, only the section of the slideshow that has been played back will be imported into the scenario.COnce the slideshow is finished, click the window.All slides in the file will be imported into the scenario and displayed in the scenario window.ProcedureFolder windowScenario windowFile windowThumbnail windowqIt takes longer to import a large PowerPoint file into a scenario.](https://usermanual.wiki/Seiko-Epson/WN6501C.Epson-Projector-Manual-1/User-Guide-679885-Page-76.png)
![Creating a Scenario 78BClick the file icon in the file window.The contents of the image file are displayed in the thumbnail window.In the case of a movie file, an icon will be displayed in the thumbnail window.CDouble-click the required file icon in the file window.The selected file will be displayed in the scenario window and it will be included into the scenario.DTo add more files, drag and drop them into the scenario window.ETo add more than one file, hold down the [Ctrl] key on the keyboard while selecting the files to be added. Once all the files to be added have been selected, drag one of the selected files into the scenario window and drop it at the place where it is to be added.All of the selected files will then be added to the scenario.Editing a ScenarioWhen projecting using the projector’s PC Free, the contents that are displayed in the scenario window above are projected in order.You can add and delete slides and files from a scenario and change their order.fAdding files and slidesDrag files that are displayed in the file window or PowerPoint slides that are displayed in the thumbnail window into the scenario window and drop them in the place where they are to be added.You can drag and drop the desired files or slides to add them to the scenario window.qTo unselect all of the selected files, click the white area outside the icon.Procedure](https://usermanual.wiki/Seiko-Epson/WN6501C.Epson-Projector-Manual-1/User-Guide-679885-Page-78.png)
![Cases Like These 84Setting the Slide AnimationWith EMP SlideMaker2, you can set effects similar to the animation effects of PowerPoint for each cell in the scenario.You can project the slides that retain the animation set in PowerPoint by setting projection time for each divided scene or setting animation.To do that, right-click in the target animation in the animation check window and click "Cell Properties".ARight-click in the target cell or the animation,and select "Cell Properties".When making the same settings for multiple cells or animations, select multiple cells by holding down the [Shift] key or the [Ctrl] key on the keyboard, right-click and then select "Cell Properties".qFiles included in a scenario with animation set in advance in PowerPoint, playback smoothly when the scenario is played back. To set animations in PowerPoint slides, we recommend you set them in the PowerPoint file itself. If you want to make animation settings for image files, or if you want to add animation settings to slides that lost their animation settings when they were included in the scenario, add the settings using the following method.ProcedureCellAnimation](https://usermanual.wiki/Seiko-Epson/WN6501C.Epson-Projector-Manual-1/User-Guide-679885-Page-84.png)
![Cases Like These 85BThe properties screen is displayed. Set each of the items by referring to the following table, and then click the "OK" button.Advance When "Automatically after" is selected, you can set the switching time from 0 to 1800 seconds. When "On mouse click" is selected, switch slides by pressing the []] or [[] buttons on the remote control during projection.Animation EffectsYou can specify the effects to use during screen transition.Select the "Direction" depending on the animation selected.The following are examples of the effects.Fly: The image changes from the direction specified.Box In: The image changes from the inside.](https://usermanual.wiki/Seiko-Epson/WN6501C.Epson-Projector-Manual-1/User-Guide-679885-Page-85.png)

![Troubleshooting 88fSuddenly changes to the EasyMP screenERR at the bottom left of the screen: Check the numbers and make the following remedies.fCannot connect to other computers when projecting in Network PresentationERR Number Error Meaning Remedy2,50,53,245,-103 Failed to startup EasyMP. Turn the power for the projector off and then back on again.51,52,100 Failed to process EasyMP. When using EMP NS Connection, reconnect EMP NSConnection.When using a USB display, reconnect the USB cable.-101 Communication was cut off from the access point. Check the access point operation.-102,-105 Wireless communication is unstable. Check the situation of network traffic, and reconnect EMP NS Connection after waiting for a while.Check RemedyDid the presenter leave the conference room without cutting off the network connection?In Network Presentation, the connection with the computer that was previously connected can be cut off when another computer tries to connect with the projector, and it connects with the computer that is trying to connect.Therefore, when a projector keyword is not set for the projector, or if you know the projector keyword, you can cut off the current connection and, if you perform a connection operation, you can connect to the projector.When a projector keyword is set for the projector, if you do not know the projector keyword, cut off projection from the projector and reconnect. To cut off connection from the projector, press the [Esc] button on the remote control, select "Close" from the close menu and press the [Enter] button on the remote control When it cuts off, you can connect from the target computer.s"Disconnecting the Network Connection"](https://usermanual.wiki/Seiko-Epson/WN6501C.Epson-Projector-Manual-1/User-Guide-679885-Page-88.png)


![99Software Copyright:This product uses free software as well as software to which this company holds the rights.The following is information on the free software used by this product.1. GPL and LGPL(1) This company uses free software for this product under the terms of the GNU General Public License Version 2, June 1991 (henceforth "GPL") or later versions, as well as the GNU LESSER General Public License Version 2, June 1991 (henceforth "LGPL") or later versions.You can see the full text of the GPL and the LGPL on the following Web sites.[GPL]http://www.gnu.org/licenses/gpl.html[LGPL]http://www.gnu.org/licenses/lgpl.htmlThis company, under the terms of the GPL and LGPL, discloses the source code for the free software used in this product based on the GPL and LGPL.Contact the support personnel as provided in the World-Wide Warranty Terms to reproduce, modify, and/or distribute the free software concerned.Please follow the conditions of the GPL and the LGPL when reproducing, modifying, and/or distributing the free software concerned.Also, the free software concerned is offered "as is" with no guarantee or warranty what so ever. The term guarantee includes, but is not limited to, appropriate commercialization, business potential, purpose of use, and does not infringe on third person rights (including, but not limited to, patent rights, copyrights, and trade secrets).(2) As shown in the above mentioned (1), under the terms of the GPL and LGPL, there is no guarantee for the free software included in this product; any problems in this product (including problems that originate with the free software concerned) do not influence the conditions of the guarantee (written guarantee) issued by this company.(3) The free software included in this product under the terms of the GPL and LGPL as well as the author are disclosed in the source code indicated in (1).2. Other free softwareAs well as the free software used under the terms of the GPL and LGPL, this company also uses the following free software for this product.Hereafter, each author, the conditions, and so on are described in the original. Furthermore, there is no guarantee for free software because of the characteristics of the free software that has already used in this product; any problems in this product (including problems that originate with the free software concerned) do not influence the conditions of the guarantee (written guarantee) issued by this company.(1) libjpegCopyright © 1991-1998 Thomas G. Lane.This software is based in part on the work of the Independent JPEG Group.(2) libpngCopyright © 1998-2004 Glenn Randers-PehrsonCopyright © 1996-1997 Andreas DilgerCopyright © 1995-1996 Guy Eric Schalnat, Group 42, Inc.(3) TremorCopyright © 2002, Xiph.org FoundationRedistribution and use in source and binary forms, with or without modification, are permitted provided that the following conditions are met:](https://usermanual.wiki/Seiko-Epson/WN6501C.Epson-Projector-Manual-1/User-Guide-679885-Page-99.png)