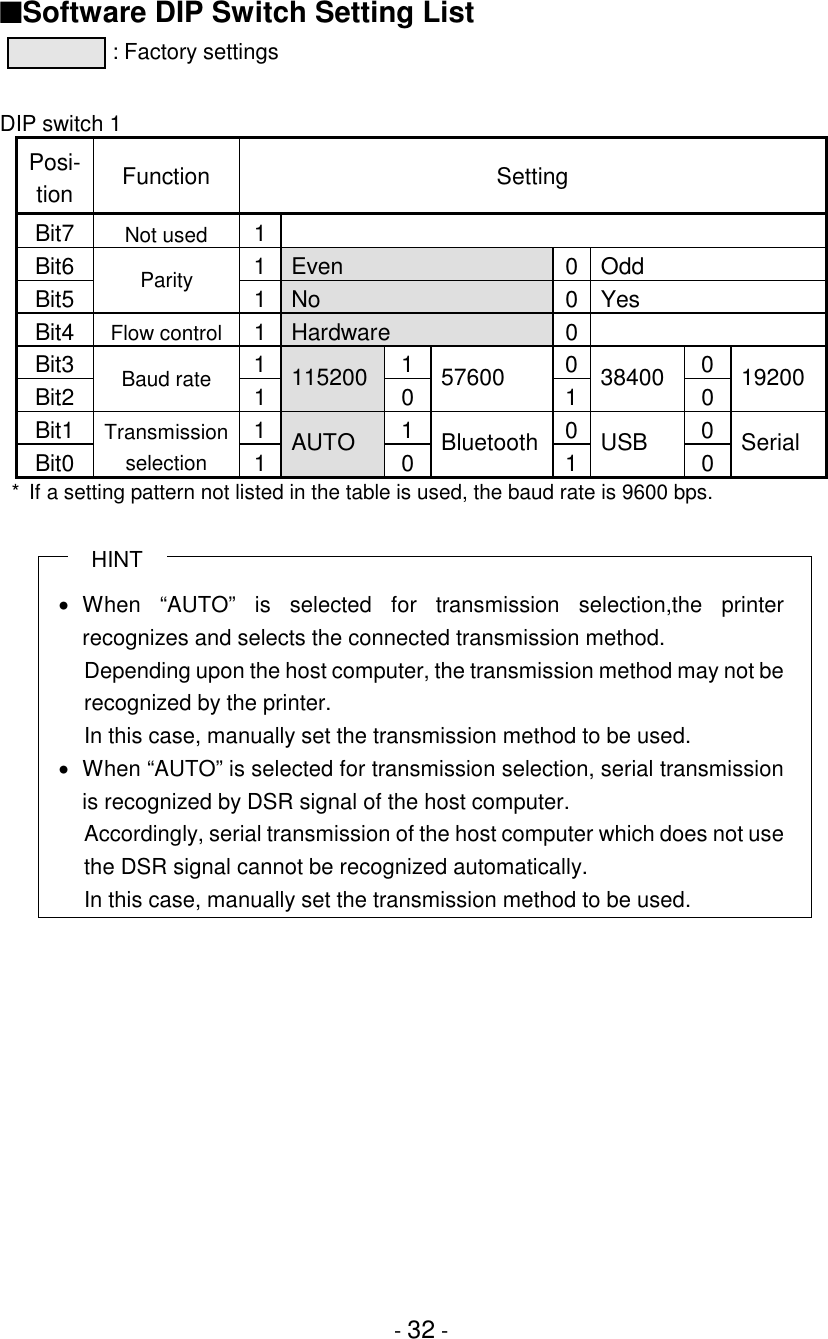
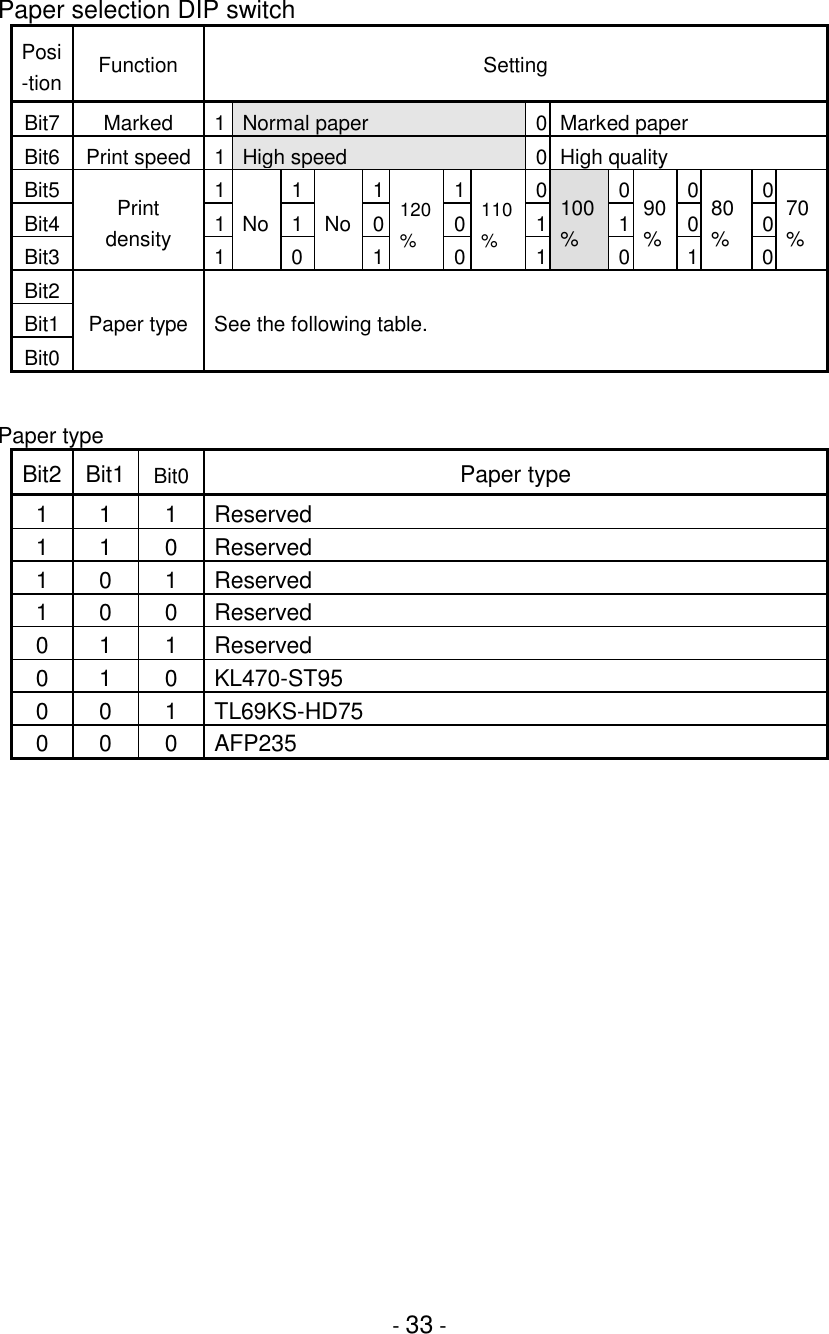
Seiko Instruments AB000001 Thermal Printer w/ Bluetooth User Manual Preliminary Users Manual Draft
Seiko Instruments Inc Thermal Printer w/ Bluetooth Preliminary Users Manual Draft
Contents
- 1. Preliminary Users Manual Draft
- 2. Users Manual
Preliminary Users Manual Draft


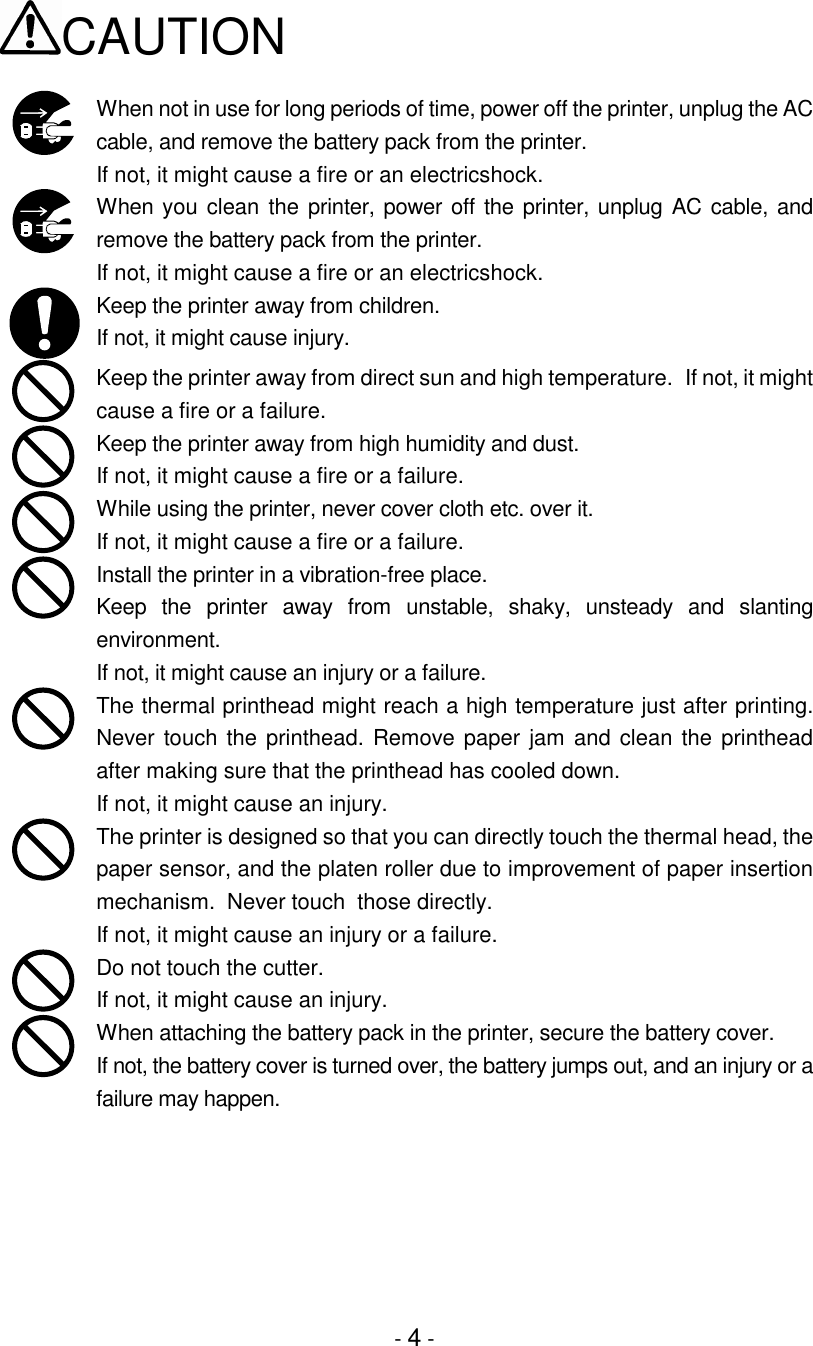
![- 5 -When AC adapter is usedWARNINGIf you find any of the following abnormalities in the AC adapter, unplug theAC cable.♦ When the AC adapter differs from usual [ smoke has come out from theAC adapter / strange smell comes out from the AC adapter / the ACadapter is unusually hot]♦ When the printer case was broken.It becomes the cause of a fire and an electricshock. Request repair from aselling agency.Do not disassemble or remodel the AC adapter. It becomes the cause of afire, an accident, and failure.Do not use other AC code than the our specified one.It becomes the cause of a fire, an accident, and failure.Do not use AC adapter on any voltage other than the specified powersupply voltage.It becomes the cause of a fire, an accident, and failure.Do not touch the metal part of AC adapter or the connector, to avoidshort-circuit absolutely.It becomes the cause of a fire, an accident, and failure.Do not place the AC adapter at the place which possibly moisten or waterit.It becomes the cause of a fire, an accident, and failure.](https://usermanual.wiki/Seiko-Instruments/AB000001.Preliminary-Users-Manual-Draft/User-Guide-329412-Page-8.png)
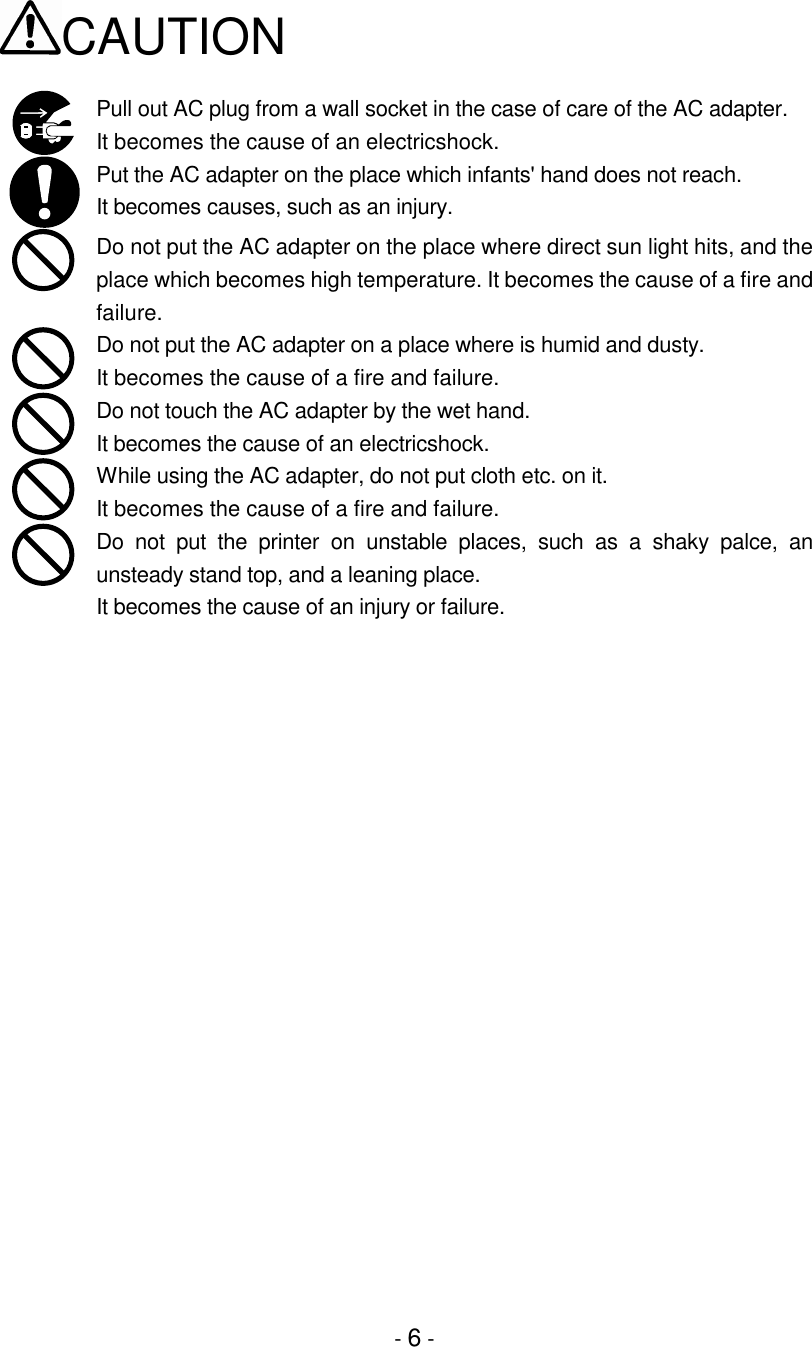
![- 9 -When the charger is usedWARNINGPull out AC plug of AC cable from a wall socket, when the charger is in thestatus as follows.• When there is a strange smell, or the battery pack is unusually hot• When the case breaks• When liquid has leakedIt becomes the cause of a fire and an electricshock. Request repair from aselling agency.When the battery pack differs from usual [smoke has come from thebattery pack under charge / there is strange smell / the battery pack isunusually hot], pull out AC plug of the AC cable from a wall socket.There is fear of liquid leakage, generation of heat, a burst, and ignition, andit becomes the cause of a fire and an injury.Put neither water nor a foreign substance into the inside of the charger.It becomes the cause of a fire and an electricshock.Do not disassemble or remodel the charger by any means. It becomes thecause of a fire and an electricshock.Do not connect other battery pack than our specified one with the charger.There is fear of a burst, ignition, and generation of heat, and it becomes thecause of a fire and an injury.Do not use other AC code than our specified one with the charger.It generates heat and ignites and becomes the cause of a fire or theaccident.Do not use a charger on any voltage other than the specified power supplyvoltage.It becomes the cause of a fire, an electricshock, or failure.Do not touch the output terminals of the charger to avoid short-circuitabsolutely.It becomes the cause of a fire, an electricshock, or failure.Do not wet the charger, or do not put it on the place which possibly wet.Itbecomes the cause of a fire, an electricshock, or failure.](https://usermanual.wiki/Seiko-Instruments/AB000001.Preliminary-Users-Manual-Draft/User-Guide-329412-Page-12.png)


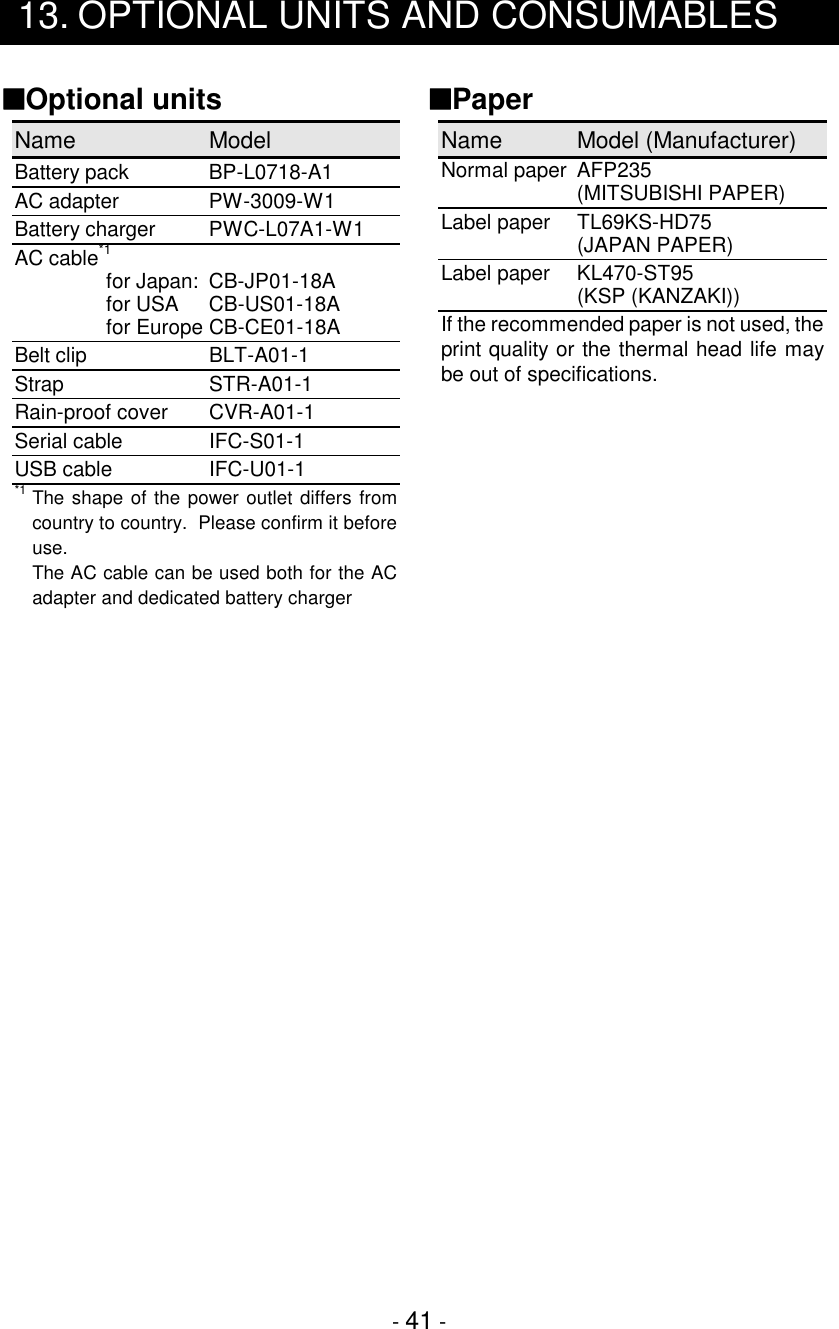
![- 17 -(7) Battery rubber coverMounts and secures the battery pack.Open the rubber cover to detach andattach the battery pack.(8) Battery release buttonRemoves the battery pack from theprinter.(9) Paper cover open leverOpens the paper cover to install the paper.(10) Paper outletPaper port equipped with a paper cutter. (11) Pincher unitInstalls paper. Paper with various widthcan be installed.(12) Paper guideChanges the right and left paper guidewidth depending on the paper widths.Changes the paper roll adapter for variouspaper roll diameters.(13) Paper guide lock leverChanges or locks the position of the leftand right paper guides.(14) Thermal headPrints characters on the paper. It reachesa high temperature just after printing.(15) Paper sensorDetects “no paper “and “eye-mark.”[POWER Lamp Display]The POWER LAMP display comes in three colors - - -green, red, and yellow.Lamp display POWER lampPower OFF OffPower ON (print ready) Green OnStandby status Dark Green OnCharging Yellow OnPower voltage failure Red OnNo paper, platen cover open Green blinksBattery voltage low Yellow blinksError Red blinks](https://usermanual.wiki/Seiko-Instruments/AB000001.Preliminary-Users-Manual-Draft/User-Guide-329412-Page-20.png)


![- 25 -6. TEST PRINTINGAfter loading the printer with paper, proceed to test printing. During test printing, theprinter function setting data and character strings for testing are printed.(1)Make sure that the paper is loaded and the printer is off. If the paper is not loaded,load the paper as instructed in Section 4, Paper Setup, and turn the printer off.(2)Press the POWER and FEED buttons simultaneously. When the POWER lamplights, release the POWER button, then the FEED button.(3)Several dozens of lines are printed as follows:"Mobile Label Printer""MPU-L465 [Ver.*.**]"" **.***.****""Copyright (C) : SII""**************************"...(4)After test printing is completed, the printer goes into the STANDBY mode.](https://usermanual.wiki/Seiko-Instruments/AB000001.Preliminary-Users-Manual-Draft/User-Guide-329412-Page-28.png)
![- 27 -(4)If the message shown below is printed, press the FEED button.[SETTING MODE]Yes: FEED/No: REPRINTHINT• If you press the REPRINT button, the printer leaves the function settingmode and turns off.• If you do not press any button within 30 seconds after the message isprinted, the printer turns off.The printer is now in the function setting mode. You can set functions by pressingbuttons.](https://usermanual.wiki/Seiko-Instruments/AB000001.Preliminary-Users-Manual-Draft/User-Guide-329412-Page-30.png)
![- 29 -Operation 1: Transmission selectionWhen the FEED button is pressed in the status where the following message isprinted, the printer moves to the transmissions selection mode. WhenREPRINT button is pressed, the printer moves to the paper selection modewithout changing the setting.DIP Switch setting mode.I/F=******** Change Setting?Yes: FEED/No: REPRINT(1) Input bit7 (MSB) through bit0 (LSB) in sequential order in the status where thefollowing message is printed.Input 8 bits.1: FEED/0: REPRINTWhen input [1] : Press FEED button.When input [0] : Press REPRINT button.For example, when setting “10101110,” continuously press the FEED,REPRINT, FEED, REPRINT, FED, FEED, FEED, and REPRINT buttons inorder.(2) When the FEED or REPRINT button is pressed eight times (for 8 bits), theprinter outputs the following message.I/F=******** Save Setting?Yes: FEED/No: REPRINTWhen the FEED button is pressed, the printer outputs the following messageand the setting is saved.I/F Setting=******** Saved.When the REPRINT button is pressed instead of the FEED button, the printeroutputs the following message and the setting is not changed.I/F Setting Not Changed.HINT• "********" shows a DIP switch setting. The left side digit shows the MSB(bit7) and the right side digit shows the LSB (bit0).](https://usermanual.wiki/Seiko-Instruments/AB000001.Preliminary-Users-Manual-Draft/User-Guide-329412-Page-32.png)
![- 30 -Operation 2: Paper selectionWhen the FEED button is pressed in the startus where the following messageis printed, the printer moves to the paper selection mode. When the REPRINTbutton is pressed, the printer moves to the function selection mode withoutchanging the setting.DIP Switch setting mode.Paper=******** Change Setting?Yes: FEED/No: REPRINT(1) Input bit7 (MSB) through bit0 (LSB) in order in the status where the followingmessage is printed.Input 8 bits.1: FEED/0: REPRINTWhen input [1] : Press FEED button.When input [0] : Press REPRINT button.For example, when setting “10101110,” continuously press the FEED,REPRINT, FEED, REPRINT, FED, FEED, FEED, and REPRINT in order.(2) When the FEED or REPRINT button is pressed eight times (for 8 bits), theprinter outputs the following message.Paper=******** Save Setting?Yes: FEED/No: REPRINTWhen FEED button is pressed, the printer outputs the following message andthe setting is saved.Paper Setting=******** Saved.When the REPRINT button is pressed instead of FEED button, the printeroutputs the following message and the setting is not changed.Paper Setting Not Changed.HINT• "********" shows a DIP switch setting. The left side digit shows the MSB(bit7) and the right side digit shows the LSB (bit0).](https://usermanual.wiki/Seiko-Instruments/AB000001.Preliminary-Users-Manual-Draft/User-Guide-329412-Page-33.png)