Senao Co IS20V222 Pronto Hotspot Controller User Manual user s manual add FCC statement
Senao International Co Ltd Pronto Hotspot Controller user s manual add FCC statement
Senao Co >
User Manual
1
1. About this Document
This documents describes step-by-step procedure to be followed to install
the Hotspot Controller at your location as quickly as possible and enjoy
the wireless access to Internet and/or to your local network.
2. WISP Information Sheet
This attached document is an information sheet regarding your controller.
The most important thing to note is the Wisp Admin login and password
that is unique to your WISP. These login credentials will allow you to
now access the Pronto OSS/BSS interface. To login to the OSS/BSS
interface, you will need to do the following:
Step1: Open a browser and navigate to https://oss.prontonetworks.com
Step2: In the field labeled “Select an Environment,” select in the pull-
down menu “Standalone”
Step3: In the field labeled “WISP ID,” enter your WISP ID Number
located on the information sheet.
Step4: In the field labeled “Login ID,” enter your login ID located on the
information sheet. This login ID will be case sensitive.
Step5: In the field labeled “Password,” enter your password located on
the information sheet. This password will be case sensitive.
The WISP Information Sheet additionally includes information such as
your WISP name, WISP ID number, location name, franchise name,
controller MAC ID, Guest Accounts, SSID, walled garden sites, and
configurations for the WAN and LAN ports. This information is specific
for that controller and these configurations can be modified within the
2
OSS/BSS interface. If you have any questions or concerns about
reconfiguring the controller, please contact your Account Manager or you
can access and download an OSS/BSS guide along with several step-by-
step documents via the Wisp Information Website located at
http://wispinfo.prontonetworks.com/. Please contact your account manager
to request credentials to access this website.
3. Installation Procedure for Hotspot Controller
Follow these easy steps to install the Hotspot Controller.
Step1: Unpack the Hotspot Controller from the box and look at the
backside of the controller to know Power Socket, WAN port,
and LAN port.
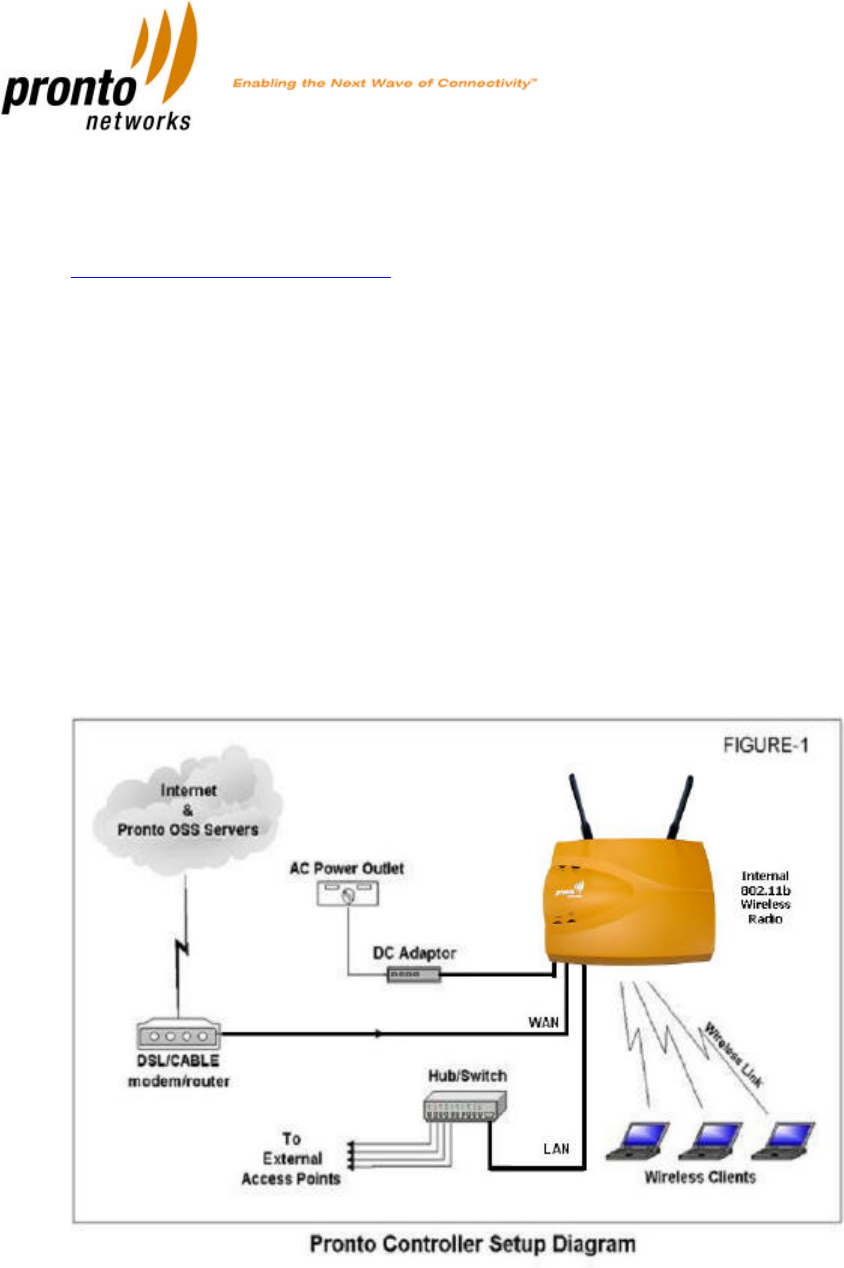
Step2: Connect the WAN port of the Hotspot Controller to your
DSL/Cable modem/router with a RJ-45 type CAT-5 Ethernet
cable as shown in the diagram (figure-1) below:

3
Step3: Plug one end of the DC Adaptor into the slot provided at the
rear of the Hotspot Controller and other end into an electrical
outlet.
Step 4: Turn ON the Power of your electrical outlet.
The Hotspot Controller will obtain the required configuration and start
initialize by itself. This process will take approximately 3-5 minutes.
4. Understanding the Booting process
This section explains that how the Hotspot Controller is booting up when
the Power is turned ON.
• First, the Hotspot Controller gets the Internet access on its WAN
port either via your DSL, Cable or Local area network (LAN).
• Then, it contact Hotspot OSS/BSS backend system located at the
Internet and download all other configurations specified for this
particular Hotspot Controller.
• Based on the downloaded configurations, it initializes all its
functionalities and transmits the wireless radio signal for wireless
clients.
It is important to note that once your Hotspot controller connected to
your DSL/CABLE modem (sometime a router device), then the IP address
to WAN port of Hotspot Controller can be assigned by your Internet
Service Provider (ISP) either by one of the following three methods:
DHCP Server located at your ISP:
This server automatically provides IP Address to WAN port every time
when Hotspot Controller power ON. This IP Address may change every
time when you restart the Hotspot Controller.
STATIC IP assigned to your location by your ISP:
This IP Address is permanent and specifically assigned to your location.
During installation of DSL/Cable at your location, the ISP handover this
IP address along with other parameters such as subnet mask, default
gateway (default router), primary DNS and secondary DNS address.
PPPoE (Point-to-Point over Ethernet) type connection:
In this case, your ISP provides PPPoE username and password to you to
receive Internet access via your DSL/Cable modem/router. For example,
username as john@sbcglobal.net and password as J12345.

4
In general, the Hotspot Controller is pre-configured as per the
information you provided in “Location_Information_Form” document
when ordering Hotspot Controller for this particular location. In that
case, the Hotspot Controller is pre-configured according to your
DSL/Cable Internet connection type such as DHCP, STATIC IP or PPPoE
and shipped to your location.
However, there might a case where the Hotspot Controller is pre-
configured for DHCP type but your DSL/Cable Internet connection type
is STATIC IP or PPPoE. Or else, the pre-configured STATIC IP/PPPoE
settings inside the Hotspot Controller are not the same (not correct) as
what your DSL/Cable Internet supporting at present. Please follow easy
instructions shown below to learn how to change the Hotspot Controller
pre-configured settings and make it work under your DSL/Cable Internet
connection type.
5. Switching to STATIC IP configuration:
Follow these steps to configure the Hotspot Controller to switch from
DHCP, PPPoE or wrong STATIC IP settings to correct STATIC IP
information.
Important Note:
• Before following the below steps, you need to reconfigure Hotspot
Controller’s existing settings in Pronto OSS server to include your
STATIC IP information. When the Hotspot Controller comes up
ONLINE, it will download this STATIC IP configuration from Pronto
OSS server and initialize automatically without any manual
configuration in future.
• If you do not have an Internet connection at this location to
reconfigure Hotspot Controller in Pronto OSS, please contact
Pronto WISP Support at 1-800-PRONTO-0. We will assist you.
Step1: Connect the WAN port of the Hotspot Controller to your
DSL/Cable modem/router with a RJ-45 Ethernet cable.
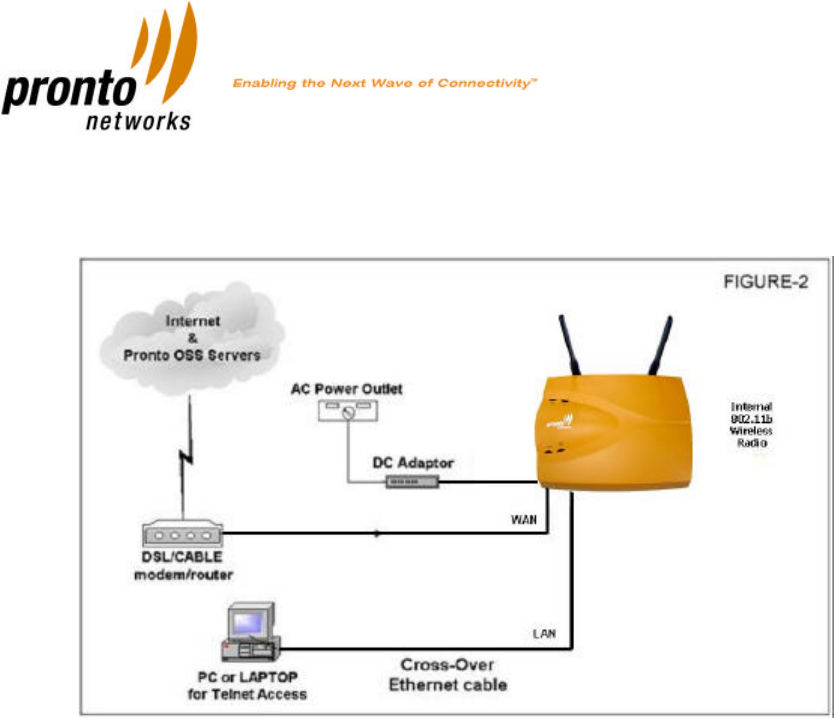
Step2: Connect your Laptop/PC directly to the LAN port of Hotspot
Controller using RJ-45 “Cross-over” Ethernet cable as shown
in the diagram (figure-2) below:
5
In case you don’t have a cross-over cable, use normal RJ-45
Ethernet cable and a hub to connect to LAN port of Hotspot
Controller as shown in the diagram (figure-3) below:
Step3: Power ON the Hotspot Controller. Check the link activity on
LAN port of Hotspot Controller to see your Laptop/PC has link.
Note: Your Laptop/PC should be configured as DHCP
client to obtain IP address from 192.168.4.0 range from
Hotspot Controller.
Step4: Verify your Laptop/PC received the IP address from the
Hotspot Controller by running the command “ipconfig” from
DOS command prompt.
Step5: Telnet to the address 192.168.4.1 by running the command
“telnet 192.168.4.1” from the DOS command prompt. Now, you
will be presented with a login prompt from PCLI (Pronto
Command Line Interface) mode.

6
Type the following commands as shown below in Bold-Black letters:
Step6: Now, the Hotspot Controller will be rebooted and come into
operational.
6. Switching to PPPoE configuration:
Follow these steps to configure the Hotspot Controller to switch from
DHCP, STATIC IP or wrong PPPoE settings to correct PPPoE information.
Important Note:
• Before following the below steps, you need to reconfigure Hotspot
Controller’s existing settings in Pronto OSS server to include your
Pronto CLI: pcli 0.1-0
% WARNING: No environment
% Factory password presets configured
Please refer to documentation for login information
User Access Verification
Password: default
PCLI> enable
Password: default
PCLI# configure terminal
config# interface eth0
config-if# ip address x.x.x.x y.y.y.y # NOTE: Replace x.x.x.x with your
STATIC IP and y.y.y.y with Subnet Mask provided by your ISP
config-if# done
config# default-router z.z.z.z # NOTE: Replace z.z.z.z with your Default
Gateway provided by your ISP
config# done
PCLI# reboot
% Do you really want to reboot the system (y/n): y

7
PPPoE information. When the Hotspot Controller comes up
ONLINE, then it will download all configurations from Pronto OSS
server and boot by itself if the Hotspot Controller in future.
• If you do not have an Internet connection at this location to
reconfigure Hotspot Controller in Pronto OSS, please contact
Pronto WISP Support at 1-800-PRONTO-0. We will assist you.
Step1: to Step4: Follow the same Steps (Step1 to Step4) mentioned above
in section 4 (Switching to STATIC IP configuration)
Step5: Telnet to the address 192.168.4.1 by running the command
“telnet 192.168.4.1” from the DOS command prompt. Now, you
will be presented with a login prompt from PCLI (Pronto
Command Line Interface) mode. Type the following commands
as shown below in Bold-Black letters:
Step6: Now, the Hotspot Controller will be rebooted and come into operation.
Pronto CLI: pcli 0.1-0
% WARNING: No environment
% Factory password presets configured
Please refer to documentation for login information
User Access Verification
Password: default
PCLI> enable
Password: default
PCLI# configure terminal
config# enable-pppoe userid passwd # NOTE: Replace the text userid
with
your PPPoE userid (for example: john@sbcglobal.net ) and text passwd with
PPPoE password provided by your ISP
config# done
PCLI# reboot
% Do you really want to reboot the system (y/n): y
The PHC will reboot on the configured IP address and come online.

8
Federal Communication Commission Interference Statement
This equipment has been tested and found to comply with the limits for a Class B digital
device, pursuant to Part 15 of the FCC Rules. These limits are designed to provide
reasonable protection against harmful interference in a residential installation. This
equipment generates, uses and can radiate radio frequency energy and, if not installed
and used in accordance with the instructions, may cause harmful interference to radio
communications. However, there is no guarantee that interference will not occur in a
particular installation. If this equipment does cause harmful interference to radio or
television reception, which can be determined by turning the equipment off and on, the
user is encouraged to try to correct the interference by one of the following measures:
- Reorient or relocate the receiving antenna.
- Increase the separation between the equipment and receiver.
- Connect the equipment into an outlet on a circuit different from that
to which the receiver is connected.
- Consult the dealer or an experienced radio/TV technician for help.
This device complies with Part 15 of the FCC Rules. Operation is subject to the following
two conditions: (1) This device may not cause harmful interference, and (2) this device
must accept any interference received, including interference that may cause undesired
operation.
FCC Caution: Any changes or modifications not expressly approved by the party
responsible for compliance could void the user's authority to operate this equipment.
IMPORTANT NOTE:
FCC Radiation Exposure Statement:
This equipment complies with FCC radiation exposure limits set forth for an
uncontrolled environment. This equipment should be installed and operated with
minimum distance 20cm between the radiator & your body.
This transmitter must not be co-located or operating in conjunction with any other
antenna or transmitter.