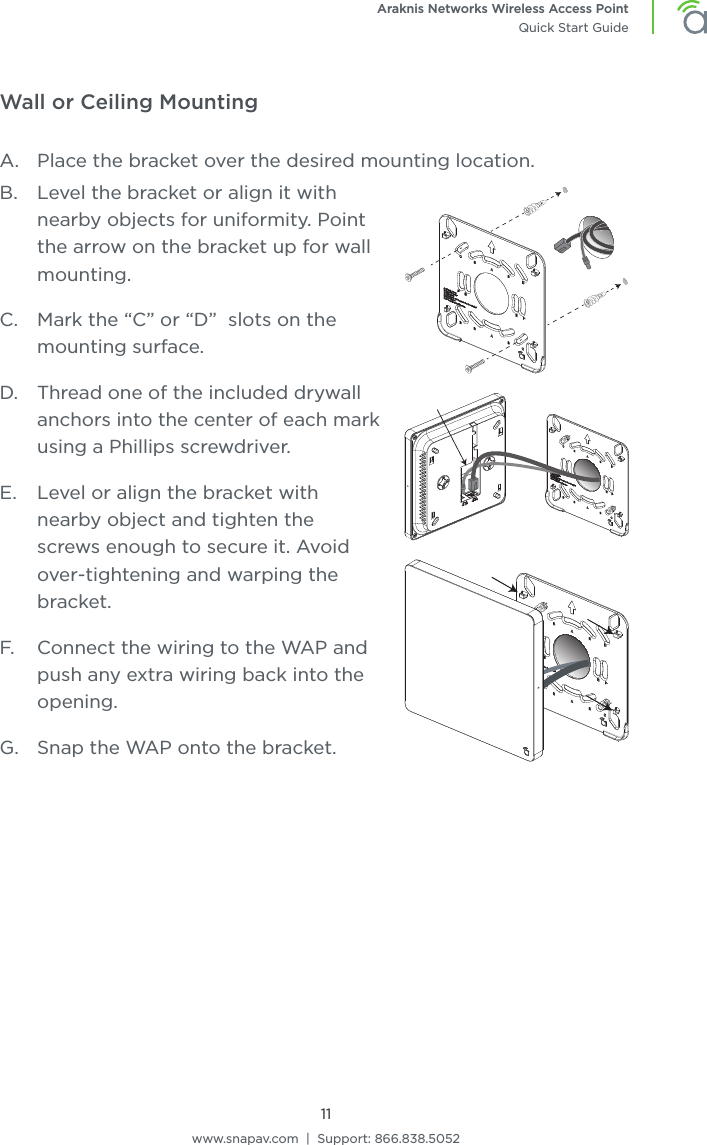
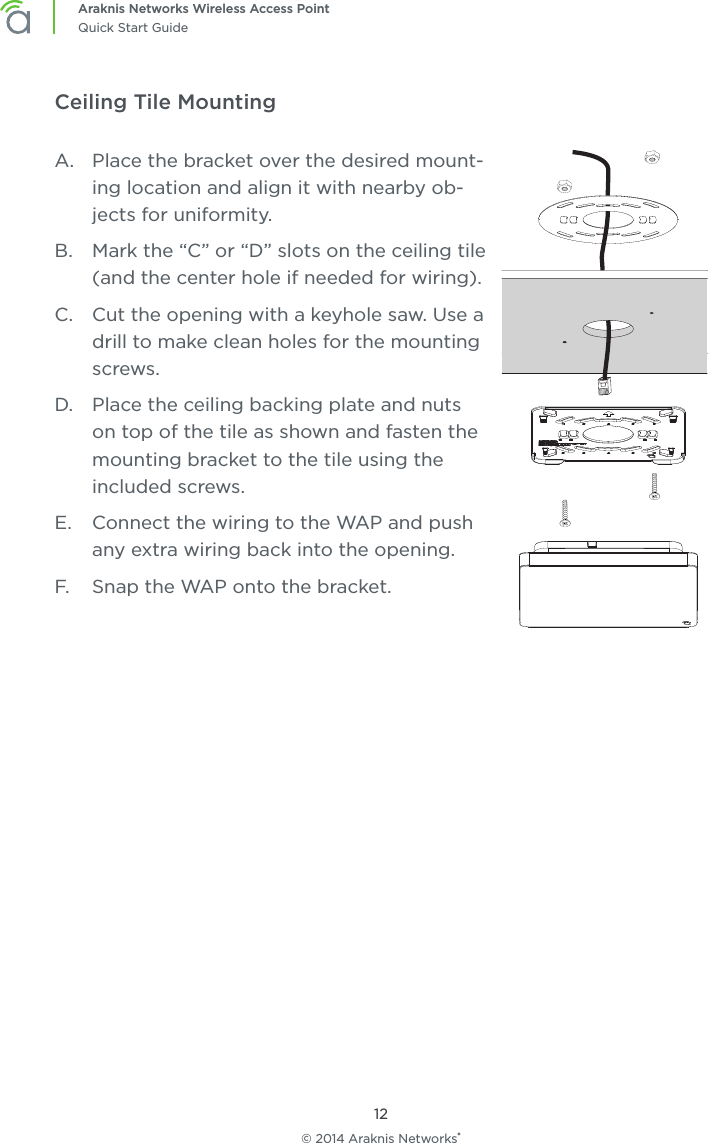
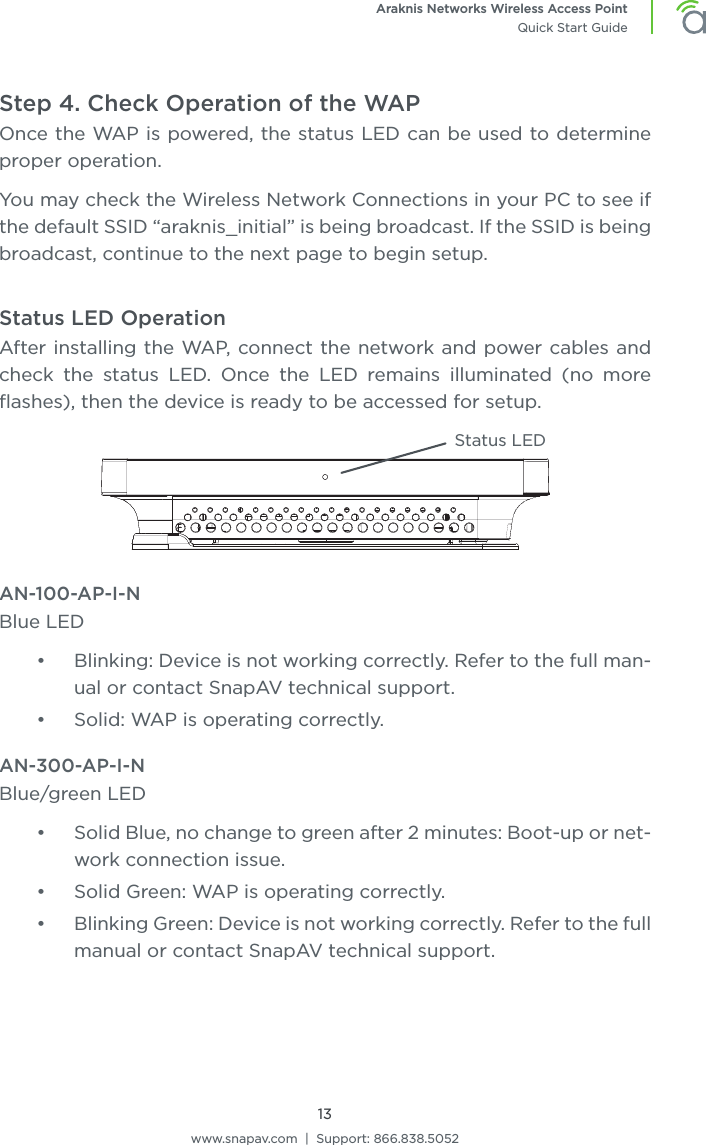
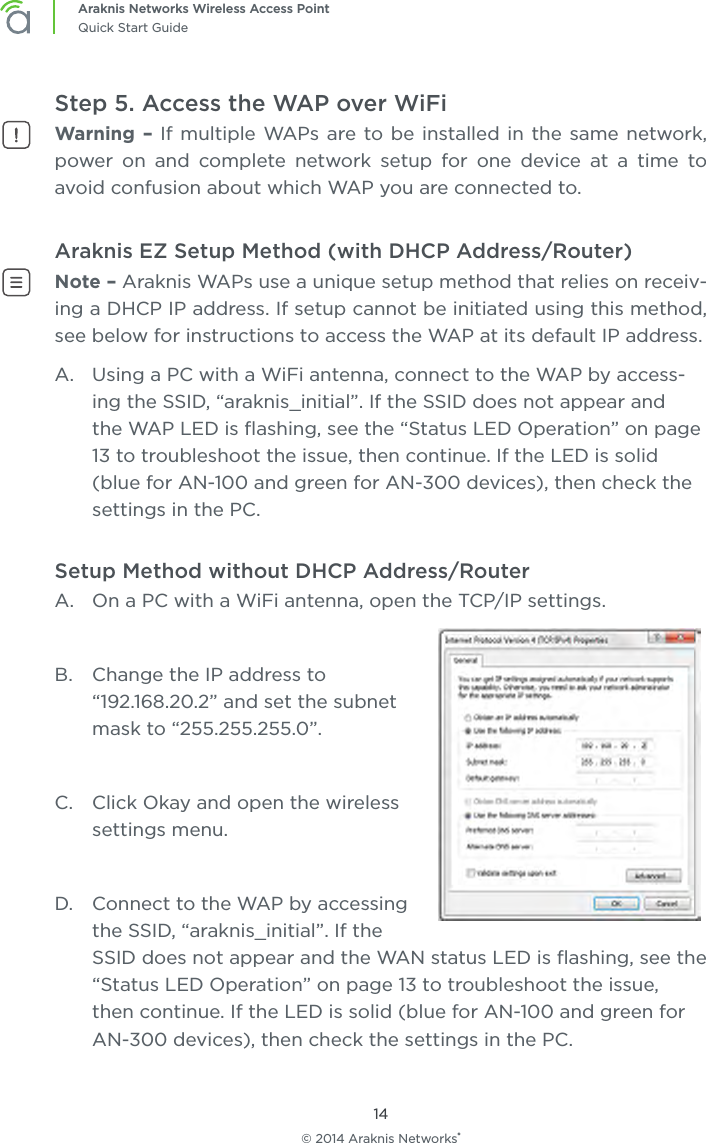
Senao Networks AN100APIN Araknis Networks 100-series Single-Band Wireless-N Indoor Access Point User Manual

Senao Networks, Inc. Araknis Networks 100-series Single-Band Wireless-N Indoor Access Point

Contents

User Manual.pdf

WIRELESS ACCESS POINTQuick Start GuideModels:AN-100-AP-I-NAN-300-AP-I-N
© 2014 Araknis Networks®2Araknis Networks Wireless Access PointQuick Start GuideFCC WarningChanges or modifications not expressly approved by the party respon-sible for compliance could void the user’s authority to operate the equipment. This device complies with Part 15 of the FCC Rules. Opera-tion is subject to the following two conditions:1. This device may not cause harmful interference, and 2. This device must accept any interference received, including interfer-ence that may cause undesired operation.NOTE: This equipment has been tested and found to comply with the limits for a Class A digital device, pursuant to part 15 of the FCC Rules. These limits are designed to provide reasonable protection against harmful interference when the equipment is operated in a commercial environment. This equipment generates, uses, and can radiate radio frequency energy and, if not installed and used in accordance with the instruction manual, may cause harmful interference to radio communi-cations. Operations of this equipment in a residential area is likely to cause harmful interference in which case the user will be required to correct the interference at his own expense.CE WarningThis is a Class A product. In a domestic environment, this product may cause radio interference, in which case the user may be required to take adequate measures.
www.snapav.com  |  Support: 866.838.50523Araknis Networks Wireless Access PointQuick Start GuideAbout this ManualThis manual was created to provide a reference for installers and end users of Araknis Networks™ products.  It provides all known information regarding the installation, setup, use, and maintenance of the product. The symbols below are used to identify important information:Pro Tip – Pro tips are included in sections of the manual to add infor-mation that provides extra value, utility, or ease-of-use for the installer or end user of the product.  Pro tips may also link to extra information that will provide a better understanding of application, technology or use of the product or feature in question. These items are not required, but have been added for your convenience.Note – Notes emphasize information important to the installation, set-up, or use of the product that is not essential to follow for safety of the equipment or user. Notes may be located before or in the midst of the section they apply to, depending on the type of information.  These items usually contain essential information, like the size or dimension of a separate part required, or a critical step in the process, that, if missed, would cause the installer or end user extra work to overcome.Caution – The caution symbol is used to indicate information vital to the safety of the equipment in use with the product, or the product it-self. Cautions are always provided before the information they relate to. Not following a caution will almost always result in permanent damage to equipment that is not covered by warranty.Warning – Warnings indicate information vital to the safety to the in-staller or end user of the product.  Warnings are always provided be-fore the information they relate to. Not following a warning may result in permanent damage to equipment and serious injury or death of the installer or end user.
© 2014 Araknis Networks®4Araknis Networks Wireless Access PointQuick Start GuideWelcome to Araknis Networks™Thank you for choosing an Araknis™ Wireless Access Point (WAP). With sleek, unobtrusive housings, extensive features, unique easy set-up, and convenient PoE power, these products are ideal for use in both residential and commercial applications.FeaturesFeature AN-100-AP-I-N AN-300-AP-I-N2.4GHz Radio Yes Yes5GHz Radio No YesConcurrent Dual-band No YesGigabit Ethernet No YesPoE Standard 802.3af 802.3af/atWiFi Standard 802.11 b/g/n 802.11 a/b/g/nOvrC Enabled Yes Yes
www.snapav.com  |  Support: 866.838.50525Araknis Networks Wireless Access PointQuick Start GuidePackage Contents*Not Pictured: Wall Mount TemplateSurface Mounting Screws (2) Drywall Anchors (2)Ceiling/Junction Box  Mounting Screws (2)Ceiling/Structured Wiring Nuts & Washers (2 ea.)AN-100/300-AP-I-N (WAP) Mounting BracketLAN CableDC Power SupplyQuick Start GuideCeiling Backing Plate
© 2014 Araknis Networks®6Araknis Networks Wireless Access PointQuick Start GuideHardware OverviewTopSideBottomAN-100-AP-I-N AN-300-AP-I-NReset ButtonStatus LEDReset ButtonStatus LEDVentilation HolesStatus LEDEthernet Cable Knockout12V DC Input (For non-PoE)Rubber Feet (4)RJ45 PoE Ethernet Jack
www.snapav.com  |  Support: 866.838.50527Araknis Networks Wireless Access PointQuick Start GuideInstallationStep 1. Select A Mounting LocationGeneral Guidelines•  Locate the WAP in a central location. Mounting height or position (ceiling/wall) will not aect performance, but higher mounting will provide better coverage.•  Avoid mounting near kitchens or rooms with large appliances that may give o EMI noise, which can reduce connection speed, and in extreme cases, block WiFi connectivity altogether.•  As a rule of thumb, each WAP can cover about a 300 ft (100m) circle (actual performance varies based on multiple variables). •  Plan multiple WAPs about 600 ft apart. Signal should overlap but only slightly.•  Use network site survey tools (not included) to determine mount-ing locations if possible. This will ensure you get the best coverage and performance from your installation.RouterKitchen Area(Weak signal due  to interference)WAPStrong SignalWeak Signal
© 2014 Araknis Networks®8Araknis Networks Wireless Access PointQuick Start GuideStep 2. Install WiringDecide how the WAP will be powered, then install the required wiring.Network Cable Requirements•  Use a Cat5e/6 straight-through cable. 568B termination is recom-mended:EIA/TIA 568B Pattern (Gold Pins Facing Up)Pin 1 White/Orange Pin 5 White/BluePin 2 Orange Pin 6 GreenPin 3 White/Green Pin 7 White/BrownPin 4 Blue Pin 8 Brown•  Maximum cable length is 328 feet (100m). A repeater device is required for longer runs.PoE RequirementsCaution – Use an 802.3af/at compliant PoE injector, switch, or router to power the WAP. Non-compliant devices can harm the WAP and lead to unpredicted results.Power Requirements for Non-PoE Applications•  AC Outlet – 100-240V AC, 50/60Hz (AN-100: 0.3A; AN-300: 0.6A)•  DC Input – 12V DC 1A (AN-100); 2A (AN-300)Wiring InstructionsWarning – Do not connect any equipment to the wiring until every-thing has been terminated and testing is complete.A.  For PoE installations, run a network cable from the PoE device to the WAP and terminate both ends to the same pattern. The DC power supply is not needed.B.  For non-PoE installations, locate an outlet for the power supply.Pro Tip – If needed, extend a 2-conductor power wire from the power supply to the WAP.
www.snapav.com  |  Support: 866.838.50529Araknis Networks Wireless Access PointQuick Start GuideWiring DiagramWeb Browser AccessMobile AppsAN-300-S W-R-161817SFPLi nk /A ct1 Gbps1 3 5 7 9 11 13 152 4 6 8 10 12 14 16RouterPoE Powered WAPPoE SwitchWAP with Power Supply
© 2014 Araknis Networks®10Araknis Networks Wireless Access PointQuick Start GuideStep 3. Mount the Access PointTable Top/ShelfThe WAP comes with rubber feet installed for placement on flat surfaces. The mounting bracket is not required for this application.Junction Box MountingThe mounting bracket is compatible with most common junction box and plaster ring dimensions, including common ceiling box sizes:•  Single/Double Gang•  4” Square Box•  3” Octagonal Box•  4” Octagonal BoxA.  Place the mounting bracket over the junction box and attach it loosely with 2 screws. (6-32 x 1” screws included)B.  Level or align the bracket with nearby object and tighten the screws enough to secure it. Avoid over-tightening and warping the bracket.C.  Connect the wiring to the WAP and push any extra wiring back into the opening.D.  Snap the WAP onto the bracket.
www.snapav.com  |  Support: 866.838.505211Araknis Networks Wireless Access PointQuick Start GuideWall or Ceiling MountingA.  Place the bracket over the desired mounting location.B.  Level the bracket or align it with nearby objects for uniformity. Point the arrow on the bracket up for wall mounting.C.  Mark the “C” or “D”  slots on the mounting surface.D.  Thread one of the included drywall anchors into the center of each mark using a Phillips screwdriver.E.  Level or align the bracket with nearby object and tighten the screws enough to secure it. Avoid over-tightening and warping the bracket.F.  Connect the wiring to the WAP and push any extra wiring back into the opening.G.  Snap the WAP onto the bracket.
© 2014 Araknis Networks®12Araknis Networks Wireless Access PointQuick Start GuideCeiling Tile MountingA.  Place the bracket over the desired mount-ing location and align it with nearby ob-jects for uniformity. B.  Mark the “C” or “D” slots on the ceiling tile (and the center hole if needed for wiring).C.  Cut the opening with a keyhole saw. Use a drill to make clean holes for the mounting screws.D.  Place the ceiling backing plate and nuts on top of the tile as shown and fasten the mounting bracket to the tile using the included screws.E.  Connect the wiring to the WAP and push any extra wiring back into the opening.F.  Snap the WAP onto the bracket.
www.snapav.com  |  Support: 866.838.505213Araknis Networks Wireless Access PointQuick Start GuideStep 4. Check Operation of the WAPOnce the WAP is powered, the status LED can be used to determine proper operation.You may check the Wireless Network Connections in your PC to see if the default SSID “araknis_initial” is being broadcast. If the SSID is being broadcast, continue to the next page to begin setup.Status LED OperationAfter installing the WAP, connect the network and power cables and check the status LED. Once the LED remains illuminated (no more flashes), then the device is ready to be accessed for setup.Status LEDAN-100-AP-I-NBlue LED•  Blinking: Device is not working correctly. Refer to the full man-ual or contact SnapAV technical support.•  Solid: WAP is operating correctly.AN-300-AP-I-NBlue/green LED•  Solid Blue, no change to green after 2 minutes: Boot-up or net-work connection issue.•  Solid Green: WAP is operating correctly.•  Blinking Green: Device is not working correctly. Refer to the full manual or contact SnapAV technical support.
© 2014 Araknis Networks®14Araknis Networks Wireless Access PointQuick Start GuideStep 5. Access the WAP over WiFiWarning – If multiple WAPs are to be installed in the same network, power on and complete network setup for one device at a time to avoid confusion about which WAP you are connected to.Araknis EZ Setup Method (with DHCP Address/Router)Note – Araknis WAPs use a unique setup method that relies on receiv-ing a DHCP IP address. If setup cannot be initiated using this method,  see below for instructions to access the WAP at its default IP address.A.  Using a PC with a WiFi antenna, connect to the WAP by access-ing the SSID, “araknis_initial”. If the SSID does not appear and the WAP LED is flashing, see the “Status LED Operation” on page 13 to troubleshoot the issue, then continue. If the LED is solid (blue for AN-100 and green for AN-300 devices), then check the settings in the PC.Setup Method without DHCP Address/RouterA.  On a PC with a WiFi antenna, open the TCP/IP settings.B.  Change the IP address to “192.168.20.2” and set the subnet mask to “255.255.255.0”.C.  Click Okay and open the wireless settings menu.D.  Connect to the WAP by accessing the SSID, “araknis_initial”. If the SSID does not appear and the WAN status LED is flashing, see the “Status LED Operation” on page 13 to troubleshoot the issue, then continue. If the LED is solid (blue for AN-100 and green for AN-300 devices), then check the settings in the PC.
www.snapav.com  |  Support: 866.838.505215Araknis Networks Wireless Access PointQuick Start GuideStep 6. Log In and Complete SetupA.  After connecting to the WAP over WiFi, open a web browser and enter the configuration address for your device:•  AN-100-AP-I-N use: http://config.an100.wap/•  AN-300-AP-I-N use: http://config.an300.wap/Note – You can also identify your WAP’s network IP address by using the DHCP table on your router (for DHCP mode), or by using IP scanner software. Free IP scanners available online.B.  Log into the device using the default login credentials:•  Username: araknis•  Password: araknisC.  Change the default SSID to the preferred SSID.Pro Tip – It is recommended to assign static IP addresses outside the DHCP range to your network devices. Document the IP information for all devices in a spreadsheet for easier future service. Pro Tip – The Device Name can be used to login to that device in the future. For example, you log in to a WAP for the first time using “http://config.an100.wap”. Then, you change the Device Name from “an100” to “bedroom”. The next time you want to access the WAP, you can type “http://config.bedroom.wap” instead of the IP address.Pro Tip – The Araknis Networks WAP comes defaulted with an open SSID called “araknis_initial”. This SSID is only for initial setup purposes. It is highly recommended to change the network name and apply bet-ter security measures for your wireless network.Note – For additional setup, see the full manual at www.SnapAV.com.
© 2014 Araknis Networks®140819-15452-Year Limited WarrantyAraknis Networks® products have a 2-Year Limited Warranty. This warranty in-cludes parts and labor repairs on all components found to be defective in ma-terial or workmanship under normal conditions of use.  This warranty shall not apply to products that have been abused, modified, or disassembled. Products to be repaired under this warranty must be returned to SnapAV or a designat-ed service center with prior notification and an assigned return authorization number (RA).Contacting Technical SupportP: (866) 838-5052E: Techsupport@araknisnetworks.com

Navigation menu