Senao Networks AP102 Wireless 802.11abgn Access Point User Manual AP102 QSG 032414
Senao Networks, Inc. Wireless 802.11abgn Access Point AP102 QSG 032414
UserManual.wiki
>
Senao Networks
>
AP102 User Manual
>
User Manual.pdf
Contents
1.
User Manual.pdf
2.
User manual rev
User Manual.pdf
Navigation menu
Upload a User Manual
Namespaces
Wiki Guide
HTML
PDF
Info
Views
User Manual
Discussion / Help
Navigation
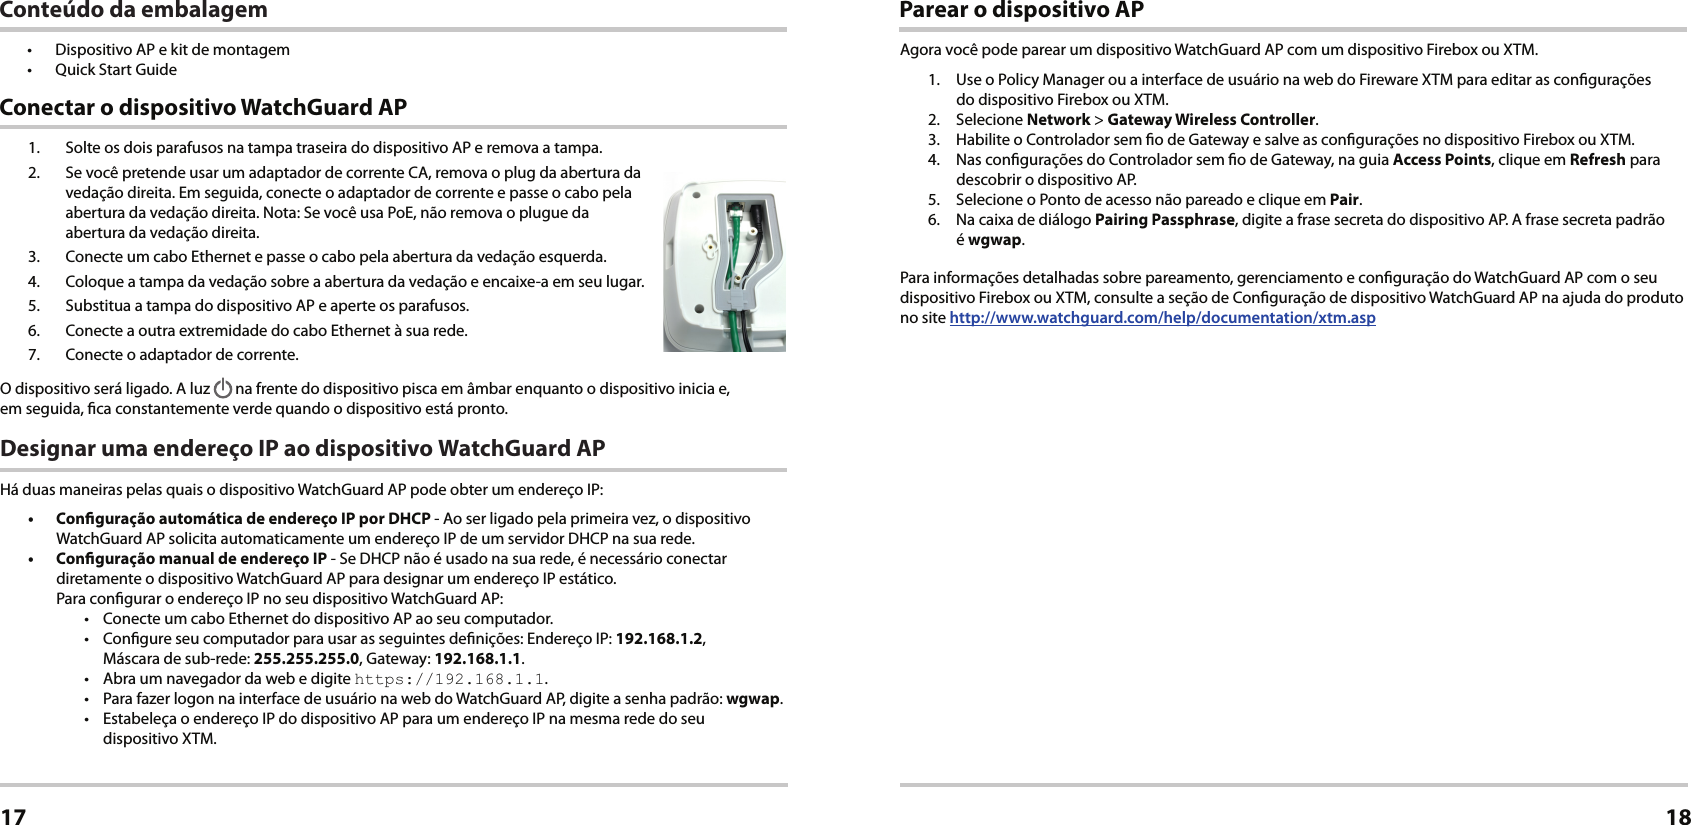
![1. APデバイスの背面カバーの2本のネジを緩め、カバーを取り外します。2. AC電源アダプタを使用する場合は、右のガスケット開口部からプラグを取り外します。 その後、電源アダプタを接続して、右側のガスケット開口部にケーブルを押し込みます。注意︰PoEを使用する場合は、右のガスケット開口部からプラグを取り外さないでください。3. イーサネット・ケーブルを接続し、左のガスケット開口部にケーブルを押し込みます。4. ガスケット開口部にガスケット・カバーを被せ、所定の位置に押し込みます。5. APデバイスのカバーを取り付け、ネジを締めます。6. イーサネット・ケーブルのもう一方の端をネットワークに接続します。7. 電源に接続します。デバイスの電源がオンになります。デバイス前面の ライトは、デバイスの起動中はオレンジ色に点滅し、デバイスの準備が完了すると緑色の点灯に変わります。WatchGuard APデバイスへ の IPアドレスの 割り当てWatchGuard APデバイスがIPアドレスを取得するには、次の2つの方法があります。 • DHCPによる自動 IPアドレ ス 設 定 - WatchGuard APデバイスは、最初に電源がオンになったときに、ネットワーク上のDHCPサーバーからIPアドレスを自動的に要求します。• 手 動 によるIPアドレス 設 定 - ネットワーク上でDHCPを使用しない場合は、直接WatchGuard APデ バイスに接続して、静的IPアドレスを割り当てる必要 があります。 WatchGuard APデバイスにIPアドレスを割り当てるには、以下の操作を行います。• イーサネット・ケーブルをAPデバイスからお使いのコンピュータに接続します。• コンピュータに以下を設定します。IPアドレ ス ︰192.168.1.2、サブネットマスク︰ 255.255.255.0、ゲ ー ト ウ ェ イ ︰192.168.1.1。• ウェブ・ブラウザを開いてhttps://192.168.1.1と入 力します。• WatchGuard APの ウェブ UIにログインするには、デフォルトのパスワードwgwapを入力します。• XTMデバイスと同じネットワーク上のIPアドレスに、APデバイスのIPアドレスを設定します。 WatchGuard APデ バイスの 接 続日本語11APデ バイスの ペアリング以上の操作で、WatchGuard APデバイスをFireboxまたはXTMデバイスで ペアリングすることができます。1. Policy ManagerまたはFireware XTMの ウェブ UIを使って、FireboxまたはXTMデバイスの設定を編集します。2. [Network] > [Gateway Wireless Controller]の順に選択します。3. Gateway Wireless Controllerを有 効にして、FireboxまたはXTMデバイスに設定を保存します。 4. Gateway Wireless Controller設定の[Access Points]タブで[Refresh]をクリックし、APデバイスを検出します。5. ペアリングされていないアクセス・ポイントを選択し、[Pair]をクリックしま す。6. [Pairing Passphrase]ダイアログボックスで、APデバイスのパスフレーズを入力します。デフォルトのパスフレーズはwgwapです。FireboxまたはXTMデバイスでのWatchGuard APのペアリング、管理、設定に関する詳細は、 http://www.watchguard.com/help/documentation/xtm.asp の製品ヘルプの「WatchGuard APデバイスの設定」セクションをご覧ください。12パッケージの内容• APデバイスおよびマ ウ ン ト・キ ット• クイックスタート・ガ イド](https://usermanual.wiki/Senao-Networks/AP102.User-Manual-pdf/User-Guide-2238526-Page-7.png)
![Certications25 26 Česky [Czech]WatchGuard tímto prohlašuje, že tento AP102 je ve shodě se základními požadavky a dalšími příslušnými ustanoveními směrnice 1999/5/ES. Dansk [Danish]Undertegnede WatchGuard erklærer herved, at følgende udstyr AP102 overholder de væsentlige krav og øvrige relevante krav i direktiv 1999/5/EF. Deutsch [German]Hiermit erklärt WatchGuard, dass sich das Gerät AP102 in Übereinstimmung mit den grundle-genden Anforderungen und den übrigen einschlägigen Bestimmungen der Richtlinie 1999/5/EG bendet. Eesti [Estonian]Käesolevaga kinnitab WatchGuard seadme AP102 vastavust direktiivi 1999/5/EÜ põhinõuetele ja nimetatud direktiivist tulenevatele teistele asjakohastele sätetele. English Hereby, WatchGuard, declares that this AP102 is in compliance with the essential requirements and other relevant provisions of Directive 1999/5/EC. Español [Spanish]Por medio de la presente WatchGuard AP102 cumple con los requisitos esenciales y cualesqui-era otras disposiciones aplicables o exigibles de la Directiva 1999/5/CE. Ελληνική [Greek]ΜΕ ΤΗΝ ΠΑΡΟΥΣΑ WatchGuard ΔΗΛΩΝΕΙ ΟΤΙ AP102 ΣΥΜΜΟΡΦΩΝΕΤΑΙ ΠΡΟΣ ΤΙΣ ΟΥΣΙΩΔΕΙΣ ΑΠΑΙΤΗΣΕΙΣ ΚΑΙ ΤΙΣ ΛΟΙΠΕΣ ΣΧΕΤΙΚΕΣ ΔΙΑΤΑΞΕΙΣ ΤΗΣ ΟΔΗΓΙΑΣ 1999/5/ΕΚ. Français [French]Par la présente WatchGuard déclare que l'appareil AP102 est conforme aux exigences essenti-elles et aux autres dispositions pertinentes de la directive 1999/5/CE. Italiano [Italian]Con la presente WatchGuard dichiara che questo AP102 è conforme ai requisiti essenziali ed alle altre disposizioni pertinenti stabilite dalla direttiva 1999/5/CE. Latviski [Latvian]Ar šo WatchGuard deklarē, ka AP102 atbilst Direktīvas 1999/5/EK būtiskajām prasībām un citiem ar to saistītajiem noteikumiem. Lietuvių [Lithuanian] Šiuo WatchGuard deklaruoja, kad šis AP102 atitinka esminius reikalavimus ir kitas 1999/5/EB Direktyvos nuostatas. Nederlands [Dutch]Hierbij verklaart WatchGuard dat het toestel AP102 in overeenstemming is met de essentiële eisen en de andere relevante bepalingen van richtlijn 1999/5/EG. Malti [Maltese]Hawnhekk, WatchGuard, jiddikjara li dan AP102 jikkonforma mal-ħtiġijiet essenzjali u ma prov-vedimenti oħrajn relevanti li hemm d-Dirrettiva 1999/5/EC. Magyar [Hungarian]Alulírott, WatchGuard nyilatkozom, hogy a AP102 megfelel a vonatkozó alapvetõ követelmé-nyeknek és az 1999/5/EC irányelv egyéb elõírásainak. Polski [Polish]Niniejszym WatchGuard oświadcza, że AP102 jest zgodny z zasadniczymi wymogami oraz pozostałymi stosownymi postanowieniami Dyrektywy 1999/5/EC. Português [Portuguese]WatchGuard declara que este AP102 está conforme com os requisitos essenciais e outras disposições da Directiva 1999/5/CE. Slovensko [Slovenian]WatchGuard izjavlja, da je ta AP102 v skladu z bistvenimi zahtevami in ostalimi relevantnimi določili direktive 1999/5/ES. Slovensky [Slovak]WatchGuard týmto vyhlasuje, že AP102 spĺňa základné požiadavky a všetky príslušné ustanove-nia Smernice 1999/5/ES. Suomi [Finnish]WatchGuard vakuuttaa täten että AP102 tyyppinen laite on direktiivin 1999/5/EY oleellisten vaatimusten ja sitä koskevien direktiivin muiden ehtojen mukainen. Svenska [Swedish]Härmed intygar WatchGuard att denna AP102 står I överensstämmelse med de väsentliga egenskapskrav och övriga relevanta bestämmelser som framgår av direktiv 1999/5/EG.R&TTE Compliance StatementThis device complies with the essential requirements of the R&TTE Directive 1999/5/EC. The following test methods have been applied in order to prove presumption of conformity with the essential requirements of the R&TTE Directive 1999/5/EC.RoHS StatementThe member states of the European Union approved directive 2002/95/EC, Restrictions of Hazardous Substances (“RoHS directive”‘) that became valid on July 1, 2006. It states that all new electrical and electronic equipment put on the market within the member states must not contain certain hazardous materials. This device complies with the European Union’s R0HS directive 2002/95/EC and similar regulations that may be adopted by other countries for European Sales.WEEE StatementWEEE is a general set of requirements dictated in the EU Directive 2002/96/EC. This Directive mandated that member EU countries enact regulations governing the Waste of Electrical and Electronic Equipment (WEEE). The Directive, and its individual transpositions into specic country laws and legislation, is aimed at the reduction of WEEE through reuse, recovery, and recycling of WEEE. WatchGuard is working in partnership with our European Union (EU) distribution partners to ensure that our products are in compliance with the WEEE statutes, and that the recovery of our product per the specic EU country legislative requirements is seamless for our product’s end users. If you have a WatchGuard product that is at its end of life and needs to be disposed of, please contact WatchGuard Customer Care Department at:U.S. Customers: 877.232.3531 International Customers: +1.206.613.0456WatchGuard is reasonably condent that our products do not contain any substances or hazardous materials presently banned by any legislation, and do not present a risk due to hazardous materials. WEEE recovery professionals should also note that these products do not have any materials that are of particular high value in their individual form.0560](https://usermanual.wiki/Senao-Networks/AP102.User-Manual-pdf/User-Guide-2238526-Page-14.png)