Senao Networks CB7510 300N Gigabit Dual Band Concurrent AP User Manual ECB7510 UM 20111109 certi
Senao Networks, Inc. 300N Gigabit Dual Band Concurrent AP ECB7510 UM 20111109 certi
User Man_U2M-CB7510_rev. 1
ECB7510
Dual Band Concurrent AP
(IEEE 802.11 a/b/g/n)
User Manual

Revision History
Version Date Notes
1.0 2010/8/22 Initial
Table of Content
1.
INTRODUCTION..............................................................................................................................................1
1.1.
S
UMMARY
....................................................................................................................................................1
1.2.
K
EY
F
EATURES
............................................................................................................................................2
1.3.
P
ACKAGE
C
ONTENTS
...................................................................................................................................3
1.4.
P
RODUCT
L
AYOUT
.......................................................................................................................................4
2.
INSTALLATION................................................................................................................................................5
2.1.
N
ETWORK
+
S
YSTEM
R
EQUIREMENTS
.........................................................................................................5
2.2.
ECB7510
P
LACEMENT
................................................................................................................................6
2.3.
S
ETUP
LAN
&
WAN.................................................................................................................................... 7
2.4.
PC
N
ETWORK
A
DAPTER SETUP
(W
INDOWS
XP) .......................................................................................... 8
2.5.
I
NITIAL
S
ETUP
ECB7510 ...........................................................................................................................10
3.
SYSTEM............................................................................................................................................................12
3.1.
O
PERATION
M
ODE
..................................................................................................................................... 12
3.2.
S
TATUS
....................................................................................................................................................... 13
3.3.
S
CHEDULE
.................................................................................................................................................15
3.4.
E
VENT
L
OG
................................................................................................................................................16
3.5.
M
ONITOR
...................................................................................................................................................17
4.
NETWORK DIAGRAM EXAMPLE.............................................................................................................18
4.1.
A
CCESS
P
OINT
...........................................................................................................................................18
4.2.
C
LIENT
B
RIDGE
.........................................................................................................................................18
4.3.
WDS
MODE
............................................................................................................................................... 19
4.4.
R
EPEATER
..................................................................................................................................................19
5.
WIRELESS 2.4G & 5G....................................................................................................................................20
5.1.
S
TATUS
....................................................................................................................................................... 20
5.2.
B
ASIC
:
M
ODE
:
AP......................................................................................................................................20
5.3.
M
ODE
:
CB ................................................................................................................................................. 22
5.4.
M
ODE
:
WDS..............................................................................................................................................23
5.5.
M
ODE
:
R
EPEATER
......................................................................................................................................24
5.6.
A
DVANCED
................................................................................................................................................25
5.7.
S
ECURITY
..................................................................................................................................................27
5.8.
F
ILTER
....................................................................................................................................................... 31
5.9.
WPS
(W
I
-F
I
P
ROTECTED
S
ETUP
)...............................................................................................................32
5.10.
C
LIENT
L
IST
............................................................................................................................................... 34
5.11.
WMM........................................................................................................................................................35
6.
NETWORK.......................................................................................................................................................36
6.1.
S
TATUS
....................................................................................................................................................... 36
6.2.
LAN .......................................................................................................................................................... 37
7.
MANAGEMENT..............................................................................................................................................38
7.1.
A
DMIN
....................................................................................................................................................... 38
7.2.
SNMP........................................................................................................................................................39
7.3.
S
CHEDULE
S
ETTINGS
.................................................................................................................................39
7.4.
F
IRMWARE
.................................................................................................................................................40
7.5.
C
ONFIGURE
................................................................................................................................................40
7.6.
R
ESET
........................................................................................................................................................ 41
ii
8.
TOOLS ..............................................................................................................................................................42
8.1.
T
IME
S
ETTING
............................................................................................................................................42
8.2.
D
IAGNOSIS
.................................................................................................................................................43
9.
NETWORK CONFIGURATION EXAMPLE...............................................................................................44
9.1.
A
CCESS
P
OINT
...........................................................................................................................................44
9.2.
C
LIENT
B
RIDGE
.........................................................................................................................................45
9.3.
WDS
R
EPEATER
........................................................................................................................................46
9.4.
R
EPEATER
..................................................................................................................................................47
E
UROPE
–
EU
D
ECLARATION OF
C
ONFORMITY
........................................................................................................ 48
1
1. Introduction
1.1. Summary
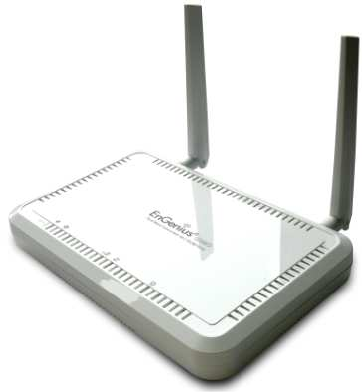
ECB7510 is a Dual Band Concurrent Wireless
11A/B/G/N AP with dual CPU that offers user
unprecedented network performance. WMM support
boosts streaming and multimedia intensive services.
It supports 2.4Ghz band under 802.11 b/g/n mode
while providing 5Ghz band to guarantee an
interference-free network access.
Multiple SSID provides advance users to
manage multiple users of various needs. TX power
control enables flexible transmission tuning for
different installation needs and prevents malicious
eaves-dropping. Isolation, filter, firewall and full
coverage of security standards promise a securer
network environment.
Dual CPU operates work simultaneously therefore users can enjoy gaming, music
or HD video on 5GHz band while web-surfing or emailing on 2.4Ghz. It also provides with
built-in 1-port full-duplex 10/100/1000 Fast Switch. ECB7510 is definitely the optimal
choice for middle & small businesses.

2
1.2. Key Features
Features Advantages
2.4Ghz & 5GhzDual Band Concurrent
Less interference and better
performance
Incredible Data Rate up to
300+300Mbps**
Heavy data payloads such as
MPEG video streaming
802.3at PoE Support User Ethernet cable as power
supply medium
SNMP Perfect for network management
Multiple SSIDs Enhanced management among
multiple users groups
One 10/100/1000 Mbps Fast Switch
Ports (Auto-Crossover)
Scalability, extend your network.
Firewall supports Virtual Server
Mapping, DMZ, IP Filter, ICMP
Blocking, SPI
Avoids the attacks of Hackers or
Viruses from Internet
Support 802.1x Authenticator, 802.11i
(WPA/WPA2, AES), VPN pass-through
Provide mutual authentication
(Client and dynamic encryption
keys to enhance security
WDS (Wireless Distribution System) Make wireless AP and Bridge mode
simultaneously as a wireless
repeater
WPS button support Quick WiFi Security Setup
WMM & QoS Wireless QoS mechanism
Best channel selection
Automatic optimal channel search
** Theoretical wireless signal rate based on IEEE standard of 802.11a, b, g, n chipset used. Actual throughput
may vary. Network conditions and environmental factors lower actual throughput rate. All specifications are
subject to change without notice.
3
1.3. Package Contents
Open the package carefully, and make sure that none of the items listed below are
missing. Do not discard the packing materials, in case of return; the unit must be shipped
back in its original package.
1 * Dual Band Concurrent AP (ECB7510)
1 * Power Adapter
2.* Dual Band Antennas
1 * CAT 5 UTP cable
1 * Quick Guide
1 * CD (User Manual)
4
1.4. Product Layout
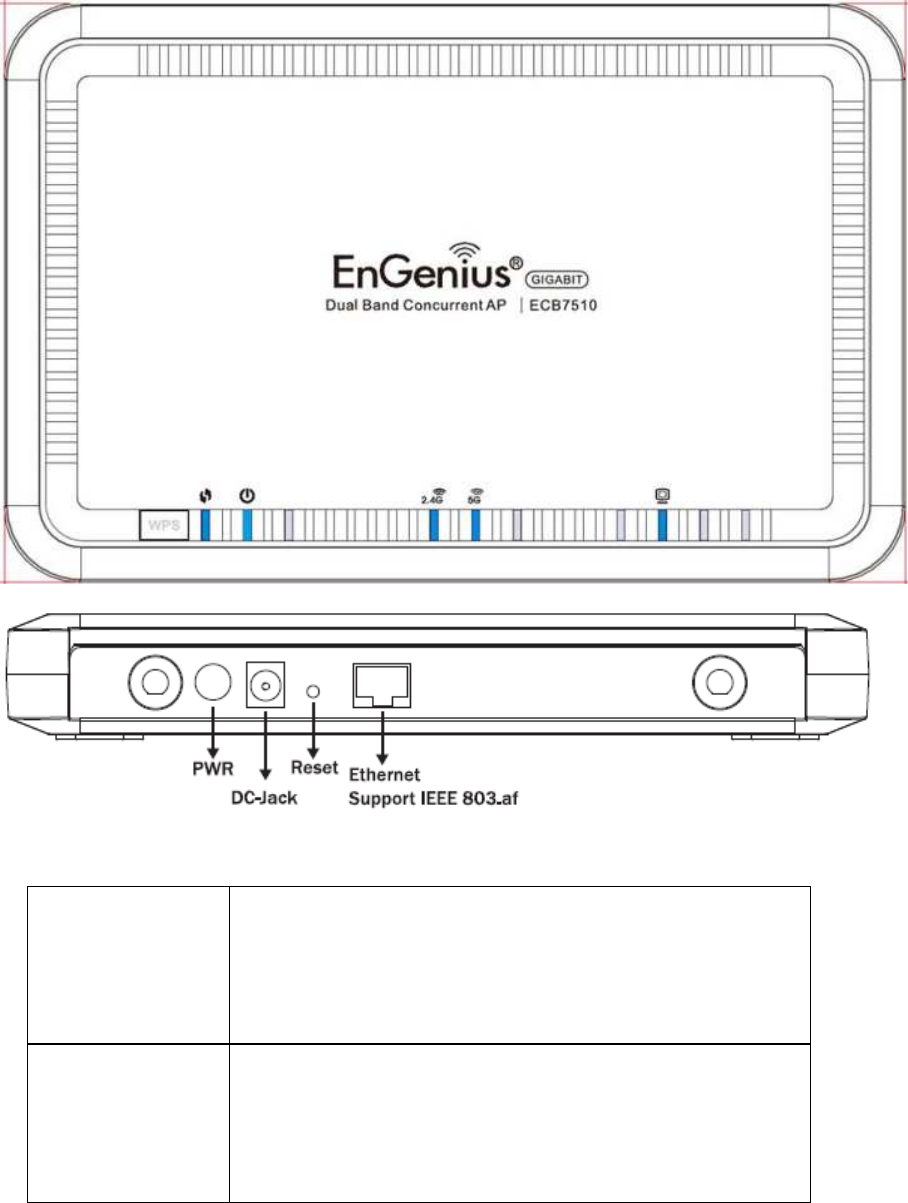
Physical Interface LAN: 1 * 10/100/1000 Fast Ethernet RJ-45
Reset Button
DC Jack
Power push button (Wi-Fi Protected Setup)
SMA connectors
LEDs Status WPS LED
Power/ Status
WLAN 2.4GHz
WLAN 5GHz
Ethernet
5
2. Installation
2.1. Network + System Requirements
To begin using the ECB7510, make sure you meet the following as minimum
requirements:
PC/Notebook.
Operating System – Microsoft Windows 7/XP/2000/VISTA
1 Free Ethernet port.
Wi-Fi card/USB dongle (802.11 a/b/g/n) – optional.
PC with a Web Browser (Internet Explorer, Safari, Firefox, Opera etc.)
One Ethernet compatible CAT5 cables.
6
2.2. ECB7510 Placement
You can place ECB7510 on a desk or any other flat surface, or you can mount it on a wall.
For optimal performance, place your device in the center of your office (or your home) in a
location that is away from any potential source of interference, such as a metal wall or
microwave oven. You may need to tune your antenna angle to get optimized wireless
performance.
Wall Mount Instruction
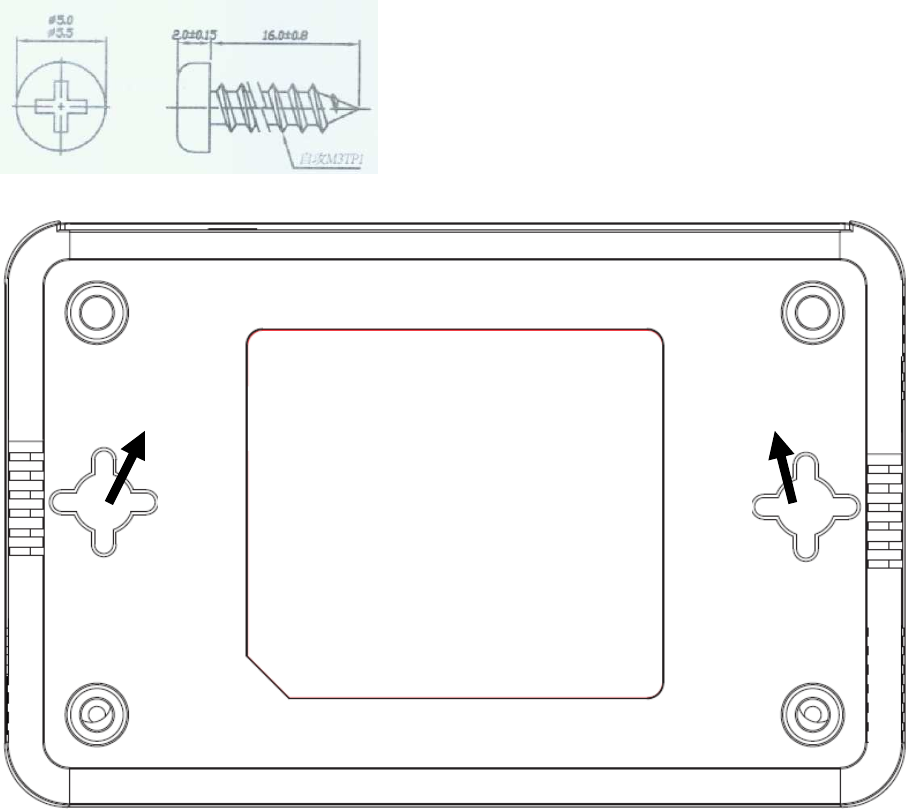
You can mount the device on the wall. There are two mounting points on the bottom of the
device. Please find a proper spot where two nails can be applied. Finally, carefully mount the
device onto the wall and make sure the nails are firmly locked on the mount points.
Screw Dimension: 18mm x 5mm
Mounting
Points
Mounting
Points

7
2.3. Setup LAN & WAN
Ethernet connection:
Connect Ethernet cable between your PC/Notebook LAN port & LAN
port on ECB7510.
8
2.4. PC Network Adapter setup (Windows XP)
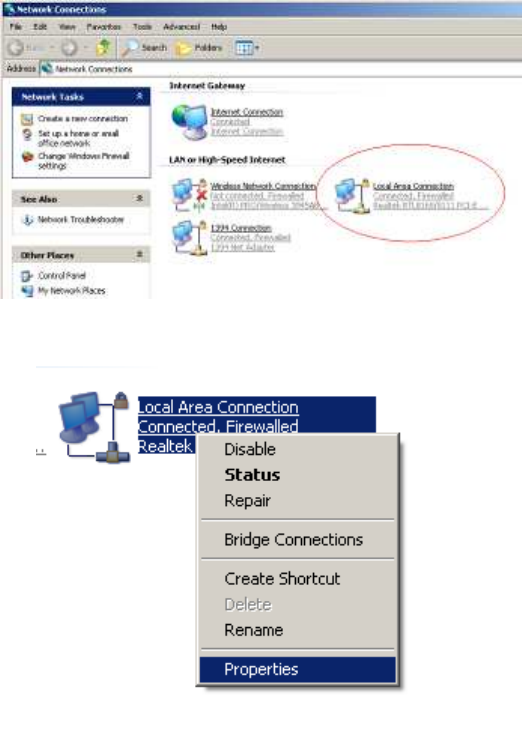
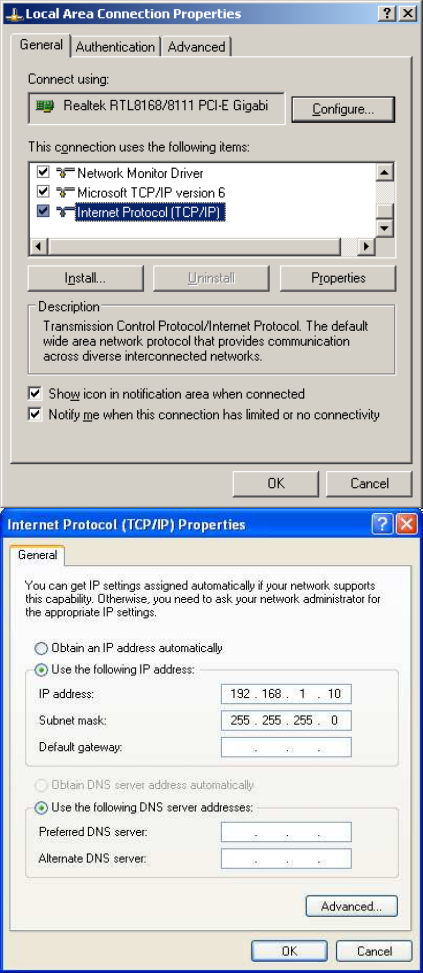
Enter [Start Menu] select [Control panel] select [Network].
Select [Local Area Connection]) icon=>select [properties]
9
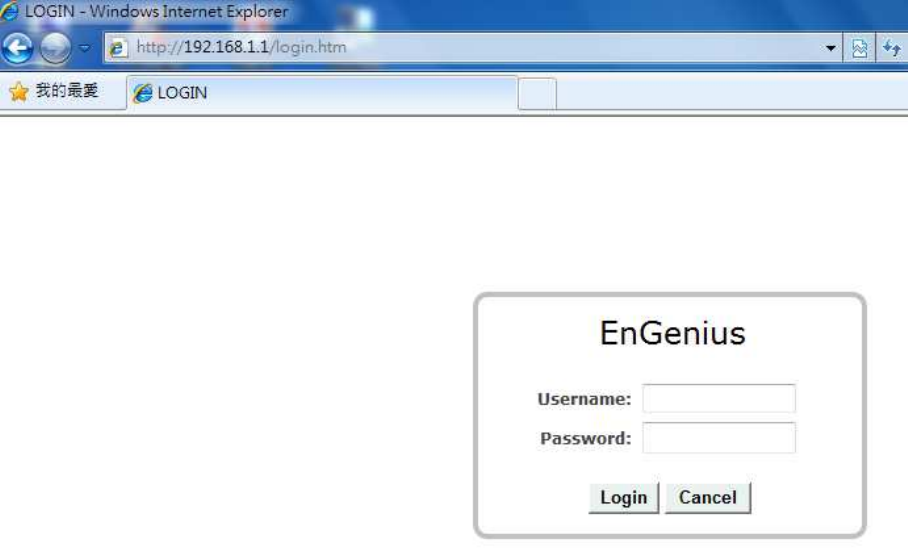
Select [Internet Protocol (TCP/IP)] =>Click [Properties].
Select the [General] tab.
Select both [Use the following IP address] and [Use the following DNS server addresses].
Note: ECB7510 does not support DHCP server so it will not assign any IP addresses to any
clients.
10
2.5. Initial Setup ECB7510
ECB7510 provides web-interface for configuration through web browser, such as
Internet Explorer, Firefox or Safari.
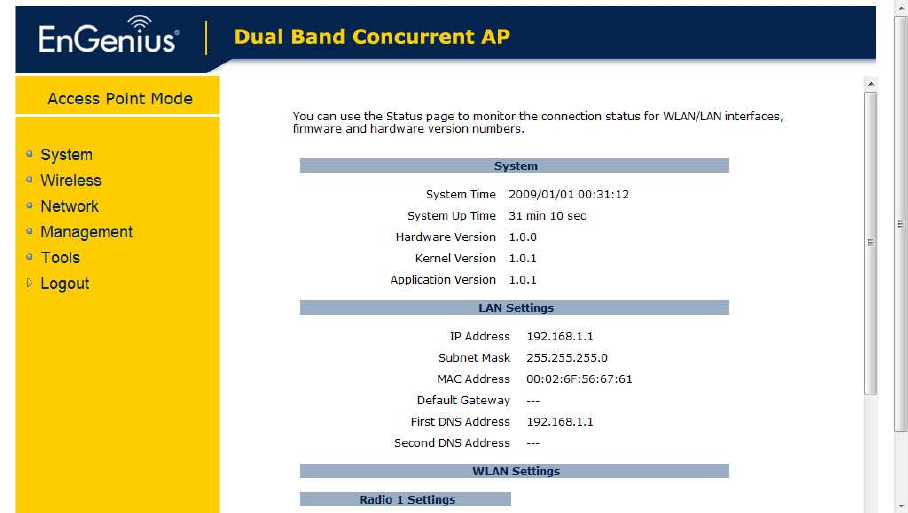
1. Open your browser (e.g. Internet Explorer).
2. Type in http://192.168.1.1 in the address bar and press [Enter].
3. The webpage will ask you to enter Username and Password. Please Use [admin] for
both Username and Password.
4. Click <Login> to navigate into ECB7510 configuration home page.
5. You will see the home page of ECB7510 as follows.
11
12
3. SYSTEM
3.1. Operation Mode
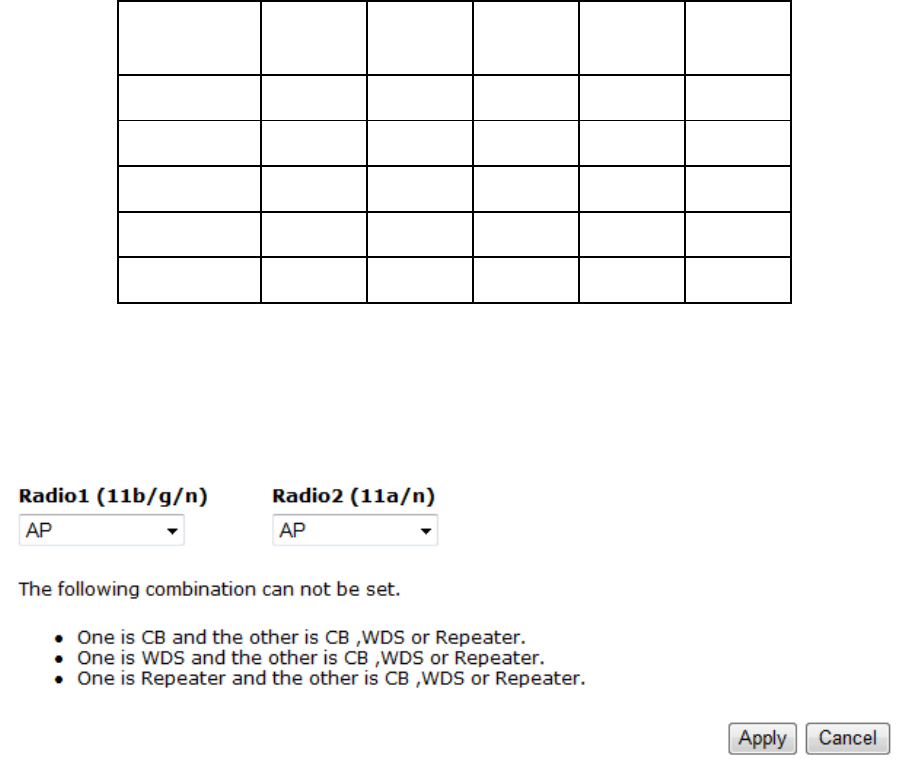
You are allowed to change the operation mode for both 2.4GHz and 5GHz radios. However,
there are combinations that are not allowed. Please refer the following table for the mode
combinations. Those that marked Yes are considered legal settings.
Operation Mode Matrix
AP WDS CB UR Disable
AP Yes Yes Yes Yes Yes
WDS Yes n/a n/a n/a Yes
CB Yes n/a n/a n/a Yes
UR Yes n/a n/a n/a Yes
Disable Yes Yes Yes Yes Yes
This page allows you to change the operating mode for both radios. You can use the drop
down menu to select AP/CB/WDS Repeater/Repeater mode and you can also disable certain
radio.
Caution: CB/ WDS Repeater/Repeater can only operate in one single radio. You can not use
those operating modes on both radios.
13
3.2. Status
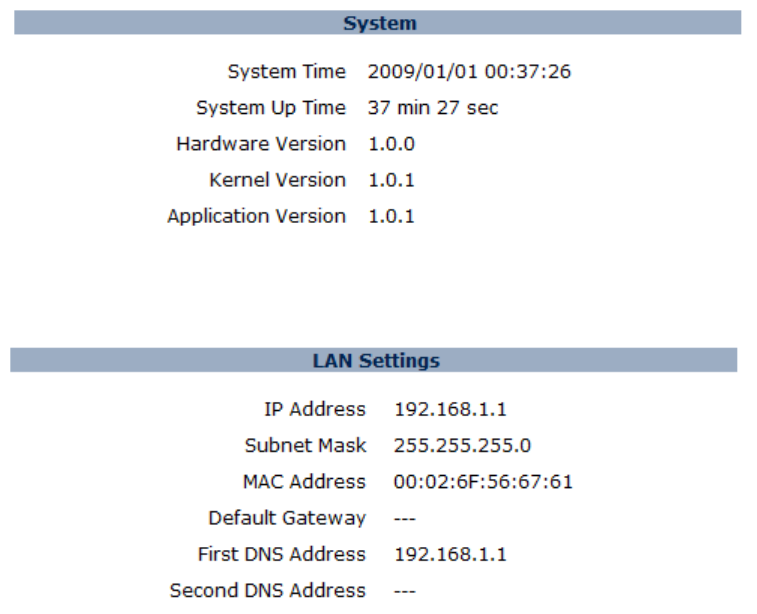
This page allows you to monitor the current status of your AP. You can use the status page
to quickly review if you have any updated firmware available (bug fixes, updates). You can
navigate from this page with a few interesting options for reminding or skipping this page
forever & so forth.
System: You can see the system time, system up time, hardware information, firmware
version and kernel version information.
LAN Settings: This section displays the AP LAN port’s current LAN & WLAN information. It
also shows whether the DHCP status.
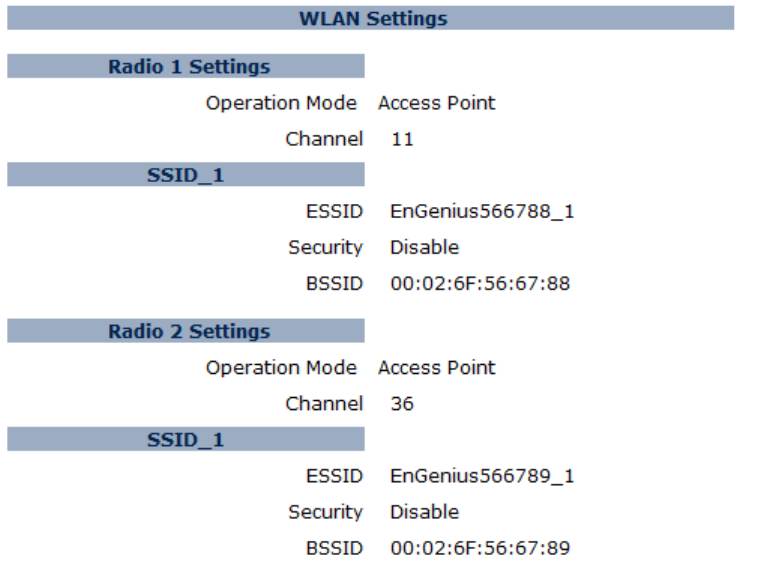
WLAN Settings: This section displays the current WLAN configuration settings. Wireless
configuration details such as SSID, Security settings, BSSID, Channel number, mode of
operation are briefly shown.
14

15
3.3. Schedule
In the schedule section, you can review your schedule such as Firewall and Power Saving
feature. If you would like to modify/add/remove the schedule, you must go to
Management->Schedule Setting to do so.
16
3.4. Event Log
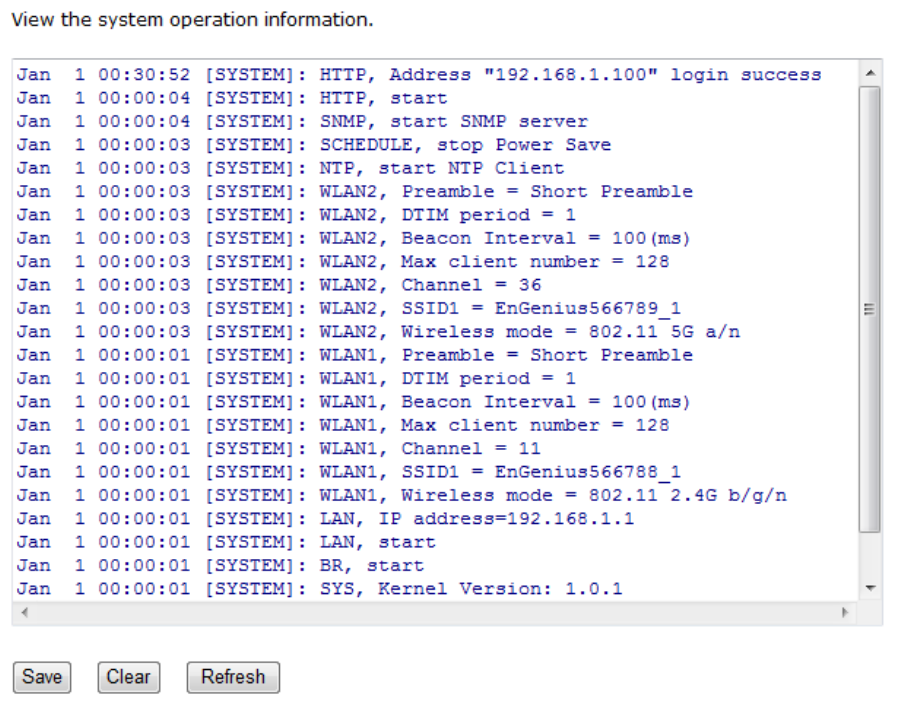
View operation event log. This page shows the current system log of the AP. It displays
any event occurred after system start up. At the bottom of the page, the system log can be
saved <Save> to a local file for further processing or the system log can be cleared
<Clear> or it can be refreshed <Refresh> to get the most updated information. When the
system is powered down, the system log will disappear if not saved to a local file.
17
3.5. Monitor
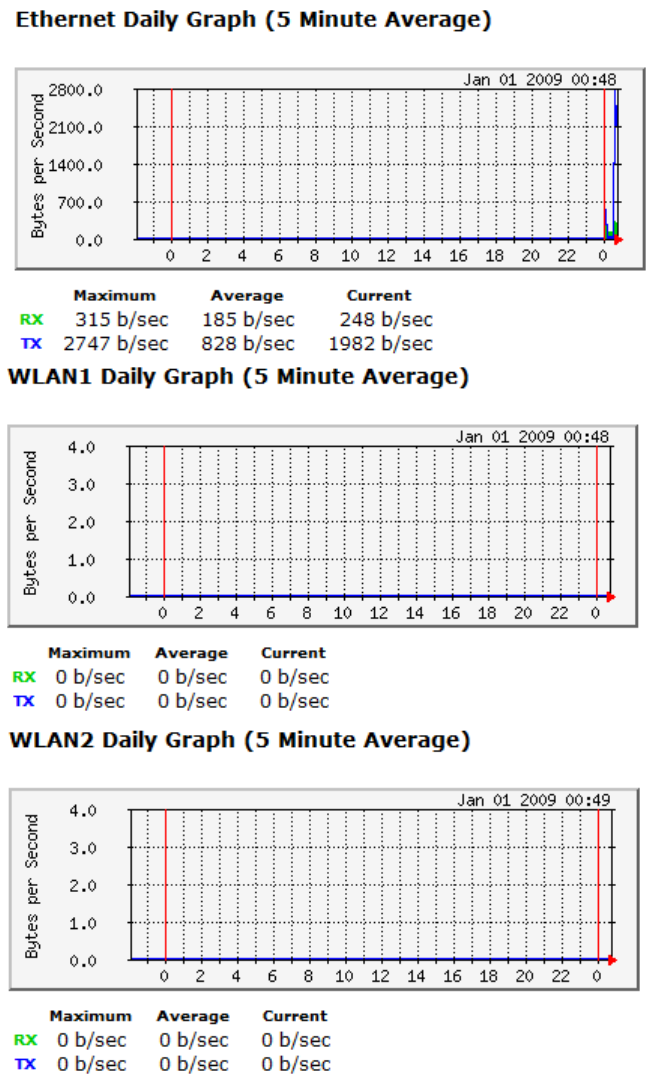
Show histogram for network connection on Ethernet, WLAN1 & WLAN2. Auto refresh
keeps information updated frequently.
Note: You can click on the [Detail] to view the statistic data generated by Weekly and
Monthly.
18
4. Network Diagram Example
4.1. Access Point
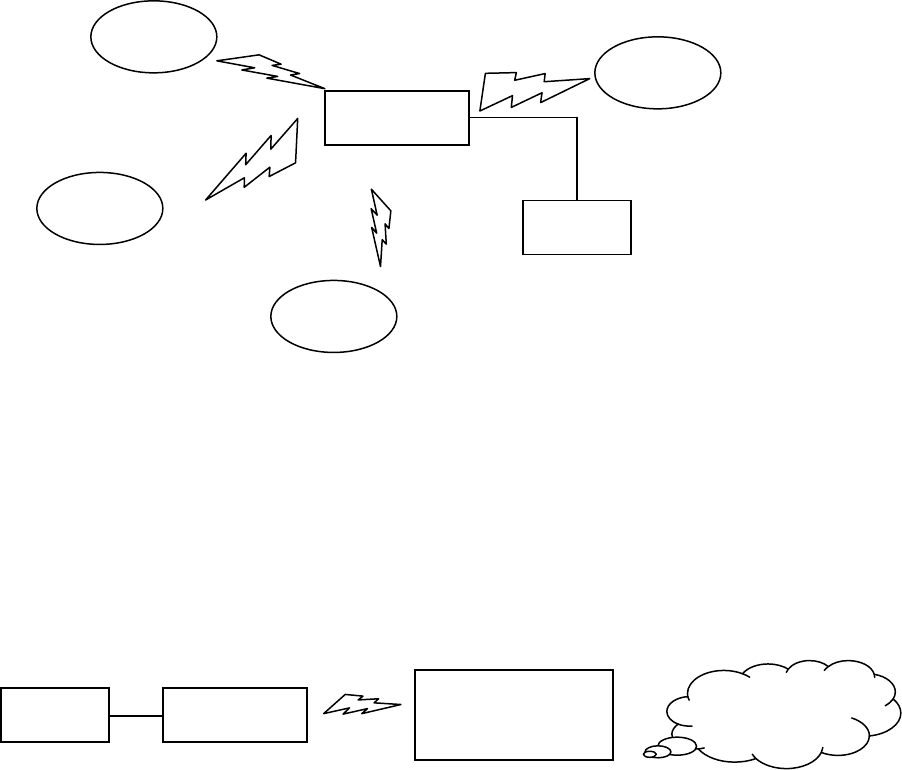
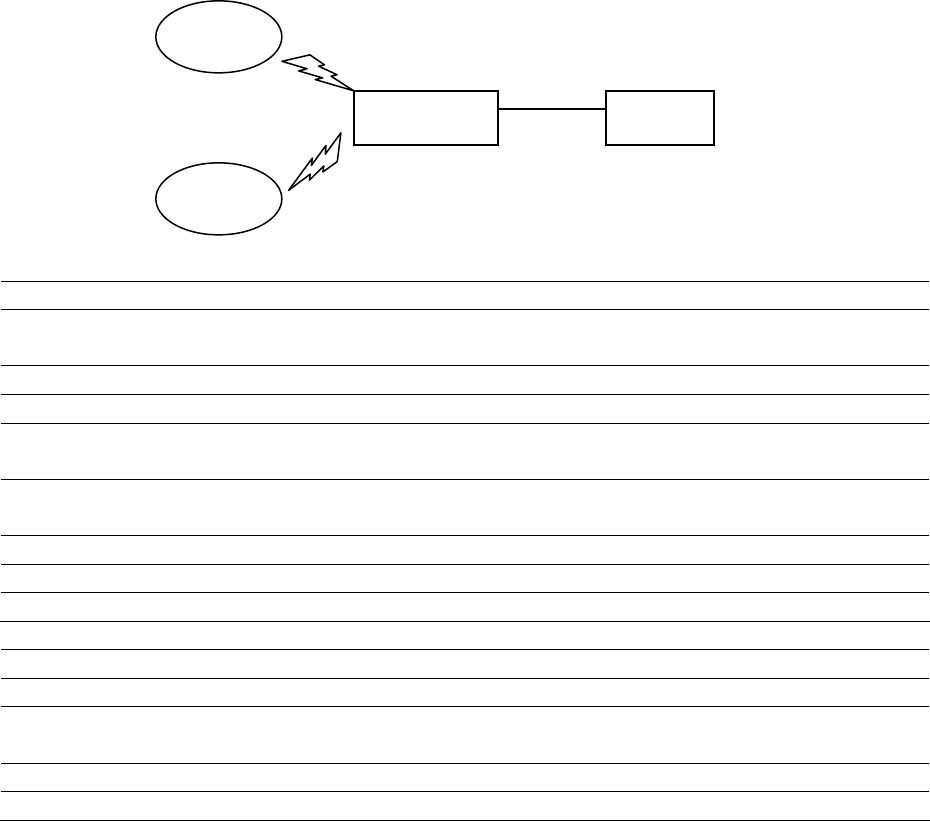
In the Access Point Mode, ECB7510 function likes a central connection for any stations or
clients that support IEEE 802.11a/b/g/n network. Stations and Client must configure the same
SSID and Security Password to associate within the range. ECB7510 supports 4 different
SSIDs to separate different clients at the same time.
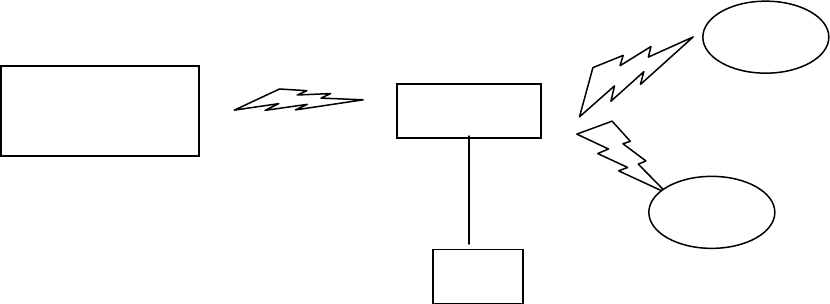
4.2. Client Bridge
In the Client Bridge Mode, the ECB7510 function as a wireless client. Connected to an
Access Point wirelessly and surf internet whenever you want. Using Site Survey to scan all
the Access Point within the range and configure its SSID and Security Password to associate
with it. Connect you station to the LAN port of the ECB7510 via Ethernet. Another radio can
still operate as an Access Point.
ECB7510
Client
Client
Client
Client
SSID1 Radio2
SSID1 Radio1
SSID2 Radio1
SSID2 Radio2
Ethernet
Client
Access Point /
Wireless Router Internet
ECB7510
Client
19
4.3. WDS mode
ECB7510 is a Dual Band Concurrent Access Point. It can operate the Access Point mode and
WDS mode at the same time. Therefore, the two operate can be combined as the WDS
repeater mode. It can have Repeater’s ability and it also has the Access Point’s capabilities.
Connect to any of the Access Point via WDS radio and share the same network with Access
Point’s radio. WDS links support up to 4 different WDS networks.
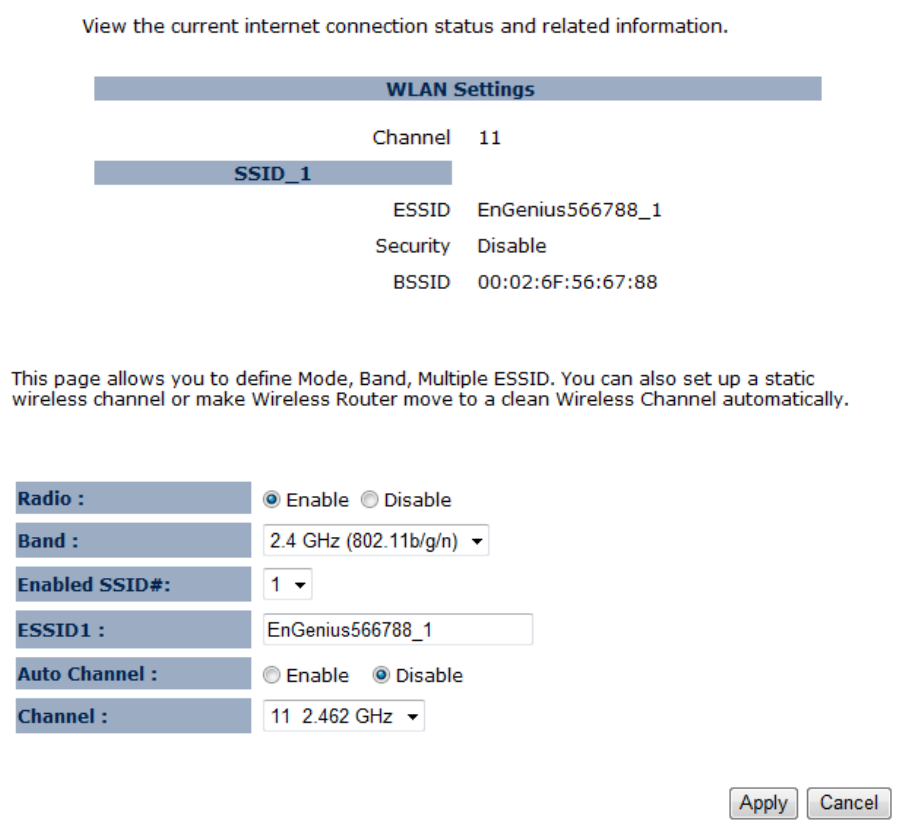
The following example shows an WDS network that uses 2.4GHz as backbone and 5GHz for
wireless client access. A WDS AP is set in the center while the other 4 are configured as WDS
STA (station).
4.4. Repeater
In the Repeater Mode, ECB7510 can extend the wireless coverage area of another Access
Point or Wireless Router. Access Point or Wireless Router must within the range so ECB7510
can associate with it by using the same SSID, Security Password and Channel.
Access Point /
Wireless Router ECB7510
Client
Client
Client
20
5. WIRELESS 2.4G & 5G
ECB7510 is a dual band concurrent product, therefore two wireless radio
configurations are provided. Both radios share the same features except for open
band and available channels under “Basic” section.
5.1. Status
This page shows the current wireless status such as your SSID, security type and BSSID.
5.2. Basic: Mode: AP
Radio: You can turn on/off wireless radio. If wireless Radio is off, you cannot associate
with AP through wireless.
Band: You can select the wireless standards running on your network environment.
Band 2.4G:
2.4 GHz(B): If all of your clients are 802.11b, select this one.
2.4 GHz(G): If all of your clients are 802.11g, select this one.
21
2.4 GHz(B/G): Either an 802.11b or an 802.11g wireless devices are in your
environment.
2.4 GHz(N): If all of your clients are 802.11n, select this one.
2.4 GHz(B/G/N): Either 802.11b, 802.11g, or 802.11n wireless devices are in
your environment.
Band 5G (Only available in Radio 2)
5 GHz (A): If all of your clients are 802.11a, select this one.
5 GHz (N): If all of your clients are 802.11n, select this one.
5 GHz (A/N): Either 802.11a or 802.11n wireless devices are in your
environment.
Enable ESSID: We support 4 multiple SSIDs in this device. Please select how many
SSIDs you would like to use in your network environment.
ESSID1~4: ESSID is the name of your wireless network. It might be a unique name to
identify this wireless device in the Wireless LAN. It is case sensitive and up to 32
printable characters. You might change the default ESSID for added security.
Auto Channel: Device will search all valid channels, then decide a most clean channel
and change to this channel if you enable this function. Depend on this function
enable or not, you will see different item below Auto Channel.
Channel: If Auto Channel is disabled, you should choose a static channel and AP will
use this channel to communicate with other clients.
Check Channel Time: If Auto Channel is enabled, you can choose a period from the
drop-down menu. AP will change to a clean channel periodically.

22
5.3. Mode: CB
Radio: You can turn on/off wireless radio. If wireless Radio is off, you cannot associate
with AP through wireless.
Band: You can select the wireless standards running on your network environment.
Band 2.4G:
2.4 GHz(B): If all of your clients are 802.11b, select this one.
2.4 GHz(G): If all of your clients are 802.11g, select this one.
2.4 GHz(B/G): Either an 802.11b or an 802.11g wireless devices are in your
environment.
2.4 GHz(N): If all of your clients are 802.11n, select this one.
2.4 GHz(B/G/N): Either 802.11b, 802.11g, or 802.11n wireless devices are in
your environment.
Band 5G (Only available in Radio 2)
5 GHz (A): If all of your clients are 802.11a, select this one.
5 GHz (N): If all of your clients are 802.11n, select this one.
5 GHz (A/N): Either 802.11a or 802.11n wireless devices are in your
environment.
Set Security: WDS Security depends on your AP security settings. Note: it does not
support mixed mode such as WPA-PSK/WPA2-PSK Mixed mode.
23
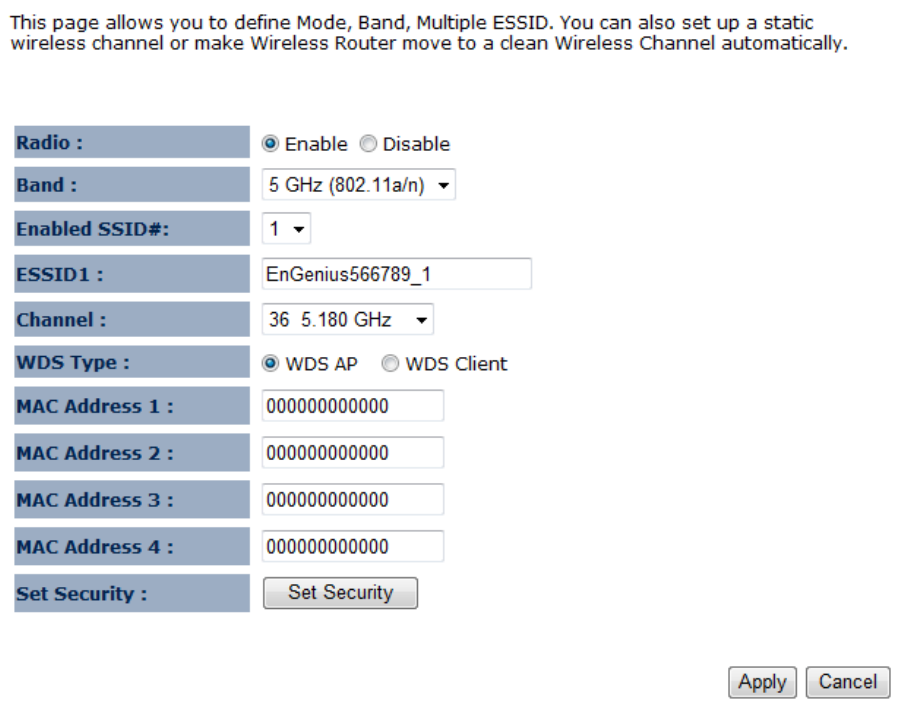
5.4. Mode: WDS
Wireless Distribution System, a system that enables the wireless interconnection of
access point, allows a wireless network to be expended using multiple access points
without a wired backbone to like them. Each WDS APs need setting as same channel and
encryption type.
MAC address 1~4: Please enter the MAC address of the neighboring APs that
participates in WDS, we support 4 devices now.
Set Security: WDS Security depends on your AP security settings. Note: it does not
support mixed mode such as WPA-PSK/WPA2-PSK Mixed mode.
24
5.5. Mode: Repeater
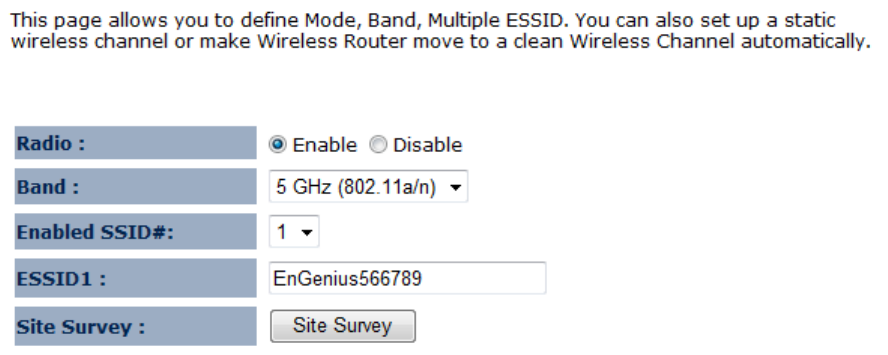
Radio: You can turn on/off wireless radio. If wireless Radio is off, you cannot associate
with AP through wireless.
Band: You can select the wireless standards running on your network environment.
Band 2.4G:
2.4 GHz(B): If all of your clients are 802.11b, select this one.
2.4 GHz(G): If all of your clients are 802.11g, select this one.
2.4 GHz(B/G): Either an 802.11b or an 802.11g wireless devices are in your
environment.
2.4 GHz(N): If all of your clients are 802.11n, select this one.
2.4 GHz(B/G/N): Either 802.11b, 802.11g, or 802.11n wireless devices are in
your environment.
Band 5G (Only available in Radio 2)
5 GHz (A): If all of your clients are 802.11a, select this one.
5 GHz (N): If all of your clients are 802.11n, select this one.
5 GHz (A/N): Either 802.11a or 802.11n wireless devices are in your
environment.
Enable ESSID: We support 4 multiple SSIDs in this device. Please select how many
SSIDs you would like to use in your network environment.
ESSID1~4: ESSID is the name of your wireless network. It might be a unique name to
identify this wireless device in the Wireless LAN. It is case sensitive and up to 32
printable characters. You might change the default ESSID for added security.
Site Survey: Use site survey to scan nearby area and connect one available AP/AP
Router.
25
5.6. Advanced
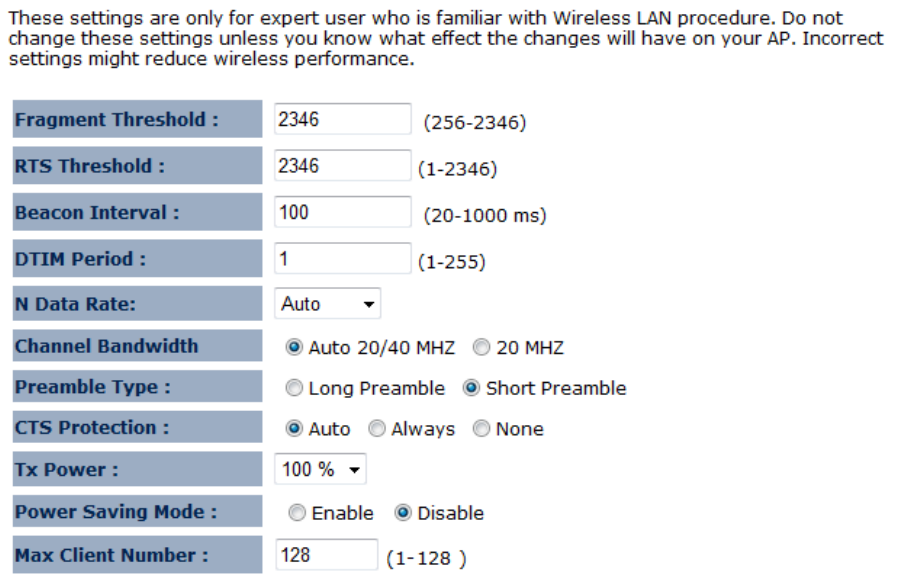
This tab allows you to set the advanced wireless options. The options included are
Authentication Type, Fragment Threshold, RTS Threshold, Beacon Interval, and Preamble
Type. You should not change these parameters unless you know what effect the changes
will have on the router.
Fragment Threshold: This specifies the maximum size of a packet during the
fragmentation of data to be transmitted. If you set this value too low, it will result in bad
performance.
RTS Threshold: When the packet size is smaller than the RTS threshold, the wireless
router will not use the RTS/CTS mechanism to send this packet.
Beacon Interval: is the interval of time that this wireless router broadcasts a beacon. A
Beacon is used to synchronize the wireless network.
DTIM Period: Enter a value between 1 and 255 for the Delivery Traffic Indication
Message (DTIM). A DTIM is a countdown informing clients of the next window for
listening to broadcast and multicast messages
Data Rate: The “Data Rate” is the rate that this access point uses to transmit data packets.
The access point will use the highest possible selected transmission rate to transmit
the data packets.
N Data Rate: The “Data Rate” is the rate that this access point uses to transmit data
packets for N compliant wireless nodes. Highest to lowest data rate can be fixed.
Channel Bandwidth: This is the range of frequencies that will be used.
Preamble Type: The “Long Preamble” can provide better wireless LAN compatibility while
the “Short Preamble” can provide better wireless LAN performance.
26
CTS Protection: It is recommended to enable the protection mechanism. This mechanism
can decrease the rate of data collision between 802.11b and 802.11g wireless
stations. When the protection mode is enabled, the throughput of the AP will be a little
lower due to a lot of frame-network that is transmitted.
TX Power: This can be set to a bare minimum or maximum power.
Power Saving Mode: Enable or disable the wireless power saving feature.
Max Client Number: Define the maximum number of clients that can associate to the AP.

27
5.7. Security
This Access Point provides complete wireless LAN security functions, included are
WEP, IEEE 802.1x, IEEE 802.1x with WEP, WPA with pre-shared key and WPA with
RADIUS. With these security functions, you can prevent your wireless LAN from illegal
access. Please make sure your wireless stations use the same security function, and are
setup with the same security key.
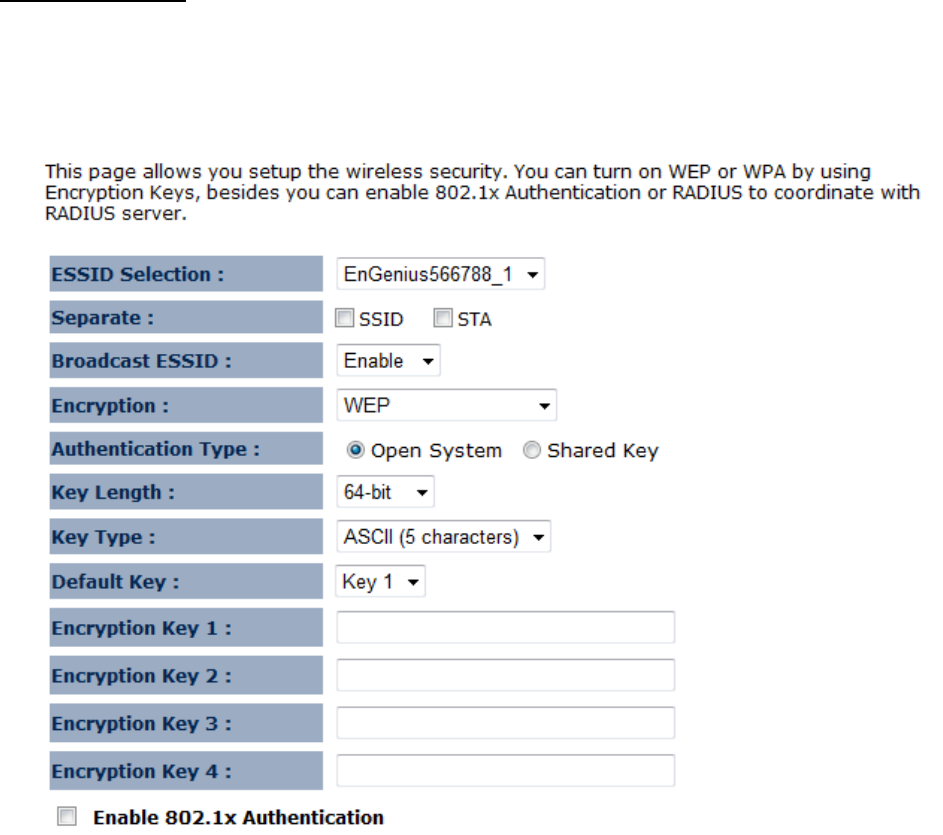
ESSID Selection: This broadband router support multiple ESSID, you could select
and set up the wanted ESSID.
Separate: Group you security settings by SSID or Station.
Broadcast ESSID: If you enabled “Broadcast ESSID”, every wireless station located
within the coverage of this access point can discover this access point easily. If
you are building a public wireless network, enabling this feature is recommended.
Disabling “Broadcast ESSID” can provide better security.
Encryption: When you choose to disable encryption, it is very insecure to operate
ECB7510.
28
WEP Encryption
When you select 64-bit or 128-bit WEP key, you have to enter WEP keys to encrypt data.
You can generate the key by yourself and enter it. You can enter four WEP keys and select
one of them as a default key. Then the router can receive any packets encrypted by one of
the four keys.
Authentication Type: There are two authentication types: "Open System" and "Shared
Key". When you select "Open System", wireless stations can associate with this
wireless router without WEP encryption. When you select "Shared Key", you should
also setup a WEP key in the "Encryption" page. After this has been done, make
sure the wireless clients that you want to connect to the device are also setup with the
same encryption key.
Key Length: You can select the WEP key length for encryption, 64-bit or 128-bit. The
larger the key will be the higher level of security is used, but the throughput will be
lower.
Key Type: You may select ASCII Characters (alphanumeric format) or Hexadecimal Digits
(in the "A-F", "a-f" and "0-9" range) to be the WEP Key.
Key1 - Key4: The WEP keys are used to encrypt data transmitted in the wireless network.
Use the following rules to setup a WEP key on the device. 64-bit WEP: input 10-digits
Hex values (in the "A-F", "a-f" and "0-9" range) or 5-digit ASCII character as the
encryption keys.
128-bit WEP: input 26-digit Hex values (in the "A-F", "a-f" and "0-9" range) or 13-digit
ASCII characters as the encryption keys.
29
Click <Apply> at the bottom of the screen to save the above configurations. You can
now configure other sections by choosing Continue, or choose Apply to apply the settings
and reboot the device.
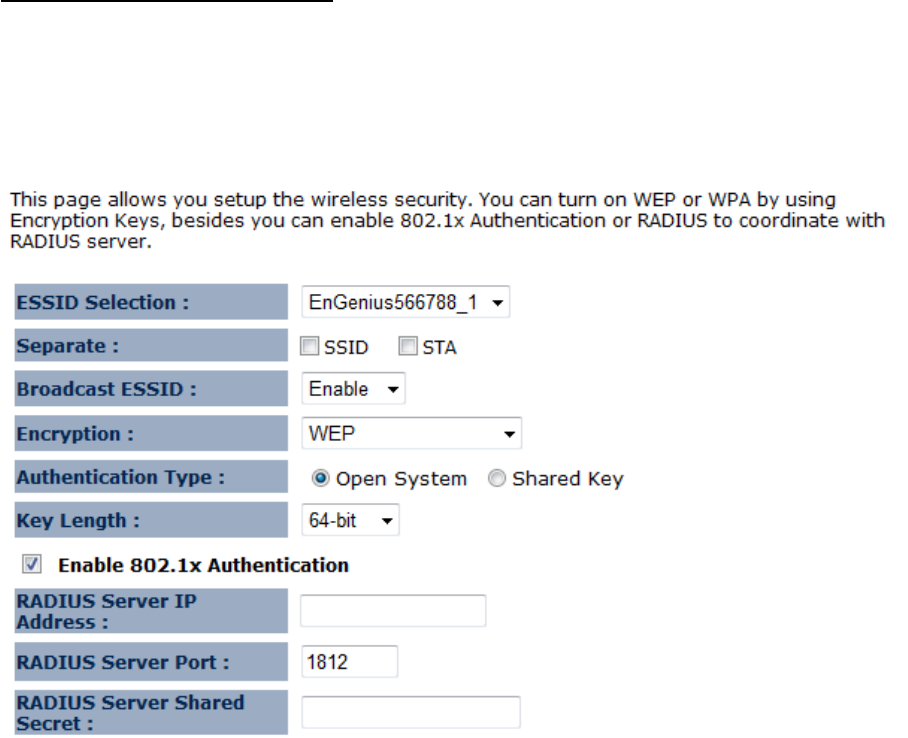
Enable 802.1x Authentication
IEEE 802.1x is an authentication protocol. Every user must use a valid account to login to
this Access Point before accessing the wireless LAN. The authentication is processed by a
RADIUS server. This mode only authenticates users by IEEE 802.1x, but it does not
encrypt the data during communication.
30
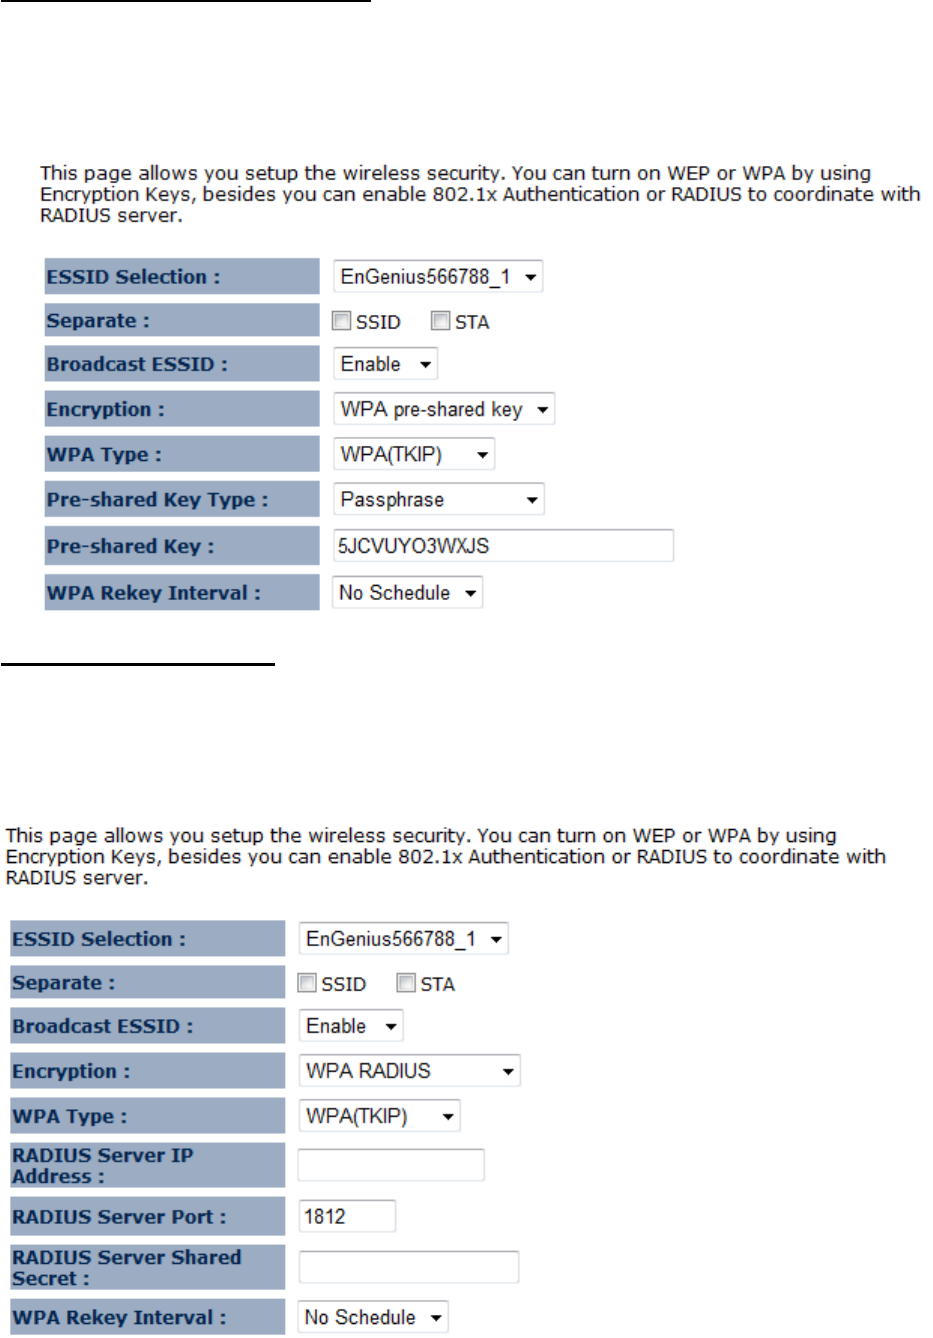
WPA Pre-Shared Key Encryption
Wi-Fi Protected Access (WPA) is an advanced security standard. You can use a
pre-shared key to authenticate wireless stations and encrypt data during communication. It
uses TKIP or CCMP (AES) to change the encryption key frequently. So the encryption key
is not easy to be cracked by hackers. This is the best security available.
WPA-Radius Encryption
Wi-Fi Protected Access (WPA) is an advanced security standard. You can use an
external RADIUS server to authenticate wireless stations and provide the session key to
encrypt data during communication.
It uses TKIP or CCMP (AES) to change the encryption key frequently. Press <Apply>
button when you are done.
31
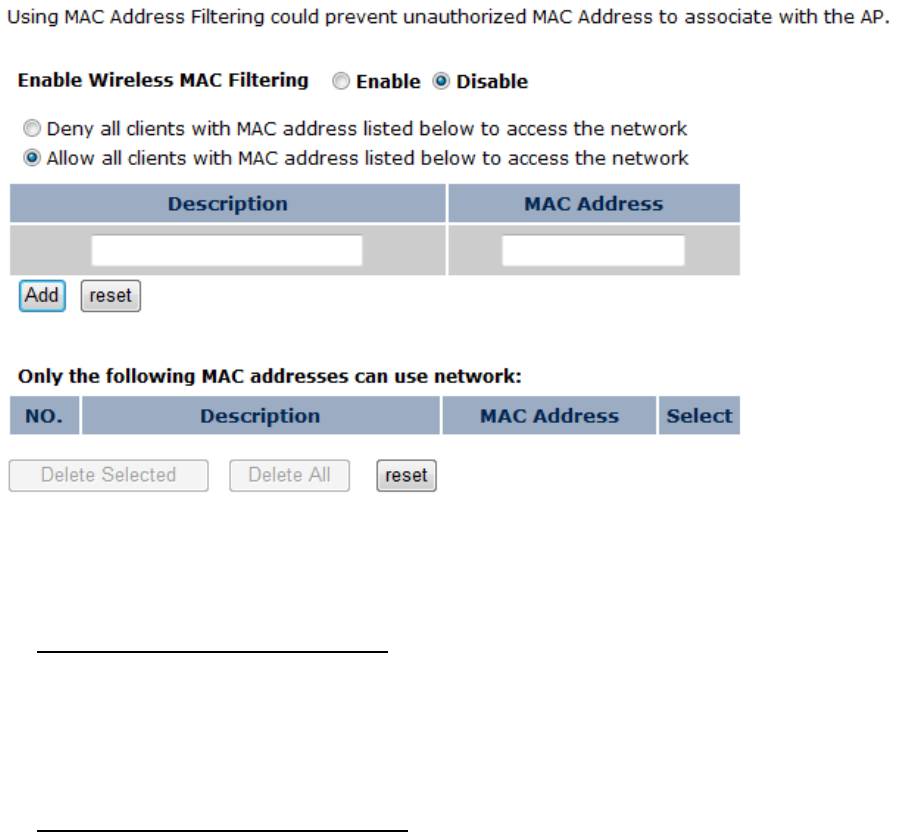
5.8. Filter
This wireless router supports MAC Address Control, which prevents unauthorized clients
from accessing your wireless network.
Enable Wireless MAC Filtering: Enable the wireless access control function
Adding an address into the list
Enter the "MAC Address" and "Comment" of the wireless station to be added and
then click <Add>. The wireless station will now be added into the "Current Access
Control List" below. If you are having any difficulties filling in the fields, just click
"Clear" and both "MAC Address" and "Comment" fields will be cleared.
Remove an address from the list
If you want to remove a MAC address from the "Current Access Control List ",
select the MAC address that you want to remove in the list and then click "Delete
Selected". If you want to remove all the MAC addresses from the list, just click the
<Delete All> button. Click <Reset> will clear your current selections.
Click <Apply> at the bottom of the screen to save the above configurations.
32
5.9. WPS (Wi-Fi Protected Setup)
WPS is the simplest way to establish a connection between the wireless clients and the
wireless router. You don’t have to select the encryption mode and fill in a long encryption
passphrase every time when you try to setup a wireless connection. You only need to
press a button on both wireless client and wireless router, and the WPS will do the rest for
you.
The wireless router supports two types of WPS: WPS via Push Button and WPS via PIN
code. If you want to use the Push Button, you have to push a specific button on the wireless
client or in the utility of the wireless client to start the WPS mode, and switch the wireless
router to WPS mode. You can simply push the WPS button of the wireless router, or click
the ‘Start to Process’ button in the web configuration interface. If you want to use the PIN
code, you have to know the PIN code of the wireless client and switch it to WPS mode, then
fill-in the PIN code of the wireless client through the web configuration interface of the
wireless router.
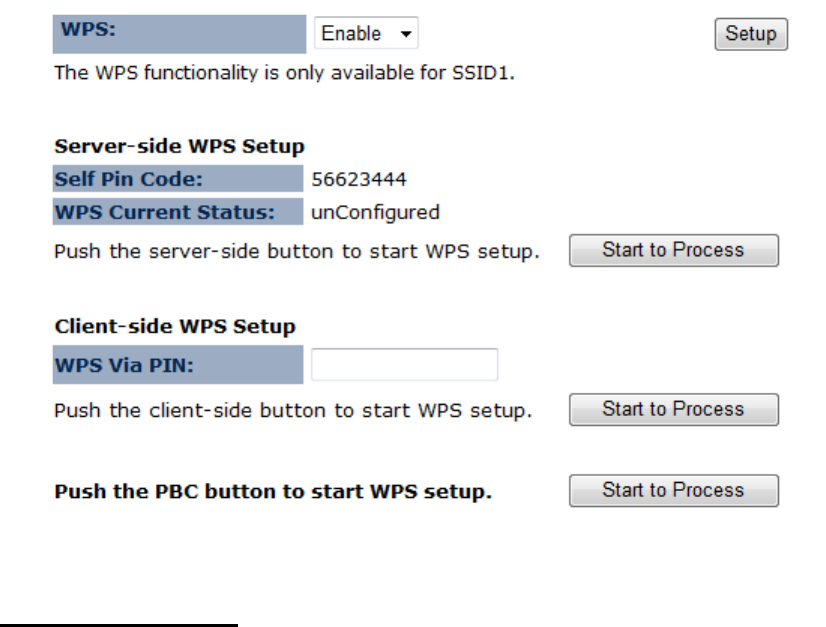
WPS: Enable/Disable WPS function from drop-down list.
Server-side Setup
Self Pin Code: This is the WPS PIN code of the wireless router. You may need this
information when connecting to other WPS-enabled wireless devices.
WPS Current Status: If the wireless security (encryption) function of this wireless router is
properly set, you’ll see a ‘Configured’ message here. Otherwise, you’ll see
‘UnConfigured’.
Software WPS button: Click on the Start to Process to begin the process of the WPS
function.

33
Client-side Setup
WPS via PIN: You can fill-in the PIN code of the wireless device and press the button to
start the WPS process. The router will wait for the WPS request from the wireless
device within 2 minutes.

34
5.10. Client List
This WLAN Client Table shows the Wireless client associate to this Wireless Router.
35
5.11. WMM

36
6. Network
6.1. Status
The status page shows the current LAN settings.
37
6.2. LAN
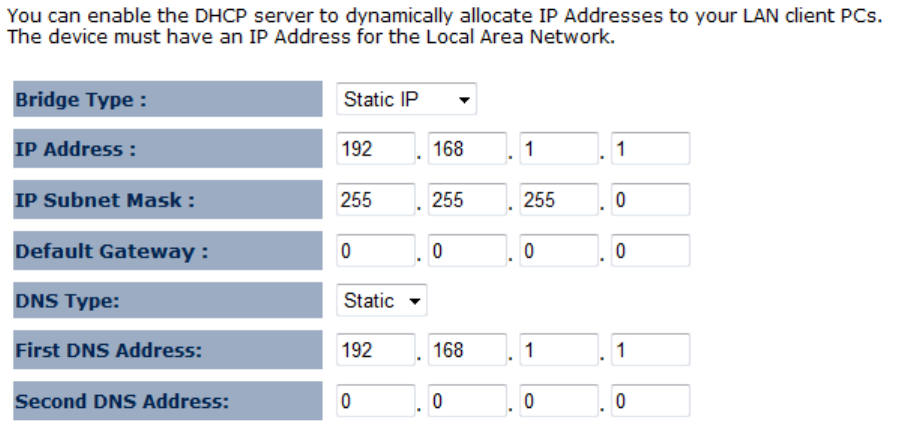
Configure you LAN settings by changing IP address, subnet mask, default
gateway and DNS settings.

38
7. Management
7.1. Admin
You can change the password required to log into the broadband router's system
web-based management. By default, the password is: admin. Passwords can contain 0 to
12 alphanumeric characters, and are case sensitive.
Old Password: Fill in the current password to allow changing to a new password.
New Password: Enter your new password and type it again in Repeat New Password for
verification purposes
Idle Timeout: Define the automatically log out period.
Click <Apply> at the bottom of the screen to save the above configurations.
39
7.2. SNMP
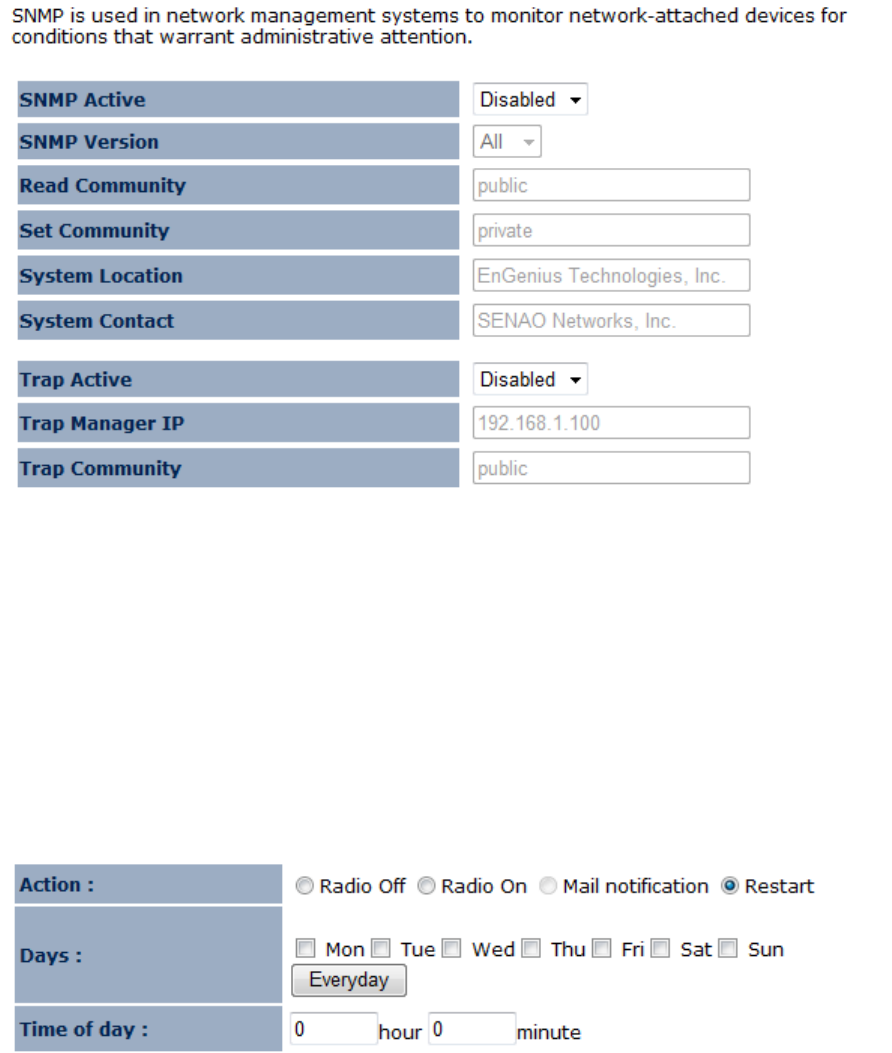
SNMP Active: Enable/Disable SNMP function from drop-down list.
SNMP Version: EOC7510 supports SNMP version v1 and v2c.
Read Community: Setup the read only community password.
Set Community: Setup the read and write community password.
System Location: Define the device location.
System Contact: Define the device contact information.
Trap Active: Enable/Disable Trap function.
Trap Manager IP: Setup the destination IP address that the trap message goes to.
Trap Community: Setup the Trap community password.
7.3. Schedule Settings
Action: Select the feature you would like to active.
Days: Define activate/deactivate period.
Time of day: Define activate/deactivate time.
40
7.4. Firmware
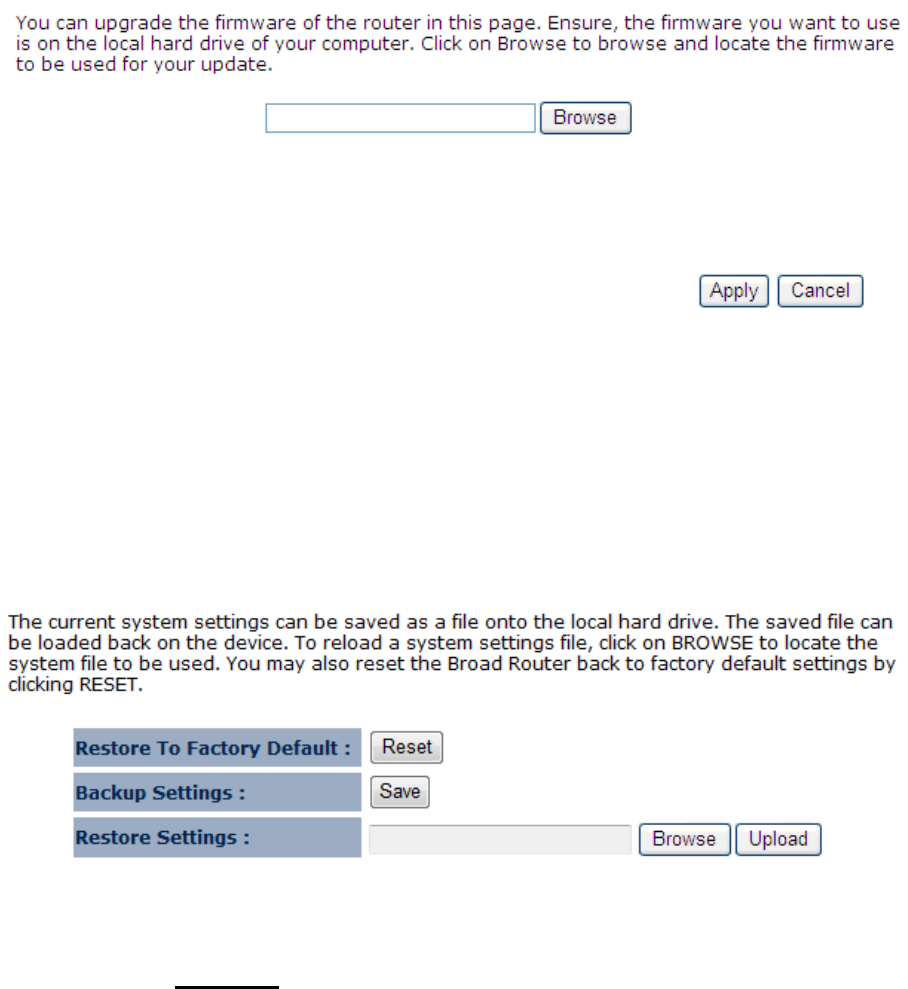
This page allows you to upgrade the router’s firmware. To upgrade the firmware of your
Broadband router, you need to download the firmware file to your local hard disk, and enter
that file name and path in the appropriate field on this page. You can also use the Browse
button to find the firmware file on your PC.
Once you’ve selected the new firmware file, click <Apply> at the bottom of the screen to
start the upgrade process
7.5. Configure
This page allows you to save the current router configurations. When you save the
configurations, you also can re-load the saved configurations into the router through the
Restore Settings. If extreme problems occur you can use the Restore to Factory Defaults to
set all configurations to its original default settings.
Restore Settings: This can save the Broadband router current configuration to a file
named "config.bin" on your PC. You can also use the <Upload> button to restore
the saved configuration to the Broadband router. Alternatively, you can use the
"Restore to Factory Defaults" tool to force the Broadband router to perform a power
reset and restore the original factory settings.

41
7.6. Reset
You can reset the AP when system stops responding correctly or stop functions.
42
8. Tools
8.1. Time Setting
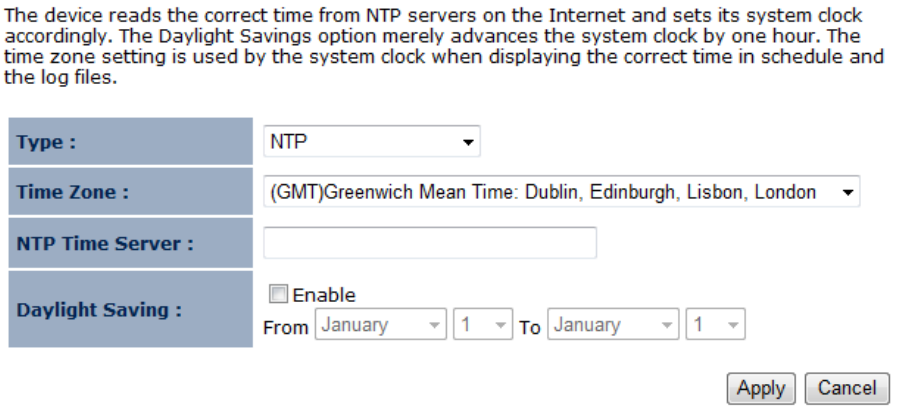
The Time Zone allows your router to reference or base its time on the settings configured
here, which will affect functions such as Log entries and Firewall settings.
Type: Define the time is Synchronize with PC or from NTP server.
Time Zone: Select the time zone of the country you are currently in. The router will set its
time based on your selection.
NTP Time Server: The router can set up external NTP Time Server.
Daylight Savings: The router can also take Daylight Savings into account. If you wish to
use this function, you must select the Daylight Savings Time period and check/tick
the enable box to enable your daylight saving configuration.
Click <Apply> at the bottom of the screen to save the above configurations.

43
8.2. Diagnosis
This page could let you diagnosis your current network status.
44
9. Network Configuration Example
9.1. Access Point
Access Point
Step1 Login to the web-based configuration interface with default IP
192.168.1.1
Step2 Select the Radio you would like it function as an Access Point
Step3 Select 802.11 a/b/g/n as your wireless mode.
Step4 Select channel with less interferences or enable auto channel
feature.
Step5 Specify the SSID for your broadcast SSID and you can also
configure multiple SSID at the same time.
Step6 Verify VLAN identifier to separate services among clients
Step7 Setup the authentication settings for each SSID.
Step8 Press Apply to save all changes.
Note: For more advanced settings, please refer to the previous chapters.
Wireless Client
Step1 Open wireless client utility software page.
Step2 Use site survey to scan nearby Access Point and select the certain
AP you would like to connect with or enter SSID manually.
Step3 Configure VLAN ID in your wireless device if available.
Step4 Select correct authentication type and password.
Caution: ECB7510’s Access Point Mode does not provide DHCP server so the Wireless Client
IP address must configure manually at the same subnet in Local Area Network
ECB7510
Client
Client
SSID2
SSID1
Ethernet Client
192.168.1.1
192.168.1.10
192.168.1.11
192.168.1.12

45
9.2. Client Bridge
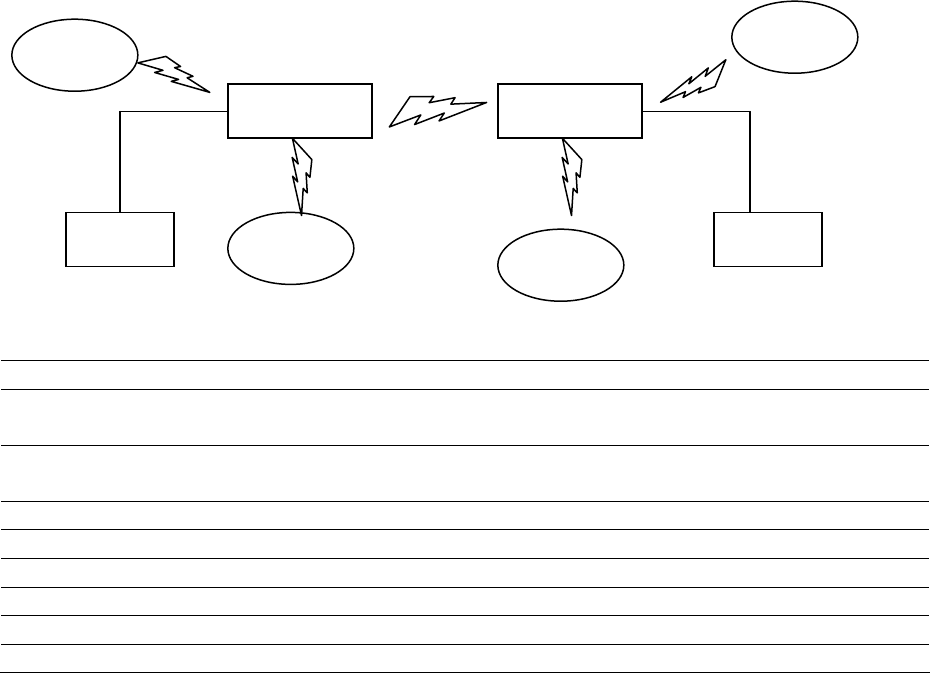
Client Bridge Mode functions like a wireless dongle. It must connect to an Access Point/AP
Router to join the network.
Please refer to the previous section to check Access point’s configuration.
Client Bridge
Step1 Login to the web-based configuration interface with default IP
192.168.1.1
Step2 Select a Radio to change Operation Mode to Client Bridge(CB)
from System -> Operation Mode.
Step3 Select 802.11a/b/g/n as your wireless mode.
Step4 Use site survey to scan Access Points that are available in nearby
area.
Step5 Select the AP you would like to associate with.
Step6 Setup the authentication settings that match to the Access Point’s
setting.
Step7 Press Apply to process all the configurations.
Note: Client Bridge’s IP setting must match to the Access Point’s subnet.
Access Point /
Wireless Router
Internet
ECB7510
Client
192.168.1.2
192.168.1.1
192.168.1.10
46
9.3. WDS Repeater
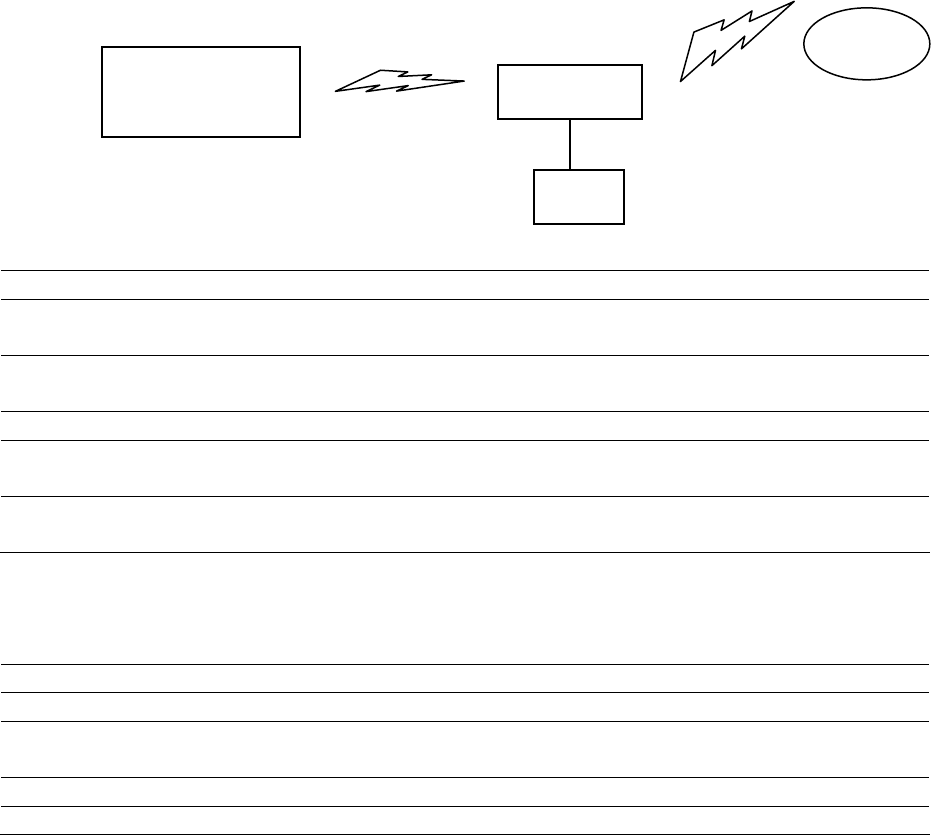
Use this feature to link multiple APs in a network, All clients associated with any APs can
communicate each other like an ad-hoc mode.
Please refer to the previous section to check Access point’s configuration.
WDS Bridge
Step1 Login to the web-based configuration interface with default IP
192.168.1.1
Step2 Select a Radio to change Operation Mode to WDS from System
-> Operation Mode.
Step3 Select 802.11a/b/g/n as your wireless mode.
Step4 Select channel you would like to use.
Step5 Setup the authentication settings
Step6 Setup WDS Link Settings.
Step7 Specify the AP’s MAC address you would like to connect with.
Step8 Press Apply to process all the configurations.
Caution: Each WDS bridge’s device must use the same Subnet, Wireless Mode, Wireless
Channel, and Security Setting.
ECB7510
Client Client
Client
ECB7510
Client
WDS 2.4GHz
Client
Client
5GHz
5GHz
5GHz
5GHz
192.168.1.1 192.168.1.2
47
9.4. Repeater
Repeater is used to extend the wireless coverage area of the Access Point. Please refer to the
previous section to configure the Access Point.
Repeater
Step1 Login to the web-based configuration interface with default IP
192.168.1.1
Step2 Select a Radio to change Operation Mode to Repeater from
System -> Operation Mode.
Step3 Select 802.11a/b/g/n as your wireless mode.
Step4 Use site survey to scan nearby Access Point and select the certain
AP you would like to connect with or enter SSID manually.
Step5 Select correct authentication type and password the same as
Access Point.
Note: 1. For more advanced settings, please refer to the previous chapters.
2. Repeater IP subnet must the same as the Access Point, please refer to the IP
Settings section for details.
Wireless Client
Step1 Open wireless client utility software page.
Step2 Use site survey to scan nearby Access Point and select the certain
AP you would like to connect with or enter SSID manually.
Step3 Configure VLAN ID in your wireless device if available.
Step4 Select correct authentication type and password.
Caution: Wireless Client IP address must configure manually at the same subnet in Local Area
Network or enable DHCP server of ECB7510 to retrieve IP automatically.
Access Point /
Wireless Router ECB7510
Client
Client
192.168.1.1
192.168.1.2
192.168.1.10
192.168.1.11

48
Europe – EU Declaration of Conformity
This device complies with the essential requirements of the R&TTE Directive 1999/5/EC. The
following test methods have been applied in order to prove presumption of conformity with the
essential requirements of the R&TTE Directive 1999/5/EC:
- EN60950-1:2006 A11:2009+A1:2010
Safety of Information Technology Equipment
- EN50385 : 2002
- Generic standard to demonstrate the compliance of electronic and electrical apparatus with the
basic restrictions related to human exposure to electromagnetic fields (0 Hz - 300 GHz)
- EN 300 328 V1.7.1: 2006-10
- Electromagnetic compatibility and Radio spectrum Matters (ERM); Wideband Transmission
systems; Data transmission equipment operating in the 2,4 GHz ISM band and using spread
spectrum modulation techniques; Harmonized EN covering essential requirements under article
3.2 of the R&TTE Directive
-
EN 301 489-1 V1.8.1: 2008-04
Electromagnetic compatibility and Radio Spectrum Matters (ERM); ElectroMagnetic
Compatibility (EMC) standard for radio equipment and services; Part 1: Common technical
requirements
- EN 301 489-17 V2.1.1 2009-05
- Electromagnetic compatibility and Radio spectrum Matters (ERM); ElectroMagnetic
Compatibility (EMC) standard for radio equipment and services; Part 17: Specific conditions for
2,4 GHz wideband transmission systems and 5 GHz high performance RLAN equipment
This device is a 2.4 GHz wideband transmission system (transceiver), intended for use in all EU
member states and EFTA countries, except in France and Italy where restrictive use applies.
In Italy the end-user should apply for a license at the national spectrum authorities in order to obtain
authorization to use the device for setting up outdoor radio links and/or for supplying public access to
telecommunications and/or network services.
This device may not be used for setting up outdoor radio links in France and in some areas the RF
output power may be limited to 10 mW EIRP in the frequency range of 2454 – 2483.5 MHz. For
detailed information the end-user should contact the national spectrum authority in France.
0560
Česky
[Czech] [Jméno výrobce] tímto prohlašuje, že tento [typ zařízení] je ve shodě se základními
požadavky a dalšími příslušnými ustanoveními směrnice 1999/5/ES.
Dansk
[Danish] Undertegnede [fabrikantens navn] erklærer herved, at følgende udstyr [udstyrets
typebetegnelse] overholder de væsentlige krav og øvrige relevante krav i direktiv
1999/5/EF.
Deutsch
[German] Hiermit erklärt [Name des Herstellers], dass sich das Gerät [Gerätetyp] in
Übereinstimmung mit den grundlegenden Anforderungen und den übrigen einschlägigen

49
Bestimmungen der Richtlinie 1999/5/EG befindet.
Eesti
[Estonian] Käesolevaga kinnitab [tootja nimi = name of manufacturer] seadme [seadme tüüp =
type of equipment] vastavust direktiivi 1999/5/EÜ põhinõuetele ja nimetatud direktiivist
tulenevatele teistele asjakohastele sätetele.
English Hereby, [name of manufacturer], declares that this [type of equipment] is in compliance
with the essential requirements and other relevant provisions of Directive 1999/5/EC.
Español
[Spanish] Por medio de la presente [nombre del fabricante] declara que el [clase de equipo]
cumple con los requisitos esenciales y cualesquiera otras disposiciones aplicables o
exigibles de la Directiva 1999/5/CE.
Ελληνική
[Greek]
ΜΕ ΤΗΝ ΠΑΡΟΥΣΑ [name of manufacturer] ∆ΗΛΩΝΕΙ ΟΤΙ [type of equipment]
ΣΥΜΜΟΡΦΩΝΕΤΑΙ ΠΡΟΣ ΤΙΣ ΟΥΣΙΩ∆ΕΙΣ ΑΠΑΙΤΗΣΕΙΣ ΚΑΙ ΤΙΣ ΛΟΙΠΕΣ
ΣΧΕΤΙΚΕΣ ∆ΙΑΤΑΞΕΙΣ ΤΗΣ Ο∆ΗΓΙΑΣ 1999/5/ΕΚ.
Français
[French] Par la présente [nom du fabricant] déclare que l'appareil [type d'appareil] est conforme
aux exigences essentielles et aux autres dispositions pertinentes de la directive
1999/5/CE.
Italiano
[Italian] Con la presente [nome del costruttore] dichiara che questo [tipo di apparecchio] è
conforme ai requisiti essenziali ed alle altre disposizioni pertinenti stabilite dalla
direttiva 1999/5/CE.
Latviski
[Latvian] Ar šo [name of manufacturer / izgatavotāja nosaukums] deklarē, ka [type of equipment
/ iekārtas tips] atbilst Direktīvas 1999/5/EK būtiskajām prasībām un citiem ar to
saistītajiem noteikumiem.
Lietuvių
[Lithuanian]
Šiuo [manufacturer name] deklaruoja, kad šis [equipment type] atitinka esminius
reikalavimus ir kitas 1999/5/EB Direktyvos nuostatas.
Nederlands
[Dutch]
Hierbij verklaart [naam van de fabrikant] dat het toestel [type van toestel] in
overeenstemming is met de essentiële eisen en de andere relevante bepalingen van
richtlijn 1999/5/EG.
Malti
[Maltese] Hawnhekk, [isem tal-manifattur], jiddikjara li dan [il-mudel tal-prodott] jikkonforma
mal-ħtiġijiet essenzjali u ma provvedimenti oħrajn relevanti li hemm fid-Dirrettiva
1999/5/EC.
Magyar
[Hungarian] Alulírott, [gyártó neve] nyilatkozom, hogy a [... típus] megfelel a vonatkozó alapvetõ
követelményeknek és az 1999/5/EC irányelv egyéb elõírásainak.
Polski
[Polish] Niniejszym [nazwa producenta] oświadcza, że [nazwa wyrobu] jest zgodny z
zasadniczymi wymogami oraz pozostałymi stosownymi postanowieniami Dyrektywy
1999/5/EC.
Português
[Portuguese] [Nome do fabricante] declara que este [tipo de equipamento] está conforme com os
requisitos essenciais e outras disposições da Directiva 1999/5/CE.
Slovensko
[Slovenian] [Ime proizvajalca] izjavlja, da je ta [tip opreme] v skladu z bistvenimi zahtevami in
ostalimi relevantnimi določili direktive 1999/5/ES.
Slovensky
[Slovak] [Meno výrobcu] týmto vyhlasuje, že [typ zariadenia] spĺňa základné požiadavky a
všetky príslušné ustanovenia Smernice 1999/5/ES.
Suomi
[Finnish] [Valmistaja = manufacturer] vakuuttaa täten että [type of equipment = laitteen
tyyppimerkintä] tyyppinen laite on direktiivin 1999/5/EY oleellisten vaatimusten ja sitä
koskevien direktiivin muiden ehtojen mukainen.
Svenska
[Swedish] Härmed intygar [företag] att denna [utrustningstyp] står I överensstämmelse med de
väsentliga egenskapskrav och övriga relevanta bestämmelser som framgår av direktiv
1999/5/EG.
50
Federal Communication Commission Interference Statement
This device complies with Part 15 of the FCC Rules. Operation is subject to the following two
conditions: (1) This device may not cause harmful interference, and (2) this device must accept any
interference received, including interference that may cause undesired operation.
This equipment has been tested and found to comply with the limits for a Class B digital device,
pursuant to Part 15 of the FCC Rules. These limits are designed to provide reasonable protection
against harmful interference in a residential installation. This equipment generates, uses and can
radiate radio frequency energy and, if not installed and used in accordance with the instructions, may
cause harmful interference to radio communications. However, there is no guarantee that
interference will not occur in a particular installation. If this equipment does cause harmful
interference to radio or television reception, which can be determined by turning the equipment off
and on, the user is encouraged to try to correct the interference by one of the following measures:
- Reorient or relocate the receiving antenna.
- Increase the separation between the equipment and receiver.
- Connect the equipment into an outlet on a circuit different from that
to which the receiver is connected.
- Consult the dealer or an experienced radio/TV technician for help.
FCC Caution: Any changes or modifications not expressly approved by the party responsible for
compliance could void the user's authority to operate this equipment.
This transmitter must not be co-located or operating in conjunction with any other antenna or
transmitter.
Operations in the 5.15-5.25GHz band are restricted to indoor usage only.
Radiation Exposure Statement:
This equipment complies with FCC radiation exposure limits set forth for an uncontrolled
environment. This equipment should be installed and operated with minimum distance 20cm between
the radiator & your body.