Senao Networks ENH200 Wireless Outdoor AP/CB User Manual
Senao Networks, Inc. Wireless Outdoor AP/CB
User Manual
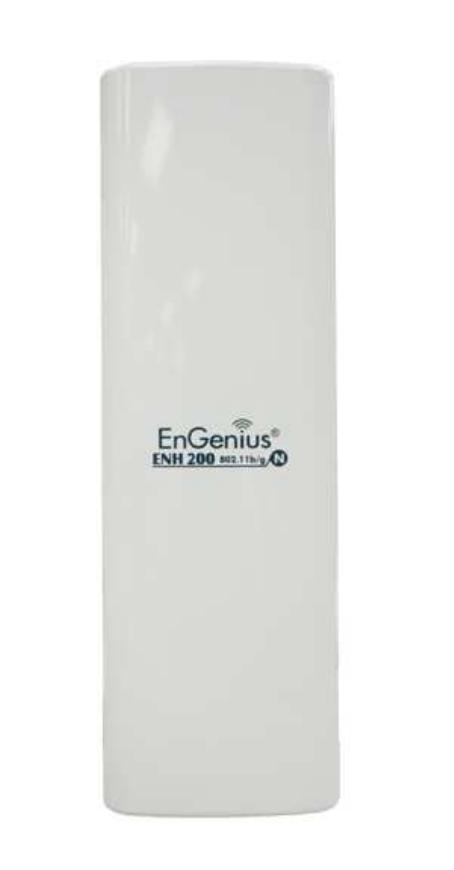
Wireless Outdoor AP/CB
User Manual
Version : 1.0
Table of Contents
1 PRODUCT OVERVIEW ........................................................................................................................................................... 5
1.1
F
EATURE
......................................................................................................................................................................... 5
1.2
B
ENEFITS
........................................................................................................................................................................ 7
1.3
P
ACKAGE
C
ONTENTS
......................................................................................................................................................... 8
1.3
S
YSTEM
R
EQUIREMENT
..................................................................................................................................................... 8
2 ENH200 MULTI-FUNCTION INSTRUCTION GUIDE ................................................................................................................ 9
2.1
A
CCESS
P
OINT
................................................................................................................................................................. 9
2.2
A
CCESS
P
OINT WITH
WDS
F
UNCTION
.................................................................................................................................. 9
2.3
C
LIENT
B
RIDGE
.............................................................................................................................................................. 10
2.4
WDS
B
RIDGE
................................................................................................................................................................ 10
2.7
C
LIENT
R
OUTER
............................................................................................................................................................. 11
3 COMPUTER CONFIGURATION INSTRUCTION..................................................................................................................... 12
3.1
A
SSIGN A
S
TATIC
IP......................................................................................................................................................... 12
3.2
L
OGGING
M
ETHOD
......................................................................................................................................................... 13
4 STATUS ................................................................................................................................................................................ 14
4.1
S
AVE
/L
OAD
................................................................................................................................................................... 14
4.2
M
AIN
.......................................................................................................................................................................... 15
4.3
W
IRELESS
C
LIENT
L
IST
..................................................................................................................................................... 16
4.4
S
YSTEM
L
OG
................................................................................................................................................................. 17
4.5
C
ONNECTION
S
TATUS
...................................................................................................................................................... 18
4.6
DHCP
C
LIENT
T
ABLE
...................................................................................................................................................... 19
5 SYSTEM ............................................................................................................................................................................... 20
5.1
S
WITCHING
O
PERATION
M
ODE
......................................................................................................................................... 20
6 WIRELESS CONFIGURATION ............................................................................................................................................... 22
6.1
W
IRELESS
S
ETTINGS
....................................................................................................................................................... 22
6.1.1 Access Point Mode .......................................................................................................................................... 22
6.1.2 Client Bridge Mode ......................................................................................................................................... 25
6.1.3 WDS Bridge Mode........................................................................................................................................... 27
6.1.4 Client Router Mode ......................................................................................................................................... 29
6.2
W
IRELESS
S
ECURITY
S
ETTINGS
.......................................................................................................................................... 31
6.2.1 WEP................................................................................................................................................................. 31
6.2.2 WPA-PSK ......................................................................................................................................................... 32
6.2.3 WPA2-PSK ....................................................................................................................................................... 33
6.2.4 WPA-PSK Mixed............................................................................................................................................... 34
6.2.5 WPA ................................................................................................................................................................ 35
6.2.6 WPA2 .............................................................................................................................................................. 36
6.2.7 WPA Mixed...................................................................................................................................................... 37
6.4
W
IRELESS
A
DVANCED
S
ETTINGS
........................................................................................................................................ 38
6.5
W
IRELESS
MAC
F
ILTER
................................................................................................................................................... 40
6.6
WDS
L
INK
S
ETTINGS
...................................................................................................................................................... 41
7 LAN SETUP .......................................................................................................................................................................... 42
7.1
IP
S
ETTINGS
.................................................................................................................................................................. 42
7.2
S
PANNING
T
REE
S
ETTINGS
............................................................................................................................................... 43
8 ROUTER SETTINGS .............................................................................................................................................................. 44
8.1
WAN
S
ETTINGS
............................................................................................................................................................. 44
8.1.1 Static IP ........................................................................................................................................................... 44
8.1.2 DHCP (Dynamic IP).......................................................................................................................................... 46
8.1.3 PPPoE (Point-to-Point Protocol over Ethernet)................................................................................................ 48
8.1.4 PPTP (Point-to-Point Tunneling Protocol)........................................................................................................ 50
8.2
LAN
S
ETTINGS
(R
OUTER
M
ODE
)...................................................................................................................................... 52
8.3
VPN
P
ASS
T
HROUGH
...................................................................................................................................................... 53
8.4
P
ORT
F
ORWARDING
........................................................................................................................................................ 54
8.5
DMZ........................................................................................................................................................................... 55
9 MANAGEMENT SETTINGS .................................................................................................................................................. 56
9.1
A
DMINISTRATION
........................................................................................................................................................... 56
9.2
M
ANAGEMENT
VLAN .................................................................................................................................................... 58
9.3
SNMP
S
ETTINGS
........................................................................................................................................................... 59
9.4
B
ACKUP
/R
ESTORE
S
ETTINGS
............................................................................................................................................. 60
9.5
F
IRMWARE
U
PGRADE
...................................................................................................................................................... 61
9.6
T
IME
S
ETTINGS
.............................................................................................................................................................. 62
9.7
L
OG
............................................................................................................................................................................. 63
9.8
D
IAGNOSTICS
................................................................................................................................................................ 64
10 NETWORK CONFIGURATION EXAMPLE............................................................................................................................ 65
10.1
A
CCESS
P
OINT
............................................................................................................................................................. 65
10.2
C
LIENT
B
RIDGE
M
ODE
.................................................................................................................................................. 66
10.3
WDS
B
RIDGE
M
ODE
.................................................................................................................................................... 67
10.4
C
LIENT
R
OUTER
........................................................................................................................................................... 68
E
UROPE
–
EU
D
ECLARATION OF
C
ONFORMITY
........................................................................................................................... 71

About This Document
This document is written by EnGenius Inc. EnGenius Inc. has rights to change any of this document
without notice and all rights reserved. This document can only be used for guiding the configuration
setup of EnGenius products.
This document is to demonstrate the EnGenius ENH200 Wireless Access Point & Client Bridge.
Please read the document carefully before setup the ENH200. If the damage is caused by the
inappropriate behaviors, the repair will not be included in the warranty.
Formats
This document uses following symbols to indicate and highlight special message.
Caution: This symbol represents the Vital message and it could be harmful for the
device or settings.
Note: This symbol represents the important message for the settings.
Tip: This symbol represents the alternative choice that can save time or resources.
Before you start
__________________________________________________
The following equipments are essential to setup the ENH200:
1. One Computer/Notebook and internet accessible.
2. Two Ethernet Cables.
3. One EnGenius device – ENH200.
The equipments listed above are only for setup the ENH200, you will need more
equipment to connect the internet and it is depend on your internet network structure. You may
refer to the chapter 2 for more information.
1 Product Overview
Thank you for using ENH200. It is a powerful, enhanced, enterprise scale product with 4+1
multi-functions Access Point, Access Point with WDS function, Client Bridge, WDS Bridge, and Client
Router.
ENH200 uses the latest wireless technology 802.11n standard. It has faster transmit/receive wireless
speed. ENH200 gives you a great advantage to save your time and cost to expend your network. It is
also compatible with 802.11b and 802.11g.
ENH200 is easily to install almost anywhere with Power over Ethernet for quick indoor installation
and regular Power by Adapter. ENH200 can manage power level control, Narrow bandwidth selection,
Traffic shaping and Real-time RSSI indicator. ENH200 is fully support of security encryption including
Wi-Fi Protected Access (WPA-PSK/WPA2-PSK), 64/128/152-bit WEP Encryption and IEEE 802.1x with
RADIUS Accounting.
1.1 Feature
The following list describes the design of the ENH200 made possible through the power and
flexibility of wireless LANs:
a) Difficult-to-wire environments
There are many situations where wires cannot be laid easily. Historic buildings, older
buildings, open areas and across busy streets make the installation of LANs either
impossible or very expensive.
b) Temporary workgroups
Consider situations in parks, athletic arenas, exhibition centers, disaster-recovery,
temporary offices and construction sites where one wants a temporary WLAN established
and removed.
c) The ability to access real-time information
Doctors/nurses, point-of-sale employees, and warehouse workers can access real-time
information while dealing with patients, serving customers and processing information.
d) Frequently changed environments
Show rooms, meeting rooms, retail stores, and manufacturing sites where frequently
rearrange the workplace.

e) Wireless extensions to Ethernet networks
Network managers in dynamic environments can minimize the overhead caused by moves,
extensions to networks, and other changes with wireless LANs.
f) Wired LAN backup
Network managers implement wireless LANs to provide backup for mission-critical
applications running on wired networks.
g) Training/Educational facilities
Training sites at corporations and students at universities use wireless connectivity to ease
access to information, information exchanges, and learning.
Benefits
High Speed Data Rate Up
to 150Mbps
Capable of handling heavy data payloads such as MPEG video
streaming
High Output Power up to
26 dBm Extended excellent Range and Coverage
IEEE 802.11b/g/n
Compliant
Fully Interoperable with IEEE 802.11b/IEEE 802.11g/IEEE 802.11n
compliant devices
4+1 Multi-Function Users can use different mode in various environment
Point-to-point,
Point-to-multipoint
Wireless Connectivity
Let users transfer data between two buildings or multiple buildings
Channel Bandwidth
Selection Using different bandwidth to reach varied distance
Support RSSI Indicator
(CB mode) Users can select the best signal to connect with AP easily
Power-over-Ethernet Flexible Access Point locations and cost savings. ENH200 must uses
the adapter provided in the package.
Support Multi-SSID
function (4 SSID) in AP
mode
Allow clients to access different networks through a single access
point and assign different policies and functions for each SSID by
manager
WPA2/WPA/ WEP/ IEEE
802.1x support Fully support all types of security types.
MAC address filtering in
AP mode Ensures secure network connection
PPPoE/PPTP function
support (AP Router/CR
mode)
Easy to access internet via ISP service authentication
SNMP Remote
Configuration
Management
Help administrators to remotely configure or manage the Access
Point easily.
QoS (WMM) support Enhance user performance and density

1.2 Benefits
Access Point Mode Use this feature to setup the access point’s configuration information.
It has support adjusting transmit power and channel. Client can access
the network with different regulatory settings and automatically
change to the local regulations.
Client Bridge Mode Use this feature to connect to an Access Point and enjoy the great
speed of surfing internet.
WDS Mode Use this feature to link multiple APs in a network, All clients associated
with any APs can communicate each other like an ad-hoc mode.
Client Router Mode This feature functions completely opposite but similarly with AP
Router Mode. Client Router connected to an AP wirelessly and
transmit internet connection protocol through AP to access the
internet.
Multiple SSIDs ENH200 supports up to 4 SSIDs on your access point. The following
options can be set to each SS to each SSID:
- SSID for public or private network
- Authentication is fully supported
- VLAN identifier
- Radius accounting identifier
- Profile isolation for infrastructure network
VLAN Specify a VLAN number for each SSID to separate the services among
clients.
QoS Use this feature to limit the incoming or outgoing throughput.
Wi-Fi Protect Access Wi-Fi Protect Access is a standard-based interoperable security
enhancement that increases the level of data protection and access
control for existing and future wireless LAN system. It is compatible
with IEEE 802.11i standard WPA leverages TKIP and 802.1X for
authenticated key management.

1.3 Package Contents
Open the package carefully, and make sure that none of the items listed below are missing. Do not
discard the packing materials, in case of return; the unit must be shipped in its original package.
1* Wireless Access Point / Client Bridge (ENH200)
1* 24V/0.6A Power Adapter
1* QIG
1* CD (User Manual)
Using other Power Adapter than the one included with ENH200 may cause damage of the device.
1.3 System Requirement
The following conditions are the minimum system requirement.
A computer with an Ethernet interface and operating under Windows XP, Vista, 7 or Linux.
Internet Browser that supports HTTP and JavaScript.
2 ENH200 Multi-Function Instruction Guide
2.1 Access Point
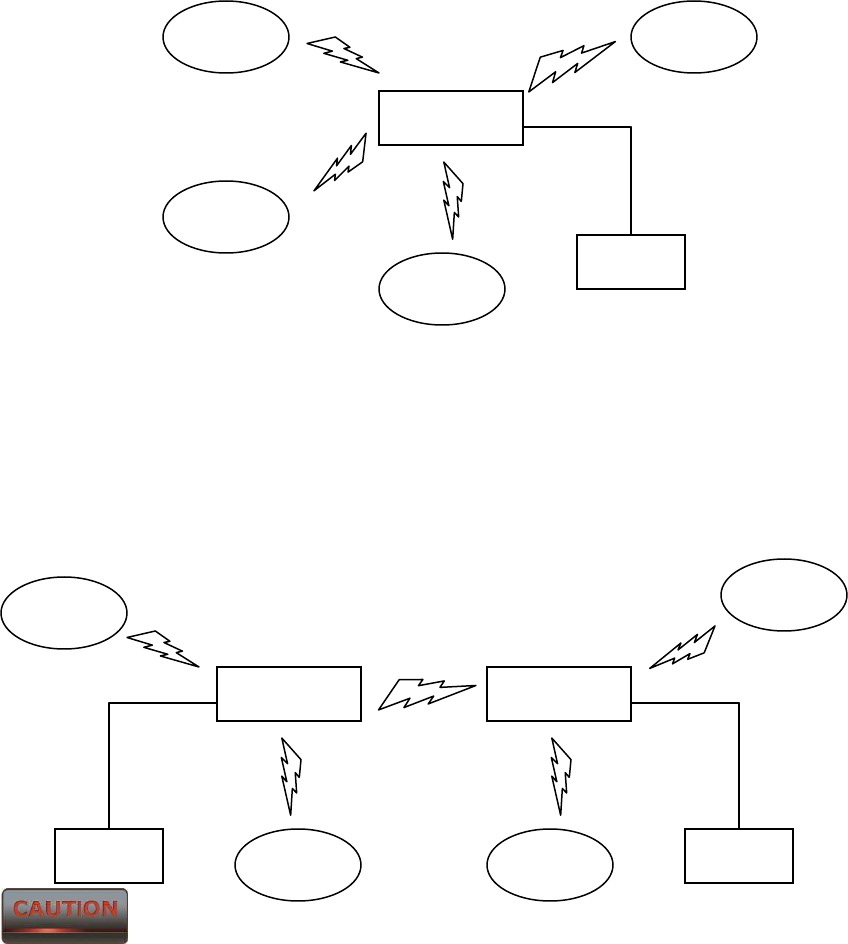
In the Access Point Mode, ENH200 function likes a central connection for any stations or clients that
support IEEE 802.11b/g/n network. Stations and Client must configure the same SSID and Security
Password to associate within the range. ENH200 supports 4 different SSIDs to separate different
clients at the same time.
2.2 Access Point with WDS Function
ENH200 also supports WDS function in Access Point Mode without losing AP’s capabilities. Configure
others Access Point’s Wireless MAC Address in both Access Point devices to enlarge the wireless area
by enabling WDS Link Settings. WDS function can support up to 8 different AP’s MAC addresses.
Not every Access Point device has support WDS in Access Point Mode. It is
recommended using ENH200 if you would like to use this service.
ENH200
Client Client
Client
ENH200
Client
WDS
ENH200
Client
Client
Client
Client
SSID1
SSID2
SSID3
SSID4
Ethernet
Client
Client Client
2.3 Client Bridge
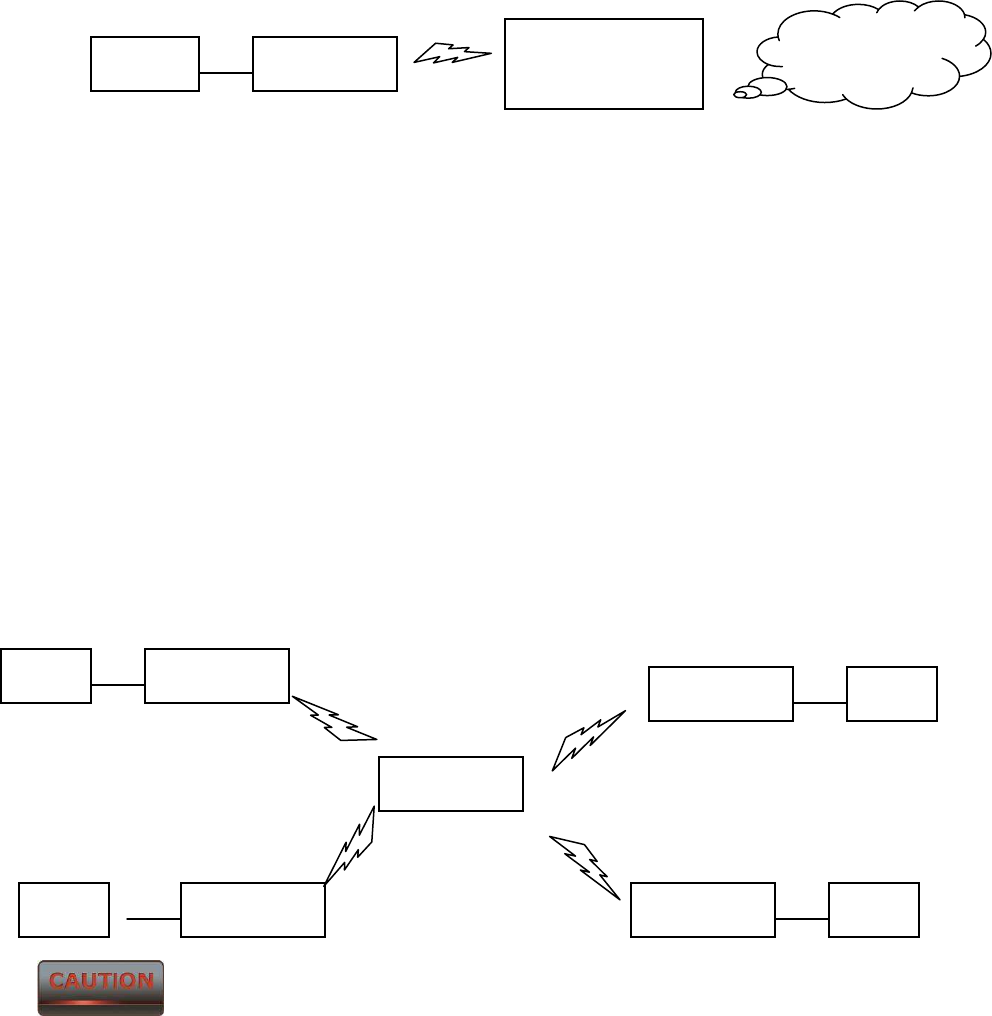
In the Client Bridge Mode, the ENH200 function likes a wireless client connecting to an Access Point
wirelessly and surf internet whenever you want. Using Site Survey to scan all the Access Point within
the range and configure its SSID and Security Password to associate with it. Connect you station to
the LAN port of the ENH200 via Ethernet.
2.4 WDS Bridge
In the WDS Bridge Mode, the ENH200 can wirelessly connect different LANs by just simply configure
each other’s MAC Address and Security Settings. This mode is used when two wired LANs locate in
small distance and want to communicate each other. The best solution is using ENH200 wirelessly
connect two wired LANs. WDS Bridge Mode can establish 16 WDS links, the network diagram is like a
Star.
WDS Bridge Mode is unlike Access Point. APs linked by WDS are using the same
frequency channel, more APs connected together may lower throughput. Please be aware to avoid
loop connection diagram, otherwise enable Spanning Tree Function.
Access Point /
Wireless Router
Internet
ENH200
Client
ENH200
WDS
ENH200
WDS
WDS
Client
WDS
Client
ENH200
Client
ENH200
ENH200
Client

2.7 Client Router
In the Client Router Mode, the ENH200 has DHCP Server build inside that allows many LANs
automatically generate an IP address to share the same Internet. Connect an AP/WISP Wirelessly and
connect to LANs via wired. Client Router Mode is act completely opposite to the AP Router Mode.
ENH200
AP / WISP
PC
PC
PC
3 Computer Configuration Instruction
The default operating mode is Client Bridge. Client Bridge will not assign an IP address to the
computer/notebook. Therefore, follow the steps to assign an IP address to your Ethernet card.
3.1 Assign a Static IP
In order to configure ENH200, please follow the instruction below:
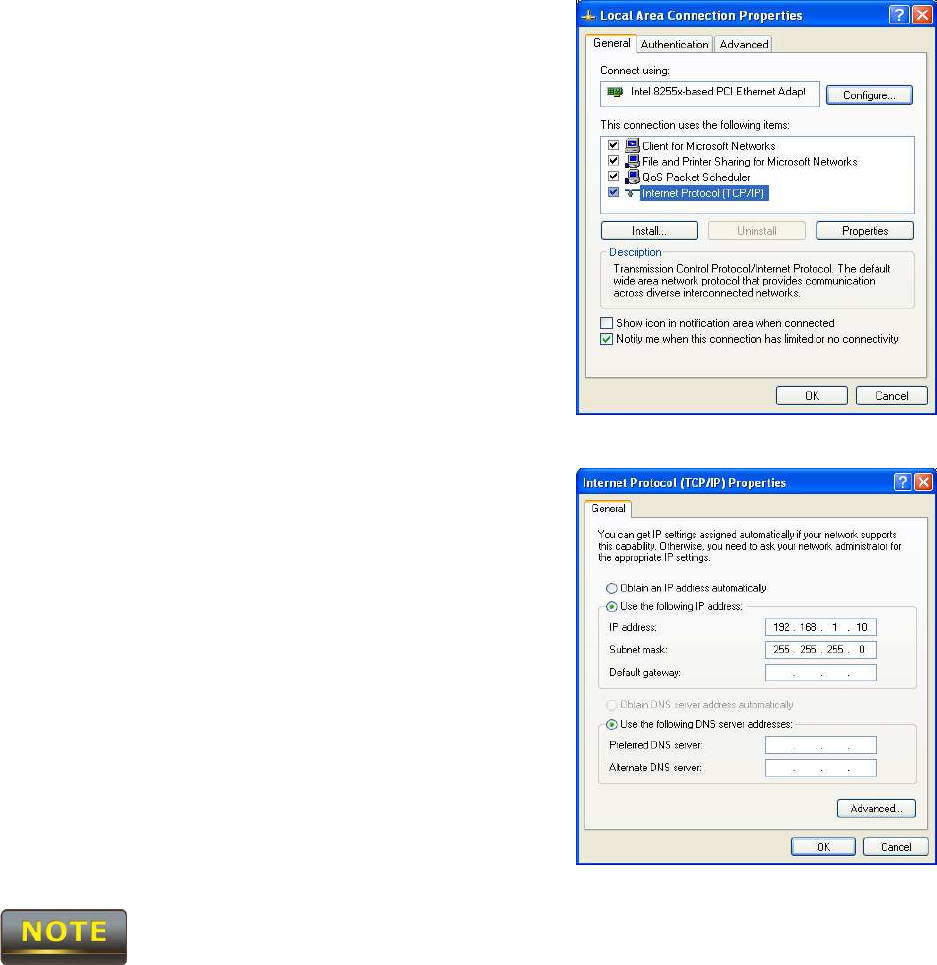
1. In the Control Panel, double click Network
Connections and then double click on the connection of
your Network Interface Card (NIC). You will then see the
following screen.
2. Select Internet Protocol (TCP/IP) and then click on the
Properties button. This will allow you to configure the
TCP/IP settings of your PC/Notebook
3. Select Use the following IP address radio button and
then enter the IP address and subnet mask. Ensure that
the IP address and subnet mask are on the same subnet
as the device.
4. Click on the OK button to close this window, and then
close LAN properties window.
IP Address entered in the TCP/IP Properties needs to be at the same subnet of the ENH200 IP Address.
For example: ENH200’s default IP Address is 192.168.1.1 so the IP Address in the TCP/IP settings
could be 192.168.1.10.
3.2 Logging Method
After complete the IP settings from last section, you can now access the web-based configuration
menu.
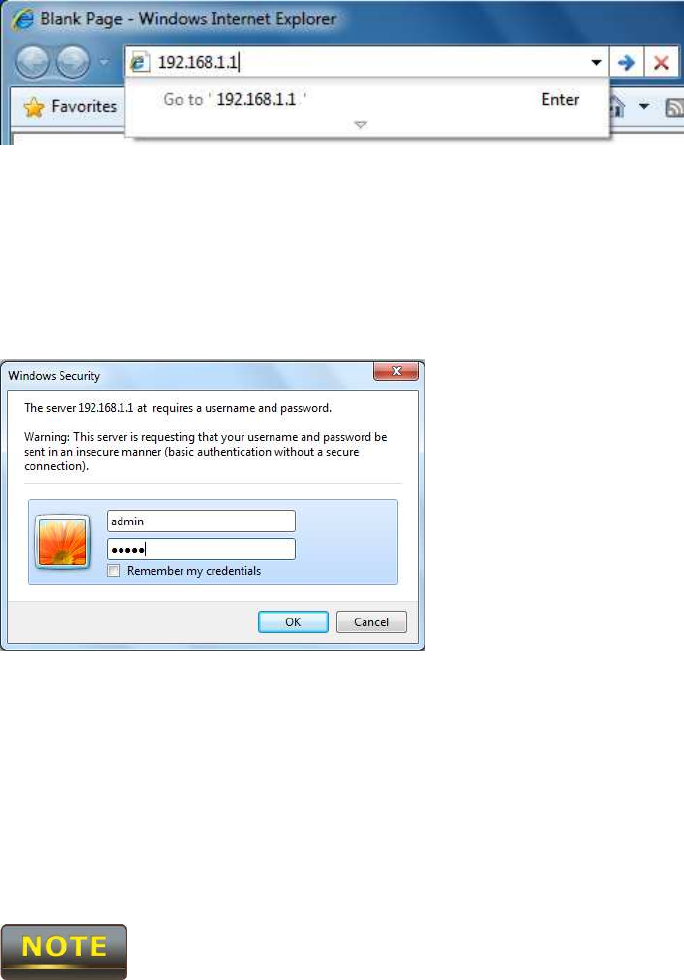
1. Open web browser
2. Enter IP 192.168.1.1 into you address filter.
Caution: If you have changed the ENH200 LAN IP address, make sure you enter the correct IP
Address.
3. After connected to the ENH200 successfully, browser will pop out a Windows Security window.
Please enter the correct Username and Password.
4. The default Username and Password are both admin.
If you have changed the Username and Password, please enter your own Username and
Password.
4 Status
Status section is on the navigation drop-down menu. You will then see three options: Main, Wireless
Client List, System Log, WDS Link Status, Connection Status, and DHCP Client Table. Each option is
described in detail below.
4.1 Save/Load
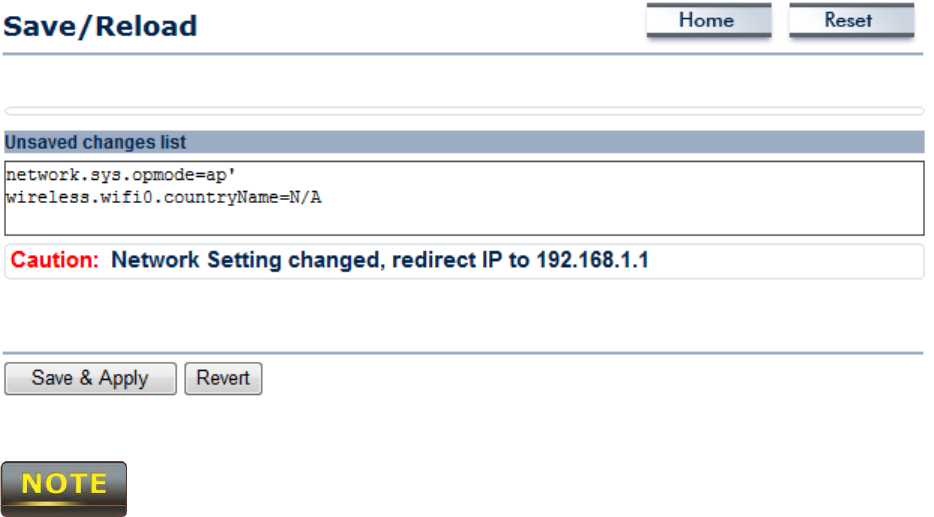
This page allows viewing the modified changes. The changes show in the Unsaved changes list table.
You can decide to cancel all the changes or to compile to the new setting.
You cannot cancel the specific settings. You can only compile all the settings or revert to the previous
settings.
4.2 Main
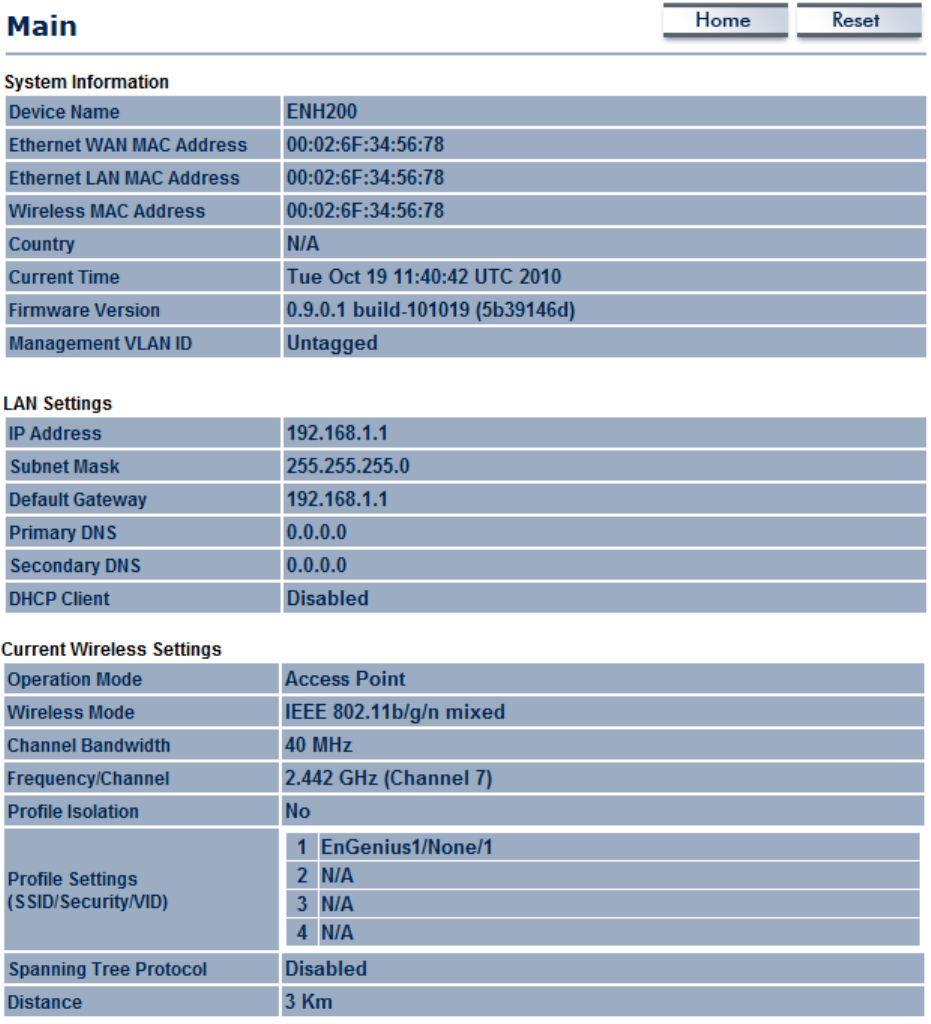
Click on the Main link under the Status drop-down menu or click Home from the top-right of the
webpage. The status that is displayed corresponds with the operating mode that is selected.
Information such as operating mode, system up time, firmware version, serial number, kernel
version and application version are displayed in the ‘System’ section. LAN IP address, subnet mask,
and MAC address are displayed in the ‘LAN’ section. In the ‘Wireless section, the frequency, channel
is displayed. Since this device supports multiple-SSIDs, the details of each SSID, such as ESSID and its
security settings are displayed.

4.3 Wireless Client List
Click on the Wireless Client List link under the Status drop-down menu. This page displays the list of
Clients that are associated to the ENH200.
The MAC addresses and signal strength for each client is displayed. Click on the Refresh button to
refresh the client list
4.4 System Log
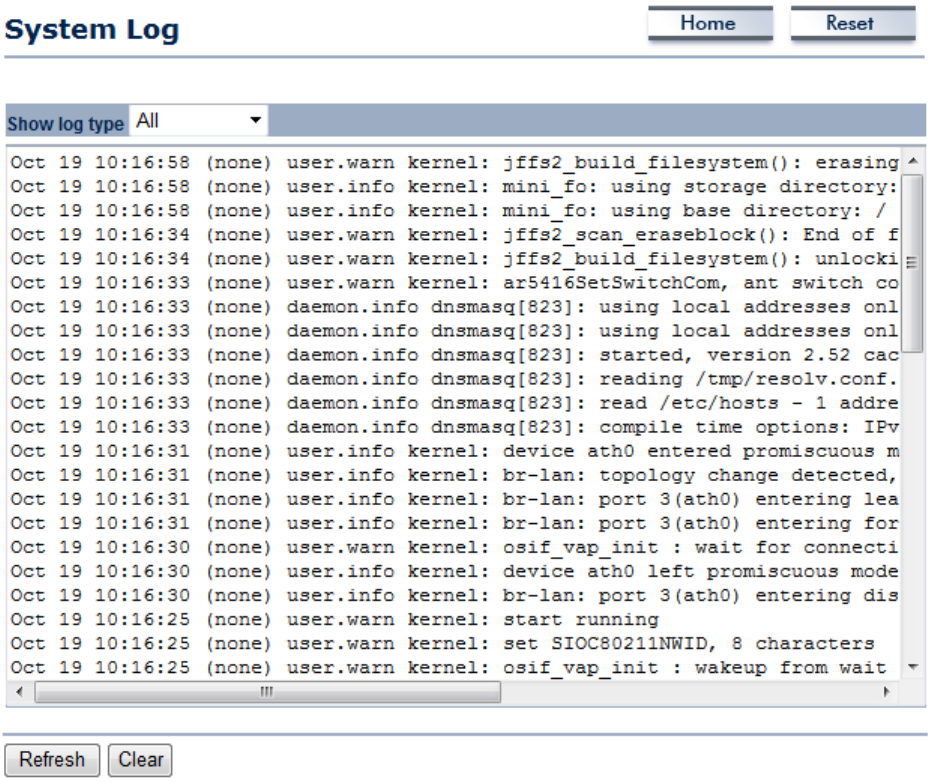
Click on the System Log link under the Status drop-down menu. The device automatically logs
(records) events of possible interest in its internal memory. If there is not enough internal memory
for all events, logs of older events are deleted, but logs of the latest events are retained.
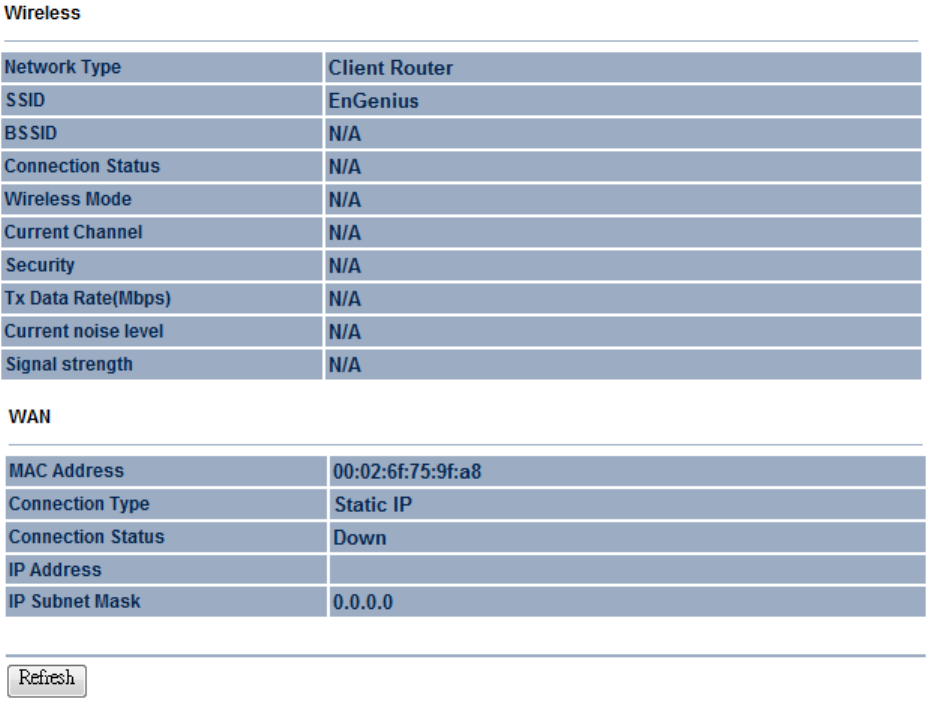
4.5 Connection Status
Click on the Connection Status link under the Status drop-down menu. This page displays the
current status of the network, including network type, SSID, BSSID, connection status, wireless
mode, current channel, security, data rate, noise level and signal strength.

4.6 DHCP Client Table
Click on the DHCP Client List link under the Status drop-down menu. This page displays the list of
Clients that are associated to the ENH200 through DHCP.
The MAC addresses and signal strength for each client is displayed. Click on the Refresh button to
refresh the client list.
5 System
5.1 Switching Operation Mode
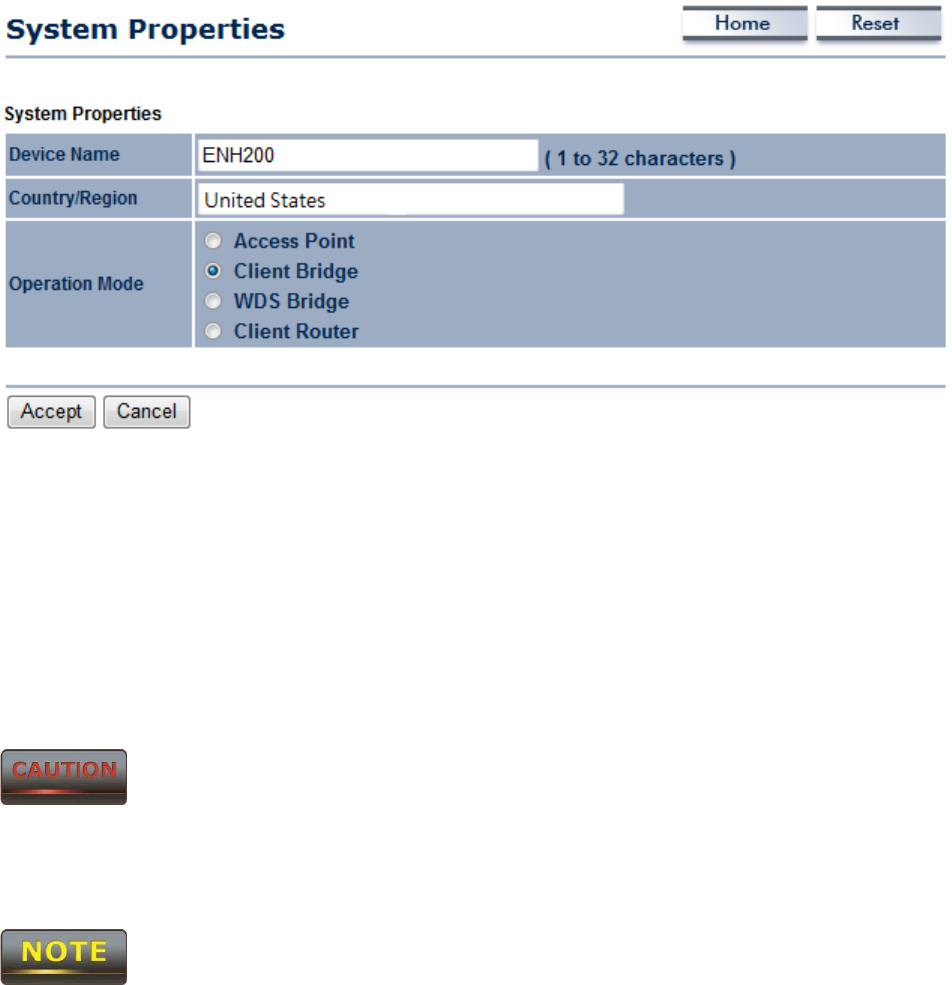
The ENH200 supports 4+1 operation modes: Access Point, Client Bridge, WDS Bridge, and Client
Router. In order to switching between the operating modes, please go to System -> Operation mode.
Click System Properties under System Section to begin.
.
Device Name: Specify a name for the device. It is not the broadcast SSID. It will be shown in SNMP
management.
Country/Region: United States
Operation Mode: Select an operation mode via Radio Button.
Click Accept to confirm the changes.
Accept does not compile the changes, you must go to Status -> Save/Load to apply the new settings.
Please refer to the chapter 4.1 for more detail.
If you would like to use Access Point with WDS Function mode, please select Access Point Mode and
then enable WDS function in the Wireless Network section.
6 Wireless Configuration
This section will guide you through all the wireless settings. Please read the instruction carefully.
Inappropriate setting could lower the performance or affect the network structure. Before you
continue, please make sure you have chosen the correct operating mode.
6.1 Wireless Settings
This section is the basic wireless settings. Please read the description carefully and check the steps on
chapter 10 in case you need more detail information.
6.1.1 Access Point Mode
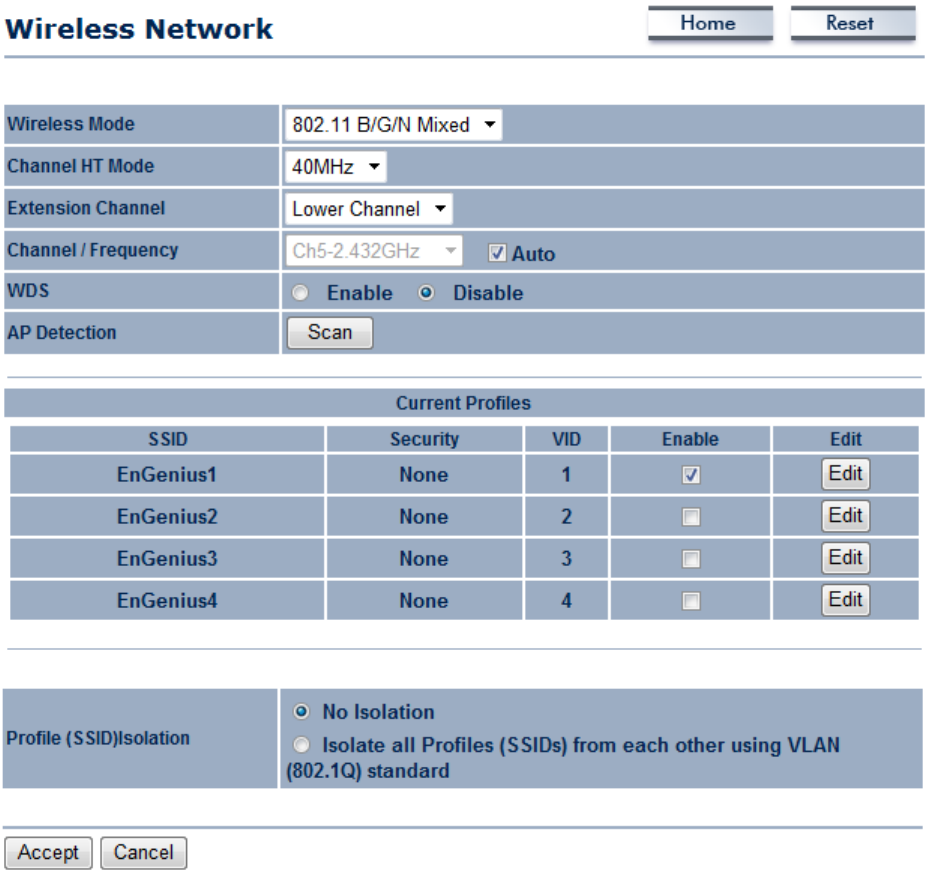
Wireless Mode The wireless mode supports 802.11b/g/n mixed modes. It is
compatible with the most common known wireless band.
Channel HT Mode The default channel bandwidth is 40 MHz. The larger channel can
provide better transmit quality and speed.
Extension Channel Specify the upper channel or lower channel selection. It may influence
the Auto channel function
Channel / Frequency The channel availability is based on the US regulation.
Auto Place a Check mark to enable Auto channel selection.
AP Detection AP Detection can help to select a best channel by scan nearby area.
Current Profile Configure up to four different SSIDs, it can help to divide group of
clients to access the network. Press Edit to configure the profile and
place a Check to enable extra SSID.
Profile Isolation Restricted Client to communicate with different VID by Selecting the
Radio button.
Accept / Cancel Press Accept to confirm the changes or Cancel to return previous
settings.
Accept does not compile the changes, you must go to Status -> Save/Load to apply the new settings.
Please refer to the chapter 4.1 for more detail.

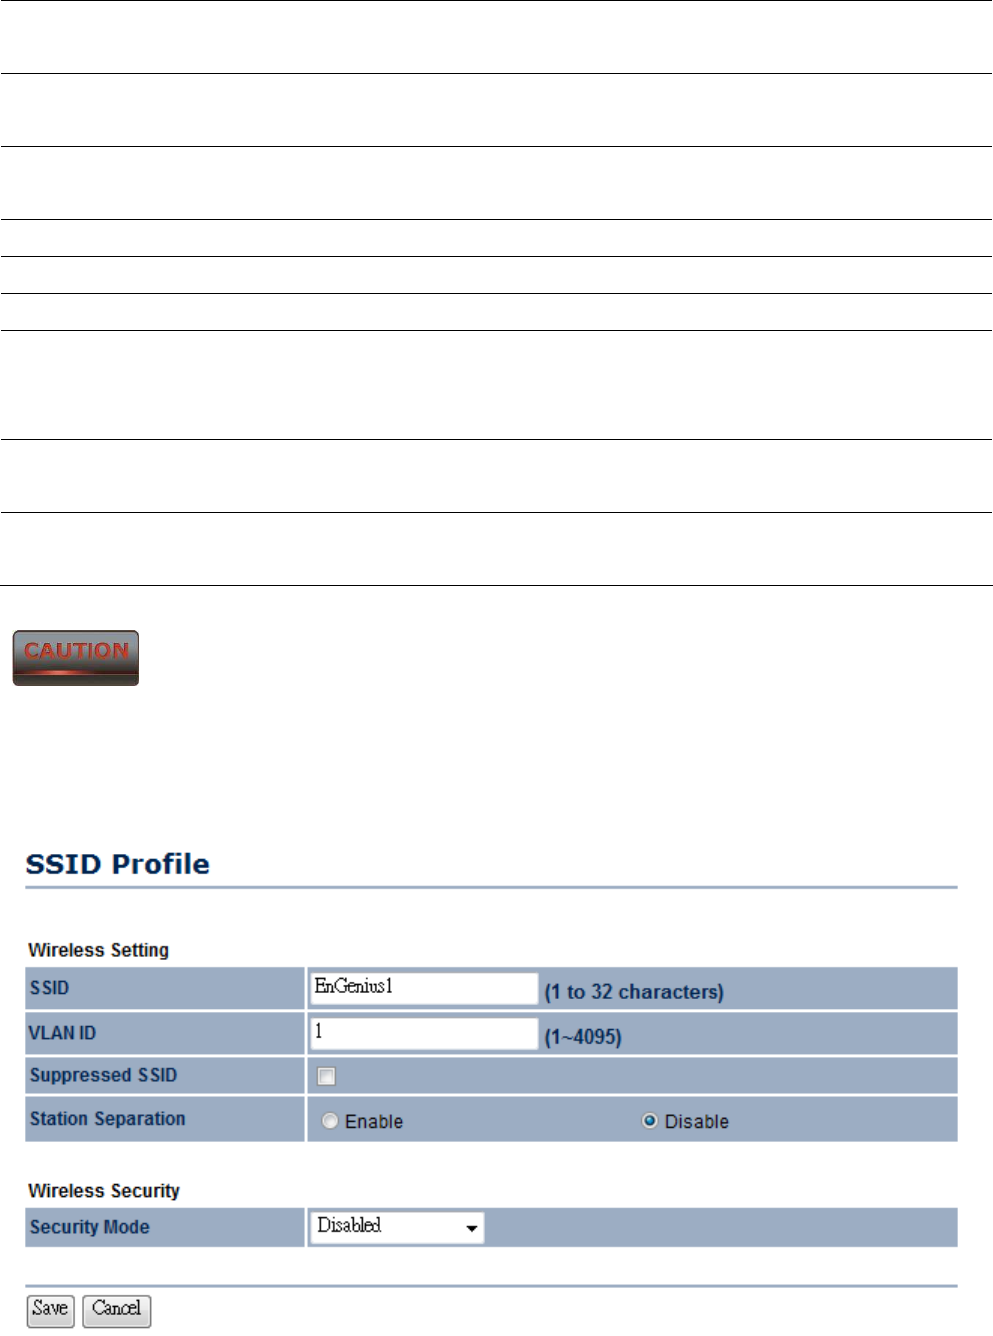
SSID Specify the SSID for current profile.
VLAN ID Specify the VLAN tag for current profile.
Suppressed SSID Place a Check to hide the SSID. Client will not be able to see the
broadcast SSID in Site Survey.
Station Separation Select the Radio Button to allow / deny client to communicate each
other.
Wireless Security Please refer to the Wireless Security section.
Save / Cancel Press Save to save the changes or Cancel to return previous settings.
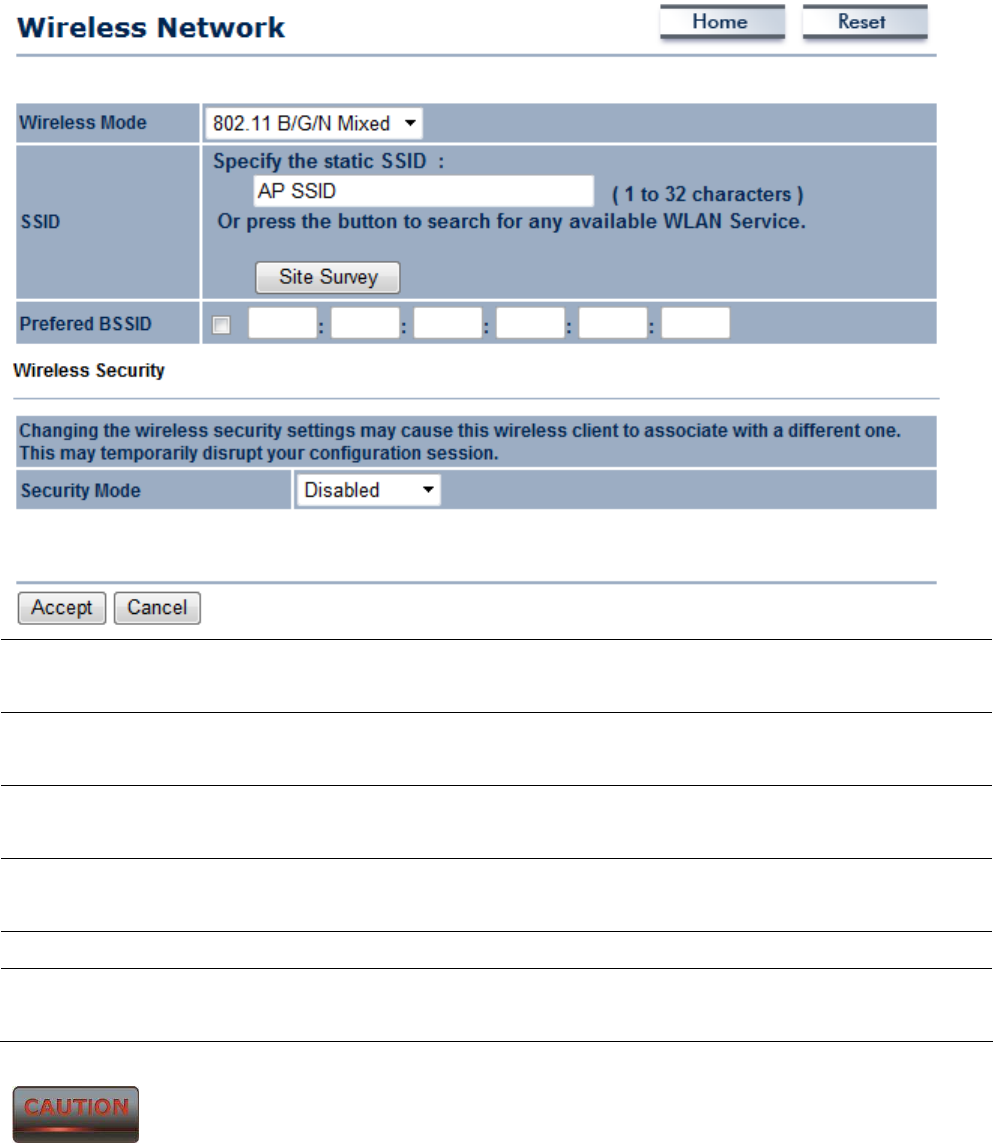
6.1.2 Client Bridge Mode
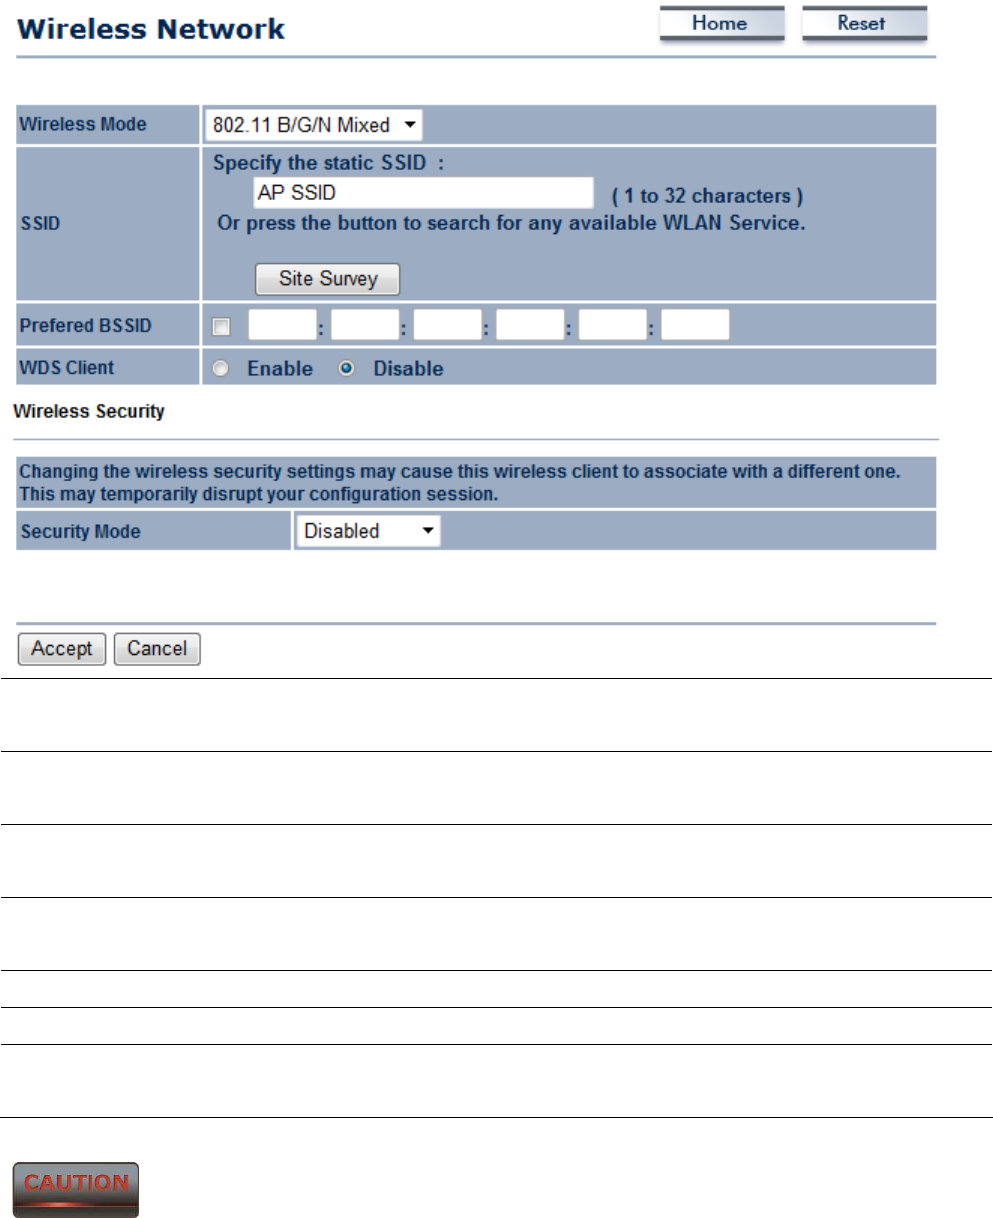
Wireless Mode The wireless mode supports 802.11b/g/n mixed modes. It is
compatible with the most common known wireless band.
SSID Specify the SSID if known. SSID text box will be automatically fill in
when select an AP in the Site Survey.
Site Survey Using Site Survey to scan nearby APs and then select the AP to
establish the connection.
Prefer BSSID Specify the MAC address if known. Prefer BSSID text box will be
automatically fill in when select an AP in the Site Survey.
WDS Client Place a Radio button to Enable / Disable WDS Client.
Wireless Security Please refer to the chapter 6.2 for details.
Accept / Cancel Press Accept to confirm the changes or Cancel to return previous
settings.
Accept does not compile the changes, you must go to Status -> Save/Load to apply the new settings.
Please refer to the chapter 4.1 for more detail.
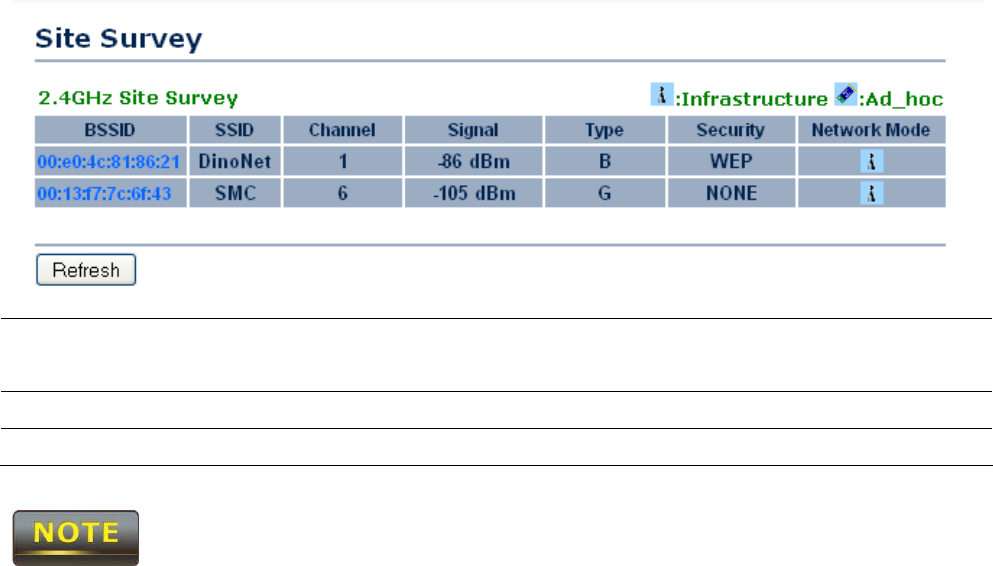
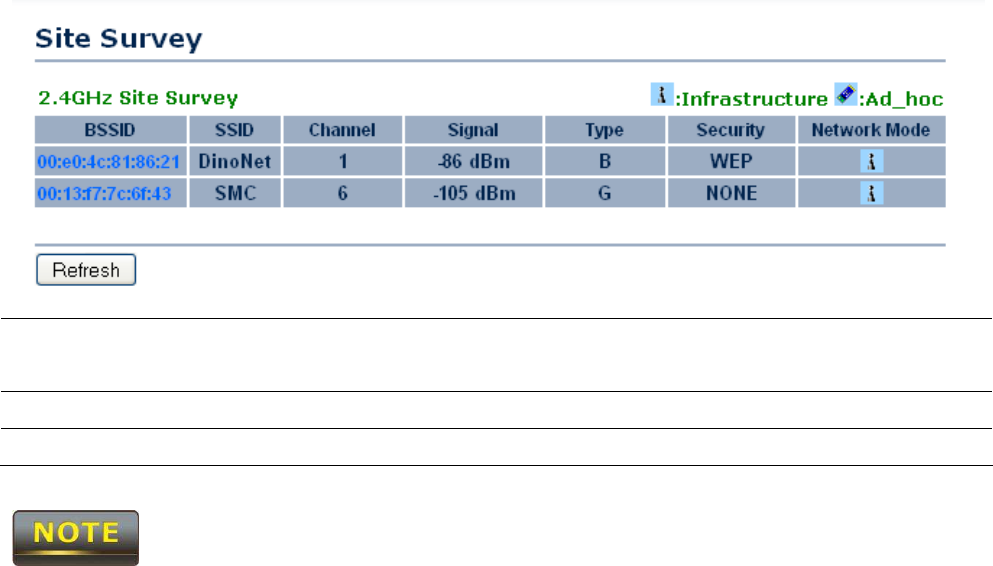
Profile After Site Survey, webpage will display all nearby area’s Access Point.
Click the BSSID if you would like to connect with it.
Wireless Security Please refer to the Wireless Security section.
Refresh Press Refresh to scan again.
If the Access Point is suppressed its own SSID, SSID section will be blank, the SSID must be filled in
manually.
6.1.3 WDS Bridge Mode
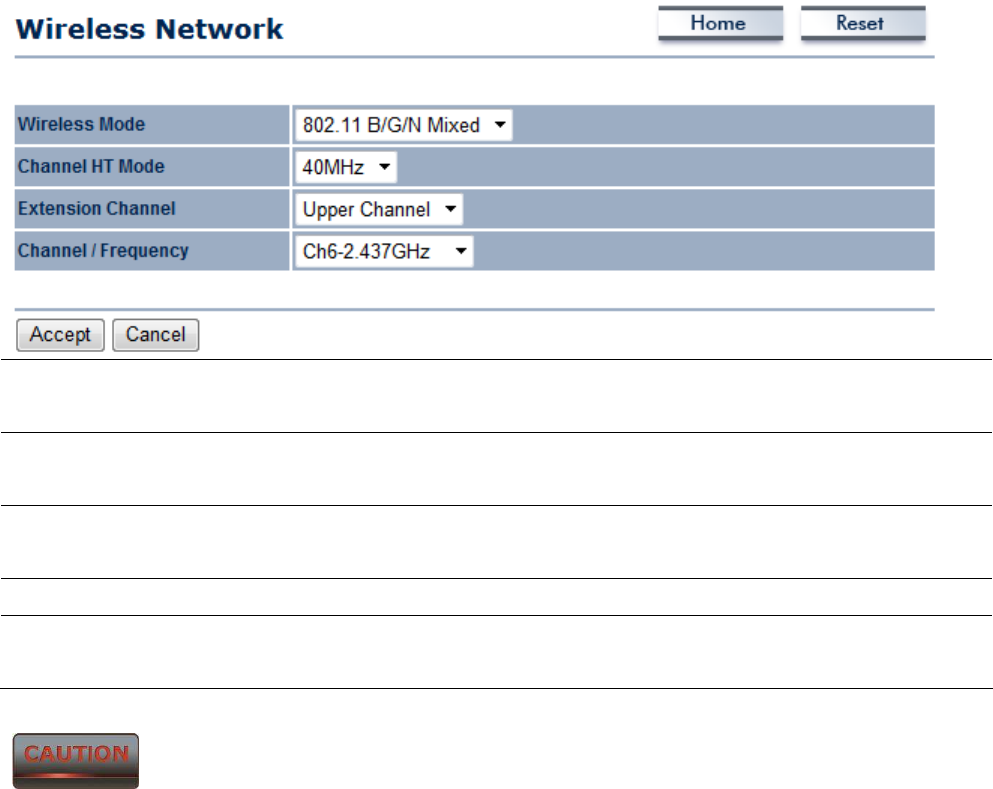
Wireless Mode The wireless mode supports 802.11b/g/n mixed modes. It is
compatible with the most common known wireless band.
Channel HT Mode The default channel bandwidth is 40 MHz. The larger channel can
provide better transmit quality and speed.
Extension Channel Specify the upper channel or lower channel selection. It may influence
the Auto channel function
Channel / Frequency The channel availability is based on the US regulation.
Accept / Cancel Press Accept to confirm the changes or Cancel to return previous
settings.
Accept does not compile the changes, you must go to Status -> Save/Load to apply the new settings.
Please refer to the chapter 4.1 for more detail.
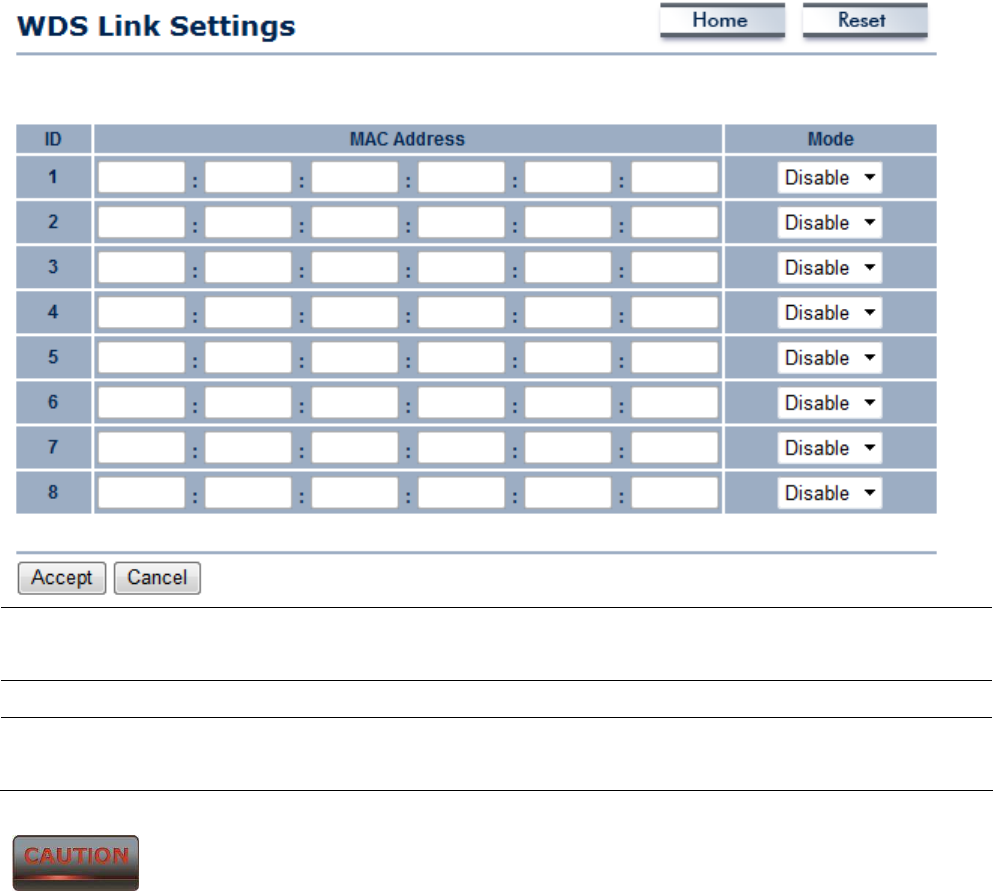
MAC Address Enter the Access Point’s MAC address that you would like to extend
the wireless area into the MAC address filter.
Mode Select Disable or Enable from the drop down list.
Accept / Cancel Press Accept to confirm the changes or Cancel to return previous
settings.
1. Accept does not compile the changes, you must go to Status -> Save/Load to apply the new
settings. Please refer to the chapter 4.1 for more detail.
2. The Access Point that you would like to extend the wireless area must enter your Access Point’s
MAC address. Not all Access Point supports this feature.
6.1.4 Client Router Mode
Wireless Mode The wireless mode supports 802.11b/g/n mixed modes. It is
compatible with the most common known wireless band.
SSID Specify the SSID if known. SSID text box will be automatically fill in
when select an AP in the Site Survey.
Site Survey Using Site Survey to scan nearby APs and then select the AP to
establish the connection.
Prefer BSSID Specify the MAC address if known. Prefer BSSID text box will be
automatically fill in when select an AP in the Site Survey.
Wireless Security Please refer to the chapter 6.2 for details.
Accept / Cancel Press Accept to confirm the changes or Cancel to return previous
settings.
Accept does not compile the changes, you must go to Status -> Save/Load to apply the new settings.
Please refer to the chapter 4.1 for more detail.
Profile After Site Survey, webpage will display all nearby area’s Access Point.
Click the BSSID if you would like to connect with it.
Wireless Security Please refer to the Wireless Security section.
Refresh Press Refresh to scan again.
If the Access Point is suppressed its own SSID, SSID section will be blank, the SSID must be filled in
manually.
6.2 Wireless Security Settings
Wireless Security Settings section will guide you to the entire Security modes configuration: WEP,
WPA-PSK, WPA2-PSK, WPA-PSK Mixed, WPA, WPA2, and WPA Mixed.
We strongly recommend that uses WPA2-PSK as your security settings.
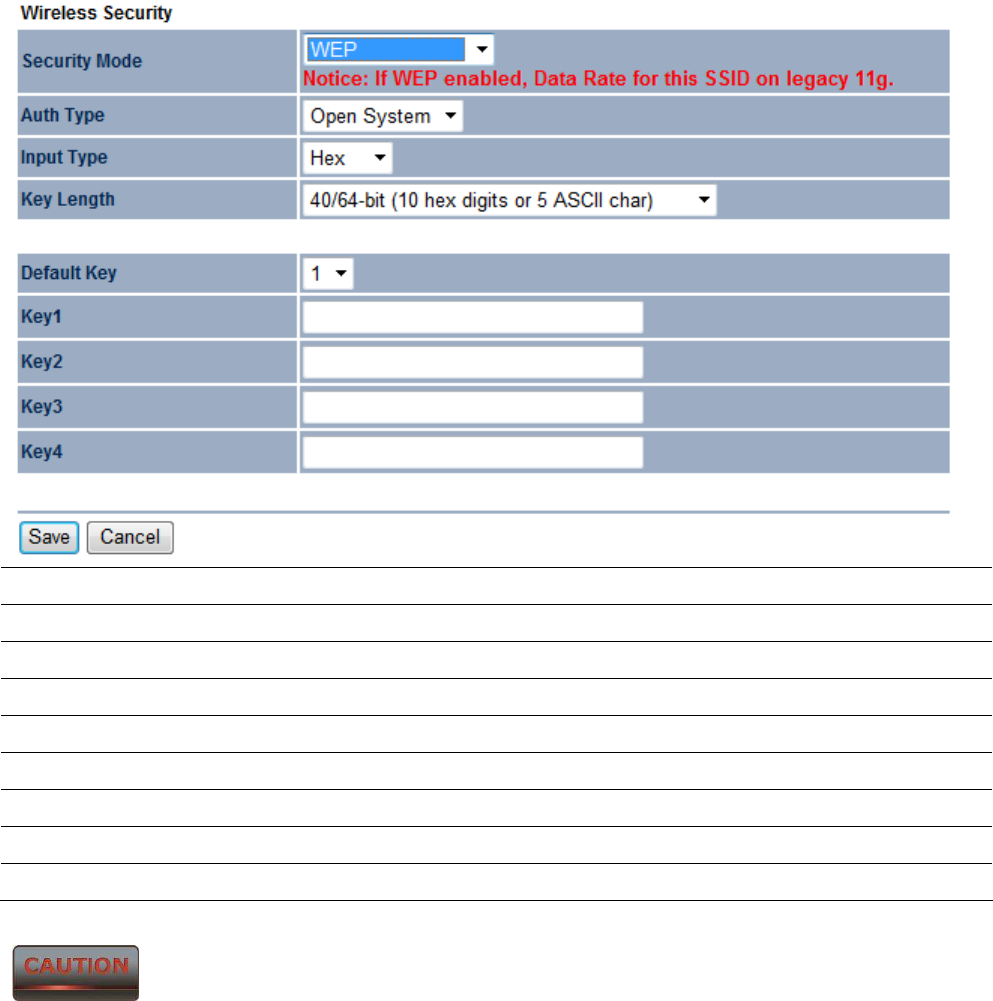
6.2.1 WEP
Security Mode Select WEP from the drop down list to begin the configuration.
Auth Type Select Auth Type in Open System or Shared.
Input Type Select Input Type in Hex or ASCII.
Key Length Select Key Length in 64/128/152 bit password length.
Default Key Select the default index key for wireless security.
Key1 Specify password for security key index No.1.
Key2 Specify password for security key index No.2.
Key3 Specify password for security key index No.3.
Key4 Specify password for security key index No.4.
802.11n does not allow WEP/WPA-PSK/WPA-PSK TKIP security mode. The date rate will drop from
802.11n to 802.11g.
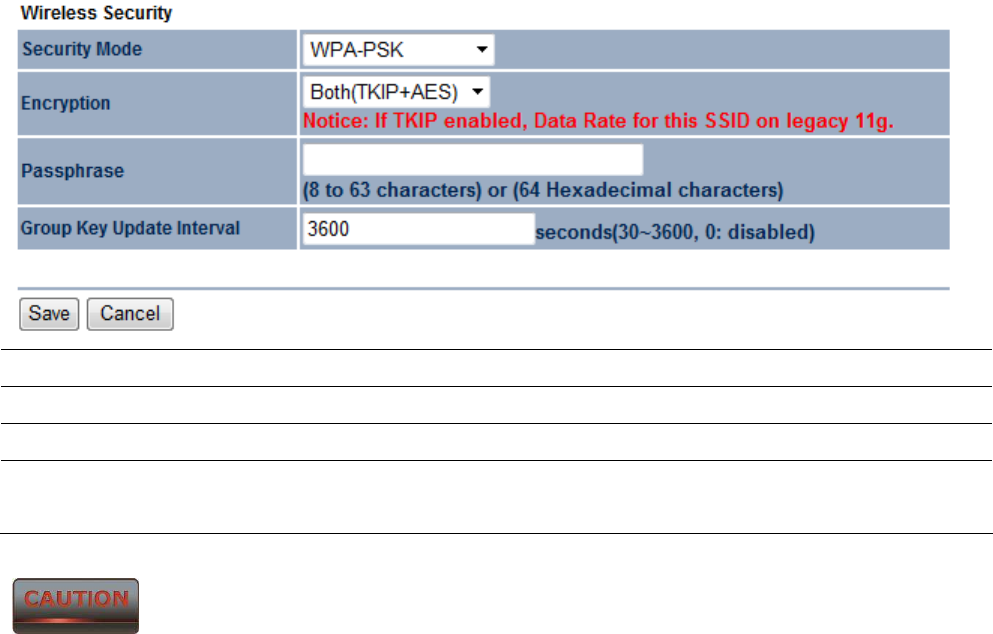
6.2.2 WPA-PSK
Security Mode Select WPA-PSK from the drop down list to begin the configuration.
Encryption Select Both, TKIP or AES for Encryption type.
Passphrase Specify the security password.
Group Key Update
Interval Specify Group Key Update Interval time.
802.11n does not allow WEP/WPA-PSK/WPA-PSK TKIP security mode. The date rate will drop from
802.11n to 802.11g.
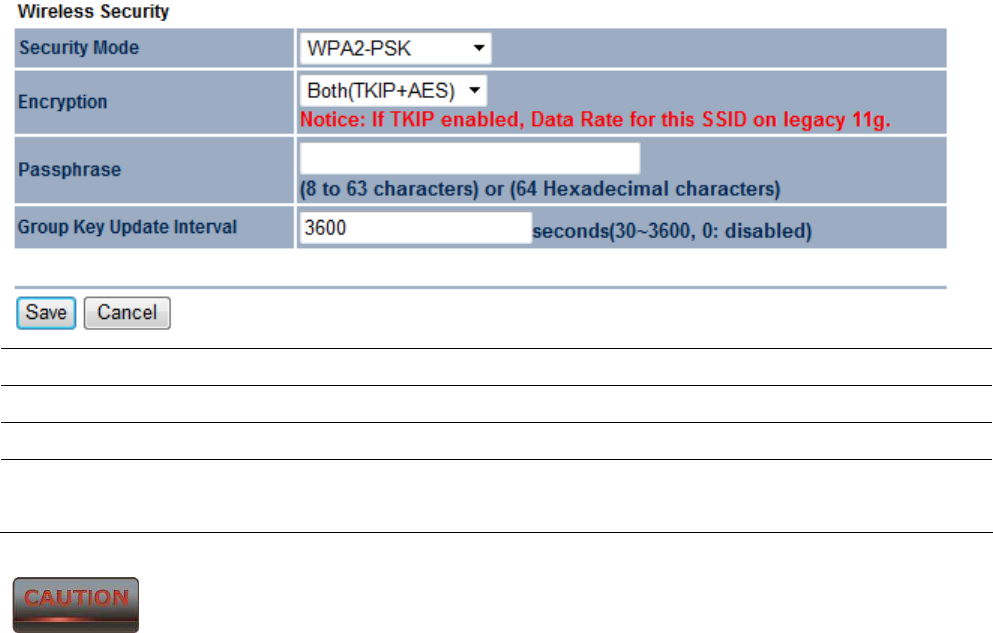
6.2.3 WPA2-PSK
Security Mode Select WPA2-PSK from the drop down list to begin the configuration.
Encryption Select Both, TKIP or AES for Encryption type.
Passphrase Specify the security password.
Group Key Update
Interval Specify Group Key Update Interval time.
802.11n does not allow WEP/WPA-PSK/WPA-PSK TKIP security mode. The date rate will drop from
802.11n to 802.11g.
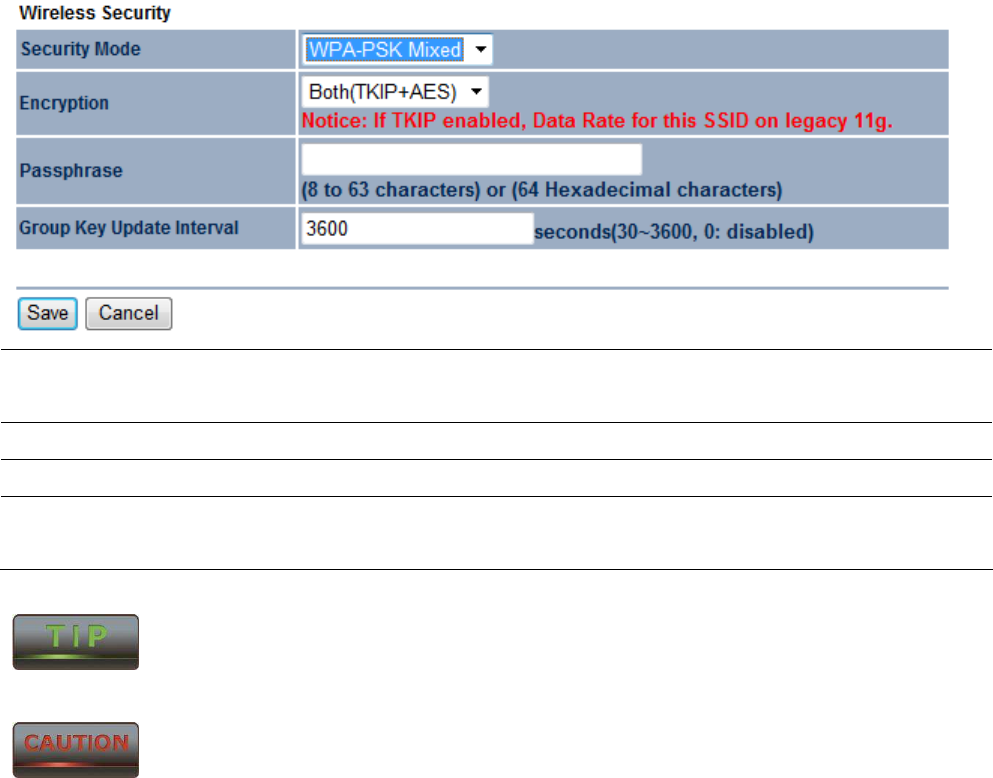
6.2.4 WPA-PSK Mixed
Security Mode Select WPA-PSK Mixed from the drop down list to begin the
configuration.
Encryption Select Both, TKIP or AES for Encryption type.
Passphrase Specify the security password.
Group Key Update
Interval Specify Group Key Update Interval time.
Uses WPA-PSK Mixed can allow multiple security modes at the same time.
802.11n does not allow WEP/WPA-PSK/WPA-PSK TKIP security mode. The date rate will drop from
802.11n to 802.11g.
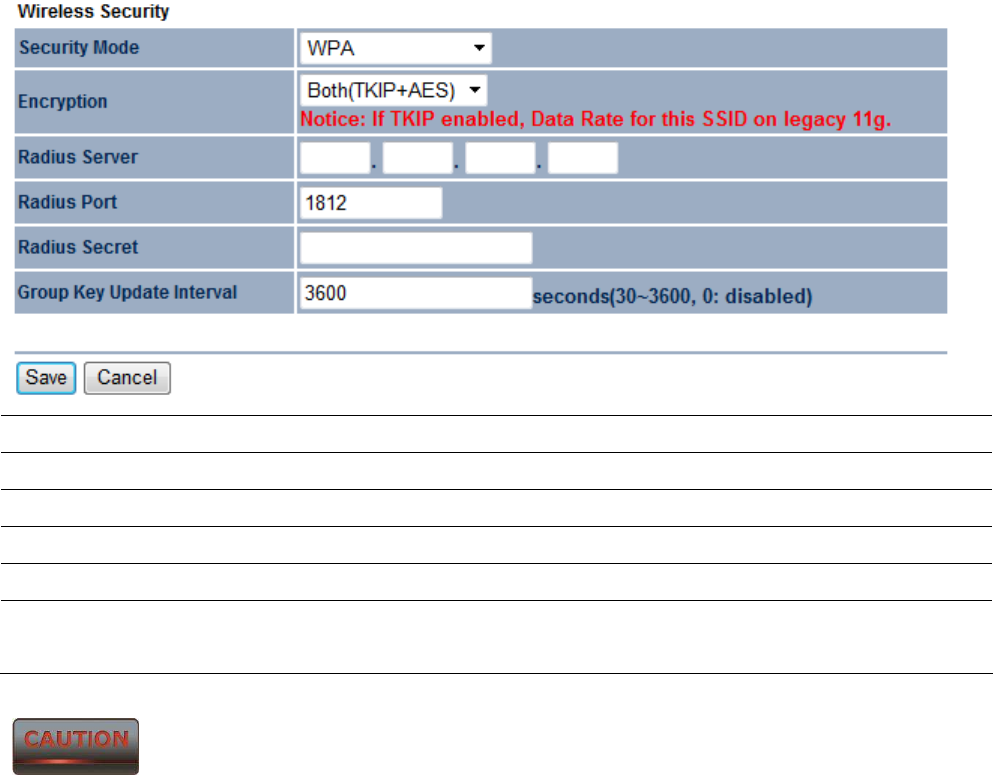
6.2.5 WPA
Security Mode Select WPA from the drop down list to begin the configuration.
Encryption Select Both, TKIP or AES for Encryption type.
Radius Server Specify Radius Server IP Address.
Radius Port Specify Radius Port number, the default port is 1812.
Radius Secret Specify Radius Secret that is given by the Radius Server.
Group Key Update
Interval Specify Group Key Update Interval time.
802.11n does not allow WEP/WPA-PSK/WPA-PSK TKIP security mode. The date rate will drop from
802.11n to 802.11g.
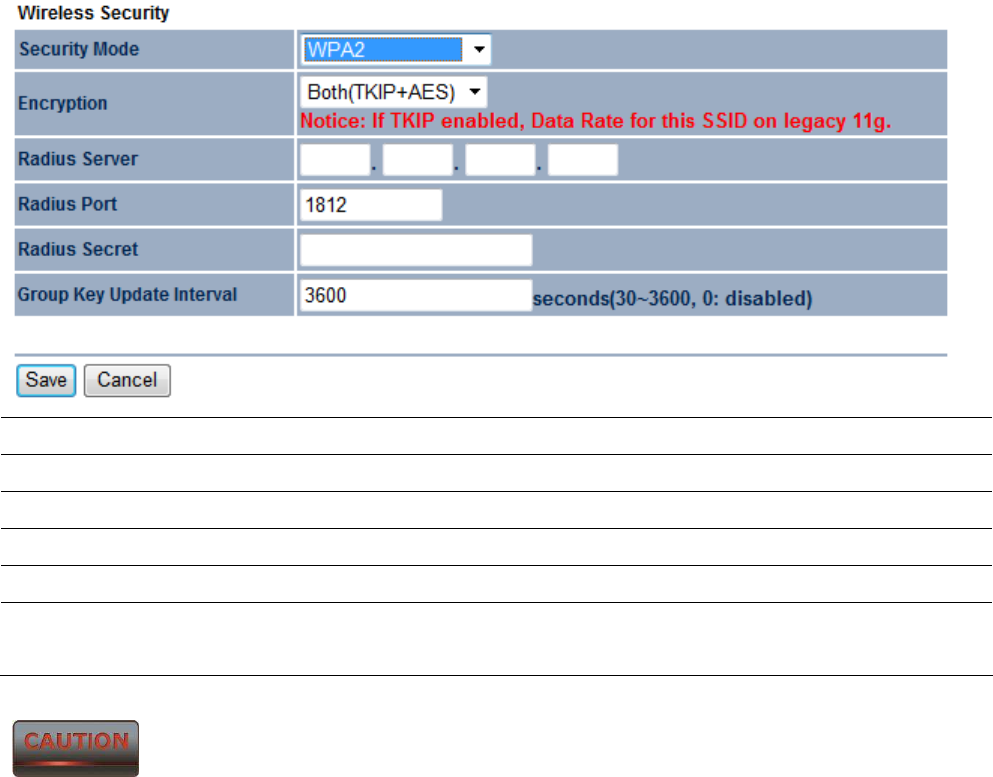
6.2.6 WPA2
Security Mode Select WPA2 from the drop down list to begin the configuration.
Encryption Select Both, TKIP or AES for Encryption type.
Radius Server Specify Radius Server IP Address.
Radius Port Specify Radius Port number, the default port is 1812.
Radius Secret Specify Radius Secret that is given by the Radius Server.
Group Key Update
Interval Specify Group Key Update Interval time.
802.11n does not allow WEP/WPA-PSK/WPA-PSK TKIP security mode. The date rate will drop from
802.11n to 802.11g.
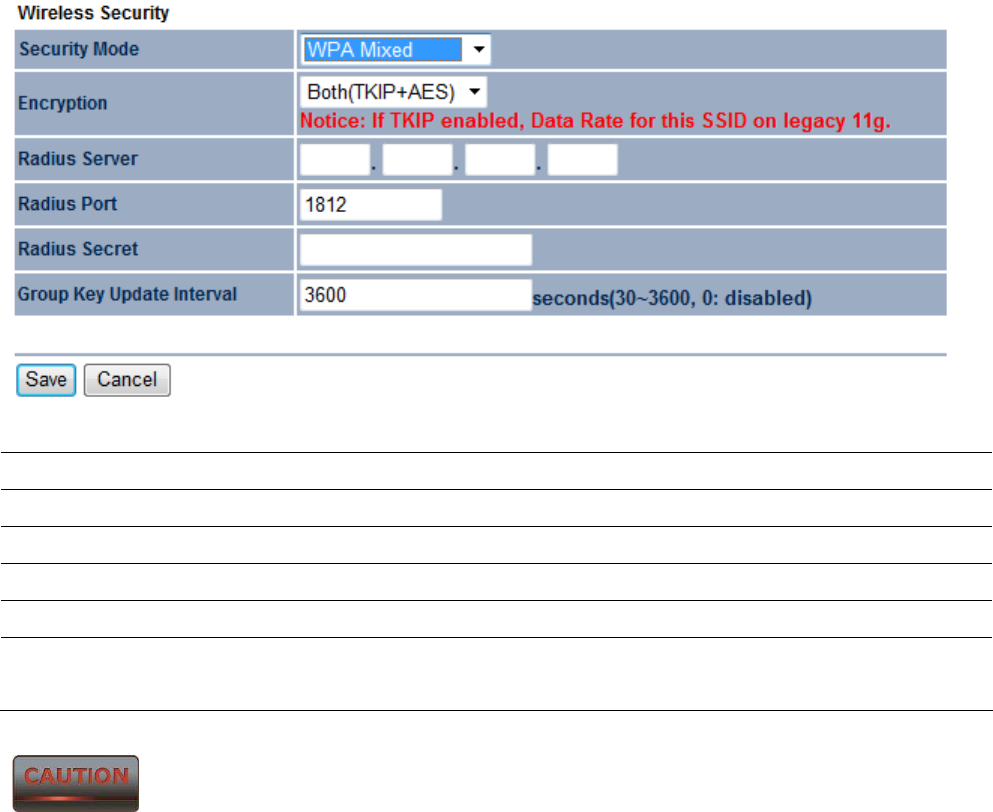
6.2.7 WPA Mixed
Security Mode Select WPA Mixed from the drop down list to begin the configuration.
Encryption Select Both, TKIP or AES for Encryption type.
Radius Server Specify Radius Server IP Address.
Radius Port Specify Radius Port number, the default port is 1812.
Radius Secret Specify Radius Secret that is given by the Radius Server.
Group Key Update
Interval Specify Group Key Update Interval time.
802.11n does not allow WEP/WPA-PSK/WPA-PSK TKIP security mode. The date rate will drop from
802.11n to 802.11g.
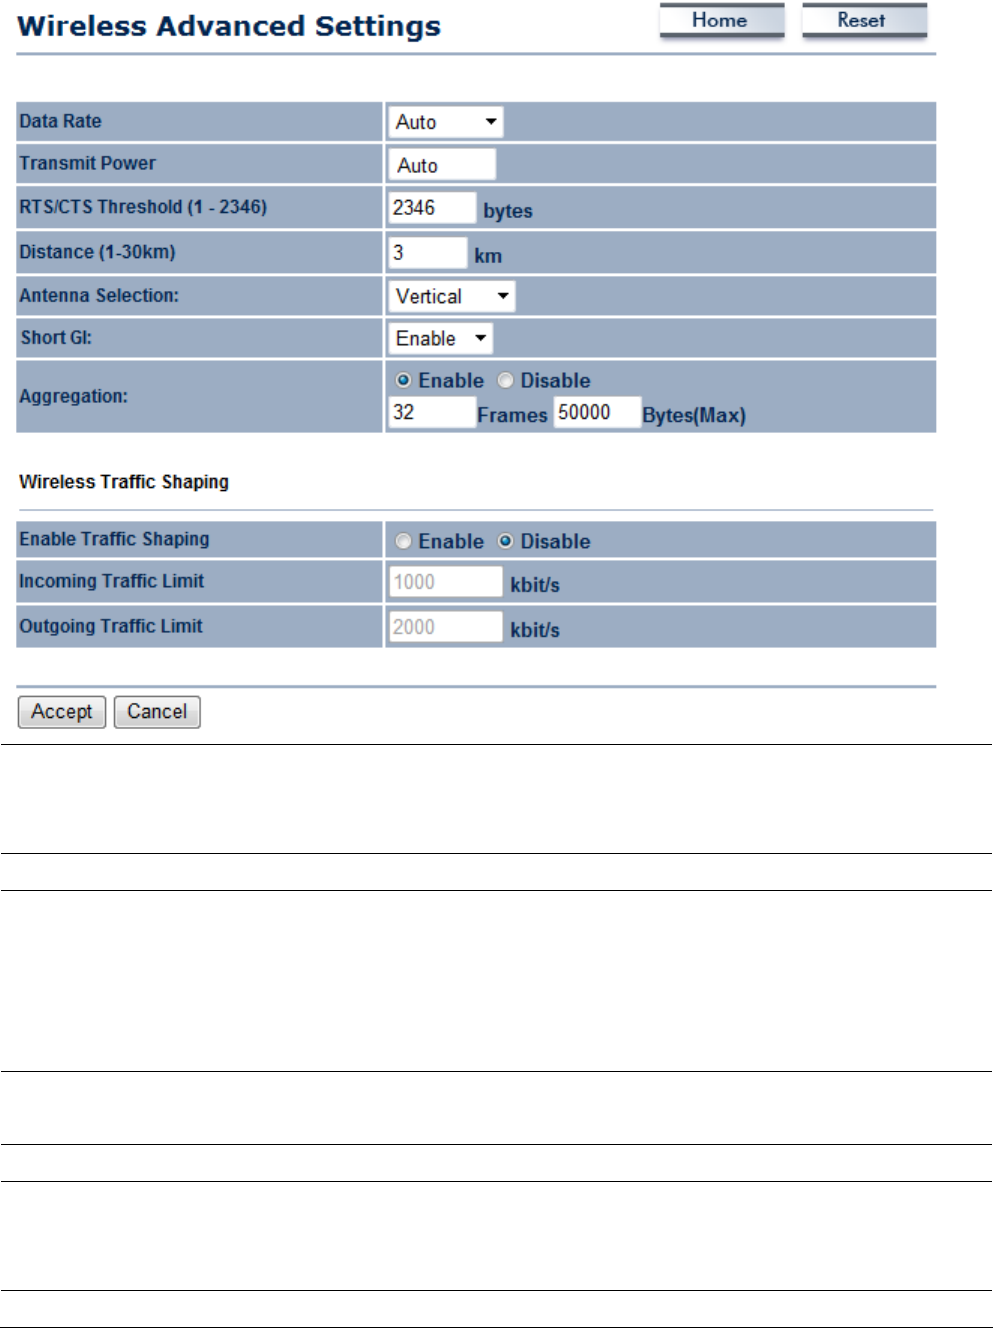
6.4 Wireless Advanced Settings
Data Rate Select Data Rate from the drop down list. Data rate will affect the
efficiency of the throughput. If the data rate is set to a small number,
the lower through will get but it can transmit to longer distance.
Transmit Power Auto Transmit Power.
RTS/CTS Threshold Specify Threshold package size for RTC/CTS. Using small number of the
threshold will cause RTS/CTS packets to be sent more often to
consuming more of the available bandwidth. In addition, if the heavy
load traffic occurs, the wireless network can be recovered easily from
interferences or collisions.
Distance Specify distance rage between AP and Clients. Longer distance may
lose high connection speed.
Antenna Selection Specify the internal antenna type.
Short GI Short GI is improved of 802.11n and 802.11a/g. It can increase 10% of
the internet speed during the data transmission. For example, the
802.11a/g’s GI is 800us, the short GI will be 400us.
Aggregation Aggregation is to merge the typical size of data’s header to one data. It

is useful for the small size but larger amount packets.
Wireless Traffic Shaping Place a Check to enable Wireless Traffic Shaping function.
Incoming Traffic Limit Specify the wireless transmission speed for downloading.
Outgoing Traffic Limit Specify the wireless transmission speed for uploading.
Accept / Cancel Press Accept to confirm the changes or Cancel to return previous
settings.
1. Changing Wireless Advanced Settings may cause insufficient wireless connection quality. Please
remain all settings as default unless you have acknowledged all changing that you have made.
2. Accept does not compile the changes, you must go to Status -> Save/Load to apply the new
settings. Please refer to the chapter 4.1 for more detail.
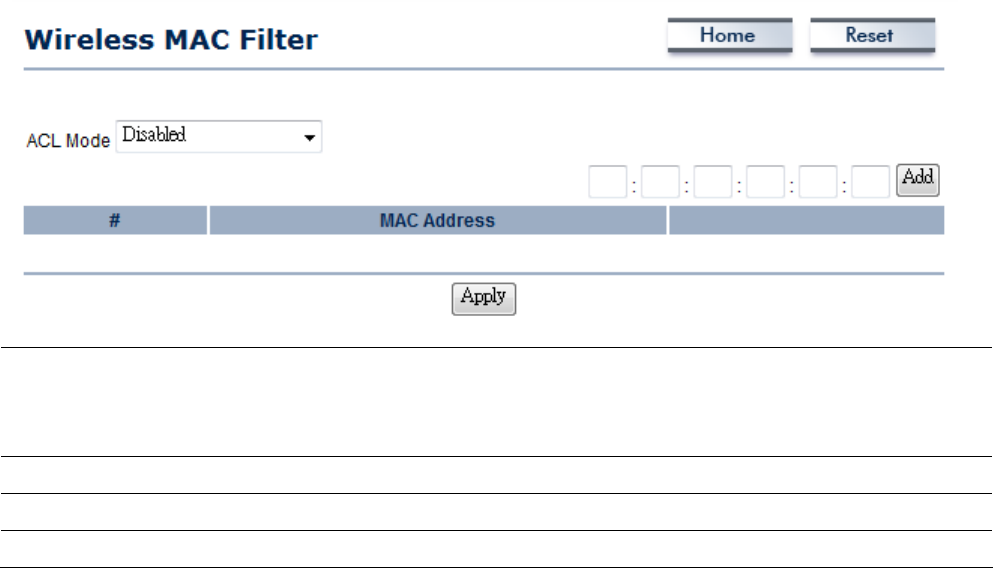
6.5 Wireless MAC Filter
Wireless MAC Filters is used to Allow or Deny wireless clients, by their MAC addresses, accessing the
Network. You can manually add a MAC address to restrict the permission to access ENH200. The
default setting is Disable Wireless MAC Filters.
0.
ACL Mode ACL Mode can help to deny or allow certain Client to access the
network. Select Disable, Deny MAC in the list or Allow MAC in the list
from the drop down list.
MAC Address Filter Specify the MAC address manually.
Add Press Add to add the MAC address in the table.
Apply Press Apply to apply the changes.
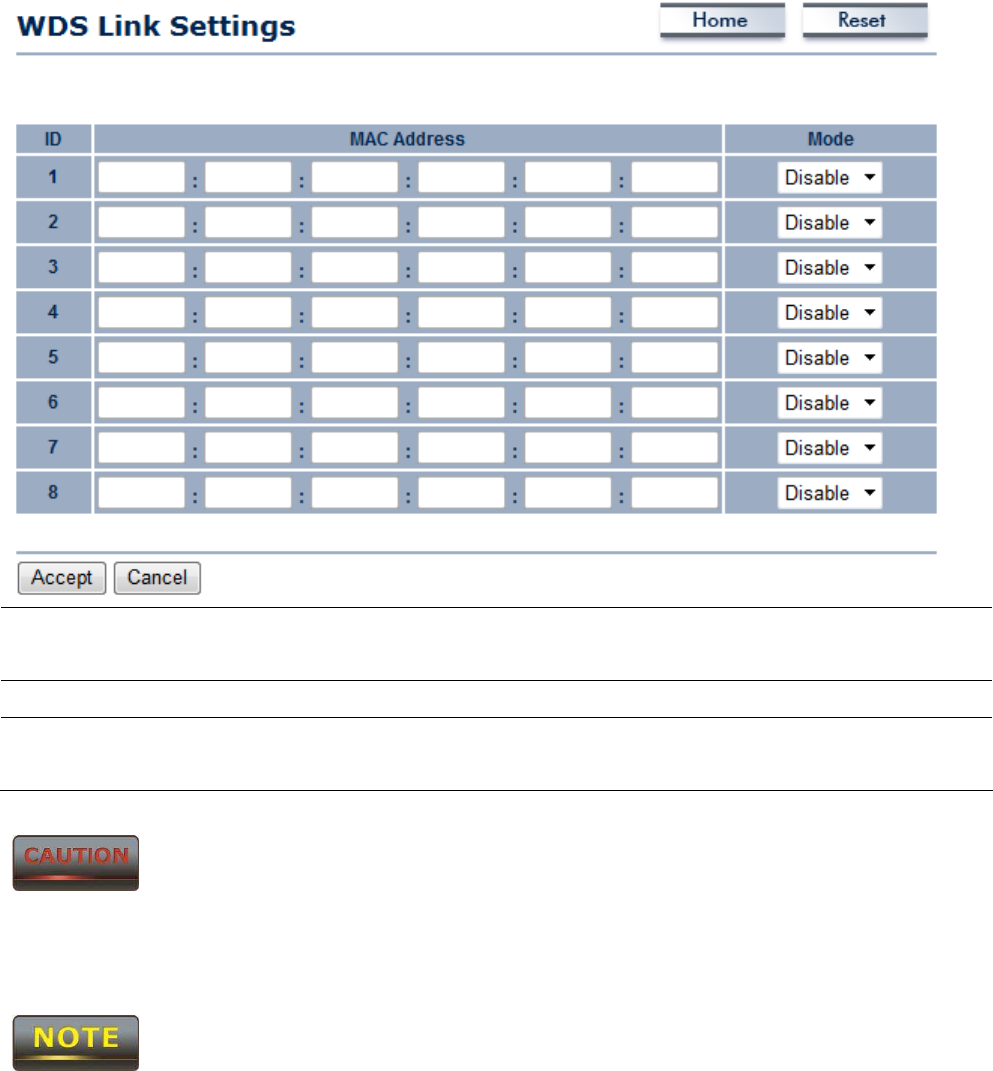
6.6 WDS Link Settings
WDS Link Settings is used to establish a connection between Access Points but the device is not
losing Access Point function. AP has WDS function can extend the wireless coverage and allow LANs
to communicate each other.
MAC Address Enter the Access Point’s MAC address that you would like to extend
the wireless area.
Mode Select Disable or Enable from the drop down list.
Accept / Cancel Press Accept to confirm the changes or Cancel to return previous
settings.
Accept does not compile the changes, you must go to Status -> Save/Load to apply the new settings.
Please refer to the chapter 4.1 for more detail.
The Access Point that you would like to extend the wireless area must enter your Access Point’s MAC
address. Not all Access Point supports this feature.
7 LAN Setup
This section will guide you to setup the Local Area Network (LAN) settings
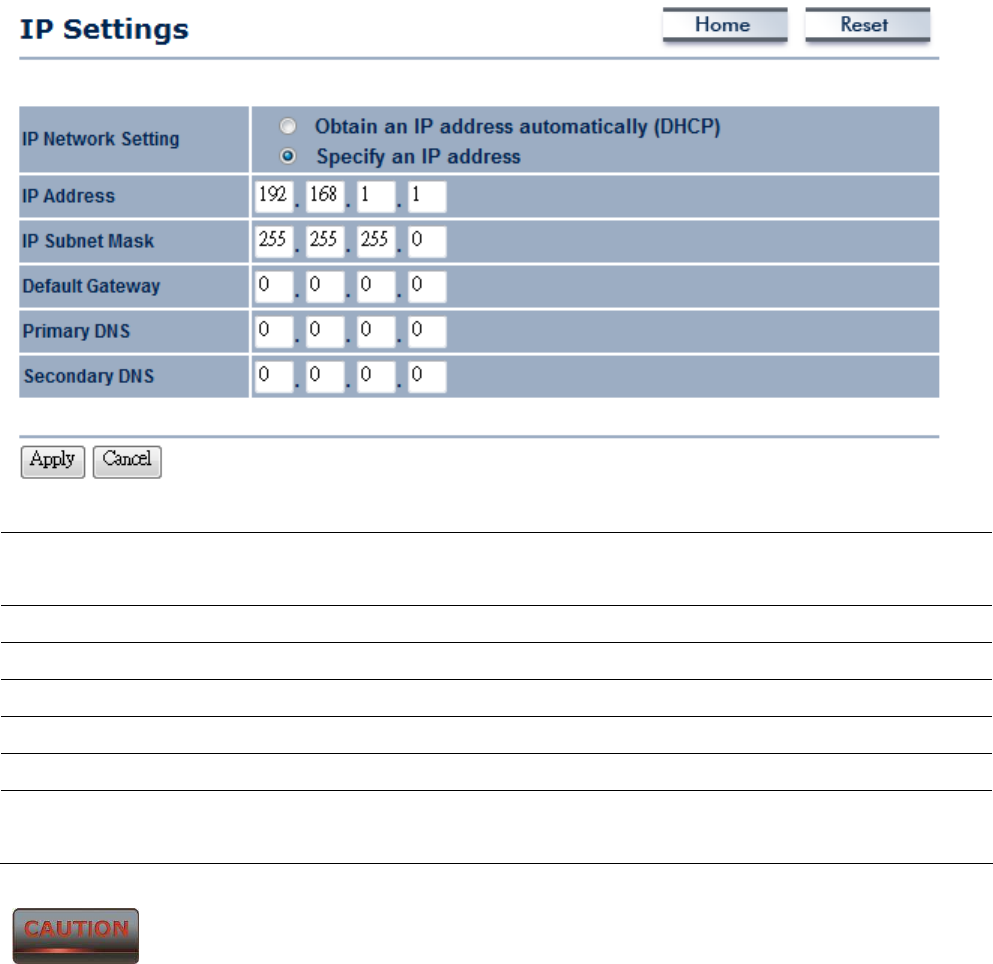
7.1 IP Settings
This section is only available for Non-Router Mode. IP Settings allows you to LAN port IP address of
the ENH200.
IP Network Setting Select Radio button for Obtain an IP address automatically or Specify
an IP address.
IP Address Specify LAN port IP address.
IP Suet Mask Specify Subnet Mask.
Default Gateway Specify Default Gateway
Primary DNS Specify Primary DNS
Secondary DNS Specify Secondary DNS
Accept / Cancel Press Accept to confirm the changes or Cancel to return previous
settings.
1. Obtain an IP address automatically is not a DHCP server. It means automatically get IP address
when device connected to a device which has DHCP server.
2. Changing LAN IP Address will change LAN Interface IP address. Webpage will automatically redirect
to the new IP address after Apply.
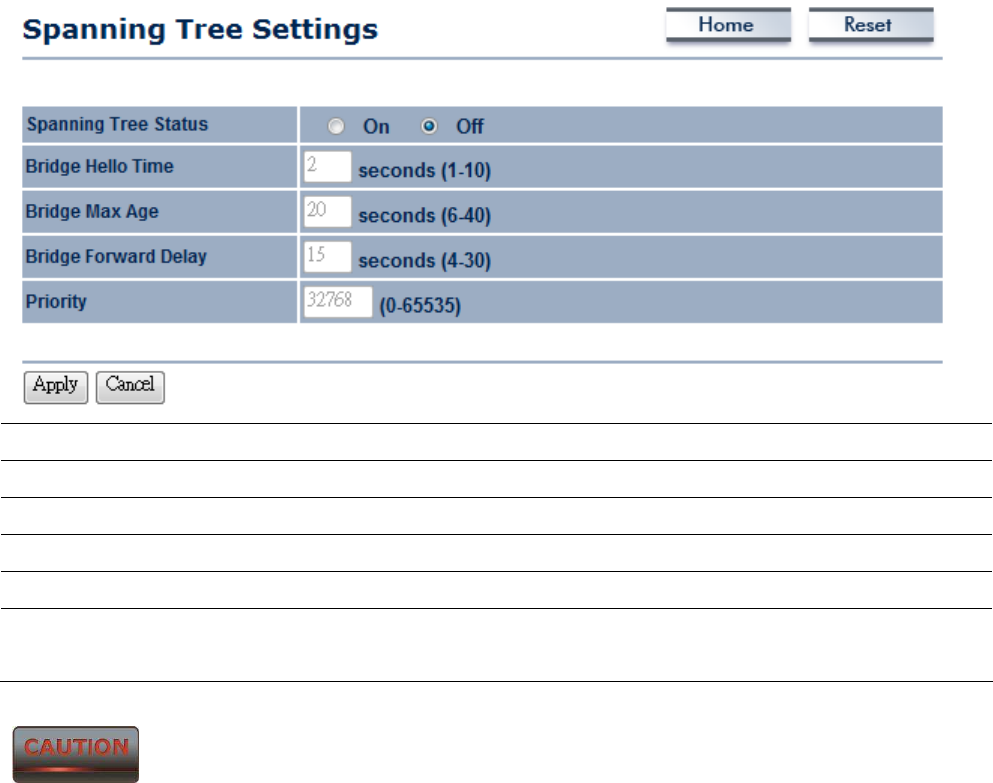
7.2 Spanning Tree Settings
Spanning Tree Status Select the Radio button to On or Off Spanning Tree function.
Bridge Hello Time Specify Bridge Hello Time in second.
Bridge Max Age Specify Bridge Max Age in second.
Bridge Forward Delay Specify Bridge Forward Delay in second.
Priority Specify the Priority number. Smaller number has greater priority.
Accept / Cancel Press Accept to confirm the changes or Cancel to return previous
settings.
Accept does not compile the changes, you must go to Status -> Save/Load to apply the new settings.
Please refer to the chapter 4.1 for more detail.
8 Router Settings
This section is only available for AP Router Mode and Client Router Mode.
8.1 WAN Settings
There are four different types of WAN connection: Static IP, DHCP, PPPoE and PPTP. Please contact
your ISP to select the connection type.
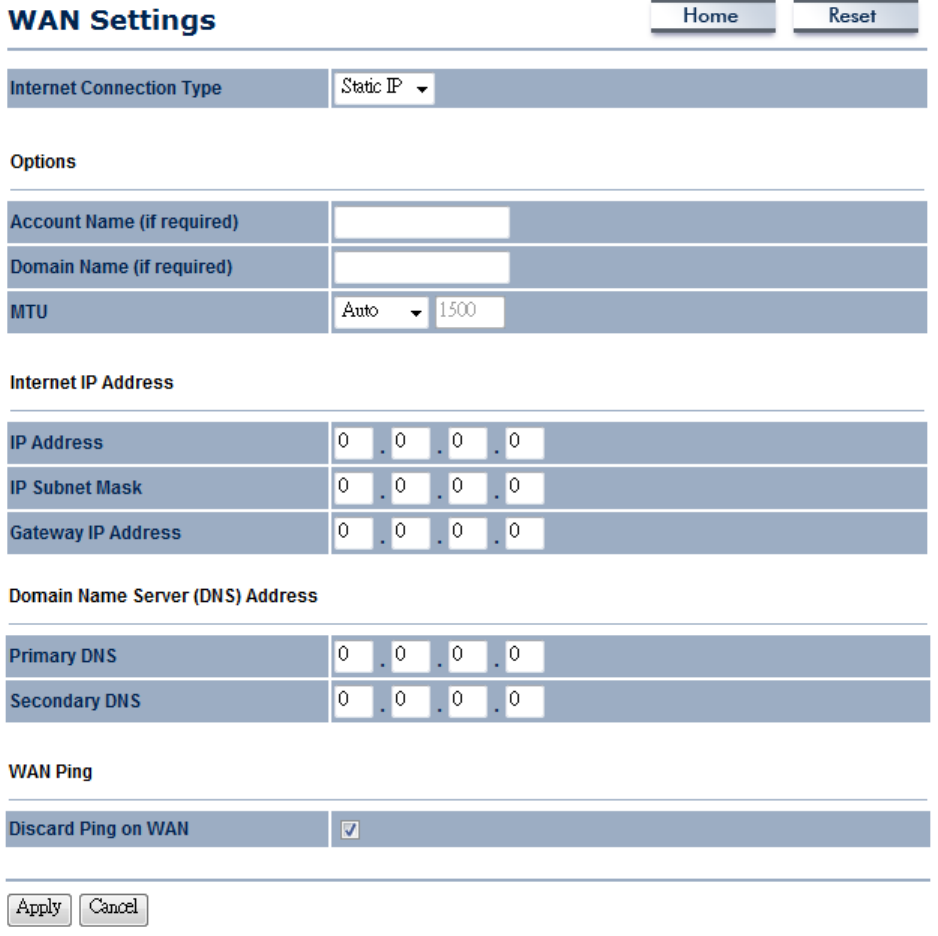
8.1.1 Static IP
Select Static IP in WAN connection if your ISP gives all the information about IP address, Subnet Mask,
Default Gateway, Primary DNS and Secondary DNS.

Internet Connection Type
Select Static IP to begin configuration of the Static IP connection.
Account Name Specify Account Name that is provided by ISP.
Domain Name Specify Domain Name that is provided by ISP.
MTU Specify the Maximum Transmit Unit size. Suggest remain in Auto.
IP Address Specify WAN port IP address.
IP Subnet Mask Specify WAN IP Subnet Mask.
Gateway IP Address Specify WAN Gateway IP address.
Primary DNS Specify Primary DNS IP.
Secondary DNS Specify Secondary DNS IP.
Discard Ping on WAN Place a Check to Enable or Disable ping from WAN.
Accept / Cancel Press Accept to confirm the changes or Cancel to return previous
settings.
Accept does not compile the changes, you must go to Status -> Save/Load to apply the new settings.
Please refer to the chapter 4.1 for more detail.
If the router's MTU is set too high, packets will be fragmented downstream. If the router's MTU is set
too low, the router will fragment packets unnecessarily and in extreme cases may be unable to
establish some connections. In either case, network performance can suffer.
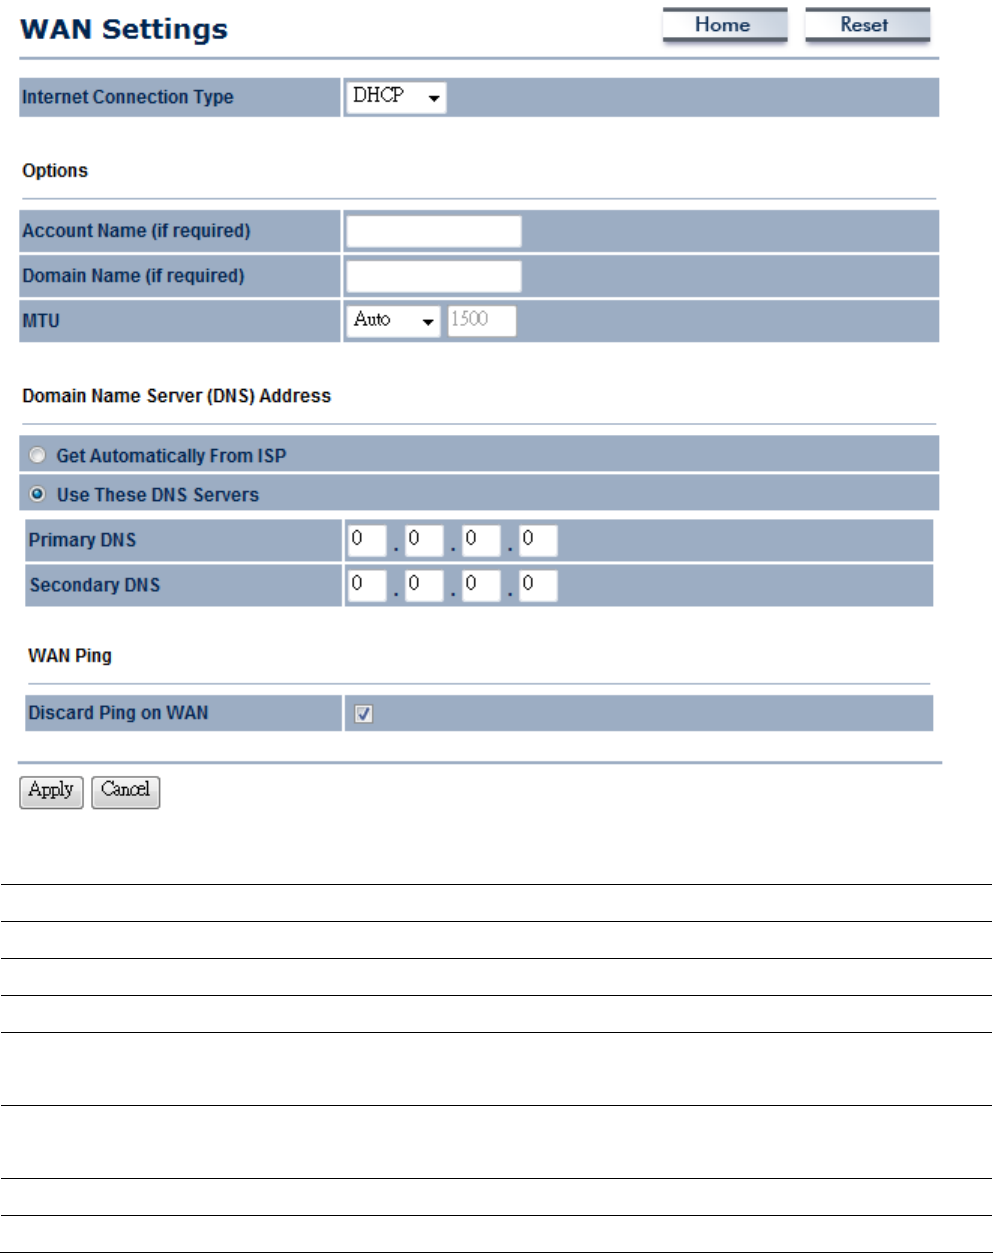
8.1.2 DHCP (Dynamic IP)
Select DHCP as your WAN connection type to obtain your IP address automatically. You will need to
enter Account Name as your hostname and DNS (Optional).
Internet Connection Type
Select DHCP to begin configuration of the DHCP connection.
Account Name Specify Account Name that is provided by ISP.
Domain Name Specify Domain Name that is provided by ISP.
MTU Specify the Maximum Transmit Unit size. Suggest remain in Auto.
Get Automatically From
ISP
Select the Radio button for get the DNS automatically from DHCP
server.
Use These DNS Servers Select the Radio button for setup the Primary DNS and Secondary
DNS servers manually.
Discard Ping on WAN Place a Check to Enable or Disable ping from WAN.
Accept / Cancel Press Accept to confirm the changes or Cancel to return previous

settings.
Accept does not compile the changes, you must go to Status -> Save/Load to apply the new settings.
Please refer to the chapter 4.1 for more detail.
If the router's MTU is set too high, packets will be fragmented downstream. If the router's MTU is set
too low, the router will fragment packets unnecessarily and in extreme cases may be unable to
establish some connections. In either case, network performance can suffer.
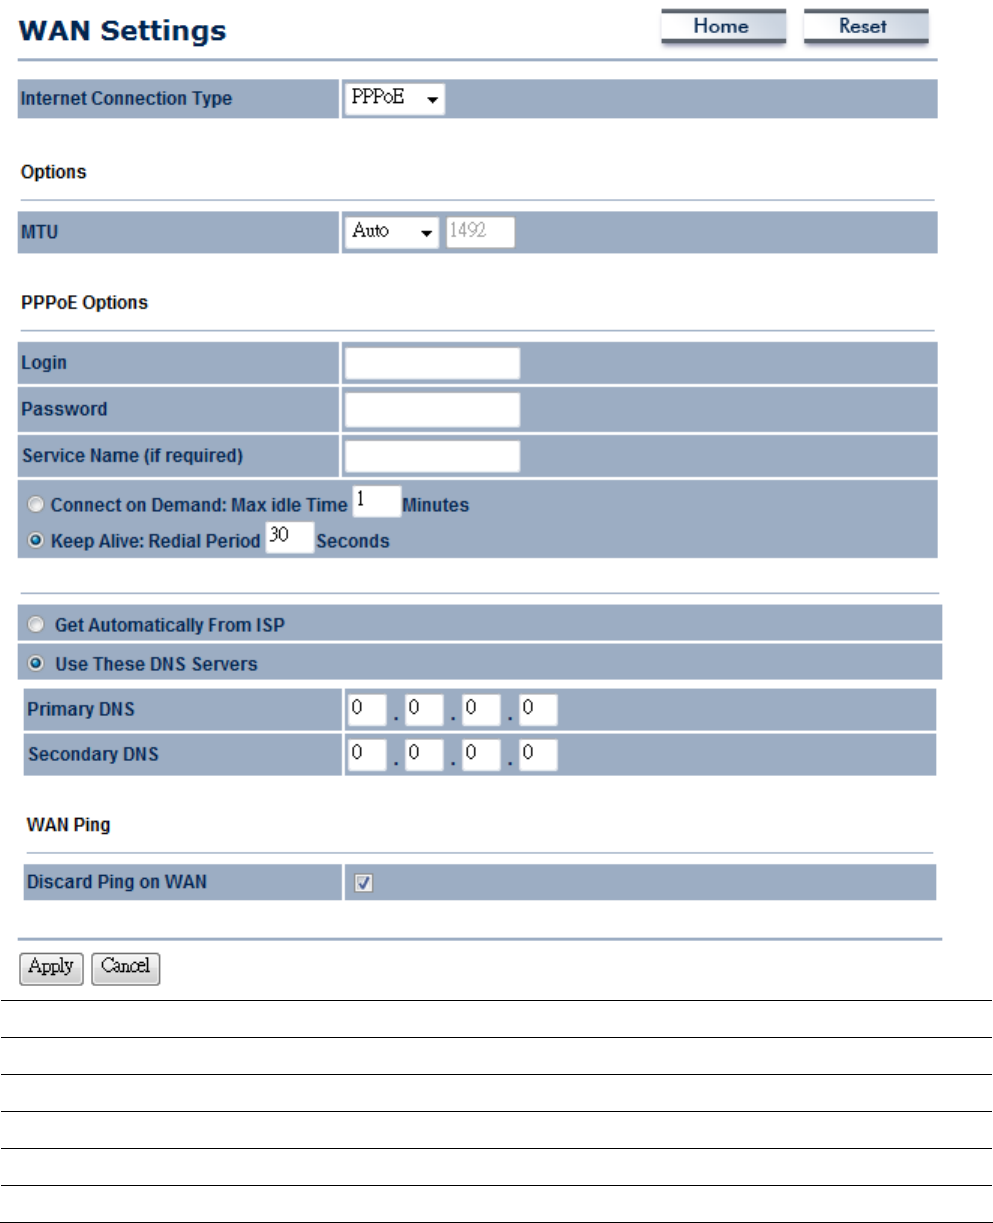
8.1.3 PPPoE (Point-to-Point Protocol over Ethernet)
Select PPPoE as your WAN connection type if your ISP provides Username and Password. PPPoE is a
DSL service and please remove your PPPoE software from your computer, the software is not worked
in ENH200.
Internet Connection Type
Select PPPoE to begin configuration of the PPPoE connection.
MTU Specify the Maximum Transmit Unit size. Suggest remain in Auto.
Login Specify the Username that is given by your ISP.
Password Specify the Password that is given by your ISP.
Service Name Specify the Service Name that is given by your ISP.
Connect on Demand Select the Radio button to specify the maximum idle time. Internet

connection will disconnect when it reach the maximum idle time, but
it will automatically connect when user tries to access the network.
Keep Alive Select the Radio button to keep internet connection always on. Specify
the redial period once the internet lose connection.
Get Automatically From
ISP
Select the Radio button for get the DNS automatically from DHCP
server.
Use These DNS Servers Select the Radio button for setup the Primary DNS and Secondary
DNS servers manually.
Discard Ping on WAN Place a Check to Enable or Disable ping from WAN.
Accept / Cancel Press Accept to confirm the changes or Cancel to return previous
settings.
Accept does not compile the changes, you must go to Status -> Save/Load to apply the new settings.
Please refer to the chapter 4.1 for more detail.
If the router's MTU is set too high, packets will be fragmented downstream. If the router's MTU is set
too low, the router will fragment packets unnecessarily and in extreme cases may be unable to
establish some connections. In either case, network performance can suffer.
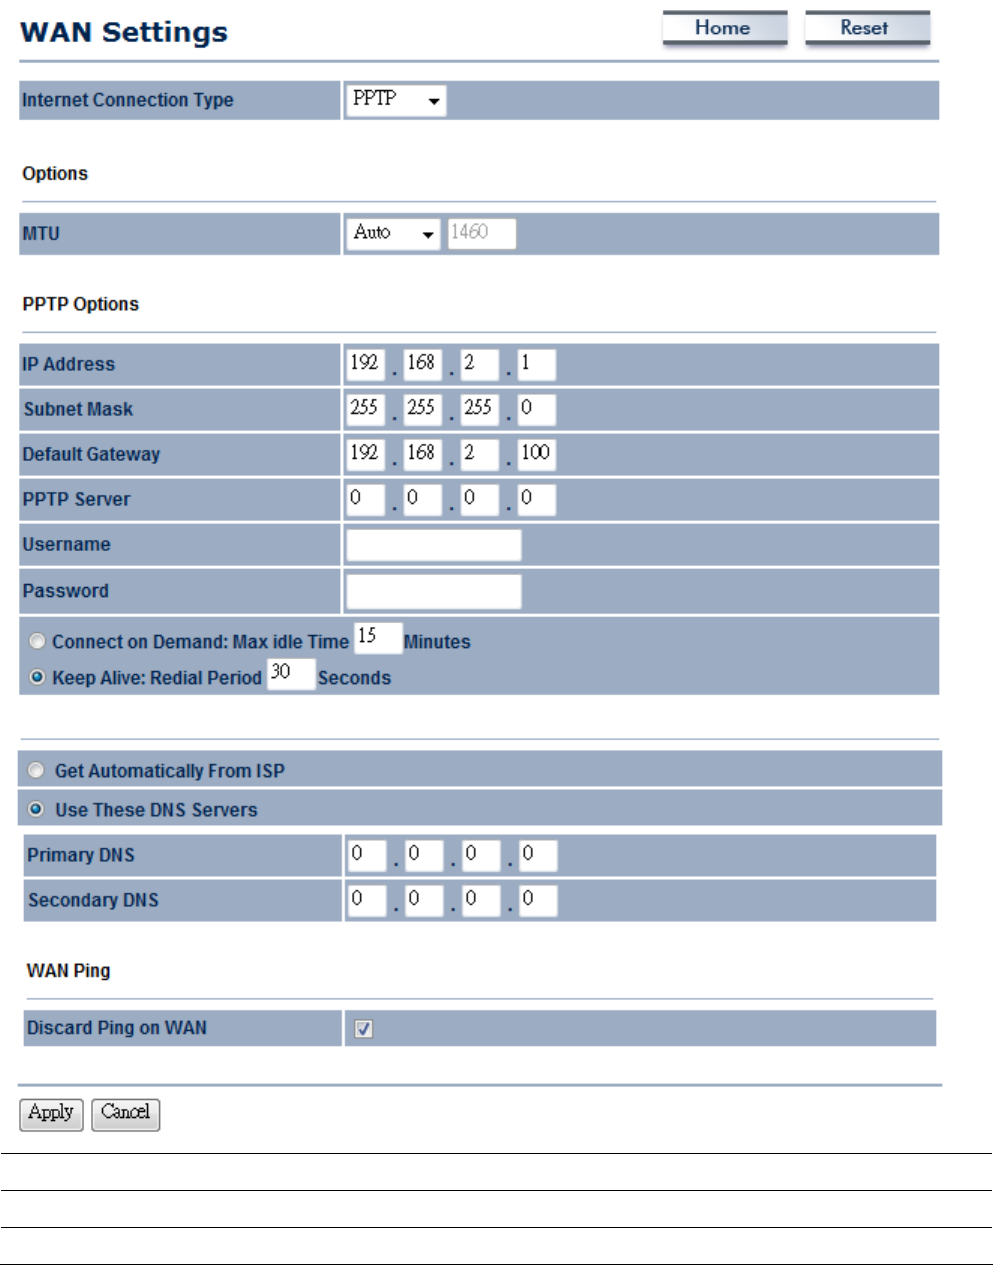
8.1.4 PPTP (Point-to-Point Tunneling Protocol)
Select PPTP as your WAN connection type if your ISP provides information about IP Address, Subnet
Mask, Default Gateway (Optional), DNS (Optional), Server IP, Username, and Password.
Internet Connection Type
Select PPTP to begin configuration of the PPTP connection.
MTU Specify the Maximum Transmit Unit size. Suggest remain in Auto.
IP Address Specify WAN port IP address.
IP Subnet Mask Specify WAN IP Subnet Mask.
Gateway IP Address Specify WAN Gateway IP address.
PPTP Server Specify PPTP Server IP address.
Username Specify the Username that is given by your ISP.
Password Specify the Password that is given by your ISP.
Connect on Demand Select the Radio button to specify the maximum idle time. Internet
connection will disconnect when it reach the maximum idle time, but
it will automatically connect when user tries to access the network.
Keep Alive Select the Radio button to keep internet connection always on. Specify
the redial period once the internet lose connection.
Get Automatically From
ISP
Select the Radio button for get the DNS automatically from DHCP
server.
Use These DNS Servers Select the Radio button for setup the Primary DNS and Secondary
DNS servers manually.
Discard Ping on WAN Place a Check to Enable or Disable ping from WAN.
Accept / Cancel Press Accept to confirm the changes or Cancel to return previous
settings.
Accept does not compile the changes, you must go to Status -> Save/Load to apply the new settings.
Please refer to the chapter 4.1 for more detail.
If the router's MTU is set too high, packets will be fragmented downstream. If the router's MTU is set
too low, the router will fragment packets unnecessarily and in extreme cases may be unable to
establish some connections. In either case, network performance can suffer.
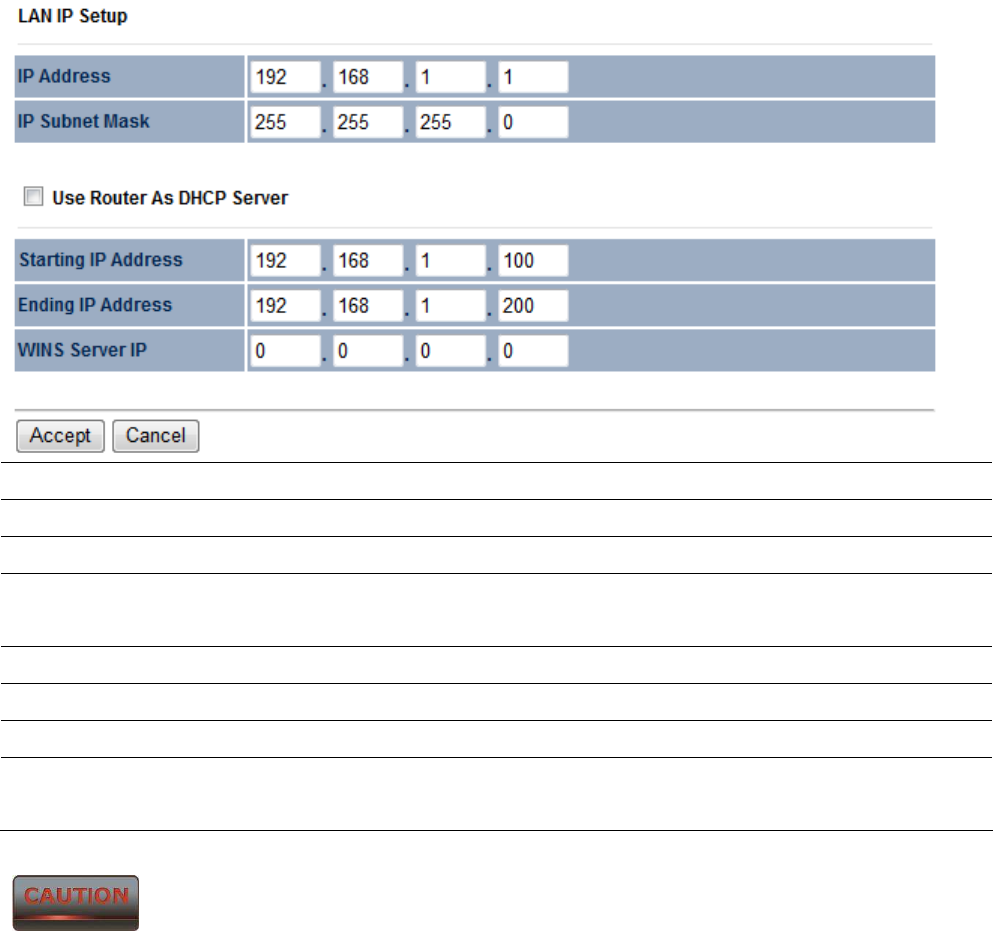
8.2 LAN Settings (Router Mode)
IP Address Specify LAN port IP address.
IP Subnet Mask Specify LAN IP Subnet Mask.
WINS Server IP Specify WINS Server IP.
Use Router As DHCP
Server Place a Check to enable DHCP server.
Starting IP Address Specify DHCP server starting IP address.
Ending IP Address Specify DHCP server ending IP address.
WINS Server IP Specify the WINS Server IP address.
Accept / Cancel Press Accept to confirm the changes or Cancel to return previous
settings.
Accept does not compile the changes, you must go to Status -> Save/Load to apply the new settings.
Please refer to the chapter 4.1 for more detail.
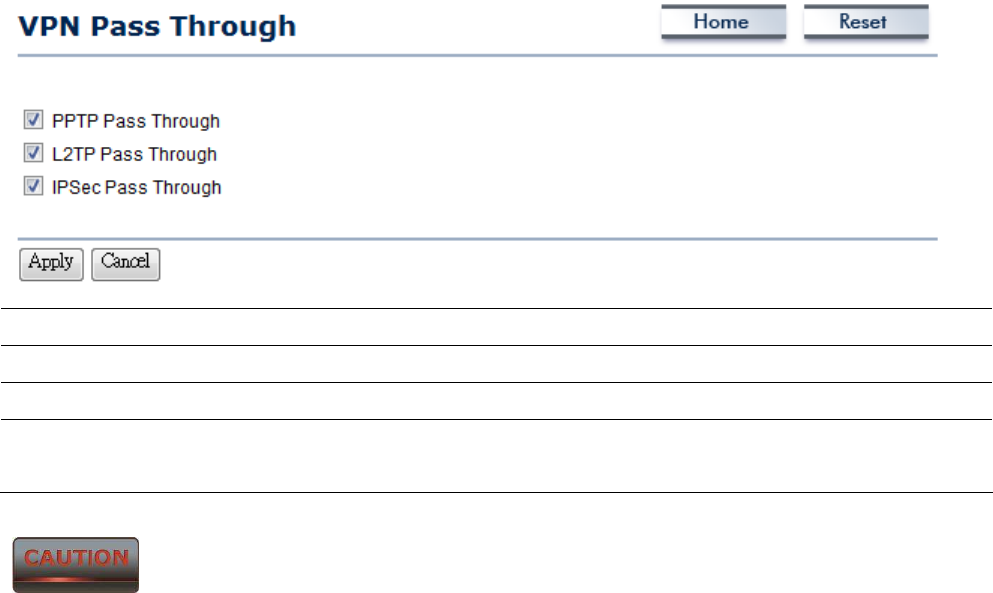
8.3 VPN Pass Through
VPN Pass Through is used to allow certain protocol to be tunneled through an IP network such as
PPTP and L2TP or implement secure exchange of packets at the IP Layer such as IPSec.
PPTP Pass Through Place a Check to enable PPTP protocol passes through WAN.
L2TP Pass Through Place a Check to enable L2TP protocol passes through WAN.
IPSec Pass Through Place a Check to enable IPSec protocol passes through WAN.
Accept / Cancel Press Accept to confirm the changes or Cancel to return previous
settings.
Accept does not compile the changes, you must go to Status -> Save/Load to apply the new settings.
Please refer to the chapter 4.1 for more detail.
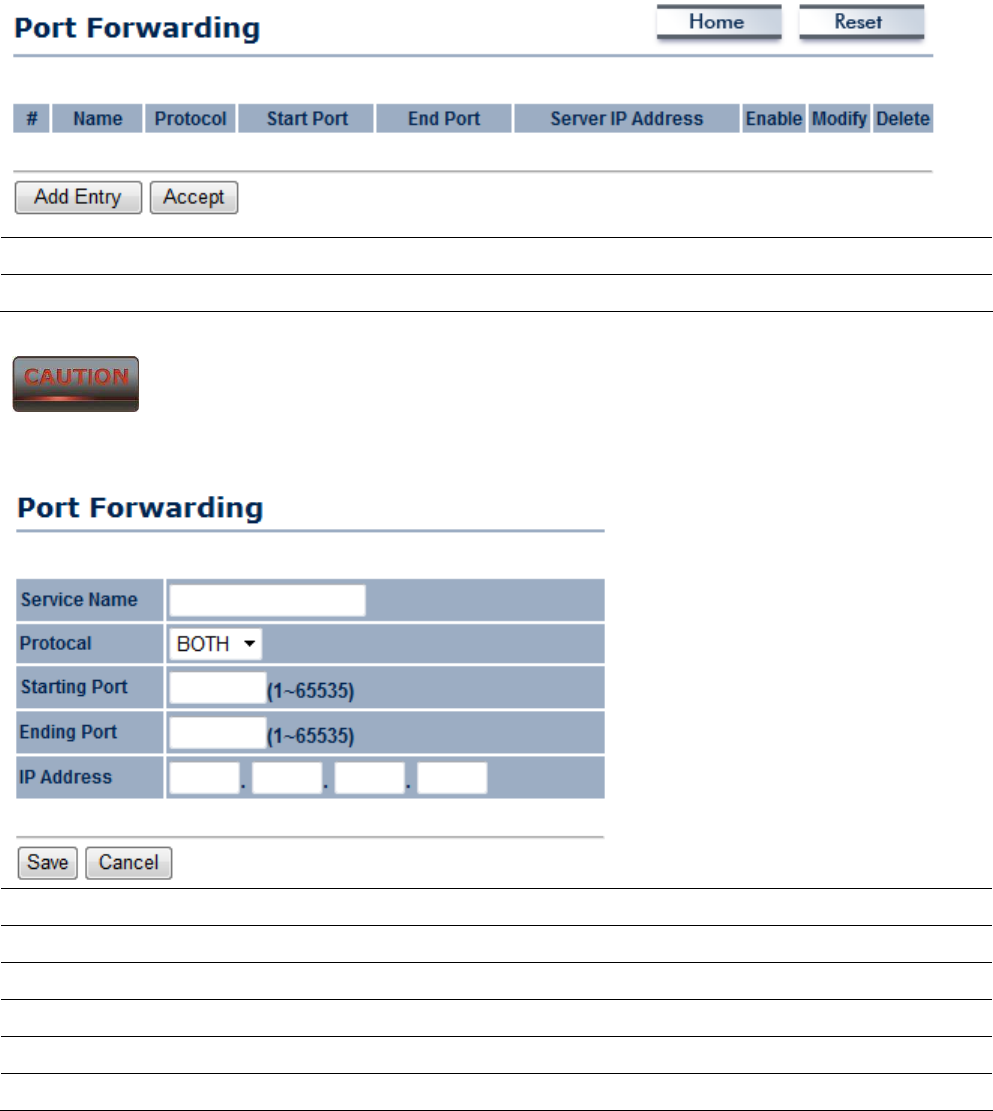
8.4 Port Forwarding
Port Forwarding is used to allow a public service such as Web Server, Mail Server, and FTP server to
be set up. For example: Set up a Web Server on your computer with port number 8080. Visitor on
the internet can access your Web Server by entering WAN Port IP with port number 8080. If your
WAN Port IP is 192.168.5.1, then visitor must enter http://192.168.5.1:8080. To find out more the
well known port numbers please search the internet.
Add Entry Press Add Entry to add a rule of Port Forwarding.
Accept Press Accept to confirm the changes.
Accept does not compile the changes, you must go to Status -> Save/Load to apply the new settings.
Please refer to the chapter 4.1 for more detail.
Service Name Specify a name for current Port Forwarding rule.
Protocol Select a protocol from drop down list: Both, TCP and UDP.
Starting Port Specify Starting Port number.
Ending Port Specify Ending Port number.
IP Address Specify IP address.
Save / Cancel Press Save to apply the changes or Cancel to return previous settings.
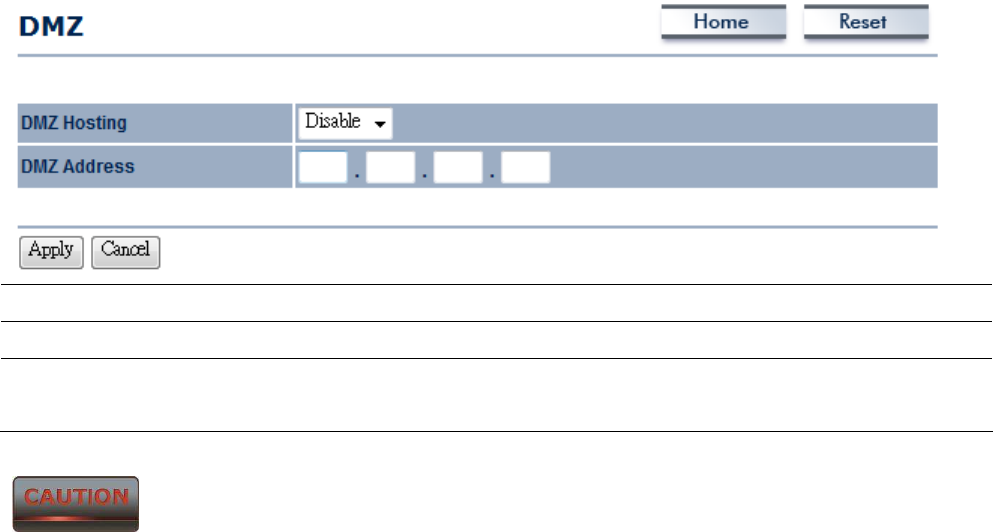
8.5 DMZ
Enable DMZ will expose your network computer to the internet. This feature may be used in some
circumstance such as Internet Gaming or Video Conference. DMZ will forward all the ports to one PC
at the same time. This PC would be easily to attack because DMZ opens all the ports to one certain
PC.
DMZ Hosting Select Enable or Disable DMZ from drop down list.
DMZ Address Specify an IP address of DMZ.
Accept / Cancel Press Accept to confirm the changes or Cancel to return previous
settings.
Accept does not compile the changes, you must go to Status -> Save/Load to apply the new settings.
Please refer to the chapter 4.1 for more detail.
9 Management Settings
Management section is on the navigation drop-down menu. You will then see seven options:
administration, management VLAN, SNMP settings, backup/restore settings, firmware upgrade, time
settings, and log. Each option is described below.
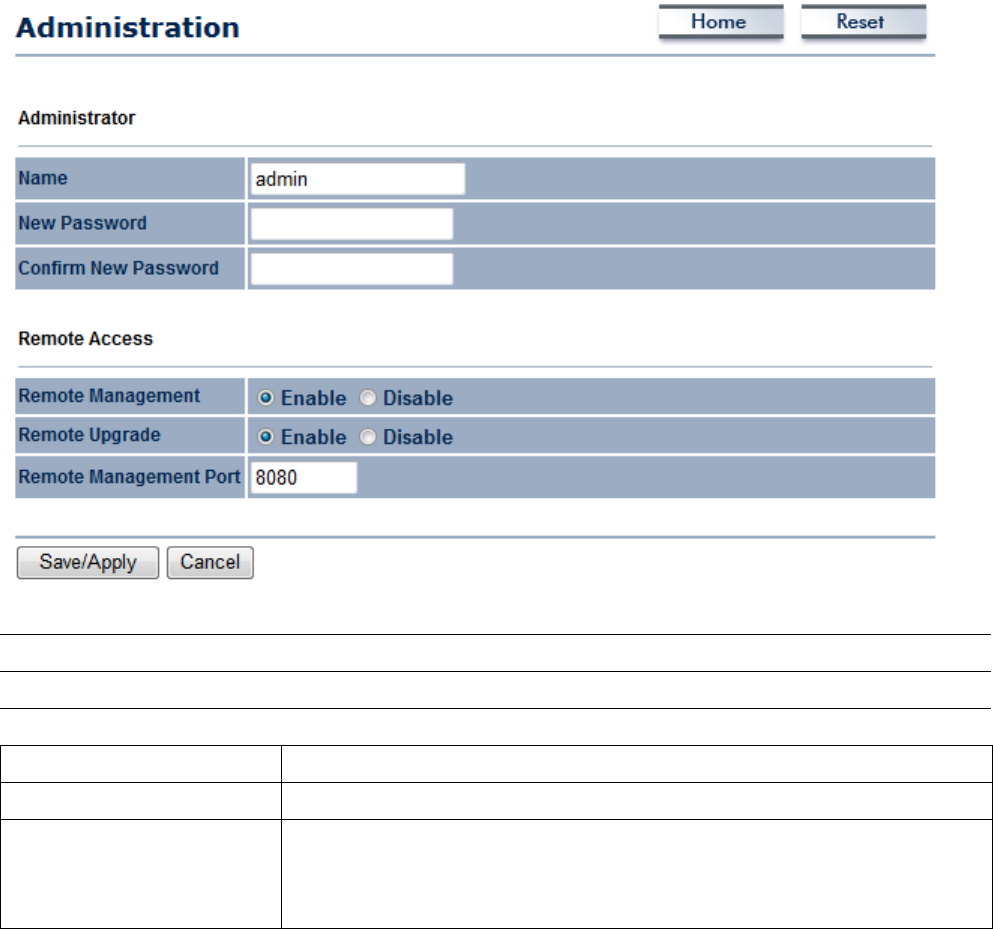
9.1 Administration
Click on the Administration link under the Management menu. This option allows you to create a
user name and password for the device. By default, this device is configured with a user name and
password admin. For security reasons it is highly recommended that you create a new user name
and password.
Name Specify Username for login.
Password Specify a Password for login
Confirm Password Re-enter the Password for confirmation.
Remote Management Select the Radio button to Enable or Disable Remote Management.
Remote Upgrade Select the Radio button to Enable or Disable Remote Upgrade.
Remote Management
Port
Specify the Port number for Remote Management. For example: If you
specify the Port number is 8080, then you will need to enter following
http://<IP address>:8080 to access the web interface.

Save/Apply / Cancel Press Save/Apply to apply the changes or Cancel to return previous
settings.
Press Save/Apply will change the setting immediately. It will not be able to undo the action.
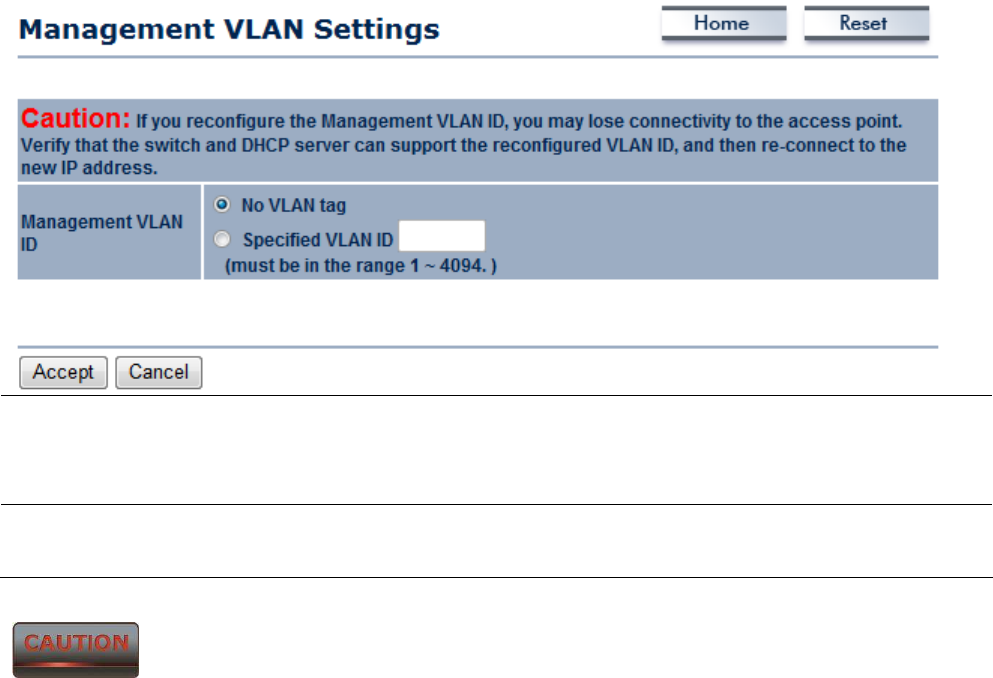
9.2 Management VLAN
Click on the Management VLAN link under the Management menu. This option allows you to assign
a VLAN tag to the packets. A VLAN is a group of computers on a network whose software has been
configured so that they behave as if they were on a separate Local Area Network (LAN). Computers
on VLAN do not have to be physically located next to one another on the LAN
Management VLAN ID If your network includes VLANs and if tagged packets need to pass
through the Access Point, specify the VLAN ID into this field. If not,
select the No VLAN tag radio button.
Accept / Cancel Press Accept to confirm the changes or Cancel to return previous
settings.
1. If you reconfigure the Management VLAN ID, you may lose connection to the ENH200. Verify
DHCP server can support the reconfigured VLAN ID, and then re-connect to the new IP address.
2. Accept does not compile the changes, you must go to Status -> Save/Load to apply the new
settings. Please refer to the chapter 4.1 for more detail.
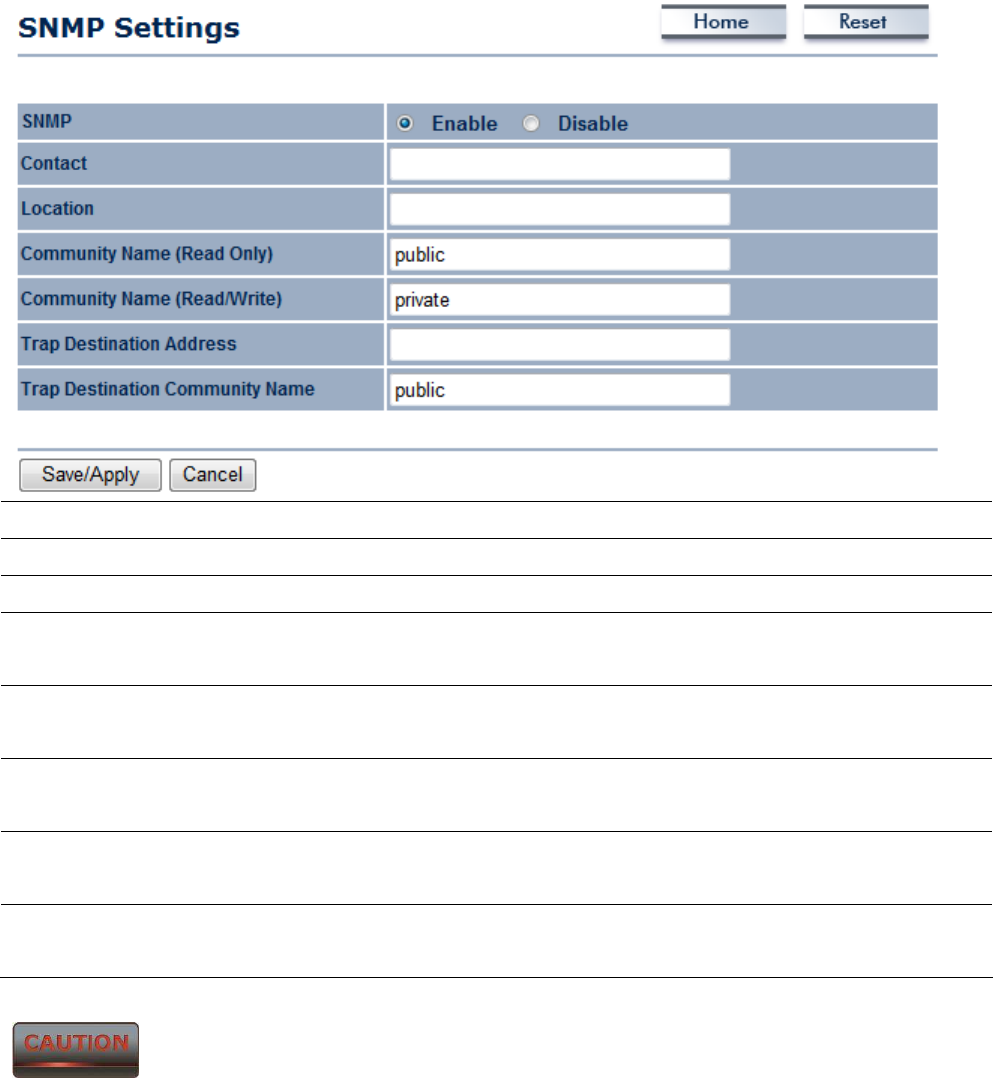
9.3 SNMP Settings
Click on the SNMP Settings link under the Management menu. This is a networking management
protocol used to monitor network-attached devices. SNMP allows messages (called protocol data
units) to be sent to various parts of a network. Upon receiving these messages, SNMP-compatible
devices (called agents) return data stored in their Management Information Bases.
SNMP Enable/Disable Select the Radio button to Enable or Disable SNMP function.
Contact Specify the contact details of the device.
Location Specify the location of the device.
Community Name Specify the password for access the SNMP community for read only
access.
Community Name Specify the password for access the SNMP community for read and
write access.
Trap Destination IP
Address
Specify the IP address that will receive the SNMP trap.
Trap Destination
Community Name
Specify the password of the SNMP trap community.
Save/Apply / Cancel Press Save/Apply to apply the changes or Cancel to return previous
settings.
Press Save/Apply will change the setting immediately. It will not be able to undo the action.
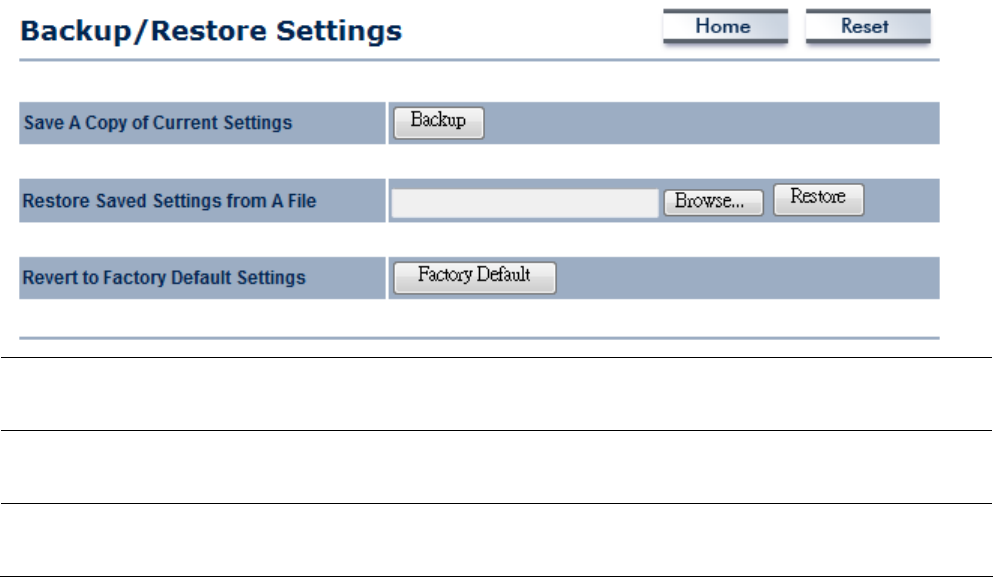
9.4 Backup/Restore Settings
Click on the Backup/Restore Setting link under the Management menu. This option is used to save
the current settings of the device in a file on your local disk or load settings on to the device from a
local disk. This feature is very handy for administrators who have several devices that need to be
configured with the same settings.
Save A Copy of Current
Settings
Click on Backup to save current configured settings.
Restore Saved Settings
from a File
ENH200 can restore a previous setting that has been saved. Click on
Browse to select the file and Restore.
Revert to Factory Default
Settings
Click on Factory Default button to reset all the settings to the default
values.
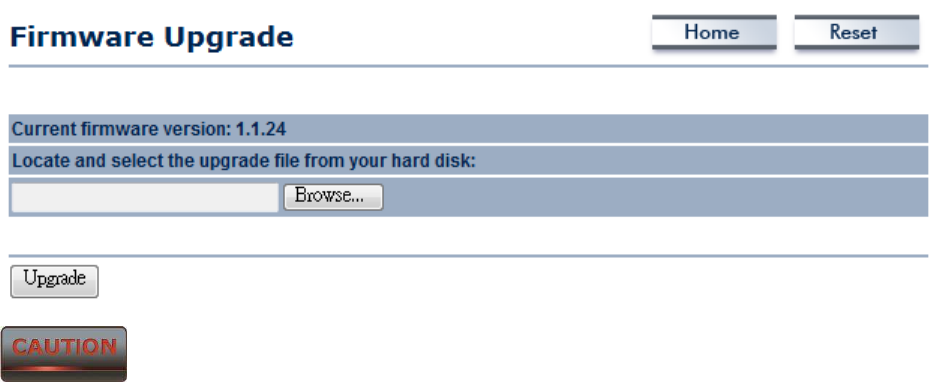
9.5 Firmware Upgrade
Click on the Firmware Upgrade link under the Management menu. This page is used to upgrade the
firmware of the device. Make sure that downloaded the appropriate firmware from your vendor.
Upgrade process may take few minutes, please do not power off the device and it may cause the
device crashed or unusable. ENH200 will restart automatically once the upgrade is completed.
9.6 Time Settings
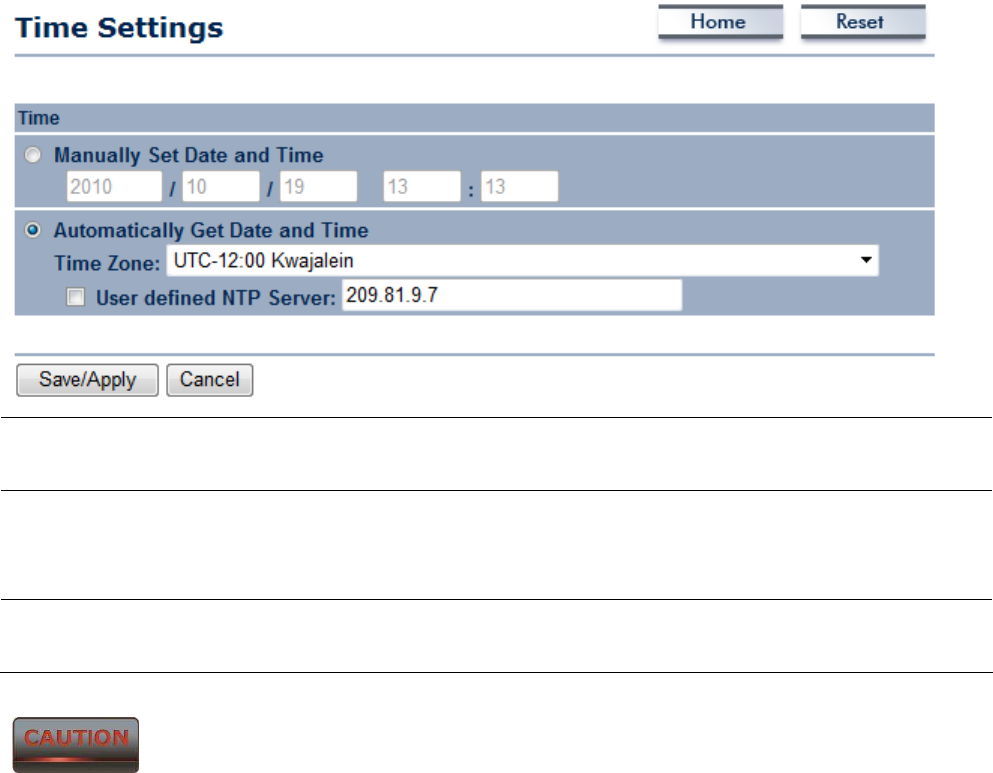
Click on the Time Settings link under the Management menu. This page allows you to configure the
time on the device. You may do this manually or by connecting to a NTP server.
Manually Set Date and
Time Manually setup the date and time.
Automatically Get Date
and Time
Specify the Time Zone from the drop down list and Place a Check to
specify the IP address of the NTP Server manually or uses default NTP
Server.
Save/Apply / Cancel Press Save/Apply to apply the changes or Cancel to return previous
settings.
Press Save/Apply will change the setting immediately. It will not be able to undo the action.
9.7 Log
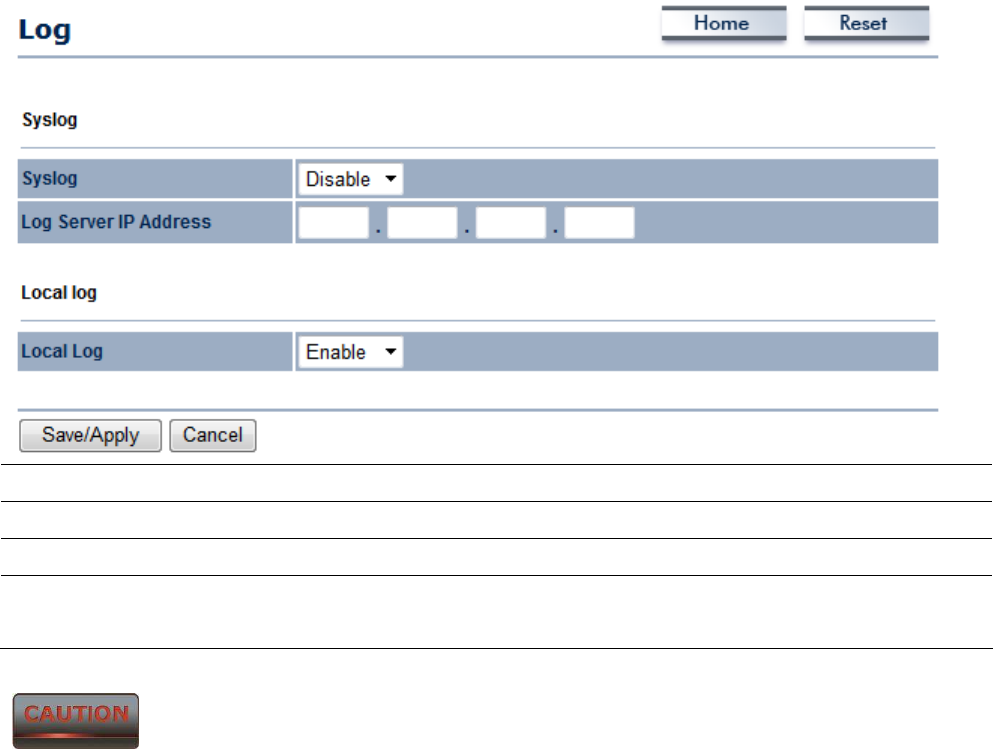
Click on the Log link under the Management menu. The Log page displays a list of events that are
triggered on the Ethernet and Wireless interface. This log can be referred when an unknown error
occurs on the system or when a report needs to be sent to the technical support department for
debugging purposes.
Syslog Select Enable or Disable Syslog function from the drop down list.
Log Server IP Address Specify the Log Server IP address.
Local Log Select Enable or Disable Local Log service.
Save/Apply / Cancel Press Save/Apply to apply the changes or Cancel to return previous
settings.
Press Save/Apply will change the setting immediately. It will not be able to undo the action.
9.8 Diagnostics
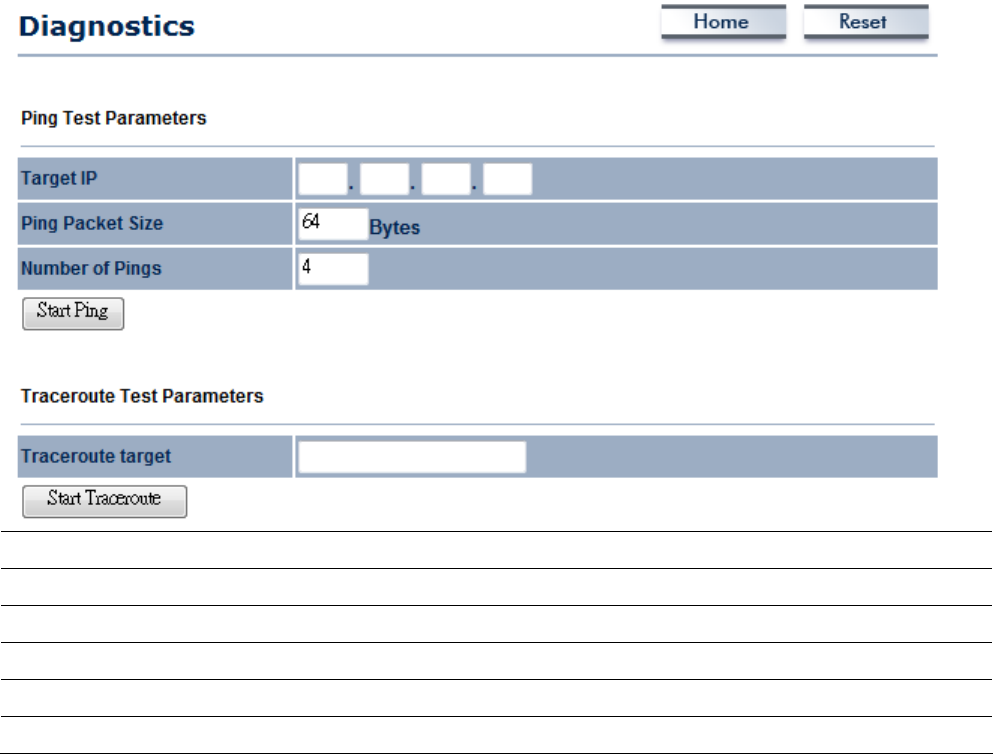
Click on the Diagnostics link under the Management menu. This function allows you to detect
connection quality and trace the routing table to the target.
Target IP Specify the IP address you would like to search.
Ping Packet Size Specify the packet size of each ping.
Number of Pings Specify how many times of ping.
Start Ping Press Start Ping to begin.
Traceroute Target Specify an IP address or Domain name you would like to trace.
Start Traceroute Press Start Traceroute to begin.
10 Network Configuration Example
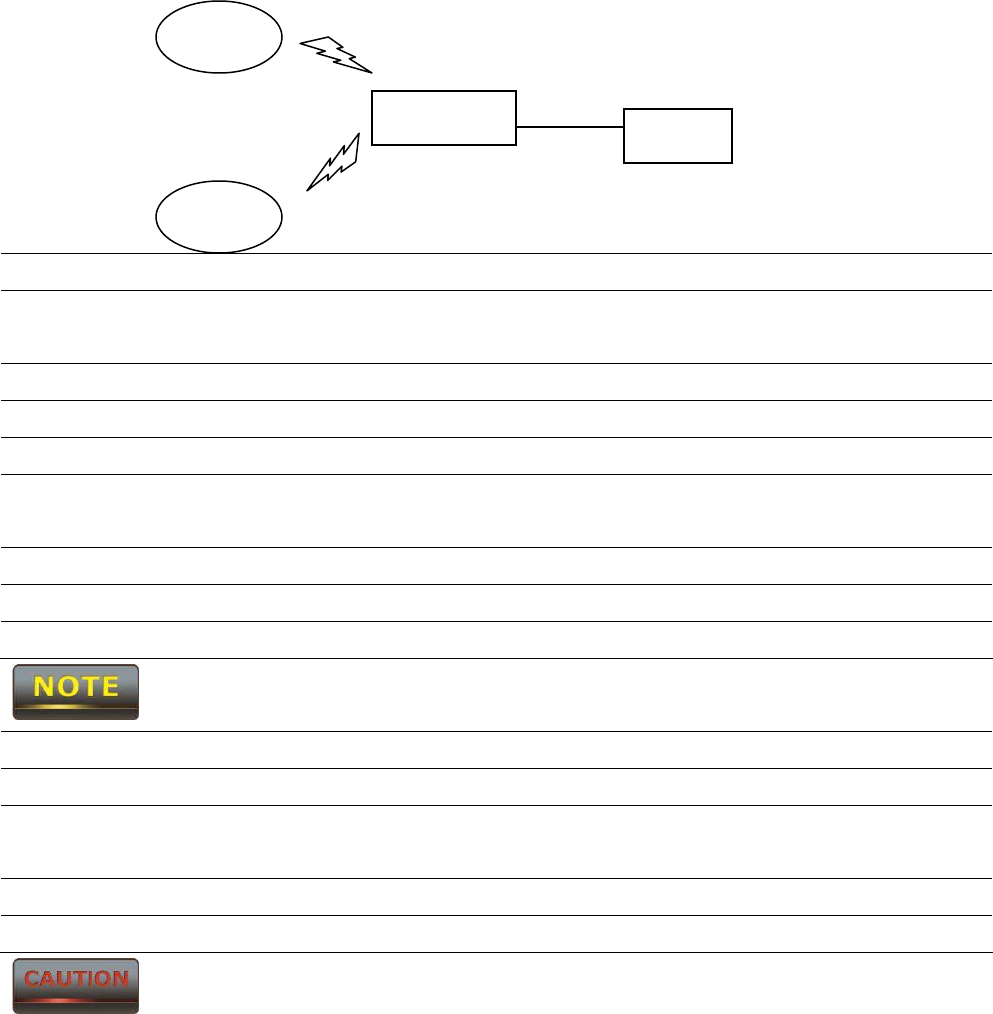
This chapter describes the role of the ENH200 with 4+1 modes. The Access Point mode’s default
configuration is a central unit of the wireless network or as a root device of the wired environment.
Repeater mode and Mesh network mode need future configuration.
10.1 Access Point
Access Point
Step1 Login to the web-based configuration interface with default IP
192.168.1.1
Step2 Follow region’s regulation.
Step3 Use site survey to scan channels that have been used in nearby area.
Step4 Select channel with less interferences.
Step5 Specify the SSID for your broadcast SSID and you can also configure
multiple SSID at the same time.
Step6 Verify VLAN identifier to separate services among clients
Step7 Setup the authentication settings.
Step8 Apply to process all the configurations.
For more advanced settings, please refer to the previous chapters.
Wireless Client
Step1 Select wireless mode you would like to associate with.
Step2 Use site survey to scan nearby Access Point and select the certain AP
you would like to connect with or enter SSID manually.
Step3 Configure VLAN ID in your wireless device if available.
Step4 Select correct authentication type and password.
ENH200’s Access Point Mode does not provide DHCP server so the Wireless Client IP
address must configure manually at the same subnet in Local Area Network.
ENH200
Client
Client
SSID2
SSID1 Ethernet Client
192.168.1.1 192.168.1.10
192.168.1.11
192.168.1.12
10.2 Client Bridge Mode
Client Bridge Mode functions like a wireless dongle. It must connect to an Access Point/AP Router to
join the network.
Please refer to the last section to check Access point’s configuration.
Client Bridge
Step1 Login to the web-based configuration interface with default IP
192.168.1.1
Step2 Follow region’s regulation.
Step3 Select Operation Mode to Client Bridge from System Properties.
Step4 Use site survey to scan Access Points that are available in nearby area.
Step5 Select the AP you would like to associate with.
Step6 Setup the authentication settings that match to the Access Point’s
setting.
Step7 Apply to process all the configurations.
Client Bridge’s IP setting must match to the Access Point’s subnet.
Access Point /
Wireless Router
Internet
ENH200
Client
192.168.1.2
192.168.1.1 192.168.1.10

10.3 WDS Bridge Mode
Use this feature to link multiple APs in a network. All clients associated with any APs can
communicate each other like an ad-hoc mode.
WDS Bridge
Step1 Login to the web-based configuration interface with default IP
192.168.1.1
Step2 Follow region’s regulation.
Step3 Select Operation Mode to WDS Bridge from System Properties.
Step4 Select channel you would like to use.
Step5 Setup the authentication settings
Step6 Setup WDS Link Settings.
Step7 Specify the AP’s MAC address you would like to connect with.
Step8 Press Apply to process all the configurations.
Each WDS bridge’s device must use the same Subnet, Wireless Mode, Wireless Channel,
and Security Setting.
ENH
WDS
ENH
WDS
WDS
Client
WDS
Client
ENH
Client
ENH
ENHClient
192.168.1.1
192.168.1.2
192.168.1.3
192.168.1.4
192.168.1.5
10.4 Client Router
In the Client Router Mode, the ENH200 has DHCP Server build inside that allows many LANs
automatically generate an IP address to share the same Internet. Connect an AP/WISP Wirelessly and
connect to LANs via wired. Client Router Mode is act completely opposite to the AP Router Mode.
Please refer to the last section to check Access point’s configuration.
Client Router
Step1 Login to the web-based configuration interface with default IP
192.168.1.1
Step2 Follow region’s regulation.
Step3 Select Operation Mode to Client Router from System Properties.
Step4 Change your Local Area Network setting to Obtain an IP Address
Automatically.
Step5 Use site survey to scan Access Points that are available in nearby area.
Step6 Select the AP you would like to associate with.
Step7 Setup the authentication settings that match to the Access Point’s
setting.
Step8 Setup your WAN connection type given by your Internet Service
Provider from WAN Settings.
Step9 Press Apply to process all the configurations.
Client Router’s IP setting must match to the Access Point’s subnet.
ENH200
AP / WISP
PC
PC
PC
192.168.1.1
192.168.1.10
192.168.1.11
192.168.1.12
Federal Communication Commission Interference Statement
This equipment has been tested and found to comply with the limits for a Class B digital device,
pursuant to Part 15 of the FCC Rules. These limits are designed to provide reasonable protection
against harmful interference in a residential installation. This equipment generates, uses and can
radiate radio frequency energy and, if not installed and used in accordance with the instructions, may
cause harmful interference to radio communications. However, there is no guarantee that
interference will not occur in a particular installation. If this equipment does cause harmful
interference to radio or television reception, which can be determined by turning the equipment off
and on, the user is encouraged to try to correct the interference by one of the following measures:
- Reorient or relocate the receiving antenna.
- Increase the separation between the equipment and receiver.
- Connect the equipment into an outlet on a circuit different from that
to which the receiver is connected.
- Consult the dealer or an experienced radio/TV technician for help.
FCC Caution: Any changes or modifications not expressly approved by the party responsible for
compliance could void the user's authority to operate this equipment.
This device complies with Part 15 of the FCC Rules. Operation is subject to the following two
conditions: (1) This device may not cause harmful interference, and (2) this device must accept any
interference received, including interference that may cause undesired operation.
IMPORTANT NOTE:
Radiation Exposure Statement:
This equipment complies with FCC radiation exposure limits set forth for an uncontrolled
environment. This equipment should be installed and operated with minimum distance 20cm
between the radiator & your body.
This transmitter must not be co-located or operating in conjunction with any other antenna or
transmitter.
Note: Country selection is not available in the US model.
Industry Canada statement:
This device complies with RSS-210 of the Industry Canada Rules. Operation is subject to the following
two conditions: (1) This device may not cause harmful interference, and (2) this device must accept
any interference received, including interference that may cause undesired operation.
Ce dispositif est conforme à la norme CNR-210 d'Industrie Canada applicable aux appareils radio
exempts de licence. Son fonctionnement est sujet aux deux conditions suivantes: (1) le dispositif ne
doit pas produire de brouillage préjudiciable, et (2) ce dispositif doit accepter tout brouillage reçu, y
compris un brouillage susceptible de provoquer un fonctionnement indésirable.
IMPORTANT NOTE:
Radiation Exposure Statement:
This equipment complies with IC radiation exposure limits set forth for an uncontrolled
environment. This equipment should be installed and operated with minimum distance 20cm
between the radiator & your body.
NOTE IMPORTANTE: (Pour l'utilisation de dispositifs mobiles)
Déclaration d'exposition aux radiations:
Cet équipement est conforme aux limites d'exposition aux rayonnements IC établies pour un
environnement non contrôlé. Cet équipement doit être installé et utilisé avec un minimum de 20 cm
de distance entre la source de rayonnement et votre corps.

Europe – EU Declaration of Conformity
This device complies with the essential requirements of the R&TTE Directive 1999/5/EC. The following test
methods have been applied in order to prove presumption of conformity with the essential requirements of
the R&TTE Directive 1999/5/EC:
- EN60950-1:2006 A11:2009
Safety of Information Technology Equipment
- EN50385 : 2002
- Generic standard to demonstrate the compliance of electronic and electrical apparatus with the basic
restrictions related to human exposure to electromagnetic fields (0 Hz - 300 GHz)
- EN 300 328 V1.7.1: 2006-10
- Electromagnetic compatibility and Radio spectrum Matters (ERM); Wideband Transmission systems; Data
transmission equipment operating in the 2,4 GHz ISM band and using spread spectrum modulation
techniques; Harmonized EN covering essential requirements under article 3.2 of the R&TTE Directive
-
EN 301 489-1 V1.8.1: 2008-04
Electromagnetic compatibility and Radio Spectrum Matters (ERM); ElectroMagnetic Compatibility (EMC)
standard for radio equipment and services; Part 1: Common technical requirements
- EN 301 489-17 V2.1.1 2009-05
- Electromagnetic compatibility and Radio spectrum Matters (ERM); ElectroMagnetic Compatibility (EMC)
standard for radio equipment and services; Part 17: Specific conditions for 2,4 GHz wideband transmission
systems and 5 GHz high performance RLAN equipment
This device is a 2.4 GHz wideband transmission system (transceiver), intended for use in all EU member states
and EFTA countries, except in France and Italy where restrictive use applies.
In Italy the end-user should apply for a license at the national spectrum authorities in order to obtain
authorization to use the device for setting up outdoor radio links and/or for supplying public access to
telecommunications and/or network services.
This device may not be used for setting up outdoor radio links in France and in some areas the RF output
power may be limited to 10 mW EIRP in the frequency range of 2454 – 2483.5 MHz. For detailed information
the end-user should contact the national spectrum authority in France.
0560

Česky
[Czech]
[Jméno výrobce] tímto prohlašuje, že tento [typ zařízení] je ve shodě se základními požadavky a dalšími
příslušnými ustanoveními směrnice 1999/5/ES.
Dansk
[Danish]
Undertegnede [fabrikantens navn] erklærer herved, at følgende udstyr [udstyrets typebetegnelse]
overholder de væsentlige krav og øvrige relevante krav i direktiv 1999/5/EF.
Deutsch
[German]
Hiermit erklärt [Name des Herstellers], dass sich das Gerät [Gerätetyp] in Übereinstimmung mit den
grundlegenden Anforderungen und den übrigen einschlägigen Bestimmungen der Richtlinie 1999/5/EG
befindet.
Eesti
[Estonian]
Käesolevaga kinnitab [tootja nimi = name of manufacturer] seadme [seadme tüüp = type of equipment]
vastavust direktiivi 1999/5/EÜ põhinõuetele ja nimetatud direktiivist tulenevatele teistele asjakohastele
sätetele.
English Hereby, [name of manufacturer], declares that this [type of equipment] is in compliance with the
essential requirements and other relevant provisions of Directive 1999/5/EC.
Español
[Spanish]
Por medio de la presente [nombre del fabricante] declara que el [clase de equipo] cumple con los
requisitos esenciales y cualesquiera otras disposiciones aplicables o exigibles de la Directiva 1999/5/CE.
Ελληνική
[Greek]
ΜΕ ΤΗΝ ΠΑΡΟΥΣΑ [name of manufacturer] ΔΗΛΩΝΕΙ ΟΤΙ [type of equipment] ΣΥΜΜΟΡΦΩΝΕΤΑΙ ΠΡΟΣ
ΤΙΣ ΟΥΣΙΩΔΕΙΣ ΑΠΑΙΤΗΣΕΙΣ ΚΑΙ ΤΙΣ ΛΟΙΠΕΣ ΣΧΕΤΙΚΕΣ ΔΙΑΤΑΞΕΙΣ ΤΗΣ ΟΔΗΓΙΑΣ 1999/5/ΕΚ.
Français
[French]
Par la présente [nom du fabricant] déclare que l'appareil [type d'appareil] est conforme aux exigences
essentielles et aux autres dispositions pertinentes de la directive 1999/5/CE.
Italiano
[Italian]
Con la presente [nome del costruttore] dichiara che questo [tipo di apparecchio] è conforme ai requisiti
essenziali ed alle altre disposizioni pertinenti stabilite dalla direttiva 1999/5/CE.
Latviski
[Latvian]
Ar šo [name of manufacturer / izgatavotāja nosaukums] deklarē, ka [type of equipment / iekārtas tips]
atbilst Direktīvas 1999/5/EK būtiskajām prasībām un citiem ar to saistītajiem noteikumiem.
Lietuvių
[Lithuanian]
Šiuo [manufacturer name] deklaruoja, kad šis [equipment type] atitinka esminius reikalavimus ir kitas
1999/5/EB Direktyvos nuostatas.
Nederlands
[Dutch]
Hierbij verklaart [naam van de fabrikant] dat het toestel [type van toestel] in overeenstemming is met de
essentiële eisen en de andere relevante bepalingen van richtlijn 1999/5/EG.
Malti
[Maltese]
Hawnhekk, [isem tal-manifattur], jiddikjara li dan [il-mudel tal-prodott] jikkonforma mal-ħtiġijiet
essenzjali u ma provvedimenti oħrajn relevanti li hemm fid-Dirrettiva 1999/5/EC.
Magyar
[Hungarian]
Alulírott, [gyártó neve] nyilatkozom, hogy a [... típus] megfelel a vonatkozó alapvetõ követelményeknek
és az 1999/5/EC irányelv egyéb elõírásainak.
Polski
[Polish]
Niniejszym [nazwa producenta] oświadcza, że [nazwa wyrobu] jest zgodny z zasadniczymi wymogami oraz
pozostałymi stosownymi postanowieniami Dyrektywy 1999/5/EC.
Português
[Portuguese]
[Nome do fabricante] declara que este [tipo de equipamento] está conforme com os requisitos essenciais
e outras disposições da Directiva 1999/5/CE.
Slovensko
[Slovenian]
[Ime proizvajalca] izjavlja, da je ta [tip opreme] v skladu z bistvenimi zahtevami in ostalimi relevantnimi
določili direktive 1999/5/ES.
Slovensky [Meno výrobcu] týmto vyhlasuje, že [typ zariadenia] spĺňa základné požiadavky a všetky príslušné

[Slovak] ustanovenia Smernice 1999/5/ES.
Suomi
[Finnish]
[Valmistaja = manufacturer] vakuuttaa täten että [type of equipment = laitteen tyyppimerkintä]
tyyppinen laite on direktiivin 1999/5/EY oleellisten vaatimusten ja sitä koskevien direktiivin muiden
ehtojen mukainen.
Svenska
[Swedish]
Härmed intygar [företag] att denna [utrustningstyp] står I överensstämmelse med de väsentliga
egenskapskrav och övriga relevanta bestämmelser som framgår av direktiv 1999/5/EG.