Senao Networks OA86708001 802.11a/b/g Outdoor Layer-2 MESH AP User Manual Manual
Senao Networks, Inc. 802.11a/b/g Outdoor Layer-2 MESH AP Manual
Manual

EnGenius Mesh AP-EOA-8670 User Manual & Configuration Guide
EnGenius Mesh AP-EOA-8670 User Manual & Configuration Guide Page 1 of 67
EnGenius Mesh AP
--EOA-8670--
User Manual & Configuration Guide

EnGenius Mesh AP-EOA-8670 User Manual & Configuration Guide
EnGenius Mesh AP-EOA-8670 User Manual & Configuration Guide Page 2 of 67
Table of Content
Table of Content 2
1 Document History 4
2 Overview 5
3 EnGenius Mesh Web-based Interface 6
4 System 9
4.1 System > System 9
4.2 System > Syslog 10
4.3 System > Advance 11
5 Network 14
5.1 Network > Network 14
5.2 Network > VLAN 15
5.3 Network > Mesh 17
5.4 Network > Wireless 21
5.5 Network > Route 24
6 Service 26
6.1 Service > MAC Access 26
6.2 Service > NTP 28
6.3 Service > RADIUS 29
6.4 Service > Linux Kernel Watchdog 32
6.5 Service > SSHD 33
6.6 Service > WME 34
6.7 Service > DHCP Relay 36
7 Management 38
7.1 Management > HTTPD 38
7.2 Management > Configuration 41
7.3 Management > SNMP 44
7.4 Management > Firmware 47
7.5 Management > Trap 48
7.6 Management > NMS Addresses 51
7.7 Management > Reboot 53
8 Tools 54
8.1 Tools > Ping 54
8.2 Tools > Ifconfig 55
8.3 Tools > Route 56
8.4 Tools > TFTP 57
9 Status 58
9.1 Status > Status 58
9.2 Status > Interfaces 59

EnGenius Mesh AP-EOA-8670 User Manual & Configuration Guide
EnGenius Mesh AP-EOA-8670 User Manual & Configuration Guide Page 3 of 67
9.3 Status > Services 61
9.4 Status > System Log 62
9.5 Status > Neighbor 63
10 Help 63

EnGenius Mesh AP-EOA-8670 User Manual & Configuration Guide
EnGenius Mesh AP-EOA-8670 User Manual & Configuration Guide Page 4 of 67
1 Document History
Revision Date Remarks Authors
1.0 2008-04-07 Draft Release

EnGenius Mesh AP-EOA-8670 User Manual & Configuration Guide
EnGenius Mesh AP-EOA-8670 User Manual & Configuration Guide Page 5 of 67
2 Overview
The purpose of this document is to describe the detail features of EnGenius Mesh
Access Point (EOA-8670), and also the procedure and methodology of configuring
and the use of EnGenius MAP.

EnGenius Mesh AP-EOA-8670 User Manual & Configuration Guide
EnGenius Mesh AP-EOA-8670 User Manual & Configuration Guide Page 6 of 67
3 EnGenius Mesh Web-based Interface
Web-based configuration interface is accessible with computer with TCP/IP capability
and web browser (e.g. Mozilla or IE).To access web-based configuration interface,
enter
https://192.168.0.1/.
In the browser URL/Location field.
You will see an authentication page display as shown in Figure 3.1.1.
Figure 3.1.1: Windows authentication page
Type “admin” in User Name and Password field, then click OK button.

EnGenius Mesh AP-EOA-8670 User Manual & Configuration Guide
EnGenius Mesh AP-EOA-8670 User Manual & Configuration Guide Page 7 of 67
EnGenius Mesh page has six main menus: System, Network, Services, Management,
Tools and Status. Each main menu also will have its submenu.
Welcome
System
System System settings
Syslog Syslog settings
Advance Advance tuning
Network
Network Network settings
VLAN VLAN settings
Mesh Mesh settings
Wireless Wireless settings
Route Route settings
Services
MAC Access Filter MAC address
NTP Network Time Protocol
RADIUS RADIUS client settings
Linux Kernel Watchdog Linux Kernel Watchdog settings
SSHD SSHD Configuration
WME WME Settings
DHCP Relay DHCP relay settings
Management

EnGenius Mesh AP-EOA-8670 User Manual & Configuration Guide
EnGenius Mesh AP-EOA-8670 User Manual & Configuration Guide Page 8 of 67
HTTPD Internal webserver settings
Configuration Configuration management
SNMP SNMP settings
Firmware Firmware maintenance
Trap Trap settings
NMS Addresses Network Management System notifying settings.
Reboot Reboot device
Tools
Ping Ping
Ifconfig Ifconfig
Route Route
TFTP TFTP
Status
Status System status
Interfaces Interfaces statistics
Services Services status
System Log System logging
Neighbor Mesh node status
Help
EnGenius Mesh AP-EOA-8670 User Manual & Configuration Guide
EnGenius Mesh AP-EOA-8670 User Manual & Configuration Guide Page 9 of 67
4 System
4.1 System > System
MAP 1000 is a layer 2 mesh network that supports gateway and relay operation mode.
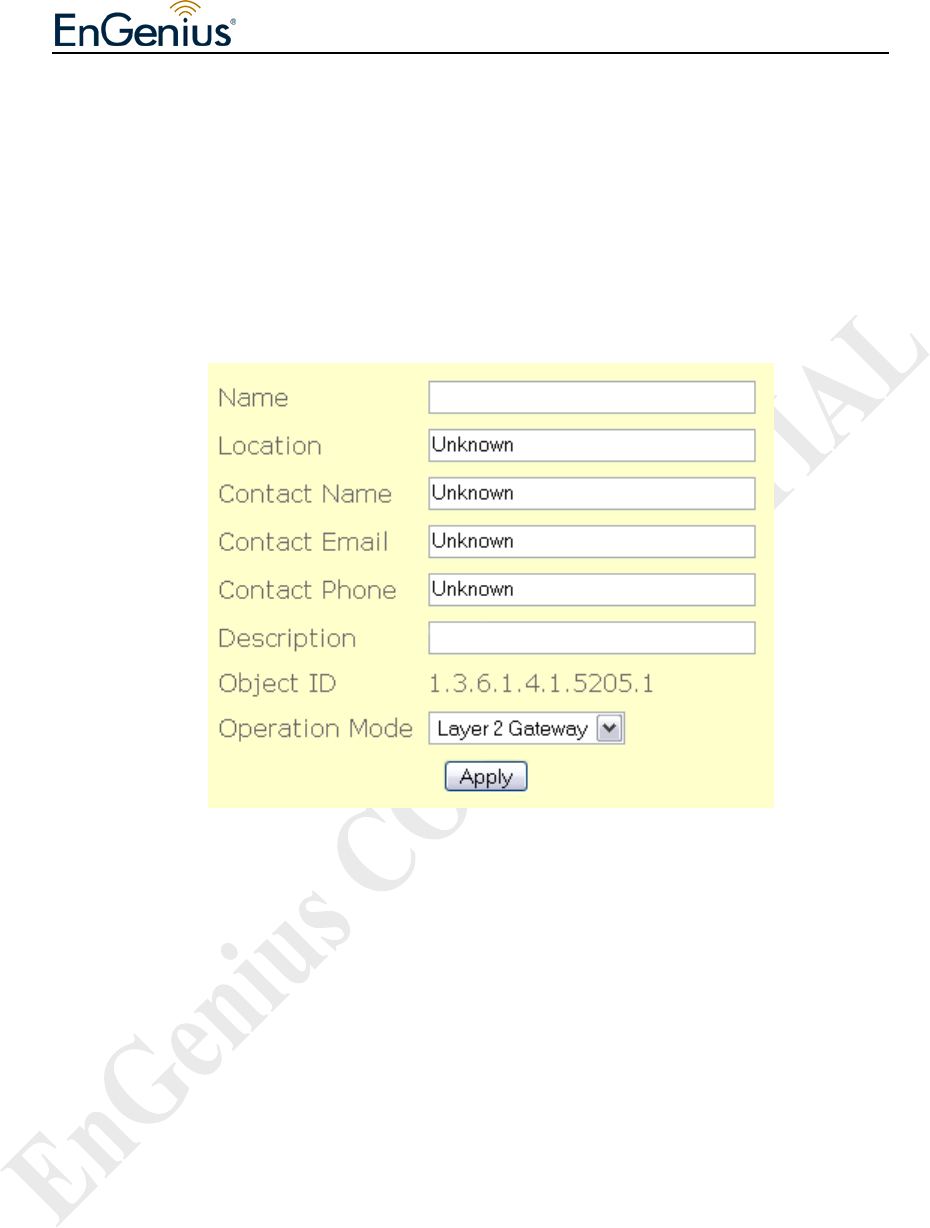
Figure 4.1.1 illustrates the system information configuration page.
Figure 4.1.1: System Information Configuration page
System Information Configuration page contains the following parameters:
• Name – Name of the device.
• Location – Location name that device located.
• Contact Name – Name of the contact person for consulting about the device.
• Contact Email – Email address of the contact person.
• Contact Phone – Phone number of the contact person.
• Description – Description of the device.
• Object ID – Display SNMP MIB object identification (OID) of the device.
• Operation Mode – Type of operation mode such as “Layer 2 Gateway” &
“ Layer 2 Relay”
• “Apply” button to save any changes made. New settings are active after the
device reboot.
EnGenius Mesh AP-EOA-8670 User Manual & Configuration Guide
EnGenius Mesh AP-EOA-8670 User Manual & Configuration Guide Page 10 of 67
4.2 System > Syslog
Certain system message is useful to understand the problem behind any undesired
result. Mesh AP 4000 is enabled with syslog server that can log message locally and
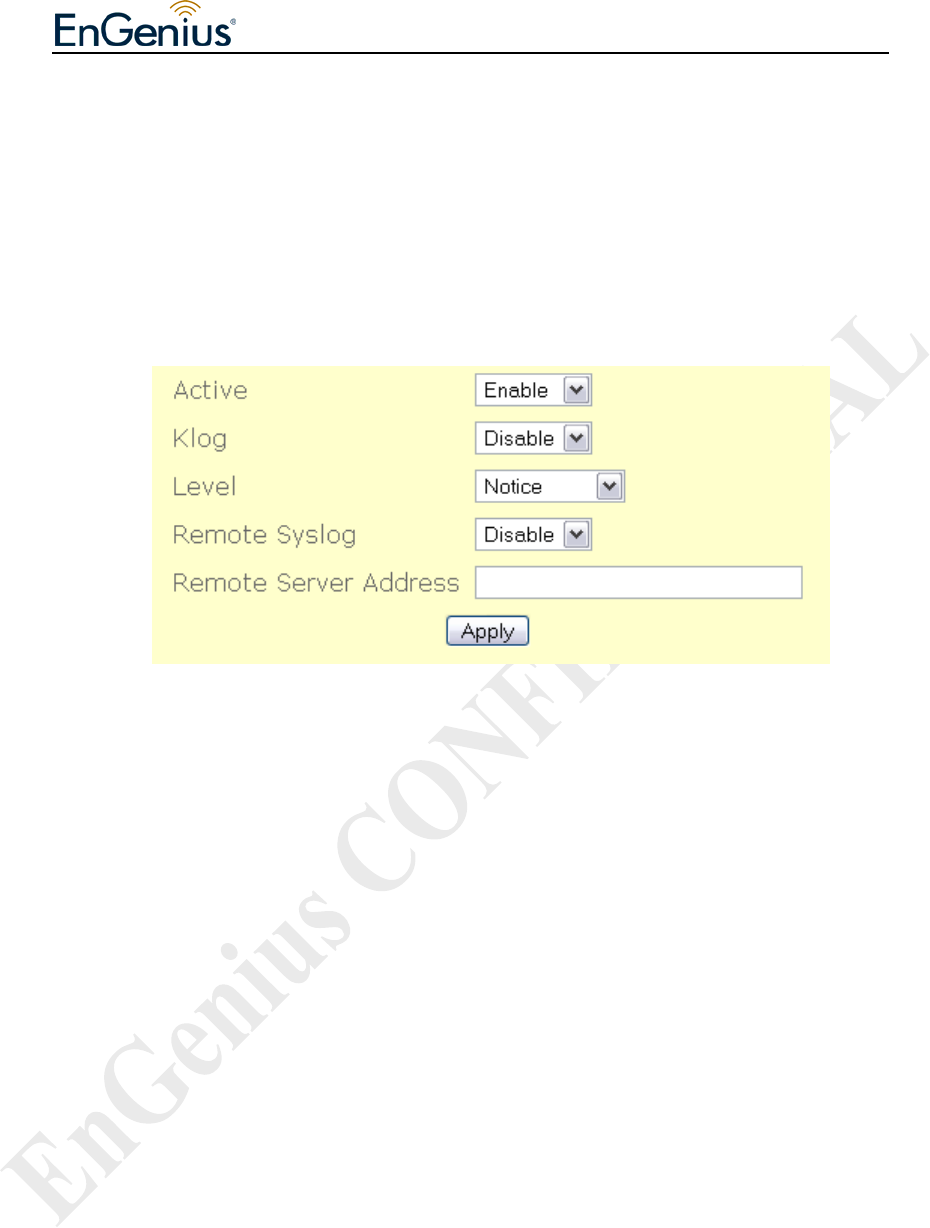
remotely. Figure 4.2.1 illustrates the Syslog configuration page.
Figure 4.2.1: Syslog configuration page
Syslog contains the following parameters:
• Active – Enable or disable system logging feature.
• Klog – Enable or disable kernel logging feature.
• Level – 8 levels of logging : emergency, alert, critical, error, warning, notice,
info and debug.
• Remote Syslog – Enable or disable remote syslog server.
• Remote Server Address – Address of remote syslog server when remote
syslog is enabled.
• “Apply” button to save any changes made. New settings are active after the
device reboot.

EnGenius Mesh AP-EOA-8670 User Manual & Configuration Guide
EnGenius Mesh AP-EOA-8670 User Manual & Configuration Guide Page 11 of 67
4.3 System > Advance
In this advance feature, networking conntrack and some wireless fine tune done.
Figure 4.3.1 illustrates the advance configuration page.
EnGenius Mesh AP-EOA-8670 User Manual & Configuration Guide
EnGenius Mesh AP-EOA-8670 User Manual & Configuration Guide Page 12 of 67
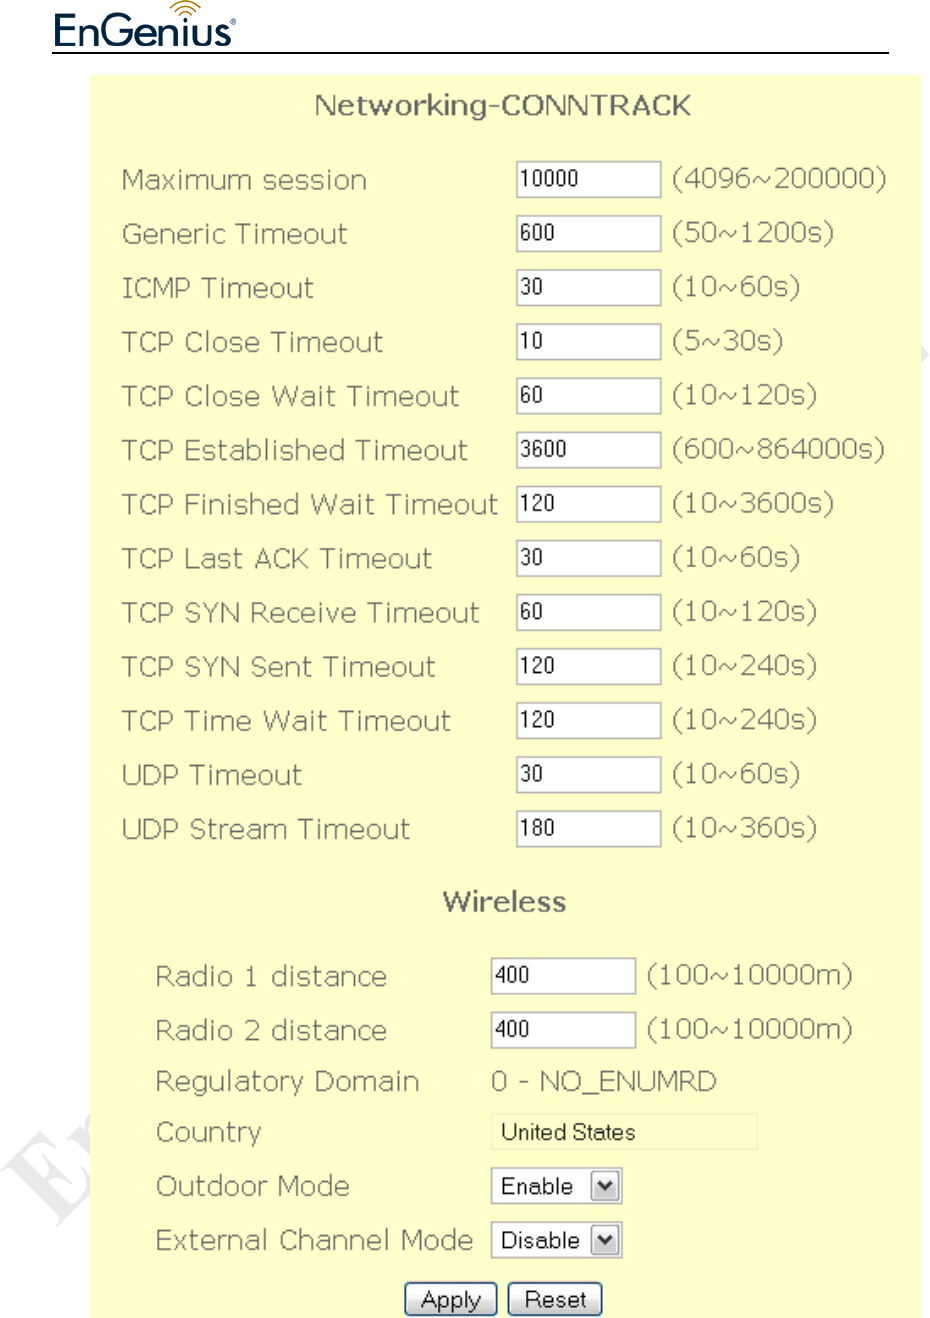
Figure 4.3.1: Advance configuration page
Advance configuration have the following parameters:

EnGenius Mesh AP-EOA-8670 User Manual & Configuration Guide
EnGenius Mesh AP-EOA-8670 User Manual & Configuration Guide Page 13 of 67
• Maximum Session – maximum connection tracking session, a higher value is
desired to support large number of local users.
• Generic Timeout – generic timeout for a connection tracking instance
• ICMP Timeout – ICMP timeout
• TCP Close Timeout – TCP close timeout
• TCP Close Wait Timeout – TCP close wait timeout
• TCP Established Timeout – TCP established timeout
• TCP Finished Wait Timeout – TCP finished wait timeout
• TCP Last Ack Timeout – Last acknowledgement timeout
• TCP SYN Receive Timeout – TCP SYN receive timeout
• TCP SYN Sent Timeout – TCP SYN sent timeout
• TCP Time Wait Timeout – TCP Time wait timeout
• UDP Timeout – UDP timeout
• UDP Stream Timeout – UDP stream timeout
• Radio 1 distance – Desired operating distance for radio 1 ( usually refer to
mesh radio )
• Radio 2 distance – Desired operating distance for radio 2 ( usually refer to
client access radio )
• Regulatory Domain – Display the regulatory domain of the wireless interface
• Country – Show the country domain.
• Outdoor Mode – Enable or disable use of outdoor mode on the wireless
interface.
• External Channel Mode – Enable or disable use of external channel mode of
the wireless interface
• “Apply” button to save any changes made. New settings are active after
reboot.
• “Reset” button to restore the settings on advance page back to factory default
settings.
EnGenius Mesh AP-EOA-8670 User Manual & Configuration Guide
EnGenius Mesh AP-EOA-8670 User Manual & Configuration Guide Page 14 of 67
5 Network
5.1 Network > Network
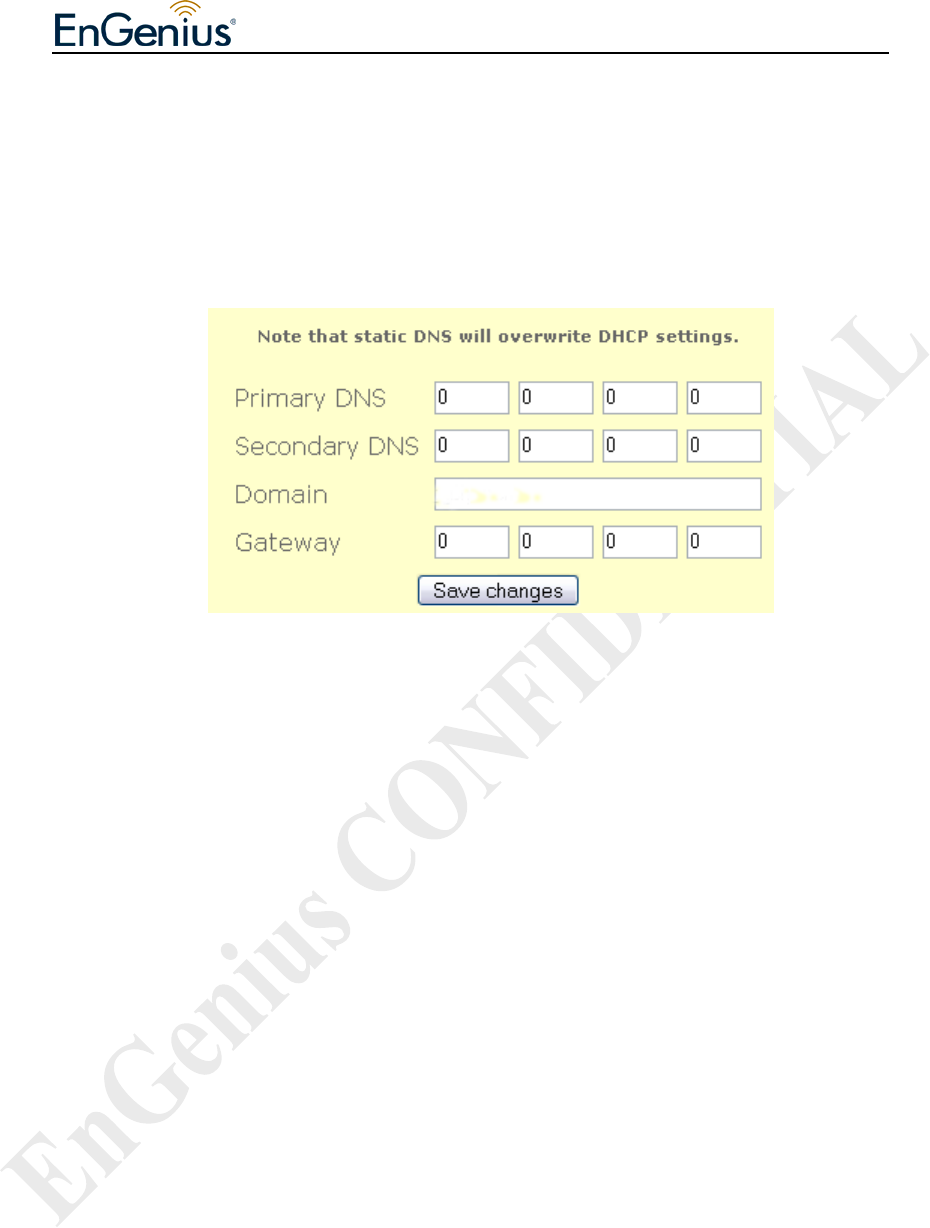
Figure 5.1.1 illustrates the network configuration page.
Figure 5.1.1: Network configuration page
Network contains the following parameters:
• Primary DNS – Primary Domain Name Server used to translates domain
names to IP addresses. Edit this field to match your ISP DNS address or leave
it unchanged to use received DNS address from your ISP.
• Secondary DNS – Secondary Domain Name Server used to translates domain
names to IP addresses. A backup DNS address to primary DNS. Specify the
Secondary DNS address.
• Domain – Specify the Domain name of network.
• Gateway – IP address of router or nodes that serves as an entrance to another
network, and vice-versa. Edit this field to match your ISP settings or leave it
unchanged to use defaults from your ISP.
• “Apply” button to save any changes made. New settings are active after the
device reboot.
EnGenius Mesh AP-EOA-8670 User Manual & Configuration Guide
EnGenius Mesh AP-EOA-8670 User Manual & Configuration Guide Page 15 of 67
5.2 Network > VLAN
Virtual LAN is a method of creating independent networks within a physical network.
Several VLANs can co-exist within such a network. This VLAN implementation is
based on the IEEE 802.1Q tagging protocol. Figure 5.2.1 illustrates the VLAN
configuration page.
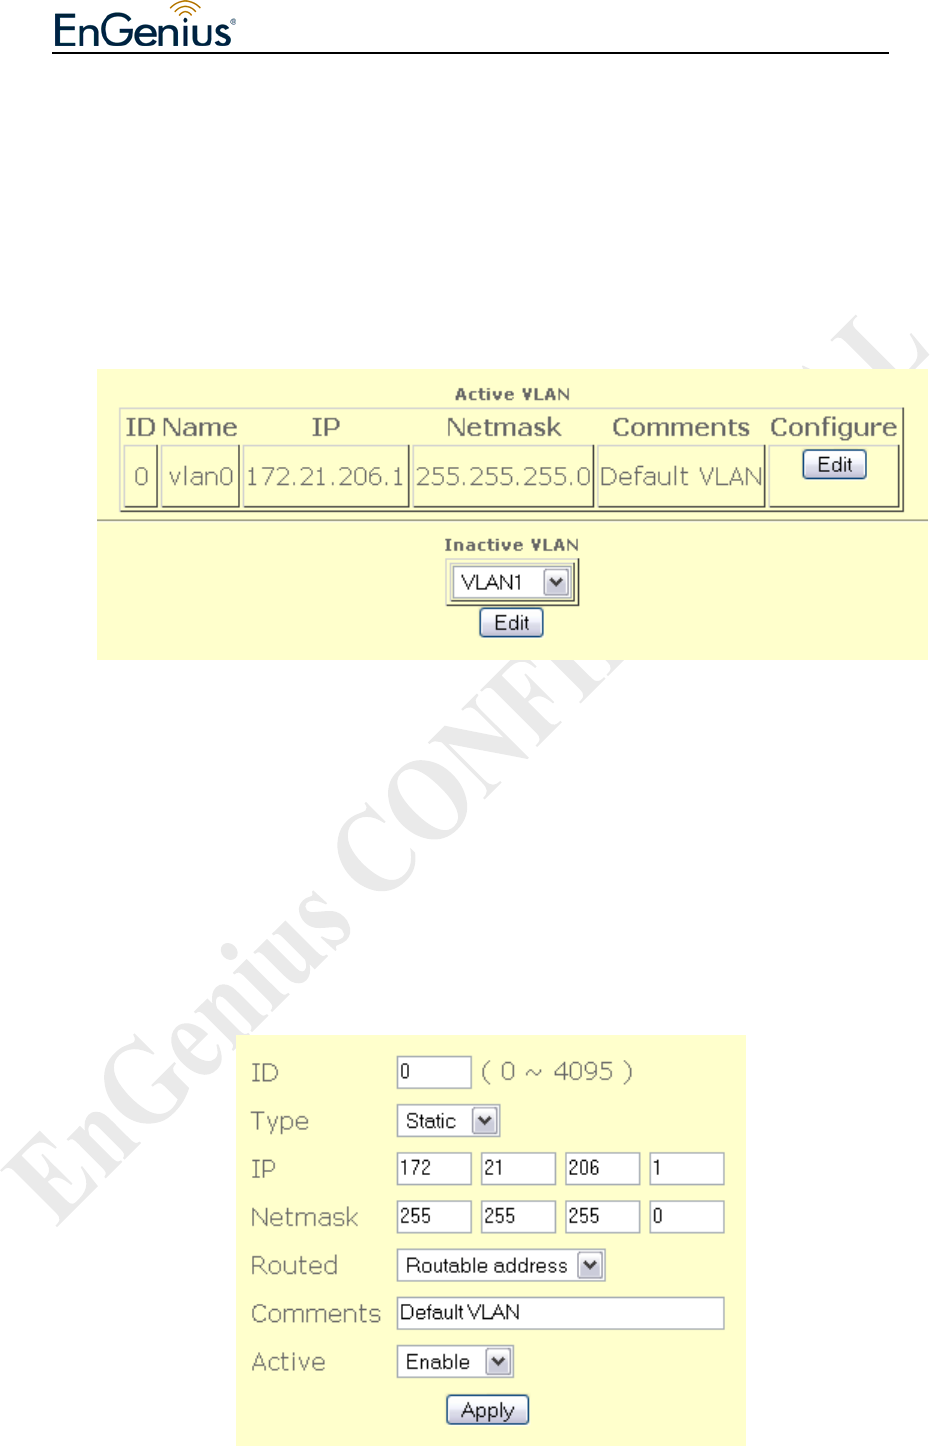
Figure 5.2.1: VLAN configuration page
To configure VLAN:
• Active VLAN list all activated VLAN. By default, only VLAN0 is active.
Click on “Edit” button to edit active VLAN.
• VLAN0 – edit page will display as shown in Figure 5.2.2.

EnGenius Mesh AP-EOA-8670 User Manual & Configuration Guide
EnGenius Mesh AP-EOA-8670 User Manual & Configuration Guide Page 16 of 67
Figure 5.2.2: VLAN0 – edit page
VLAN0 - edit page contain the following parameter:
o ID – Enter the VLAN ID.
o Type – Click on “Type” drop down menu to select “Static” or “DHCP”.
o IP – Specify the VLAN IP address.
o Netmask – Specify the network mask for this IP.
o Routed – Click on “Routed” drop down menu to select “Routable
address” or “NAT address”. A routeable network is visible to other Mesh
Node.
o Comments – Specify VLAN comments.
o Active – Click on “Active” drop down menu to select enable or disable
VLAN.
o “Apply” button to save any changes made. New settings are active
after the device reboot.
• To edit inactive VLAN, click on “Inactive VLAN” drop down menu, select
on VLAN you want to edit. For example, select VLAN1. Click on bottom
“Edit” button to edit inactive VLAN1.
• VLAN1 – edit page will display as shown in Figure 5.3.2
EnGenius Mesh AP-EOA-8670 User Manual & Configuration Guide
EnGenius Mesh AP-EOA-8670 User Manual & Configuration Guide Page 17 of 67
5.3 Network > Mesh
This device will form a wireless mesh network with other device provided the correct
configuration. Figure 5.3.1 illustrates the wireless settings of the mesh.
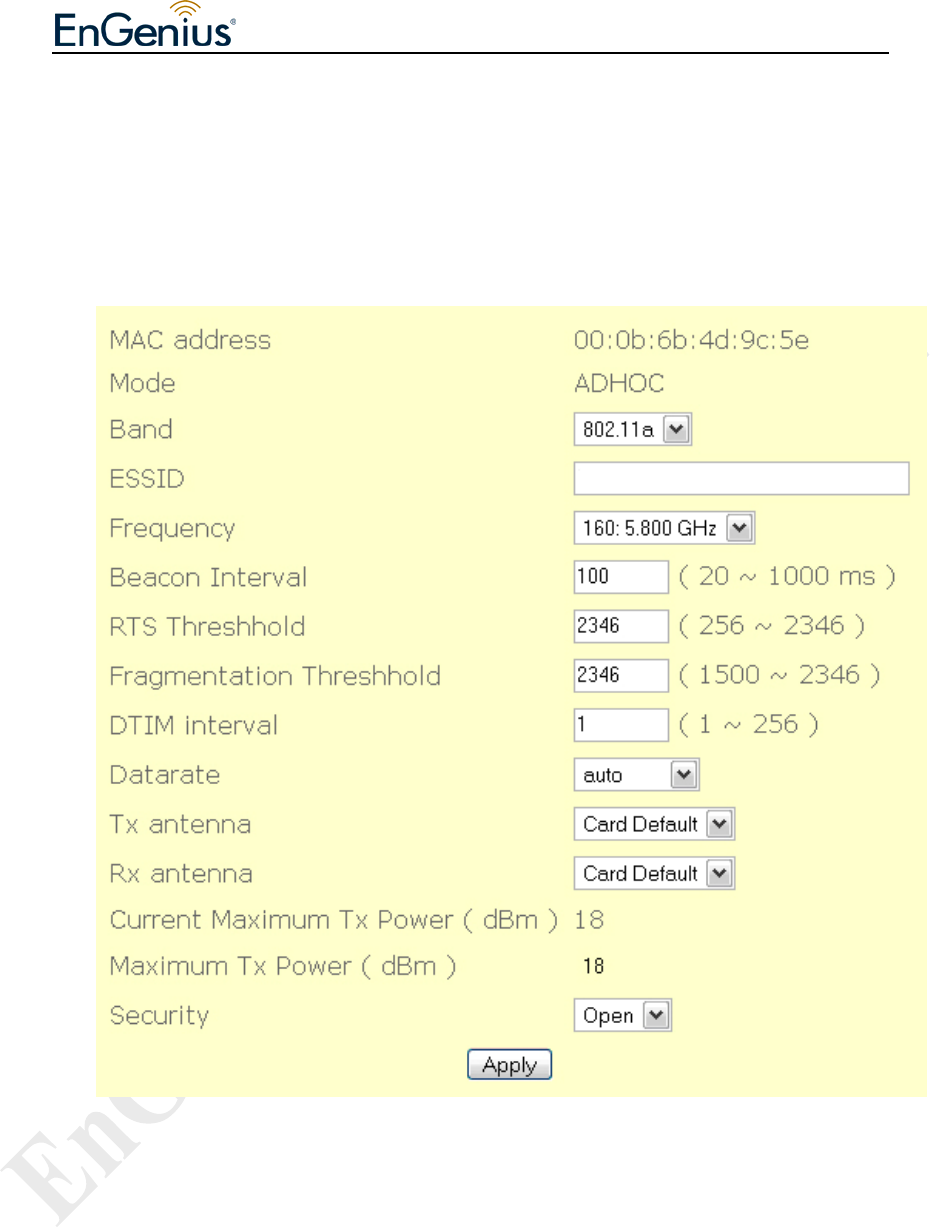
Figure 5.3.1: Mesh - wireless configuration page
Mesh – wireless page contain the following parameter:
• MAC address – Display the MAC address of Mesh – wireless interface.
• Mode – Click on “Mode” drop down menu to select “AP”, “STA”,
“ADHOC” or “WDS” operating mode. AP mode will bring the wireless
device to Access Point mode. Under this mode, it can connect multiple

EnGenius Mesh AP-EOA-8670 User Manual & Configuration Guide
EnGenius Mesh AP-EOA-8670 User Manual & Configuration Guide Page 18 of 67
wireless communication devices together to form a wireless network and
can relay data between wireless and wired devices.
STA mode will bring the wireless device to Station mode. Under this mode,
it needs to connect to an AP to join the wireless network.
ADHOC mode will bring the wireless device to adhoc mode where no AP
is required. The connection is established for the duration of one session
by discovering others device within range.
WDS mode will bring the wireless device to form a wireless distribution
system that connects to other AP to form a larger network. Data can be
ralayed between 2 stations.
Only ADHOC mode is allowed in mesh network. Mode other than
ADHOC is disabled and not supported.
• Band – Click on “Band” drop down menu to select “802.11a”, “802.11b”
or “802.11g’ operating band. Choose 802.11a if you want to operates mesh
network under the 5GHz spectrum and up to 54Mbps. However, make sure
your hardware is supported for this kind of operation. Choose 802.11b for
operation under 2.4 GHz spectrums for rates up to 11Mbps. Choose
802.11g for operation under 2.4GHz that are backward compatible with
802.11b band. It can support rates up to 54Mbps.
• ESSID – Extended Service Set Identifier is a code attached to all packets
on a wireless network to identify each packet as part of that network. This
entry is case sensitive text string which consists of a maximum of 32
alphanumeric characters. Enter your ESSID into this field that consistent
with other mesh so that it can join or form the mesh network.
• Frequency – Click on “Frequency” drop down menu to select operating
frequency of wireless network in GHz.
• Beacon Interval – Beacon are management packets sent by an Access
Point to manage and synchronize a wireless network. Value in the range of
20 to 1000 milliseconds is permitted. The default value is set to 100
milliseconds.

EnGenius Mesh AP-EOA-8670 User Manual & Configuration Guide
EnGenius Mesh AP-EOA-8670 User Manual & Configuration Guide Page 19 of 67
• RTS Threshold – Request to Send management packet. With smaller RTS
length value, the wireless network can recover from interference and
collisions quicker at a cost of reducing the maximum throughput. Network
with heaving loading or interference is advised to use smaller value of
RTS.
• Fragmentation Threshold – Fragmentation of packet into desired length.
Network with high packet error should use smaller value. Use of small
value will results in lower throughput due to more overheads is introduced.
• DTIM Interval – Delivery Traffic Indication Message is a countdown
mechanism for informing associated stations of the next window for
listening to broadcast and multicast messages. When the AP has buffered
broadcast or multicast messages, it sends the next DTIM with a DTIM
interval value. Clients hear the beacons and awaken to receive the
broadcast and multicast messages. A range of value 1 to 255 is permitted.
The default value is 1.
• Datarate – Click on “Datarate” drop down menu to select wireless
network datarate. For example, 1 Mbps, 2 Mps, 5.5 Mbps……
• Tx antenna – Click on “Tx antenna” drop down button to select
“Diversity”, “Card Default”, “Port 1”, or “Port 2”.
• Rx antenna - Click on “Rx antenna” drop down button to select
“Diversity”, “Card Default”, “Port 1”, or “Port 2”.
• Current Maximum Tx Power (dBm) – Display current maximum Tx
power.
• Maximum Tx Power (dBm) – Show the maximum Tx power of this
device.
• Security – Add security features to the wireless network. Click on
“Security” drop down button to select “Open”, “WEP” or “AES”. Only
when select “WEP” or “AES” will display “Encryption Key” field as
shown in Figure 5.3.2.

EnGenius Mesh AP-EOA-8670 User Manual & Configuration Guide
EnGenius Mesh AP-EOA-8670 User Manual & Configuration Guide Page 20 of 67
Figure 5.3.2: Mesh - wireless configuration page (with encryption key)
o Open-no encryption or security is applied.
o WEP-Wired Equivalent Privacy. An encryption using either 64-bit or
128-bit to encrypt the network packets.
o AES-Advanced Encryption Standard. An encryption scheme that uses
128-bit to encrypt the network packets.
• “Apply” button to save any changes made. New settings are active after the
device reboot.
EnGenius Mesh AP-EOA-8670 User Manual & Configuration Guide
EnGenius Mesh AP-EOA-8670 User Manual & Configuration Guide Page 21 of 67
5.4 Network > Wireless
Figure 5.4.1 illustrates the AP configuration page.
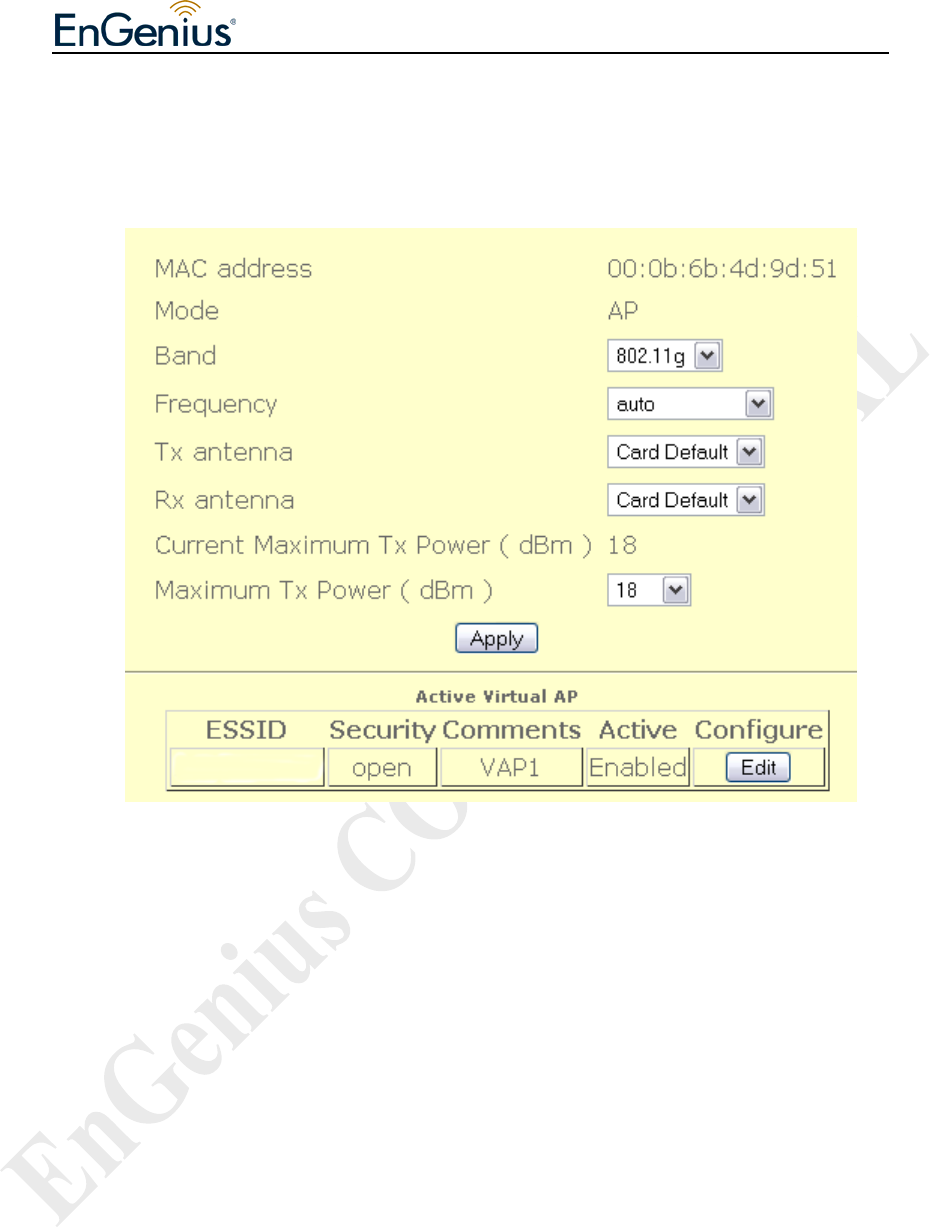
Figure 5.4.1: AP configuration page
Wireless AP contains the following parameters:
• MAC address – Displays the MAC address of the wireless interface.
• Mode – Only AP mode is available in MAP 4000.
• Band – “802.11a”, “802.11b” or “802.11g” operating band.
• Frequency – Operating frequency of the wireless network in Ghz.
• Tx antenna – Select “Diversity”, “Port 1”, “Port 2” or “Card Default”.
• Rx antenna – Select “Diversity”, “Port 1”, “Port 2” or “Card Default”.
• Current Maximum Tx Power – Displays current transmit power of the
wireless card due to regulatory limitation.
• Maximum Tx Power (dBm) – Select transmit power of the AP wireless card.
• “Apply” button to save any changes made. New settings are active after the
EnGenius Mesh AP-EOA-8670 User Manual & Configuration Guide
EnGenius Mesh AP-EOA-8670 User Manual & Configuration Guide Page 22 of 67
device reboot.
• “Edit” button to edit Active Virtual AP. AP configuration – edit page is
shown in Figure 5.4.2.
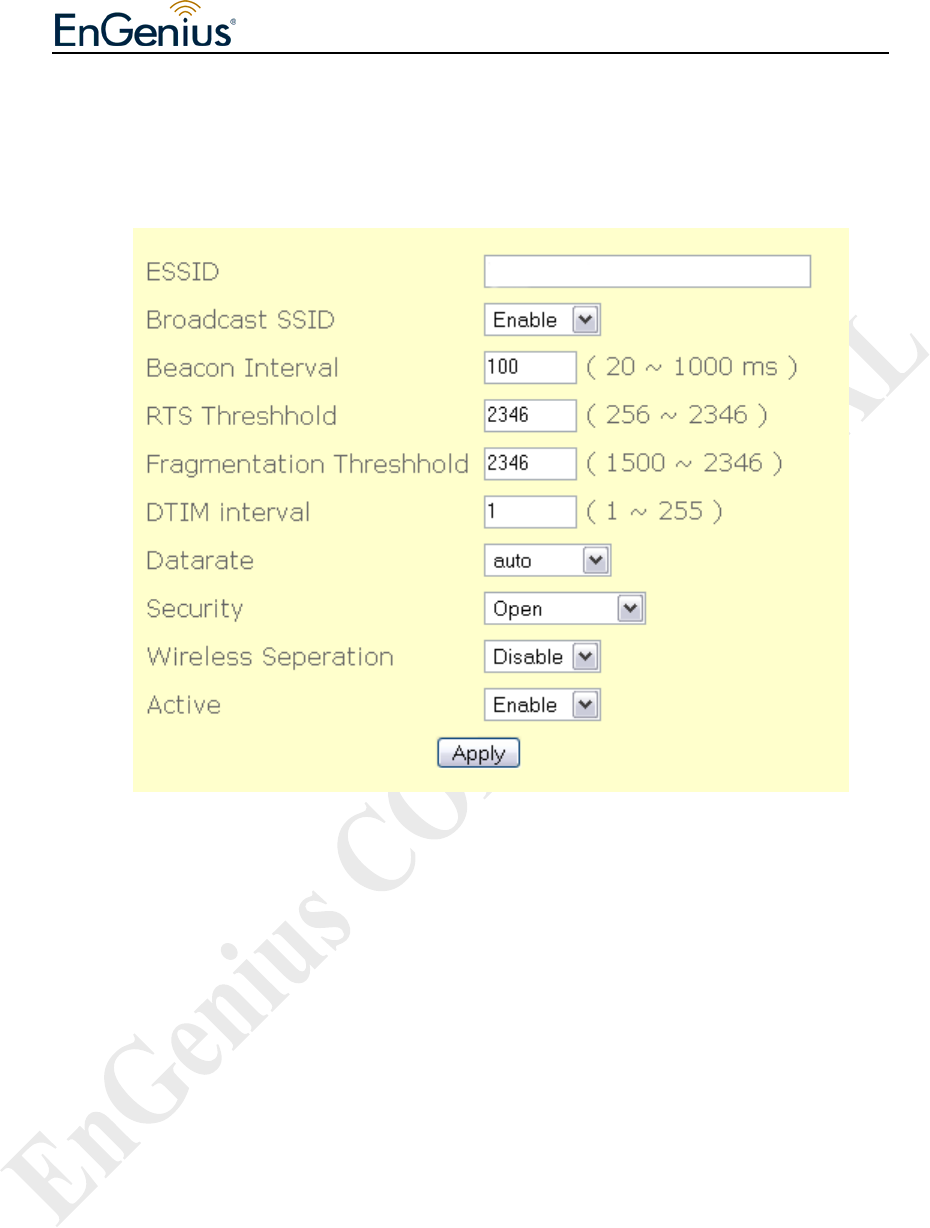
Figure 5.4.2: AP configuration – edit page
AP configuration – edit page contain the following parameter:
o ESSID – Enter the ESSID of wireless network.
o Broadcast SSID – Click on “Broadcast SSID” to enable or disable
Broadcast SSID.
o Beacon Interval – Enter the Beacon Interval value.
o RTS Threshold – Enter the RTS Threshold value.
o Fragmentation Threshold – Enter the Fragmentation Threshold value.
o DTIM interval - Enter the DTIM interval value.
o Datarate – Click on “Datarate” drop down menu to select datarate. For
example, 1 Mbps, 2 Mbps, 5.5 Mbps……
o Security - Click on “Security” drop down menu to select “Open”, “WEP”,

EnGenius Mesh AP-EOA-8670 User Manual & Configuration Guide
EnGenius Mesh AP-EOA-8670 User Manual & Configuration Guide Page 23 of 67
“WPA”, Select “WEP” will display “802.1x” drop down menu and
“Encryption key” field as shown in Figure 5.4.3. While select “WPA (1 &
2)” will display “WPA Type” drop down menu, “802.1x” drop down menu
and “Encryption key” field as shown in Figure 5.4.4.
Figure 5.4.3 AP0 with WEP security selected
Figure 5.4.4: APO configuration – edit page (WPA (1 & 2))
Open-no encrytion or security is applied.
WEP-Wired Equivalent Privacy. A encryption using either 64-bit or
128-bit to encrypt the network packets.
WPA-Wi-fi Protected Access is a class of systems to secure wireless
networks.
802.1 x-Enable or disable 802.1x.
WPA Type-Select “TKIP” type or “AES” type.
o Wireless Seperation – Click on “Wireless Seperation” drop down menu
to enable or disable wireless separation.
o “Apply” button to save any changes made. New settings are active after
the device reboot.
EnGenius Mesh AP-EOA-8670 User Manual & Configuration Guide
EnGenius Mesh AP-EOA-8670 User Manual & Configuration Guide Page 24 of 67
5.5 Network > Route
Routing refers to selecting paths in a network along which to send data. Figure 5.5.1
illustrates the route configuration page.
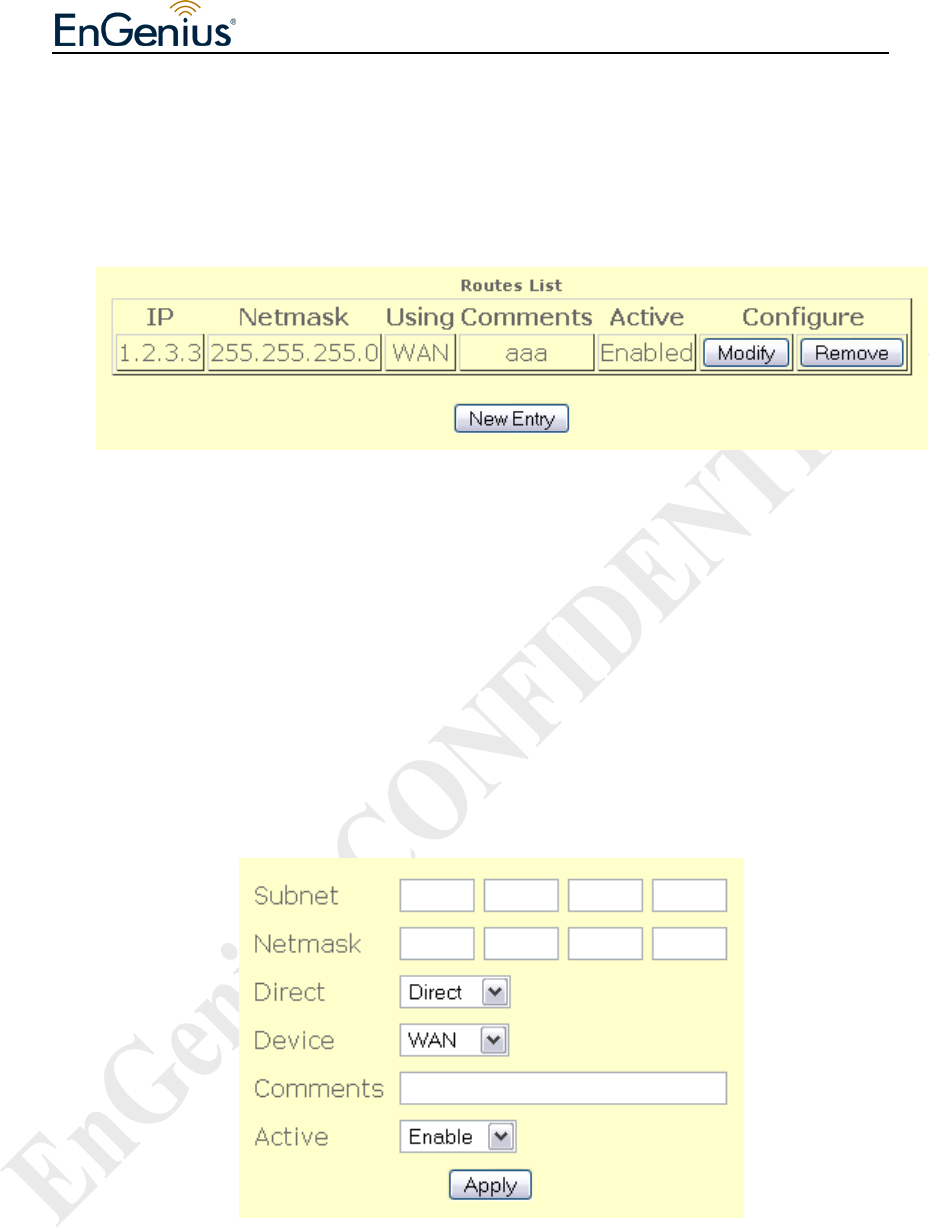
Figure 5.5.1: Route configuration page
Route contains the following parameters:
• Routes List – Display list of routes.
• “Modify” button to edit the current selection
• “Remove” button to delete the current selection
• “New Entry” button to add new entry.
Figure 5.5.2 illustrates the add or edit page for route entry.
Figure 5.5.2: Routes – add or edit page
Routes – add page contain the following parameter:
• Subnet – Enter the IP address of destination subnet.

EnGenius Mesh AP-EOA-8670 User Manual & Configuration Guide
EnGenius Mesh AP-EOA-8670 User Manual & Configuration Guide Page 25 of 67
• Netmask – Enter the IP address of destination subnet network mask.
• Gateway – Enter the gateway address.
• Direct – Click on “Direct” drop down menu to select “Direct” or “Indirect”
route.
• Device – Click on “Device” drop down menu to select device. For example,
WAN, VLAN0, VLAN1……
• Comments – Enter the interface comments.
• Active – Enable to disable this interface.
• “Apply” button to save any changes made. Please reboot to enable new
settings.
EnGenius Mesh AP-EOA-8670 User Manual & Configuration Guide
EnGenius Mesh AP-EOA-8670 User Manual & Configuration Guide Page 26 of 67
6 Service
6.1 Service > MAC Access
MAC Access provides another level of security by filtering the packets coming into
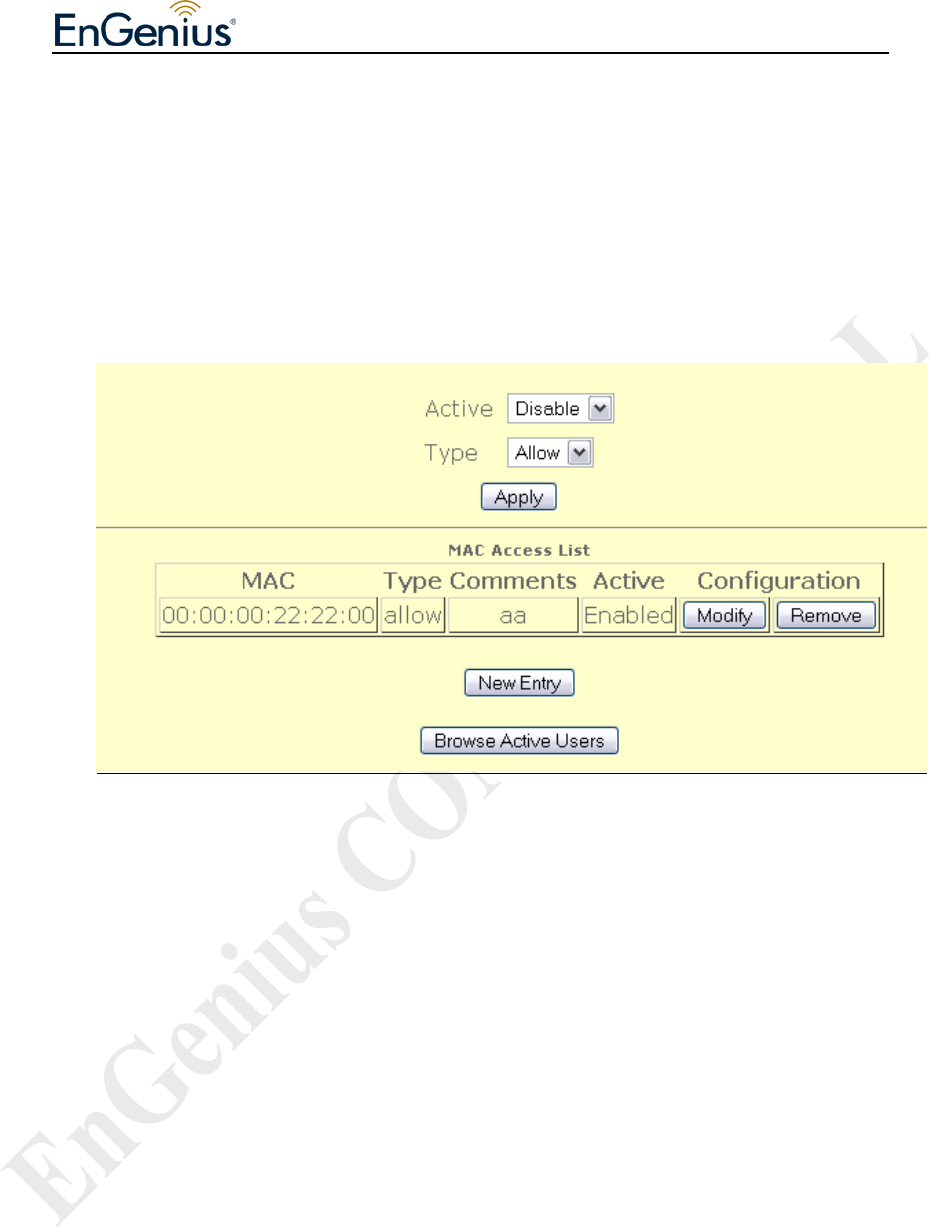
the device. Figure 6.1.1 illustrates the MAC Access configuration page.
Figure 6.1.1: MAC Access configuration page
MAC access configuration page contains the following parameters :
• Active – Enable or disable this feature.
• Type – Allow or deny the for this access control.
• "Apply" button to save any changes made.
• "Modify" button to edit current selection.
• "Remove" button to delete current selection.
• "New Entry" button to add new entry.
• "Browse Active Users" button to browse for users that are currently active
Figure 6.1.2 illustrates the configuration page for edit or add new entry to the MAC
access control.
EnGenius Mesh AP-EOA-8670 User Manual & Configuration Guide
EnGenius Mesh AP-EOA-8670 User Manual & Configuration Guide Page 27 of 67
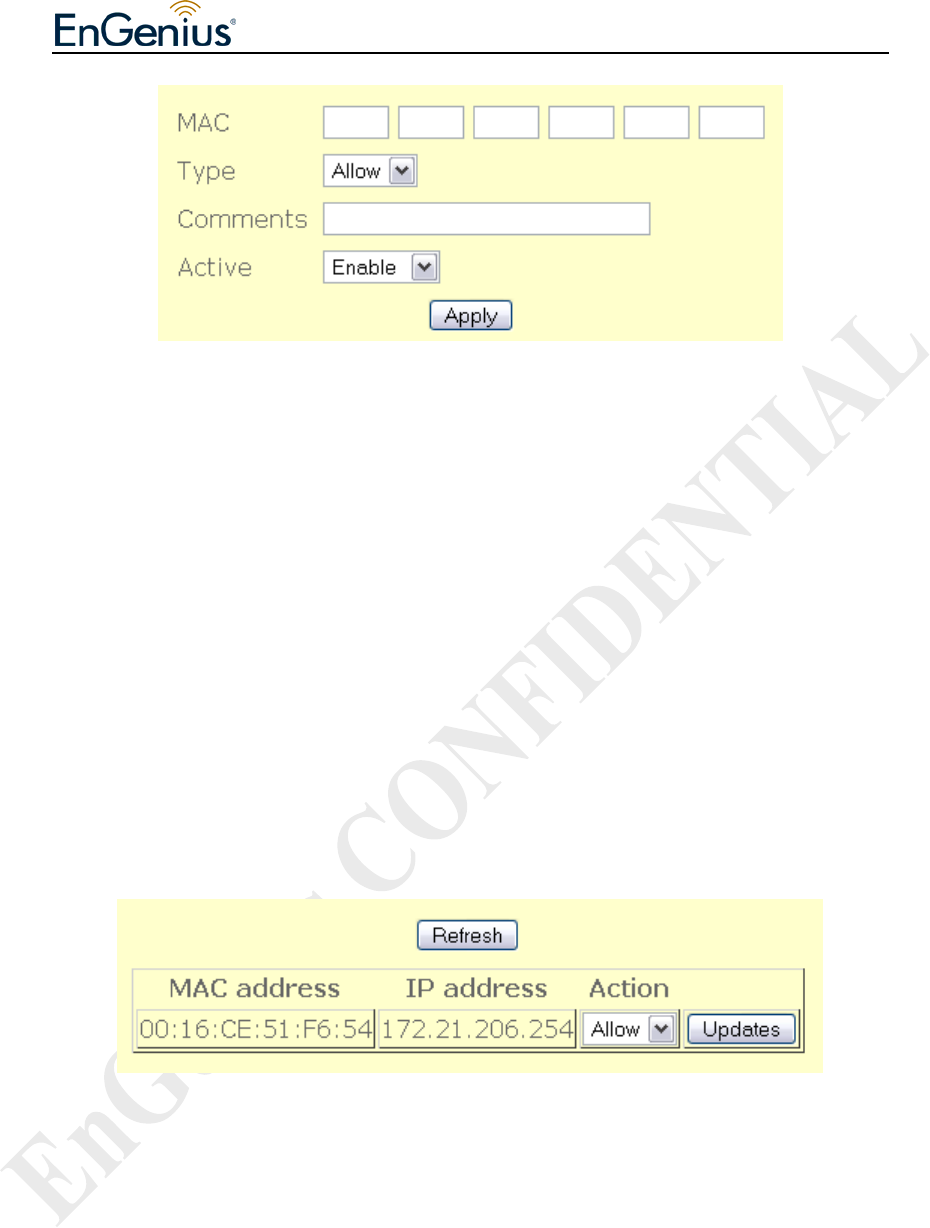
Figure 6.1.2: MAC Access – edit page
MAC Access - edit page contain the following parameter:
• MAC – Enter the MAC address.
• Type – Click on “Type” drop down menu to allow or deny access MAC
address.
• Comments – Enter MAC Access comments.
• Active – Click on “Active” drop down menu to enable or disable MAC
Access.
• “Apply” button to save any changes made. New settings are active after the
device reboot.
Figure 6.1.3 illustrates the browse active user.
Figure 6.1.3 Browse active user page
Browse active user page contains the following parameters:
• “Refresh” button to refresh the active user table.
• Action – Select allow or deny to the selected user.
• “Updates” button to update the entry to the mac access control
EnGenius Mesh AP-EOA-8670 User Manual & Configuration Guide
EnGenius Mesh AP-EOA-8670 User Manual & Configuration Guide Page 28 of 67
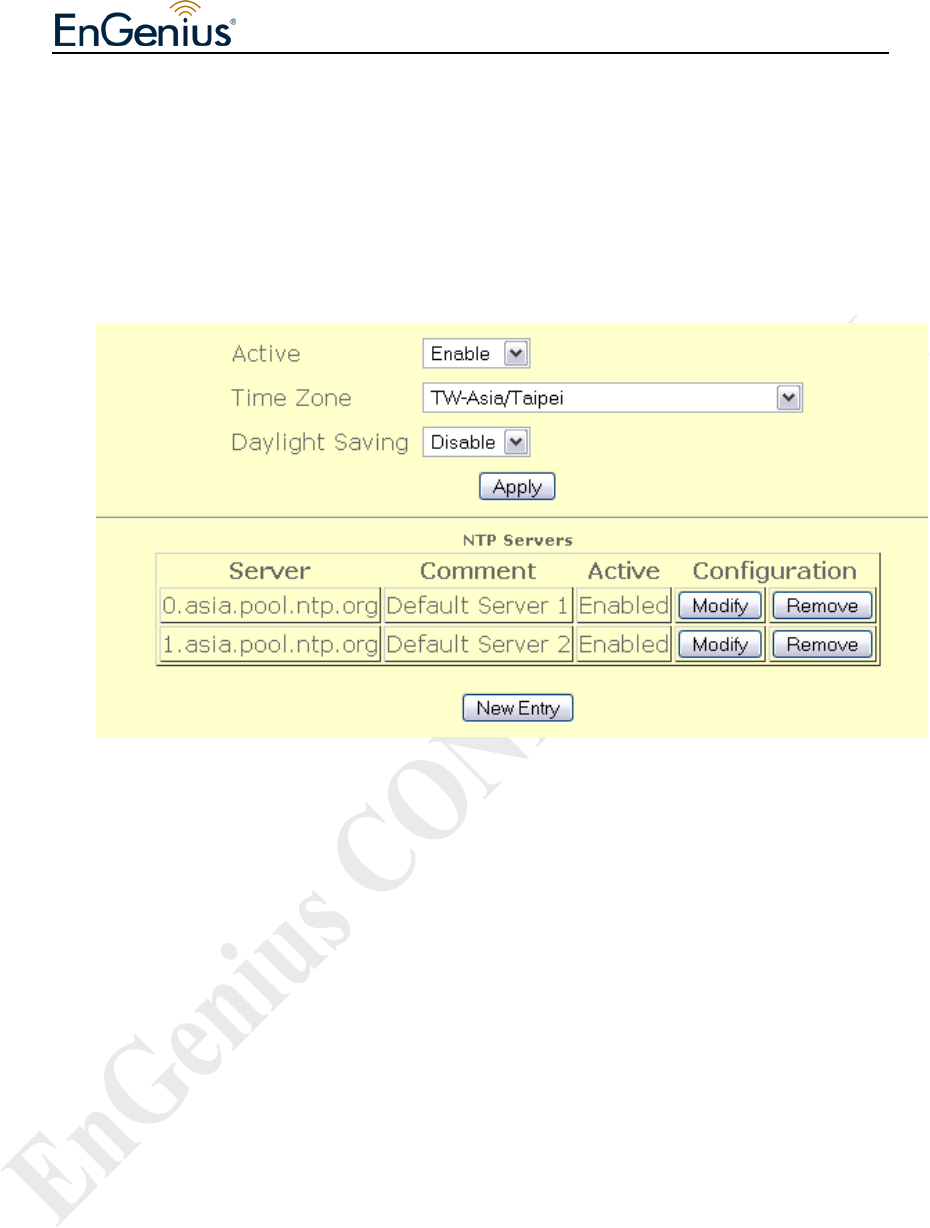
6.2 Service > NTP
Network Time Protocol (NTP) is a protocol for synchronizing the system clocks over
data networks. Figure 6.2.1 illustrates the NTP configuration page.
Figure 6.2.1: NTP configuration page
NTP configuration page contains the following parameters:
• Active – Enable or disable NTP feature
• Time Zone – Select the correct time zone.
• Daylight Saving – Enable or disable daylight saving.
• “Apply” button to save any changes made.
• “Modify” button to edit current selection.
• “Remove” button to delete current selection.
• “New Entry” button to add new entry to the NTP.
Figure 6.2.2 illustrates the configuration page for add or edit NTP server settings.

EnGenius Mesh AP-EOA-8670 User Manual & Configuration Guide
EnGenius Mesh AP-EOA-8670 User Manual & Configuration Guide Page 29 of 67
Figure 6.2.2: NTP – add or edit page
NTP add or edit page contains the following parameters:
• Server – Enter the NTP server name.
• Comments - Enter NTP server comments.
• Active – Click on “Active” drop down menu to enable or disable this NTP
server.
• “Apply” button to save any changes made. New settings are active after the
device reboot.
6.3 Service > RADIUS
Remote Authentication Dial In User Service (RADIUS) is an AAA (Authentication,
Authorization and Accounting) protocol for applications such as network access or IP
mobility. RADIUS client will verify authentication push by RADIUS server. Figure
6.3.1 illustrates the RADIUS client configuration page.
EnGenius Mesh AP-EOA-8670 User Manual & Configuration Guide
EnGenius Mesh AP-EOA-8670 User Manual & Configuration Guide Page 30 of 67
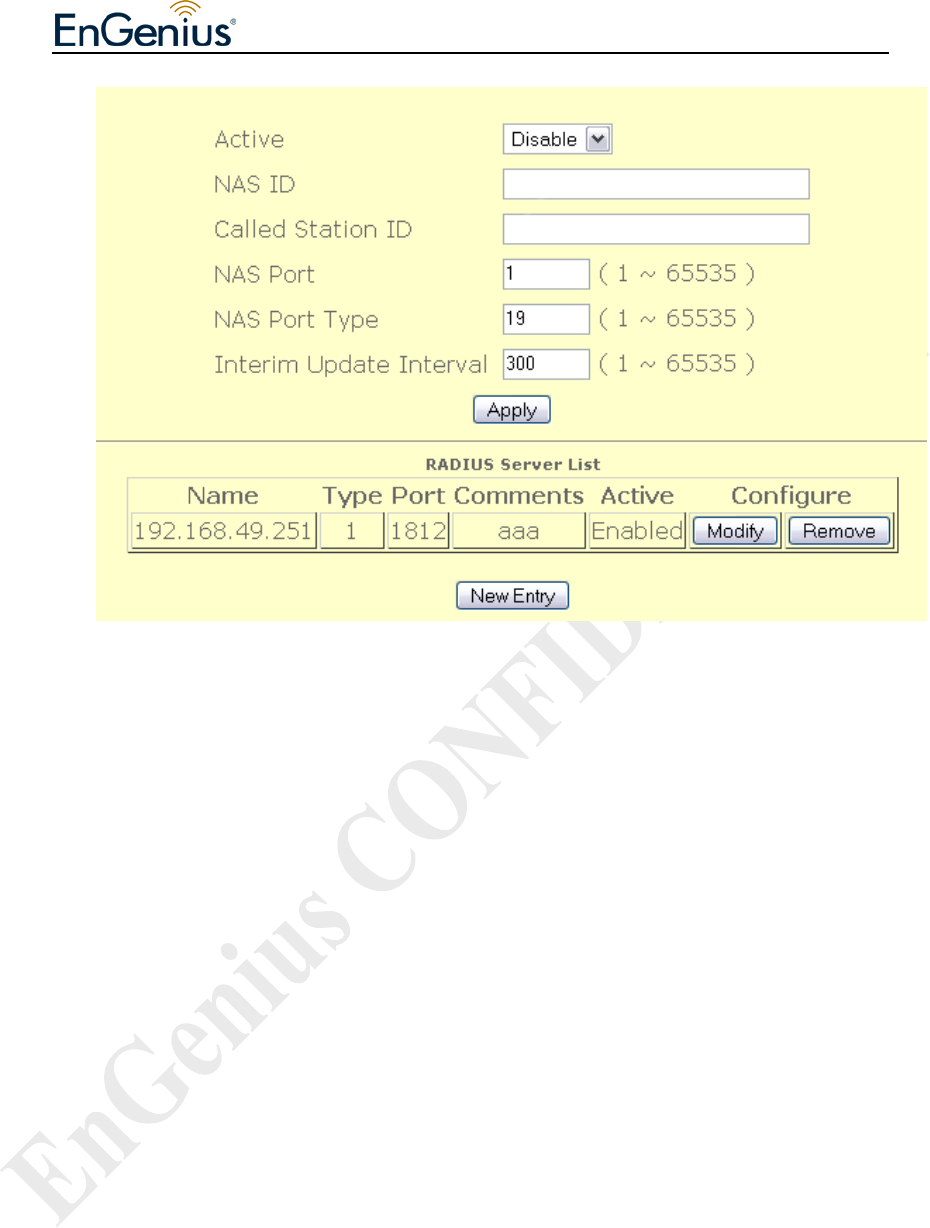
Figure 6.3.1: RADIUS client configuration page
RADIUS client configuration page contains the following parameters :
• Active – Enable or disable RADIUS client.
• NAS ID – Enter the NAS ID.
• Called Station ID – Enter the Called Station ID.
• NAS Port – Enter the NAS Port number.
• NAS Port Type – Enter the NAS Port Type.
• Interim Update Interval – Enter the value of Interim Update Interval.
• “Apply” button to save any changes made. New settings are active after the
device reboot.
• “Modify” button to edit RADIUS server entry.
• “Remove” button to delete RADIUS entry.
• “New Entry” button to add new entry.
Figure 6.3.2 illustrates the add or edit page for RADIUS entry.
EnGenius Mesh AP-EOA-8670 User Manual & Configuration Guide
EnGenius Mesh AP-EOA-8670 User Manual & Configuration Guide Page 31 of 67
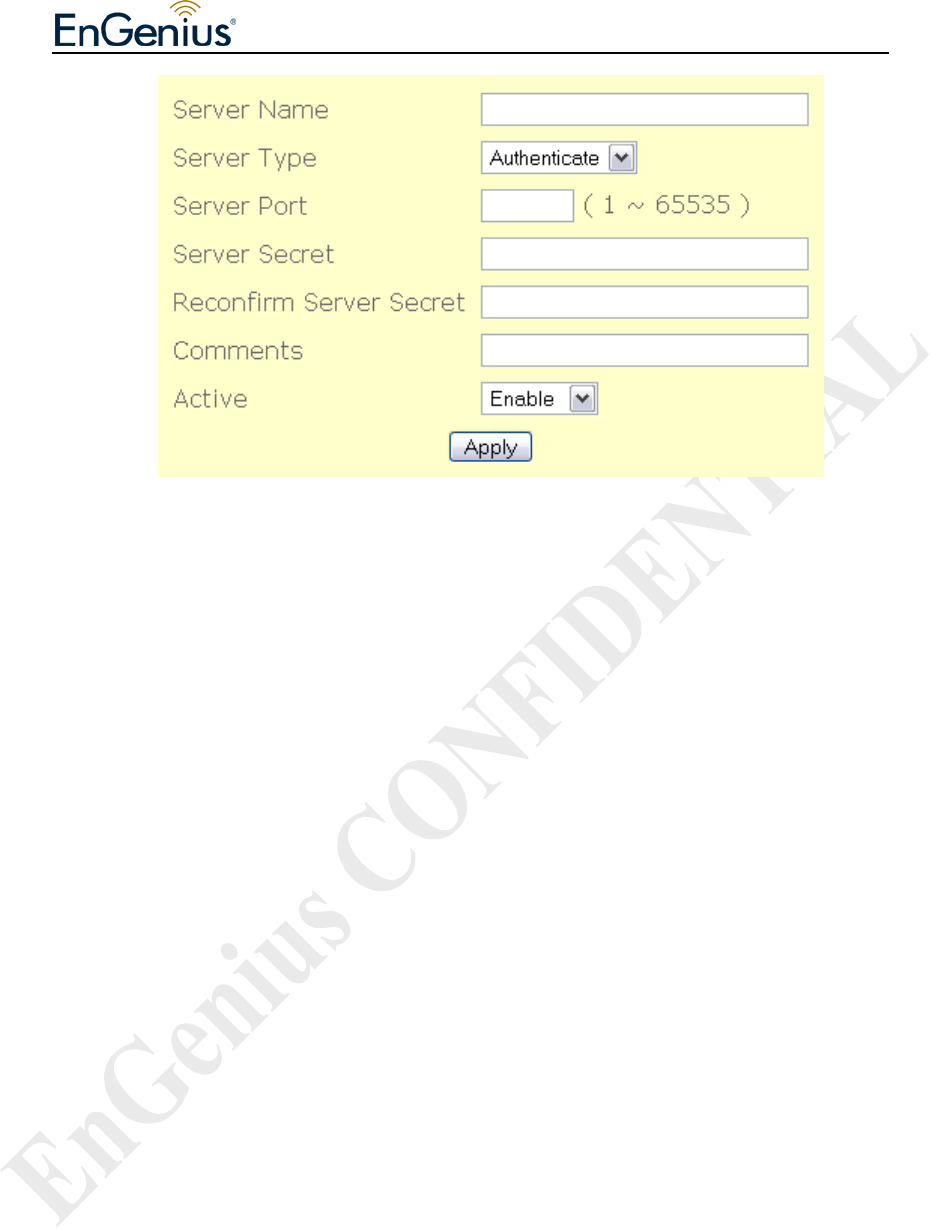
Figure 6.3.2: RADIUS server – add or edit page
RADIUS server - add or edit page contain the following parameter:
• Server Name – Enter the RADIUS server name.
• Server Type – Click on “Server Type” drop down menu to select
“Authenticate” or “Accounting” server type.
• Server Port – Enter the number of Server Port.
• Server Secret – Enter the Server Secret.
• Reconfirm Server Secret – Re-enter the Server Secret to confirm it.
• Comments – Enter RADIUS server comments.
• Active – Enable or disable this entry.
• “Apply” button to save any changes made. New settings are active after the
device reboot.
EnGenius Mesh AP-EOA-8670 User Manual & Configuration Guide
EnGenius Mesh AP-EOA-8670 User Manual & Configuration Guide Page 32 of 67
6.4 Service > Linux Kernel Watchdog
Linux kernel watchdog will constantly monitor the integrity of the system. During
system locked up, kernel watchdog will trigger a system reboot to recover the system
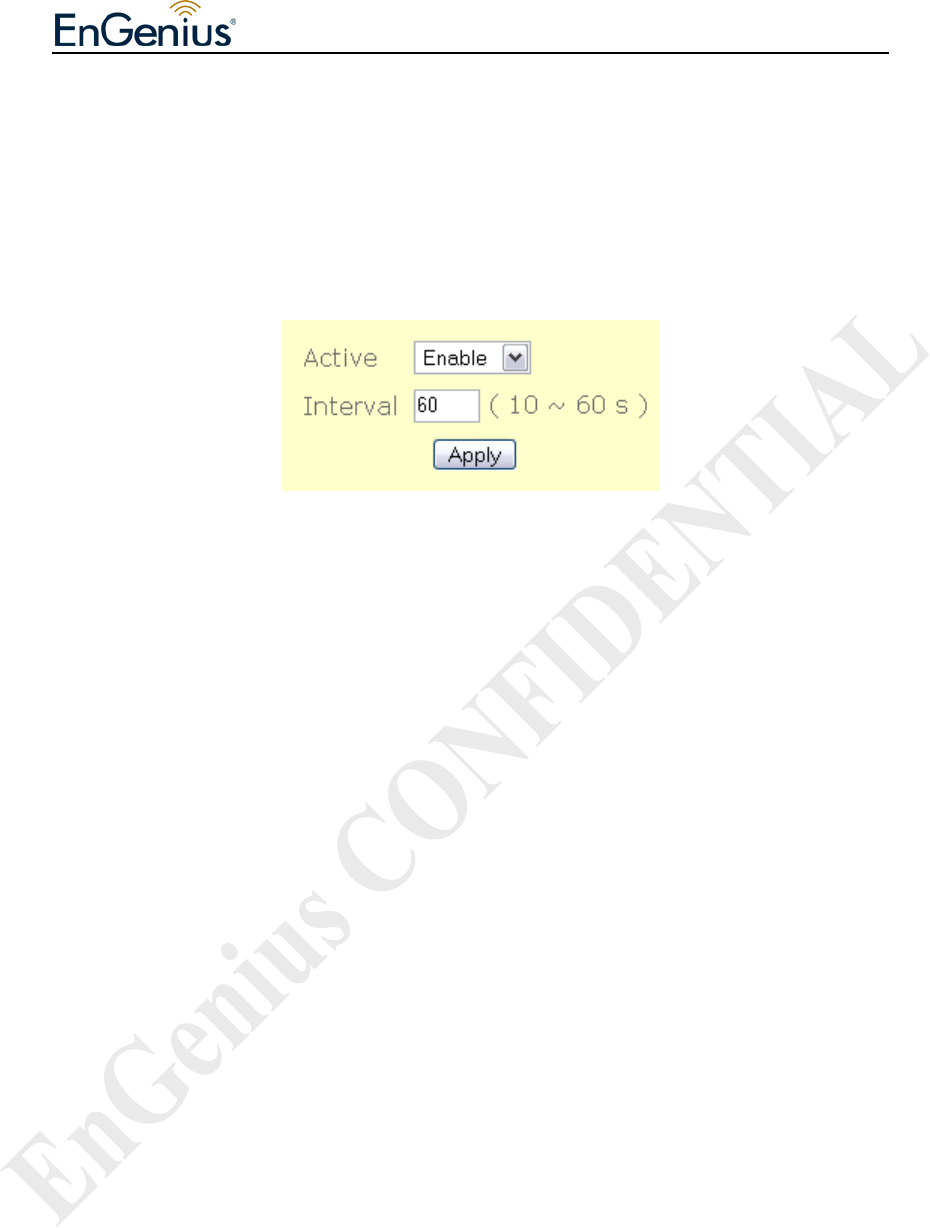
from failure. Figure 6.4.1 illustrates the linux kernel watchdog configuration page.
Figure 6.4.1: Lindog configuration page
Linux kernel watchdog configuration page contains the following parameters:
• Active – Enable or disable this service.
• Interval – Specify the interval watchdog will pool for system status.
• “Apply” button to save any changes made. Please reboot to enable new
settings.
EnGenius Mesh AP-EOA-8670 User Manual & Configuration Guide
EnGenius Mesh AP-EOA-8670 User Manual & Configuration Guide Page 33 of 67
6.5 Service > SSHD
SSHD provides remote management using command line interface (CLI). Figure
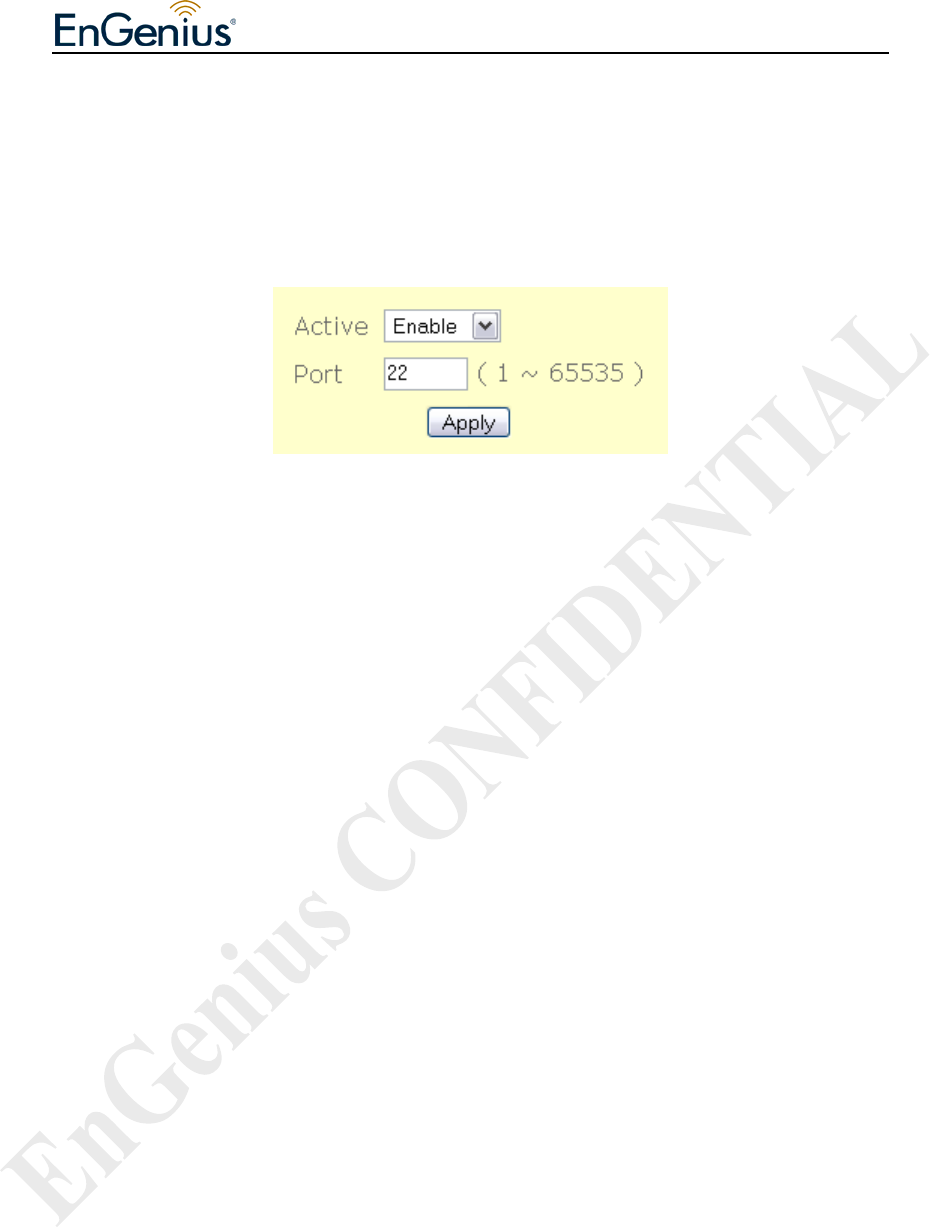
6.5.1 illustrates the SSHD configuration page.
Figure 6.5.1: SSHD configuration page
SSHD configuration page contains the following parameters:
• Active – Enable or disable this service.
• Port – Specify the TCP/IP port that the SSHD will listen for incoming
connection.
• “Apply” button to save any changes. Please reboot to enable new settings.
EnGenius Mesh AP-EOA-8670 User Manual & Configuration Guide
EnGenius Mesh AP-EOA-8670 User Manual & Configuration Guide Page 34 of 67
6.6 Service > WME
Based on 802.11e draft standard. It provides basic quality of service (QoS) features to
802.11 networks. WMM prioritizes traffic according to 4 AC (Access Categories) -
voice, video, best effort, and background.
However, it does not provide guaranteed throughput. It is suitable for simple
applications that require QoS, such as Voice over IP (VoIP) on Wi-Fi phones. Figure
6.6.1 illustrates the WME configuration page.
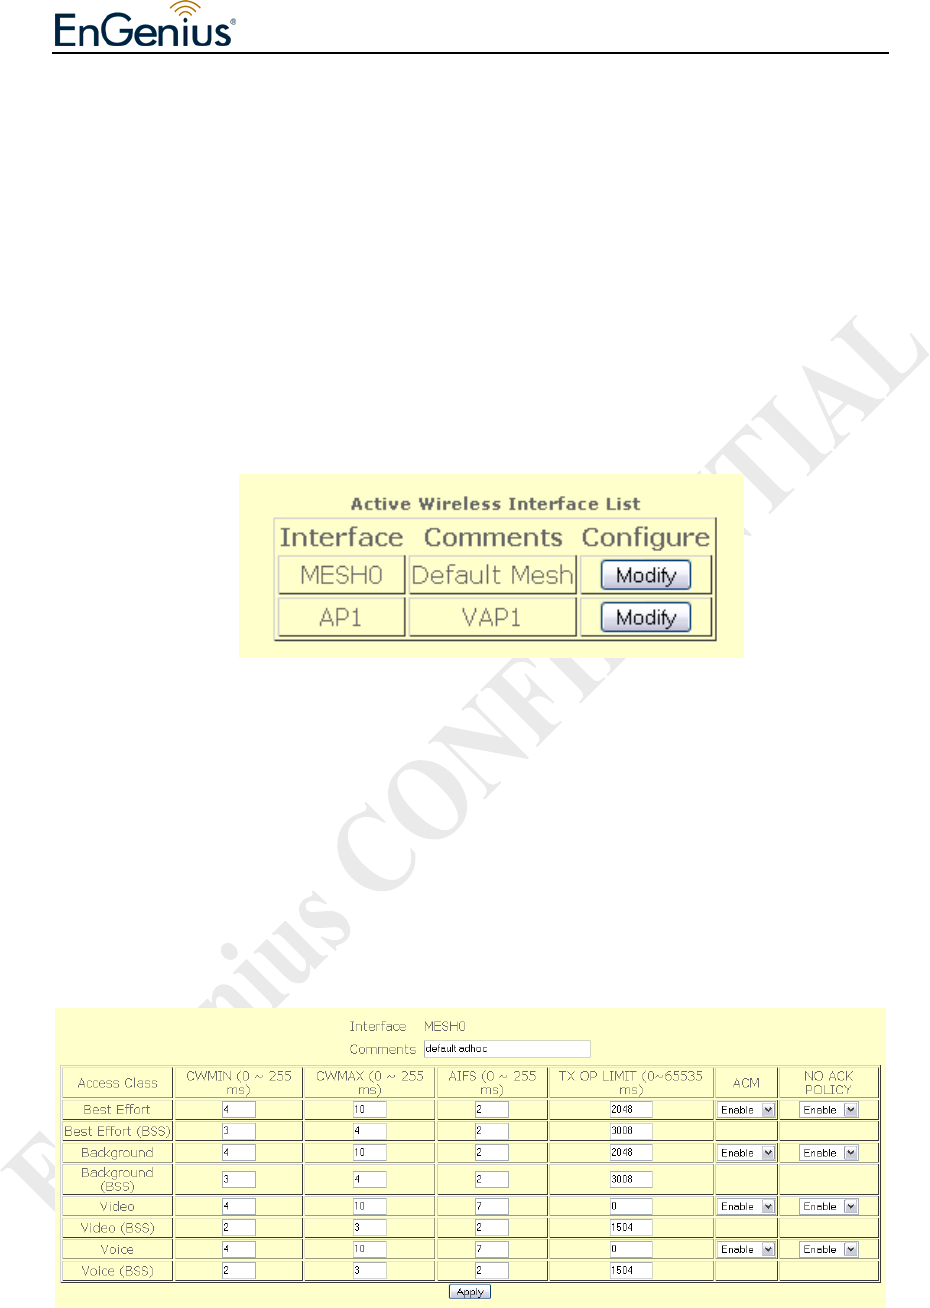
Figure 6.6.1: WME configuration page
WME configuration page contains the following parameters:
• “Modify” button to edit the current selection of the active wireless interface
list.
Figure 6.6.2 illustrates the edit page for WME parameters.
Figure 6.6.2: WME - edit page

EnGenius Mesh AP-EOA-8670 User Manual & Configuration Guide
EnGenius Mesh AP-EOA-8670 User Manual & Configuration Guide Page 35 of 67
WME – edit page contains the following parameters:
• Interface – Specify the interface for WMM.
• Comments – Optional comments for this entry.
• Active – Enable or disable WME.
• CWMIN – Minimum contention window. This parameter is input to the
algorithm that determines the initial random backoff wait time (window) for
retry of a transmission. The value specified here in the Minimum Contention
Window is the upper limit (in milliseconds) of a range from which the initial
random backoff wait time is determined.
• CWMAX – Maximum contention window. Maximum Contention Window.
The value specified here in the Maximum Contention Window is the upper
limit (in milliseconds) for the doubling of the random backoff value.
• AIFS – The Arbitration Inter-Frame Spacing Number specifies a wait time (in
milliseconds) for data frames.
• TX OP LIMIT – Transmission Opportunity is an interval of time when a
WME AP/station has the right to initiate transmissions onto the wireless
medium (WM). This value specifies (in milliseconds) the Transmission
Opportunity (TXOP); that is, the interval of time when the WMM AP/station
as the right to initiate transmissions on the wireless network.
• ACM – Enable or disable Admission Control
• NO ACK POLICY – Enable or disable No-acknowledgement
• Best Effort – AP side, low priority, high throughput. Bulk data that requires
maximum throughput and is not time-sensitive is sent to this queue.
• Video – AP side, high priority, minimum delay. Time-sensitive video data is
automatically sent to this queue.
• Voice – AP side, high priority. Time-sensitive data like VoIP and streaming
media are automatically sent to this queue.
• Best Effort (BSS) – Station side, low priority, high throughput. Bulk data that
requires maximum throughput and is not time-sensitive is sent to this queue.
EnGenius Mesh AP-EOA-8670 User Manual & Configuration Guide
EnGenius Mesh AP-EOA-8670 User Manual & Configuration Guide Page 36 of 67
• Background (BSS) – Station side, medium priority, medium throughput and
delay. Most traditional IP data is sent to this queue.
• Video (BSS) – Station side, high priority, minimum delay. Time-sensitive
video data is automatically sent to this queue.
• Voice (BSS) – Station side, high priority. Time-sensitive data like VoIP and
streaming media are automatically sent to this queue.
6.7 Service > DHCP Relay
For a dynamic network, MAP 1000 is able to forward the DHCP request to a backend
DHCP server when operating in layer 2 mode. Figure 6.7.1 illustrates the
configuration page for DHCP Relay.
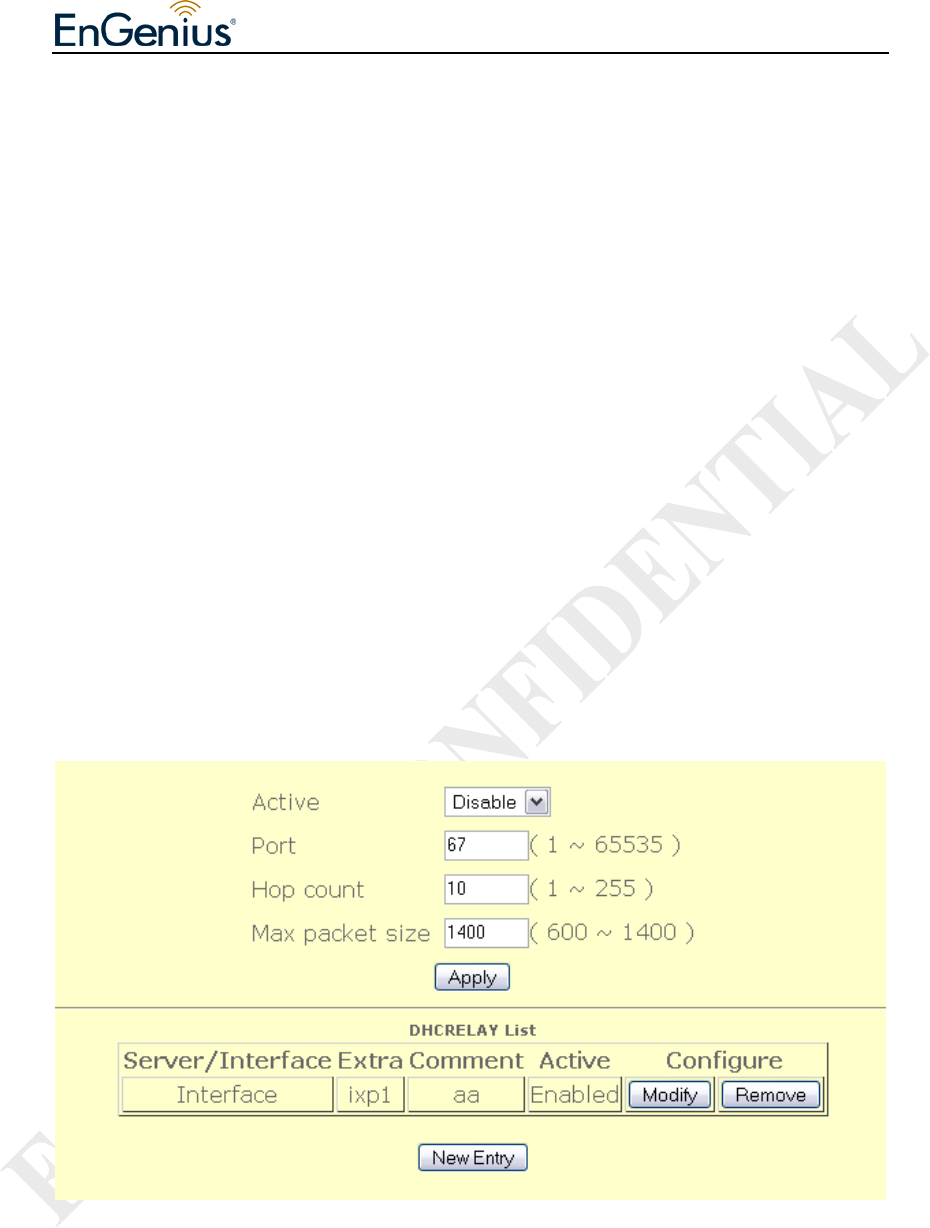
Figure 6.7.1 DHCP Relay Settings
DHCP Relay contains the following parameters:
• Active: Enable or disable DHCP Relay feature.
• Port: Port to listen for DHCP packet. Default value is 67.
• Hop count: Number of hop the DHCP discover packet can travel before it is
EnGenius Mesh AP-EOA-8670 User Manual & Configuration Guide
EnGenius Mesh AP-EOA-8670 User Manual & Configuration Guide Page 37 of 67
dropped by this device. Default value is 10.
• Max packet size: Maximum packet size of the DHCP discover packet.
Normally specify a large number of packet size is recommended. Default
value is 1400.
• “Apply” button to save any changes made. Please reboot to enable new
settings.
• “Modify” button to edit current selection.
• “Remove” button to delete current selection.
• “New Entry” button to add server IP or Interface.
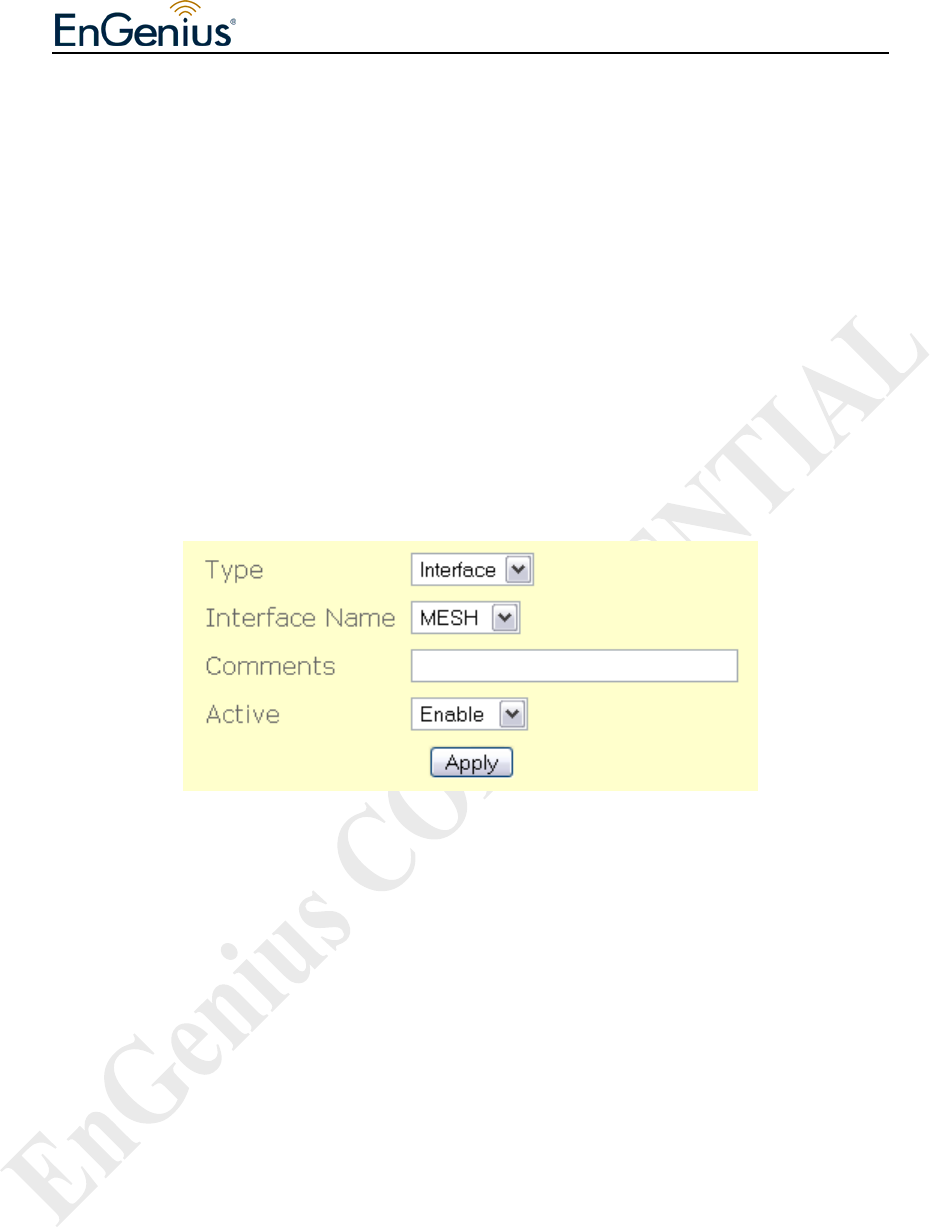
Figure 6.7.2 illustrates the add or edit configuration page.
Figure 6.7.2 Server or Interface configuration page.
The add or edit configuration page contains the following parameters.
• Type – Server IP or interface list
• Interface Name – Once the “type” drop down menu is changed to interface,
interface name selection drop down menu will appear for the users to make
selection on the interface where the DHCP server can be reach. The interface
also must include the interface where the client can be reach.
• IP – Specify the IP address of the backend DHCP server.
• Comments – Additional comments on this entry.
• Active – Enable or disable this entry.
• “Apply” button to save any changes made. Please reboot to enable new
settings.
EnGenius Mesh AP-EOA-8670 User Manual & Configuration Guide
EnGenius Mesh AP-EOA-8670 User Manual & Configuration Guide Page 38 of 67
7 Management
7.1 Management > HTTPD
Webbased configuration management is done through the secure HTTP. Figure 7.1.1
illustrates the HTTPD server configuration page.
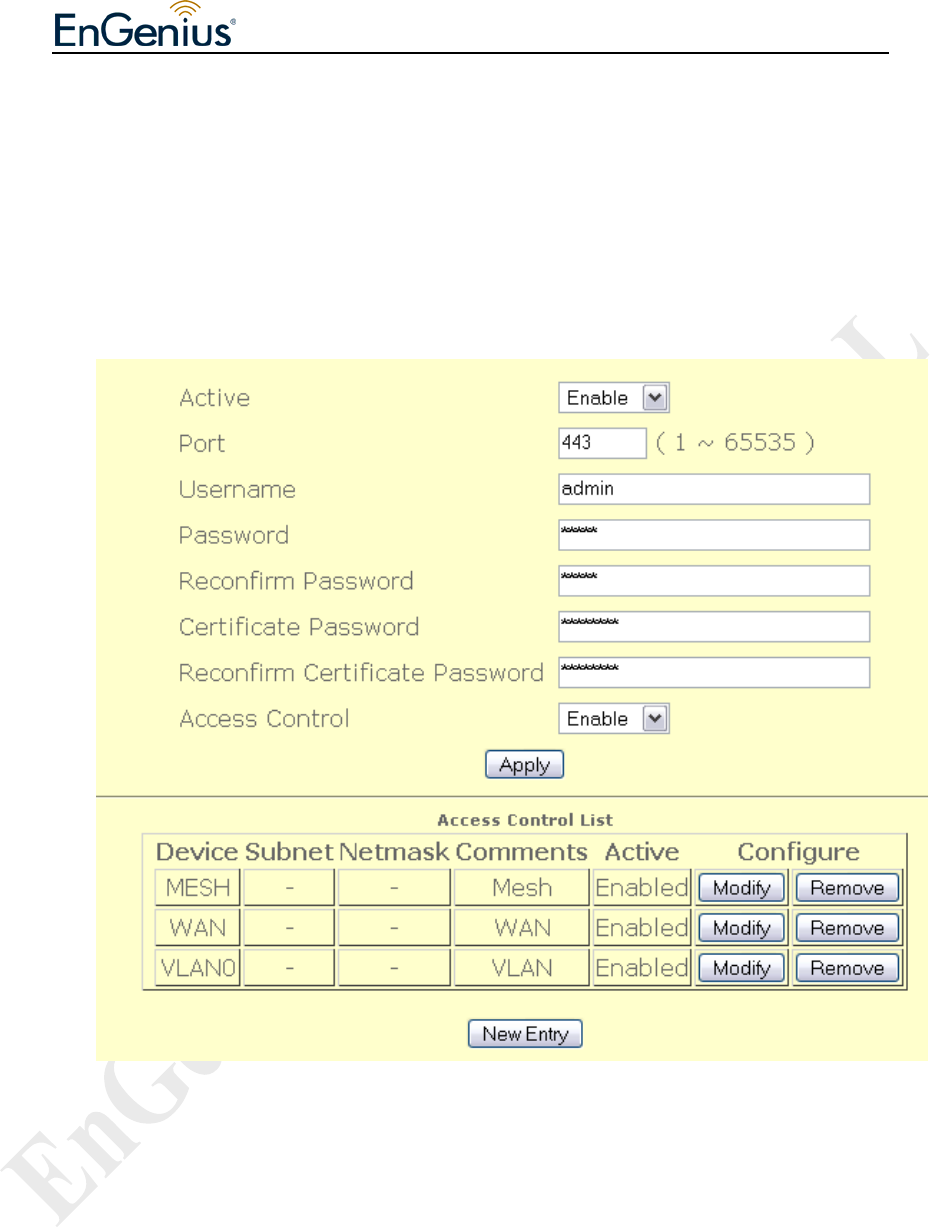
Figure 7.1.1: HTTPD server configuration page
HTTPD server configuration page contains the following parameters:
• Active – Enable or disable HTTPD server.
• Port – Enter the HTTPD port number.
• Username – Enter the HTTPD username.
• Password – Enter the HTTPD password.
• Reconfirm Password – Re-enter password to confirm it.
• Certificate Password – Enter the certificate password.
EnGenius Mesh AP-EOA-8670 User Manual & Configuration Guide
EnGenius Mesh AP-EOA-8670 User Manual & Configuration Guide Page 39 of 67
• Reconfirm Certificate Password – Re-enter certificate password to confirm
it.
• Access Control – Enable or disable access control.
• “Apply” button to save any changes made. Please reboot to enable new
settings.
• “Modify” button to edit current selection.
• “Remove” button to edit current selection.
• “New Entry” button to add entry to the access control table.
Figure 7.1.2 illustrates the access control configuration page.
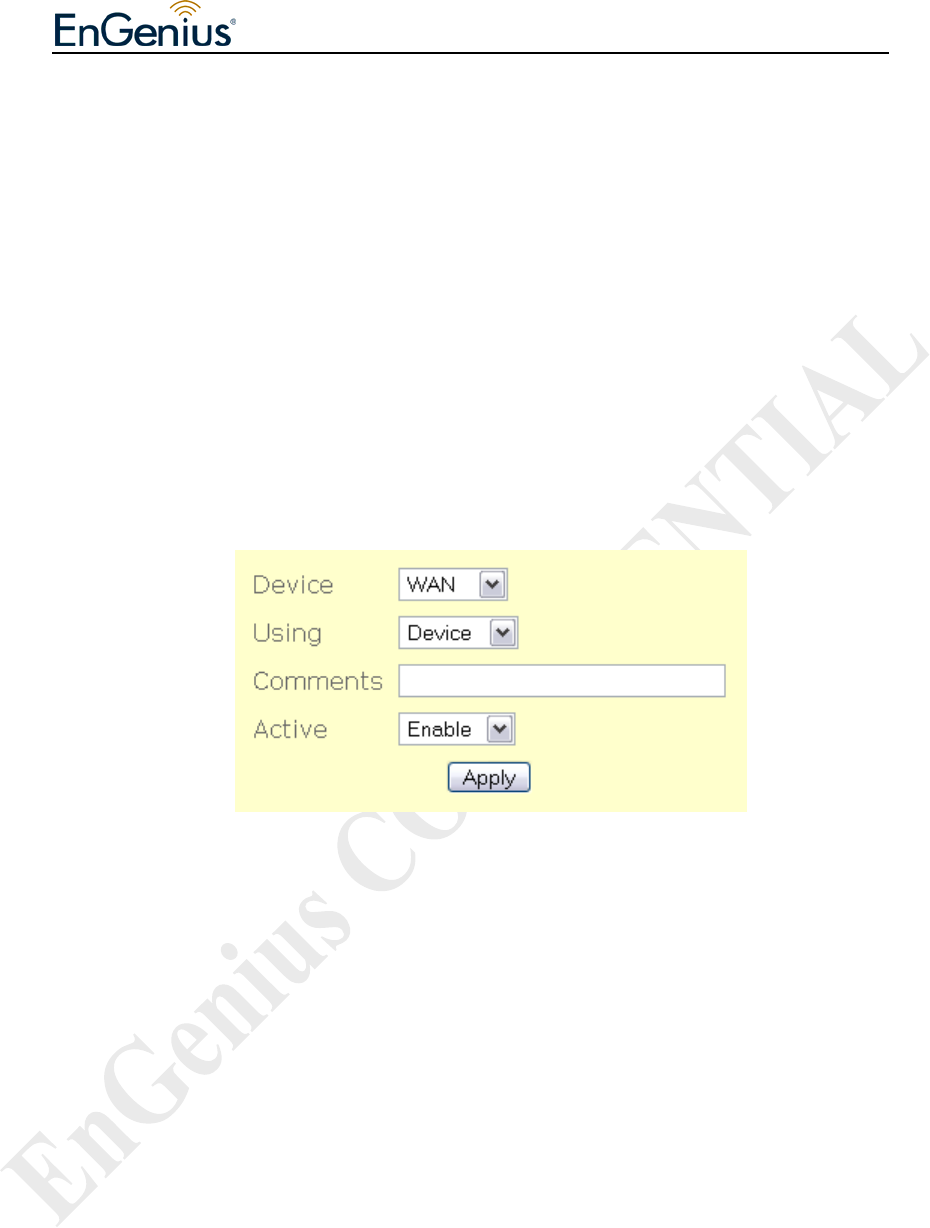
Figure 7.1.2: HTTPD Access Control – add or edit page
HTTPD Access Control page contains the following parameters:
• Device – Click on “Device” drop down menu to select device. For example
WAN, MESH, VLAN0……
• Using – Click on “Using” drop down menu to select using “Device” or
“Network”.
• Subnet – Specify subnet to access or deny access HTTPD server
configuration page.
• Netmask – Specify netmask for this subnet
• Comments – Enter comments for this entry.
• Active – Enable or disable this entry.
• “Apply” button to save any changes made. Please reboot to enable new
settings.

EnGenius Mesh AP-EOA-8670 User Manual & Configuration Guide
EnGenius Mesh AP-EOA-8670 User Manual & Configuration Guide Page 40 of 67
EnGenius Mesh AP-EOA-8670 User Manual & Configuration Guide
EnGenius Mesh AP-EOA-8670 User Manual & Configuration Guide Page 41 of 67
7.2 Management > Configuration
Under this configuration menu, you can perform the following action. Figure 7.2.1
illustrates the configuration page.
Figure 7.2.1: Configuration page
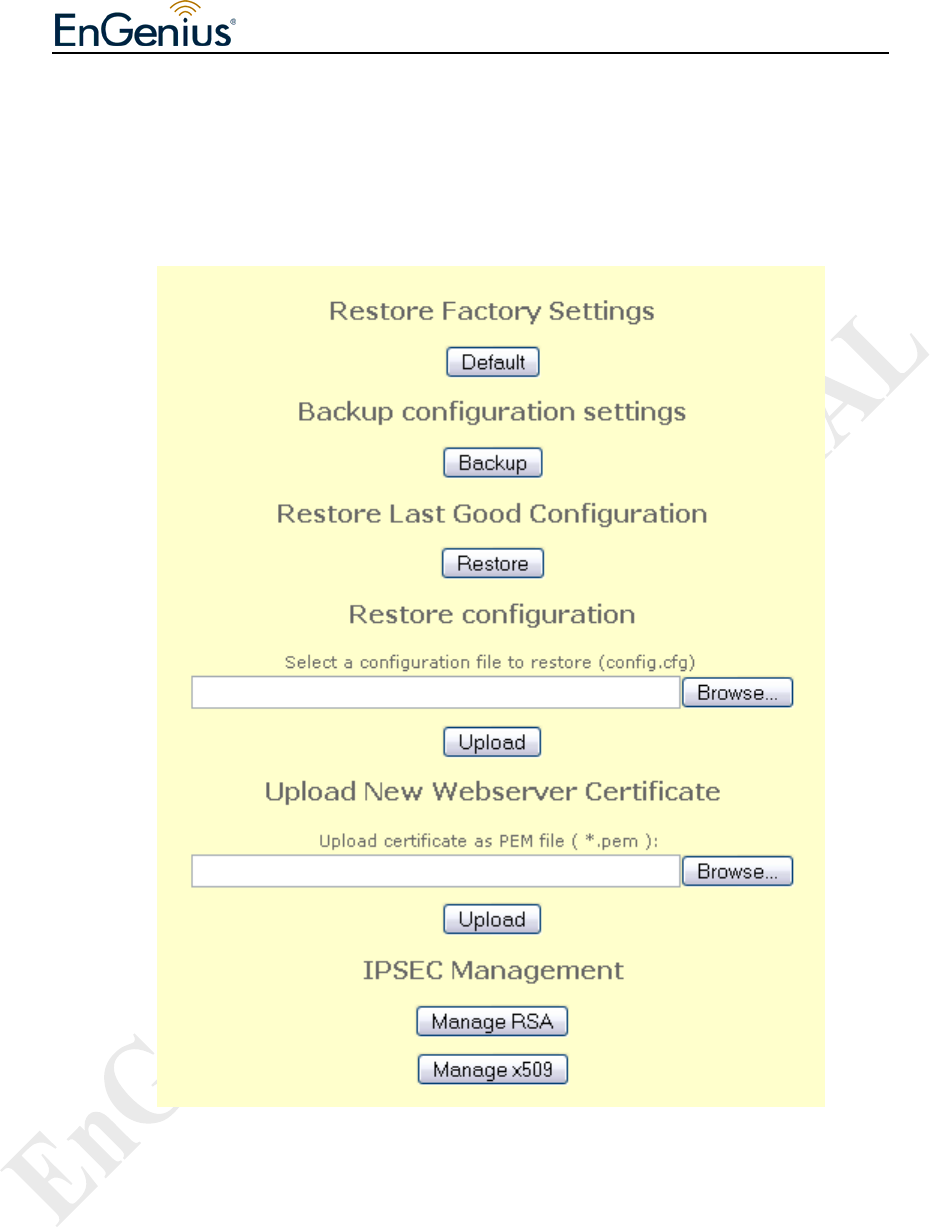
Configuration page contains the following parameters:
• “Default” button to restore factory default settings.
• “Backup” button to save configuration settings file (config.cfg).
• “Restore” button to restore configuration to last good configuration.
• “Browse” & “Upload” button to perform file searching and uploading.
EnGenius Mesh AP-EOA-8670 User Manual & Configuration Guide
EnGenius Mesh AP-EOA-8670 User Manual & Configuration Guide Page 42 of 67
• “Manage RSA” button to manage RSA certificates.
• “Manage x509” button to manage x509 related certificates.
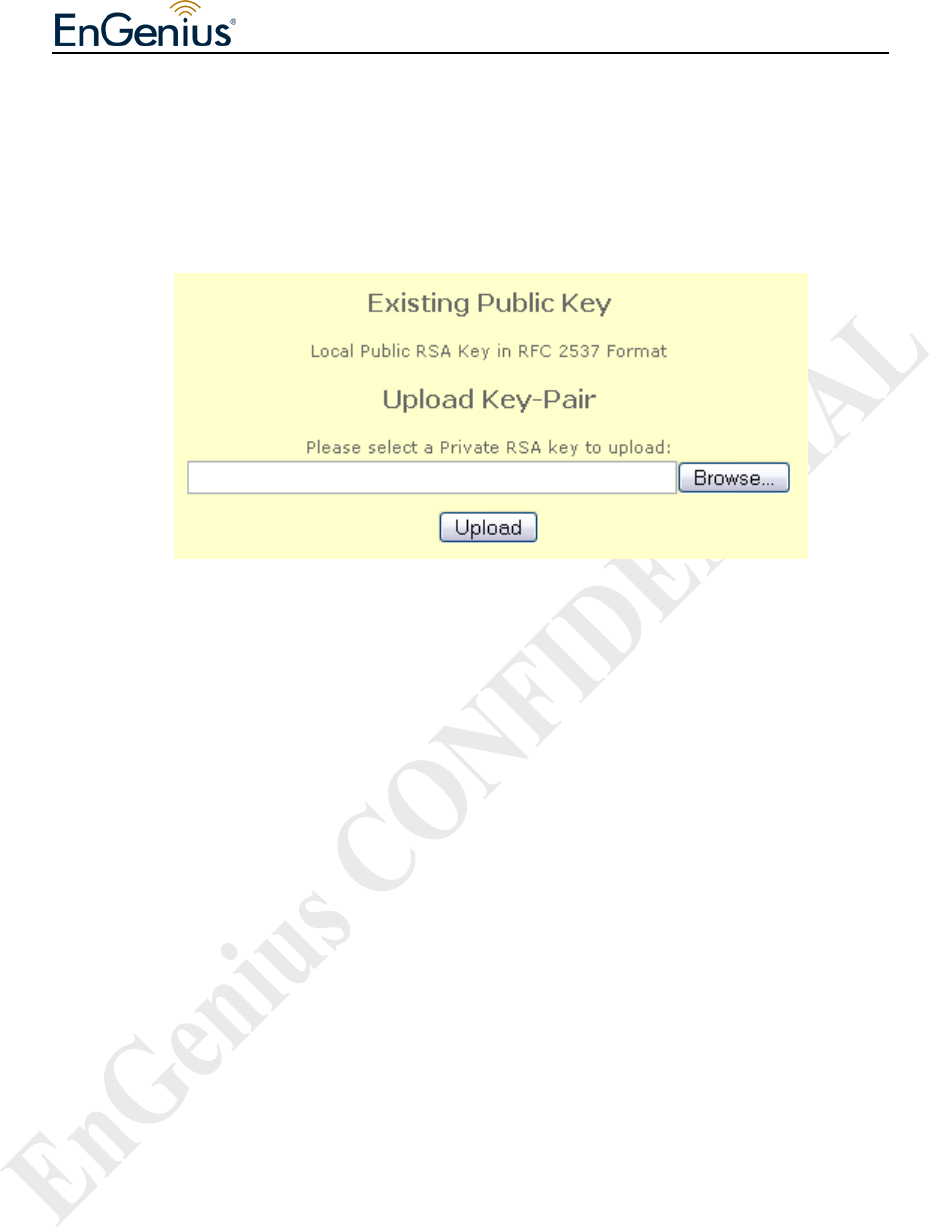
Figure 7.2.2 illustrates the IPSEC management configuration page.
Figure 7.2.2: IPSEC Management – RSA page
IPSEC Management – RSA page contain the following parameter:
• Existing Public Key – Display the local public RSA key format.
• Upload Key-Pair – Click on “Browse…” button to browse and select private
RSA key. Then, click on “Upload” button to upload selected private RSA key.
Figure 7.2.3 illustrates the IPSEC Management x509 configuration page.
EnGenius Mesh AP-EOA-8670 User Manual & Configuration Guide
EnGenius Mesh AP-EOA-8670 User Manual & Configuration Guide Page 43 of 67
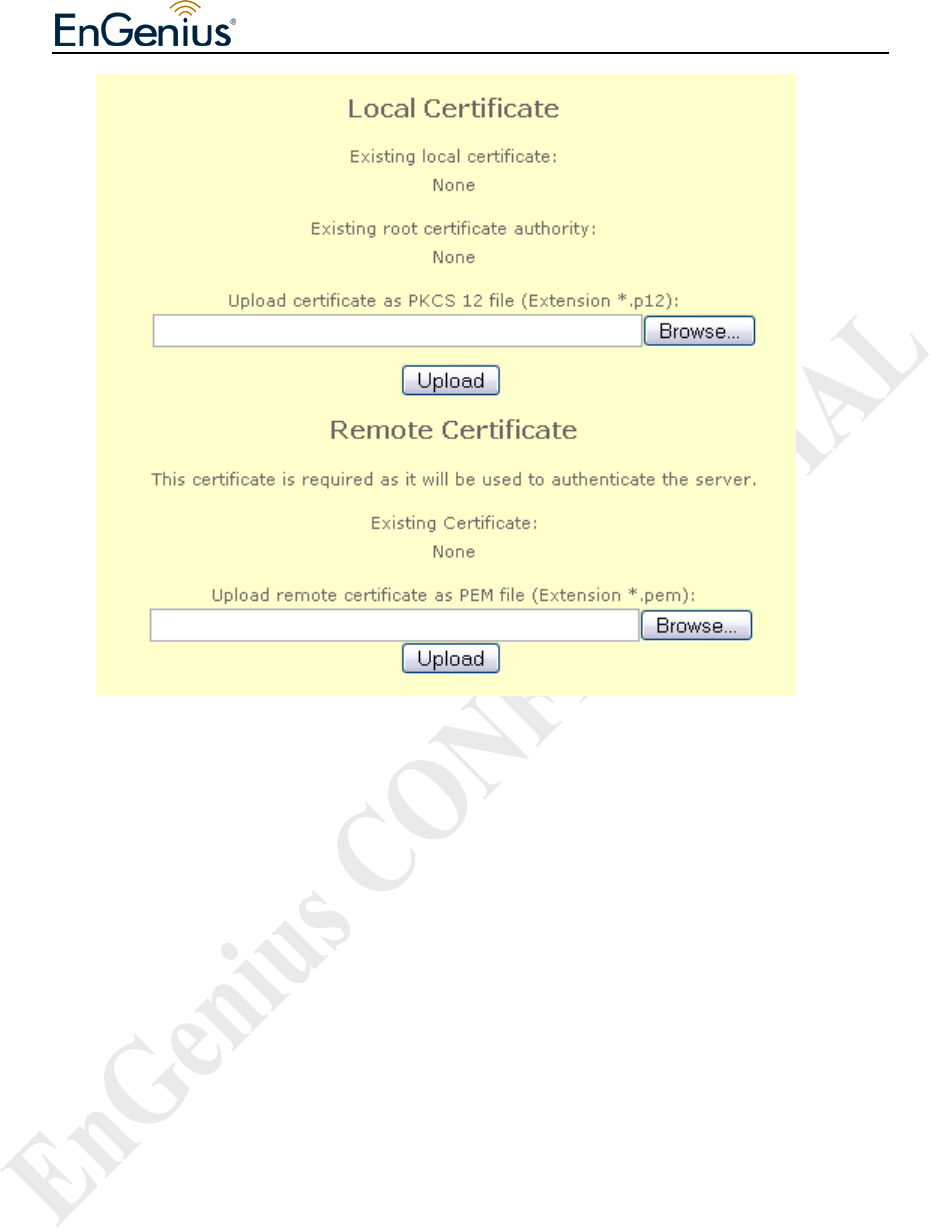
Figure 7.2.3: IPSEC Management – x509 page
IPSEC Management – x509 page contain the following parameter:
• Local Certificate – Display existing local certificate and existing root
certificate authority. Click on “Browse…” button to browse and select
certificate as PKCS 12 file. Then, click on “Upload” button to upload selected
certificate.
• Remote Certificate - Display existing certificate. Click on “Browse…”
button to browse and select remote certificate as PEM file. Then, click on
“Upload” button to upload selected certificate.

EnGenius Mesh AP-EOA-8670 User Manual & Configuration Guide
EnGenius Mesh AP-EOA-8670 User Manual & Configuration Guide Page 44 of 67
7.3 Management > SNMP
Simple Network Management Protocol (SNMP) used to monitor devices for
conditions that warrant administrative attention. Figure 7.3.1 illustrates the SNMP
configuration page.
Figure 7.3.1: SNMP configuration page
SNMP configuration page contains the following parameters:

EnGenius Mesh AP-EOA-8670 User Manual & Configuration Guide
EnGenius Mesh AP-EOA-8670 User Manual & Configuration Guide Page 45 of 67
• Active – Enable or disable SNMP management.
• Version – Select “v1 or v2c”, “v3”, or “all” SNMP version.
• Port – Enter the SNMP port number.
• v2 Read Community – Enter the v2 Read Community.
• Reconfirm v2 Read Community – Re-enter v2 Read Community to verify.
• v2 Read-write Community – Enter the v2 Read-write Community.
• Reconfirm v2 Read-write Community – Re-enter v2 Read-write Community
for verification.
• v3 Read Username – Enter the v3 Read Username.
• v3 Read-write Username – Enter the v3 Read-write Username.
• v3 Password – Enter the v3 Password.
• Reconfirm v3 Password – Re-enter v3 Password for verification.
• v3 Passphrase – Enter the v3 Passphrase.
• Reconfirm v3 Passphrase – Re-enter v3 Passphrase for verification.
• Access control – Enable or disable SNMP access control.
• “Apply” button to save any changes made. Please reboot to enable new
settings.
• “Modify” button to edit access control entry.
• “Remove” button to remove access control entry.
• “New Entry” button to add new access control rule.
Figure 7.3.2 illustrates the access control configuration page for SNMPD
Figure 7.3.2: SNMP Access Control – add or edit page

EnGenius Mesh AP-EOA-8670 User Manual & Configuration Guide
EnGenius Mesh AP-EOA-8670 User Manual & Configuration Guide Page 46 of 67
SNMP Access Control – add or edit page contains the following parameters:
• Device - Click on “Device” drop down menu to select device. For example,
WAN, MESH, VLAN0……
• Using - Click on “Using” drop down menu to select “Device” or “Network”.
• Subnet – Specify subnet to access or deny access SNMP server.
• Netmask – Specify netmask for this subnet.
• Comments - Enter comments for this entry.
• Active - Click on “Active” drop down menu to enable or disable this entry.
• “Apply” button to save any changes made. Please reboot to enable new
settings.
EnGenius Mesh AP-EOA-8670 User Manual & Configuration Guide
EnGenius Mesh AP-EOA-8670 User Manual & Configuration Guide Page 47 of 67
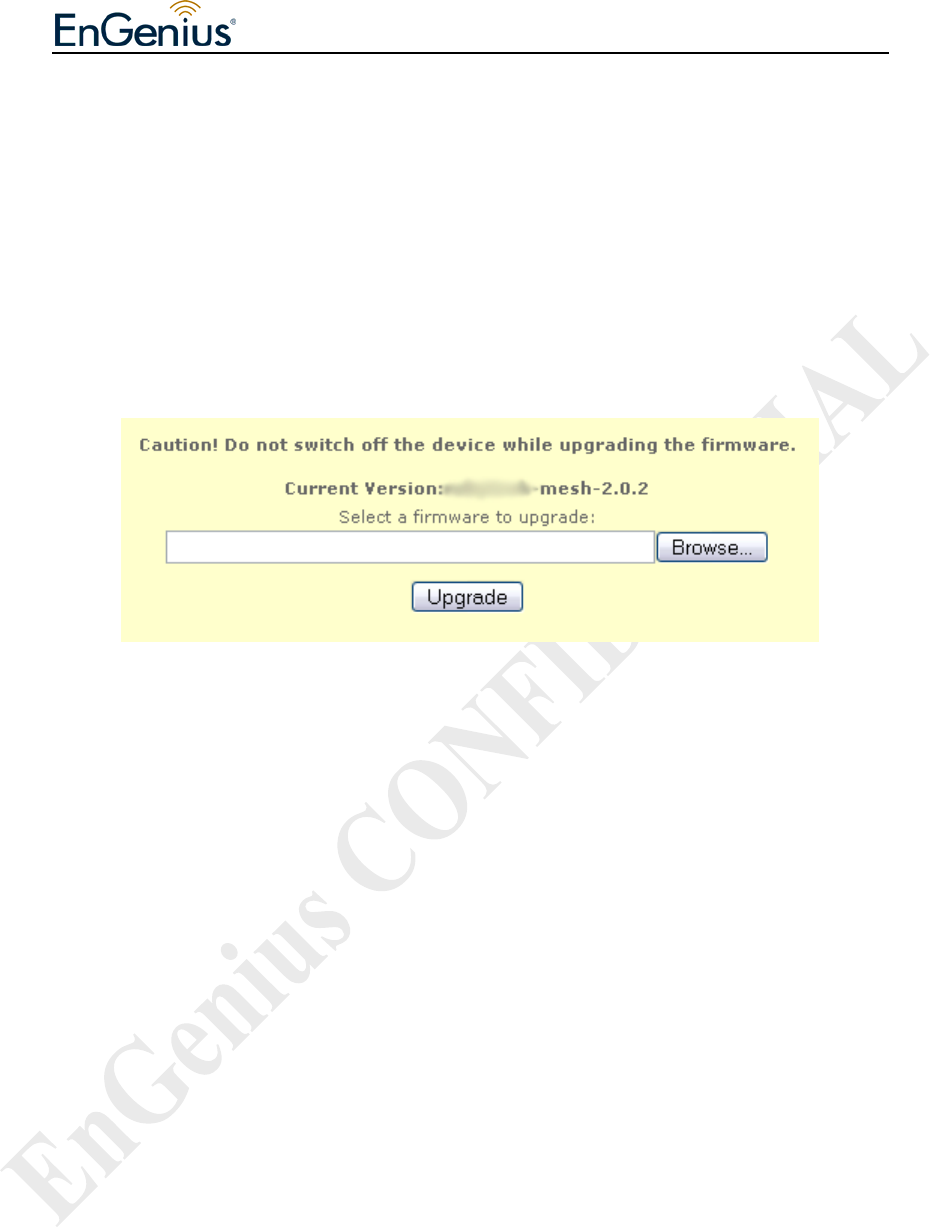
7.4 Management > Firmware
Under firmware upgrade management. You can view the current firmware release
version, update latest firmware. Please note that do not power off the device while
upgrading the firmware. Otherwise you'll render this device unrecoverable. The
firmware process will take around 6 minutes to complete. Figure 7.4.1 illustrates the
Firmware Upgrade page.
Figure 7.4.1: Firmware Upgrade page
Firmware Upgrade process:
• Click on “Browse…” button to browse and select firmware to upgrade.
• Click on “Upgrade” button upgrade selected firmware.
• “Current Version” display current firmware revision number.
EnGenius Mesh AP-EOA-8670 User Manual & Configuration Guide
EnGenius Mesh AP-EOA-8670 User Manual & Configuration Guide Page 48 of 67
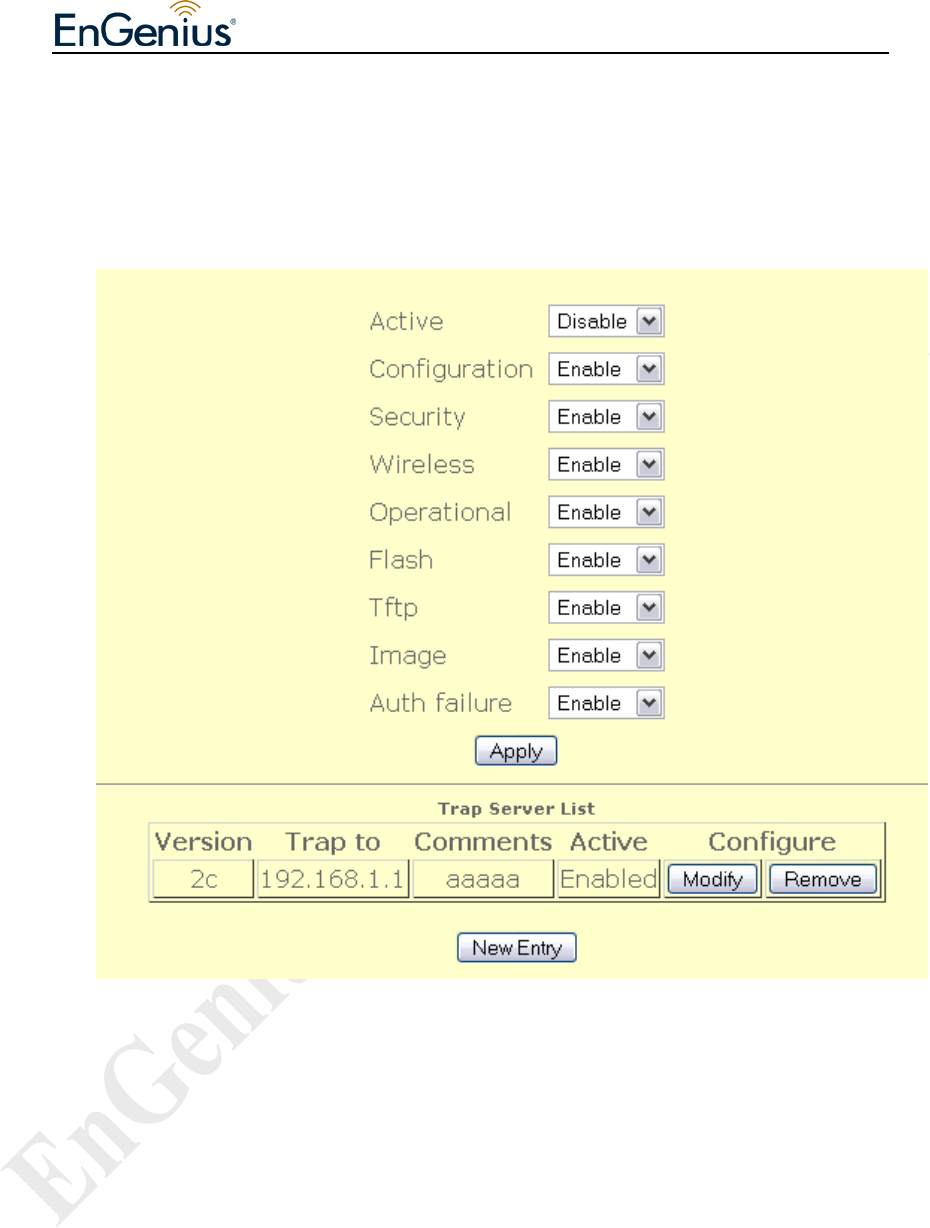
7.5 Management > Trap
Trap used to report an alert or other asynchronous event about managed system.
Figure 7.5.1 illustrates the trap configuration page.
Figure 7.5.1: Trap configuration page
Trap configuration page contains the following parameters:
• Active – Enable or disable trap report.
• Configuration – Enable or disable report on configuration issue.
• Security – Enable or disable security trap report.
• Wireless – Enable or disable wireless trap report.
• Operational – Enable or disable operational trap report.
• Flash – Enable or disable flash trap report.
• Tftp – Enable or disable tftp trap report.
EnGenius Mesh AP-EOA-8670 User Manual & Configuration Guide
EnGenius Mesh AP-EOA-8670 User Manual & Configuration Guide Page 49 of 67
• Image – Enable or disable image trap report.
• Auth failure – Enable or disable authentication failure trap report.
• “Apply” button to save any changes made. Please reboot to enable new
settings.
• “Modify” button to edit trap server entry.
• “Remove” button to delete trap server entry.
• “New Entry” button to add new server entry.
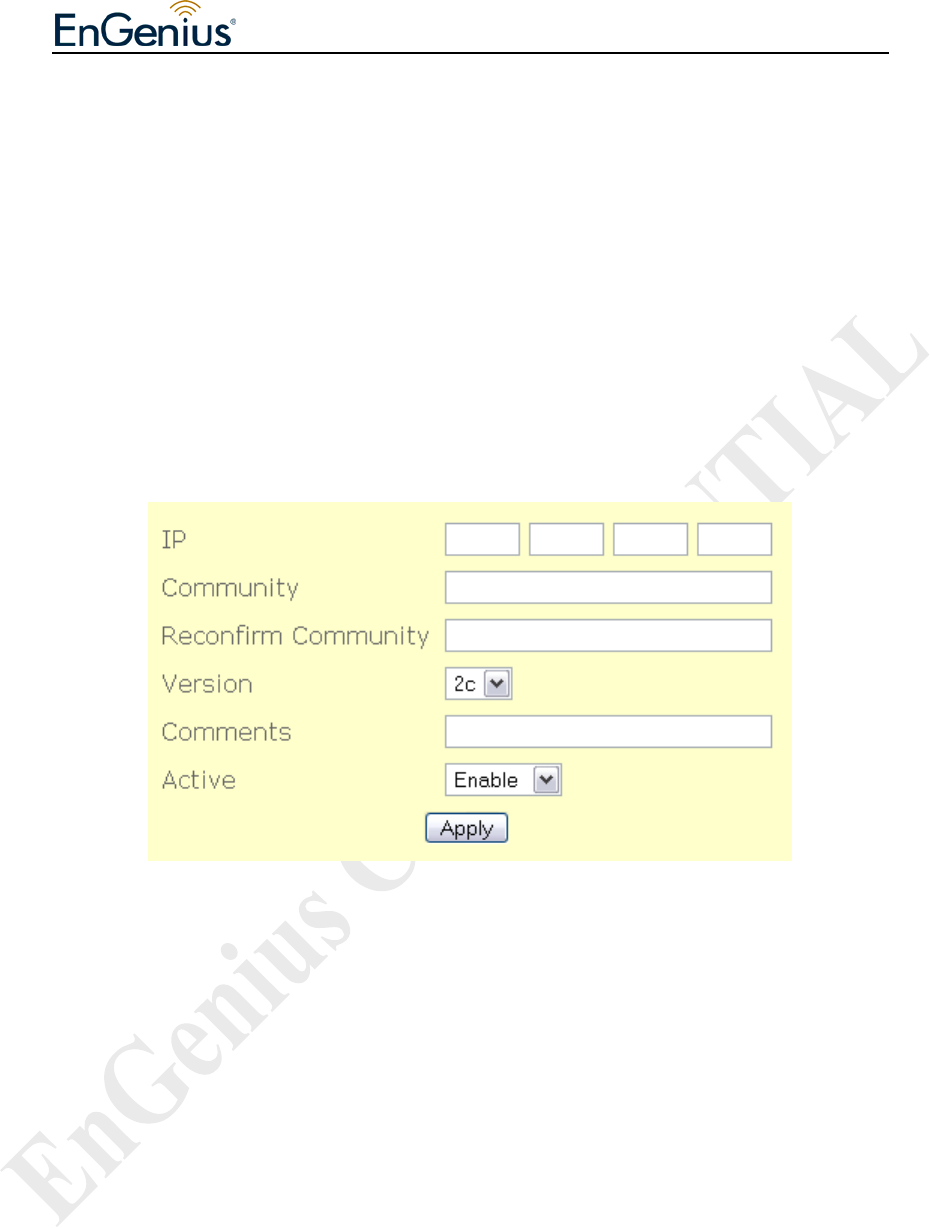
Figure 7.5.2 illustrates the configuration page for add or delete trap server.
Figure 7.5.2: Trap server – add or edit page
Trap server – add or edit page contain the following parameter:
• IP – Enter destination IP to send trap.
• Community – Enter community of trap.
• Reconfirm Community – Re-enter community to confirm it.
• v3 Username – Enter v3 username.
• v3 Password – Enter v3 user password.
• Reconfirm v3 Password – Re-enter password to confirm it.
• v3 Passphrase – Enter v3 user passphrase.
• Reconfirm v3 Passphrase – Re-enter passphrase to confirm it.
• Version – SNMP Version.
• Comments – Enter Trap comments.
• Active – Enable or disable this entry.

EnGenius Mesh AP-EOA-8670 User Manual & Configuration Guide
EnGenius Mesh AP-EOA-8670 User Manual & Configuration Guide Page 50 of 67
• “Apply” button to save any changes made. Please reboot to enable new
settings.
EnGenius Mesh AP-EOA-8670 User Manual & Configuration Guide
EnGenius Mesh AP-EOA-8670 User Manual & Configuration Guide Page 51 of 67
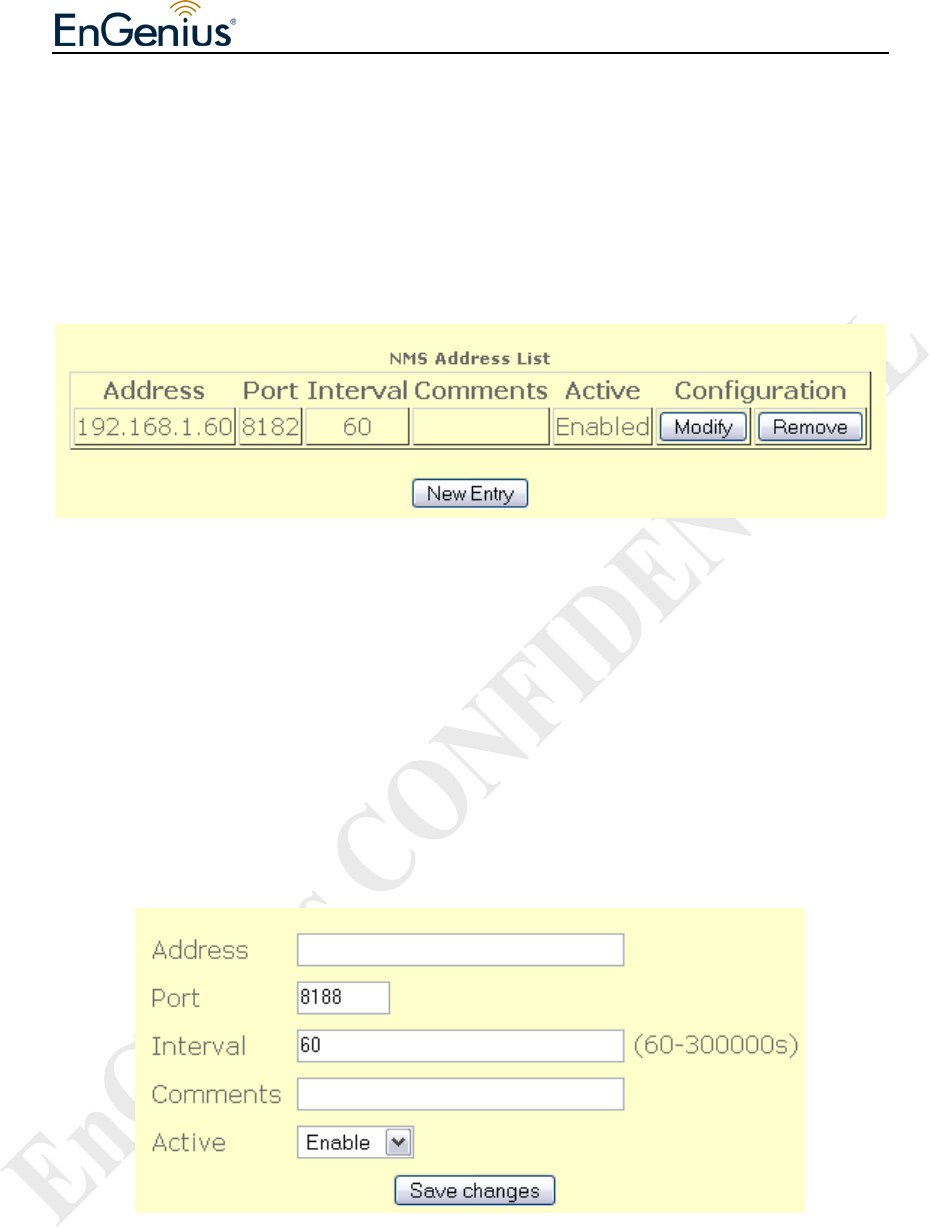
7.6 Management > NMS Addresses
NMS address is used for the system to report back to Network Management System
located outside of the network. Figure 7.6.1 illustrates the NMS server address
configuration page.
Figure 7.6.1 NMS Address List
NMS address configuration page contains the following parameters:
• NMS Address List – List of NMS server.
• “Modify” button to edit the selected entry.
• “Remove” button to delete the selected entry.
• “New Entry” button to add new entry to the NMS server.
Figure 7.6.2 illustrates the NMS address configuration page for add or edit.
Figure 7.6.2: NMS Addresses – add or edit page
NMS Address – add page contain the following parameter:
• Address – Enter the IP address of the NMS server.
• Port – Enter the port of the NMS server which is waiting for the report.
• Interval – Enter the interval of report to NMS server.

EnGenius Mesh AP-EOA-8670 User Manual & Configuration Guide
EnGenius Mesh AP-EOA-8670 User Manual & Configuration Guide Page 52 of 67
• Comments – Enter comments for the entry.
• Active – Enable or disable this entry.
• “Apply” button to save any changes made. Please reboot to enable new
settings.

EnGenius Mesh AP-EOA-8670 User Manual & Configuration Guide
EnGenius Mesh AP-EOA-8670 User Manual & Configuration Guide Page 53 of 67
7.7 Management > Reboot
You can perform system reboot here. Figure 7.11.1 illustrates the reboot page.
Figure 7.11.1: Reboot page
Reboot page contains the following parameters:
• “Reboot” button to reboot the device.
EnGenius Mesh AP-EOA-8670 User Manual & Configuration Guide
EnGenius Mesh AP-EOA-8670 User Manual & Configuration Guide Page 54 of 67
8 Tools
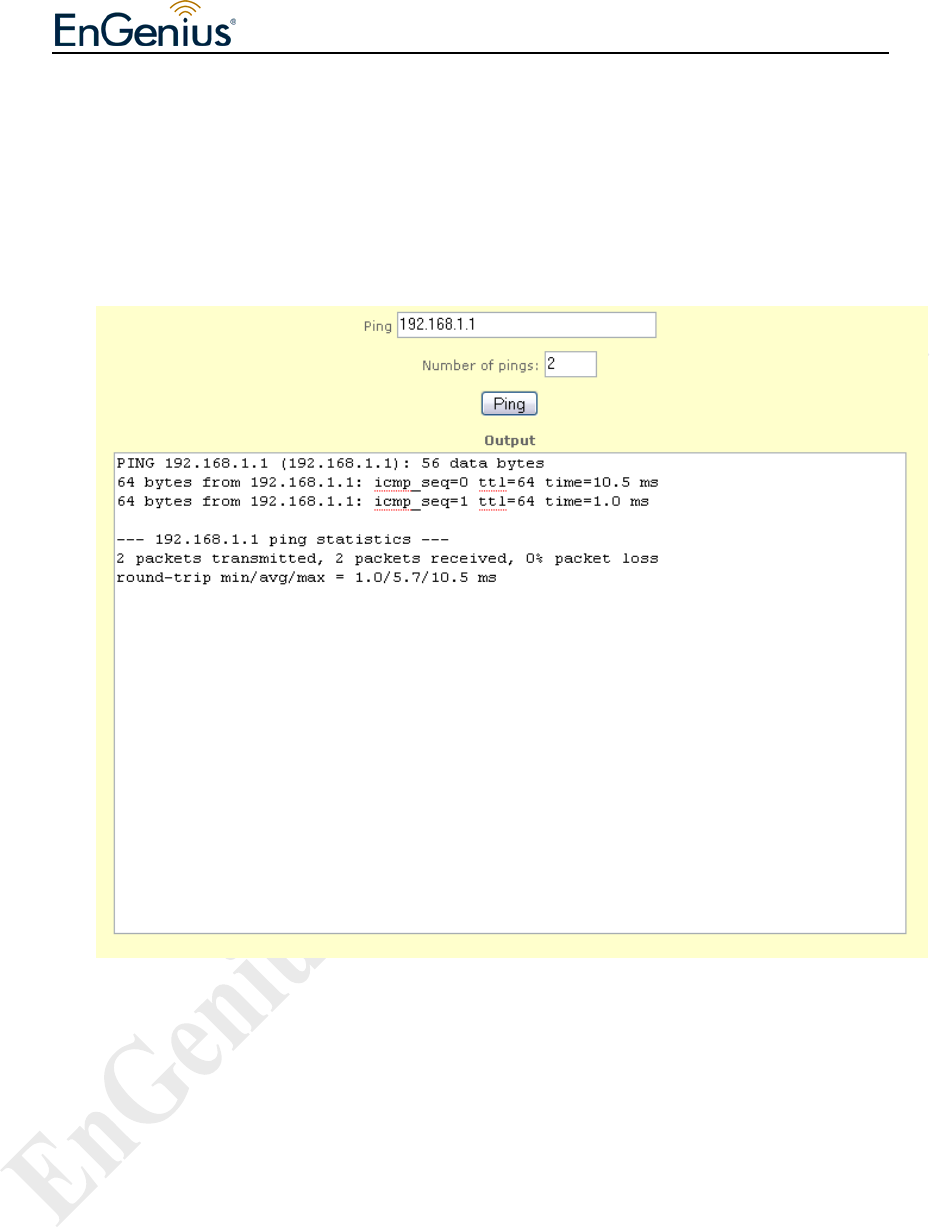
8.1 Tools > Ping
Figure 8.1.1 illustrates the ping page.
Figure 8.1.1: Ping page
Ping page contains the following parameters:
• Ping – Enter the IP address to ping.
• Number of pings – Enter the number of pings to send.
• “Ping” button to ping and display output of ping command.
• “Output” text area display result of the ping command.
EnGenius Mesh AP-EOA-8670 User Manual & Configuration Guide
EnGenius Mesh AP-EOA-8670 User Manual & Configuration Guide Page 55 of 67
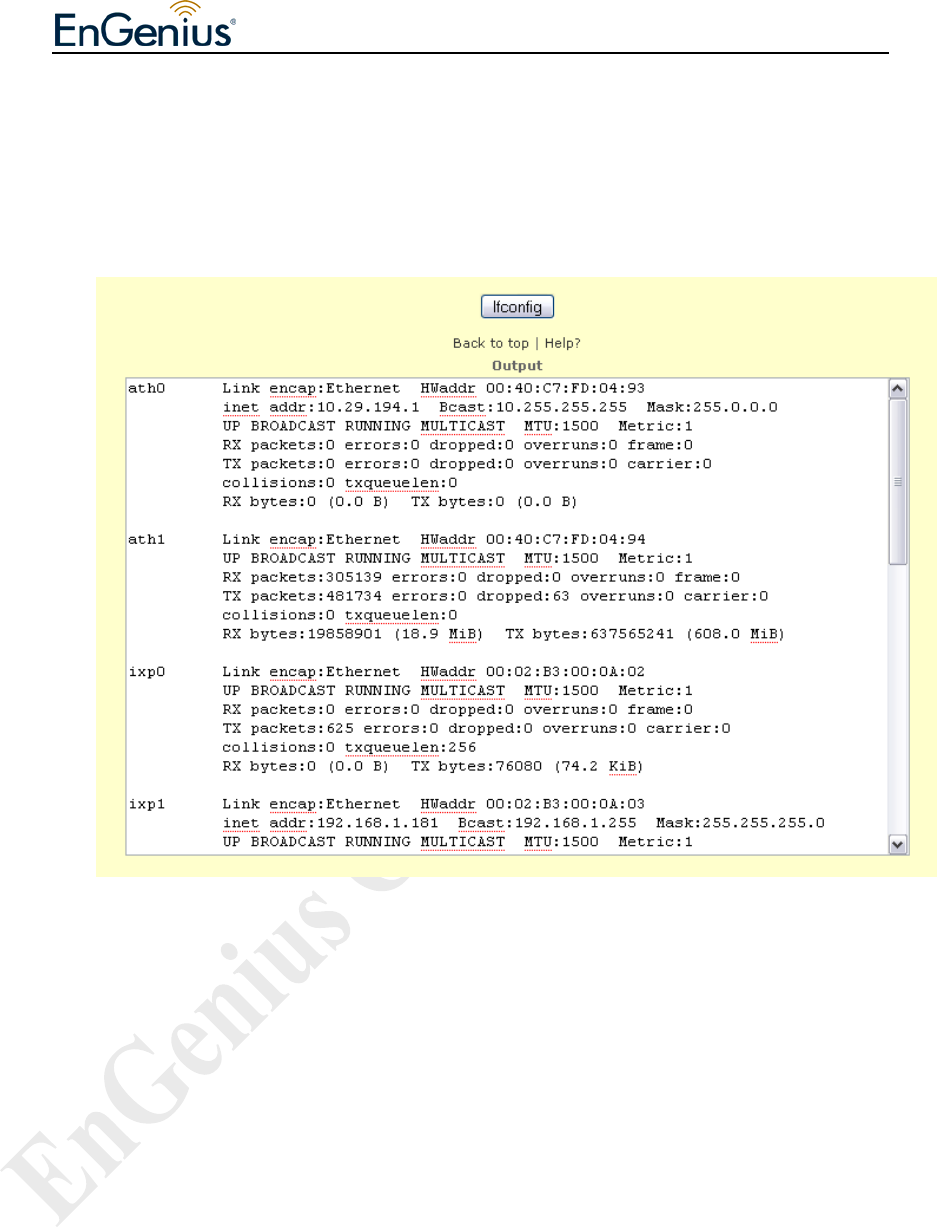
8.2 Tools > Ifconfig
Ifconfig page is used to collect verbose information about device network interfaces.
Figure 8.2.1 illustrates the ifconfig page.
Figure 8.2: Ifconfig page
Ifconfig page contains the following parameters:
• “Ifconfig” button to call ifconfig command.
• “Output” text area to display the output of the command.
EnGenius Mesh AP-EOA-8670 User Manual & Configuration Guide
EnGenius Mesh AP-EOA-8670 User Manual & Configuration Guide Page 56 of 67
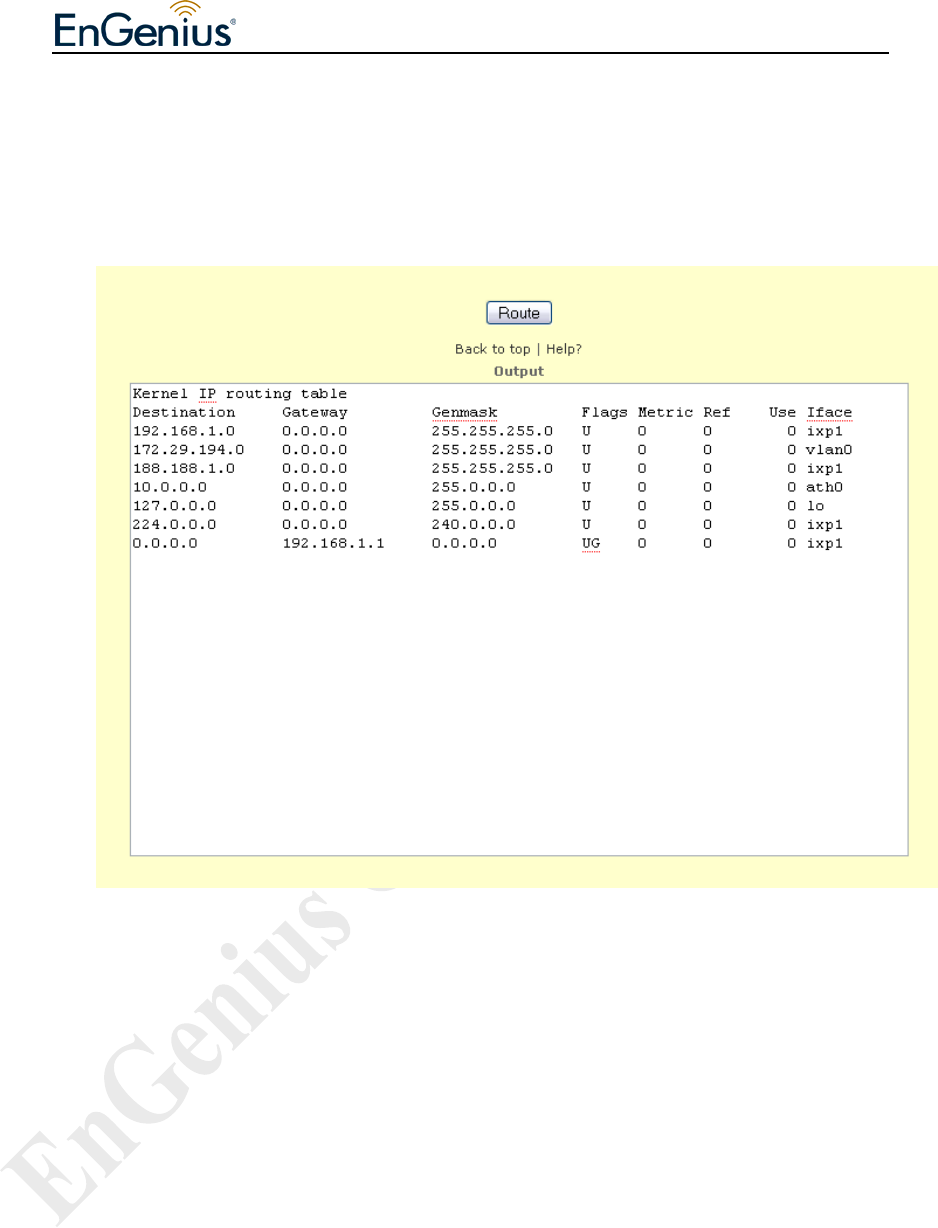
8.3 Tools > Route
Route page is used to collect information about device’s routing table. Figure 8.3.1
illustrates the route page.
Figure 8.3.1: Route page
Route page contains the following parameters:
• “Route” button to display output of route command.
• “Output” text area display result of the route command.
EnGenius Mesh AP-EOA-8670 User Manual & Configuration Guide
EnGenius Mesh AP-EOA-8670 User Manual & Configuration Guide Page 57 of 67
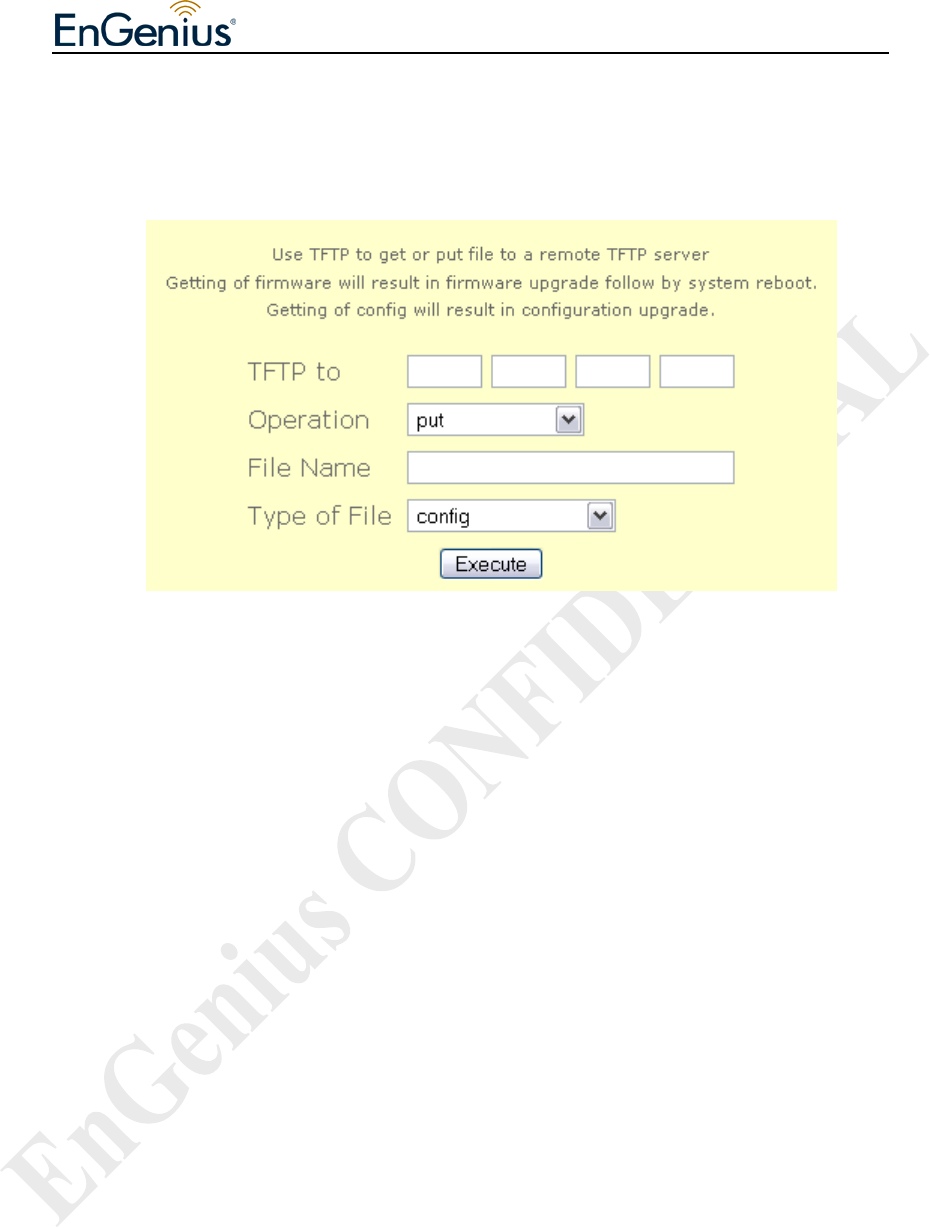
8.4 Tools > TFTP
Figure 8.4.1 illustrates the TFTP page.
Figure 8.4.1: TFTP page
TFTP contains the following parameters:
• TFTP to – Enter the destination IP address of remote TFTP server.
• Operation – Select “put”, “get” or “get and reboot” file to remote TFTP
server.
• File Name – Enter the File Name to put or get.
• Type of File – Select “config”, “firmware”, “ipsec x509 local”, “ipsec x509
remote”, or “ipsec rsa” file.
• Execute button to perform directed action.
EnGenius Mesh AP-EOA-8670 User Manual & Configuration Guide
EnGenius Mesh AP-EOA-8670 User Manual & Configuration Guide Page 58 of 67
9 Status
9.1 Status > Status
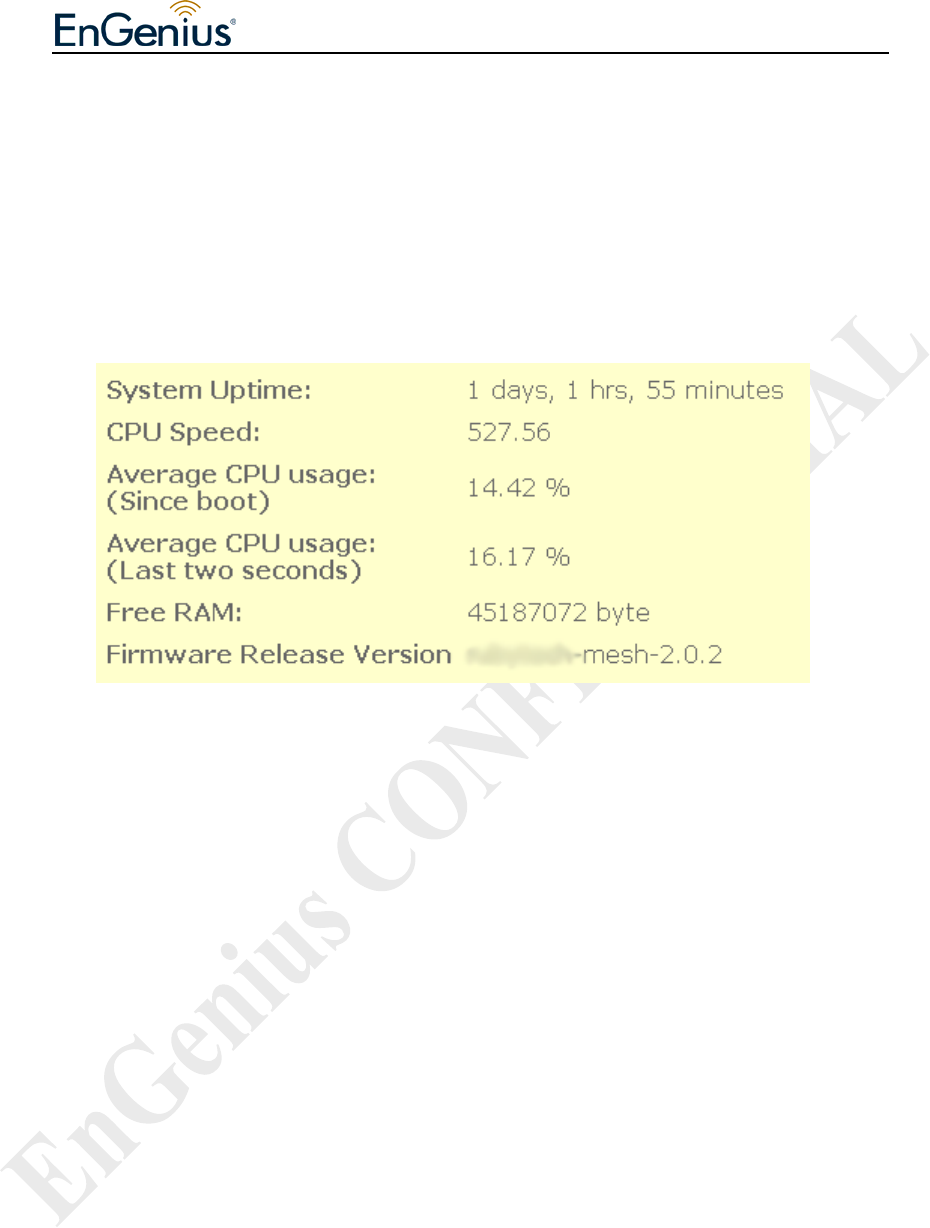
Status page will display current system status of Mesh AP. Figure 9.1.1 illustrates the
system status page.
Figure 9.1.1: System Status page
System Status will display system uptime in format: day, hours, minute. For example,
“Uptime0 days, 2 hrs, 17 minutes”
EnGenius Mesh AP-EOA-8670 User Manual & Configuration Guide
EnGenius Mesh AP-EOA-8670 User Manual & Configuration Guide Page 59 of 67
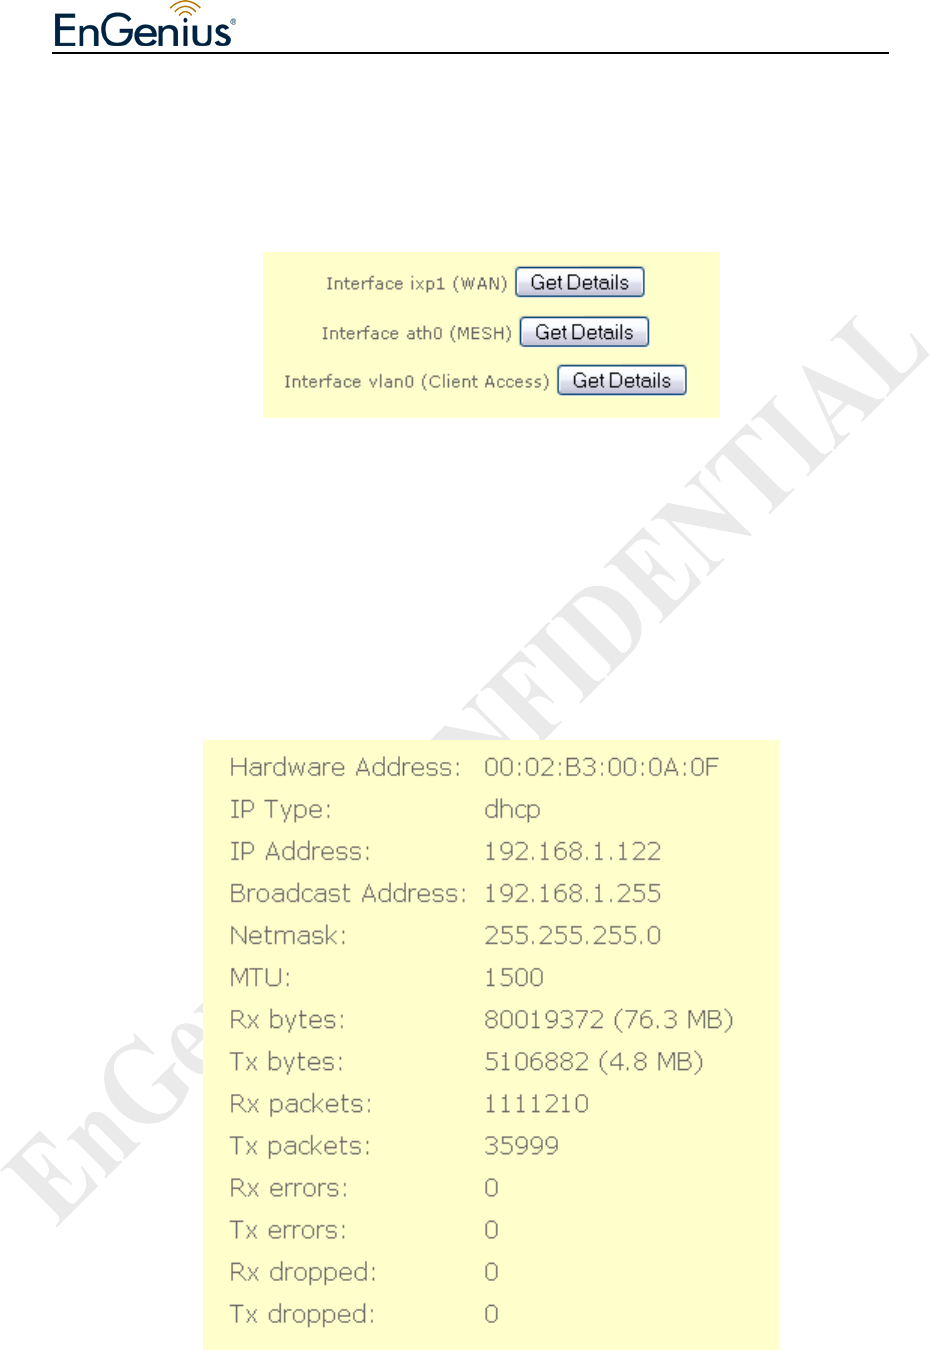
9.2 Status > Interfaces
Figure 9.2.1 illustrates the interface page. Active interface will be listed under the
interface page.
Figure 9.2.1: Interface page
Interface page contains the following parameters:
• “Get Details” button to obtain details on the selected interface.
Figure 9.2.2 illustrates the details when interface ixp0 ( WAN ) is selected.
Figure 9.2.2: Details of interface ixp0 ( WAN ).
Interface ixp1 page contain the following parameter:

EnGenius Mesh AP-EOA-8670 User Manual & Configuration Guide
EnGenius Mesh AP-EOA-8670 User Manual & Configuration Guide Page 60 of 67
• Hardware Address – Display the hardware address of interface.
• IP Type – Interface get IP via which way (like DHCP).
• IP Address – Display the IP address of interface.
• Broadcast Address – Display the broadcast address of interface.
• Netmask – Display the network mask of this IP.
• MTU – Display MTU value of interface.
• Rx bytes – Display Rx bytes value of interface.
• Tx bytes – Display Tx bytes value of interface.
• Rx packets – Display Rx packets value of interface.
• Rx errors – Display Rx errors value of interface.
• Rx dropped – Display Rx dropped value of interface.
EnGenius Mesh AP-EOA-8670 User Manual & Configuration Guide
EnGenius Mesh AP-EOA-8670 User Manual & Configuration Guide Page 61 of 67
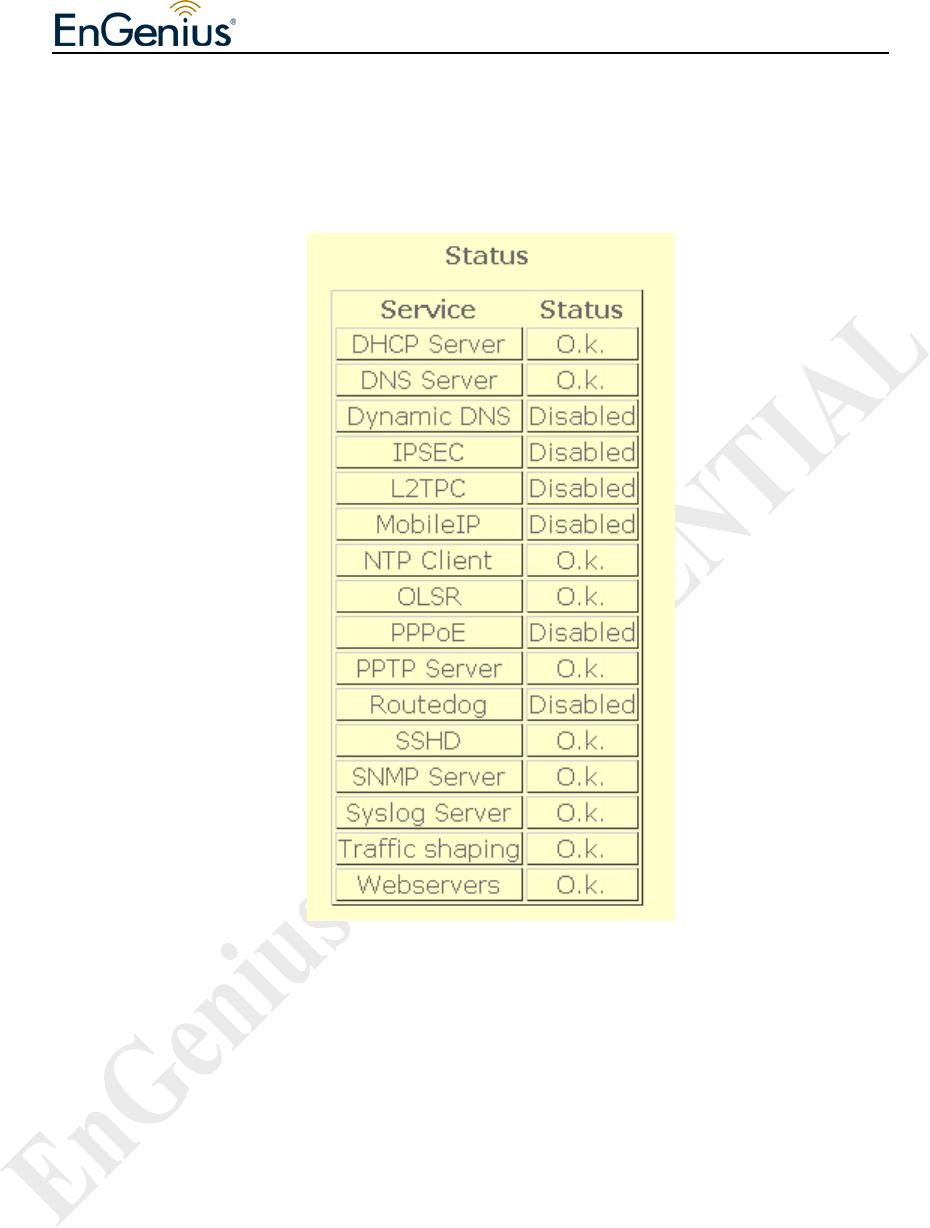
9.3 Status > Services
Figure 9.3.1 illustrates the status of each service running in the device.
Figure 9.3.1: Services page
Services page display status of each service. Services page contains the following
parameters:
• DHCP Relay
• NTP Client
• SSHD
• SNMP Server
• Syslog Server
• Webservers
EnGenius Mesh AP-EOA-8670 User Manual & Configuration Guide
EnGenius Mesh AP-EOA-8670 User Manual & Configuration Guide Page 62 of 67
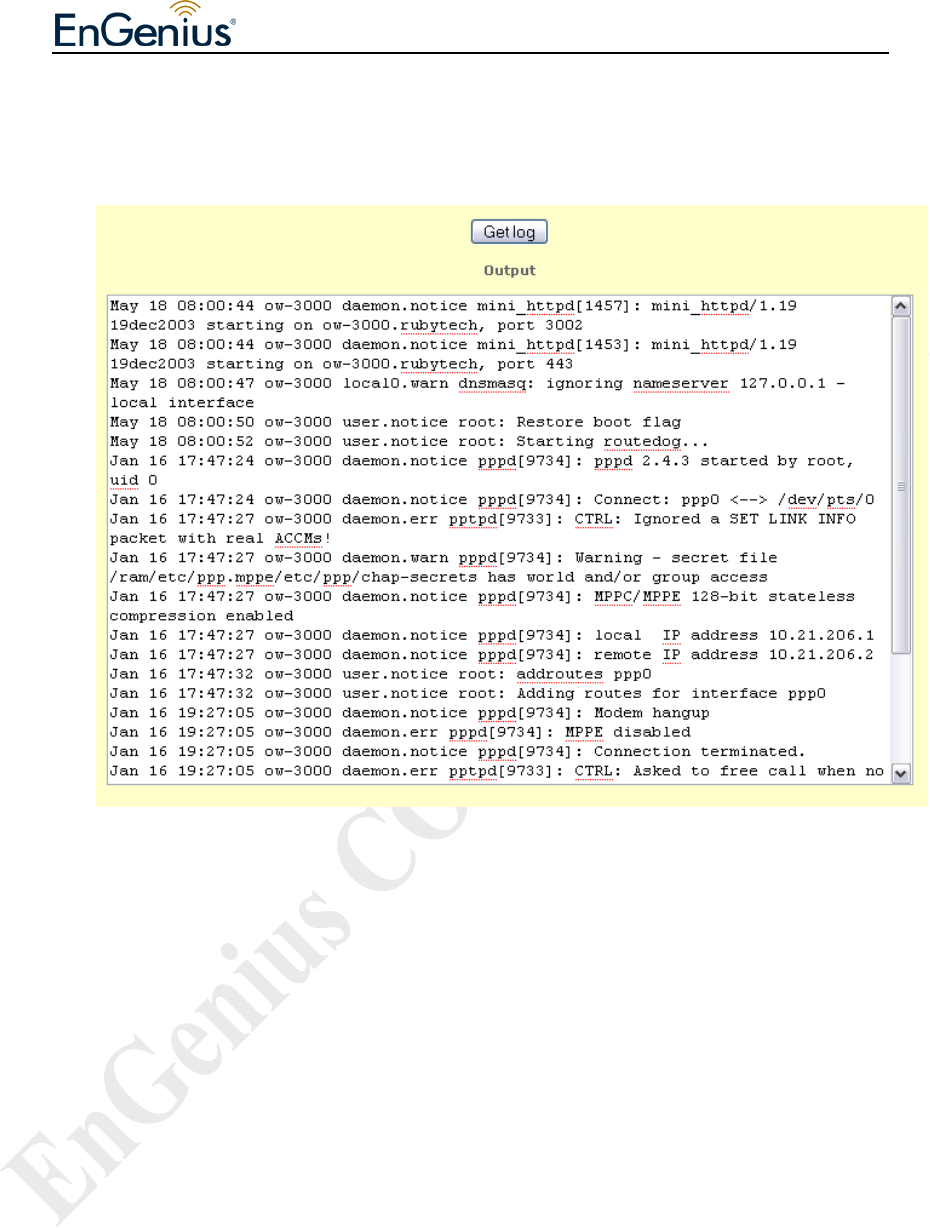
9.4 Status > System Log
Figure 9.4.1 illustrates the system log page.
Figure 9.4.1: System Log page
System log page contains the following parameters:
• “Get log” button to display output of system log command.
• “Output” text area to display the result of the output.
EnGenius Mesh AP-EOA-8670 User Manual & Configuration Guide
EnGenius Mesh AP-EOA-8670 User Manual & Configuration Guide Page 63 of 67
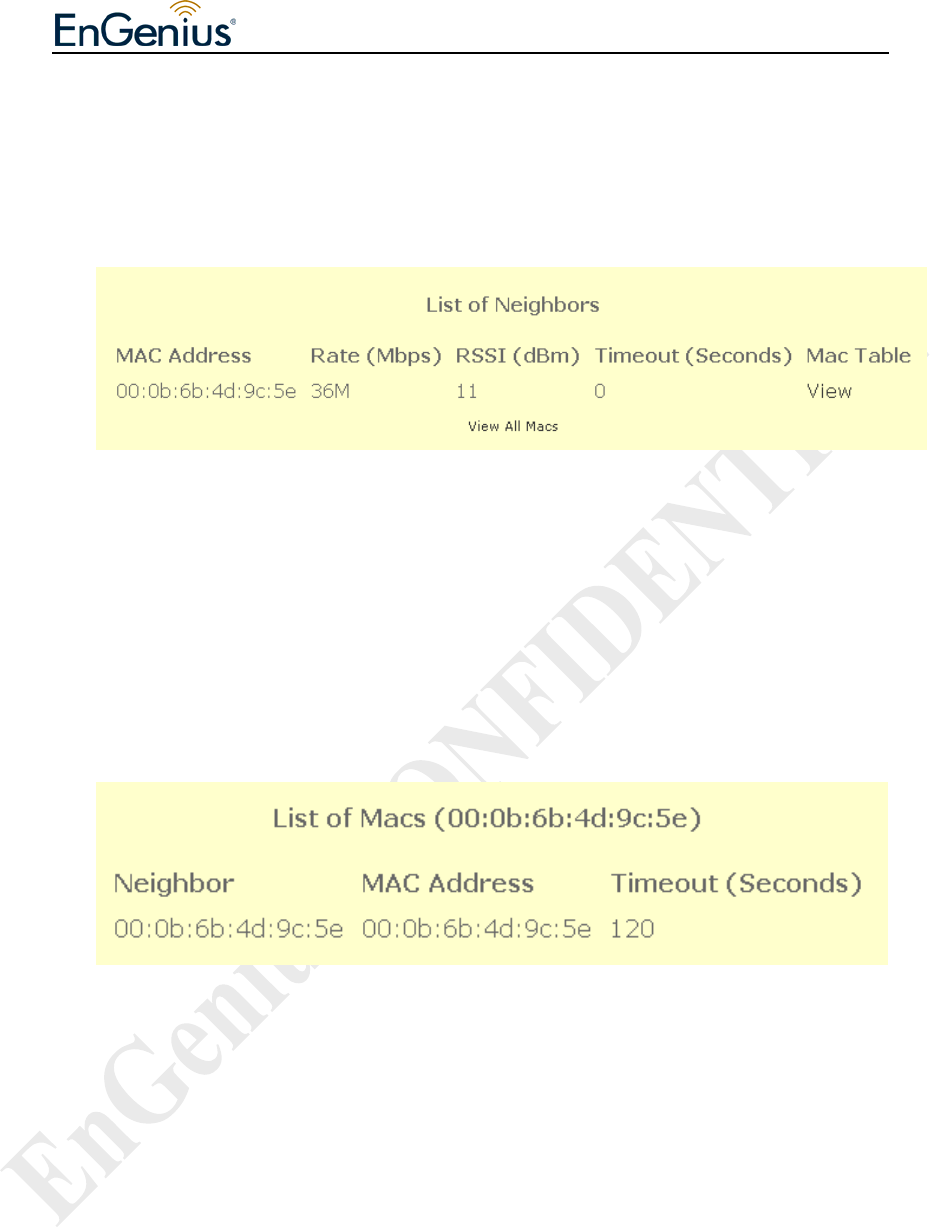
9.5 Status > Neighbor
Neighbor status page will show the mesh node status. It show neighbor with details
such as rate, rssi, timeout. Figure 9.8.1 illustrates the neighbor status page.
Figure 9.8.1: Neighbor Status page
Neighbor Status page contains the following parameters:
• List of Neighbors – display a list of connected neighbor
• <View hyperlink> - display the MAC table of the selected entry.
• View All Macs – display all the MAC currently visible to the device.
Figure 9.8.2 illustrates the MAC registered under the selected node.
Figure 9.8.2: MAC table of the specific nodes
10 Help
Help page provide links to specific help related to configuration and some description
according to each submenu of the configuration..

EnGenius Mesh AP-EOA-8670 User Manual & Configuration Guide
EnGenius Mesh AP-EOA-8670 User Manual & Configuration Guide Page 64 of 67
Note 1. Federal Communication Commission Interference Statement
This equipment has been tested and found to comply with the limits for a Class B digital
device, pursuant to Part 15 of the FCC Rules. These limits are designed to provide
reasonable protection against harmful interference in a residential installation. This
equipment generates, uses and can radiate radio frequency energy and, if not installed
and used in accordance with the instructions, may cause harmful interference to radio
communications. However, there is no guarantee that interference will not occur in a
particular installation. If this equipment does cause harmful interference to radio or
television reception, which can be determined by turning the equipment off and on, the
user is encouraged to try to correct the interference by one of the following measures:
- Reorient or relocate the receiving antenna.
- Increase the separation between the equipment and receiver.
- Connect the equipment into an outlet on a circuit different from that
to which the receiver is connected.
- Consult the dealer or an experienced radio/TV technician for help.
FCC Caution: Any changes or modifications not expressly approved by the party
responsible for compliance could void the user's authority to operate this equipment.
For operation within 5.15 ~ 5.25GHz frequency range, it is restricted to indoor
environment.
This device complies with Part 15 of the FCC Rules. Operation is subject to the following
two conditions: (1) This device may not cause harmful interference, and (2) this device
must accept any interference received, including interference that may cause undesired
operation.
IMPORTANT NOTE:
Radiation Exposure Statement:
This equipment complies with FCC radiation exposure limits set forth for an
uncontrolled environment. This equipment should be installed and operated
with minimum distance 20cm between the radiator & your body.
This transmitter must not be co-located or operating in conjunction with any other antenna
or transmitter.
The availability of some specific channels and/or operational frequency bands
are country dependent and are firmware programmed at the factory to match
the intended destination. The firmware setting is not accessible by the end
user.
EnGenius Mesh AP-EOA-8670 User Manual & Configuration Guide
EnGenius Mesh AP-EOA-8670 User Manual & Configuration Guide Page 65 of 67
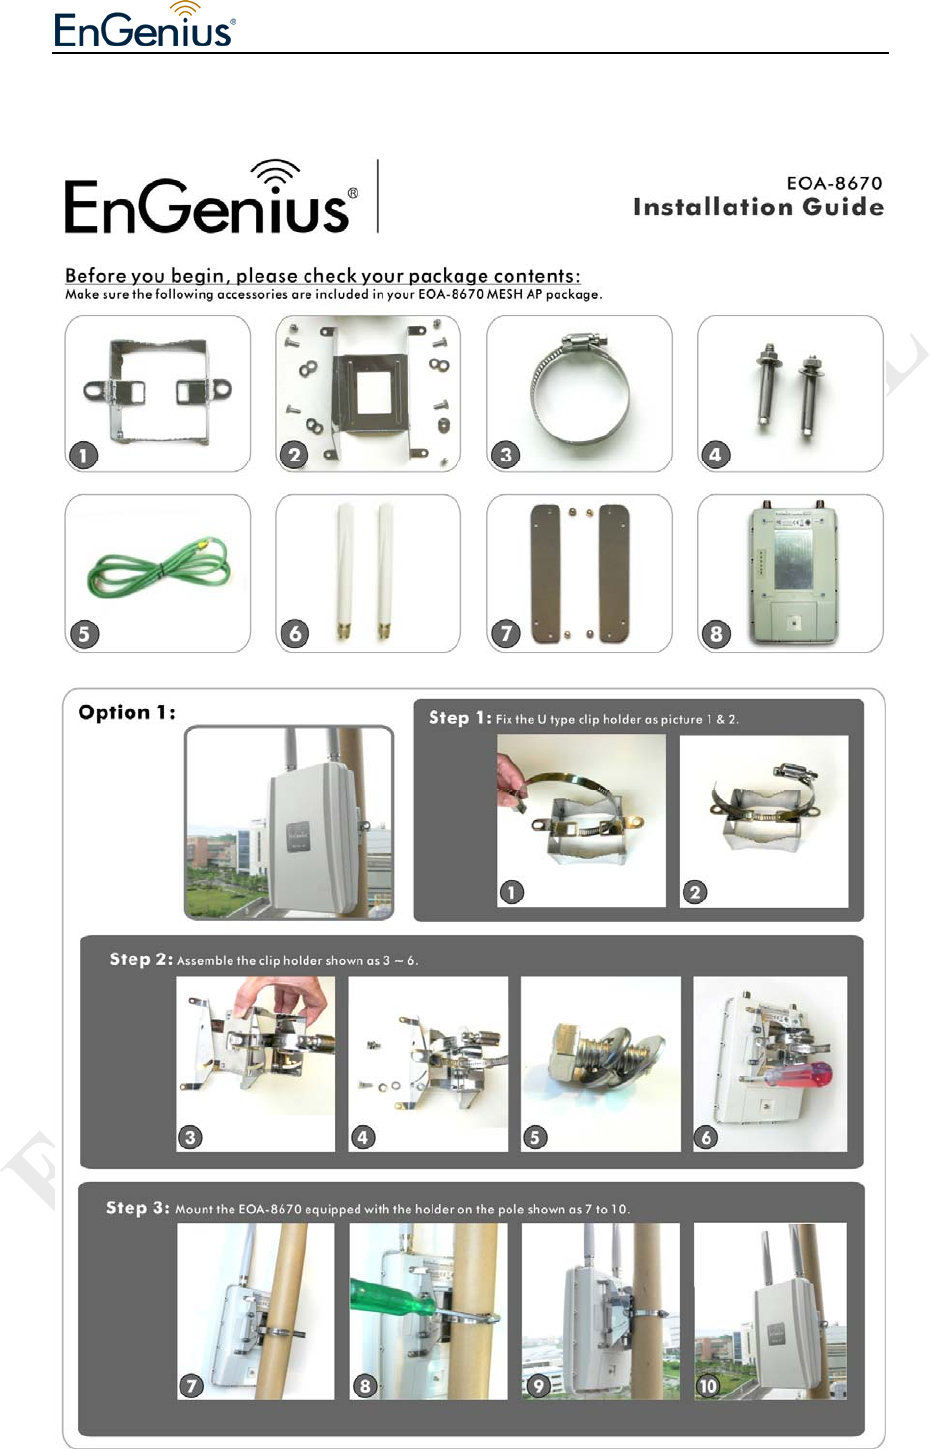
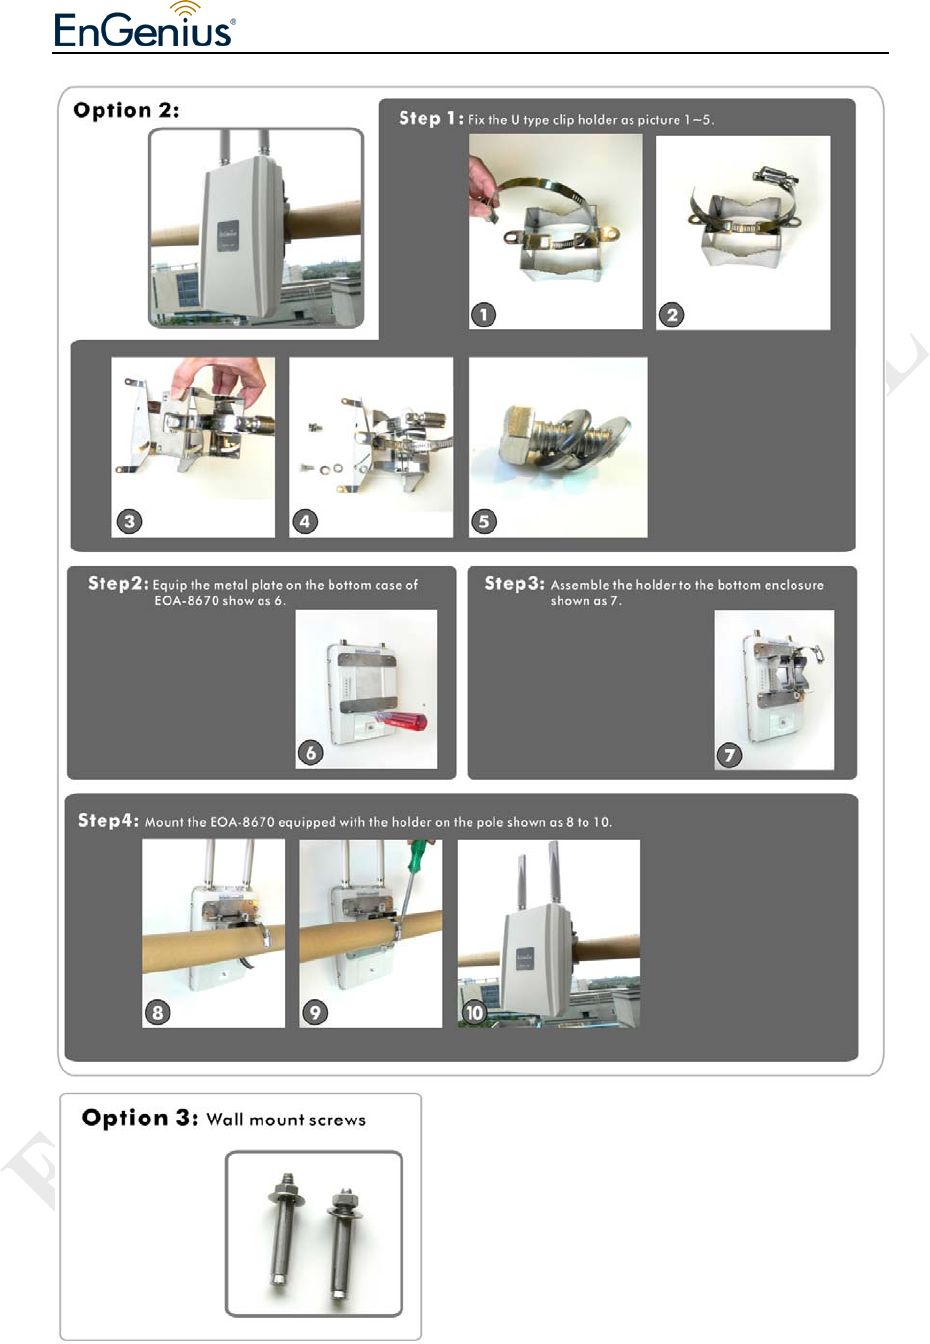
Note 2. Mounting Kit setup
EnGenius Mesh AP-EOA-8670 User Manual & Configuration Guide
EnGenius Mesh AP-EOA-8670 User Manual & Configuration Guide Page 66 of 67
EnGenius Mesh AP-EOA-8670 User Manual & Configuration Guide
EnGenius Mesh AP-EOA-8670 User Manual & Configuration Guide Page 67 of 67
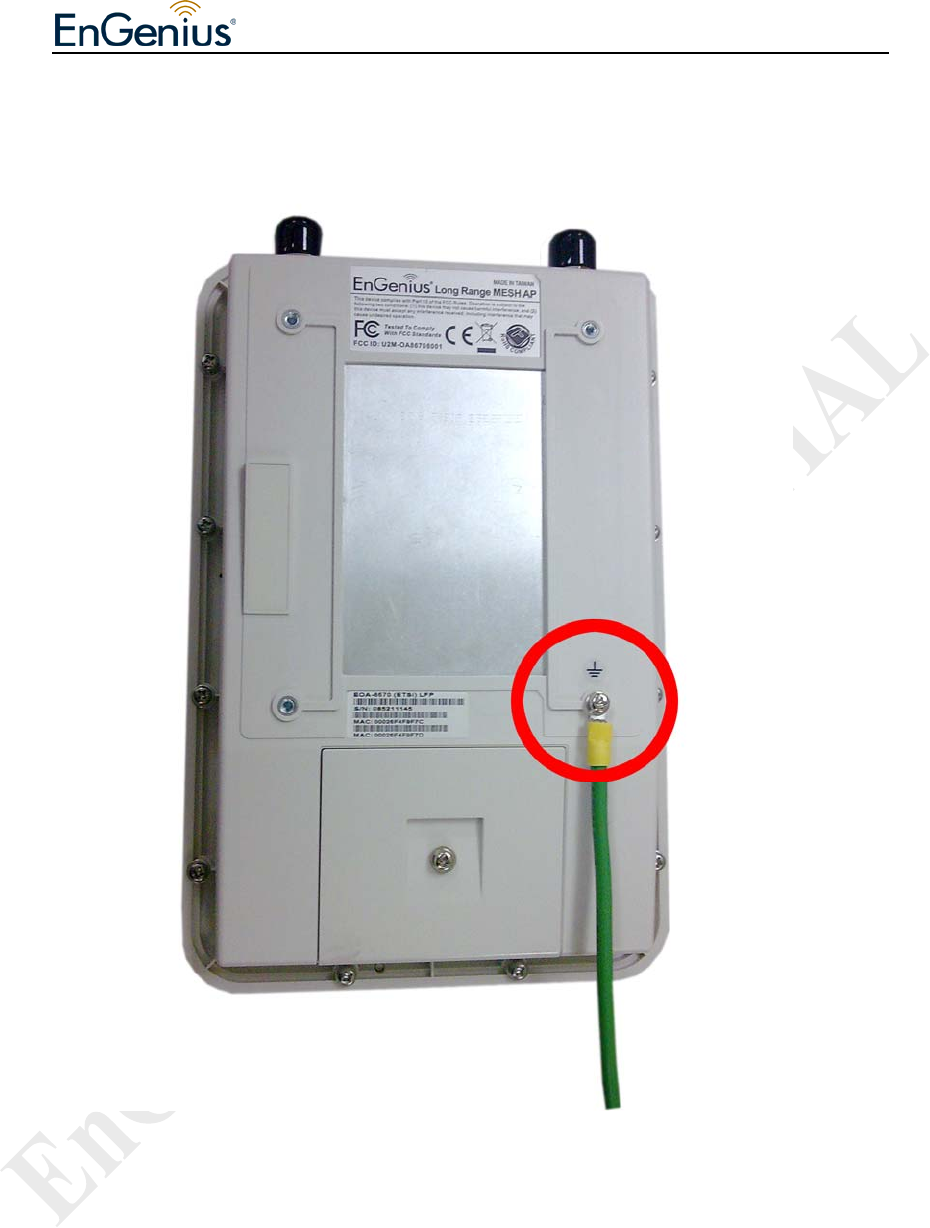
Note 3. Grounding Cable locked location