Sendo SND251 Dual Band Portable Cellular Transceiver User Manual 251 Book
Sendo International Ltd Dual Band Portable Cellular Transceiver 251 Book
Sendo >
Users Manual

Contents
1Copyright and Legal Information 3
2Your Phone 5
3Getting started 7
4Making a call 10
5Answering a call 12
6Using the contact list 13
7Menu navigation 14
8Messages 15
9Internet menu 19
10 Sounds 22
11 Extras 25
12 Settings 34
13 Services 36
14 Troubleshooting 38
15 Safety information 41
16 RF and FDA/FCC Statements 45
17 Warranty 51

3
1
Copyright and Legal Information
1 Copyright and Legal Information
The wireless phone described in this
manual is approved for use in GSM 850 and
1900 networks.
Copyright Information
Part number: 8E30-17262-00000, Edition 1.
Copyright Sendo 2002. All rights reserved.
Printed in the Netherlands.
SENDO is a registered trademark, or
trademark, of Sendo International Ltd. and/
or its affiliates.
Reproduction, transfer, distribution or
storage of part or all of the contents in this
document in any form without the prior
written permission of Sendo is prohibited.
T9 Text Input is a registered trademark of
Tegic Communications. All rights reserved.
T9 Text input is licensed under one or more
of the following U.S. Patents: 5,818,437,
5,953,541, 5,945,928, 6,011,554 and
additional patents are pending worldwide.
DISCLAIMER
The information contained in this user guide
is written for the Sendo phone model 251.
Sendo reserves the right to make changes
and improvements to the products and any
of the features of the products described in
this document without prior notice
THE CONTENTS OF THIS DOCUMENT ARE
PROVIDED "AS IS". EXCEPT AS REQUIRED
BY APPLICABLE LAW, NO WARRANTIES
OF ANY KIND, EITHER EXPRESS OR
IMPLIED, INCLUDING, BUT NOT LIMITED
TO, THE IMPLIED WARRANTIES OF
MERCHANTABILITY AND FITNESS FOR A
PARTICULAR PURPOSE, ARE MADE IN
RELATION TO THE ACCURACY,
RELIABILITY OR CONTENTS OF THIS
DOCUMENT. SENDO RESERVES THE
RIGHT TO REVISE THIS DOCUMENT OR
WITHDRAW IT AT ANY TIME WITHOUT
PRIOR NOTICE. UNDER NO
CIRCUMSTANCES SHALL SENDO BE
RESPONSIBLE FOR ANY LOSS OF DATA
OR INCOME OR ANY SPECIAL,
INCIDENTAL, CONSEQUENTIAL OR
INDIRECT DAMAGES HOWSOEVER
CAUSED.
Export Information
The product is subject to the United States
Export Administration Regulations.
Diversion contrary to U.S. law is prohibited.
You must comply with all applicable export
laws, restrictions and regulations of the
United States or foreign agencies or
authorities, and shall not export, or transfer
for the purpose of re-export, this product in
violation of any such restrictions, laws or
regulations, or without all necessary
approvals. As of June 2001 under US legal
requirements, this means that the Exported
Product may not be downloaded or
otherwise exported or re-exported (i) into
Cuba, Iran, Iraq, Libya, North Korea, Sudan,
Syria, the Taliban-controlled areas of

4
1
Copyright and Legal Information
Afghanistan or any other country subject to
U.S. trade sanctions covering the
downloaded software product, to
individuals or entities controlled by such
countries, or to nationals or residents of
such countries other than nationals who are
lawfully admitted permanent residents of
countries not subject to such sanctions; or
(ii) to anyone on the U.S. Treasury
Department's list of Specially Designated
Nationals and Blocked Persons, the U.S.
Commerce Department's Denied Persons
List, or the U.S. Commerce Department's
Entity List.
FCC/Industry Canada Notice
This phone may cause TV or radio
interference (for example, when using the
phone in close proximity to receiving
equipment). The FCC or Industry Canada
can require you to stop using the phone if
such interference cannot be eliminated.
This device complies with part 15 of the FCC
rules. Operation is subject to the condition
that this device does not cause harmful
interference.
For your safety
You should observe and follow the
guidelines given in this manual for the safe
and efficient use of your phone. Failure to
comply with these guidelines and
requirements may void your warranty and
may invalidate any approvals given to the
phone. Please see the Important Safety
section of this manual before you use the
phone.
5
2
Your Phone
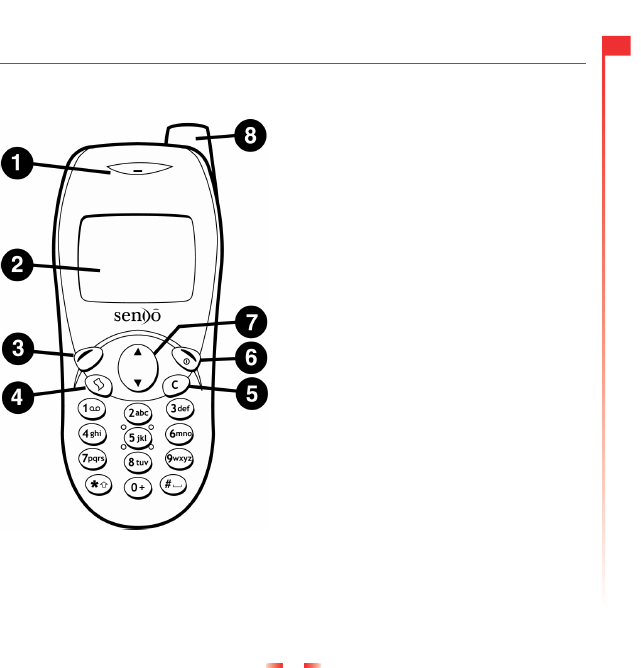
2 Your Phone
nEarpiece
oDisplay – Graphical indicators, menu options
and other information is shown here.
pLeft soft key – This key performs the function
immediately above it on the display.
qQuick access key – The function of this key
will vary depending on the model of your
phone. It provides quick access to a certain
function such as SIM Toolkit or messaging.
rClear key – This erases text or takes you
back to your previous step, depending on
the context. A long press of this key takes
you back to the main screen.
sRight soft key – A long press of this key will
switch the telephone on and off. It also
performs the function immediately above it
on the display.
tUp and down keys – Used to scroll through
menus and options.
uAntenna
6
2
Your Phone
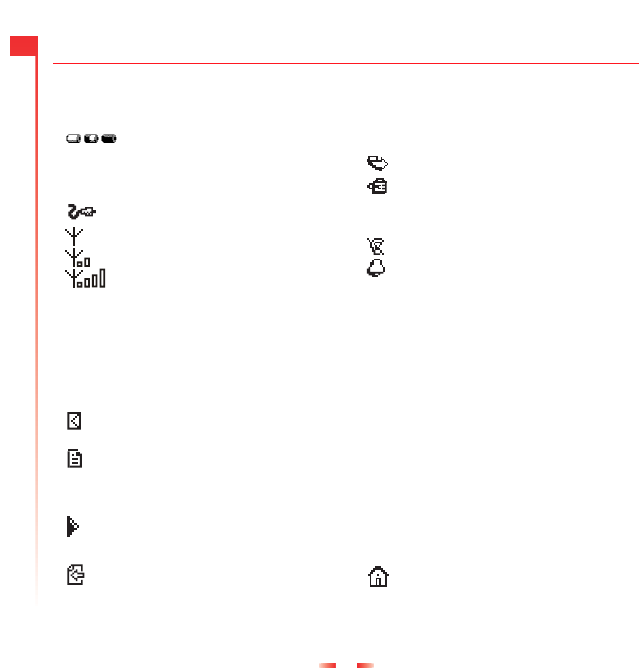
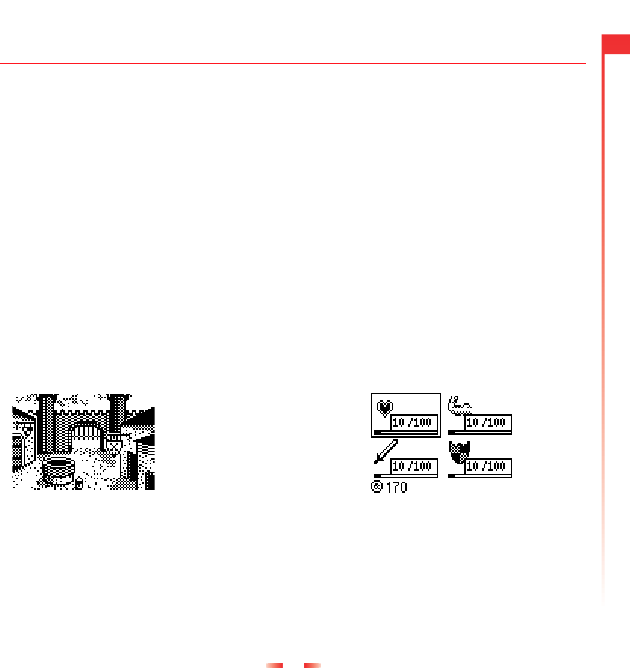
Symbol description
Main screen
Battery indicator
Empty icon indicates a very weak
battery level. Solid icon indicates a
fully charged battery level
Battery charging
Signal strength indicator
No bars indicates a very weak
signal
Four bars indicates a very strong
signal
mNew text message
All incoming calls are diverted
Keypad locked
lNew voice mail message (this icon
is network dependent)
Silent mode active
Alarm clock set
In calls list
nShows that a call was incoming
oShows that a call was outgoing
xShows that a call was missed
In messages list
Indicates the messages which
have not yet been read
Indicates the messages which
have been read
kIndicates the smiley messages
which have not yet been read
jIndicates the smiley messages
which have been read
Lists
In lists shows the option that is currently activated
Internet
Returns you to the previous screen Displays the current Homepage
7
3
Getting started
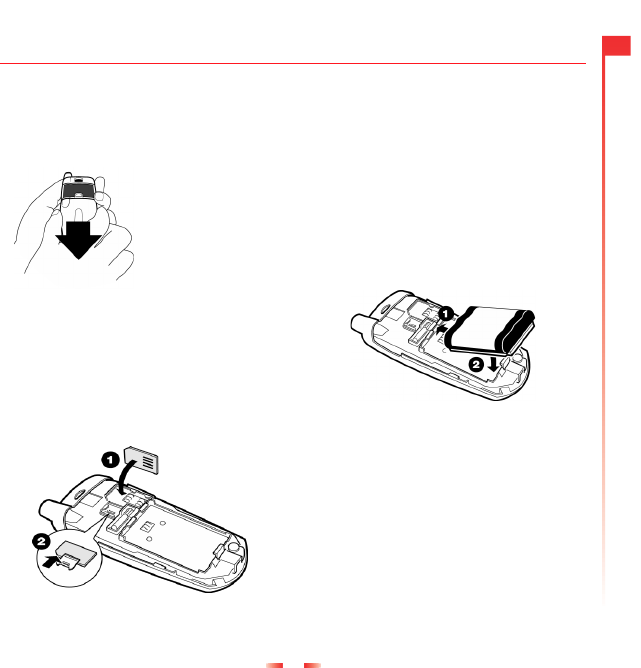
3 Getting started
To use your phone, you must first insert the
SIM card supplied by your service provider,
and then charge the battery.
Removing the back cover
Press down on the
area below the clip and
slide the cover back.
Lift off.
Inserting the SIM card
Place the SIM in the phone, starting with the
right side first, making sure that the golden
contacts of the card are touching the
contacts of the phone. Hold the SIM card in
place and slide the metal plate to the right,
in order to cover the left hand side of the SIM
card.
☛Note: Keep all SIM cards out of small
children’s reach. The SIM card is easily
damaged by scratches or bending, so
be cautious when inserting and
removing the card.
Fitting the battery
Insert the battery with the label facing down.
Align the tabs on the battery with the tabs on
the back of the phone. Clip into place. To
remove press on the clip and lift the battery
out.
1You must charge the battery for at least
12 hours before using the telephone for
the first time.
2Allow your battery to fully discharge
occasionally before recharging it.
3When the battery is completely
discharged it may take some time for the
battery charging icon to appear after you
have connected the charger.

8
3
Getting started
☛Note: Always turn your phone off before
you insert or remove the battery.
Charging the battery
Insert the connector on the charger lead into
the connector at the base of the phone. Plug
the charger into a mains AC socket. When
charging commences, the battery icon will
change into a charger cable icon. When the
battery is fully charged, the battery icon will
reappear and you can disconnect the
charger.
The battery will normally take around 2 to 3
hours to charge.
Charging and Discharging
A new battery's full performance is achieved
only after two or three complete charge and
discharge cycles. The operations times
provided are reasonable estimates and may
be affected by network conditions, charging
and phone usage.
The battery can be charged and
discharged hundreds of times but it will
eventually wear out. When the operating
time (talk-time and standby time) is
noticeably shorter than normal, it is time to
buy a new battery.
Use only batteries approved by Sendo and
recharge your battery only with the chargers
approved by Sendo. When a charger is not
in use, disconnect it from the power source.
Do not leave the battery connected after its
battery indicator shows that the battery is
full, or for longer than a single day, since
overcharging may shorten its life. If left
unused a fully charged battery will
discharge itself over time.
If the battery is completely empty, it may
take a few minutes before you can make or
receive a call once you plug the phone into
a charger.
For better operation times, discharge the
battery from time to time by leaving your
phone switched on until it turns itself off and
the battery is fully discharged.
Do not attempt to discharge the battery by
any other means.
☛Note: Use the battery only for its
intended purpose.
☛Never use any charger or battery that is
damaged or worn out.
☛Do not short circuit the battery. All
batteries can cause property damage,
injury or burns if a conductive material
such as jewelry or keys comes into
contact with the exposed terminals. The
material may complete an electrical
circuit and become quite hot. Exercise
care in handling your phone battery. For
example, avoid carrying your phone
battery loose in a pocket or purse.
This product is designed for use with
Sendo-approved batteries only. Use of
9
3
Getting started
unapproved batteries may be
dangerous and may cause damage to
the battery or the phone and may void
your warranty.
☛Leaving the battery in hot or cold places,
such as in a closed car in summer or
winter conditions, may reduce the
capacity and lifetime of the battery.
Always try to keep the battery between
59 F and 77 F (15°C and 25°C). A phone
with a battery that has been exposed to
temperature extremes may temporarily
not work, even when the battery is fully
charged.
Dispose of the battery properly. Comply
with all local laws or regulations in disposing
of your battery. Do not dispose of batteries
in a fire.
Powering up/down
To switch the phone on: Press d. If the
phone asks for a PIN code: Enter the code
that is supplied with the SIM card. The code
will be displayed as asterisks. When
complete, press g, OK. Wait a few
seconds while the phone searches for the
network. Once the network has been found,
the main screen appears and your phone is
ready to be used. The main screen shows
the network name and two icons giving the
signal strength (top right) and battery level
(top left).
To switch the phone off, press and hold d.
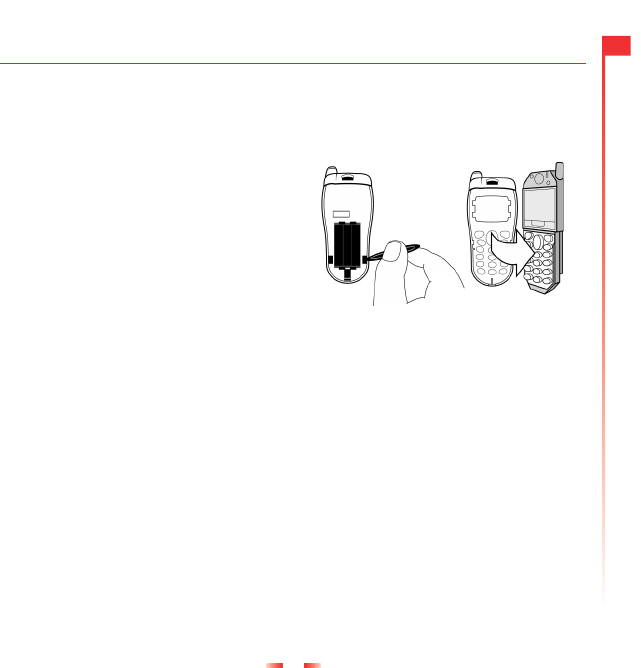
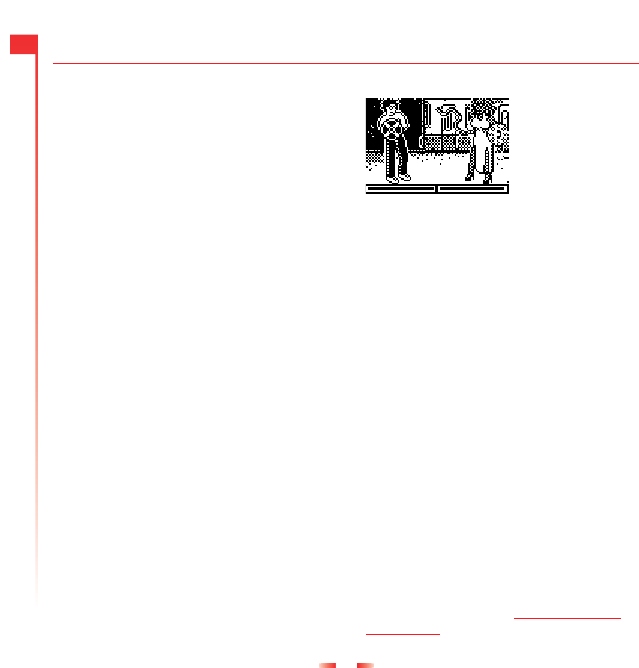
Removing the front cover
It is possible to personalize your telephone
by replacing the covers. Use the tool
provided with your new cover as illustrated
below.
☛Warning: The tool is small and has a thin
edge and point. Be careful when using
the tool. Keep the tool in a safe location
and out of small children’s reach.

10
4
Making a call
4 Making a call
Dialing a number
1Key in the area code and number that
you want to call then press g, Call to
dial.
To delete the entire number and return to the
main screen, press and hold c.
2To end the call, press d, End.
Making an international call
1Press and hold 0 until the plus sign "+"
is displayed. This replaces the
international access code.
2Enter the country code, area code, and
phone number.
3Press g, Call to dial.
Making an emergency call
1Enter 911 (or the local emergency
number).
2Press g, Call to dial.
☛Warning: The phone must be switched
on, properly charged and used in a
service area with adequate signal
strength to make an emergency call.
Emergency calls also may not be
possible when certain network services
or phone features are in use. Do not rely
on your wireless phone as your only
method of emergency communications.
Making calls from the contact list
1Press ; from the main screen, you can
also press d, Contacts then select the
Search option.
2Type in the first letters of the name or
scroll and find the one that you want.
3Press g, Call to dial.
Speed dialing
Allows you to dial a number simply by
pressing and holding the assigned key from
the main screen.
To assign a contact list entry to a key:
Press ; to enter the contacts list and scroll
to the appropriate entry. Press and hold one
of the keys 2 to 9 until the key number
appears on the left of the screen beside the
name. This indicates that the speed dial is
successfully assigned.
Making a call from the calls list
The phone stores a list of your recent
incoming, outgoing and missed calls.
The list stores up to 30 entries.
An icon on the left of the screen indicates the
type of call:
nIncoming call
xMissed call
oOutgoing call

11
4
Making a call
To dial a number from the redial/calls list:
Press : to access the list. Scroll and find
the one that you want and press g, Call to
dial.
Adjusting the loudness
The earpiece volume may be adjusted
during a conversation. Press : to make the
speech louder and ; to make it quieter.

12
5
Answering a call
5 Answering a call
To answer a call, press g, Accept. To reject a call, press d, Reject.
Call waiting
This feature means you are informed of a
second incoming call by an audible melody
in the earpiece.
Press d, Reject to reject the second call.
Press g, Accept to put the current call on
hold and activate the second call.
To end the active call and return to the held
call, press d, End.
To switch between calls, press g, Options
and then select the Swap option.
☛Note: Your network may not support call
waiting or may require you to subscribe
to this feature. If you do not have call
waiting or are roaming on another
network, accepting a second call will
end the first call. You will not be able to
switch.
In call options
When you are in a call, you can press g,
Options. These could be:
Contacts
Gives you access to the contact list.
Hold/Unhold
Puts the active call on hold/reactivates the
held call.
Mute/Unmute
Switches the microphone off/on.
Send message
Allows you to send a text message.
SIMToolkit
Gives you access to the SIM Toolkit.
Swap
Swaps between the current call and the
call on hold.
End all
Ends all calls.

13
6
Using the contact list
6 Using the contact list
The names and numbers you enter into your contact list are stored on the SIM card.
To access your contact list entries, press ; from the main screen.
Storing a name and number
1Press d, Contacts from the main
screen.
2Use the up and down keys : and ; to
scroll to the Add new option, then press
g, Select.
3Enter the area code and phone number,
then press g, OK.
4Enter the name you wish to store in the
contact list, then press g, OK. Use the
keypad as explained in the table in the
Messages section to enter the characters
and to switch between lower case, upper
case, and numeric modes.
5Enter the chat name that you wish to
assign to the contact.
Correcting an entry
Pressing c deletes the character
immediately to the left of the cursor.
Pressing and holding c deletes all of the
text that you have entered.
Contact list options
When you have selected a name you can
open a list of options by pressing d,
Options that will allow you to change, delete,
give details and send a message.
Fixed names
This service allows you to restrict your
outgoing calls to certain selected numbers
from your SIM card. This feature is
dependent on your service provider. Your
phone will ask for the PIN2 code to activate
this function. You can obtain this code from
your service provider. When this feature is
activated, a new contact list is made visible
in place of your standard one. Only numbers
from this contact list can be dialed. You can
add numbers to this contact list in the same
way as adding numbers to your normal
contact list, with the exception that you have
to enter the PIN2 code.
Broadcast messages
Your service provider may offer Cell
Broadcast. This could be information on the
traffic, weather, events, or local information
which is broadcast by the network to all
mobiles in a specific area. When you
activate this feature, you may receive
messages about the selected topic. Contact
your service provider for more details.

14
7
Menu navigation
7 Menu navigation
To enter the main menu, press g, Menu from the main screen.
Scrolling
You can scroll from one menu to another
using the front keys : and ;. When you
find the menu that you are looking for, press
g, Select to go in. Press End, back or c
to return to the previous level.
SIM Toolkit
Your service provider may offer some
special services or applications. The name
of the menu may change to indicate the type
of service, for example "Information".
For more details, please contact your
service provider.

15
8
Messages
8 Messages
Calling your voice mail
When you have a new message in your
voice mailbox, your phone displays either
the voice mail icon l in the main screen or
a text message sent from the network. This
depends on your service provider.
Note: Voice mail is a network service
provided by your service provider. You may
have to subscribe to this service. This
service may not be available when roaming.
Press and hold 1. If the phone asks for the
voice mailbox number, enter it and press
g, Call. The number can be obtained from
your service provider.
Reading a text message
When you receive a text message, the
envelope m icon is displayed at the top of
the main screen.
1Press g, Read to display the new
message directly from the main screen.
2To read old messages select Read from
the Messages menu.
3Use the up and down keys : and ; to
scroll through the message.
4Press d, Options to access the
following message options:
Delete
Removes the message.
Chat
Initiates a chat session.
Reply
Sends a text message to the sender.
Call
Calls the sender (or, if there is a number in
quotes in the message, this number is
called instead).
Save no.
Adds the sender’s phone number to your
contact list.
Time/date
Displays the date and time of the
message.
Forward
Sends the message to someone else.
Sending a text message
You can send messages of up to 160
characters to another compatible phone.
1Enter the Messages menu and select the
option Send.
2Type in a new message or select a
message from a list of saved messages.
3When you have entered the text, press
g, Send.
4Enter the destination phone number, or
press d, Contacts and select a name
from your contact list.
5Press g, Send to send the message.

16
8
Messages
☛Note: If you reply to a message, you do
not have to re-enter the number. This is
done automatically.
Sending a Smiley SMS
Send a picture with your text message to
other compatible phones. All other phones
will display an Internet style Smiley ;-).
Choose g, Smiley.
1. Emotions
2. Celebrations
3. Sports
4. Animals
5. Others
Select the Smiley you would like to use from
one of these categories and press g,
Select. The text is restricted to 156
characters to allow space for the Smiley.
Reading a Smiley SMS
When you choose a message that has a
Smiley in it, the Smiley appears on the
screen for 3 seconds or until a key is
pressed. Then the message appears. After
this time the message reads as normal. A
message with a smiley attached has a k
icon if new and a j if read.
Reading a Games SMS
The multiplayer games use text messages
to communicate with other players. When
you receive a games SMS pressing g,
Read will take you to the games menu.
Press g, Select and proceed as instructed
in the appropriate game section.
Message settings
This menu offers three options:
Center number
Allows you to enter or change the service
center number for text messaging.
Voice mail
Allows you to enter or change your voice
mail number.
Characters
Allows you to choose whether you want to
enter text in GSM (Latin characters) or
Unicode (Non Latin characters) mode.
Unicode characters take up more room on
your phone so the length of your text
messages is restricted to half the usual
number of characters.
Chat
Sendo chat allows you to send messages to
another user, with a compatible GSM
phone, and view both sent and received
SMS messages for chat participants in a
convenient Chat screen.
Starting a chat session
Enter the Messages menu and select the
Chat option.
17
8
Messages
Enter your chat name on the My chat name
screen (this screen will not appear if you
have already created a chat name).
You will then need to enter the number of the
person with whom you would like to chat, or
alternatively you can press d, Contacts to
go into the contact list.
Enter his/her chat name on the Enter chat
name screen (this screen will not appear if
you have already created a chat name for
this person).
Editing a chat name
You can edit a chat name for a contact by
selecting the desired name in the contact
list and pressing d, Options. Select the
Change option and edit the chat name.
You can edit your chat name by selecting
My number from the Contacts menu. Select
the Consult option and then press d,
Options. Select the change option and edit
the chat name.
Initiating a chat
To send a chat message enter the text in the
chat editor field and then press g, Send.
The sent text will then appear in the chat
history field and is sent to the other chat
participant as a standard SMS message.
Chat options
Press d, Options from the Chat screen to
view the chat options.
You have three options:
Swap
Changes the active area between the text
entry field and the chat history field.
Font size
Select between normal and small font on
the Chat screen.
Exit
Exit the chat session.
Predictive Text Input
To save time when you are writing a text
message, your phone has a built in
dictionary feature which uses the letters that
you are typing to complete the word.
This input method allows you to simply
press each key once. For example, to write
the name "Ross", press 7, then 6, then
7, then 7 just once each.
The word may change as you type, but don’t
worry about what is on the screen until you
have finished the word. Sometimes different
words share the same sequence of key
presses. If the finished word is wrong, press
0 to scroll through other possibilities. If the
word that you are looking for is still not there,
press * repeatedly to change the text
mode to a and enter the word again.
After you have completed a word, press the
space key # to enter the next word. Press
and hold # to pick a symbol to insert from
the character table.
18
8
Messages
Some intelligent punctuation (including full
stops, hyphens and apostrophes) are also
available on 1. The punctuation mark is
completed when you enter the next
keystroke.
Changing the editing mode
The current editing mode is indicated at the
bottom of the screen by one of these icons:
aLower case text mode
bUpper case text mode
qNumeric mode
hT9 Text Input (lower case)
iT9 Text Input (upper case)
You can switch among upper case, lower
case, and numeric modes by repeatedly
pressing *. You can switch to predictive
T9 Text Input by repeatedly pressing *.
These are the characters that come on to
the screen when you press the numeric
keypad. They are featured in the table
below:
To enter two characters on the same key,
enter the first one and then wait for the
cursor to reappear before entering the
second.
Example: To enter the name "Ross" when
you are in lower case mode:
Press * to enter upper case mode,
Press 7 three times, to display "R", you will
then return to lower case mode.
Press 6 three times, to display "o".
Press 7 four times, to display "s".
Then press 7 four times, to display "s".
Entering symbols
A long press on # displays a table
showing all the symbols available to you.
Scroll down the table to display more
symbols.
To enter a symbol:
1Scroll to the row containing the symbol
you want.
2Press the numeric key (1 to 9) to
reach the symbol you want.
Key List of characters available
1 1.,@‘?!":;¿¡
2 abc2àäåæç
3 def3éè
4 ghi4ì
5jkl5
6 mno6ñòöø
7pqrs7ß
8 tuv8üù
9 wxyz9
00
#Space
123456789
.,-!?@():
&‘ " /_;$%+
*=<>#£¥∆¤
§√ί»ÀŒ—”÷
ÿŸ¿ìàäåæç
éèÄÅÉòñÆe

19
9
Internet menu
9 Internet menu
☛Note: The Internet menu may have a
different name, for example “Browser”,
depending on your network.
To access the Internet menu, select Internet
from the main menu. To select a menu
option use the corresponding numeric key
or navigate using the : or ; keys and
press g, OK.
The following menu options are available:
1Homepage - Connect to the
Internet server and your
homepage.
2Favorites - Store up to 8 of your
favorite Internet sites for easy
access.
3Add favorite - Add to your list of
favorites.
4Open page - Open a WAP page.
5Refresh page - Refresh the current
WAP page while in a WAP session.
6Settings - Configure your WAP
settings.
7Help - Provides help and advice on
using Mobile Explorer.
0Exit - Returns to the main menu.
☛Note: When in a WAP session you can
access the Internet menu by pressing
the Quick Access key.
Connecting to an Internet page
To begin a WAP session, either select the
Homepage option on the Internet menu to
open your homepage, or select the Open
page option from the Internet menu and
then enter the WAP address. Select the Go
option and press g, OK.
Configuring your connection profiles
In order to configure your Internet settings
select the Settings option from the Internet
menu and then select the Profiles option.
Each of your connection profiles will be
listed. To edit an existing profile select the
relevant profile name and press g, Edit.
To create a new profile select the Create
Connection option and press g, OK. Enter
a name for the new connection and select
Create.
One of your connection profiles can be
selected as the default by choosing the
relevant profile, pressing g, Edit and
selecting Set as default from the menu.
Press g, OK to confirm your choice.
☛Note: Some of these settings may not be
required for your network. Contact your
Service Provider for required Internet
connection information.

20
9
Internet menu
Entering your Dial-up Settings
Choose the Dial-up Settings option and then
enter the relevant information into all
required fields. Once you have entered all
the necessary information select Update
and press g, OK.
Entering your Internet (HTTP) settings
Choose the Internet (HTTP) Settings option
and then enter the relevant information into
all required fields. Once you have entered
all the necessary information select Update
and press g, OK.
Entering your Mobile (WAP) settings
Choose the Mobile (WAP) Settings option
and then enter the relevant information into
all required fields. Once you have entered
all the necessary information select Update
and press g, OK.
☛Tip: When entering an IP/Gateway
address press * to enter a full stop.
Configuring your homepage
In order to configure your homepage select
Settings from the Internet menu and then
select the Homepage option.
You have three options:
Default
Returns to the default homepage settings.
If a default homepage has not been
provided please contact your Service
Provider.
Current
When in a WAP session this option sets
the current WAP page as the homepage.
User Specified
Sets the entered WAP address as the
homepage. You must enter a WAP address
in the Homepage URL field.
☛Note: Some service providers do not
allow users to specify their homepage.
Contact your service provider for more
details.
Once you have selected your desired option
select Update and press g, OK.
Images
In order to change your image settings
select the Settings option from the Internet
menu and then choose the Images option.
You have four options:
Scale
Scales large images to fit the size of the
screen.
All
Displays all images regardless of size.
Small
Only displays those images small enough
to be displayed fully on the screen.
None
Does not display any images.
☛Note: Turning off or reducing image size
will speed up download time.

21
9
Internet menu
Password
In order to change your password settings
select the Settings option from the Internet
menu and then select the Password option.
You have two options:
Require password
You are required to enter a password
each time you enter an authenticated WAP
site.
Cache password
Saves your passwords once entered on
authenticated WAP sites.
Once you have selected your desired option
go to Update and press g, OK.
In order to delete your saved passwords go
to Clear and press g, OK.
Favorites
The Favorites menu allows you to save up to
8 WAP addresses, providing you with quick
access to your favorite sites.
There are two ways to create a favorite:
Creating a favorite from the Internet menu
In order to create a favorite select the
Favorites option from the Internet menu.
Select the Add favorite option and press g,
OK. Enter the desired name and WAP
address. Select Add and press g, OK.
The new favorite will now appear in your list
of favorites.
Creating a favorite from a WAP page
In order to create a favorite from a WAP
page press the Quick Access key to go to
the Internet menu. Select the Add favorite
option. The name of your WAP page will
appear at the top of the screen.
Enter the desired name for the favorite,
select Add and press g, OK. The new
favorite will now appear in your list of
favorites.
Editing and deleting a favorite
To edit a favorite
Select the Favorites option from the Internet
menu. Select the favorite you would like to
edit and press g, Edit. Change the favorite
information, name or URL, select Update
and press g, OK.
The favorite is updated.
To delete a favorite
Select the Favorites option from the Internet
menu. Select the favorite you would like to
delete and press g, Edit. Select Delete
favorite and press g, OK.

22
10
Sounds
10 Sounds
This menu allows you to configure the various tunes that the phone plays when you receive a
call or a new text message, or some other event occurs.
Ringer
Select this option to set the ringtone for
incoming calls.
Ringtone composer
Go into the Sounds menu and press g,
Composer.
Change your ringtones to personalize your
phone. Create your own ringtones with our
ringtone composer.
You have two entry methods.
Text
Notes are entered textually
Graphic
Notes are entered on a musical score
Both entry methods use the same key
presses unless stated.
In this menu the keys represent the following
notes:
1C5G
2D6A
3E7B
4F
8Enters a rest (text mode)
;Enters a rest (graphic mode)
9Changes the scale of the note
between the range 1-4
0Changes the duration of the note.
Each press decreases the duration
of the note between the range: full
note, half note, quarter note, eighth
note, sixteenth note and thirty-
second note.
#Changes a normal note to a sharp
and a sharp back to a normal note.
*Changes a normal note to a dotted,
double dotted or 2/3 note.
cErases the previous note. A long
press will clear all notes.
☛Tip: A short press of the : and ; keys
will move you between notes in either
entry mode.
Once you have composed the ringtone
press g, Options to enter the menu screen.
The available options are:
Tempo
Allows you to choose from a list of tempos
at which to play the ringtone.
Play
Allows you to play your ringtone.
Save
Allows you to save your ringtone.
Delete
Allows you to delete the ringtone.

23
10
Sounds
Send
Allows you to send your ringtone to one of
your friends.
Receiving a ringtone
If you have received a ringtone press g,
Options to enter the menu from where you
can play, save or delete the ringtone. If you
press c the ringtone and message will be
deleted.
☛Note: It is only possible to save 10
ringtones whether you have composed
them yourself or received them as a
message. To save more you will have to
overwrite an existing ringtone.
Volume
Select this option to change the volume
setting for the different ringtones that the
phone plays.
Key Tones
This menu allows you to set the type of
keypad tones that you would like to hear
when pressing the keys.
You have three options:
Off
No sound emitted upon a key press.
On
Short, low volume tone.
DTMF
These are standard tones, as used in
touch tone phones. Each number has its
own specific tone.
Vibrate Mode
Select this menu to set the vibrate mode for
incoming calls or text messages.
You have three options:
Off
Deactivates the vibrate mode function.
On
Sets the phone to vibrate for an incoming
call or text message.
Vibrate then ring
Sets the phone to vibrate for a few
seconds before the phone starts to ring.
☛Note: This option is not available on all
models. None of the above settings
affects any of the sounds settings.
Events
This option allows you to set the alert sounds
to on or off for the following options:
New message • New broadcast • Low
battery • Low credit
☛Note: Alert sounds can be applied only
to those services supported by your
carrier. When roaming certain services
may not be supported.

24
10
Sounds
This is only with certain subscriptions.
Equalizer
Enter the Sounds menu and select
Equalizer.
This menu allows you to alter the earpiece
audio settings of your phone.
Choose from these three settings to
optimize audio quality:
• Treble • Normal • Bass
25
11
Extras
11 Extras
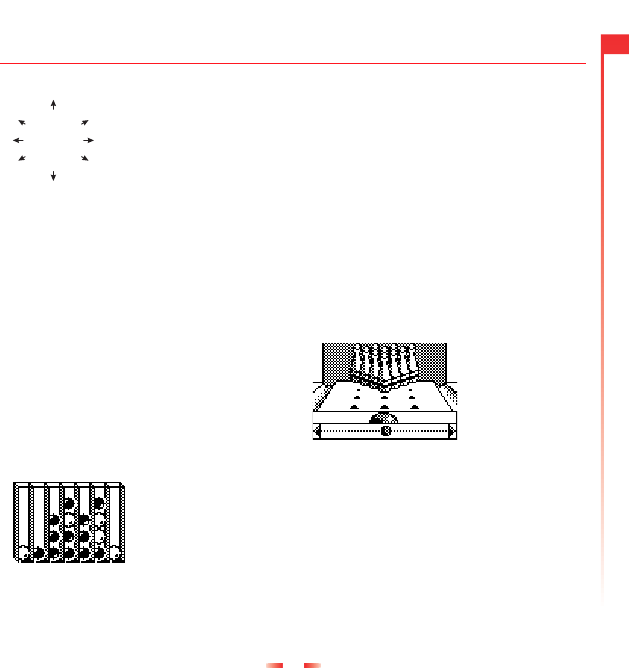
FlippIT
Go to the Extras menu and
select Games followed by
FlippIT.
There are 6 levels; 3x3 is the
easiest.
The objective of the game is to change the
white discs to black discs. You do this by
selecting one of the white discs by pressing
the 5 key. This turns the white disc to
black, but also turns all of the discs directly
above, below, to the left and to the right on
the selected discs to black.
You can move the cursor from one to
another using the keys in the grid above. On
the right of the screen you will see the
number of moves that you have made so far,
and also the smallest number of moves that
it is possible to complete the level in.
With each higher level the grid gets bigger
and harder!
Quaddro
Go into the Extras
menu and select
Games followed by
Quaddro.
You can select the
number of players:
Demonstration mode lets you watch the
computer play against itself.
You against the computer.
You against a friend.
The objective of the game is to drop your
counters into the slots along the top of the
board, in the attempt to create a line of four,
horizontally, vertically or diagonally.
When you drop a counter, it will fall all the
way to the bottom or sit on top of any other
counters that are in that column. So, think
carefully before you play!
You move the flashing cursor left and right
along the top of the screen using the 4
and 6 keys. Pressing 5 will drop the
counter into the column.
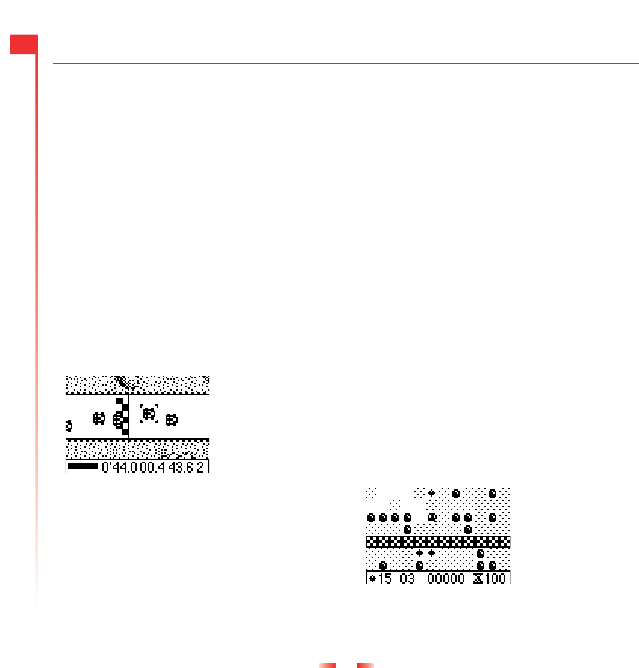
Tenpin
Go into the Extras
menu and select
Games followed
by Tenpin.
The aim of the
game is to knock
as many of the
pins down as possible.
To play the game press g, New and the
game will begin. The game is played over
10 frames and in each frame you have two
attempts to knock down all of the pins.
You can position the ball on the lane by
pressing 4 or 6 to move across the
lane.
2
8
1
4
7
3
6
9
26
11
Extras
To bowl the ball straight press 5 when the
Swing bar is positioned in the center of the
bowling ball.
To bowl at an angle press 5 when the
Swing bar is to the left or right of the bowling
ball.
Try to get the top score of 300 and enter
your name on the Hi-score table!
To enter your name use the 2 and 8
keys to scroll through the alphabet. Press
4 to move to the next letter and 6 to
move back. As soon as you have entered
your name press g, OK to see the Hi-score
table. Press OK again to return to the game
menu
Racing Game
Go to the Extras
menu and select
Games, then
select the racing
game option. To
enter the game
options menu
press g, New. It is now possible to start the
race immediately or change the level of
difficulty and number of laps by using the
:; and g keys.
The object of the game is to race against the
other cars through the checkpoints around
four championship tracks. The track will be
displayed momentarily before going to the
starting grid. When the race starts tap the
2 key to accelerate or 8 to decelerate.
You can steer your car by tapping the 4
key to rotate anti-clockwise or the 6 key to
rotate clockwise. The game may be paused
by pressing the c key.
☛Tip: You need to tap the keys rather than
holding them down.
During the race the status is shown at the
bottom of the screen. Your speed is
represented by a speed bar. The total race,
lap and best lap counters are also shown
together with the current lap number. Each
time you pass a checkpoint a flag will be
shown in the top left of the display. If you
miss a checkpoint you will have to go back
before you can proceed to the next one.
At the end of the race, if you finish in the top
three, you will progress to the next track until
the championship is complete. Points are
awarded through the races according to
your finishing position.
Gem Raider
Go to the Extras
menu and select
Games followed
by Gem Raider. To
start the game
press g, New.
Gem Raider is a game of strategy and
speed where the objective is to make your
way through the diamond mine, collect as
27
11
Extras
many diamonds as possible and find the
exit before the air runs out.
When the game starts, your character
flashes to show its position. To make your
way through the mine press 2 to move up,
8 to move down, 4 to move left and 6
to move right. Game status is at the bottom
of the display, showing the number of
diamonds left to collect, numbers of lives
remaining and score. The time left before
you run out of air is shown on the bottom
right. The game may be paused by pressing
the c key.
As you dig through the soil, rocks will fall
down behind you unless they are supported
by more soil. You can support a rock on your
head if you dig underneath it, but if a rock
falls on you it will kill you. Increase your
score by collecting diamonds by moving
over them. Once you have collected
sufficient diamonds your character will flash
and you will be able to use the exit.
Deadly butterflies also occupy the mine. If
you touch a butterfly it will kill you instantly.
For bonus diamonds you can try killing the
butterfly by making rocks fall onto it. Once a
level is completed any remaining time is
credited to your score.
The game ends when you exhaust all of your
lives or complete all the levels. You may be
able to enter your name on the hi-score
table. Type your name using the keypad
and select g, OK when finished.
Splat
Go to the Extras
menu and select
Games followed
by Splat. To start
the game press
g, New. You will
start on level 1.
When you are ready to play, press any key.
The object of the game is to stop the moles
from digging up your garden. You will see a
3x3 grid of mole holes; when you see a mole
peep through the hole, hit it by pressing the
appropriate 1 to 9 key. For example, if
a mole appears in the middle hole, press
5 because it is positioned in the middle of
the 1 to 9 keys.
Points are awarded for each mole hit. Watch
out for surrender flags, if you hit a mole that
has surrendered, points will be deducted
from your score. Your score and the game
status are shown at the bottom of the
display. The game may be paused by
pressing the c key.
At the end of the game you will receive a
bonus according to your accuracy. Attain
70% or more accuracy to progress to the
next level.
The game ends when you fail to progress to
the next level or you reach the final level.
You may be able to enter your name on the
high score table. Type your name using the
keypad and select g, OK when finished.
28
11
Extras
Sumino
Go to the Extras menu
and select Games
followed by Sumino. To
start the game press
g, New.
You may find it helpful
to rotate your telephone
sideways to play this
game.
The objective of the
game is to arrange the
randomly-generated building blocks that fall
down the screen such that they interlock to
form one or more continuous horizontal
lines. Once a continuous line has been
formed, it will be removed and all the blocks
above it will fall down a line. You will be
awarded points for each block positioned
and each horizontal line formed.
To move the block left press 2, to move it
right press 8. The block can be rotated by
pressing 5. Press 4 to make the block
drop into place. The game may be paused
by pressing the c key.
Your score and the game status are shown
at the side of the display. The shape of the
next block is also shown. The level of
difficulty will increase the longer the game is
played.
The game ends when the blocks reach the
top of the display. You may be able to enter
your name on the hi-score table. Type your
name using the keypad and select g, OK
when finished.
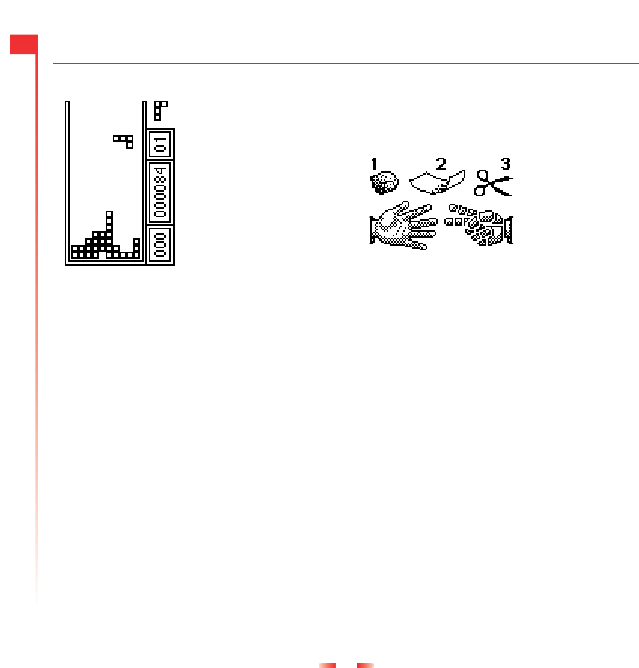
Scizzors
Go to the Extras
menu and select
Games followed
by Scizzors. You
will see an
animated display.
In order to select
the stone press
1.
To select the paper press 2.
To select the scizzors press 3.
The object of the game is to try and beat the
computer by selecting one of the three
objects. When you do this the computer also
selects one of the 3 objects.
The rules are simple:
Scizzors (2 fingers out) cuts paper,
therefore scizzors wins.
Paper (flat palm) wraps stone, therefore
paper wins.
Stone (fist) blunts scizzors, therefore stone
wins.
Two of the same results in a tie.
29
11
Extras
Chess
Go to the Extras
menu and select
Games followed
by Chess.
To enter the game
options menu
press g New. It's
possible to play the game against
somebody on the same handset or remotely
via SMS. Use the :; keys to make your
selection and g Select to start the game.
When playing via SMS you will be prompted
for the mobile telephone number of the other
player before the game starts.
When moves are received from another
player the Messages option will be
displayed in the game menu. Select this
option using the :; keys and press g
Select twice. Press g Select again to
accept the move or select one of the
alternative options shown.
The conventional rules of chess apply. To
move a piece, first move the flashing cursor
to the piece you wish to move. To move the
cursor up press the 2 key, to move it
down press the 8 key, to move it left press
the 4 key and to move it right press the
6 key. Once the cursor is positioned,
press the 5 key to select. A selected
square is shown with a solid outline. Move
the cursor to where you wish to move using
the same method.
The color of pieces in play is shown in the
top right of the display; a diagonal line is
shown when the king is in check and an 'X'
upon check mate. Castling is achieved by
selecting the king and then the rook.
Checkers
Go to the Extras
menu and select
Games followed
by Checkers.
To enter the game
options menu
press g New. It's
possible to play the game against
somebody on the same handset or remotely
via SMS. Use the :; keys to make your
selection and g Select to start the game.
When playing via SMS you will be prompted
for the mobile telephone number of the other
player before the game starts.
When moves are received from another
player the Messages option will be
displayed in the game menu. Select this
option using the :; keys and press g
Select twice. Press g Select again to
accept the move or select one of the
alternative options shown.
The conventional rules of checkers apply.
To move a piece, first move the flashing
cursor to the piece you wish to move. To
move the cursor up press the 2 key, to
move it down press the 8 key, to move it
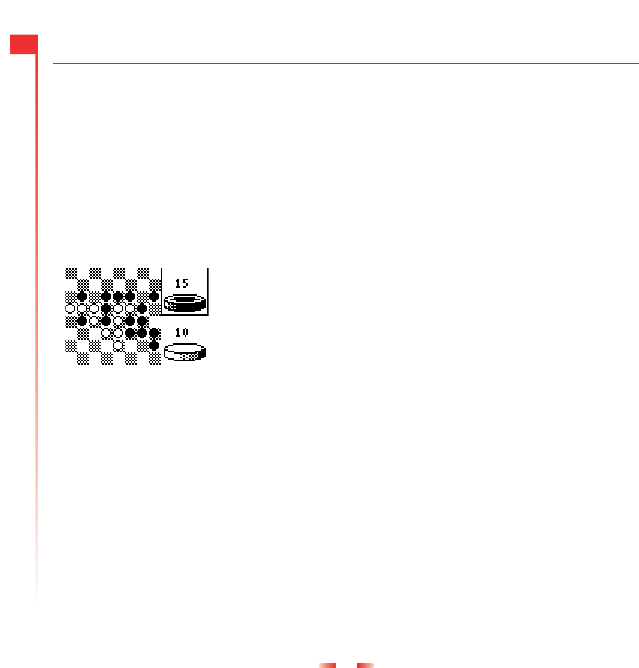
30
11
Extras
left press the 4 key and to move it right
press the 6 key. Once the cursor is
positioned press the 5 key to select. A
selected square is shown with a solid
outline. Move the cursor to where you wish
to move to using the method described
above.
Reversi
Go to the Extras menu and select Games
followed by Reversi.
Reversi is a two
player board
game where each
player first
chooses a color
and then takes
turns to place a
colored disc on the board. Any discs that
get caught between two discs of the
opposite color by a newly placed disc are
reversed (i.e. they change color). You may
only place a disc if doing so will reverse at
least one other disc. Otherwise you have to
miss a turn.
The game ends when either the board is full
or neither player can make a move. The
winner is the player who has more discs on
the board at the end of the game.
To enter the game options menu press g
New. It's possible to play the game against
somebody on the same handset or remotely
via SMS. Use the :; keys to make your
selection and g Select to start the game.
When playing via SMS you will be prompted
for the mobile telephone number of the other
player before the game starts.
When moves are received from another
player the Messages option will be
displayed in the game menu. Select this
option using the :; keys and press g
Select twice. Press g Select again to
accept the move or select one of the
alternative options shown.
Move the flashing cursor to the position in
which you wish to place the disk. To move
the cursor up press the 2 key, to move it
down press the 8 key, to move it left press
the 4 key and to move it right press the
6 key. Once the cursor is positioned,
press the 5 key to select.
KombatClub
Go to the Extras menu and select Games
followed by KombatClub.
KombatClub is a two-player SMS fighting
game set in a fictitious dark and dirty future.
Challenge your friends to an all-out, 5 round
‘mean streets’ bout with whatever weapons
come to hand.
Creating your profile
Before playing for the first time you must
create your profile. Use the : and ; keys
and select Options. Use the : and ; keys
and select Profile. Press g to enter the
menu. Select Edit Name and press the g
31
11
Extras
key again. Enter your name using the
keypad followed by g OK.
Select your preference of character by
using the :; keys and select Character?
Press g to enter the menu. Choose your
character using the :; keys and press
g to confirm.
Select g, Back to return to the previous
menu.
You will start the game with the following
items:
A stick and hubcap
Bandana
Anorak
Slippers
250 in cash
A visit downtown
From the main
menu select
Downtown and
press g. Move
around the
downtown area by
using the :;
keys and Press g to enter. The c key can
be used to go back to the previous menu.
The Pawnbroker’s
Here you can choose from a selection of
new weapons and protective wear. Spend
your money wisely. Equipment can also be
sold to recoup losses but you will not get a
very good price.
The Red Lion
The Red Lion is the busiest public house in
town. Here you can review your
achievements and replay your saved bouts.
The Wall of Fame
Hi-scores and a league table of results will
be written onto the Wall of Fame in graffiti.
The Dojo
It is possible to meet some of the world's
most renowned instructors and tutors in the
dojo. In exchange for some cash you may
improve your health (top left), strength (top
right) or combat (bottom left) and defense
(bottom right) skills.
How to challenge another player
From the game menu select Challenge and
press g. If you want to play a friend, select
Phone Number and press g OK. Enter the
mobile telephone number of the player you
wish to challenge and press g OK. If you
want to play against the server, select the
server name from the list and press g OK.
32
11
Extras
Each bout of combat consists of a series of
five moves. For each move there is a choice
of high, medium or low attack and defense
positions. Each player chooses five attack
and defense moves.
Enter your desired attack position using the
:; keys and press g to confirm your
selection. When you have entered your five
attack moves select Accept and press g.
Repeat this to enter your desired defense
positions. If you have more than one type of
equipment available you will be asked to
choose which equipment to use for this
bout. To send the challenge select Yes and
press g.
Accepting a challenge
If you receive a challenge from another
player the Messages option will appear in
the main game menu. Select Messages and
press g to continue.
A list of outstanding challenges will be
shown. Use the :; keys to select the
player and press g. Select Accept if you
wish to take up the challenge or Decline if
you do not. Selecting Replay later will return
you to the main game menu.
If you choose to accept the challenge enter
your five attack and defense moves using
the same method as challenging another
player.
The Bout of Combat
Once both players
have chosen their
moves the fight
will commence.
Each player's
remaining health
is shown at the
bottom of the display. When bout has
finished the results are displayed. Cash is
awarded for each successful hit and at the
end of the game.
☛Tip: You can save bouts to watch again
later and you can also save your best
opponents as favorites so that you can
easily challenge them again.
Playing against a server
For all the two player games (Chess,
Checkers, Reversi and KombatClub) you
can play against a server, or use a server to
match you with other Sendo users. To add a
server use the : and ; keys to select
Options and then use the : and ; keys to
select Server. Select Add, enter the server
name and press g. Enter the server
number and press g OK. The game works
in exactly the same way as when you play
against your friends.
Note: This feature may not be available in all
areas or on all networks. Your phone may
have been pre-programmed with server
details. If not, please check with your
service provider or see www.sendo.com/
gameserver for relevant server details.

33
11
Extras
Customizing your telephone
It is possible to assign pictures to items in
the main menu, the idle screen, screen
saver and contacts in the phone book.
Receiving a picture
Pictures and logos for your phone can be
obtained from a wide number of sources.
When you have received your picture "1 new
picture" will be displayed. To view the
picture press g, View. To accept the
picture press g, Save.
The picture list menu will appear. Highlight
a position to save the picture and press g,
Select. Enter a name for the picture using
the keypad and press g, OK.
Managing your pictures
Go to the Extras menu followed by Pictures,
and press g, Select.
If you have received pictures, they will be
displayed by name in the order they were
received. Use the :; keys to choose a
picture and press g, Options. You may
also view the picture by pressing g, View.
Available options from the following menu
will appear:
Assign
Used to assign the selected picture to an
item.
Unassign
Removes the association of the selected
picture to an item.
Delete
Permanently deletes the selected picture.
Unassign all
Removes the association of all pictures to
any items. Press g, OK to confirm.
Delete all
Permanently deletes all pictures. Press
g, OK to confirm.
Memory
Displays the amount of remaining
memory.
Assigning a picture
From the above menu select Assign and
press g, Select.
From the menu that follows it is possible to
assign a picture to any main menu item, the
idle screen, screensaver or a contact in your
contacts list. Make your choice using the
:; keys and press g, Select.
If you select the main menu option a new
sub-menu will be displayed. Select the
name of the menu you would like to assign
the picture to using the method described
above. To display pictures in the main
menu, animations must be set to off.
☛Tip: To view the clock when a picture is
assigned to the idle screen press the c
key.

34
12
Settings
12 Settings
Languages
This menu allows you to change the
language of the phone.
Alarm clock
You can use your phone as an alarm clock.
Enter the Settings menu and press g,
Alarm. Set the alarm to On and enter the
time, specifying AM or PM, when you
require the phone to ring. When it rings
press
d, Off to switch it off, or
g, Snooze to stop the alarm for ten
minutes. The alarm will then sound again.
☛Note: The alarm will sound even if the
phone is switched off. The phone will
power on but you will not be able to
receive or make calls. Once the alarm
finishes the phone will switch off.
Setting time and date
Go to Set date and press g, Select. Enter
the date and press g, OK.
Press g, Select. Enter the time, specifying
AM or PM, Press g, OK.
The date and time will be stored.
Screensaver
A screensaver is a picture that is displayed
when the phone has been idle for a certain
amount of time.
It is possible to turn this on or off, select the
delay before it becomes active and change
the picture.
When the screensaver is active press c to
use the phone
Auto redial
When this function is activated, the phone
will automatically redial a number when the
call attempt fails. If the other user’s phone is
busy, the phone will wait a few seconds
before each attempt, and then beep when it
succeeds.
Auto answer
This function is only applicable when certain
hands-free accessories (e.g., a personal
hands-free headset) are connected to the
phone. When you receive an incoming call
with this feature activated, the phone rings
three times before automatically accepting
the call.
Any key answer
When this function is activated, you can
answer an incoming call by pressing any
key, except d, Reject.

35
12
Settings
Animations
It is possible to enable or disable animations
of the main menu.
☛Note: when assigning downloaded
pictures to the main menu the menu
animations must be set to Off.
Security
Your PIN (Personal Identity Number) code is
a code that you can use to protect your
phone from unwanted users. This is the
number that the phone asks for at switch on.
PIN Code:
1Activate PIN entry requirement at switch
on (if your SIM card supports this).
2Deactivate PIN entry requirement at
switch on (if your SIM card supports this).
3Change PIN.
4Change PIN2.
Some network services require a separate
security code. This code is the PIN2. This
menu allows you to change the PIN2 code
that the mobile asks for when using certain
features. To activate the PIN code
requirement or change the PIN code, you
need to enter the current PIN code.
If you don’t know your PIN code, contact
your service provider.
☛Note: If you enter the wrong PIN code
three times, the SIM card is locked. You
must contact your service provider for
further instructions.
Shortcuts
To lock/unlock the keypad, press g, then
* from the main screen.
To enter/exit silent mode press g then #
from the main screen.
To enter a pause while dialing press and
hold # until the letter p appears. This will
insert a pause of 3 seconds.

36
13
Services
13 Services
Commands
This menu allows you to send special
commands to the network to get specific
information. This could be information such
as the time and date, your own phone
number, or the amount of credit remaining
on your SIM card. The commands, and
whether this feature is available, can be
obtained from your service provider. You
can store the number of the command and
a name. Once stored, scroll to the command
and press g, Send to get the required
information from the network.
Network selection
This menu allows you to choose how the
phone searches for the network.
Mode
Automatic
Sets the search mode to automatic. The
phone searches all available networks
and automatically selects one.
Manual
Sets the search mode to manual. The
phone searches all available networks
and, when finished, displays a list of all the
networks found. You can scroll up and
down with : ; to select the network that
you wish to use. Once you select a
network, your phone will always try to
select this network. Network selection
stays manual until you switch to automatic
mode.
Search
Searches for and then displays all
available networks. If you are in manual
mode then the selected network will
become your default network.
Send number
This menu allows you to select whether you
hide your identity or not when you call
someone.
There are three options:
Network
Setting returns to Network default setting.
On
Your telephone number is sent to your
correspondent when you call.
Off
Your telephone number is not sent to your
correspondent when you call.
Cost/timers
This menu contains all information on the
amount of time you have spent on calls.
This menu offers five options:
Balance
Displays the amount of credit that you
have left on your prepaid card.
Outgoing
Displays the total time that you have spent
on your phone on outgoing calls.

37
13
Services
Incoming
Displays the total time that you have spent
on your phone on incoming calls.
Limit
Allows you to view and set the maximum
cost limit that you can go up to.
Rate
Allows you to set the price per unit, and
enter the currency in which you wish the
call costs to be displayed.
☛Note: The actual time invoiced by your
service provider may vary depending on
network features to which you
subscribe, rounding off, taxes and other
fees and charges.
Forward
This network feature allows you to forward
your incoming calls to your voice mailbox or
to another number.
This menu offers four options:
If busy
When activated, calls will be forwarded if
you are already in a call.
If no answer
When activated, calls will be forwarded if
you do not answer your phone.
Unreachable
When activated, calls will be forwarded if
your phone is off or if you are out of
coverage.
All calls
When activated, all of your incoming calls
will be forwarded. For each of the above,
you can: Check, activate or cancel the
service.
Service numbers
Your service provider may have pre-
programmed some useful numbers into
your SIM card. These numbers normally
give access to special services. For more
information contact your service provider.
1Press d, Contacts to display the
contact list menu, scroll using : ;.
2Scroll to the Service no. option, then
press g, Select.
Call waiting
This menu allows you to activate or
deactivate the call waiting feature.
☛Note: Your network may not support all
of these features. Any unsupported
features will not be shown in the menu.

38
14
Troubleshooting
14 Troubleshooting
Problem Possible cause Possible corrective action
Phone does not power
on
Battery empty Fully charge the battery and then press d.
Battery contacts dirty Clean contacts on battery and phone with a dry cloth,
attach battery, wait a few seconds and press d.
Phone does not
charge
Battery empty Charge for 2 hours. Don’t worry if the battery icon
does not change immediately.
Disconnect and try again.
Charger incorrectly connected Check the main socket, and the connection to the
phone.
Battery How long should I charge the
battery the first time?
12 hours continuous.
I don’t get as much
battery life as I
expected
The phone uses battery power
when it is switched on even if it
is not in a call. Making calls and
playing with the different
functions of the phone will run
down the battery faster. The
stated battery life is under
optimum conditions.
Charge the phone regularly.
“Insert SIM” is
displayed when I
switch on the phone
SIM card is incorrectly inserted
or missing. SIM card is
damaged or dirty
Check that the SIM card is positioned correctly, and
that the metal clip is slid across. Try again. Visually
check the SIM and clean the contacts with a dry
cloth. Try again.
The PIN code is
blocked
3 incorrect entries Enter the unblocking code supplied with the SIM
card. If you do not have this code, contact your
service provider.
The PIN2 code is
blocked
3 incorrect entries Enter the PIN2 unblocking code supplied with the
SIM card. If you do not have this code, contact your
service provider.
“NCK Code” is
displayed on my
handset
The handset is locked to a
network and a SIM from another
network has been placed in the
telephone
Remove the SIM and insert the correct network SIM.
39
14
Troubleshooting
“Blocked” is displayed
on my handset
The NCK code has been
entered incorrectly 10 times and
the handset has been security
disabled
Return the handset to your service operator or to an
authorized Sendo service center for resetting.
A key on the keypad is
not working
The keypad is not seated
correctly after removing and
replacing the telephone’s
plastic cover
Remove the telephone’s plastic cover and re-seat
the keypad correctly.
Poor display Low temperature Move to a warmer place and let the phone warm up.
Can’t connect to
network
Weak signal Move into an area of better coverage. If you are in a
building, move towards a window.
Invalid SIM card Contact your service provider.
Network not allowed Try reselecting the network. Switch off and then back
on.
Can’t make/receive
calls
Weak signal Check that the service provider name is displayed on
the screen. If not, try to reconnect to the network.
Phone is switched off Press d for a few seconds.
Check the number Use the full area code and country code in the
number.
Call key not pressed After dialing the number you must press g, Call.
Network is busy If you hear rapid beeps, then the network is busy.
Hang up and try again.
Call barring or fixed dialing is
activated
Check the fixed dialing settings. Otherwise check the
call barring settings with your service provider.
Not registered with service
provider
After purchasing your phone, you may need to call
your service provider to activate the line.
No credit left on your prepaid
card
Recharge your credit.
Low earpiece volume Low setting Press : when you are in a call to increase the
volume.
Low ringer melody Low setting Go into the Sounds menu, select Volume and
increase the setting.
Problem Possible cause Possible corrective action
40
14
Troubleshooting
Cannot enter some
words
Wrong entry mode Your phone has T9 text input (i.e. it guesses what
words you are trying to enter). To enter a special
word press * repeatedly to change to normal multi
tap mode.
“Message list full” is
displayed in the main
screen
Your SIM card memory is full of
text messages, therefore you
cannot receive any more
messages.
Go into the Read menu of the message menu and
delete some of your messages.
Some features do not
work
Feature not supported by the
operator or your subscription.
Call your service provider.
Some menus are
missing
There are restrictions on your
SIM card or subscription.
Call your service provider.
I can only enter names
of up to 7 characters in
my contact list
Your phone is in Unicode mode. Change the Characters Message Setting to GSM
mode. See the Message Settings section for more
information.
Problem Possible cause Possible corrective action

41
15
Safety information
15 Safety information
IMPORTANT SAFETY INFORMATION
You should observe and follow these guidelines for
the safe and efficient use of your phone. Failure to
comply with these guidelines and requirements
may void your warranty and may invalidate any
approvals given to your phone.
Drive Safely
Do not use a hand-held telephone while driving.
Give your full attention to driving. If using a hand-
held phone, pull over safely and park the vehicle in
a safe location first. Always place the phone in its
holder; do not place the phone on the passenger
seat, near an airbag or where it can break loose in
a collision or sudden stop.
Always obey local laws and regulations regarding
the use of a cellular phone in the areas where you
drive. In some areas, it is illegal to use a cellular
telephone while driving, and hands-free operation
is required in many other areas. Do not hold your
phone in your hand while driving.
Do not use a headset (such as a headset that
covers both ears) that interferes with your ability to
hear emergency vehicle sirens or the warning horns
of other vehicles. Driving safely always comes first!
Operation
Remember to follow any special regulations in force
in any area and always switch off your phone
whenever you are instructed not to use it, or when
its use may be illegal or cause interference or
danger. Most modern electronic equipment is
shielded from RF signals. However, certain
electronic equipment may not be shielded against
the RF signals from your wireless phone.
Read the user’s manual of any accessory or device
and its operation and safety instructions before
using it with your phone. Do not connect
incompatible products.
Do not use your phone if the antenna is damaged.
Replace the antenna only with one approved by the
manufacturer. Unapproved antennas or
modifications may damage your phone, degrade
its performance and violate local regulations. Do
not touch the antenna unnecessarily while a call is
in progress. Contact with the antenna affects call
quality and may cause your phone to transmit at a
higher power level than otherwise needed. Hold
your phone as you would any other phone. The
antenna should point up and over your shoulder.
Do not point the infrared beam at anyone’s eye or
allow it to interfere with other infrared devices.
The charger is compatible only with power sources
indicated on its label. Do not connect the charger to
a power source of a different voltage or frequency.
Do not use the charger outdoors or in areas where
it may become wet. Unplug the charger from the
wall socket using the body of the charger, not the
cord. Locate the cord so that it will not be tripped
over, stepped on or damaged. Do not use the
charger if it is damaged. Unplug the charger from
the wall socket before cleaning it. Use a slightly
damp cloth for cleaning, and allow the charger to
dry fully before plugging it in.
Only use accessories approved by Sendo. Using
unapproved accessories with your phone may
result in degraded performance, fire, electric shock
or injury, and may void the warranty. Please check
with your dealer for the availability of approved
accessories. Your phone is intended for use only
with chargers approved by the manufacturer. Any
other use will invalidate any approval given to your
phone and may be dangerous.
Children
Your phone is not a toy. Do not allow small children
to play with it. They could hurt themselves or others.

42
15
Safety information
Children could also damage the phone or make
calls that increase your telephone bill.
Pacemakers
Sendo recommends that a minimum separation of
20 cm ( or 6 inches) be maintained between a
wireless phone and a pacemaker to avoid potential
interference with the pacemaker. These
recommendations are consistent with the
independent research by and recommendations of
Wireless Technology Research. Persons with
pacemakers:
Should always keep the phone more than 20 cm
(or 6 inches) from their pacemaker when the
phone is switched on;
Should not carry the phone in a breast pocket;
Should use the ear opposite the pacemaker to
minimize the potential for interference.
If you have any reason to suspect that
interference is taking place, switch off your
phone immediately.
Hearing Aids
Some wireless phones may interfere with some
hearing aids. In the event of such interference, you
should consult your service provider.
Medical Equipment.
Operation of wireless phones, may interfere with the
inadequately protected medical devices. Consult a
physician or the manufacturer of the medical
device to determine if they are adequately shielded
from external RF energy. Turn off your phone in
hospital and other health care facilities when any
regulations posted in these areas instruct you to do
so, as equipment that could be sensitive to external
RF energy may be in operation.
Vehicles
RF signals may affect improperly installed or
inadequately shielded electronic systems in motor
vehicles (e.g. electronic fuel injection systems,
electronic anti-skid (anti-lock) braking systems,
electronic speed control systems, air bag systems).
Check with the supplier or its representative
regarding your vehicle. You should also consult the
supplier of any equipment that has been added to
your vehicle.
Do not place your phone or any accessories in the
area over an airbag or in the airbags deployment
area. An airbag inflates with great force, and
serious injury could occur.
Using your phone in a vehicle demands special
considerations. The fitting of any accessories to a
vehicle should only be undertaken by a suitably
qualified person to ensure that vehicle systems are
not adversely affected, and that the accessory
gives optimum performance.
Only qualified personnel should service the phone,
or install the phone in a vehicle. Faulty installation or
service may be dangerous and may invalidate any
warranty that may apply to the unit.
Check regularly that all wireless phone equipment
in your vehicle is mounted and operating properly.
Do not store or carry flammable liquids, gases or
explosive materials in the same compartment as
the phone, its parts or accessories.
Switch off your phone before boarding a non-
commercial aircraft or when instructed to do so on
a commercial airline. The use of wireless
telephones in an aircraft may interfere with the
operation of the aircraft and may be illegal.
Posted Areas
Turn off your phone in any area where posted
notices so require.

43
15
Safety information
Potentially Explosive Atmospheres
Turn off your phone and do not remove its battery
when in any area with a potentially explosive
atmosphere and obey all signs and instructions. It
is rare, but your phone or its accessories could
generate sparks. Sparks in such areas could cause
an explosion or fire resulting in property damage,
bodily injury or even death. Areas with potentially
explosive atmospheres are often, but not always,
clearly marked. They include: Fuelling areas, such
as petrol stations, below deck on boats, and fuel or
chemical transfer and storage facilities. Follow
these guidelines also when you enter areas where
fuel odors are present, such as when a gas leak
occurs in a home; areas where the air contains
chemicals or particles, such as grain, dust or metal
powders; and any other area where you would
normally be advised to turn off your vehicle engine.
Turn off your phone when at gas or petrol stations
(service station). Users are reminded of the need to
observe restrictions on the use of radio equipment
in fuel depots (fuel storage and distribution areas),
chemical plants or where blasting operations are in
progress.
Areas with a potentially explosive atmosphere are
often but not always clearly marked. They include
below deck on boats; chemical transfer or storage
facilities; vehicles using liquefied petroleum gas
(such as propane or butane); areas where the air
contains chemicals or particles, such as grain, dust
or metal powders; and any other area where you
would normally be advised to turn off your vehicle
engine.
Blasting Areas
To avoid interfering with blasting operations, turn
your phone off when in a "blasting area" or in areas
posted "turn off two-way radio". Obey all signs and
instructions.
Emergency Calls
IMPORTANT!
This phone, like any wireless phone, operates using
radio signals, wireless and landline networks as
well as user-programmed functions that cannot
guarantee connection in all conditions. Do not rely
solely upon your wireless phone for emergency
communications (e.g. medical emergencies).
Remember, to make or receive any calls the phone
must be switched on and in a service area with
adequate signal strength. Emergency calls may not
be possible on all wireless phone networks or when
certain network services and/or phone features are
in use. Check with local service providers.
To make an emergency call:
1If the phone is not on, switch it on.
☛Note: Some networks may require that a
valid SIM card be properly inserted in
the phone.
2Press and hold the Clear key for several
seconds to ready the phone for calls.
3Key in the emergency number for your
present location (e.g. 911, 112 or other
official emergency number). Emergency
numbers vary by location.
4Press the Call key.
If certain features are in use (Key guard, Locking,
Call Restricting etc.), you may first need to turn
those features off before you can make an
emergency call.
When making an emergency call, follow all
instructions of the emergency operation and do not
hang up until requested do so.

44
15
Safety information
Servicing
Do not attempt to disassemble or repair your
phone, as you may damage the phone or injure
yourself and will void your warranty. Only qualified
personnel at an authorized service center should
perform repairs. Your phone does not contain any
consumer serviceable parts. Make back up copies
of all data and delete security sensitive data before
sending your phone in for repair.
Back Up Data
To avoid loss of important information, remember to
make back up copies of all data regularly.
Disposal
Your battery and other components may require
precautions to be taken for safe disposal. The
battery type is indicated on the battery label. Please
follow all local and/or governmental laws and
regulations when disposing of your phone or
battery.
Care and Maintenance
Follow these care and maintenance instructions to
improve the performance and life of your phone.
Failure to follow the suggestions may invalidate
your phone’s warranty:
Keep it and all its parts and accessories out of
small children's reach.
Keep it dry.
Do not use or store it in dusty or dirty areas.
Do not attempt to take the phone apart.
Do not drop, throw or shake it.
Do not use soaps, chemicals, cleaning solvents,
or strong detergents to clean it. Use a moist
cloth to wipe it.
Avoid exposing your phone to any severe
shocks, extreme (hot or cold) temperatures or
moisture.
Keep your phone away from open flames such
as lit candles or cigarettes.
Use only the supplied or an approved
replacement antenna. Unauthorized antennas,
modifications or attachments could damage the
phone and may violate regulations governing
radio devices. When removing the antenna,
keep it out of small children’s reach.
If the phone, battery, or any accessory is not
working properly, take it to your nearest
qualified service facility. Back up all data before
taking your phone to a service center as
maintenance or recovery of data is not
guaranteed. If you have any sensitive
information, please back it up and then delete it
from your phone before taking your phone to the
service center.

45
16
RF and FDA/FCC Statements
16 RF and FDA/FCC Statements
Radio frequency (RF) signals
THIS MODEL PHONE MEETS THE
GOVERNMENT’S REQUIREMENTS FOR
EXPOSURE TO RADIO WAVES.
Your wireless phone is a radio transmitter and
receiver. It is designed and manufactured not to
exceed the emission limits for exposure to radio
frequency (RF) energy set by the Federal
Communications Commission of the U.S.
Government and by Health Canada. These limits
are part of comprehensive guidelines and establish
permitted levels of RF energy for the general
population. The guidelines are based on standards
that were developed by independent scientific
organizations through periodic and thorough
evaluation of scientific studies. The standards
include a substantial safety margin designed to
assure the safety of all persons, regardless of age
and health. The exposure standard for wireless
mobile phones employs a unit of measurement
known as the Specific Absorption Rate, or SAR. The
SAR limit set by the FCC and Health Canada is
1.6W/kg.* Tests for SAR are conducted using
standard operating positions accepted by the FCC
and Industry Canada with the phone transmitting at
its highest certified power level in all tested
frequency bands. Although the SAR is determined
at the highest certified power level, the actual SAR
level of the phone while operating can be well
below the maximum value. This is because the
phone is designed to operate at multiple power
levels so as to use only the power required to reach
the network. In general, the closer you are to a
wireless base station antenna, the lower the power
output.
Before a phone model is available for sale to the
public in the US and Canada, it must be tested and
certified to the FCC and Industry Canada that it
does not exceed the limit established by the
government-adopted requirement for safe
exposure. The tests are performed in positions and
locations (for example, at the ear and worn on the
body) as approved by the FCC and Industry
Canada for each model. The highest SAR value for
this model phone as reported to the FCC and
available for review by Industry Canada when
tested for use at the ear is 1.39 W/kg, and when
worn on the body, as described in this user guide,
is 0.435 W/kg. (Body-worn measurements differ
among phone models, depending upon available
accessories and FCC requirements.) While there
may be differences between the SAR levels of
various phones and at various positions, they all
meet the government requirement.
The FCC and Industry Canada have granted an
Equipment Authorization for this model phone with
all reported SAR levels evaluated as in compliance
with the FCC RF exposure guidelines. SAR
information on this model phone is on file with the
FCC and can be found under the Display Grant
section of http://www.fcc.gov/oet/fccid after
searching on FCC ID:P6PSND251, Industry Canada
ID: IC:4279A-SND251 or MET Listing no:E112302.
For body-worn operation, to maintain compliance
with FCC RF exposure guidelines, use only Sendo-
approved accessories. When carrying the phone
while it is on, place the phone in the original Sendo
carry case that has been tested for compliance.
Use of non-Sendo-approved accessories may
violate FCC RF exposure guidelines and should be
avoided.
*In the United States and Canada, the SAR limit for
mobile phones used by the public is 1.6 watts/kg
(W/kg) averaged over one gram of tissue and
allows for testing and other tolerances. The
standard incorporates a substantial margin of
safety to give additional protection for the public
and to account for any variations in measurements.
46
16
RF and FDA/FCC Statements
The U.S. Food and Drug
Administration’s Center for
Devices and Radiological Health
Consumer Update on Mobile Phones
FDA has been receiving inquiries about the safety
of mobile phones, including cellular phones and
PCS phones. The following summarizes what is
known—and what remains unknown—about
whether these products can pose a hazard to
health, and what can be done to minimize any
potential risk. This information may be used to
respond to questions.
Why the concern?
Mobile phones emit low levels of radiofrequency
energy (i.e. radiofrequency radiation) in the
microwave range while being used. They also emit
very low levels of radiofrequency energy (RF),
considered non-significant, when in the stand-by
mode. It is well known that high levels of RF can
produce biological damage through heating effects
(this is how your microwave oven is able to cook
food). However, it is not known whether, to what
extent, or through what mechanism, lower levels of
RF might cause adverse health effects as well.
Although some research has been done to address
these questions, no clear picture of the biological
effects of this type of radiation has emerged to
date. Thus, the available science does not allow us
to conclude that mobile phones are absolutely safe,
or that they are unsafe. However, the available
scientific evidence does not demonstrate any
adverse health effects associated with the use of
mobile phones.
What kinds of phones are in question?
Questions have been raised about hand-held
mobile phones, the kind that have a built-in antenna
that is positioned close to the user’s head during
normal telephone conversation. These types of
mobile phones are of concern because of the short
distance between the phone’s antenna—the
primary source of the RF— and the person’s head.
The exposure to RF from mobile phones in which
the antenna is located at greater distances from the
user (on the outside of a car, for example) is
drastically lower than that from hand-held phones,
because a person’s RF exposure decreases
rapidly with distance from the source. The safety of
so-called "cordless phones," which have a base
unit connected to the telephone wiring in a house
and which operate at far lower power levels and
frequencies, has not been questioned.
How much evidence is there that hand-held mobile
phones might be harmful?
Briefly, there is not enough evidence to know for
sure, either way; however, research efforts are on-
going. The existing scientific evidence is conflicting
and many of the studies that have been done to
date have suffered from flaws in their research
methods. Animal experiments investigating the
effects of RF exposures characteristic of mobile
phones have yielded conflicting results. A few
animal studies, however, have suggested that low
levels of RF could accelerate the development of
cancer in laboratory animals. In one study, mice
genetically altered to be predisposed to
developing one type of cancer developed more
than twice as many such cancers when they were
exposed to RF energy compared to controls. There
is much uncertainty among scientists about
whether results obtained from animal studies apply
to the use of mobile phones. First, it is uncertain
how to apply the results obtained in rats and mice
to humans. Second, many of the studies that
showed increased tumor development used
animals that had already been treated with cancer-

47
16
RF and FDA/FCC Statements
causing chemicals, and other studies exposed the
animals to the RF virtually continuously—up to 22
hours per day.
For the past five years in the United States, the
mobile phone industry has supported research into
the safety of mobile phones. This research has
resulted in two findings in particular that merit
additional study:
1In a hospital-based, case-control study,
researchers looked for an association between
mobile phone use and either glioma (a type of
brain cancer) or acoustic neuroma (a benign
tumor of the nerve sheath). No statistically
significant association was found between
mobile phone use and acoustic neuroma. There
was also no association between mobile phone
use and gliomas when all types of types of
gliomas were considered together. It should be
noted that the average length of mobile phone
exposure in this study was less than three years.
When 20 types of glioma were considered
separately, however, an association was found
between mobile phone use and one rare type of
glioma, neuroepithelliomatous tumors. It is possible
with multiple comparisons of the same sample that
this association occurred by chance. Moreover, the
risk did not increase with how often the mobile
phone was used, or the length of the calls. In fact,
the risk actually decreased with cumulative hours of
mobile phone use. Most cancer-causing agents
increase risk with increased exposure. An ongoing
study of brain cancers by the National Cancer
Institute is expected to bear on the accuracy and
repeatability of these results1.
2Researchers conducted a large battery of
laboratory tests to assess the effects of
exposure to mobile phone RF on genetic
material. These included tests for several kinds
of abnormalities, including mutations,
chromosomal aberrations, DNA strand breaks,
and structural changes in the genetic material of
blood cells called lymphocytes. None of the
tests showed any effect of the RF except for the
micronucleus assay, which detects structural
effects on the genetic material. The cells in this
assay showed changes after exposure to
simulated cell phone radiation, but only after 24
hours of exposure. It is possible that exposing
the test cells to radiation for this long resulted in
heating. Since this assay is known to be
sensitive to heating, heat alone could have
caused the abnormalities to occur. The data
already in the literature on the response of the
micronucleus assay to RF are conflicting. Thus,
follow-up research is necessary2.
FDA is currently working with government, industry,
and academic groups to ensure the proper follow-
up to these industry-funded research findings.
Collaboration with the Cellular Telecommunications
Industry Association (CTIA) in particular is
expected to lead to FDA providing research
recommendations and scientific oversight of new
CTIA-funded research based on such
recommendations.
Two other studies of interest have been reported
recently in the literature:
1Two groups of 18 people were exposed to
simulated mobile phone signals under
laboratory conditions while they performed
cognitive function tests. There were no changes
in the subjects’ ability to recall words, numbers,
or pictures, or in their spatial memory, but they
were able to make choices more quickly in one
visual test when they were exposed to simulated
mobile phone signals. This was the only change
noted among more than 20 variables
compared3.

48
16
RF and FDA/FCC Statements
2In a study of 209 brain tumor cases and 425
matched controls, there was no increased risk of
brain tumors associated with mobile phone use.
When tumors did exist in certain locations,
however, they were more likely to be on the side
of the head where the mobile phone was used.
Because this occurred in only a small number of
cases, the increased likelihood was too small to
be statistically significant4.
In summary, we do not have enough information at
this point to assure the public that there are, or are
not, any low incident health problems associated
with use of mobile phones. FDA continues to work
with all parties, including other federal agencies
and industry, to assure that research is undertaken
to provide the necessary answers to the
outstanding questions about the safety of mobile
phones.
What is known about cases of human cancer that
have been reported in users of hand-held mobile
phones?
Some people who have used mobile phones have
been diagnosed with brain cancer. But it is
important to understand that this type of cancer
also occurs among people who have not used
mobile phones. In fact, brain cancer occurs in the
U.S. population at a rate of about 6 new cases per
100,000 people each year. At that rate, assuming
80 million users of mobile phones (a number
increasing at a rate of about 1 million per month),
about 4800 cases of brain cancer would be
expected each year among those 80 million
people, whether or not they used their phones.
Thus it is not possible to tell whether any
individual’s cancer arose because of the phone, or
whether it would have happened anyway. A key
question is whether the risk of getting a particular
form of cancer is greater among people who use
mobile phones than among the rest of the
population. One way to answer that question is to
compare the usage of mobile phones among
people with brain cancer with the use of mobile
phones among appropriately matched people
without brain cancer. This is called a case-control
study. The current case-control study of brain
cancers by the National Cancer Institute, as well as
the follow-up research to be sponsored by industry,
will begin to generate this type of information.
What is FDA’s role concerning the safety of mobile
phones?
Under the law, FDA does not review the safety of
radiation-emitting consumer products such as
mobile phones before marketing, as it does with
new drugs or medical devices. However, the
agency has authority to take action if mobile
phones are shown to emit radiation at a level that is
hazardous to the user. In such a case, FDA could
require the manufacturers of mobile phones to
notify users of the health hazard and to repair,
replace or recall the phones so that the hazard no
longer exists. Although the existing scientific data
do not justify FDA regulatory actions at this time,
FDA has urged the mobile phone industry to take a
number of steps to assure public safety. The
agency has recommended that the industry:
support needed research into possible biological
effects of RF of the type emitted by mobile phones;
Design mobile phones in a way that minimizes any
RF exposure to the user that is not necessary for
device function; and
cooperate in providing mobile phone users with the
best possible information on what is known about
possible effects of mobile phone use on human
health.
At the same time, FDA belongs to an interagency
working group of the federal agencies that have
responsibility for different aspects of mobile phone

49
16
RF and FDA/FCC Statements
safety to ensure a coordinated effort at the federal
level. These agencies are:
National Institute for Occupational Safety and
Health
Environmental Protection Agency
Federal Communications Commission
Occupational Health and Safety Administration
National Telecommunications and Information
Administration
The National Institute of Health also participates in
this group.
In the absence of conclusive information about any
possible risk, what can concerned individuals do?
If there is a risk from these products—and at this
point we do not know that there is—it is probably
very small. But if people are concerned about
avoiding even potential risks, there are simple
steps they can take to do so. For example, time is a
key factor in how much exposure a person
receives. Those persons who spend long periods of
time on their hand-held mobile phones could
consider holding lengthy conversations on
conventional phones and reserving the hand-held
models for shorter conversations or for situations
when other types of phones are not available.
People who must conduct extended conversations
in their cars every day could switch to a type of
mobile phone that places more distance between
their bodies and the source of the RF, since the
exposure level drops off dramatically with distance.
For example, they could switch to
a mobile phone in which the antenna is located
outside the vehicle,
a hand-held phone with a built in antenna
connected to a different antenna mounted on the
outside of the car or built into a separate package,
or
a headset with a remote antenna to a mobile phone
carried at the waist.
Again, the scientific data do not demonstrate that
mobile phones are harmful. But if people are
concerned about the radiofrequency energy from
these products, taking the simple precautions
outlined above can reduce any possible risk.
Where can I find additional information?
For additional information, see the following
websites:
Federal Communications Commission (FCC) RF
Safety Program (select "Information on Human
Exposure to RF Fields from Cellular and PCS Radio
Transmitters"):
http://www.fcc.gov/oet/rfsafety
World Health Organization (WHO) International
Commission on Non-Ionizing Radiation Protection
(select Qs & As):
http://www.who.int/emf
United Kingdom, National Radiological Protection
Board:
http://www.nrpb.org.uk
Cellular Telecommunications Industry Association
(CTIA):
http://www.wow-com.com
U.S. Food and Drug Administration (FDA) Center
for Devices and Radiological Health:
http://www.fda.gov/cdrh/consumer/
1 Muscat et al. Epidemiological Study of Cellular
Telephone Use and Malignant Brain Tumors. In:
State of the Science Symposium;1999 June 20;
Long Beach, California.
2 Tice et al. Tests of mobile phone signals for
activity in genotoxicity and other laboratory assays.

50
16
RF and FDA/FCC Statements
In: Annual Meeting of the Environmental Mutagen
Society; March 29, 1999, Washington, D.C.; and
personal communication, unpublished results.
3 Preece, AW, Iwi, G, Davies-Smith, A, Wesnes, K,
Butler, S, Lim, E, and Varey, A. Effect of a 915-MHz
simulated mobile phone signal on cognitive
function in man. Int. J. Radiat. Biol., April 8, 1999.
4 Hardell, L, Nasman, A, Pahlson, A, Hallquist, A
and Mild, KH. Use of cellular telephones and the
risk for brain tumors: a case-control study. Int. J.
Oncol., 15: 113-116, 1999.

51
17
Warranty
17 Warranty
Sendo One Year Limited Warranty
Sendo America, Inc. ("SENDO") warrants, subject
to the exclusions and limitations set forth below,
that this cellular phone ("Product") is free from
defects in material and workmanship that result in
Product failure during normal usage, according to
the following terms and conditions:
1. The limited warranty for the Product extends for
ONE (1) year beginning on the date of the purchase
of the Product or FIFTEEN (15) months from the
date of its manufacture as determined by the date
code in the Product.
2. The limited warranty extends to the original
purchaser of the Product ("Consumer") and is not
assignable or transferable to any subsequent
purchaser or user.
3. The Limited warranty extends only to Consumers
who purchase the Product in the market for its
intended sale
4. During the limited warranty period, SENDO will
repair, or replace, at SENDO's sole option, any
defective parts, or any parts that will not properly
operate for their intended use with new or
refurbished replacement items if such repair or
replacement is needed because of malfunction or
failure of the Product during normal usage. No
charge will be made to the Consumer for any such
parts. SENDO will also pay for the labor charges
incurred by SENDO in repairing or replacing the
defective parts. The limited warranty does not cover
defects in appearance, cosmetic, decorative or
structural items, including framing, and any non-
operative parts. This limited warranty does not
apply to any damage or failure to operate caused
by use of the product other than in accordance with
the instructions contained in the User Manual, or for
periodic maintenance or repair due to normal wear
and tear. SENDO's limit of liability under the limited
warranty shall be the actual cash value of the
Product at the time the Consumer returns the
Product for repair, determined by the price paid by
the Consumer for the Product less a reasonable
amount for usage. SENDO shall not be liable for any
other losses or damages. These remedies are the
Consumer's exclusive remedies for breach of
warranty.
5. Upon request from SENDO, the Consumer must
prove the date of the original purchase of the
Product by a dated bill of sale or dated itemized
receipt.
6. The Consumer shall bear the cost of taking or
shipping the Product to the place of purchase or
the Customer Service Department of SENDO. If the
Product was taken to the place of purchase, the
Consumer shall bear the cost of retrieving the
Product. If shipped to SENDO, SENDO shall bear
the cost of shipping the Product back to the
Consumer after the completion of service under this
limited warranty and provided that repairs were
required to be performed under this limited
warranty.
7. The Consumer shall have no coverage or
benefits under this limited warranty if any of the
following conditions are applicable:
a) The Product has been subject to abnormal use,
abnormal conditions, improper storage, exposure
to moisture or dampness, unauthorized
modifications, unauthorized connections,

52
17
Warranty
unauthorized repair, misuse, neglect, abuse,
accident, alteration, improper installation, or other
acts which are not the fault of SENDO, including
damage caused by shipping.
b) Physical damage to the surface of the Product,
including scratches or cracks in or to the outside
casing or LCD, or damages caused by dropping
the Product.
c) The Product has been damaged from external
causes such as liquid, water, collision with an
object, or from fire, flooding, sand, dirt, windstorm,
lightening, earthquake or damage from exposure to
weather conditions, an Act of God, or battery
leakage, theft, blown fuse, or improper use of any
electrical source, damage caused by computer or
internet viruses, bugs, worms, Trojan Horses,
cancelbots or damage caused by the connection to
other products not recommended for
interconnection by SENDO.
d) The Product has been altered or repaired by
anyone other than an approved SENDO service
center or if it has been used with unapproved
accessories or other ancillary items.
e) For adaptations or adjustments made to the
Product to comply with local standards in any
country other than one for which the Product was
designed and manufactured.
f) Loss or integrity of any user data stored in the
Product or any storage device used in conjunction
with the Product at any time
g) The Customer Service Department at SENDO
was not advised by the Consumer in writing of the
alleged defect or malfunction of the Product within
fourteen (14) days after the expiration of the
applicable limited warranty period.
h) The Product serial number plate or the accessory
data code has been removed, defaced or altered.
i) The defect or failure to operate was caused by
defective function of the cellular system or by
inadequate signal reception.
8. If a problem develops during the limited warranty
period, the Consumer shall take the following step-
by-step procedure:
a) The Consumer shall return the Product to the
place of purchase for repair or replacement
processing. Back up all data before returning the
Product for repair. If the Consumer has sensitive
information stored on the Product, the Consumer
must copy it to another device and delete it from the
Product before repair.
b) If "a" is not convenient because of distance (more
than 50 miles) or for other good cause, the
Consumer may contact the Customer Service
Department at SENDO, at the phone number listed
on the bottom of the next page, for further
instructions.
c) The Consumer shall ship the Product prepaid
and insured. Expenses related to removing the
Product from an installation are not covered under
this limited warranty.
d) The Consumer will be billed for any parts or labor
charges not covered by this limited warranty. The
Consumer will be responsible for any expenses
related to reinstallation of the Product.
e) SENDO will repair or authorize the repair of the
Product under the limited warranty within 30 days
after receipt of the Product by SENDO or an
SENDO authorized service center. If SENDO
cannot perform repair covered under this limited
warranty within 30 days, or after a reasonable
number of attempts to repair the same defect,
SENDO at its sole option, will provide a
replacement Product or refund the purchase price
of the Product less a reasonable amount for usage.

53
17
Warranty
f) If the Product is returned to the Customer Service
Department at SENDO during the limited warranty
period, but the problem with the Product is not
covered under the terms and conditions of this
limited warranty, the Consumer will be notified and
given an estimate of the charges the Consumer
must pay to have the Product repaired, with all
shipping charges billed to the Consumer. If the
estimate is refused, the Product will be returned
freight collect. If the Product is returned to the
Customer Service Department at SENDO after the
expiration of the limited warranty period, SENDO's
normal service policies shall apply and the
Consumer will be responsible for all shipping
charges.
9. The Product consists of newly assembled
equipment that may contain used components that
have been reprocessed to allow machine
compliance with Product performance and
reliability specifications.
10. ANY IMPLIED WARRANTY OF
MERCHANTABILITY, OR FITNESS FOR A
PARTICULAR PURPOSE OR USE, SHALL BE
LIMITED TO THE DURATION OF THE FOREGOING
LIMITED WRITTEN WARRANTY. OTHERWISE, THE
FOREGOING LIMITED WARRANTY IS THE
CONSUMER'S SOLE AND EXCLUSIVE REMEDY
AND IS IN LIEU OF ALL OTHER WARRANTIES,
EXPRESS OR IMPLIED. SENDO DOES NOT
WARRANT UNITERRUPTED OR ERROR FREE
INTERNET OR DATA CONNECTIONS. SENDO
SHALL NOT BE LIABLE FOR SPECIAL,
INCIDENTAL OR CONSEQUENTIAL DAMAGES,
INCLUDING BUT NOT LIMITED TO, LOSS OF
ANTICIPATED BENEFITS OR PROFITS, LOSS OF
SAVINGS OR REVENUE, PUNITIVE DAMAGES,
LOSS OF USE OF THE PRODUCT OR ANY
ASSOCIATED EQUIPMENT, LOSS OF DATA,
COST OF CAPITAL, COST OF ANY SUBSTITUTE
EQUIPMENT OR FACILITIES, DOWNTIME, THE
CLAIMS OF ANY THIRD PARTIES, INCLUDING
CUSTOMERS, AND INJURY TO PROPERTY,
RESULTING FROM THE PURCHASE OR USE OF
THE PRODUCT OR ARISING FROM BREACH OF
THE WARRANTY, BREACH OF CONTRACT,
NEGLIGENCE, STRICT TORT, OR ANY OTHER
LEGAL OR EQUITABLE THEORY, EVEN IF SENDO
KNEW OF THE LIKELIHOOD OF SUCH DAMAGES.
SENDO SHALL NOT BE LIABLE FOR DELAY IN
RENDERING SERVICE UNDER THE LIMITED
WARRANTY, OR LOSS OF USE DURING THE
PERIOD THAT THE PRODUCT IS BEING
REPAIRED OR LOSS OF DATA.
11. Some jurisdictions do not allow limitation of how
long an implied warranty lasts, so the above one
year warranty limitation may not apply to you (the
Consumer). Some jurisdictions do not allow the
exclusion or limitation of incidental and
consequential damages, so certain of the above
limitations or exclusions may not apply to you (the
Consumer). This limited warranty gives the
Consumer specific legal rights and the Consumer
may also have other rights that vary from
jurisdiction to jurisdiction.
12. SENDO neither assumes nor authorizes any
authorized service center or any other person or
entity to assume for it any other obligation or liability
beyond that which is expressly provided for in this
limited warranty including the provider or seller of
any extended warranty or service agreement.
13. This is the entire warranty between SENDO and
the Consumer, and supersedes all prior and

54
17
Warranty
contemporaneous agreements or understandings,
oral or written, and all communications relating to
the Product, and no representation, promise or
condition not contained herein shall modify these
terms.
14. This limited warranty allocates the risk of failure
of the Product between the Consumer and SENDO.
The allocation is recognized by the Consumer and
is reflected in the purchase price of the Product.
15. Any action or lawsuit for breach of warranty
must be commenced within eighteen (18) months
following delivery of the Product.
16. Questions concerning this limited warranty may
be directed to www.sendo.com.
17. The limited warranty period for SENDO
accessories are specifically defined within their
own warranty cards and packaging.