Senstar E7EM0201 Wireless Gate Sensor User Manual Wireless Gate Sensor
Senstar Corporation Wireless Gate Sensor Wireless Gate Sensor
Senstar >
User Manual
FlexZone Wireless Gate Sensor Page 1
FlexZone™
Instruction sheet #6
G6DA0603-001, Rev A
December 15, 2015
Description
The Wireless Gate Sensor (WGS) operates in conjunction with the FlexZone processor to provide
RF-based wireless security protection for gates. The WGS is comprised of two components. The
wireless gate sensor module (GSM) a high-sensitivity accelerometer, is attached to the protected
gate. The GSM analyzes signals picked up from the fence fabric on the gate and will transmit an
alarm when it detects vibration, motion, or positional changes. A wireless gate sensor receiver
(GSR) that is mounted on the FlexZone processor receives the transmission and passes on the
alarm signal to the FlexZone processor. Alarm data communications are via the FlexZone
processor over the Silver Network or by contact closures.
Features
• 300 m (984 ft.) (nominal) transmission range with the supplied rubber whip antenna (requires
direct line of sight)
• secure RF transmissions via 128-bit encryption
• supervised comm-link (heartbeat monitor, 2 missed transmissions = supervision alarm)
Note Setup and operation of the WGS requires as a minimum, Network Manager
version 2.20, UCM version 1.37 and FlexZone version 2.4 software.
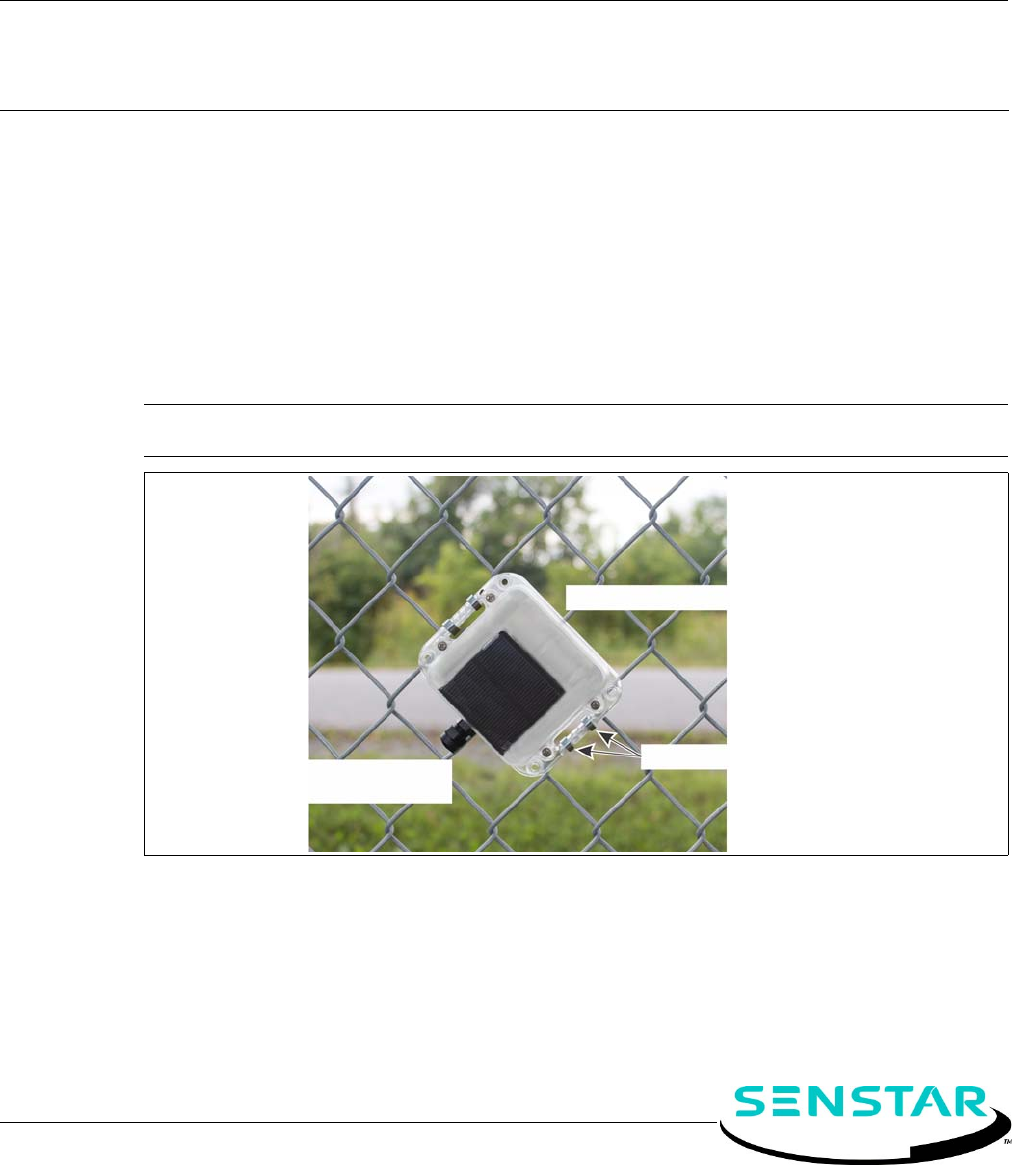
Figure 1 FlexZone Wireless Gate Sensor Module (solar powered)
solar powered GSM mounted on sliding gate
stainless steel cable ties (2 per side)
no connection to
auxiliary security device
Wireless Gate Sensor

Specifications Rev A
Page 2 FlexZone Wireless Gate Sensor
• three selectable GSM supervision modes which are based on the position and orientation of
the gate sensor module
• supervised input for auxiliary device alarm reporting (e.g., magnetic contact)
• solar powered - requires 2 hrs indirect sunlight per day (nominal)
5 days run time with no light (from fully charged)
• 1 year (nominal) runtime using alkaline D-cell battery; 2+ years using lithium D-cell battery
• low power notification transmitted at 25% capacity (solar) 10% capacity (D-cell battery)
• emergency backup battery - 30 days run time (nominal)
• user-configurable detection parameters and target filters
• up to 4 GSMs can report to one receiver
• each receiver provides 8 distinct channels (up to 32 GSMs per site - requires 8 FlexZone
processors)
Specifications
• power consumption: GSM 3 mW (avg) GSR 0.5 W
• operating voltage: solar / 1.5 V alkaline D-cell battery* OR 3.6 V lithium D-cell battery*
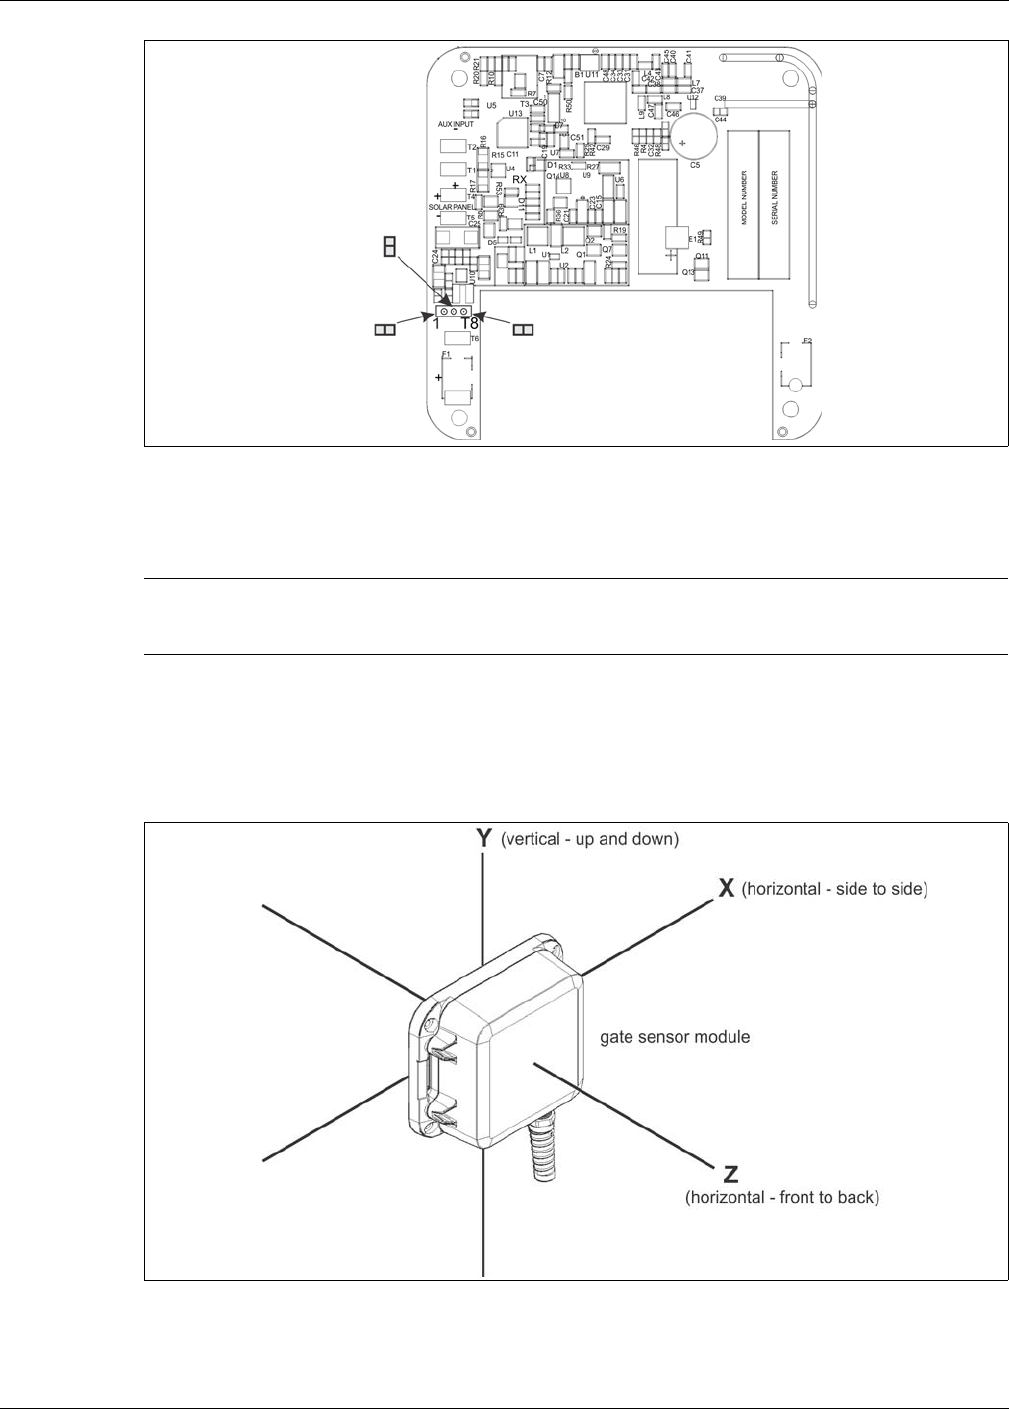
* battery type and voltage user selectable via shunt on T8 (see Figure 10)
• detection frequency response: 0.1 to 400 Hz
• transmission range: 300 m (984 ft.) (nominal) requires direct unobstructed line of site
• coverage area: 1 to 5 gate panels depending on the height, width, type, and quality of the gate
Compliance
Canada: Industry Canada Identification Number: Gate Sensor Module 1454B-E7EM0201; Gate Sensor
Receiver 1454B-E7BA0300
This device complies with Industry Canada license-exempt RSS standard(s). Operation is subject to the
following two conditions: (1) This device may not cause harmful interference, and (2) this device must accept
any interference received, including interference that may cause undesired operation.
Ce dispositif est conforme aux normes CNR d’Industrie Canada applicables aux appareils radio exempts de
licence. Son fonctionnement est sujet aux deux conditions suivantes : 1) le dispositif ne doit pas produire de
brouillage préjudiciable; et 2) il doit accepter tout brouillage reçu, y compris un brouillage susceptible de
provoquer un fonctionnement indésirable.
USA: FCC Identification Number: Gate Sensor Module 15T-E7EM0201; Gate Sensor Receiver
15T-E7BA0300
Changes or modifications not expressly approved by Senstar Corporation could void the user's authority to
operate the equipment.
FCC Certification - This device complies with part 15 of the FCC Rules. Operation is subject to the following
two conditions: (1) This device may not cause harmful interference, and (2) this device must accept any
interference received, including interference that may cause undesired operation.
This equipment has been tested and found to comply with the limits for a Class B digital device, pursuant to
Part 15 of the FCC Rules. These limits are designed to provide reasonable protection against harmful
interference in a residential installation. This equipment generates, uses and can radiate radio frequency
energy and, if not installed and used in accordance with the instructions, may cause harmful interference to
radio communications. However, there is no guarantee that interference will not occur in a particular
installation. If this equipment does cause harmful interference to radio or television reception, which can be
Note The number of GSMs required to protect a gate varies with the type and
size of the gate being protected. To determine the required number of
GSMs, install one in a central position and test the gate. If the coverage is
inadequate, install two GSMs at a central height and at 1/3 and 2/3 of the
width and test the gate. Continue this process until your detection
requirements are met (maximum of 4 GSMs per gate).
Rev A Installation
FlexZone Wireless Gate Sensor Page 3
determined by turning the equipment off and on, the user is encouraged to try to correct the interference by
one or more of the following measures:
•Reorient or relocate the receiving antenna.
•Increase the separation between the equipment and receiver.
•Connect the equipment into an outlet on a circuit different from that to which the receiver is connected.
•Consult the dealer or an experienced radio/TV technician for help.
Europe:
This device complies with ETSI standard EN 300 440 for European operation.
The use of shielded cables is required for compliance.
Installation
The FlexZone Wireless Gate Sensor requires the installation of three devices, a FlexZone
processor, a GSR, and a GSM. In addition, the GSM includes the option of connecting an auxiliary
security device like a magnetic contact as an aid for supervision and alarm reporting. The
FlexZone processor serves as the WGS base station. The FlexZone Product Guide (G6DA0102)
includes the installation details for the FlexZone processor.
Installation overview
1. Install the GSR on the FlexZone processor.
2. Install the whip antenna on the FlexZone processor.
3. Install the FlexZone processor.
4. Install the gate sensor module. (If a gate contact is being used in conjunction with the GSM,
install and connect the gate contact.)
Mounting the gate sensor receiver
The GSR mounts onto the expansion header (T2) on the FlexZone processor, either by piggy-
backing onto the network interface card (NIC) or directly onto the header if the processor does not
include an NIC. The FlexZone processor powers and communicates with the receiver through the
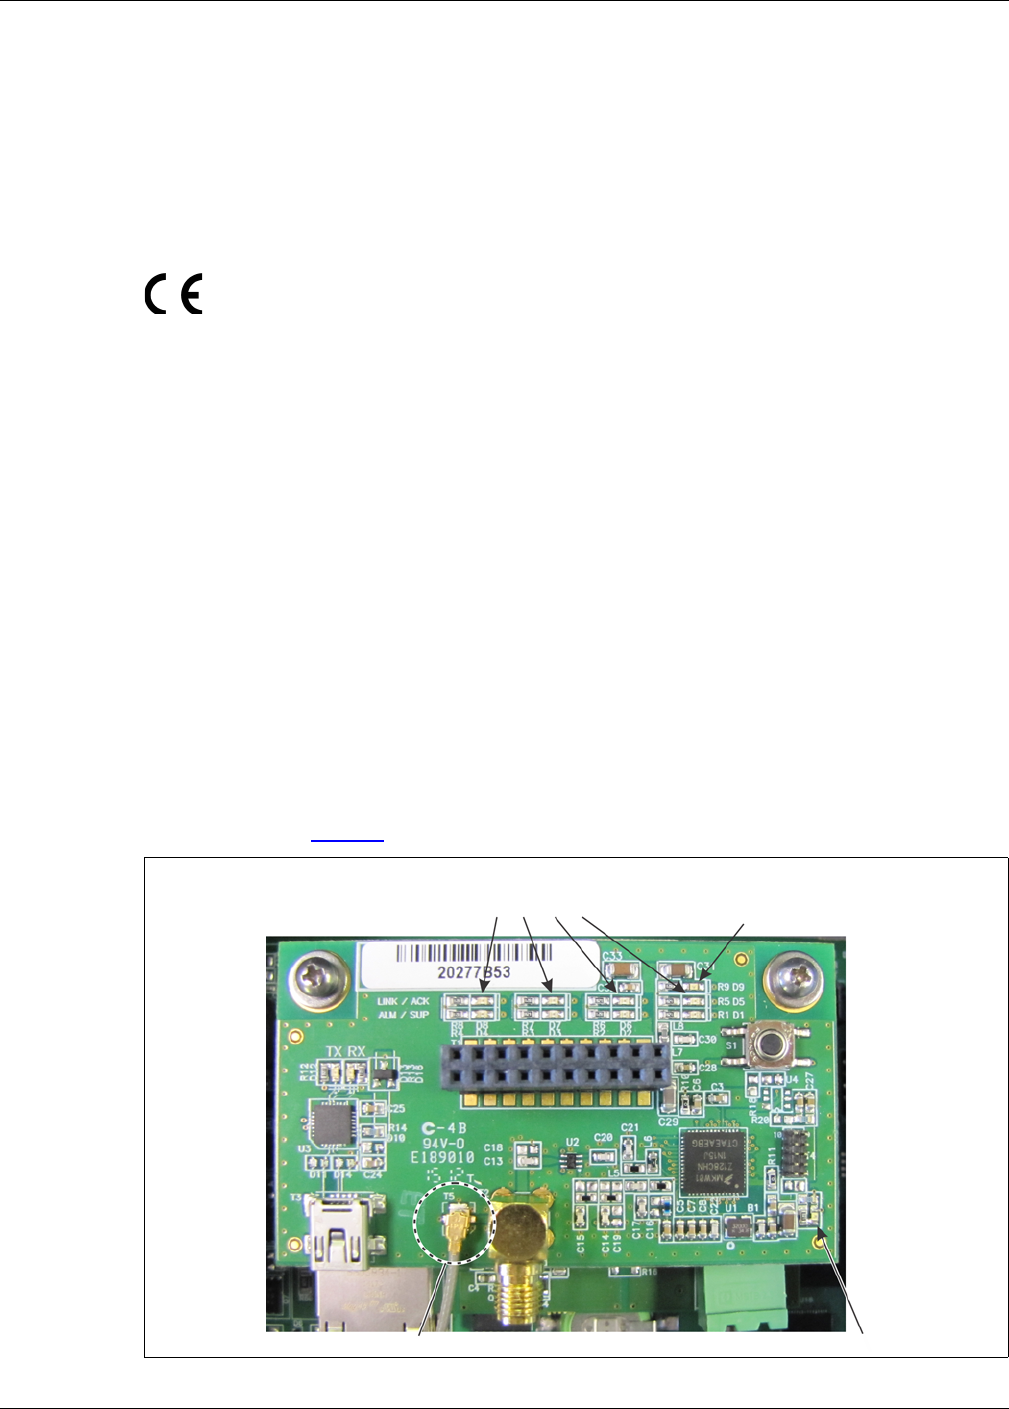
expansion header. Figure 2 illustrates the LED indicators and the antenna connection for the GSR.
Figure 2 GSR LEDs & antenna connection
LEDs LINK / ACK - steady ON green; flash OFF when receiving
ALM / SUP - steady ON red for alarm or supervision condition
GSM # 1 2 3 4 host communications flashing blue
plug UFL connector from antenna into T5 on GSR RF communications flashing blue
Installation Rev A
Page 4 FlexZone Wireless Gate Sensor
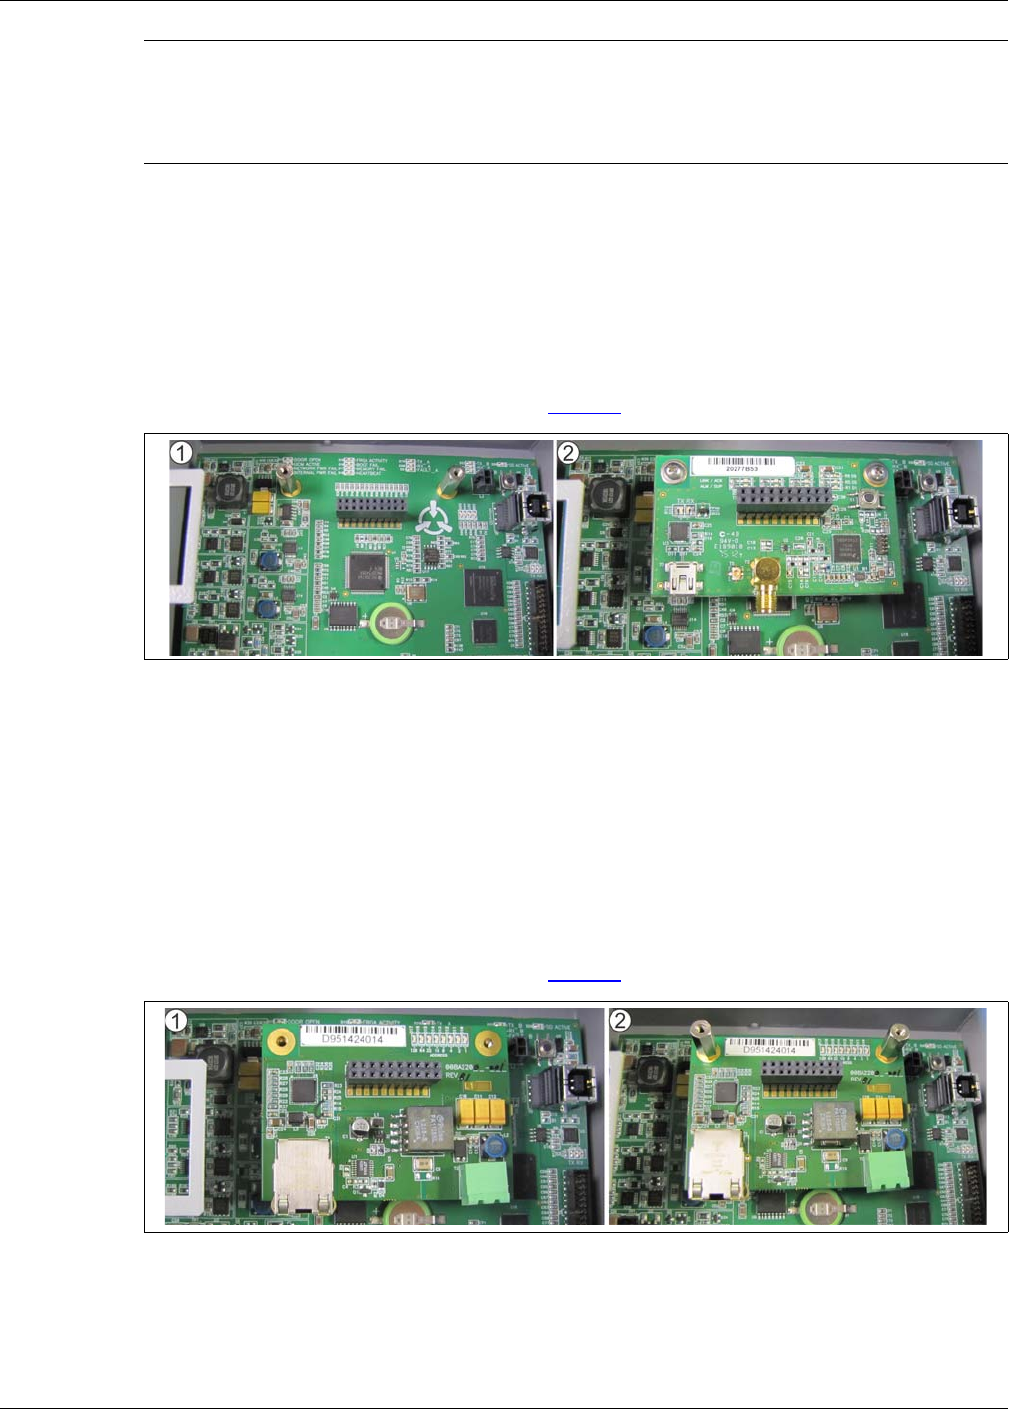
Installing the receiver on the FlexZone processor
1. Remove and retain the mounting hardware from the 2 standoffs on the FlexZone processor
(flat washer, lock washer, machine screw).
2. Align the 20-pin header on the bottom of the receiver with the expansion header on the
FlexZone processor and align the 2 mounting holes on the receiver with the 2 standoffs.
Carefully, insert the receiver into the expansion header. Use the retained mounting hardware
to secure the receiver to the FlexZone processor.
3. Connect the antenna to the receiver (see Figure 2).
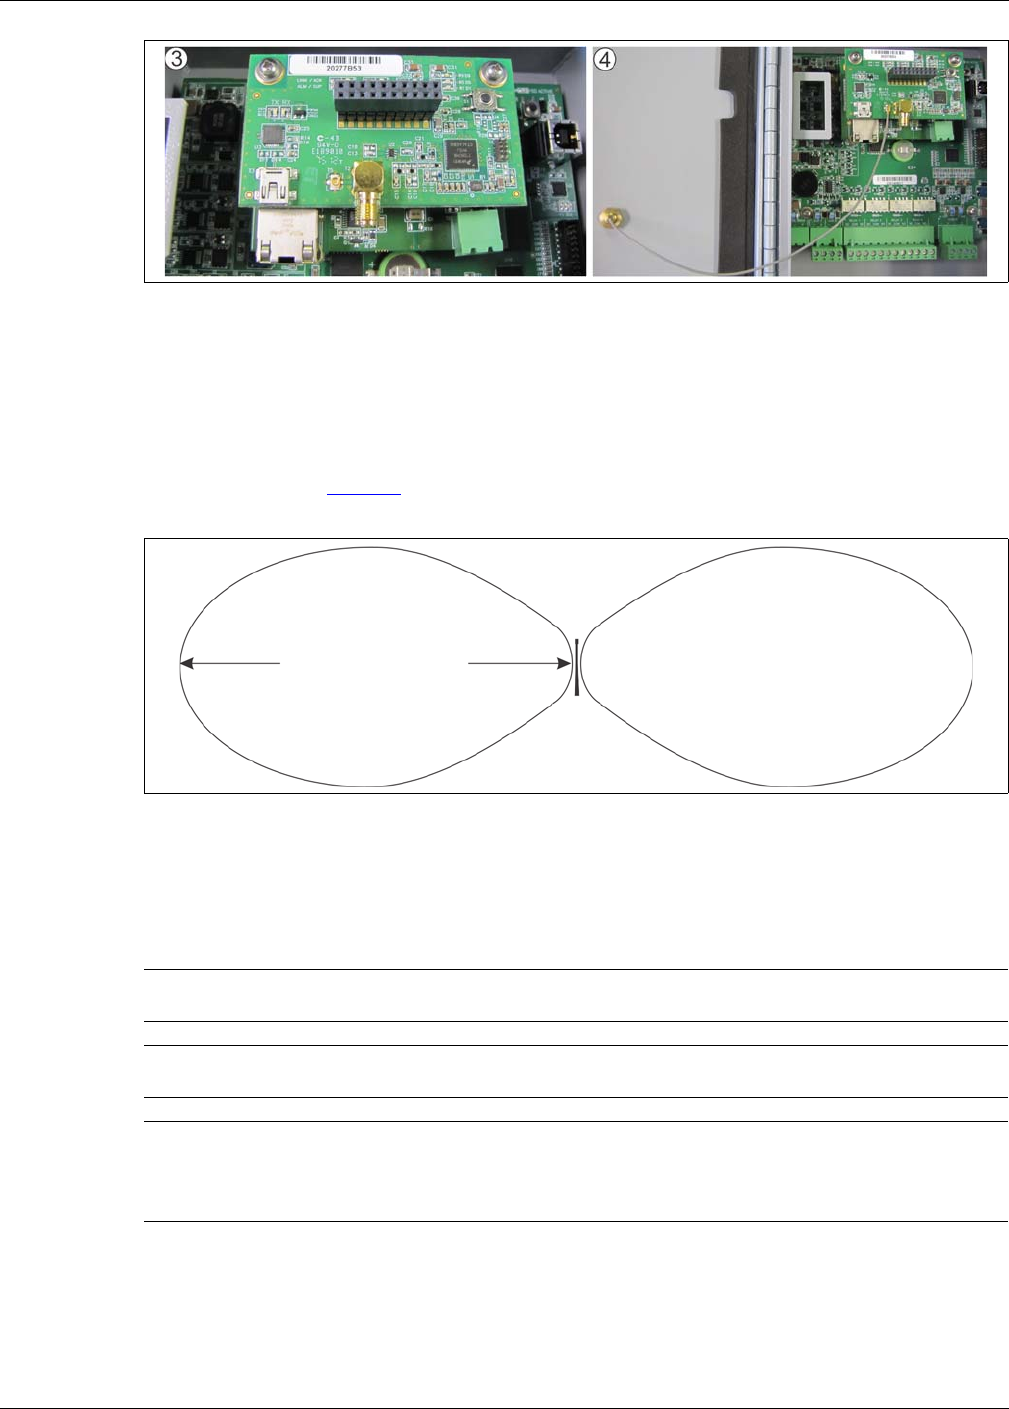
Installing the receiver on an NIC
1. Remove and retain the mounting hardware securing the NIC to the processor (flat washer,
lock washer, machine screw).
2. Secure the NIC to the FlexZone processor with the 2 supplied standoffs.
3. Align the 20-pin header on the bottom of the receiver with the expansion header on the NIC
and align the 2 mounting holes on the receiver with the 2 standoffs on the NIC. Carefully, insert
the receiver into the expansion header. Use the retained mounting hardware to secure the
receiver to the NIC.
4. Connect the antenna to the receiver (see Figure 2).
CAUTION The FlexZone processor, network interface card and receiver all contain
static sensitive components. Follow proper ESD handling procedures when
working on the cards.
Disconnect all sources of power to the FlexZone processor before installing
the receiver.
Figure 3 Mounting the receiver on the FlexZone processor
Figure 4 Mounting the receiver on the NIC (steps 1 & 2)
Rev A Installation
FlexZone Wireless Gate Sensor Page 5
Antenna mounting
The supplied whip antenna is sensitive in the 360º horizontal plane, but has low sensitivity above
and below the antenna. The recommended installation location is centered on the FlexZone
processor enclosure door. The enclosure door provides the largest ground plane, which improves
the antenna’s sensitivity. Enclosure door mounting provides good sensitivity in both directions
down the fence line. Figure 6 is a cross sectional representation of the antenna pattern for the
supplied whip antenna.
It is also possible to mount the rubber whip antenna on the top of the enclosure. However, top
mounting generally results in a reduced maximum range along the fence line due to the smaller
ground plane. However, mounting the antenna on top of the enclosure provides omni-directional
coverage.
1. Locate the center of the selected mounting surface and mark the position of the mounting hole
at that point.
Figure 5 Mounting the receiver on the NIC (steps 3 & 4)
Figure 6 Cross sectional antenna coverage pattern
Note To mount the antenna on the enclosure door or on the top of the enclosure,
drill a 6.3 mm (1/4 in.) hole in the center of the mounting surface.
Note For top enclosure mounting, remove the processor circuit card from the
enclosure before drilling the mounting hole.
Note The rubber whip antenna provides a good seal when the nut is securely
tightened on the inside of the enclosure. However, a thin bead of outdoor
rated silicone can be added around the base of the antenna to provide
additional protection against water ingress.
300 m (984 ft.) nominal
low sensitivity
low sensitivity
FlexZone processor Rev A
Page 6 FlexZone Wireless Gate Sensor
2. For door mounting, open the enclosure door, lay the processor flat on the open side, and drill
from the outside of the door.
For top mounting, remove the processor circuit card from the enclosure and drill the mounting
hole in the center of the top of the enclosure.
3. Carefully remove all metal shavings from the enclosure.
4. Remove the locking nut from the base of the antenna and pass the wire through the drilled
hole (add a bead of silicone around the base of the antenna if desired).
5. Feed the antenna wire through the locking nut and securely tighten the nut inside the
enclosure.
6. Connect the UFL connector on the antenna wire to T5 on the receiver (see Figure 2).
FlexZone processor
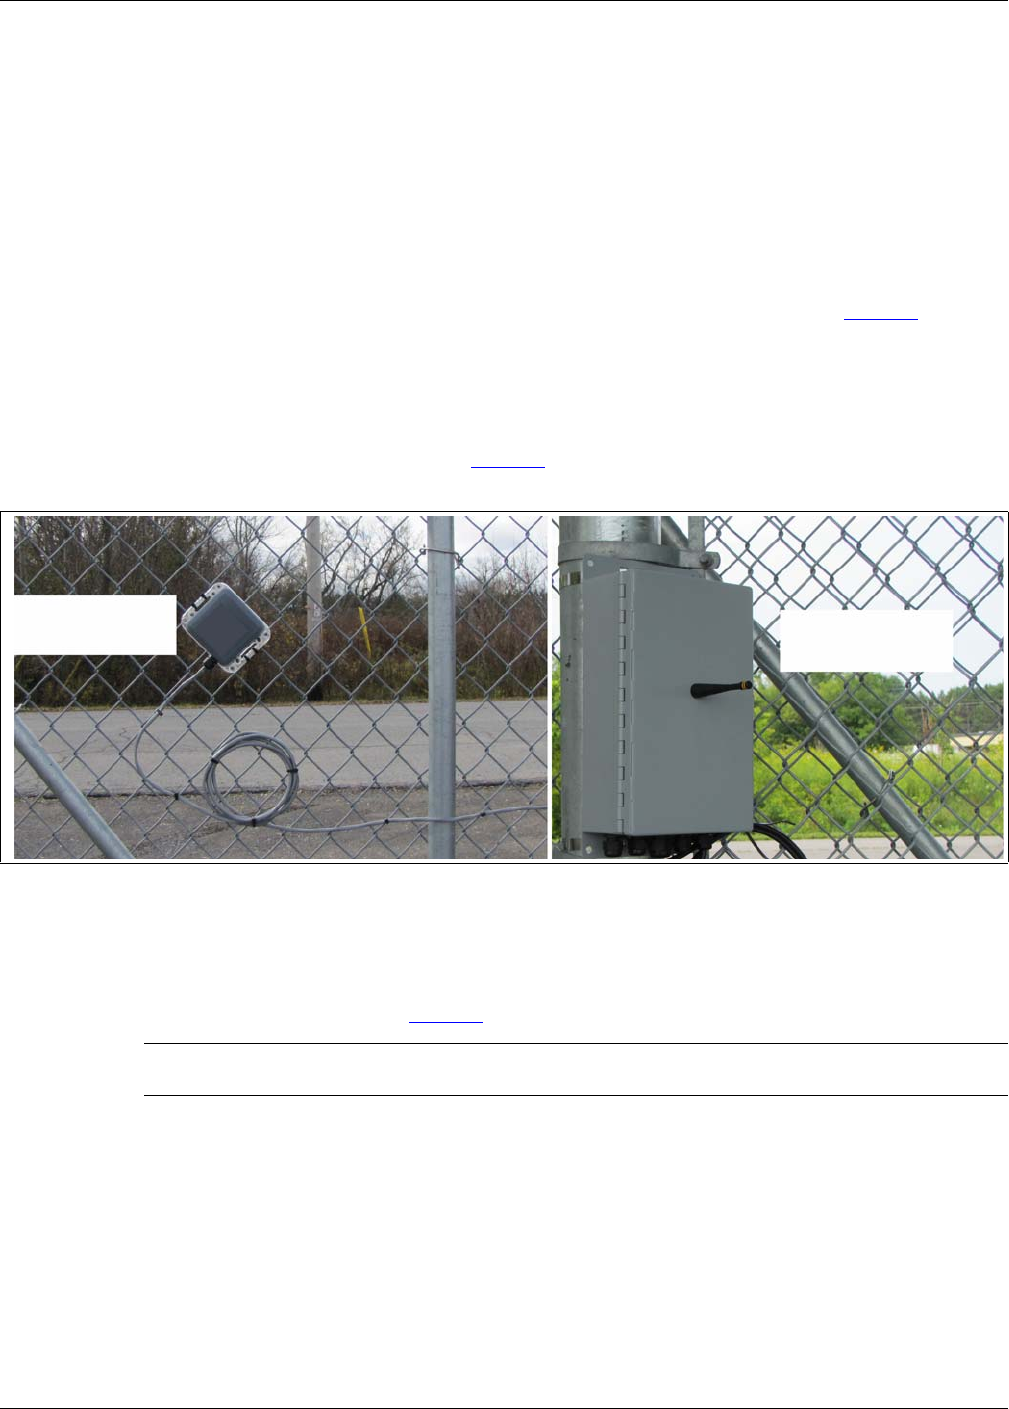
The FlexZone processor must be within 300 m (984 ft.) and have an unobstructed line of sight to
each of its reporting GSMs (up to 4). Figure 7 shows a fence-mounted FlexZone processor with a
rubber whip antenna mounted on the enclosure door.
Mounting the gate sensor module
The GSM is designed to be attached directly to the fence fabric on a gate with UV-resistant
polypropylene cable ties (supplied). For increased security, the GSM can also be attached with
stainless steel cable ties (see Figure 1).
Using an auxiliary security device (gate contact) with the GSM
The GSM includes a cable entry port fitted with a sealed cable gland for connecting a magnetic
contact or other 2 wire security device to the GSM. The status of the auxiliary security device is
reported to the host FlexZone processor by the GSM. The FlexZone processor passes the status
information to the security management system over the Silver Network or via contact closures.
The WGS can be configured to suppress GSM sensor and/or supervision alarms when the
FlexZone Aux input is in alarm (i.e., when the gate is open). A FlexZone splice kit is available for
making the connection between the auxiliary device and the GSM.
Figure 7 Angle-mounted FlexZone processor and gate sensor module
Note When attaching the GSM, ensure that the auxiliary input cable port is
oriented toward the ground.
battery powered GSM
on sliding gate with angle-mounted for
FlexZone processor
best RF reception
magnetic gate contact
Rev A FlexZone processor
FlexZone Wireless Gate Sensor Page 7
Connecting the auxiliary device to the GSM
1. Begin by installing the gate contact according to the manufacturers’ directions.
2. Follow the instructions provided with the splice kit to connect the cable from the gate contact to
the cable leading to the GSM.
3. Attach the cable to the fence with UV resistant cable ties.
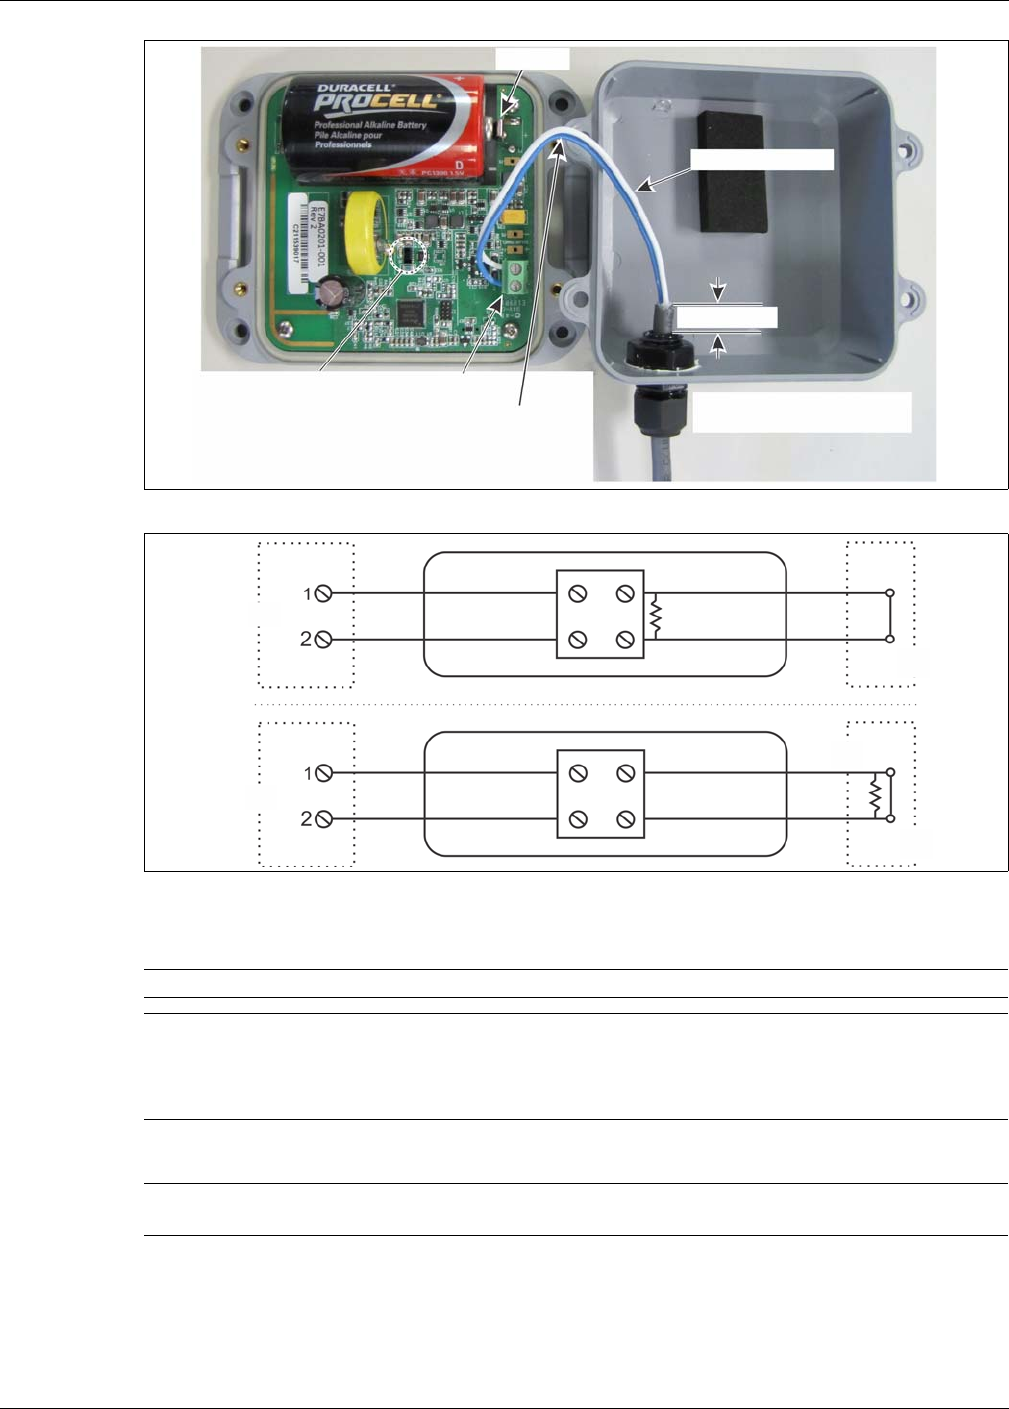
Figure 8 Connecting the auxiliary device to the GSM
Figure 9 Auxiliary device wiring examples
Note The contact closure input to the GSM MUST be voltage free.
Note The GSM cable gland accepts cables with an OD of 2.9 to 6.4 mm
(0.115 to 0.25 in.).
The auxiliary input connector on the GSM accepts wire sizes between 16
and 26 AWG with a 1/4 in. strip (1.3 mm2 to 0.13 mm2 with a 6 mm strip).
Note If the supervision resistor is installed inside the SK9 enclosure, the SK9
should be mounted as close to the gate contact as possible.
battery +
13 cm (5 in.) leads
securely tighten the 16 mm
proximity sensor (tamper) auxiliary input
1 cm (0.4 in)
(5/8 in.) compression nut
connector
route the wires from the auxiliary device
(gate contact) along the inside edge of the
enclosure beside the battery or solar capacitor
keep the wires away from the proximity sensor
gate contact
normally closed
GSM AUX input supervision
SK-9 enclosure
terminal block
resistor
gate contact
normally closed
GSM AUX input
supervision
SK-9 enclosure
terminal block resistor

FlexZone processor Rev A
Page 8 FlexZone Wireless Gate Sensor
4. At the mounting location for the GSM, remove 13 cm (5 in.) of the outer jacket.
5. Remove 6 mm (1/4 in.) of insulation from the end of each wire.
6. Remove and retain the 4 screws from the GSM.
7. Remove the compression nut from the cable gland fitting and pass the cable through the nut
and into the enclosure so that the two leads plus 1 cm (0.4 in.) of outer jacket are inside the
GSM.
8. Route the two leads along the inside edge of the GSM. Fold the two leads back so the battery
or solar capacitor holds them toward the side of the enclosure and away from the proximity
sensor (see Figure 8).
9. Connect the two leads to the auxiliary input connector on the GSM.
10. Ensure the wire leads are properly dressed (away from the proximity sensor) and cannot be
pinched by the enclosure cover and reinstall the 4 screws.
Selecting the GSM battery type
For GSMs using D-cell batteries, set the shunt on T8 for the specific type and voltage of the
battery being used (see Figure 10). The solar powered GSM does not include the T8 header.
• for a 1.5 V alkaline battery place the shunt on T8 pins 1 and 2
• for a 3.6 V lithium battery place the shunt on T8 pins 2 and 3
Replacing the GSM battery
The GSM will transmit a low battery notification when the battery is down to 10% capacity. The
GSM can usually continue to operate for over a month after the low battery notification. However,
other factors such as temperature also affect the battery life. Senstar recommends that the battery
be replaced within one week of the low battery notification (see Figure 8).
Note Install the SK9 enclosure 15 cm (6 in.) above the cable to provide drip
loops.
Note If there is a chance that the GSM will be relocated to another position on the
gate at a later time, create a service loop with sufficient cable near the
GSM.
CAUTION The GSM requires that all 4 screws (# 6 X 32 X 3/8 in.) be installed and
securely tightened to prevent water ingress into the device. If a screw is
lost, it must be replaced.
Note The lithium type D-cell battery should be used at sites which experience
periods of extremely cold (or hot) temperatures. The lithium type battery will
provide more than double the operational lifetime of the alkaline type
battery in normal use.
CAUTION If the GSM includes an auxiliary device connection, use care when
removing the cover from the GSM to ensure that no pulling force is applied
to the auxiliary input connector (13 cm lead).
Rev A FlexZone processor
FlexZone Wireless Gate Sensor Page 9
Gate sensor module supervision
There are 3 selectable modes for GSM supervision:
• Mode 1: swinging gates - GSM ignores horizontal motion (front to back) in the Z axis - any
other motion triggers supervision alarm
• Mode 2: vertical pivot lift-gates - GSM ignores rotational motion (up and down) in both the
X & Y axis - any other motion triggers supervision alarm
• Mode 3: sliding gates - any motion triggers supervision alarm
Figure 10 Setting the battery selection shunt on the GSM
Note When used in conjunction with a magnetic contact, each supervision Mode
will ignore all motion when the GSM’s auxiliary input is active (i.e., gate
contact open).
Figure 11 Supervision mode concept drawing
leave shunt parked on T8 pin 2 for
battery powered units in storage
place shunt on T8 pins 1 and 2 for
1.5 V D-cell alkaline battery
place shunt on T8 pins
2 and 3 for 3.6 V D-cell
lithium battery
battery compartment
WGS Configuration Rev A
Page 10 FlexZone Wireless Gate Sensor
WGS Configuration
The Universal Configuration Module (UCM) is a Windows based software application, which
serves as the calibration, setup and maintenance tool for the FlexZone sensor system and the
Wireless Gate Sensor. The UCM communicates with the FlexZone processor locally through a
USB connection, or remotely via the Silver Network Manager. The UCM communicates with the
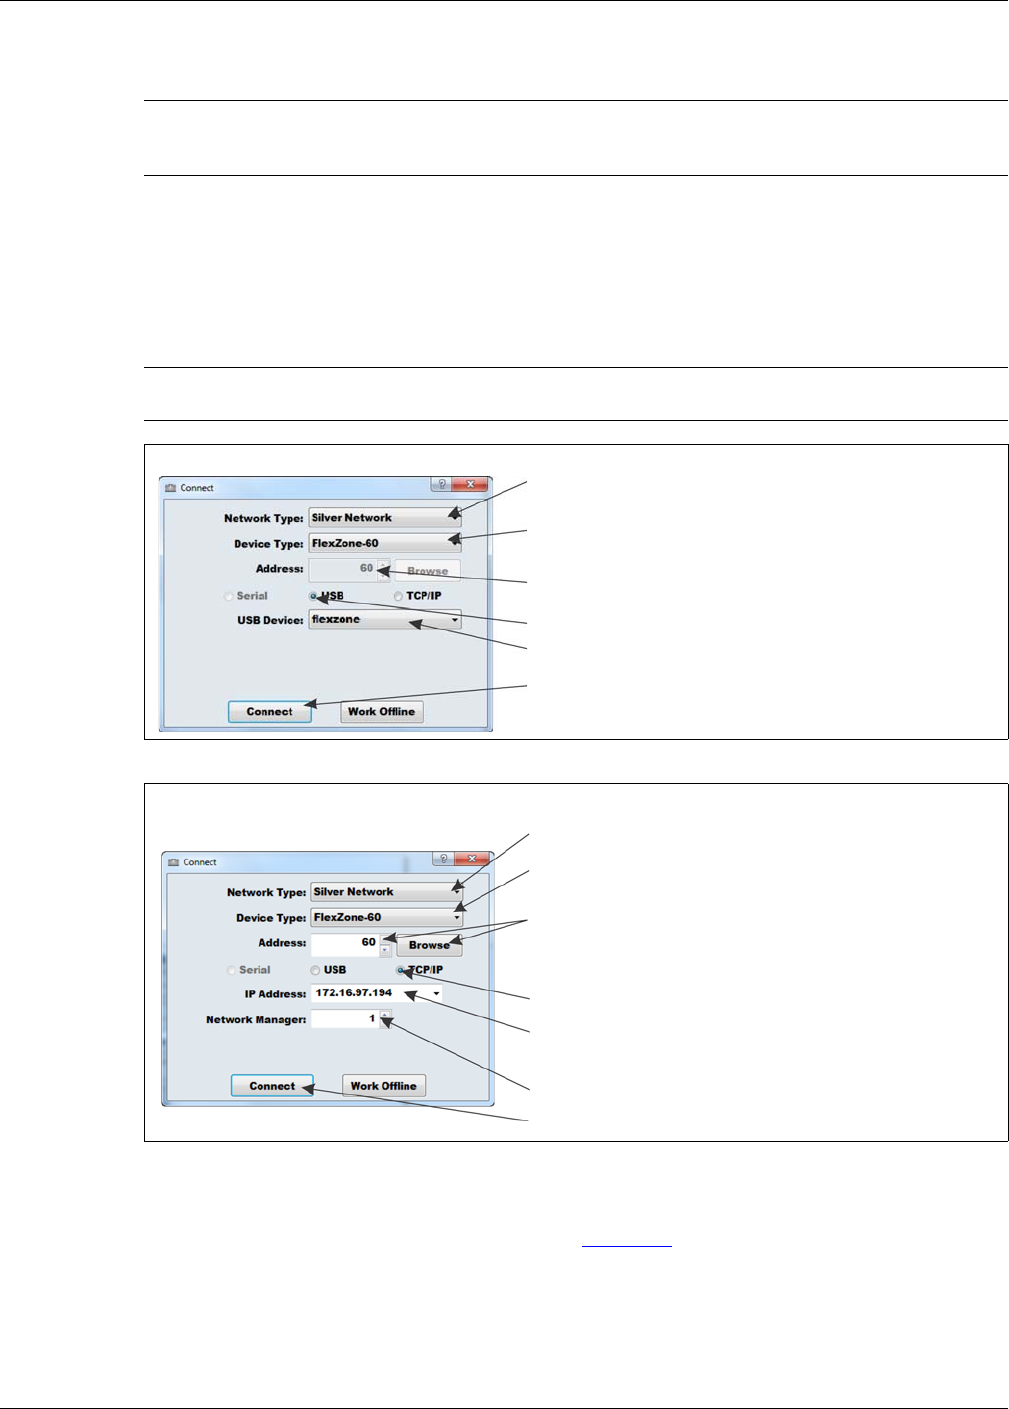
WGS through the FlexZone processor. When you start the UCM, a window displays that enables
you to specify the device to which you are connecting.
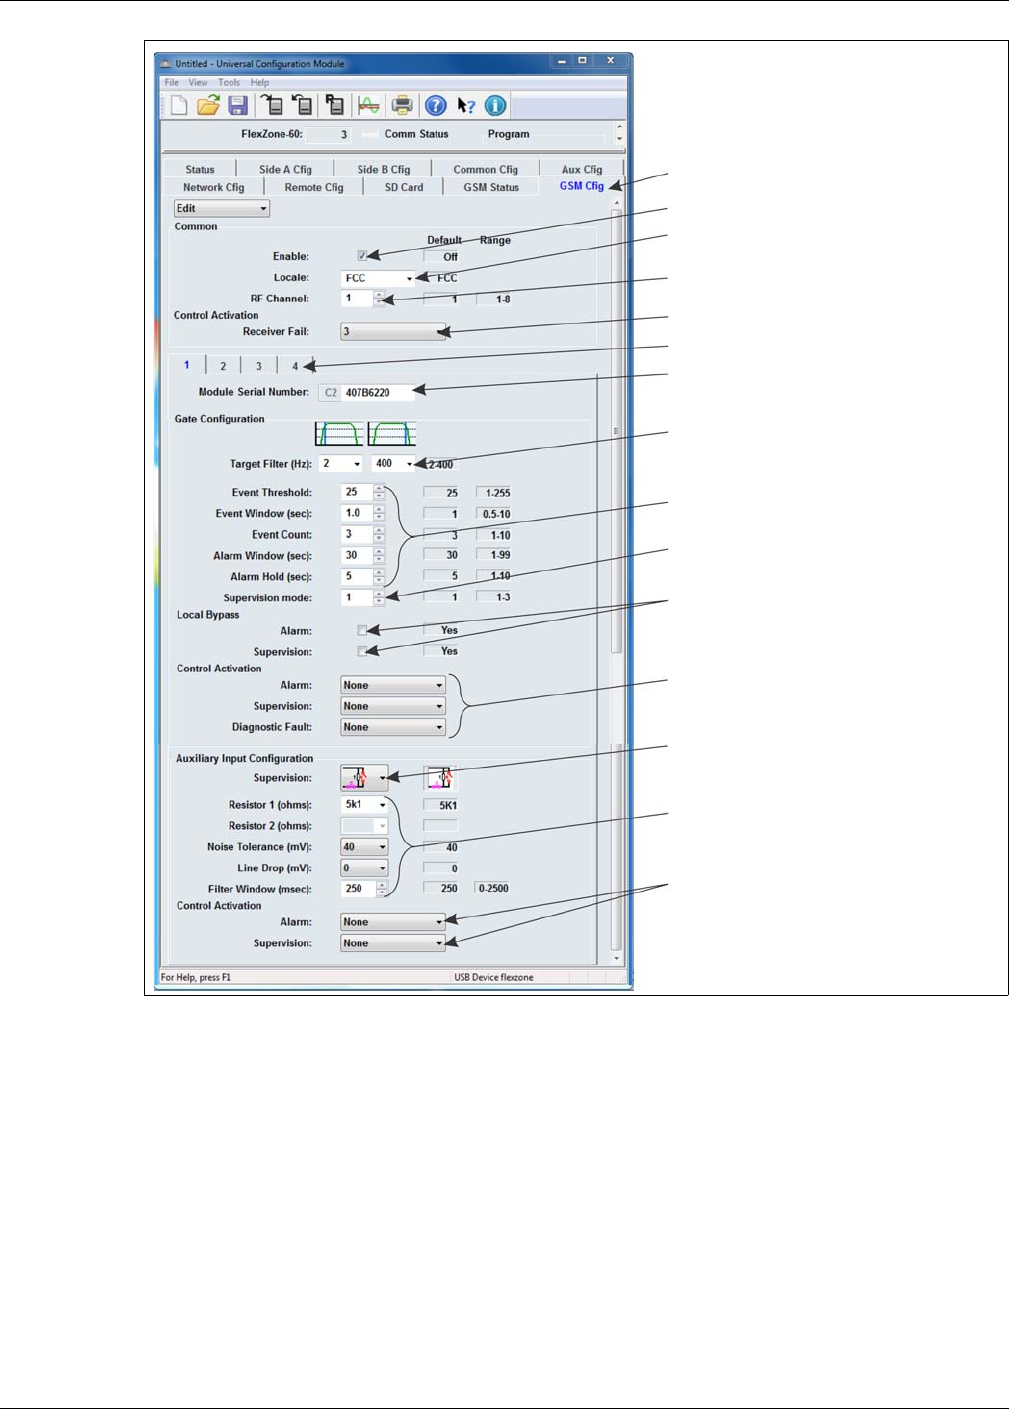
When the UCM connection is made, the FlexZone status window displays. Select the GSM Cfig
tab to display the GSM configuration parameters. Figure 14: shows the GSM Cfig window and the
following table includes descriptions of the configuration settings.
Note Consult the online help for detailed information on UCM operation.
Refer to the FlexZone Product Guide for additional information on
configuring the FlexZone processor.
Tip Save UCM files with a meaningful name, which includes the time and
date. The files can then be reopened at a later time (Work Offline).
Figure 12: Connecting the UCM (via USB)
Figure 13: Connecting the UCM (via TCP/IP
USB direct connection in the Network Type: field select the network to
which you are connecting (Silver for FlexZone)
in the Device Type: field select the device (FlexZone -4 or -60)
the address of the connected processor is displayed
select the connection type (i.e., USB)
select the arrow to display the connected USB device
select the connect button to establish the connection
TCP/IP connection via Network Manager in the Network Type: field select the network to which you
are connecting (Silver for FlexZone)
to connect via the Silver Network Manager, use the Browse
button to locate the processor address OR use the Address
field to specify the processor address (Browse requires a
previously specified IP address and Network Manager ID)
select the connection type (i.e., TCP/IP)
enter the IP address of the Network Manager PC
(if the NM and UCM are located on the same PC,
enter 127.0.0.1 as the IP Address)
specify the ID number assigned to the Network Manager
select the connect button to establish the connection
in the Device Type: field select the device (FlexZone -4 or -60)

Rev A WGS Configuration
FlexZone Wireless Gate Sensor Page 11
Wireless gate sensor configuration parameters
UCM Parameter Parameter description Default
Common Settings
Enable Select (check) the Enable checkbox if the FlexZone includes a WGS. Off
Locale Specify the Locale where the WGS will operate FCC = North America;
ETSI = Europe. FCC
RF Channel Specify the RF channel this receiver will use to communicate with its gate
sensor modules. Each receiver at a site must use a distinct channel to
communicate with its GSMs to prevent interference (1 - 8 channels).
1
Receiver Fail Specify a relay that will activate to signal a receiver fail condition (Local
control mode or NM Mode).
GSM selection tabs Select a tab (1 - 4) to setup and configure each GSM that reports to this
FlexZone processor. The settings apply only to the selected GSM.
Gate Module Serial
Number Enter the last 8-digits of the gate sensor module’s serial number to enable
communications between the receiver and the GSM.
Gate Configuration
Target Filters There are 2 filters for adjusting the frequency response of the GSM. The high
pass filter can be set to 0.1, 0.5, 1, 2, 4, or 8 Hz. The low pass filter can be set
to 400, 80, 40, 25, 12, 8, or 4 Hz. The 2 filter settings cannot overlap. The high
pass filter is used to screen out low frequency vibrations such as the fence
motion caused by wind and loose fence fabric. The low pass filter is used to
screen out high frequency vibrations.
HPF - 2 Hz
LPF - 400 Hz
Event Threshold The received signal strength (1 - 255) at which an event is added to the Event
Count (Event = disturbance). 25
Event Window (sec) Sets the time period (0.5 - 10) after an Event is recorded before the next
Event can be recorded. Used to prevent vibrations from a single Event from
being recorded as subsequent Events.
1 sec
Event Count The number of Events (1 - 10) that must occur to trigger an alarm. 3
Alarm Window (sec) Sets the time period (1 - 99) after the first Event is recorded in which the
specified number of Events must occur to trigger an alarm. If the Alarm
Window time setting lapses before the Event Count is reached, the Event
Count resets to 0.
30 sec
Alarm Hold The time period (1 - 10) after an alarm is signaled before a subsequent alarm
can begin to accumulate. 3 sec
Supervision Mode Sets the gate sensor module’s supervision mode (1 - 3) based on the type of
gate being monitored (see Gate sensor module supervision on page 9). 3
Local Bypass
Alarm When an auxiliary security device (e.g., magnetic contact) is used in
conjunction with the GSM, a GSM alarm will not be reported when the Aux
Input is active (i.e., the gate is open).
No
Supervision When an auxiliary security device is used in conjunction with the GSM, a
GSM supervision condition will not be reported when the Aux Input is active. No
Control Activation
Alarm Specify a relay that will activate to signal a GSM alarm condition (Local control
mode or NM Mode).
Supervision Specify a relay that will activate to signal a GSM supervision condition (Local
control mode or NM Mode).
Diagnostic Fault Specify a relay that will activate to signal a GSM diagnostic fault condition
(Local control mode or NM Mode).

WGS Configuration Rev A
Page 12 FlexZone Wireless Gate Sensor
Auxiliary Input Configuration
Supervision Specify the resistor supervision scheme used with the auxiliary security
device.
Resistor 1 Specify the value of supervision resistor R1. 5k1
Resistor 2 Specify the value of supervision resistor R2 (available when dual resistor
supervision is selected).
Noise Tolerance Used to compensate for noisy input wiring (0, 20, 40, 60, 80, 100 mV) when
using single/dual resistor supervision on the auxiliary input. Set this parameter
in conjunction with the Filter Window setting to reduce FAR/NAR.
40
Line Drop Used to compensate for the voltage drop on long or high resistance input
wiring (0, 20, 40, 60 mV) available with single/dual resistor supervision.
0
Filter Window
(msec) Specifies the time for which an input must remain active before an event is
declared (0 to 2.5 s in 125 ms increments). Adjust the Filter Window in
conjunction with the Noise Tolerance to reduce FAR/NAR.
250 msec
Control Activation
Alarm Specify a relay that will activate to signal an Auxiliary Input alarm condition
(Local control mode or NM Mode).
Supervision Specify a relay that will activate to signal an Auxiliary Input supervision
condition (Local control mode or NM Mode).
Rev A WGS Configuration
FlexZone Wireless Gate Sensor Page 13
The following procedures assume that the FlexZone processor, the GSR and the GSM are
installed and operational, and that the FlexZone processor is configured.
• Ensure that the GSM is powered up (i.e., new battery installed, or at least 2 hours of sunlight
exposure for solar powered unit).
• Once the GSM serial number is entered via the UCM and downloaded to the FlexZone
processor, it generally takes about 2 minutes for the GSM/GSR pairing process to complete.
• It is possible that an interference alarm may be generated when reassigning GSM serial
numbers, or when setting up a network. If the interference alarm persists, select a different RF
channel.
Gate sensor module setup
1. Connect the UCM to the FlexZone processor.
Figure 14: GSM configuration window
GSM configuration tab
Enable checkbox
selectable RF channel
selectable relay for GSR fail notification
GSM selection tabs
enter the GSM Serial Number
high pass and low pass target filters
GSM detection parameters
selectable GSM supervision mode
selectable auxiliary device local bypass
selectable relays for GSM alarm,
supervision and diagnostic fault conditions
selectable auxiliary device supervision
auxiliary device input parameters
selectable relay for auxiliary device alarm
and supervision
specify the Locale (area of operation)
North America = FCC; Europe = ETSI

WGS Configuration Rev A
Page 14 FlexZone Wireless Gate Sensor
2. Select the GSM cfig tab.
3. Select (check) the Enable checkbox.
4. Specify the Locale (where the microwave will operate) FCC = North America; ETSI = Europe.
5. If there is more than one FlexZone processor communicating with wireless gate sensors at
this location, specify the RF channel for this processor.
6. If Local control mode or Network Manager mode alarm reporting is being used for this
processor, specify a relay to be activated if the receiver module fails (if desired).
If Remote control mode is being used for this processor, refer to the Network Manager online
help and the Network Manager Interface application note (00DA0209) for details on
configuring NM alarm reporting via the Silver Network.
7. Select a GSM configuration tab.
8. Enter the GSM’s serial number.
9. Specify the GSM’s Supervision Mode.
10. If Local control mode or Network Manager mode alarm reporting is being used for this
processor, specify a relay to be activated to report a GSM sensor alarm, a GSM supervision
condition and a GSM Fault condition.
11. Download the configuration changes to the processor.
If the GSM will operate in conjunction with an auxiliary security device, configure the Local Bypass
settings.
1. Select the Alarm checkbox to mask GSM sensor alarms, select the Supervision checkbox to
mask GSM supervision alarms when the auxiliary security device is active (in alarm).
2. Specify the supervision scheme for the auxiliary input.
3. Specify the supervision resistor value(s).
4. Adjust the auxiliary input Noise Tolerance, Line Drop and Filter Window parameters, if
required.
5. If Local control mode or Network Manager mode alarm reporting is being used for this
processor, specify a relay to be activated to report an auxiliary input Alarm condition and
Supervision condition.
6. Download the configuration changes to the processor.
Gate sensor module calibration
GSM calibration involves testing the gate to ensure that the detection parameter settings will
detect a valid intrusion (see G6DA0209 FlexZone Detection tests). The recommended method to
simulate a cut intrusion is to strike the fence fabric with the blade of a screwdriver. Hold the
screwdriver a few inches away from the fence and flip your wrist to lightly strike the fence. Practice
this to develop a consistent motion that applies a similar amount of force with each impact. Strike
the fence at the same location for each test, waiting at least 2 seconds between impacts. The best
Note Senstar recommends leaving the target filters and the GSM’s detection
parameters at the default settings for the calibration procedure. Adjust the
Target Filters only if you are experiencing an unacceptable NAR.
Note Before beginning the GSM calibration, perform a shake test to ensure the
gate is secure and has no loose fittings that may cause nuisance alarms
during windy conditions. Grip the fence fabric in the middle of the gate and
apply a pushing /pulling motion with increasing force.
Rev A WGS Configuration
FlexZone Wireless Gate Sensor Page 15
method to simulate a climb intrusion is to actually climb on the fence fabric (you do not have to
climb over the fence). Begin the tests on the protected surface at the farthest point away from the
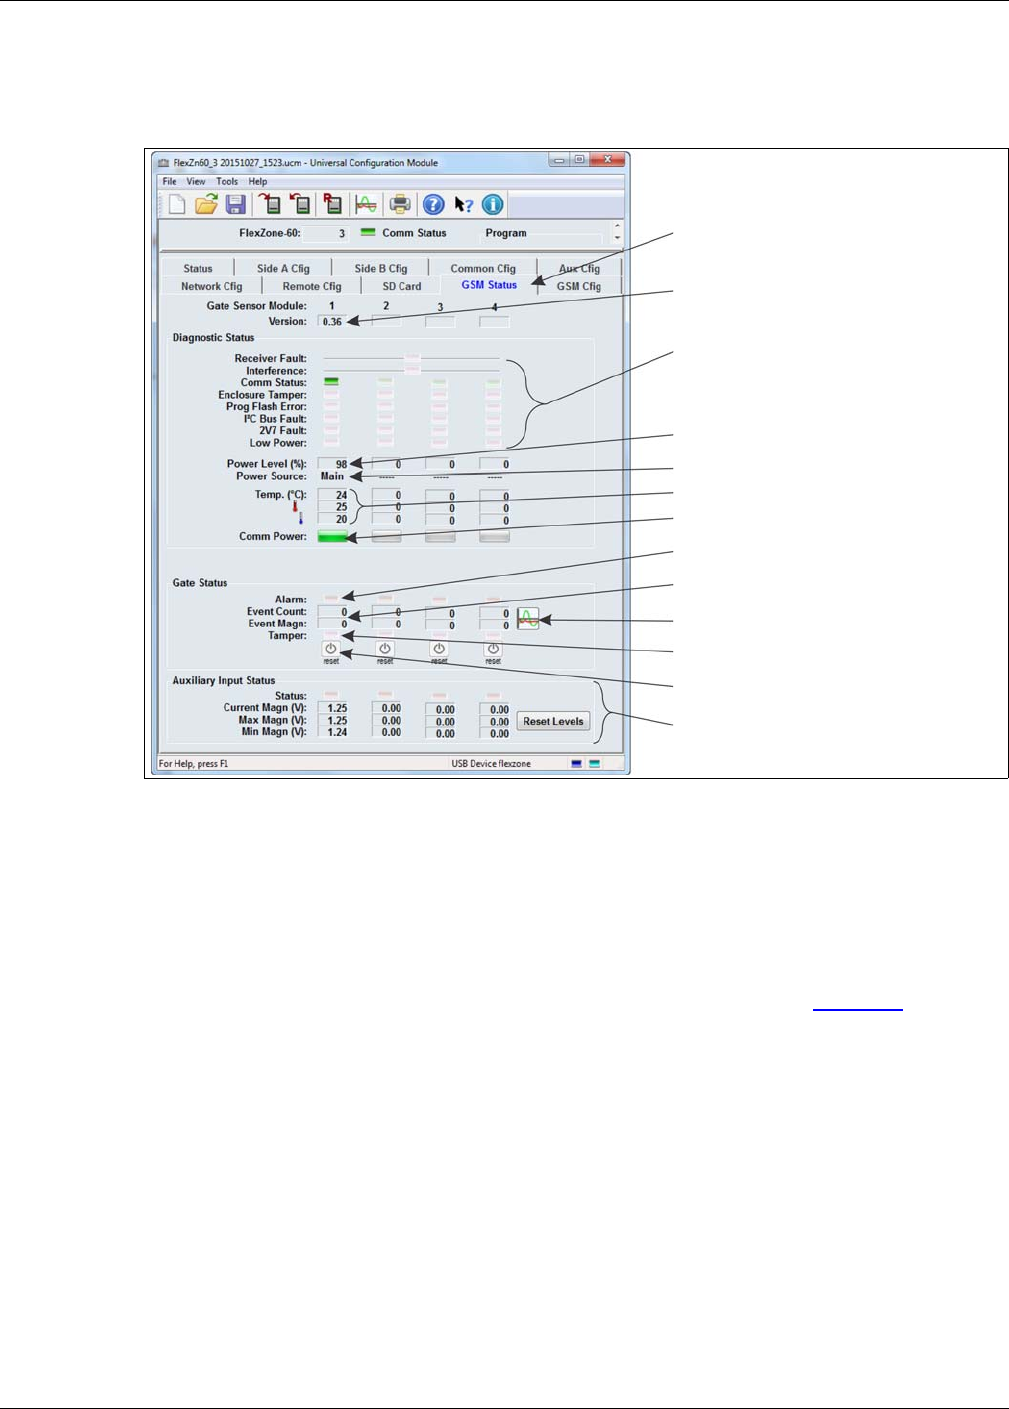
GSM. The UCM GSM Status window displays information about the gate sensor modules. Use the
UCM Magnitude Response Plot to calibrate and monitor the gate sensor module’s response.
1. Connect the UCM to the FlexZone processor.
2. Select the GM Status tab.
3. With the gate in its closed secure position, select the reset button. (The reset button sets the
current position of the GSM as the secure position.)
4. Verify the status of the GSM (no faults or alarms).
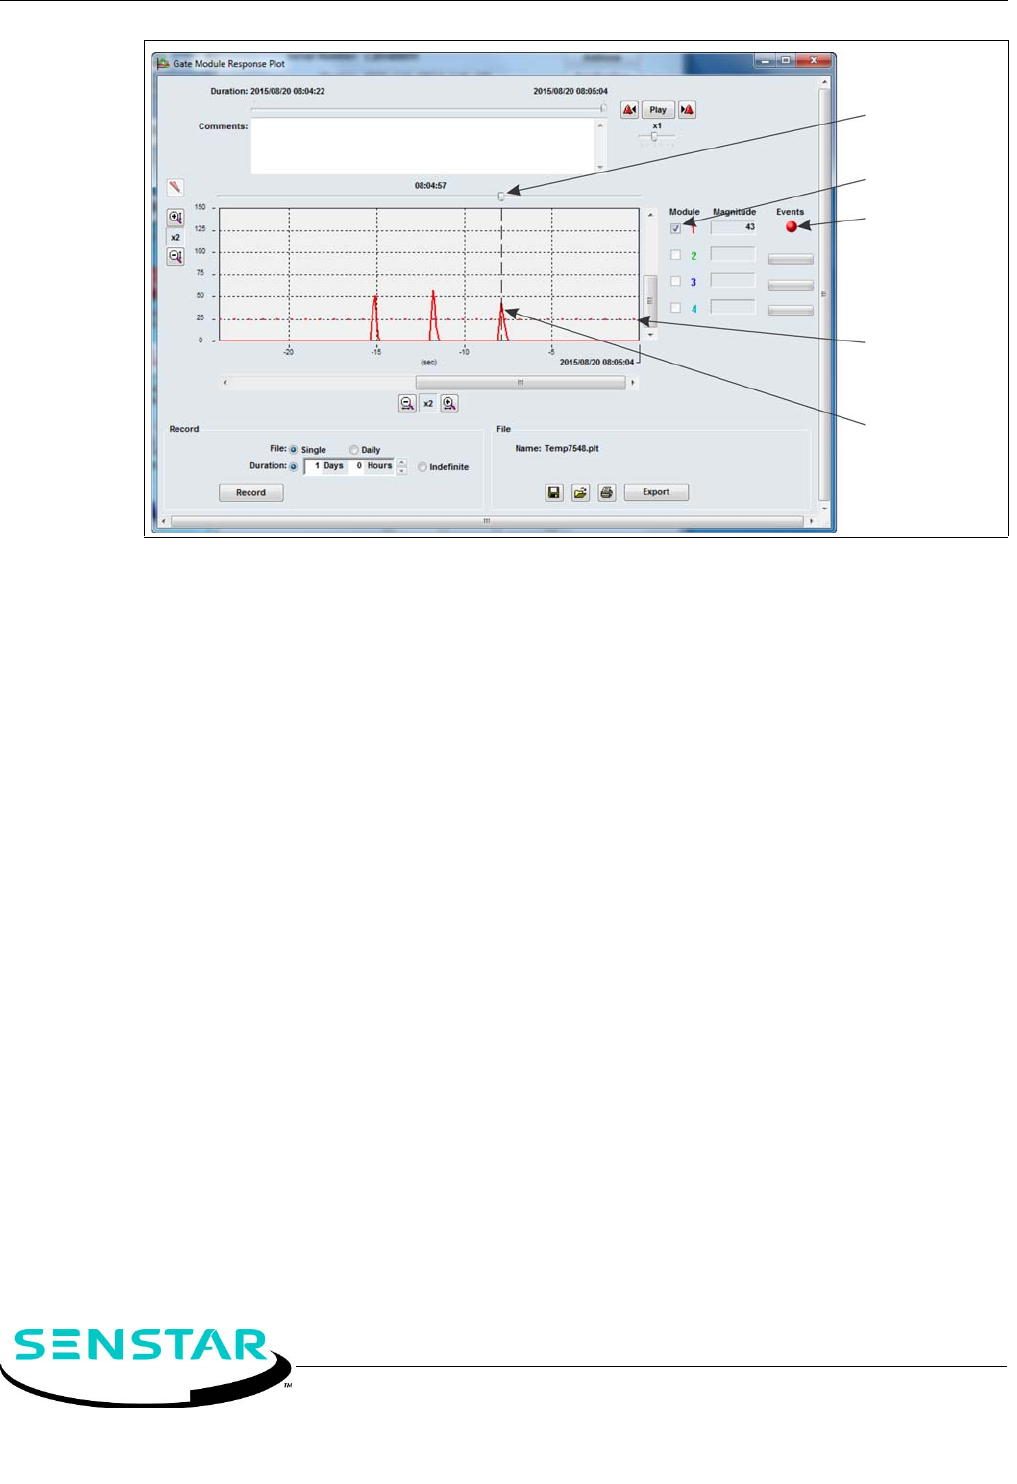
5. Select the Magnitude Response Plot button to open a plot window (see Figure 16:).
Figure 15 GSM status window
GSM Status tab
GSM firmware version
diagnostic status indicators
green = OK, purple = fault, gray = no fault,
question mark = status unknown
communication power indicator (bar graph)
Red indicate GSM Alarm active
Event Count and Event Magnitude
for current activity
select to open a Magnitude Response Plot
purple indicates GSM supervision condition
select Reset to set the current position of
the GSM as the secure operating position
current status of auxiliary input
current power level (capacity)
current power source (Main)
temperature readings (current, max., min.)
WGS Configuration Rev A
Senstar Corporation website: www.senstar.com email: info@senstar.com
FlexZone, Senstar and the Senstar logo are registered trademarks of Senstar Corporation. Product names and Company names included in this
document are used only for identification purposes, and are the property of, and may be trademarks of their respective owners. Copyright © 2015,
Senstar Corporation. All rights reserved. The information in this document is subject to change without notice. Printed in Canada.
6. Select the Record button and have the tap tester begin the tests at the farthest point on the
gate from the GSM.
7. Continue the tap testing moving closer to the GSM and then away from the GSM on the
opposite side until the gate has been fully tested.
• Each series of 3 taps should cause an alarm.
• The tap tests that are farthest away from the GSM should have the lowest magnitude
response. If tests closer to the GSM have lower magnitudes, inspect the fence for loose
fabric or other issues.
• If any of the test taps do not cause a response above the Event Threshold, repeat the
tests at that location.
• If the repeated tests remain below the Event Threshold, lower the Event Threshold and
repeat the tests.
• If all of the tests are significantly above the Event Threshold, raise the Event Threshold
and repeat the tests.
• Continue this process until each series of 3 taps causes an alarm.
You can adjust the GSM detection parameters to meet your site-specific security requirements.
Once the sensor is setup, calibrated and operational you should monitor the NAR to ensure
optimum settings. Minor adjustments to the Target Filters and the Event Threshold can be used to
prevent nuisance alarms caused by environmental factors and fence condition.
Figure 16: Gate sensor module response plot window
use the slider to
display the signal
magnitude
select the gate
module to test
alarm bell displays
when alarm occurs
Event Threshold
(red dotted line)
recorded signal
response from tap
testing