Sensus Metering Systems AR5002 Utility Meter RF Transceiver User Manual AR5000
Sensus Metering Systems Utility Meter RF Transceiver AR5000
Users Manual

Sensus AR5000
User’s Guide
Models AR5001 & AR5002

ii Sensus Metering Systems
Sensus AR5000 User’s Guide
Copyright © 2006 Sensus Metering Systems. All rights reserved.
No part of this document may be reproduced or transmitted in any
form or by any means, electronic or mechanical, for any purpose,
without the express written permission of Sensus Metering Systems.
Sensus Metering Systems, the Sensus logo, AR5000, ...???... are
trademarks or registered trademarks of Sensus Metering Systems.
Components of the TouchRead System are protected under U.S.
patents 3,748,654; 4,132,981; 4,652,877; 4,758,836 and other
pending.
Sensus cannot accept any financial or other responsibilities that may
be the result of your use of this information including direct,
indirect, special, or consequential damages. There are no warranties
extended or granted by this document. Refer to separate Sensus
warranty documents for product warranty coverage and specifics.
Sensus Metering Systems, 8601 Six Forks Road – Suite 300, Raleigh,
NC 27615. 919-845-4000.
FCC notice This equipment has been tested and found to comply with the limits
for Class B digital device, pursuant to part 15 of the FCC Rules.
These limits are designed to provide reasonable protection against
harmful interference in a residential installation. This equipment
generates, uses and can radiate radio frequency energy and, if not
installed and used in accordance with the instructions, may cause
harmful interference to radio communications. However, there is no
guarantee that interference will not occur in a particular installation.
If this equipment does cause harmful interference to radio or
television reception, which can be determined by turning the
equipment off and on, the user is encouraged to try to correct the
interference by one or more of the following measures:
• Reorient or relocate the receiving antenna.
• Increase the separation between the equipment and receiver.
• Connect the equipment into an outlet on a circuit different from
that to which the receiver is connected.
• Consult the dealer or an experienced radio/TV technician for
help.
Changes or modifications not expressly approved by Sensus Metering
Systems could void the user's authority to operate this equipment.

Sensus AR5000 User’s Guide iii
Contents
Chapter 1: About the AR5000
Device Care & Handling . . . . . . . . . . . . . . . . . . . . . . . . . . . . . . . . . . . . . 1-3
Use the Hand-Held Device . . . . . . . . . . . . . . . . . . . . . . . . . . . . . . . . . . . 1-4
Turn the Device ON/OFF . . . . . . . . . . . . . . . . . . . . . . . . . . . . . . . . . . . 1-4
About the Key Controls / Functions. . . . . . . . . . . . . . . . . . . . . . . . . . . . 1-5
About the Meter Display . . . . . . . . . . . . . . . . . . . . . . . . . . . . . . . . . . . . 1-7
How to Carry & Hold the AR5000 . . . . . . . . . . . . . . . . . . . . . . . . . . . . . 1-8
Configuring the AR5000 . . . . . . . . . . . . . . . . . . . . . . . . . . . . . . . . . . . . . 1-9
Link the AR5000 to a TouchRead Device (SmartGun/AutoGun) . . . . . 1-9
Change the Display Font & Size . . . . . . . . . . . . . . . . . . . . . . . . . . . . . 1-11
Adjust the Display . . . . . . . . . . . . . . . . . . . . . . . . . . . . . . . . . . . . . . . . 1-13
View the Battery Status. . . . . . . . . . . . . . . . . . . . . . . . . . . . . . . . . . . . 1-14
View the Current HHD ID & User . . . . . . . . . . . . . . . . . . . . . . . . . . . . 1-15
View the Date & Time . . . . . . . . . . . . . . . . . . . . . . . . . . . . . . . . . . . . . 1-16
Set Up & Use the Communication Stand . . . . . . . . . . . . . . . . . . . . . . 1-18
Connect the Stand . . . . . . . . . . . . . . . . . . . . . . . . . . . . . . . . . . . . . . . 1-18
Mount the Stand . . . . . . . . . . . . . . . . . . . . . . . . . . . . . . . . . . . . . . . . . 1-20
Place the AR5000 in the Stand . . . . . . . . . . . . . . . . . . . . . . . . . . . . . . 1-21
Charge the AR5000 . . . . . . . . . . . . . . . . . . . . . . . . . . . . . . . . . . . . . . . . 1-22
Charge the AR5000 in the Stand . . . . . . . . . . . . . . . . . . . . . . . . . . . . 1-22
Charge the AR5000 using the Wall Charger. . . . . . . . . . . . . . . . . . . . 1-24
Battery Maintenance . . . . . . . . . . . . . . . . . . . . . . . . . . . . . . . . . . . . . . 1-24
Contact Customer Support. . . . . . . . . . . . . . . . . . . . . . . . . . . . . . . . . . 1-27
Chapter 2: Collect Meter Data
Start Collecting Data . . . . . . . . . . . . . . . . . . . . . . . . . . . . . . . . . . . . . . . . 2-2
Select A Route . . . . . . . . . . . . . . . . . . . . . . . . . . . . . . . . . . . . . . . . . . . 2-3
Alter Route Behaviors . . . . . . . . . . . . . . . . . . . . . . . . . . . . . . . . . . . . . . 2-4

iv Sensus Metering Systems
Chapter: Contents
Manage Reading Scenarios . . . . . . . . . . . . . . . . . . . . . . . . . . . . . . . . . .2-7
About Meter Read Behaviors . . . . . . . . . . . . . . . . . . . . . . . . . . . . . . . .2-8
Resolve Readings That Don’t Match the Displayed Location . . . . . . . .2-9
Resolve a Non-Route Meter . . . . . . . . . . . . . . . . . . . . . . . . . . . . . . . .2-10
Resolve Reading Malfunctions and Bad Reads . . . . . . . . . . . . . . . . .2-12
Enter Data . . . . . . . . . . . . . . . . . . . . . . . . . . . . . . . . . . . . . . . . . . . . . . . .2-14
Enter Manual Readings . . . . . . . . . . . . . . . . . . . . . . . . . . . . . . . . . . . .2-14
Enter TouchRead Readings . . . . . . . . . . . . . . . . . . . . . . . . . . . . . . . .2-16
Enter RadioRead Readings (AR5002 only). . . . . . . . . . . . . . . . . . . . .2-18
Enter Notes . . . . . . . . . . . . . . . . . . . . . . . . . . . . . . . . . . . . . . . . . . . . .2-19
Mark Locations . . . . . . . . . . . . . . . . . . . . . . . . . . . . . . . . . . . . . . . . . .2-20
Answer Questions . . . . . . . . . . . . . . . . . . . . . . . . . . . . . . . . . . . . . . . .2-21
Add New Meters to Route . . . . . . . . . . . . . . . . . . . . . . . . . . . . . . . . . .2-22
Chapter 3: Find Route Information
Search the Route . . . . . . . . . . . . . . . . . . . . . . . . . . . . . . . . . . . . . . . . . . .3-3
Search for an Address . . . . . . . . . . . . . . . . . . . . . . . . . . . . . . . . . . . . . .3-4
Go to the First Address . . . . . . . . . . . . . . . . . . . . . . . . . . . . . . . . . . . . .3-5
Go to the Last Address . . . . . . . . . . . . . . . . . . . . . . . . . . . . . . . . . . . . .3-6
Search for a Meter ID . . . . . . . . . . . . . . . . . . . . . . . . . . . . . . . . . . . . . .3-8
Search Displayed Text . . . . . . . . . . . . . . . . . . . . . . . . . . . . . . . . . . . . .3-9
Find Unfinished Sections of the Route . . . . . . . . . . . . . . . . . . . . . . . .3-12
Find UnRead Meters . . . . . . . . . . . . . . . . . . . . . . . . . . . . . . . . . . . . . .3-12
Find UnVisited Location. . . . . . . . . . . . . . . . . . . . . . . . . . . . . . . . . . . .3-13
Find Unanswered Questions . . . . . . . . . . . . . . . . . . . . . . . . . . . . . . . .3-15
Find Special Entries. . . . . . . . . . . . . . . . . . . . . . . . . . . . . . . . . . . . . . . .3-17
Find Marked Locations . . . . . . . . . . . . . . . . . . . . . . . . . . . . . . . . . . . .3-17
Find Noted Locations. . . . . . . . . . . . . . . . . . . . . . . . . . . . . . . . . . . . . .3-19
Find Limit Violators . . . . . . . . . . . . . . . . . . . . . . . . . . . . . . . . . . . . . . .3-20
Review Read Information . . . . . . . . . . . . . . . . . . . . . . . . . . . . . . . . . . .3-23
Review Route Statistics . . . . . . . . . . . . . . . . . . . . . . . . . . . . . . . . . . . .3-23
Review Previous Transactions . . . . . . . . . . . . . . . . . . . . . . . . . . . . . .3-25

Sensus AR5000 User’s Guide 1-1
About the
AR5000
The AR5000 is the latest hand-held data collection device
from Sensus Metering Systems. This system provides a wide
range of options for collecting information and simplifies
many of the functions associated with reading utility meters.
Use the information in this document as a reference for the
basic features and setup options available in the AR5000.
You use the AR5000 series hand-held device to collect
readings from utility meters. Readings take place along
predefined routes. The device allows you to select a route
and enter readings using several methods. Both the AR5001
and AR5002 model versions provide the same basic set of
features, including the ability to enter meter reading data
manually or with the Sensus TouchRead system. The AR5002
model has the added capability of reading Sensus RadioRead
equipped meters.
Both devices also allow you to enter notes about locations,
mark locations to follow up later, and manage situations
where the information in the device doesn’t match the
locations on the route. You can also search through routes
and readings, check that the route is complete, and obtain
other statistics.

1–2 Sensus Metering Systems
Chapter 1: About the AR5000
Office staff add route information into the AR5000 and
extract your meter readings and notes from it by connecting
it to a PC via a communication stand. The stand also charges
the battery, which should last through your shift.
This chapter gives you an introduction to the device,
including basic instructions for use, setup, and maintenance.
The chapter is divided into the following sections:
•
Device Care & Handling
on page 1-3 - This section lists
warnings and care instructions.
•
Use the Hand-Held Device
on page 1-4 - Basic instructions
for the ON/OFF, keypad, and display functions.
•
Configuring the AR5000
on page 1-9 - Basic AR5000
configuration options.
•
Set Up & Use the Communication Stand
on page 1-18 -
Basic setup instructions for the communication stand.
•
Charge the AR5000
on page 1-22 - How to charge the
AR5000 and replace the battery.
•
Contact Customer Support
on page 1-27 - For Customer
Support.
You can find instructions for reading route information in
Chapter 2:
Collect Meter Data
. You can find instructions on
searching for specific route-related information in Chapter 3:
Find Route Information
.

Sensus AR5000 User’s Guide 1-3
Device Care & Handling
Device Care & Handling
Users need to do very little maintenance on the AR5000.
Typically, keeping the device in good working order requires
little more than occasional cleaning. Clean the case and
keyboard of the AR5000 with warm water, a mild detergent,
and a toothbrush.
If your AR5000 is going to be used in an environment where
it will be regularly exposed to substances such as oil or tar
that require stronger cleaning supplies, check with Sensus
Customer Support for a list of approved cleaning chemicals
that will not damage the case or seals on the AR5000. Find
contact information for Sensus Customer Support in
Contact
Customer Support
on page 1-27.
You do, however, need to observe some basic precautions
when handling the AR5000. The unit is housed in a rugged,
shock resistant, sealed case. But, it is a precision piece of
equipment.
!
Caution Do not use any kind of brush on the
display. A brush will scratch the display
and make it difficult to read the text.
!
Caution The AR5000 is water resistant, but not
water-proof. Do not submerge the unit for
extended periods.
!
Caution Do not drop the AR5000.

1–4 Sensus Metering Systems
Chapter 1: About the AR5000
Use the Hand-Held Device
Typically, you are going to pick-up your AR5000 at the
beginning of a shift and use it to collect meter reading
information. Before you use the system, you need to
familiarize yourself with the basic system controls.
This section provides information on the basic AR5000
controls and functions and is divided under the following
headings:
•
Turn the Device ON/OFF
on page 1-4 - How to switch the
power for the AR5000.
•
About the Key Controls / Functions
on page 1-5 - An
overview of the basic function keys.
•
About the Meter Display
on page 1-7 - An overview of
display and basic display controls.
•
How to Carry & Hold the AR5000
on page 1-8 - How attach
straps and hold the AR5000.
ÂTurn the Device ON/OFF
You can leave the AR5000 switched ON for extended periods
of time. The batteries are designed to keep the unit operating
for more than enough time to complete an average work
shift. Typically, you can use the AR5000 for a shift and then
place the unit into the charging stand with the power
switched ON (see
Charge the AR5000
on page 1-22).
Note
To extend battery life, the AR5000 has a sleep
feature that switches OFF the screen. If the
unit is inactive for approximately 10 minutes,
the system blanks the screen and sets the
device to the power-saver mode.
Sensus AR5000 User’s Guide 1-5
Use the Hand-Held Device
To switch the AR5000 ON/OFF...
ÂPress and release the On/Off key.
• If the system is ON, pressing the ON/OFF key blanks the
screen and set the AR5000 to power-saver mode.
• If the system is in power-saver mode, pressing the
On/Off key switches the AR5000 back ON and returns
the system to the same screen that was displayed when
the system switched to power-saver mode.
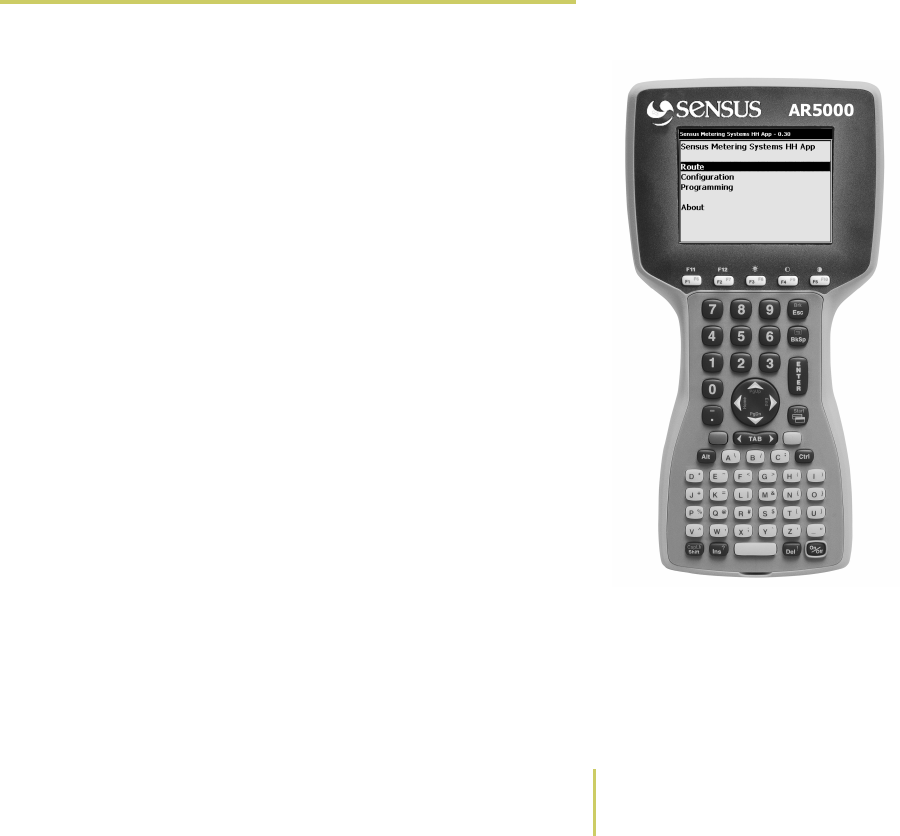
About the Key Controls / Functions
AR5000 Keypad & DisplayThe Function keys on the AR5000 can be defined and used as
shortcuts to many of the functions that you use frequently for
adjusting configuration settings and viewing information.
There are five Function keys. However, you can access up to
12 different functions and three additional controls with these
five keys. The list below provides a brief description of the
default function key assignments. These function key
assignments can be changed by office staff using a PC to
communicate with and configure the device. You should find
out whether the default assignments have been changed.
The following functions are available by pressing only the
function key:
• F1 - Manual Read - Use this function key to display the
Enter Text screen to enter a manual meter reading (see
Enter Manual Readings
on page 2-14).
• F2 - Note - Use this function key to display the Note screen
for entering a note about a location, such as “beware of
dog” (see
Enter Notes
on page 2-19).
• F3 - Search - Use this function to display the Search
Route... menu to find a particular address, meter, or other
information (see
Search the Route
on page 3-3).
• F4 - Mark - Use this function key to mark/unmark the
currently selected location on a route so that you can

1–6 Sensus Metering Systems
Chapter 1: About the AR5000
easily go back to it later (see
Mark Locations
on
page 2-20).
• F5 - Transaction History - Use this function key to display
the transaction history of meter readings collected on the
route from the beginning of the route to the most current
reading (see
Review Previous Transactions
on page 3-25).
The following functions are available by pressing and holding
the blue key and then pressing the function key:
• F6 (blue key + F1) - Configuration - Use this function to
display the Configuration menu.
• F7 (blue key + F2) - Gun Utilities - Use this function key to
display the Smart/AutoGun Utilities screen for linking to a
SmartGun or AutoGun (see
Link the AR5000 to a
TouchRead Device (SmartGun/AutoGun)
on page 1-9).
• F8 (blue key + F3) - This key is undefined by default.
• F9 (blue key + F4) - This key is undefined by default.
• F10 (blue key + F5) - This key is undefined by default.
The following functions and controls are available by pressing
and holding the yellow key and pressing the function key at
the same time:
• F11 (yellow key + F1) - This key is undefined by default.
• F12 (yellow key + F2) - Display Route Name - Use this
function key to display the name of the currently selected
route. The system displays a message with the route
name. Press the Esc key to clear the route name message.
• Backlight ON/OFF (yellow key + F3) - Use this control to
switch the backlight ON/OFF for better visibility in low-light
conditions.
• Contrast Light (yellow key + F4) - Use this control to
decrease the on-screen contrast and lighten the
appearance of characters.
• Contrast Dark (yellow key + F5) - Use this control to
increase the on-screen contrast and darken the
appearance of characters.
Sensus AR5000 User’s Guide 1-7
Use the Hand-Held Device
The remaining keys on the AR5000 keypad work in much the
same way as a standard typewriter keyboard. You can use
these keys to enter alpha/numeric information or to navigate
around the screens and menus as described in the various
sections of this guide.
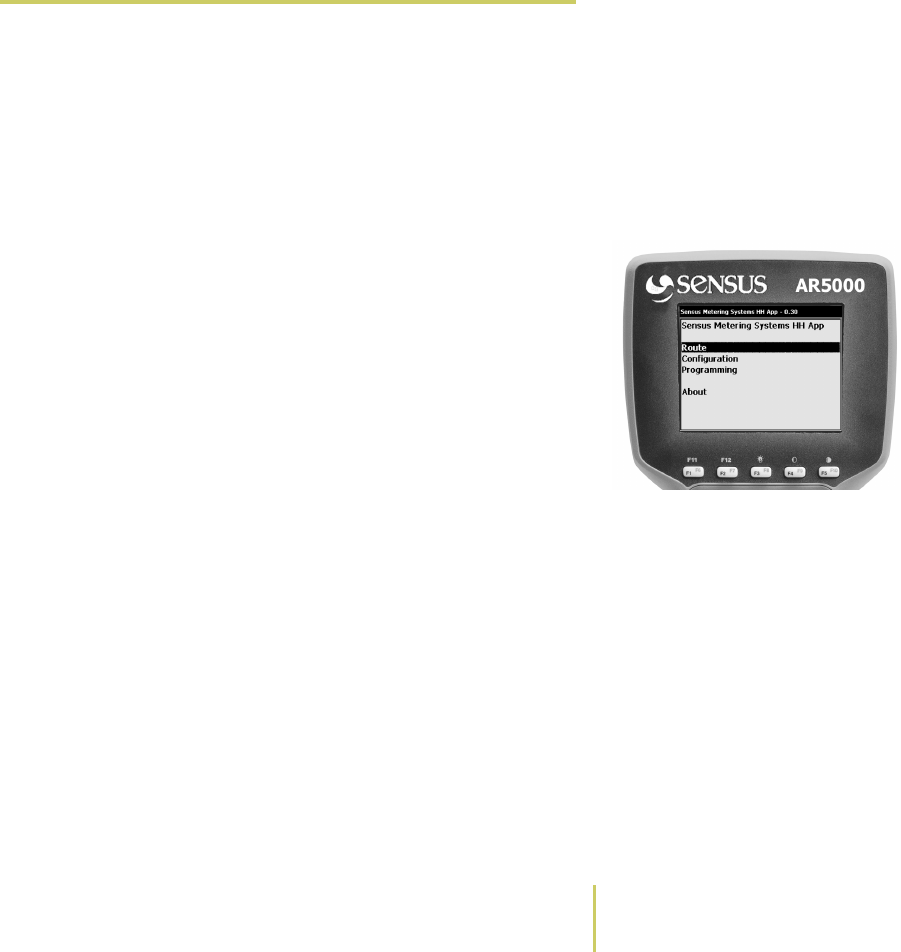
About the Meter Display
Typically, you will not need to make any adjustments related
to the screen. However, you can adjust the display’s contrast
and backlight to your preferences (see
Adjust the Display
on
page 1-13). In addition, you can set the size and style for the
display font (see
Change the Display Font & Size
on
page 1-11).
Function Keys & DisplayYou view all of the AR5000’s route information on the
system’s high-contrast Liquid crystal display screen. This
monochrome display has a 4.1” diagonal viewing area, is
shock-mounted, sealed, and equipped with a heater for cold
weather operation.
1–8 Sensus Metering Systems
Chapter 1: About the AR5000
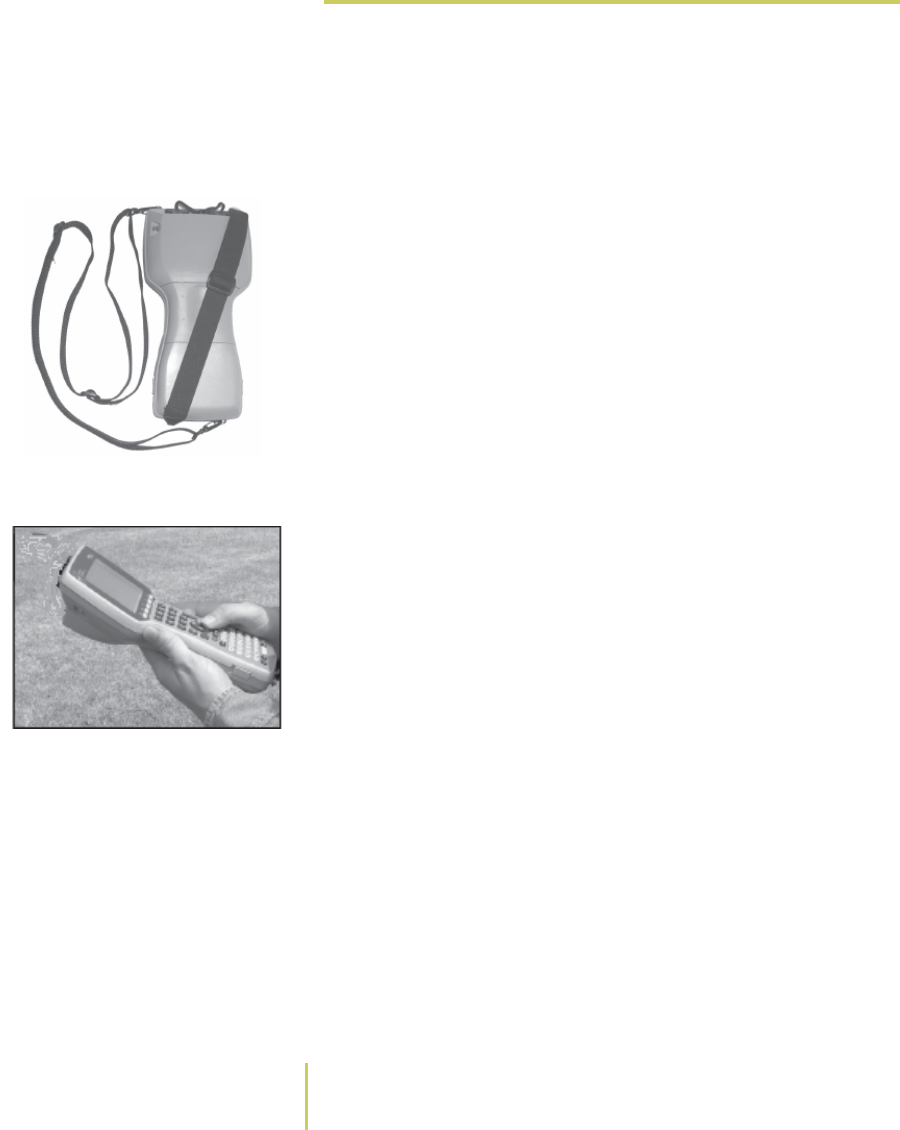
How to Carry & Hold the AR5000
You can use the AR5000 with two different types of carry
straps. One strap allows you to sling the unit over your
shoulder for hands-free carrying, and the other makes it easy
to hold the device in one hand while you are reading meters.
Straps on the AR5000 Both the hand strap and the shoulder strap attach with clips
to the attachment points at the top and bottom of the
AR5000. Use the clips on the end of each strap to connect to
the device, as shown in the illustration.
When you are carrying the AR5000 with the shoulder strap,
you do not need to hold the device in your hands while
walking. However, you do need to hold the device in one
hand to operate the controls, enter any information, or
search for data.
Holding the AR5000

Sensus AR5000 User’s Guide 1-9
Configuring the AR5000
Configuring the AR5000
You can configure a number of settings, before you take the
AR5000 into the field. For example, everyone has different
preferences for the system display brightness and volume
settings. You can link the AR5000 to a TouchRead gun to
transfer meter readings without the need to manually enter
them. Or, you may want to check some of the basic system
settings, such as the battery charge level.
This section provides procedures for configuring and verifying
the following:
•
Link the AR5000 to a TouchRead Device
(SmartGun/AutoGun)
on page 1-9 - How to configure the
AR5000 to communicate with a TouchRead gun.
•
Change the Display Font & Size
on page 1-11 - How to
adjust the size of the font on the screen.
•
Adjust the Display
on page 1-13 - How to adjust
brightness and contrast of the screen.
•
View the Battery Status
on page 1-14 - How to check the
battery.
•
View the Current HHD ID & User
on page 1-15 - How to
check the ID number and user designation for the unit.
•
View the Date & Time
on page 1-16 - How to check the
date and time.
• Change the Volume Setting - How to adjust the volume
setting for the system sounds. ???
ÂLink the AR5000 to a TouchRead
Device (SmartGun/AutoGun)
If you are going to use a TouchRead gun to collect meter
data, then you need to link that gun with the AR5000. Linking
enables the AR5000 to receive readings from the gun.
Typically, this link is already established when you pick-up the
1–10 Sensus Metering Systems
Chapter 1: About the AR5000
equipment at the start of the shift. However, you should
always verify that the gun and the AR5000 are linked. If they
are not, you need to perform the following procedure.
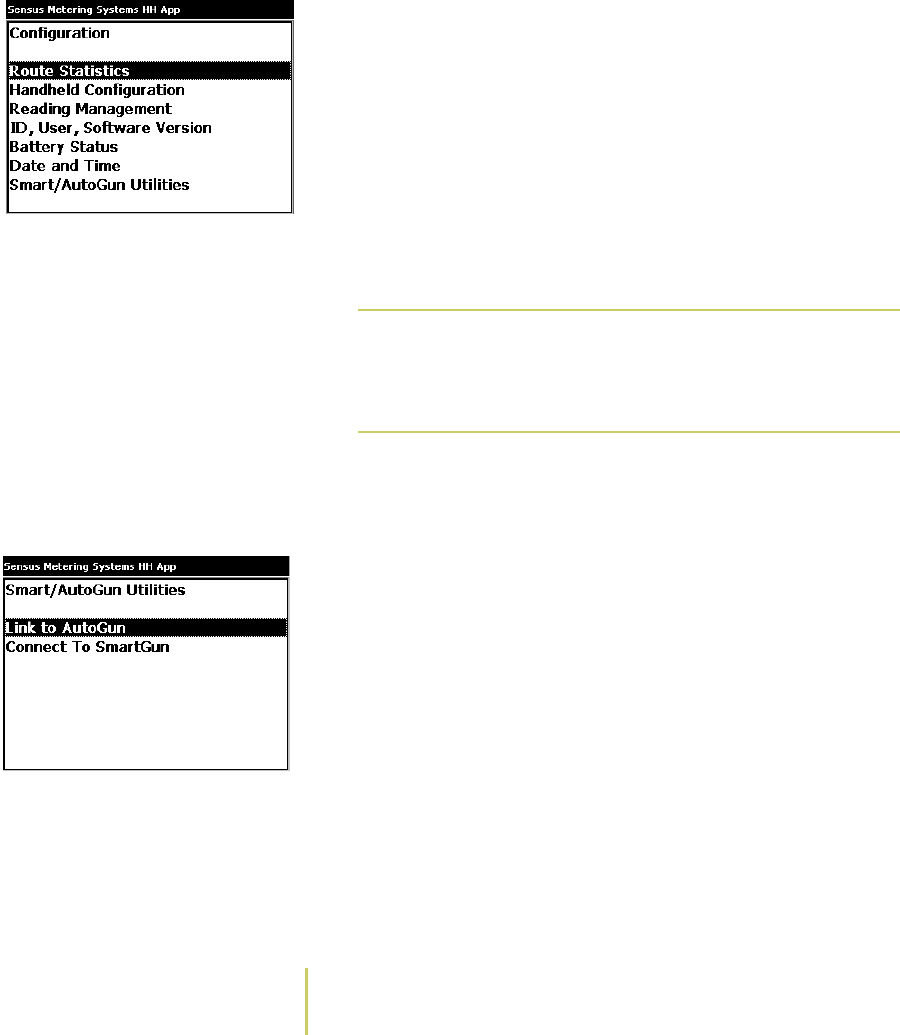
Configuration Menu To link a TouchRead device...
1Open the Configuration menu.
• If you have just removed the AR5000 from the charging
stand, the system automatically displays a Startup
Screen.
Use the PgUp/PgDn key to highlight Configuration on
the Startup Screen. Press the Enter key. The system
displays the Configuration Menu.
• While you are working on a route, press the F6 key. The
system displays the Configuration Menu
2Use the PgUp/PgDn key to select Smart/AutoGun Utilities.
Smart/AutoGun Utilities
Screen
3Press the ENTER key.
The system displays the Smart/AutoGun Utilities screen.
4Use the PgUp/PgDn key to highlight Link To AutoGun.
5Press the ENTER key.
Note
F6 is the default key assignment for the
Configuration menu. Key assignments can be
changed. For more information, see About the
Key Controls/Functions.
Sensus AR5000 User’s Guide 1-11
Configuring the AR5000
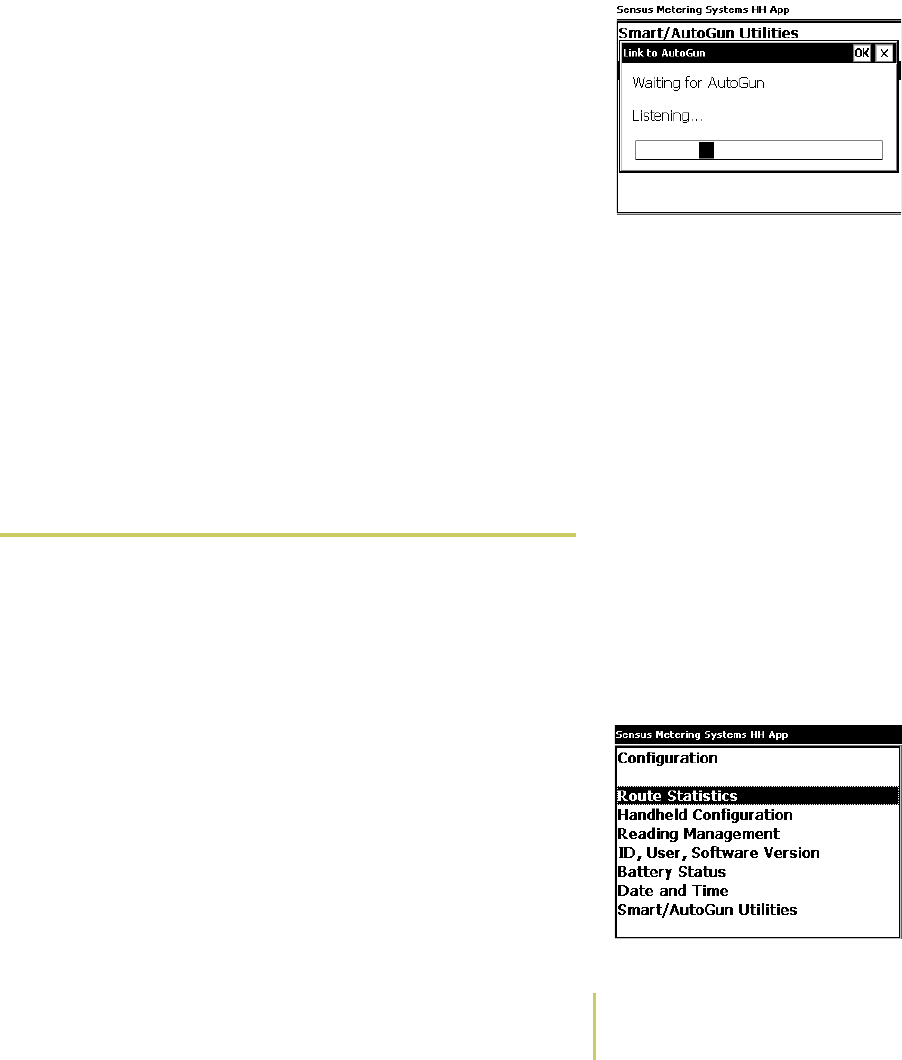
The system displays the Link to AutoGun screen, with the
message Waiting for AutoGun, and a status bar.
Link to AutoGun ScreenaPress and hold the trigger (center button) on the
AutoGun.
bRelease the trigger when the screen on the AutoGun
displays a Configuration Menu.
cUse the arrow keys to highlight Link.
dPress the center button on the AutoGun.
The AutoGun displays a Link sub-menu.
eUse the arrow keys to highlight AR400x on the Link sub-
menu.
fPress the center button on the AutoGun and hold the
AutoGun no further than arm’s length from the AR5000.
The AR5000 searches for a signal from the AutoGun.
When the systems communicate successfully, the
AR5000 displays the Smart/AutoGun Utilities screen
again. The AutoGun displays the message Link enabled
to HDDID xxx.
ÂChange the Display Font & Size
Some users need to view large numbers and letters on the
AR5000 screen. Other users prefer the text on the display to
be smaller. You can adjust the appearance of the characters
(display font) or the size of the on-screen text.
Configuration MenuTo change the font and size...
1Open the Configuration menu.
• If you have just removed the AR5000 from the charging
stand, the system automatically displays a Startup
Screen.
Use the PgUp/PgDn key to highlight Configuration on
the Startup Screen. Press the Enter key. The system
displays the Configuration Menu.
1–12 Sensus Metering Systems
Chapter 1: About the AR5000
• While you are working on a route, press the F6 key. The
system displays the Configuration Menu
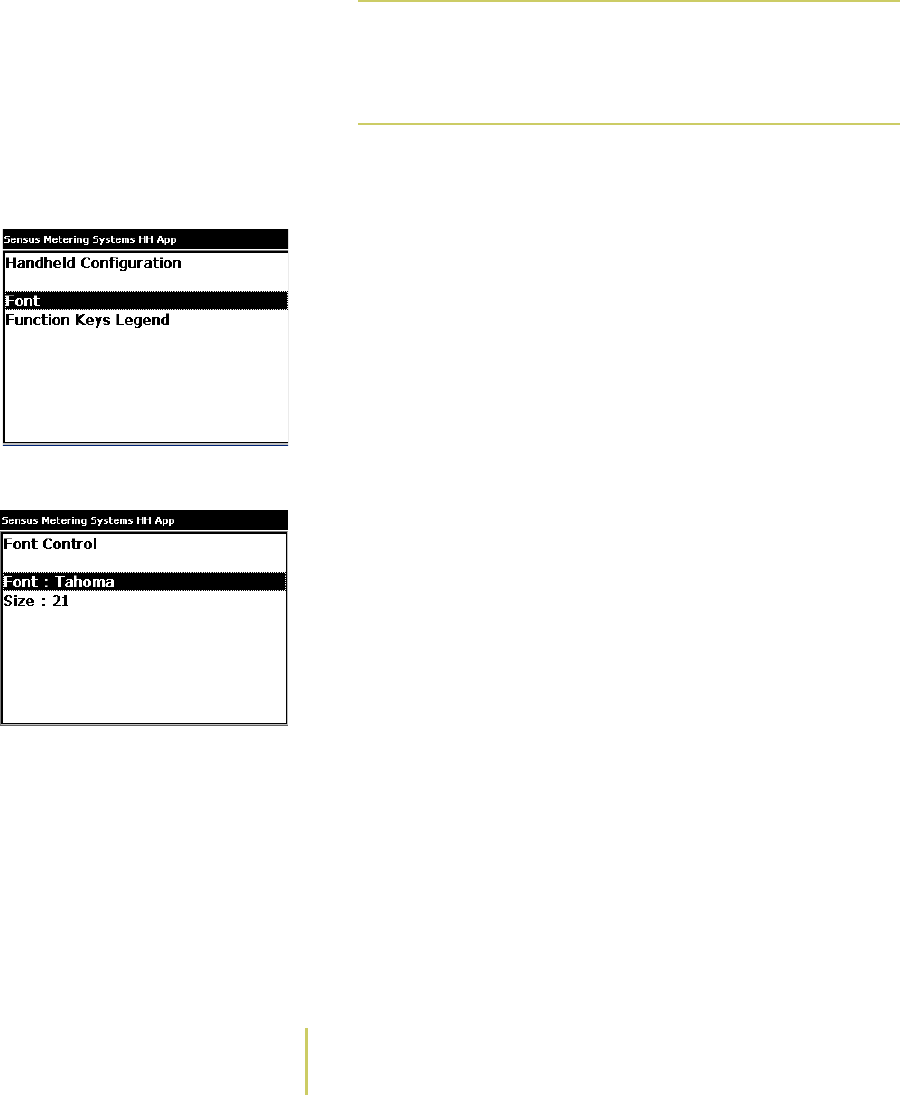
2Use the PgUp/PgDn key to select Handheld Configuration.
Handheld Configuration Screen 3Press the ENTER key.
The system displays the Handheld Configuration screen.
4Use the PgUp/PgDn key to highlight Font.
Font Control Screen 5Press the ENTER key.
The system displays the Font Control screen. This screen
displays the current Font and Size.
• To change the font, use the PgUp/PgDn key to highlight
Font and press the Enter key.
Each time you press the Enter key, the system changes
the displayed font. You have several font choices.
Continue pressing the Enter key until the system
displays the font you would like to use.
• To change the font size, use the use the PgUp/PgDn key
to highlight Size and press the Enter key.
Each time you press the Enter key, the system changes
the font size. You have choices ranging from 12 points
(smallest), to 30 points (largest). Continue pressing the
the Enter key until the system displays the font size you
would like to use.
Note
F6 is the default key assignment for the
Configuration menu. Key assignments can be
changed. For more information, see About the
Key Controls/Functions.

Sensus AR5000 User’s Guide 1-13
Configuring the AR5000
6Once you have selected the display settings that you
would like to use, press the Esc key until you return to the
screen that you were viewing before changing the display
font and font size.
ÂAdjust the Display
Users carry the AR5000 into many different types of
environments. This means that the users are operating the
unit under many different lighting conditions. You can switch
the screen backlight on/off to enhance visibility in dark
conditions. Backlight is literally a light that shines on the
display to enhance the visibility in low light conditions. You
can also adjust the contrast on the screen to your preference.
Contrast affects the difference in light/dark between the
characters on the screen and the background.
To switch the backlight on/off...
1Press and hold the yellow key to right of the TAB key.
2Press the F3 key.
• If the backlight was switched ON before you began this
procedure, the system switches the backlight OFF.
• If the backlight was switched OFF before you began this
procedure, the system switches the backlight ON.
To adjust the contrast on the screen...
1Press and hold the yellow key to the right of the TAB key.
2Press the F4 key or F5 key.
• Press the F4 key to make the contrast lighter.
1–14 Sensus Metering Systems
Chapter 1: About the AR5000
• Press the F5 key to make the contrast darker.
ÂView the Battery Status
Before you take the AR5000 into the field, check to verify
that the battery is charged. If you run the system on long
routes or for more than 8 hours in a day, you may also want
to check the battery during the day to verify that it is carrying
enough charge to complete your work.
Configuration Menu To view the battery status...
1Open the Configuration menu.
• If you just removed the AR5000 from the charging
stand, the system displays a Startup Screen.
Use the PgUp/PgDn key to highlight Configuration on
the Startup Screen. Press the Enter key. The system
displays the Configuration Menu.
• While you are working on a route, press the F6 key. The
system displays the Configuration Menu
Note
Adjusting the backlight and the contrast does
not require you to display a configuration
screen.
Note
F6 is the default key assignment for the
Configuration menu. Key assignments can be
changed. For more information, see About the
Key Controls/Functions.
Sensus AR5000 User’s Guide 1-15
Configuring the AR5000
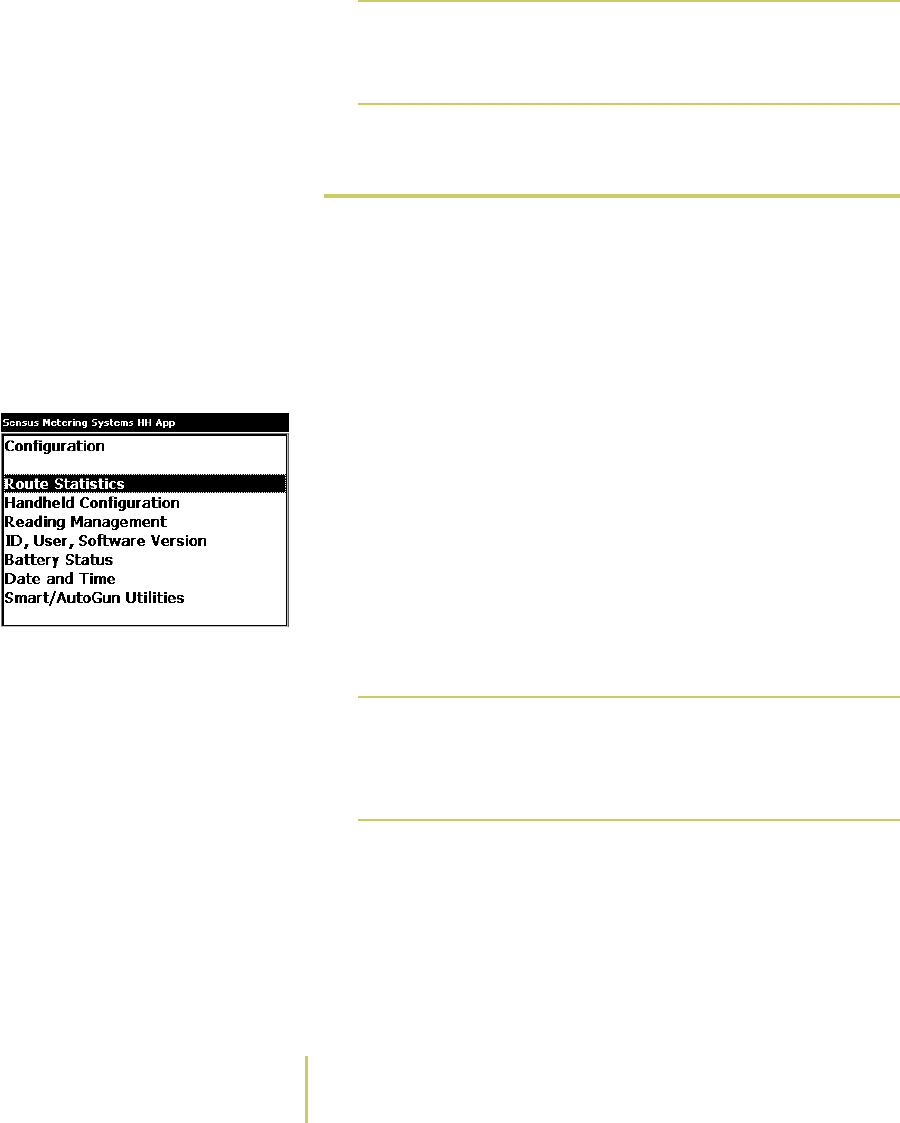
2Use the PgUp/PgDn key to select Battery Status.
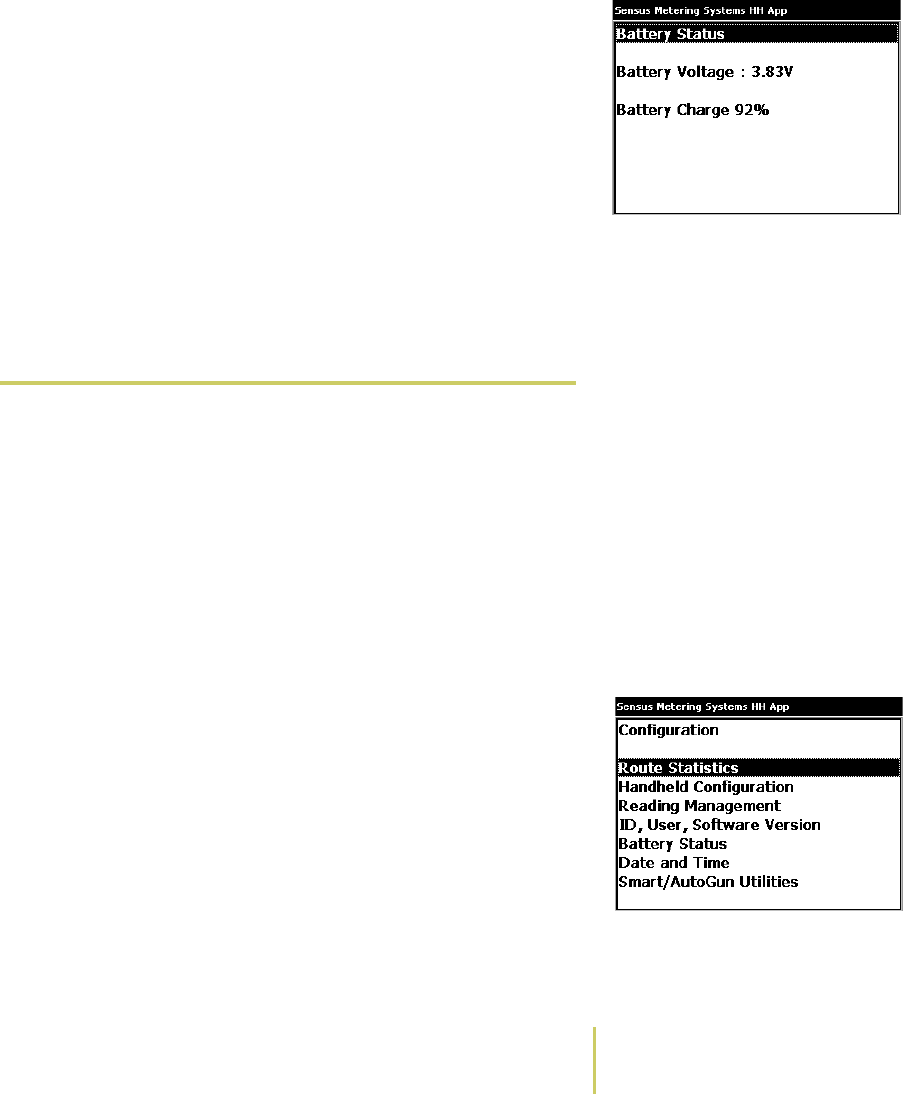
Battery Status Screen3Press the ENTER key.
The system displays the Battery Status screen.
• The safe operating range for Battery Voltage is
TBD???V - 8.4V.
• The safe operating range for Battery Charge is
TBD???% - TBD???%.
4Once you finish, press the Esc key until you return to the
screen that you were viewing before checking the battery.
If the battery needs to be charged, see
Charge the AR5000
on page 1-22.
ÂView the Current HHD ID & User
The office staff can setup an ID number for each AR5000
hand-held device (HHD). They also can assign an ID for the
operator (user) that is assigned to a specific HHD.
Before you take the AR5000 into the field, check to verify
that you have the AR5000 unit assigned to you. The same
screen that displays the Hand-held and Operator IDs also
displays the version number of the installed software and the
serial number for the hand-held unit.
Configuration MenuTo view the HHD and operator IDs...
1Open the Configuration menu.
• If you just removed the AR5000 from the charging
stand, the system displays a Startup Screen.
Use the PgUp/PgDn key to highlight Configuration on
the Startup Screen. Press the Enter key. The system
displays the Configuration Menu.

1–16 Sensus Metering Systems
Chapter 1: About the AR5000
• While you are working on a route, press the F6 key. The
system displays the Configuration Menu
2Use the PgUp/PgDn key to select ID, User, SW Version.
ID, User, Software Version
Screen
3Press the ENTER key.
The system displays the ID, User, Software Version
screen.
4Once you finish, press the Esc until you return to the
screen that you were viewing before checking the IDs.
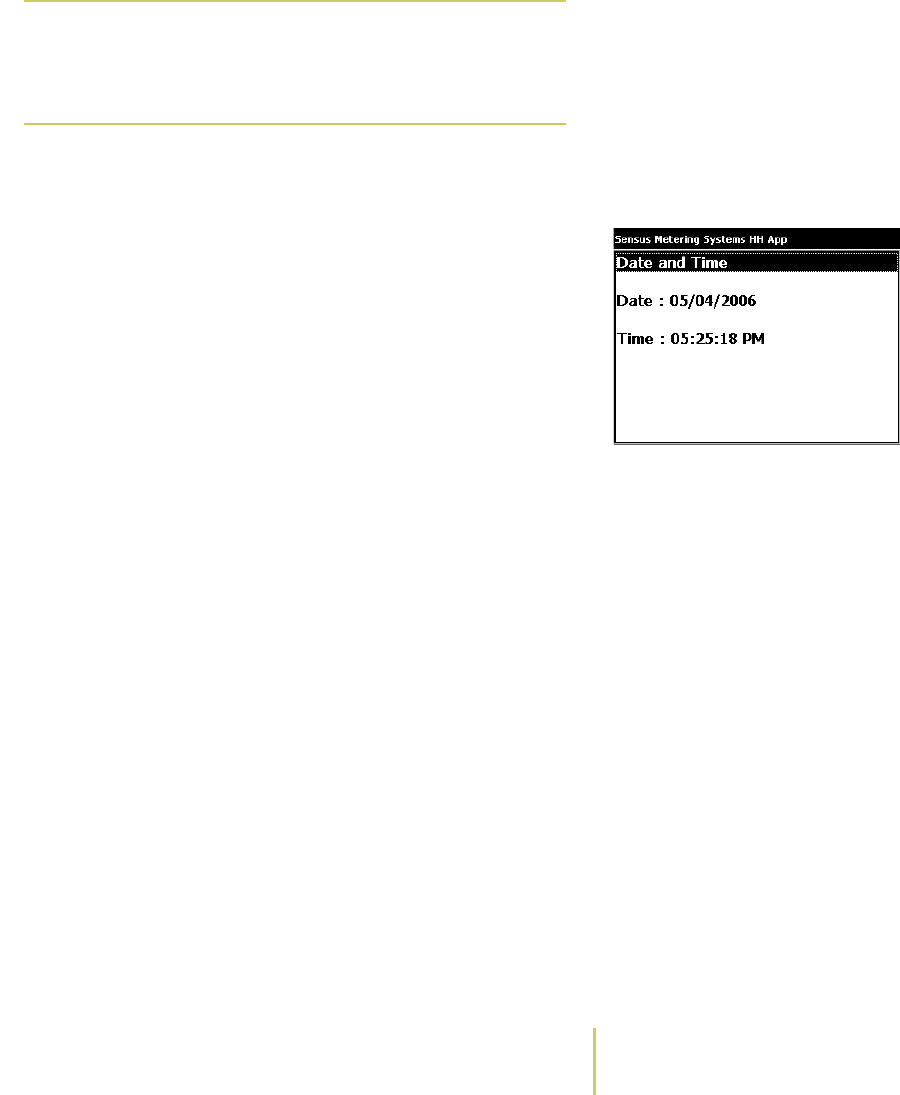
ÂView the Date & Time
The AR5000 puts a date and time stamp on every data entry
you make. Before you pickup the device to begin reading, the
date and time are set automatically each time the device is
connected to a PC using the Communication Stand.
Before you take the AR5000 into the field, check to verify
that the date and time are correct.
Configuration Menu To view the date and time...
1Open the Configuration menu.
• If you just removed the AR5000 from the charging
stand, the system displays a Startup Screen.
Use the PgUp/PgDn key to highlight Configuration on
the Startup Screen. Press the Enter key. The system
displays the Configuration Menu.
Note
F6 is the default key assignment for the
Configuration menu. Key assignments can be
changed. For more information, see About the
Key Controls/Functions.
Sensus AR5000 User’s Guide 1-17
Configuring the AR5000
• While you are working on a route, press the F6 key. The
system displays the Configuration Menu
2Use the PgUp/PgDn key to select Date and Time.
Date and Time Screen3Press the ENTER key.
The system displays the Date and Time screen.
4Once you finish, press the Esc key until you return to the
screen that you were viewing before checking the date
and time.
Note
F6 is the default key assignment for the
Configuration menu. Key assignments can be
changed. For more information, see About the
Key Controls/Functions.

1–18 Sensus Metering Systems
Chapter 1: About the AR5000
Set Up & Use the Communication Stand
The communication stand serves two functions for the
AR5000. First, the stand provides a connection that the office
staff uses to transfer and synchronize files between the
AR5000 and an office computer. Second, the stand charges
the AR5000’s battery.
AR5000 Communication Stand Typically, office staff are the only people involved in
transferring and synchronizing information on the office PCs
and the AR5000. You should only need to verify that the
system battery is properly charged (see
Charge the AR5000
on page 1-22).
This section provides information on how to connect the
communication stand and is divided under the following
headings:
•
Connect the Stand
on page 1-18 - How to connect the
communication stand to AC power and an office PC.
•
Mount the Stand
on page 1-20 - How to mount a
communication stand on a wall.
•
Place the AR5000 in the Stand
on page 1-21 - How to
verify that the stand is operating properly.
ÂConnect the Stand
When you first setup the communication stand, you need to
make three cable connections - AC power, PC communication,
and communication to another stand. Once you have setup
and successfully connected the communication stand(s), you
only need to place the AR5000 into the stand to have it

Sensus AR5000 User’s Guide 1-19
Set Up & Use the Communication Stand
automatically begin charging and ready to communicate with
the office PC.
Typical Connections Between a
PC & Communication Stands
To connect the communication stand...
1Determine where you want to place the communication
stand.
• If you are going to leave the stand on a counter or
table-top, verify that the surface is level, stable, and
free of moisture and debris.
• If you are going to mount the stand on a wall, see
Mount the Stand
on page 1-20. Mount the stand before
making any cable connections.
2Locate all of the necessary cables.
• AC Power Cable - This cable provides the AC power
connection to a single communication stand.
• PC to Master Stand Communication Cable - This cable
has a 15-pin connection on the stand end and a 9-pin
serial connector at the PC end. Use this for the signal
connection from the PC to a single stand or from the PC
to the first of multiple stands.
If you are connecting several stands, you can chain them
together using additional cables:
• Stand to Stand Communication Cable - This cable has a
15-pin connector at both ends. Use this for the signal
connection between multiple stands.
• Stand to Stand Power Cable - This cable has an AC
power connecter at both ends and powers up to 25
stands in series. For each additional 25 stands, you
need one additional AC power cable to connect to the
wall socket.
3Connect the cables.
aConnect the signal cables between the first stand and
the PC.

1–20 Sensus Metering Systems
Chapter 1: About the AR5000
bConnect the signal cables between the remaining
stands, if needed.
cConnect the AC power cable between the first stand and
the wall socket.
dConnect the power cables between the first stand and
up to 24 additional stands, if needed.
ÂMount the Stand
You have the option of setting the communication stand on a
stable table-top, or mounting the stand to a wall. The back of
the stand is fitted with four slots that can accommodate #10
pan head screws.
Back of the Communication
Stand
To mount the communication stand on a wall...
1Mark the location for mounting the stand.
aVerify that the AC power and communication cables will
reach the AC power outlet, the computer, and other
stands involved in this installation.
bTransfer the hole pattern from the back of the stand to
the desired location on the wall.
2Drill and anchor screws sufficient to support the weight of
the stand and the AR5000, along with the stress of
placing/removing the device.
3Mount the stand and connect the cables (see
Connect the
Stand
on page 1-18).
Note
For every 25 stands, connect another AC
power cable to the wall socket.

Sensus AR5000 User’s Guide 1-21
Set Up & Use the Communication Stand
Place the AR5000 in the Stand
Once you have setup the communication stand, you can
place the AR5000 into the stand to begin charging (see
Charge the AR5000
on page 1-22). The office staff performs
all of the data transfer and file synchronization between
shifts. Typically, the AR5000 user only needs to verify that
the stand is working correctly.
Verify that the unit is seated correctly in the stand. The top
LED on the stand is green and is lit when the device is
properly placed in the stand.

1–22 Sensus Metering Systems
Chapter 1: About the AR5000
Charge the AR5000
The AR5000 is a battery-powered device. Typically, users
place the unit in a Communication Stand at the end of their
shift and pick it up again at the start of their next shift. This
period in the stand (+/- 16 hours) provides enough time for
the battery to be fully charged and ready for use. However,
you need to make sure that the battery has enough of a
charge to keep the system working while you read meters on
a route.
This section provides information on the following:
•
Charge the AR5000 in the Stand
on page 1-22 - This is the
most common method for charging the AR5000 battery.
•
Charge the AR5000 using the Wall Charger
on page 1-24
- Use a wall charger if you need to charge the AR5000
when the stand is not available.
•
Battery Maintenance
on page 1-24 - When and how to
replace the battery.
ÂCharge the AR5000 in the Stand
Communication Stand Users typically put the AR5000 into the Communication Stand
at the end of every shift. This serves two purposes. One, the
stand provides a data-link that the office staff can use to
transfer information to-and-from the AR5000 (for more
information, see
Set Up & Use the Communication Stand
on
page 1-18). The second function of the stand is to charge the
AR5000 battery.
Note
You can leave the AR5000 in the charging
stand for extended periods of time. Once the
unit is fully charged, the stand continues to
monitor the battery charge level and provides
additional power only as needed to keep the
battery fully charged.

Sensus AR5000 User’s Guide 1-23
Charge the AR5000
To charge the AR5000 in the stand...
1Place the AR5000 into the Communication Stand.
LEDs on the Charging Stand2Verify that the unit is seated correctly in the stand and
charging.
Check the LEDs listed below.
• Handheld Seated - The top LED is green. This LED is lit
when the device is properly placed in the charging
stand. This light must be lit for the system to charge the
AR5000 battery.
• Charging HandHeld - The second LED from the top is
red. This LED is lit when the AR5000 battery is charging.
• Charging AutoGun - The third LED from the top is red.
This LED is lit when the AutoGun battery is charging.
Refer to the AutoGun documentation for more
information.
• Stand Active - The fourth LED from the top is yellow.
This LED is lit when the AR5000 is communicating with
a PC.
!
Warning Never use any charging device other than
the approved Sensus charging device with
the AR5000. The use of any other charging
device may cause damage to the AR5000
and will automatically void any warranties.

1–24 Sensus Metering Systems
Chapter 1: About the AR5000
ÂCharge the AR5000 using the Wall
Charger
If you need to charge the AR5000 when the stand is not
available, you can use a Sensus-approved wall charger that
plugs into a standard AC outlet to charge the device.
To charge the AR5000 using the wall charger…
1Plug the wall charger into an AC outlet.
2Insert the power cord from the wall charger into the power
input jack located on the top of the AR5000.
ÂBattery Maintenance
The AR5000 uses a type VR151, 3800mAh, 3.6V, re-
chargeable NiMH Battery Pack. During normal use, you
typically do not need to do anything other than charge the
battery (see
Charge the AR5000
on page 1-22) and check the
!
Warning Never use any charging device other than
the approved Sensus charging device with
the AR5000. The use of any other charging
device may cause damage to the AR5000
and will automatically void any warranties.
Note
You can leave the AR5000 plugged into the
wall charger for an extended period of time.
Once the unit is fully charged, the wall charger
provides additional power only as needed to
keep the battery fully charged.
Sensus AR5000 User’s Guide 1-25
Charge the AR5000
level of the battery charge (see
View the Battery Status
on
page 1-14).
A battery can withstand many cycles of charging and use.
The actual number of charges depends on your operating
conditions. If the battery does not hold a charge long enough
for you to complete your work, then it needs to be replaced.
Good maintenance practice is to replace the battery
approximately every two years.
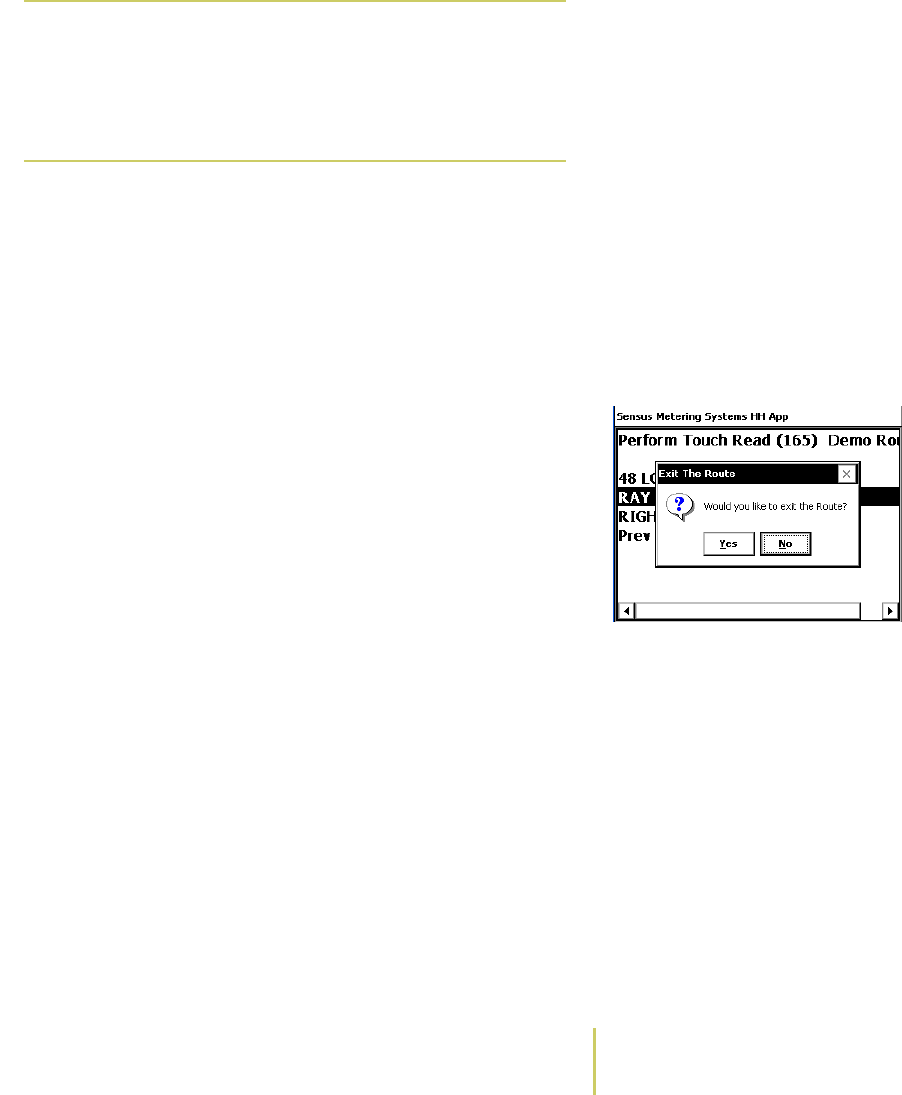
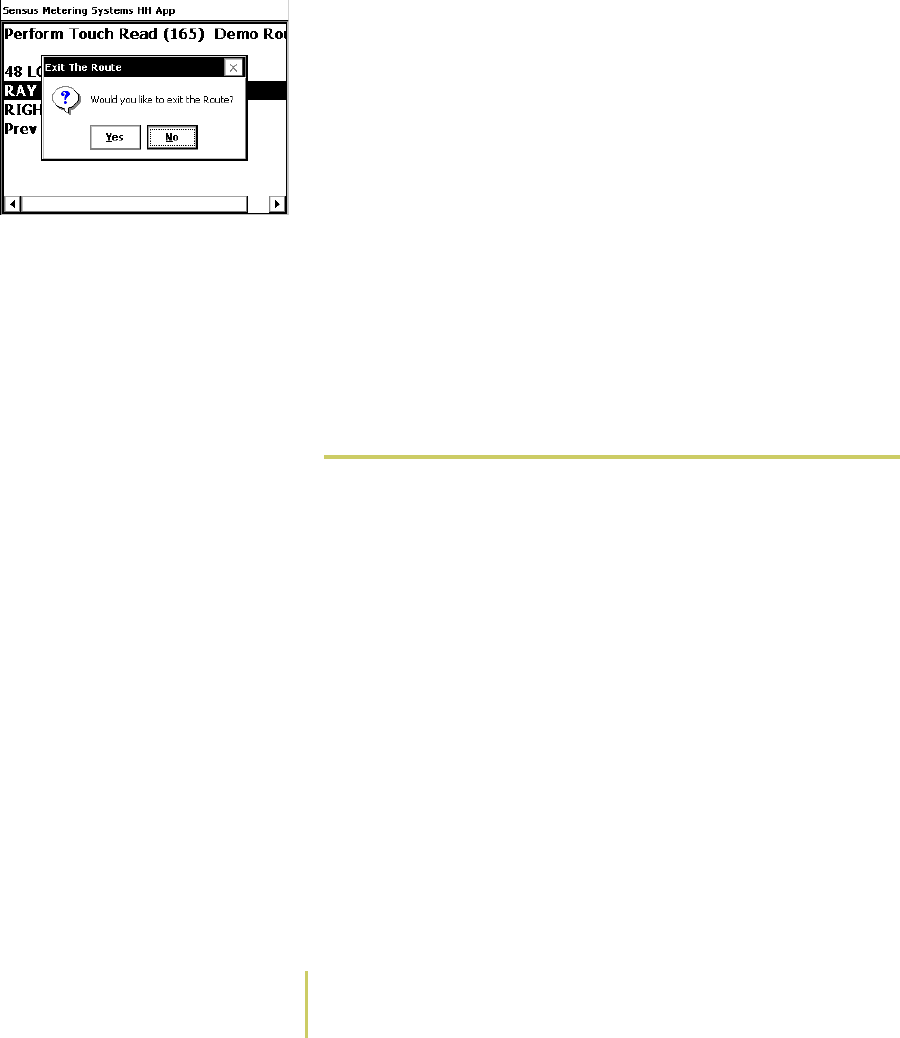
Exit Route MessageTo replace the battery...
1Exit any open routes.
aPress the Esc key.
The system displays the Exit Route message.
bUse the TAB key to select Yes and press the ENTER key.
The system exits the open route and displays a list of
available routes.
2Switch the AR5000 OFF (see
Turn the Device ON/OFF
on
page 1-4).
!
Warning Never use any charging device other than
the approved Sensus charging equipment
with the AR5000. The use of any other
charging device may cause damage to the
AR5000 and will automatically void any
warranties.
1–26 Sensus Metering Systems
Chapter 1: About the AR5000
3Place the AR5000 face-down on a flat surface.
AR5000 Battery Compartment 4Push UP on the two latches on each side of the battery
compartment and open the lid of the battery
compartment.
5Slide the battery to the left to release, and remove it from
the battery compartment.
6Place the new battery in the compartment and slide to the
right to lock it in place.
7Press down on the lid of the battery compartment until
both sides of the lid snap closed.
8Slide the two latches down to lock the lid in place.
9Place the AR5000 into the charging stand.
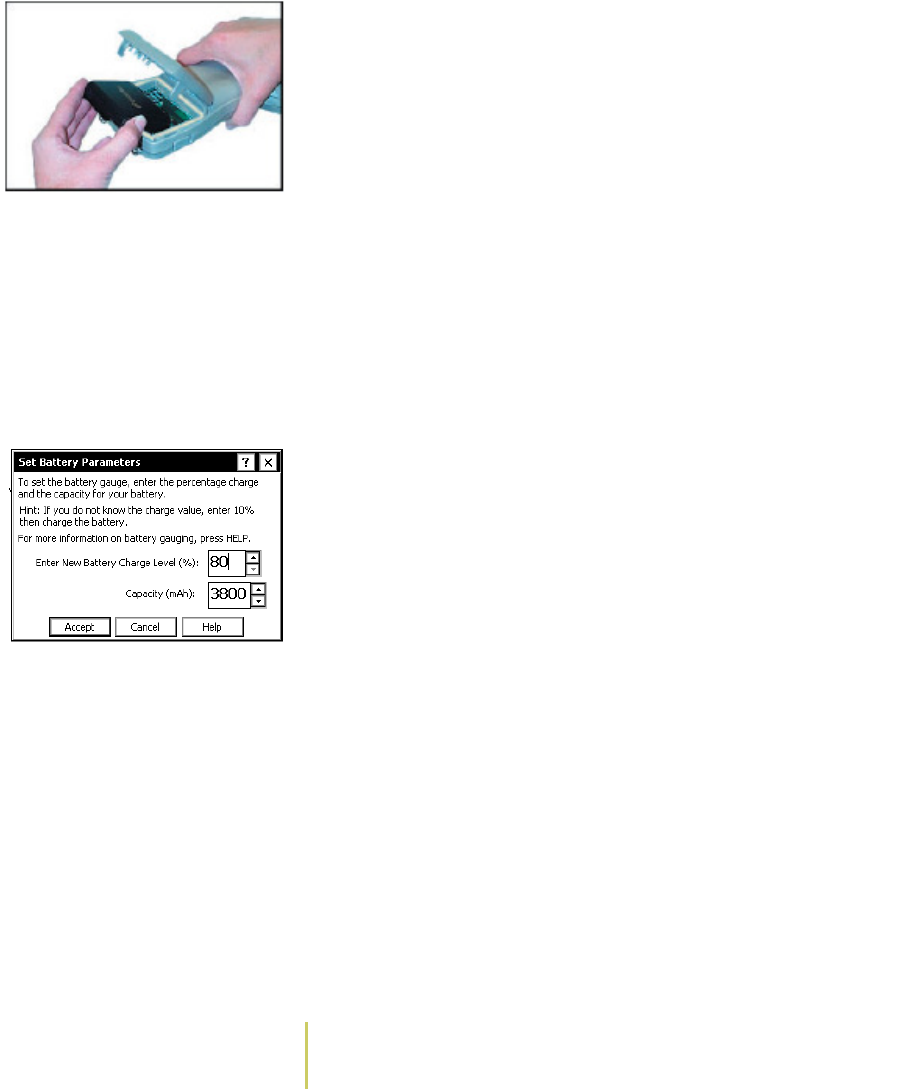
New Battery Detected Screen When you place the AR5000 into the charging stand, the
system displays the New Battery Detected Screen.
10 Set the charge percentage on the New Battery Detected
Screen by completing the following steps:
aUse the TAB key to highlight Charge Percentage.
bUse the PgUp/PgDn key to select 80%.
cUse the TAB key to highlight the Accept button.
dPress the Enter key.
Allow the system to charge 8-16 hours.

Sensus AR5000 User’s Guide 1-27
Contact Customer Support
Contact Customer Support
This User Guide provides the majority of reference
information that you need to operate and maintain the
Sensus AR5000. However, there may encounter some
situation where you can not find the answers to your
equipment questions in the User’s Guide. In those cases, you
have three options for finding more information.
• www.Sensus.com - The company’s web site is a good
resource for news and up-to-date information on Sensus,
along with the latest on the complete line of Sensus
products and services.
• Telephone Support - Telephone support is available
Monday through Friday, from 8:00 a.m. until 7:00 p.m.
Eastern. Call 1-800-METER IT (638-3748) and select
Option 2.
• E-mail Support - If you are trying to reach Sensus
Customer Support after regular business hours, you can E-
mail your questions to amr.support@sensus.com.

1–28 Sensus Metering Systems
Chapter 1: About the AR5000

Sensus AR5000 User’s Guide 2-1
Collect Meter
Data
This chapter describes how to use the AR5000 to collect data
in the field. Use the instructions in this section to set up
routes, enter information into the AR5000, and resolve any
conflicts between the stored routes.
The chapter is divided into the following sections:
•
Start Collecting Data
on page 2-2 - This section includes
instructions for tasks that need to be performed at the
beginning of a route.
•
Manage Reading Scenarios
on page 2-7 - This section
includes information and instructions for dealing with
common problems route reading problems.
•
Enter Data
on page 2-14 - This section includes
instructions for the various methods of entering data into
the AR5000.
You can find general information on the AR5000 in Chapter 1:
About the AR5000
. You can find instructions for finding
specific route-related information in Chapter 3:
Find Route
Information
.

2–2 Sensus Metering Systems
Chapter 2: Collect Meter Data
Start Collecting Data
By the time you are ready to pick up a hand-held unit from
the charger and begin collecting meter readings, the AR5000
should be set up and ready for use. Typically, the office staff
performs daily tasks to configure the AR5000 for reading
meters. These tasks include clearing any information from
previous shifts and loading the AR5000 with routes,
questions, and configuration settings for the new shift.
The new information loaded into the AR5000 includes the
following:
• Route meters - This typically includes the street address,
customer name, meter ID, and account number for each
location along the route. For more information see
Select
A Route
on page 2-3.
• Questions - Questions are attached to specific addresses
and require a response from readers. For more
information, see
Answer Questions
on page 2-21.
• AR5000 Configuration Settings - The office staff can set
several AR5000 parameters that will affect the way that
the equipment will react in certain scenarios. For more
information, see
About Meter Read Behaviors
on page 2-8.
Once the office staff has setup the AR5000 with the route
and configuration information, you can use the information in
this section to start collecting data. You need to select a
route and you have the option of changing some system
behaviors. Find instruction for these tasks in this section:
•
Select A Route
on page 2-3 - Choose from several preset
routes, stored in the AR5000.
•
Alter Route Behaviors
on page 2-4 - Adjust the settings on
the AR5000 Reading Management menu.
Sensus AR5000 User’s Guide 2-3
Start Collecting Data
ÂSelect A Route
Before you can begin collecting information, you need to
select one of the routes stored in the AR5000. The office staff
typically programs route information and loads that
information into the AR5000. Each route in the AR5000 is
labeled with a unique name.
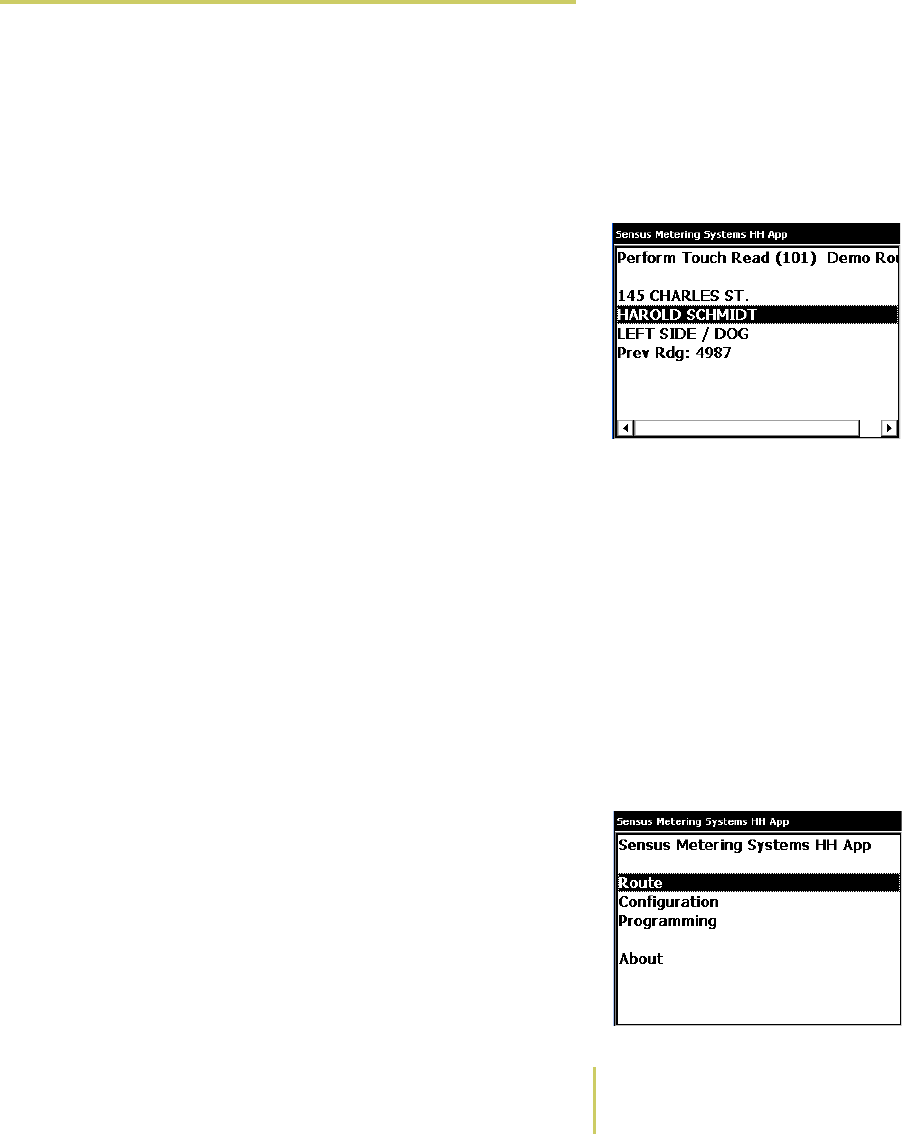
Typical Location DisplayThe routes are typically setup to follow the actual path that
someone in the field takes to read a group of meters. For
example, a route running through a residential neighborhood
lists the addresses, in order, from one end of a street to the
other. Each location along a route can be configured to
include the following information:
• Street Address
• Customer Name
• Meter ID Number
• Customer Account Number
You can search through a stored route for certain details. For
example, you can find a specific address or meter ID. More
information is available in the chapter
Find Route Information
on page 3-1.
To select a route...
1Open the Routes list.
Startup ScreenÂIf you have just removed the AR5000 from the charging
stand, the system automatically displays a Startup
Screen.
2–4 Sensus Metering Systems
Chapter 2: Collect Meter Data
Use the PgUp/PgDn key to highlight Routes on the
Startup Screen. Press the Enter key. The system
displays the Routes list.
Exit Route ÂIf you are working on a route, you need to exit the route
before you can access the Route List.
Press the Esc key. The system displays an Exit Route
message. Use the Tab key to select Yes. Press the Enter
key. The system displays the Routes list.
2Use the PgUp/PgDn key to highlight one of the choices on
the Routes list.
3Press the Enter key.
The system opens the selected route and displays the
information for the first location. You can begin entering
data. For more information on entering data into the
AR5000, see the
Enter Data
on page 2-14 section.
ÂAlter Route Behaviors
You can change several settings that affect how the system
responds during a route. The Reading Management menu
gives you access to the following settings:
• Entry Direction (left-to-right or right-to-left) - When you
manually enter meter readings, the system displays a
dialog box and you enter numbers with the keypad (see
Enter Manual Readings
on page 2-14). By default, the
system is setup for this data to be entered from left-to-
right on the screen. Change the Entry Direction setting if
you want to enter the reading from right-to-left.
• Traverse (forward or backward) - Routes are set up to be
run in a set order. When you select a route, the system
displays a default location at one end and advances
forward through the route (see Auto Advance, below).
Change the Traverse setting if you want to read the route
in the other direction (backward).
Sensus AR5000 User’s Guide 2-5
Start Collecting Data
• Auto Advance (ON or OFF) - This feature automatically
advances the screen to the next location along the route,
after the latest location reading is complete. By default,
the Auto Advance feature is switched ON. Change the Auto
Advance setting if you want to switch the Auto Advance
feature OFF.
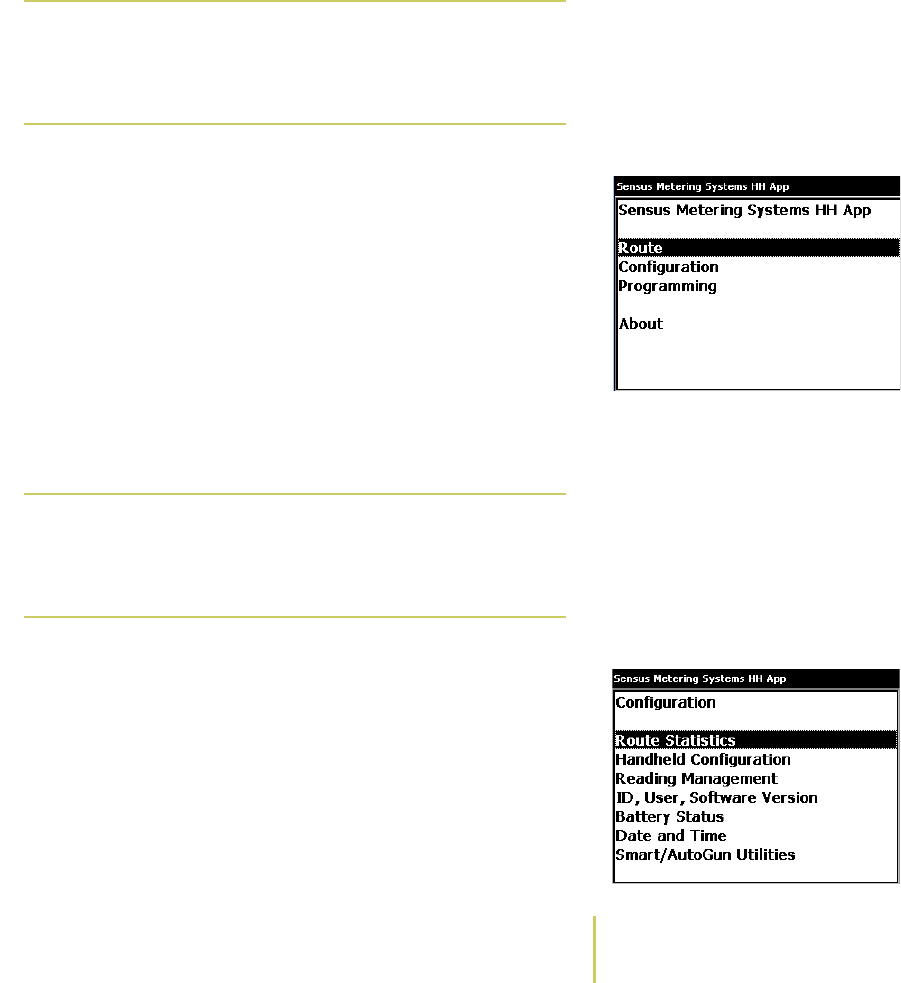
Startup ScreenTo alter the route behaviors...
1Open the Configuration menu.
• If you have just removed the AR5000 from the charging
stand, the system automatically displays a startup
screen.
Use the PgUp/PgDn key to highlight Configuration on
the Startup Screen and press the Enter key. The system
displays the Configuration menu.
• If you have a route open, press F11.
The system displays the Configuration menu.
Configuration Menu2Use the PgUp/PgDn key to highlight Reading Management
on the Configuration menu.
3Press the Enter key.
Note
Only a completed meter reading will
automatically advance the route display to the
next location. Other actions, such as entering
notes, will not advance the location.
Note
F11 is the default key assignment for the
Configuration menu. Key assignments can be
changed. For more information, see About the
Key Controls/Functions.
2–6 Sensus Metering Systems
Chapter 2: Collect Meter Data
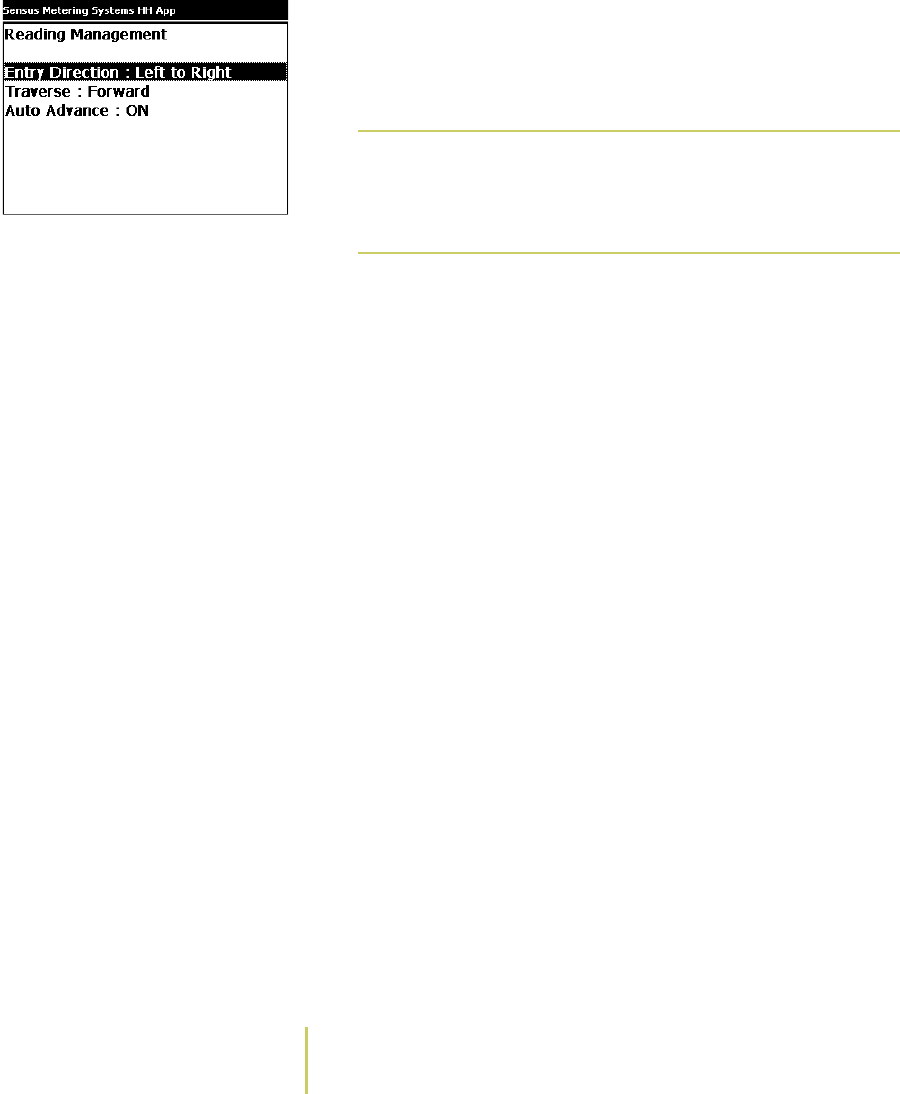
The system displays the Reading Management screen.
Reading Management Screen 4Use the PgUp/PgDn key to highlight the parameter that
you would like to change on the Reading Management
screen.
5Press the Enter key to toggle the selected setting.
6Repeat step 4 and step 5 as needed to configure the
system to your preferences.
7Press the Esc key when you finish setting your preferences
on the Reading Management screen.
The system returns to the Configuration menu.
8Press the Esc key again to exit the Configuration menu.
Note
Each of the parameters on the Reading
Management screen has a choice of two
settings. Use the Enter key to toggle between
the two settings for the highlighted parameter.

Sensus AR5000 User’s Guide 2-7
Manage Reading Scenarios
Manage Reading Scenarios
During the course of reading meters on a route, you can
encounter several common scenarios where the system
generates error messages. Meters may not match a location,
they may not be part of the stored route, or the system may
not correctly read information.
The following list provides a brief description of each part of
this section:
•
Resolve Readings That Don’t Match the Displayed Location
on page 2-9 - How to handle a meter ID that does not
match the address/location information in a stored route.
•
Resolve a Non-Route Meter
on page 2-10 - How to handle
a meter ID that is not included anywhere in the stored
route.
•
Resolve Reading Malfunctions and Bad Reads
on
page 2-12 - What to do if the AR5000 encounters reading
errors (ex.: malfunctions or no-read messages).

2–8 Sensus Metering Systems
Chapter 2: Collect Meter Data
About Meter Read Behaviors
Typically, the office staff perform daily tasks to configure the
AR5000 for reading meters. This configuration involves
collecting existing data from the AR5000 and loading new
information into the AR500.
The existing data collected from the AR5000 includes read
information taken from the utility meters, notes entered by
the readers, and answers to questions.
The new information loaded into the AR5000 includes the
following:
• Route meters - This typically includes the street address,
customer name, meter ID, and account number for each
location along the route. For more information see
Select
A Route
on page 2-3.
• Questions - Questions are attached to specific addresses
and require a response from readers. For more
information, see
Answer Questions
on page 2-21.
• AR5000 Configuration Settings - The office staff can set
several AR5000 parameters that will affect the way that
the equipment will react in certain scenarios.
By the time you are ready to pick up a hand-held unit from
the charger and begin collecting meter readings, the AR5000
should already be loaded with routes, questions, and
configuration settings. The configuration settings determine
what you will see displayed on the screen in certain
situations.
The following list provides a brief description of the
configuration settings that affect meter reading behaviors:
• Prompt when not matching displayed location - This
setting determines what the AR5000 displays when the
system reads a meter ID that does not match the currently
displayed location.
If this setting is selected, the system displays a message
when the ID does not match.

Sensus AR5000 User’s Guide 2-9
Manage Reading Scenarios
If this setting is not selected, the system does not display
any message and begins a search for a match at another
location on the route.
• Prompt when not found on route - This setting determines
how the AR5000 responds when the system reads a meter
ID that does not match any meter ID information stored
for the route.
If this setting is selected, the system displays a message
when the ID does not match.
If this setting is not selected, the system does not display
any error message and stores data directly into the
AR5000 memory.
• Enter note on apply - This setting allows the office staff to
configure a message that is attached to every reading that
is applied to an address.
More information on where these settings affect the display
are provided as part of these sections -
Resolve Readings
That Don’t Match the Displayed Location
on page 2-9,
Resolve a Non-Route Meter
on page 2-10,
Resolve Reading
Malfunctions and Bad Reads
on page 2-12.
ÂResolve Readings That Don’t Match
the Displayed Location
During the course of reading a route, you can encounter a
mismatch between the actual ID on a meter and the meter
ID displayed on the AR5000 screen. To resolve this type of
mismatch, you can apply the reading to the current location
or search the route for the ID.
Note
This error only occurs with TouchRead or
RadioRead systems. For more information, see
Enter TouchRead Readings on page 2-16 and
Enter RadioRead Readings (AR5002 only) on
page 2-18.
2–10 Sensus Metering Systems
Chapter 2: Collect Meter Data
To resolve a mismatch...
1Read a meter with the TouchRead or RadioRead system.
If the AR5000 detects a mismatch, the system either
prompts you for action or automatically stores the reading
into memory, depending on the configuration settings. For
more information, see
About Meter Read Behaviors
on
page 2-8.
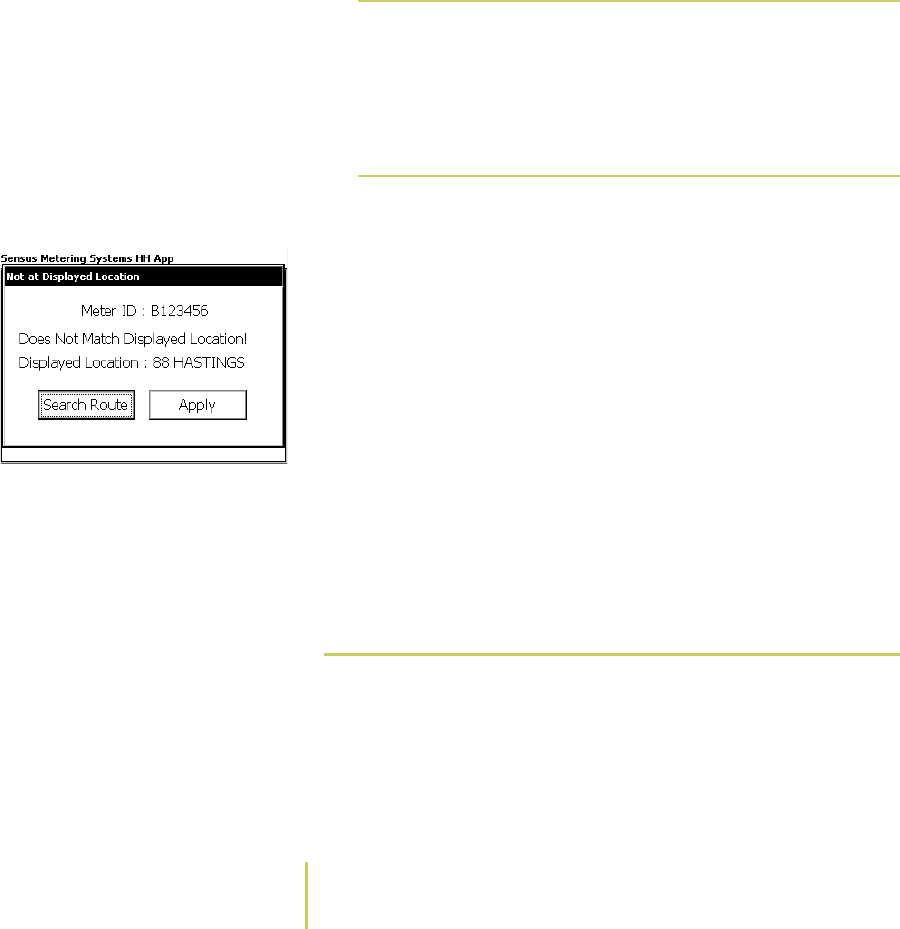
Does Not Match Displayed
Location Message
2Resolve the mismatch.
If the system is configured to prompt, the screen displays
a “Does Not Match Displayed Location!” message.
Use the TAB key to select either Apply or Search Route.
Then press the ENTER key.
• Select Apply to automatically apply the reading data to
the current address and complete the read.
• Select Search Route to search for the address stored
with the meter ID.
When the system locates the address, select Apply to
save the reading information to the address and
complete the read.
ÂResolve a Non-Route Meter
During the course of reading a route, you can find a meter ID
that is not in the stored route. When you read a meter and
Note
If the system is configured to store data
without a prompt, the data is automatically
saved in the AR5000 memory and the read for
that location is complete.
Data stored in the AR5000 memory is typically
retrieved by the office staff.
Sensus AR5000 User’s Guide 2-11
Manage Reading Scenarios
the AR5000 cannot find the ID, you can search the route for
the meter ID or apply the reading to the current location.
Non-Route Meter MessageTo resolve a non-route meter...
1Read a meter with the TouchRead or RadioRead system.
If the AR5000 detects a non-route meter, the system
either prompts you or automatically stores the reading into
memory, depending on the configuration. For more
information, see
About Meter Read Behaviors
on page 2-8.
2Resolve the non-route meter in one of the following ways:
ÂIf the screen displays a “Does Not Match Displayed
Location!” message, resolve the location error as
described in the section
Resolve Readings That Don’t
Match the Displayed Location
on page 2-9.
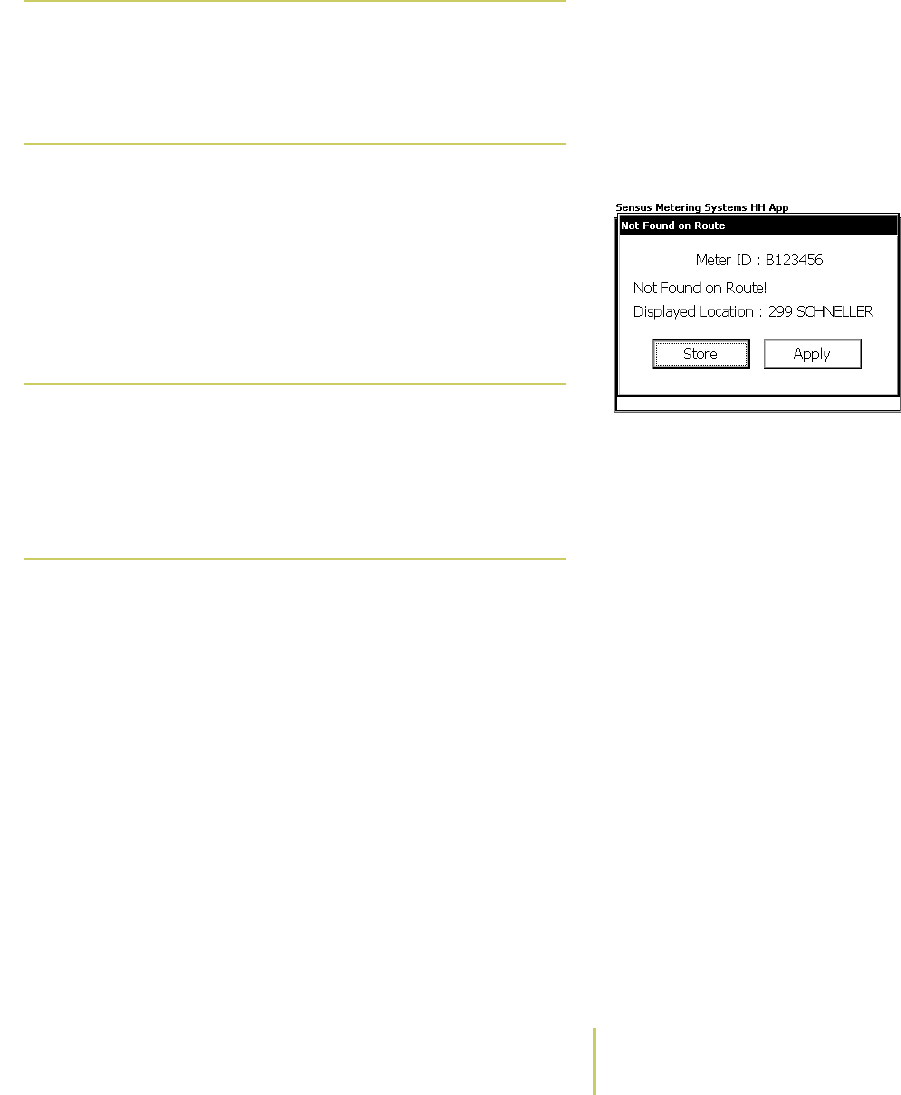
ÂIf the screen then displays a “Not Found on Route!”
message:
• Use the TAB key to select Apply or Search Route and
press the ENTER key.
• Select Apply to automatically apply the reading data
to the currently displayed address and complete the
read.
• Select Search Route to search for the address stored
with the meter ID. When the system locates the
Note
This error only occurs with TouchRead or
RadioRead systems. For more information, see
Enter TouchRead Readings on page 2-16 and
Enter RadioRead Readings (AR5002 only) on
page 2-18.
Note
If the system is configured to store data
without a prompt, the data is automatically
saved in the AR5000 memory and the read for
that location is complete.
Data stored in the AR5000 memory is typically
retrieved by the office staff.

2–12 Sensus Metering Systems
Chapter 2: Collect Meter Data
address, select Apply to save the reading information
to the address and complete the read.
ÂResolve Reading Malfunctions and
Bad Reads
During the course of reading a route, you may encounter
errors when the AR5000 captures partial data. This can
include errors in the meter ID or errors reading the data from
the meter. When the system encounters a bad read, you can
re-read the meter ID or you can manually enter the read for
the current location.
Note
If the system does not locate the meter ID
anywhere in the route, the screen displays a
“Not Found on Route” message. Use the tab
key to select Store and save the read data into
the system memory. Select Apply to save the
data to the currently displayed location.
Note
This error only occurs with TouchRead or
RadioRead systems. For more information, see
Enter TouchRead Readings on page 2-16 and
Enter RadioRead Readings (AR5002 only) on
page 2-18.
Sensus AR5000 User’s Guide 2-13
Manage Reading Scenarios
To resolve a malfunction or bad read...
1Read a meter with the TouchRead or RadioRead system.
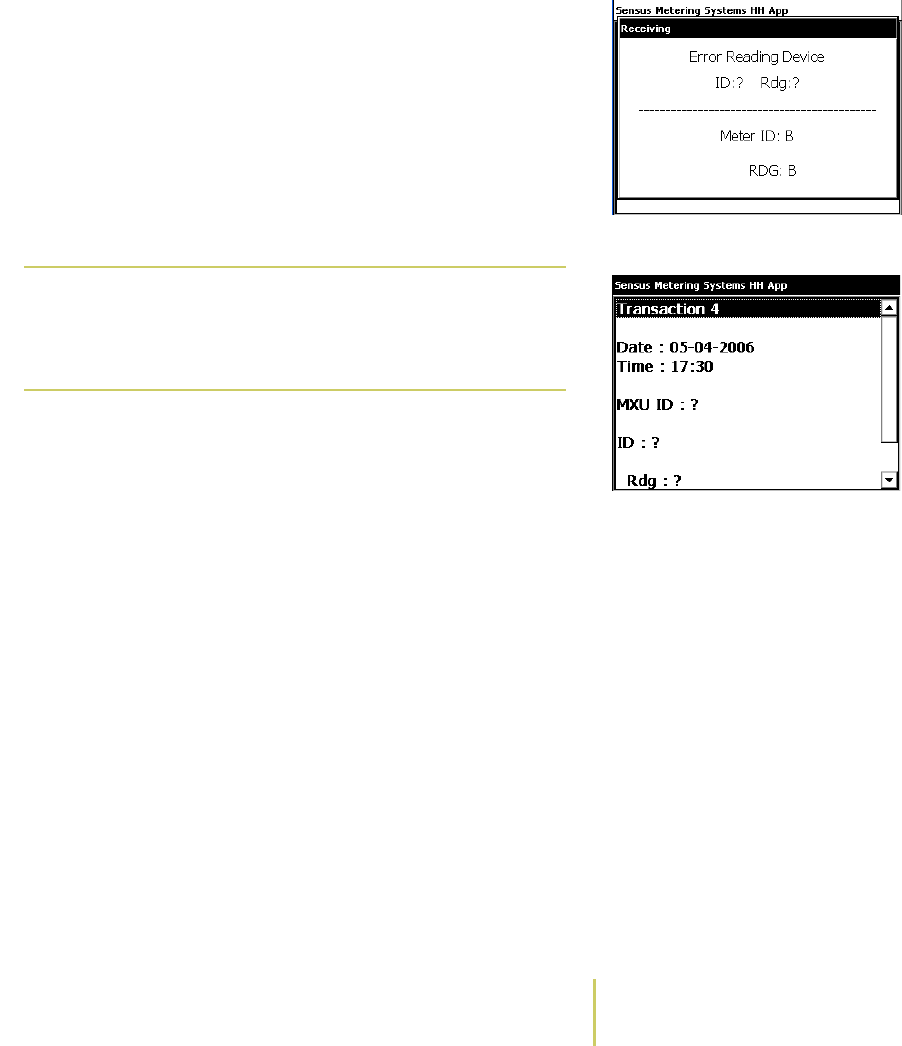
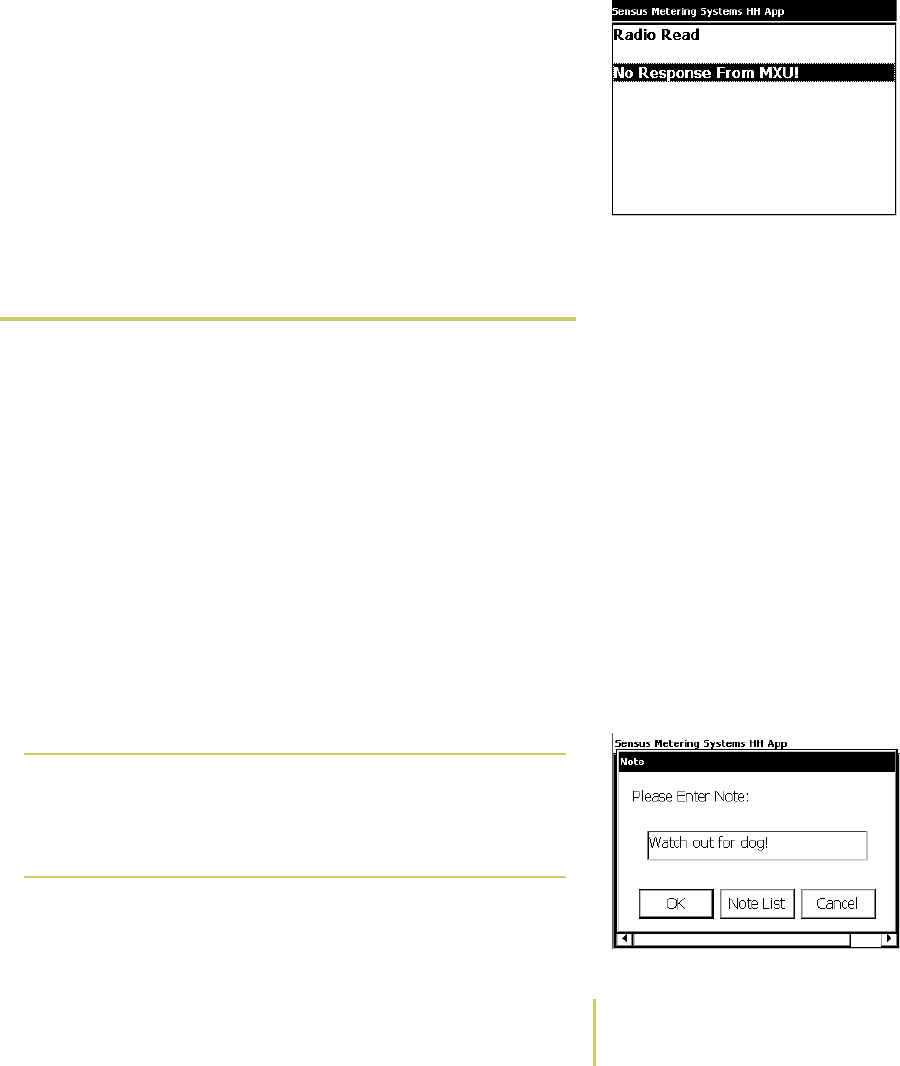
Error Reading Device MessageIf there is a data error, the system briefly displays the
error message “Error Reading Device” (for TouchRead
devices), or “No Response From MXU” (for RadioRead
devices), and sounds an error tone.
2Use the F5 key to view the transaction history for the
current location.
Transaction History (w/error)
3Resolve the error.
aTry to read the meter again.
bIf the read fails again, manually enter the ID and
Reading information (see
Enter Manual Readings
on
page 2-14).
Note
F5 is the default key assignment for the
Transaction History function. Key assignments
can be changed. For more information, see
About the Key Controls/Functions.

2–14 Sensus Metering Systems
Chapter 2: Collect Meter Data
Enter Data
The AR5000 can store several different types of data. The
most common is reading data from utility meters. However,
the system is also capable of storing several other types of
data. For example, you can enter notes, mark locations,
answer questions, and add new meters to a route.
Meter readings can be entered with one of three methods -
Manual, TouchRead, and RadioRead. Any other type of data
can be entered with the keypad, through a series of menus
and screens. The following list provides a brief description of
each part of this section:
•
Enter Manual Readings
on page 2-14 - Use the keypad to
enter readings from utility meters.
•
Enter TouchRead Readings
on page 2-16 - Use the
AutoGun to enter readings from utility meters.
•
Enter RadioRead Readings (AR5002 only)
on page 2-18 -
Use the RadioRead function to enter readings from utility
meters.
•
Enter Notes
on page 2-19 - Use the keypad to enter
additional information for a location on the route.
•
Mark Locations
on page 2-20 - Provide a searchable mark
about a location on the route.
•
Answer Questions
on page 2-21 - Respond to preset
questions.
•
Add New Meters to Route
on page 2-22 - Manually add a
new location to an existing route.
ÂEnter Manual Readings
The most common method of entering meter read data into
any AR5000 is to manually type the read information for a
location. You may need to use this method for an entire
Sensus AR5000 User’s Guide 2-15
Enter Data
route. Or, you may only use manual data entry for corrections
or resolving conflicts and errors.
To enter a manual reading...
1Use the TAB key to scroll through the route to the location
where you want to enter the information.
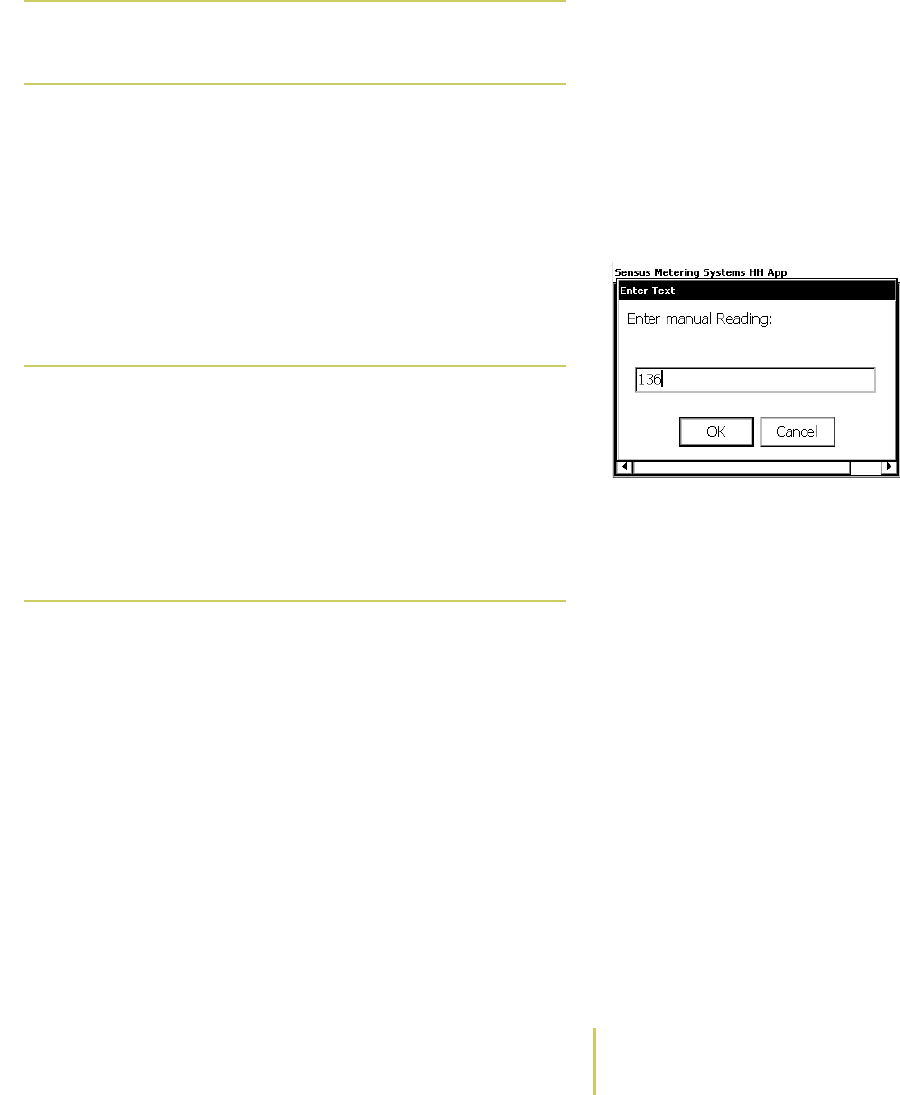
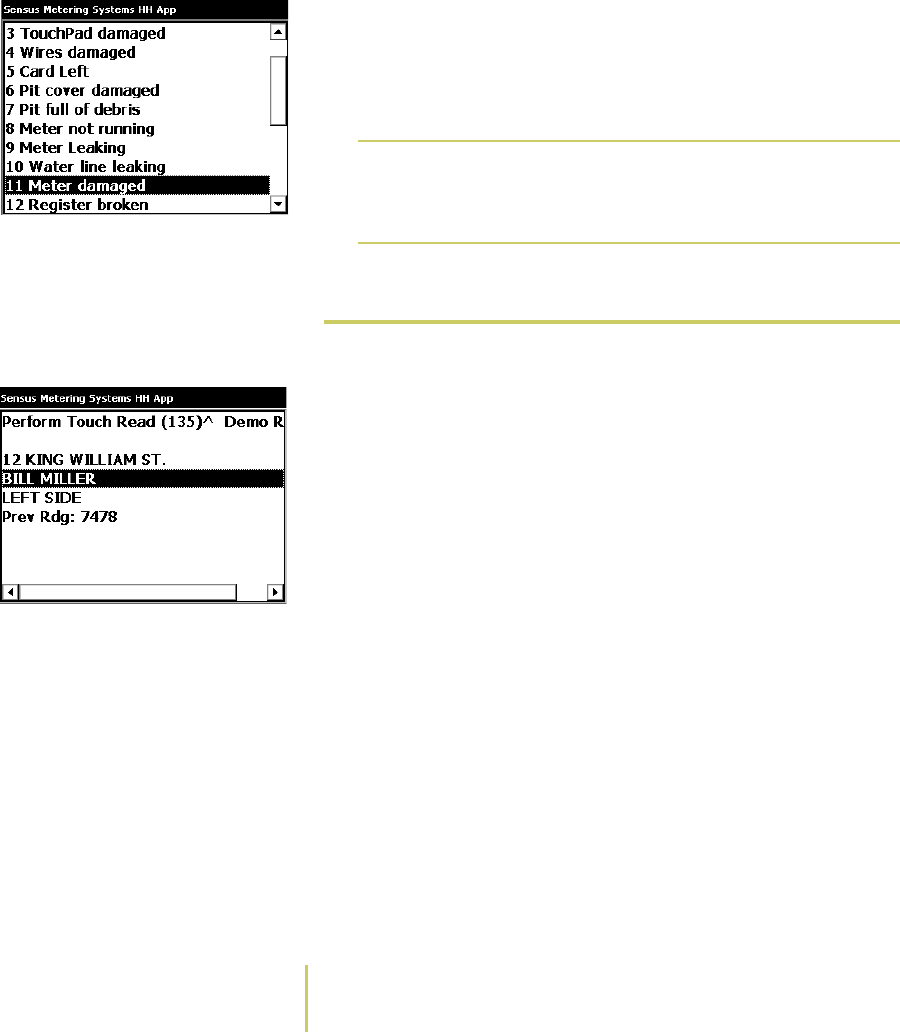
Enter Text ScreenThe system displays “Perform Manual Read” across the top
of the screen for addresses that require manual reads.
2Press the F1 key to open the Enter Text Screen.
3Use the number keypad to enter the reading.
4Use the TAB key to select
OK
.
5Press the ENTER key.
Note
You can enter a manual reading for any
location, even if it is RadioRead or TouchRead.
Note
F1 is the default key assignment for the Enter
Text function. Key assignments can be
changed. The system may be configured to
open the Enter Text screen when you press
any number key. For more information, see
About the Key Controls/Functions.
You can exit the Enter Text screen by pressing
the Esc key, or use the TAB key to select
Cancel and press the ENTER key.

2–16 Sensus Metering Systems
Chapter 2: Collect Meter Data
The system accepts the read and returns to the route.
ÂEnter TouchRead Readings
The Sensus TouchRead System allows you to collect meter
reading data without manually typing information on the
keypad. In this system, you touch a TouchPad with a gun.
The gun reads the data and sends it to the AR5000.
There are three components in a TouchRead system:
• Sensus TouchRead System TouchPad - The TouchPad
encoders are typically mounted in an easily accessible
location (ex.: the outside wall of a building). A TouchPad
is connected to the utility meter and provides a point of
contact where the guns can read data. For more
information on encoders, see ___???TBD___.
• Sensus SmartGun or AutoGun - These guns are hand-held
devices that you use along with the AR5000. The gun must
be are linked to the AR5000. Use these guns to physically
touch the TouchPad and read the meter data. Additional
information on linking the AR5000 with a SmartGun or
AutoGun is available in
Link the AR5000 to a TouchRead
Device (SmartGun/AutoGun)
on page 1-9.
• AR5000 - When the AR5000 is linked to a gun, the system
stores meter data in the routes or in the system memory.
Note
If the reading that you enter does not fall
within preset limits, the AR5000 sounds an
audible waning and displays the Limit Check
screen.
Select Confirm to accept the reading and
ignore the warning.
Select Re-Read to ignore the numbers and
enter a new reading.
Sensus AR5000 User’s Guide 2-17
Enter Data
To enter a TouchRead...
1Use the TAB key to scroll through the route, to the location
where you want to enter information.
The system displays “Perform TouchRead” across the top
of the screen for addresses that are setup for
TouchReadings.
2Place the flat disk face of the reading gun against the
TouchPad remote or pit-lid mounted TouchPad (TR/PL)
module and squeeze the trigger.
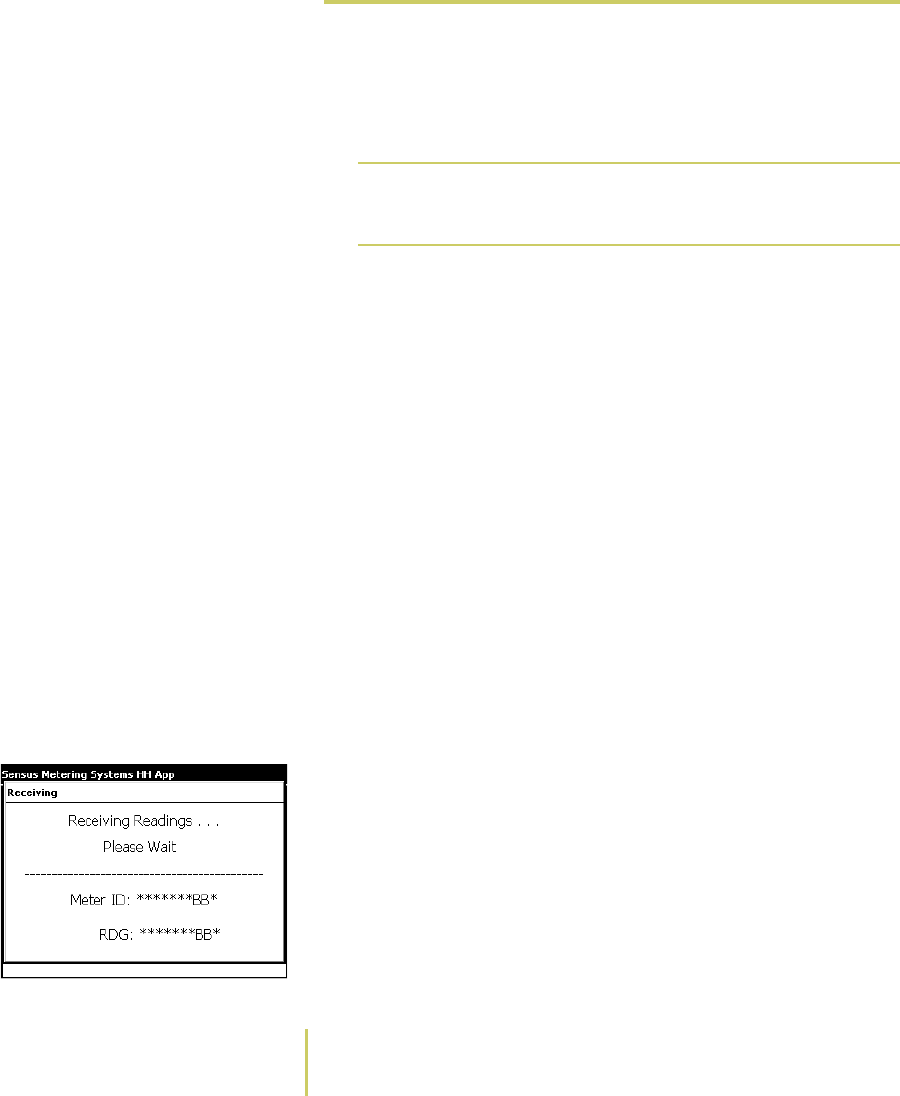
How To Hold the GunThe system briefly displays a “Receiving Readings”
message, while receiving data.
• If the reading is successful, the system sounds a beep
and stores the reading.
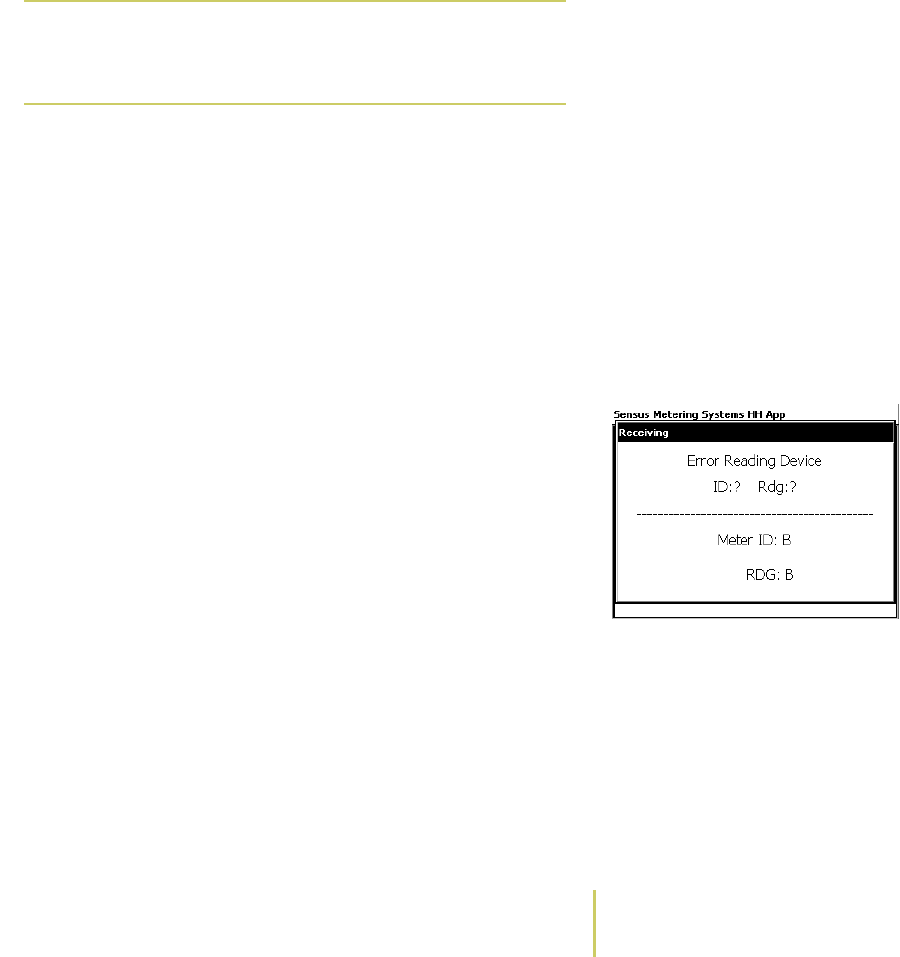
Error Reading Device Message• If the system is unable to read the information, the
screen displays an “Error Reading Device” error
message. For more information, see
Resolve Reading
Malfunctions and Bad Reads
on page 2-12.
• If the meter ID does not match the information for that
address on the route, the system initiates an
“Address/Meter Mismatch” error. For more information,
see
Resolve Readings That Don’t Match the Displayed
Location
on page 2-9.
• If the meter ID does not match any ID on the route, the
system initiates a “Non-Route Meter” error. For more
information, see
Resolve a Non-Route Meter
on
page 2-10.
Note
You can attempt a TouchRead on any meter
equipped with an encoder, regardless of the
information on the AR5000 display.
2–18 Sensus Metering Systems
Chapter 2: Collect Meter Data
ÂEnter RadioRead Readings (AR5002
only)
The Sensus RadioRead System allows you to collect meter
data without manually typing information on the keypad. In
this system, a radio transmitter sends meter data directly to
the AR5002.
The AR5002 version of the system is equipped with a radio
receiver. This enables the unit to read data from utility
meters equipped with a radio transmitter. If there are no
obstructions between the AR5002 and the meter and there is
no radio interference in the area, the system can perform a
RadioRead on meters up to ___???___ feet away.
To enter a RadioReading...
1Use the TAB key to scroll through the route, to the location
where you want to enter information.
The system displays “Perform RadioRead” across the top
of the screen for addresses that are setup to be read with
the radio.
2Press the ENTER key.
Receiving Readings Message The system displays a “Receiving Readings” message, and
searches for data.
• If the reading is successful, the system sounds a beep
and stores the reading at the selected address.
• If the system is unable to detect a signal, the screen
displays a “No Response From MXU” error message. For
Note
The RadioRead function is only available on
the AR5002 version of the system.
Sensus AR5000 User’s Guide 2-19
Enter Data
more information, see
Resolve Reading Malfunctions
and Bad Reads
on page 2-12.
No Response From MXU Error• If the meter ID does not match the information for that
address on the route, the system initiates an
“Address/Meter Mismatch” error. For more information,
see
Resolve Readings That Don’t Match the Displayed
Location
on page 2-9.
• If the meter ID does not match any ID on the route, the
system initiates a “Non-Route Meter” error message.
For more information, see
Resolve a Non-Route Meter
on page 2-10.
ÂEnter Notes
As you are reading meters, you can enter additional text
information for locations along a preset route. These notes
are useful for capturing information about a location. For
example, you could enter notes that indicate a physical
problem with the equipment or a beware of dog warning.
You can search for addresses with notes. For more on
searching, see
Find Noted Locations
on page 3-19.
To enter a note...
1Use the TAB key to scroll through the route to the location
where you want to enter the information.
Enter Text Screen2Use the F2 key to open the
Enter Text Screen
.
3Enter the note by one of two methods.
ÂUse the keypad to enter an alpha-numeric note.
Note
F2 is the default key assignment for the Note
function. Key assignments can be changed. For
more information, see About the Key
Controls/Functions.
2–20 Sensus Metering Systems
Chapter 2: Collect Meter Data
The note can be any length, up to 50 characters.
When you are finished, use the TAB key to select
OK
and press the ENTER key.
Note List Screen ÂUse the TAB key to select
Note List
.
Press the ENTER key. The system displays a list of
preset notes. Use the PgUp and PgDn keys to highlight
a note from the list. Press the ENTER key to select the
note.
ÂMark Locations
Typical Marked Address You can place a mark on any location in the route. This mark
is typically used along with notes, for reviewing information
after a route is complete. For example, you may have an
issue with a meter, mark it, and return at the end of the route
to attempt to resolve the issue.
You can search for marked addresses at any time. For more
on locating marks, see
Find Marked Locations
on page 3-17.
To Mark/Unmark an address...
1To mark an address, complete the following steps:
aUse the TAB key to scroll through the route to the
location you want to mark/unmark.
bUse the F4 key to mark the address.
Note
You can exit the Enter Text screen by pressing
the Esc key, or use the TAB key to select
Cancel and press the ENTER key.
Sensus AR5000 User’s Guide 2-21
Enter Data
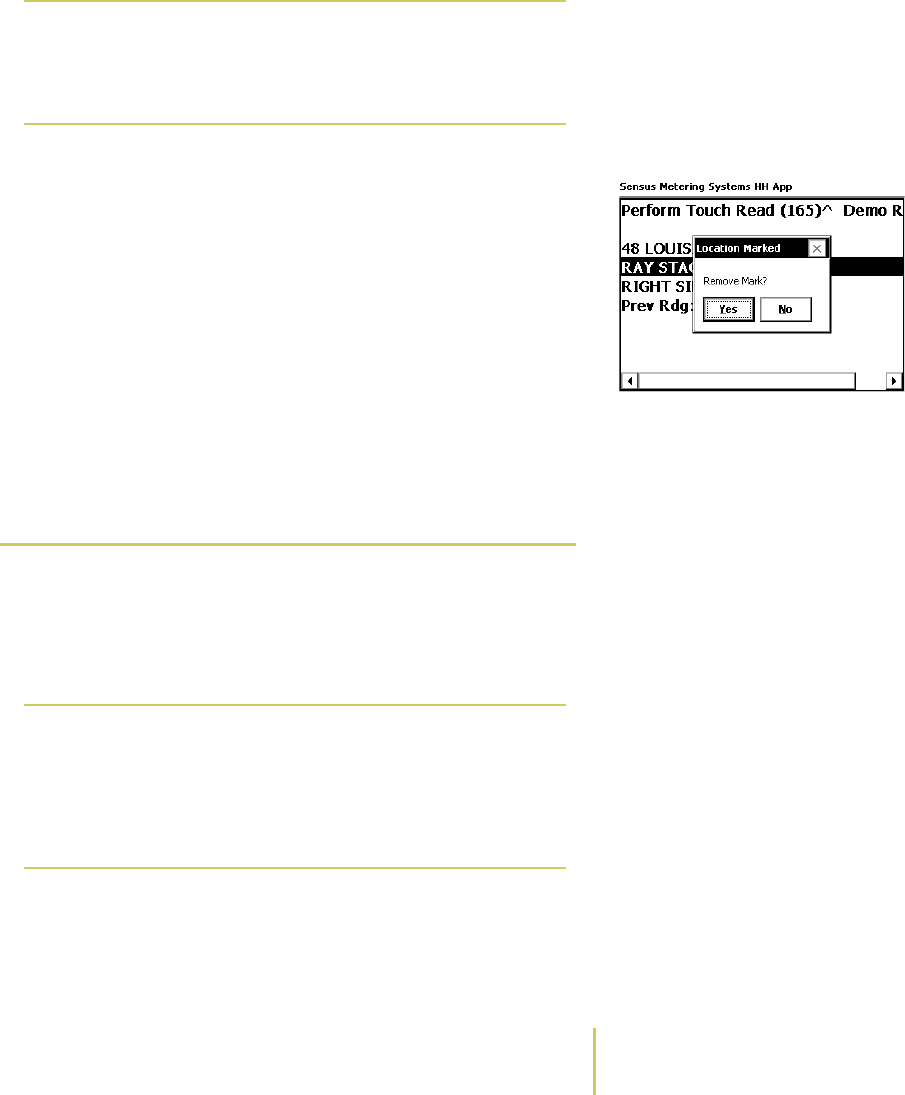
The system places a caret (“^”) character in the
heading at the top of the screen.
Location Marked Screen2To unmark an address, complete the following steps:
aUse the TAB key or the search function to locate a
marked address. For information on searching, see
Find
Marked Locations
on page 3-17.
bPress the F4 Key. The system displays a Location
Marked Screen.
cUse the TAB key to select Yes or No.
• Select Yes to unmark the address.
• Select No to keep the mark on the address.
dPress the ENTER key to accept your selection.
ÂAnswer Questions
Typically, office staff setup the AR5000 and load route
information (see
Start Collecting Data
on page 2-2).
Depending on the route setup, the AR5000 may prompt you
to answer questions during the route.
To answer a question...
1Choose a route address.
Note
F4 is the default key assignment for the Mark
function. Key assignments can be changed. For
more information, see About the Key
Controls/Functions.
Note
Questions are attached to specific addresses.
The system can be set to show the question as
soon as you display an address. Or, the system
can be set to show the question immediately
after you enter the meter reading for an
address.
2–22 Sensus Metering Systems
Chapter 2: Collect Meter Data
Use any method to choose an address along the route
(manual read, search, etc.). The system displays a
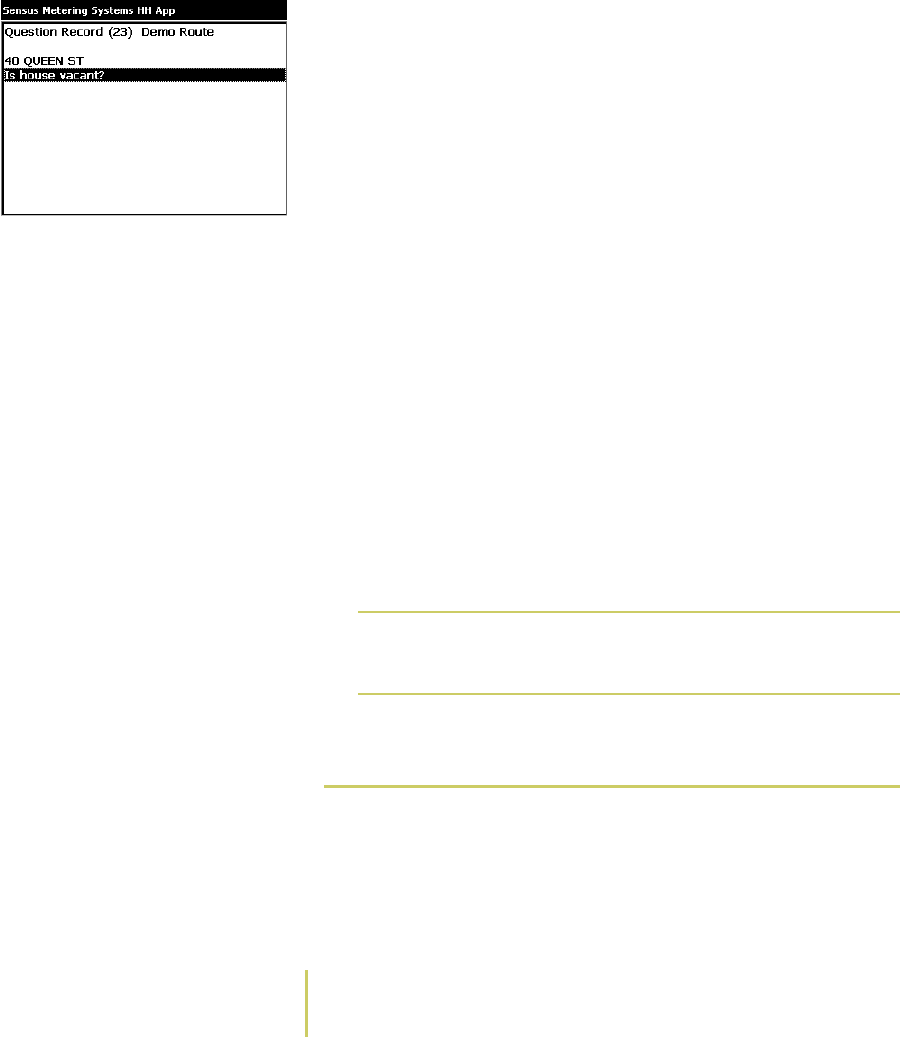
Question screen for addresses configured with questions.
Typical Question Screen 2Answer the question.
Depending on the type of question, you could be asked to
respond in one of two ways.
• Yes or No - Some questions require a yes or no answer
(ex.: Is this address occupied?). Use the Tab key to
select Yes or No. Press the ENTER key to save your
answer and return to the route.
• Numeric response - Some questions require a number
in response (ex.: How many people live at this
address?). Use the keypad to type the appropriate
answer. Then, press the ENTER key to save your
answer and return to the route.
• Multiple choice - Some questions provide a list of
responses (ex.: choose a, b, c, etc.). Use the Tab key to
select the appropriate answer. Then, press the ENTER
key to save your answer and return to the route.
• Type a response - Some questions require a written
response (ex.: Where is the meter located?). Use the
keypad to type in an appropriate answer. Then, press
the ENTER key to save your response and return to the
route.
ÂAdd New Meters to Route
During the course of reading a route, you may encounter a
meter or an address that is missing from the information
stored in your AR5000. For example, areas with new
development or construction activity may have new buildings
Note
You can press the Esc key to exit the Question
Screen without entering an answer.

Sensus AR5000 User’s Guide 2-23
Enter Data
completed before they can be added to the billing system in
your office. The Add Meter function allows you to insert
information for a new location in your route.
To add a new meter ID...
1Choose a location along the route for the new ID.
Use any method to choose an address along the route
(manual read, search, etc.).
2Press the Ins key or the F8 key.
The system displays an Enter Text screen to enter the new
meter ID.
3Enter the New Meter ID.
Use the keypad to enter a description of the new meter.
4Use the Tab key to select OK.
5Press the ENTER key.
The system displays an Enter Text screen for the reading
information from the new meter.
Note
The system places the new meter ID
information into the route just before the
location that is displayed on the screen.
Note
F8 is the default key assignment for the Mark
function. Key assignments can be changed. For
more information, see About the Key
Controls/Functions.
Note
You typically need to enter some description
information for the location (ex.: street
address). Also include meter ID numbers, if
they are available.

2–24 Sensus Metering Systems
Chapter 2: Collect Meter Data
6Use the Tab key to select OK.
7Press the ENTER key.
The system saves the information and returns to the
route.
Note
You can use the Tab key to select Cancel and
press Enter to exit the any Text screen in this
instruction.

Sensus AR5000 User’s Guide 3-1
Find Route
Information
Routes are primarily made up of addresses and Meter IDs.
The AR5000 can also store descriptive text, marks, notes,
limits, and statistics for each route. You often run a route
from start-to-finish without needing to check any
information. However, there are times you need to verify
reads, check that the route is complete, and review statistics.
Use the features described in this section to search for
addresses, meter ID’s, text entries; find incomplete sections
or special entries; and review read data.
The chapter is divided into the following sections:
•
Search the Route
on page 3-3 - This section lists
instructions on searching for addresses, meter IDs, and
text.
•
Find Unfinished Sections of the Route
on page 3-12 - This
section includes instructions on searching for unread
meters/addresses and unanswered questions.
•
Find Special Entries
on page 3-17 - This section includes
instructions on finding marks, notes, and range violations.
•
Review Read Information
on page 3-23 - This section
includes instructions on how to review existing read
information.


Sensus AR5000 User’s Guide 3-3
Search the Route
Search the Route
Routes are primarily an organized list of individual locations
and their associated meter IDs. The locations are listed in a
logical order to match the path that you could take as you
physically move from one location to the next. Typically, you
start at one end of the route and move through the list,
entering readings until you reach the end of the route.
However, there are times you may need to locate a specific
address or meter on the route. This could happen if you take
the route out of order or need to verify an address, reading,
or specific text associated with a specific address.
The AR5000 has a set of features that you can use to search
for addresses, meter IDs, and specific displayed text.
Find instruction for these tasks in this section:
•
Search for an Address
on page 3-4 - How to display a
specific address on a route.
•
Go to the First Address
on page 3-5 - How to display the
first address on a route.
•
Go to the Last Address
on page 3-6 - How to display the
last address on a route.
•
Search for a Meter ID
on page 3-8 - How to display the
location information for a specific meter ID.
Note
Some addresses may have multiple meters
(ex.: apartment buildings or industrial sites).
Typically, each meter is listed at a separate
location on a route.
Note
Once you find an address, you can perform
any of the functions described in Chapter 2:
Collect Meter Data.
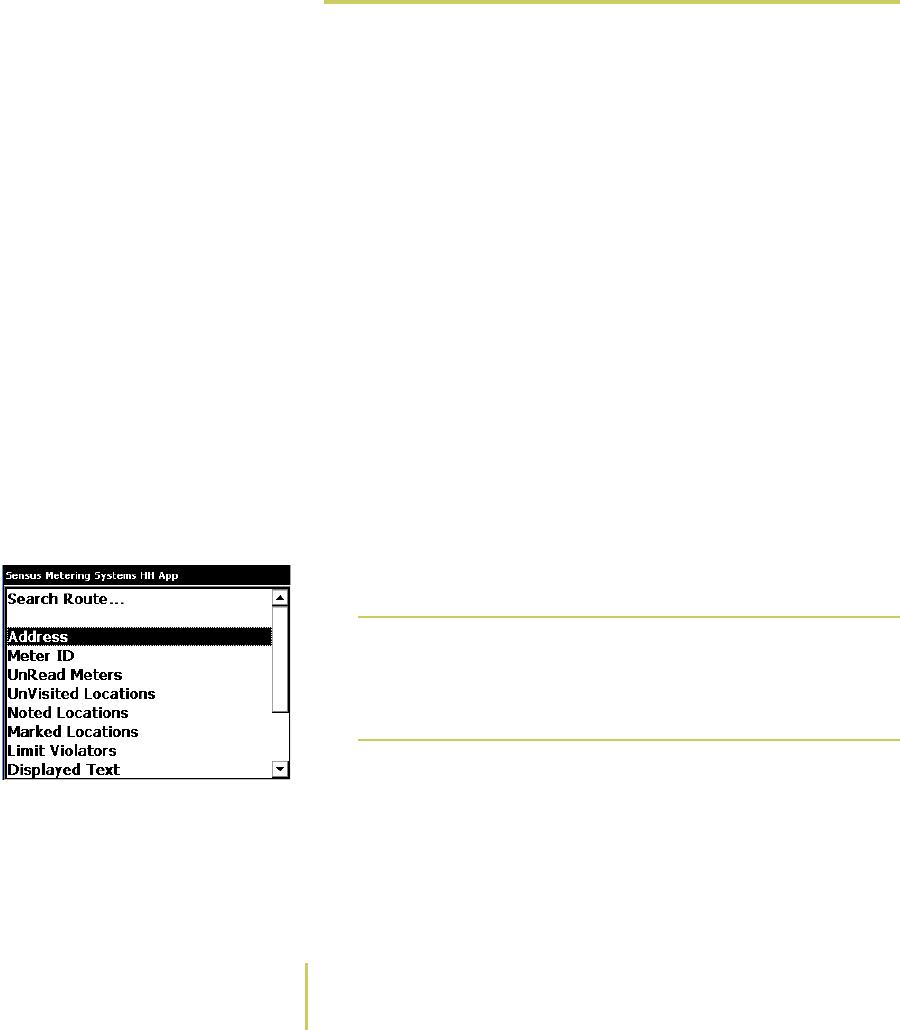
3–4 Sensus Metering Systems
Chapter 3: Find Route Information
•
Search Displayed Text
on page 3-9 - How to find specific
text in the route (including notes and questions).
ÂSearch for an Address
Routes are configured in a set order. When you select a
route, the system displays a default location at one end of
the route and advances forward through to the other end of
the route (for more information on setting the route
direction, see the section
Alter Route Behaviors
on page 2-4).
Depending on how you physically travel through your route,
you may take a meter reading out of order or you may want
to verify some information for a specific location that you
already visited. You can use the TAB key to page through
every location to find the address, or you can use the search
function.
To search for an address...
1Open a route.
See
Start Collecting Data
on page 2-2 for instructions on
opening a route.
Search Route... Menu 2Press the F3 key.
The system displays the Search Route... menu.
3Use the PgUp/PgDn key to select Address.
4Press the ENTER key.
The system displays an Enter Text dialog box.
Note
F3 is the default key assignment for the Search
menu. Key assignments can be changed. For
more information, see About the Key
Controls/Functions.
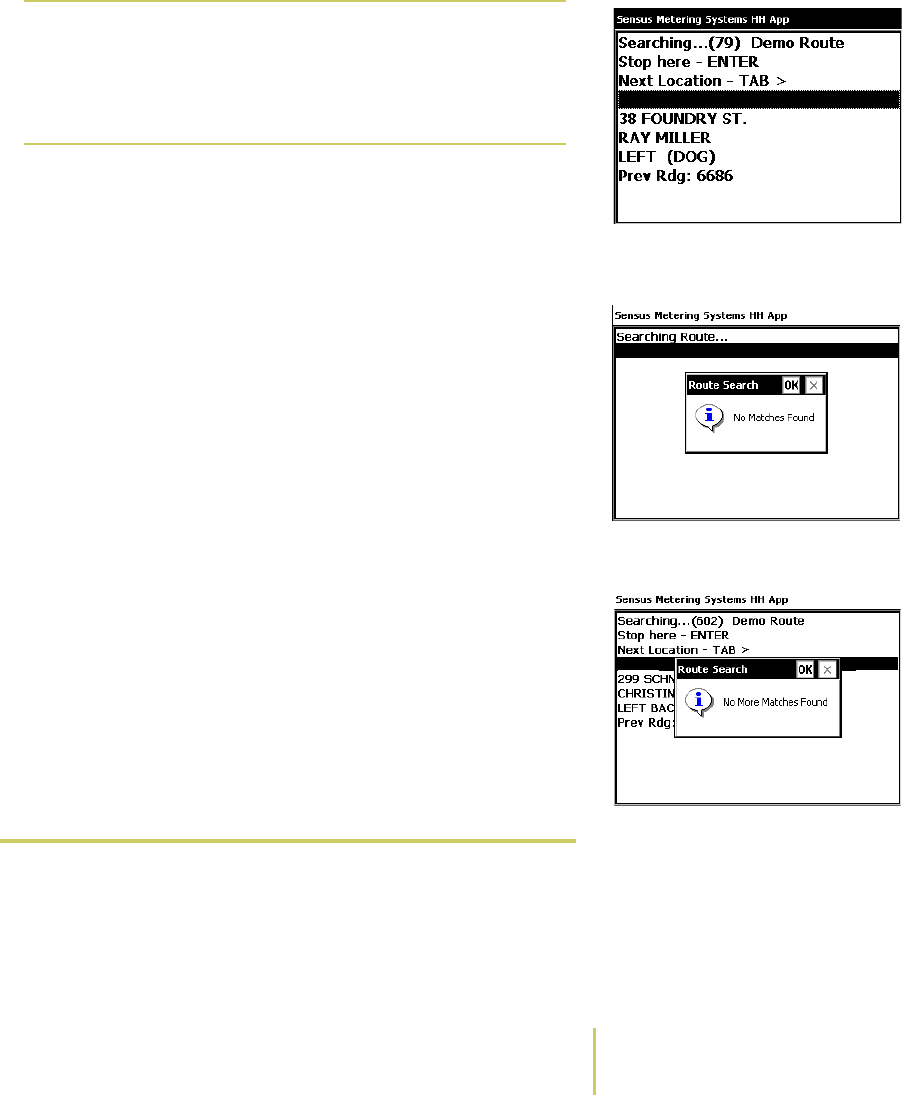
Sensus AR5000 User’s Guide 3-5
Search the Route
5Use the keypad to type the address information you would
like to search for.
6Press the ENTER key.
Search ResultsThe system displays the results of the search.
No Matches Found Message• If the system cannot find the information you entered,
then the screen displays a No Matches Found message.
Press the Esc key to clear the No Matches Found
message and end the search.
• If the system finds more than one match for the
information you entered, the screen displays the first
match, along with the following choices:
Stop here - Press the ENTER key to stop the search on
the displayed location.
Next Location - Press the TAB> key and the system
displays the next location in the search results.
You can use the TAB> key to scroll forward through the
list of search results. Once you reach the end of the
search results, the system displays a No More Matches
Found message.
Press the Esc key to clear the No More Matches Found
message and end the search.
No More Matches Found
Message
ÂGo to the First Address
By default, the AR5000 displays the first address when you
open a route. You can use the search function to return to
Note
The system searches for exactly what you
type, including numbers and spaces. If you
enter part of the address (ex.: just the street
name or number) the system will display every
location that contains that information.

3–6 Sensus Metering Systems
Chapter 3: Find Route Information
the first address. This function is available from any point
along the route.
To go to the first address on a route...
1Open a route.
See
Start Collecting Data
on page 2-2 for instructions on
opening a route.
2Press the F3 key.
Search Route... Menu The system displays the Search Route... menu.
3Use the PgUp/PgDn key to select Go To Beginning.
4Press the ENTER key.
The system displays the first location on the route.
ÂGo to the Last Address
By default, the AR5000 displays the first address when you
open a route. You can use the TAB key to page through every
Note
The first and last route address are
interchangeable, depending on how you have
the AR5000 configured. You can set the
system to traverse forward, starting at one end
of the route (ex.: address#1 through
address#10). Or, you can set the system to
traverse in reverse, starting at the opposite
end of the route (ex.:address#10 through
address#1). For more on this configuration
setting, see Alter Route Behaviors on
page 2-4.
Note
F3 is the default key assignment for the Search
menu. Key assignments can be changed. For
more information, see About the Key
Controls/Functions.
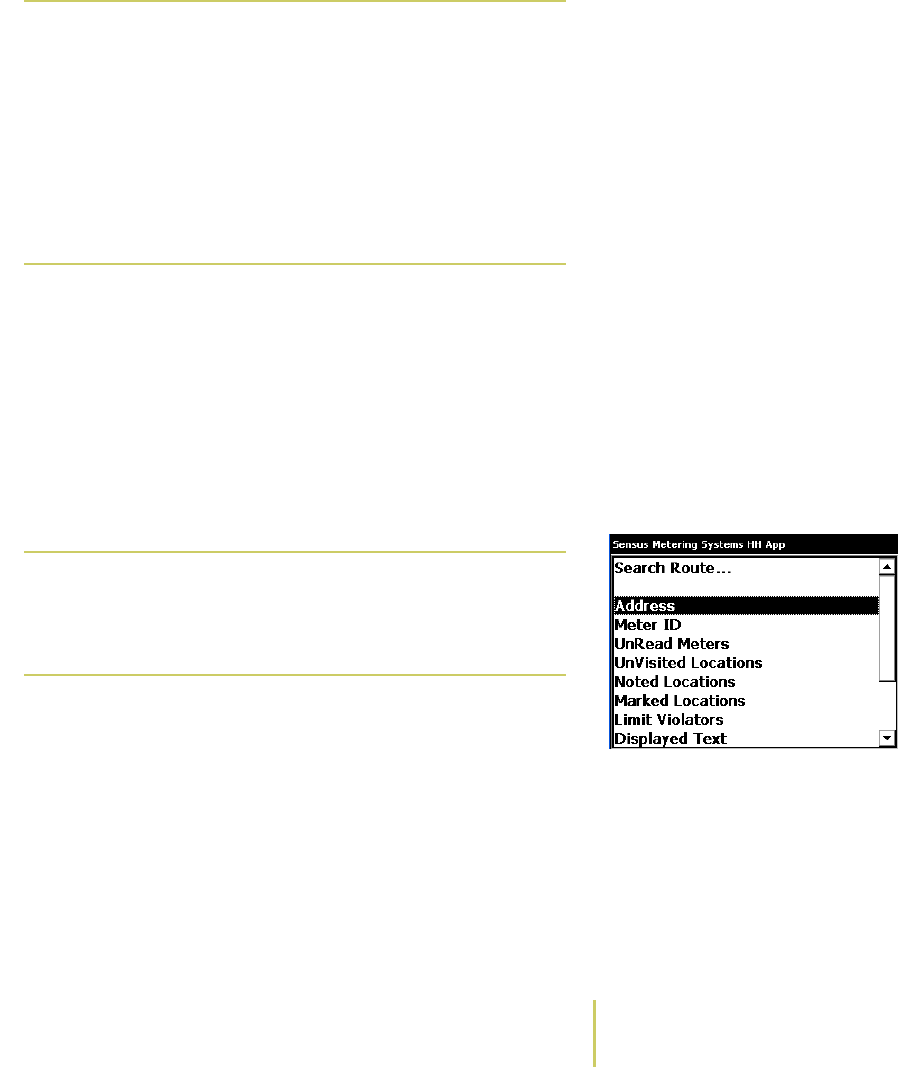
Sensus AR5000 User’s Guide 3-7
Search the Route
address to the end of the route. Or, you can use the search
function go to the last address. This function is available from
any point along the route.
To go to the last address on a route...
1Open a route.
See
Start Collecting Data
on page 2-2 for instructions on
opening a route.
2Press the F3 key.
Search Route... MenuThe system displays the Search Route... menu.
3Use the PgUp/PgDn key to select Go To End.
4Press the ENTER key.
The system displays the last location on the route.
Note
The first and last route address are
interchangeable, depending on how you have
the AR5000 configured. You can set the
system to traverse forward, starting at one end
of the route (ex.: address#1 through
address#10). Or, you can set the system to
traverse in reverse, starting at the opposite
end of the route (ex.:address#10 through
address#1). For more on this configuration
setting, see Alter Route Behaviors on
page 2-4.
Note
F3 is the default key assignment for the Search
menu. Key assignments can be changed. For
more information, see About the Key
Controls/Functions.
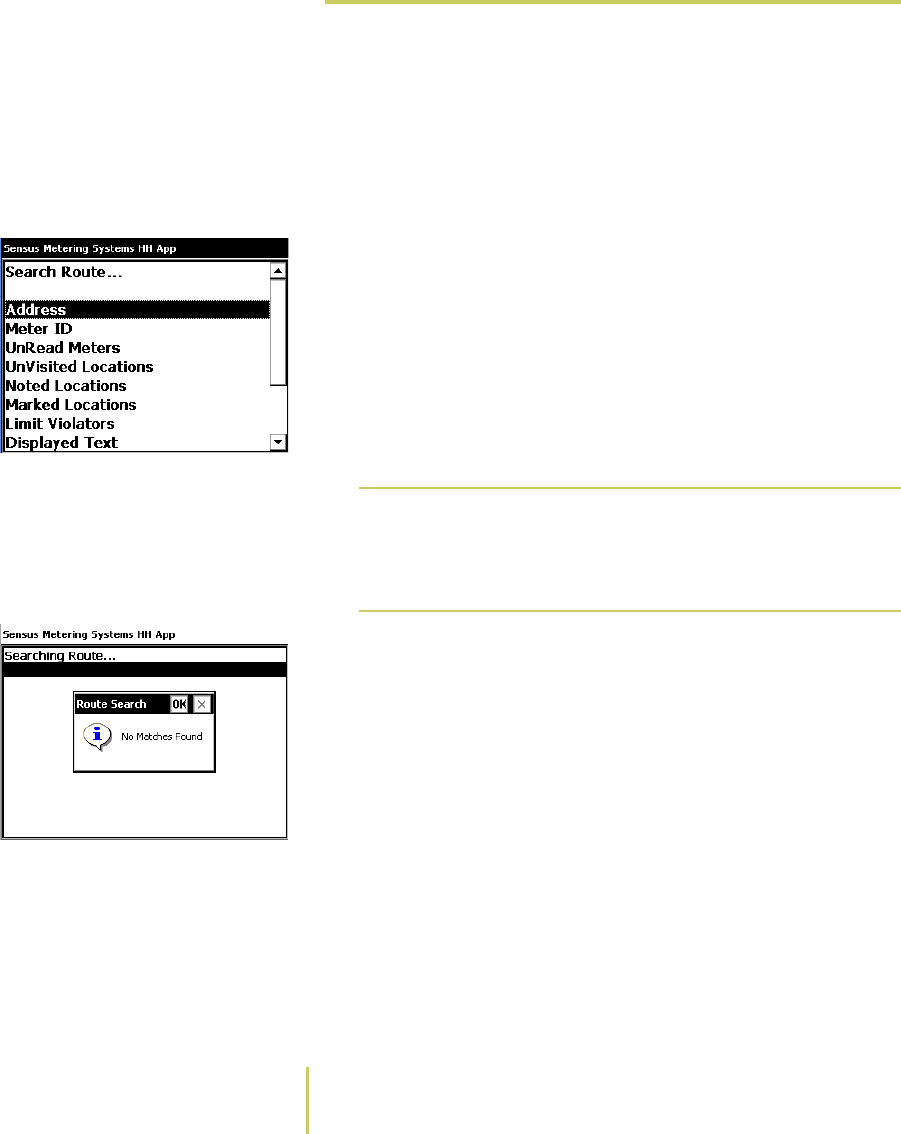
3–8 Sensus Metering Systems
Chapter 3: Find Route Information
ÂSearch for a Meter ID
During the route, you may need to display information for a
specific meter ID. Depending on how you run the route, you
may take a meter reading out of order or the actual meter ID
may not match the information stored in the route. You can
use the TAB key to page through every location on the route
and find the meter ID or you can use the search function.
To search for a meter ID...
1Open a route.
See
Start Collecting Data
on page 2-2 for instructions on
opening a route.
2Press the F3 key.
The system displays the Search Route... menu.
Search Route... Menu
3Use the PgUp/PgDn key to select Meter ID.
4Press the ENTER key.
The system displays an Enter Text dialog box.
5Use the keypad to enter the Meter ID that you would like
to search for.
No Matches Found Message 6Press the ENTER key.
The system displays the results of the search.
• If the system cannot find the information you entered,
then the screen displays a No Matches Found message.
Note
F3 is the default key assignment for the Search
menu. Key assignments can be changed. For
more information, see About the Key
Controls/Functions.
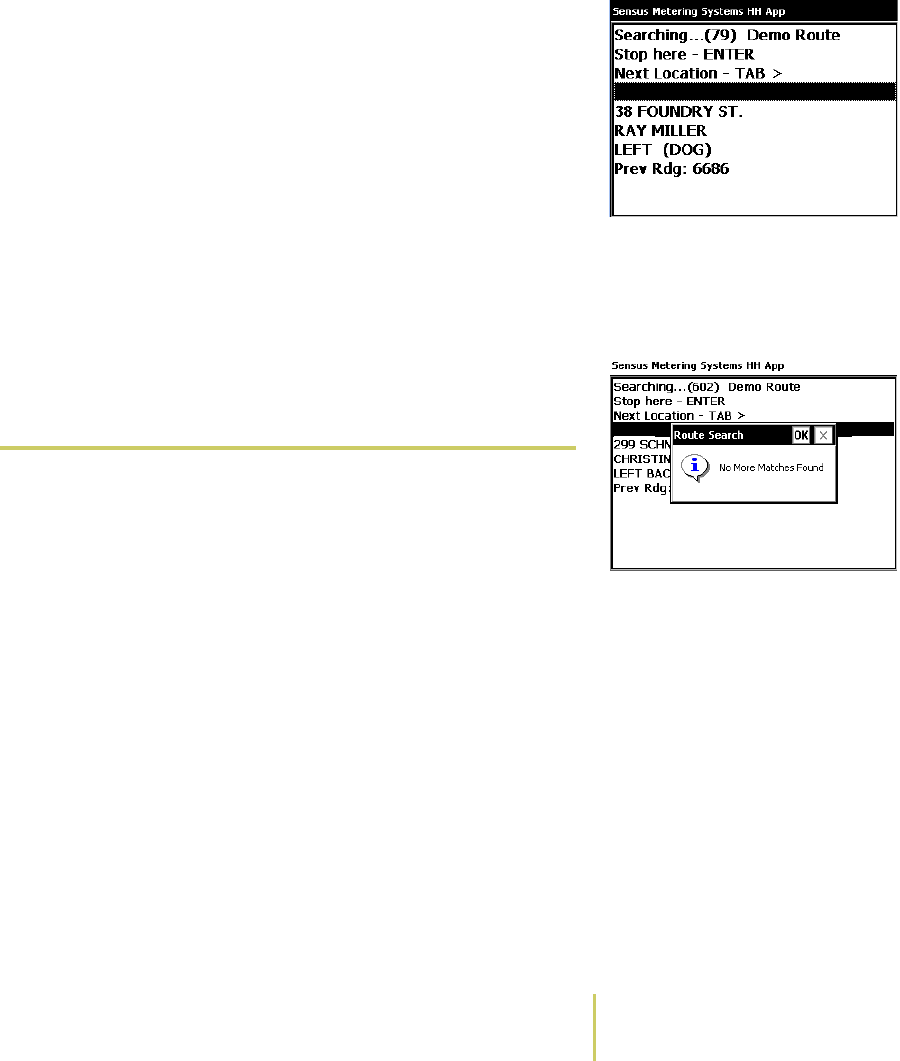
Sensus AR5000 User’s Guide 3-9
Search the Route
Press the Esc key to clear the No Matches Found
message and end the search.
Search Results Screen• If the system finds more than one match for the
information you entered, the screen displays the first
match, along with the following choices:
Stop here - Press the ENTER key to stop the search on
the displayed location.
Next Location - Press the TAB> key and the system
displays the next location in the search results.
You can use the TAB> key to scroll through the entire
list of search results. Once you reach the end of the
search results, the system displays a No More Matches
Found message.
No More Matches Found
Message
Press the Esc key to clear the No More Matches Found
message and end the search.
ÂSearch Displayed Text
The AR5000’s search displayed text function allows you to
search for any alphanumeric information stored in the route.
This could include meter IDs, account numbers, address
information, text entered into notes, customer names, and
questions.
To search for displayed text...
1Open a route.
See
Start Collecting Data
on page 2-2 for instructions on
opening a route.
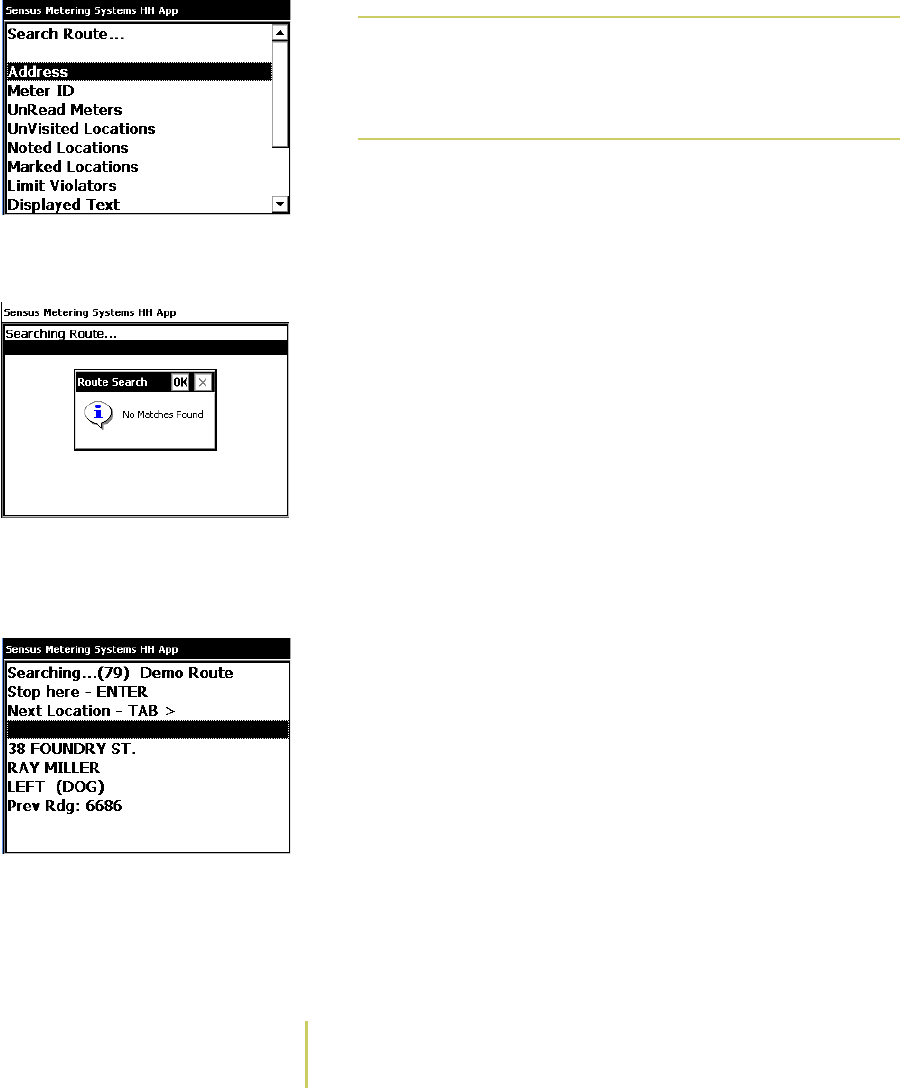
3–10 Sensus Metering Systems
Chapter 3: Find Route Information
2Press the F3 key.
Search Route... Menu The system displays the Search Route... menu.
3Use the PgUp/PgDn key to select Display Text.
4Press the ENTER key.
The system displays an Enter Text dialog box.
5Use the keypad to enter the text that you would like to
search for.
6Press the ENTER key.
The system displays the results of the search.
• If the system cannot find the information you entered,
then the screen displays a No Matches Found message.
No Matches Found Message Press the Esc key to clear the No Matches Found
message and end the search.
Search Results Screen • If the system finds more than one match for the
information you entered, the screen displays the first
match, along with the following choices:
Stop here - Press the ENTER key to stop the search on
the displayed location.
Next Location - Press the TAB> key and the system
displays the next location in the search results.
You can use the TAB> key to scroll through the entire
list of search results. Once you reach the end of the
Note
F3 is the default key assignment for the Search
menu. Key assignments can be changed. For
more information, see About the Key
Controls/Functions.
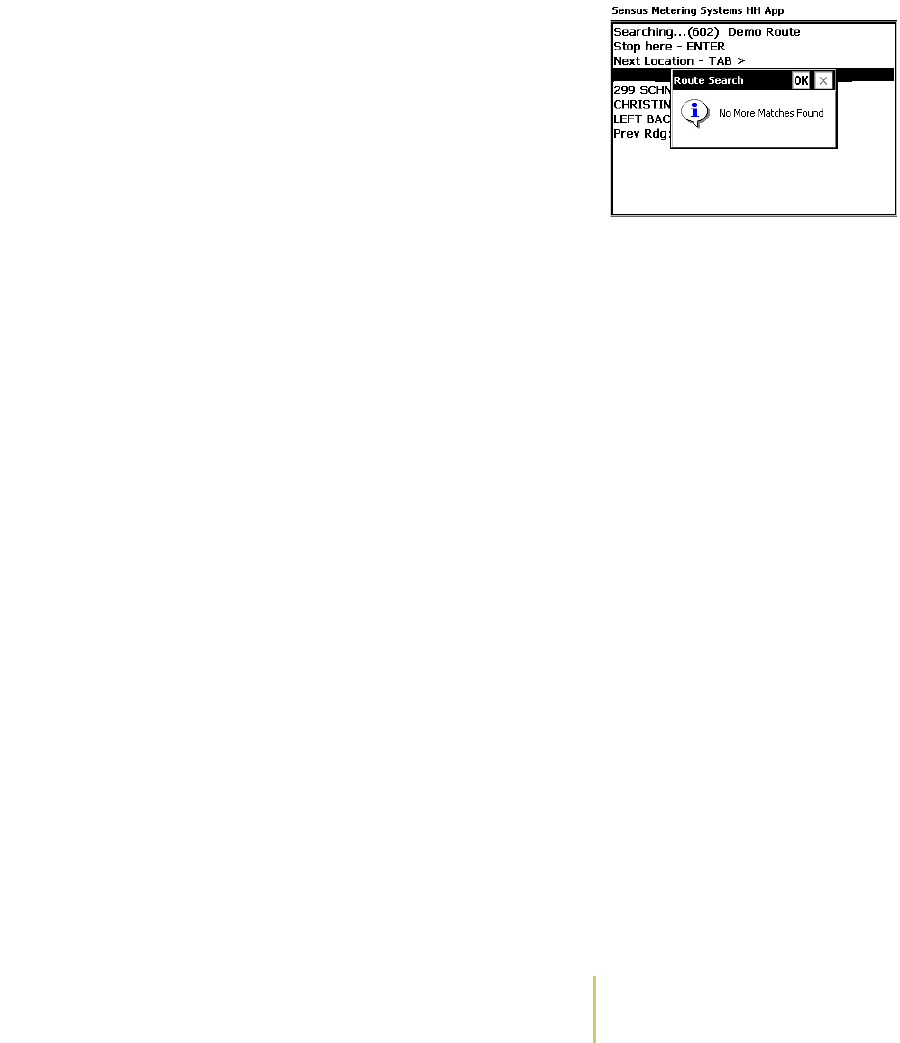
Sensus AR5000 User’s Guide 3-11
Search the Route
search results, the system displays a No More Matches
Found message.
No More Matches Found
Message
Press the Esc key to clear the No More Matches Found
message and end the search.

3–12 Sensus Metering Systems
Chapter 3: Find Route Information
Find Unfinished Sections of the Route
At the end of reading a route, you can search to verify that all
of the tasks are complete for that route. You can find meters
without any new reading data, addresses that have no new
data, and questions that have not been answered.
The following list provides a brief description of each part of
this section:
•
Find UnRead Meters
on page 3-12 - How to locate meters
on the route that do not have any new reading data.
•
Find UnVisited Location
on page 3-13 - How to find
locations along the route that have not had any activity.
•
Find Unanswered Questions
on page 3-15 - How to find
questions that have not received any response.
ÂFind UnRead Meters
The AR5000 typically associates read information with a
meter ID (see
Manage Reading Scenarios
on page 2-7).
When you reach the end of a route you may want to verify
that all of the meters have readings associated with them. At
any time during the reading process, you can use the search
function to check which meter IDs are still unread.
Search Route... Menu To find unread meters...
1Open a route.
See
Start Collecting Data
on page 2-2 for instructions on
opening a route.
2Press the F3 key.
Note
Once you find a location or a question, you can
perform any of the functions described in
Chapter 2: Collect Meter Data.
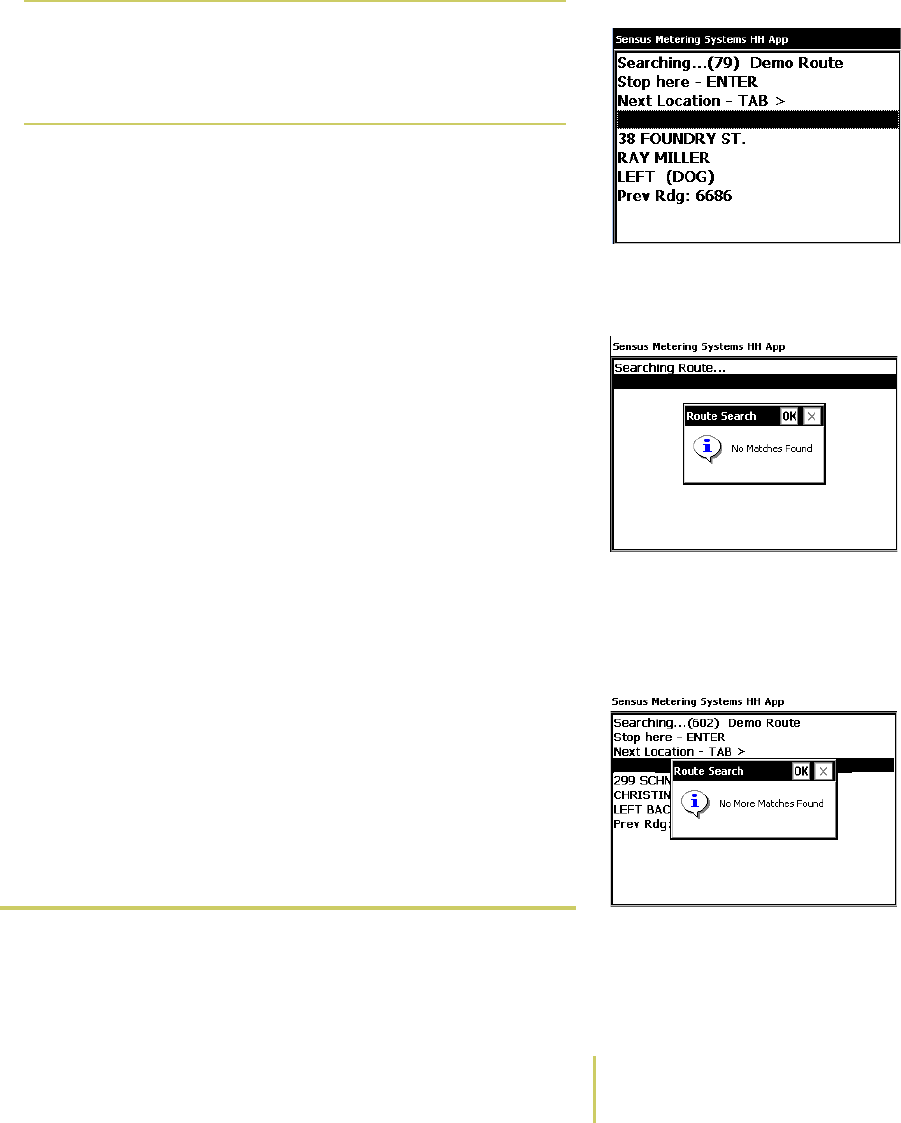
Sensus AR5000 User’s Guide 3-13
Find Unfinished Sections of the Route
The system displays the Search Route... menu.
3Use the PgUp/PgDn key to select UnRead Meters.
4Press the ENTER key.
Search Results ScreenThe system displays the results of the search.
No Matches Found Message• If the system cannot find the information you entered,
then the screen displays a No Matches Found message.
Press the Esc key to clear the No Matches Found
message and end the search.
• If the system finds more than one match for the
information you entered, the screen displays the first
match, along with the following choices:
Stop here - Press the ENTER key to stop the search on
the displayed location.
Next Location - Press the TAB> key and the system
displays the next location in the search results.
No More Matches Found
Message
You can use the TAB> key to scroll through the entire
list of search results. Once you reach the end of the
search results, the system displays a No More Matches
Found message.
Press the Esc key to clear the No More Matches Found
message and end the search.
ÂFind UnVisited Location
The AR5000 typically associates meter IDs with a particular
location or address (see
Manage Reading Scenarios
on
page 2-7). When you visit a location, you typically enter
Note
F3 is the default key assignment for the Search
menu. Key assignments can be changed. For
more information, see About the Key
Controls/Functions.
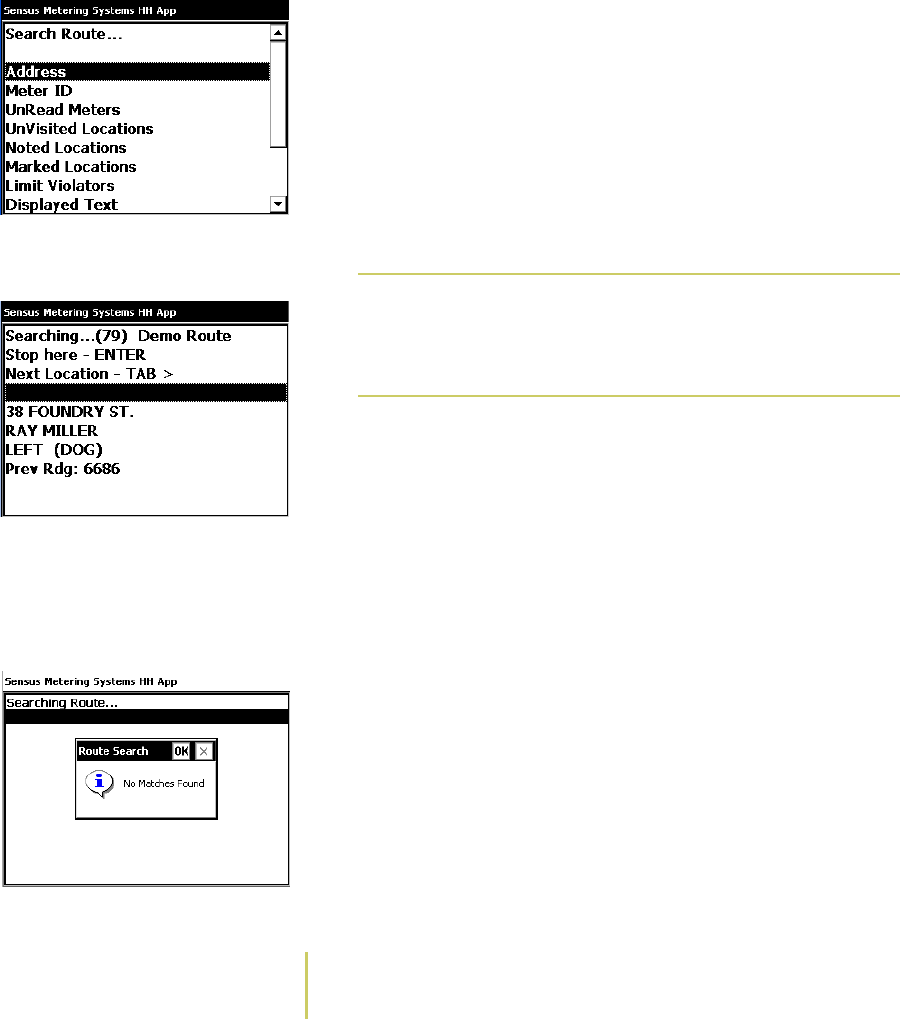
3–14 Sensus Metering Systems
Chapter 3: Find Route Information
some information for that location such as notes, readings,
etc. When the route is complete, you may want to check to
verify that you have visited every location on the route. At
any time during the reading process, you can use the search
function to check which locations are still unread.
To find unvisited locations...
1Open a route.
See
Start Collecting Data
on page 2-2 for instructions on
opening a route.
2Press the F3 key.
Search Route... Menu The system displays the Search Route... menu.
3Use the PgUp/PgDn key to select UnVisited Locations.
4Press the ENTER key.
Search Results Screen The system displays the results of the search.
• If the system cannot find the information you entered,
then the screen displays a No Matches Found message.
No Matches Found Message Press the Esc key to clear the No Matches Found
message and end the search.
• If the system finds more than one match for the
information you entered, the screen displays the first
match, along with the following choices:
Stop here - Press the ENTER key to stop the search on
the displayed location.
Note
F3 is the default key assignment for the Search
menu. Key assignments can be changed. For
more information, see About the Key
Controls/Functions.

Sensus AR5000 User’s Guide 3-15
Find Unfinished Sections of the Route
Next Location - Press the TAB> key and the system
displays the next location in the search results.
No More Matches Found
Message
You can use the TAB> key to scroll through the entire
list of search results. Once you reach the end of the
search results, the system displays a No More Matches
Found message.
Press the Esc key to clear the No More Matches Found
message and end the search.
ÂFind Unanswered Questions
Depending on the way the system is configured, the AR5000
may prompt you to answer questions during the route (see
Answer Questions
on page 2-21). At any time during the
reading process, you can check to see if there are any
unanswered questions.
To find unanswered questions...
1Open a route.
See
Start Collecting Data
on page 2-2 for instructions on
opening a route.
2Press the F3 key.
Search Route... MenuThe system displays the Search Route... menu.
3Use the PgUp/PgDn key to select Unanswered Questions.
4Press the ENTER key.
Note
F3 is the default key assignment for the Search
menu. Key assignments can be changed. For
more information, see About the Key
Controls/Functions.

3–16 Sensus Metering Systems
Chapter 3: Find Route Information
The system displays the results of the search.
No Matches Found Message • If the system cannot find the information you entered,
then the screen displays a No Matches Found message.
Press the Esc key to clear the No Matches Found
message and end the search.
• If the system finds more than one match for the
information you entered, the screen displays the first
match, along with the following choices:
Stop here - Press the ENTER key to stop the search on
the displayed location.
Search Results Screen Next Location - Press the TAB> key and the system
displays the next location in the search results.
You can use the TAB> key to scroll through the entire
list of search results. Once you reach the end of the
search results, the system displays a No More Matches
Found message.
Press the Esc key to clear the No More Matches Found
message and end the search.
No More Matches Found Message

Sensus AR5000 User’s Guide 3-17
Find Special Entries
Find Special Entries
Special entries are non-read information stored in a route for
certain locations. This information includes marks, notes, and
limit violators. During the course of reading meters, you can
search for each type of special entry.
The following list provides a brief description of each part of
this section:
•
Find Marked Locations
on page 3-17 - How to find
locations on the route that have been marked.
•
Find Noted Locations
on page 3-19 - How to find locations
on the route that have notes/comments added.
•
Find Limit Violators
on page 3-20 - How to find locations
on the route with read data that is outside of the preset
limits.
ÂFind Marked Locations
You can place a mark on any location in the route. Marking a
location places a caret (“^”) character in the heading of the
on-screen display (see
Mark Locations
on page 2-20). You
can use this mark, for reviewing information after a route is
complete. For example, you can mark a location that you
were unable to read during the route. At any time during the
reading process, you can review a list of marked locations.
Note
Once you find a location, you can perform any
of the functions described in Chapter 2: Collect
Meter Data.
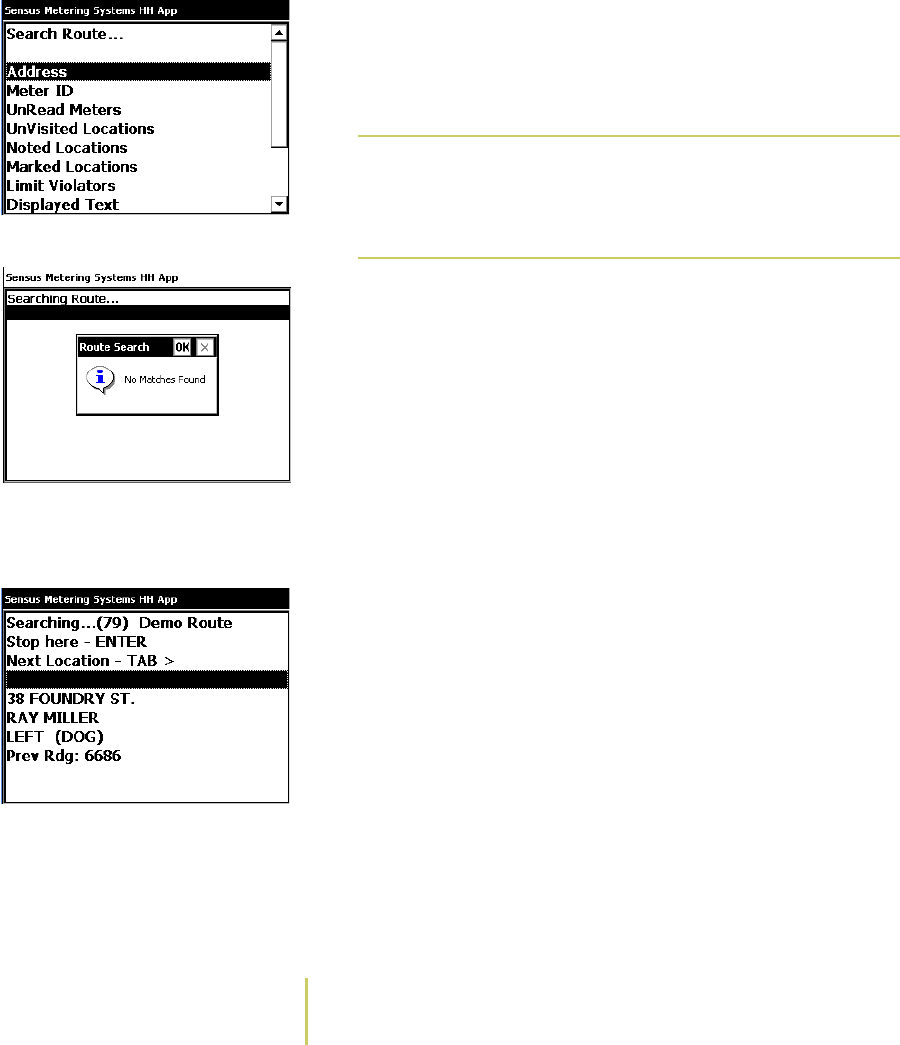
3–18 Sensus Metering Systems
Chapter 3: Find Route Information
To find marked locations...
1Open a route.
Search Route... Menu See
Start Collecting Data
on page 2-2 for instructions on
opening a route.
2Press the F3 key.
The system displays the Search Route... menu.
3Use the PgUp/PgDn key to select Marked Locations.
4Press the ENTER key.
The system displays the results of the search.
• If the system cannot find the information you entered,
then the screen displays a No Matches Found message.
No Matches Found Message Press the Esc key to clear the No Matches Found
message and end the search.
Search Results Screen • If the system finds more than one match for the
information you entered, the screen displays the first
match, along with the following choices:
Stop here - Press the ENTER key to stop the search on
the displayed location.
Note
F3 is the default key assignment for the Search
menu. Key assignments can be changed. For
more information, see About the Key
Controls/Functions.
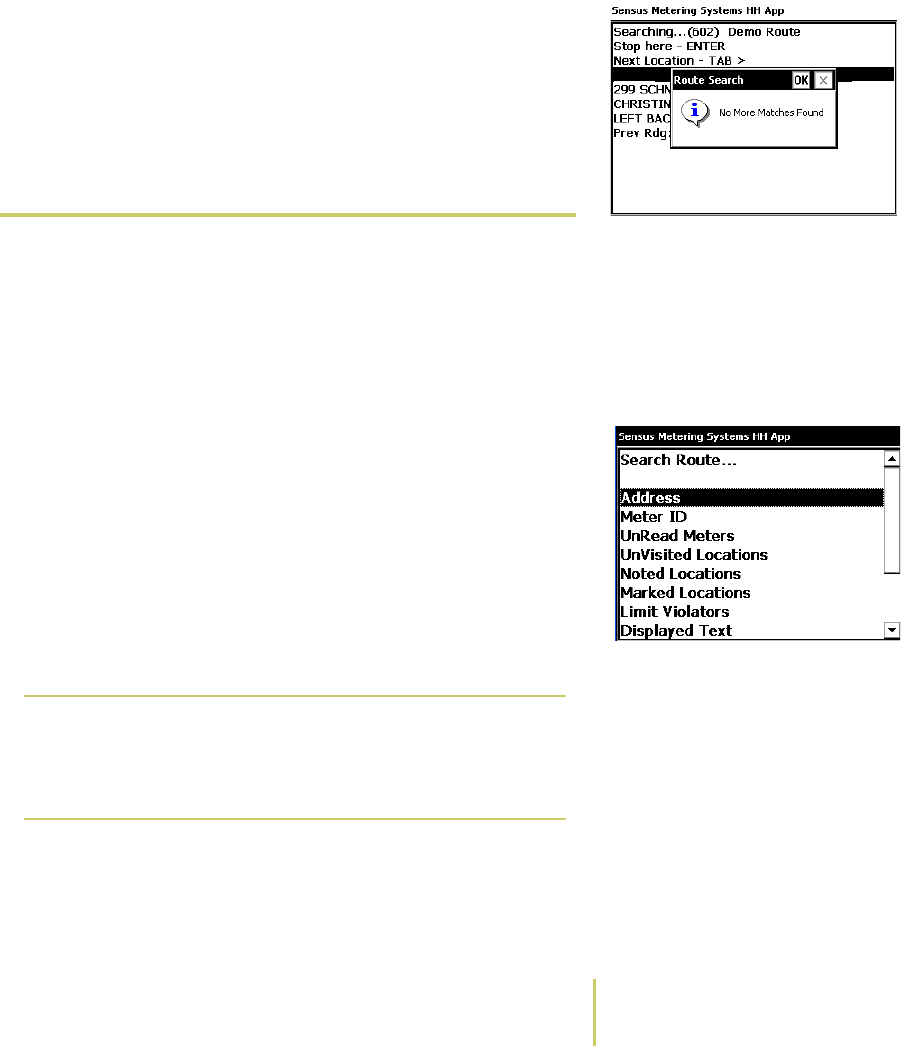
Sensus AR5000 User’s Guide 3-19
Find Special Entries
Next Location - Press the TAB> key and the system
displays the next location in the search results.
No More Matches Found
Message
You can use the TAB> key to scroll through the entire
list of search results. Once you reach the end of the
search results, the system displays a No More Matches
Found message.
Press the Esc key to clear the No More Matches Found
message and end the search.
ÂFind Noted Locations
As you are reading meters, you can enter additional text
information for locations along a preset route (see
Enter
Notes
on page 2-19). For example, you can enter a note
when you encounter an equipment problem with a meter. At
any time during the reading process, you can review a list of
the notes.
To find noted locations...
1Open a route.
See
Start Collecting Data
on page 2-2 for instructions on
opening a route.
2Press the F3 key.
Search Route... MenuThe system displays the Search Route... menu.
3Use the PgUp/PgDn key to select Noted Locations.
Note
F3 is the default key assignment for the Search
menu. Key assignments can be changed. For
more information, see About the Key
Controls/Functions.
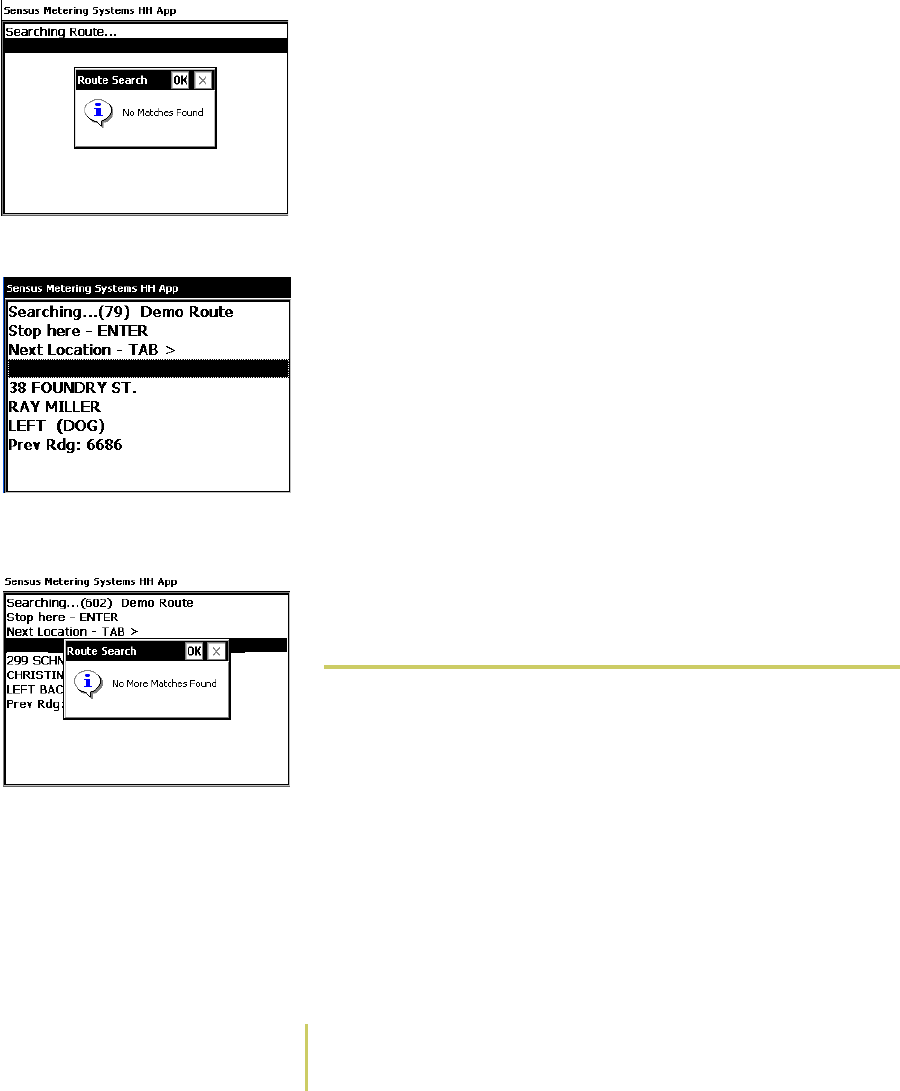
3–20 Sensus Metering Systems
Chapter 3: Find Route Information
4Press the ENTER key.
No Matches Found Message The system displays the results of the search.
• If the system cannot find the information you entered,
then the screen displays a No Matches Found message.
Press the Esc key to clear the No Matches Found
message and end the search.
• If the system finds more than one match for the
information you entered, the screen displays the first
match, along with the following choices:
Search Results Screen Stop here - Press the ENTER key to stop the search on
the displayed location.
Next Location - Press the TAB> key and the system
displays the next location in the search results.
You can use the TAB> key to scroll through the entire
list of search results. Once you reach the end of the
search results, the system displays a No More Matches
Found message.
No More Matches Found
Message
Press the Esc key to clear the No More Matches Found
message and end the search.
ÂFind Limit Violators
The office staff typically configures high/low limits for the
readings from each meter along the route. This assigns a
range of acceptable readings for each location. As you are
reading meters, you may encounter readings that do not fall
within the preset limits. If a reading does not fall within this
range, the AR5000 sounds an audible warning and displays
the Limit Check screen (see
Enter Data
on page 2-14/
Enter
Manual Readings
on page 2-14). At any time during the
reading process, you can review a list of the violators.

Sensus AR5000 User’s Guide 3-21
Find Special Entries
To find limit violators...
1Open a route.
See
Start Collecting Data
on page 2-2 for instructions on
opening a route.
2Press the F3 key.
Search Route... MenuThe system displays the Search Route... menu.
3Use the PgUp/PgDn key to select Noted Locations.
4Press the ENTER key.
The system displays the results of the search.
No Matches Found Message• If the system cannot find the information you entered,
then the screen displays a No Matches Found message.
Press the Esc key to clear the No Matches Found
message and end the search.
Note
F3 is the default key assignment for the Search
menu. Key assignments can be changed. For
more information, see About the Key
Controls/Functions.
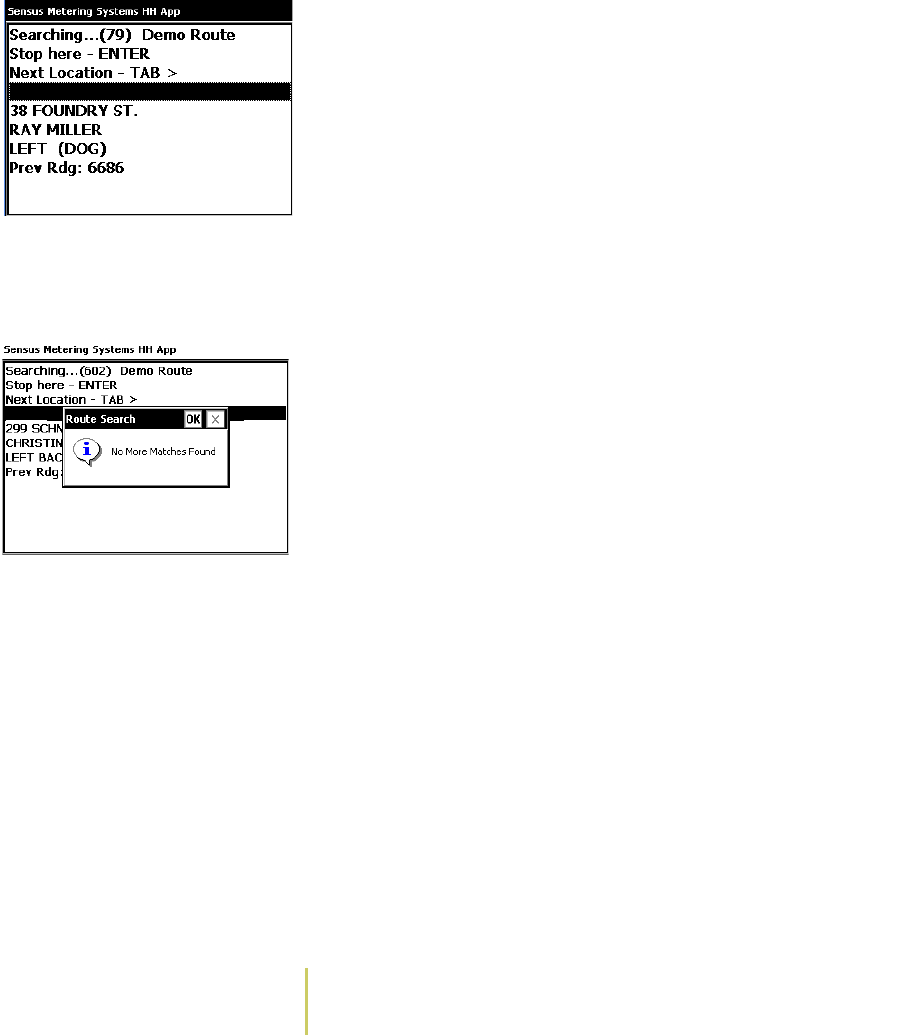
3–22 Sensus Metering Systems
Chapter 3: Find Route Information
• If the system finds more than one match for the
information you entered, the screen displays the first
match, along with the following choices:
Search Results Screen Stop here - Press the ENTER key to stop the search on
the displayed location.
Next Location - Press the TAB> key and the system
displays the next location in the search results.
You can use the TAB> key to scroll through the entire
list of search results. Once you reach the end of the
search results, the system displays a No More Matches
Found message.
Press the Esc key to clear the No More Matches Found
message and end the search.
No More Matches Found
Message

Sensus AR5000 User’s Guide 3-23
Review Read Information
Review Read Information
The AR5000 can store several types of historical data,
including route statistics and previous transactions. You can
use this information as a quick reference to check the activity
on a route. This information is available at any time.
The following list provides a brief description of each part of
this section:
•
Review Route Statistics
on page 3-23 - How to view
various statistics for an open route.
•
Review Previous Transactions
on page 3-25 - How to view
a list of every meter ID that has had activity during the
time you are on the route.
ÂReview Route Statistics
As you are reading meters, the AR5000 collects statistics in
the following categories:
• Read/Unread - Lists the number of locations that have
been read or remain unread. These are displayed in the
following format: read/unread (see
Find UnRead Meters
on page 3-12).
• New Meter - Lists the number of new meter IDs added to
the (see
Add New Meters to Route
on page 2-22).
• Noted - Lists the number of locations with a note added
(see
Find Noted Locations
on page 3-19).
• Questioned - Lists the number of locations with a question
(see
Answer Questions
on page 2-21).
• Answered - Lists the number of locations with a question
that has been answered (see
Answer Questions
on
page 2-21).
• Marked - Lists the number of locations that have been
marked (see
Enter Data
on page 2-14/
Mark Locations
on
page 2-20).

3–24 Sensus Metering Systems
Chapter 3: Find Route Information
• Visited - Lists the number of locations visited (see
Find
UnVisited Location
on page 3-13).
• Unvisited - Lists the number of locations that have not
been visited (see
Find UnVisited Location
on page 3-13).
At any time during the reading process, you can review an
on-screen report of these statistics. This report can be useful
as a quick reference at the end of your route, to verify that
you have completed all of the necessary tasks for that route.
You can also use this report at the beginning of a route to
check for questions, marks, and notes that could require
special attention during that route.
To review route statistics...
1Open a route.
See
Start Collecting Data
on page 2-2 for instructions on
opening a route.
2Press the F6 key.
Configuration Menu The system displays the Configuration menu.
3Use the PgUp/PgDn key to select Route Statistics.
4Press the ENTER key.
Statistics Screen The system displays the Statistics screen for the route you
have open.
5Press the Esc key to exit the Statistics screen.
Note
F6 is the default key assignment for the
Configuration menu. Key assignments can be
changed. For more information, see About the
Key Controls/Functions.
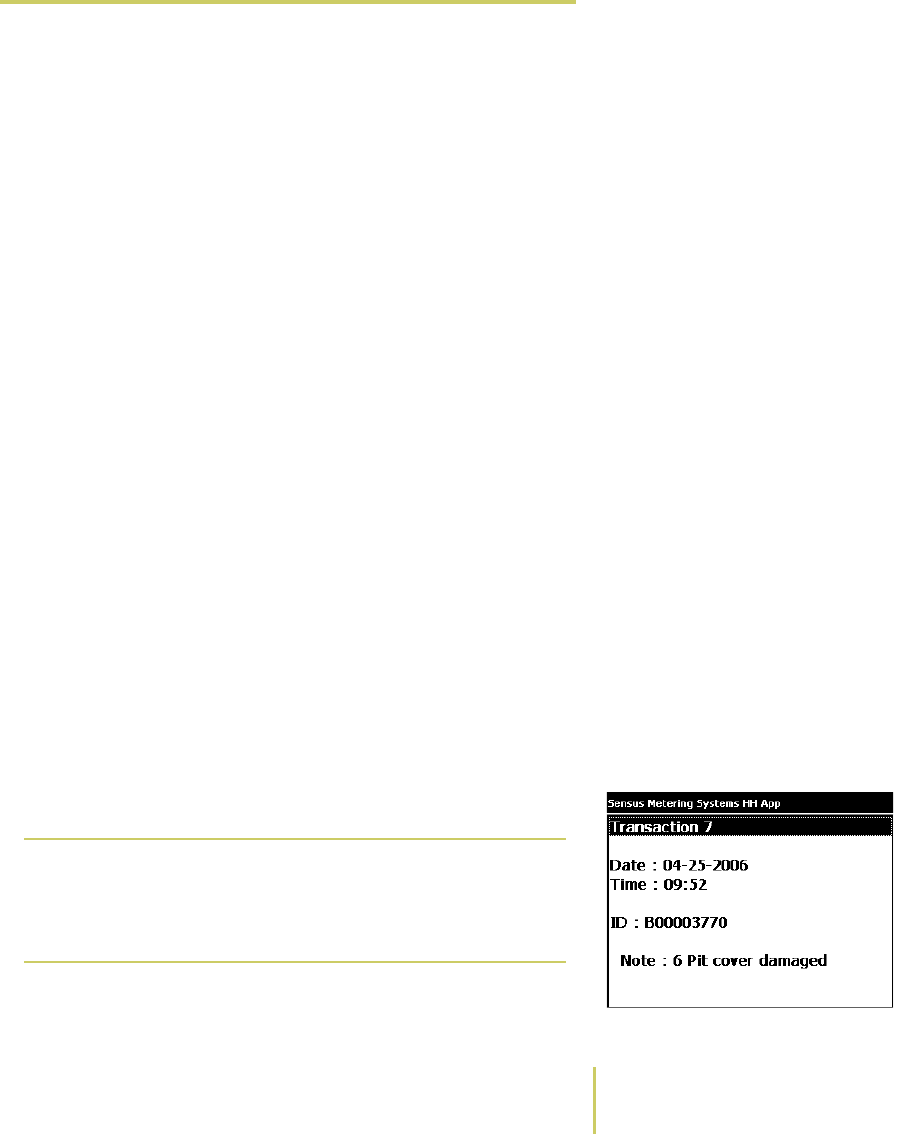
Sensus AR5000 User’s Guide 3-25
Review Read Information
ÂReview Previous Transactions
At any time during the reading process, you can review an
on-screen report of the reading activity on the current route.
This report provides a list of every meter ID that has had
some activity. Each item on this list includes the following
information:
• Transaction number - A transaction number appears at the
top of the screen. Transaction 1 is the most current activity
on the route, Transaction 2 displays the next most current
ID with activity, and so on.
• Date - This shows the date of the transaction.
• Time - This shows the time of the transaction.
• ID - This indicates the meter ID for the transaction.
• Rdg - This lists the current reading data.
• Note - Any notes associated with the meter ID will be listed
here.
This report can be useful as ___TBD???___
To review previous transactions...
1Open a route.
See
Start Collecting Data
on page 2-2 for instructions on
opening a route.
2Press the F5 key.
Transaction History ItemThe system displays the first item in the Transaction
History.
Note
F5 is the default key assignment for the
Transaction History. Key assignments can be
changed. For more information, see About the
Key Controls/Functions.
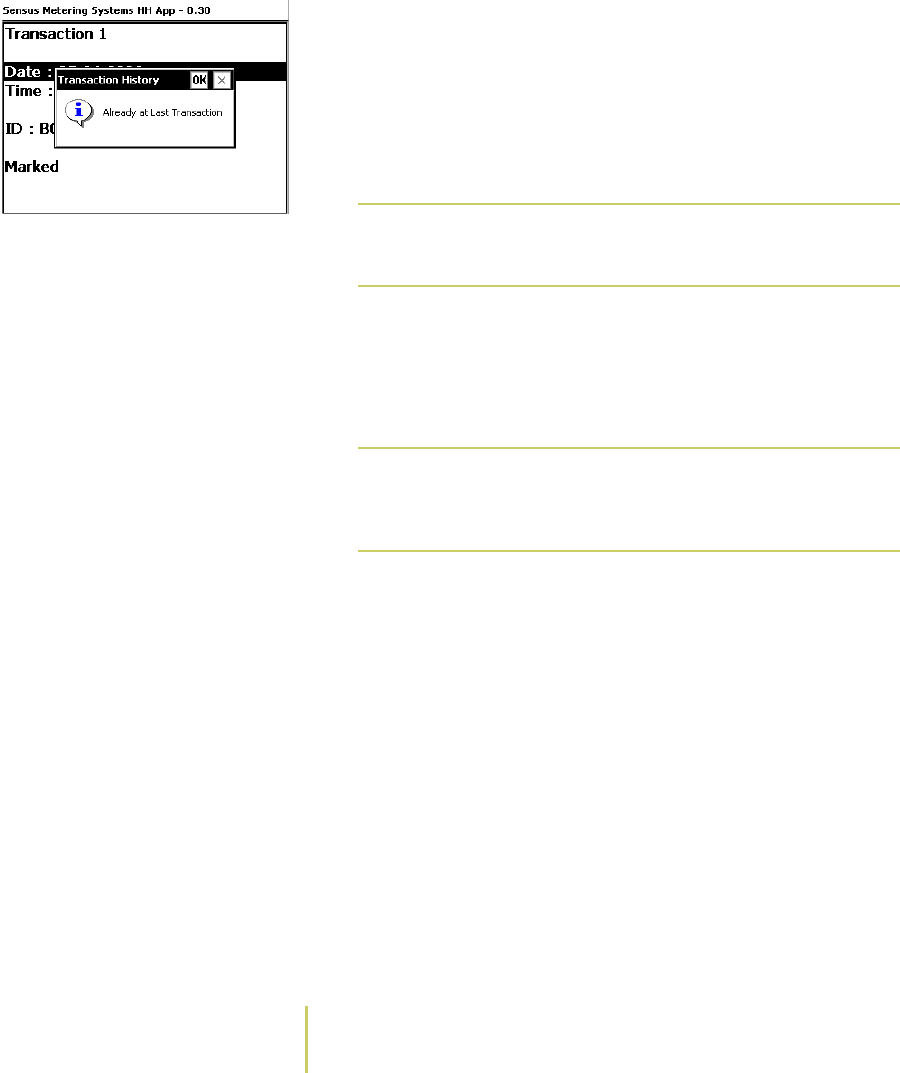
3–26 Sensus Metering Systems
Chapter 3: Find Route Information
3Use the TAB key to page through the Transaction History.
Already at Last Transaction
Message
• When you reach the end of the list, the system displays
the message Already at Last Transaction. Press the Esc
key to clear the message and return to the Transaction
History list.
• When you reach the beginning of the list, the system
displays the message Already at First Transaction. Press
the Esc key to clear the message and return to the
Transaction History list.
4Press the F3 key to go to a location.
When a transaction is displayed, pressing F3 causes the
system to exit the list and display the location associated
with that transaction.
Note
You can use the Esc key to exit the Transaction
History list, at any time.
Note
Once you find a location, you can perform any
of the functions described in Chapter 2: Collect
Meter Data.

Book Title 1-1
Index
A
address. see location
AR5002 . . . . . . . . . . . . . . . . . . . . . . . . . . 2-18
auto advance . . . . . . . . . . . . . . . . . . . . . . . 2-4
AutoGun . . . . . . . . . . . . . . . . . . . . . .1-9, 2-16
B
backlight . . . . . . . . . . . . . . . . . . . . . . . . . 1-13
battery
charging . . . . . . . . . . . . . . . . . . . . . . . 1-22
maintenance . . . . . . . . . . . . . . . . . . . . 1-24
replacing . . . . . . . . . . . . . . . . . . . . . . . 1-24
view status . . . . . . . . . . . . . . . . . . . . . 1-14
C
cables . . . . . . . . . . . . . . . . . . . . . . . . . . . 1-18
carrying the device . . . . . . . . . . . . . . . . . . 1-8
cleaning . . . . . . . . . . . . . . . . . . . . . . . . . . . 1-3
communication stand . . . . . . . . . . . . . . . 1-18
charging AR5000 in . . . . . . . . . . . . . . . 1-22
connecting . . . . . . . . . . . . . . . . . . . . . . 1-18
mounting . . . . . . . . . . . . . . . . . . . . . . . 1-20
placing AR5000 in . . . . . . . . . . . . . . . . 1-21
configuration . . . . . . . . . . . . . . . . . . . .1-9, 2-8
contrast . . . . . . . . . . . . . . . . . . . . . . . . . . 1-13
customer account number . . . . . . . . . . . . . 2-3
customer support . . . . . . . . . . . . . . . . . . . 1-27
D
date and time . . . . . . . . . . . . . . . . . . . . . 1-16
display . . . . . . . . . . . . . . . . . . . . . . . . . . . . 1-7
backlight . . . . . . . . . . . . . . . . . . . . . . . 1-13
contrast . . . . . . . . . . . . . . . . . . . . . . . . 1-13
font . . . . . . . . . . . . . . . . . . . . . . . . . . . 1-11
E
entry direction . . . . . . . . . . . . . . . . . . . . . . 2-4
F
font . . . . . . . . . . . . . . . . . . . . . . . . . . . . . 1-11
function keys . . . . . . . . . . . . . . . . . . . . . . . 1-5
H
HHD ID . . . . . . . . . . . . . . . . . . . . . . . . . . 1-15
holding the device . . . . . . . . . . . . . . . . . . . 1-8
L
limit violators . . . . . . . . . . . . . . . . . . . . . . 3-20
limits . . . . . . . . . . . . . . . . . . . . . . . . . . . . 3-20
location
locations . . . . . . . . . . . . . . . . . . . . . . . . . . 2-3
adding to route . . . . . . . . . . . . . . . . . . 2-22
entering notes . . . . . . . . . . . . . . . . . . . 2-19
first in route . . . . . . . . . . . . . . . . . . . . . . 3-5

2Sensus Metering Systems
last in route . . . . . . . . . . . . . . . . . . . . . . 3-6
marked . . . . . . . . . . . . . . . . . . . . . . . . . 3-17
marking . . . . . . . . . . . . . . . . . . . . . . . . 2-20
noted . . . . . . . . . . . . . . . . . . . . . . . . . . 3-19
problems . . . . . . . . . . . . . . . . . . . . . . . . 2-9
questions . . . . . . . . . . . . . . . . . . . . . . . 2-21
searching . . . . . . . . . . . . . . . . . . . . . . . . 3-4
unvisited . . . . . . . . . . . . . . . . . . . . . . . 3-13
M
maintenance
cleaning . . . . . . . . . . . . . . . . . . . . . . . . . 1-3
manual read entry . . . . . . . . . . . . . . . . . . 2-14
marking locations . . . . . . . . . . . . . . . . . . . 2-20
meter ID . . . . . . . . . . . . . . . . . . . . . . 2-3, 3-25
searching . . . . . . . . . . . . . . . . . . . . . . . . 3-8
meter readings
configuration . . . . . . . . . . . . . . . . . . . . . 2-8
entering manually . . . . . . . . . . . . . . . . 2-14
errors . . . . . . . . . . . . . . . . . . . . . . . . . . . 2-7
location mismatch . . . . . . . . . . . . . . . . . 2-9
malfunctions . . . . . . . . . . . . . . . . . . . . 2-12
non-route meters . . . . . . . . . . . . . . . . . 2-10
problems . . . . . . . . . . . . . . . . . . . . . . . . 2-7
TouchRead . . . . . . . . . . . . . . . . . . . . . 2-16
transactions . . . . . . . . . . . . . . . . . . . . . 3-25
unread meters . . . . . . . . . . . . . . . . . . . 3-12
N
notes . . . . . . . . . . . . . . . . . . . . . . . . . . . . 2-19
searching . . . . . . . . . . . . . . . . . . . 3-9, 3-19
O
ON/OFF . . . . . . . . . . . . . . . . . . . . . . . . . . . 1-4
operator ID . . . . . . . . . . . . . . . . . . . . . . . . 1-15
P
power ON/OFF . . . . . . . . . . . . . . . . . . . . . 1-4
Q
questions . . . . . . . . . . . . . . . . . . . . . . . . . 2-21
unanswered . . . . . . . . . . . . . . . . . . . . . 3-15
R
RadioRead . . . . . . . . . . . . . . . . . . . . . . . . 2-18
readings. see meter readings
routes
adding new meters . . . . . . . . . . . . . . . 2-22
non-route meters . . . . . . . . . . . . . . . . . 2-10
options . . . . . . . . . . . . . . . . . . . . . . . . . . 2-4
ordering . . . . . . . . . . . . . . . . . . . . . . . . . 2-4
searching . . . . . . . . . . . . . . . . . . . . . . . . 3-3
selecting . . . . . . . . . . . . . . . . . . . . . . . . 2-3
statistics . . . . . . . . . . . . . . . . . . . . . . . . 3-23
unfinished sections . . . . . . . . . . . . . . . 3-12
unread meters . . . . . . . . . . . . . . . . . . . 3-12
unvisited locations . . . . . . . . . . . . . . . . 3-13
S
screen . . . . . . . . . . . . . . . . . . . . . . . . . . . . 1-7
SmartGun . . . . . . . . . . . . . . . . . . . . .1-9, 2-16
stand, communication. see communication stand
statistics . . . . . . . . . . . . . . . . . . . . . . . . . . 3-23
straps . . . . . . . . . . . . . . . . . . . . . . . . . . . . . 1-8
street address. see location
T
text size . . . . . . . . . . . . . . . . . . . . . . . . . . 1-11

Book Title 1-3
time and date . . . . . . . . . . . . . . . . . . . . . . 1-16
TouchRead . . . . . . . . . . . . . . . . . . . .1-9, 2-16
transactions, reviewing . . . . . . . . . . . . . . 3-25
traverse . . . . . . . . . . . . . . . . . . . . . . . . . . . 2-4
U
user ID . . . . . . . . . . . . . . . . . . . . . . . . . . . 1-15
W
wall charger . . . . . . . . . . . . . . . . . . . . . . . 1-24

4Sensus Metering Systems