Users Manual
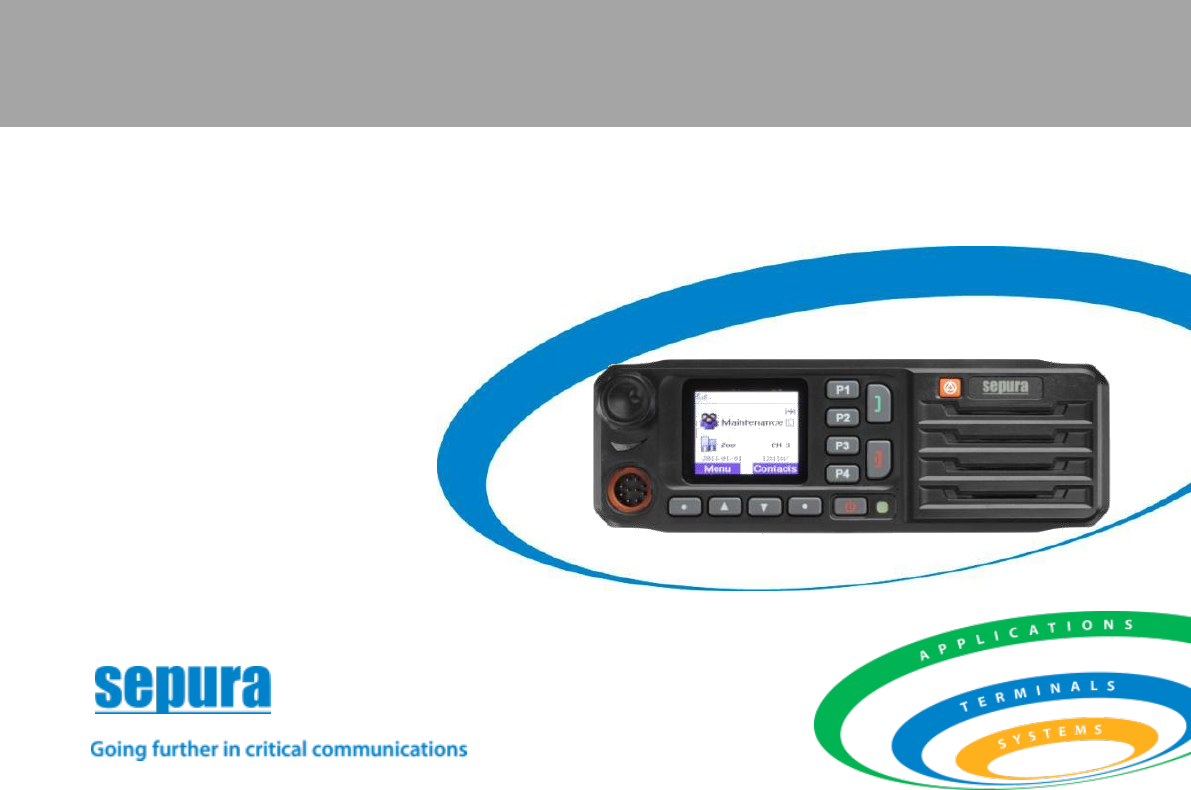
Quick Reference Guide
DMR Mobile
SBM8000 / SCM8000 / SEM8000

DMR Mobile
0
General
This guide covers the basic operation of the DMR Mobile.
Please refer to the DMR Mobile user guide for more detailed
information on using this product.
Disclaimer notice
Sepura’s policy is to continually improve its products. The
features and facilities described in this document were correct at
publication, but are subject to change without notice.
Contact Us
Sepura plc.
Radio House,
St Andrew’s Road,
Cambridge CB4 1GR
United Kingdom
Tel: +44 (0)1223 876000
Fax: +44 (0)1223 879000
SPR-DOC-03808/1a
Original Instructions: ENGLISH
© Sepura plc. 2014
All rights reserved. This document is intended for the use of Sepura plc’s customers
and/or other parties only for the purposes of the agreement or arrangement under
which this document is submitted, and no part of it may be reproduced or transmitted
in any form or means without the prior written permission of Sepura plc.
Contents
Safety .................................................................................... 1
Regulatory ............................................................................ 2
Disposing of this product ..................................................... 2
FCC Notice ............................................................................ 2
FCC Radiation Exposure Statement: ..................................... 2
IC RSS Warning .................................................................... 3
IC Radiation Exposure Statement ......................................... 4
Connectors, controls, buttons and keys ............................. 6
Status indicators and icons ................................................. 6
Accessory information ......................................................... 8
Fist microphone ................................................................. 8
Basic operation .................................................................... 8
Power On/Off..................................................................... 8
Adjusting the volume .......................................................... 8
Selecting a Channel ............................................................ 8
Making a PTT call ............................................................... 8
Receiving a PTT call ........................................................... 9
Emergency alarm ............................................................... 9

Quick Reference Guide
1
Safety
Read these safety instructions carefully.
Attention!
Sepura mobiles are designed for use by mobile workforces,
often working alone, and are intended for use in occupational
and controlled conditions. This product is restricted for
occupational use and is not intended or authorised for use by
the general population.
It is the responsibility of the person operating the product to
ensure that it is operated safely at all times, and that local laws
and regulations governing the usage of Radio Frequency (RF)
products are observed.
Users must be trained to operate this product safely. Their
personal safety could be affected if they do not understand how
to operate this product correctly.
Exposure to RF energy
Sepura designs and manufactures products to meet strict
guidelines and international standards relating to Radio
Frequency energy and the potential health risks associated with
using such products.
Sepura terminals are low powered radio transmitters and
receivers that receive and transmit Radio Frequency (RF)
signals when switched on. The antenna radiates RF energy only
when transmitting and not in standby mode.
Users should be informed of the potential health risks
associated with long term exposure to RF energy by their
employer.
RF energy interference with electronic equipment
Some personal medical devices, such as hearing aids and
pacemakers, can be affected by RF energy. Always consult your
Service Provider or the manufacturer of the medical device
before using RF wireless devices.
Some electronic devices are sensitive to RF energy. Always
obey signs restricting the use of wireless devices.
Safely operating the product
Users should always ensure that the mobile is operating
correctly before entering any environment that has a potential
risk to personal safety.
Operate the fist microphone in a vertical position and with the
microphone 5 cm (2 in.) away from your mouth when
transmitting.
Safety in hazardous environments
Always switch off the mobile in environments where RF wireless
devices could potentially cause an explosion. Potentially
hazardous areas are not always signed. Obey all signs and
instructions relating to the usage of RF wireless devices.
Do not use the mobile in the presence of gas fumes, explosives
dust situations, nuclear facilities, fuel or chemical transfer or
storage facilities.
This mobile is not designed for use in potentially explosive
environments where RF wireless devices could potentially cause
an explosion. SWITCH OFF the mobile if you are unsure if the
mobile is a risk in these environments. Potentially hazardous
areas are not always signed. Obey all signs and instructions
relating to the usage of RF wireless devices.
Safety when driving a vehicle
Always obey local laws and regulations governing the operation
of RF wireless devices when driving and whilst at locations.
Do not operate the product if it creates a distraction from driving
safely and observing road conditions.
Always switch off the mobile at refuelling stations. Always
observe and obey warning signs relating to the use of RF
wireless devices in the vicinity of refuelling stations.
DMR Mobile
2
Accessories
Sepura products have been tested to meet strict guidelines for
personal safety and operational conditions. Only accessories
approved by Sepura are recommended for use with this product.
Always read the instructions supplied with the accessory for
additional safety instructions.
Unauthorised modifications to the product could cause the
product to become non-operational.
The use of non-approved accessories may invalidate any
product warranty.
If a non-approved accessory is fitted, it may compromise the
product safety ratings.
Servicing
Do not attempt to dismantle this product.
Servicing and repairs to this product must be performed by
trained service technicians at Sepura approved service centres.
Regulatory
Sepura declares that this product is
compliant with the essential requirements
and other relevant provisions of the
European R&TTE directive 1999/5/EC
relating to radio and telecommunications
terminal equipment and the mutual
recognition of their conformity. This product is also compliant
with directive 2011/65/EU having been designed and
manufactured to the RoHS requirements.
Disposing of this product
This symbol on the product or its packaging
indicates that this product must not be disposed of
as household or commercial waste. Some
countries have set up collection and recycling
systems for waste electrical and electronic
products. By ensuring that this product and its
packaging is disposed of correctly, you will help
prevent potentially negative consequences for the environment
and human health, and help conserve natural resources. Please
dispose of your waste product according to your national and
local regulations. Contact your Service Provider for information
about disposing of this product in your region of the world.
FCC Notice
Any Changes or modifications not expressly approved by the
party responsible for compliance could void the user’s authority
to operate the equipment.
FCC Radiation Exposure Statement:
This equipment complies with FCC radiation exposure limits set
forth for a controlled environment. The antenna should be
installed and operated with a minimum distance of 75cm to any
person. This distance has been calculated based on a 2dB
cable loss between mobile and antenna.
This transmitter must not be co-located or operating in
conjunction with any other antenna or transmitter.
Quick Reference Guide
3
IC RSS Warning
This device complies with Industry Canada licence-exempt RSS
standard(s). Operation is subject to the following two conditions:
(1) this device may not cause interference, and (2) this device
must accept any interference, including interference that may
cause undesired operation of the device.
The term “IC:” before the certification/registration number only
signifies that the Industry Canada technical specifications were
met. Under Industry Canada regulations, this radio transmitter
may only operate using an antenna of a type and maximum (or
lesser) gain approved for the transmitter by Industry Canada.
To reduce potential radio interference to other users, the
antenna type and its gain should be so chosen that, the
equivalent isotropically radiated power (e.i.r.p.) is not more than
that necessary for successful communication.
This radio transmitter (8739A-SEM8010, 8739A-SEM8010H,
8739A-SEM8040, 8739A-SEM8040H) has been approved by
Industry Canada to operate with the antenna types listed below
with the maximum permissible gain and required antenna
impedance for each antenna type indicated. Antenna types not
included in this list, having a gain greater than the maximum
gain indicated for that type, are strictly prohibited for use with
this device.
Antenna type
Maximum permissible gain and
required antenna impedance
Isotropic
0dBi 50Ω
Le présent appareil est conforme aux CNR d'Industrie Canada
applicables aux appareils radio exempts de licence.
L'exploitation est autorisée aux deux conditions suivantes: (1)
l'appareil ne doit pas produire de brouillage, et (2) l'utilisateur de
l'appareil doit accepter tout brouillage radioélectrique subi,
même si le brouillage est susceptible d'en compromettre le
fonctionnement.
Conformément à la réglementation d'Industrie Canada, le
présent émetteur radio peut fonctionner avec une antenne d'un
type et d'un gain maximal (ou inférieur) approuvé pour
l'émetteur par Industrie Canada. Dans le but de réduire les
risques de brouillage radioélectrique à l'intention des autres
utilisateurs, il faut choisir le type d'antenne et son gain de sorte
que la puissance isotrope rayonnée équivalente (p.i.r.e.) ne
dépasse pas l'intensité nécessaire à l'établissement d'une
communication satisfaisante.
Le présent émetteur radio (8739A-SEM8010, 8739A-SEM8010H,
8739A-SEM8040, 8739A-SEM8040H) a été approuvé par
Industrie Canada pour fonctionner avec les types d'antenne
énumérés ci-dessous et ayant un gain admissible maximal et
l'impédance requise pour chaque type d'antenne. Les types
d'antenne non inclus dans cette liste, ou dont le gain est
supérieur au gain maximal indiqué, sont strictement interdits
pour l'exploitation de l'émetteur.
Type d’antenne
Le gain maximal admissible et
l'impédance d'antenne requise
Isotrope
0dBi 50Ω

DMR Mobile
4
IC Radiation Exposure Statement
This equipment complies with IC RF radiation exposure limits
set forth for a controlled environment. This transmitter must not
be co-located or operating in conjunction with any other antenna
or transmitter.
The antenna should be installed and operated with a minimum
distance of 75cm to any person. The distance has been
calculated based on a 2dB cable loss between antenna and
mobile.
Cet équipement est conforme avec IC les limites d'exposition
aux rayonnements définies pour un contrôlé environnement.
Cet émetteur ne doit pas être co-localisés ou fonctionner en
conjonction avec une autre antenne ou émetteur.
L’antenne doit être installé et utilisé avec un minimum de 75cm
de distance de toute personne. La distance a été calculée sur la
base d'une perte de 2 dB câble entre l'antenne et mobiles.
Quick Reference Guide
5
DMR Mobile
6
Connectors, controls, buttons and
keys
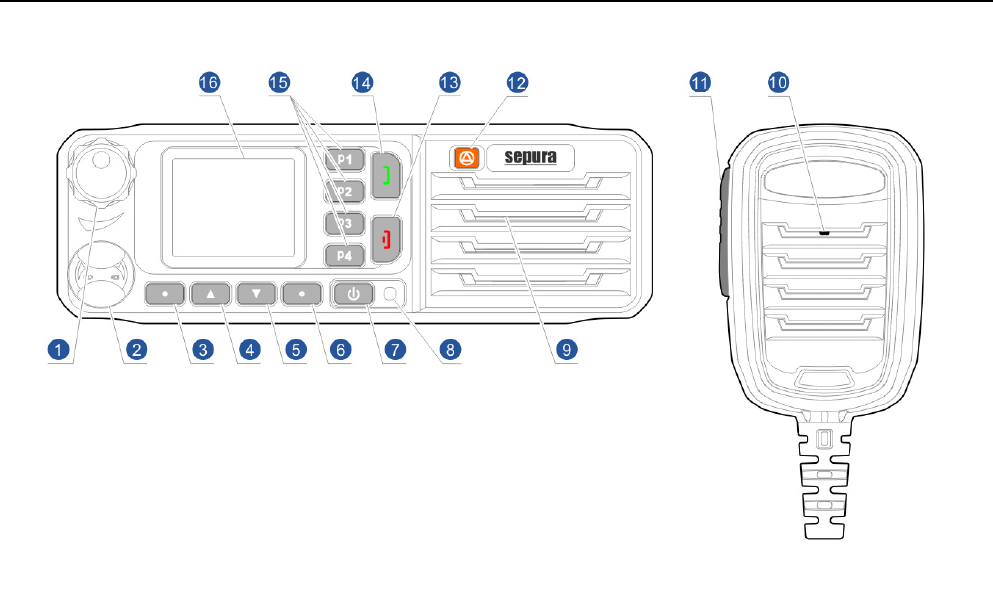
Refer to the illustration for the location of the following
connectors, controls, buttons and keys:
(1) Volume control knob
(2) Microphone/programming cable interface connector
(3) Left context key
(4) Up navigation key
(5) Down navigation key
(6) Right context key
(7) Power button
(8) LED
(9) Speaker
(10) Microphone
(11) PTT key (hand microphone)
(12) Emergency button
(13) Home/Cancel key
(14) Dial key(future use)
(15) P1 - P4 (programmable keys)
(16) Display
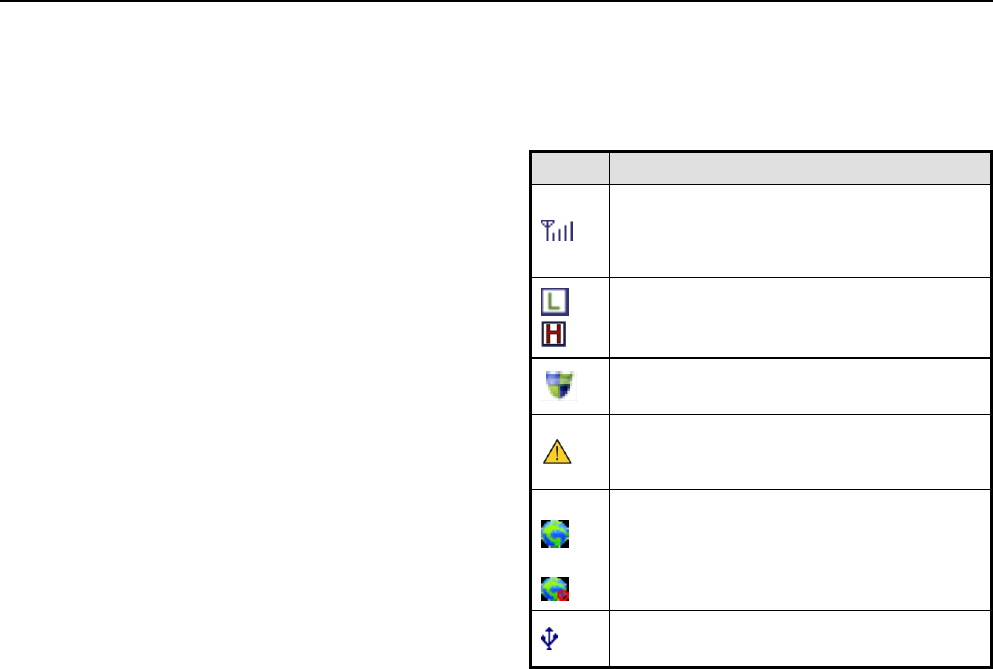
Status indicators and icons
Status indicators show the operational state of your mobile.
Icons appear on your mobile display when you perform certain
activities or activate certain features.
Signal and security icons
Icon
Description
Receiving Signal Strength
Indicates the receiving signal strength. Bars
indicate the strength of the signal. Maximum 4
bars indicate strongest signal.
Transmission Power
Low transmission power for current channel.
High transmission power for current channel.
Security
Analogue scrambling or digital encryption is active.
Emergency
Indicates that the emergency alarm mode is
activated.
GPS tracking
GPS feature is available and the terminal is
receiving valid GPS data.
GPS feature is available but the terminal does not
have valid location information.
USB connected
Indicates that USB device is connected.
Quick Reference Guide
7
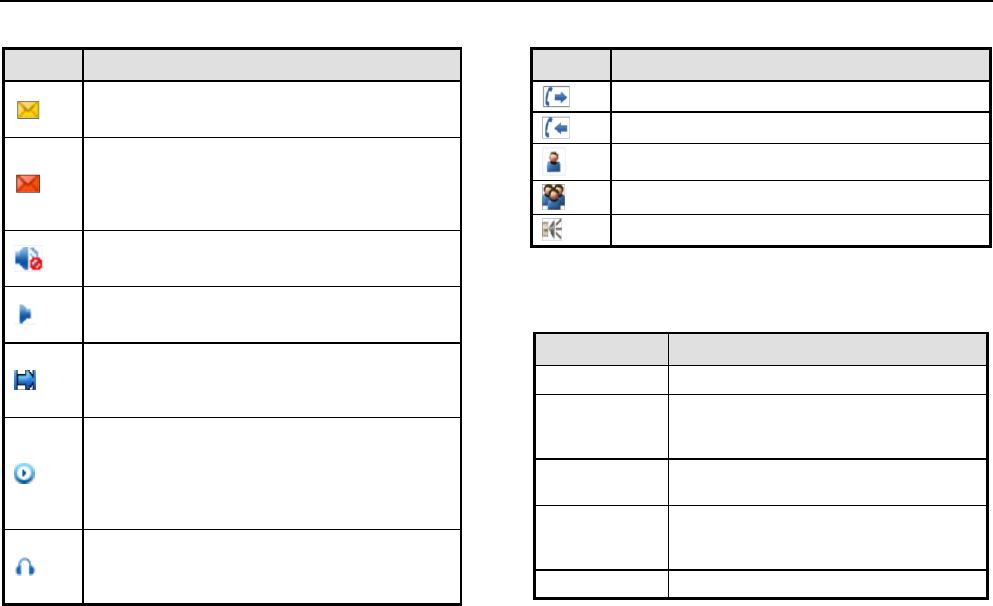
General icons
Icon
Description
New Message
You have an unread message in your mailbox .
Message inbox full
You need to clear your message inbox. If the
message inbox is not cleared, older messages will
be deleted when a new message is received.
Speaker Off
The speaker is muted.
Monitor Channel
Indicates that monitor channel is active.
Talk-around
Indicates that Talk-around is active for repeater
mode or the current channel is in direct mode.
Channel Scanning
Scanning is in process when the icon rotates.
Scanning stops on a priority channel when the
centre triangle is red. Scanning stops on a non-
priority channel when the centre triangle is green.
External Device connected
Indicates that an external microphone or speaker
is connected.
Calls
Icon
Description
Initialising a call
Receiving a call
Private call in progress
Group call in progress
All call in progress
LED status indicators
The LEDs on the radio change colour to show the operational
status of your radio.
LED colour
Operational State
Solid red
In use and transmitting
Solid green
In use and receiving voice, short
message or data. Can also indicate
channel activity
Solid orange
Call hang time period, press PTT to talk
back
Flashing
orange
Emergency state or there is a missed
call/incoming call alert or the radio is
scanning
Flashing red
Incoming emergency alarm

DMR Mobile
8
Accessory information
Sepura supply a range of accessories for this product. Contact
your Service Provider or visit our website for a full list of
accessories:
http://www.sepura.com/products/terminals/accessories/dmr-
accessories.aspx
Fist microphone
Your mobile is equipped with a standard fist microphone
designed for close-talk mobile communications.
Attach the microphone heavy-duty connector to the Microphone/
programming cable interface connector on the mobile.
When using the microphone, always hold the microphone firmly
in your hand with the microphone facing towards you and in an
upright position. Hold the microphone approximately 5 cm (2 in.)
away from your mouth when speaking.
To talk, press the PTT grip switch during the call hang time
period (when the LED is solid orange) and talk clearly into the
microphone. Release the grip switch when you have finished
talking.
Never hold or swing the microphone by the heavy-duty coiled
lead.
Note that your mobile can also be used with an optional keypad
fist microphone (part no. 300-01064). This microphone supports
the one touch button feature that lets you make a group or
private call to a predefined alias or ID by pressing one of the
predefined numerical keys (1 to 9). It can also be used to
manually dial a contact.
Always secure your microphone using the mounting clip when
not in use.
Basic operation
Power On/Off
To power on, press and hold the Power button.
To power off the radio, press and hold the Power button.
Adjusting the volume
Rotate the Volume control knob clockwise to increase the
volume.
Rotate the Volume control knob counter-clockwise to decrease
the volume.
Selecting a Channel
Your Service Provider may program the mobile channels before
use. Each channel can be configured as either an analogue or
digital channel. Note that some functions, such as messages,
are not available on analogue channels.
Press the up/down navigational keys to select a channel.
Making a PTT call
Your mobile may already be programmed with contacts (people
and groups) by your Service Provider. Each group may be
allocated to a different channel. The contact person or group
can be programmed as a private call, group call or All Call.
Call to the default contact group or person
A contact person or group may be added as a default contact.
The default contact is called when you press the PTT button.
You may need to select the channel before making the call.
In the Home display, press the PTT button to initiate a call.

Quick Reference Guide
9
Call a group or person from the contact list
Press the right context key to activate the Contacts menu.
Select the Contacts List option and then press the left context
key to Confirm.
Use the navigation keys to scroll through the list. With the
contact group or person highlighted, press PTT button to initiate
a call.
Manually dial a contact group or person
A keypad fist microphone is required to use this feature.
Press the right context key to activate the Contacts menu.
Use the navigation keys to select the Manual Dial option.
Enter the ID number of the group or person.
Press the PTT button to initiate a call.
Receiving a PTT call
When the mobile is in standby mode the green LED will light to
indicate an incoming call. The display changes to show the call
type, either the private call icon or the group call icon, alias or
the ID of the caller. The incoming call icon appears to indicate
that the call is being received. You will hear the person speaking.
Private call incoming
Group call incoming
Press the PTT button to respond to the caller within the hang
time duration (when the LED is solid orange).
You cannot respond to an All Call.
Emergency alarm
Your mobile may not be programmed for an Emergency alarm. If
an alarm is programmed it may not sound an audible alert. Ask
your Service Provider for information on how your radio is
programmed for Emergency alarms.
The Emergency alarm sounds an audible beep and sends an
emergency message to others in your call group and you can
talk to others in the group.
Press and hold the Emergency button until an audible beep
sounds.
The Emergency alarm icon appears on the status bar. The
alarm group alias or ID displays on the screen with the
Emergency Alarm icon and outgoing call icon.
Emergency Alarm status icon
Emergency Alarm icon
Outgoing icon
If the emergency call is successful the mobile displays the
message “emergency alarm succeed”. If the alarm call has
failed the mobile displays the message “emergency alarm failed”.
To cancel the emergency alarm call, press and hold the
Emergency button.
Sepura plc
Radio House
St Andrew’s Road
Cambridge
CB4 1GR
UK
Tel: +44 (0)1223 876000
Fax: +44 (0)1223 879000
Sepura.com