Sepura SEM8040 DMR Mobile Radio User Manual Installation Guide
Sepura plc DMR Mobile Radio Installation Guide
Sepura >
Contents
- 1. Quick Reference Guide
- 2. Installation Guide
- 3. Users Manual Rev
Installation Guide
40 40/SEM8040CM80
DMR Mobile
Vehicle Installation Guide
SB /S M80
This Installation Guide provides basic instructions for installing the DMR mobile
transceiver into a vehicle. This product can be installed into various makes and
models of vehicles and therefore this is not intended to be a definitive guide to
installing the product.
Always read the vehicle manufacturer’s handbook before starting to install the
product. Installation of this product may affect the vehicle electrical systems.
Contact the vehicle manufacturer if you are not certain if it is safe to install this
product.
The installation should comply with FCS1362 CODE OF PRACTICE for the
installation of mobile radio and related ancillary equipment in land based vehicles
(see http://www.fcs.org.uk).
SPR-DOC-03806/1
Original Instructions: ENGLISH
© Sepura plc. 2014
Sepura’s policy is to continually improve its products. The
features and facilities described in this document were correct
at publication, but are subject to change without notice.
DMR Mobile
1
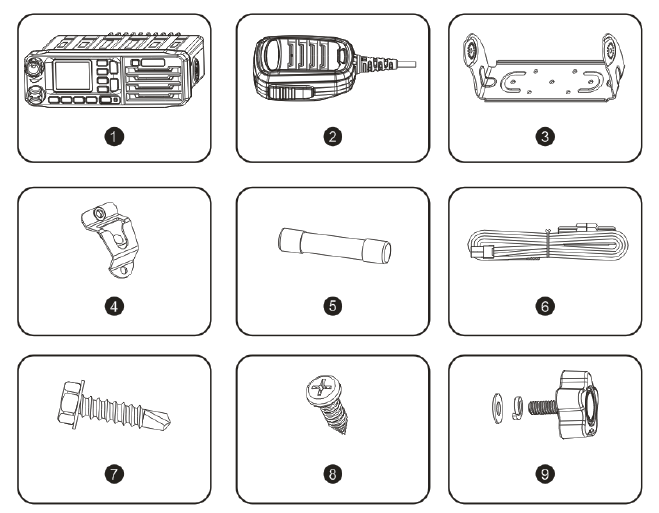
Unpacking
(1) DMR Mobile
(2) Fist microphone
(3) Mounting bracket
(4) Microphone hanger
(5) Fuse (spare)
(6) DC power cable including fuse holder and fuse
(7) ST4.8x20 self-tapping screw (6 pieces)
(8) ST4x16 self-tapping screw (2 pieces)
(9) Knurled knob lock screw (2 pieces)
Unpack the contents of the box and ensure that all items are received in good
condition. If any of the goods are damages or not supplied, notify your Service
Provider within 10 days of receipt of equipment.
Vehicle Installation Guide
2
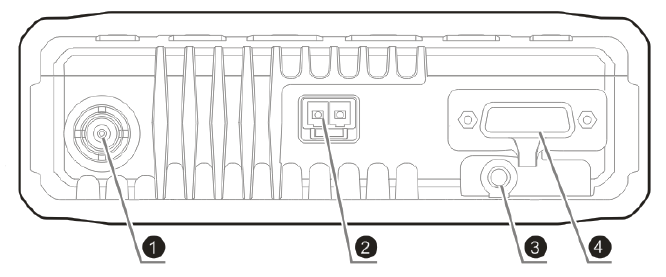
Connectors
(1) Antenna connector
(2) Power cable connector
(3) GPS antenna connector
(4) Interface connector
Safety
This product may affect public broadcast radio, security code alarm systems and
some engine management systems.
The installation of this transceiver must be performed by a qualified vehicle
installation technician.
This product must be installed in accordance with national and local radio
communications authorities and/or Health and Safety regulations.
Always switch off the transceiver in environments where RF wireless devices could
potentially cause an explosion. Potentially hazardous areas are not always signed.
Obey all signs and instructions relating to the usage of RF wireless devices.
Do not attempt to dismantle this product.
In order to reduce the risk of RF burns, the antenna must always remain connected
whilst the equipment is switched on. Under no circumstances should the antenna
be connected or disconnected whilst the equipment is switched on. Do not touch
the antenna when the transceiver is switched on.
Do not touch the heatsink fins when the transceiver is switched on. There is a
potential risk of a burn injury.
If a non-approved accessory is fitted, it may compromise the product safety ratings
and may void any product warranty.
It is recommended that the vehicle battery is disconnected before installing the
product. Always read the vehicle handbook to establish whether it is practical to
DMR Mobile
3
disconnect the vehicle battery without effecting devices, such as central locking
mechanisms, engine management computers, security-coded in-car entertainment
units and so on.
Prolonged operation of the product when the vehicle engine is switched off could
drain the vehicle battery.
Avoid damage to fuel lines, hydraulic lines and existing cables.
This product is suitable for 12V negative earth vehicles only. Do not use other
supply systems, this may damage the product.
12V supply leads, antenna cables and speaker wiring must be routed away from
gas or fuel lines, and any in-vehicle electrical wiring to reduce the risks associated
with a fuel leak.
Operator access and safety
Install the transceiver in a position where the operator has easy access to the
controls and the microphone when wearing a seat belt. The controls must be within
the operator's normal field of vision.
Position the transceiver so that it does not obstruct or become at risk of damage
from any occupant or carried items.
Installation Precautions
RF energy
Vehicle manufacturers make use of electronic control systems such as the ignition
and anti-skid devices.
Speed control, fuel injection, anti-lock braking, navigation, air bag and other
electronic systems are not adversely effected by RF interference. However, if
difficulty is experienced or faulty operation suspected, contact the vehicle
manufacturer for advice before continuing to install the product.
To prevent interference with any other electronic systems in the vehicle, the
antenna must be mounted away from these devices and their associated cables.
Refer to the vehicle handbook for the location of these devices and information
relating to radio frequency interference.
Specialised vehicles
The installation on certain specialised vehicles such as fuel tankers and fire-fighting
vehicles may be subject to additional safety regulations which must be closely
observed. Before starting to install this product, check the relevant safety
regulations for the vehicle and you understand them.
Petrol powered vehicles
Check the vehicle to ensure that there are no petrol leaks before starting an
installation involving the use of electric tools that may ignite the fuel. Before drilling,
always check the location of fuel lines and electrical wiring looms, Avoid drilling
near the fuel tank.
Vehicle Installation Guide
4
Gas powered vehicles
Check the vehicle to ensure that there are no gas leaks before starting an
installation involving the use of electric tools that may ignite the fuel.
DO NOT USE A NAKED FLAME. Butane and propane gases are heavier than air,
and may be present in some lower parts of the vehicle and undetectable by smell.
STOP if you notice any sign of a gas leak and inform the vehicle owner
immediately.
Before drilling, always check the location of fuel lines and electrical wiring looms,
Avoid drilling near the fuel tank. Supply cables should be run, if possible, on the
opposite side of the vehicle to the gas fuel pipe.
Vehicles fitted with electronic devices
In theory, any vehicle electronic systems could be affected by the presence of radio
frequency energy, which when detected may cause the device to malfunction. The
source of RF energy may be a mobile transceiver installed within the vehicle or
operating in another vehicle in close proximity. If interaction occurs, loss of control
could result for the duration of the transmission.
In the interests of safety, the operator must test the vehicle under working
conditions on completion of the installation.
Installation guidelines and recommendations
Temperature considerations
Reliable transmit operation is achieved when the transceiver is mounted in a
position that allows free flow of air over the finned heat sink. This is achieved by
mounting the transceiver in the normal horizontal orientation with no restriction to
the air flow. For any other orientation, varying degrees of degradation may result.
Mounting the transceiver on top of the dashboard is not recommended. Exposure to
direct sunlight may cause the temperature to rise to over 80oC (176oF). Prolonged
exposure to these temperatures may damage the product.
Do not mount the transceiver close to a heat source, for example, in front of the
vehicle’s heater vent.
Location considerations
The transceiver must be fitted within the interior of the vehicle (excluding the engine
compartment) and protected from the external environment and vehicle cleaning
operations.
Never install the transceiver directly above the head of the driver or any passenger,
or in any position where it could cause harm in the event of an accident.
Ensure that the installation does not impede the normal operation of the vehicle,
including the operation of any safety devices such as airbags and seatbelt
tensioners.
DMR Mobile
5
The transceiver must be installed away from cables carrying very high currents
such as the starter motor cable or the electric traction motor and its cables on
electric vehicles.
Ensure that the cables are routed so that they are kept well clear of any existing
vehicle system cabling.
Secure all cabling to eliminate the possibility of damage by sharp edges or moving
parts.
Pre-installation checks
Before installing the product, check that the electronic systems and lights are
working on the vehicle.
Installing into the vehicle console
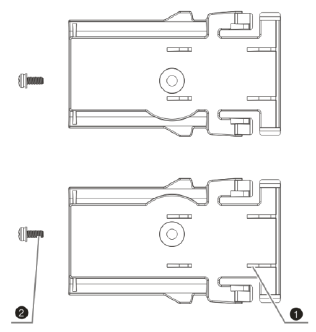
The transceiver can be installed into the vehicle console using the optional Mobile
DIN Mount kit (part no. 300-01074).
(1) Mounting bracket (2 pieces)
(2) Screws (2 pieces)
Attach the brackets to each side of the transceiver. Note that the brackets are not
identical and should be fitted with the flat edge to the top of the transceiver. Secure
each bracket into position using a screw.
It may be necessary to connect all cabling before attaching the DIN mount. Slide
the transceiver into the DIN mount until an audible ‘click’ is heard and secure into
position.
Only remove the DIN mounted transceiver using specifically designed DIN mount
removal tools.
Vehicle Installation Guide
6
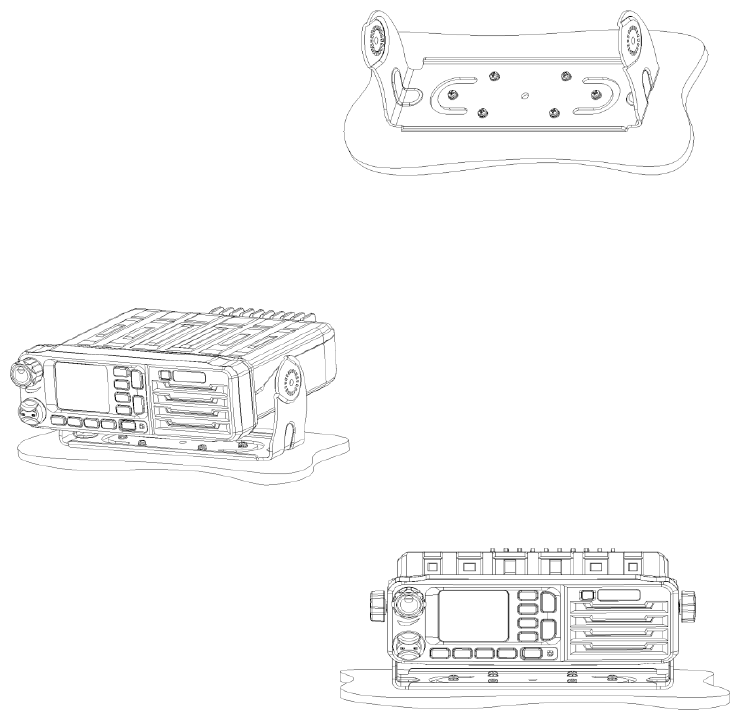
Installing using the mounting bracket
The mounting bracket must be
screwed to an appropriate flat
surface within the vehicle
Use the bracket as the as a template
to correctly position the holes before
drilling a pilot hole.
Secure the bracket into position
using the six ST4.8x20 self-tapping
screw.
Place the transceiver into the middle
of the mounting bracket.
Adjust the transceiver position to a
horizontal angle or 20 degrees angle
(or angle of depression).
Secure into position using the two
knurled knob lock screws.

DMR Mobile
7
DC supply connection
With the transceiver end of the power connector resting in its intended final position,
route the wires to the vehicle battery.
If the power cable needs to be shortened, it must be shortened from the battery
connection end. A fuse must be fitted to the positive line (red wire) when the cable
has been shortened. A new fuse holder must be fitted (not supplied) because the
existing fuse holder cannot be reused. The fuse must be positioned close to the
battery terminal.
CAUTION! Failure to connect the wires to the correct terminal of the battery or power
supply may damage the product and void any warranty.
Connect the red wire (+12V) to the positive terminal on the battery.
Connect the black wire (GND) to the negative terminal on the battery.
Antenna installation
WARNING! Risk of burn injury. Do not touch the antenna when the transceiver is switched
on.
Fitting the DMR mobile antenna
The antenna should be fitted on the centre of the vehicle roof. Alternative positions,
such as wing mounting, will give degraded performance. The coaxial feeder should
be secured along its length to eliminate the possibility of damage by sharp edges or
moving parts.
Refer to the instructions supplied with the antenna for additional safety and
installation instructions.
Fitting the GPS antenna (optional)
The antenna unit connects to a female SMA connector on the rear of the
transceiver. It is recommended that the antenna is mounted on the highest point of
the vehicle in the centre of the roof with an uninterrupted view of the sky. When a
separate DMR mobile antenna is installed, each antenna should be positioned on
the centre line of the roof as far away from each other as possible. An active
antenna is recommended, the supply of which is on the centre pin, 3.3V nominal,
40mA maximum.
Refer to the instructions supplied with the antenna for additional safety and
installation instructions.
Vehicle Installation Guide
8
Fist microphone
The fist microphone should be located centrally for the operator(s) to access, using
the hanger provided.
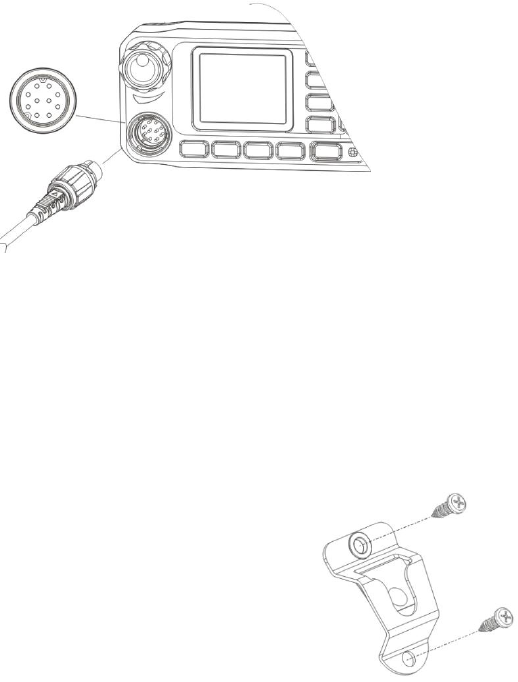
The fist microphone connector has a direction indicator. With the direction indicator
facing upwards, rotate the outer self-lock cover in a clockwise direction. Fit the
connector to the transceiver ensuring that the self-lock cover fits over the
corresponding connector on the transceiver. Pressing firmly, rotate the outer self-
lock cover in a clockwise direction until it is secure.
Install the microphone mounting clip in a position that provides the operator with
easy access to the microphone and where the cable cannot interfere with the
vehicle controls or with the driver’s feet. The position must not affect the safety of
the driver when driving the vehicle.
Using the two ST4x16 self-tapping screws, secure the
microphone hanger at the suitable place inside the
vehicle.
Place the fist microphone onto the hanger.

DMR Mobile
9
RF Compatibility Checks
The following checks must always be carried out if the vehicle is equipped with
electronic anti-skid, electronic ignition or engine management systems.
The transceiver should be operated only for the time required to make an
observation.
An assistant will be required for the following checks.
With the vehicle stationary and the engine running at fast idle, operate the
transmitter. Check that the brake lights do not illuminate and that the engine
continues to run normally, and that the engine does not surge or cut out.
Operate the brake pedal, key the transmitter and check that the brake lights do not
extinguish.
Put the vehicle into motion at a speed of 10 to 15 mph (15 to 25 km/h), key the
transceiver and operate the brake pedal simultaneously. Check that the braking
action is normal and that the engine does not surge or cut out.
WARNING!
In the event of an apparent malfunction in the braking or any other systems
during RF compatibility checks, the transceiver installation should be rendered
inoperative and the vehicle manufacturer should be contacted before any further
use is made of the transceiver installation.
Unqualified persons should not attempt to modify these units in any way.
Vehicle Installation Guide
10
Technical specifications
Dimensions (HxWxD) ....................................................................... 60x177x184mm
Weight.............................................................................................................. 1500g
Fuse
Rating .......................................................................................................... 32V 15A
Type ............................................................................... SLO-BLO 3AG 1/4” x 1-1/4”
DC supply
DC supply voltage, nominal ...................................... 13.6V (10.8V min. 15.6V max.)
Current, max. ....................................................................................................... 11A
Ground ..........................................................................................................negative
Typical current drain ........................ 500mA Standby, 1A Rx, 8A TX 25W RF output
Power output ................................................................................................ 5W/25W
Environmental
Operating temperature ....................................................... -30 to 60oC (-22 to 140oF)
Storage temperature .......................................................... -40 to 85oC (-40 to 185oF)
Dust and water rating .......................................................................................... IP54
Connectors
Antenna .................................................................................................. BNC female
GPS ........................................................................................................ SMA female

Sepura plc
Radio House
St Andrew’s Road
Cambridge
CB4 1GR
UK
Tel: +44 (0)1223 876000
Fax:+44 (0)1223 879000
Sepura.com
Sepura.com