Sercomm AP51DAR 802.11a+g Wireless Access Point User Manual
Sercomm Corporation 802.11a+g Wireless Access Point
Sercomm >
Contents
- 1. Manual 1
- 2. Manual 2
- 3. Users manual 1
- 4. Users manual 2
Users manual 2
PC and Server Configuration
47
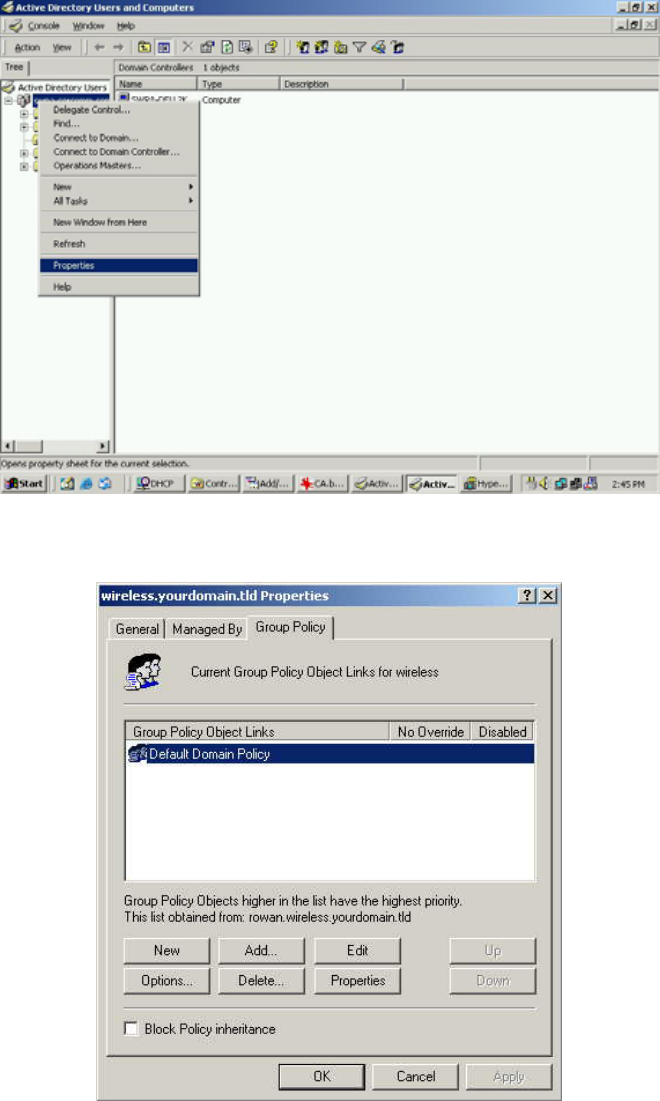
Figure 35: Active Directory Screen
6. Select the Group Policy tab, choose Default Domain Policy then click Edit.
Figure 36: Group Policy Tab
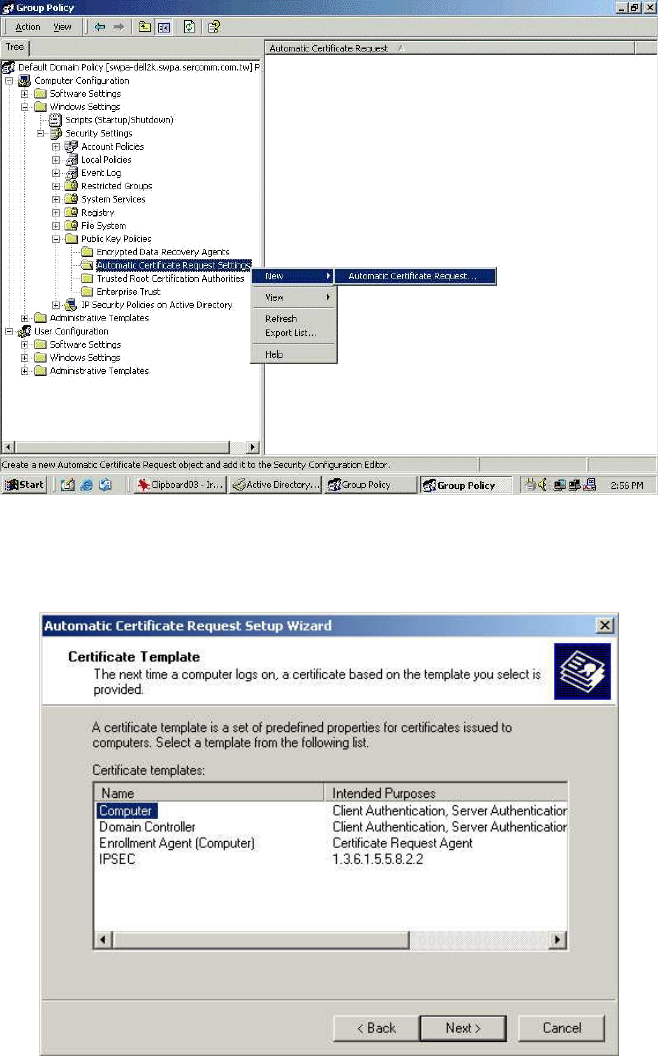
7. Select Computer Configuration - Windows Settings - Security Settings - Public Key
Policies, right-click Automatic Certificate Request Settings - New - Automatic Certificate
Request.
Wireless Access Point User Guide
48
Figure 37: Group Policy Screen
8. When the Certificate Request Wizard appears, click Next.
9. Select Computer, then click Next.
Figure 38: Certificate Template Screen
10. Ensure that your certificate authority is checked, then click Next.
11. Review the policy change information and click Finish.
12. Click Start - Run, type cmd and press enter.
Enter secedit /refreshpolicy machine_policy
This command may take a few minutes to take effect.
PC and Server Configuration
49
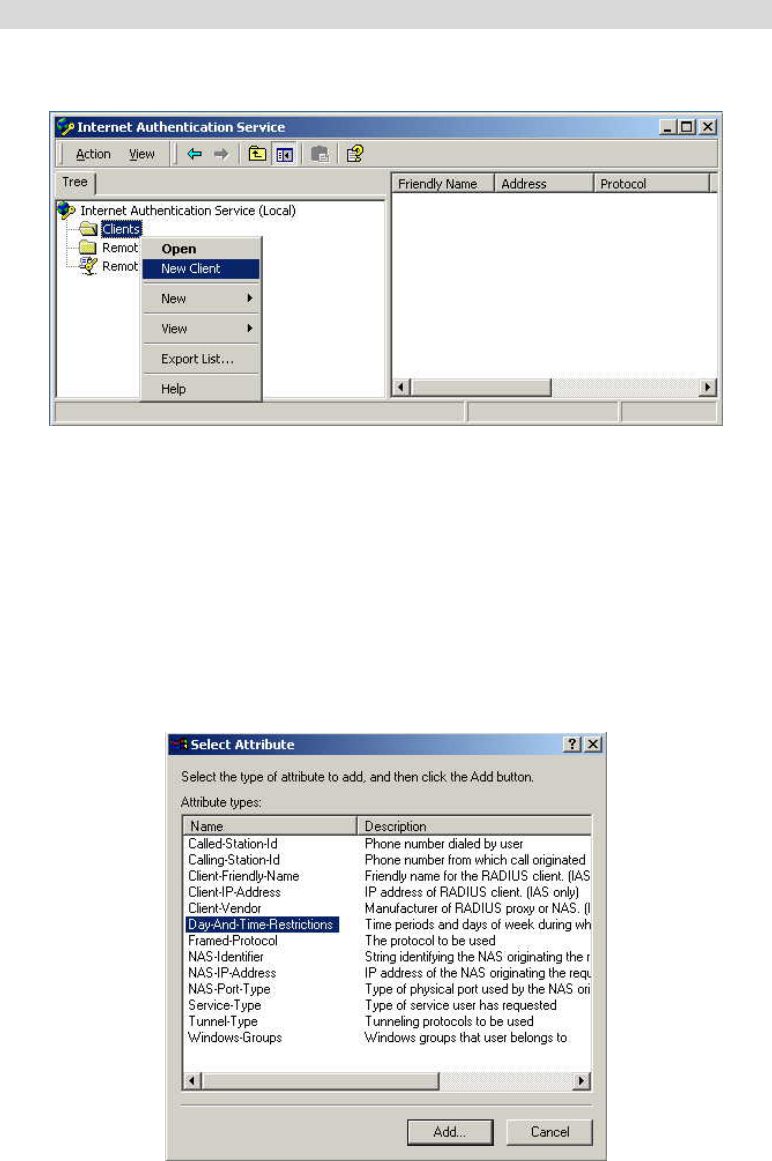
Internet Authentication Service (Radius) Setup
1. Select Start - Programs - Administrative Tools - Internet Authentication Service
2. Right-click on Clients, and select New Client.
Figure 39: Service Screen
3. Enter a name for the access point, click Next.
4. Enter the address or name of the Wireless Access Point, and set the shared secret, as
entered on the Security Settings of the Wireless Access Point.
5. Click Finish.
6. Right-click on Remote Access Policies, select New Remote Access Policy.
7. Assuming you are using EAP-TLS, name the policy eap-tls, and click Next.
8. Click Add...
If you don't want to set any restrictions and a condition is required, select Day-And-Time-
Restrictions, and click Add...
Figure 40: Attribute Screen
9. Click Permitted, then OK. Select Next.
10. Select Grant remote access permission. Click Next.
Wireless Access Point User Guide
50
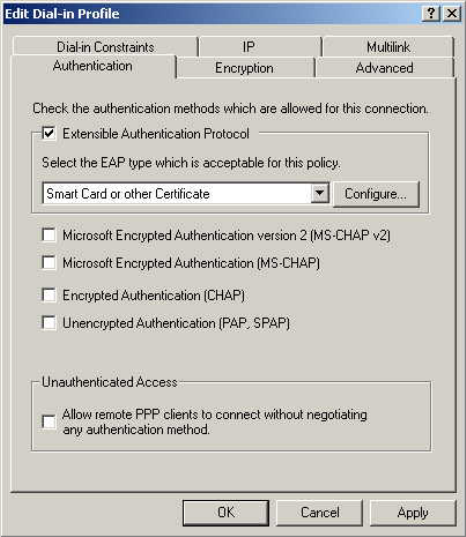
11. Click Edit Profile... and select the Authentication tab. Enable Extensible Authentication
Protocol, and select Smart Card or other Certificate. Deselect other authentication
methods listed. Click OK.
Figure 41: Authentication Screen
12. Select No if you don't want to view the help for EAP. Click Finish.
PC and Server Configuration
51
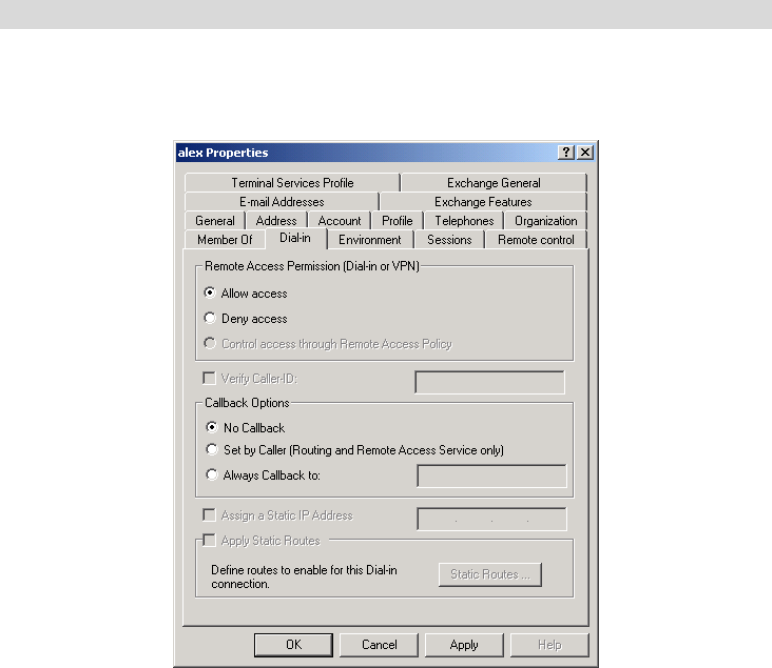
Remote Access Login for Users
1. Select Start - Programs - Administrative Tools- Active Directory Users and Computers.
2. Double click on the user who you want to enable.
3. Select the Dial-in tab, and enable Allow access. Click OK.
Figure 42: Dial-in Screen
Wireless Access Point User Guide
52
802.1x Client Setup on Windows XP
Windows XP ships with a complete 802.1x client implementation. If using Windows 2000,
you can install SP3 (Service Pack 3) to gain the same functionality.
If you don't have either of these systems, you must use the 802.1x client software provided
with your wireless adapter. Refer to your vendor's documentation for setup instructions.
The following instructions assume that:
• You are using Windows XP
• You are connecting to a Windows 2000 server for authentication.
• You already have a login (User name and password) on the Windows 2000 server.
Client Certificate Setup
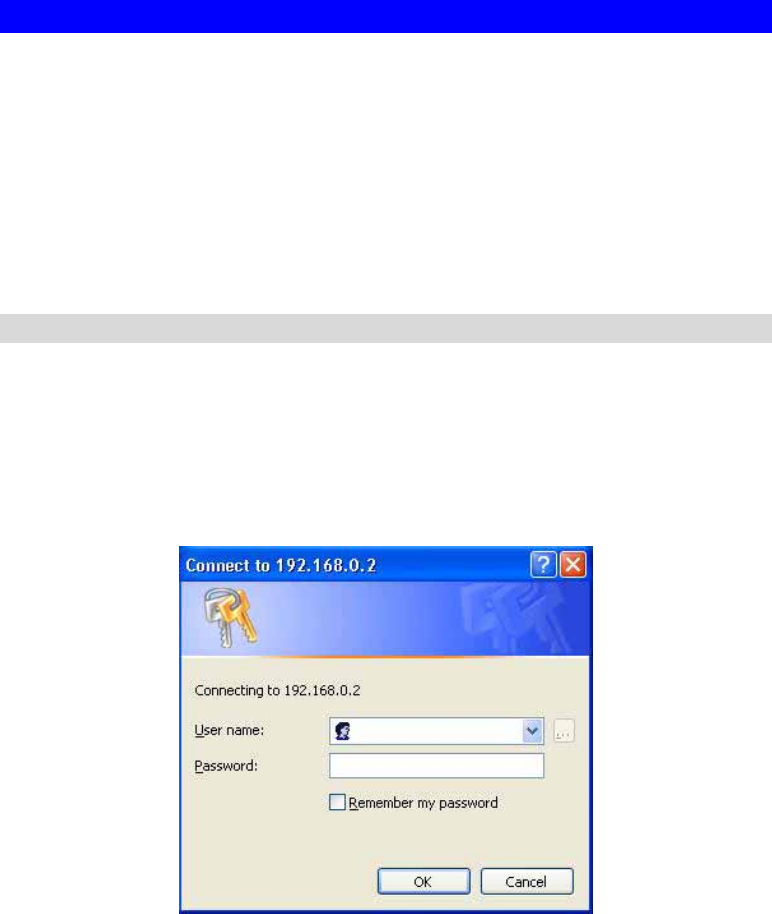
1. Connect to a network which doesn't require port authentication.
2. Start your Web Browser. In the Address box, enter the IP address of the Windows 2000
Server, followed by /certsrv
e.g
http://192.168.0.2/certsrv
3. You will be prompted for a user name and password. Enter the User name and Password
assigned to you by your network administrator, and click OK.
Figure 43: Connect Screen
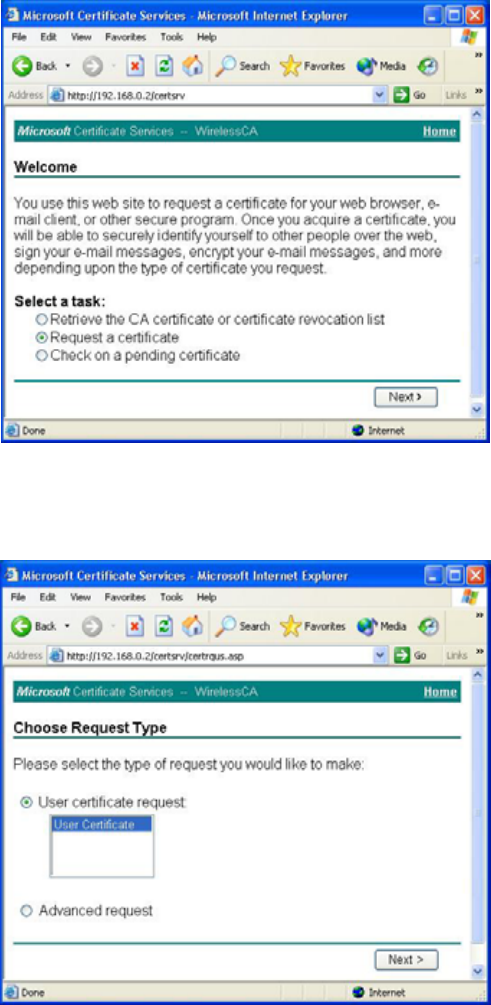
4. On the first screen (below), select Request a certificate, click Next.
PC and Server Configuration
53
Figure 44: Wireless CA Screen
5. Select User certificate request and select User Certificate, the click Next.
Figure 45: Request Type Screen
6. Click Submit.

Wireless Access Point User Guide
54
Figure 46: Identifying Information Screen
7. A message will be displayed, then the certificate will be returned to you.
Click Install this certificate.
Figure 47:Certificate Issued Screen
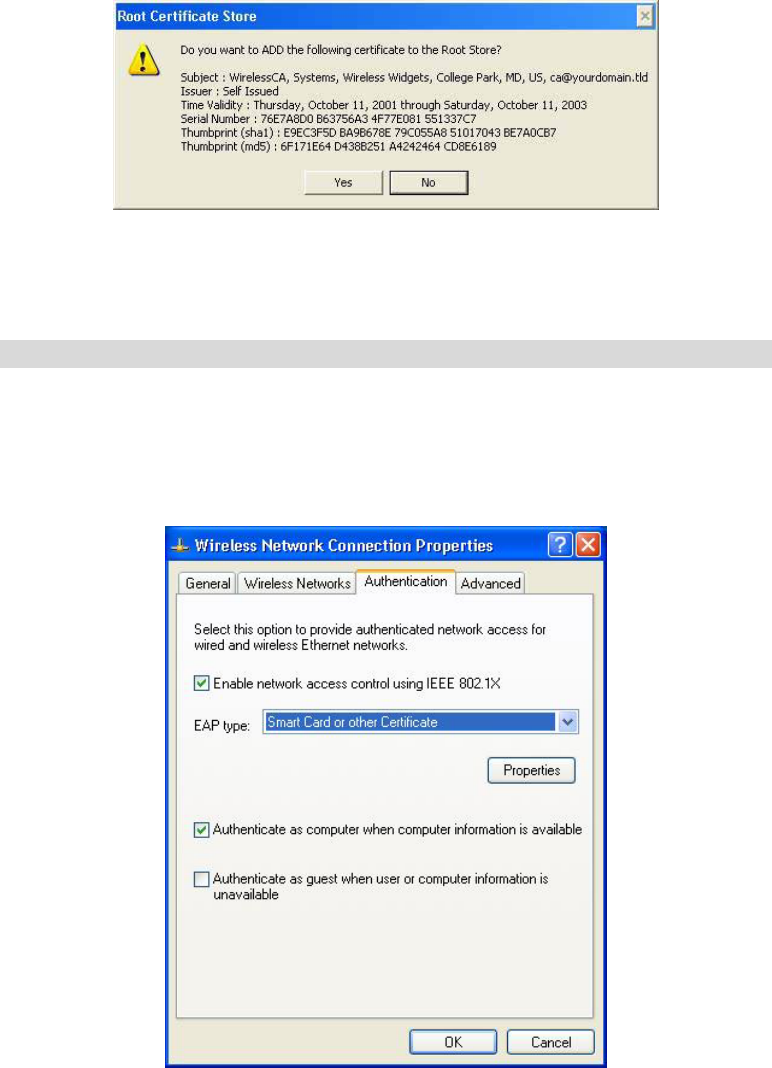
8. . You will receive a confirmation message. Click Yes.
PC and Server Configuration
55
Figure 48: Root Certificate Screen
9. Certificate setup is now complete.
802.1x Authentication Setup
1. Open the properties for the wireless connection, by selecting Start - Control Panel -
Network Connections.
2. Right Click on the Wireless Network Connection, and select Properties.
3. Select the Authentication Tab, and ensure that Enable network access control using IEEE
802.1X is selected, and Smart Card or other Certificate is selected from the EAP type.
Figure 49: Authentication Tab
Encryption Settings
The Encryption settings must match the APs (Access Points) on the Wireless network you
wish to join.
• Windows XP will detect any available Wireless networks, and allow you to configure
each network independently.

Wireless Access Point User Guide
56
• Your network administrator can advise you of the correct settings for each network.
802.1x networks typically use EAP-TLS. This is a dynamic key system, so there is no
need to enter key values.
Enabling Encryption
To enable encryption for a wireless network, follow this procedure:
1. Click on the Wireless Networks tab.
Figure 50: Wireless Networks Screen
2. Select the wireless network from the Available Networks list, and click Configure.
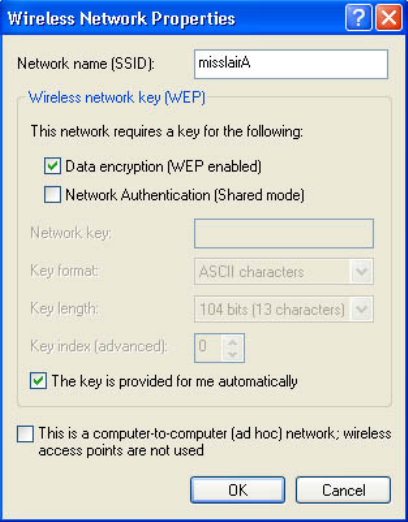
3. Select and enter the correct values, as advised by your Network Administrator.
For example, to use EAP-TLS, you would enable Data encryption, and click the checkbox
for the setting The key is provided for me automatically, as shown below.
PC and Server Configuration
57
Figure 51: Properties Screen
Setup for Windows XP and 802.1x client is now complete.
Wireless Access Point User Guide
58
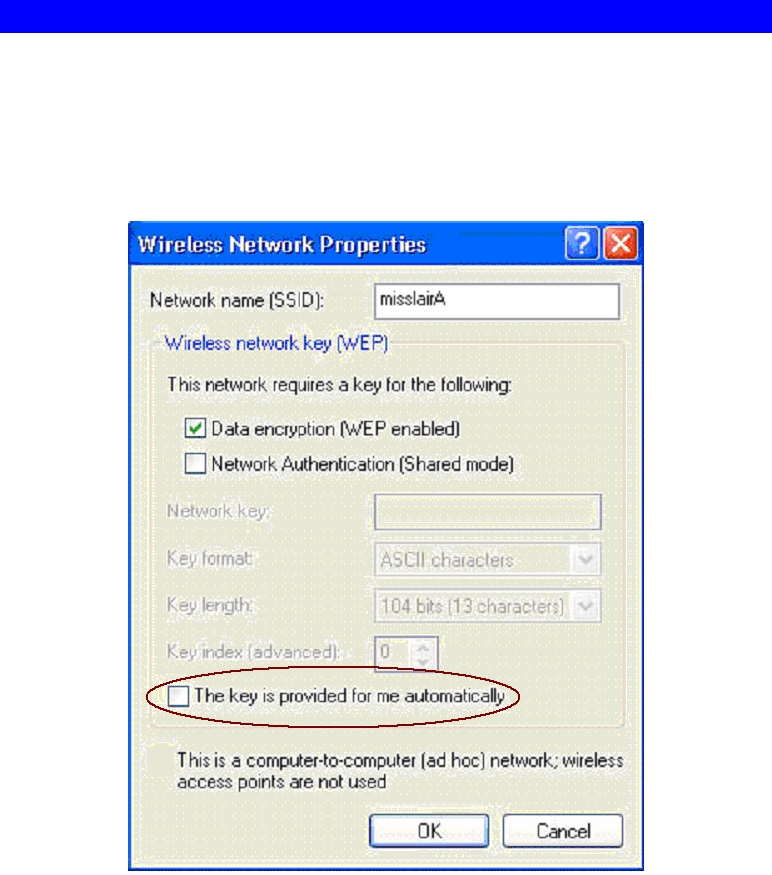
Using 802.1x Mode (without WPA)
This is very similar to using WPA-Enterprise.
The only difference is that on your client, you must NOT enable the setting The key is
provided for me automatically.
Instead, you must enter the WEP key manually, ensuring it matches the WEP key used on the
Access Point.
Figure 52: Properties Screen
Note:
On some systems, the "64 bit" WEP key is shown as "40 bit" and the "128 bit" WEP key is
shown as "104 bit". This difference arises because the key input by the user is 24 bits less than
the key size used for encryption.

59
Chapter 5
Operation and Status
This Chapter details the operation of the Wireless Access Point and the status
screens.
Operation
Once both the Wireless Access Point and the PCs are configured, operation is automatic.
However, you may need to perform the following operations on a regular basis.
• If using the Access Control feature, update the Trusted PC database as required. (See
Access Control in Chapter 3 for details.)
• If using 802.1x mode, update the User Login data on the Windows 2000 Server, and
configure the client PCs, as required.
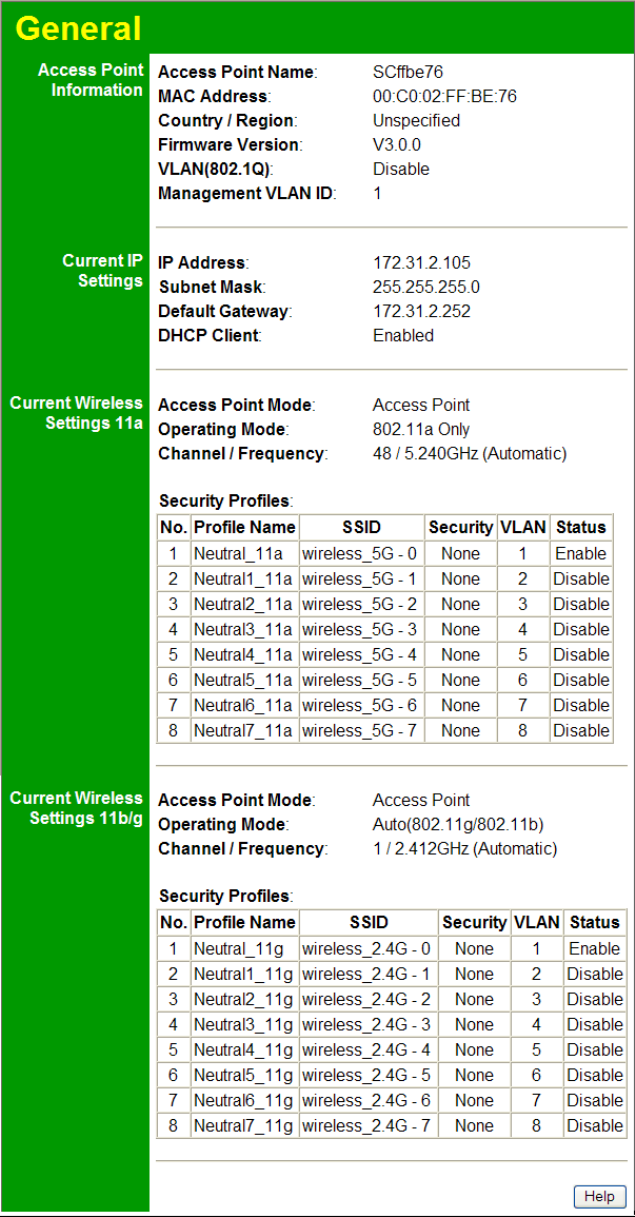
General Screen
Use the General link on the main menu to view this screen.
5
Wireless Access Point User Guide
60
Figure 53: General Screen

Operation and Status
61
Data - General Screen
Access Point Information
Access Point Name The current name will be displayed.
MAC Address The MAC (physical) address of the Wireless Access Point.
Country/Region The region or domain, as selected on the Basic Wireless screen.
Firmware Version The version of the firmware currently installed.
VLAN The current VLAN status will be displayed.
Management VLAN
ID The current VLAN ID used for management.
Current IP Settings
IP Address The IP Address of the Wireless Access Point.
Subnet Mask The Network Mask (Subnet Mask) for the IP Address above.
Default Gateway The Gateway for the LAN segment to which the Wireless Access
Point is attached (the same value as the PCs on that LAN
segment).
DHCP Client This indicates whether the current IP address was obtained from a
DHCP Server on your network.
It will display "Enabled" or "Disabled".
Current Wireless Settings
Access Point Mode The current Access Point mode is displayed.
Operation Mode The current operational mode is displayed.
Channel/Frequency The Channel currently in use is displayed.
Security Profiles
Profile Name The current profile name is displayed.
SSID The current SSID.
Security This displays the current Security setting.
VLAN This displays the current VLAN ID.
Status The current status of each Wireless Station is displayed.
Wireless Access Point User Guide
62
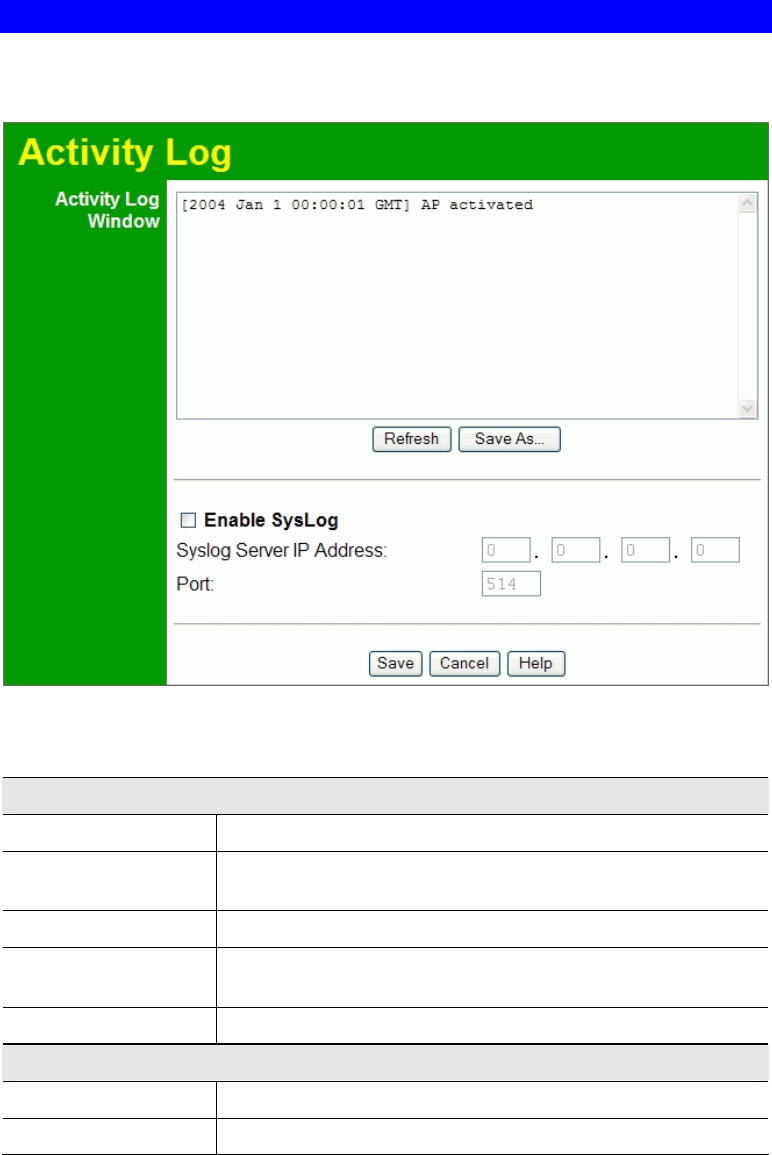
Activity Log
If you have a Syslog Server on your LAN, this screen allows you to configure the Access Point
to send log data to your Syslog Server.
Figure 54: Activity Log Screen
Data - Activity Log Screen
Activity Log Window
Current Time The system date and time is displayed.
Log The Log shows details of the connections to the Wireless Access
Point.
Enable Syslog If enabled, log data will be sent to your Syslog Server.
Syslog Server IP
Address Enter the IP address of your Syslog Server.
Port Enter the port number of your Syslog Server.
Buttons
Refresh Update the data on screen.
Save As Save the log to a file on your pc.
Operation and Status
63
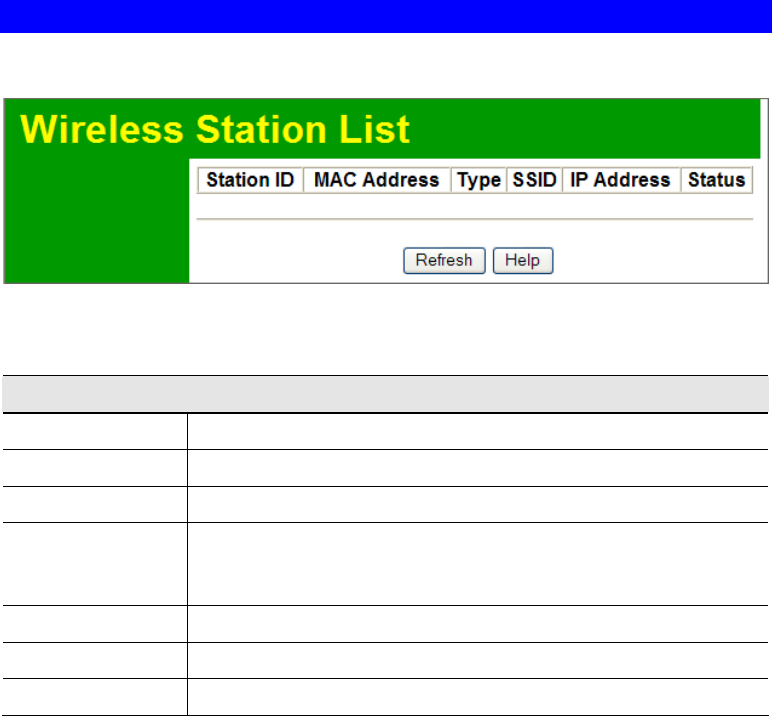
Wireless Station List
This screen is displayed when the Wireless Station List is clicked.
Figure 55 Wireless Station List Screen
Data - Wireless Station List Screen
Wireless Station List
Station ID The ID of each Wireless Station is displayed.
MAC Address The MAC (physical) address of each Wireless Station is displayed.
Type The type of each Wireless Station.
SSID This displays the SSID used the Wireless station. Because the
Wireless Access Point supports multiple SSIDs, different PCs could
connect using different SSIDs.
IP Address This indicates the current IP Address of each Wireless Station.
Status This indicates the current status of each Wireless Station.
Refresh Button Update the data on screen.
Wireless Access Point User Guide
64
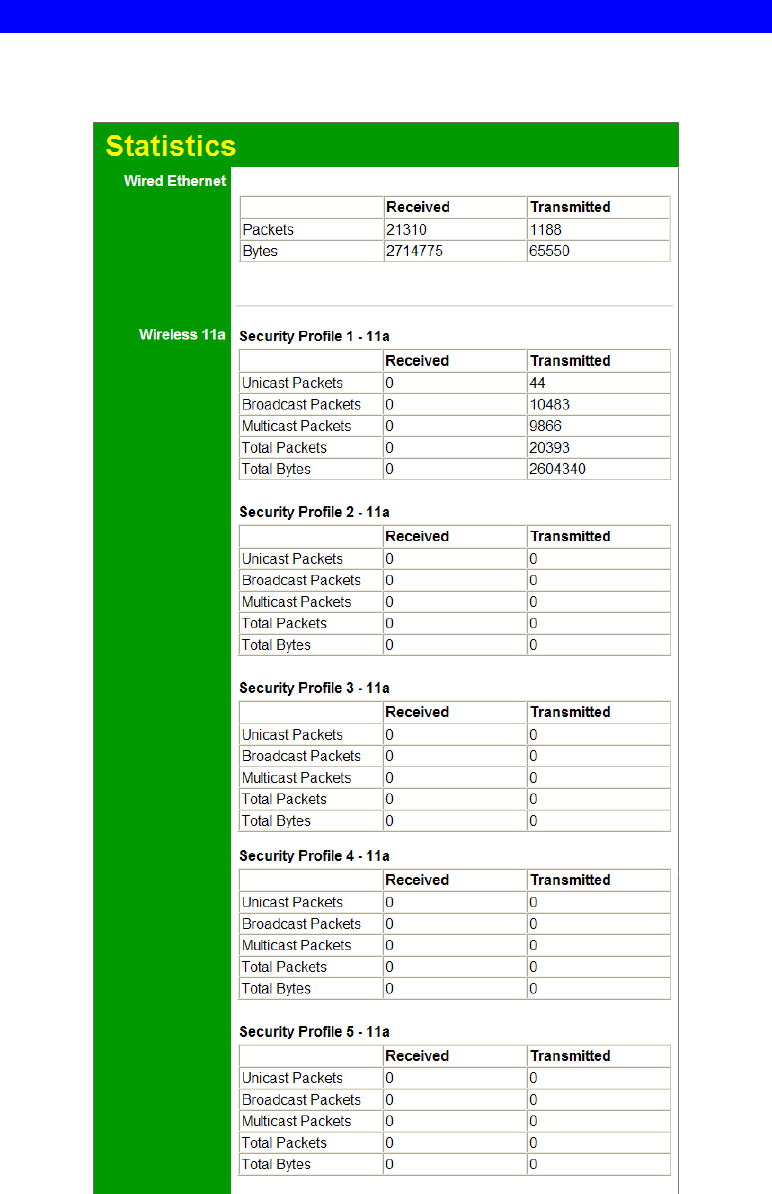
Statistics Screen
This screen is displayed when the Statistics is clicked. It shows details of the traffic flowing
through the Wireless Access Point.
Figure 56: Statistics Screen

Operation and Status
65
Data - Statistics Screen
Wired Ethernet
Packets The number of packets transmitted to or received from the wired
Ethernet.
Bytes The number of bytes transmitted to or received from the wired
Ethernet.
Wireless
Unicast Packets Unicast transmission, in which packets are sent or received from a
single source to a specified destination
Broadcast Packets Broadcast transmission, in which packets are sent or received from
a single source to other destinations.
Multicast Packets Multicast transmission, in which packets are sent or received from
one or more sources to other destinations.
Total Packets Number of the total packets transmitted to or received from
Wireless Stations.
Total Bytes Number of the total bytes transmitted to or received from Wireless
Stations.
66
Chapter 6
Other Settings & Features
This Chapter explains when and how to use the Wireless Access Point's
"Management" Features.
Overview
This Chapter covers the following features, available on the Wireless Access Point’s
Management menu.
• Change Password
• Remote Management
• Upgrade Firmware
• Backup/Restore Settings
• Reboot AP
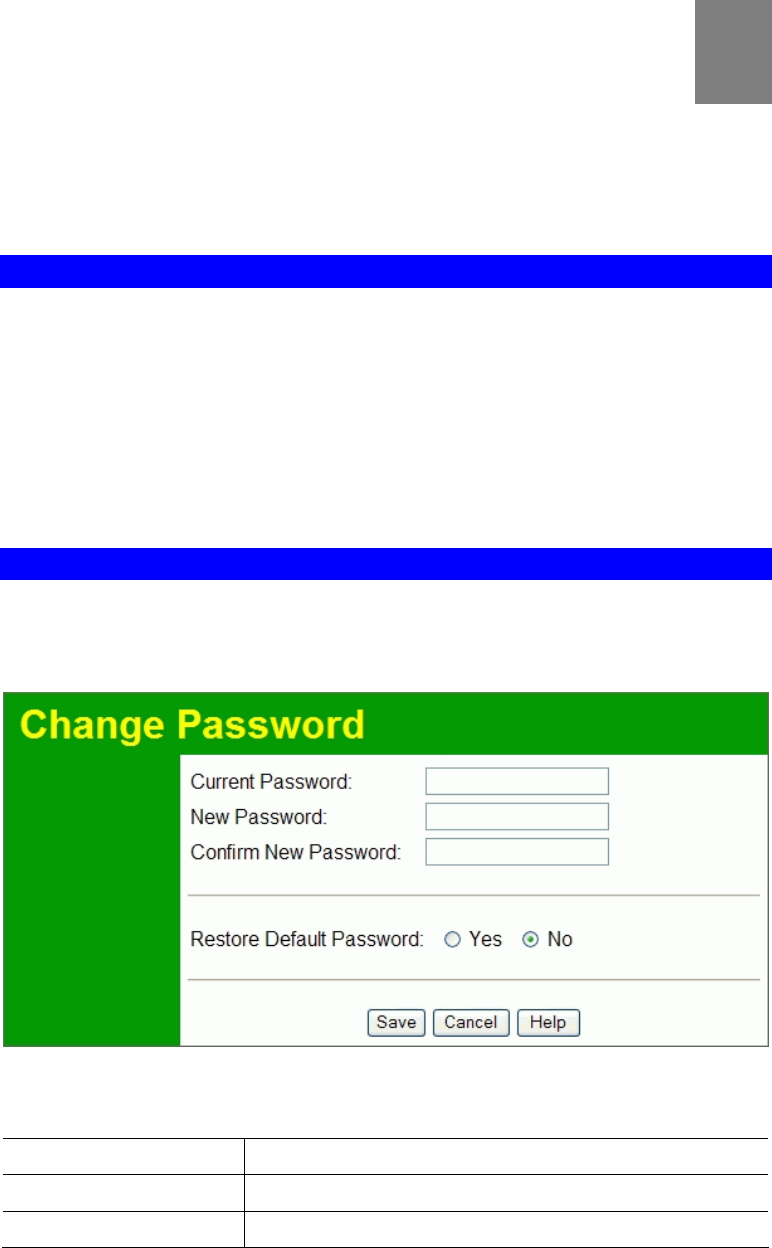
Change Password Screen
The Change Password screen allows you to assign a password to the Wireless Access Point.
This password limits access to the configuration interface. The default password is password.
It is recommended that this be changed, using this screen.
Figure 57: Change Password Screen
Data - Change Password Screen
Current Password Enter the current password here.
New Password Enter the new password here.
Confirm New Password Re-enter the new password in this field.
6
Other Settings & Features
67
Restore Default
Password Click Yes to clear and restore password settings to the factory
default values.
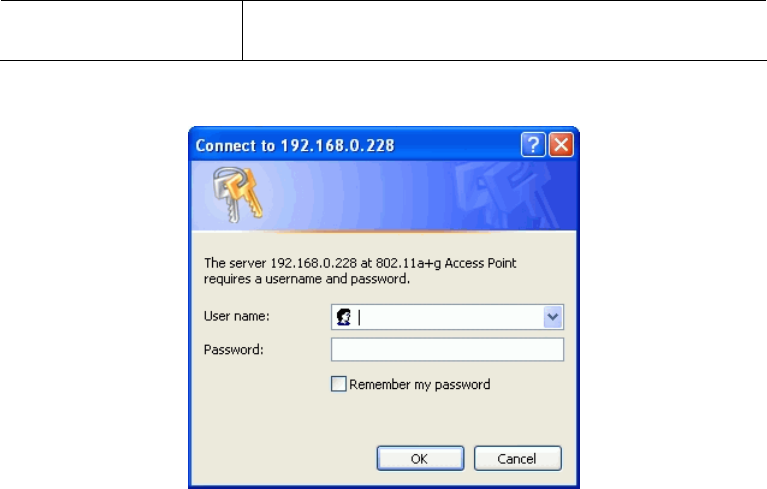
You will be prompted for the password when you connect, as shown below.
Figure 58: Password Dialog
Enter the User Name and Password, as set on the Change Password screen above.
Wireless Access Point User Guide
68
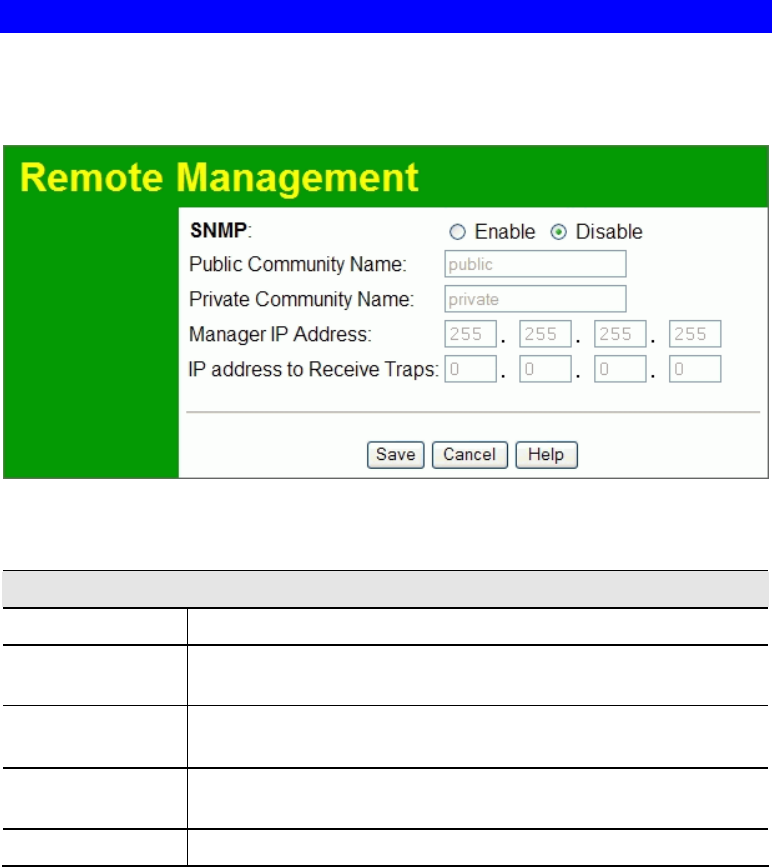
Remote Management
SNMP (Simple Network Management Protocol) is only useful if you have a SNMP program
on your PC. To reach this screen, select Remote Management in the Management section of
the menu.
Figure 59: Remote Management Screen
Data - Remote Management Screen
Remote Management
SNMP Enable or disable SNMP as required
Public Community
Name Enter the public community string, usually "Public".
Private
Community Name Enter the private community string, usually "Private".
Manager IP
Address Enter the IP address of the required station.
IP address to.. Enter the IP Address of the desired PC.
Other Settings & Features
69
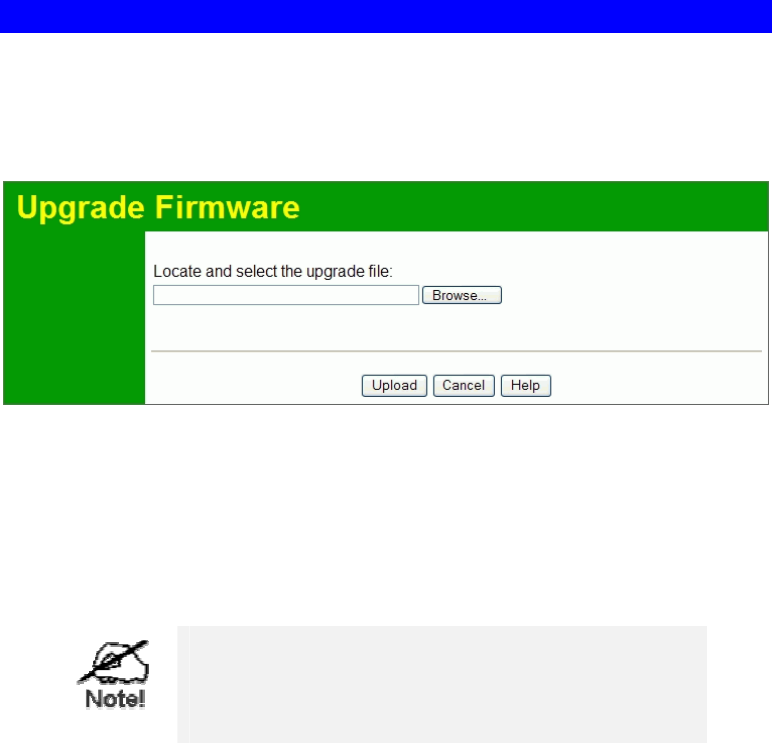
Firmware Upgrade
The firmware (software) in the Wireless Access Point can be upgraded using your Web
Browser.
You must first download the upgrade file, and then select Upgrade Firmware in the
Management section of the menu. You will see a screen like the following.
Figure 60: Firmware Upgrade Screen
To perform the Firmware Upgrade:
1. Click the Browse button and navigate to the location of the upgrade file.
2. Select the upgrade file. Its name will appear in the Upgrade File field.
3. Click the Upload button to commence the firmware upgrade.
The Wireless Access Point is unavailable during the
upgrade process, and must restart when the
upgrade is completed. Any connections to or
through the Wireless Access Point will be lost.
Wireless Access Point User Guide
70
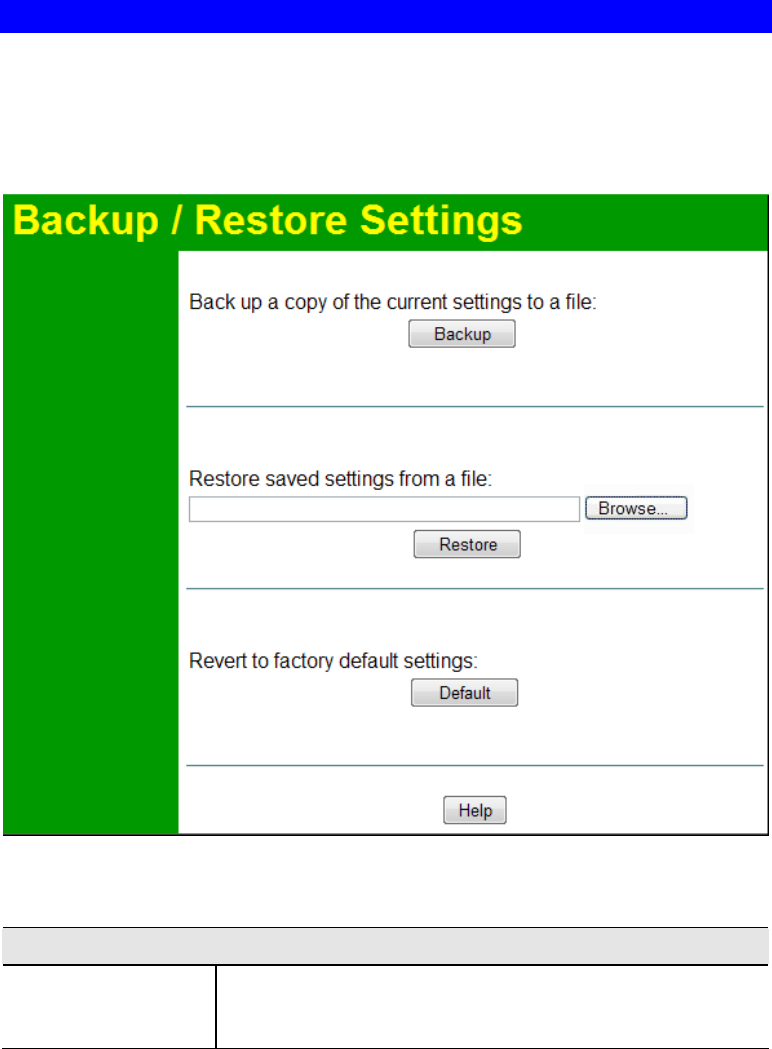
Backup/Restore Settings
This screen allows you to Backup (download) the configuration file, and to restore (upload) a
previously-saved configuration file.
You can also set the Wireless Access Point back to its factory default settings.
To reach this screen, select Backup/Restore Settings in the Management section of the menu.
Figure 61: Backup/Restore Settings Screen
Data - Backup/Restore Screen
Backup
Back up a copy of the
current settings to a
file
Click the Backup button to download the current settings to a file
on your PC.

Other Settings & Features
71
Restore
Restore saved settings
from a file If you have a previously-saved configuration file, you can use
this to restore those settings by uploading the file.
1. Click the Browse button and navigate to the location of the
configuration file.
2. Select the upgrade file. Its name will appear in the File field.
3. Click the Restore button to commence the upload.
4. The Wireless Access Point will need to restart, and will be
unavailable during the restart. All exiting connections will be
broken.
Default
Default Use this to set the Wireless Access Point back to its factory
default settings.
• Click Default to start the procedure.
• The Wireless Access Point will need to restart, and will be
unavailable during the restart. All exiting connections will be
broken.
Wireless Access Point User Guide
72
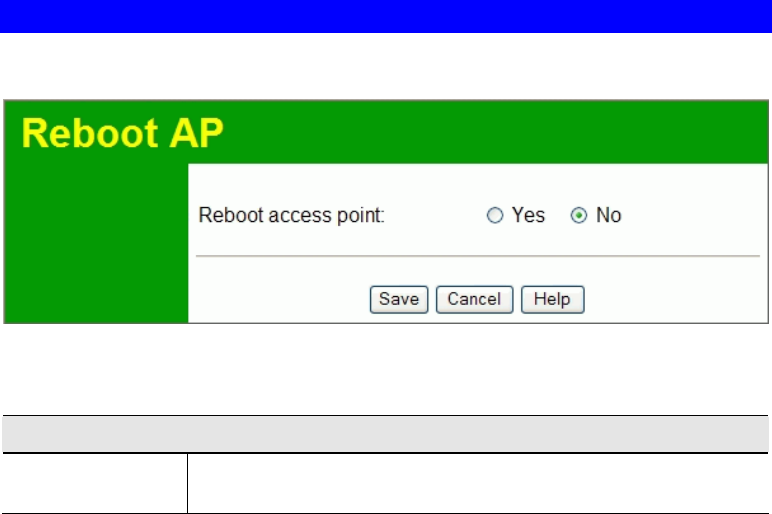
Reboot AP
To reach this screen, select Reboot AP in the Management section of the menu.
Figure 62: Reboot AP Screen
Data - Reboot AP Screen
Reboot AP
Reboot access
point Click Yes to restart the Wireless Access Point.

73
Appendix A
Specifications
Wireless Access Point
Hardware Specifications
CPU AR5312
Radio-on-Chip AR2112+AR5112
DRAM 16 Mbytes
Flash ROM 4 Mbytes
LAN port 1 x Auto-MDIX RJ 45 for 10/100Mbps PoE port
IEEE 802.3af comliance
Network Standard IEEE 802.11b (Wi-Fi™) and IEEE
802.11g compliance
11G/B
Operating Frequencies 2.412. - 2.462GHz(FCC), 2.412. - 2.472GHz(EU)
Network Standard IEEE 802.11a compliance 11A
Operating Frequencies:
FCC: 5.15 - 5.25GHz, 5.725 - 5.825GHz
Europe: 5.15 - 5.35GHz, 5.47 - 5.725GHz
Japan: 4.90 - 5.00GHz, 5.03 - 5.091GHz, 5.15 -
5.125GHz
Antennae 2x5dbi detachable single band antennae.
One for 5GHz, the other for 2.4GHz
Operating temperature 0~45℃
Storage temperature -20℃~70℃
Power Adapter DC 12V/1000mA
Dimensions 189mm (W) x 125mm (D) x 34mm (H)
Software Specifications
Feature Details
Wireless • Access point support
• Roaming supported
• IEEE 802.11a/11g/11b compliance
• Auto Sensing Open System / Share Key authentication
• Wireless Channels Support
• Automatic Wireless Channel Selection
A

Wireless Access Point User Guide
74
• MBSSID support
• WMM support
• Tx Power Adjustment
• Transmit Data Rate
• Domain Selection
• Preamble Type: long or short support
• RTS Threshold Adjustment
• Fragmentation Threshold Adjustment
• Beacon Interval Adjustment
• SSID assignment
• Short Slot time support
• CTS-only &CTS/RTS protect mechanism support
• DFS(Dynamic Frequency Selection) Support
• TPC (Transmit Power Control) Support
Operation Mode • Common AP
• PTP Bridge
• PTMP Bridge
• Repeater
Security • Open, Shared, WPA, WPA-PSK and WPA2-PSK authentication
• 64bit/128bit/152bit WEP, TKIP, AES-CCMP support
• 802.1x support
• EAP-MD5, EAP-TLS, EAP-TTLS, PEAP
• RADIUS based MAC authentication
• Block inter-wireless station communication (wireless separation)
• Block SSID broadcast
Management • Web based configuration
• Configurable Web port
• RADIUS Accounting
• RADIUS-On feature
• RADIUS Accounting update
• Message Log
• Access Control list file support
• Configuration file Backup/Restore
• Statistics support
• RADIUS DNS name
• SNMP v1 & v2c
• Device discovery program/Windows Utility
Other Features • DHCP client
• WINS client
• Radius client
• Enable/Disable Wireless
Firmware Upgrade HTTP

Appendix A - Specifications
75
FCC Statement
This equipment has been tested and found to comply with the limits for a Class B digital
device, pursuant to Part 15 of the FCC Rules. These limits are designed to provide reasonable
protection against harmful interference in a residential installation.
This equipment generates, uses and can radiate radio frequency energy and, if not installed and
used in accordance with the instructions, may cause harmful interference to radio
communications. However, there is no guarantee that interference will not occur in a particular
installation. If this equipment does cause harmful interference to radio or television reception,
which can be determined by turning the equipment off and on, the user is encouraged to try to
correct the interference by one of the following measures:
• Reorient or relocate the receiving antenna.
• Increase the separation between the equipment and receiver.
• Connect the equipment into an outlet on a circuit different from that to which the receiver
is connected.
• Consult the dealer or an experienced radio/TV technician for help.
To assure continued compliance, any changes or modifications not expressly approved by the
party responsible for compliance could void the user's authority to operate this equipment.
(Example - use only shielded interface cables when connecting to computer or peripheral
devices).
FCC Radiation Exposure Statement
This equipment complies with FCC RF radiation exposure limits set forth for an uncontrolled
environment. This equipment should be installed and operated with a minimum distance of 20
centimeters between the radiator and your body.
This device complies with Part 15 of the FCC Rules. Operation is subject to the following two
conditions:
(1) This device may not cause harmful interference, and
(2) this device must accept any interference received, including interference that may cause
undesired operation.
This transmitter must not be co-located or operating in conjunction with any other antenna or
transmitter.

76
Appendix B
Troubleshooting
Overview
This chapter covers some common problems that may be encountered while using the Wireless
Access Point and some possible solutions to them. If you follow the suggested steps and the
Wireless Access Point still does not function properly, contact your dealer for further advice.
General Problems
Problem 1: Can't connect to the Wireless Access Point to configure it.
Solution 1: Check the following:
• The Wireless Access Point is properly installed, LAN connections are
OK, and it is powered ON. Check the LEDs for port status.
• Ensure that your PC and the Wireless Access Point are on the same
network segment. (If you don't have a router, this must be the case.)
• If your PC is set to "Obtain an IP Address automatically" (DHCP
client), restart it.
• You can use the following method to determine the IP address of the
Wireless Access Point, and then try to connect using the IP address,
instead of the name.
To Find the Access Point's IP Address
1. Open a MS-DOS Prompt or Command Prompt Window.
2. Use the Ping command to “ping” the Wireless Access Point. Enter
ping followed by the Default Name of the Wireless Access Point.
e.g. ping SC003318
3. Check the output of the ping command to determine the IP address of
the Wireless Access Point, as shown below.
Figure 63: Ping
If your PC uses a Fixed (Static) IP address, ensure that it is using an IP
Address which is compatible with the Wireless Access Point. (If no DHCP
Server is found, the Wireless Access Point will default to an IP Address and
Mask of 192.168.0.228 and 255.255.255.0.) On Windows PCs, you can use
Control Panel-Network to check the Properties for the TCP/IP protocol.
B

Appendix B - Troubleshooting
77
Problem 2: My PC can't connect to the LAN via the Wireless Access Point.
Solution 2 Check the following:
• The SSID and WEP settings on the PC match the settings on the
Wireless Access Point.
• On the PC, the wireless mode is set to "Infrastructure"
• If using the Access Control feature, the PC's name and address is in the
Trusted Stations list.
• If using 802.1x mode, ensure the PC's 802.1x software is configured
correctly. See Chapter 4 for details of setup for the Windows XP 802.1x
client. If using a different client, refer to the vendor's documentation.
78
Appendix C
Windows TCP/IP
Overview
Normally, no changes need to be made.
• By default, the Wireless Access Point will act as a DHCP client, automatically obtaining a
suitable IP Address (and related information) from your DHCP Server.
• If using Fixed (specified) IP addresses on your LAN (instead of a DHCP Server), there is
no need to change the TCP/IP of each PC. Just configure the Wireless Access Point to
match your existing LAN.
The following sections provide details about checking the TCP/IP settings for various types of
Windows, should that be necessary.
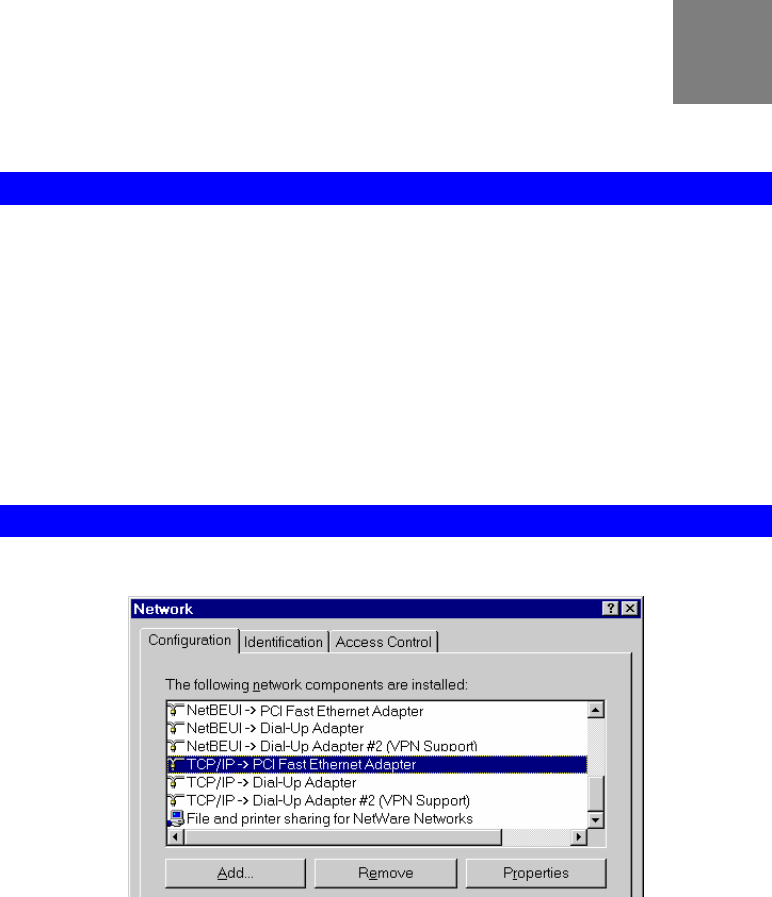
Checking TCP/IP Settings - Windows 9x/ME:
1. Select Control Panel - Network. You should see a screen like the following:
Figure 64: Network Configuration
2. Select the TCP/IP protocol for your network card.
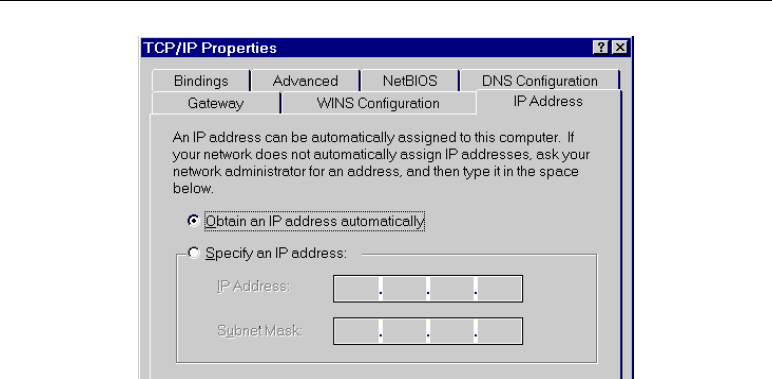
3. Click on the Properties button. You should then see a screen like the following.
C
Appendix C - Windows TCP/IP
79
Figure 65: IP Address (Win 95)
Ensure your TCP/IP settings are correct, as follows:
Using DHCP
To use DHCP, select the radio button Obtain an IP Address automatically. This is the default
Windows settings. To work correctly, you need a DHCP server on your LAN.
Using "Specify an IP Address"
If your PC is already configured for a fixed (specified) IP address, no changes are required.
(The Administrator should configure the Wireless Access Point with a fixed IP address from
the same address range used on the PCs.)
Wireless Access Point User Guide
80
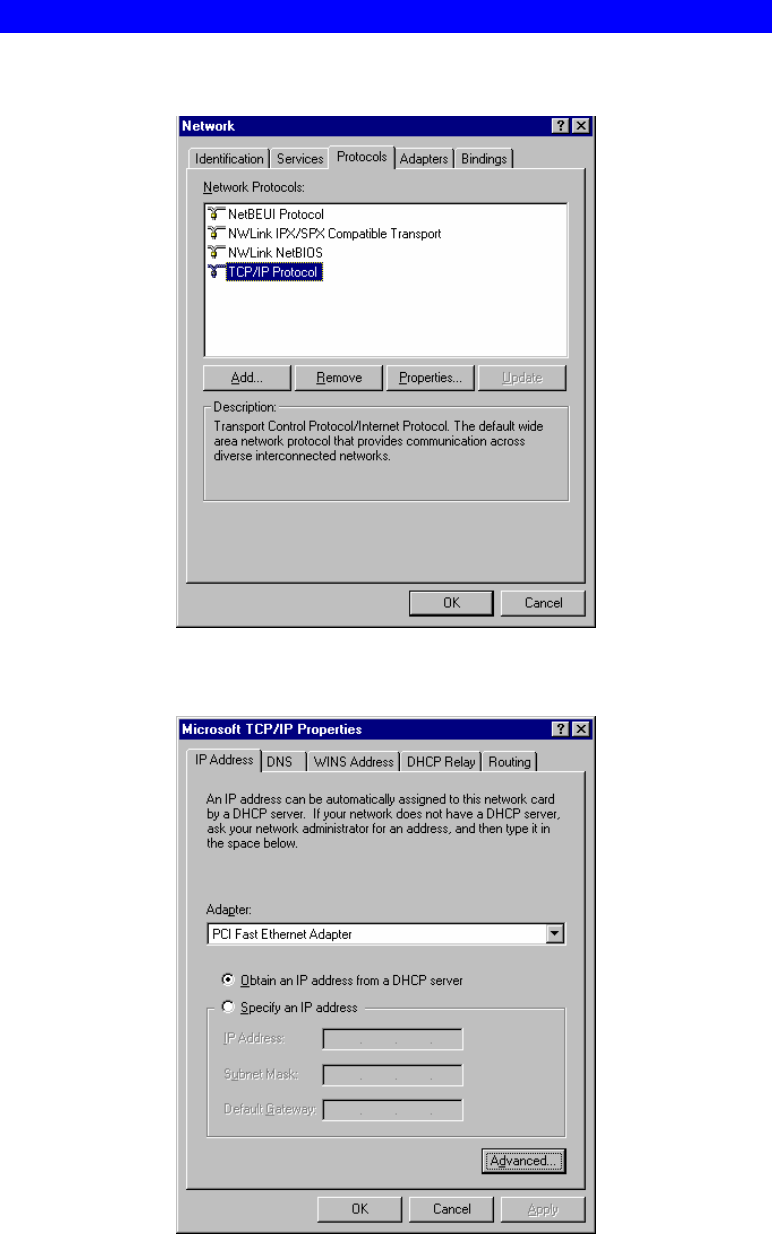
Checking TCP/IP Settings - Windows NT4.0
1. Select Control Panel - Network, and, on the Protocols tab, select the TCP/IP protocol, as
shown below.
Figure 66: Windows NT4.0 - TCP/IP
2. Click the Properties button to see a screen like the one below.
Figure 67: Windows NT4.0 - IP Address

Appendix C - Windows TCP/IP
81
3. Select the network card for your LAN.
4. Select the appropriate radio button - Obtain an IP address from a DHCP Server or Specify
an IP Address, as explained below.
Obtain an IP address from a DHCP Server
This is the default Windows setting. This is the default Windows settings. To work correctly,
you need a DHCP server on your LAN.
Using "Specify an IP Address"
If your PC is already configured for a fixed (specified) IP address, no changes are required.
(The Administrator should configure the Wireless Access Point with a fixed IP address from
the same address range used on the PCs.)
Wireless Access Point User Guide
82
Checking TCP/IP Settings - Windows 2000
1. Select Control Panel - Network and Dial-up Connection.
2. Right click the Local Area Connection icon and select Properties. You should see a screen
like the following:
Figure 68: Network Configuration (Win 2000)
3. Select the TCP/IP protocol for your network card.
4. Click on the Properties button. You should then see a screen like the following.
Figure 69: TCP/IP Properties (Win 2000)

Appendix C - Windows TCP/IP
83
5. Ensure your TCP/IP settings are correct:
Using DHCP
To use DHCP, select the radio button Obtain an IP Address automatically. This is the default
Windows setting. This is the default Windows settings. To work correctly, you need a DHCP
server on your LAN.
Using a fixed IP Address ("Use the following IP Address")
If your PC is already configured for a fixed (specified) IP address, no changes are required.
(The Administrator should configure the Wireless Access Point with a fixed IP address from
the same address range used on the PCs.)
Wireless Access Point User Guide
84
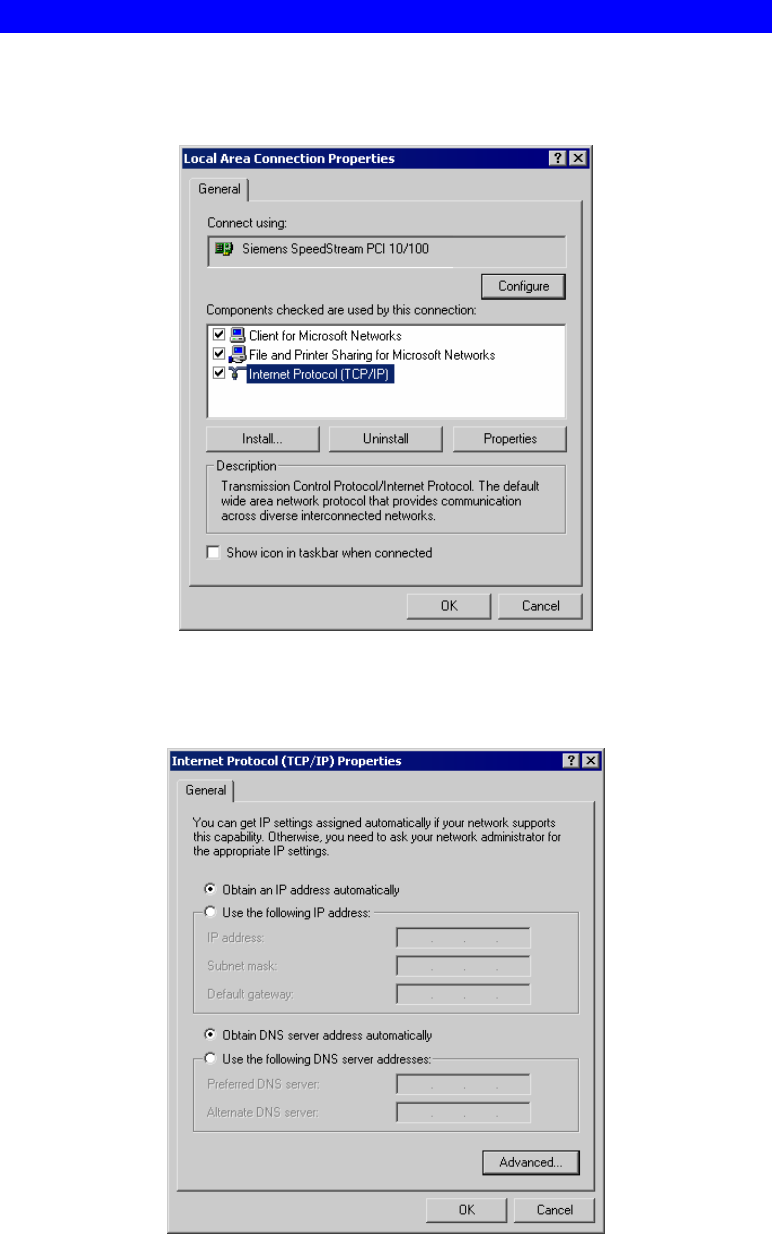
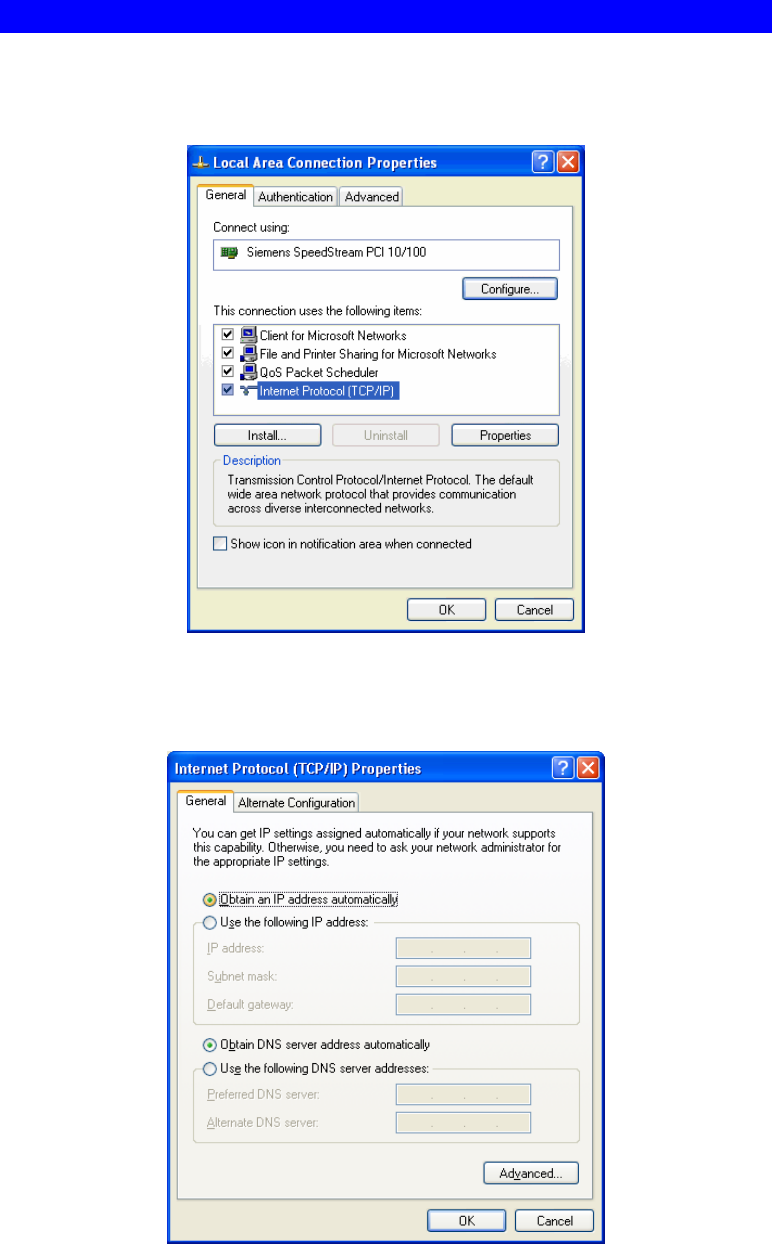
Checking TCP/IP Settings - Windows XP
1. Select Control Panel - Network Connection.
2. Right click the Local Area Connection and choose Properties. You should see a screen
like the following:
Figure 70: Network Configuration (Windows XP)
3. Select the TCP/IP protocol for your network card.
4. Click on the Properties button. You should then see a screen like the following.
Figure 71: TCP/IP Properties (Windows XP)

Appendix C - Windows TCP/IP
85
5. Ensure your TCP/IP settings are correct.
Using DHCP
To use DHCP, select the radio button Obtain an IP Address automatically. This is the default
Windows setting. To work correctly, you need a DHCP server on your LAN.
Using a fixed IP Address ("Use the following IP Address")
If your PC is already configured for a fixed (specified) IP address, no changes are required.
(The Administrator should configure the Wireless Access Point with a fixed IP address from
the same address range used on the PCs.)
Wireless Access Point User Guide
86
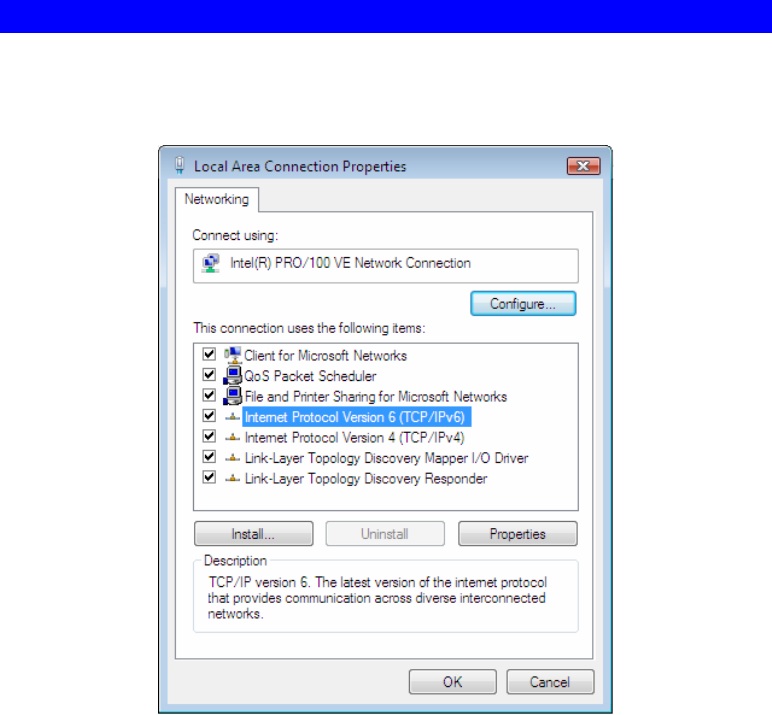
Checking TCP/IP Settings - Windows Vista
1. Select Control Panel - Network Connections.
2. Right click the Local Area Connection Status and choose Properties. Click Continue to
the User Account Control dialog box, then you should see a screen like the following:
Figure 72: Network Configuration (Windows Vista)
3. Select the TCP/IP protocol for your network card.
4. Click on the Properties button. You should then see a screen like the following.
Appendix C - Windows TCP/IP
87
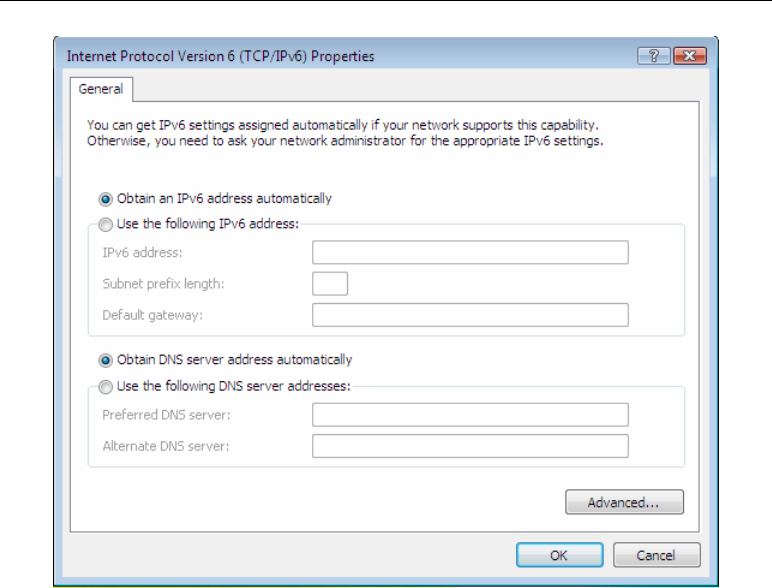
Figure 73: TCP/IP Properties (Windows Vista)
5. Ensure your TCP/IP settings are correct.
Using DHCP
To use DHCP, select the radio button Obtain an IP Address automatically. This is the default
Windows setting. To work correctly, you need a DHCP server on your LAN.
Using a fixed IP Address ("Use the following IP Address")
If your PC is already configured for a fixed (specified) IP address, no changes are required.
(The Administrator should configure the Wireless Access Point with a fixed IP address from
the same address range used on the PCs.)

88
Appendix D
About Wireless LANs
Overview
Wireless networks have their own terms and jargon. It is necessary to understand many of
these terms in order to configure and operate a Wireless LAN.
Wireless LAN Terminology
Modes
Wireless LANs can work in either of two (2) modes:
• Ad-hoc
• Infrastructure
Ad-hoc Mode
Ad-hoc mode does not require an Access Point or a wired (Ethernet) LAN. Wireless
Stations (e.g. notebook PCs with wireless cards) communicate directly with each other.
Infrastructure Mode
In Infrastructure Mode, one or more Access Points are used to connect Wireless Stations
(e.g. Notebook PCs with wireless cards) to a wired (Ethernet) LAN. The Wireless Stations
can then access all LAN resources.
Access Points can only function in "Infrastructure" mode,
and can communicate only with Wireless Stations which are
set to "Infrastructure" mode.
SSID/ESSID
BSS/SSID
A group of Wireless Stations and a single Access Point, all using the same ID (SSID),
form a Basic Service Set (BSS).
Using the same SSID is essential. Devices with different SSIDs are unable to
communicate with each other. However, some Access Points allow connections from
Wireless Stations which have their SSID set to “any” or whose SSID is blank ( null ).
ESS/ESSID
A group of Wireless Stations, and multiple Access Points, all using the same ID (ESSID),
form an Extended Service Set (ESS).
D

Appendix D - About Wireless LANs
89
Different Access Points within an ESS can use different Channels. To reduce interference,
it is recommended that adjacent Access Points SHOULD use different channels.
As Wireless Stations are physically moved through the area covered by an ESS, they will
automatically change to the Access Point which has the least interference or best
performance. This capability is called Roaming. (Access Points do not have or require
Roaming capabilities.)
Channels
The Wireless Channel sets the radio frequency used for communication.
• Access Points use a fixed Channel. You can select the Channel used. This allows you to
choose a Channel which provides the least interference and best performance. For 802.11g,
13 channels are available in the USA and Canada., but 11channels are available in North
America if using 802.11b.
• If using multiple Access Points, it is better if adjacent Access Points use different
Channels to reduce interference. The recommended Channel spacing between adjacent
Access Points is 5 Channels (e.g. use Channels 1 and 6, or 6 and 11).
• In "Infrastructure" mode, Wireless Stations normally scan all Channels, looking for an
Access Point. If more than one Access Point can be used, the one with the strongest signal
is used. (This can only happen within an ESS.)
• If using "Ad-hoc" mode (no Access Point), all Wireless stations should be set to use the
same Channel. However, most Wireless stations will still scan all Channels to see if there
is an existing "Ad-hoc" group they can join.
WEP
WEP (Wired Equivalent Privacy) is a standard for encrypting data before it is transmitted. This
is desirable because it is impossible to prevent snoopers from receiving any data which is
transmitted by your Wireless Stations. But if the data is encrypted, then it is meaningless
unless the receiver can decrypt it.
If WEP is used, the Wireless Stations and the Wireless Access Point must have the same
settings.
WPA-PSK
Like WEP, data is encrypted before transmission. WPA is more secure than WEP, and should
be used if possible. The PSK (Pre-shared Key) must be entered on each Wireless station. The
256Bit encryption key is derived from the PSK, and changes frequently.
WPA-Enterprise
This version of WPA requires a Radius Server on your LAN to provide the client
authentication according to the 802.1x standard. Data transmissions are encrypted using the
WPA standard.
If this option is used:
• The Access Point must have a "client login" on the Radius Server.
• Each user must have a "user login" on the Radius Server.
• Each user's wireless client must support 802.1x and provide the login data when required.

Wireless Access Point User Guide
90
All data transmission is encrypted using the WPA standard. Keys are automatically generated,
so no key input is required.
802.1x
This uses the 802.1x standard for client authentication, and WEP for data encryption. If
possible, you should use WPA-Enterprise instead, because WPA encryption is much stronger
than WEP encryption.
If this option is used:
• The Access Point must have a "client login" on the Radius Server.
• Each user must have a "user login" on the Radius Server.
• Each user's wireless client must support 802.1x and provide the login data when required.
• All data transmission is encrypted using the WEP standard. You only have to select the
WEP key size; the WEP key is automatically generated.

Regulatory Approvals
FCC Statement
This equipment has been tested and found to comply with the limits for a Class B digital
device, pursuant to Part 15 of the FCC Rules. These limits are designed to provide reasonable
protection against harmful interference in a residential installation.
This equipment generates, uses and can radiate radio frequency energy and, if not installed and
used in accordance with the instructions, may cause harmful interference to radio communica-
tions. However, there is no guarantee that interference will not occur in a particular installation.
If this equipment does cause harmful interference to radio or television reception, which can be
determined by turning the equipment off and on, the user is encouraged to try to correct the
interference by one of the following measures:
Reorient or relocate the receiving antenna.
Increase the separation between the equipment and receiver.
Connect the equipment into an outlet on a circuit different from that to which the receiver
is connected.
Consult the dealer or an experienced radio/TV technician for help.
To assure continued compliance, any changes or modifications not expressly approved by the
party responsible for compliance could void the user's authority to operate this equipment.
(Example - use only shielded interface cables when connecting to computer or peripheral
devices).
FCC Radiation Exposure Statement
This equipment complies with FCC RF radiation exposure limits set forth for an uncontrolled
environment. This equipment should be installed and operated with a minimum distance of 20
centimeters between the radiator and your body.
This device complies with Part 15 of the FCC Rules. Operation is subject to the following two
conditions:
(1) This device may not cause harmful interference, and
(2) This device must accept any interference received, including interference that may cause
undesired operation.
This transmitter must not be co-located or operating in conjunction with any other antenna or
transmitter.
The antennas used for this transmitter must be installed to provide a separation distance of at
least 20 cm from all persons and must not be co-located or operating in conjunction with any
other antenna or transmitter.
Channel
The Wireless Channel sets the radio frequency used for communication.
•Access Points use a fixed Channel. You can select the Channel used. This allows you to
choose a Channel which provides the least interference and best performance. In the USA
and Canada, 11 channel are available. If using multiple Access Points, it is better if adjacent
Access Points use different Channels to reduce interference.
• In "Infrastructure" mode, Wireless Stations normally scan all Channels, looking for an
Access Point. If more than one Access Point can be used, the one with the strongest
signal is used. (This can only happen within an ESS.)
• If using "Ad-hoc" mode (no Access Point), all Wireless stations should be set to use the
same Channel. However, most Wireless stations will still scan all Channels to see if there
is an existing "Ad-hoc" group they can join.
CAUTION:
1) To comply with FCC RF exposure compliance requirements, a separation
distance of at least 20 cm must be maintained between the antenna of this
device and all persons.
2) This transmitter must not be co-located or operating in conjunction with
any other antenna or transmitter.