Sercomm BASICKEYPAD RF Basic Keypad User Manual Basic Keypad QIG UL 20140109
Sercomm Corporation RF Basic Keypad Basic Keypad QIG UL 20140109
Sercomm >
User manual.pdf
Installation Instruction
1 Basic Keypad v1.0 2013/11/15
Basic Keypad Installation Guide
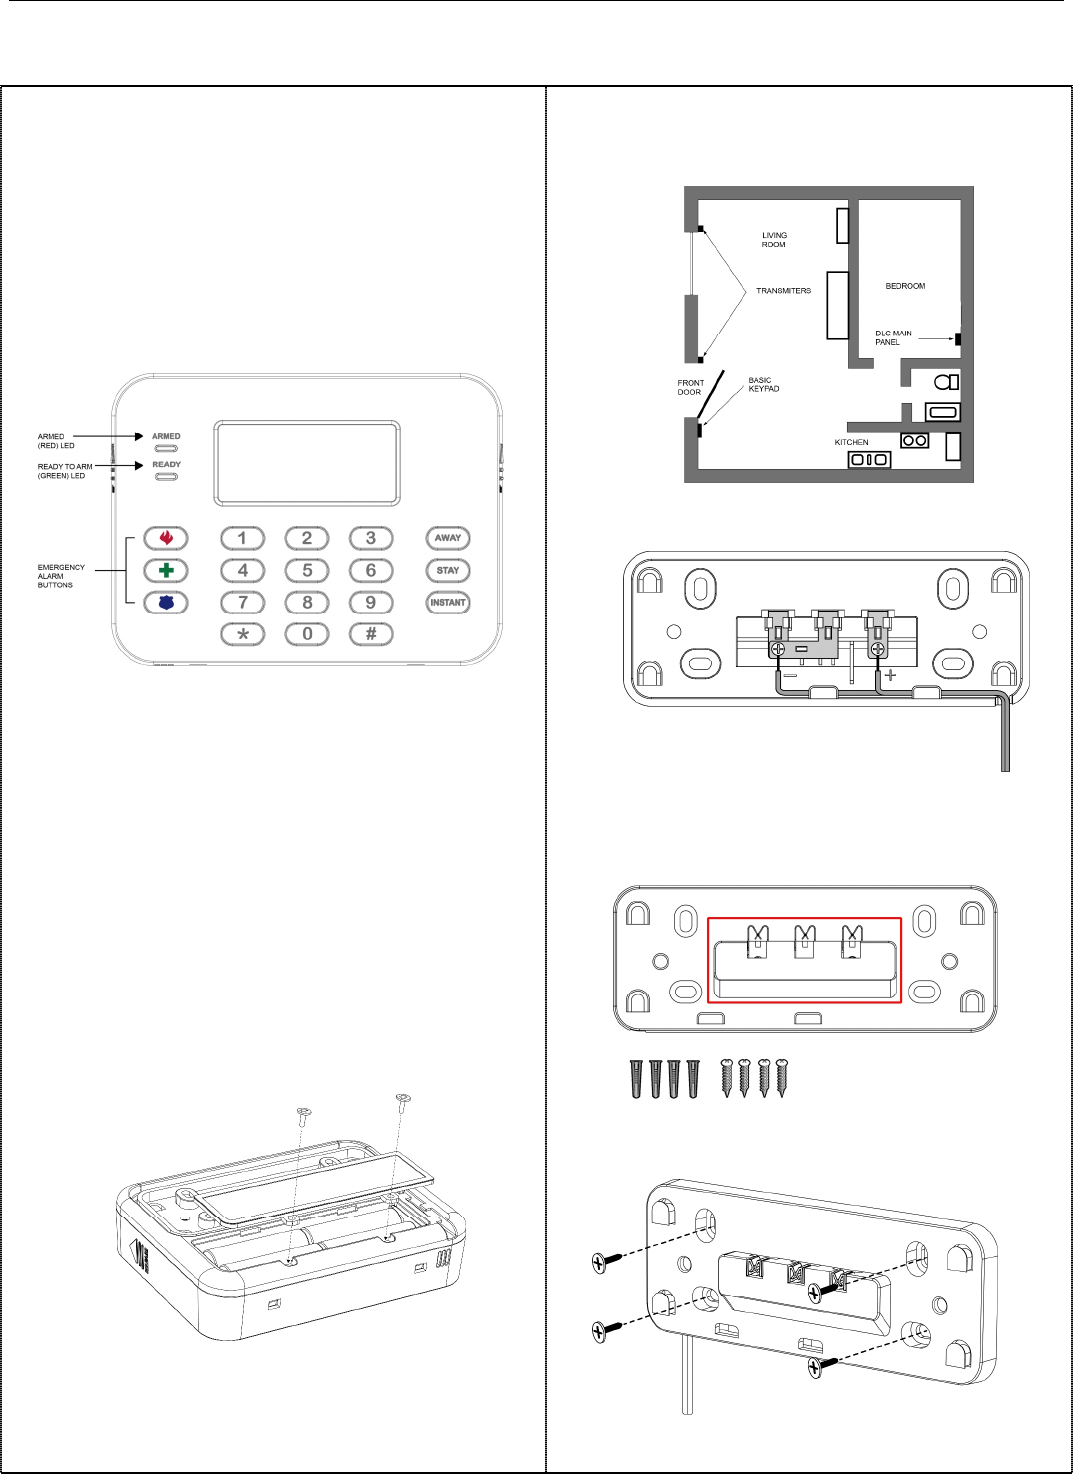
Product Description
The basic keypad can provide a convenient interface to enable
control of all system functions. You can use the keypad to arm or
disarm your security system as well as check system status. A
beep will sound when any button is pressed on the keypad.
The keypad is also equipped with a tamper switch. If the kepad
is removed from the wall, the device will generate an alarm and
send it to the AT&T digital Life Central Monitoring Center.
The keypad features are shown in the following figure.
Package Contens
The following items should be included:
• Basic Keypad x 1
• Wall Mounting Plate x 1
• Anchor/Screw x 4
• Battery Cover Screw x 2
• Screw Adapter x 1
• NiMH Rechargeable Battery x 4
Pre-Installation
1. Install the four supplied NiMH rechargeable batteries
correctly.
2. Attach and tighten the battery cover to the keypad with two
supplied Security Torx screws.
NOTE: A special screwdriver is required for installing the
Security Torx screws.
Installation
NOTE: The installation area should be a flat surface. Mounted
it down on an uneven surface could cause damage to the unit.
1. Route the wire (not included) from the control panels
through the opening in the back of the mounting plate.
2. Place the mounting plate in the desired position of the
wall.
NOTE: Make sure the connector pins of the mounting
plate are upward while installing.
3. Use a screwdriver to mount the plate with the included
four anchors/screws through the round holes.
4. Attach and push down the keypad to the plate. Make sure
the device is firmly fixed on the wall.
Sercomm
Installation Instruction
Basic Keypad v1.0 2013/11/15
2
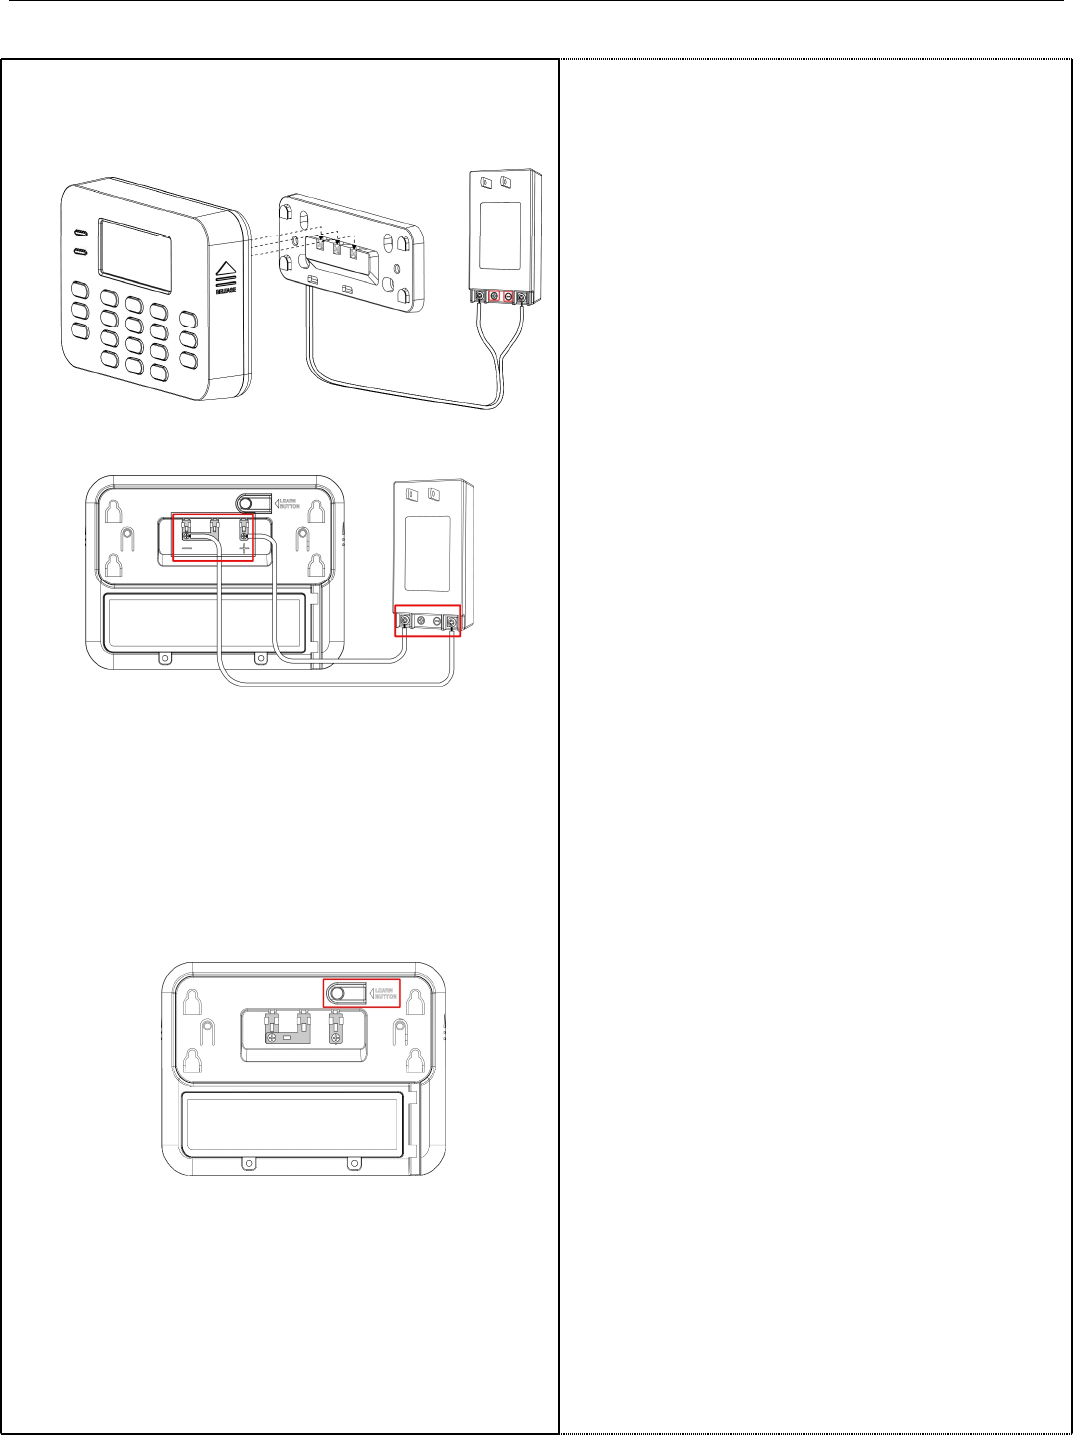
5. Using the wire to connect the supplied power adapter. Use
only the power adapter provided. Using a different one may
cause hardware damage.
NOTE: Make sure that the positive and negative wires are
on the correct terminals.
6. Plug the power adapter into an AC socket.
7. The LCD will light up, as well as the backlight if the
installation is successful.
Discovering and Registering the Device Controller
Follow these steps to discover and register the device controller:
1. Place the keypad into Discovery Mode.
2. Make the keypad discoverable by pressing the Learn button
located on the back of the unit.
3. Confirm that the keypad has been discovered in DLC100.
4. Label the keypad in DLC100.
FCC Statement
This equipment has been tested and found to comply with the
limits for a Class B digital device, pursuant to Part 15 of the FCC
Rules. These limits are designed to provide reasonable protection
against harmful interference in a residential installation.
This equipment generates, uses and can radiate radio
frequency energy and, if not installed and used in accordance
with the instructions, may cause harmful interference to
radio communications. However, there is no guarantee that
interference will not occur in a particular installation. If this
equipment does cause harmful interference to radio or
television reception, which can be determined by turning the
equipment off and on, the user is encouraged to try to correct
the interference by one of the following measures:
• Reorient or relocate the receiving antenna.
• Increase the separation between the equipment and
receiver.
• Connect the equipment into an outlet on a circuit
different from that to which the receiver is connected.
• Consult the dealer or an experienced radio/TV
technician for help.
To assure continued compliance, any changes or
modifications not expressly approved by the party
responsible for compliance could void the user's authority to
operate this equipment. (Example - use only shielded
interface cables when connecting to computer or peripheral
devices).
Radiation Exposure Statement
This product comply with the FCC portable RF exposure
limit set forth for an uncontrolled environment and are safe
for intended operation as described in this manual. The
further RF exposure reduction can be achieved if the product
can be kept as far as possible from the user body or set the
device to lower output power if such function is available.
This device complies with Part 15 of the FCC Rules.
Operation is subject to the following two conditions:
(1) This device may not cause harmful interference, and
(2) This device must accept any interference received,
including interference that may cause undesired operation.
This transmitter must not be co-located or operating in
conjunction with any other antenna or transmitter.
Sercomm