Sercomm IP822LM Home Plug 802.11g Residential Access Point User Manual IP822LM 1
Sercomm Corporation Home Plug 802.11g Residential Access Point IP822LM 1
Sercomm >
Manual

HomePlug
802.11g Access Point
User's Guide

i
TABLE OF CONTENTS
CHAPTER 1 INTRODUCTION..............................................................................................................1
Features of your HomePlug 802.11g Access Point....................................................................2
Package Contents.............................................................................................................................2
Physical Description........................................................................................................................3
CHAPTER 2 INSTALLATION...............................................................................................................5
Requirements ....................................................................................................................................5
Procedure...........................................................................................................................................5
CHAPTER 3 ACCESS POINT SETUP..................................................................................................7
Overview.............................................................................................................................................7
Preparation........................................................................................................................................7
Configuration....................................................................................................................................8
Status Screen..................................................................................................................................10
HomePlug Settings.........................................................................................................................11
Wireless Settings Screen.............................................................................................................13
Wireless Security..........................................................................................................................15
LAN IP Setup Screen.....................................................................................................................17
Set Password Screen......................................................................................................................18
CHAPTER 4 WIRELESS CLIENT CONFIGURATION...................................................................19
Overview...........................................................................................................................................19
Wireless Settings...........................................................................................................................19
CHAPTER 5 OPERATION AND STATUS.........................................................................................20
Operation..........................................................................................................................................20
Status Screen..................................................................................................................................20
Attached Devices.............................................................................................................................21
CHAPTER 6 MAINTENANCE..............................................................................................................23
Overview...........................................................................................................................................23
Backup Settings..............................................................................................................................23
Firmware Upgrade ..........................................................................................................................25
APPENDIX A SPECIFICATIONS........................................................................................................26
HomePlug 802.11g Access Point................................................................................................26
Wireless Interface..........................................................................................................................26
APPENDIX B TROUBLESHOOTING.................................................................................................28
Overview...........................................................................................................................................28
General Problems ...........................................................................................................................28
APPENDIX C WINDOWS TCP/IP......................................................................................................29
Overview...........................................................................................................................................29
Checking TCP/IP Settings - Windows 9x/ME:.........................................................................29
Checking TCP/IP Settings - Windows NT4.0...........................................................................31
Checking TCP/IP Settings - Windows 2000.............................................................................32
Checking TCP/IP Settings - Windows XP................................................................................34
ii
P/N: 9560TP0001
Copyright 2005. All Rights Reserved.
Document Version: 1.0
All trademarks and trade names are the properties of their respective owners.
1
Chapter 1
Introduction
This Chapter provides an overview of the HomePlug 802.11g Access Point's
features and capabilities.
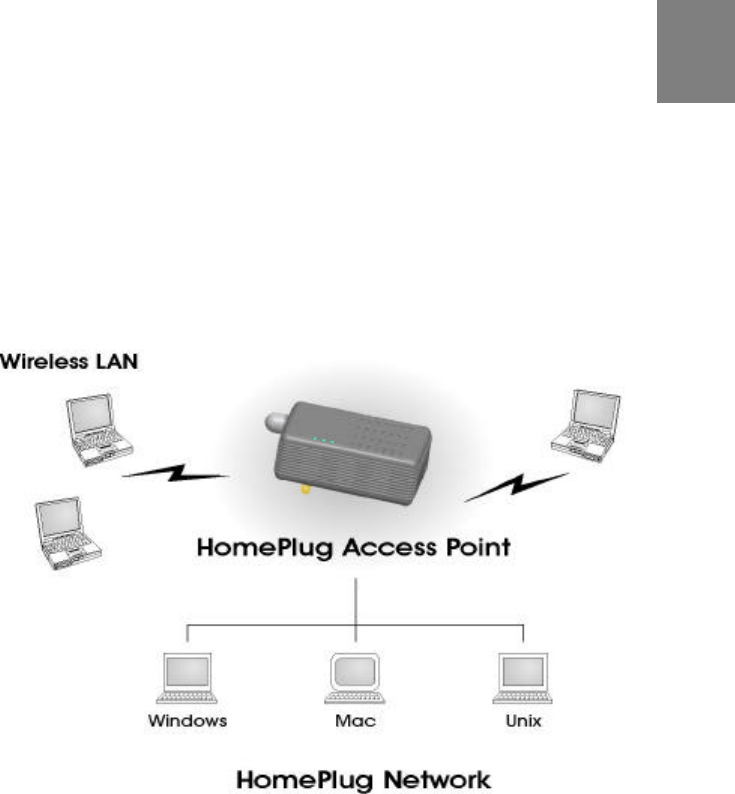
Congratulations on the purchase of your new HomePlug 802.11g Access Point. The HomePlug
802.11g Access Point links your 802.11b or 802.1x Wireless Stations to your HomePlug network..
The Wireless stations and HomePlug devices are then on the same network, and can communi-
cate with each other without regard for whether they are connected to the network via a
Wireless or HomePlug connection.
Figure 1: HomePlug 802.11g Access Point
The auto-sensing capability of the HomePlug 802.11g Access Point allows wireless clients to
use either 802.11g or 802.11b connections.
1

HomePlug 802.11g Access Point User Guide
2
Features of your HomePlug 802.11g Access Point
The HomePlug 802.11g Access Point incorporates many advanced features, carefully designed
to provide sophisticated functions while being easy to use.
• Standards Compliant. The HomePlug 802.11g Access Point complies with the IEEE
802.11b (DSSS) and IEEE 802.11g specifications for Wireless LANs.
• Upgradeable Firmware. Firmware is stored in a flash memory and can be upgraded
easily, using only your Web Browser.
• WEP support. Support for WEP (Wired Equivalent Privacy) is included. Both 64 Bit and
128 Bit keys are supported.
• WPA-PSK support. Support for WPA-PSK is included, providing enhanced data
security.
• Simple Configuration. If the default settings are unsuitable, they can be changed
quickly and easily.
• DHCP Client Support. Dynamic Host Configuration Protocol provides a dynamic IP
address to PCs and other devices upon request. The HomePlug 802.11g Access Point can
act as a DHCP Client, and obtain an IP address and related information from your exis ting
DHPC Server.
• Password - protected Configuration. Optional password protection is provided to
prevent unauthorized users from modifying the configuration data and settings.
Package Contents
The following items should be included:
• HomePlug 802.11g Access Point
• Quick Start Guide
• CD-ROM
If any of the above items are damaged or missing, please contact your dealer immediately.
Introduction
3
Physical Description
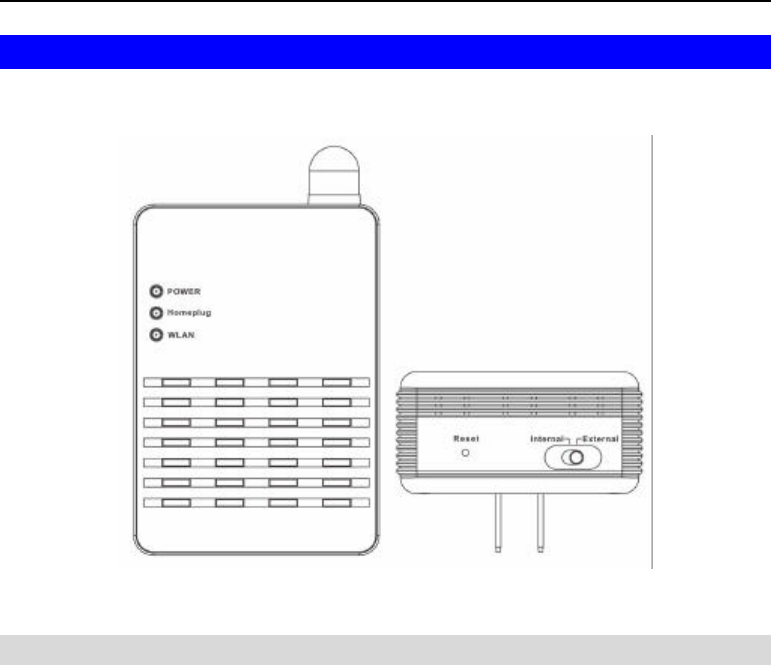
The HomePlug 802.11g Access Point is illustrated below.
Figure 2: HomePlug Access Point
LEDs
There are three (3) LEDs on the top face on the unit.
Power On - Normal operation.
Off - No power
HomePlug On - The HomePlug network is active. This means that at least one other
HomePlug device was detected.
Off - HomePlug network is not available - no other HomePlug devices were
detected.
Flashing - Data is being transmitted or received via the HomePlug network.
WLAN On - Idle.
Off - Error- Wireless connection is not available.
Flashing - Data is being transmitted or received via the HomePlug 802.11g
Access Point. Data includes "network traffic" as well as user data.

HomePlug 802.11g Access Point User Guide
4
Buttons and Switches
Reset Button This button has two (2) functions:
• Reboot. When pressed and released, the HomePlug 802.11g Access
Point will reboot (restart).
• Clear All Data. This button can also be used to clear ALL data and
restore ALL settings to the factory default values.
To Clear All Data and restore the factory default values:
1. Power Off.
2. Hold the Reset Button down while you Power On.
3. Keep holding the Reset Button for a few seconds, until the RED LED
has flashed TWICE.
4. Release the Reset Button. The HomePlug 802.11g Access Point is now
using the factory default values.
Antenna
Switch Use this to select either the internal antenna (if connected).
The default is "Internal". This should not be changed to "External" unless
an external antenna is fitted.
5
Chapter 2
Installation
This Chapter covers the physical installation of the HomePlug 802.11g Ac-
cess Point.
Requirements
Requirements:
• TCP/IP network protocol
• HomePlug network
• Installed Wireless network adapter for each PC that will be wirelessly connected to the
network
Procedure
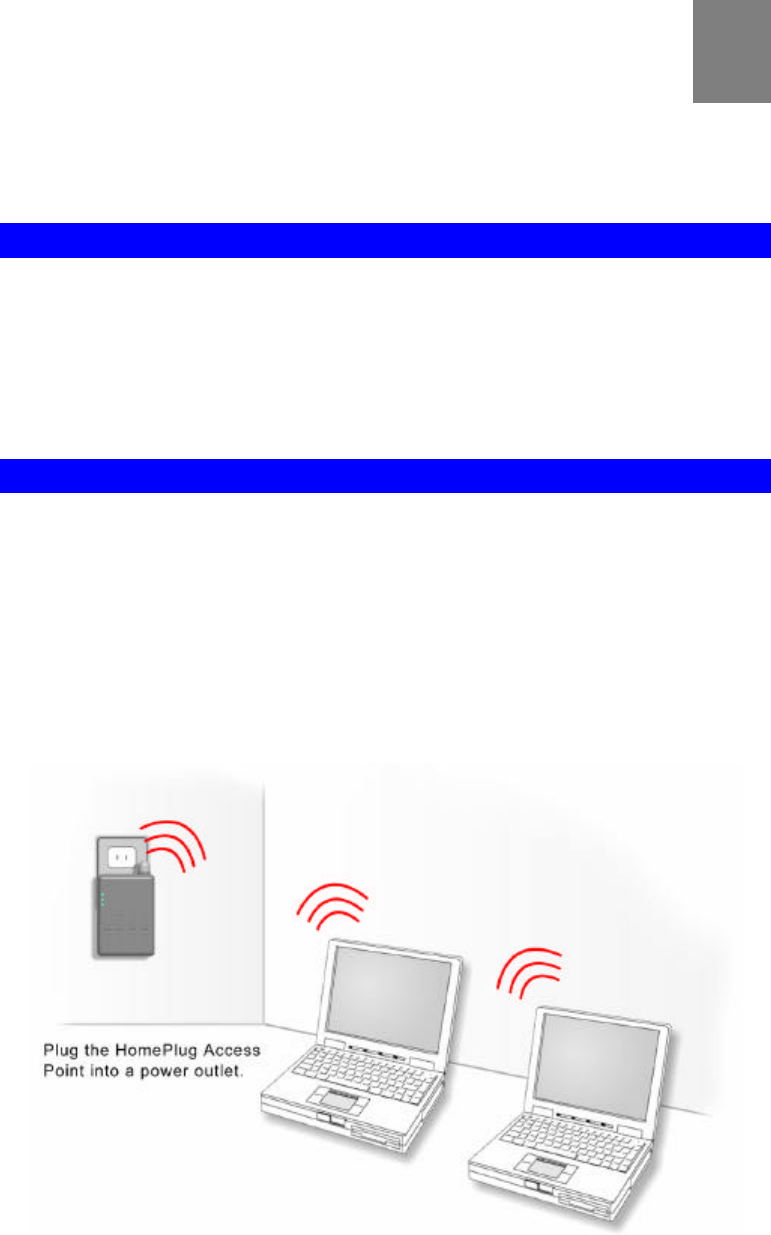
1. Select a suitable location for the installation of your HomePlug 802.11g Access Point. To
maximize reliability and performance, follow these guidelines:
• Use an elevated location if possible. This will assist the wireless range and throughput.
It may be advisable to use an extension cord if all your power points are located at
floor level.
• Place the HomePlug 802.11g Access Point near the center of your wireless coverage
area if possible.
• If possible, ensure there are no thick walls or metal shielding between the HomePlug
802.11g Access Point and Wireless stations.
Figure 3: Installation Diagram
2

HomePlug 802.11g Access Point User Guide
6
2. Plug the HomePlug 802.11g Access Point into a power outlet, and wait a few seconds for
startup to be completed.
3. Check the LEDs:
• The Power LED should be ON.
• The WLAN LED should be ON.
• The HomePlug LED should be ON.
For more information, refer to LEDs in Chapter 1.

7
Chapter 3
Access Point Setup
This Chapter provides details of the Setup process for Basic Operation of
your HomePlug 802.11g Access Point.
Overview
This chapter describes the setup procedure to make the HomePlug 802.11g Access Point a valid
device on your LAN, and to function as an Access Point for your Wireless Stations.
Wireless Stations may also require configuration. For details, see Chapter 4 - Wireless Station
Configuration.
The HomePlug 802.11g Access Point can be configured using either the supplied Windows
utility or your Web Browser
Preparation
Before commencing, install the HomePlug 802.11g Access Point in your LAN, as described
previously.
Then, to establish a connection to the HomePlug 802.11g Access Point, you can use either the
HomePlug interface or the Wireless interface.
Ensure that a connection is possible, as described below.
HomePlug Interface
To use the HomePlug interface:
• Your PC needs a HomePlug network adapter.
• The HomePlug Adapter on the PC must be set to use the same HomePlug Network Pass-
word as the HomePlug 802.11g Access Point.
The default HomePlug Network Password for the HomePlug 802.11g Access Point is
HomePlug
• The software supplied with your HomePlug adapter will allow you to change the HomePlug
Network Password on your PC, and may allow you to change the HomePlug Network
Password on the HomePlug 802.11g Access Point, provided you know its Access Code.
The Access Code is shown on a sticker on the HomePlug 802.11g Access Point.
Wireless Interface
To use the Wireless interface, your PC needs to match the current Wireless settings on the
HomePlug 802.11g Access Point. The default Wireless settings are:
SSID default
Wireless Security Disabled.
If using the default settings, the HomePlug 802.11g Access Point will appear in your PC's list of
"Available Wireless Networks", and you can simply select it.
3
HomePlug 802.11g Access Point User Guide
8
IP Address
Your PC needs to have an IP address which is compatible with the HomePlug 802.11g Access
Point. The default IP address and subnet mask for the HomePlug 802.11g Access Point are:
IP address 192.168.0.101
Subnet Mask 255.255.255.0
To perform initial configuration, you will need to set your PC to use a fixed IP address which is
compatible with this IP address ( e.g. 192.168.0.100 ) and using the same Subnet Mask
( 255.255.255.0 ).
See Appendix C - Windows TCP/IP Setup for details of this procedure.
Configuration
1. Start your Web browser. You must use a Browser which supports frames and JavaScript.
2. In the Address box, enter "HTTP://" and the IP Address of the HomePlug 802.11g Access
Point
e.g.
HTTP://192.168.0.101
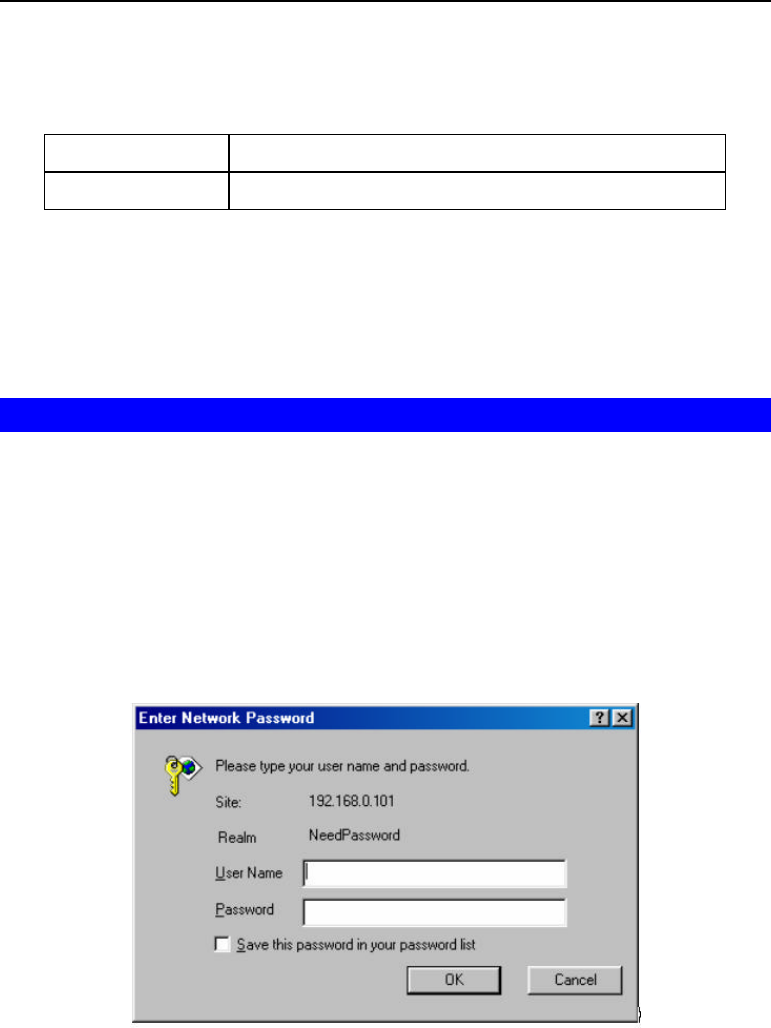
3. You should then see a login prompt, which will ask for a User Name and Password.
Enter admin for the User Name, and leave the Password blank.
These are the default values. The password (but not the user name) can and should be
changed. Always enter the current password, as set on the Password screen.
Figure 4: Password Dialog
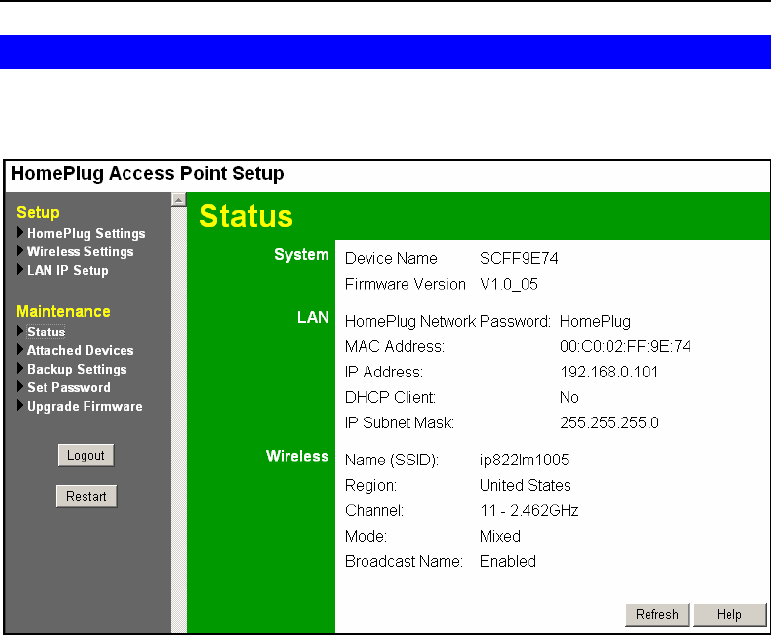
4. You will then see the Status screen, which displays the current settings and status. No data
input is possible on this screen.
5. From the menu, select and configure the following options, as described in the following
sections:
• HomePlug Settings
• Wireless Settings
• LAN IP Setup
• Set Password

Setup
9
If you change the IP address of the HomePlug 802.11g Access
Point, you will lose the connection from your PC to the
HomePlug 802.11g Access Point.
You need to re-connect using the new IP address.
If the address range has changed, you will need to re-
configure your PC to use a compatible IP address
6. Setup of the HomePlug 802.11g Access Point is now complete.
Wireless stations must now be set to match the HomePlug 802.11g Access Point. See
Chapter 4 for details.
If you can't connect:
It is likely that your PC’s IP address is incompatible with the HomePlug 802.11g
Access Point’s IP address. This can happen if your LAN does not have a DHCP
Server.
The default IP address of the HomePlug 802.11g Access Point is 192.168.0.101, with
a Network Mask of 255.255.255.0.
If your PC’s IP address is not compatible with this, you must change your PC’s IP
address to an unused value in the range 192.168.0.1 ~ 192.168.0.254, with a Network
Mask of 255.255.255.0. See Appendix C - Windows TCP/IP for details for this
procedure.
HomePlug 802.11g Access Point User Guide
10
Status Screen
When you first connect, you will see the Status screen. This displays the current settings and
status of the HomePlug 802.11g Access Point. No data can be input on this screen.
Figure 5: Status Screen
For further details of this screen, refer to Status Screen in Chapter 5.
Setup
11
HomePlug Settings
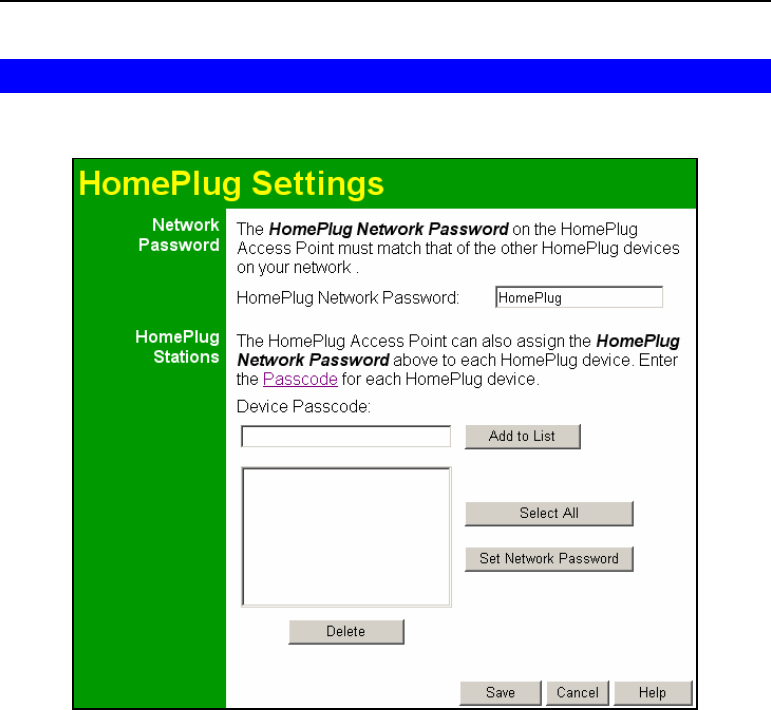
This screen can be reached via the HomePlug Settings link on the main menu.
Figure 6: HomePlug Settings Screen
This screen allows you to set the HomePlug Network Password for the HomePlug 802.11g
Access Point as well as other HomePlug stations (devices) on your network. All HomePlug
devices must use the same HomePlug Network Password in order to communicate with each
other.
You can also use this screen to assign a new Network Password to other HomePlug stations on
your HomePlug Network. To do this:
1. Enter the Device Passcodes of each HomePlug stations on your LAN.
Each HomePlug station has a unique Passcode in the format xxxx-xxxx-xxxx-xxxx, usually
shown on a label on the rear or base of the HomePlug device.
2. When completed, click "Save" to save the list (or click "Cancel" if you decide to discard
your changes).
3. Select the HomePlug stations you wish to assign the Network Password to.
4. Click the "Set Network Password" button.
5. A confirmation message will appear confirming the success of the password change for
each device. An error message will appear if any device is not able to be reset to the new
network password.

HomePlug 802.11g Access Point User Guide
12
Data - HomePlug Settings
Network Password
HomePlug
Network Password Enter the Network Password for your HomePlug network here.
All HomePlug devices must use the same Network Password.
• This password is case-sensitive.
• All HomePlug devices mu st use the same Network Pass-
word.
• The password can contain letters, numbers or punctuation.
• The password must be at least 4 characters.
HomePlug Stations
Station List This list is used if you wish to use the HomePlug 802.11g Ac-
cess Point to assign the same Network Password to other
HomePlug stations.
If you don't wish to do this, there is no need to input your other
HomePlug stations here.
Device Passcode Use this to add a HomePlug station to the list:
1. Enter the HomePlug's Default Passcode in the Device
Passcode field. Each HomePlug station has a unique Pass-
code in the format xxxx-xxxx-xxxx-xxxx, usually shown on a
label on the rear or base.
2. Click the Add to List button.
3. When finished, click the Save button to save the list.
Select All
Button Click this button to select all HomePlug stations in the list. You
can also select stations individually if desired.
Set Network Password
Button Click this button to assign the current network password to all
selected HomePlug stations. Wait a few seconds for the mes-
sage regarding the success of this operation.
Delete
Button Click this button to delete all selected HomePlug stations.
Setup
13
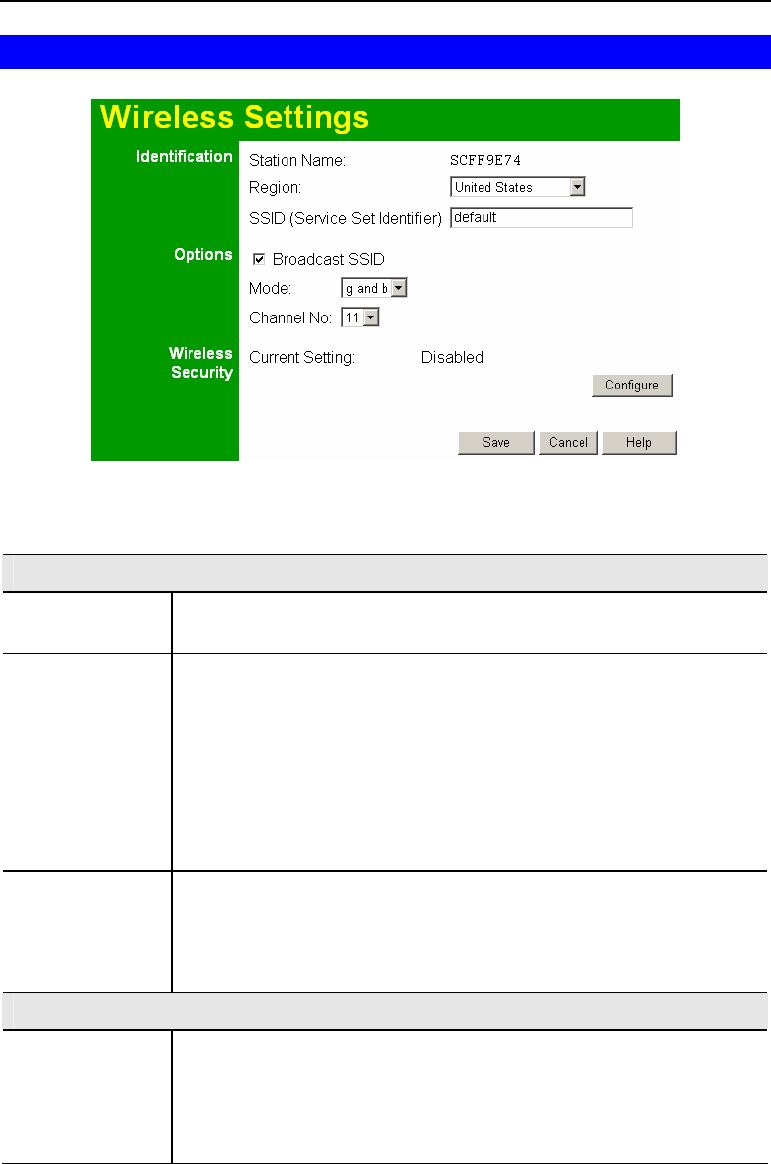
Wireless Settings Screen
Figure 7: Wireless Settings Screen
Data - Wireless Settings Screen
Identification
Station Name On your PC, some Wireless status screens may display this name as the
Access Point in use.
Region The region can not be changed by the users.
SSID Enter a 32-character (maximum) service set ID in this field. The SSID is
case sensitive.
To connect to this Access Point, all Wireless stations must use the
same SSID as this Access Point.
Options
Broadcast
SSID If Enabled, the SSID will broadcast its name to all Wireless Stations.
Wireless stations will be able to see this Access Point in their list of
"Available Networks", and adopt the correct SSID. If the Broadcast
SSID option is disabled, users must enter the SSID and other wireless
details manually.

HomePlug 802.11g Access Point User Guide
14
Mode Select the desired option.
• g & b
Both 802.11g and 802.11b stations are able to connect.
• g only
If selected, this ensures that 802.11g mode Wireless stations will
connect at high speed, but 802.11b mode Wireless stations will be
unable to connect at all.
• b only
If selected, 802.11g mode is unavailable. 802.11g mode Wireless
stations will only be able to connect if they can also run in stan-
dard 802.11b mode.
Channel No. Select the Channel you wish to use on your Wireless LAN.
If you experience interference (shown by lost connections and/or slow
data transfers) you may need to experiment with different channels to
see which is the best.
Wireless Security
Current Setting The current security setting is displayed.
Configure Button
Click this button to access the Wireless security sub-screen, and
modify the security settings as required.
Setup
15
Wireless Security
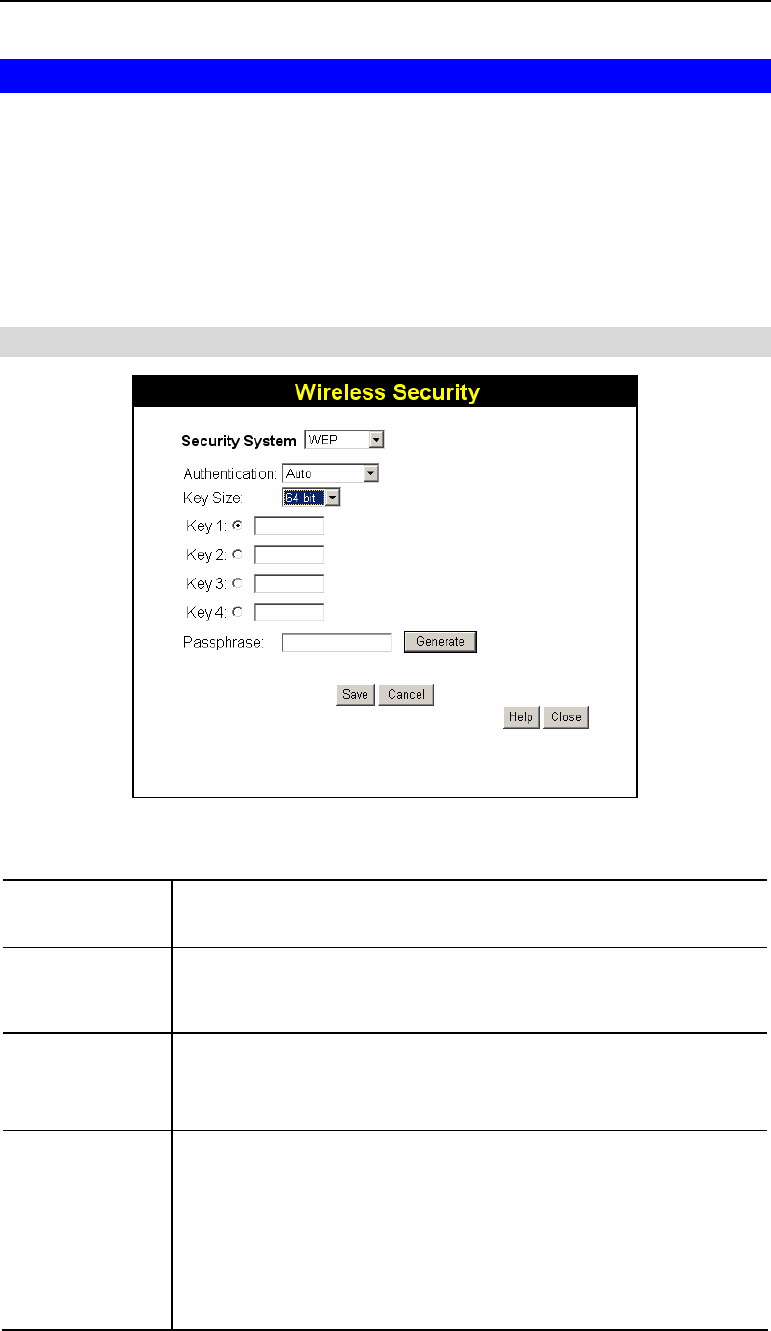
This screen is accessed by clicking the "Configure" button on the Wireless Settings screen.
There are 3 options for Wireless security:
• Disabled - no data encryption is used.
• WEP - data is encrypted using the WEP standard.
• WPA-PSK - data is encrypted using the WPA-PSK standard. This is a later standard than
WEP, and provides much better security than WEP. If all your Wireless stations support
WPA-PSK, you should use WPA-PSK rather than WEP.
WEP Wireless Security
Figure 8: WEP Screen
Data - WEP Screen
Security
System WEP
The 802.11b standard. Data is encrypted before transmission.
Authentication Normally this can be left at the default value of "Auto". If that fails,
select the appropriate value - "Open System" or "Shared Key." Check
your wireless station's documentation to see what method to use.
Data
Key Size Select the WEP Encryption level:
• 64-bit (sometimes called 40-bit) encryption
• 128-bit (sometimes called 104 bit) encryption
Keys All wireless stations must use the same key values as the HomePlug
802.11g Access Point.
• Use the radio buttons to select the default key.
• Enter the key value you wish to use. Other stations must have the
same key values.
• Keys must be entered in Hex.
Hex characters are the digits (0 ~ 9) and the letters A ~ F.
HomePlug 802.11g Access Point User Guide
16
Passphrase This feature allows you to generate a key or keys from a text (ASCII)
phrase, rather than enter keys in Hex.
To use this feature:
• Enter a word or group of printable characters in the Passphrase
field
• Click the "Generate Key" button.
• If encryption strength is set to 64 bit, then each of the four key
fields will be populated with key values. If encryption strength is
set to 128 bit, then only the selected WEP key field will will be
given a key value.
WPA-PSK Wireless Security
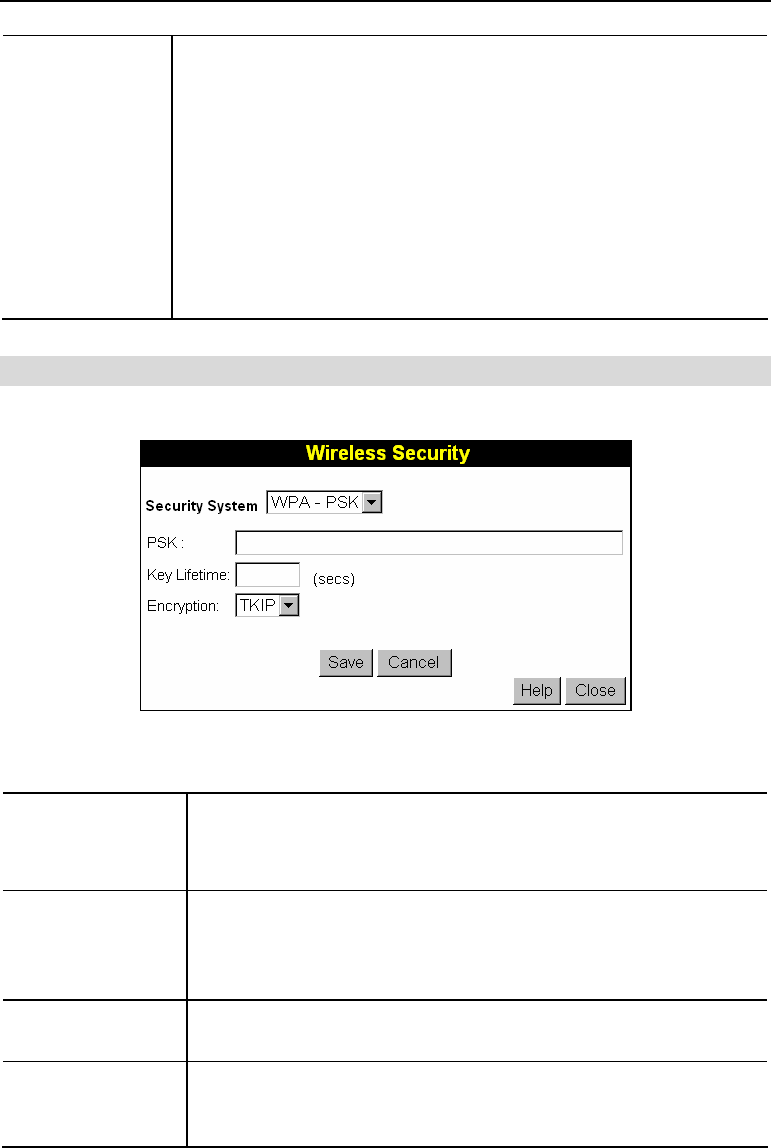
If "WPA-PSK" is selected, the screen will look like the following example.
Figure 9: WPA-PSK Screen
Data – WPA-PSK Screen
Security
System WPA-PSK
Like WEP, data is encrypted before transmission. WPA is more secure
than WEP, and should be used if all wireless stations support WPA.
PSK This is also called the "Passphrase" or "Network Key". Enter the
desired key value. Data is encrypted using a key derived from the
PSK. Other Wireless Stations must use the same key. The PSK must
be from 8 to 63 characters in length.
Key Lifetime This determines how often the encryption key is changed. You can
change the default value if desired.
Encryption The WPA-PSK standard allows different encryption methods to be
used. Select the desired option. Wireless Stations must use the same
encryption method.
Setup
17
LAN IP Setup Screen
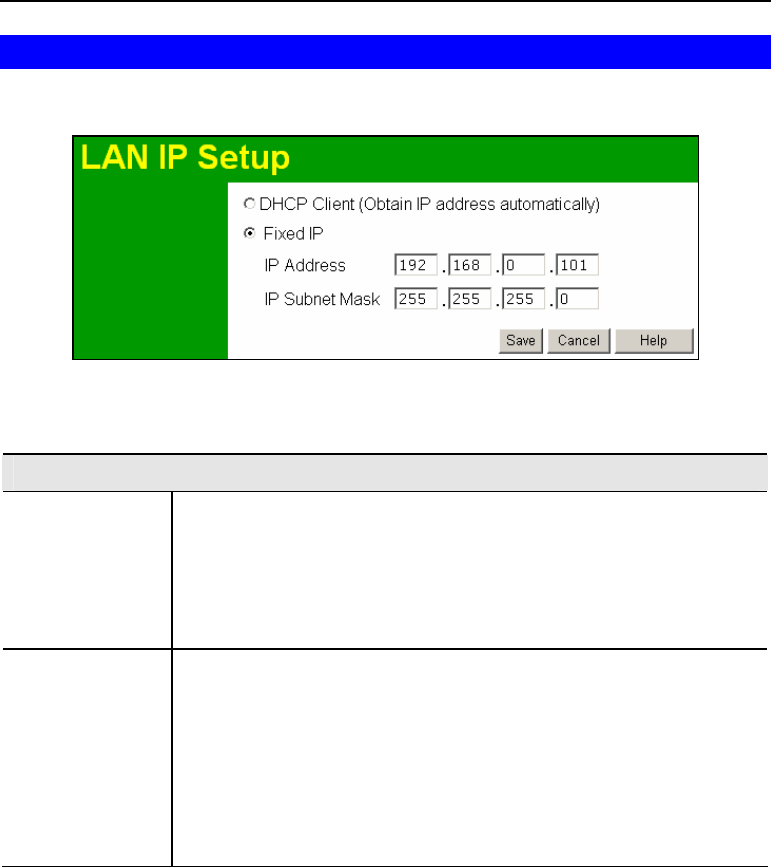
Click LAN IP Setup on the menu to view a screen like the following.
Figure 10:LAN IP Setup Screen
Data - LAN IP Setup Screen
LAN IP Setup
DHCP Client If selected, the HomePlug 802.11g Access Point will obtain an IP ad-
dress from the DHCP Server on your LAN.
Only select this option if you have a DHCP Server on your LAN.
However, even if you have a DHCP Server, it is usually better to use a
Fixed IP address as described below.
Fixed IP If you don’t have a DHCP Server on your LAN, the Fixed IP setting
must be selected, and the following data entered:
• IP Address:
IP address for the HomePlug 802.11g Access Point. Enter an un-
used IP Address from within the range used by your LAN.
• Subnet Mask:
Use the same value as PCs on your LAN. The default value
255.255.255.0 is standard for small (class "C") networks.
HomePlug 802.11g Access Point User Guide
18
Set Password Screen
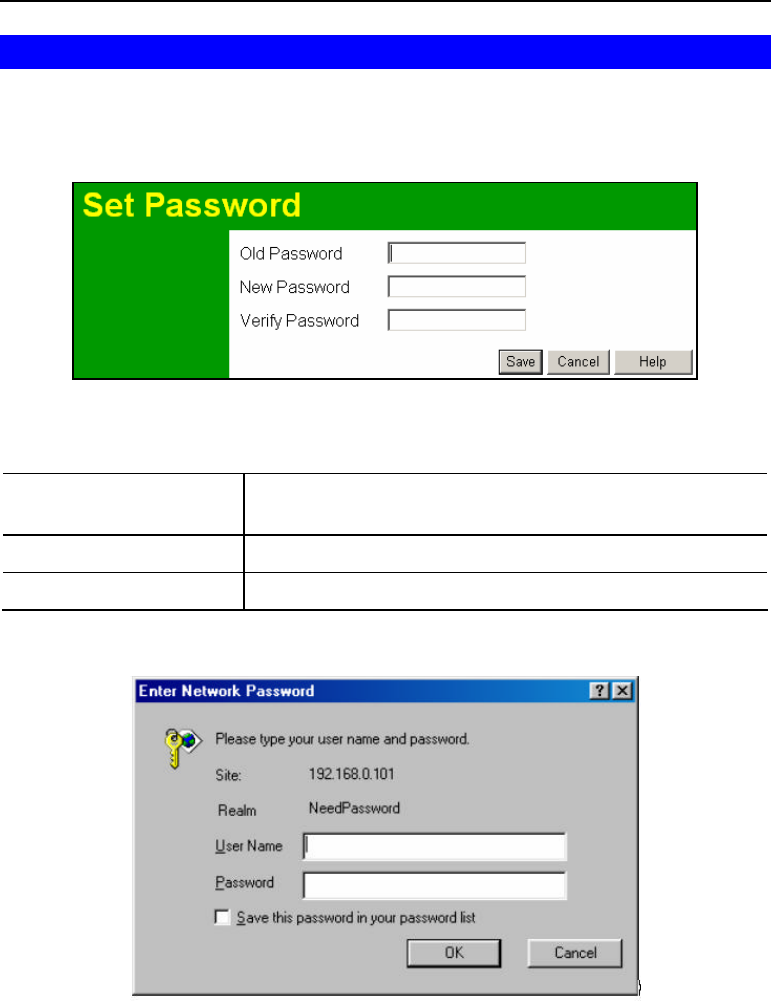
The Set Password screen allows you to assign a password to the HomePlug 802.11g Access
Point. This password limits access to the configuration interface. The default password is blank
(no password). It is recommended that this be changed, using this screen.
Figure 11: Set Password Screen
Data - Set Password Screen
Current Password Enter the current password here. If the current password is
blank, leave this blank.
New Password Enter the new password here
Repeat New Password Re-enter the new password in this field.
You will be prompted for the password when you connect, as shown below.
Figure 12: Password Dialog
• Enter admin for the User Name.
• Enter the HomePlug 802.11g Access Point’s password, as set on the Password screen
above.

19
Chapter 4
Wireless Client Configuration
This Chapter details the configuration required for each PC or other Wire-
less Client using the HomePlug 802.11g Access Point.
Overview
All Wireless Stations need to have settings which match the HomePlug 802.11g Access Point.
These settings depend on the mode in which the Access Point is being used.
Wireless Settings
For each of the following items, each Wireless Station must have the same settings as the
HomePlug 802.11g Access Point.
Mode On each PC, the mode must be set to Infrastructure.
SSID (ESSID) This must match the value used on the HomePlug 802.11g Access Point.
The default value is default
Note! The SSID is case sensitive.
WEP If WEP is enabled on the HomePlug 802.11g Access Point, each station
must use the same settings as the HomePlug 802.11g Access Point.
• The Encryption type or Key size (64Bit/128Bit) must match.
• Each Wireless Station must have the HomePlug 802.11g Access
Point’s Default Key in the same location in its Key table. (But it does
not have to be the Default key for the Wireless Station.)
• The HomePlug 802.11g Access Point must have the Default Key for
each Wireless Station in the same location in its Key table.
This is usually achieved by having all Stations and the HomePlug
802.11g Access Point use the same Key table, but having different
Default keys.
WPA-PSK If WPA-PSK is enabled on the HomePlug 802.11g Access Point, each
station must also be set to use WPA-PSK.
The PSK (also called Network Key or Passphrase) used on the HomePlug
802.11g Access Point must also be set on each Wireless station.
Each Wireless Station must use the same encryption method as the
HomePlug 802.11g Access Point.
4
20
Chapter 5
Operation and Status
This Chapter details the operation of the HomePlug 802.11g Access Point
and the status screens.
Operation
Once both the HomePlug 802.11g Access Point and the PCs are configured, operation is
automatic.
Status Screen
Use the Status link on the main menu to view this screen.
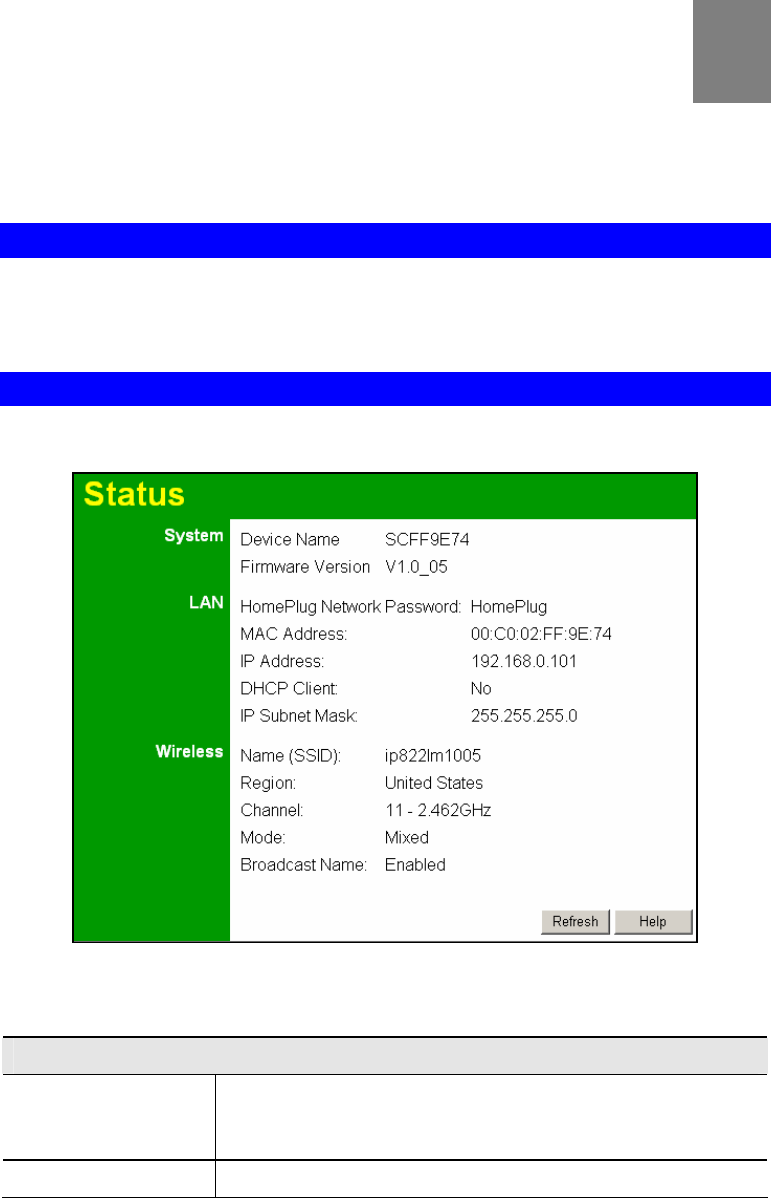
Figure 13: Status Screen
Data - Status Screen
System
Device Name The name of the HomePlug 802.11g Access Point. This name is
used to identify the HomePlug 802.11g Access Point when using
the supplied Windows utility.
Firmware Version The version of the current firmware installed.
5
Operation and Status
21
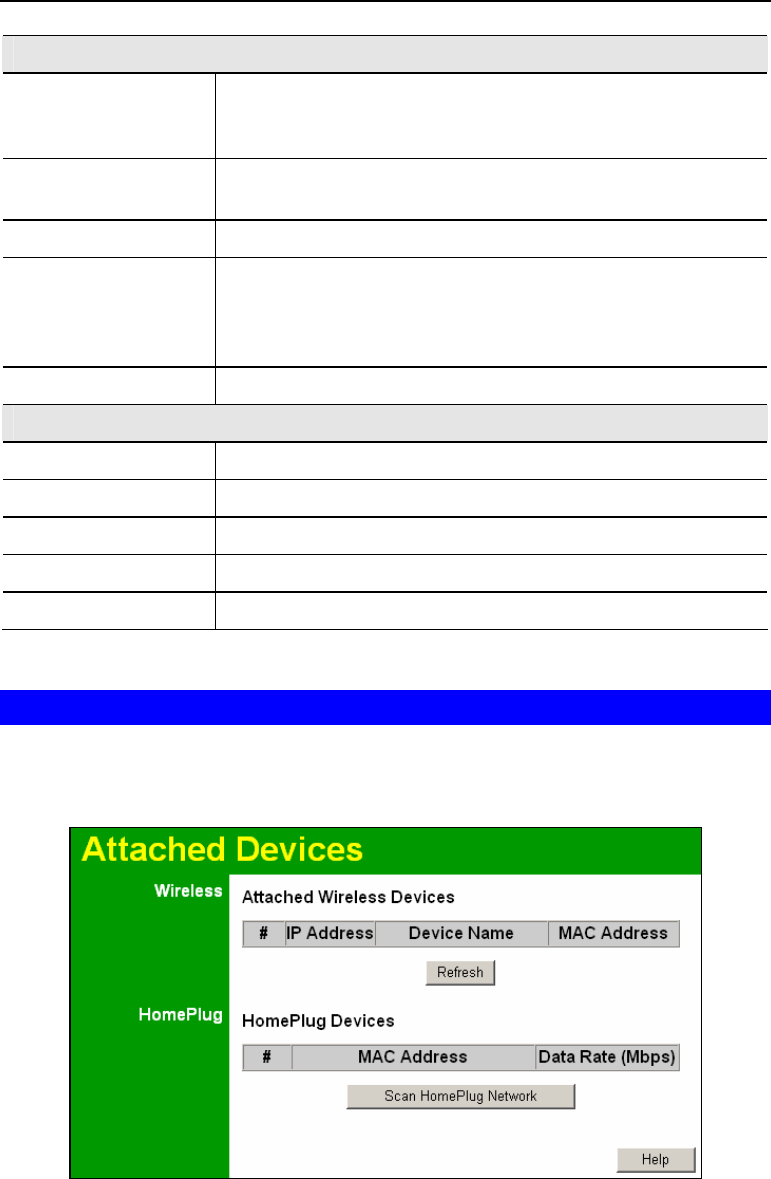
LAN
HomePlug Network
Password The Network Password used by the HomePlug network. Only
devices using the same password can communicate with each
other.
MAC Address This shows the MAC Address for this device, as seen from the
LAN interface.
IP Address The IP Address of this device.
DHCP Client This indicates if the IP address above was obtained from a DHCP
Server. If it was, then the DHCP client value will be "Yes".
If the IP address above was set a fixed or static IP address, the
DHCP client value will display as "No".
IP Subnet Mask The IP Subnet Mask (Network Mask) for the IP Address above.
Wireless
Name (SSID) The SSID (network name) in use is displayed.
Channel This shows the Channel currently used.
Mode This indicates the 802.11 wireless mode currently used.
Broadcast Name This indicates if the SSID (network name) is being broadcast.
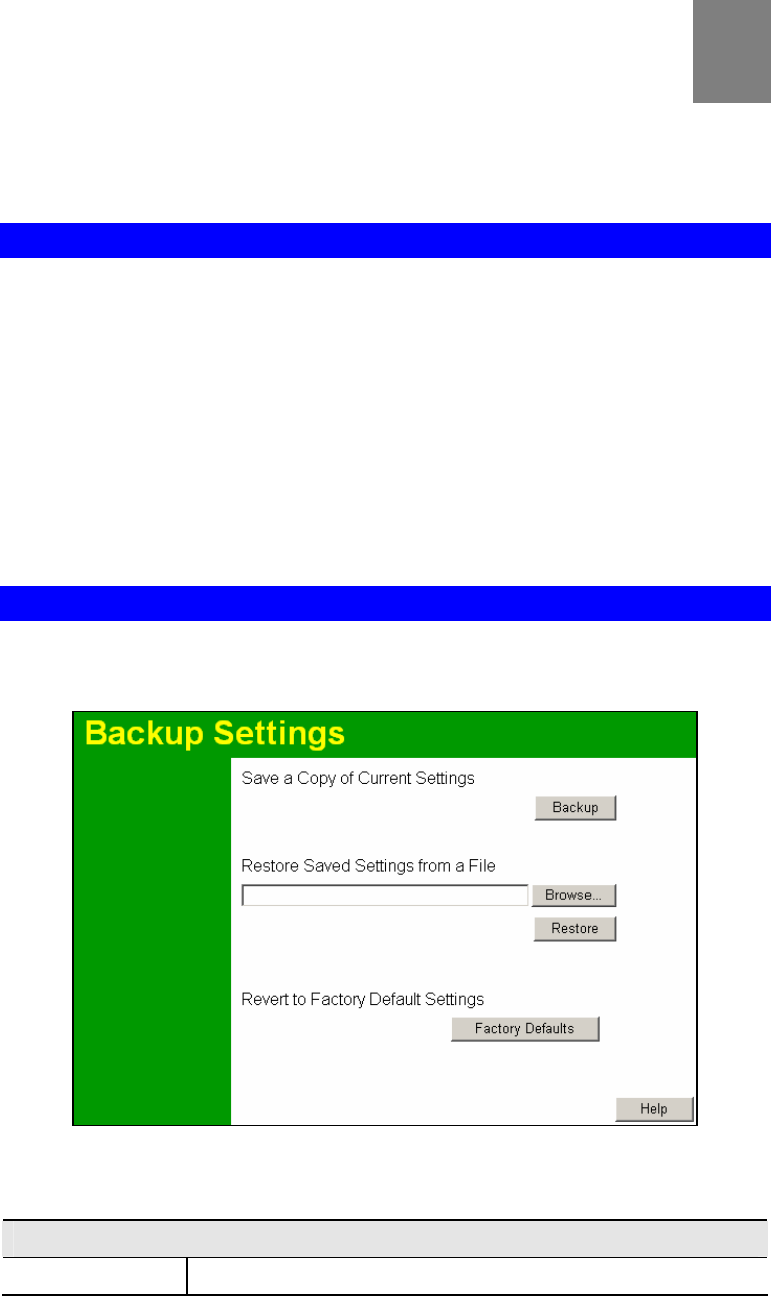
Attached Devices
The Attached Devices screen shows all the known devices attached to your network.
An example screen is shown below.
Figure 14: Attached Devices

HomePlug 802.11g Access Point User Guide
22
Data - Attached Devices Screen
Wireless
Attached Wireless Devices This table lists all the Wireless devices (clients) currently
associated with the HomePlug 802.11g Access Point.
IP Address The IP address of each Wireless station is displayed in this
column.
MAC Address The MAC address of each Wireless station is displayed in
this column. The MAC address is a low-level network identi-
fier assigned to each Ethernet interface at the time of
manufacture.
Refresh
Button Clicking this will update the list of Wireless stations cur-
rently associated with the HomePlug Access Point
HomePlug
HomePlug Devices This table lists all the known HomePlug devices on your
LAN.
MAC Address The MAC address of each HomePlug station is displayed in
this column. The MAC address is a low-level network identi-
fier assigned to each Ethernet interface at the time of
manufacture.
Data Rate The HomePlug connection speed of each HomePlug device
is displayed here.
Scan HomePlug Network
Button Clicking this will scan the HomePlug network and update the
list of HomePlug devices.
23
Chapter 6
Maintenance
This Chapter explains when and how to use the HomePlug 802.11g Access
Point's "Maintenance" Features.
Overview
This Chapter covers the features available on the HomePlug 802.11g Access Point’s Mainte-
nance menu.
The Maintenance menu has the following options:
• Status - see Chapter 5 for details.
• Attached Devices - - see Chapter 5 for details.
• Backup Settings - see the following section.
• Set Password - see Chapter 3 for details.
• Upgrade Firmware - see later in this Chapter.
Backup Settings
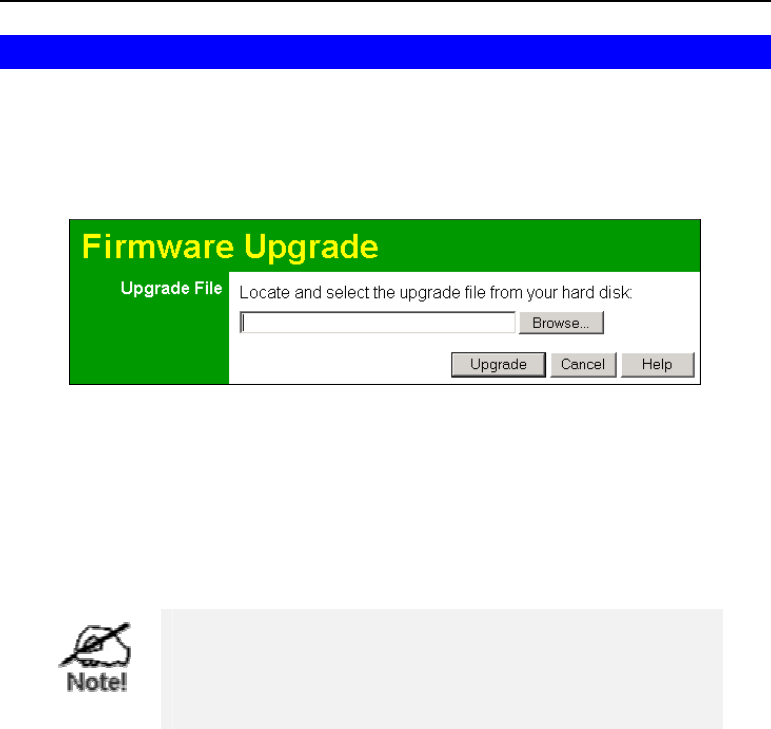
This screen is displayed when the Backup Settings button on the Maintenance screen is
clicked.
Figure 15 Backup Settings Screen
Data - Backup Settings Screen
Buttons
Backup Use this to download a copy of the current configuration, and store
6

HomePlug 802.11g Access Point User Guide
24
the file on your PC. Click "Backup" to start the download.
Restore This allows you to restore a previously-saved config file back to the
Access Point. Click "Browse" to select the config file, then click
"Restore" to upload the config file.
WARNING !
Uploading a config file will destroy (overwrite) ALL of the existing
settings.
Factory Defaults Clicking the "Factory Defaults" button will reset the Access Point to
its factory default settings.
WARNING !
This will delete ALL of the existing settings.
Other Settings & Features
25
Firmware Upgrade
The firmware (software) in the HomePlug 802.11g Access Point can be upgraded using your
Web Browser.
You must first download the upgrade file, and then select Upgrade Firmware on the menu. You
will see a screen like the following.
Figure 16: Firmware Upgrade Screen
To perform the Firmware Upgrade:
1. Click the Browse button and navigate to the location of the upgrade file.
2. Select the upgrade file. Its name will appear in the Upgrade File field.
3. Click the Upload button to commence the firmware upgrade.
The HomePlug 802.11g Access Point is unavailable
during the upgrade process, and must restart when the
upgrade is completed. Any connections to or through the
HomePlug 802.11g Access Point will be lost.

26
Appendix A
Specifications
HomePlug 802.11g Access Point
Model HomePlug 802.11g Access Point
Dimensions 141mm(W) * 100mm(D) * 27mm(H)
Operating Temperature 0° C to 40° C
Storage Temperature -10° C to 70° C
Network Protocol: TCP/IP
Network Interface: 802.11b / 802.11g Wireless Ethernet
HomePlug interface
LEDs 3
Power 100VAC - 240VAC auto-sensing
Wireless Interface
Standards IEEE802.11g WLAN, JEIDA 4.2, roaming support
Frequency 2.4 to 2.4835GHz (Industrial Scientific Medical Band )
Channels Maximum 14 Channels, depending on regulatory authorities
Modulation DSSS BPSK/QPSK/CCK, OFDM/CCK
Data Rate Up to 54 Mbps
Coverage Area Indoors : 15m @54Mbps, 120m @6Mbps or lower
Outdoors : 40m @54Mbps, 300m @6Mbps or lower
Security WEP (64Bit/128Bit), WPA-PSK (TKIP)
Output Power 13dBm (typical)
Receiver Sensitivity -80dBm Min.
A

Appendix A - Specifications
27
FCC Statement
This equipment has been tested and found to comply with the limits for a Class B digital device,
pursuant to Part 15 of the FCC Rules. These limits are designed to provide reasonable protec-
tion against harmful interference in a residential installation.
This equipment generates, uses and can radiate radio frequency energy and, if not installed and
used in accordance with the instructions, may cause harmful interference to radio communica-
tions. However, there is no guarantee that interference will not occur in a particular installation.
If this equipment does cause harmful interference to radio or television reception, which can be
determined by turning the equipment off and on, the user is encouraged to try to correct the
interference by one of the following measures:
· Reorient or relocate the receiving antenna.
· Increase the separation between the equipment and receiver.
· Connect the equipment into an outlet on a circuit different from that to which the receiver is
connected.
· Consult the dealer or an experienced radio/TV technician for help.
To assure continued compliance, any changes or modifications not expressly approved by the
party responsible for compliance could void the user's authority to operate this equipment.
(Example - use only shielded interface cables when connecting to computer or peripheral de-
vices).
FCC Radiation Exposure Statement
This equipment complies with FCC RF radiation exposure limits set forth for an uncontrolled
environment. This equipment should be installed and operated with a minimum distance of 20
centimeters between the radiator and your body.
This device complies with Part 15 of the FCC Rules. Operation is subject to the following two
conditions:
(1) This device may not cause harmful interference, and
(2) this device must accept any interference received, including interference that may cause
undesired operation.
This transmitter must not be co-located or operating in conjunction with any other antenna or
transmitter.
The antennas used for this transmitter must be installed to provide a separation distance of at
least 20 cm from all persons and must not be co-located or operating in conjunction with any
other antenna or transmitter.
Channel
The Wireless Channel sets the radio frequency used for communication.
¡EAccess Points use a fixed Channel. You can select the Channel used. This allows you to
choose a Channel which provides the least interference and best performance. In the USA
and Canada, 11 channel are available. If using multiple Access Points, it is better if adjacent
Access Points use different Channels to reduce interference.
¡E In "Infrastructure" mode, Wireless Stations normally scan all Channels, looking for an
Access Point. If more than one Access Point can be used, the one with the strongest
signal is used. (This can only happen within an ESS.)
¡E If using "Ad-hoc" mode (no Access Point), all Wireless stations should be set to use the
same Channel. However, most Wireless stations will still scan all Channels to see if there
is an existing "Ad-hoc" group they can join.
CAUTION:
1) To comply with FCC RF exposure compliance requirements, a separation
distance of at least 20 cm must be maintained between the antenna of this
device and all persons.
2) This transmitter must not be co-located or operating in conjunction with
any other antenna or transmitter.

28
Appendix B
Troubleshooting
Overview
This chapter covers some common problems that may be encountered while using the Home-
Plug 802.11g Access Point and some possible solutions to them. If you follow the suggested
steps and the HomePlug 802.11g Access Point still does not function properly, contact your
dealer for further advice.
General Problems
Problem 1: Can't connect to the HomePlug 802.11g Access Point to configure it.
Solution 1: If you don't know the Wireless settings of the HomePlug 802.11g Access
Point, you must use the HomePlug interface for configuration. Use a Home-
Plug adapter on your PC to connect to the HomePlug network.
Then use the Windows utility to locate the HomePlug 802.11g Access Point.
The Windows utility is able to locate the HomePlug 802.11g Access Point
even if its IP address is incompatible with your PC, or your PC and the
HomePlug 802.11g Access Point are using different HomePlug network
passwords.
Problem 2: My PC's wireless interface can't connect to the HomePlug 802.11g Access
Point.
Solution 2 Check the following:
• The SSID and wireless security settings on the PC match the settings on
the HomePlug 802.11g Access Point.
Note that if the SSID (network name) is not broadcast, you will not be
able to see the HomePlug 802.11g Access Point in your PC's list of
"Available Networks", so will not be able to select it. Instead, you must
configure the network details manually.
• On the PC, the wireless mode is set to "Infrastructure"
Problem 3: My PC's HomePlug interface can't connect to the HomePlug 802.11g Access
Point.
Solution 3 Check that your PC and the HomePlug 802.11g Access Point are using the
same HomePlug network password.
B
29
Appendix C
Windows TCP/IP
Overview
Normally, no changes need to be made to your Network. Adding the
HomePlug 802.11g Access Point does not change your network.
• By default, the HomePlug 802.11g Access Point will act as a DHCP client, automatically
obtaining a suitable IP Address (and related information) from your DHCP Server.
• If you don't have a DHCP Server on your LAN, you should use fixed (static) IP addresses
on each PC.
• If using Fixed (specified) IP addresses on your LAN (instead of a DHCP Server), there is no
need to change the TCP/IP of each PC. Just configure the HomePlug 802.11g Access Point
to match your existing LAN.
The following sections provide details about checking the TCP/IP settings for various types of
Windows, should that be necessary.
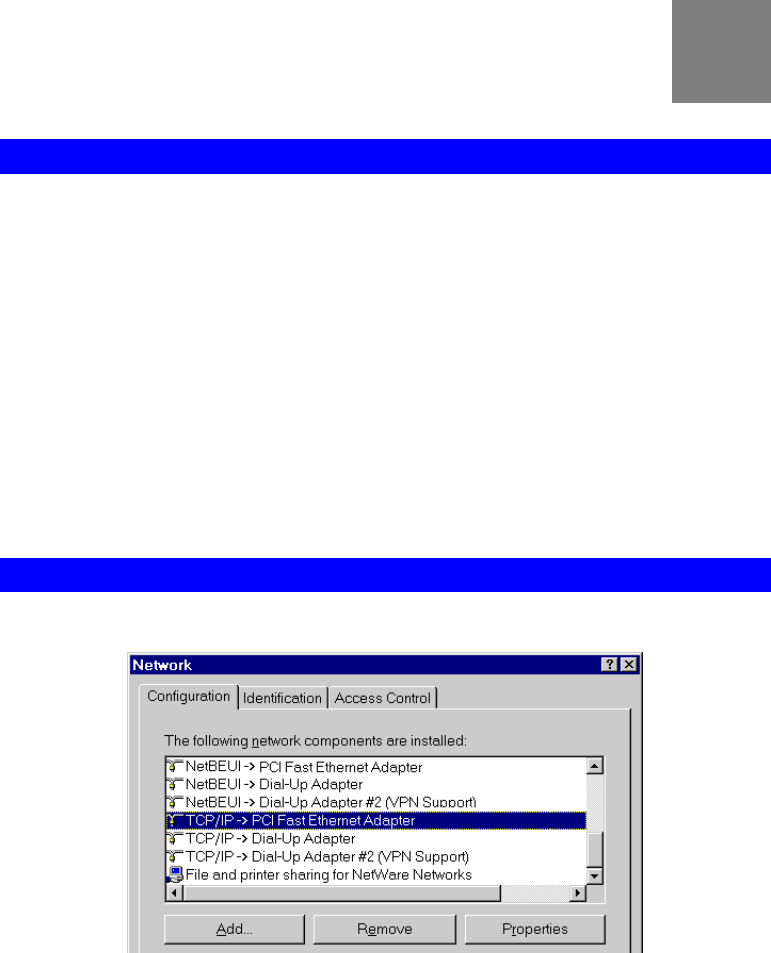
Checking TCP/IP Settings - Windows 9x/ME:
1. Select Control Panel - Network. You should see a screen like the following:
Figure 17: Network Configuration
2. Select the TCP/IP protocol for your network card.
3. Click on the Properties button. You should then see a screen like the following.
C
30
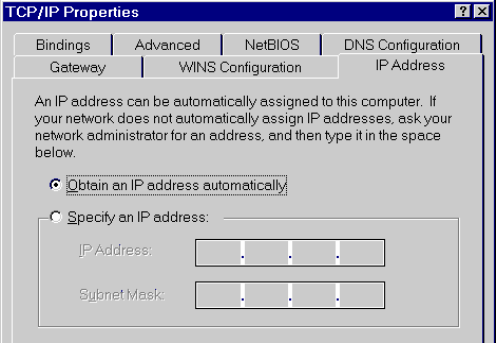
Figure 18: IP Address (Win 95)
Ensure your TCP/IP settings are correct, as follows:
Using DHCP
To use DHCP, select the radio button Obtain an IP Address automatically. This is the default
Windows settings.
Using a Fixed or Static IP Address
To use a fixed or static IP address
• Select "Specify an IP address".
• Enter the desired IP Address and Subnet Mask.
• Click "OK"
Each device on your network mu st have a unique IP address and the same Subnet Mask.
To perform initial configuration of the HomePlug 802.11g Access Point, you can use the follow-
ing values on your PC:
• IP Address: 192.168.0.100
• Subnet Mask: 255.255.255.0
Appendix C - Windows TCP/IP
31
Checking TCP/IP Settings - Windows NT4.0
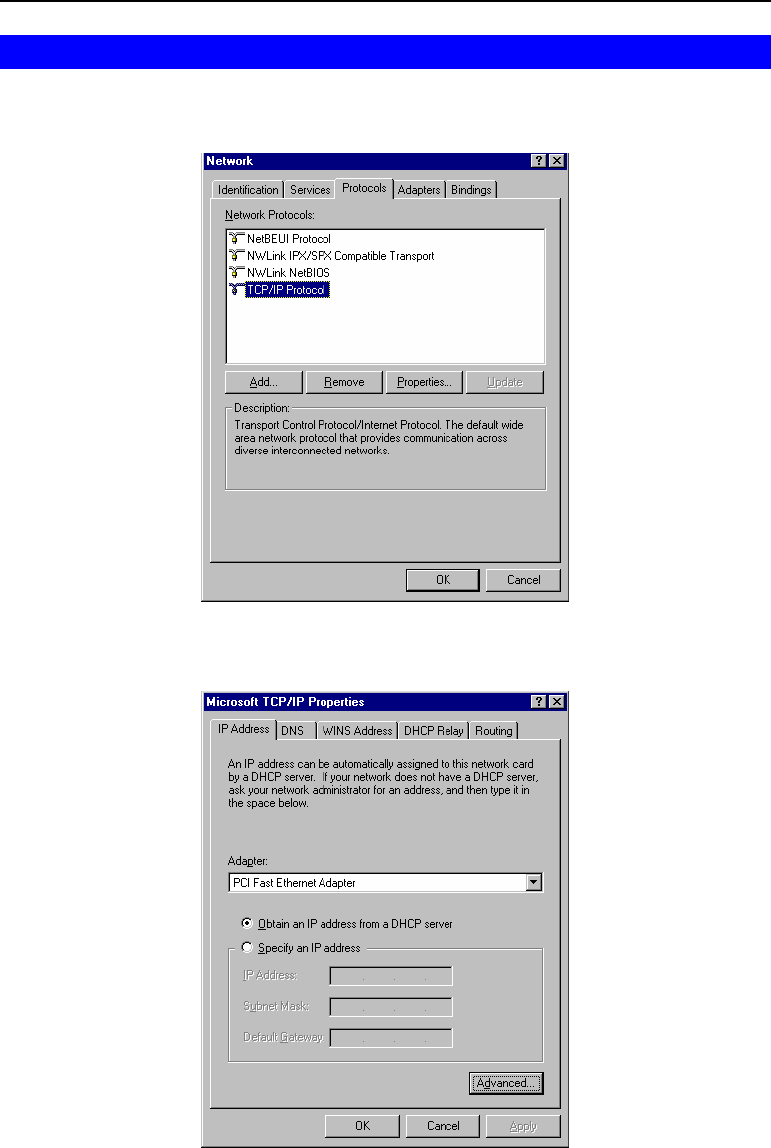
1. Select Control Panel - Network, and, on the Protocols tab, select the TCP/IP protocol, as
shown below.
Figure 19: Windows NT4.0 - TCP/IP
2. Click the Properties button to see a screen like the one below.
Figure 20: Windows NT4.0 - IP Address
3. Select the network card for your LAN.
4. Select the appropriate radio button - Obtain an IP address from a DHCP Server or Specify
an IP Address, as explained below.
32
Obtain an IP address from a DHCP Server
This is the default Windows setting. Using this method is recommended. By default, the
HomePlug 802.11g Access Point will act as a DHCP Server.
Using a Fixed or Static IP Address
To use a fixed or static IP address
• Select "Specify an IP address".
• Enter the desired IP Address and Subnet Mask.
• Click "OK"
Each device on your network must have a unique IP address and the same Subnet Mask.
To perform initial configuration of the HomePlug 802.11g Access Point, you can use the follow-
ing values on your PC:
• IP Address: 192.168.0.100
• Subnet Mask: 255.255.255.0
Checking TCP/IP Settings - Windows 2000
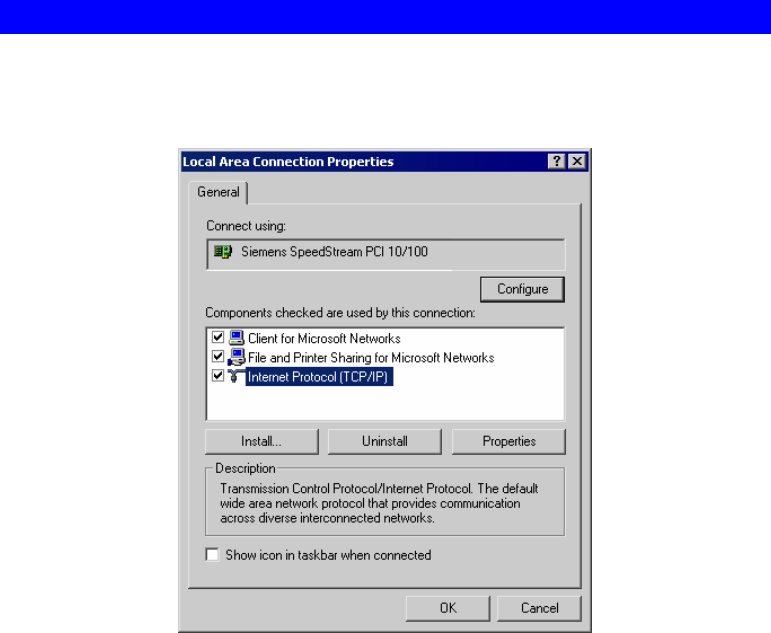
1. Select Control Panel - Network and Dial-up Connection.
2. Right click the Local Area Connection icon and select Properties. You should see a screen
like the following:
Figure 21: Network Configuration (Win 2000)
3. Select the TCP/IP protocol for your network card.
4. Click on the Properties button. You should then see a screen like the following.
Appendix C - Windows TCP/IP
33
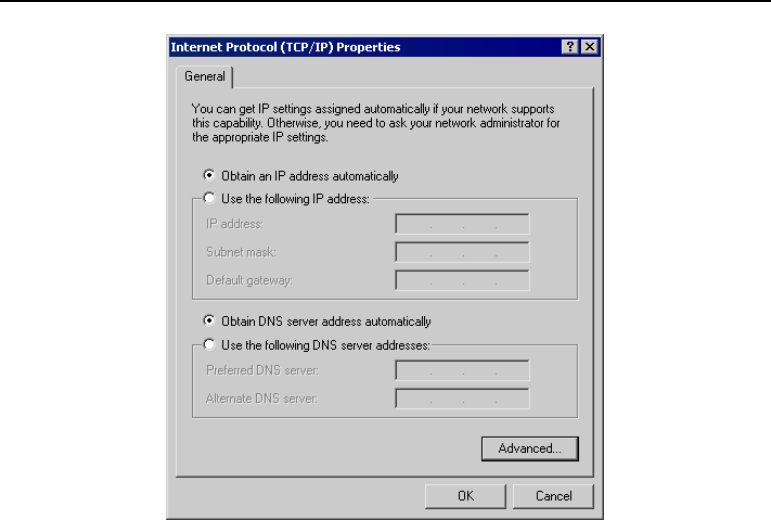
Figure 22: TCP/IP Properties (Win 2000)
5. Ensure your TCP/IP settings are correct:
Using DHCP
To use DHCP, select the radio button Obtain an IP Address automatically. This is the default
Windows settings.
Using a Fixed or Static IP Address
To use a fixed or static IP address
• Select "Specify an IP address".
• Enter the desired IP Address and Subnet Mask.
• Click "OK"
Each device on your network must have a unique IP address and the same Subnet Mask.
To perform initial configuration of the HomePlug 802.11g Access Point, you can use the follow-
ing values on your PC:
• IP Address: 192.168.0.100
• Subnet Mask: 255.255.255.0
34
Checking TCP/IP Settings - Windows XP
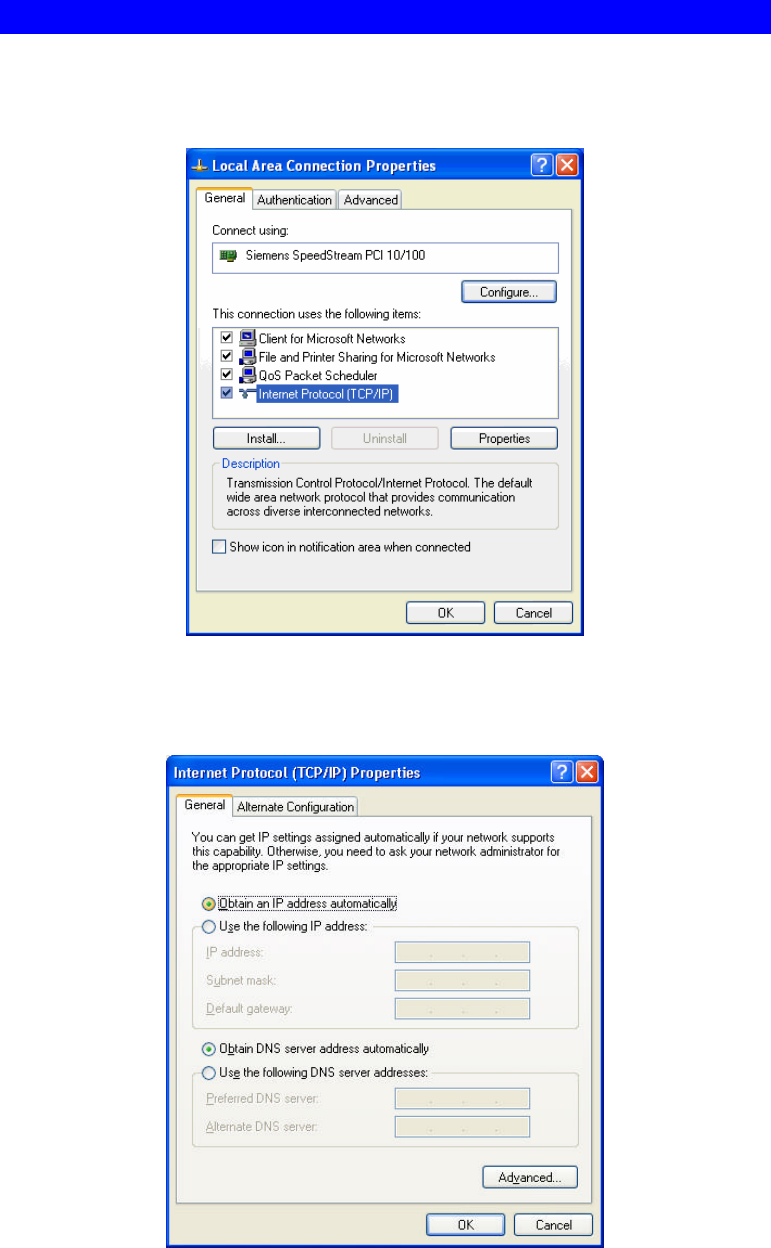
1. Select Control Panel - Network Connection.
2. Right click the Local Area Connection and choose Properties. You should see a screen
like the following:
Figure 23: Network Configuration (Windows XP)
3. Select the TCP/IP protocol for your network card.
4. Click on the Properties button. You should then see a screen like the following.
Figure 24: TCP/IP Properties (Windows XP)

Appendix C - Windows TCP/IP
35
5. Ensure your TCP/IP settings are correct.
Using DHCP
To use DHCP, select the radio button Obtain an IP Address automatically. This is the default
Windows settings.
Using a Fixed or Static IP Address
To use a fixed or static IP address
• Select "Specify an IP address".
• Enter the desired IP Address and Subnet Mask.
• Click "OK"
Each device on your network must have a unique IP address and the same Subnet Mask.
To perform initial configuration of the HomePlug 802.11g Access Point, you can use the follow-
ing values on your PC:
• IP Address: 192.168.0.100
• Subnet Mask: 255.255.255.0