Sercomm SWPIR03N Z-Wave Motion Sensor User Manual Wireless 802 11g Network Camera
Sercomm Corporation Z-Wave Motion Sensor Wireless 802 11g Network Camera
Sercomm >
Users Manual
1
SW-PIR03N Z-Wave Motion Sensor Installation Guide
SW-PIR03N is a PIR (Passive Infrared) sensor, which can detect levels of infrared radiation from objects in its range of view. This
Motion Detector is fully compatible with any Z-Wave controller and can be operated in any Z-Wave network with other Z-Wave
certified devices from other manufacturers. All non-battery operated nodes within the network will act as repeaters regardless of
vendor to increase reliability of the network."
It is also a pet immune motion sensor, which is used to ignore the motion caused by animals and thus reduce the likelihood of false
alarms. The sensitivity of the sensor will disregard the motion caused by animals under 85 pounds, like a full-grown dog or small
cats.
In addition, the SW-PIR03N has walk test mode and white light immunity, which can be used to reduce false alarms caused by
lights, flashlights or other reflective objects. These outstanding features of the sensor provides the professional security for
protecting any home or business to save time, money and deliver a great surveillance experience as well.
Specification
Frequency
908.4~916 MHz
Battery Type
GP CR123A * 1
RF Transmission Range
Outdoor: 60 Meters
Temperature Sensor
±1 C Accuracy
Rearm Timer
3 Minutes
Operating Temperature
0 C to 50 C (32° - 122°F)
Storage Temperature
-20 C to 65 C (-4° - 149°F)
Battery Life
2 Years (Assume 30 trigger events per day @25°C)
Dimensions (H xW x D)
93.4mm x 50mm x 31.8mm
Detect Range
Distance: Max. 15M (±1M) w/mounting height 1.8M @25°C
Angle: Max. 90 (±10) Degree @25°C
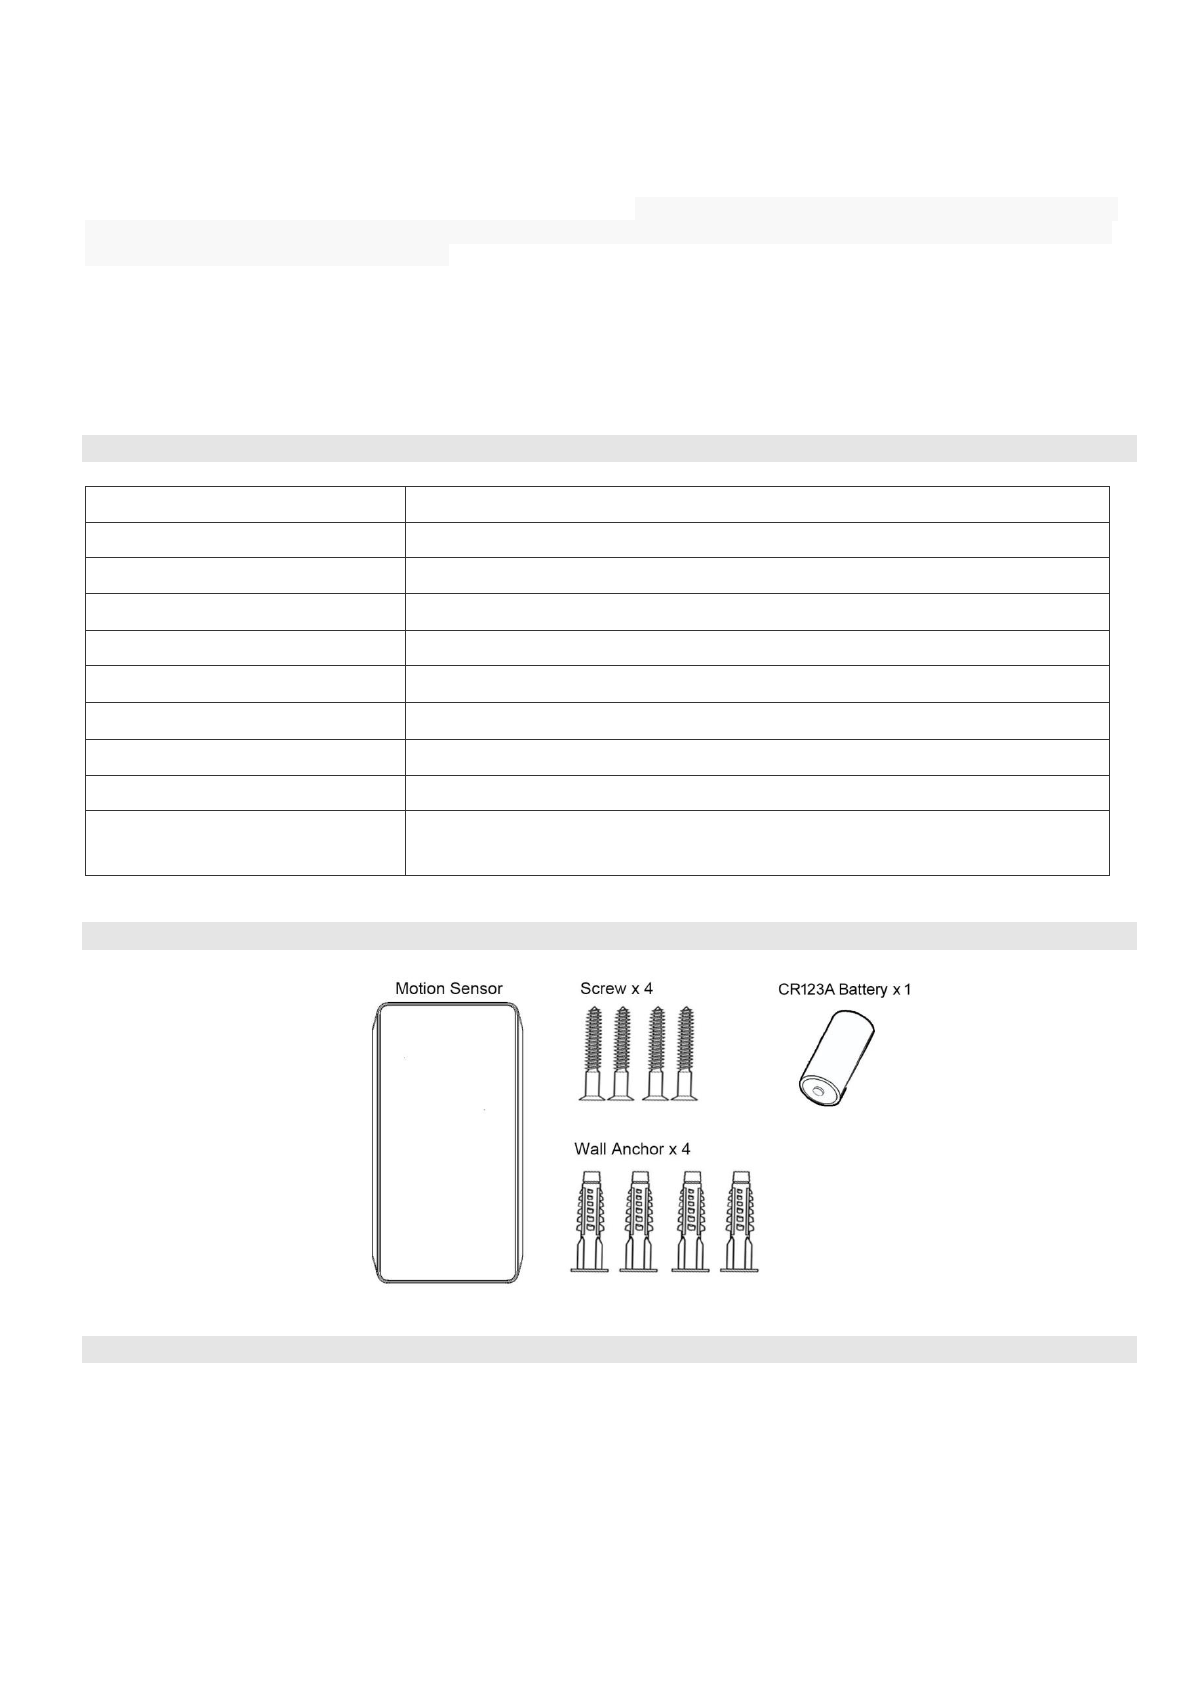
Package Contents
Installation
1. Detach the mount bracket from the device.
2. Install the provided battery correctly.
3. Attach the mount bracket back to the device.
2
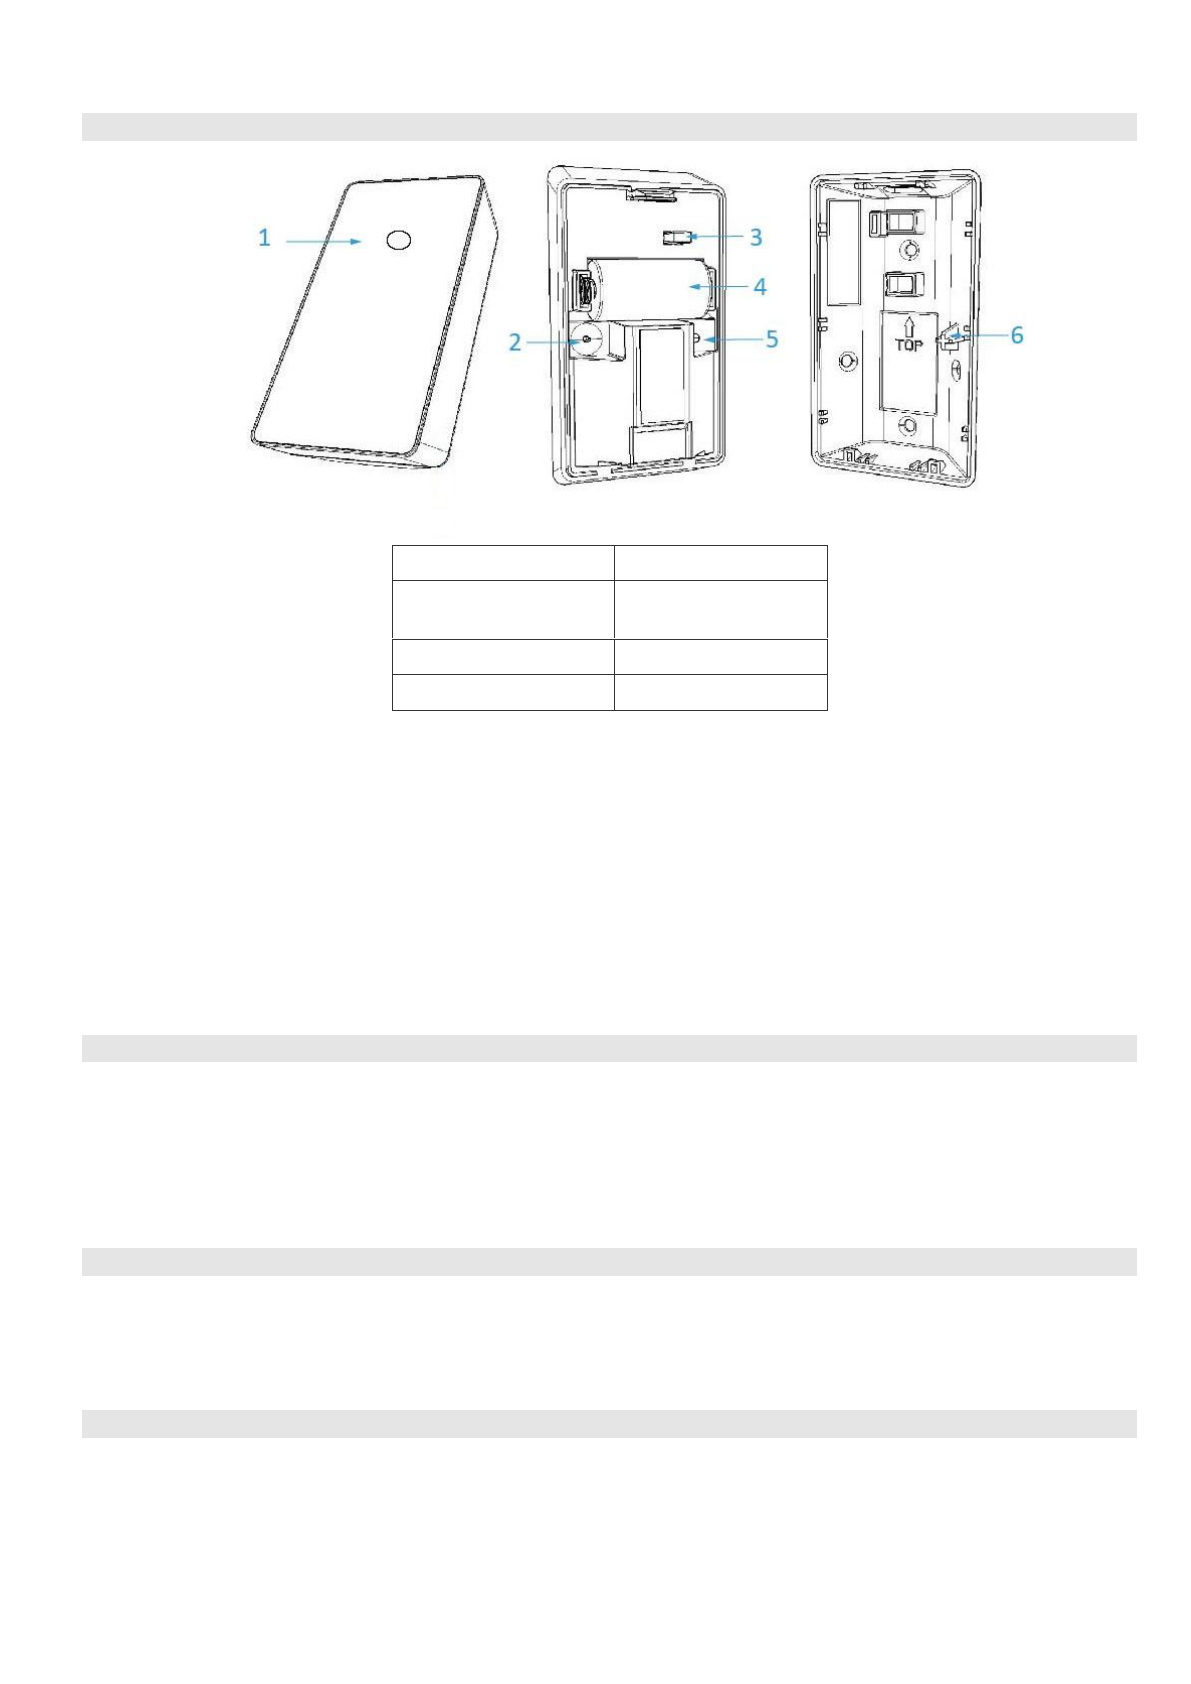
Operation
1. PIR LED (Red)
5. Pairing LED (Green)
2. Tamper Switch
6. Battery Cover (Wall
Mount Bracket)
3. Jumper (Walk Test)
4. Battery
Remove the protection film on front panel before installation.
When the battery is installed, the PIR LED will be blinking for 30 seconds and then turn off when the Motion Sensor is ready
to be used.
After the tamper switch is pressed, the Motion Detector will be in normal mode. The PIR LED on the device will illuminate
when the Motion Detector is triggered.
When the Motion Detector is triggered, it will send Basic Set ON (0xFF).
If no movement detected in three minutes, it will send Basic Set OFF (0x00).
CAUTION:
RISK OF EXPLOSION IF BATTERY IS REPLACED BY AN INCORRECTED TYPE. DISPOSE OF USED
BATTERIES ACCORDING TO THE INSTRUCTIONS.
Add (Inclusion) Sensor
For adding in (Inclusion) a network: Put the Z-Wave controller into "Add (Inclusion)" mode, and follow its instruction to add
SW-PIR03N to your controller. This sensor needs to be included before installation.
1. Install the battery and the Pairing LED indicator will be lit for one second to indicate a successful booting.
2. It will blink one time every second while scanning the network.
3. If the network is not found after 30 seconds, the sensor will go into sleep mode. To wake the sensor again, you need to use the
tamper switch to trigger the adding (Inclusion) process, and then the sensor will repeat steps from 2 to 3.
Remove (Exclusion) Sensor
1. Set the Z-Wave controller to "Exclusion" mode.
2. Press the tamper button 3 times within 2 seconds.
3. The PIR LED will light up for 1 second if success.
4. The device will begin to search for a new network.
Association
Associations (Association Command Class Version 2)
This Sensor supports 2 association groups. This has the effect that when the sensor is triggered, all devices associated with the
sensor will receive the relevant reports. Through an association the sensor may control another Z-Wave network device, e.g. a
alarm device, wall plug, lamp etc.

3
Every group can be support to associated 5 devices max.
GROUP 1 is lifeline service that assigned to Sensor (Motion detector) status – Open/Close. It enables the sensor to send reports
and readings to a Z-Wave Controller or Z-Wave Gateway whenever the sensor is triggered. This Group Support:
NOTIFICATION_REPORT_V4
DEVICE_RESET_LOCALLY_NOTIFICATION
COMMAND_CLASS_SENSOR_MULTILEVEL_V7
BATTERY_REPORT
GROUP 2 allows for Sending Basic to associated devices in this group. This Group Support:
BASIC_SET
Reset to Factory Defaults
1. Press the tamper switch 4 times within 2 seconds and hold the 4th press until the PIR LED lights up.
2. The PIR LED will be off after 3 seconds and all settings will be reset to factory defaults.
Walk Test
1. The PIR will be in “Walk Test” mode for 3 minutes after install the battery. After 3 minutes, the PIR will return to normal
operation mode if the “Walk Test” jumper is not installed.
2. If the installer needs longer time to perform walk test, install the “Walk Test” jumper and the PIR will NOT return to normal
operation mode.
3. Rearm timer is configured to 2 seconds for walk test and 3 minutes for normal operation mode.
4. To save the battery, remember to remove the jumper after walk test finished.
4
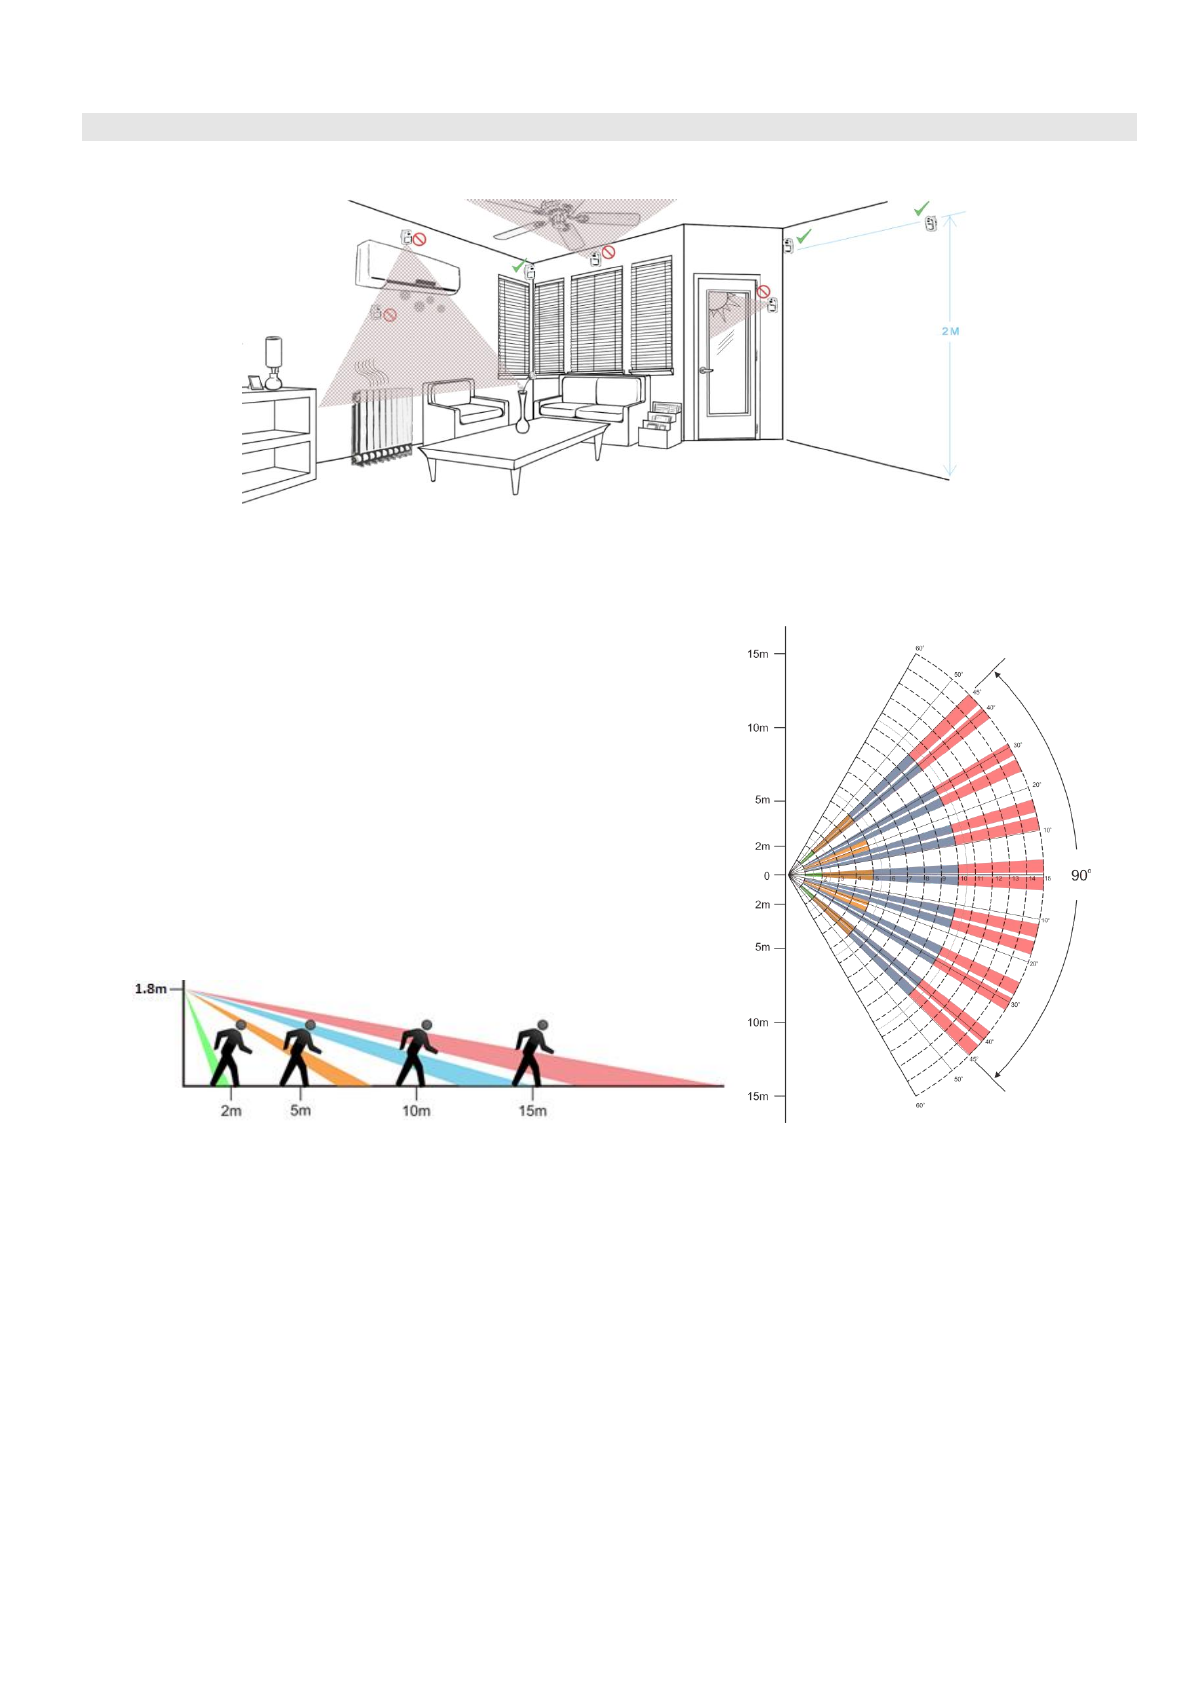
Mounting Instruction
The recommended mounted position for a Motion Detector should be 1.8M from the floor in the corner of a room. At this height,
the device can detect a movement up to 15M (±1M ) (see the following image). Also, in this position, the 90 degrees (±10 degree)
fan-shaped detection pattern can normally offer greater protection than mounting on a flat wall.
Before selecting a position, the following installation hints should be noted:
1. Do not position the Motion Detector facing a window or direct sunlight. The device is also not suitable for using in draughty
area where air conditioner or fan been installed. The excessive wind may cause false alarm.
2. Avoid aiming directly near heat sources, eg: fires, radiators, boiler etc.
3. Mount the detector where possible, so that the logical path of an intruder would cut across the fan pattern rather than directly
towards the device.
4. Before mounting the PIR, perform walk test to ensure the detection coverage.
5
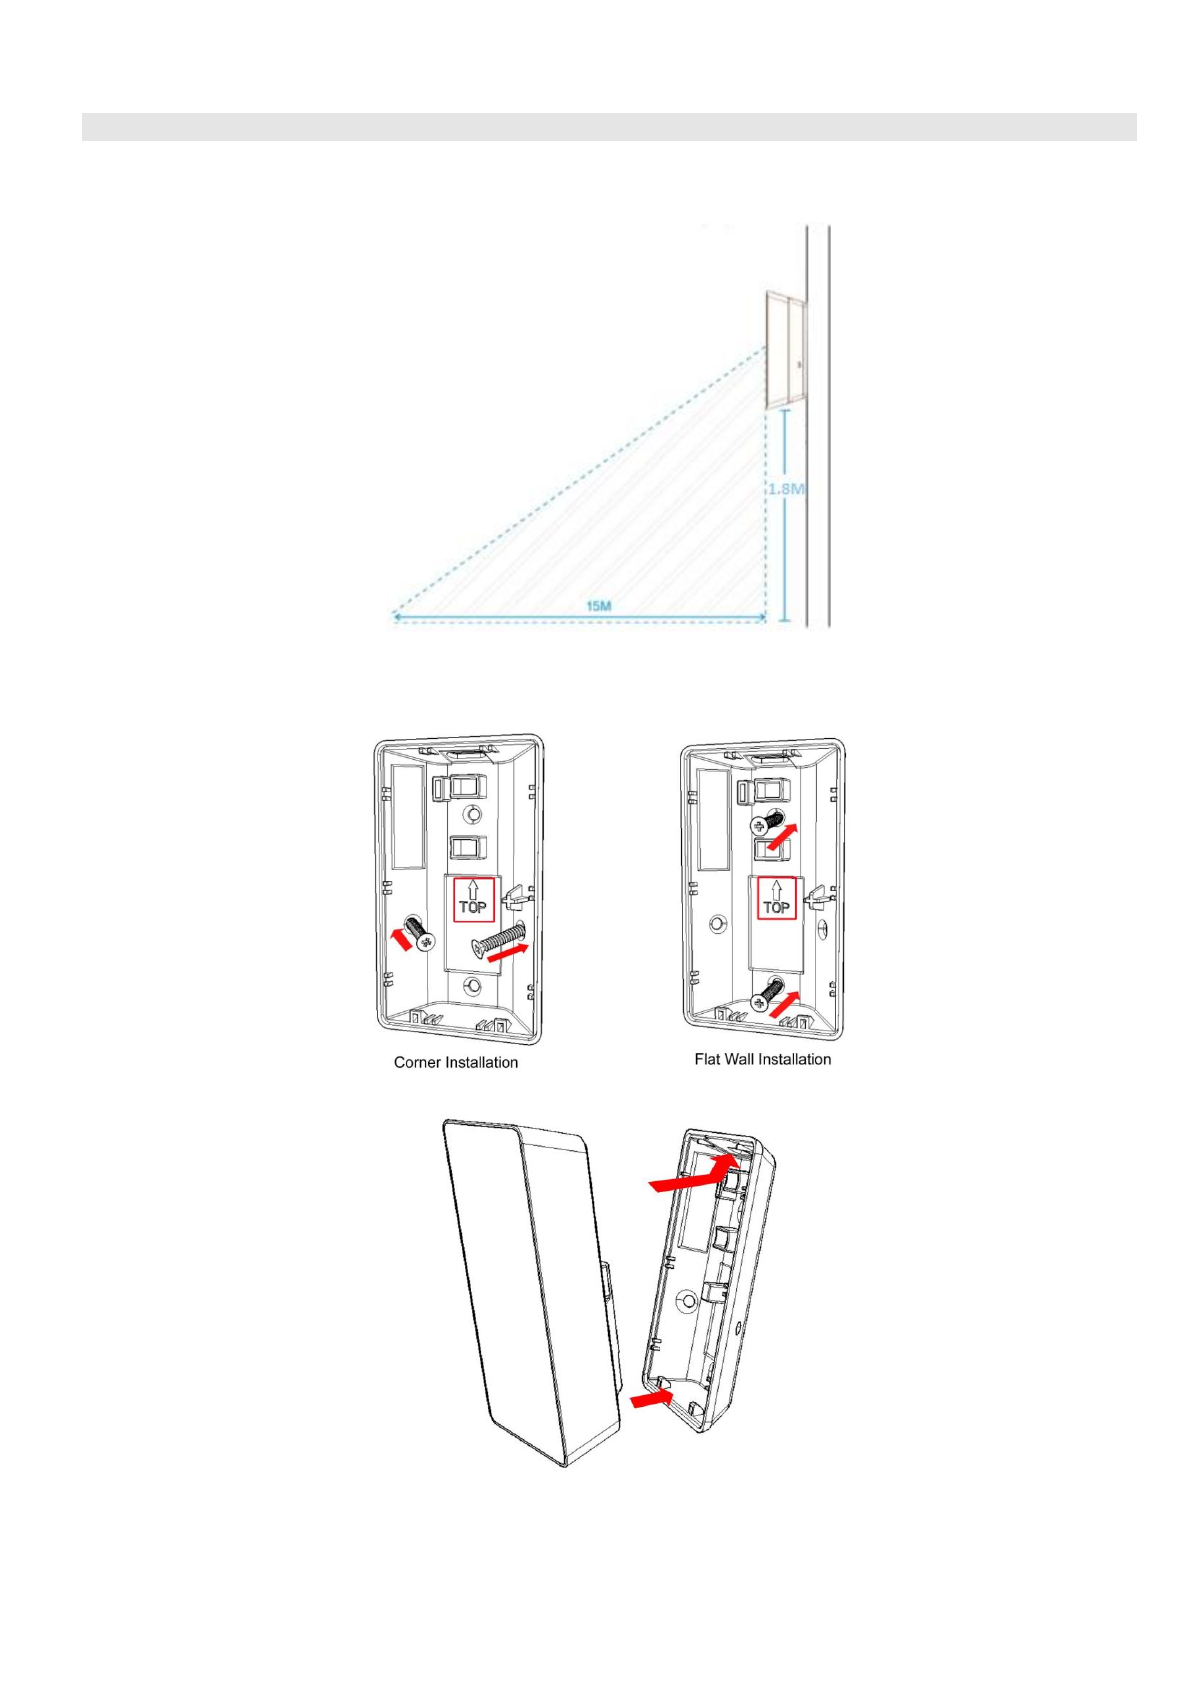
Wall Mounting
Note: The device is suggested to be set at 90 degrees angle, which is the best mounted position for offering the 15M protection
area.
4. Detach the mount bracket from the device.
5. Mount the bracket with the supplied screws/anchors into the wall. It can be either mounted on a flat surface or in a corner.
Note: Make sure the mount bracket is installed in the correct direction (upwards arrow).
6. Attach the device to the mount bracket.

6
Z-Wave Command Classes
• COMMAND_CLASS_ZWAVEPLUS_INFO
• COMMAND_CLASS_VERSION
• COMMAND_CLASS_MANUFACTURER_SPECIFIC
• COMMAND_CLASS_DEVICE_RESET_LOCALLY
• COMMAND_CLASS_POWERLEVEL
• COMMAND_CLASS_BATTERY
• COMMAND_CLASS_NOTIFICATION
• COMMAND_CLASS_ASSOCIATION
• COMMAND_CLASS_ASSOCIATION_GRP_INFO
• COMMAND_CLASS_BASIC
• COMMAND_CLASS_WAKE_UP
• COMMAND_CLASS_FIRMWARE_UPDATE_MD
• COMMAND_CLASS_SENSOR_MULTILEVEL
• COMMAND_CLASS_CONFIGURATION
Z-Wave Configuration
Configuration
Parameter
Function
Size
(Byte)
Configuration
Value
Unit
Default
Setting
Description
1
Configure motion
trigger interval
2
0x0002~0x00
B4
1s
180s
After motion detected, ignores
consequent motion events during
the trigger interval to save battery
power.
If “Walk Test” jumper is
enabled, the interval will be set to
2 seconds and ignores this
configuration.
Notification Type
Switch Type
Status
Notification Type
PIR ON/OFF
0x07
Tamper Switch
0x07
Event
PIR ON/OFF
Close:0x00, Open:0x08
Tamper Switch
Close:0x00, Open:0x03
BASIC Report
PIR ON/OFF
Close:0x00, Open:0xFF
Alarm V1
(Movement)
Alarm Type
0x07
Alarm Level
0x00 (No movement after3
mins )
0xFF (Motion detected)

7
FCC Statement
This equipment has been tested and found to comply with the limits for a Class B digital device, pursuant to part 15 of the FCC
Rules. These limits are designed to provide reasonable protection against harmful interference in a residential installation. This
equipment generates uses and can radiate radio frequency energy and, if not installed and used in accordance with the instructions,
may cause harmful interference to radio communications. However, there is no guarantee that interference will not occur in a
particular installation. If this equipment does cause harmful interference to radio or television reception, which can be determined
by turning the equipment off and on, the user is encouraged to try to correct the interference by one or more of the following
measures:
—Reorient or relocate the receiving antenna.
—Increase the separation between the equipment and receiver.
—Connect the equipment into an outlet on a circuit different from that to which the receiver is connected.
—Consult the dealer or an experienced radio/TV technician for help.
This device complies with Part 15 of the FCC Rules. Operation is subject to the following two conditions: (1) this device may not
cause harmful interference, and (2) this device must accept any interference received, including interference that may cause
undesired operation.
Caution!
Any changes or modifications not expressly approved by the party responsible for compliance could void the user's authority to
operate the equipment.
FCC Radiation Exposure Statement
This equipment complies with FCC RF radiation exposure limits set forth for an uncontrolled environment. This equipment should
be installed and operated with a minimum distance of 20 centimeters between the radiator and your body.
This device complies with Part 15 of the FCC Rules. Operation is subject to the following two conditions:
(1) This device may not cause harmful interference, and
(2) This device must accept any interference received, including interference that may cause undesired operation.
This transmitter must not be co-located or operating in conjunction with any other antenna or transmitter.
FCC RF Radiation Exposure Statement:
This Transmitter must not be co-located or operating in conjunction with any other antenna or transmitter.
This equipment complies with FCC RF radiation exposure limits set forth for an uncontrolled environment. This equipment
should be installed and operated with a minimum distance of 20 centimeters between the radiator and your body.