Sercomm SZPIR02 ZigBee Motion Sensor User Manual SZ PIR02xxxxxxxx
Sercomm Corporation ZigBee Motion Sensor SZ PIR02xxxxxxxx
Sercomm >
SZ-PIR02xxxxxxxx-User Manual

1
SZ-PIR02 ZigBee Motion Detector Installation Guide
SZ-PIR02 is a PIR (Passive Infrared) sensor, which can detect levels of infrared radiation from objects in its range of view. This
Motion Detector is fully compatible with any products that are ZigBee-enabled.
Specification
Frequency 2.4 GHz
Battery Type DC3V CR123A * 1
Range Outdoor: Max 100M
Warm up Time 30 seconds
Rearm Timer 5 seconds ~ 3 minute
Adjustable Sensitivity Up to10m
Operating Temperature 0 C to 50 C (32° - 122°F)
Storage Temperature -20 C to 70 C (-4° - 158°F)
Battery Life 2 Years
Dimensions (H xW x D) 84mm x 61mm x 39mm
Detect Range Distance: Max. 10M w/mounting height 2.5M @25°C
Angle: Max. 100 degree
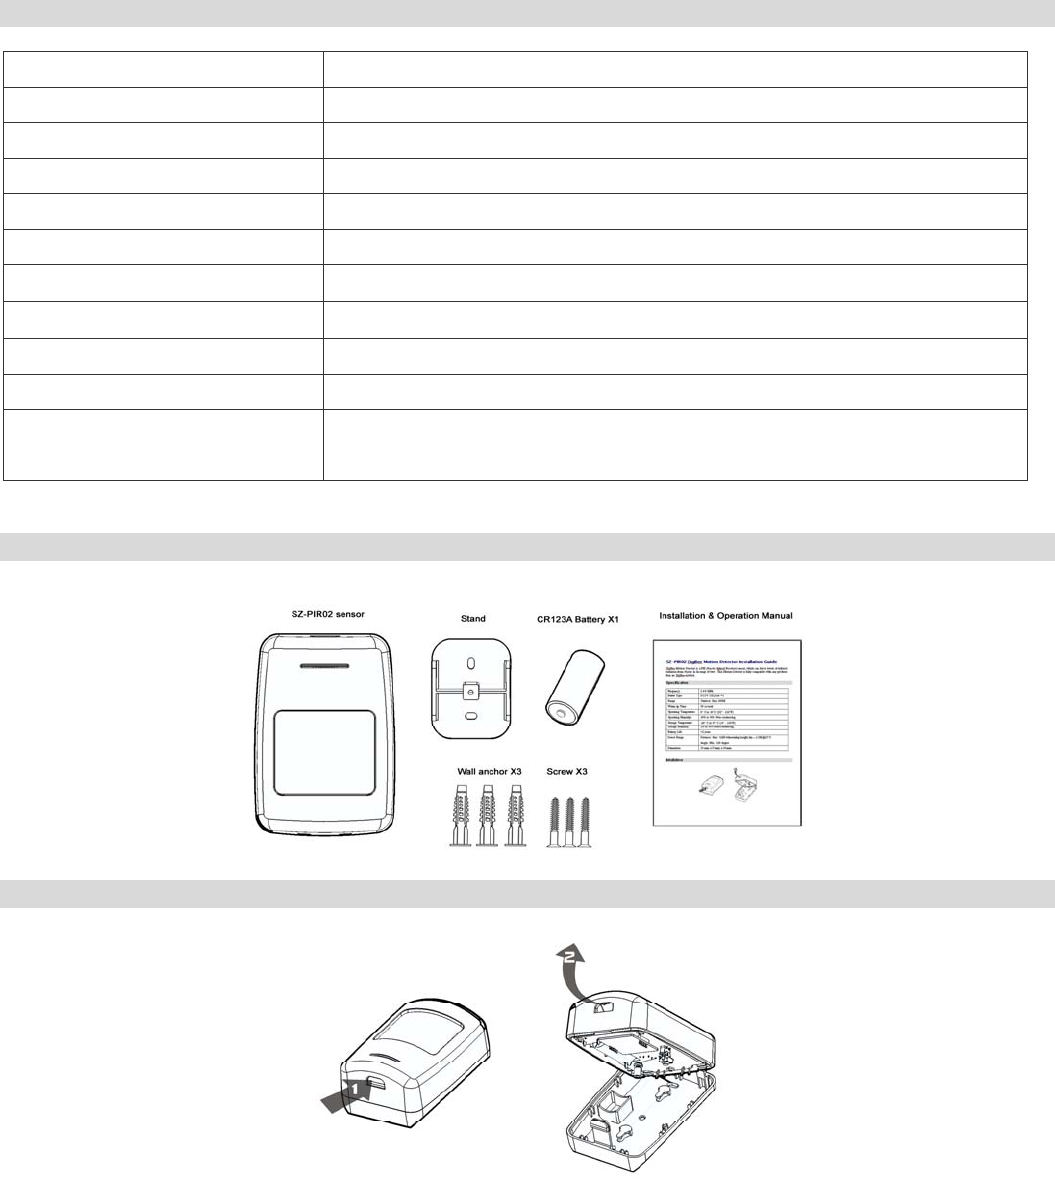
Package Contents
Intallation
1. Detach the rear cover from the device.
2. Install the supplied battery properly.

2
3. Attach the rear cover back to the device.
Wall Mounting
Note: The device is suggested to be set at 12 degrees angle, which is the best mounted position for offering the 10M protection
area.
1. Mount the stand with the screws into the wall.
2. Detach the rear cover from the device.
3. Use the supplied screw to fix the rear cover and the stand.
4. Attach the device to the rear cover.

3
Operation
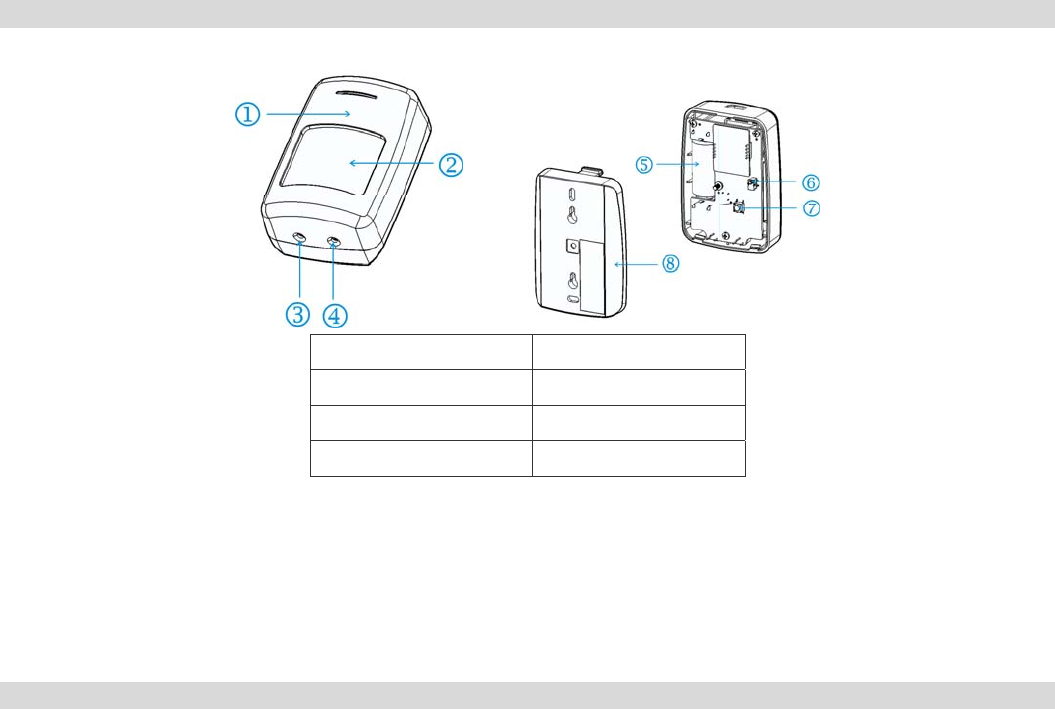
1. Front Cover 5. Battery
2. PIR Lens 6. Tamper Switch
3. Time-off Knob 7. Join/Leave Switch
4. Sensitivity Knob 8. Rear Cover
When the battery is installed, the LED will be on for 30 seconds and then turn off when the Motion Sensor is ready to be used.
Time-off knob is used to control the certain period of time for re-triggering after the motion has been detected. The time range
can be set from 5 seconds to 3 minutes.
After the tamper switch is pressed, the Motion Detector will be in normal mode. The LED on the device will not illuminate in
order to conserve battery life when the Motion Detector is triggered.
Adding to a ZigBee Network
Join Function
For “Join” a network, please do the following instruction:
Put the ZigBee Coordinator into “Permit-Joining” mode.
Pressed Join/Leave button for 1 second. The LED is flashing while processing. If the SZ-PIR02 has been joined with the
ZigBee Coordinator successfully, the Green LED will be on for 2 seconds and then off. The Green LED will be off
instantly if failed.
Leave Function
For “Leave” a network, please do the following instruction:
Pressed Join/Leave button for 3 seconds to let the SZ-PIR01 be deleted from the ZigBee Coordinator. If the SZ-PIR02
has been deleted successfully, the LED will be on for 1 second and then off.

4
Mounting Instruction
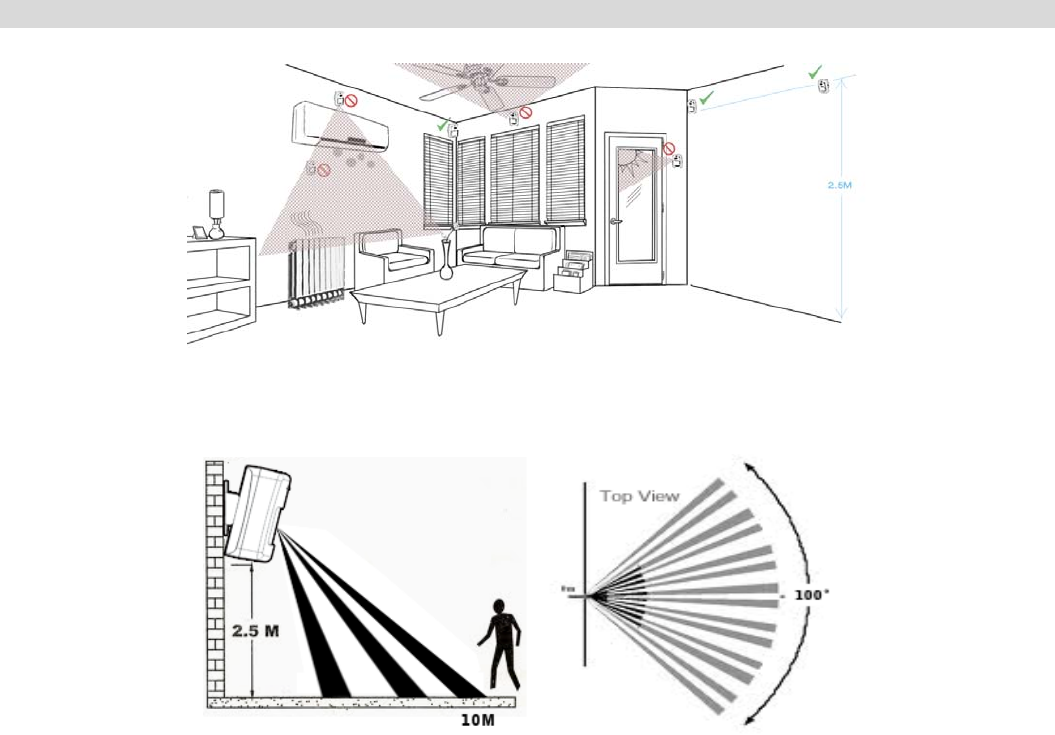
The recommended mounted position for a Motion Detector should be 2.5m from the floor in the corner of a room. At this height,
the device can detect a movement up to 10 meters depending on the adjustment (see the following image). Also, in this position,
the 100 degrees fan-shaped detection pattern can normally offer greater protection than mounting on a flat wall.
Before selecting a position, the following installation hints should be noted:
1. Do not position the Motion Detector facing a window or direct sunlight. The device is also not suitable for using in draughty
area where air conditioner or fan been installed. The excessive wind may cause false alarm.
2. Avoid aiming directly near heat sources, eg: fires, radiators, boiler etc.
3. Mount the detector where possible, so that the logical path of an intruder would cut across the fan pattern rather than directly
towards the device.

5
FCC Statement
This equipment has been tested and found to comply with the limits for a Class B digital device, pursuant to part 15 of
the FCC rules. These limits are designed to provide reasonable protection against harmful interference in a residential
installation. This equipment generates, uses and can radiate radio frequency energy and, if not installed and used in
accordance with the instructions, may cause harmful interference to radio communications. However, there is no
guarantee that interference will not occur in a particular installation. If this equipment does cause harmful interference
to radio or television reception, which can be determined by turning the equipment off and on, the user is encouraged
to try to correct the interference by one or more of the following measures:
-Reorient or relocate the receiving antenna.
-Increase the separation between the equipment and receiver.
-Connect the equipment into an outlet on a circuit different from that to which the receiver is connected.
-Consult the dealer or an experienced radio/TV technician for help.
You are cautioned that changes or modifications not expressly approved by the party responsible for compliance could
void your authority to operate the equipment.
This device complies with Part 15 of the FCC Rules. Operation is subject to the following two conditions: (1) this
device may not cause harmful interference and (2) this device must accept any interference received, including
interference that may cause undesired operation
This Transmitter must not be co-located or operating in conjunction with any other antenna or transmitter.
This equipment complies with FCC RF radiation exposure limits set forth for an uncontrolled environment . This
equipment should be installed and operated with a minimum distance of 20 centimeters between the radiator and your
body.
CE Approval
CE Standards
This product complies with the 99/5/EEC directives, including the following safety and EMC standards:
EN300328
EN301489
EN55022/24
CE Marking Warning
This is a Class B product. In a domestic environment this product may cause radio interference in which case the user may be
required to take adequate measures.
UL Notices: This device complies with UL Standard UL639.