Sercomm SZPIR04N ZigBee Motion Sensor User Manual Wireless 802 11g Network Camera
Sercomm Corporation ZigBee Motion Sensor Wireless 802 11g Network Camera
Sercomm >
Users Manual
1
SZ-PIR04N ZigBee Motion Detector Installation Guide
SZ-PIR04N is a PIR (Passive Infrared) sensor, which can detect levels of infrared radiation from objects in its range of view. This
Motion Detector is fully compatible with any ZigBee coordinator that are HA 1.2 certified.
It is also a pet immune motion sensor, which is used to ignore the motion caused by animals and thus reduce the likelihood of false
alarms. The sensitivity of the sensor will disregard the motion caused by animals under 85 pounds, like a full-grown dog or small
cats.
In addition, the SZ-PIR04N has walk test mode and white light immunity, which can be used to reduce false alarms caused by
lights, flashlights or other reflective objects. These outstanding features of the sensor provides the professional security for
protecting any home or business to save time, money and deliver a great surveillance experience as well.
Specification
Frequency
2.4 GHz
Battery Type
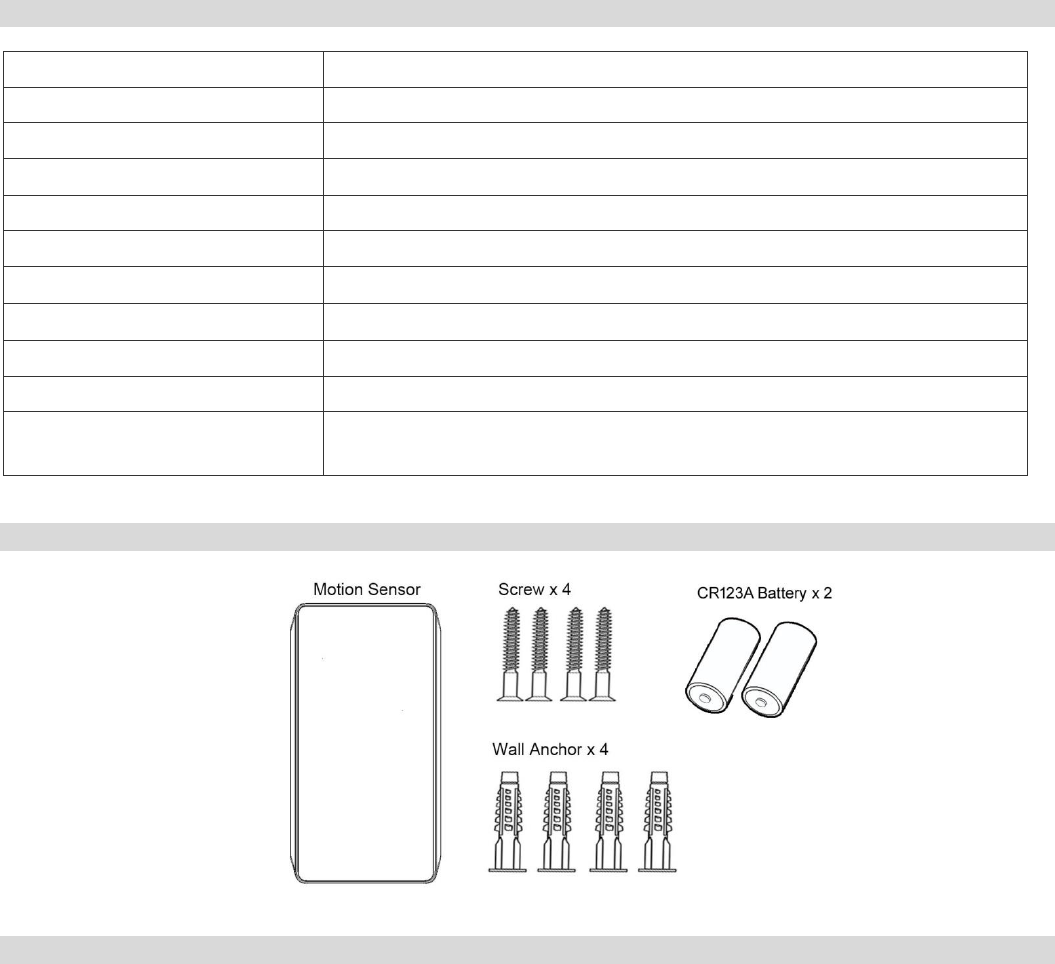
GP CR123A (1400 mAh) * 2
RF Transmission Range
Outdoor: 300 Meters
Temperature Sensor
±1 C Accuracy
Light Sensor
0~2500 Lux
Rearm Timer
3 Minutes
Operating Temperature
0 C to 50 C (32° - 122°F)
Storage Temperature
-20 C to 65 C (-4° - 149°F)
Battery Life
5 Years (Assume 30 events per day @25°C)
Dimensions (H xW x D)
93.4mm x 50mm x 31.8mm
Detect Range
Distance: Max. 15M (±1M) w/mounting height 1.8M @25°C
Angle: Max. 90 (±10) Degree
Package Contents
Intallation
1. Detach the mount bracket from the device.
2. Install the provided batteries correctly.
3. Attach the mount bracket back to the device.
2
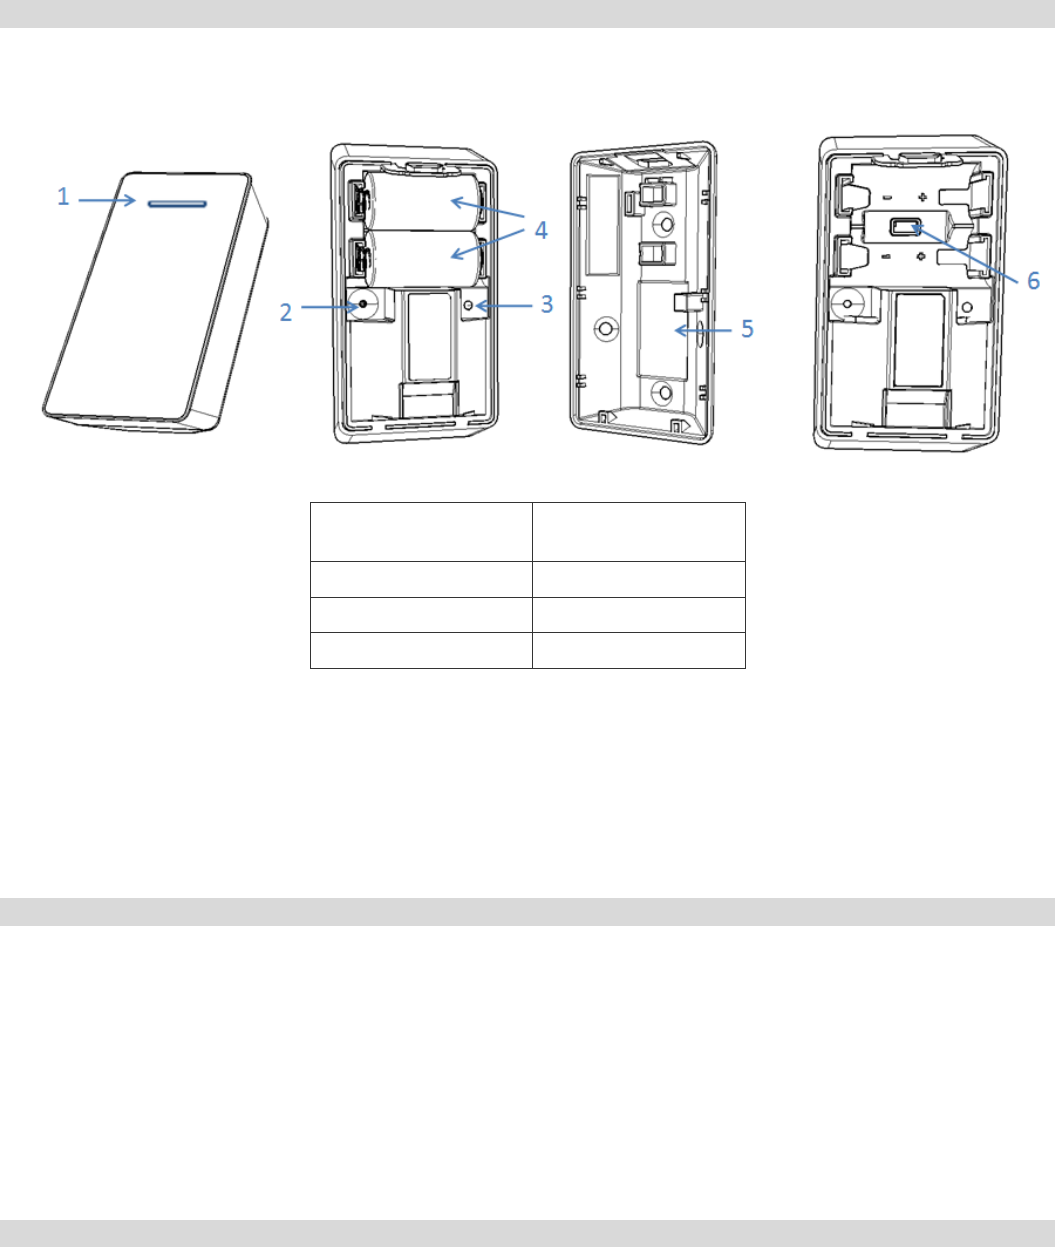
Operation
1. PIR LED (Red)
5. Battery Cover (Wall
Mount Bracket)
2. Tamper Switch
6. Walk Test Switch
3. Pairing LED (Green)
4. Batteries
When the batteries are installed, the PIR LED will be blinking for 30 seconds and then turn off when the Motion Sensor is
ready to be used.
After the tamper switch is pressed, the Motion Detector will be in normal mode. The PIR LED on the device will illuminate
when the Motion Detector is triggered.
The motion sensor needs to be checked and perform walk test annually to make sure the detection function is working
properly.
Adding to a ZigBee Network
Join Function
After installing the batteries, the Join/Leave (Green) LED will start blinking every 5 seconds which indicates SZ-PIR04N
is ready to join a ZigBee network.
The device will attempt to joing a ZigBee network for 20 times (100 seconds). If all attempts fail, SZ-PIR04N will stop
joininig process, and need to press and release the tamper again to start joinging process.
Leave Function
For “Leave” a network, please do the following instruction:
Press and hold the tamper switch while installing the batteries.
Release the tamper switch within 4 seconds and the device will be reset to factory default.
Walk Test
1. Remove the batteries and adjust the “Walk Test Switch” setting to “On” to enable “Walk Test”.
2. Install the batteries and rearm timer will be configured to 5 seconds for installers to test the detection coverage.
3. Remember to adjust the switch setting back to Off (normal mode) after walk test finished to save battery power.
3
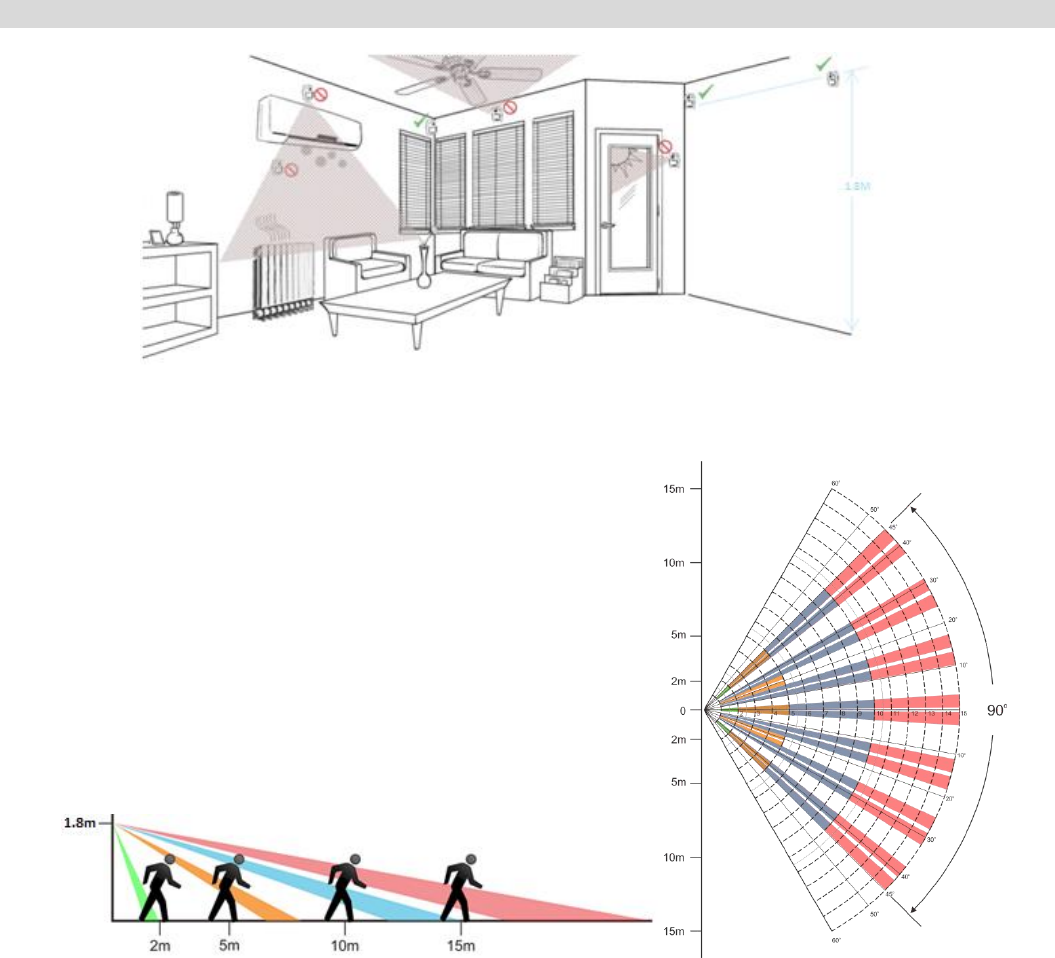
Mounting Instruction
The recommended mounted position for a Motion Detector should be 1.8M from the floor in the corner of a room. At this height,
the device can detect a movement up to 15M (±1M ) (see the following image). Also, in this position, the 90 degrees (±10 degree)
fan-shaped detection pattern can normally offer greater protection than mounting on a flat wall.
Before selecting a position, the following installation hints should be noted:
1. Do not position the Motion Detector facing a window or direct sunlight. The device is also not suitable for using in draughty
area where air conditioner or fan been installed. The excessive wind may cause false alarm.
2. Avoid aiming directly near heat sources, eg: fires, radiators, boiler etc.
3. Mount the detector where possible, so that the logical path of an intruder would cut across the fan pattern rather than directly
towards the device.
4. Before mounting the PIR, perform walk test to ensure the detection coverage.
4
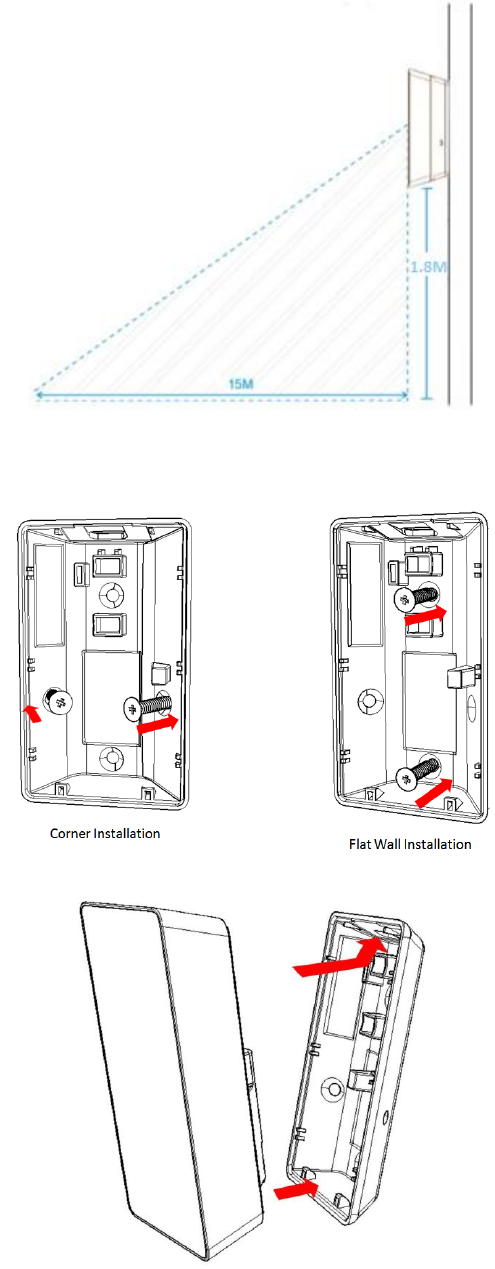
Wall Mounting
Note: The device is suggested to be set at 90 degrees angle, which is the best mounted position for offering the 15M protection
area.
1. Detach the mount bracket from the device.
2. Mount the bracket with the supplied screws/anchors into the wall. It can be either mounted on a flat surface or in a corner.
Note: Make sure the mount bracket is installed in the correct direction (upwards arrow).
3. Attach the device to the mount bracket.

5
FCC Statement
This equipment has been tested and found to comply with the limits for a Class B digital device, pursuant to Part 15 of the FCC
Rules. These limits are designed to provide reasonable protection against harmful interference in a residential installation.
This equipment generates, uses and can radiate radio frequency energy and, if not installed and used in accordance with the
instructions, may cause harmful interference to radio communications. However, there is no guarantee that interference will not
occur in a particular installation. If this equipment does cause harmful interference to radio or television reception, which can be
determined by turning the equipment off and on, the user is encouraged to try to correct the interference by one of the following
measures:
Reorient or relocate the receiving antenna.
Increase the separation between the equipment and receiver.
Connect the equipment into an outlet on a circuit different from that to which the receiver is connected.
Consult the dealer or an experienced radio/TV technician for help.
To assure continued compliance, any changes or modifications not expressly approved by the party responsible for compliance
could void the user's authority to operate this equipment. (Example - use only shielded interface cables when connecting to
computer or peripheral devices).
FCC Radiation Exposure Statement
This equipment complies with FCC RF radiation exposure limits set forth for an uncontrolled environment. This equipment should
be installed and operated with a minimum distance of 20 centimeters between the radiator and your body.
This device complies with Part 15 of the FCC Rules. Operation is subject to the following two conditions:
(1) This device may not cause harmful interference, and
(2) This device must accept any interference received, including interference that may cause undesired operation.
This transmitter must not be co-located or operating in conjunction with any other antenna or transmitter.
Canada Statement
This device complies with Industry Canada’s licence-exempt RSSs. Operation is subject to the following two conditions:
(1) This device may not cause interference;
(2) This device must accept any interference, including interference that may cause undesired operation of the device.
Le présent appareil est conforme aux CNR d’Industrie Canada applicables aux appareils radio exempts de licence. L’exploitation
est autorisée aux deux conditions suivantes :
(1) l’appareil ne doit pas produire de brouillage;
(2) l’utilisateur de l’appareil doit accepter tout brouillage radioélectrique subi, même si le brouillage est susceptible d’en
compromettre le fonctionnement.
The device meets the exemption from the routine evaluation limits in section 2.5 of RSS 102 and compliance with RSS-102 RF
exposure, users can obtain Canadian information on RF exposure and compliance.
Le dispositif rencontre l'exemption des limites courantes d'évaluation dans la section 2.5 de RSS 102 et la conformité à
l'exposition de RSS-102 rf, utilisateurs peut obtenir l'information canadienne sur l'exposition et la conformité de rf.
This transmitter must not be co-located or operating in conjunction with any other antenna or transmitter. This equipment should
be installed and operated with a minimum distance of 20 centimeters between the radiator and your body.
Cet émetteur ne doit pas être Co-placé ou ne fonctionnant en même temps qu'aucune autre antenne ou émetteur. Cet équipement
devrait être installé et actionné avec une distance minimum de 20 centimètres entre le radiateur et votre corps.
UL Notices: This device complies with UL Standard UL639.
SZ-PIR04N V1.0
PN: 957BXL0201
Issue Date: 2016/11/15