Contents
- 1. User Manual.pdf
- 2. Users Manual_rev.pdf
User Manual.pdf
xCAM
User’s Guide

i
Table of Contents
CHAPTER 1 INTRODUCTION .............................................................................................. 1
Overview ............................................................................................................................ 1
Physical Details - xCAM ................................................................................................... 2
Physical Details - XW3 ...................................................................................................... 4
Package Contents .............................................................................................................. 5
CHAPTER 2 BASIC SETUP ................................................................................................... 6
System Requirements ........................................................................................................ 6
Installation ......................................................................................................................... 6
Wall Mounting ................................................................................................................... 9
APPENDIX A SPECIFICATIONS ........................................................................................ 11
Spec ................................................................................................................................... 11
Regulatory Approvals ..................................................................................................... 12
Copyright © 2015. All Rights Reserved.
Document Version: 1.0
All trademarks and trade names are the properties of their respective owners.

1
Chapter 1
Introduction
This Chapter provides information of the xCAM's features, components and
capabilities.
Overview
Congratulations on the purchase of your new xCAM. The xCAM is a True Day/Night IP
camera that features high definition 1280 x 720p video resolution and 802.11n WiFi
connectivity.
Features
• Standalone Design. The xCAM is a standalone system with built-in CPU and Video
encoder. It requires only a power source and a connection to your touch screen.
• Dual Video Compressions. The xCAM supports H.264 and MJEPG video for different
image compressions.
• Suitable for Home, Business or Public Facilities. Whether for Home, Business or
Public Facility surveillance, or just for entertainment and fun, the xCAM has the features
you need.
• IR LED Support. Each xCAM has two infrared LED. The LEDs can provide
illumination around 5 meters long, that can help to output a better video quality while
under low-light conditions such as indoors, on cloudy days, or in the morning or evening.
Wireless Features
• Supports 802.11n Wireless Standard. The 802.11n standard provides backward
compatibility with the 802.11b and g standards. The xCAM can work with all 802.11n,
802.11b and 802.11g Wireless stations.
• Wired and Wireless Network. The xCAM can be connected either with wire or
wirelessly to your network.
1
2
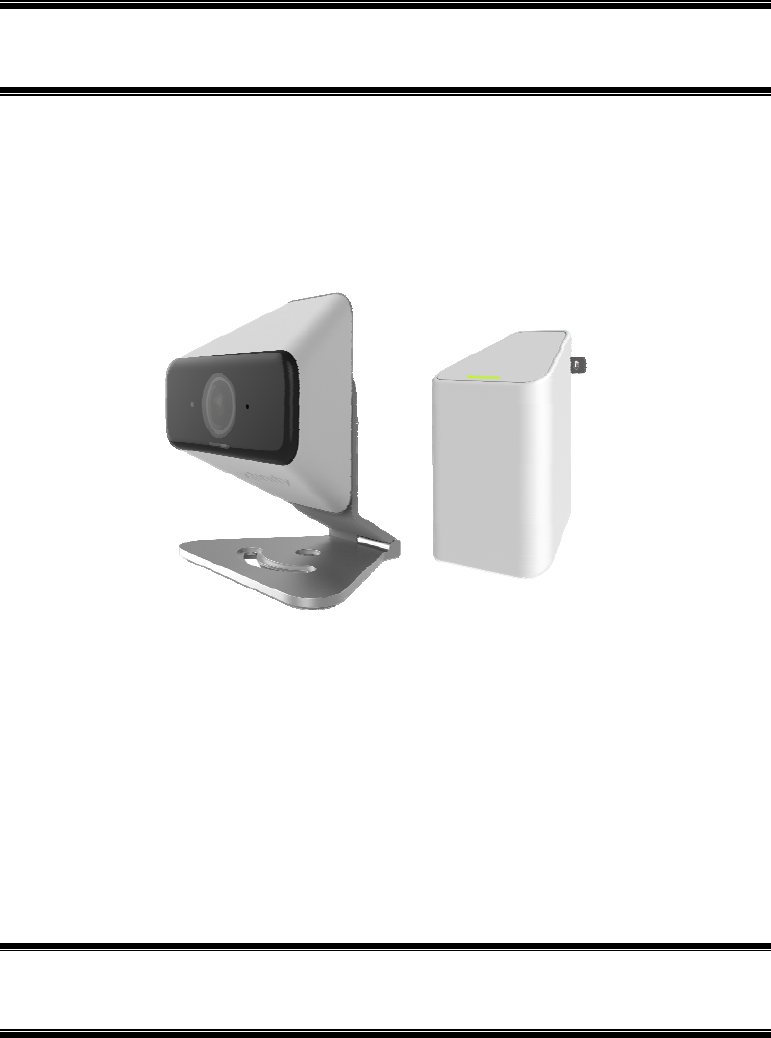
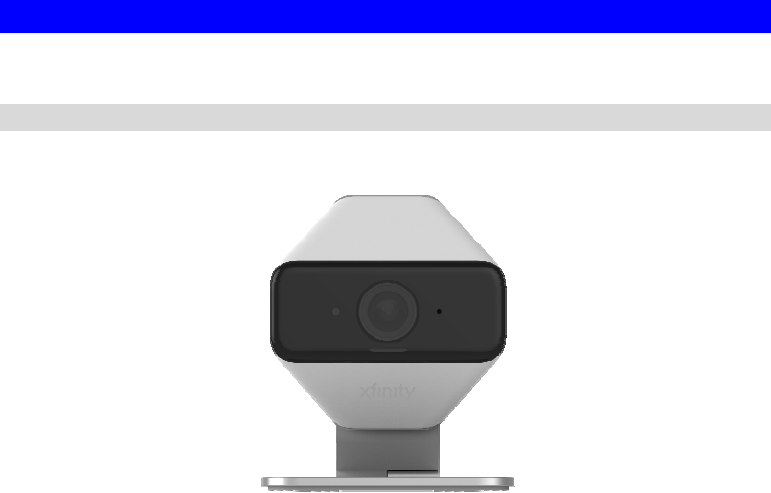
Physical Details - xCAM
Front - xCAM
Figure 1: Front Panel
IR LEDs IR LEDs provide illumination at night or in a dark environment.
Lens No physical adjustment is required or possible for the lens, but you
should ensure that the lens cover remain clean. The image quality is
degraded if the lens cover is dirty or smudged.
POWER indicator
(Blue/Yellow) On (Blue) - The xCAM is paired.
Flashing (Blue) - The xCAM is connected to router but not paired.
Flashing (Yellow) - The xCAM is not connected to XW3 or XW3 is
not connected to a router.
3
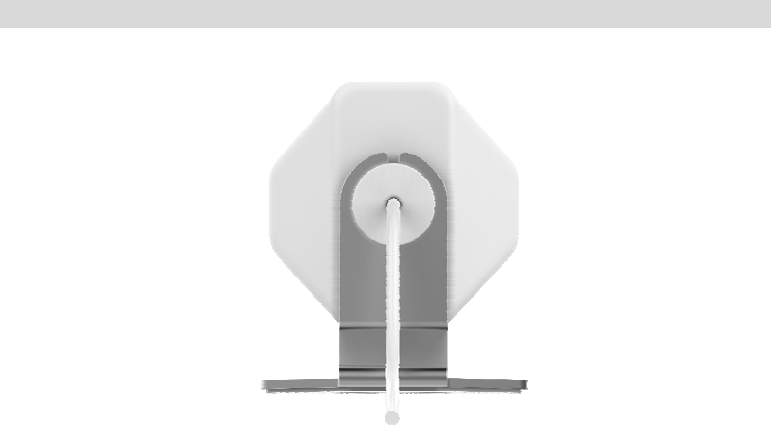
Rear - xCAM
Figure 2: Rear Panel
RJ-45 Jack This RJ-45 connector is used for power connection when the camera
is under wireless mode. A customized PoE (Power over Ethernet)
splitter, as a Y-cable, is provided to allow connection to PC for
setup and pairing.
Reset Button This button has two (2) functions:
• Reboot. When pressed and released, the xCAM will reboot
(restart).
• Clear All Data. This button can also be used to clear ALL data
and restore ALL settings to the factory default values.
To Clear All Data and restore the factory default values:
1. Power On.
2. Keep holding the Reset Button down for 8 seconds.
3. Release the Reset Button. The xCAM is now using the factory
default values.
Microphone The built-in microphone is located on the rear of the device.
4
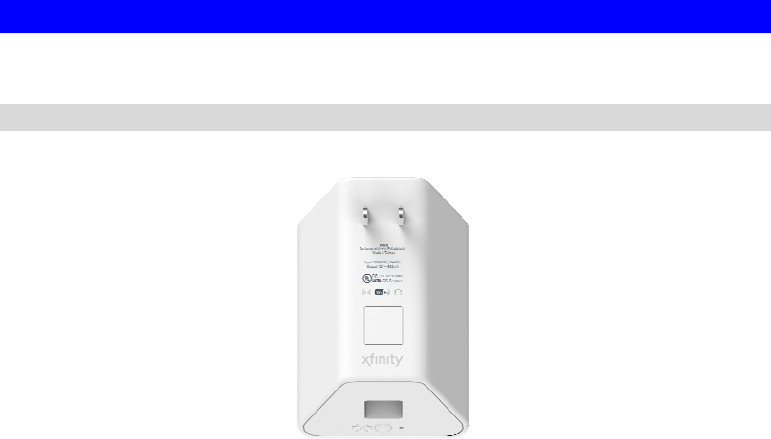
Physical Details - XW3
XW3
LAN Port To be connected to the RJ-45 jack of xCAM for power feed and data
exchange.
Reset Button This button has the following function:
• Reset to manufacturer default valued and reboot. When
pressed and held over 10 seconds, the settings of the XW3 will
be set to their default values.
WPS Button Push the WPS button on the device and on your other wireless
device to perform WPS function that easily creates an encryption-
secured wireless connection automatically.
POWER indicator
(Blue/Yellow) On (Blue) - The XW3 is connected to a router.
Rapid Flashing (Blue) - WPS association is in process.
Slow Flashing (Blue) - The XW3 is not configured or trying to
connect to a router.
Flashing (Yellow) - The XW3 is not connected to a router.
5
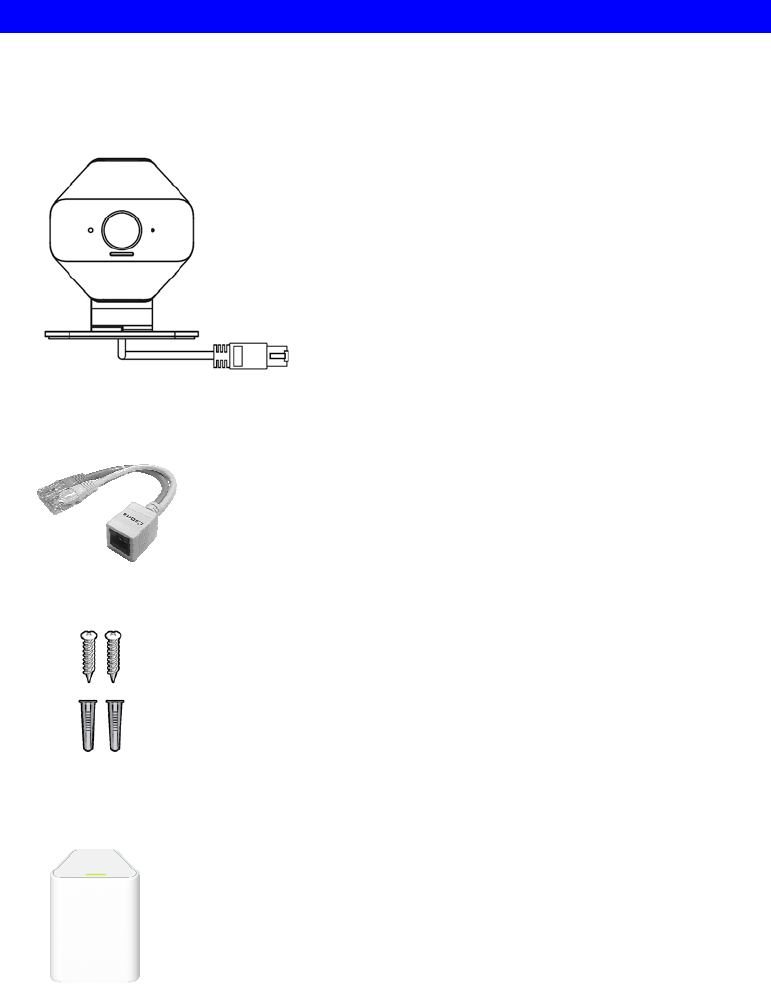
Package Contents
The following items should be included in the package: If any of these items are damaged or
missing, please contact your dealer immediately.
• xCAM Unit (with Stand and Ethernet RJ-45 pigtail) * 1
• Y-cable * 1
• Screw/Anchor x 2
• XW3 Unit * 1
6
Chapter 2
Basic Setup
This Chapter provides information on how to install and configure the xCAM.
System Requirements
• To use the Wireless interface on the wireless model, other Wireless devices must be
compliant with the IEEE802.11n, IEEE802.11b or IEEE802.11g specifications. All
Wireless stations must use compatible settings.
Mode: Infrastructure
SSID: ANY
Wireless Security: Disabled
Domain: USA
Channel No.: Auto
Installation
You must complete the following installation procedure when using the xCAM for the first
time.
Step 1 - Adding an xCAM to your network
Make sure the Router and the Touch Panel are both powered on and synchronized before
adding your xCAM. This step is required when an xCAM is used for the FIRST time. It only
needs to be done ONCE in order to configure the wireless settings for the xCAM.
Note: Skip this section if the xCAM has been set up already.
1. On the Touch Panel, click on Setting icon on the home page.
2. Enter the "Master" code.
3. Enter the "Technical code/ID", then click the "Done" button.
4. Select "Home Devices". Then choose "Cameras-> Add a Camera".
5. Click the "Next" button to check network.
2
7
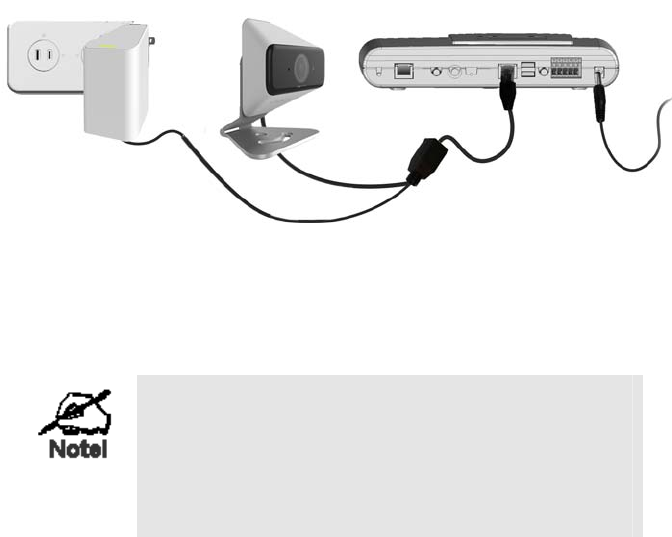
6. Install the xCAM.
Figure 3: Camera Installation
a. Connect the provided Y-cable to the XW3 and the Home Gateway.
b. Use the xCAM pigtail Ethernet RJ-45 to connect the LAN port of Y-cable.
The wireless and wired modes cannot work
simultaneously. It is recommended to first
configure the wireless settings of an xCAM using
wired mode. After configuration, disconnect the
wire and power, and power on the xCAM again.
Then, it will be ready for wireless operation.
c. Check and make sure that the Power LED is on.
7. Click "Next" button. The Touch Panel will start adding the xCAM.
8. Click "Accept" button.
9. Click "Next" button.
10. Enter the required data for the device. Click "Next".
11. Adjust the xCAM, if required. Click "Next".
12. Click "Verify Camera" button. Then click "Next".
13. Click on "Cameras" on the main screen.
14. Now you can see the live stream in the touch panel. Setup is now complete.
15. Unplug the Y-cable and power off the xCAM. Now the xCAM is ready to be placed at a
desired location, and can operate under wireless mode.
8
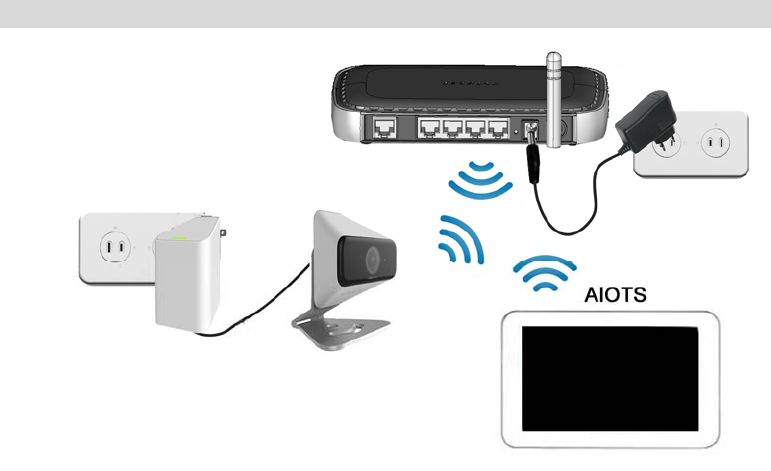
Physical Installation
Figure 4: Installation
1. Move the xCAM to where it is to be placed.
2. Connect the Ethernet cable to the LAN port of the xCAM and XW3.
3. Check and make sure that the Power LED is on.
9
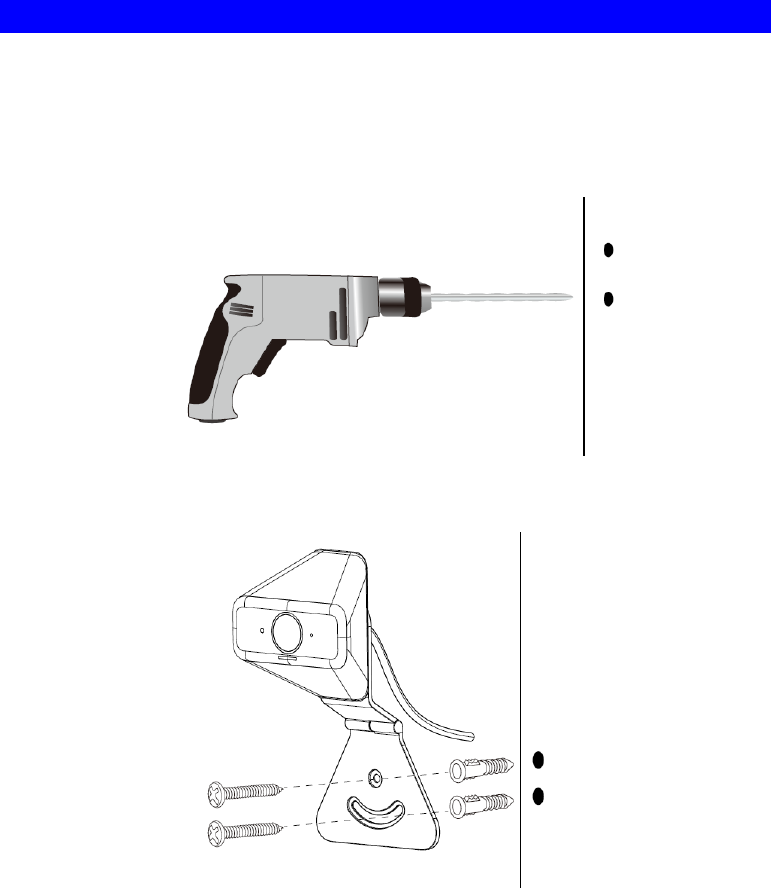
Wall Mounting
*Note: Please make sure that the xCAM is configured and added to the network before
permanent mounting.
1. Use the electric drill for boring two holes in the desired position where you would like to
install the xCAM.
2. Screw the two anchors into the holes of the wall.
3. Attach the xCAM to the wall and secure it with the two screws.
10
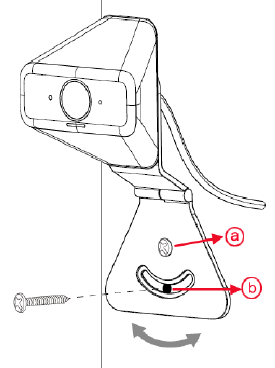
Note: The following steps are recommended:
a. Mount the camera with the screw first.
b. Adjust the angel by moving the opening of the stand. Install the other screw after the
adjustment.
4. Ensure that the xCAM is secured firmly.

11
Appendix A
Specifications
Spec
xCAM
Model xCAM
Dimensions 76.8mm (W) x 76.8mm (H) x 38.6mm (D) (without stand)
Operating Temperature 0° C to 40° C
Video compression H.264 and MJPEG
Network Interface 1 Ethernet 10/100BaseT (RJ45 pigtail)
Storage Temperature -20° C to 70° C
LED 1
Buttons 1 Reset Button
Power Adapter XW3
XW3
Model XW3
Operating Temperature 0° C to 40° C
Network Interface 1 Ethernet 10/100BaseT (RJ45 port)
Storage Temperature -20° C to 70° C
LED 1
Buttons 1 Reset Button
1 WPS Button
Antenna 2 x 2
Power Adapter AC Plug
A

12
Regulatory Approvals
FCC Statement
This equipment generates, uses and can radiate radio frequency energy and, if not installed and
used in accordance with the instructions, may cause harmful interference to radio
communications. However, there is no guarantee that interference will not occur in a particular
installation. If this equipment does cause harmful interference to radio or television reception,
which can be determined by turning the equipment off and on, the user is encouraged to try to
correct the interference by one of the following measures:
• Reorient or relocate the receiving antenna.
• Increase the separation between the equipment and receiver.
• Connect the equipment into an outlet on a circuit different from that to which the receiver
is connected.
• Consult the dealer or an experienced radio/TV technician for help.
To assure continued compliance, any changes or modifications not expressly approved by the
party responsible for compliance could void the user's authority to operate this equipment.
(Example - use only shielded interface cables when connecting to computer or peripheral
devices).
FCC Radiation Exposure Statement
This equipment complies with FCC RF radiation exposure limits set forth for an uncontrolled
environment. This equipment should be installed and operated with a minimum distance of 20
centimeters between the radiator and your body.
This device complies with Part 15 of the FCC Rules. Operation is subject to the following two
conditions:
(1) This device may not cause harmful interference, and
(2) This device must accept any interference received, including interference that may cause
undesired operation.
This transmitter must not be co-located or operating in conjunction with any other antenna or
transmitter.
This product is UL and cUL certified and comply with UL60950-1 Information Technology
Equipment applicable requirement.
Note: The country code selection is for non-US model only and is not available to all US
model. Per FCC regulation, all WiFi product marketed in US must fixed to US operation
channels only.