Shaoxing Longxin Electronics PC1002I MOBILE INTERNET DEVICE - USB PORTION User Manual
Shaoxing Longxin Electronics Co., Ltd. MOBILE INTERNET DEVICE - USB PORTION
USERS MANUAL
1
Contents
Contents
Contents
Contents
1. Appearance …………… ………………………………………………………… 2
2. Getting started …………… ……………………………………………………… 2
3. Inputting …………… …………………………………………………………… 8
4. Desktop …………… …………………………………………………………… 9
5. Browsing web pages …………… ……………………………………………… 15
6. Typical applications …………… ……………………………………………… 1 5
7. Tips and other information …………… ……………………………………… 24
8. Customized settings …………… ……………………………………………… 2 9
9. Using HDMI ………………………… ………………………………………… 40
10. Locking the device ………………………… ………………………………… 41
11. Troubleshooting ………………………… …………………………………… 41
2
1.
1.
1.
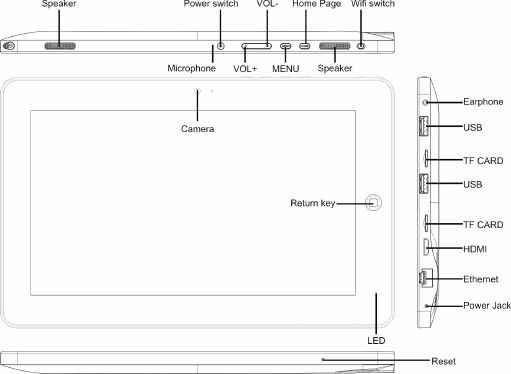
1. Appearance
Appearance
Appearance
Appearance
Production structure:
2.
2.
2.
2. Getting
Getting
Getting
Getting started
started
started
started
Note: O u r Company spares no efforts to improve the product quality. Therefore, if
there is any difference between the delivered product and the contents of the User
’
s
Guide because of the upgrading of the software, the former shall prevail. Thank you
for your understanding in this respect!
2.1
2.1
2.1
2.1 Charging
Charging
Charging
Charging the
the
the
the battery
battery
battery
battery
A battery is embedded in the handheld PC, which should be charged whenever the
3
power is low.
Power adapter:
To charge the battery, insert one end adapter into the outlet and the other end into
the power jack on the device.
1. After the adapter is inserted, the battery indicator will turn red, which means
the charging is in process. When the battery is fully charged, the indicator
will turn green. At the time, you should unplug the adapter, while the
indicator still remains green.
2. You can also use the handheld PC when the battery in it is being charged.
Note:
It takes longer to charge the battery fully when the PC with the battery is powered
on.
2.2
2.2
2.2
2.2 Using
Using
Using
Using a
a
a
a SD
SD
SD
SD card
card
card
card
Inserting SD card:
Place the SD card into the groove and press it with a finger till you hear a sound of
“ click ” . At the time, the information on the left corner of the screen says: “ SD card
being prepared. ”
Viewing the files in the SD card:
When you run t he File Browser, all files under the root directory of the card will be
displayed. At the time, you can choose “ SD card 1 ” to open the contents in the card.
Removing the SD card:
4
First close all files already opened from the card . Then c lick the menu, and select
Setup → SD card
’
s memory → SD card 1 → Uninstall SD card. At the time, the
system indicates that “ the SD card has been safely removed ” . After that, press the
card gently to allow it to project one part of it, and hold that part to pull out the
whole card. Then the screen will indicate that “ SD card was removed. ”
Note:
1. Insert the SD card properly. Otherwise, it may damage the card.
2. Do not pull out the card before the screen indicate s “ uninstall SD card ” .
Otherwise, it may damage the card.
3. It is suggest ed that the memory cards of the major brands in the market be used
so that the cards can be compatible with the device.
2.3
2.3
2.3
2.3 Hot
Hot
Hot
Hot plug
plug
plug
plug of
of
of
of SD
SD
SD
SD card
card
card
card and
and
and
and external
external
external
external flash
flash
flash
flash disk
disk
disk
disk
Do not hot plug the SD card and external flash disk when they are being used or
their contents are browsed. If, in such software as My Video, My Music and My
Photo, the files in the SD card and external flash disk are being used or browsed,
and the card or the disk is pulled out directly, it may damage them, and the program
may exits for self protection. For details of plugging and unplugging the card,
please refer to the part “ 2.2--Using the SD card ” . Before you remove the external
flash disk, you must close all its files being used.
2.4
2.4
2.4
2.4 Memory
Memory
Memory
Memory space
space
space
space
The device has three memory spaces: Internal memory, flash disk and SD card. The
5
internal memory of the device won ’ t be displayed. The folders of SD card are
displayed as “ SD card 1 ” and “ SD card 2 ” . The folders of external flash disk are
displayed as “ Flash Disk 1 ” and “ Flash Disk 2 ” . The system memory can only be
used for storing the system files, with a capacity of 2GB. The capacity of the SD
card and the external flash disk is subject to the device itself. The system can
support an SD card of 32GB at maximum.
For details of the memory, please refer to the part “ 8.6 — SD card and device
’
s
memory ”
2.5
2.5
2.5
2.5 Power-on/off
Power-on/off
Power-on/off
Power-on/off
1. Power-on: When the battery is fully charged, press the power switch for two
seconds to power on the device. At the time, the device will vibrate once. After
powered on, the system will enter the screen-locking interface, where you can
move up the unlocking icon to enter the main interface and down to the icon of
electronic photo frame to enter the interface where you can play the pictures .
2. Power-off: Press the power switch for four seconds, and the system will pop up a
interface for confirmation. Click the power-off icon at the bottom of the screen, and
the device will be turned off. At the time, it will vibrate once. Move up the
power-off icon, the system will return to the power-off interface.
3. Sleeping mode: Press the power switch for one second, and the system will enter
the sleeping mode, in which the LCD screen will turn black. In this mode, you can
press any key to wake up the system. Once waken up, the system enters the

6
screen-locking interface.
To
save energy, if the electricity is insufficient in the
sleeping mode, the system can power off itself after it is automatically powered on.
2.6
2.6
2.6
2.6 Vibration
Vibration
Vibration
Vibration
Power-on vibration: Click the setup icon the shortcut bar, and select
settings for the voice and display mode. Then select the check box behind the
“ tactile feedback ” and the vibration function is enabled.
P o wer-off vibration: In vibration mode, you can click the icon on the
shortcut bar, and select settings for the voice and display mode. Then select the
check box behind the “ tactile feedback ” and the vibration function is disabled.
2.7
2.7
2.7
2.7 Turning
Turning
Turning
Turning interface
interface
interface
interface
The interface can be turned at times when the direction of the device changes.
When you hold the device in a vertical way, the interface will show the contents in
a vertical way too. When horizontal, the interface stands horizontal too. The screen
can turn within two seconds and restore the previous state after refreshing.
2.8
2.8
2.8
2.8 External
External
External
External network
network
network
network cable
cable
cable
cable and
and
and
and flash
flash
flash
flash disk
disk
disk
disk
External
External
External
External network
network
network
network cable
cable
cable
cable
Insert the network cable into the port of Ethernet . Once logged in, the system will
automatically obtain an IP address for network access. Network access can also be
realized through manual setups.
7
External flash disk:
Insert the flash disk into the USB port. Once it is properly connected, you can save
and copy contents between the device and the PC.
2.9
2.9
2.9
2.9 Network
Network
Network
Network connection
connection
connection
connection
Cable network:
After you insert the network cable into the port designed for Ethernet on the PC, the
icon “ ETH ” will appear on status bar at the top of the screen. Then the device will
obtain the IP address automatically to access to the network. Network access can
also be realized through manual setups.
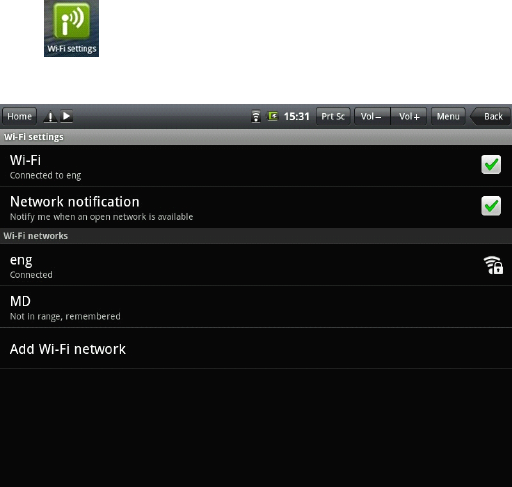
Wireless network:
1.Move leftward the WI-FI switch at the upper right part of the device to be in the
ON state;
2.Select the icon “ setup ” under the shortcut bar on the desktop;
3.Select “ wireless network ” in the setup menu;
4.Open WI-FI through the check box behind it;
5.Select “ WI-FI setup ” to set the WI-FI network;
6. All APs found by the device will be listed. You can click the AP name to be
connected;
7. If the connection is successful before the AP, the information of AP will be saved.
To start connecting, select “ connect ” in the popped-up window. To eliminate the AP
information, select “ forget ” ;
8
8. If AP is not encrypted , you can select “ connect ” in the popped-up window to
start connecting;
9. If AP is encrypted , you should enter the password in the popped-up window and
then click “ connect ” to start connecting;
10. If the connection is successful, an icon indicating the successful connection will
appear on the transfer bar at the top of the desktop.
3.
3.
3.
3. Inputting
Inputting
Inputting
Inputting
3.1
3.1
3.1
3.1 Keyboard
Keyboard
Keyboard
Keyboard
When you need to input the programs or files made up of texts and digits, the touch
keyboard will appear on the screen.
Note: The device is compatible with USB keyboard. However, a USB keyboard is
connected to the device, some keys may become ineffective.
3.2
3.2
3.2
3.2 Touch
Touch
Touch
Touch screen
screen
screen
screen
The touch screen can sense the movement of the finger, through which you can
perform the operations below:
Note: Never attempt to place objects onto the touch screen, with which the screen
can be scratched or damaged.
Click: Click the icon or option you select;
Long press:
You
can long press the icon to select you desired option, or drag the
icon to the shortcut bar at the bottom of the desktop;
Drag:
You
can drag the icons to change their positions on the desktop or between
9
pages, or move the application icons to the shortcut bar
You can also use a pen rather than you finger to operate the touch screen.
3.3 Mouse
The device is compatible with external mouse. After a mouse is connected , you can
use the mouse for such operations as clicking, selecting, dragging, sliding or for
right clicking to pop up the menu.
4.
4.
4.
4. Desktop
Desktop
Desktop
Desktop
4.1
4.1
4.1
4.1 Status
Status
Status
Status bar
bar
bar
bar
At the upmost part of the screen is the status bar, at the left of which is one software
button and right are five. The buttons are defined as Home, Prt Sc,
Vol-
and
Vol
+,
Menu AND Back . A t he status bar other information is also indicated , such as the
strength of 3G and of WI-FI signals, the state of Ethernet and battery and the time.
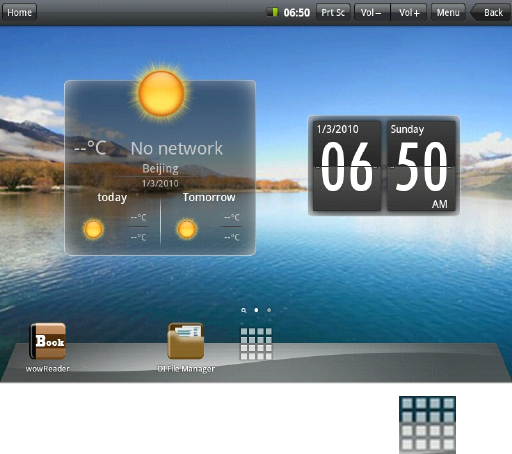
4.2 Home page
The home page of Feichu Flat Handheld PC consists of two modes: Gadget Mode
and Icon Mode. The two modes can be switched through the button at the middle of
the shortcut bar. The interface of Gadget Mode is shown in the picture below:
10
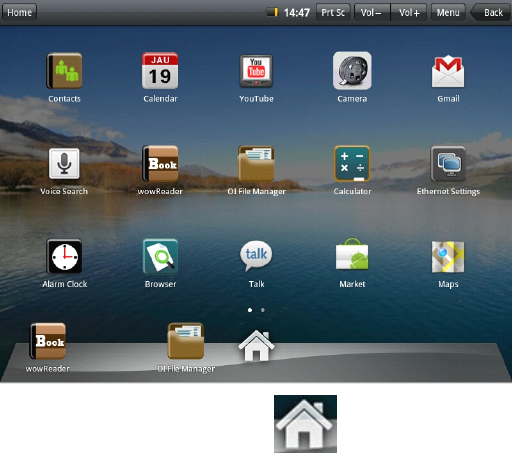
To enter the interface of application icons, click the button at the
shortcut bar, as shown below:
11
To enter the interface of Gadget Mode, click .
4.3
4.3
4.3
4.3 Shortcut
Shortcut
Shortcut
Shortcut mode
mode
mode
mode
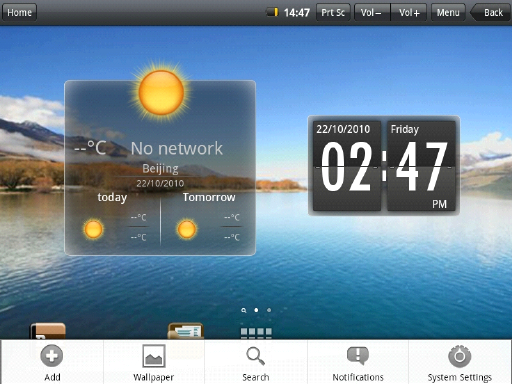
In the major interface of the Gadget Mode, you can press the menu button or click
the icon Menu at the status bar. Then the shortcut menu icons will appear , which are
Add, Wallpaper, Search, Notification, Desktop Setting and System Setting, as
shown below:
12
4.4
4.4
4.4
4.4 Shortcut
Shortcut
Shortcut
Shortcut way
way
way
way to
to
to
to add
add
add
add gadgets
gadgets
gadgets
gadgets
1.
1.
1.
1. Shortcut
Shortcut
Shortcut
Shortcut mode
mode
mode
mode
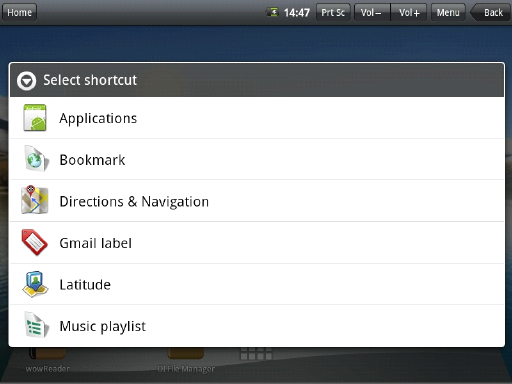
To add a shortcut mode of an application to the desktop, press
Menu → Add → Shortcut in the Gadget mode interface. Once added, you can click
the shortcut icon to perform the related operations.
13
2.
2.
2.
2. Widgets
Widgets
Widgets
Widgets
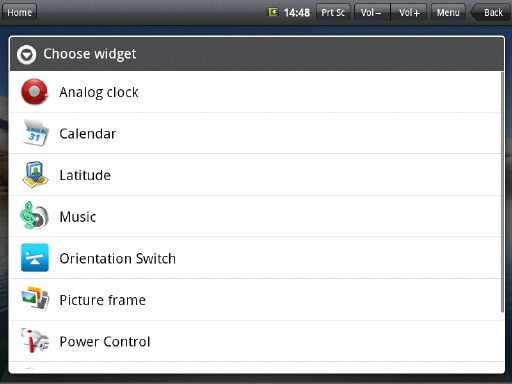
To add the widgets to the major screen, press Menu → Add → Widgets in the gadget
mode interface. And then select the widget you want to add. Once added, you can
click the shortcut icon to perform the related operations.
14
4.5
4.5
4.5
4.5 Using
Using
Using
Using gadgets
gadgets
gadgets
gadgets
The user can add, delete and install the gadgets, add and delete application icons,
and move the icons. You can also drag the icons between the operation areas or
between operation area and shortcut bar.
In the desktop gadget interface, long press the gadget icon, and a small square
graphic and a recycling bin icon at the middle of the shortcut bar will be popped up.
Drag the recycling bin icon to any place on the desktop, or drag it to the recycling
bin to delete it.
15
5.
5.
5.
5. Browsing
Browsing
Browsing
Browsing web
web
web
web pages
pages
pages
pages
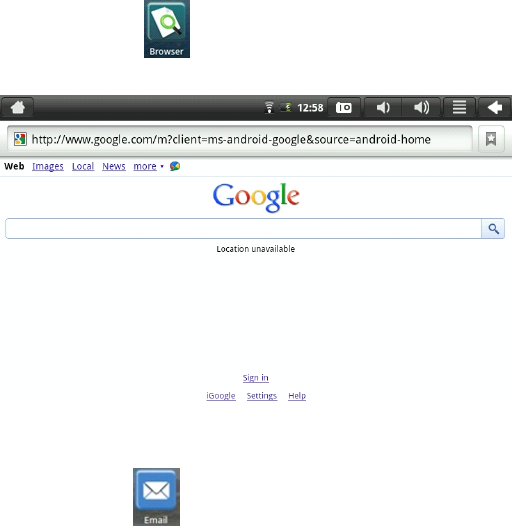
The user can access to the Internet through the browser.
Click the browser icon on the desktop, and you can access to the web
pages. The popped-up interface is shown below :
6.
6.
6.
6. Typical
Typical
Typical
Typical applications
applications
applications
applications
6.1
6.1
6.1
6.1 Email
Email
Email
Email
Click the email icon , you can enter the email interface, where you can
perform the operations below :
1. Se t the account for the email;
16
2. Write new emails;
3. Send and receive the emails;
4. Download or print the attachments.
Tip: To pop up the shortcut menu, press the menu button.
6.2
6.2
6.2
6.2 File
File
File
File explorer
explorer
explorer
explorer
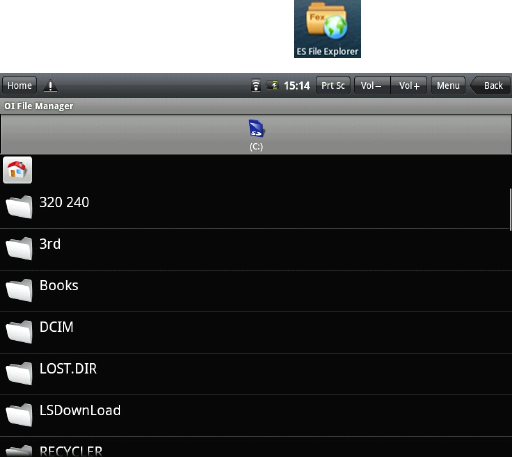
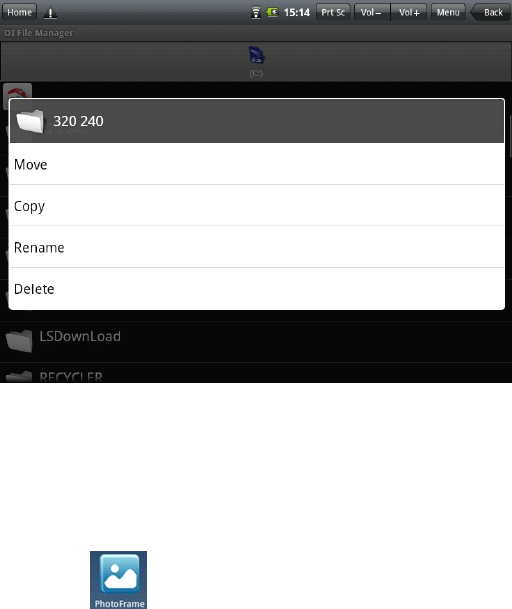
To enter the file explorer interface, click the icon , as show below:
Press the icon and hold it, the operation list will be popped up, where you can
17
perform such operations as move, copy, rename and delete, as shown below:
Installing files
If you want to install the files in the explorer, you only need to click the installation
files with an extension name “ APK ” . At the time, a prompt window will be popped
up, and then you can select Install to install the fife into the device.
6.3
6.3
6.3
6.3 Photo
Photo
Photo
Photo Frame
Frame
Frame
Frame
Click the icon to enter the interface for picture browsing. You can also

18
play the pictures in a slide mode. After you click the button Menu, the shortcut
menu of the electronic photo frame will be popped up, with which you can perform
the operation s below:
1. Random playing;
2. Sharing the pictures being played;
3. Setting time intervals for playing ;
4. Setting the fold for playing ;
5. Selection setup items.
6.4
6.4
6.4
6.4 Gallery
Gallery
Gallery
Gallery
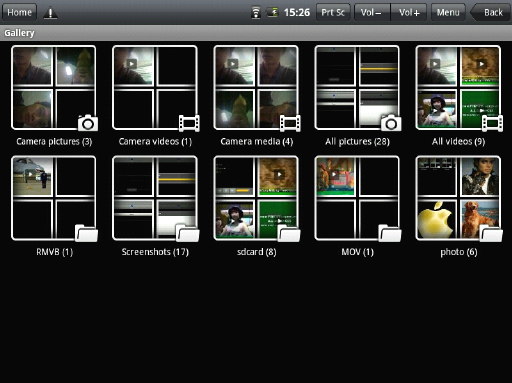
Click the icon for the multimedia library, and the interface will be shown as
below:
19
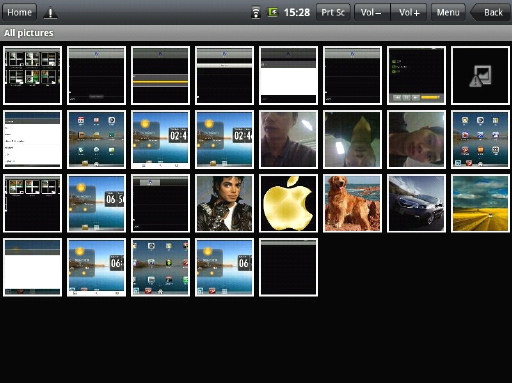
1. Click the menu button to pop up the shortcut menu, where such items as All
Pictures, Multi-Option and Camera Settings are available.
20
2. Click All Pictures, and system will enter the slide playing mode.
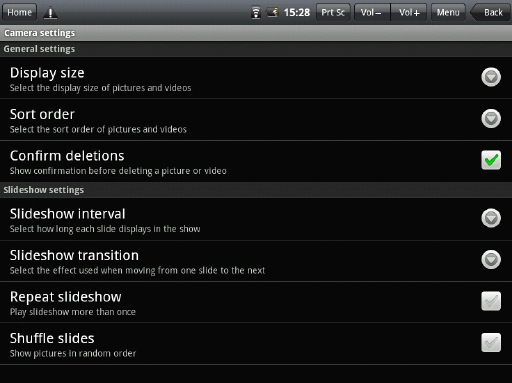
3. Click Camera Settings, and you can enter the setup interface, as shown below :
21
4. Click the thumbnail at the picture library interface , and you can view the picture
in full screen. Click the screen, and the zoom-in and zoom-out items will be popped
up, where you can perform the related operations. Press the menu button, and the
system will pop up the shortcut menu, where you can realize such operations as
sharing picture, deleting picture and cropping , setting as wallpaper and clicking
icon of contact people. Go on clicking, and you can view the details of the picture,
display the picture onto the map, play the picture in a slide mode, etc.
5. Long press the thumbnail at the picture library interface , the system will pop up
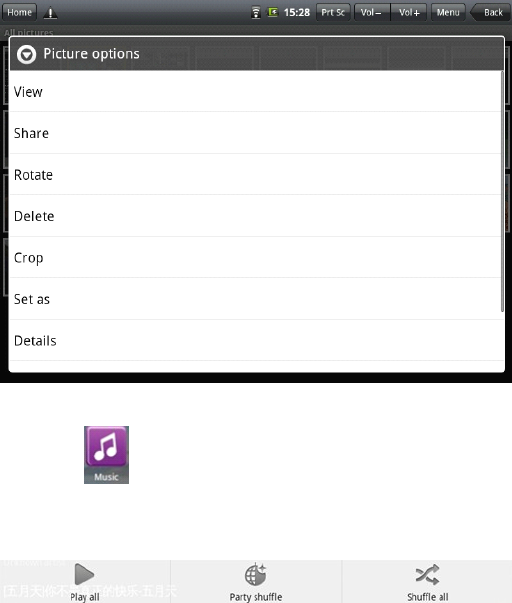
22
the option interface, as shown below:
6.5
6.5
6.5
6.5 Music
Music
Music
Music
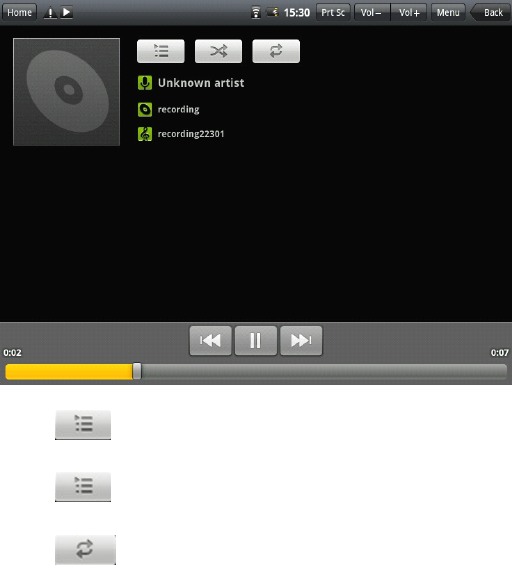
Click the icon to enter the music mode.
After you click the menu, the menu shown below will be popped up. You can select
Play All, Party Shuffle or S h uffle All.
23
To enter the playing interface, click the song.
1. Click to enter the play list;
2. Click to enter the mode of Party Shuffle;
3. Click to switch over between Play All mode and Play Single mode;
4. Click the menu button to perform the operations below: Delete the current track,
24
add the current track to the play list or jump to the music library.
6.6 Camera
Click to enter the mode for shooting pictures.
To operate the device in this application:
1. Click the icon at the lower right angle to shoot the picture. You can save the
picture to DCIM/CAMERA under SD root directory.
2. Move the slide block on the icon at the right, and you can change the shoot
mode to video mode.
3. Click the icon on the upper right angle to view the previous picture, where
you can for the picture perform such operations as deletion, sharing and
setting as wallpaper or as contact person icon. Click Finish to return to the
shooting interface.
4. Move the left icon rightward, and you can set such items as storage place,
picture size and picture quality for the camera.
7.
7.
7.
7. Tips
Tips
Tips
Tips and
and
and
and other
other
other
other information
information
information
information
7.1
7.1
7.1
7.1 Some
Some
Some
Some fast
fast
fast
fast operations
operations
operations
operations
To return to the home page, click .
To adjust the volume, click /
25
7.2
7.2
7.2
7.2 Setting
Setting
Setting
Setting for
for
for
for shortcut
shortcut
shortcut
shortcut operations
operations
operations
operations
7.2.1
7.2.1
7.2.1
7.2.1 Access
Access
Access
Access to
to
to
to Internet
Internet
Internet
Internet in
in
in
in a
a
a
a wireless
wireless
wireless
wireless way
way
way
way
Click to enter the interface for wireless access to Internet, as shown
below:
7.2.2
7.2.2
7.2.2
7.2.2 Access
Access
Access
Access to
to
to
to I
I
I
I n
n
n
n ternet
ternet
ternet
ternet
Click the internet access icon to access to the Internet. You can set the IP address
manually, with the interface shown below:
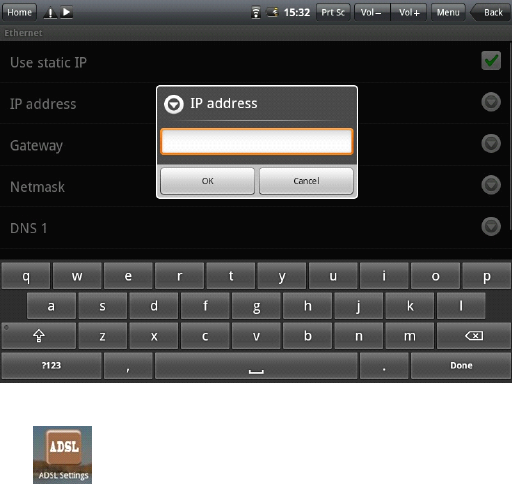
26
7.2.3
7.2.3
7.2.3
7.2.3 Access
Access
Access
Access to
to
to
to Internet
Internet
Internet
Internet through
through
through
through ADSL
ADSL
ADSL
ADSL
Click to reach the interface for dialing settings, as shown below:
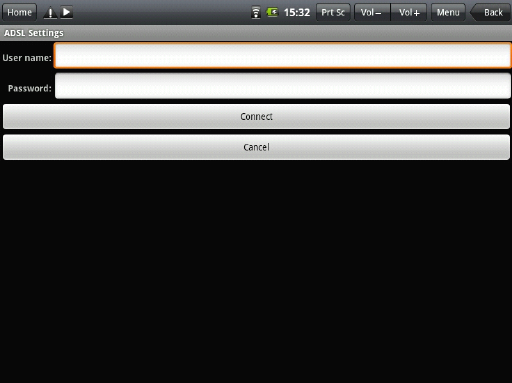
27
After you enter the user name and password, you can click “ connect ” to access to
the Internet.
7.2.4
7.2.4
7.2.4
7.2.4 Access
Access
Access
Access to
to
to
to the
the
the
the Internet
Internet
Internet
Internet in
in
in
in 3G
3G
3G
3G mode
mode
mode
mode
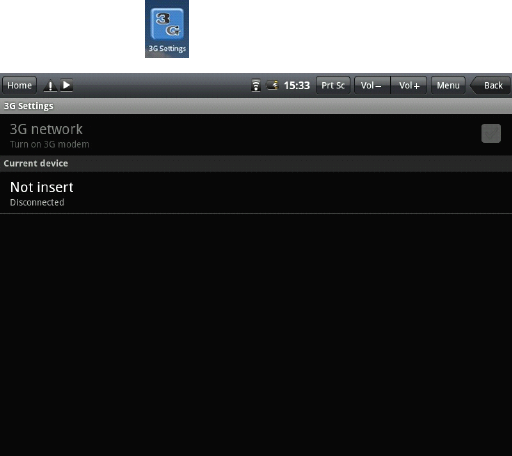
First of all you should buy a 3G wireless internet access card from China Telecom,
China M o bile or China Unicom. At present, the network adapter which supports 3G
internet access is branded as “ Wangxun I916. ”
As o u r company spares no efforts to improve the product quality, the software
contained in the products is being upgraded continuously, which may be compatible
28
with more models. At any rate, the delivered product shall prevail.
To access to the I n ternet in 3G mode, you must buy card with models mentioned
above.
To
do that, you can place the card you bought into the 3G network adapter,
and insert the adapter into the USB port of the device. At the time, the indicator for
3G Internet access will be illuminated. This means you can access to the Internet
now, so please just click .
Select the check box behind the 3G network item. At the time, you will the 3G icon
29
appearing in the screen, which means you can surfer on the Internet now.
7.3
7.3
7.3
7.3 About
About
About
About the
the
the
the battery
battery
battery
battery
The large-size LCD screen of the device will consume quite a lot electric power.
To
extend the working time of the battery, you may reduce the use of some functions.
1. Watch movies, listen to music or shoot pictures;
2. Brightness: Press Menu → Setup → Voice/Display(display setting) → Brightness
(lower down the brightness);
3. Network search: Press Menu → Setup → Wireless Network → Connect to Wireless
Network → WIFI Setting → Notification;
4. In terms of WIFI use, please set the WIFI switch at the upper right angle of the
screen to OFF state (turn off WIFI).
8.
8.
8.
8. Customized
Customized
Customized
Customized settings
settings
settings
settings
To customize the settings, click on the shortcut menu.
8.1
8.1
8.1
8.1 Wireless
Wireless
Wireless
Wireless operation
operation
operation
operation and
and
and
and network
network
network
network
To turn on or off WIFI, you can set the WIFI switch on the upper angle of the
device as ON or OFF when the WIFI items are properly configured.
Access to the Internet in a wireless way
If you want to set and manage connection point designed for the wireless access to
the I n ternet, please press Menu → System Settings → Wireless Network → WIFI
30
setting. For details, please refer to the section “ 7.2.1 Access
Access
Access
Access to
to
to
to Internet
Internet
Internet
Internet in
in
in
in a
a
a
a
wireless
wireless
wireless
wireless way.
way.
way.
way.
Settings for 3G network
If you want to set and manage connection point designed for 3G network, please
press Menu → System Settings → Wireless Network → 3G network setting. For
details, please refer to the section “ 7.2.4
7.2.4
7.2.4
7.2.4 Access
Access
Access
Access to
to
to
to the
the
the
the Internet
Internet
Internet
Internet in
in
in
in 3G
3G
3G
3G mode.
mode.
mode.
mode. ”
8.2
8.2
8.2
8.2 Access
Access
Access
Access to
to
to
to the
the
the
the I
I
I
I n
n
n
n ternet
ternet
ternet
ternet
Access to broadband network and Ethernet
For details, please refer to the section “ 7.2.2
7.2.2
7.2.2
7.2.2 Access
Access
Access
Access to
to
to
to Internet
Internet
Internet
Internet ” and the section
“7.2.3
7.2.3
7.2.3
7.2.3 Access
Access
Access
Access to
to
to
to Internet
Internet
Internet
Internet through
through
through
through ADSL.
ADSL.
ADSL.
ADSL. ”
8.3
8.3
8.3
8.3 Voice
Voice
Voice
Voice and
and
and
and Display
Display
Display
Display
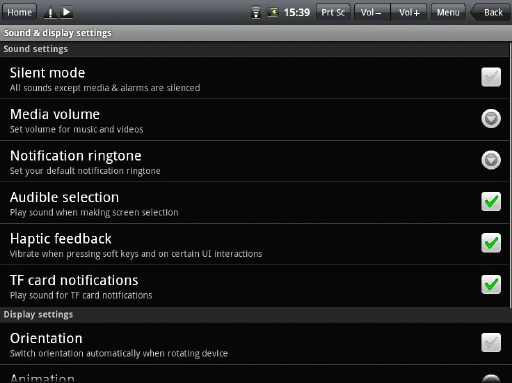
Set the ringing, notification and screen brightness.
31
Mute mode
To set the system to a mute, except for medium and alarm clock, you can press
Menu → System Settings → Voice and Display (voice setting) → Mute.
Medium volume
To set the volume for the music and video, you can press Menu → System
Settings → V oice and Display (voice setting) → Medium V olume.
Notification ringing
To set the default notification ringing, you can press Menu → System
32
Settings → V oice and Display (voice setting) → Notification Ringing.
Selecting the operation ringing
If you desire that there is a sound when a selection is made through the screen, you
can press Menu → System Settings →
Voice
and Display (voice setting) →
T
actile
Feedback.
If you want to use the soft key and use some UI interacted vibrations, you can press
Menu → System Settings → Voice and Display (voice setting) →
T
actile Feedback.
SD card notification
If you want a sound at the time of SD card notification, you can press
Menu → System Settings → Voice and Display (voice setting) → SD Card
Notification.
Direction
After you select Menu → Setup → V oice and Display(voice setting) → Direction, you
can set the system as such that when the device turns it automatically changes the
direction of the interface. If the check box is ticked, the device will automatically
change its direction of the interface as it turns.
Animation
To allow all or some window animations to be played, press Menu → System
Settings → V oice and Display (voice setting) → Animation.
Brightness
To adjust the brightness of the screen, press Menu → System Settings → Voice and
33
Display (voice setting) → Brightness.
Standby mode
To adjust the delayed time for screen locking, press Menu → System
Settings → V oice and Display (voice setting) → Standby Mode.
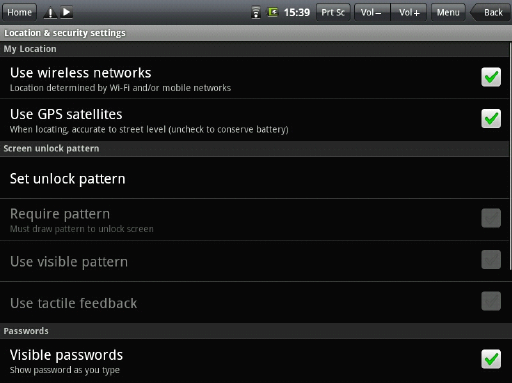
8.4 Position and safety
Settings for GPS system and personal safety.
GPS
To activate GPS operation (can be accurate to the street level), press
34
Menu → System Settings → Positin and Safety → Using GPS.
Password
To display the characters of the password when it is entered, press Menu → System
Settings → Positin and Safety → Password Display.
Saving credentials
To use and install safety credential, press Menu → System Settings → Positin and
Safety, and then perform the related operations under the root directory of the
credential. For example, you can set the password for the safety credential.
8.5
8.5
8.5
8.5 Application
Application
Application
Application
Unknown resources
Select this item to permit that application provided by the unauthorized electronic
market can be installed
Management for application
To manage or delete the installed application , press Menu → System
Settings → Application → Management.
Running services
To view or control the running service, press Menu → System
Settings → Application → Running Services.
Development
To set the option for development of application, press Menu → System
Settings → Application → Development.
35
8.6
8.6
8.6
8.6 SD
SD
SD
SD card
card
card
card and
and
and
and system
system
system
system memory
memory
memory
memory
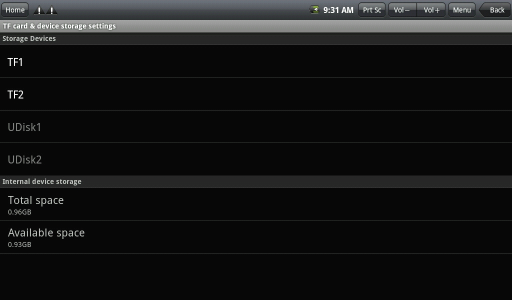
View the remaining memory space .
Memory
Memory
Memory
Memory devices
devices
devices
devices (SD
(SD
(SD
(SD card
card
card
card and
and
and
and flash
flash
flash
flash disk)
disk)
disk)
disk)
To view or perform operation s for the memory devices, such as uninstalling, press
Menu → System Settings → SD card and system memory. Then select a memory
device under the related root directory, like SD card 1. After you enter the interface
of the memory device, you can view the total capacity and the remaining capacity,
or you can uninstall it. The interface is shown below.
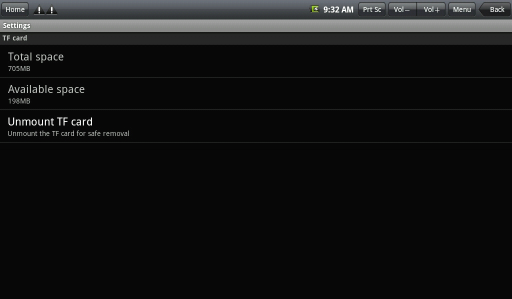
36
System
System
System
System memory
memory
memory
memory
To view the system memory, press Menu → System Settings → SD Card and System
Memory. Under its root directory, you can view the system memory.
8.7
8.7
8.7
8.7 OSD
OSD
OSD
OSD Language
Language
Language
Language and
and
and
and keyboard
keyboard
keyboard
keyboard
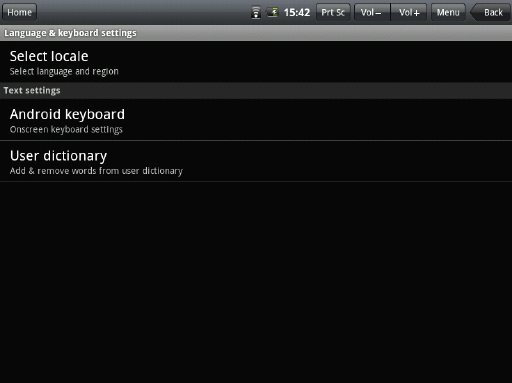
In this item, you can set the OSD language and region 、character entering and
automatic correction.
37
Select
Select
Select
Select OSD
OSD
OSD
OSD language
language
language
language and
and
and
and region
region
region
region
To select the OSD language and region, press Menu → System Settings → OSD
language and keyboard → Select OSD language .
Android
Android
Android
Android keyboard
keyboard
keyboard
keyboard
To set Android keyboard , press Menu → System Settings → OSD language and
keyboard → Android keyboard .
User-defined dictionary
To add words into or delete words from the user-defined dictionary, press
38
Menu → System Settings → OSD language and keyboard → User-defined dictionary.
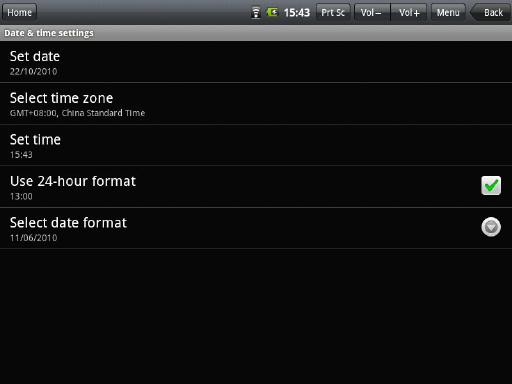
8.8 Date and time
To set the date, time, time zone, time system and format, you can press
Menu → System Settings → Date and time.
8.9 Screen calibration
To calibrate the screen, press Menu → System Settings → Screen calibration. The n
calibrate the touch screen by following the prompts. After that, the system will
prompt you to return to the settings list.

39
8.10 About the device
In this item, you can view the information on law, device status and software
version.
S tatus
To view the status of the battery, power-on time and WIFI address, press
Menu → System Settings → About the device → Status.
Information on law
To view the information on law, press Menu → System Settings → About the
40
device → Information on law.
Model
To view the mode, press Menu → System Settings → About the device → Model.
Firmware version
To view the firmware version, press Menu → System Settings → About the
device → Firmware version.
Version No.
To view the version No., press Menu → System Settings → About the
device → Version No.
9.
9.
9.
9. Using
Using
Using
Using HDMI
HDMI
HDMI
HDMI
With HDMI, video contents being played by the flat handheld PC can be
transferred to HDMI monitor (like a TV set with HDMI port) for playing. The
outputs the PC supports can offer a maximum resolution of 720P. The related
operations are as follows:
1. Power on the flat handheld PC.
2. Connect Feichu to HDMI monitor with HDMI cable and power on the
monitor. At the time, on the status bar messages about HDMI connection will
be popped up.
3. Play the video files on the flat handheld PC.
4. Press MENU, and the PC
’
s screen will turn black, a process lasting about 5
seconds during which the contents are being switched to HDMI monitor.
You

41
may wait with patience.
5. You can transfer the contents to the PC again by any of the four ways below:
1) System transfers to PC automatically after the playing is completed.
2) Press Menu during playing to switch the video contents to the PC.
3) Pull out the HDMI cable during playing, after which the video contents will be
transferred to the PC.
4) Press Back to exit the playing mode, after which the video contents will be
transferred to the PC.
10.
10.
10.
10. Locking
Locking
Locking
Locking the
the
the
the device
device
device
device
Unlocking screen/device:
When the system is the sleeping mode, you can short press the power switch to
enter the interface for screen locking. To unlock the screen, move the corresponding
icon upward, and the system will enter the state prior to sleeping mode.
11.
11.
11.
11. Troubleshooting
Troubleshooting
Troubleshooting
Troubleshooting
11.1
11.1
11.1
11.1 Turning
Turning
Turning
Turning off
off
off
off applications
applications
applications
applications
Once an application is turned on, it will occupy some space, and if there are too
many applications that have been turned on, it will slow down the running speed of
the device. Therefore, you should timely close those applications not being used, so
that more space can be saved and the device can run faster.
To turn off the application, click at the shortcut bar, and the system will
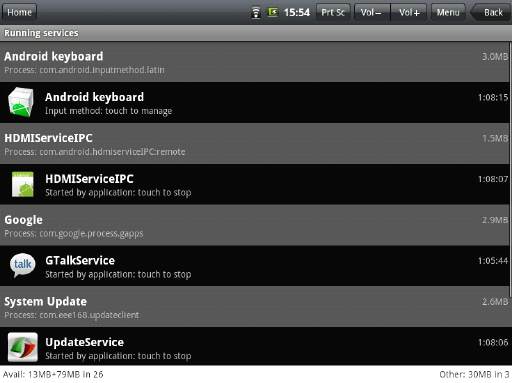
42
enter the interface of system settings, where you can select Application → Running
Services, as shown below:
Click the application to be closed, and the system will pop up a window which asks
you whether you need to stop the service window, as shown below:
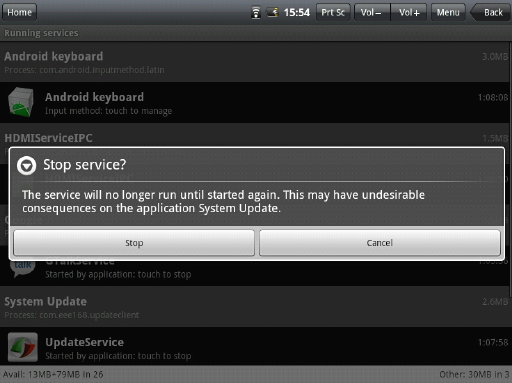
43
Click Stop, and the application will be closed and disappear within the window
being used.
11.2 Compulsory power-off
1. Press the power switch and hold down for 7 seconds, the device will be powered
off in a compulsory way.
2. Press Rest at the right lower part of the device, the device will be powered off in
a compulsory way.
44
11.3
11.3
11.3
11.3 Restore
Restore
Restore
Restore defaults
defaults
defaults
defaults
If you want to restore the factory defaults and delete all other data, please press
Menu → System Settings → Privacy → Defaults
Warning: Once you select Reset, the Google account, data and settings of the
system and application and the downloaded applications will be deleted. Thus , be
careful when using this function.
This device complies with part 15 of the FCC rules. Operation is subject to the
following two conditions: (1) this device may not cause harmful interference,
and (2) this device must accept any interference received, including
interference that may cause undesired operation.
NOTE: The manufacturer is not responsible for any radio or TV interference
caused by unauthorized changes and modifications to this equipment. Such
changes and modifications could void the user’s authority to operate the equipment.
NOTE: This equipment has been tested and found to comply with the limits for
a Class B digital device, pursuant to part 15 of the FCC Rules. These limits
are designed to provide reasonable protection against harmful interference in
a residential installation. This equipment generates uses and can radiate
radio frequency energy and, if not installed and used in accordance with the
instructions, may cause harmful interference to radio communications.
However, there is no guarantee that interference will not occur in a particular
installation.
If this equipment does cause harmful interference to radio or television
reception, which can be determined by turning the equipment off and on, the
user is encouraged to try to correct the interference by one or more of the
following measures:
- Reorient or relocate the receiving antenna.
- Increase the separation between the equipment and receiver.
-Connect the equipment into an outlet on a circuit different from that to which
the receiver is connected.
-Consult the dealer or an experienced radio/TV technician for help.