Sharp AL 1035 WH A User Manual To The Ee8c4a25 6e16 4723 A472 242b459e627d
User Manual: Sharp AL-1035-WH A to the manual
Open the PDF directly: View PDF ![]() .
.
Page Count: 50
- CONTENTS
- INTRODUCTION
- BEFORE USING THE MACHINE
- COPY FUNCTIONS
- PRINTER FUNCTIONS
- BASIC PRINTING
- PRINTER DRIVER SETUP SCREEN
- SETTING ADVANCED PRINTER FUNCTIONS
- PRINTING MULTIPLE PAGES ON ONE PAGE (N-Up Printing)
- FITTING THE PRINTED IMAGE TO THE PAPER (Fit To Paper Size)
- ROTATE THE PRINTED IMAGE 180 DEGREES (Rotate 180 degrees)
- ENLARGING/REDUCING THE PRINTED IMAGE (Zoom)
- ADJUSTING THE IMAGE EXPOSURE (image adjustment)
- ADDING A WATERMARK TO PRINTED PAGES (Watermark)
- SAVING FREQUENTLY USED PRINT SETTINGS
- SCANNER FUNCTIONS
- TROUBLESHOOTING
- ROUTINE MAINTENANCE

Scanner
Copier
Printer
Model: AL-1035-WH
AL-1035-WH A
DIGITAL MULTIFUNCTIONAL SYSTEM
OPERATION GUIDE

1
CONTENTS
1BEFORE USING THE MACHINE
PART NAMES AND FUNCTIONS ..................... 3
●OPERATION PANEL ........................................5
POWER ON AND OFF....................................... 6
●POWER ON ......................................................6
●POWER OFF ....................................................6
LOADING PAPER.............................................. 7
●PAPER..............................................................7
●PAPER FEEDING.............................................9
OPERATION IN COPY, PRINT AND SCAN
MODE............................................................... 10
SOFTWARE INSTALLATION.......................... 11
●BEFORE SOFTWARE SETUP.......................11
●SOFTWARE INSTALLATION .........................12
●CONNECTING TO THE COMPUTER ............14
2COPY FUNCTIONS
NORMAL COPYING ........................................ 15
●MAKING A COPY DARKER OR LIGHTER ....16
●SETTING THE NUMBER OF COPIES ...........16
REDUCTION/ENLARGEMENT ....................... 17
●MANUAL RATIO SELECTION........................17
CONVENIENT COPY FUNCTIONS................. 18
●COPYING TWO ORIGINALS ONTO A SINGLE
SHEET OF PAPER (2 IN 1 Copy) ..................18
●ID CARD COPY ..............................................19
3PRINTER FUNCTIONS
BASIC PRINTING ............................................ 20
●ACCESSING THE PRINTER DRIVER FROM
THE "START" BUTTON..................................21
PRINTER DRIVER SETUP SCREEN .............. 22
SETTING ADVANCED PRINTER FUNCTIONS
.......................................................................... 23
●PRINTING MULTIPLE PAGES ON ONE PAGE
(N-Up Printing) ................................................23
●FITTING THE PRINTED IMAGE TO THE
PAPER (Fit To Paper Size).............................24
●ROTATE THE PRINTED IMAGE 180
DEGREES (Rotate 180 degrees) ...................24
●ENLARGING/REDUCING THE PRINTED
IMAGE (Zoom)................................................25
●ADJUSTING THE IMAGE EXPOSURE (image
adjustment) .....................................................25
●ADDING A WATERMARK TO PRINTED
PAGES (Watermark)...................................... 26
SAVING FREQUENTLY USED PRINT
SETTINGS ....................................................... 27
●SAVING SETTINGS AT THE TIME OF
PRINTING (Custom Settings) ........................ 27
4SCANNER FUNCTIONS
SCANNING OVERVIEW.................................. 28
SCANNING FROM THE MACHINE (SCAN to
USB)................................................................. 29
SCANNING FROM THE TWAIN COMPLIANT
APPLICATIONS (PC scanning) ..................... 30
●SCANNER DRIVER SETTINGS .................... 31
●PREVIEW SCREEN ...................................... 32
5TROUBLESHOOTING
TROUBLESHOOTING..................................... 33
●MACHINE/COPYING PROBLEMS................ 34
●SOFTWARE INSTALLATION PROBLEMS ... 36
●PRINTING AND SCANNING PROBLEMS .... 38
MISFEED REMOVAL ...................................... 41
INDICATOR DISPLAY OF THE MACHINE
STATUS AND SOLUTION............................... 42
ERROR CODE AND SOLUTION..................... 43
6ROUTINE MAINTENANCE
REPLACING TONER CARTRIDGES.............. 45
REPLACING DRUM CARTRIDGES................ 46
CLEANING THE DOCUMENT GLASS AND
DOCUMENT COVER....................................... 47
CARTRIDGE CLEANING MODE .................... 47
ABOUT SUPPLIES.......................................... 48

2
INTRODUCTION
This Operation Guide describes how to use the AL-1035-XX digital multifunctional system. Please substitute the
name of your model for "XX".
• For any "AL-XXXX" in this manual, please replace the "XXXX" with your model.
• The screen images and steps in this manual are for the Windows XP version. The screen images for other
Windows versions may be different.
• For the information on the operating system, please refer to your operating system manual or online Help.
• This manual has been prepared to cover as many issues as possible. If you have any questions, please contact
the dealer or nearest authorized service representative.
• This product has undergone strict quality control and inspection procedures. In the unlikely event that a defect or
other problem is discovered, please contact your dealer or nearest authorised service representative.
• Aside from instances provided for by law, SHARP is not responsible for failures occurring during the use of the
product or its options, or failures due to incorrect operation of the product and its options, or other failures, or for
any damage that occurs due to use of the product.
The display screens, messages, and key names shown in this Guide may differ from those on the actual machine
due to product improvements and modifications.
Note
Warning
• Reproduction, adaptation or translation of the contents of this guide without prior written permission is prohibited, except as
allowed under copyright laws.
• All information in this guide is subject to change without notice.
3
1Chapter 1
BEFORE USING THE MACHINE
This chapter contains basic information that should be read before using the machine.
PART NAMES AND FUNCTIONS
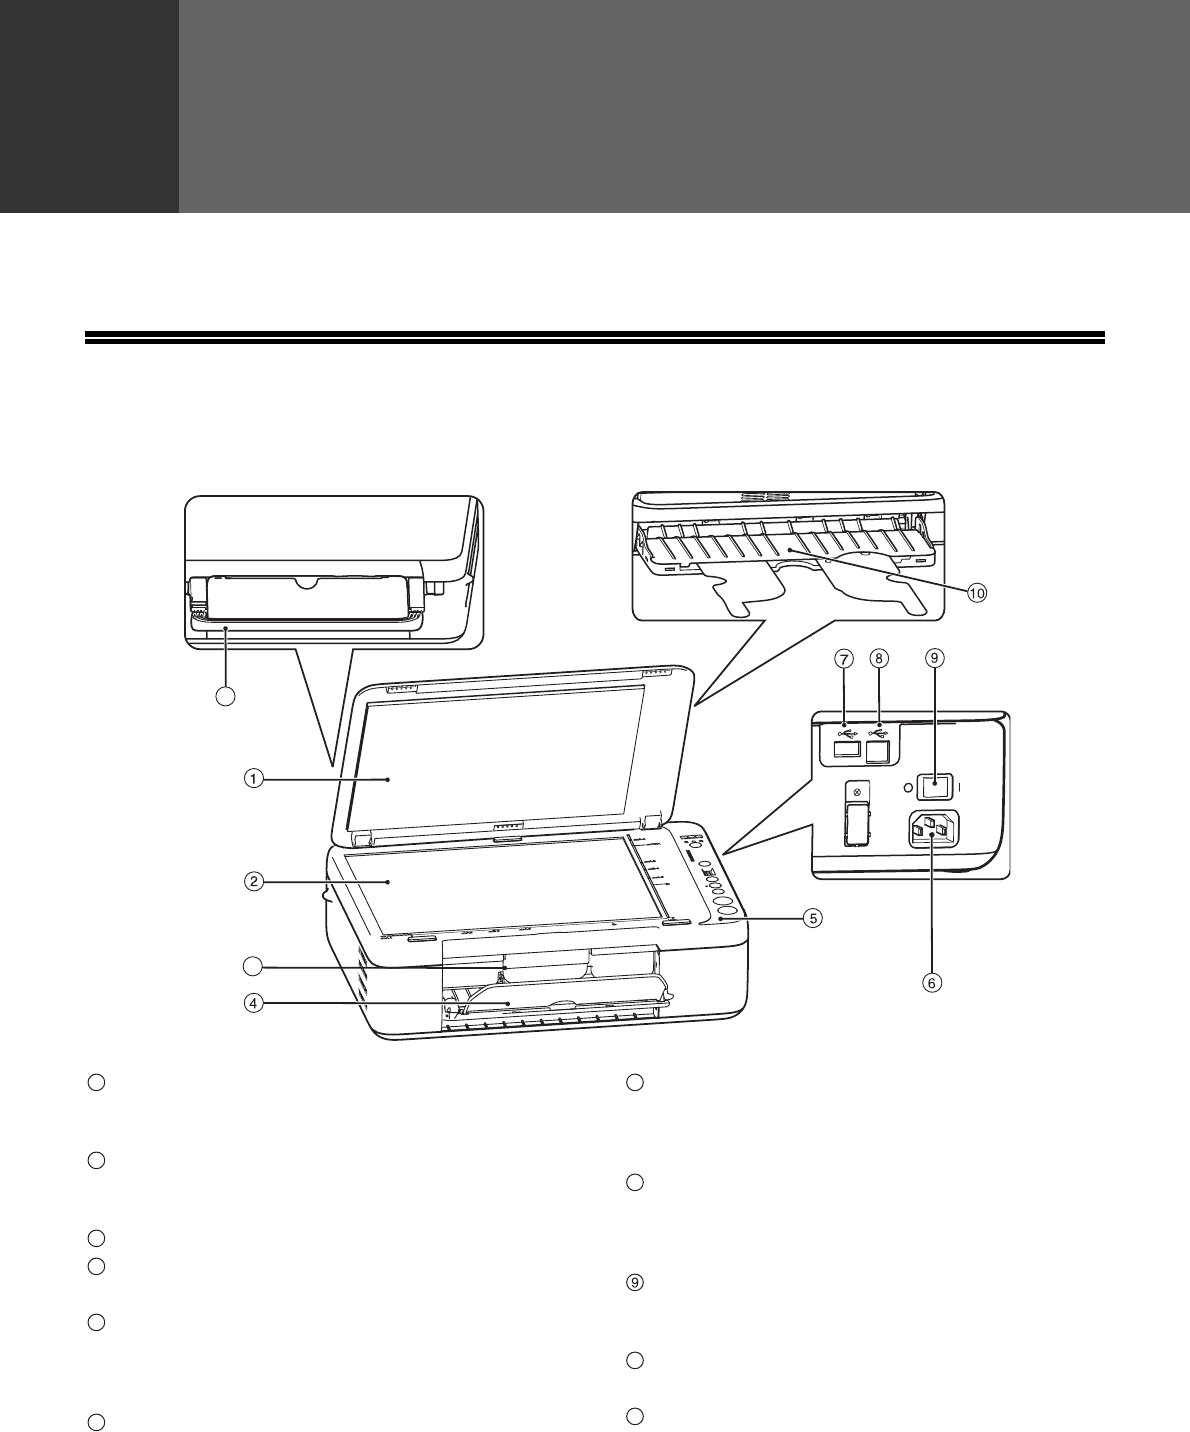
Exterior
Document cover
Open this cover to make copies from the document
glass.
Document glass
Place an original that you wish to scan face down
here. (Page 15)
Scanner document glass locking handle
Feed tray
Expand this tray to place paper. (Page 9)
Operation panel
It contains the operation keys and indicators and is
used to select functions and enter the number of
copies. (Page 5)
Power line connector
USB 2.0 connector (A type)
It is used to connect the USB device (USB
memory) to the machine to use the "SCAN to
USB" function. (Page 29)
USB 2.0 connector (B type)
It is used to connect the machine to your computer
to use the print and scan functions.
(Page 14)
Power switch
Press to turn the machine power on and off.
(Page 6)
Output tray
Pull this tray out to receive the finished document.
Handle
Pull this handle to move the machine easily.
11
3
1
2
3
4
5
6
7
8
10
11

4
BEFORE USING THE MACHINE
Interior
Support bar
Support the machine cover with this bar when
replacing the toner cartridge and drum cartridge.
To close the machine cover, support the cover with
your right hand, gently lift the green-marked
support bar and pull to the half-close position, and
then gently lift the bar again until the cover is
completely closed.
Toner cartridge
It contains toner. When the machine runs out of
toner, please replace with a new toner cartridge.
(Page 45)
Drum cartridge
Copy images are formed on the drum cartridge.
When the drum cartridge reaches life, please
replace with a new drum cartridge.(Page 46)
14
13
12
12
13
14
5
BEFORE USING THE MACHINE
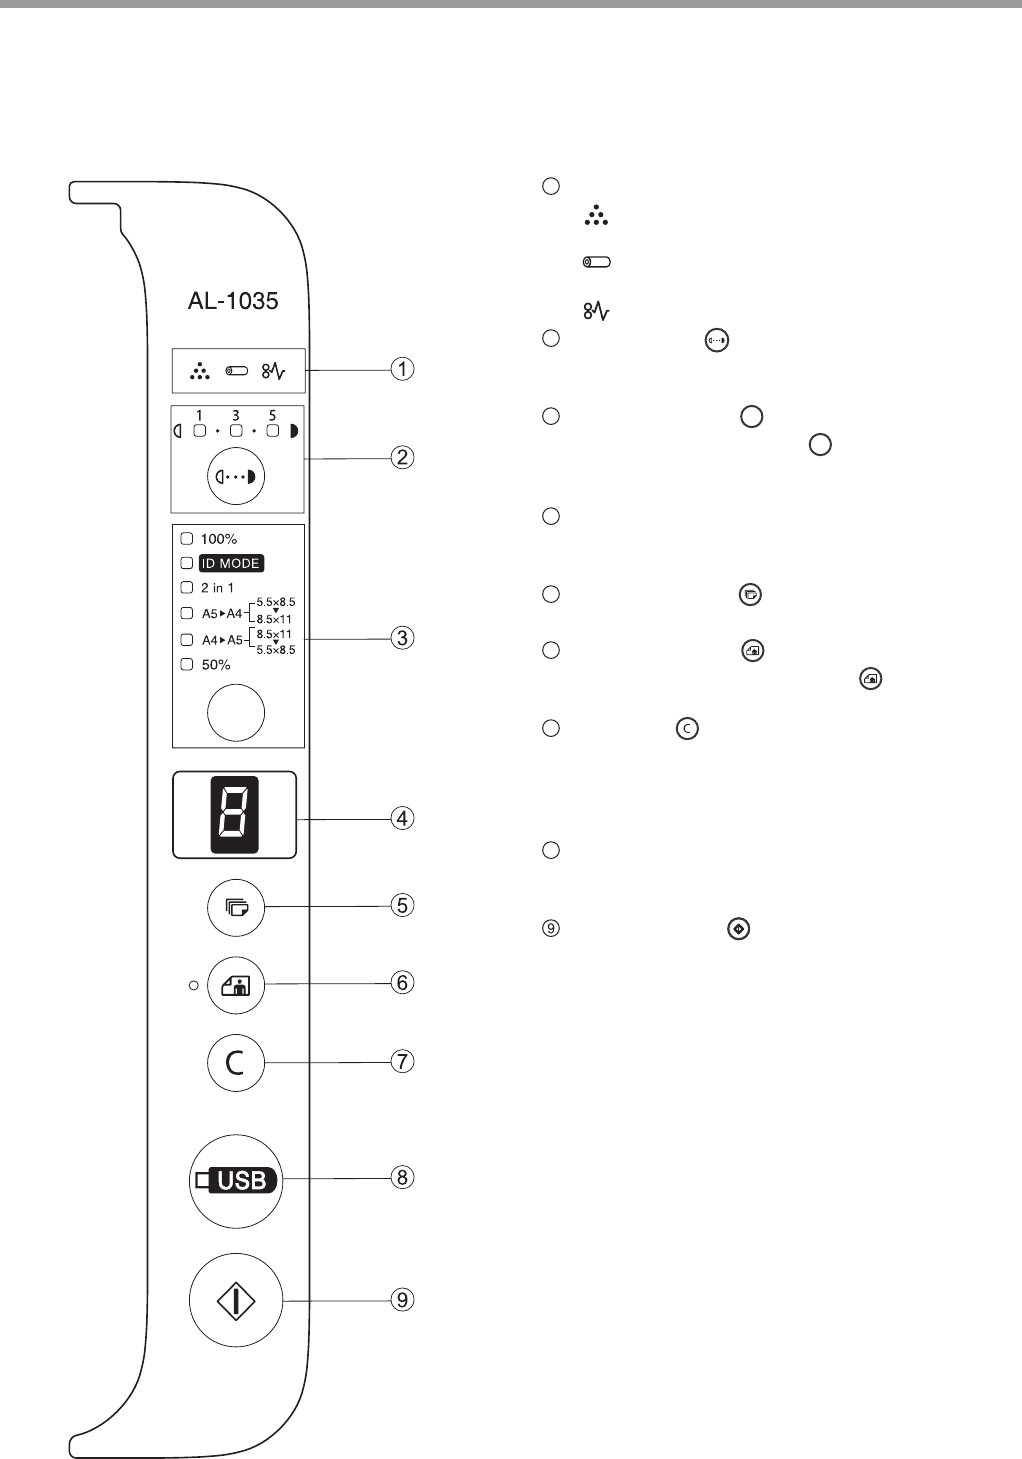
OPERATION PANEL
Alarm indicator
[ ] "Toner cartridge replacement required"
indicator(Page 45)
[ ] "Drum cartridge replacement required"
indicator(Page 46)
[ ] "Misfeed" indicator(Page 42)
Density key ( )/Indicator
It is used to adjust the MANUAL or PHOTO
exposure level.(Page 16)
Mode select key ( )
Press the mode select key
()
, you can select the
ratio (100
%
, A5
X
A4, A4
X
A5 and 50
%
), ID MODE
and 2-in-1 mode.
(Page 17, Page 18, Page 19)
LED indicator
It is used to indicate the number of copies, "out of
paper", "misfeed" and error code. (Page 42)
Copy Count key ( )
It is used to set the number of copies.(Page 15)
Photo mode key ( )/Indicator
Press the [PHOTO MODE] key () to copy the
image originals (e.g., photo). (Page 16)
Clear key ( )
It is used to clear the displayed number of copies
or to terminate a copying task. The total number
will be displayed if you press and hold this
key.(Page 6)
SCAN to USB key
Press this key to scan the originals to the USB
device (USB memory). (Page 29)
Copy Start key ( )
Press this key to copy start. (Page 15)
1
2
3
4
5
6
7
8

6
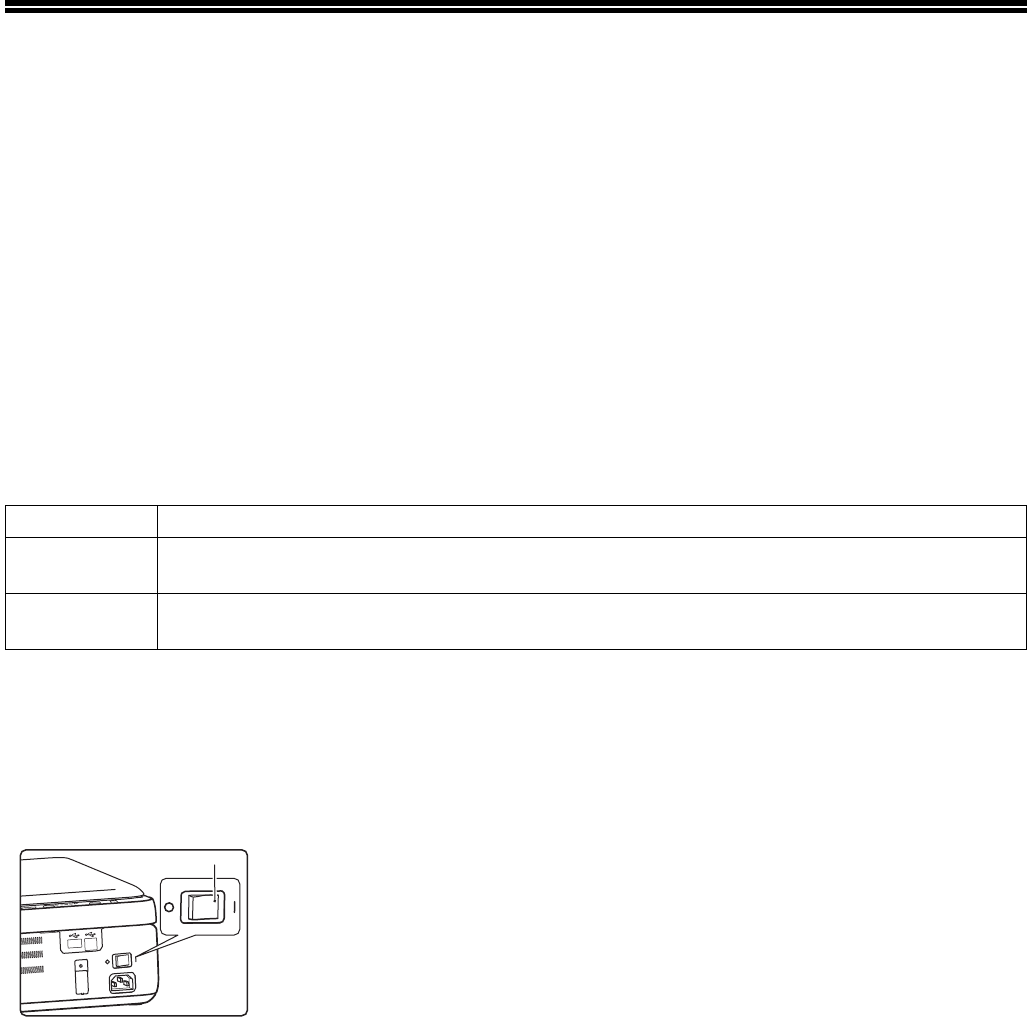
POWER ON AND OFF
The power switch is at the right side of the machine.
POWER ON
Turn the power switch to the "ON"
position.
It takes about several
seconds for the machine
to warm up. The machine
can start copying only
after warm-up.
However, you can
change settings and
press the [COPY
START] key ( ) during
warm-up. The copying
will start immediately
after warm-up.
POWER OFF
Be sure to turn the power switch to the
"OFF" position when it is not being used.
When the machine is
powered off during an
operation, misfeed may
occur, and the task being
processed will be
cancelled.
Auto power shut off
The auto power shut off mode helps to reduce the total power consumption and the running cost. It also helps to
save natural resources and reduces environmental pollution.
If no operation is performed in 3 minutes when the machine is on, the machine will automatically enter auto power
shut off mode (The 100% ratio indicator will flash, and all the other indicators will be off). To restore normal
operation, press any key on the operation panel. The normal mode will be resumed when the machine receives any
printing task.
“ON”
“OFF”
• Upon the startup of the machine, or when the [CLEAR] key ( ) is pressed twice, the machine will be restored
to its initial settings. When the machine is restored to its initial settings, all the settings and selected functions
will be cancelled.
• If no operation is performed in 3 minutes, the machine will automatically enter auto power shut off mode.
• When the machine restores to the initial status after resolving the misfeed, do not turn off the power supply.
Note
Initial setting
Upon the startup of the machine, or when the [CLEAR] key ( )is pressed twice, or when it has been left
untouched for 1 minute after finishing a task, the machine will be restored to its initial settings.
Copy ratio: 100%, Exposure:3
Copy count: 0, All special copier modes: OFF
7
LOADING PAPER
When there is no paper on the feed tray, the "paper required" indicator ( ) will be on.
The output tray must be expanded before normal copying or printing operations, otherwise, the machine will not
warm up.
PAPER
To achieve the best result, please use the paper recommended by SHARP.
*1 When printing a large amount of copies or using the 80g/m2 paper, empty the output tray every time when 10 sheets have been
printed. Otherwise, a pile-up error may occur.
*2 The quantity of paper loadable to the feed tray differs for different paper weights.
*3 If a feeding error occurs when using thick paper, you will need to load the paper one sheet at a time into the feed tray.
*4 Appliable for the inch system.
Special paper
Please observe the following standards when using special paper.
●When using paper not recommended by SHARP, please operate in single-sheet mode (do not try to
perform continuous copying or printing)
●There are many types of special paper, some of which cannot be used in this machine. Before using
special paper, please contact the authorized service department.
●Before using paper not recommended by SHARP, please carry out a copying test to check if it is suitable.
Paper type Size Weight Capacity
Standard paper A4
A5
A6
8.5 × 11*4
5.5 × 5.5*4
56g/m2 to 80g/m2 *140 pieces *2
(Standard paper:
80g/m2, the feeding
height shall be less
than the paper guide
size limit.)
Recycled paper
Thick paper*391g/m2 to 128g/m2 –
Thin paper 56g/m2 to 59g/m2–
Labels – – –

8
BEFORE USING THE MACHINE
Print side face up
Load the paper with the print side face up according to the paper type.
Paper that cannot be used
• Special media for inkjet printers (fine paper, glossy
paper, glossy film, etc.)
• Carbon paper or thermal paper
• Irregularly shaped paper
• Pasted paper, stapled paper, paper with clips
• Damp paper
• Paper with folds marks, torn paper or curled paper
• Paper with a wave-like pattern due to moisture
absorption
• Transparent film
• Thin paper less than 56g/m2
• Paper that is 128g/m2 or heavier
Non-recommended paper
• Iron-on transfer paper
• Paper which reverse side has been printed by other
printer or multifunctional device
• Paper which printing surface has been printed by
another printer or multifunctional device
• Perforated paper
• Postcards without folds
• Various types of plain paper and special media are sold. Some types cannot be used with the machine. Contact your
dealer or nearest authorised service representative for advice on using these types of paper.
• The image quality and toner fusibility of paper may change due to ambient conditions, operating conditions, and paper
characteristics, resulting in image quality inferior to that of SHARP standard paper. Contact your dealer or nearest
authorised service representative for advice on using these types of paper.
• The use of non-recommended or prohibited paper may result in skewed feeding, misfeeds, poor toner fusing (the toner
does not adhere to the paper well and can be rubbed off), or machine failure. Before using non-recommended paper,
check if printing can be performed properly.
9
BEFORE USING THE MACHINE
PAPER FEEDING
Ensure that the machine is not printing or copying, and carry out paper feeding according to the following steps.
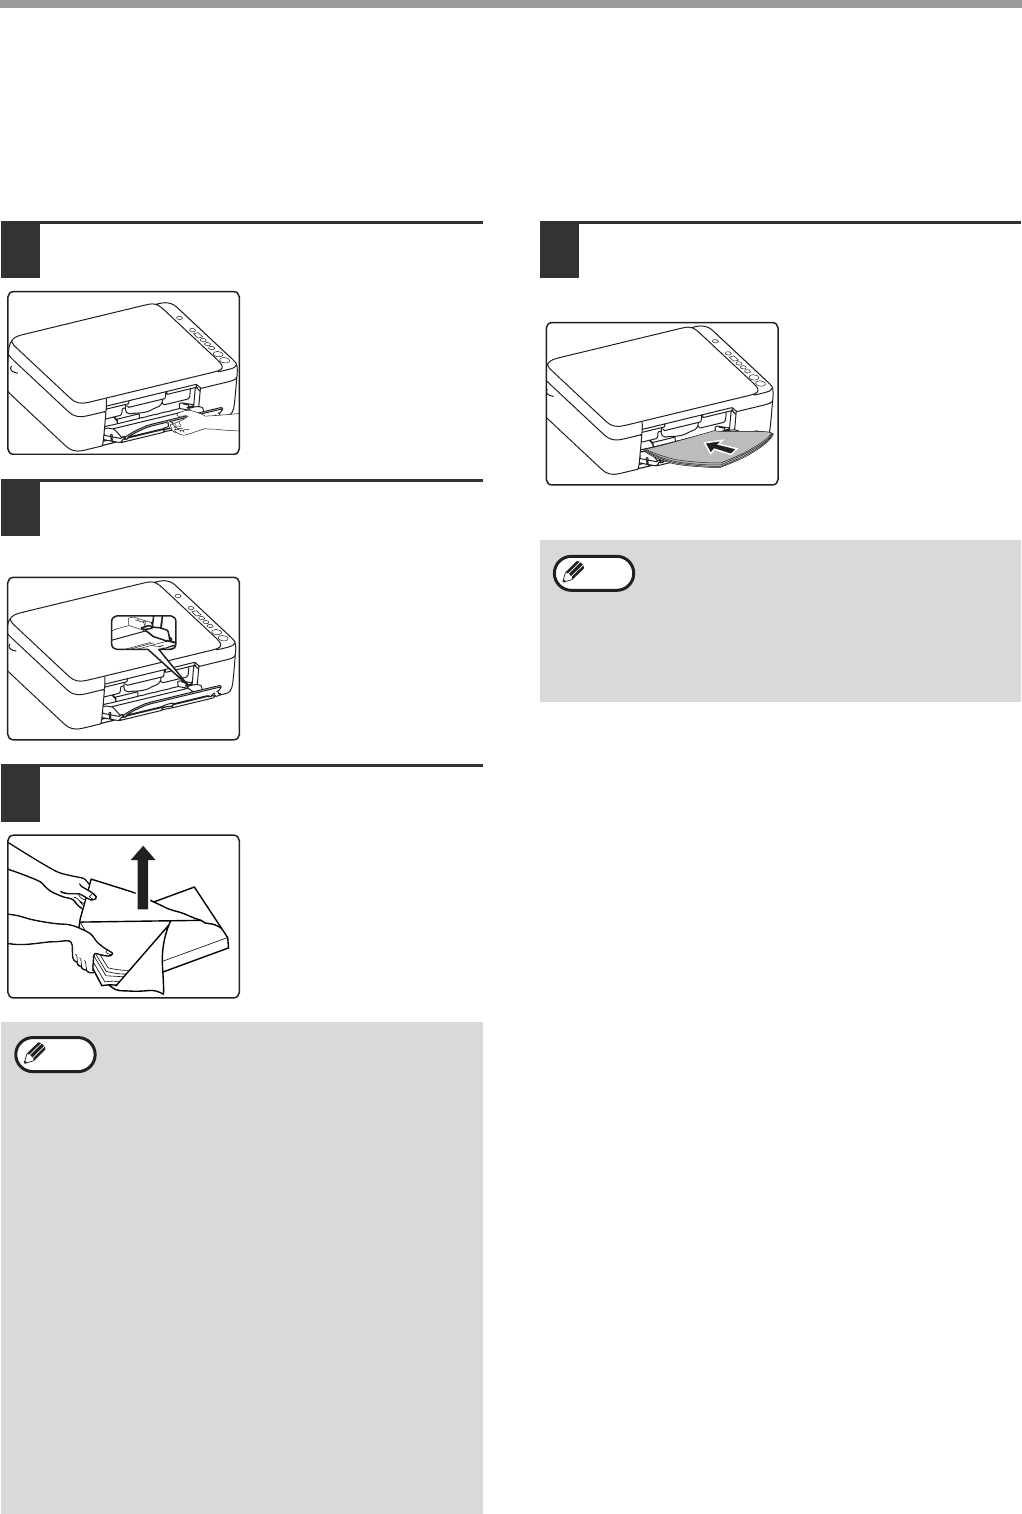
Feeding the feed tray
1Expand the feed tray.
2Adjust the paper guide to the proper
position according to the paper size.
3Load the paper onto the feed tray.
Open the paper package,
flip the paper fully, and
then load into the tray.
4Place the paper completely on the
feed tray.
5
• The loaded paper cannot exceed the limit of
the paper guide (max. 40 pieces).
• Do not add paper onto the loaded paper.
Otherwise, several pieces of paper will be
fed into the machine at one time.
• To add paper, remove the paper remaining
on the feed tray and combine them into one
stack before loading. The size and type of
the added paper shall be consistent with
the previous one.
• Do not use paper smaller than the size of
the original. Otherwise folding or an
incomplete image may be resulted in.
• Do not use paper that has been printed by
another printer or multifunction device.
Otherwise, a folded or corrupted image
may be resulted in.
• When printing on the reverse side of
previously printed paper, the paper must be
loaded one sheet at a time. Loading more
than one sheet at a time may cause
misfeeds or dirty.
Note
• In the case of a misfeed, tidy the paper and
reload it.
• Flatten curled paper before using it.
• When loading the paper, align with the
proper position on the paper guide.
• When misfeed occurs, rotate the paper 180
degrees and reload.
Note

10
OPERATION IN COPY, PRINT AND
SCAN MODE
When using the machine in COPY, PRINT or SCAN mode, some operations cannot be run simultaneously.
Mode COPY PRINT Scan to
computer SCAN to USB
COPY COPY key input Ye s Ye s Ye s N o
In the copying process No No No
PRINT In the printing process No No No
SCAN In the process of Scan
Preview/scanning No Yes
11
SOFTWARE INSTALLATION
BEFORE SOFTWARE SETUP
This chapter describes how to install the software necessary for the printing and scanning functions of this machine.
Software
The CD-ROM that accompanies the machine contains the following software:
Software
Printing driver
The printer driver enables you to use the printing function of the machine.
Scanning driver
The scanning driver enables you to use the scanning function of the machine in the TWAIN compliant applications.
Hardware and software requirements
Before installing the software, please confirm the following hardware and software requirements.
*1 Only when the computer is preinstalled with the Microsoft USB 2.0 driver or installed with the USB 2.0 driver provided by
Microsoft in "Windows Update" for the Windows 2000/XP/Vista/7 system can the USB 2.0 interface of the machine transmit
data with the standard speed of USB 2.0 (high speed).
*2 Using the installer for the installation of software requires administrator authority.
*3 Includes the 64-bit operating system.
Power on the machine
The power switch is at the right side of the machine.
Turn the power switch to "ON" position.
Computer type The computer that is compliant with IBM PC/AT and configured with USB 2.0*1 interface
Operating
system*2
Windows 2000, Windows XP
*3
, Windows Vista
*3
, Windows 7
*3
Other hardware
requirements
A system environment that can fully run the above operating systems
“ON”
12
BEFORE USING THE MACHINE
SOFTWARE INSTALLATION
1The USB cable shall not be connected
to the machine. Be sure that the cable
is not connected before the
installation.
If the machine is connected with the cable, the
screen will display a Plug and Play window. In
this situation, click the "Cancel" button to close
the window, and disconnect the cable.
2Insert the "Software CD-ROM"
CD-ROM into your CD-ROM drive.
3Click "start" button, click "my
Computer" ( ), and then double
click the CD-ROM icon ( ).
• In Windows Vista/7, click "start" button, click
"Computer", and then double click the CD-ROM
icon.
• In Windows 2000, double click "my Computer",
and then double click the CD-ROM icon.
4Double click "Setup" icon ( ).
In Windows Vista /7, if a message window
appears asking for your confirmation, click
"permit".
5The language selection screen will
appear. Select your desired language,
and then click the "next" button.
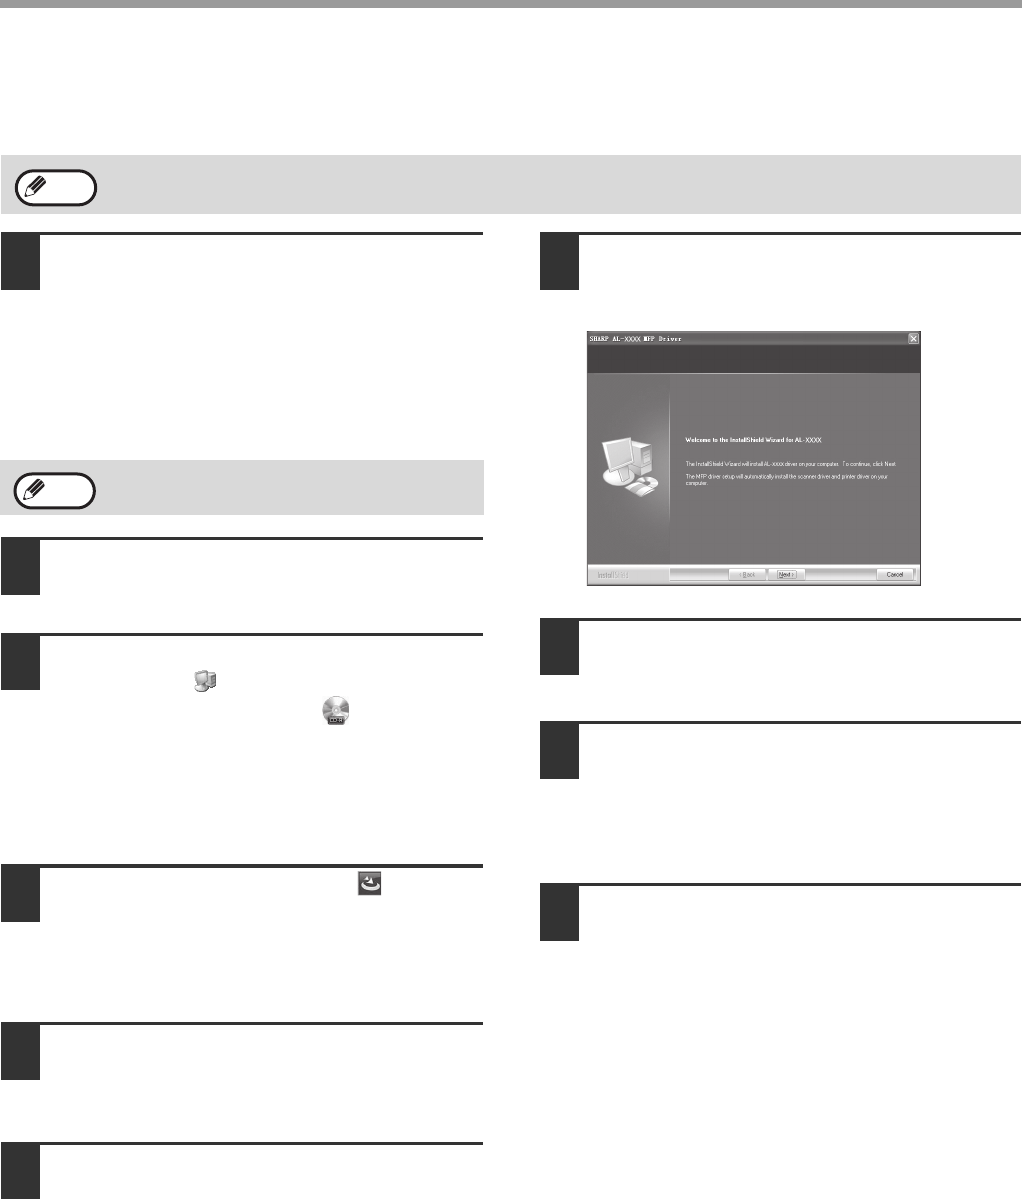
6Read the welcome message, and then
click the "next" button.
7Select the installation position, and
then click the "next" button.
7
8When the "finish" screen appears,
click the "finish" button.
9
Ensure that the machine is on, and
connect the machine and your
computer with the USB cable (page14).
Windows will detect the machine and display the
Plug and Play screen.
10
Start to install the driver.
"SHARP AL-XXXX Scanner" appears in the
"locate new hardware wizard" dialog box. Select
"install the software automatically
(recommended) ", and then click the "next"
button. Operate according to the instructions on
the screen.
The "locate new hardware wizard" dialog box
appears again, displaying "SHARP AL-XXXX
Printer". Select "install the software automatically
(recommended) ", and then click the "next"
button. Operate according to the instructions on
the screen.
The screen images in this Guide are for Windows XP. The screen images for other Windows version are different.
Note
The USB cable is connected in step 10.
Note

13
BEFORE USING THE MACHINE
The software installation is completed at this time.
• If you are using Windows Vista /7
If a security warning window appears, be
sure to click "Install this driver software
anyway".
• If you are using Windows 2000/XP
If a warning message for Windows logo
test or digital signature appears, be sure
to click "Continue Anyway" or "Yes"
button.
Caution
14
BEFORE USING THE MACHINE
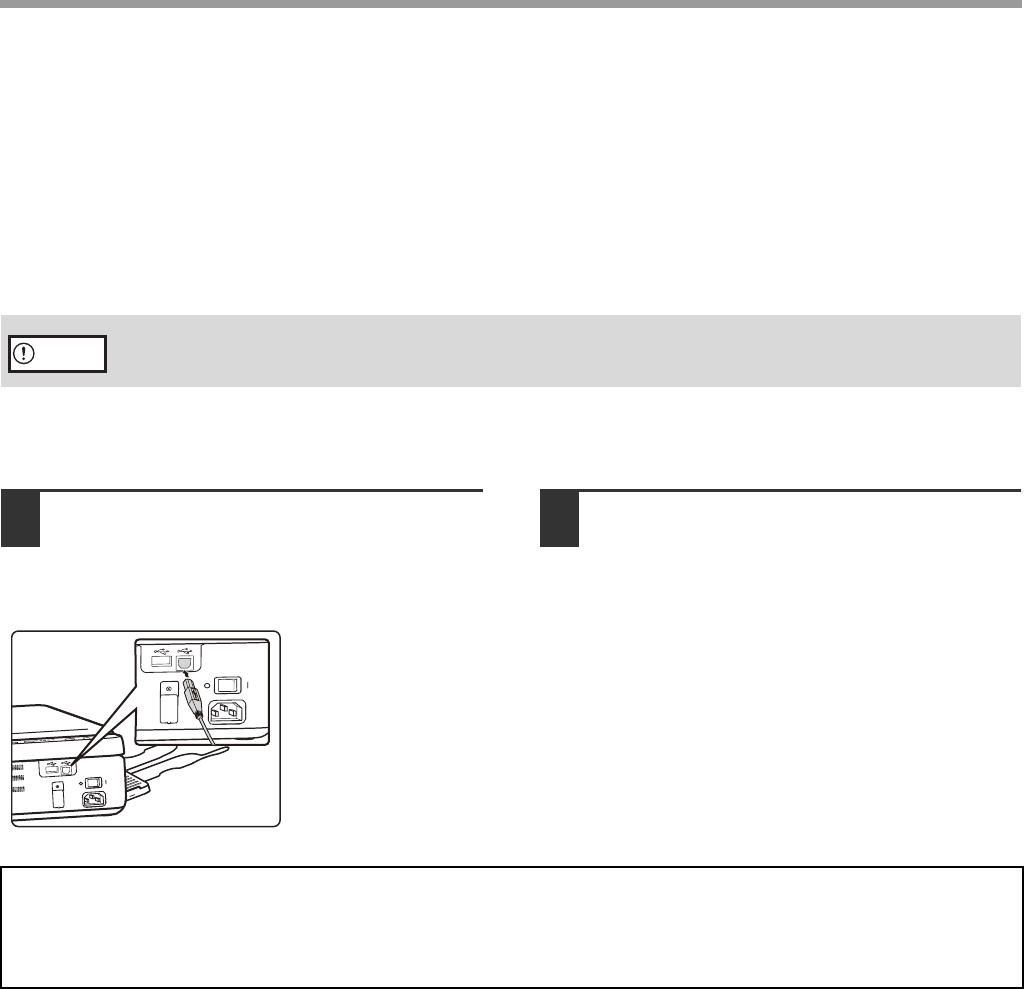
CONNECTING TO THE COMPUTER
Connect the machine to your computer according to the following steps.
Connecting the cable
USB cable
Shielded pair cable with high-speed transmission.
If a USB 2.0 interface is used for connecting the machine, please use a USB cable that supports USB 2.0.
Connecting the USB cable
1Insert the cable into the USB interface
of the machine. 2Insert the other end of the cable into
the USB interface of your computer.
3
4
5
6
7
8
9
10
11
USB is available with a PC that is configured with a USB driver and preinstalled with Windows 2000, Windows XP,
Windows Vista or Windows 7.
Caution
System requirement of USB 2.0 (for high-speed mode)
If the computer is preinstalled with a Microsoft USB 2.0 driver or installed with a USB 2.0 driver for Windows 2000/XP/Vista/7
through "Windows Update", the USB 2.0 interface of the machine is able to transmit data at the standard speed of USB 2.0
(high speed).
15
2
Chapter 2
COPY FUNCTIONS
This chapter explains how to use the copy functions.
NORMAL COPYING
This section explains how to make a regular copy.
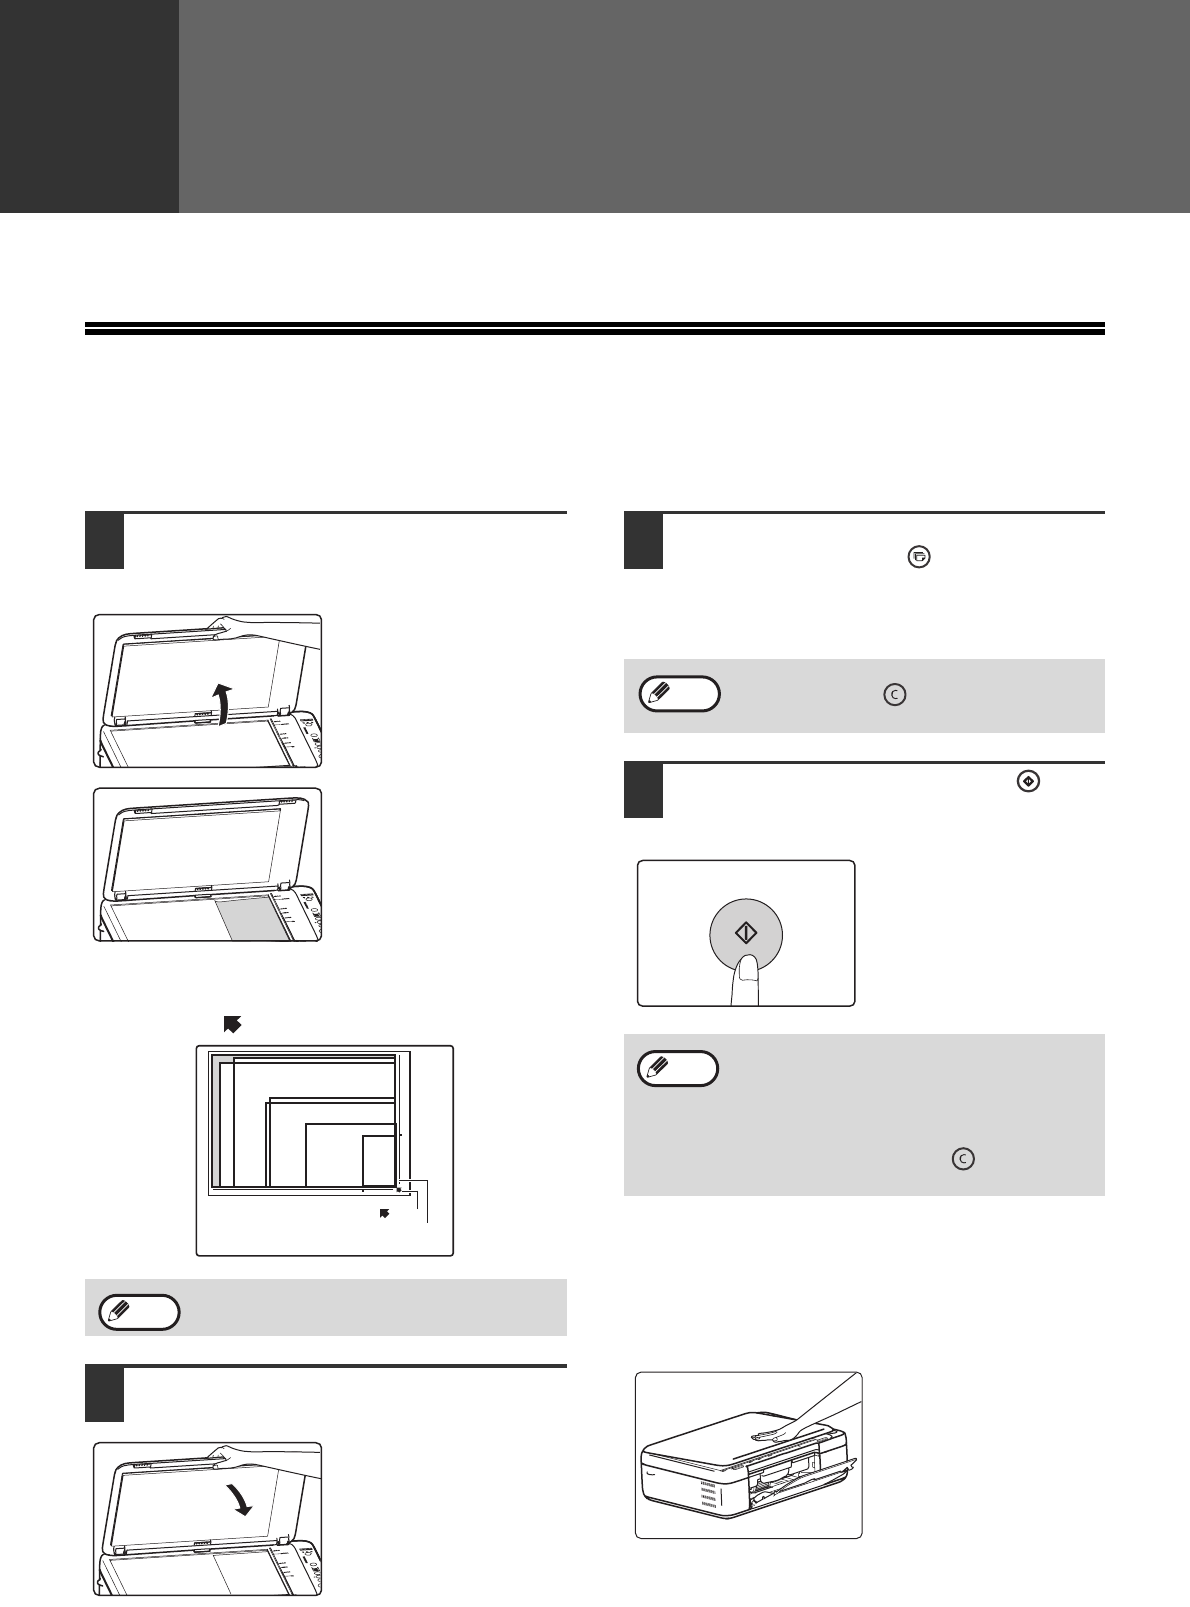
1Open the document cover and place
the original.
Place the original face
down on the document
glass.
[How to place the original]
The corners of the original shall be aligned with the tip of
the arrow mark ( ) on the scale mark of document glass.
2Close the document cover.
Be sure to close the
document cover after
placing the original. If left
open, the areas outside
the original will be copied
black, causing excessive
use of toner.
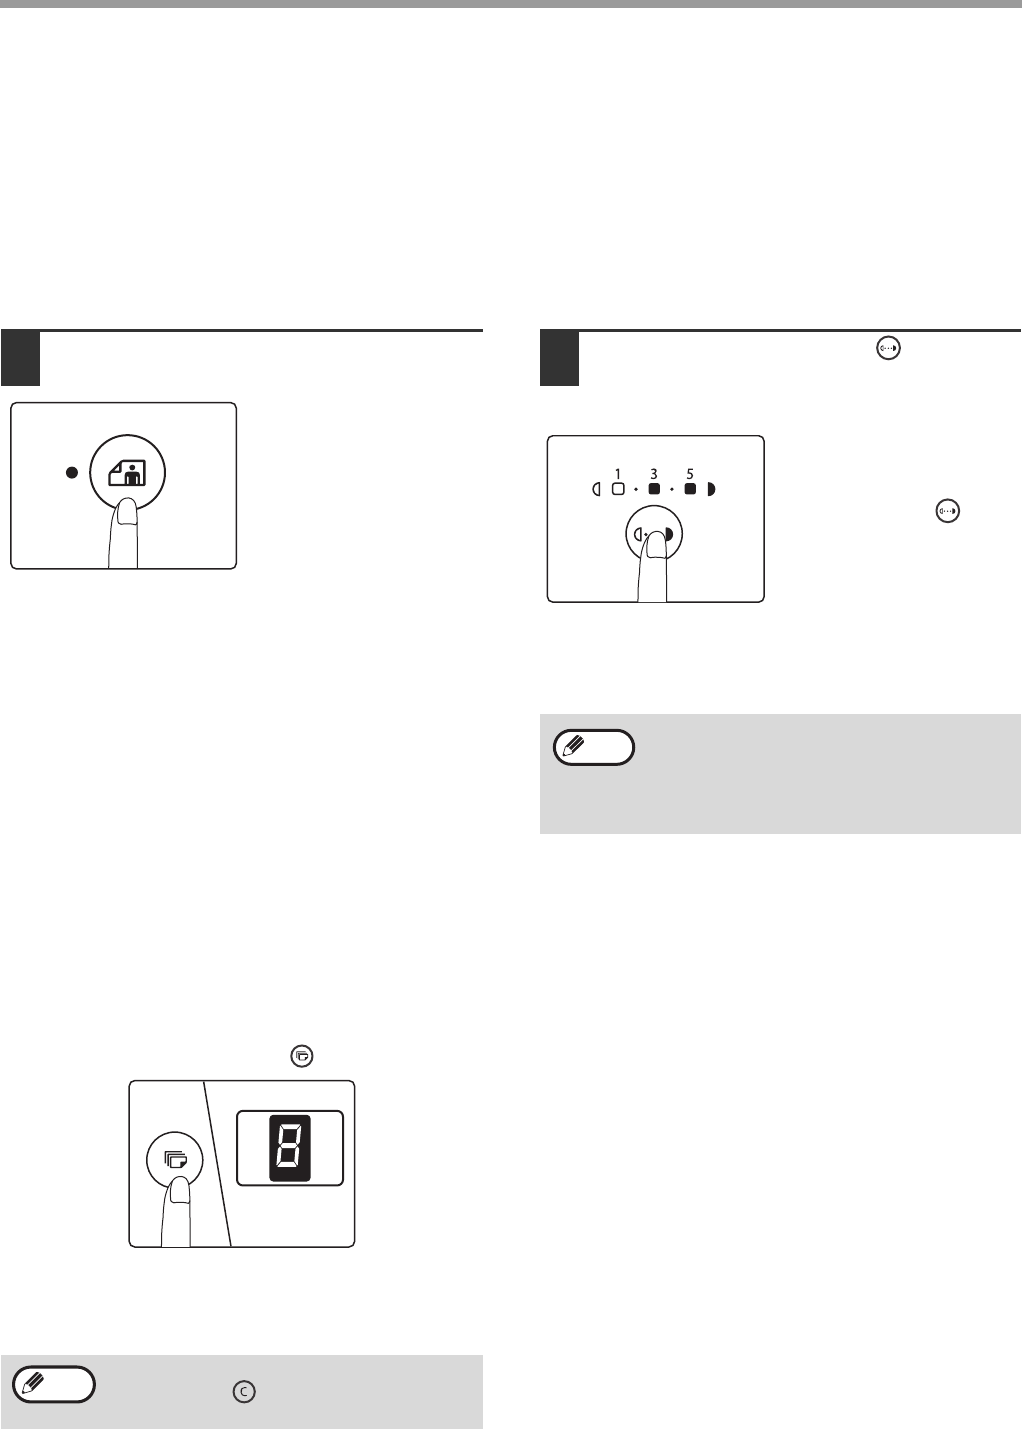
3Set the number of copies with the
[COPY COUNT] key ( ).
Up to 9 copies can be set.
A Single copy can be made even if "0" appears
for the number of copies.
4Press the [COPY START] key ( ) to
copy start.
The copy is delivered to
the paper output tray.
An original up to A4 can be placed on the
document glass.
Document glass scale
Mark
8 x5
A5
A4
1/2 1/2
11x8
1/2
A6
ID
Note
If you set the wrong number of copies, press
the [CLEAR] key ( ) and then enter the
correct number.
• Remove the paper on the output tray
whenever 10 sheets have been delivered.
• About 1 minutes after copying ends, the
copy settings will restore to the initial
settings.
• Press the [CLEAR] key ( ) to stop
copying in the middle of a run.
Note
Note
Copying books or originals with folds or creases
Press down the document cover, while copies as
shown. If the document cover is not completely closed,
shadows may appear on the copy or it may be fuzzy.
Flatten originals with folds or creases well before
printing.
16
COPY FUNCTIONS
MAKING A COPY DARKER OR LIGHTER
If you wish to select the exposure level by yourself, follow the steps below. (Each original type has five exposure
levels.)
Original type
●MANUAL ... Adjust the copy exposure levels as needed to facilitate reading.
●PHOTO ..... Halftones in the photo are reproduced with greater clarity.
1If the original type is PHOTO, press
the [PHOTO MODE] key.
When this key is
pressed, the [PHOTO
MODE] indicator will be
light.
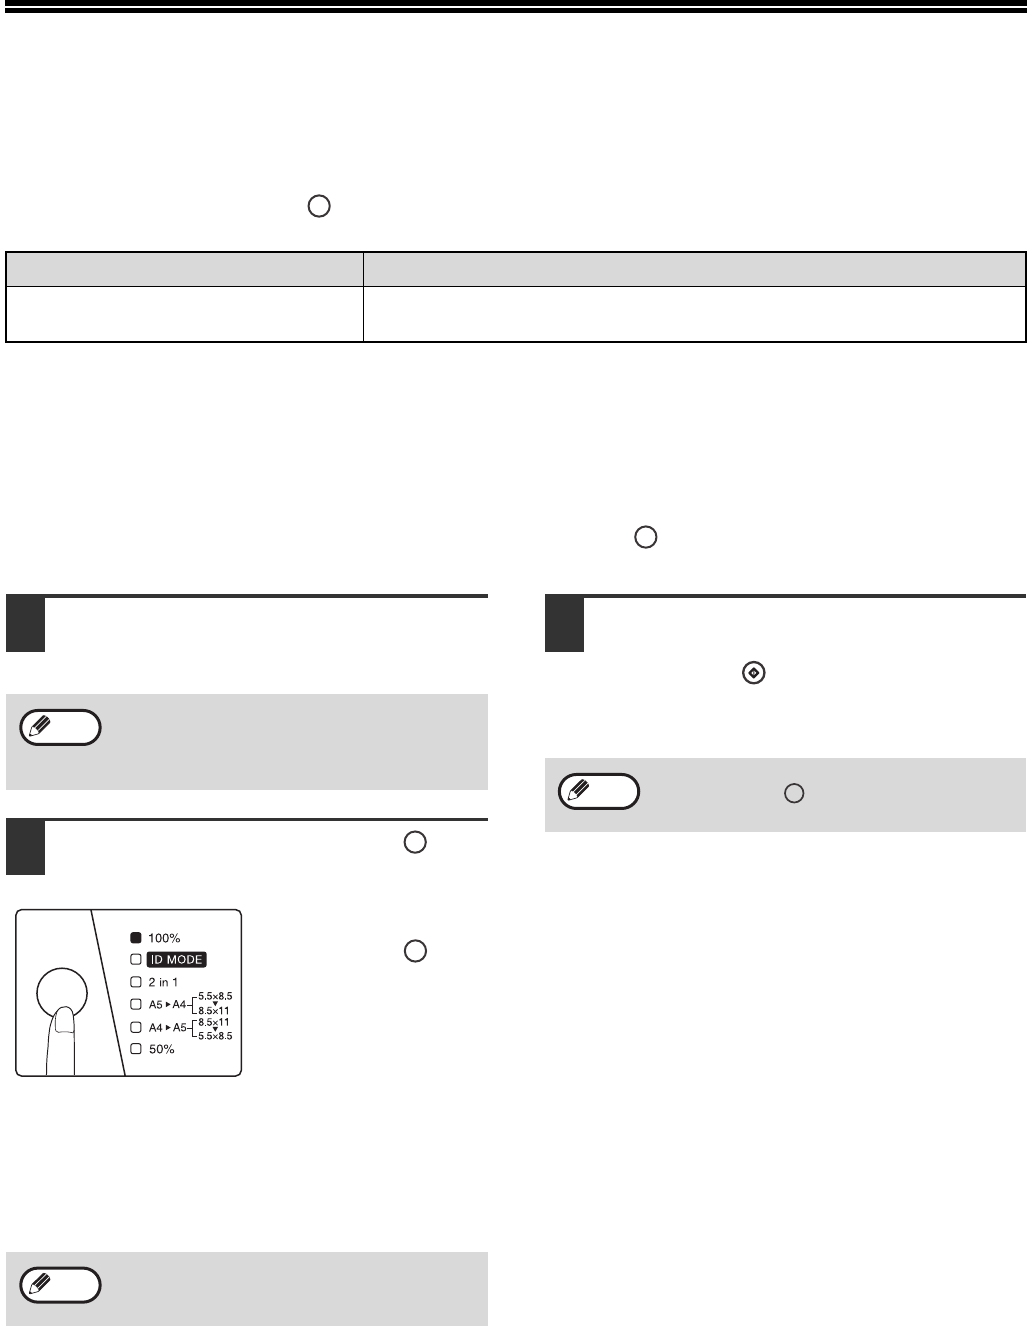
2Press the [DENSITY] key ( ) to adjust
the exposure level (1 (light) to 5
(dark)).
The sequence for
displaying the exposure
levels when the
[DENSITY] key ( ) is
pressed: level 3 → level 2
→ level 1 → level 5 →
level 4.
If exposure level 2 or 4 is
selected, the two indicators of 1, 3 or 3, 5 will light
simultaneously.
SETTING THE NUMBER OF COPIES
Press the [COPY COUNT] key ( ) to set the number of copies.
●The set number of copies appears in the display. A
maximum of 9 copies can be set.
●If you wish to make only a single copy, copying is
possible with the display showing "0".
Exposure value guidelines
1 − 2 Dark originals like newspapers
3 Originals with common exposure levels
4 − 5 Color text, text written in pencil or
light-colored text
Note
If you enter the wrong number, press the
[CLEAR] key ( ) and enter the correct
number.
Note
17
REDUCTION/ENLARGEMENT
With the ZOOM function, you can select copy ratio between AB system: A5 →A4 (141%), A4 →A5 (70%),
Inch system: 5.5X8.5 →8.5X11(129%), 8.5X11 →5.5X8.5 (64%), and 50%.
The method for enlarging or reducing the copies is described below.
With the [MODE SELECT] key ( ), you can manually select the ratio of reduction or enlargement.
Selectable ratios:
MANUAL RATIO SELECTION
Copies can be reduced down to A4 →A5 (70%), (8.5X11 →5.5X8.5 (64%)) and 50%, or enlarged up to A5 →A4
(141%), (5.5X8.5 →8.5X11(129%)). Press the [MODE SELECT] key ( ) to select a ratio.
1Place the original on the document
glass.
2Use the [MODE SELECT] key ( ) to
select the desired copying ratio.
Selecting a fixed ratio
Press the [MODE
SELECT] key ( ) and
select a fixed ratio
(AB system: A5 →A4
(141%), A4 →A5 (70%),
and 50%.
Inch system: 5.5X8.5 →
8.5X11(129%), 8.5X11 →
5.5X8.5 (64%) and 50%).
3Set the number of copies and other
settings, and then press the [COPY
START] key ( ).
The copy will be delivered to the paper output
tray.
Original position Selectable ratios
Document glass AB system: A5 →A4 (141%), A4 →A5 (70%) and 50%
Inch system: 5.5X8.5 →8.5X11(129%), 8.5X11 →5.5X8.5 (64%) and 50%
Be sure to close the document cover after
placing the original. If left open, the area
outside the original will be copied black,
causing excessive use of toner.
Select the correct paper according to the
ratio, otherwise, the image will be printed
outside the paper.
Note
Note
To return the ratio to 100%, press the [MODE
SELECT] key ( ) until the 100% indicator
lights up.
Note
18
CONVENIENT COPY FUNCTIONS
This section explains major convenient copy functions.
COPYING TWO ORIGINALS ONTO A SINGLE SHEET
OF PAPER (2 IN 1 COPY)
Two originals can be copied onto a single sheet of paper in a selected layout pattern.
This function is convenient for compiling two-page reference materials into a compact format, or for providing an
overview of two pages of a document on a single page.
1Place the first original.(Page 15)
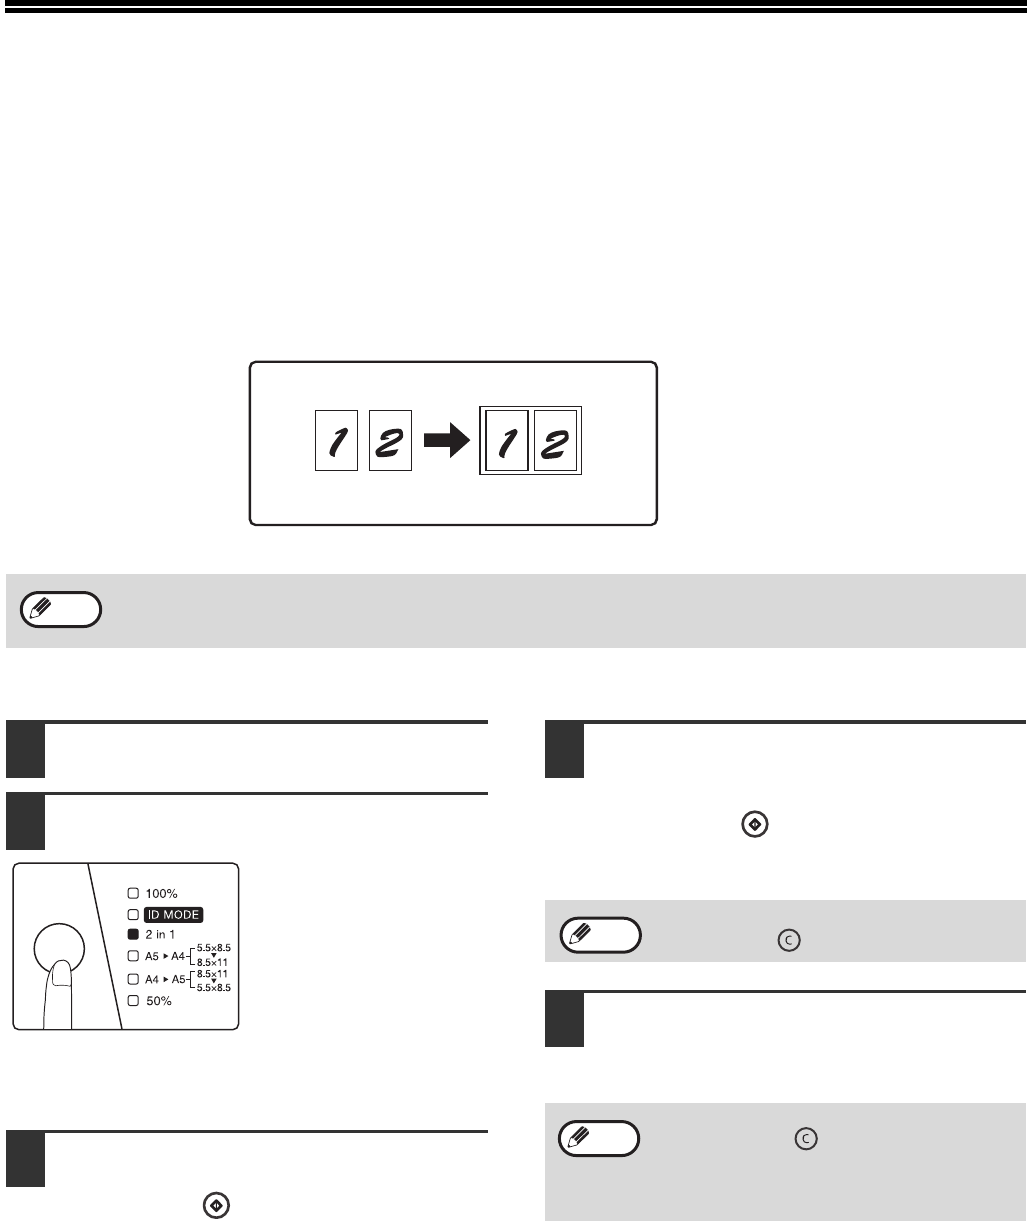
2Press the [MODE SELECT] key to
select [2 in 1] until the indicator light.
The mode select sequence
is as follows: "100%","ID
MODE", "
2 in 1
", "(
AB
system: A5→A4 (141%),
A4 →A5 (70%)
)", "
Inch
system: 5.5X8.5 →
8.5X11(129%), 8.5X11
→5.5X8.5 (64%)
",
"50%".
3Set the number of copies and other
settings, and then press the [COPY
START] key ( ).
4When the "2 in 1" indicator lights,
replace the original with the next
original, and then press the [COPY
START] key ( ).
The "2 in 1" indicator blinks, and the original is
scanned into memory.
5When the originals have been
scanned, the copies will be delivered
to the output tray.
• When using the document glass, reduction is possible to 50%. Certain combinations of original size, paper size,
and number of images may result in images being cut off.
• 2 in 1 copy cannot be used in combination with the ID card copy function.(Page 19)
2 IN 1 COPY
Note
To clear the data in memory, press the
[CLEAR] key ().
• To cancel the 2 in 1 copying, press the
[CLEAR] key ().
• To cancel the 2 in 1 copy mode, press the
[MODE SELECT] key until the 2 in 1
indicator is off.
Note
Note
19
COPY FUNCTIONS
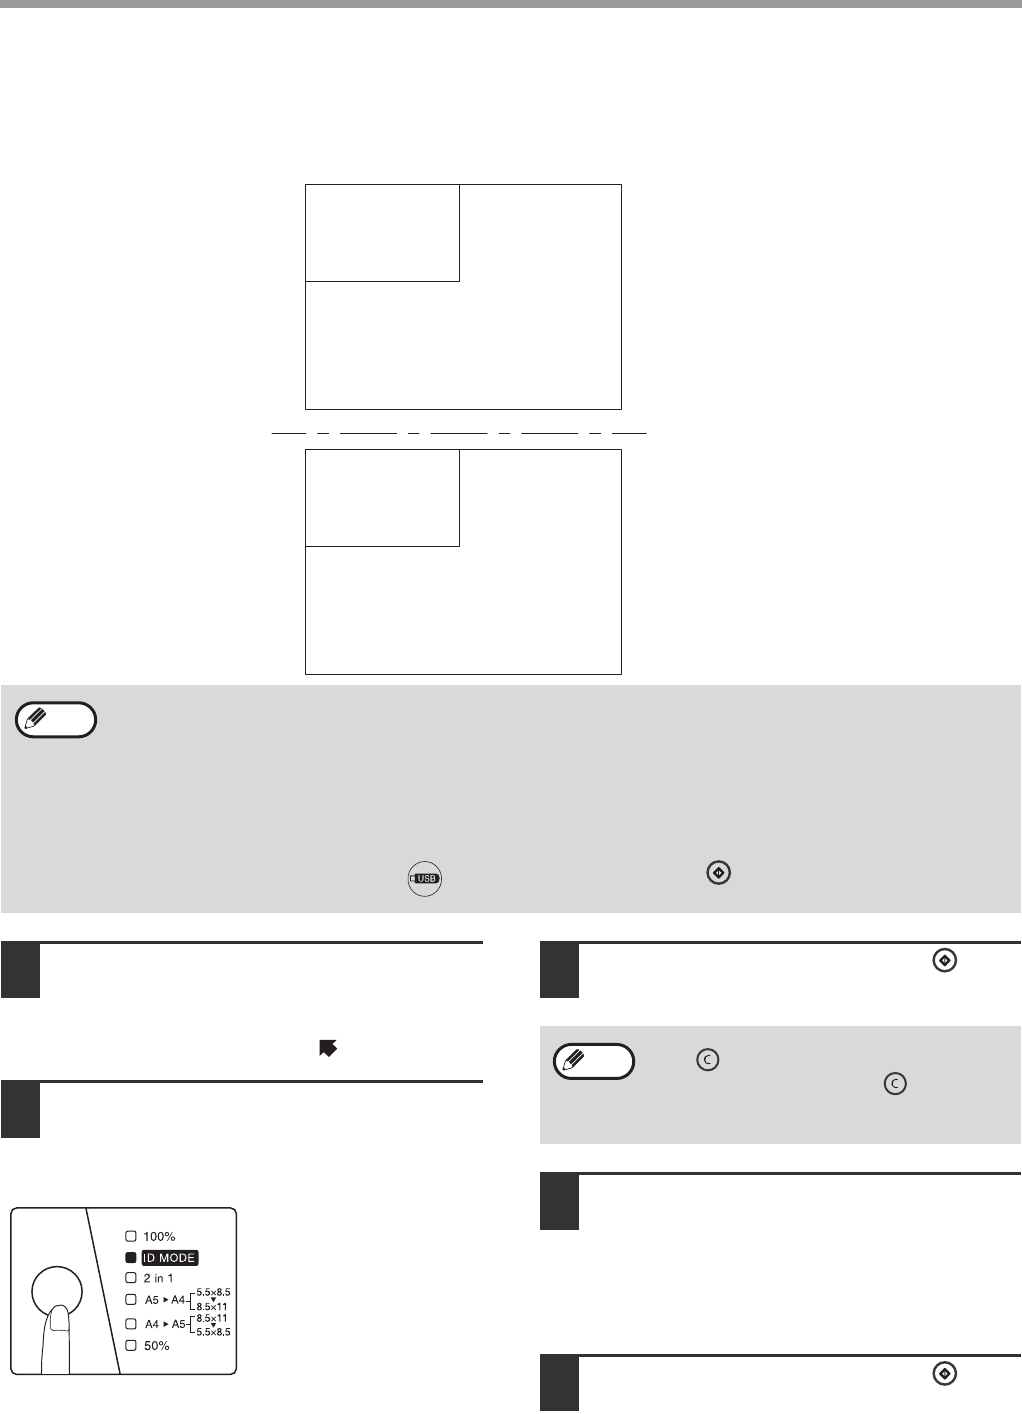
ID CARD COPY
To print both sides of an ID card onto paper according to the specified pattern. The specified patterns for ID card
copying are shown as follows.
1Open the cover, and place the ID card
on the document glass, aligning it in
portrait on the corner at the right side
of the document glass ( ) .
2Press the [MODE SELECT] key and
select [ID MODE] to light up its
indicator.
The ID Copy indicator will
light up. The original
exposure level can be
changed as needed.
3Press the [COPY START] key ( ).
4Open the cover and turn the ID card
over on the document glass.
When the LED indicator and ID Copy indicator
both blink, turn over the ID card in time. If it is not
turned over within 30 seconds, the copying will be
cancelled.
5Press the [COPY START] key ( )
again.
When the scan is finished, Copy will begin.
• To copy an ID card, operate according to the following steps.
• ID Card Copy cannot be used together with 2 in 1 or manual ratio selection.
• Usable paper: A4 or letter.
• The image may be cut off even if paper of standard size is used.
• In ID Copy mode, the scan area and number of copies (1 copy) cannot be changed. By selecting ID Copy mode,
the number of copies is automatically set to be 1 Copy.
• Maximum ID Card size:X 148mm,Y 210mm.
• Image loss:1.5mm.
• Pressing the [SCAN to USB] key ( ) instead of [COPY START] key ( ) enables ID card scan on one
document to USB device.
ID Card A1
ID Card A2
ID Card B1
ID Card B2
Note
After scanning one side, press the [CLEAR]
key ( ), the relevant data will be cleared. If
you press the [CLEAR] key ( ) again, the
ID Copy mode will be cancelled, and it will
return to the 100% copy mode.
Note

20
3
Chapter 3
PRINTER FUNCTIONS
This chapter explains how to use the printer functions.
The procedure for loading paper is the same as for loading copy paper. Please refer to "PAPER FEEDING" (Page 9).
BASIC PRINTING
The following example explains how to print a document from "Wordpad", an standard accessory of application in
Windows.
Before printing, make sure that the machine is ready, the output tray has been expanded, the printer driver has been
installed, and the USB cable has been connected to the machine and computer.
1Start Wordpad and open the
document that you wish to print.
2Select "Print" from the "File" menu of
the wordpad.
The "Print" dialog box will appear.
3Make sure that "SHARP AL-XXXX" is
selected as the printer.
If you need to change any printing settings, click
the "Preferences" button to open the printer driver
setup screen.
The printer driver
setup screen will
appear.
Windows 2000 does not have the "Preferences" button
in this dialog box. Select settings as needed on each
of the tabs in the setup screen and click the "OK"
button.
"PRINTER DRIVER SETUP SCREEN" (Page 22)
"SETTING ADVANCED PRINTER FUNCTIONS"
(Page 23)
4Click the "Print" button.
Printing begins.
The prints will be
delivered to the
output tray.
• Print jobs received while the machine is copying or scanning will be stored in memory. When the copy job is
finished, the print jobs will begin.
• Printing is not possible when the front or side cover is opened for machine maintenance, or when a misfeed
occurs or the machine runs out of paper or toner, or when the drum cartridge needs to be replaced.
Note
xxxx
21
PRINTER FUNCTIONS
If paper in the feed tray runs out during the printing
Add paper to the feed tray, and then press the [COPY START] key ( ) to resume printing.
To cancel a printing task, press the [CLEAR] key ( ).
ACCESSING THE PRINTER DRIVER FROM THE
"START" BUTTON
You can access the printer driver or change the driver settings through the "start" button of Windows. Settings
adjusted in this way will be the initial settings when you print from an application. (If you change the settings from the
printer driver setup screen at the time of printing, the settings will revert to the initial settings when you quit the
application.)
1Click the "start" button, and then click
"Printers and Faxes".
• In Windows 2000, click the "Start" button and
point to "Settings", and then select "Printers".
• In Windows Vista, click the "Start" button and
select "Control Panel" and then select
"Printers".
• In Windows 7, click the "Start" button, and then
select "Equipment and Printers".
2Click the "SHARP AL-XXXX" printer
driver icon.
3Select "Properties" in the "File" menu.
• In Windows Vista, select "Properties" from the
"Organize" menu.
• In Windows 7, right click the printer driver icon
and select "printer properties".
4Click the "Printing Preferences"
button in the "General" tab.
The printer driver setup screen will appear.
"PRINTER DRIVER SETUP SCREEN" (Page 22)
• For the restrictions on the COPY/SCAN mode in the PRINT mode and the restrictions on the PRINT mode in the
SCAN/COPY mode, please refer to"OPERATION IN COPY, PRINT AND SCAN MODE" (Page 10).
Note
• In Windows XP, if "Printers and Faxes"
does not appear in the "start" menu, select
"Control Panel", select "Printers and Other
Hardware", and then select "Printers and
Faxes".
• In Windows 7, if "Equipment and Printers"
does not appear in the "start" menu, select
"Control Panel", select "Hardware and
Sound", and then select "View Equipment
and Printers".
Note
22
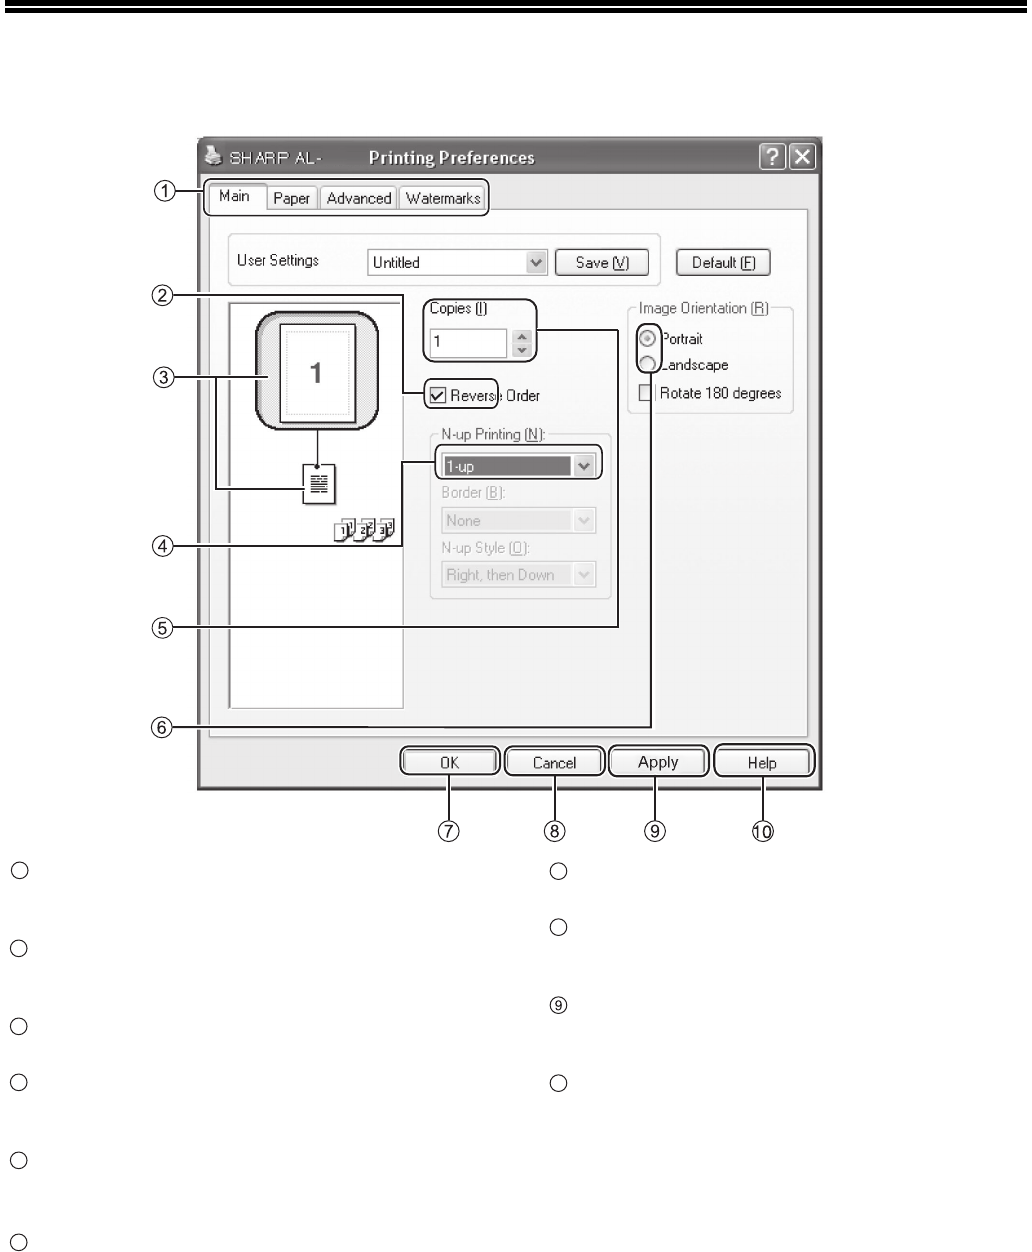
PRINTER DRIVER SETUP SCREEN
Tab
The settings are grouped on tabs. Click a tab to bring
it to the front.
Checkbox
Click on a checkbox to activate or deactivate a
function.
Print setting image
This shows the effect of the selected print settings.
Drop-down menu
It allows you to make a selection from a list of
choices.
"Copies" button
It allows you to select numbers of printing sets.
( Max.9 sets )
Check button
It allows you to select one item from a list of options.
"OK" button
Click to save your settings and exit the dialog box.
"Cancel" button
Click this button to exit the dialog box without making
any changes to the settings.
"Apply" button
Click to save your settings without closing the dialog
box.
"Help" button
Click this button to display the help file for the printer
driver.
XXXX
XXXX
1
2
3
4
5
6
7
8
10
23
SETTING ADVANCED PRINTER
FUNCTIONS
This section explains major advanced printing functions.
The explanations assume that the paper size and other basic settings have already been selected. For the basic
procedure for printing and the steps for accessing the printer driver, please refer to "BASIC PRINTING" (Page 20).
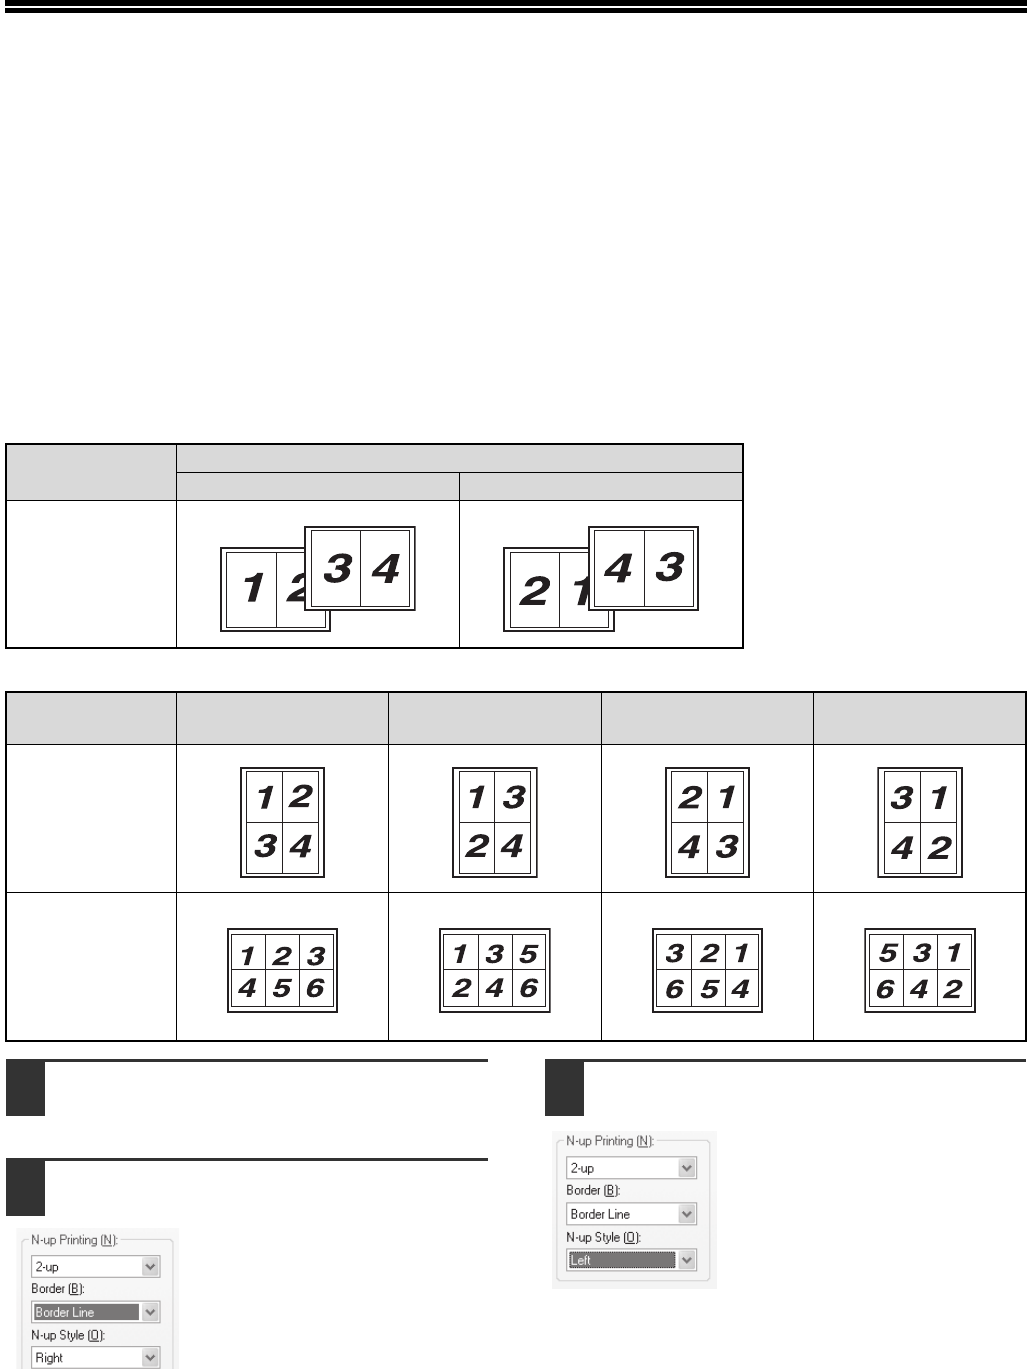
PRINTING MULTIPLE PAGES ON ONE PAGE
(N-Up Printing)
This function can be used to reduce the print image and print multiple pages on a single sheet of paper.
This is convenient when you want to print multiple images such as photos on a single sheet of paper, and when you
want to save paper.
The following print results will be obtained, depending on the order selected.
1Click the "Main" tab in the printer
driver setup screen.
2Select the number of pages per sheet.
If you wish to print borderlines,
check the "Border" box.
3Select the order of the pages.
N-Up
(Pages per sheet)
Print results
From left to right From right to left
2-Up
(2 pages per
sheet)
N-Up
(Pages per sheet) Right, and Down Down, and Right Left, and Down Down, and Left
4-Up
(4 pages per
sheet)
6-Up
(6 pages per
sheet)
24
PRINTER FUNCTIONS
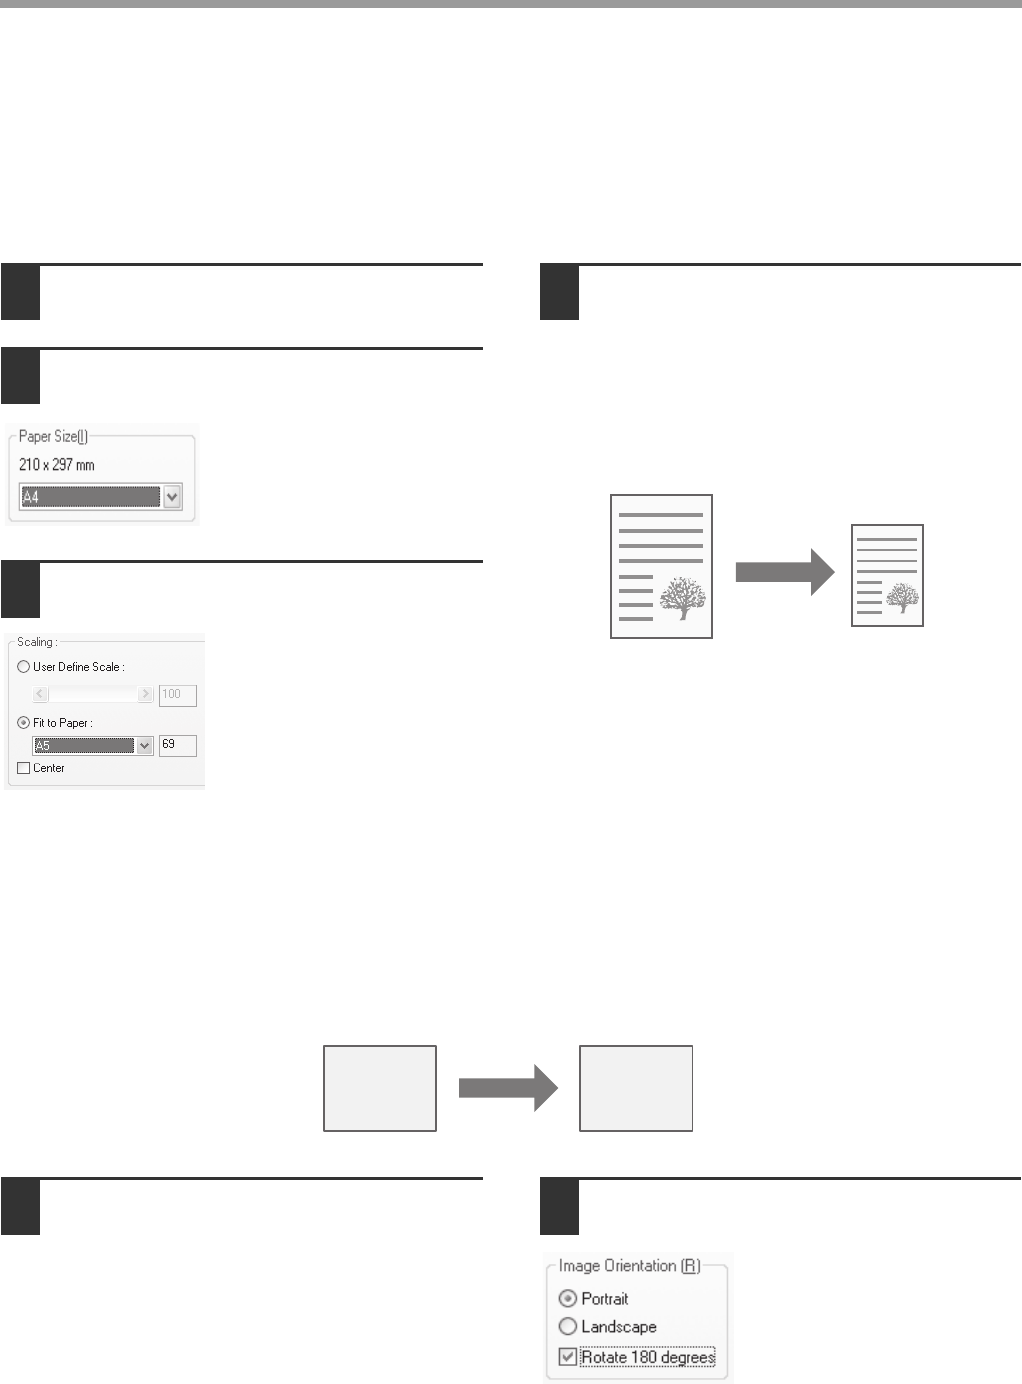
FITTING THE PRINTED IMAGE TO THE PAPER (Fit To
Paper Size)
The printer driver can adjust the size of the printed image to match the size of the paper loaded in the machine.
Follow the steps shown below when using this function. The explanation below assumes that you intend to print an
A4 document on A5 size paper.
1Click the "Paper" tab in the printer
driver setup screen.
2Select the original size (A4) of the
printed image in "Paper Size".
3Check the "Fit To Paper" button.
4Select the actual size of paper (A5) to
be used for printing.
The size of the printed image will be
automatically adjusted to match the size of the
paper loaded in the machine.
ROTATE THE PRINTED IMAGE 180 DEGREES (Rotate 180
degrees)
The function can be used to rotate the image 180 degrees so that it can be printed correctly on paper that can only
be loaded in one direction.
1Click the "Main" tab in the printer
driver setup screen. 2Check the "Rotate 180 degrees" box.
Paper Size: A4
Fit To Paper Size: A5
A4 size
document
(Paper Size)
A5 size paper
(Fit To Paper Size)
ABCD
ABCD
25
PRINTER FUNCTIONS
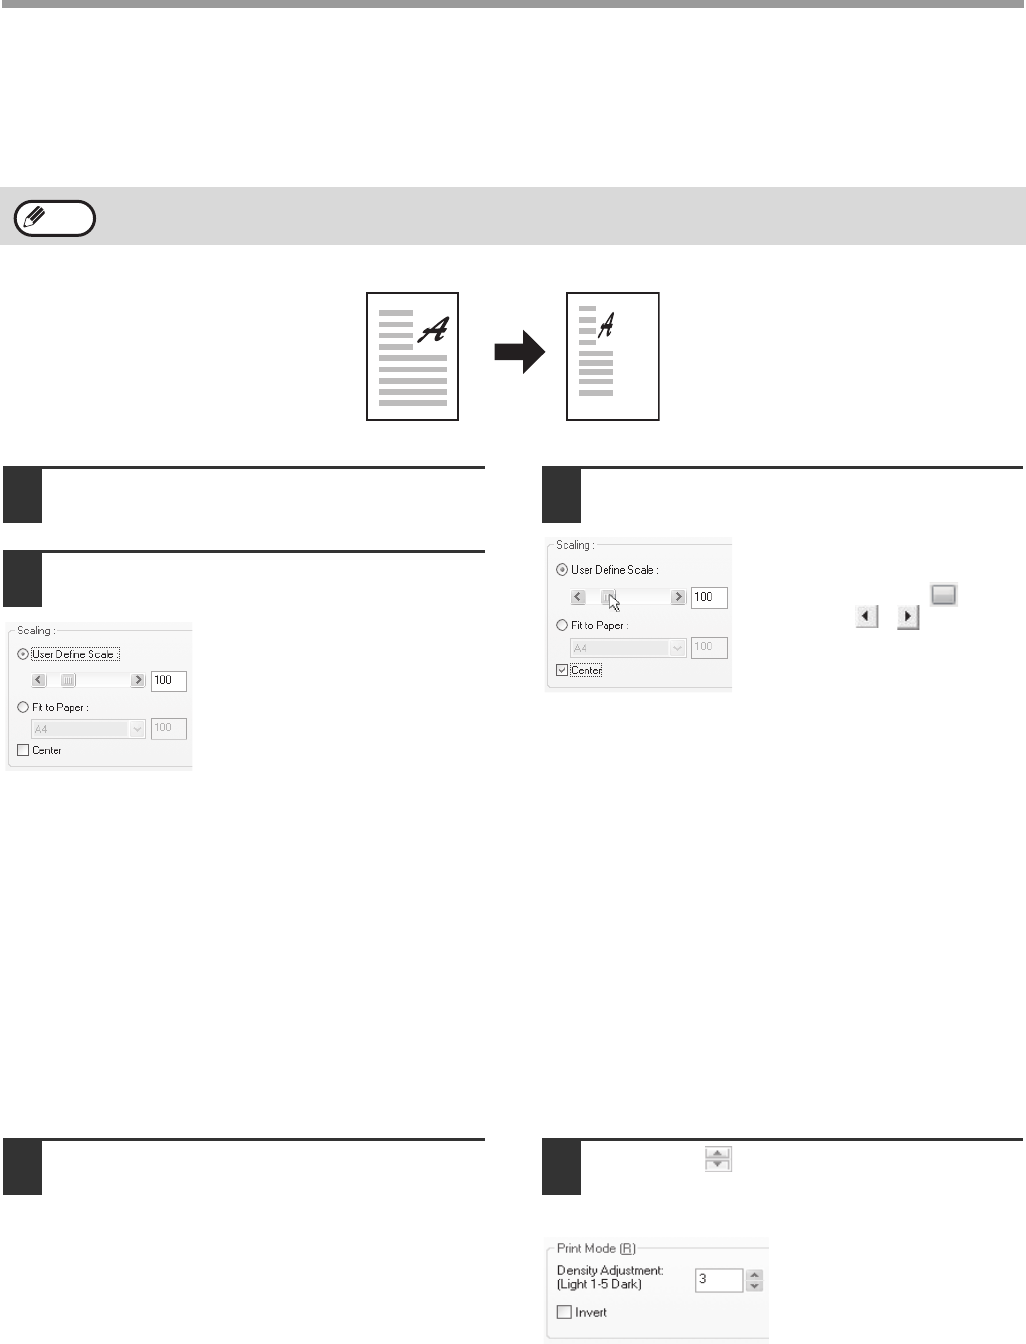
ENLARGING/REDUCING THE PRINTED IMAGE (Zoom)
This function is used to enlarge or reduce the image to a selected percentage. This allows you to enlarge a small
image or add margins to the paper by slightly reducing an image.
1Click the "Paper" tab in the printer
driver setup screen.
2Check the "User Define Scale" box.
3Select the zoom ratio.
You can change the ratio by
directly entering a number,
dragging the slider or
using the ( , ) button at
an increment of 1% (Zooming
ratio: 25% to 400%).
You can also set the center
point of the paper by checking
"Center" box.
ADJUSTING THE IMAGE EXPOSURE (image adjustment)
The exposure can be adjusted in the print settings when printing a photo or other image. These settings can be used
for simple corrections when you do not have image editing software installed in your computer.
1Click the "Advanced" tab in the printer
driver setup screen. 2Press the button to adjust the
printing exposure.
You can also check the
"Invert" box to print a
negative image. This
function can be used to
reduce the toner
consumption when printing
documents with large areas
of black (which use large
quantities of toner).
The "Scaling" is not available when "N-Up Printing" is selected.
Note
26
PRINTER FUNCTIONS
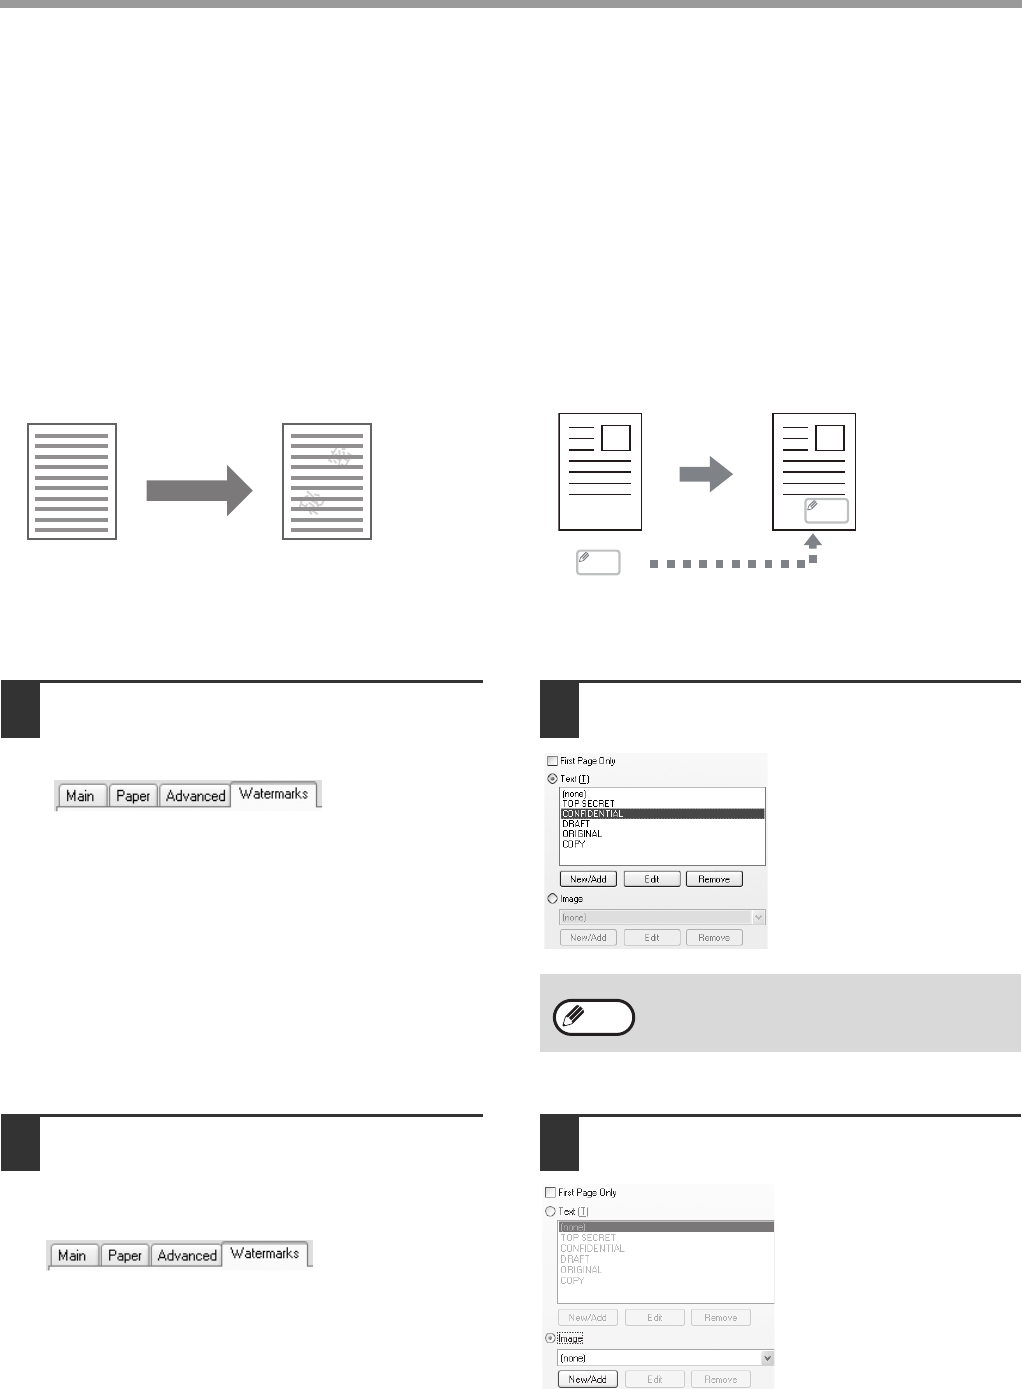
ADDING A WATERMARK TO PRINTED PAGES
(Watermark)
The watermark includes a text stamp and an image stamp.
zText: Faint shadow-like text can be added to the background of the printed image as a watermark. The
watermark text size, darkness, angle and position can be adjusted. The text can be selected from a
pre-stored list, or entered to create an original watermark.
zImage: you can print a bitmap or JPEG image stored in your computer on the printed data. The image
size, position and darkness can be adjusted. This function can be used to "stamp" the frequently used
images or the logos you create onto the printed data.
Text
1Click the "Watermarks" tab in the
printer driver setup screen. 2
2Check the "Text" button.
Select a saved watermark
text from the list. You can
click the "Edit" button to
edit the font and select
other detailed settings.
You can also determine
the watermark printing
range by checking the
"First Page Only" box.
Image stamp
1Click the "Watermarks" tab in the
printer driver setup screen.
1
2Check the "Image" button.
If an image stamp has
been stored, select the
stamp from the
drop-down menu.
If an image stamp has not
been stored, click the
"New/Add" button, select
the file from which you
want to create the image
stamp, and then select
other detailed settings.
You can also determine the watermark printing range
by checking the "First Page Only" box.
TextText
MEMO
MEMO
Image
To create a new watermark, click "New/Add"
button.
Note
27
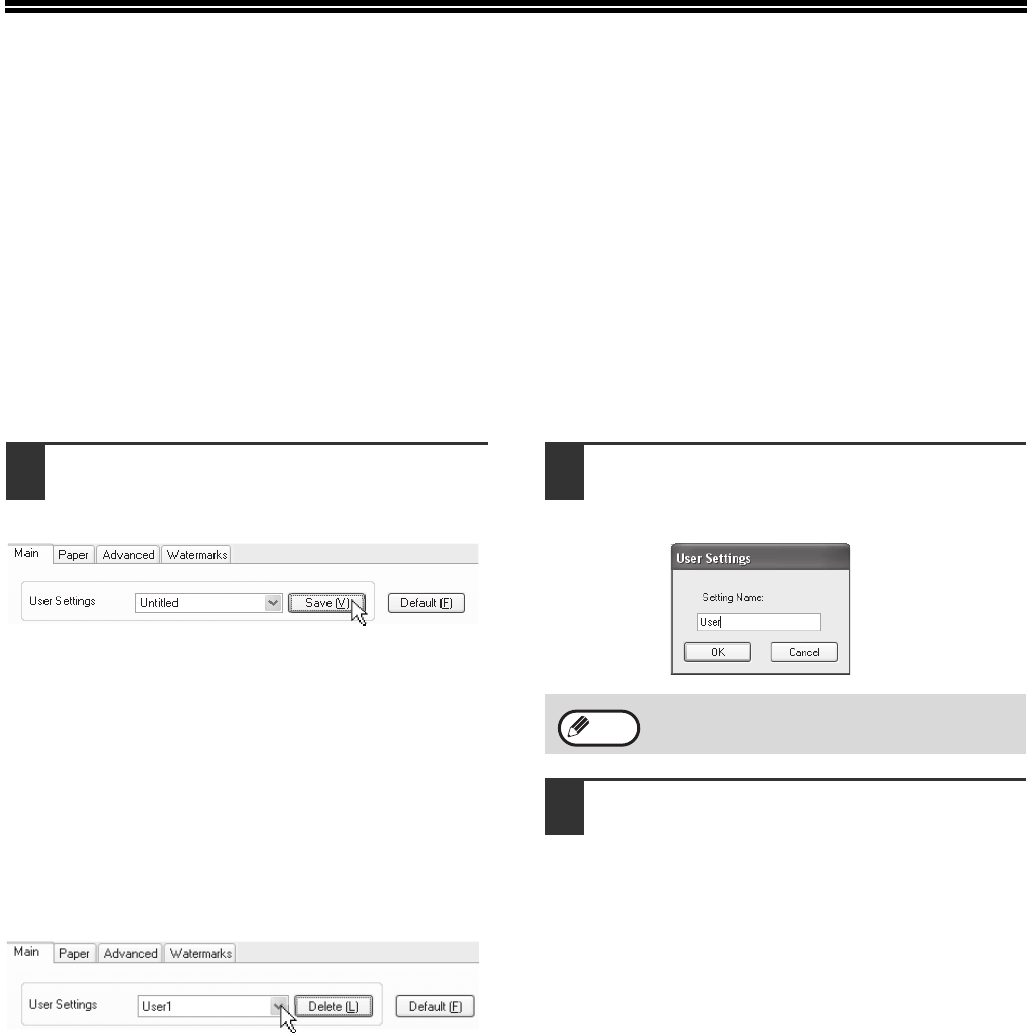
SAVING FREQUENTLY USED PRINT
SETTINGS
Settings configured on each of the tabs at the time of printing can be saved as custom settings. Saving the
frequently used settings under an assigned name makes it easy to select those settings the next time you need to
use them.
SAVING SETTINGS AT THE TIME OF PRINTING (Custom
Settings)
Settings can be saved from any tab of the printer driver properties window.
For the steps for accessing the printer driver, please refer to "BASIC PRINTING" (Page 20).
1Configure the print settings on each
tab and click the "Save" button on any
tab.
2After checking the saved settings,
enter a name for the settings
(maximum of 21 characters).
3Click the "OK" button.
Using the saved settings
Select the custom settings that you wish to use on any tab.
Deleting saved settings
Select the custom settings that you want to delete in "Using the saved settings" (above), and click the "Delete"
button.
Up to 29 sets of custom settings can be
saved.
Note
28
4
Chapter 4
SCANNER FUNCTIONS
This chapter explains how to use the scanner function.
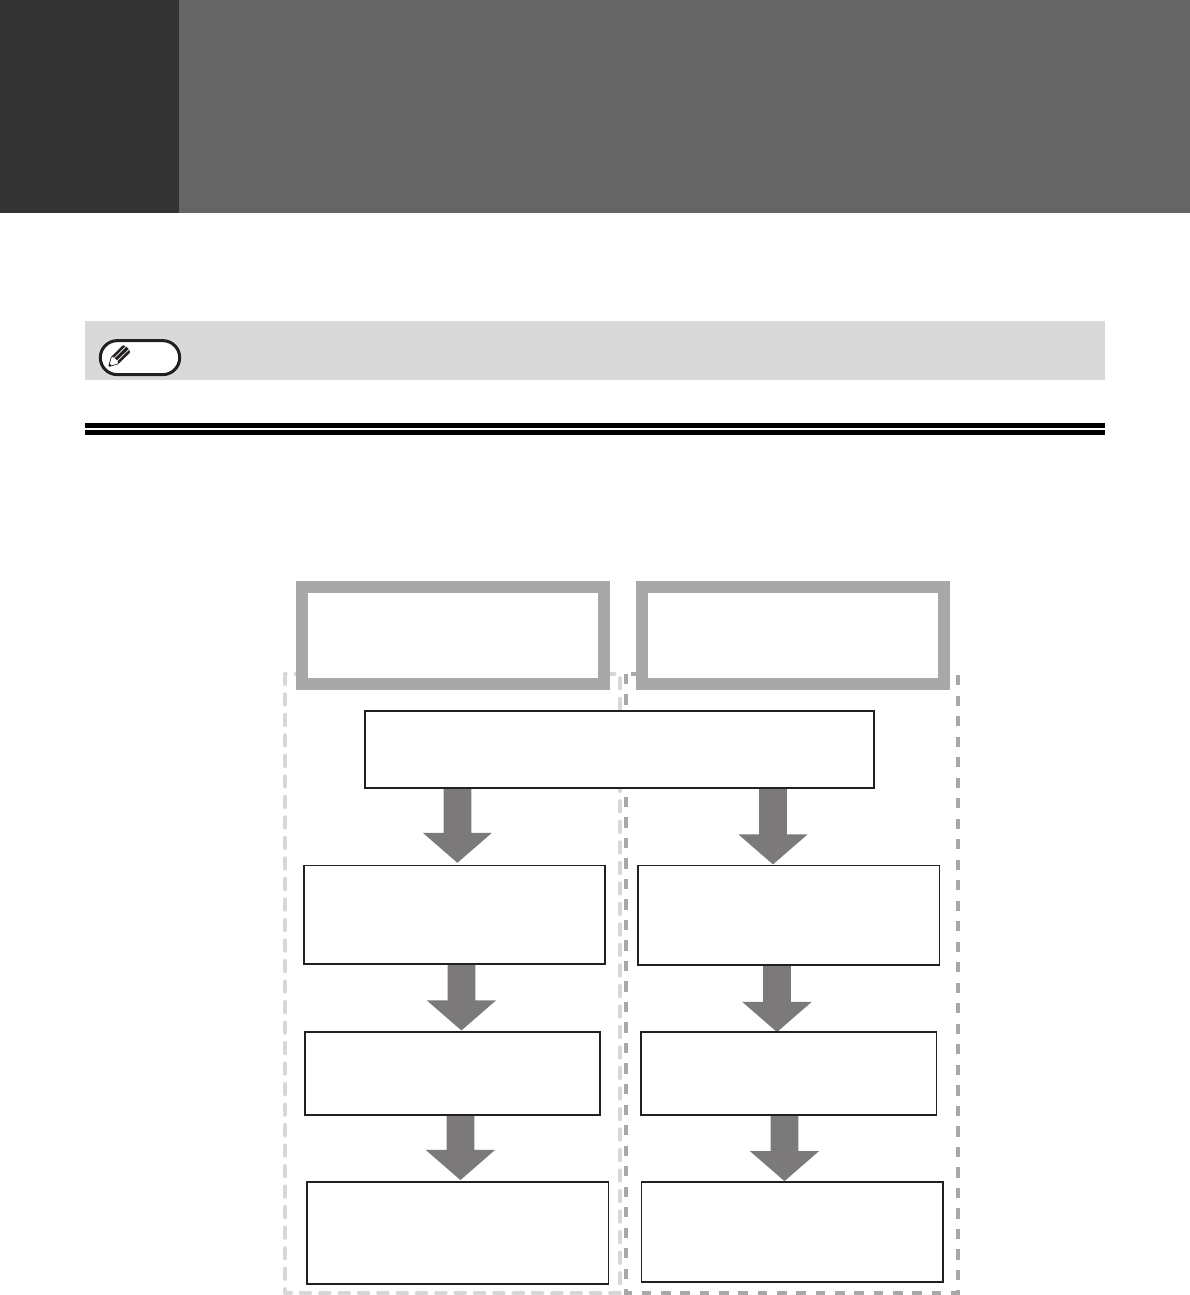
SCANNING OVERVIEW
The flow chart shown below provides an overview of scanning.
*1 TWAIN is an industrial interface standard for image data processing devices (including scanners). By installing a
TWAIN driver on your computer, you can scan and process images using a variety of TWAIN-compliant
applications.
Scanning is not possible when the machine is under maintenance, or when a misfeed occurs or the machine runs
out of toner, or when the drum cartridge needs to be replaced.
Note
Scanning from the TWAIN*1
compliant applications (PC
scanning)
Place the original in the scanning position
For details, please refer to "NORMAL COPYING"
(Page15).
Start a TWAIN-compliant
application, and select the
machine's scanner driver.
Insert a USB memory stick
into the machine
Select the scan setting Select the scan setting
SCAN
"SCANNING FROM THE TWAIN
COMPLIANT APPLICATIONS
(PC scanning)" (Page30)
SCAN
Scanning from the machine
(SCAN to USB)
29
SCANNING FROM THE MACHINE
(SCAN to USB)
Send the scanned image to the USB memory connected to the machine according to the following steps. The
relevant file is saved in the USB memory.
Scanning from the operation panel of the machine
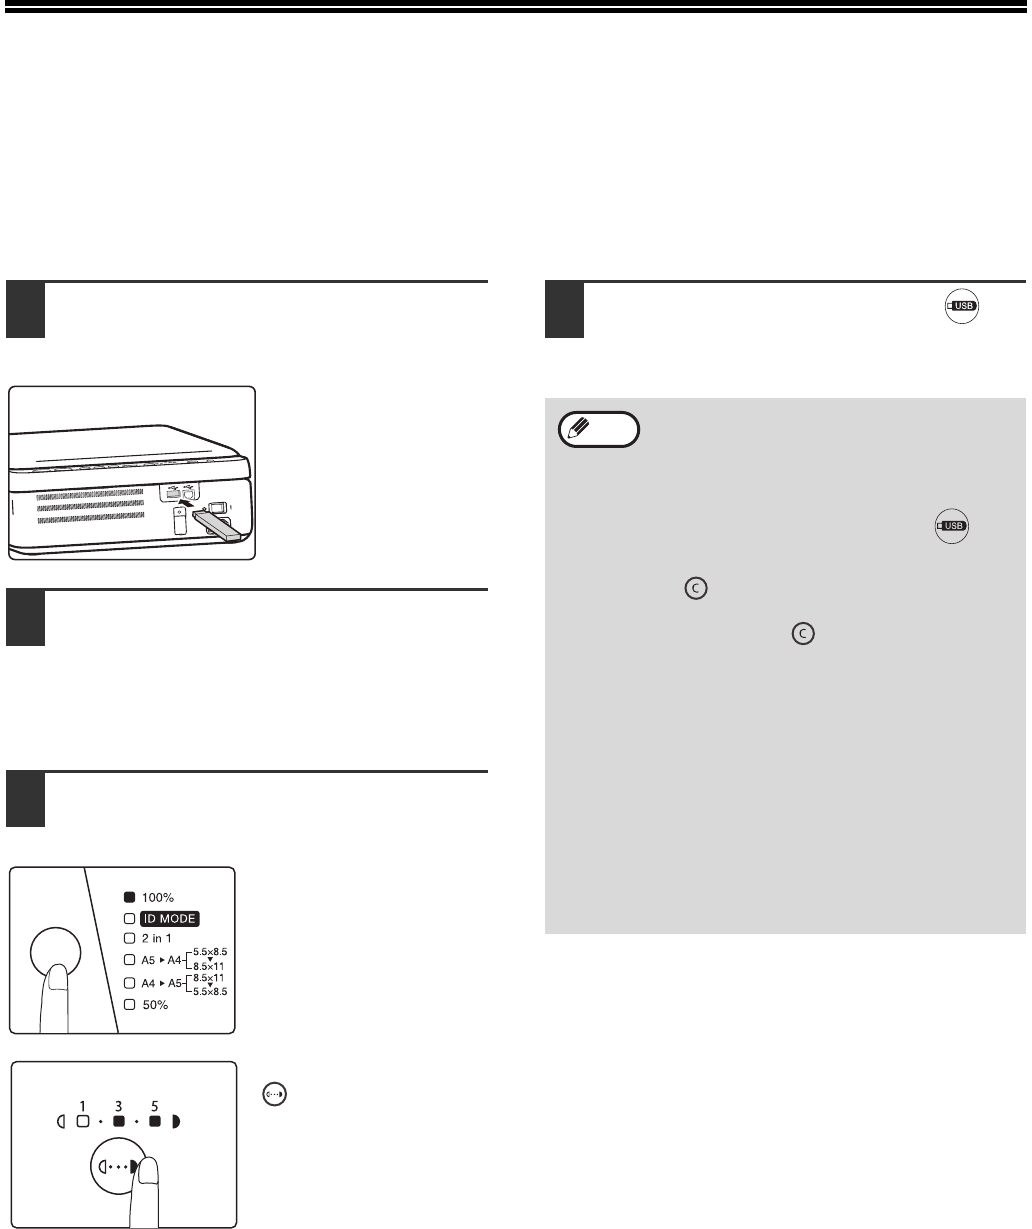
1Connect the USB memory to the USB
interface (A type) of the machine.
2Place the original that you wish to
scan on the document glass.
For placement of the original, please refer to
"NORMAL COPYING" (Page15).
3Select scan settings by pressing the
keys on the operation panel.
The scanning ratio is
100%.
You can also select ID
MODE.
Press the [DENSITY] key
( ) to adjust the
exposure level as needed.
If exposure level 2 or 4 is
selected, the two
indicators of 1, 3 or 3, 5
will light simultaneously.
4Press the [SCAN to USB ] key ( ) to
start scanning .
• When scanning an ID card (ID card mode),
the LED indicator and ID Copy indicator will
flash after one side of the ID card has been
scanned. Turn over the ID card on the
document glass within 30 seconds and
press the [ SCAN to USB ] key ( )
again to finish scanning.
• To stop scanning, press the [CLEAR] key
().
• To return to the default state, press the
[CLEAR] key ( ) twice.
• For restrictions on COPY/PRINT in the
SCAN mode or the restrictions on SCAN in
the COPY or PRINT mode, please refer to
"OPERATION IN COPY, PRINT AND SCAN
MODE" (Page10).
• The storage folder for normal scanning is
different from that of ID card scanning.
(Please use your USB memory stick icon to
replace the "H" in the following paths.)
Normal scanning: H:\documents\Photo
ID card scanning: H:\documents\ID card
• Do not unplug the USB memory when the
USB indicator is flashing.
Note
30
SCANNING FROM THE TWAIN
COMPLIANT APPLICATIONS (PC scanning)
The SHARP scanner driver is compatible with the TWAIN standard, therefore scanning from the TWAIN compliant
applications is possible. The steps for using certain applications for scanning may be different from the following
steps. For details, please refer to the scanner driver help file or the help file of your applications.
1Place the original that you wish to
scan on the document glass.
For setting the original, please refer to "NORMAL
COPYING" (Page15).
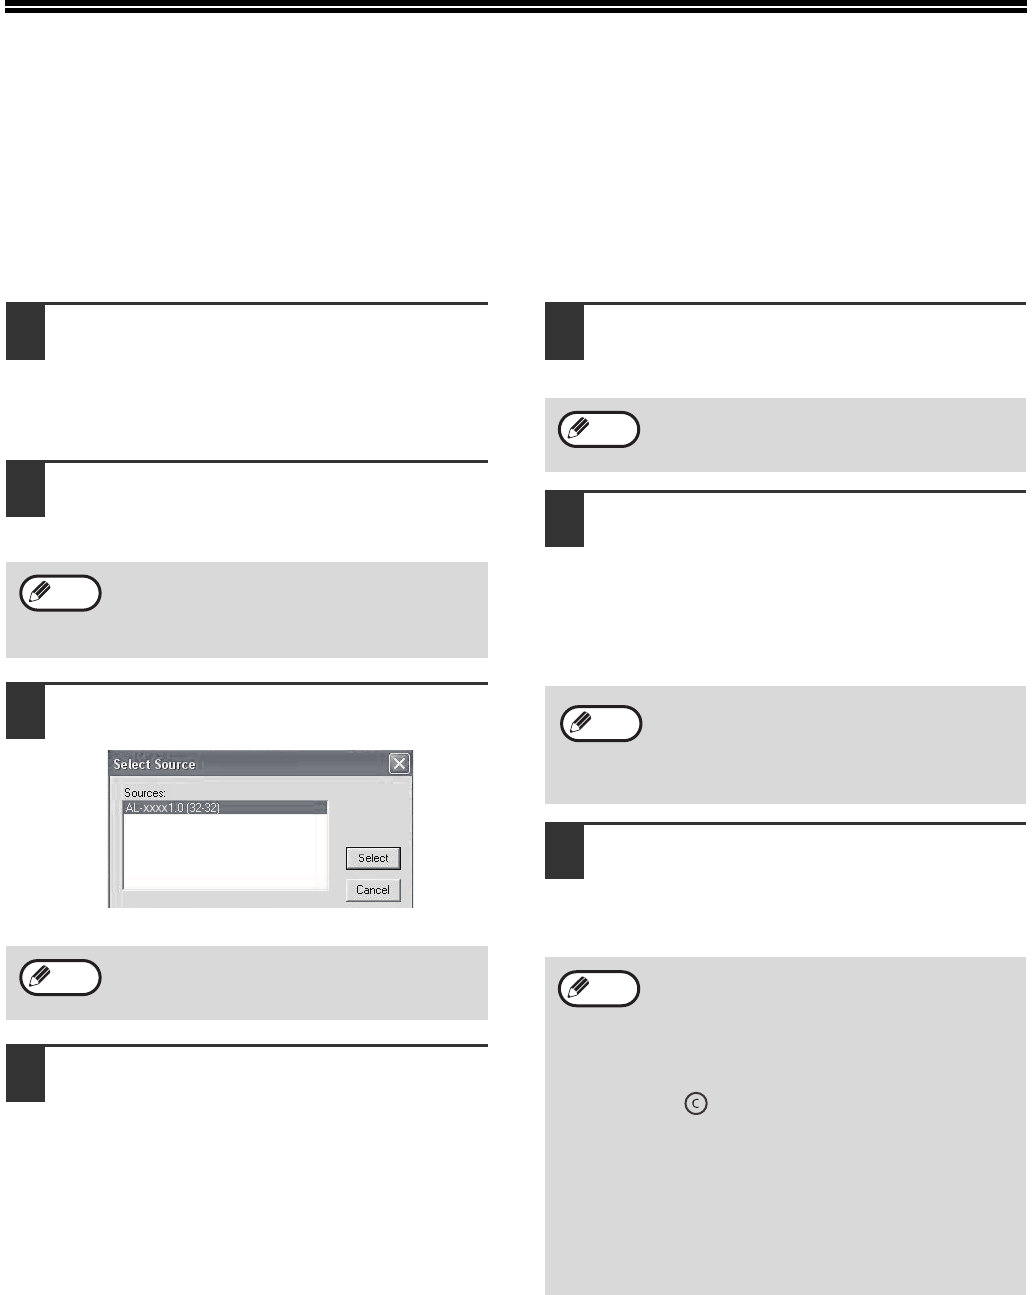
2Open the TWAIN compliant application,
and select "Select scanner" from the
"File" menu.
3Select "AL-XXXX 1.0(32-32)", and then
click the "Selected" button.
4Select "Acquire image" from the "File"
menu of the application.
The scanner driver setup screen will appear.
"SCANNER DRIVER SETTINGS" (Page31)
5Click the "Preview" button.
The preview image will appear.
6Specify the scanning area and set the
scan preferences.
For information on specifying the scanning area
and setting the scan preferences, see Scanner
Driver Help.
"SCANNER DRIVER SETTINGS" (Page31)
7When you are ready to begin
scanning, click the "Scan" button.
The method for accessing the menu to select
the scanner depends upon the application.
For more information, refer to the manual or
the help file of your application.
Depending on your system, "AL-XXXX" or
"AL-XXXX 1.0 " may appear on the "Select
Source" screen.
Note
Note
If the angle of the image is not correct, reset
the original, and click the "Preview" button
again.
Scanning a large area at a high resolution will
increase the volume of data and prolong the
time needed for scanning. When selecting the
scan preferences, it is advisable to reduce the
resolution or specify a suitable scanning area.
• To scan an ID card, press the "ID card"
button, and click the "Scan" key to scan one
side of the ID card. Then turn the ID card
over on the document glass, and press the
"Scan" key again to finish scanning.
• To stop scanning, press the [CLEAR] key
( ) or click [CANCEL].
• To cancel a scanning job after clicking the
"Scan" button, press the [Esc] key on your
keyboard.
• For the restrictions on COPY/PRINT in the
SCAN mode or the restrictions on SCAN in
the COPY or PRINT mode, please refer to
"OPERATION IN COPY, PRINT AND SCAN
MODE" (Page10).
Note
Note
Note
31
SCANNER FUNCTIONS
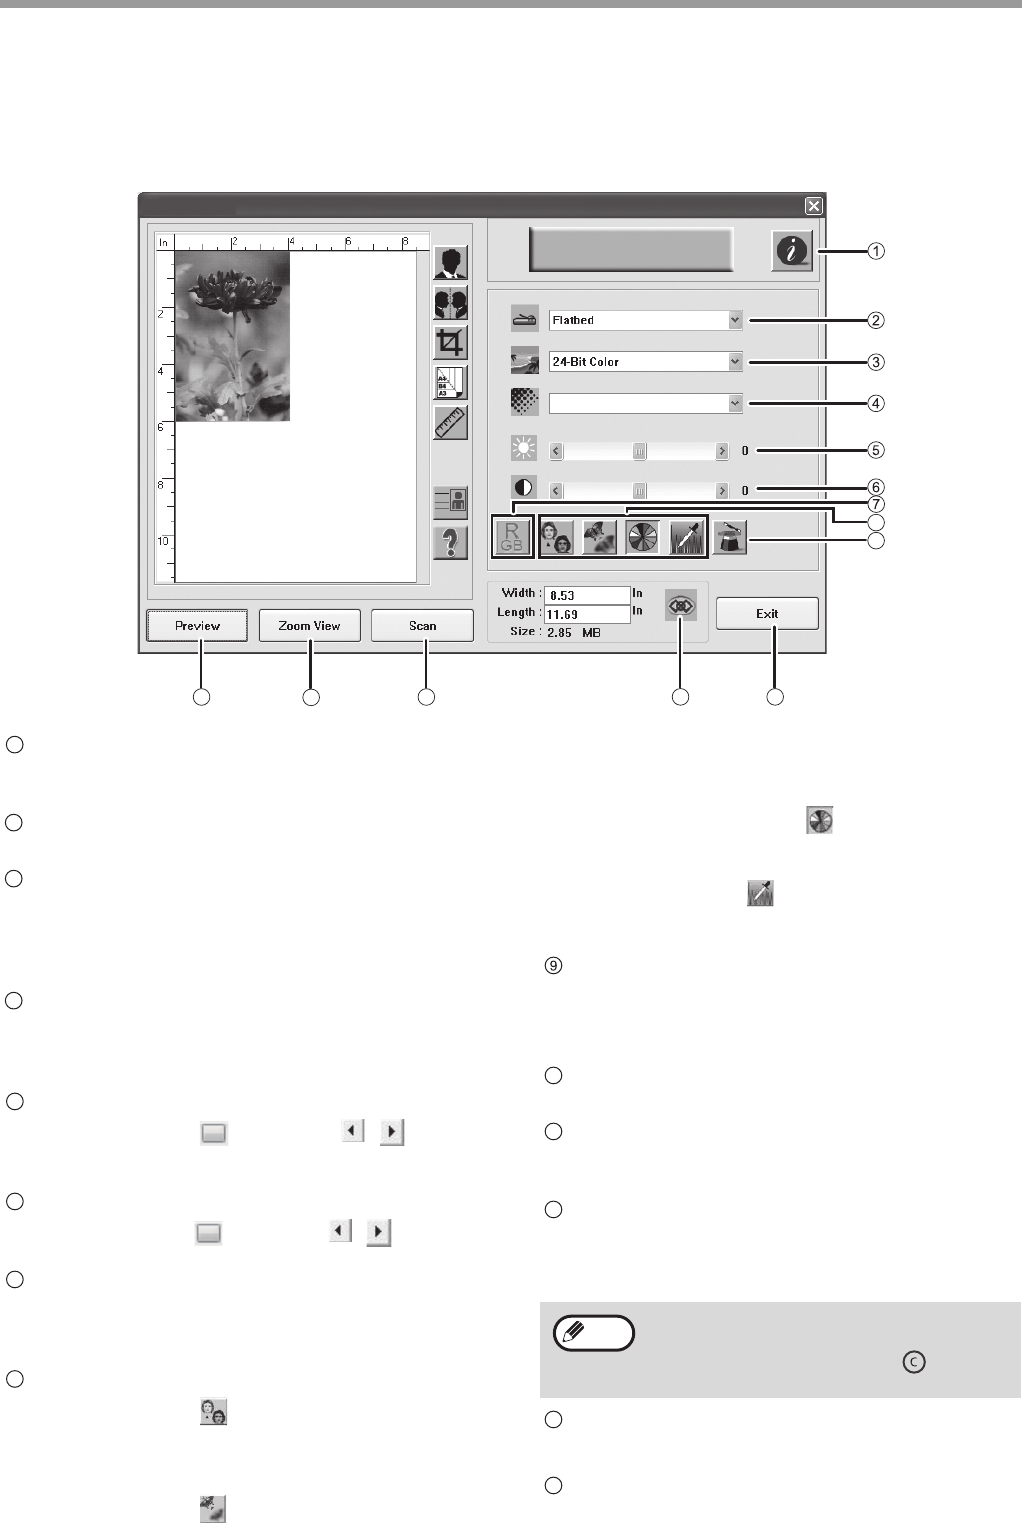
SCANNER DRIVER SETTINGS
The scanner driver setup screen consists of the "Preview" screen, which enables you to select the scan setting
buttons and shows the scanned image. For details on the scan settings, click the "Help" button in the preview screen
to display Help.
"Scanner Information" button
To display the scanner information and driver
information.
Scan Methed menu
Platform scanning.
"Image Type" menu
The image types include "Black and White", "8-Bit
Gray" and "24-Bit Color". For details on the
settings, click the "Help" button in the preview
screen to display Help.
"Resolution" menu
The following resolutions can be selected from the
drop-down menu: 50dpi, 72dpi, 100dpi, 144dpi,
150dpi, 200dpi, 300dpi, 600dpi.
Brightness
Drag the scroll bar ( )
or use the ( , ) button
to change the brightness. The brightness range is
-100 to 100.
Contrast
Drag the scroll bar ( ) or use the ( , ) button to
change the contrast. The contrast range is -100 to 100.
"RGB Adjustment" button
Click this button to adjust the RGB of the image. This
button is highlighted when the "Image Type" is
selected "Black and White" or "8-Bit Gray".
Image enhancement tool
"Descreen" button ( )
Click this button to clear the common cloud patterns
in the prints. You can select "None", "Newspaper",
"Magazine" or "Catalog".
"Sharpen" button ( )
Click this button to enhance the scanned image. You
can select "None", "Light", "More", "Heavy" or "Extra
Heavy".
"Color Adjustment" button ( )
Click this button to adjust the image of the default
image color.
"Auto Level" button ( )
Click this button to adjust the brightest and darkest
zones in order to optimize the image.
"Advanced Setting" button
Click to display the advanced image setting tools.
For details on the settings, click the "Help" button
in the preview screen to display Help.
"Preview" button
To preview the original.
"Zoom View" button
Click this button to enlarge the preview image size to
the optimal size of the preview window.
"Scan" button
Click to scan an original using the selected settings.
Ensure that the settings are correct before clicking
this button.
"Lock Scaling" button
Click to lock the width to height ratio of the image.
"Exit" button
Click to exit the scanner driver setup screen.
8
9
1413
12
11
10
AL-XXXX
200
Sharp AL-XXXX
Sharp AL-XXXX
1
2
3
4
5
6
7
8
To cancel a scanning job after clicking the
"Scan" button, press the [Esc] key on your
keyboard or the "CLEAR" key ( ) on the
machine.
10
11
12
Note
13
14
32
SCANNER FUNCTIONS
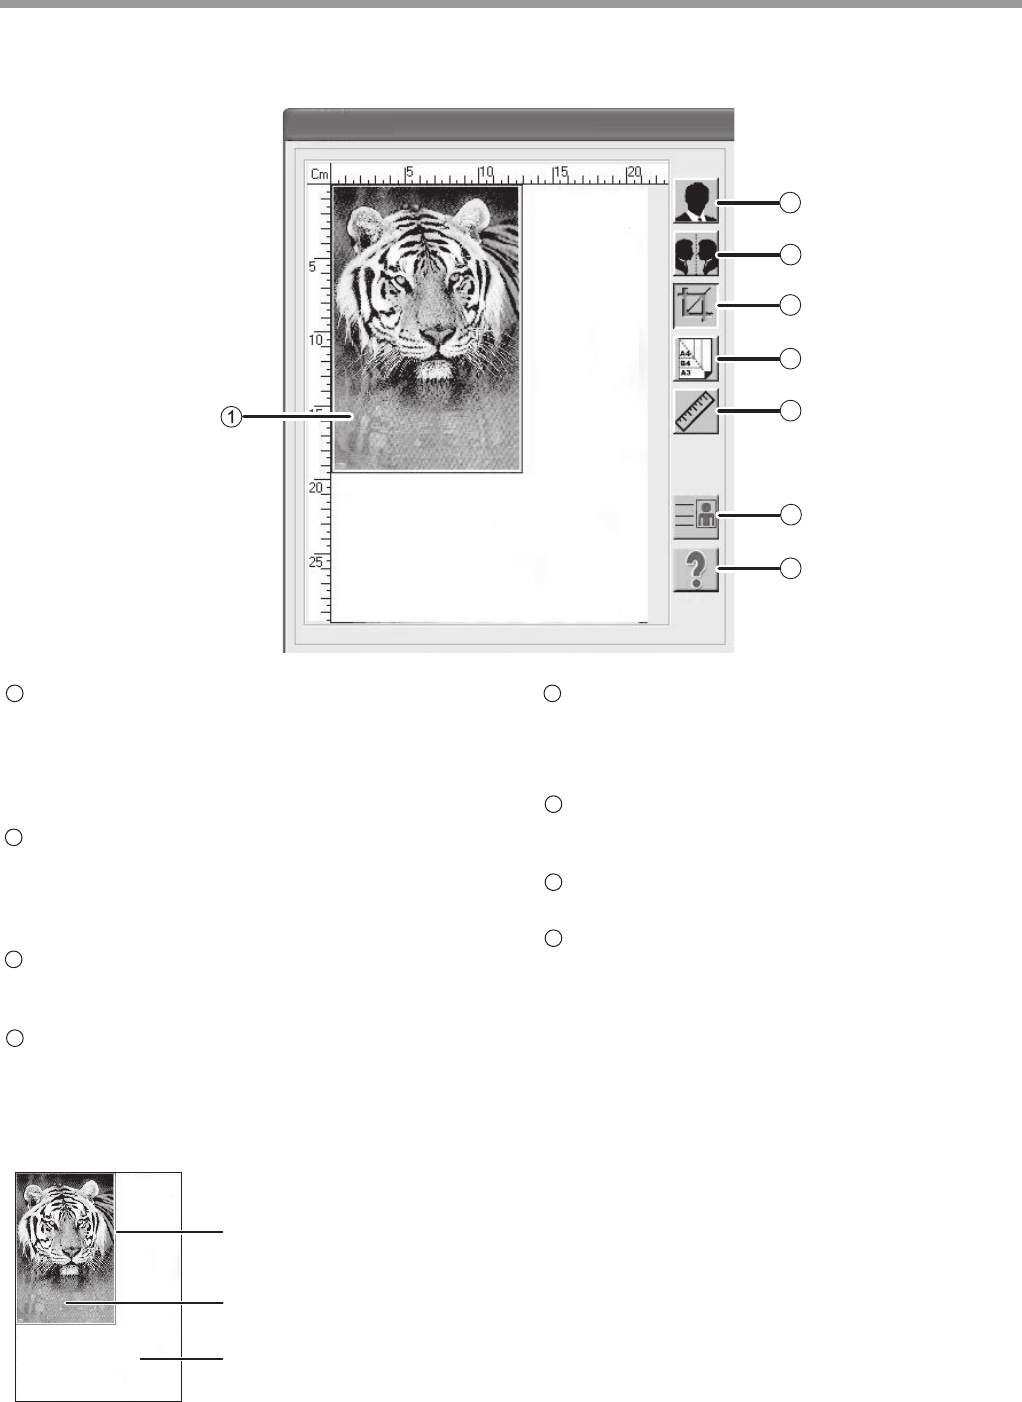
Preview screen
Click the "Preview" button in the Set-up screen to
display the scanned image. You can specify the
scanning area by dragging the mouse inside the
window. The inside of the frame created by
dragging the mouse will be the scanning area.
"Invert" button
Click this button to automatically change the
brightness and color of the image. For color
images, each pixel will be changed to its inverse
color.
"Mirror" button
Click this button to scan a mirror image of the
original.
"Preview Auto-Area" button
Click when the preview screen is displayed to
automatically set the scanning area as the entire
preview image.
Click the "Preview
Auto-Area" button, and then
the scanning area will be
automatically set as the
entire preview image.
Preview image
Preview screen
"Page Size" button
Click this button to select the area that you want
to scan. You can select "Card-4 × 2.5 inch,
Photo-5 × 3.5 inch, B5, A5 or A4".
"Units" button
Click this button to set the unit of measurement
(options: inch, centimeter or pixel.)
ID Card
Click this key to perform scanning in ID card mode.
"Help" button
Click to display the help file for the scanner driver.
PREVIEW
SCREEN
2
3
4
5
6
7
8
AL-XXXX
AL-XXXX
1
2
3
4
5
6
7
8

33
5
Chapter 5
TROUBLESHOOTING
This chapter describes the steps of troubleshooting and misfeed clearing.
TROUBLESHOOTING
If you experience difficulty while using the machine, check the following troubleshooting guide before calling for
service. Many problems can be easily solved by the user. If you still cannot solve the problem with the help of the
troubleshooting guide, turn off the power switch and unplug the machine, and contact your dealer or the nearest
authorised service department.
MACHINE/COPYING PROBLEMS
The machine does not operate. ................................................................................................................. 34
Copies are too dark or too light.................................................................................................................. 34
Blank copies............................................................................................................................................... 34
Part of the image is cut off or there is too much blank space. ................................................................... 34
Wrinkles appear in the paper or the image disappears in some places. ................................................... 34
Paper misfeed............................................................................................................................................ 34
Copies are smudged or dirty...................................................................................................................... 35
A copy job stops before it is finished.......................................................................................................... 35
Any one of the alarm indicators ( ,,) is lit or blinking. ............................................................. 35
Lighting fixture flickers. .............................................................................................................................. 35
SOFTWARE INSTALLATION PROBLEMS
The driver cannot be installed (Windows 2000/XP/Vista/7) ...................................................................... 36
The Plug and Play window does not appear.............................................................................................. 36
The driver cannot be installed correctly with the Plug and Play window. ................................................... 37
Uninstall software....................................................................................................................................... 37
PRINTING AND SCANNING PROBLEMS
The machine cannot print. ......................................................................................................................... 38
Printing is slow. .......................................................................................................................................... 38
The printed image is light and uneven. ...................................................................................................... 38
The printed image is dirty........................................................................................................................... 38
The printed image is skew or it runs off the paper. .................................................................................... 39
The printed image is darker or lighter than expected................................................................................. 39
Any one of the alarm indicators ( ,,) is lit or blinking. ............................................................. 39
Poor scanning quality................................................................................................................................. 39
Unable to scan the image. ......................................................................................................................... 40
Scanner transfer speed is slow.................................................................................................................. 40
MISFEED REMOVAL .................................................................................... 41
INDICATOR DISPLAY OF THE MACHINE STATUS AND SOLUTION....... 42
ERROR CODE AND SOLUTION .................................................................. 43

34
TROUBLESHOOTING
MACHINE/COPYING PROBLEMS
The following problems are related to the general operation of the machine and copying.
Problem Cause and solution Page No.
The machine does not operate.
The machine is not plugged into a power socket.
→Plug the machine into a grounded power socket. –
Power switch is turned OFF.
→Turn the power switch ON. 6
Warming up.
→Indicates that the machine is warming up. Copies cannot be
made until the machine has finished warming up.
6
The machine is in auto power shut off mode.
→In auto power shut off mode, press any key to resume normal
operation.
6
Copies are too dark or too light.
Select the correct original type.
→Press the [DENSITY] key ( ) to select proper exposure
manually.
16
Blank copies.
The original is not placed with face down on the
document glass.
→Place the original face down on the document glass.
15
Part of the image is cut off or there
is too much blank space.
The original was not placed in the correct position.
→Place the original correctly. 15
No appropriate ratio was selected according to the size of
the original and the size of the paper.
→Press the [MODE SELECT] key to have the copy made using the
appropriate ratio for the original and paper.
17
Wrinkles appear in the paper or
the image disappears in some
places.
The paper is outside of the specified size and weight
range.
→ Use copy paper within the specified range.
7
Paper is curled or damp.
→Do not use the curled or crimped paper. Replace it with dry copy
paper. If the machine is not used for a long time, remove the
paper from the feed tray, put it into a bag and store in a dark place
to prevent moisture absorption.
–
Paper misfeed.
Misfeed occurs.
→To clear the misfeed, please refer to "MISFEED REMOVAL". 41
The paper is outside of the specified size and weight
range.
→Use copy paper within the specified range.
7
Paper is curled or damp.
→Do not use the curled or crimped paper. Replace it with dry copy
paper. If the machine is not used for a long time, remove the
paper from the feed tray, put it into a bag and store in a
dark/shady place to prevent moisture absorption.
–
Paper is not loaded properly.
→Make sure that the paper is properly loaded. 9
Torn pieces of paper inside the machine.
→Remove all the torn pieces of the misfeed paper. 41
Too much paper is loaded into the feed tray.
→If the stack height of paper exceeds the upper limit of the paper
guide, remove some of the paper to keep the stack height within
the limit.
9
The paper guide does not match the width of the paper.
→Adjust the paper guide to match the width of the paper. 9
Output tray is not expanded.
→Expand the output tray. 7

35
TROUBLESHOOTING
Copies are smudged or dirty.
The document glass or the inside of the document cover
is dirty.
Clean them regularly.
47
The original is smudged or dirty.
Use a clean original. –
Paper contains excessive moisture.
Replace with dry copy paper. –
Please refer to "CARTRIDGE CLEANING MODE". 47
A copy job stops before it is
finished.
The feed tray is out of paper.
Load paper. 9
Any one of the alarm indicators
( , , ) is lit or blinking.
Please refer to "INDICATOR DISPLAY OF THE MACHINE
STATUS AND SOLUTION" to check the meaning of the
alarm indicator and error message, and take appropriate
actions.
42
Lighting fixture flickers.
The same power socket is used by the lighting fixture and
the machine.
Connect the machine to a power socket which is not used by
other electric appliances.
–
Problem Cause and solution Page No.
36
TROUBLESHOOTING
SOFTWARE INSTALLATION PROBLEMS
If the software is not installed correctly, please check the following items on your computer.
The driver cannot be installed
(Windows 2000/XP/Vista/7)
If you can not install the driver in the Windows
2000/XP/Vista/7 system, please check your computer
settings according to the following steps.
1Click the "Start" button and then click
"Control Panel".
In Windows 2000, click the "Start" button, select
"Settings" and then click "Control Panel".
2Click "Performance and
Maintenance"
,
and then click
"System".
• In Windows 2000, double click the "System"
icon.
• In Windows Vista, click "System Maintenance"
and then click "System".
• In Windows 7, click "System and Safety" and
then click "System".
3Click the "Hardware" tab and then
click the "Driver Signature" button.
• In Windows Vista, click "Change Settings", if a
message window appears asking for your
confirmation, click "Continue". Click the
"Hardware" tab again and then click "Windows
Update Driver Settings".
• In Windows 7, click "Change Settings", if a
message window appears asking for your
confirmation, click "Continue". Click the
"Hardware" tab again and then click "Device
Installation Settings".
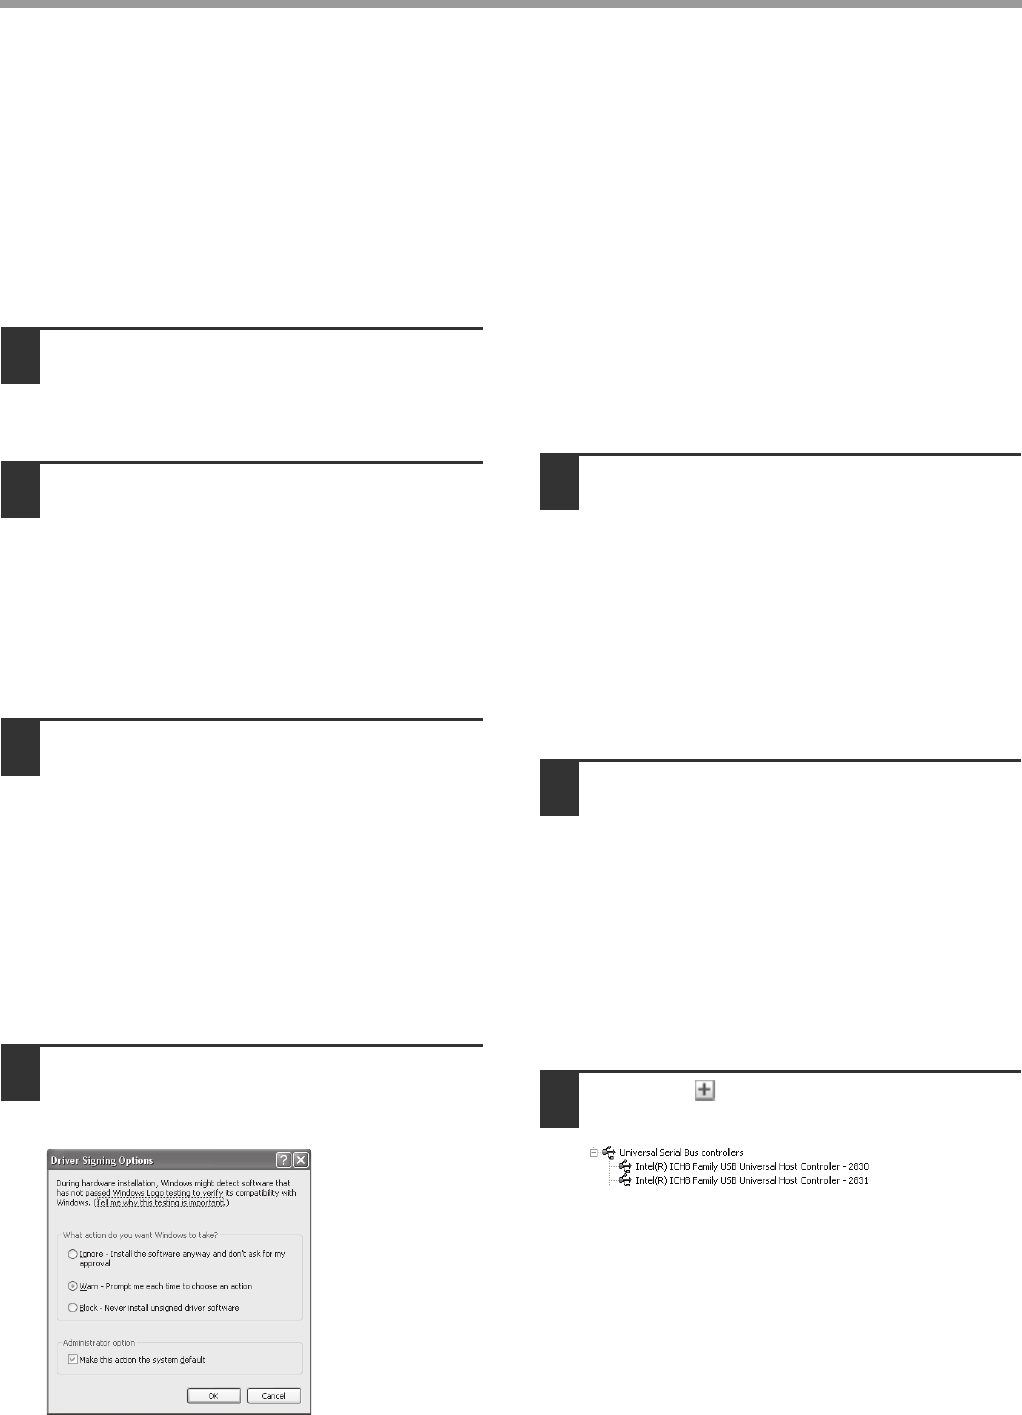
4Confirm "What action do you want the
Windows to take?" ("File signature
verification" in Windows 2000).
If the "Block" option is selected, the driver can not
be installed. Select the "Warning" option and then
install the driver according to "SOFTWARE
INSTALLATION" (Page12).
• In Windows Vista, the "Windows Update Driver
Settings" window will appear.
• In Windows 7, the "Device Installation Settings"
window will appear.
The Plug and Play window does not
appear.
If the Plug and Play window does not appear when you
connect the machine to your computer with USB cable
and turn on the machine power, please check whether
the USB port is available according to following steps.
1Click the "Start" button, click "Control
Panel", and then click "Performance
and Maintenance".
• In Windows 2000, click the "Start" button, select
"Settings" and then click "Control Panel".
• In Windows Vista, click the "Start" button and
select "Control Panel" and then select "System
and Maintenance".
• In Windows 7, click the "Start" button and select
"Control Panel" and then select "System and
Safety".
2Click "System", click the "Hardware"
tab and then click the "Device
Manager" button
The "USB controller" will appear in the device list.
• In Windows 2000, double click the "System"
icon, click the "Hardware" tab and then click the
"Device Manager" button.
• In Windows Vista, click "Device Manager", if a
message window appears asking for your
confirmation, click "Continue".
• In Windows 7, click the "Device Manager"
button directly.
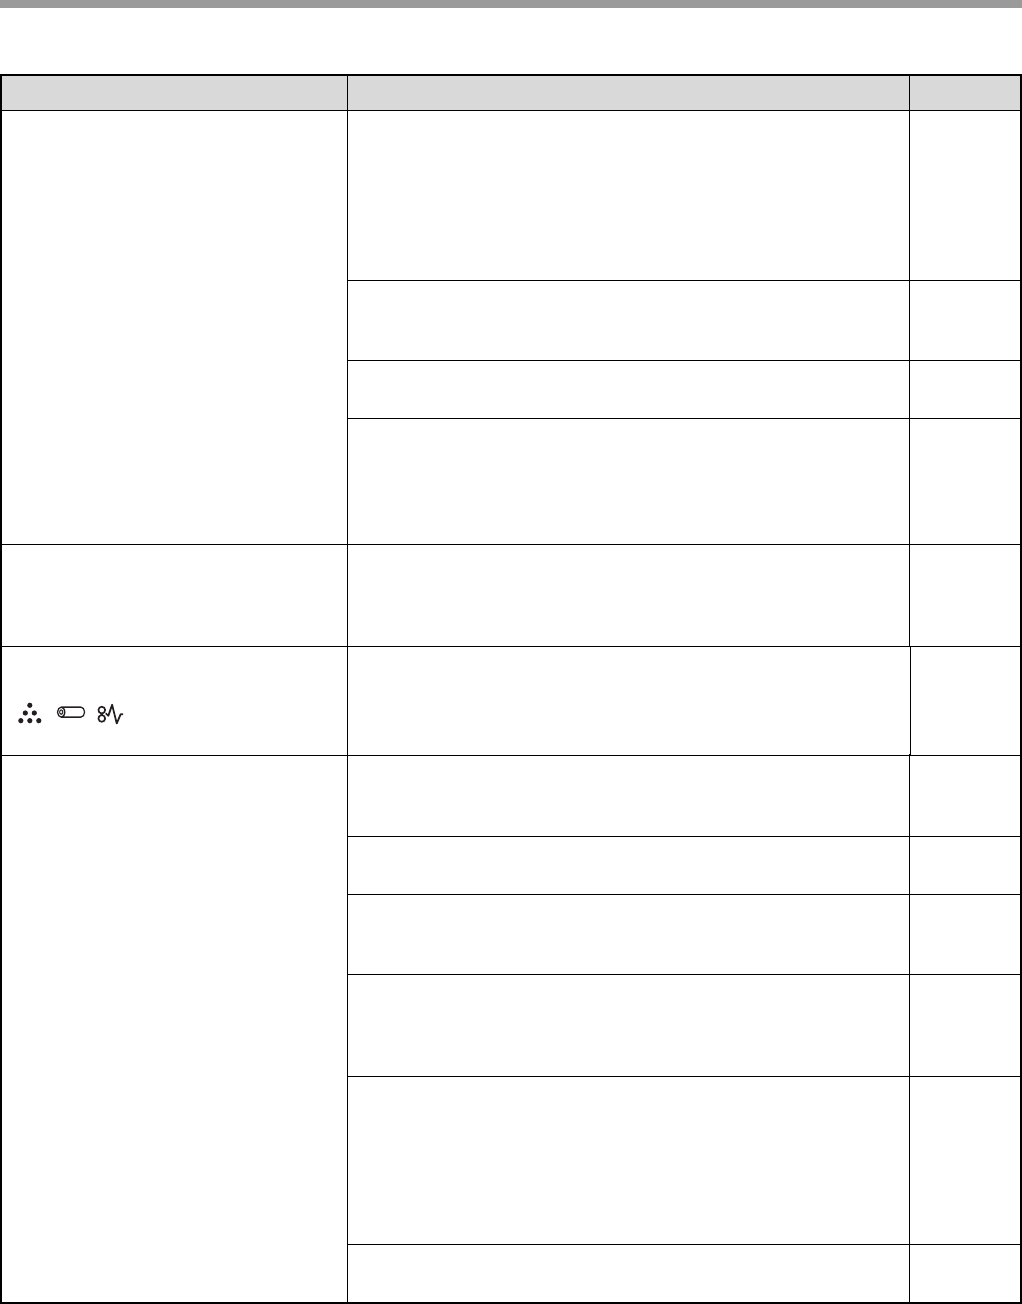
3Click the icon in the "Universal
Serial Bus controllers".
Two items shall be displayed: your controller
chipset type and root hub. If these items appear,
you can use the USB port. If a yellow exclamation
mark appears in the "Universal Serial Bus
controllers" or the "Universal Serial Bus
controllers" does not appear, you shall check
your computer manual to solve the USB problem
or contact your computer manufacturer.

37
TROUBLESHOOTING
4When you confirm that the USB port
has been enabled, please install the
software according to "SOFTWARE
INSTALLATION" (Page12).
5
The driver cannot be installed
correctly with the Plug and Play
window.
If you can not install the driver correctly with the Plug
and Play window (for example, the Plug and Play
window appears when the files for installing the driver
are not copied), please uninstall undesired devices
according to the following steps, and then install the
driver according to "SOFTWARE INSTALLATION"
(Page12).
1Click the "Start" button, click "Control
Panel", and then click "Performance
and Maintenance".
• In Windows 2000, click the "Start" button, select
"Settings" and then click "Control Panel".
• In Windows Vista, click the "Start" button and
select "Control Panel" and then select "System
and Maintenance".
• In Windows 7, click the "Start" button and select
"Control Panel" and then select "System and
Safety".
2Click "System", click the "Hardware"
tab and then click the "Device
Manager" button.
• In Windows 2000, double click the "System"
icon, click the "Hardware" tab and then click the
"Device Manager" button.
• In Windows Vista, click "Device Manager", if a
message window appears asking for your
confirmation, click "Continue".
• In Windows 7, click the "Device Manager"
button directly.
3Click the icon beside "Other
devices".
If "SHARP AL-XXXX" appears, select and delete
this item.
4According to "SOFTWARE
INSTALLATION" (Page12), install
software.
Uninstall software
To uninstall the software, follow the steps below.
1Click the "Start" button and then click
"Control Panel".
• In Windows 2000, click the "Start" button, select
"Settings" and then click "Control Panel".
• In Windows Vista, click the "Start" button and
then click "Control Panel".
2Click "Add or Remove Programs".
• In Windows 2000, double click the "Add/
Remove Programs" icon.
• In Windows Vista, click "Uninstall Program".
3Select the driver from the list and
uninstall the software.
For more information, refer to the manual or the
help file of your operating system.
4Restart your computer.
5
If "Other devices" does not appear, close the
"Device Manager" Window.
XXXX
Note

38
TROUBLESHOOTING
PRINTING AND SCANNING PROBLEMS
The following problems are related to the general operation of printing and scanning.
Problem Cause and solution Page No.
The machine cannot print.
The machine is not correctly connected to your
computer.
Check both ends of the USB cable and make sure that you have
a solid connection. Please use the USB cable delivered together
with the machine.
–
Copying.
Wait until the copy job is completed. –
Your machine is not selected correctly in the current
applications for the print job.
When choosing "Print" from the "File" menu located in the
applications, make sure that you have selected "SHARP
AL-XXXX" printer (where XXXX is the model name of your
machine) in the "Print" dialog box.
–
The printer driver has not been installed properly.
Follow these steps to check if the printer driver is installed
properly.
1 Click the "start" button, and then click "Printers and Faxes".
In Windows 2000, click the "Start" button, select "Settings"
and then click "Printers".
In Windows Vista, click the "Start" button and select "Control
Panel" and then double click "Printers".
In Windows 7, click the "Start" button, and then click
"Equipment and Printers".
2 If the "SHARP AL-XXXX" printer driver icon is shown but you
still cannot print, it is possible that the printer driver has not
been installed correctly. In this case, delete the software and
then reinstall it.
–
Printing is slow. Simultaneous use of two or more applications.
Exit all the undesired applications before printing. –
The printed image is light and
uneven.
The paper is loaded in such a way that the printing takes
place on the back side of the paper.
Some paper types have printable front and back sides. If the
paper is loaded in such a way that printing takes place on the
back side, toner will not adhere well to the paper and high-quality
images cannot be produced.
9
The printed image is dirty.
You are using the paper that is outside the specified size
and weight range.
Use copy paper within the specified range.
7
Paper is curled or damp.
Do not use the curled or crimped paper. Replace it with dry copy
paper. If the machine is not used for a long time, remove the
paper from the feed tray, put it into a bag and store in a shady
and cool place to prevent moisture absorption.
–
You did not set sufficient margins in the paper settings of
your application.
The top and bottom of the paper may be dirty if the margins are
set outside of the specified print area.
Set the margins in the software application within the specified
print area.
–
Please refer to "CARTRIDGE CLEANING MODE". 47
39
TROUBLESHOOTING
The printed image is skew or it
runs off the paper.
The paper loaded in the feed tray does not have the same
size as that specified in the printer driver.
→Check if the "Paper Size" options suit the size of the paper loaded
in the feed tray.
→If the "Fit To Paper Size" setting is activated, make sure that the
paper size selected from the drop-down list is the same as the
size of the loaded paper.
–
The document direction setting is not correct.
→Click the "Main" tab in the printer driver setup screen, and verify if
the "Image Orientation" option is set to your requirements.
–
Paper is not loaded properly.
→Make sure that the paper is properly loaded. 9
You did not correctly specify the margins for the
application in use.
→Check the layout of the document margins and the paper size
settings for the application you are using. And check if the print
settings are specified correctly to suit the paper size.
–
The printed image is darker or
lighter than expected.
The setting for the print density is not appropriate.
→You can adjust the print density on the printer driver. Click the
"Advanced" tab in the printer driver setup screen and select the
"Density Adjustment" from 1 (light) to 5 (dark).
–
Any one of the alarm indicators
(,,) is lit or blinking.
Please refer to "INDICATOR DISPLAY OF THE MACHINE
STATUS AND SOLUTION" to check the meaning of the
alarm indicator and error message, and take appropriate
actions.
42
Poor scanning quality.
The document glass or the inside of the document cover
is dirty.
→Clean them regularly.
47
The original is smudged or dirty.
→Use a clean original. –
You have not specified a suitable resolution.
→Make sure that the resolution setting in the scanner driver is
appropriate for the original.
–
Scanning a large area at high resolution
→If you attempt to scan a large area at high resolution and there is
insufficient memory in the machine to hold the scanned data,
please scan at a lower resolution or decrease the scanning area.
–
The brightness and contrast settings are not suitable.
→If you are scanning with a TWAIN-compliant application and the
resulting image has unsuitable brightness or contrast (for
example, it is too light), click "Colour Adjustment" or "Auto Level"
to adjust it. Click the "Hue/Saturation/Lightness" in the "Advanced
setting" to adjust the image while viewing the output image on the
screen.
–
The original was not placed in the correct position.
→Place the original correctly. 15
Problem Cause and solution Page No.

40
TROUBLESHOOTING
Unable to scan the image.
If scanning is disabled, shut down your computer, turn off
the machine power switch, and unplug the machine
power cord. Then, restart your computer, restore power to
the machine, and try scanning again. If scanning is still
disabled, check the following items.
–
Your application is not TWAIN compliant.
→If your application is not TWAIN compliant, you can not scan.
Make sure that your application is TWAIN compliant.
–
You have not selected the scanner driver of the machine
in your application.
→Make sure that the machine's scanner driver is selected in your
TWAIN-compliant application.
–
You have not specified all the scanning preferences
appropriately.
→Scanning a file with large area at high resolution results in a large
quantity of data and a prolonged scanning time. The scanning
preferences should be set appropriately for the type of original to
be scanned, i.e., Newspaper, Magazine, Catalogue.
–
There is not enough machine memory.
→The scan resolution will vary depending on the scanning area and
how much memory in the machine is free.
–
Scanner transfer speed is slow.
Your computer does not meet the system requirements
for the USB 2.0 interface (Hi-Speed mode).
→See "System requirements for USB 2.0 (Hi-Speed mode)" in
Chapter 1 to configure your system as required for USB 2.0, and
check if "Hi-Speed" is set.
14
Problem Cause and solution Page No.
41
MISFEED REMOVAL
When a misfeed occurs, the misfeed indicator ( ) will blink and the machine will automatically stop working.
Troubleshooting for misfeed
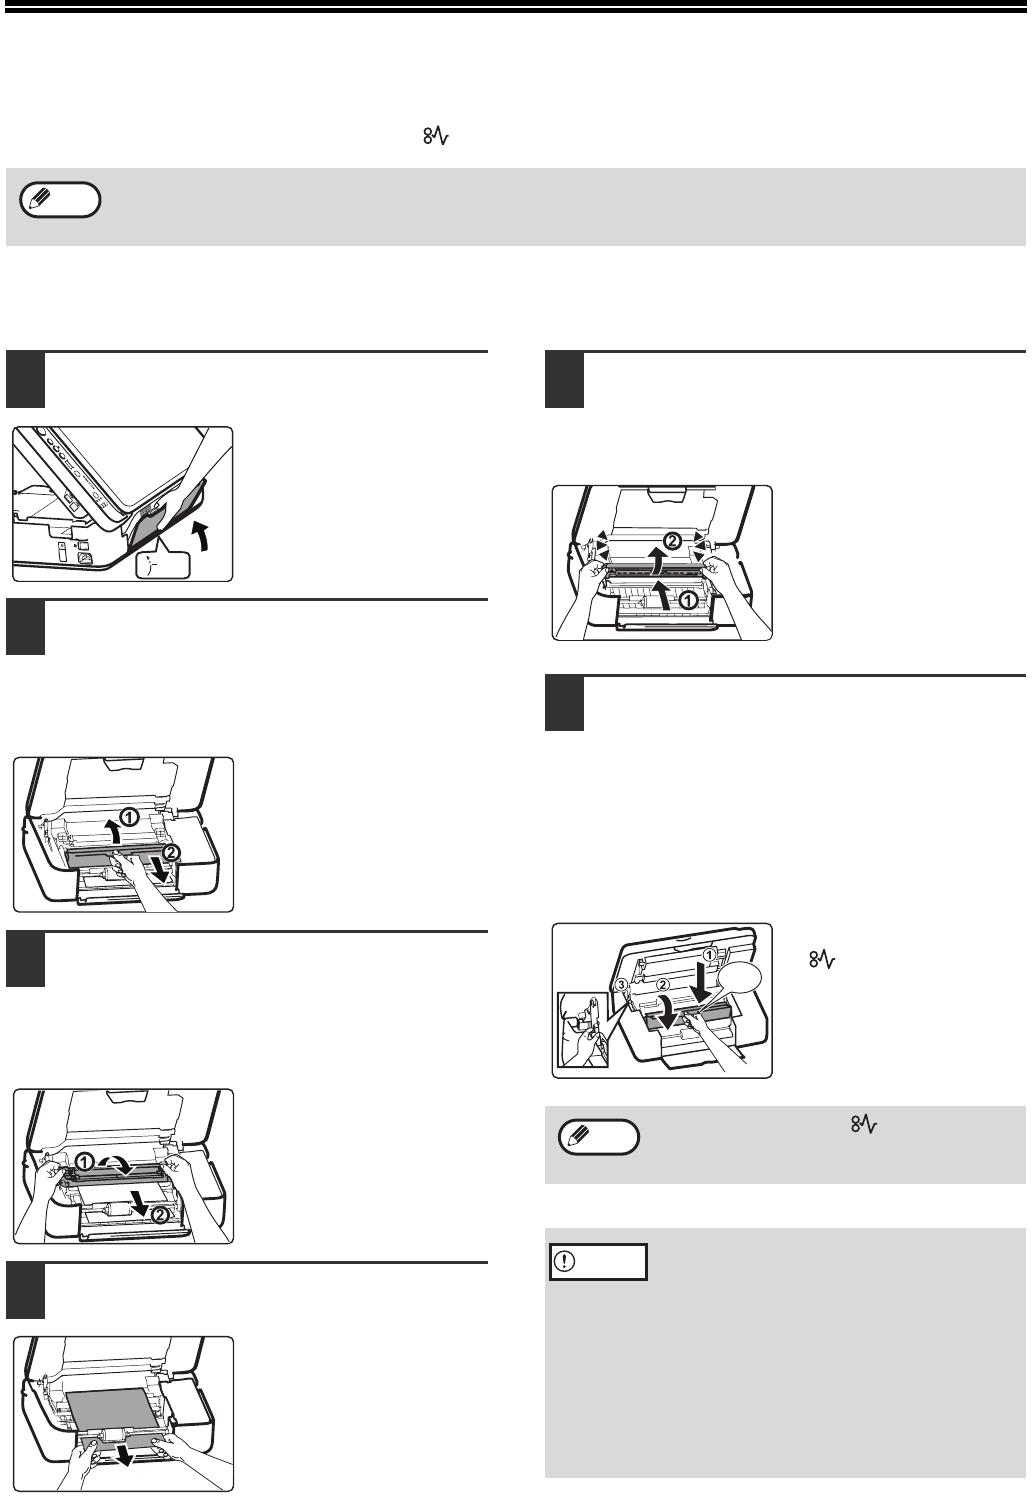
1Push the output tray to the middle
position.
2Lift the scanner document glass
locking handle, open the cover of the
machine, lift it and remove the
cartridge following the direction of the
arrow (place it horizontally).
3Hold the green-marked position with
your both hands and rotate in the
direction of the arrow, and take out
the drum cartridge (place it on a clean
surface).
4Take out the misfeed paper and be
careful not to tear it.
5Aim the drum cartridge to the bayonet
of the machine, insert it into the
bayonet and rotate in the direction of
the arrow.
6Insert the toner cartridge into the
bayonet of the machine, press it down
in the direction of the arrow until a
"click" is heard. Gently lift support bar
at the green-marked and pull to a
half-closed position, and then gently
lift the bar again until the cover is
completely closed.
The misfeed indicator
( ) will go out.
The paper may tear when you remove a misfeed paper. In this event, be sure to remove all the torn pieces of paper
from the machine. Take care not to touch the drum cartridge (the green part). Any scratches or damage to the
surface of the drum will cause dirty copies.
Note
1/2
If the misfeed indicator ( ) does not stop
blinking, check for any torn pieces of paper in
the machine.
• Do not touch the drum cartridge (green
portion) when removing the misfeed paper.
Doing so may damage the drum and cause
smudges on copies.
• While closing the cover of the machine,
please beware of clamping your fingers.
• Confirm whether the original is placed slant
or not when making copies again.
• Toner remained on the feed roller may
re-affect the quality of copying original
when removing the misfeed paper.
“Click”
Note
Caution
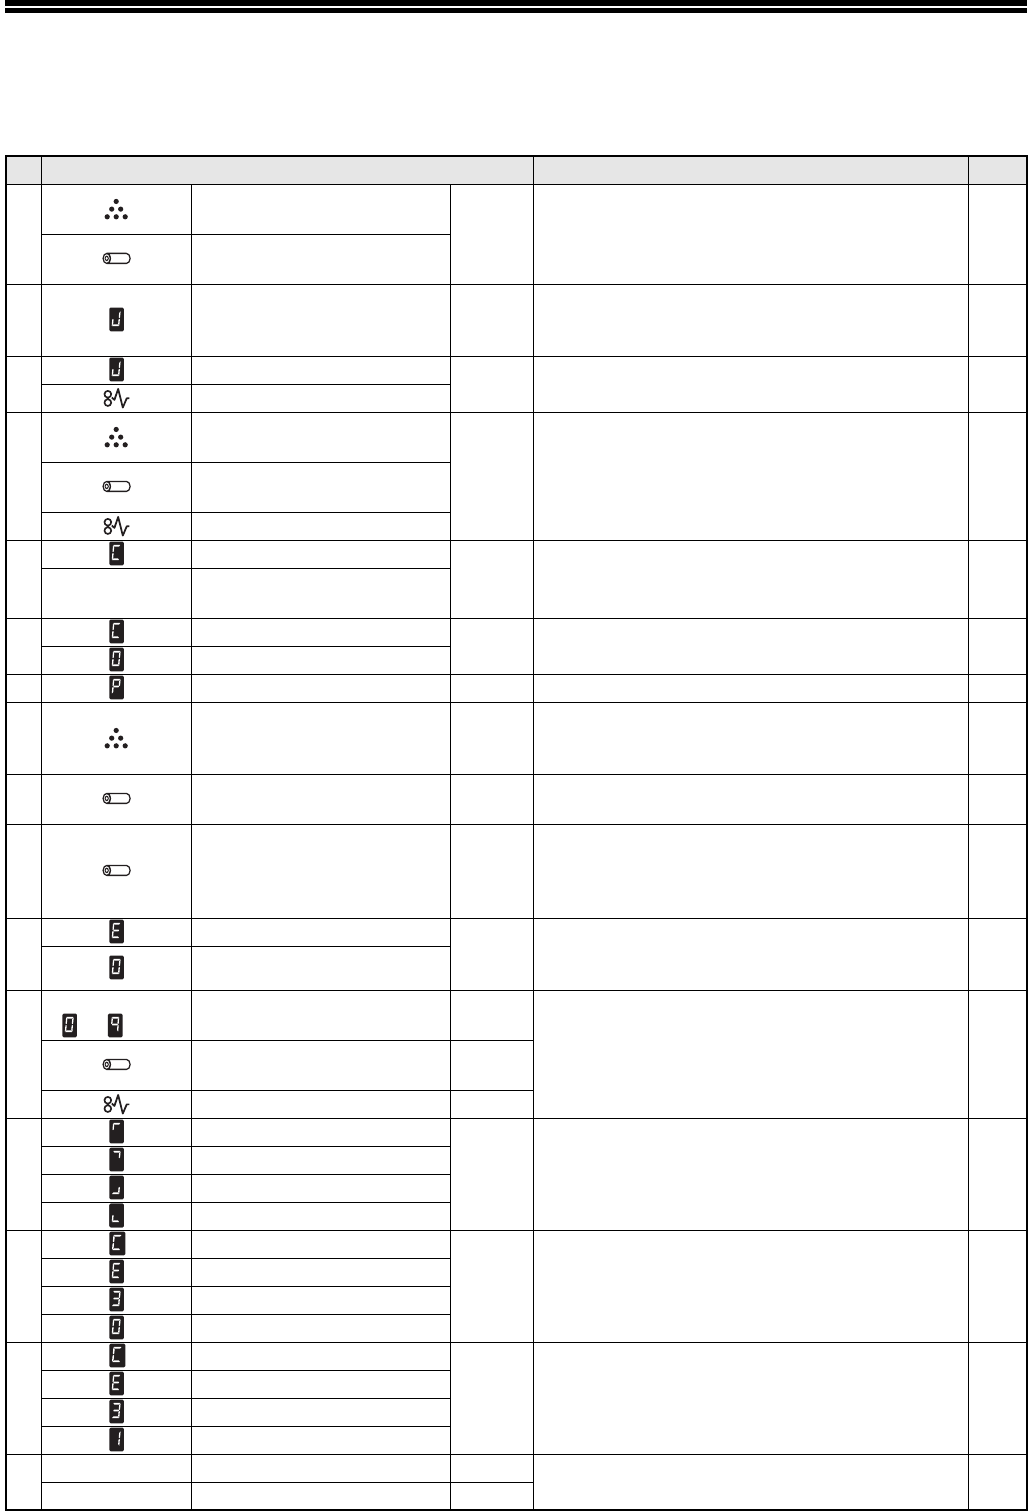
42
INDICATOR DISPLAY OF THE
MACHINE STATUS AND SOLUTION
No Indication Status, Cause and Solution Page
1
Toner cartridge replacement
required indicator Blinking
together
Toner cartridge or drum cartridge is not
installed. Install toner cartridge and drum
cartridge.
45,46
Drum cartridge replacement
required indicator
2 LED Indicator Blinking
The output tray is closed. Only scan function can
be used. To copy or print, please expand the
output tray.
15
3LED Indicator Blinking
together
Paper misfeed occurs. Remove the misfeed
paper. 41
Misfeed indicator
4
Toner cartridge replacement
required indicator Blinking
together Cover is open. Close the cover. 41,45Drum cartridge replacement
required indicator
Misfeed indicator
5
LED Indicator Blinking
in turn
Continuous copying. The copy speed slows
down for a while. –
Remaining
copy count LED Indicator
6LED Indicator Blinking
in turn
Continuous printing. The print speed slows
down for a while. –
LED Indicator
7 LED Indicator Blinking Paper out. Feed paper and press the start key. 15
8 LED Indicator Light
The toner is about to run out. Prepare the new
toner cartridge. By replacing the toner cartridge,
the counter will be cleared automatically.
45
9Drum cartridge replacement
required indicator Light The life of the drum cartridge is about to end.
Preparing to replace the drum cartridge. 46
10 Drum cartridge replacement
required indicator Blinking
The life of the drum cartridge ends. The
machine stops working. Replace the drum
cartridge, and the count of the drum cartridge
should be cleared.
46
11
LED Indicator Blinking
one by
one
The loaded paper size is wrong. Press "C" key
to clear the error. 7, 9
LED Indicator
12
One of the
number
(–)
LED Indicator Light
The machine is in ready status. –Drum cartridge replacement
required indicator Off
Misfeed indicator Off
13
LED Indicator
Rotate
in circle Machine is transferring data. –
LED Indicator
LED Indicator
LED Indicator
14
LED Indicator
Blinking
one by
one
USB access problem. Check if there is any
obvious damage sign. Or, replace the USB
device.
29
LED Indicator
LED Indicator
LED Indicator
15
LED Indicator
Blinking
one by
one
USB device is memory full. Check if there is
memory space for storage. 29
LED Indicator
LED Indicator
LED Indicator
16 "100%" ratio Mode LED Blinking Auto power shut off mode. To restore normal
operation, press any key. 6
– Other Indicator/LED Off

43
ERROR CODE AND SOLUTION
*If the problem persists, please contact the dealer or nearest authorized service representative.
SN Main
code
Sub
code Content Solution
1 E7 10 Scanner trouble Turn off the power. Then turn on and check it.
2 E7 11 Scanner trouble Turn off the power. Then turn on and check it.
3 E7 20 LSU trouble Turn off the power. Then turn on and check it.
4 F5 02 Scanner trouble Turn off the power. Then turn on and check it.
5 L1 00 Scanner trouble Turn off the power. Then turn on and check it.
6 L3 00 Scanner trouble Turn off the power. Then turn on and check it.
7 L4 58 Motor trouble Clear it by service.
8 L6 10 LSU trouble Turn off the power. Then turn on and check it.
9 U2 04 Memory error Turn off the power. Then turn on and check it.
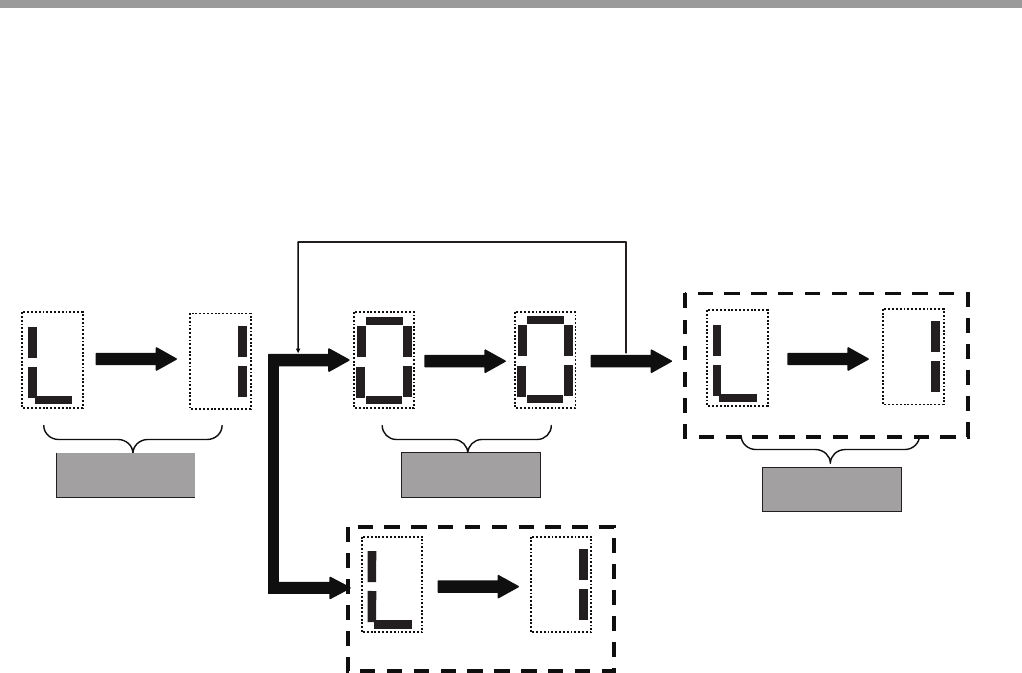
44
TROUBLESHOOTING
Main code will be displayed upon machine error, and the sub code will be displayed when the "start" key is pressed.
The display interval between the two main codes is about 0.5 second. The interval for the cyclic display of the two
codes is 0.25 second. The display interval of the sub codes is the same as that of the main codes (See the following
display example for the error code of LED indicator).
Example: L1-00
Main Code Sub Code Main Code
If do not press the copy start
button, after a brief interval, the two
Main Code repeatedly display.
Press the
copy start button to
show the
sub code
Release the copy start button
main code display
The two Sub Code are repeatedly
display after a brief interval.
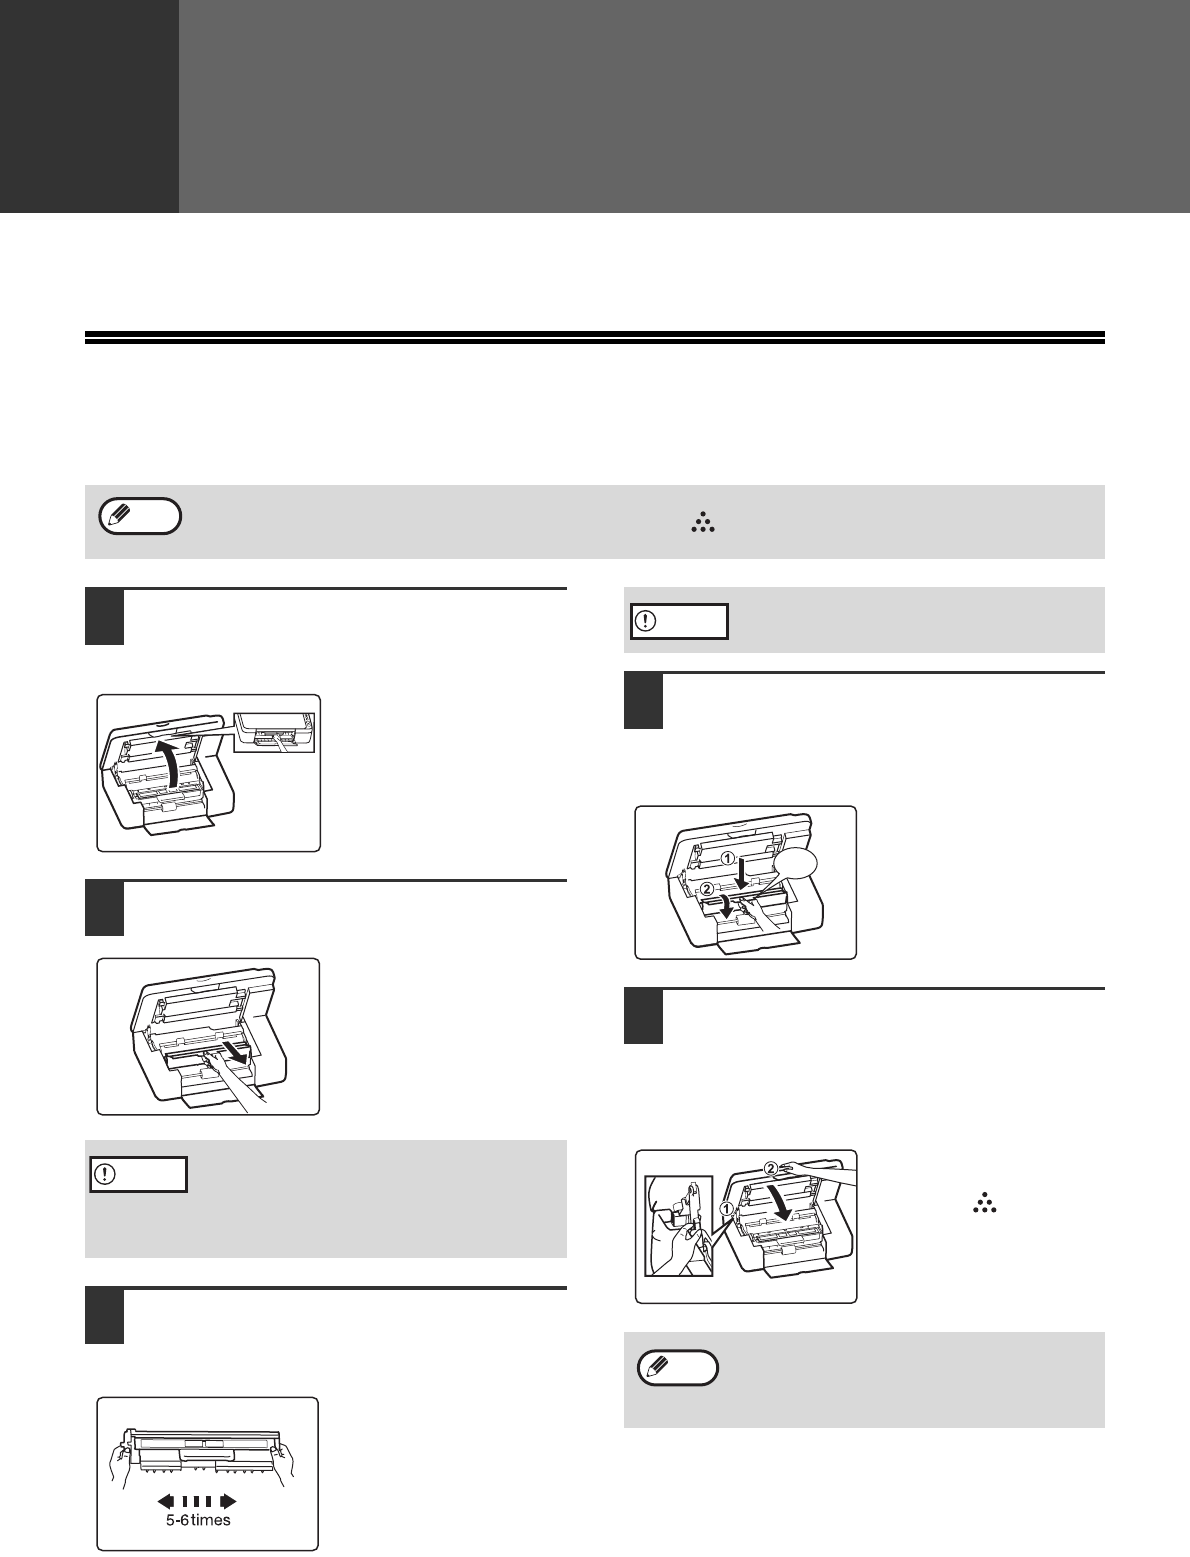
45
6
Chapter 6
ROUTINE MAINTENANCE
This chapter explains how to replace the toner and drum cartridge, clean the machine and store the supplies.
REPLACING TONER CARTRIDGES
Please replace the toner cartridge according to the following steps.
1Lift the document glass locking
handle and open the cover of the
machine.
2Remove the old cartridge following
the upward direction of the arrow.
3Take the new cartridge out of the bag,
grasp the cartridge on both sides and
shake it horizontally five to six times.
Please give priority to
using the toner delivered
together with the
machine when using the
toner cartridge for the
first time.
4Hold the new cartridge by its grips,
and insert it at a 45-degree angle
towards the slot. Press it down until a
"click" is heard.
If there is any dirt or dust
on the new toner
cartridge, remove it
before installing the
cartridge.
5Gently lift the support bar at the
green-marks and pull to a half-closed
position, and then gently lift the bar
again until the cover is completely
closed. Connect the power.
The "toner cartridge
replacement required"
indicator ( ) will go
out.
The following phenomena indicate that the cartridge has run out of toner, please replace it with a new cartridge.
• When the "toner cartridge replacement required" indicator ( ) is on.
• If the copies show white lines, light-colored printing or fogged image.
Note
After removing the old cartridge, do not shake
it or tap it. Otherwise toner may leak from the
cartridge. Immediately put the old cartridge in
the bag of the new cartridge. Dispose of the
old cartridge according to local regulations.
Caution
Grasp the cartridge grips when holding the
cartridge.
• Before closing the cover, make sure that the
new toner cartridge is correctly installed.
• Confirm whether the original is placed slant
or not when making copies again.
Caution
“Click”
Note
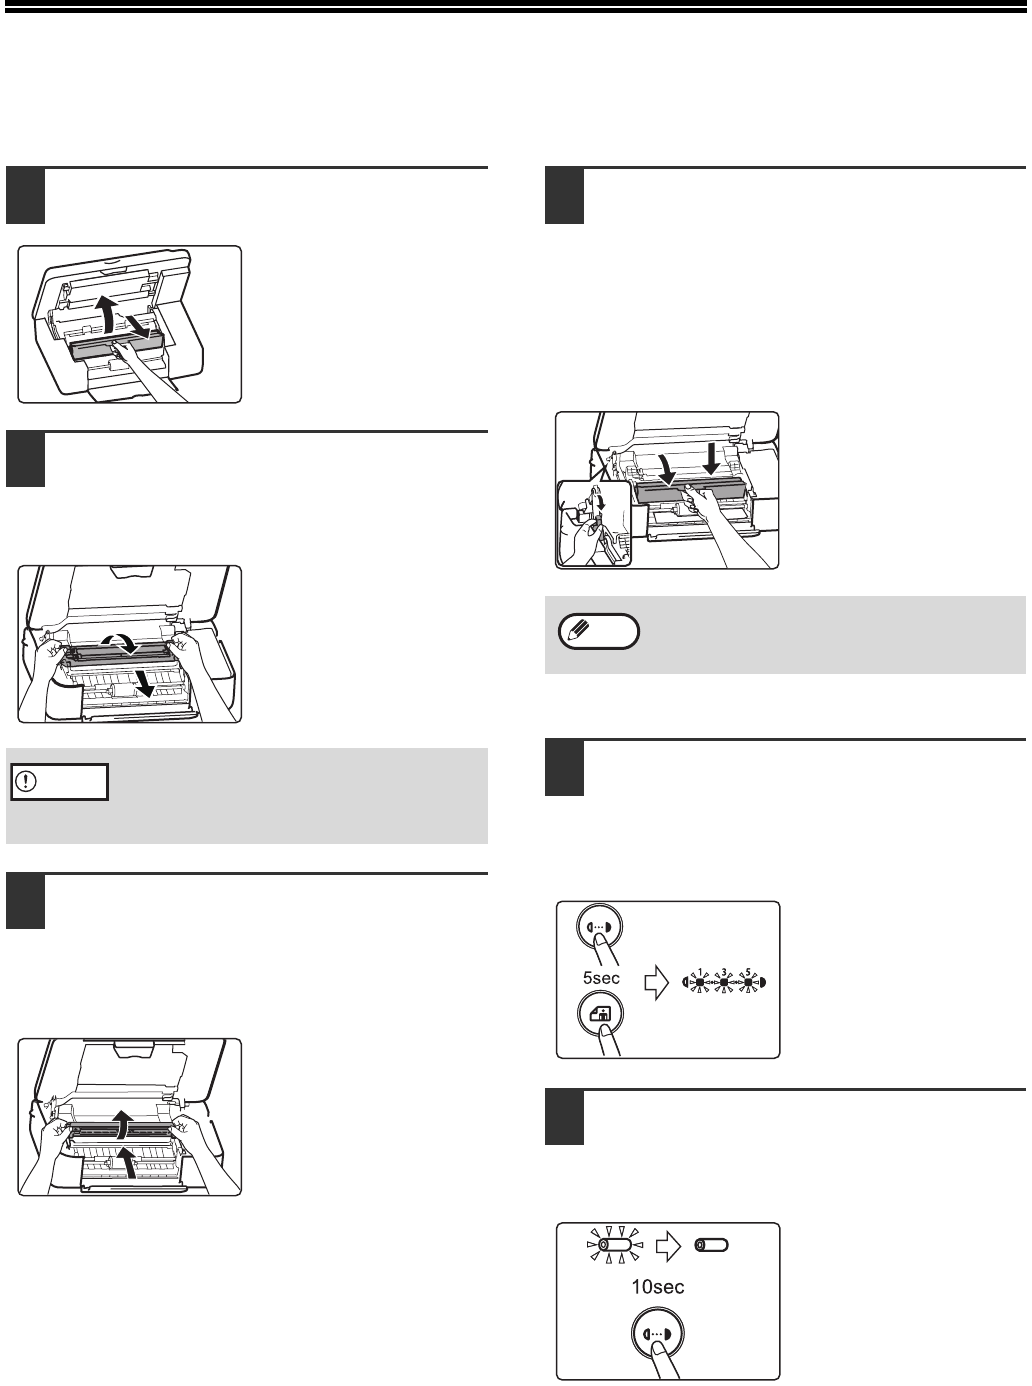
46
REPLACING DRUM CARTRIDGES
Please replace the drum cartridge according to the following steps.
1Open the cover of the machine and
remove the toner cartridge.
2Hold the green-marked position with
your both hands and rotate in the
direction of the arrow, and take out
the old drum cartridge.
3Aim the new drum cartridge to the
bayonet of the machine, insert it into
the bayonet, rotate in the direction of
the arrow and insert the drum
cartridge until a "click" is heard.
4Insert the toner cartridge into the
bayonet of the machine, press it down
in the direction of the arrow until a
"click" is heard. Gently lift support bar
at the green-marked and pull to a
half-closed postion, and then gently
lift the bar again until the cover is
completely closed.
5Turn on the power, press the
[DENSITY] key and [PHOTO MODE]
key at the same time until all
indicators except for [PHOTO MODE]
indicator light on.
6Press the [DENSITY] key again until
the indicatiors return to normal status.
Confirm whether the indicator of the
drum cartridge is light off.
Do not touch the surface of the drum (green
portion) of the drum cartridge when replacing
the drum cartridge. Doing so may damage the
drum and cause smudges on copies.
Caution
Before closing the cover, make sure that the
new drum cartridge is correctly installed.
Note
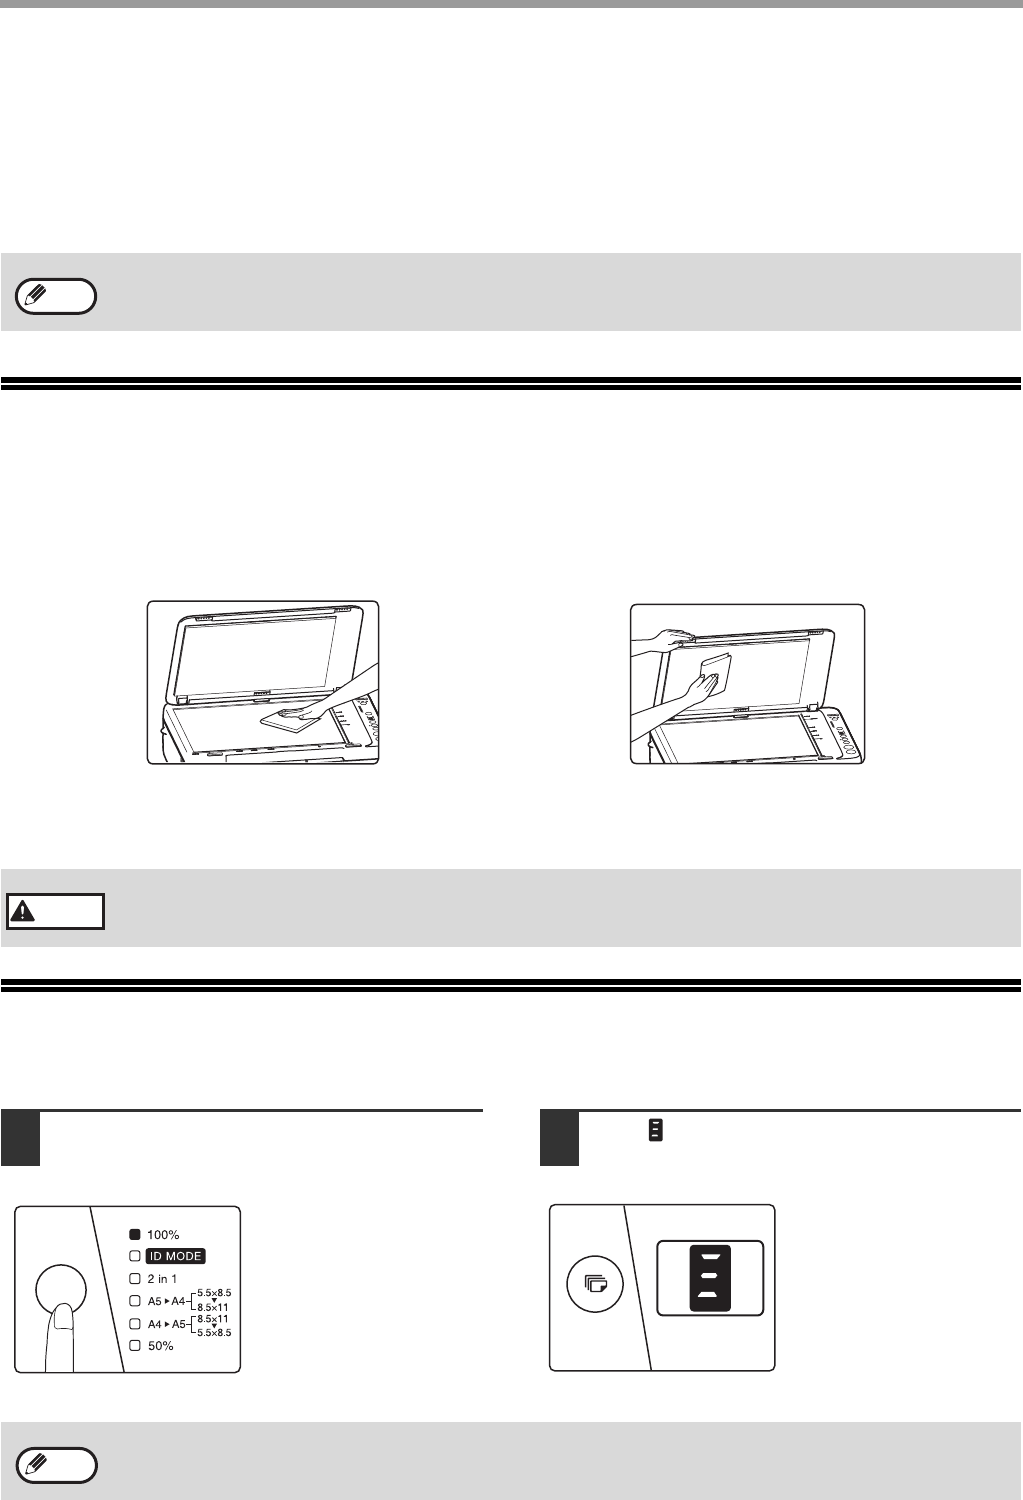
47
ROUTINE MAINTENANCE
The useful life of the drum cartridge is approximately 8000 copies*. When the internal counter reaches
approximately 7700 copies, the drum cartridge replacement required indicator will light up. For more information on
purchasing a drum cartridge, see "ABOUT SUPPLIES" (p.48). When the drum cartridge replacement required
indicator blinks, the machine will stop operating until the cartridge is replaced. Replace the drum cartridge at this
time.
* Based on copying onto A4 or letter size paper at 6% toned area.
CLEANING THE DOCUMENT
GLASS AND DOCUMENT COVER
If the document glass or the underside of the document cover become dirty, the dirt may appear on copies. Always
keep these parts clean.
Stains or dirt on the document glass will also be copied. Wipe the document glass and the underside of document
cover with a soft, clean cloth.
If necessary, dampen the cloth with water. Do not use thinner, benzene, or similar volatile cleaning agents.
CARTRIDGE CLEANING MODE
If printed images are smudged or dirty under the humid environment, please execute cartridge cleaning mode.
1Press the mode select key for approx.
5 seconds. 2The ( ) blinks in the display, and
cartridge cleaning mode starts.
Do not remove the protective cover on the drum portion (black paper) of a new drum cartridge before use. The
cover protects the drum against external light.
Do not spray flammable cleaner gas. Gas from the spray may come in contact with the
high-temperature parts of the internal components, creating a risk of fire or electric shock.
Note
Warning
If the printed images are not improved, please repeat the cleaning mode a few times. Please run
cartridge cleaning mode only when needed, as it consumes cartridges.
Note
48
ABOUT SUPPLIES
When ordering supplies, please use the correct part numbers as listed below.
Supply list
* Based on copying onto A4 or letter size paper at 6% toned area (The life of the Toner cartridge which has been
included in the unit at the factory is approximately 1,000 sheets.)
Proper storage
1.Store the supplies in a location that is:
• clean and dry,
• at a stable temperature,
• not exposed to direct sunlight.
2.Store paper in the wrapper and lying flat.
3.Paper stored in packages standing up or out of the wrapper may curl or become damp, resulting in paper
misfeeds.
Storing toner cartridges
Store a new toner cartridge box horizontally with the top side up. Do not store a toner cartridge standing on end. If
stored standing on end, the toner may not distribute well even after shaking the cartridge vigorously, and will remain
inside the cartridge without flowing out.
Supply of spare parts and consumables
The supply of spare parts for repair of the machine is guaranteed for at least 7 years following the termination of
production. Spare parts are those parts of the machine which may break down within the scope of the ordinary use
of the product, whereas those parts which normally exceed the life of the product are not to be considered as spare
parts. Consumables too, are available for 7 years following the termination of production.
Be sure to use only genuine SHARP parts and supplies.
For best copying results, be sure to use only SHARP products.
Only genuine SHARP consumabies carry the Genuine Supplies label.
Supply Part number Usable life
Toner cartridge AL-103TD Approx. 2,000 sheets*
Drum cartridge AL-103DR Approx. 8,000 sheets
Note
GENUINE SUPPLIES

OPERATION GUIDE
AL1035-EX-ZZ
