Sharp DMR0132 Microwave Oven User Manual Manual
Sharp Corporation Microwave Oven Manual
UserManual.wiki
>
Sharp
>
DMR0132 User Manual
Manual
Navigation menu
Upload a User Manual
Namespaces
Wiki Guide
HTML
PDF
Info
Views
User Manual
Discussion / Help
Navigation

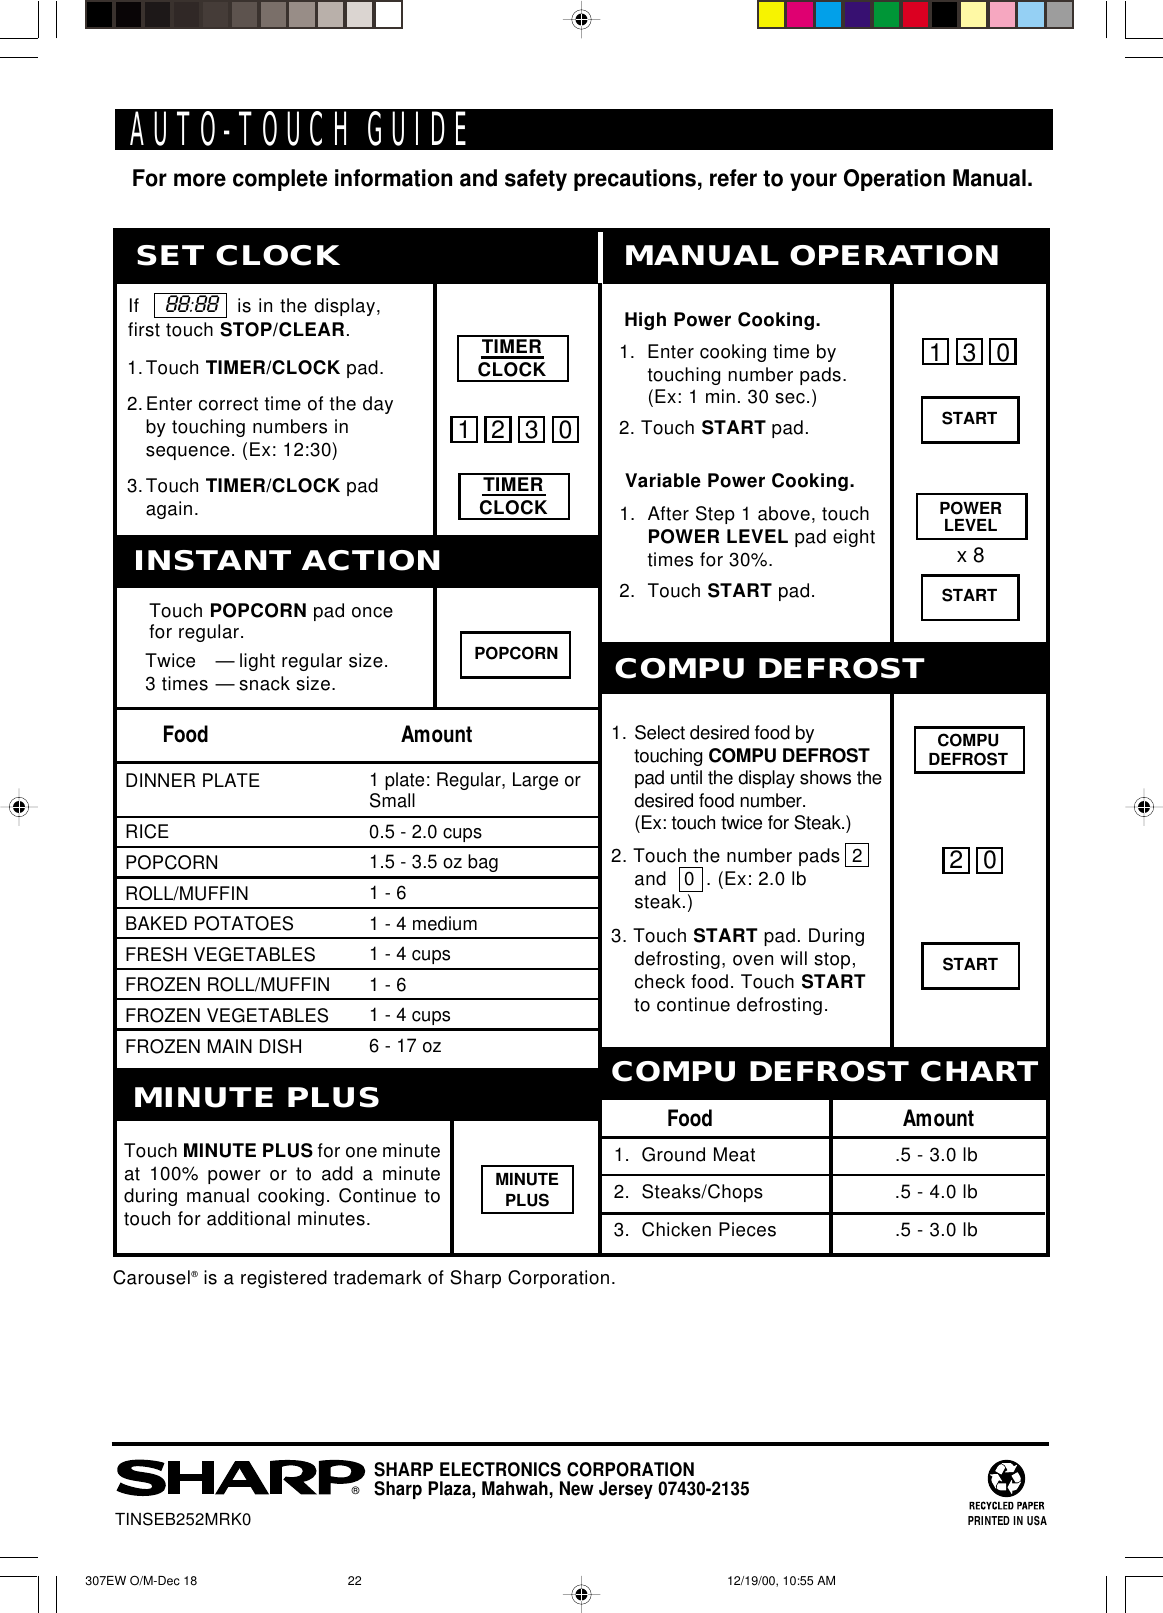
![Carousel® es una marca registrada de Sharp Corporation.Para mayor informacion y precauciones de seguridad, consulte el Manual de OperacionesGUIA AUTO-TOUCHTABLA COMPU DEFROSTOPERACION MANUALCocimiento con Alta Energia.1. Marque el tiempo de cocimiento al oprimir los numeros. (Ej: 1 min. 30 sec.)2. Oprima el START.1. Después de realizar el primer paso (Num. 1 arriba), oprimael POWER LEVEL ochoveces para 30%.2. Oprima el START.Energia de CocimientoVariable.Tipo de Comida Cantidad3. Piezas de Pollo ,5 a 3,0 libras2. Bistec/Chuletas ,5 a 4,0 libras1. Carne Molida ,5 a 3,0 librasOprima MINUTE PLUS paraobtener un minuto al 100% deenergia o para agregar otrominuto durante el cocimientomanual. Vuelva a oprimirlo paraobtener minutos adicionales.PONER LA HORASi aparece 88:88 en lapantalla, primero oprima“STOP/CLEAR”.1. Oprima TIMER/CLOCK .2. Ponga la hors correcta del dia oprimiendo los numeros en secuencia (Ej: 12:30).3. Oprima TIMER/CLOCK otra vez.FUNCION INSTANTANEAACTION Oprima “POPCORN” una vez parael tamaño normal de palomitas.2 Veces para el tamaño normal “light”.3 Veces para el tamaños botana.Allimento CantidadPOPCORNMINUTO EXTRACOMPU DEFROSTTIMERCLOCKTIMERCLOCK12301 plato: Normal, Grande oPequeño0,5 a 2,0 tazas1,5 a 3,5 onzas1 a 6 pedazos1 a 4 mediano1 a 4 tazas1 a 6 pedazos1 a 4 tazas6 a 17 onzasPlato PrincipalArrozPalomitas De MaízPanPapa AsadaVerdura FrescaPan CongeladoVerdura CongeladoPlato CongeladoPOWERLEVEL1 3 0MINUTEPLUSSTARTSTART1. Seleccione el alimentodeseado, tocando el COMPUDEFROST hasta que lapantalla presente el númerodel alimento deseado. (Ex:toque dos veces para bistec)2. Oprima los numeroscorrespondientes 2 y 0 .(Ej: 2,0 libras [0,900 kg])3. Oprima START. Aldescongelar, el horno sedetiene y revisa la comida.Oprima START para sequirdescongelando.COMPUDEFROST2 0STARTx 8307EW O/M-Dec 18 12/19/00, 10:55 AM21](https://usermanual.wiki/Sharp/DMR0132/User-Guide-130219-Page-23.png)