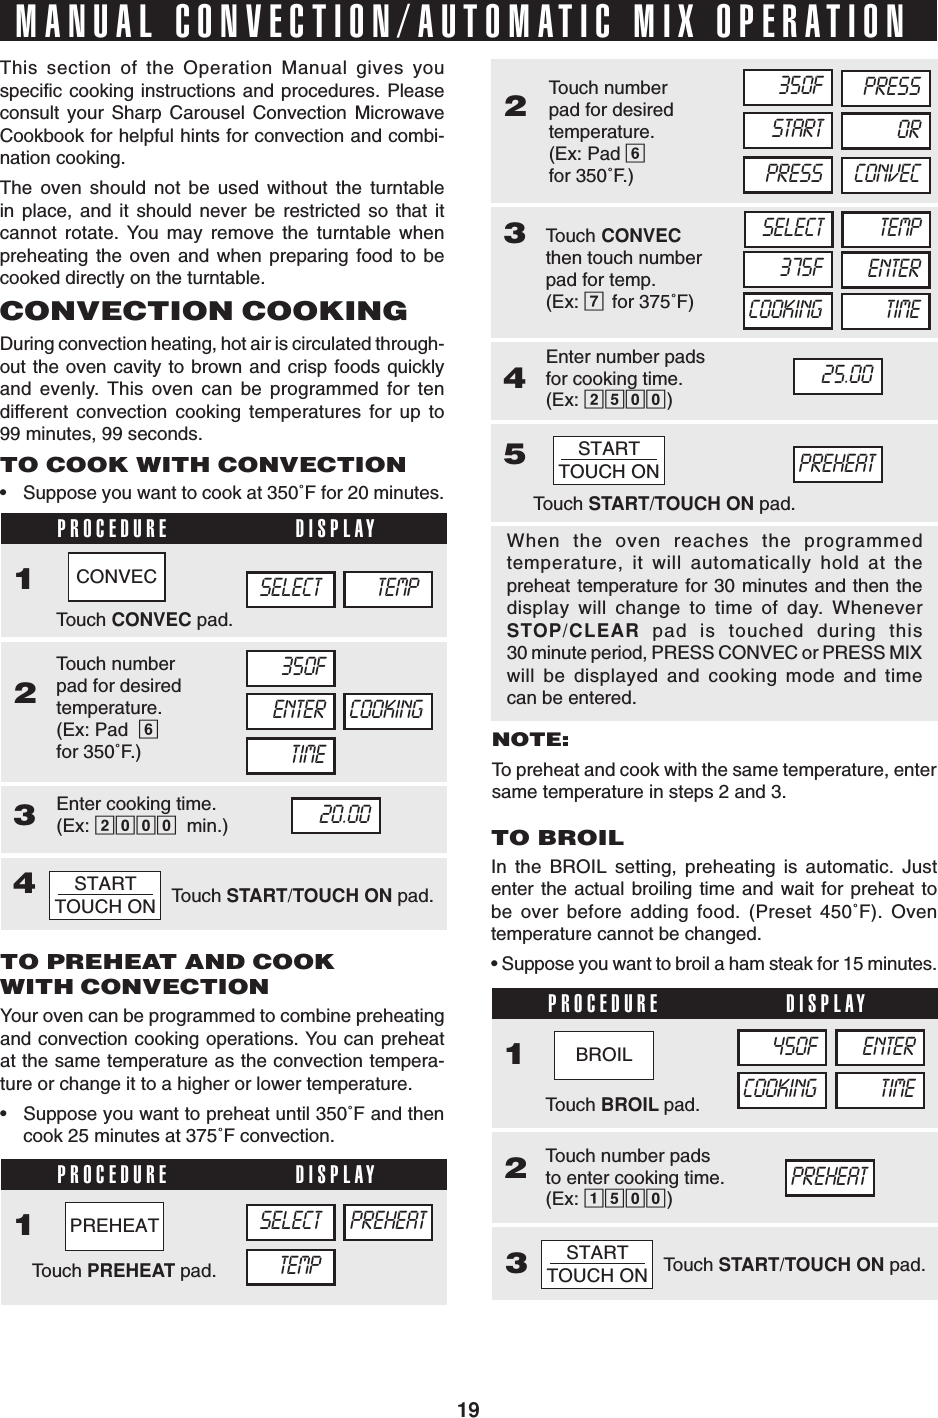
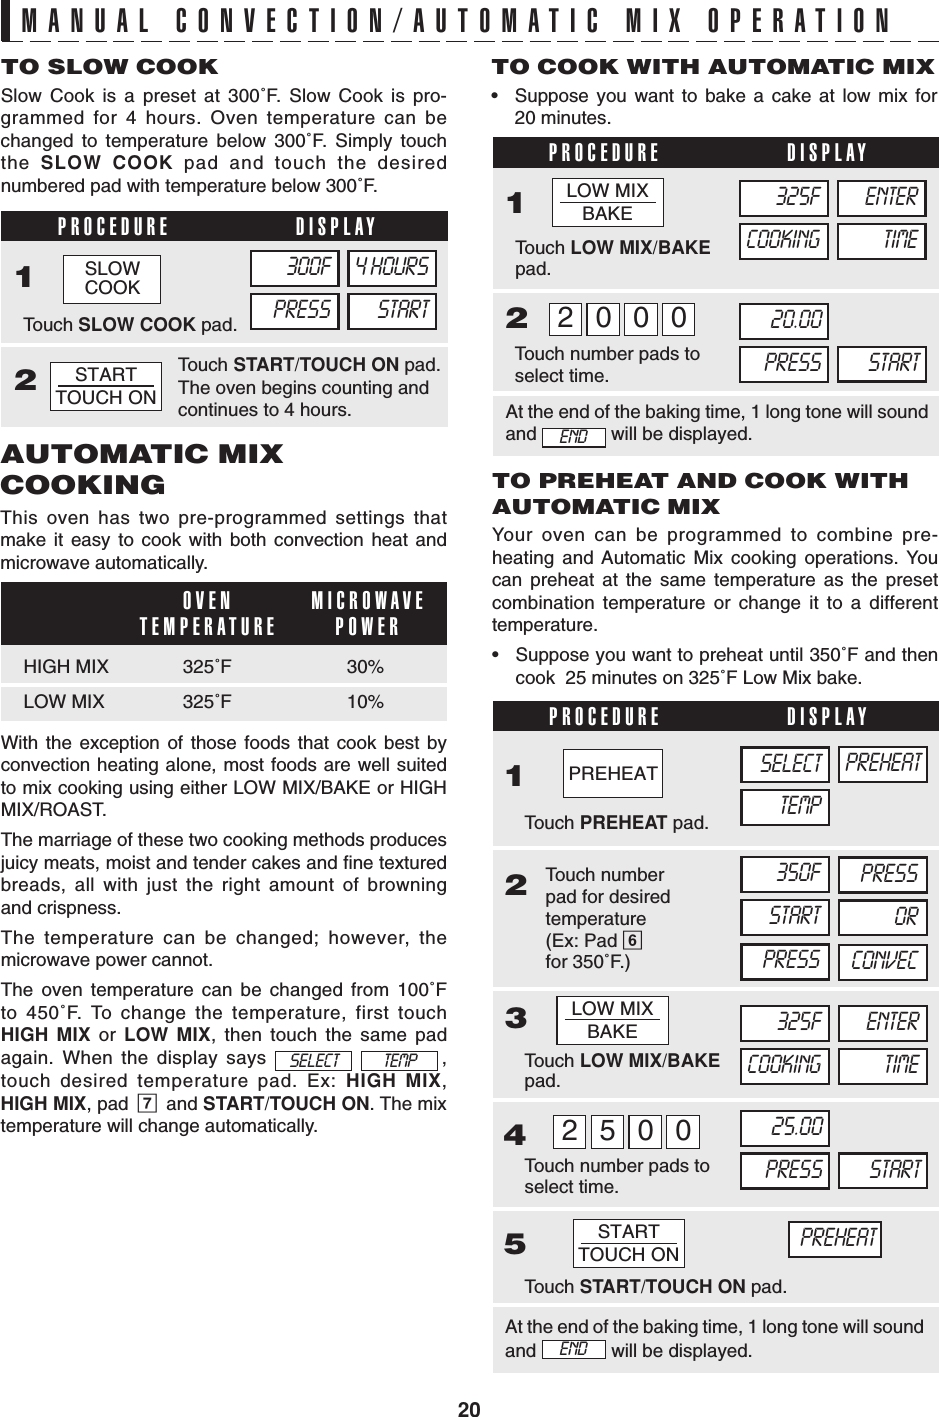
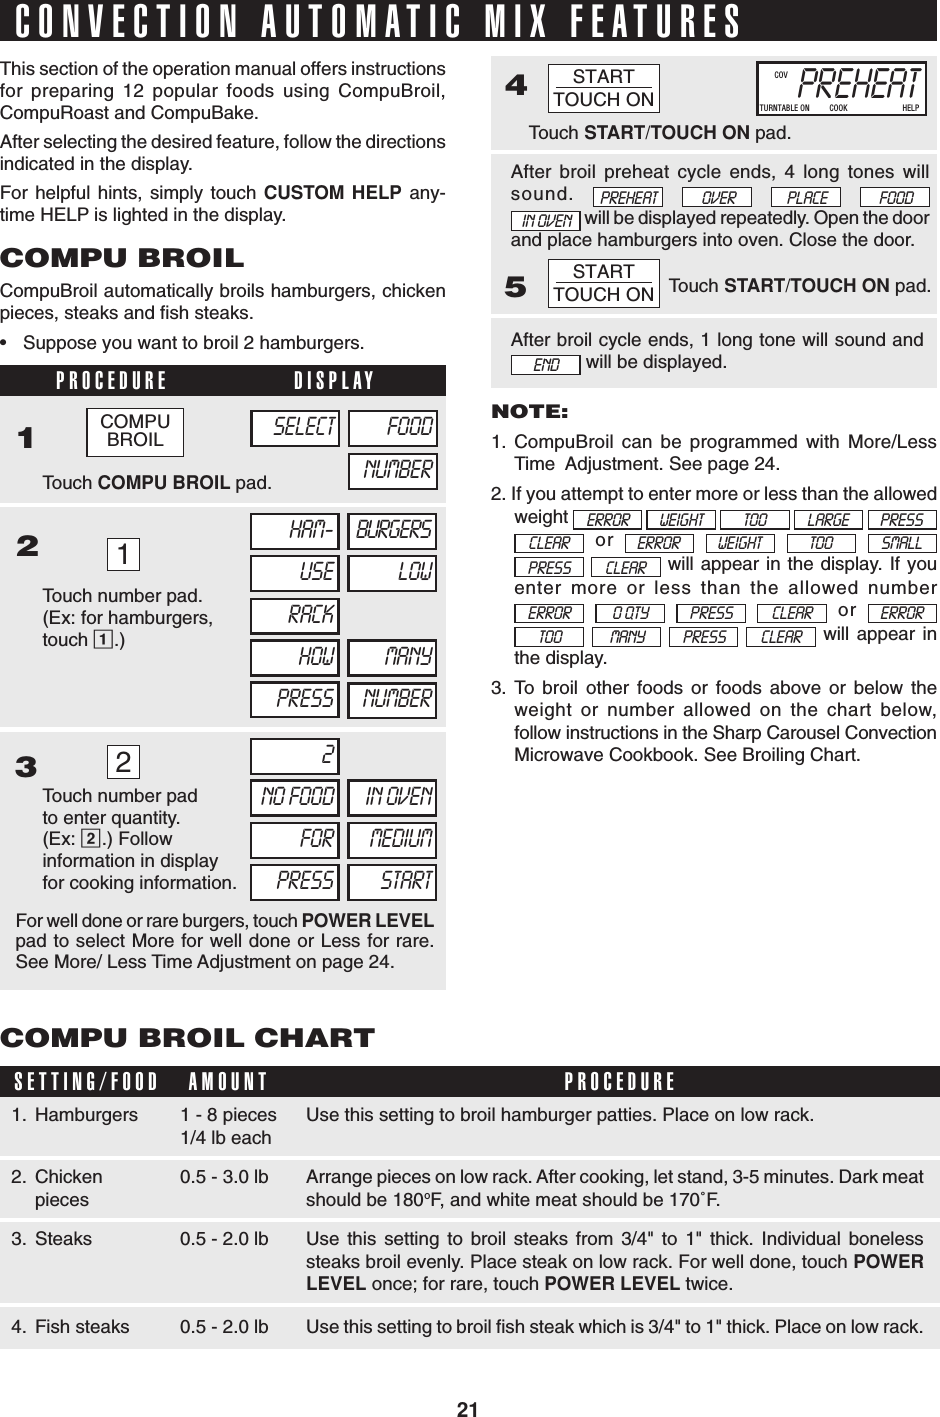
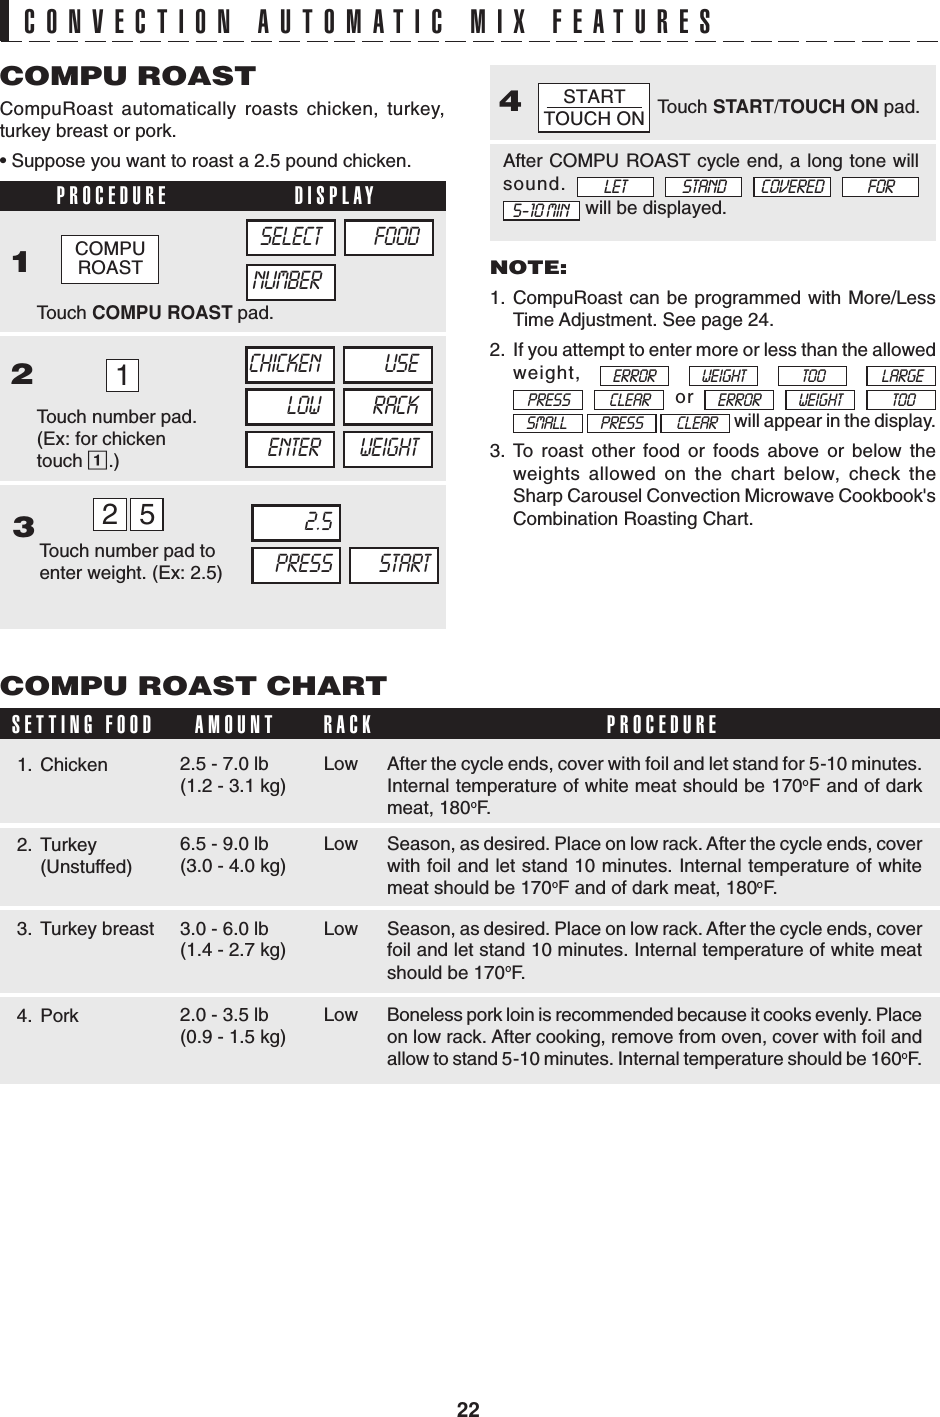
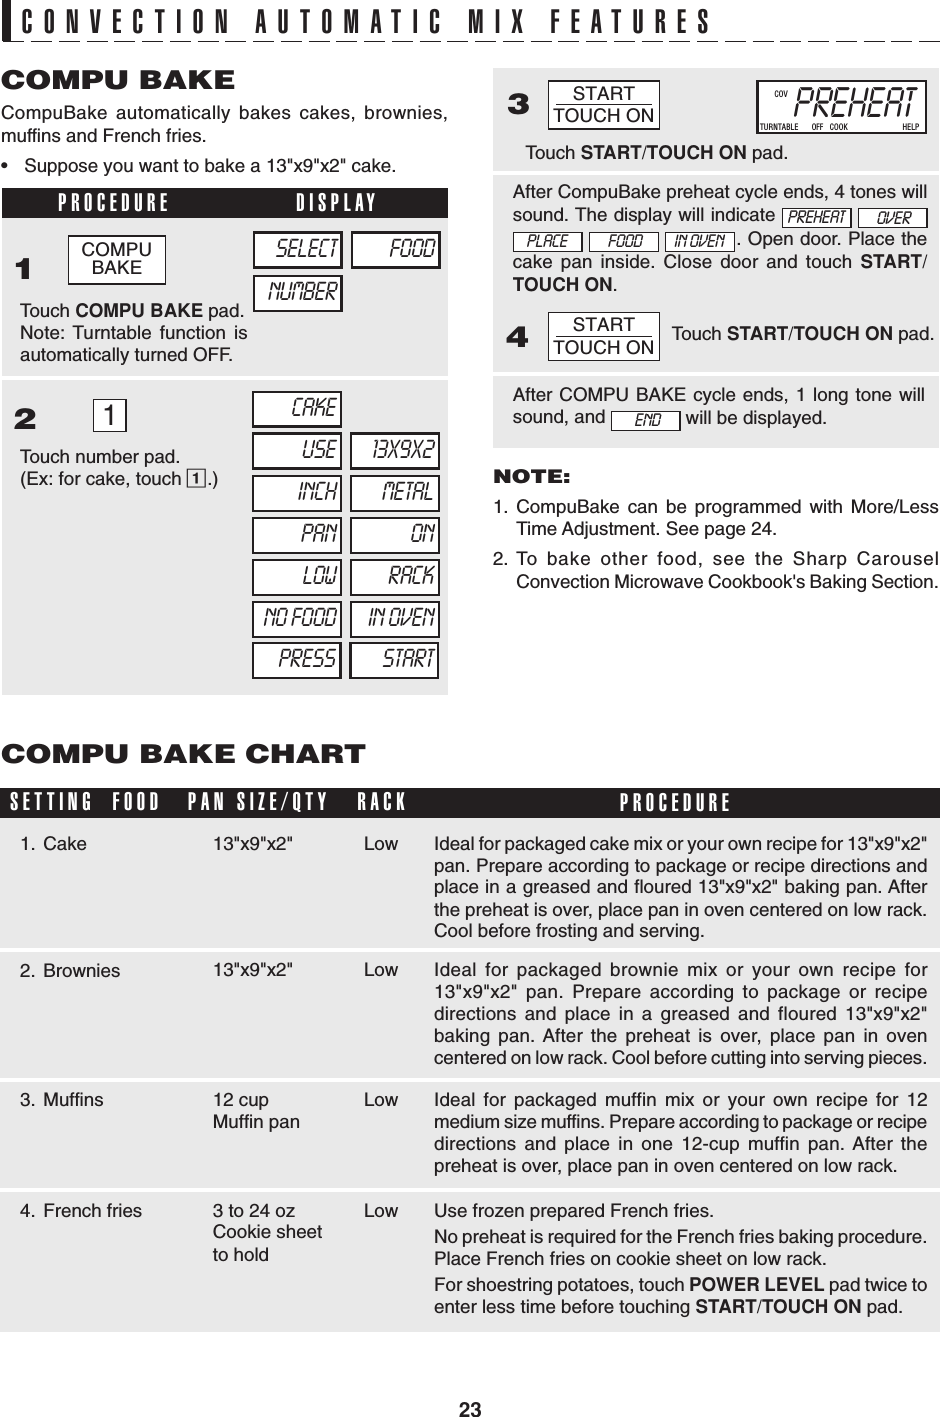
Sharp DMR0162 Microwave Oven User Manual R 1874 75 E
Sharp Corporation Microwave Oven R 1874 75 E
UserManual.wiki
>
Sharp
>
DMR0162 User Manual
Users Manual
Navigation menu
Upload a User Manual
Namespaces
Wiki Guide
HTML
PDF
Info
Views
User Manual
Discussion / Help
Navigation


![3IMPORTANT SAFETY INSTRUCTIONSSAVE THESE INSTRUCTIONSWhen using electrical appliances basic safety precautions should be followed, including the following:WARNING -To reduce the risk of burns, electric shock, fire, injury to persons or exposure to excessivemicrowave energy:SAVE THESE INSTRUCTIONS1. READ ALL INSTRUCTIONS BEFORE USINGTHE APPLIANCE.2. Read and follow the specific “PRECAUTIONS TOAVOID POSSIBLE EXPOSURE TO EXCESSIVEMICROWAVE ENERGY” on inside front cover.3. This appliance must be grounded. Connect onlyto properly grounded outlet. See “GROUNDINGINSTRUCTIONS” on page 4 and INSTALLATIONINSTRUCTIONS.4. Install or locate this appliance only in accordancewith the provided installation instructions.5. Some products such as whole eggs and sealedcontainers—for example, closed glass jars—areable to explode and should not be heated inthis oven.6. Use this appliance only for its intended use asdescribed in this manual. Do not use corrosivechemicals or vapors in this appliance. This typeof oven is specifically designed to heat, cook ordry food. It is not designed for industrial orlaboratory use.7. As with any appliance, close supervision isnecessary when used by children.8. Do not operate this appliance if it has a damagedcord or plug, if it is not working properly or if it hasbeen damaged or dropped.9. This appliance should be serviced only byqualified service personnel. Contact nearestSharp Authorized Servicer for examination, repairor adjustment.10. Do not cover or block any openings on theappliance.11. Do not store or use this appliance outdoors. Donot use this product near water—for example, neara kitchen sink, in a wet basement, near a swimmingpool, or similar locations.12. Do not immerse cord or plug in water.13. Keep cord away from heated surfaces.14. Do not let cord hang over edge of table or counter.15. See door surface cleaning instructions on page 26.16. To reduce the risk of fire in the oven cavity:a. Do not overcook food. Carefully attend toappliance when paper, plastic or othercombustible materials are placed inside theoven to facilitate cooking.b. Remove wire twist-ties from paper or plasticbags before placing bag in oven.c. If materials inside the oven ignite, keepoven door closed, turn oven off anddisconnect the power cord or shut off powerat the fuse or circuit breaker panel.d. Do not use the cavity for storage purposes.Do not leave paper products, cooking utensilsor food in the cavity when not in use.17. Liquids, such as water, coffee or tea are able tobe overheated beyond the boiling point withoutappearing to be boiling. Visible bubbling orboiling when the container is removed from themicrowave oven is not always present. THISCOULD RESULT IN VERY HOT LIQUIDSSUDDENLY BOILING OVER WHEN A SPOONOR OTHER UTENSIL IS INSERTED INTO THELIQUID.To reduce the risk of injury to persons:a. Do not overheat the liquid.b. Stir the liquid both before and halfway throughheating it.c. Do not use straight-sided containers withnarrow necks. Use a wide-mouthed container.d. After heating, allow the container to stand inthe microwave oven at least for 20 secondsbefore removing the container.e. Use extreme care when inserting a spoon orother utensil into the container.18.Clean ventilation openings and grease filtersfrequently—Grease should not be allowed toaccumulate on ventilation openings, louver orgrease filters.19. Use care when cleaning the louver and thegrease filters. Corrosive cleaning agents, such aslye-based oven cleaners, ma damage the louverand the grease filters.20. When flaming food under the hood, turn the fan on.21. This appliance is suitable for use above both gasand electric cooking equipment 36” wide or less.R-1874/75 [E] 4/8/03, 11:04 AM3](https://usermanual.wiki/Sharp/DMR0162/User-Guide-539809-Page-5.png)

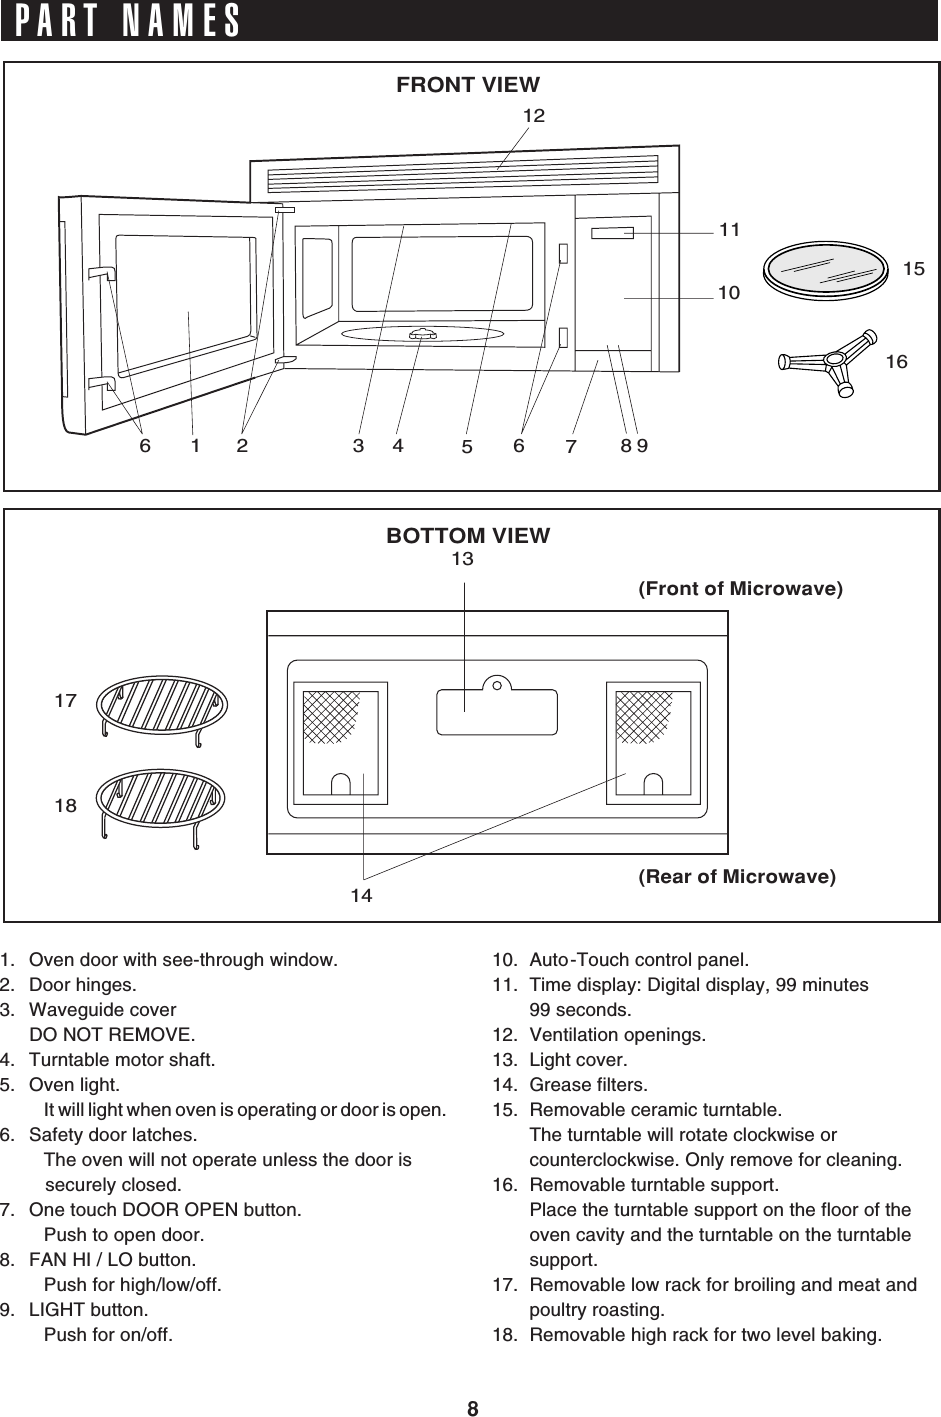
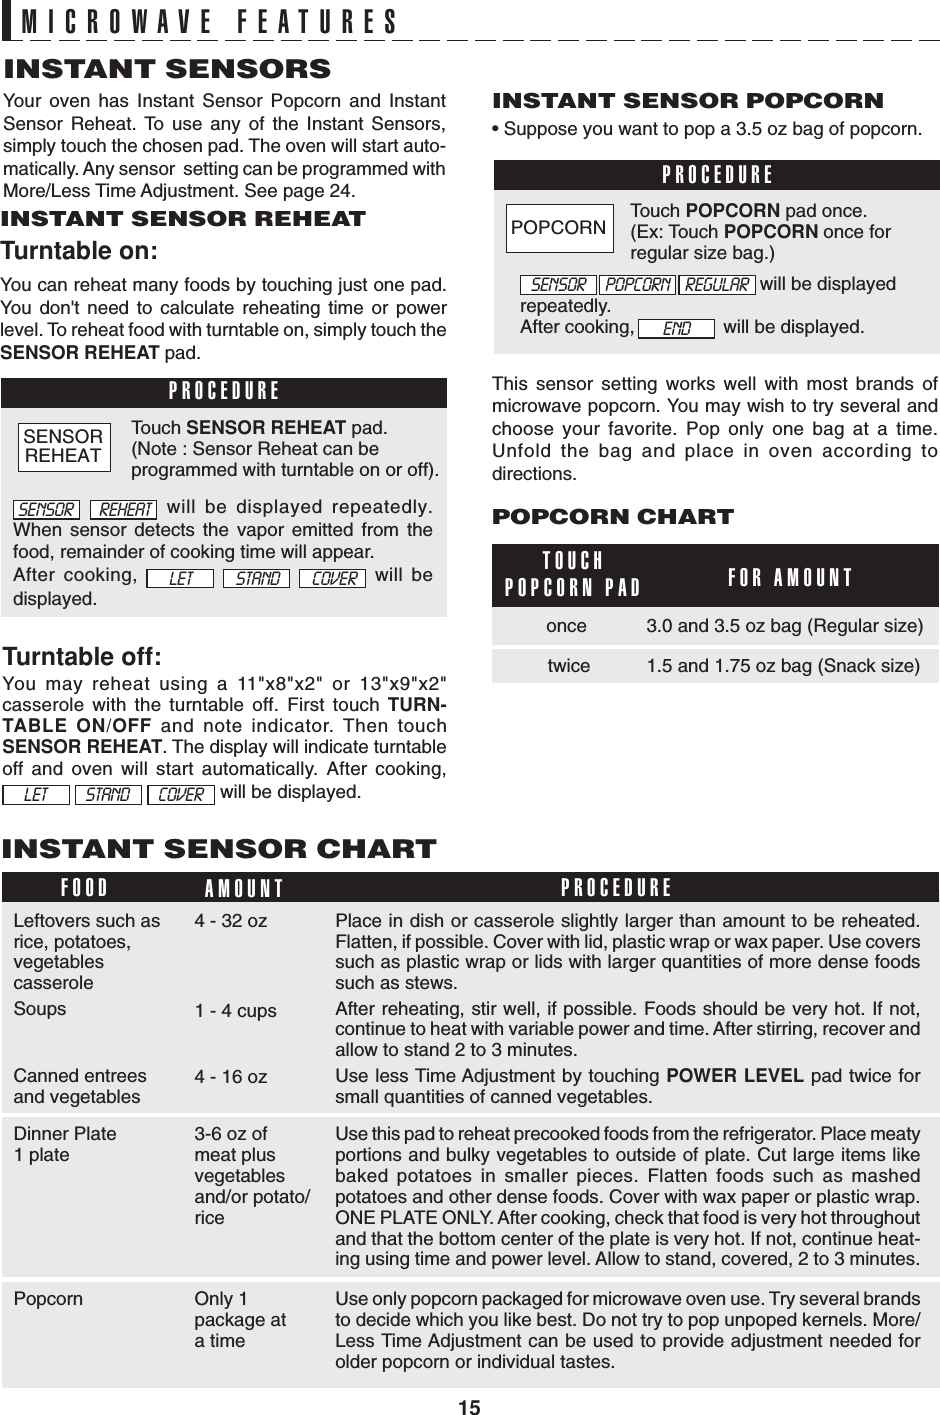
![10TOUCH CONTROL PANELINTERACTIVE DISPLAYWords will light in the display to indicatefeatures and cooking instructions.Number next to the control panel illustration indicates page on whichthere are feature descriptions and usage information.MODEL R-187525212223111211241119202020191915131524 14-162412R-1874/75 [E] 5/6/02, 11:41 AM10](https://usermanual.wiki/Sharp/DMR0162/User-Guide-539809-Page-12.png)
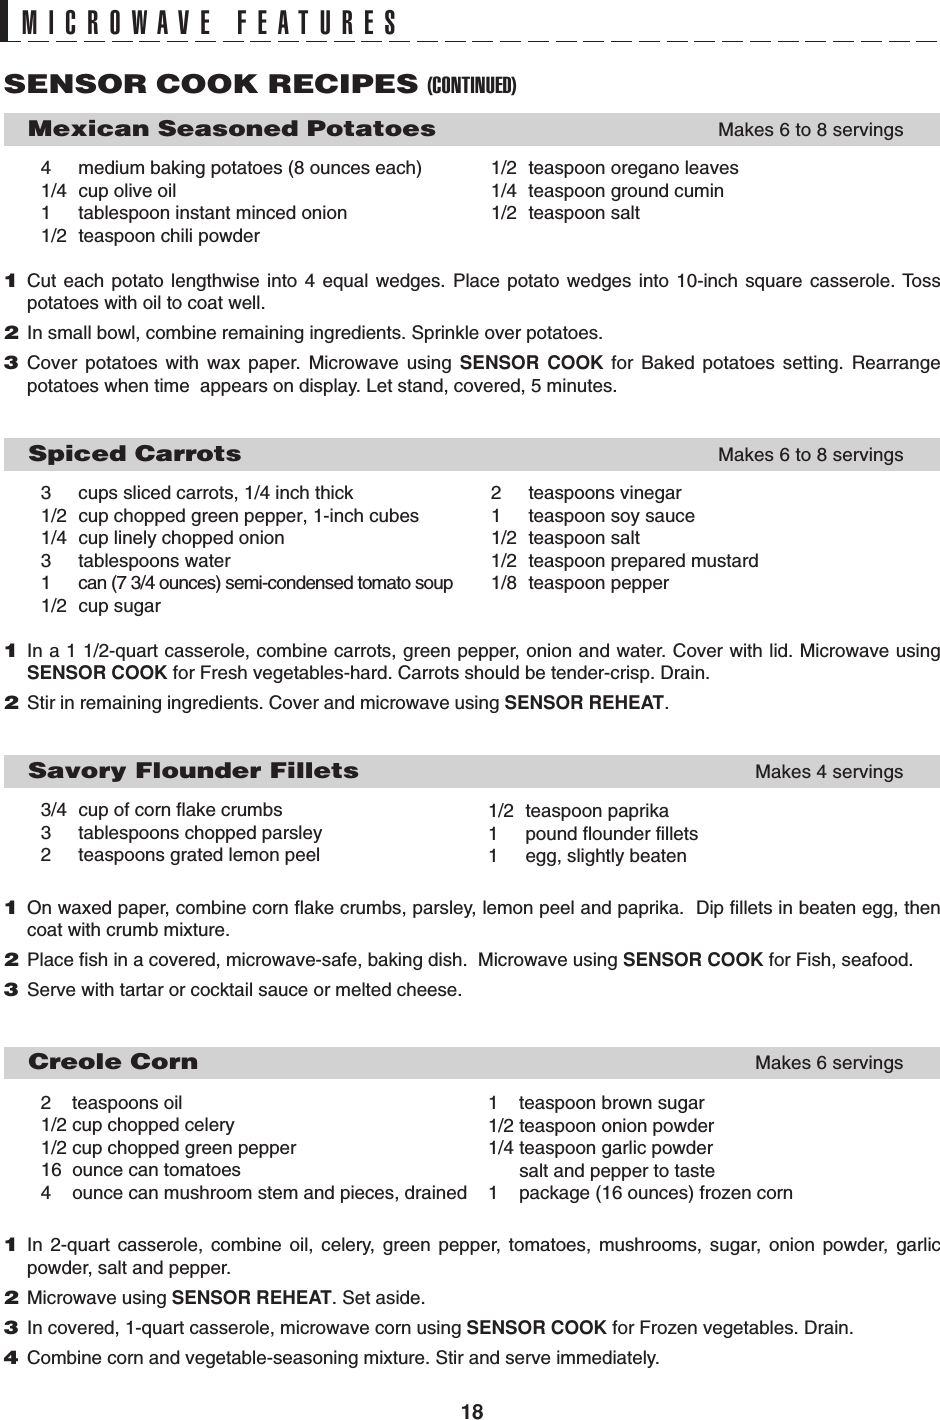

![29SPECIFICATIONSR-1874 / R-1875Cut along this line.PERSONAL RECIPES AND NOTESI have enclosed a check made payable to Sharp Accessories & Supplies Center.Please bill my VISA MASTERCARD AMERICAN EXPRESSAcct. No. _______________________________________ Expiration date _____ / _____Signature_________________________________________________________________(All credit card orders must be signed.)Name ______________________________________________________________________________Address ____________________________________________________________________________City ____________________________________ State ____________ Zip ______________________Daytime Phone No. ( ) ___________________________________________________________Please send me ______ cookbooks at $10.25 each $ ________Illinois sales tax, (if applicable) per book $.44 no. of books _____________ $ ________Other tax, (if applicable) no. of books _____________ $ ________TOTAL ORDER AMOUNT $ ________Price is subject to change without notice.MICROWAVE COOKBOOK ORDER FORMMail to: SHARP Accessories & Supplies Center2130 Townline RoadPeoria, Illinois 61615–1560★ The International Electrotechnical Commission’s standardized method for measuring output wattage. This test method is widely recognized.★★ Internal capacity is calculated by measuring maximum width, depth and height. Actual capacity for holding food is less.In compliance with standards set by:FCC – Federal Communications Commission Authorized.DHHS – Complies with Department of Health and Human Services (DHHS) rule, CFR, Title 21, Chapter I,Subchapter J.– This symbol on the nameplate means the product is listed by Underwriters Laboratories, Inc.AC Line Voltage:AC Power Required:Output Power Microwave:*Convection Heater:Frequency:Outside Dimensions:Cavity Dimensions:Oven Capacity:**Cooking Uniformity:Weight:UL Rating - Single phase 120V, 60Hz, AC onlyCSA Rating - Single phase 116V, 60Hz, AC onlyUL Rating - 1600 W 13.2 amps.CSA Rating - 1500 W 13.0 amps.850 W1400 W2450 MHz29 15/16” (W) x 16 11/32” (H) x 15 9/32” (D)17 1/8” (W) x 81/16” (H) x 13 13/16” (D)1.1 cu. ft.Turntable, diameter 13” & Stirrer FanApprox. 71 lbsR-1874/75 [E] 5/9/03, 3:49 PM29](https://usermanual.wiki/Sharp/DMR0162/User-Guide-539809-Page-31.png)