Sharp HRO00041 PCS Cellular Phone W/ Bluetooth User Manual 2 of 2
Sharp Corporation PCS Cellular Phone W/ Bluetooth 2 of 2
Sharp >
Contents
- 1. User Manual 1 of 2
- 2. User Manual 2 of 2
- 3. User manual 1 of 2
User Manual 2 of 2

100 Settings
Call Settings
Voicemail & Diverts
This service can be used to divert incoming calls that you cannot
answer. Calls can be diverted to another phone number or to your
voicemail system.
Note
•This service may not be available on all mobile phone networks.
Contact your service provider for more information.
To Set the Voicemail Numbers
You can divert calls to the network voicemail service centre.
Depending on whether you are inside or outside your network area,
you can set two voicemail numbers, a number for your home network
area or for a roaming network area.
Note
•This service depends on the SIM card. Contact your SIM card
vendor for more information.
“Settings”
→
“Call Settings”
→
“Voicemail & Diverts”
→
“Voicemail”
→
“Settings”
→
“Voicemail Numbers”
1. Select “Home Mailbox” or “Roam Mailbox”.
2. Enter the desired phone number.
To Access the Voicemail Centre
1. Press and hold G in standby.
To Activate the Voicemail Service
“Settings”
→
“Call Settings”
→
“Voicemail & Diverts”
→
“Voicemail”
→
“Activate”
1. Select one of the following options:
“Always”: Diverts all calls without ringing.
“When Busy”: Diverts incoming calls while you are talking
on the phone.
“No Answer”: Diverts incoming calls if you do not answer
a call within a certain period of time.
“Not Reachable”: Diverts incoming calls when your phone has
no network service or is switched off.
If you select “No Answer”, select the period of time from 6 levels
(05 to 30 seconds).
2. Press .
(M 12-6)
(M 12-6-1)

Settings 101
To Activate the Diverts Service
Select the appropriate option.
“Settings”
→
“Call Settings”
→
“Voicemail & Diverts”
→
“Diverts”
1. Select “Activate” or “By Service”.
If you select “By Service”, you can select further divert options.
2. Select from “Always”, “When Busy”, “No Answer” or “Not
Reachable”.
If you select “No Answer”, select the period of time from 6 levels
(05 to 30 seconds).
3. Enter a phone number to which you wish to divert calls or
search for it in the Contacts List (p. 34).
4. Press .
Note
•When “Voice Calls” diverts are set to “Always”, “ ” is displayed
in standby.
To Check the Diverts Status
“Settings”
→
“Call Settings”
→
“Voicemail & Diverts”
→
“Status”
1. Select the diverts option you wish to check.
To Deactivate the Diverts/Voicemail Service
“Settings”
→
“Call Settings”
→
“Voicemail & Diverts”
→
“Deactivate”
1. Select the desired option.
To Cancel the Diverts and Voicemail Service
Once you have changed the diverts settings, you can cancel them all
with this service.
“Settings”
→
“Call Settings”
→
“Voicemail & Diverts”
→
“Cancel All”
Call Waiting
Note
•This service may not be available on all mobile phone networks.
Contact your service provider for more information.
If you wish to be able to receive another incoming call while you have
a call in progress, you must activate the Call Waiting service.
“Settings”
→
“Call Settings”
→
“Call Waiting”
1. Select “On”, “Off” or “Status”.
Showing Your Phone Number
This lets you control whether to show your phone number when
calling another party or not.
“Settings”
→
“Call Settings”
→
“Show Your Number”
1. Select “On”, “Off” or “Status”.
Note
•Some networks do not support this service. Please check with your
service provider for availability.
(M 12-6-2)
(M 12-6-3)
102 Settings
Restrict Calls
This function lets you place restrictions on incoming and outgoing
calls. To activate this option you will need the specified password,
which is available from your service provider.
“Settings”
→
“Call Settings”
→
“Restrict Calls”
1. Select “Outgoing Calls” or “Incoming Calls”.
“Outgoing Calls”: Restricts outgoing calls.
“Incoming Calls”: Restricts incoming calls.
2. Select one of the following options:
(For “Outgoing Calls”)
“Bar All Outgoing Calls”: Restricts all outgoing calls except
emergency calls.
“Bar International Calls”: Restricts all outgoing international
calls.
“Only Local & Home”: Restricts all outgoing international
calls except to your home country.
(For “Incoming Calls”)
“Bar All Incoming Calls”: Restricts all incoming calls.
“Bar if Abroad”: Restricts all incoming calls when you
are outside of the coverage from your
registered service provider.
3. Select one of the following options:
“All Services”: Restricts all services.
“Voice Calls”: Restricts all voice calls.
“Video Calls”: Restricts all video calls.
“Fax”: Restricts all fax calls.
“Messages”: Restricts all messages.
4. Select “On”, “Off” or “Status”.
5. Enter the network password.
To Cancel Settings
“Settings”
→
“Call Settings”
→
“Restrict Calls”
1. Select “Outgoing Calls” or “Incoming Calls”.
2. Select “Cancel All”.
3. Enter the network password.
Rejecting an Incoming Call
You can register phone numbers you do not wish to answer.
To Reject the Registered Number
“Settings”
→
“Call Settings”
→
“Restrict Calls”
→
“Rejected Numbers”
→
“Switch On/Off”
1. Select “On” or “Off”.
(M 12-6-4)

Settings 103
To Register the Rejected Number
“Settings”
→
“Call Settings”
→
“Restrict Calls”
→
“Rejected Numbers”
→
“Set Rejecting Number”
1. Select a blank field.
2. Enter the desired number.
Withheld Call
“Settings”
→
“Call Settings”
→
“Restrict Calls”
→
“Withheld Call”
1. Select “On” or “Off”.
Changing the Network Password
“Settings”
→
“Call Settings”
→
“Restrict Calls”
→
“Change
N/W Password”
1. Enter the old network password.
2. Enter a new network password.
3. Enter the new network password again.
If you enter the incorrect password, you are asked to enter the
password again.
4. Press .
Fixed Dialling No.
When the Fixed Dialling No. is enabled, you can only call
pre-registered numbers.
To Enable Fixed Dialling No.
“Settings”
→
“Call Settings”
→
“Restrict Calls”
→
“Fixed
Dialling No.”
→
“Switch On/Off”
1. Select “On” to enable this function.
To Add a New Name
“Settings”
→
“Call Settings”
→
“Restrict Calls”
→
“Fixed
Dialling No.”
→
“Edit Dial List”
1. Highlight the blank entry, press [Options], then select “Add
New Dial”.
2. Enter your PIN2 code.
3. Add a name and a phone number.
For details on adding a name and a phone number, see “Add New
Contact” on page 34.
4. Press [Save].
Minute Minder
Minute Minder function informs you of your talk time by sounding a
tone after every minute.
“Settings”
→
“Call Settings”
→
“Minute Minder”
1. Select “On” or “Off”.
Displaying Call Timer
“Settings”
→
“Call Settings”
→
“Display Call Timer”
1. Select “On” or “Off”.
Displaying Call Costs
“Settings”
→
“Call Settings”
→
“Display Call Cost”
1. Select “On” or “Off”.
(M 12-6-5)
(M 12-6-6)
(M 12-6-7)
104 Settings
Auto Redial
“Settings”
→
“Call Settings”
→
“Auto Redial”
1. Select “On” or “Off”.
Video Call Settings
Set various types of functions and services for video calls.
Selecting an image for the Alternative Image
You can select an image shown to the caller between the sub camera
image and an alternative image from the saved picture files.
“Settings”
→
“Video Call Settings”
→
“Camera Picture”
1. Select “Default Image” or “Alternative Image”.
For “Default Image”, select “Internal Camera” or “Alternative
Image”.
For “Alternative Image”, select “Preset Picture” or “My Pictures”.
Turning On or Off the Speakers
“Settings”
→
“Video Call Settings”
→
“Loudspeaker”
1. Select “On” to turn on the loudspeakers on the sides of your
phone, or select “Off” to turn it off.
Selecting the Picture Quality
Select the desired data format for your environment.
“Settings”
→
“Video Call Settings”
→
“Incoming Picture
Quality”
“Settings”
→
“Video Call Settings”
→
“Outgoing Picture
Quality”
1. Select from “Normal”, “Quality Prior” or “Frame Rate Prior”.
Select “Frame Rate Prior” to perform faster communication.
Backlight
With this setting On, the phone’s backlight is on when making a video
call.
“Settings”
→
“Video Call Settings”
→
“Backlight”
1. Select “Always On”, “Always Off” or “As Normal Setting”.
The “As Normal Setting” option depends on the backlight setting
of the main display (p. 97).
Mute
You can mute the microphone while making a video call.
“Settings”
→
“Video Call Settings”
→
“Mute Microphone”
1. Select “On” to mute or “Off” to cancel mute.
Assigning Hold Guidance Picture
You can display an image saved in the phone on your main display
while you are putting a call on hold.
“Settings”
→
“Video Call Settings”
→
“Hold Guidance Pict”
1. Select “Preset Picture” or “My Pictures”.
2. Select the desired picture.
(M 12-6-8)
(M 12-7)
(M 12-7-1)
(M 12-7-2)
(M 12-7-3) (M 12-7-4)
(M 12-7-5)
(M 12-7-6)
(M 12-7-7)
Settings 105
Security
Enabling/Disabling the PIN Code
If the PIN code is enabled you are asked to enter the PIN code each
time the phone is switched on. Your PIN code is registered on the
SIM/USIM card and you should have been made aware of the code
when you purchased the SIM/USIM card. Contact your service
provider for further details.
“Settings”
→
“Security”
→
“PIN Entry”
→
“Switch On/Off”
1. Select “On” to enable the PIN code or “Off” to disable.
2. Enter your PIN code.
Note
•If you enter the wrong PIN code three times in step 2, the SIM/USIM
card will lock. To remove the lock, contact your service provider/
SIM/USIM card vendor.
To Change the PIN Code
This allows you to change the PIN code registered on the SIM/USIM
card. Before you change the PIN code, select “On” in step 1 in
“Enabling/Disabling the PIN Code”.
“Settings”
→
“Security”
→
“PIN Entry”
→
“Change PIN”
1. Enter the existing PIN code.
2. Enter a new PIN code.
3. Enter the new PIN code again.
Changing the PIN2 Code
The PIN2 code is used to protect certain functions in the phone such
as Fixed Dialling No. and call cost limits. The following shows you how
to change the PIN2 code.
“Settings”
→
“Security”
→
“Change PIN2”
1. Enter the existing PIN2 code.
2. Enter a new PIN2 code.
3. Enter the new PIN2 code again.
Handset Lock
The Handset Lock is an additional security feature which prevents
unauthorised use of the phone or certain features.
“Settings”
→
“Security”
→
“Handset Lock”
1. Select “On” or “Off”.
2. Enter your handset code.
(M 12-8)
(M 12-8-1)
(M 12-8-2)
(M 12-8-3)
106 Settings
Function Lock
By setting this option on, all the functions of your phone will be locked
until the correct handset code is entered.
“Settings”
→
“Security”
→
“Function Lock”
1. Enter your handset code.
The default handset code is “9999”. For details on changing the
handset code, see “Changing the Handset Code”.
To Turn Off the Function Lock
Enter your handset code in standby to turn the Function Lock off.
Contacts Lock
The Contacts Lock function prevents unauthorised use of your
Contacts List.
“Settings”
→
“Security”
→
“Contacts Lock”
1. Select “On” to lock or “Off” to unlock.
2. Enter your handset code.
Showing Secret Data
By setting this option on, the hidden data can be displayed.
“Settings”
→
“Security”
→
“Show Secret Data”
1. Select “On” to display or “Off” to hide.
2. Enter your handset code when you select “On”.
Changing the Handset Code
The default handset code is “9999”.
“Settings”
→
“Security”
→
“Change Handset Code”
1. Enter the old handset code.
2. Enter a new handset code.
3. Enter the new handset code again.
Master Reset
Resetting All Settings from M1 to M12
“Settings”
→
“Master Reset”
→
“Reset Settings”
1. Enter your handset code.
The default handset code is “9999”. For details on changing the
handset code, see “Changing the Handset Code”.
Resetting All Settings from M1 to M12 and All Created Data
“Settings”
→
“Master Reset”
→
“Reset All”
1. Enter your handset code.
For details on the handset code, see “Changing the Handset
Code”.
(M 12-8-4)
(M 12-8-5)
(M 12-8-6)
(M 12-8-7)
(M 12-9)
(M 12-9-1)
(M 12-9-2)

Call Log 107
Call Log
The phone will record the last 30 missed calls, received calls and
dialled numbers.
Viewing Call Log
“Call Log”
1. Select from “All Calls”, “Dialled Numbers”, “Missed Calls” or
“Received Calls”.
The selected call log list is displayed.
To switch logs, press c or d.
2. Select the phone number you wish to view.
If you wish to dial the number, press .
Tip
•You can also confirm call logs by pressing D in standby.
Sending Messages
1. In the call log list, highlight the phone number or name you
wish to send a message to.
2. Press [Options] and select “Create Message”.
For details on creating a message, see “Creating a New
Message” on page 49.
Note
•The Postcard service is not available with some service providers.
Please contact your service provider for more information.
Deleting a Call Log
1. In the call log list, press [Options] and select “Delete” or
“Delete All”.
Call Timers
This function lets you check the duration of your calls.
Checking the Duration of the Last Call and All Calls
“Call Log”
→
“Call Timers”
1. Select “Received Calls” or “Dialled Calls”.
Resetting Call Timers
“Call Log”
→
“Call Timers”
→
“Clear Timers”
1. Enter your handset code.
The default handset code is “9999”. For details on changing the
handset code, see “Changing the Handset Code” on page 106.
Data Counter
You can confirm the number of bytes used in the 3G (UMTS) and GSM
transmission.
“Call Log”
→
“Data Counter”
1. Select from “Last Data” or “All Data”.
Resetting All Data Counter
“Call Log”
→
“Data Counter”
→
“Clear Counter”
(M 9) (M 9-5)
(M 9-5-3)
(M 9-6)
(M 9-6-3)

108 Call Log
Call Costs
This function lets you check the charges for your calls.
Some
networks do not support Charging Advice. Please check with your
service provider for availability.
Checking the Cost of the Last Call
“Call Log”
→
“Call Costs”
→
“Last Call”
Checking the Total Call Cost
“Call Log”
→
“Call Costs”
→
“All Calls”
Setting the Charge Rate
Set the charge rate to calculate the call cost and set the maximum
limit for call cost.
“Call Log”
→
“Call Costs”
→
“Cost Units”
→
“Set Units”
1. Enter your PIN2 code.
2. Enter a currency unit (up to 3 characters).
3. Enter a cost per unit.
To enter a decimal point, press P.
Setting the Charge Limit
This function is useful if you wish to make sure you do not exceed a
certain charge limit.
“Call Log”
→
“Call Costs”
→
“Max Cost”
→
“Set Limit”
1. Enter your PIN2 code.
2. Enter a value.
Checking the Residual Credit
“Call Log”
→
“Call Costs”
→
“Residual Credit”
Resetting All Call Costs
“Call Log”
→
“Call Costs”
→
“Clear Costs”
1. Enter your PIN2 code.
(M 9-7)
(M 9-7-1)
(M 9-7-2)
(M 9-7-5)
(M 9-7-6)
(M 9-7-3)
(M 9-7-4)

Connectivity 109
Connectivity
By configuring the settings in this menu, you can connect to Bluetooth
wireless technology or Infrared enabled phones via these
connections, as well as a PC via Bluetooth wireless technology or
Infrared connections.
Bluetooth
For using the Bluetooth wireless function, you need to search for
other Bluetooth wireless technology enabled devices to establish
contact with your phone. Keep your phone within a distance of 10
metres from the devices before searching.
Using the Bluetooth Wireless Function
To Turn On or Off
“Connectivity”
→
“Bluetooth”
→
“Switch On/Off”
1. Select “On” or “Off”.
The Bluetooth wireless setting is activated, “On” is selected and
“ ” is displayed.
To Show or Hide Your Phone
“Connectivity”
→
“Bluetooth”
→
“Visibility”
1. Select the desired visibility settings.
“Show My Phone”: Allows other devices to recognise your
phone.
“Hide My Phone”: Hides your phone from other devices.
To Search for Devices to be Paired
A maximum of 16 devices can be searched for.
“Connectivity”
→
“Bluetooth”
→
“Search for Devices”
1. Select the desired device for pairing.
2. Enter the device passcode.
Note
•If the Bluetooth wireless function is off before searching, the phone
turns the Bluetooth wireless function on automatically and starts
searching.
•You can only select one device for pairing. To change the paired
device, see “To Activate the Paired Device” on page 110.
Tip
•You can save battery power by turning the Bluetooth wireless
function off while it is not in use. Turn the Bluetooth wireless
function off in “To Turn On or Off” or in “To Turn Off Automatically”
on page 110.
•During a call, you can divert voice calls to the paired handsfree
device. Press [Options], select “Transfer Audio” and then “To
Bluetooth” or “To Handset”. If you wish to disconnect the paired
device, select “Off”.
(M 10)
(M 10-1)
(M 10-1-1)
(M 10-1-2)
(M 10-1-3)

110 Connectivity
To Activate the Paired Device
Paired devices are listed by tabs for all devices and for handsfree
devices.
“Connectivity”
→
“Bluetooth”
→
“Paired Devices”
1. Press d to switch to the list for handsfree devices.
2. Select the desired device you wish to activate.
To Rename or Delete the Paired Devices
“Connectivity”
→
“Bluetooth”
→
“Paired Devices”
1. Press c or d to switch between all devices and handsfree
devices.
2. Highlight the desired device.
3. Press [Options].
4. Select “Change Name” or “Delete”.
You can rename or delete by pressing after selecting desired
device.
To Send All Data to Other Devices
You can send all the data for applications such as Contacts List,
Calendar, Tasks, etc. to selected devices.
“Connectivity”
→
“Bluetooth”
→
“Send All”
1. Select the desired device.
If a device is not specified, searching starts automatically.
2. Enter your handset code.
The default handset code is “9999”. For details on changing the
handset code, see “Changing the Handset Code” on page 106.
3. Enter the device passcode for unpaired devices.
4. Select the desired data to send.
Note
•If the handsfree device is connected, the confirmation screen to
deactivate the handsfree function is displayed. Press [Yes] to
deactivate.
Bluetooth Wireless Settings
With this setting you can rename your phone, prevent other phones
from recognising your phone, turn the Bluetooth wireless function off
automatically to save battery power, etc.
To Rename Your Phone
You can rename your phone. The name is shown in other devices
when your phone is detected.
“Connectivity”
→
“Bluetooth”
→
“Bluetooth Settings”
→
“Device Name”
1. Enter the new device name.
To Turn Off Automatically
“Connectivity”
→
“Bluetooth”
→
“Bluetooth Settings”
→
“Bluetooth Timeout”
1. Select the desired time.
Your phone turns the function off automatically after the specified
time.
(M 10-1-4)
(M 10-1-5)
(M 10-1-6)

Connectivity 111
To Switch the Handsfree Settings
You can switch modes of the handsfree kit between two modes;
talking with the handsfree kit or talking with the phone.
“Connectivity”
→
“Bluetooth”
→
“Bluetooth Settings”
→
“Handsfree Setting”
1. Select “Private mode” or “Handsfree mode”.
“Private mode”: For talking with the phone
“Handsfree mode”: For talking with the handsfree kit
To Turn the Authentication Request On or Off
You can request the sender or receiver of the OBEX data to
authenticate the passcode (exchanging the passcode) before pairing
devices.
“Connectivity”
→
“Bluetooth”
→
“Bluetooth Settings”
→
“Authentication”
1. Select “On” or “Off”.
Note
•No authentication is required for the paired devices.
•Even if you select “Off”, you may authenticate the passcode when
the sender requests it.
To See Your Phone Details
“Connectivity”
→
“Bluetooth”
→
“Bluetooth Settings”
→
“My Phone Details”
Infrared
In order to use the infrared function, you need to search for other
infrared enabled devices to establish contact with your phone. Keep
your phone within a distance of 20 centimetres from the other phone
before searching. The infrared setting will return to off when no data
is transmitted/received via infrared communication.
Turning On or Off
“Connectivity”
→
“Infrared”
→
“Switch On/Off”
1. Select “On” or “Off”.
The infrared setting is activated, and “ ” is displayed.
Sending All Data to Other Devices
“Connectivity”
→
“Infrared”
→
“Send All”
1. Enter your handset code.
The default handset code is “9999”. For details on changing the
handset code, see “Changing the Handset Code” on page 106.
2. Select the desired data to send.
3. Enter the authorisation code.
(M 10-2)
(M 10-2-1)
(M 10-2-2)

112 Connectivity
Network Settings
Selecting a Service Automatically
Each time the power is turned on, your phone selects a service
automatically.
“Connectivity”
→
“Network Settings”
→
“Select Service”
1. Select “Auto”.
Selecting a Service Manually
“Connectivity”
→
“Network Settings”
→
“Select Service”
1. Select “GSM”.
Selecting a Network Automatically
Each time the power is turned on, your phone always tries to connect
to the preferred network.
If your phone is not connected to the network, you can perform the
following immediately to establish the preferred network connection.
“Connectivity”
→
“Network Settings”
→
“Select Network”
→
“Automatic”
Setting the Network Manually
“Connectivity”
→
“Network Settings”
→
“Select Network”
→
“Manual”
1. Select the desired network.
Adding a New Network
“Connectivity”
→
“Network Settings”
→
“Select Network”
→
“Add New Network”
If there are no entries, press and go to step 2.
If there is an entry, press and perform the following steps.
1. Select “Add”.
2. Enter the country code (up to 3 digits).
3. Enter the network code (up to 3 digits).
4. Enter a new network name (up to 25 characters).
5. Select “Select network type”.
6. Select the desired network.
Editing the Preferred List
“Connectivity”
→
“Network Settings”
→
“Select Network”
→
“Set Preferred”
1. Select the name of the network you wish to edit.
2. Select “Insert” to insert over the selected position, “Add to
end” to insert at the end or “Delete” to delete.
Showing the Network Information
“Connectivity”
→
“Network Settings”
→
“Network
Information”
Information about the operator name, package and services are
displayed.
(M 10-3)
(M 10-3-3)
Connectivity 113
Flight Mode
When the Flight Mode is set to “On”, the phone cuts off the network
connections and stops searching for available networks to connect.
With this mode, you can play games or music even when you fly.
“Connectivity”
→
“Flight Mode”
1. Select “On” or “Off”.
Internet Settings
Note
•In normal operations, you do not need to change the settings.
•Internet settings have already been entered in your phone
depending on your service provider. You may have restrictions on
viewing, deleting, copying or modifying the settings. Contact your
service provider for details.
WAP Settings
“Connectivity”
→
“Internet Settings”
→
“WAP Settings”
→
“Create New”
“Profile Name”: WAP profile name (Unique name)
“Proxy”: Proxy setting for WAP (When “Use
Proxy” is On)
“Access Point”: Access point for WAP (When “Use
Proxy” is Off)
“Use Proxy”: Setting to connect by Proxy or not
“Home”: Home page URL (When “Use Proxy” is
Off)
Streaming Settings
“Connectivity”
→
“Internet Settings”
→
“Streaming
Settings”
→
“Create New”
“Profile Name”: Profile name for streaming (Unique
name)
“Proxy Address”: Proxy address
“Proxy Port Number”: Port number (1-65535)
“Access Point”: Access point
Proxy Settings
“Connectivity”
→
“Internet Settings”
→
“Proxy”
→
“Create
New”
“Proxy Name”: Proxy name (Unique name)
“Proxy Address”: IP address
“Access Point”: Access point
“Home”: Home page URL
“Port Number”: Port number (1-65535)
“Authentication Type”: Authentication Type (“HTTP-BASIC” or
“HTTP-DIGEST”)
“User Name”: User name for authentication
“Password”: Password for authentication
(M 10-4)
(M 10-5)
(M 10-5-1)
(M 10-5-2)
(M 10-5-3)
114 Connectivity
Access Point Settings
“Connectivity”
→
“Internet Settings”
→
“Access Point”
→
“Create New”
“Access Point Name”: Access point name (Unique name)
“APN”: APN setting
“Authentication Type”: Authentication type (“NONE”, “PAP” or
“CHAP”)
“User Name”: User name for access point
“Password”: Password for access point
“DNS”: DNS (Domain Name System)
“Linger Time”: Linger Time (1-99999 sec.)
Re-Provisioning Settings
“Connectivity”
→
“Internet Settings”
→
“Re-Provisioning
Settings”
→
“Execute Pending”
Clearing DNS Cache
“Connectivity”
→
“Internet Settings”
→
“Clear DNS Cache”
White List
“Connectivity”
→
“Internet Settings”
→
“White List”
→
“Create New”
“SMSC Address”: SMSC address
“SM Originating Address”: SM originating address
To Activate the WAP/Streaming Profile
“Connectivity”
→
“Internet Settings”
1. Select “WAP Settings” or “Streaming Settings”.
2. Select the desired profile you wish to activate.
To Edit/Copy/Delete the WAP/Streaming Profile
“Connectivity”
→
“Internet Settings”
1. Select “WAP Settings” or “Streaming Settings”.
2. Highlight the desired profile.
3. Press [Options] and select the desired option.
“Edit”: Modify the desired item
“Copy”: Enter the new file name
“Delete”: Press [Yes] to delete
Memory Card
With a memory card inserted in your phone, you can make backup
files of Bookmarks, Text, Contacts, Calendar and Tasks in the
handset memory card to the memory card. You can also restore the
backup data from the memory card.
(M 10-5-4)
(M 10-5-5)
(M 10-5-6)
(M 10-5-7)
(M 10-6)
Connectivity 115
Making a Backup File on the Memory Card
“Connectivity”
→
“Memory Card”
→
“Backup/Restore”
→
“Backup”
1. Enter your handset code.
The default handset code is “9999”. For details on changing the
handset code, see “Changing the Handset Code” on page 106.
2. Select the desired item to backup or “Select All” to backup all
files.
Restoring a Backup File
“Connectivity”
→
“Memory Card”
→
“Backup/Restore”
→
“Restore”
1. Enter your handset code.
2. Select the desired item to restore or “Select All” to restore all
files.
3. Select the desired file to restore.
A confirmation message indicating deletion from the handset
memory is displayed.
4. Press [Yes].
Note
•To delete a backup file, highlight the desired item, press [Options]
and select “Delete” after performing steps 1 to 3.
Formatting Memory Card
“Connectivity”
→
“Memory Card”
→
“Format Card”
1. Enter your handset code.
The default handset code is “9999”. For details on changing the
handset code, see “Changing the Handset Code” on page 106.
2. Press [Yes] to start formatting.
(M 10-6-2)

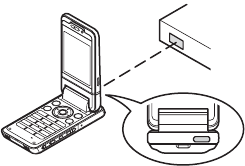
116 Connecting 903SH to Your PC
Connecting 903SH to Your PC
You can use the following functions by connecting the 903SH to your
PC using an Infrared port, a USB port* or Bluetooth wireless
technology port:
• 3G/GSM modem
• Handset Manager for 903SH
*Requires an optional USB data cable XN-1DC30 for USB port
connection.
System Requirements
Operating System:
Windows 98*, Windows Me, Windows 2000**,
Windows XP***
*Windows 98 Second Edition
** Service Pack 4 or later
*** Service Pack 2 or later
Supported Software:
Microsoft Outlook/Outlook Express
Interface:
Infrared port, USB port or Bluetooth wireless port
CD-ROM drive
3G/GSM Modem
You can use 903SH as a 3G/GSM modem to access the Internet from
your PC. Connect your phone to your PC via Bluetooth wireless
technology or USB interface. Software installation on your PC is
required. For details, see “Software Installation” on page 117.
Modem via the USB Cable
To use the modem function using a USB cable, use the cable
mentioned above and see the instructions accompanying the cable.
Modem via Bluetooth connection
To use the modem function via Bluetooth wireless technology
interface, see “Using the Bluetooth Wireless Function” on page 109
and turn the modem function on.
For details on software support, refer to the following site:
http://www.sharp-mobile.com
Note
•Modem communication is not possible while communicating with
the Handset Manager via Bluetooth wireless technology, Infrared
or USB interface.
•Your phone exhausts the battery when connected to a PC, even
when not communicating.
Connecting 903SH to Your PC 117
Handset Manager
You can transmit the following items between your phone and your
PC, and can use Contacts List entries on your PC:
• My Items files (pictures/sounds/video clips/Other Documents data)
• Contacts List entries
• Schedule entries
To use the Handset Manager function, see “Connecting 903SH to
Your PC” on page 116 and set your phone to Data Transfer mode.
For details on software support, refer to the following site:
http://www.sharp-mobile.com
Software Installation
1. Insert the supplied CD-ROM into your CD-ROM drive.
The 903SH CD-ROM screen is displayed.
If the 903SH CD-ROM screen is not displayed, double-click
[Launcher.exe] in your CD-ROM.
2. Press the desired button.
3. Follow the on-screen instructions to complete installation.
Note
•The phone may not recognise the USB data cable if it is connected
while an application (Camera, My Items, etc.) is running. Connect
the USB data cable in standby.
Infrared Communication
•Infrared ports need to be aligned with each other.
•Infrared ports need to be placed within 20 cm of each other and
within a 30° angle.
3G/GSM modem
•It is not recommended that you make or answer calls when you are
using 903SH as a 3G/GSM modem. The operation may be
interrupted.
Handset Manager
•Some large files may not be able to be transmitted from the PC to
the phone.
•Applications (Camera, My Items, etc.) do not run when the phone
is connected to the PC via Bluetooth wireless technology interface,
Infrared or USB data cable.
118 Troubleshooting
Troubleshooting
Problem Solution
The phone does not turn on. •Make sure the battery is properly
inserted and charged.
PIN code or PIN2 code is
rejected.
•Make sure you have entered the
correct code (4 to 8 digits).
•Your SIM/USIM card/protected
functions will become locked after
three unsuccessful attempts.
•Contact your SIM/USIM provider if you
do not have the correct PIN code.
The SIM/USIM card becomes
locked.
•Enter the PUK code (8 digits) provided
by your service provider (if supported).
•If the attempt is successful, enter the
new PIN code and confirm your phone
is operational again. Otherwise contact
your dealer.
The display is difficult to
read.
•Adjust the backlight brightness for the
display.
Phone functions do not work
after the phone is turned on.
•Check the radio signal strength
indicator as you may be outside the
service area.
•Check to see if any error message is
displayed when you turn your phone
on. If so, contact your dealer.
•Make sure the SIM/USIM card is
correctly inserted.
Calls cannot be made or
received.
•If the message “SIM card error” is
displayed when the phone is switched
on, you cannot use your SIM/USIM
card or the SIM/USIM card is
damaged. Contact your dealer or
network service provider.
•Check your call barring, fixed dialling
setting, remaining battery and call
forwarding settings.
•Check if your phone is currently
performing data communication using
Infrared (IrDA),
Bluetooth
wireless
technology interface or a USB data
cable.
•Check the remaining balance if you are
using a pre-paid SIM/USIM card.
Call quality is poor.
•Your current location may not provide
good call quality (i.e., in a car or train).
Move to a location where radio signal
strength is greater.
Problem Solution
Troubleshooting 119
Cannot access network
service.
•Check where your account has been
registered and where the service is
available.
Cannot send or receive text
message.
•Make sure you are correctly
subscribed for the Short Message
Service, that the network supports this
service, and that the centre number is
set up correctly. If not, contact your
network service provider.
Cannot connect to
Multimedia Messaging
Service provider.
•MMS settings and configuration may
be missing or incorrect or the network
does not support it. Check your service
provider’s access point number.
Contact your service provider to
confirm the correct settings.
Limited memory available. •Delete any unnecessary data.
Call is terminated
unexpectedly.
•Magnetised objects such as health
necklaces placed near the phone may
terminate the call. Keep your phone
away from such objects.
No entries are displayed in
the Contacts List.
•Confirm that the Contacts Location
setting (Handset or SIM/USIM) is
correct.
Problem Solution
Fax transmission failure.
•Before transmitting fax data, configure
your fax software to use the software
flow control.
•Use of the optional data cable is
recommended for transmitting fax
data.
Cannot receive OBEX data.
•The OBEX data can only be received
only in standby. The message “Please
return to standby.” is displayed.
Problem Solution

120 Safety Precautions and Conditions of Use
Safety Precautions and Conditions of
Use
Your phone conforms to international regulations insofar as it is used
under normal conditions and in accordance with the following
instructions.
CONDITIONS OF USE
Electromagnetic waves
• Do not switch on your phone aboard an aircraft (as your phone may
interfere with the aircraft’s electronic systems). Current legislation
forbids this use and legal action can be taken against the user.
• Do not switch on your phone in a hospital, except in designated
areas.
• Use of your phone’s function may affect the performance of
medical electronic units (pacemakers, hearing aids, insulin pumps,
etc.). When the phone function is on, do not bring it near medical
equipment or into areas in which medical equipment is being used.
If you have a hearing aid or a pacemaker, only use the phone on
the opposite side of your body from where it is located. The phone
should be kept at least 6 inches (15.24 cm) from a pacemaker
ANYTIME the phone is switched on.
• Do not switch on your phone near gas or flammable substances.
• Observe the rules concerning the use of mobile phones at gasoline
stations, chemical plants and at all sites where a risk of explosion
exists.
Caring for your phone
• Do not allow children to use your phone without supervision.
• Do not open or attempt to repair your phone yourself. The product
can only be repaired by authorised service personnel.
• Do not drop your phone or subject it to severe impacts. Bending the
body and pushing the display or keys with extreme force could
damage the phone.
• Do not use solvents to clean your phone. Use only a soft, dry cloth.
• Do not carry your phone in your back pocket as it could break when
you sit down. The display is made of glass and is particularly
fragile.
• Avoid touching the external connector on the underside of the
phone, since the delicate components within can be damaged by
static electricity.
Battery
• Use your phone only with batteries, chargers and accessories
recommended by the manufacturer. The manufacturer disclaims
any liability for damage caused by the use of other chargers,
batteries or accessories.
•Network configuration and phone usage will affect
talk-time and standby time.
Using the games or camera will hasten battery consumption.

Safety Precautions and Conditions of Use 121
•When the battery charging alert is displayed on the screen,
charge the battery as soon as possible. If you continue using
your phone ignoring the alert, the phone may cease to function,
and all data and settings you have stored may be lost at any
moment.
• Before removing the battery from the phone, make sure the phone
is switched off.
• Replace and charge the new battery as soon as possible after
removing the old one.
• Do not touch the battery terminals. Batteries can cause damage,
injury or burns if a conductive material touches exposed terminals.
When the battery is detached from the phone, use a cover made
of non-conductive material for keeping and carrying the battery
safely.
• Recommended temperature for using and storing batteries is
approximately 20°C.
• The batteries’ performance is limited in low temperatures,
particularly below 0°C and the phone may not work temporarily
regardless of the amount of remaining battery power.
• Exposing the phone to extreme temperatures will shorten battery
life.
• The battery can be charged and discharged hundreds of times but
it will eventually wear out. When the operating time (talk-time and
standby time) is noticeably shorter than normal, it is time to buy a
new battery.
CAUTION
RISK OF EXPLOSION IF BATTERY IS REPLACED
BY AN INCORRECT TYPE,
DISPOSE OF USED BATTERIES ACCORDING
TO THE INSTRUCTIONS
See “Battery Disposal” on page 12.
Memory Card
• Do not remove or insert a memory card while data on the card is
being edited. Do not turn off the phone or device containing the
memory card while data on the card is being edited as this may
damage the data or cause the card to stop functioning correctly.
• Data may be lost under the following circumstances.
- If the phone is dropped, or shook, or force is applied while the
memory card is inserted.
- When the phone is used in areas that are exposed to static
electricity or electric noise.
• Backup your important data in case data on the memory cards are
lost due to malfunctions.
• Do not touch the metal terminals with your hands or metal objects.
• Do not bend the memory card or subject it to violent impact. Keep
it away from water and high temperatures.
• SHARP holds no responsibility for the loss or damage of data
contained on a memory card.
• Keep all memory cards out of the reach of small children.

122 Safety Precautions and Conditions of Use
Aerial Care
• Do not cover the top of the phone (p. 8, No. 21) with your hand
when in use as this may interfere with the performance of the
built-in aerial. Call quality may deteriorate leading to shortened
talk-time and standby time because the mobile phone has to
operate on a higher power level than is necessary.
• Use only the aerial supplied or one approved by Sharp for your
mobile phone. Using unauthorised or modified aerials may damage
the mobile phone. Moreover, since the mobile phone may violate
the appropriate regulations, it may lose performance or exceed the
limitation of SAR levels.
• To avoid impaired performance, do not damage the aerial of the
mobile phone.
• While talking directly to the microphone, please hold the mobile
phone so that the aerial is upwards over your shoulder.
• To avoid interfering with blasting operations, please turn off the
mobile phone in a blasting area or in a place where a “turn off
two-way radio” sign is posted.
Camera Operation
• Learn picture quality, file formats, etc. beforehand.
The taken pictures can be saved in JPEG format.
• Be careful not to move your hand while taking pictures.
If the phone moves while taking a picture, the picture can become
blurred. When taking a picture, hold the phone firmly to prevent it
from moving, or use the delay timer.
• Clean the lens cover before taking a picture.
Fingerprints, oils, etc. on the lens cover hinder clear focusing.
Wipe them off with a soft cloth before taking a picture.
Others
• As with any electronic storage unit, data may be lost or corrupted
under various circumstances.
• Before connecting the phone with a PC or a peripheral unit, read
the operation manual for the other unit carefully.
• If the phone’s battery has been removed for some time, or the
phone has been reset, the unit’s clock and calendar may be
reinitialised. The date and time should be updated in this case.
• The phone uses a magnet to recognise that the phone is closed.
Do not place magnetic cards near your phone or get the card
caught in the phone as it may damage the recorded data.
Safety Precautions and Conditions of Use 123
ENVIRONMENT
• Keep your phone away from extreme heat. Do not leave it on the
dashboard of a car or near a heater. Do not leave it in any place
that is extremely damp or dusty.
• Since this product is not waterproof, do not use it or store it where
fluids such as water can splash onto it. Raindrops, water spray,
juice, coffee, steam, perspiration, etc. will also cause
malfunctions.
PRECAUTIONS CONCERNING VEHICLE USE
• It is the user’s responsibility to check the local laws governing the
use of a mobile phone in vehicles. Pay full attention to driving. Pull
off to the side of the road, park the car, and switch off the engine
before making or answering a call.
• Use of your phone’s function may interfere with the vehicle’s
electronic systems, such as the ABS anti-lock brakes or the
air-bag. To ensure no such problem occurs, please check with
your dealer or car manufacturer before connecting your phone.
• Only allow qualified service maintenance personnel to install the
vehicle accessories.
The manufacturer disclaims any liability for damage which may result
as a consequence of improper use or use contrary to the instructions
contained herein.
SAR
Your Sharp mobile phone has been designed, manufactured and
tested so as not to exceed the limits for exposure to electromagnetic
fields recommended by the Council of the European Union. These
limits are part of comprehensive guidelines developed by
independent scientific organisations. The guidelines include a
substantial safety margin designed to assure the safety of the phone
user and others and to take into account variations in age and health,
individual sensitivities and environmental conditions. European
standards provide for the amount of radio frequency electromagnetic
energy absorbed by the body when using a mobile phone to be
measured by reference to the Specific Absorption Rate (SAR). The
SAR limit for the general public is currently 2 watts per kilogram
averaged over 10 grams of body tissue. Your Sharp mobile phone
SAR value is 0.544 watts per kilogram. This has been tested to
ensure that this limit is not exceeded even when the phone is
operating at its highest certified power. In use however your Sharp
mobile phone may operate at less than full power because it is
designed to use only sufficient power to communicate with the
network.

124 Safety Precautions and Conditions of Use
INFORMATION ON PROPER DISPOSAL
A. Information on Disposal for Users (private households)
1. In the European Union
Attention: If you want to dispose of this equipment, please do not
use the ordinary dust bin!
Used electrical and electronic equipment must be treated separately
and in accordance with legislation that requires proper treatment,
recovery and recycling of used electrical and electronic equipment.
Following the implementation by member states, private households
within the EU states may return their used electrical and electronic
equipment to designated collection facilities free of charge*. In some
countries* your local retailer may also take back your old product free
of charge if you purchase a similar new one.
*) Please contact your local authority for further details.
If your used electrical or electronic equipment has batteries or
accumulators, please dispose of these separately beforehand
according to local requirements.
By disposing of this product correctly you will help ensure that the
waste undergoes the necessary treatment, recovery and recycling
and thus prevent potential negative effects on the environment and
human health which could otherwise arise due to inappropriate waste
handling.
2. In other Countries outside the EU
If you wish to discard this product, please contact your local
authorities and ask for the correct method of disposal.
For Switzerland: Used electrical or electronic equipment can be
returned free of charge to the dealer, even if you
don’t purchase a new product. Further collection
facilities are listed on the homepage of
www.swico.ch or www.sens.ch.
A
ttention: Your product is marked with this symbol. It means that
used electrical and electronic products should not be
mixed with general household waste. There is a
separate collection system for these products.

Safety Precautions and Conditions of Use 125
B. Information on Disposal for Business Users.
1. In the European Union
If the product is used for business purposes and you want to discard
it:
Please contact your SHARP dealer who will inform you about the
take-back of the product. You might be charged for the costs arising
from take-back and recycling. Small products (and small amounts)
might be taken back by your local collection facilities.
For Spain: Please contact the established collection system or
your local authority for take-back of your used
products.
2. In other Countries outside the EU
If you wish to discard of this product, please contact your local
authorities and ask for the correct method of disposal.
PRECAUTIONS FOR USE IN USA
Changes or modifications not expressly approved by the
manufacturer responsible for compliance could void the user’s
authority to operate the equipment.
Exposure to Radio Waves
THIS MODEL PHONE MEETS THE GOVERNMENT’S
REQUIREMENTS FOR EXPOSURE TO RADIO WAVES.
Your wireless phone is a radio transmitter and receiver. It is designed
and manufactured not to exceed the emission limits for exposure to
radio frequency (RF) energy set by the Federal Communications
Commission of the U.S. Government. These limits are part of
comprehensive guidelines and establish permitted levels of RF
energy for the general population. The guidelines are based on
standards that were developed by independent scientific
organizations through periodic and thorough evaluation of scientific
studies. The standards include a substantial safety margin designed
to assure the safety of all persons, regardless of age and health.
The exposure standard for wireless mobile phones employs a unit of
measurement known as the Specific Absorption Rate, or SAR. The
SAR limit set by the FCC is 1.6 W/kg.* Tests for SAR are conducted
using standard operating positions specified by the FCC with the
phone transmitting at its highest certified power level in all tested
frequency bands. Although the SAR is determined at the highest
certified power level, the actual SAR level of the phone while
operating can be well below the maximum value. This is because the
phone is designed to operate at multiple power levels so as to use
only the power required to reach the network. In general, the closer
you are to a wireless base station antenna, the lower the power
output.
126 Safety Precautions and Conditions of Use
Before a phone model is available for sale to the public, it must be
tested and certified to the FCC that it does not exceed the limit
established by the government-adopted requirement for safe
exposure. The tests are performed in positions and locations (e.g., at
the ear and worn on the body) as required by the FCC for each model.
The highest SAR value for this model phone when tested for use at
the ear is 0.355 W/kg and when worn on the body, as described in
this user guide, is 0.426 W/kg. Body-worn Operation; This device
was tested for typical body-worn operations with the back of the
phone kept 1.5 cm from the body. To maintain compliance with FCC
RF exposure requirements, use accessories that maintain a 1.5 cm
separation distance between the user’s body and the back of the
phone. The use of belt-clips, holsters and similar accessories should
not contain metallic components in its assembly.
The use of accessories that do not satisfy these requirements may
not comply with FCC RF exposure requirements, and should be
avoided. While there may be differences between the SAR levels of
various phones and at various positions, they all meet the government
requirement for safe exposure.
The FCC has granted an Equipment Authorization for this model
phone with all reported SAR levels evaluated as in compliance with
the FCC RF emission guidelines. SAR information on this model
phone is on file with the FCC and can be found under the Display
Grant section of http://www.fcc.gov/oet/fccid after searching on FCC
ID APYHRO00041.
Additional information on Specific Absorption Rates (SAR) can be
found on the Cellular Telecommunications & Internet Association
(CTIA) web-site at http://www.phonefacts.net.
*In the United States and Canada, the SAR limit for mobile phones
used by the public is 1.6 watts/kg (W/kg) averaged over one gram
of tissue. The standard incorporates a substantial margin of safety
to give additional protection for the public and to account for any
variations in measurements.

Specifications and Optional Accessories 127
Specifications and Optional Accessories
Specifications
Weight: Approximately xxx g (with battery)
Dimensions (W × H × D): Approximately xx × xx × xx mm
(without protruding parts)
Battery: Lithium Ion, x.x V, xxx mAh
Optional Accessories
• Lithium-Ion Battery (XN-1BT70)
• Cigarette Lighter Charger (XN-1CL30)
• USB Data Cable (XN-1DC30)
• AC Charger (XN-1QC30, XN-1QC31)
• External Antenna Cable (XN-1AT90)
• Audio Remote-Controller (XN-1AR90)
• Car Holder (XN-1CH91)
• Desktop Holder (XN-1DH91)
• Stereo Headset (XN-1HS90)
• Handsfree/Microphone (XN-1HU90)
• Video Cable (XN-1VC90)
The above accessories may not be available in all regions.
For details, please contact your dealer.

128 Index
Index
A
Alarms 82
Area Info 58
B
Battery 11
Battery Level Indicator 13
Bluetooth Wireless Function 109
C
Calculator 83
Calendar 79
Call Costs 108
Call Log 107
Call Settings 100
Call Timers 107
Camera (digital/video) 40
Adjusting the Exposure 42
Common Shortcut Keys 44
Continuous Shoot 45
Focus Setting 43
Recording Video Clips 41
Selecting the Picture or Video Quality 43
Selecting the Picture Size 44
Selecting the Recording Time 46
Selecting the Scene 45
Selecting the Shutter Sound 46
Switching between the Photo and Video
Camera Modes 43
Taking Pictures 40
Cell Broadcasts 57
Characters 28
Changing the Input Mode 29
Using Templates 30
Connectivity 109
Bluetooth 109
Flight Mode 113
Infrared 111
Internet Settings 113
Network Settings 112
Contacts List 33
Contact Groups 37
Manage Category 36
Memory Status 38
Selecting the Storage Memory 33
Speed Dial List 38
Synchronising Contacts List Entries with
those on the Internet 39
Viewing My Contact Details 34
Contacts Lock 106
Countdown Timer 89
D
Data Counter 107
Date & Time 98
Display Position 17
Display Settings 95
E
Earpiece Volume 22
E-Book 86
Emergency Calls 20
Expenses Memo 89
F
Function Lock 106
G
Games & Applications 71
Java™ Information 75
Setting Permission 72
Switching the Screensaver On or Off 74
Viewing Application Information 73
H
Handset Code 106
Handset Lock 105
I
In Call Menu (Video Call) 26
Changing the Image of Yourself 26
Muting the Microphone 26
Swapping Images 26
Turning the Speakers On and Off 26
Using the Optical Zoom Function 26
Video Call Settings 27
In Call Menu (Voice Call) 22
Accessing SMS/MMS Menu during a
Call 23
Conference Call 23
Muting the Microphone 24
Putting a Call on Hold 23
Turning the Speakers On and Off 22
International Calls 20
Internet Settings 113
Index 129
K
Keypad Lock 15
L
Language Setting 99
M
Master Reset 106
Memory Card 114
Messaging (SMS/MMS/Email) 48
Calling the Phone Number 52
Downloading 52
Email Settings 57
Forwarding 53
General Settings 55
Locking or Unlocking 53
MMS Settings 56
Remote Forward 53
Sending a Message in the Drafts Box 51
Sending a Voice Clip Message or Video
Clip Message 51
Sending with Postcard 53
SMS Settings 56
Storing the Phone Number 52
Using the Sending Options 50
Music Player 62
My Items 64
N
Navigating Functions 19
Network Settings 112
O
Organiser & Tools 79
Other Documents 66
P
PC Connection 116
Phone Help 90
Pictures 64
PIN Code 105
PIN2 Code 105
Power On and Off 15
Profiles 92
R
Redialling 21
S
Safety Precautions 120
Scanner 85
Screensavers 74
Secret Data 106
Security 105
Settings 92
SIM Application 91
SIM Card 11
Sound Settings 98
Sounds & Ringtones 65
Speed Dialling 21
Stopwatch 87
T
Tasks 87
Text Templates 70
Troubleshooting 118
V
Video Call Settings 27
Video Clips 66
Vodafone live! 59
Voice Recorder 84
W
WAP Browser 60
World Clock 89
130 List of Menu Functions
List of Menu Functions
Menu No./Main Menu Menu No./Sub Menu1
1Entertainment 1Games & Applications
2TV & Video
2Vodafone live!
1Vodafone live!
2Enter URL
3Bookmarks
4Alert Inbox
5My Saved Page
6History
7Browser Settings
8What’s New?
9Music
10 Games & Applications
11 Ringtones
12 Pictures
13 News
14 Sport
3Music
1Last Played Music/Currently Playing
2My Music
3Download Music
4Messaging
1Create Message
2Inbox
3Drafts
4Sent Messages
5Outbox
6Messenger
7Templates
8Media Album
9Messaging Settings
10 Memory Status
5Camera
6My Items
1Pictures
2Sounds & Ringtones
3Games & Applications
4Videos
5Text Templates
6Other Documents
7Memory Status
7Organiser & Tools
1Calendar
2Alarms
3Calculator
4Voice Recorder
5Scanner
6E-Book
7Stopwatch
8Tasks
9World Clock
10 Countdown Timer
11 Expenses Memo
12 Phone Help
8Contacts
1Contacts List
2Call Voicemail
3Manage Category
4Speed Dial List
5My Contact Details
6Contact Groups
7Synchronise
8Settings
9Manage Contacts
Menu No./Main Menu Menu No./Sub Menu1

List of Menu Functions 131
Note for the menu indications for the Postcard and Media
Album services
•The menu indications for the Postcard and Media Album services
vary in the United Kingdom and Ireland as follows:
Menu No./Main Menu Menu No./Sub Menu1
9Call Log
1All Calls
2Dialled Numbers
3Missed Calls
4Received Calls
5Call Timers
6Data Counter
7Call Costs
10 Connectivity
1Bluetooth
2Infrared
3Network Settings
4Flight Mode
5Internet Settings
6Memory Card
11 SIM Application
12 Settings
1Profiles
2Display Settings
3Sound Settings
4Date & Time
5Language
6Call Settings
7Video Call Settings
8Security
9Master Reset
Current indications
in the user guide Indications in
United Kingdom Indications in
Ireland
“Postcard” “live! Postcard” (Not available)
“As Postcard” “As live! Postcard” (Not available)
“State/Province” “County” “State/Province”
“Media Album” “live! Studio” “Picture Album”
“To Album” “To live! Studio” “To Picture Album”