Sharp HRO00053 UPCS Cordless Handset User Manual
Sharp Corporation UPCS Cordless Handset
UserManual.wiki
>
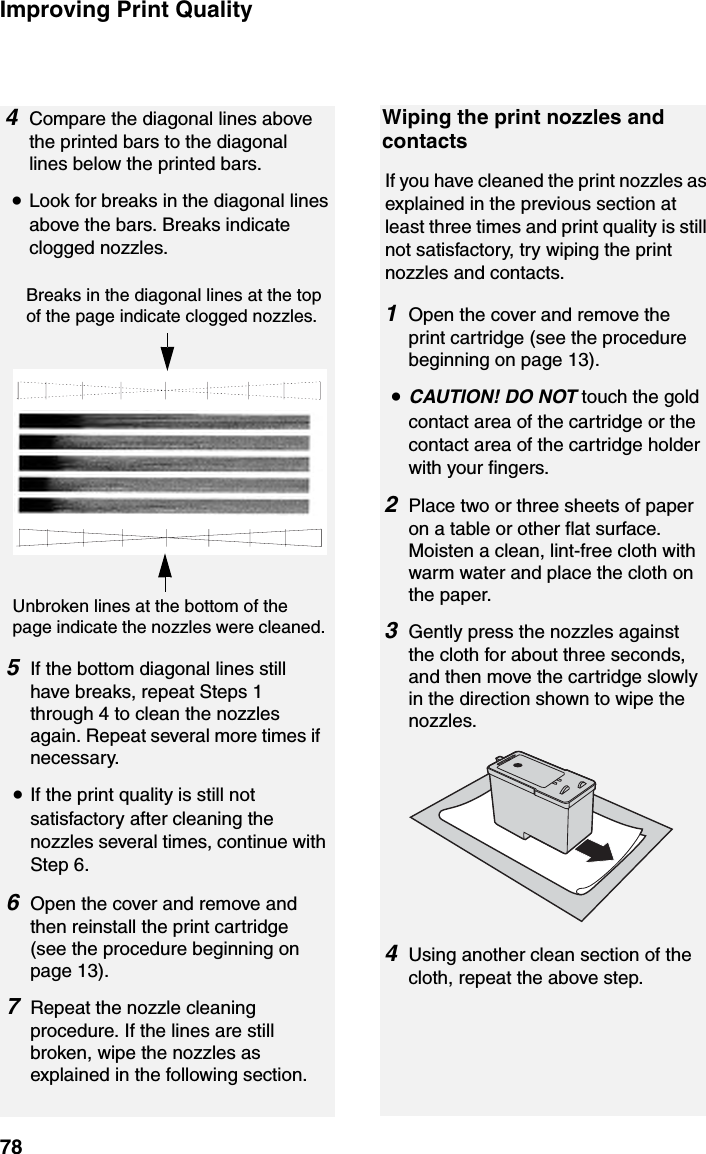
Sharp
>
HRO00053 User Manual
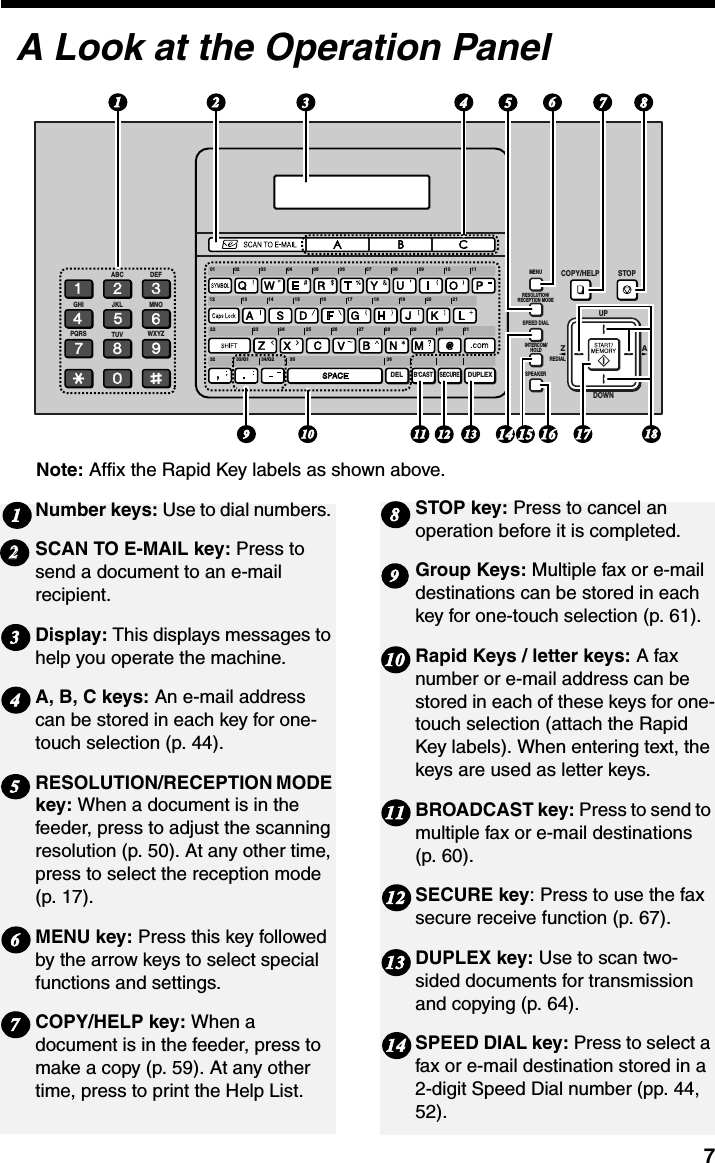
>
User Manual
Contents
1.
User Manual Addendum
2.
User Manual
User Manual
Navigation menu
Upload a User Manual
Namespaces
Wiki Guide
HTML
PDF
Info
Views
User Manual
Discussion / Help
Navigation


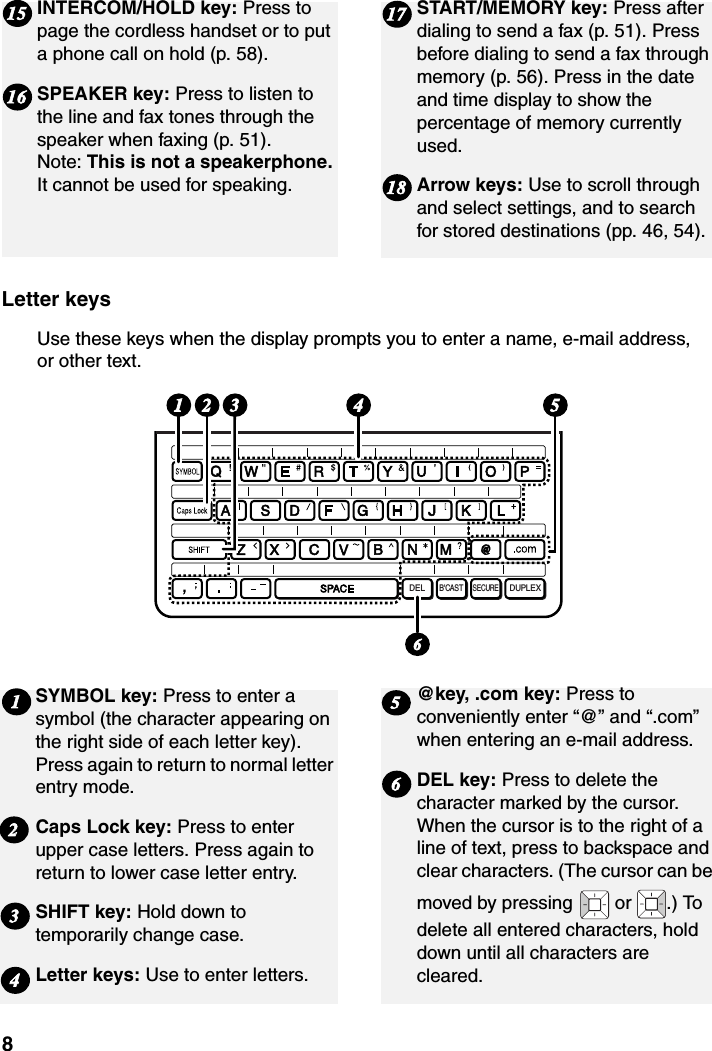
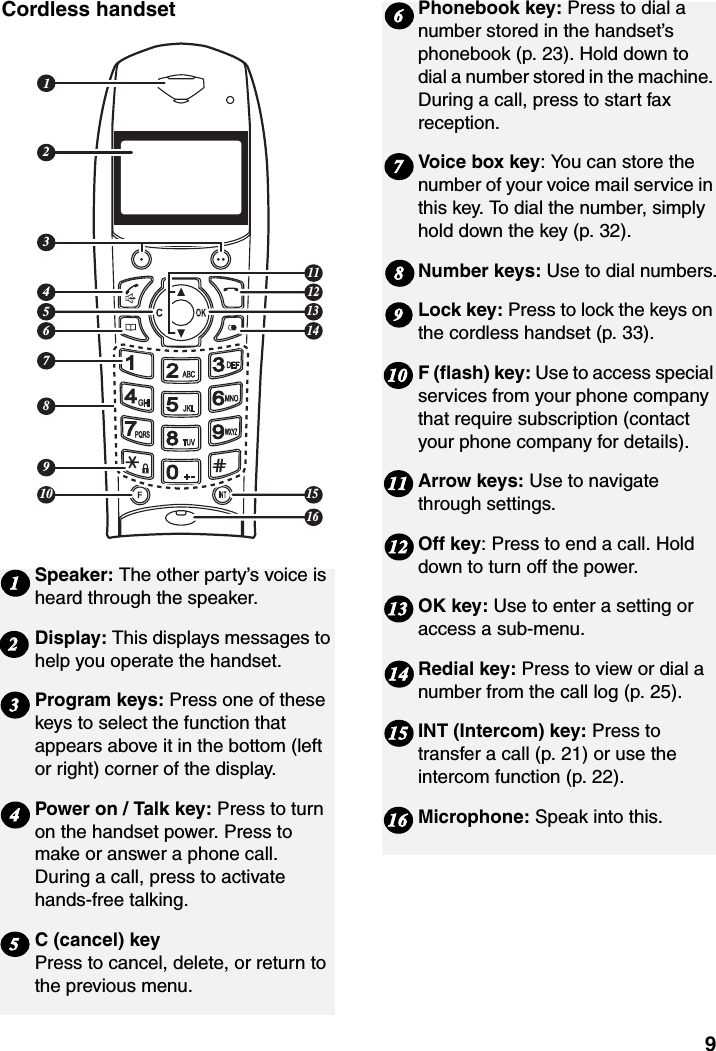

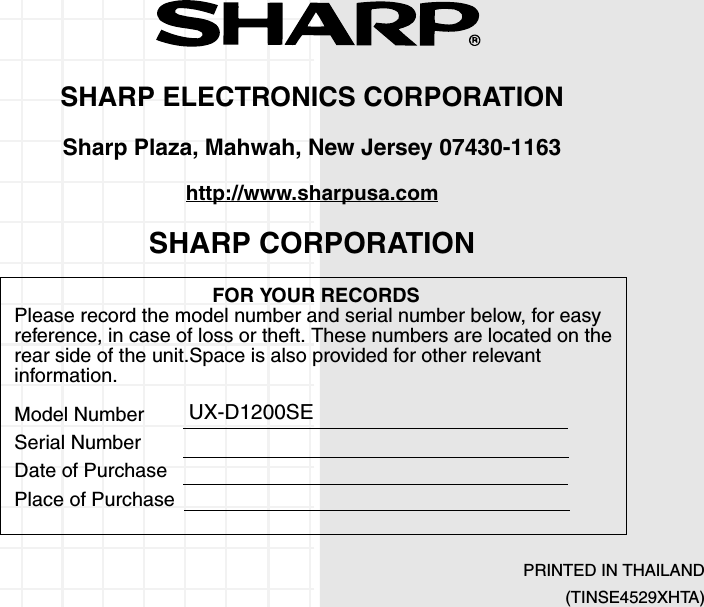
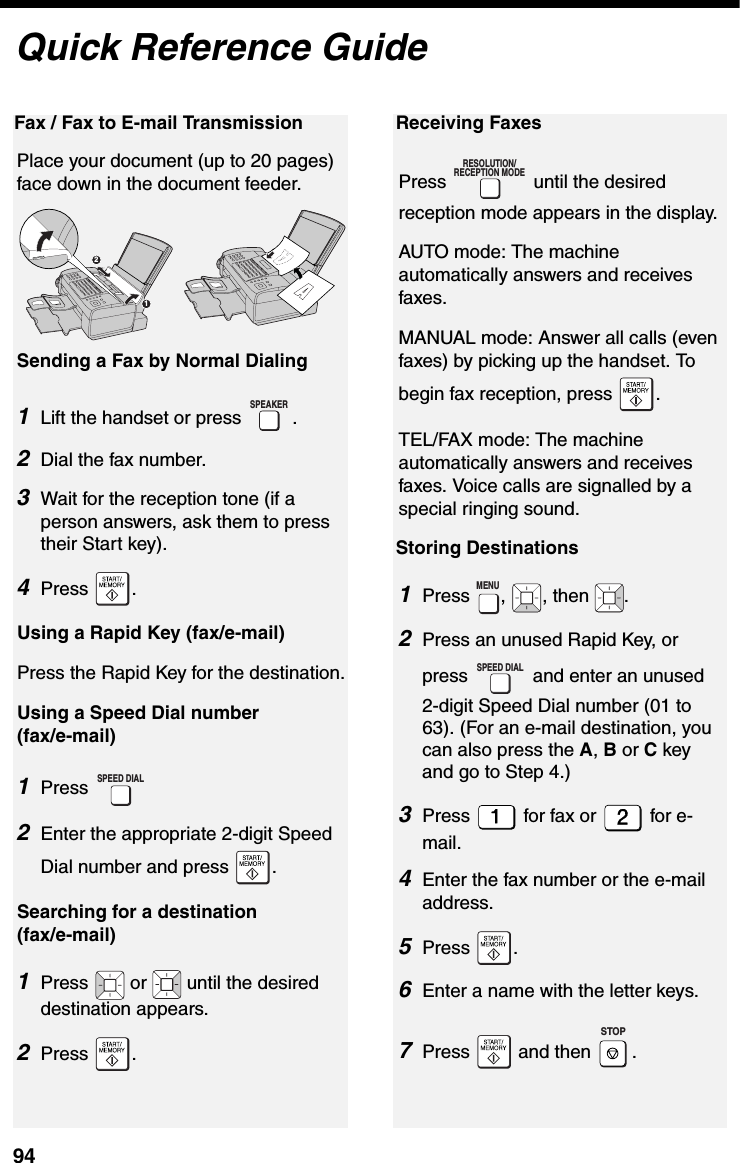
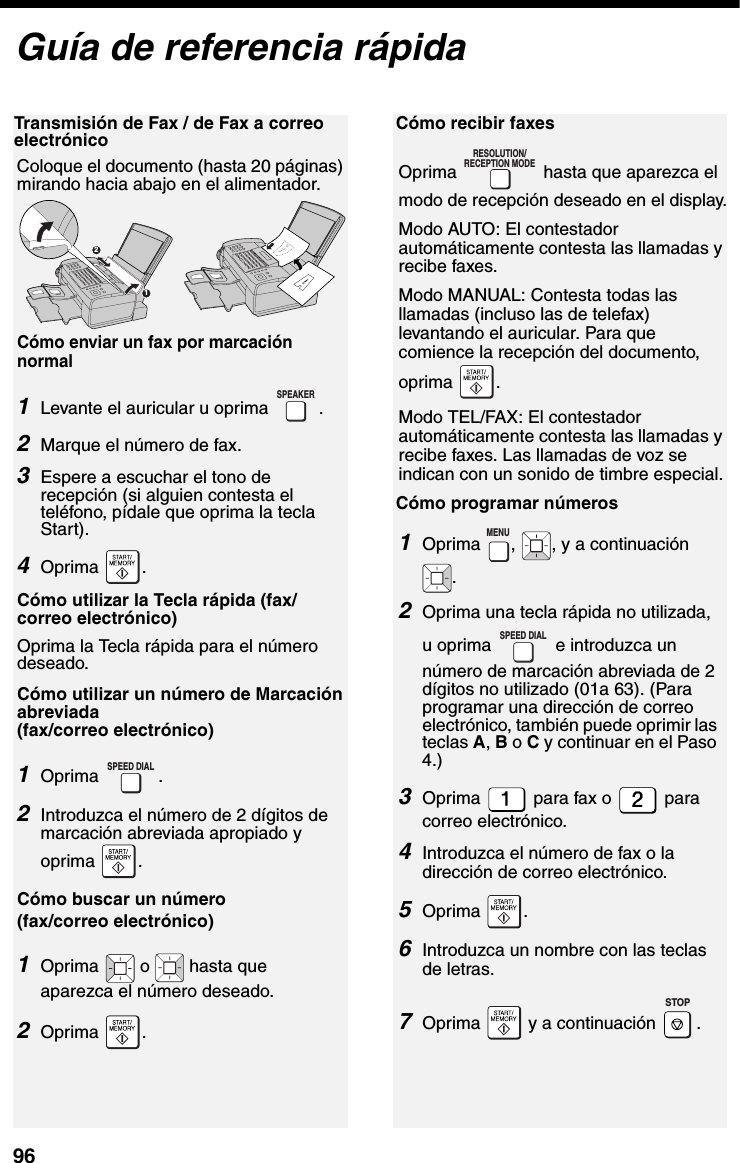
![Connecting the Power Cord131. InstallationPlug the power cord into a 120 V, 60 Hz, grounded AC (3-prong) outlet.Caution! Do not plug the power cord into any other kind of outlet. This will damage the machine and is not covered under the warranty.Caution! Remove all packing tape before plugging in the power cord (see page 11), or damage to the machine may result.The display will show [CHECK CARTRIDGE] until you install the print cartridge.Connecting the Power Cord♦It is recommended that you install surge protectors for the power and telephone lines. Surge protectors can be purchased at most telephone specialty stores.Print cartridge yieldSHARP UX-C80B replacement cartridgeInk Save mode OFF: Approx. 480 letter pagesInk Save mode ON: Approx. 800 letter pages(The initial cartridge has the same yield as the replacement cartridge.)♦Ink Save mode is initially turned off. To turn on Ink Save mode, see pages 69 and 73.Installing the Print CartridgeCaution! Do not open the cover while the machine is printing.Note: Keep print cartridges sealed in their packages until you are ready to install them. It is recommended that you do not use a cartridge that has been left unused for a long time after opening, as the print quality may be considerably degraded.♦Make sure the machine’s power cord is plugged in and paper is loaded in the paper tray.1Open the cover (grasp the finger grip).If at any time the display shows [ADD PAPER &] / [PRESS START KEY], check the paper tray. If the tray is empty, add paper. If there is paper in the tray, take it out and then reinsert it. When finished, press .](https://usermanual.wiki/Sharp/HRO00053.User-Manual/User-Guide-696524-Page-15.png)
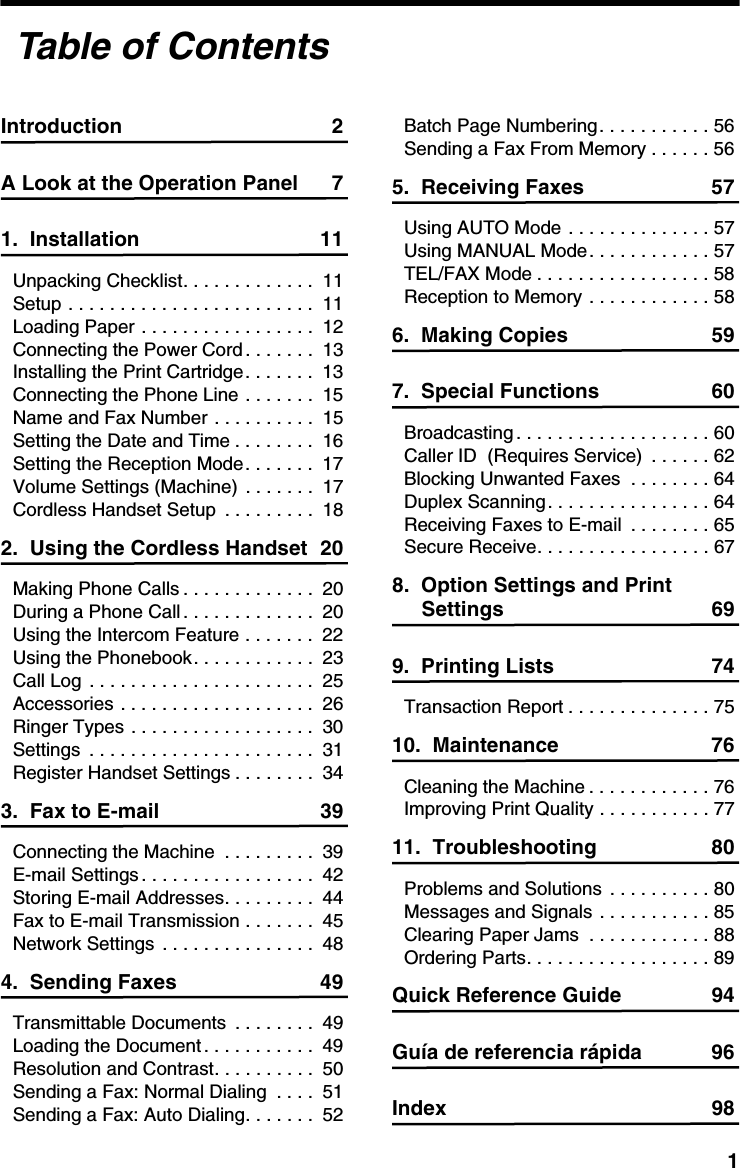
![Installing the Print Cartridge142Remove only the tape from the new cartridge.•Make sure all tape is removed.•CAUTION! DO NOT touch the gold contact area on the cartridge.3Make sure the cartridge holder is in the position shown. Place your fingers on top of the holder and open the holder release.If the display shows [PRINTER ERROR] or [PRINTER ERROR/CHECK PAPER], open the cover and check for jammed paper. Remove any jammed paper (see page 88) and close the cover.4Insert the new print cartridge (➊). Close the holder (➋), making sure it clicks into place.•CAUTION! DO NOT touch the gold contact area or pull on the cable.•If you are replacing the cartridge, remove the old cartridge. If you are going to use the old cartridge again, place it in an air-tight container (containers for this purpose can be purchased at most office supply stores).125Close the cover, pressing firmly on both front corners.Display: [CHANGE CARTRIDGE]/ [1=NEW, 2=OLD].6Press (NEW) if the cartridge you installed is new. Display: [NEW CARTRIDGE?] / [OK:PRESS START]Press (OLD) if the cartridge you installed is old.7Press .If you selected "OLD" in the previous step, this completes the installation procedure. (Note: If you find that print quality is not satisfactory, see p. 77 to align the print cartridge.)](https://usermanual.wiki/Sharp/HRO00053.User-Manual/User-Guide-696524-Page-16.png)
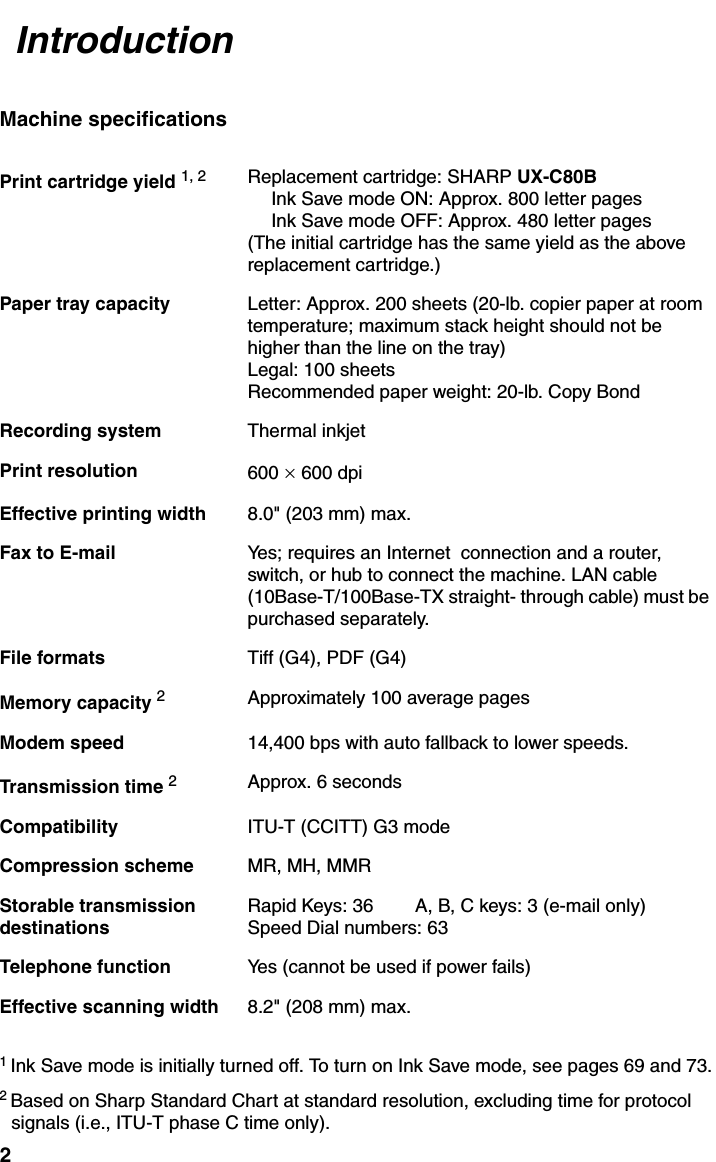
![Connecting the Phone Line151. InstallationIn this example, “15” is closest to a straight line. The machine is initially set to print high quality images, which require more ink. If you prefer to use less ink and speed up drying time, change the “INK SAVE MODE” setting to “ON” (pp. 69 and 73).Connecting the Phone LineStandard (RJ-11C) wall jackThe machine is initially set for tone dialing. If you are on a pulse dial line, change the “DIAL MODE” setting (pp. 69 and 70).If you selected "NEW", the machine will print an alignment page. Continue with the steps below. 8In the alignment page, locate the line that is closest to a straight line. 9Enter the number of the straightest line with the number keys.•To clear a mistake, press .10Press .Name and Fax NumberEnter your name and fax number. ♦Your entered name and fax number will be printed automatically at the top of all fax pages you send. (This is required by FCC regulations.)1Press , then until [ENTRY MODE] appears.2Press . Display: [OWN NUMBER SET]3Press . [ENTER FAX #]4Enter your fax number with the number keys (max. 20 digits).•To insert a space, press .•To clear a mistake, press .MENUWhen the resolution is set to HALF TONE, the machine is initially set to print at a slower printing speed to enable higher quality images. When using HALF TONE, if you prefer faster printing at the expense of slightly reduced image quality, change the “QUALITY MODE” setting to “NO” (pp. 69 and 73).TEL. LINE jack](https://usermanual.wiki/Sharp/HRO00053.User-Manual/User-Guide-696524-Page-17.png)
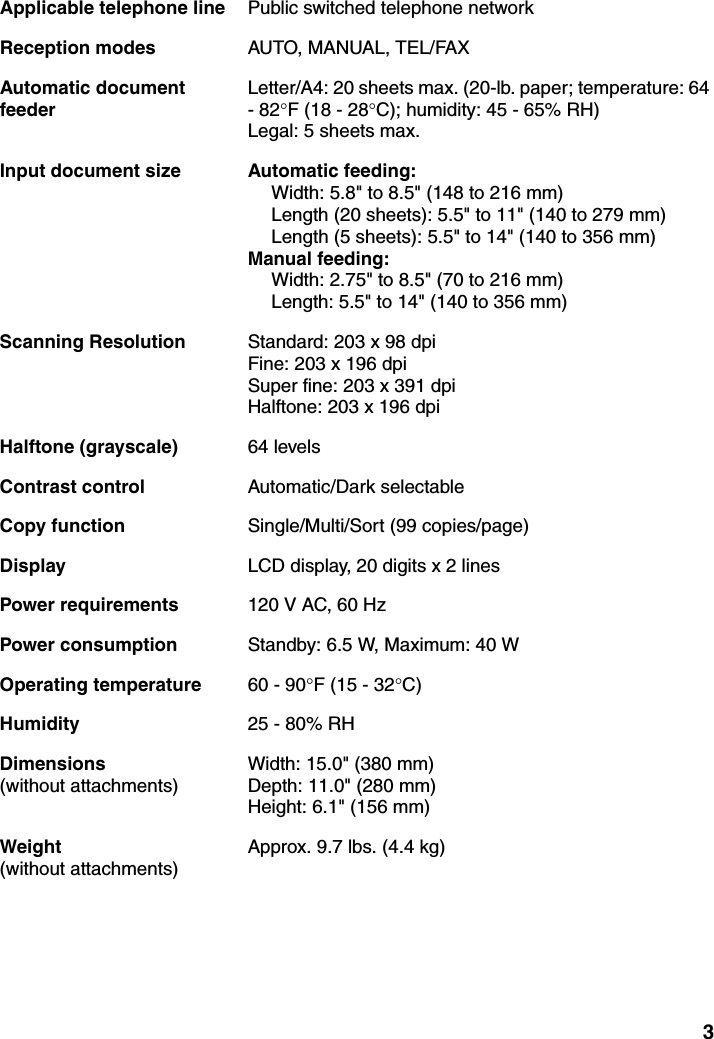
![Setting the Date and Time165Press .6Enter your name using the letter keys (max. 24 characters). Example: SHARP•To clear a mistake, press .•For information on using the text entry keys, see page 8.7Press . [DATE&TIME SET] 8Press to exit. STOPSetting the Date and TimeSet the date and time. ♦The date and time will be printed automatically at the top of all fax pages you send (this is required by FCC regulations). The date and time also appear in the display.1Press , then until [ENTRY MODE] appears.2Press , then until [DATE&TIME SET] appears.MENU3Press .•The currently set date appears (example): [DATE 08-15-2006]4Enter a two-digit number for the month ("01" for January, "02" for February, "12" for December, etc.).Example: January [DATE 01-15-2006]•To correct a mistake, press to move the cursor back to the mistake and enter the correct number.5Enter a two-digit number for the day ("01" to "31").Example: the 5th [DATE 01-05-2006]6Enter the year (4 digits).Example: •The currently set time appears (example): [TIME 12:19 PM]7Enter a two-digit number for the hour ("01" to "12") and a two-digit number for the minute ("00" to "59").Example 9:25: [TIME 09:25 PM]8Press to select A.M. or to select P.M.9Press . [ANTI JUNK #]10 Press to exit.STOP](https://usermanual.wiki/Sharp/HRO00053.User-Manual/User-Guide-696524-Page-18.png)
![Using the Phonebook24Using the phonebook to dial a number1Press to open the phonebook.•To open the phonebook in the machine, hold down until the book opens (or you can select “<Base Phbk>” in the cordless handset phonebook and press (Valid.)).2Press or until the name of the party that you want to call appears.•To go directly to names that begin with a certain letter, repeatedly press the number key for that letter until the letter appears, wait briefly until the first name that starts with that letter appears, and then press or until the desired name appears. Press OK.Note: If a name in the machine’s phonebook contains one of the following symbols, the symbol will appear as a space: $ | \ { } [ ] ^ ˜ ' @_ 3Press . The number is dialed automatically.4When you are ready to end the call, press .Editing an entry in the phonebook1Press to open the phonebook.2Press or until the entry that you wish to change appears.3Press (Option).4Press or until “EDIT ENTRY” appears and press (Valid.). 5The name appears. To edit the name, press C to backspace and clear characters, and then enter the new characters with the number keys (see Step 3 on page 23). When the correct name appears, press (Valid.).6The number appears. To edit the number, press C to backspace and clear digits, and then enter the new digits with the number keys. When the correct number appears, press (Valid.).7To select a different icon, press or . When the desired icon is selected, press (Valid.).8To exit the menu, press .7Press (Valid.).•The entry is stored.](https://usermanual.wiki/Sharp/HRO00053.User-Manual/User-Guide-696524-Page-26.png)
![Register Handset Settings34Register Handset SettingsIn order to be used, a cordless handset must first be registered in the machine (the base). The cordless handset that came with the machine is already registered. To register an additional cordless handset, follow the steps below. ♦If the system PIN number has been changed to a number other than “0000” in the machine (see page 35), or if you are registering the cordless handset in more than one base, you must use the personal registration procedure on page 35 to register the cordless handset.♦A cordless handset can be registered in up to four bases. To register the cordless handset in multiple bases, repeat the personal registration procedure on page 35 using each base. To select which base the cordless handset will normally be used with, see page 37.Registering a cordless handset (regular procedure)On the cordless handset1Press or until “SETTINGS” appears and press OK.2Press or to select “ADVANCED SET.” and press (Valid.).3Press or to select “SET HANDSET” and press (Valid.).4Select “REGISTRATION” and press (Valid.).5Press (Yes). The handset enters registration mode.On the machine (the base)1Press , then until [REGISTER HS SETTING] appears.2Press twice.3Press .•The display will show [WAITING HS ENTRY] while the machine communicates with the cordless handset. When registration is finished, [HSX REGISTERED] will appear, where “X” is the number of the newly registered handset.•If registration fails, [ABORT HS ENTRY] will appear.MENU](https://usermanual.wiki/Sharp/HRO00053.User-Manual/User-Guide-696524-Page-36.png)
![Register Handset Settings352. Cordless HandsetProgramming a system PINThe system PIN is a 4-digit ID number that is used to prevent unauthorized registration of a cordless handset in the machine. When the system PIN is set to a number other than 0000 (the initial factory setting), a cordless handset must be registered using the personal registration procedure and the correct system PIN must be entered on the cordless handset during registration. Follow these steps to program a system PIN in the machine.1Press , then until [REGISTER HS SETTING] appears.2Press , then until [SYSTEM PIN] appears.3Press .4Enter the current system PIN (4 digits).•The system PIN is initially set to 0000 at the factory.5Press .6Enter the new system PIN that you wish to use (4 digits).7Press .8Enter the new system PIN once again for confirmation.9Press .10 Press to exit.MENUSTOPRegistering a cordless handset (personal registration)Use this procedure to register a cordless handset in the following cases:♦The system PIN has been changed to a number other than “0000”.♦You are registering the handset in multiple bases.♦You want to choose the number that is assigned to the cordless handset. ♦You want to assign a name to the base (the machine). This name appears when you press the OK key in the standby screen.On the cordless handset1Press or until “SETTINGS” appears and press OK.2Press or to select “ADVANCED SET.” and press (Valid.).3Press or to select “SET HANDSET” and press (Valid.).4Select “PERSON. REGISTR” and press (Valid.).5Enter the number (1 to 4) that you would like to assign to the machine and press (Valid.). •This number is used to identify the machine when the cordless handset is registered in multiple bases.](https://usermanual.wiki/Sharp/HRO00053.User-Manual/User-Guide-696524-Page-37.png)
![Register Handset Settings366The current base name appears. If desired, you can press C to delete the old base name and then enter a new name (see Step 3 on page 23). When the desired name appears, press (Valid.).7Enter the system PIN (4 digits) of the machine (see page 35). Press (Valid.).•The handset enters registration mode.On the machine (the base)1Press , then until [REGISTER HS SETTING] appears.2Press twice.3Press .•Registration begins.On the cordless handset1When the cordless handset display indicates that registration is finished, enter the number from 1 to 5 that you would like to assign to the handset. •A number that is already assigned to another cordless handset cannot be used.MENUDeleting a cordless handsetTo delete the registration of a cordless handset from the machine, follow the steps below. This procedure can be used if you need to disable a cordless handset.♦Perform the following steps on the machine.1Press , then until [REGISTER HS SETTING] appears.2Press , then until [HS DELETE] appears.3Press .4Enter the number of the handset (1 to 5) that you wish to delete.5Press .6Enter the system PIN (4 digits) of the machine (see page 35; if the system PIN has not been changed from the intial factory-set PIN, enter “0000”).7Press to delete the handset.8Press to exit.MENUSTOP](https://usermanual.wiki/Sharp/HRO00053.User-Manual/User-Guide-696524-Page-38.png)
![Register Handset Settings372. Cordless HandsetDisabling fax reception from the cordless handsetIf you prefer that the cordless handset not be used to start fax reception, follow the steps below to change the remote fax reception setting to NO.♦Perform the following steps on the machine.1Press , then until [REGISTER HS SETTING] appears.2Press , then until [REMOTE FAX RX] appears.3To allow remote fax reception, press (“YES”). To prohibit remote fax reception, press (“NO”).4Press to exit.MENUSTOPGiving priority to a baseIf you have used the personal registration procedure to register the cordless handset in more than one base, the following procedure can be used to select which base the cordless handset normally uses.♦The initial setting is auto. When auto is selected (or when the selected base is not powered on), the cordless handset uses the first base that is powered on.1Press or until “SETTINGS” appears and press OK.2Press or to select “ADVANCED SET.” and press (Valid.).3Press or to select “SET HANDSET” and press (Valid.).4Press or to select “BASE PRIORITY” and press (Valid.).5The screen indicates the current base priority setting. •To keep the current setting, press (Valid.).•To change the setting, press (Edit). Press or to select “AUTO” or the desired base (each base is identified by the number assigned in Step 5 of the personal registration procedure), and press (Valid.).6To exit the menu, press .](https://usermanual.wiki/Sharp/HRO00053.User-Manual/User-Guide-696524-Page-39.png)
![Connecting the Machine40IP addressThe machine requires an IP address to communicate on the Internet.If your network is set up to automatically assign IP addresses, you do not need to do anything; the machine will automatically receive an IP address when it is connected.Automatic assignment of IP addresses is normally performed by a DHCP server, which may be a computer, router, or other device on the network. (Most routers used on home networks contain a DHCP server.)If your network requires that a static (permanent) IP address be assigned to the machine, see Network Settings on page 48 to enter the IP address and related information. Checking your IP address and the connectionTo check the machine’s IP address and verify that the machine is able to communicate on the network, follow these steps.1Press , then until [NETWORK SETTING] appears.2Press , then to show [NETWORK INFORMATION]MENU3Press .•If the machine has automatically received an IP address and is able to communicate, [IP ADDRESS/DHCP: ON] will appear on the top line of the display, followed by the IP address on the bottom line. To show the machine’s host name, press .•If a static IP address has been entered in the machine and the machine is able to communicate, [IP ADDRESS/DHCP: OFF] will appear on the top line of the display, followed by the IP address on the bottom line. To show the machine’s host name, press .•If the machine was unable to receive an IP address automatically, or if the router locked up after the machine received an IP address,[IP ADDRESS/DHCP: FAIL] / [192.168. 1 .201] will appear. “192.168. 1 .201“ is an IP address that is assigned to the machine for diagnostic purposes when connection fails (it cannot be used for regular communication).•If a cable has not been connected, [CHECK CABLE] will appear.•If [NOW CONNECTING / CHECK LATER] appears, press to exit, wait briefly, and then repeat the procedure again.STOP](https://usermanual.wiki/Sharp/HRO00053.User-Manual/User-Guide-696524-Page-42.png)
![Connecting the Machine413. Fax to E-mailIf the machine is unable to communicate...♦Check the Ethernet cable. Are the connections secure? Are you using straight-through (not crossover) cable for 10Base-T/100Base-TX?♦There may be a problem in the router or other device to which the machine is connected. Try removing and then restoring the power to the router (see the manual for the router).♦If [IP ADDRESS/DHCP: FAIL] appears, remove and then reinsert the Ethernet cable plug, and repeat Steps 1 to 3 above. If the same message appears, check the device that acts as the DHCP server on your network (try removing and restoring the power). If your router is your DHCP server, make sure that DHCP is enabled in the router settings. If your network does not have a DHCP server, set a static IP address as explained on page 48.♦If a static IP address has been set, make sure that the network settings (page 48) are correct .](https://usermanual.wiki/Sharp/HRO00053.User-Manual/User-Guide-696524-Page-43.png)
![E-mail Settings42Before the Fax to E-mail function can be used, you must configure the e-mail settings.The e-mail settings specify your outgoing mail server, as well as your sender name, sender address, and other items that appear in the e-mail message to which scanned image files are attached.♦It is easiest to configure the e-mail settings in the machine’s Web page. The machine’s Web page can be accessed from any computer on the same network as the machine.♦The e-mail settings can also be configured using the machine’s operation panel.Note: If you need to configure “POP before SMTP” settings, you must use the Web page.If you do not know your SMTP server name or whether or not you need to configure “POP before SMTP” settings, ask your Internet service provider.Accessing the machine’s Web pageTo access the Web page, you will need to know the machine’s host name or IP address (usually it is most convenient to use the host name).To check the machine’s host name or IP address, follow the procedure in Checking your IP address and the connection (page 40), or print the Network Settings List (page 74).E-mail Settings Type in the host name or IP address of the machine in the Address bar of the Web browser on your computer.The Web page menu will appear. Select E-mail Setup and configure the settings. For explanations of the settings, click Help in the Web page menu.Note: If the Web page is used while the machine is in operation (except for voice calls using the handset), machine operation may become unstable.Using the machine’s operation panel to configure the settingsFollow the steps below to display the e-mail settings, and then configure each setting as explained in the table on the next page.1Press , then until [E-MAIL SETTING] appears.2Press , then repeatedly until the setting that you wish to configure appears. 3Press . (Note: This step is not necessary for the “FILE FORMAT” setting.)4Enter the required information for the setting as explained in the table on the next page.5After configuring the setting, the next e-mail setting will appear in the display. You can configure the next setting, or press to exit.MENUSTOP](https://usermanual.wiki/Sharp/HRO00053.User-Manual/User-Guide-696524-Page-44.png)
![Storing E-mail Addresses44Storing E-mail AddressesYou can store e-mail addresses in the A, B, and C keys, in Rapid Keys, and in Speed Dial numbers. ♦An e-mail address stored in a Rapid Key or the A, B, or C key is selected by simply pressing that key. A total of 36 Rapid Keys are available. (Note: Attach the Rapid Key labels as shown on page 7.)♦An e-mail address stored in a Speed Dial number is selected by pressing and entering the 2-digit Speed Dial number. A total of 63 Speed Dial numbers are available.Note: Rapid Keys and Speed Dial numbers are also used for fax (p. 52).Storing an e-mail addressFollow the steps below to store an e-mail address using the machine’s operation panel.♦E-mail addresses can also be stored using the machine’s Web page. To access the Web page, see page 42.1Press , , then .2To store an e-mail address in the A, B, or C key, press the desired key and go directly to Step 4.To store an e-mail address in a Rapid Key, press the desired Rapid Key.To store an e-mail address in a Speed Dial number, press SPEED DIALMENUSPEED DIALand enter the desired 2-digit number (01 to 63).•If you prefer to have the machine suggest an available Rapid Key / Speed Dial number at the end of the procedure, press .3Press to select E-MAIL.Display: [E-MAIL # MODE]4Enter the e-mail address with the letter and number keys (max. of 128 characters).•For information on using the letter keys, see page 8.•To clear a mistake, press .5Press .6Enter the name of the recipient (max. 20 characters). 7Press . •If you selected a Rapid Key or Speed Dial number in Step 2, the display will briefly show [STORED], and then [NEW NUMBER]. Go to Step 8.•If you did not select a Rapid Key or Speed Dial number in Step 2, the display will show the next available Rapid Key or Speed Dial number. If that number is acceptable, press and go to Step 8. If not, press the desired Rapid Key, or press the A, B, or C key, or press and enter the desired 2-digit Speed Dial number, and go to Step 8.SPEED DIAL](https://usermanual.wiki/Sharp/HRO00053.User-Manual/User-Guide-696524-Page-46.png)
![Fax to E-mail Transmission453. Fax to E-mail8Return to Step 2 to store another e-mail address, or press to exit. Editing and clearing stored e-mail addressesTo make changes to a previously stored e-mail address, or to clear an address, follow these steps:1Press , , then .2Press the key in which the address is stored (Rapid Key or A, B, or C key), or press and enter the 2-digit Speed Dial number in which the address is stored. (You can also press or until the name or address appears and press .)Display: [1=EDIT, 2=CLEAR] 3Press for EDIT or for CLEAR.•If you selected CLEAR, go to Step 8.4If you selected EDIT, make the desired changes to the address.•Press or to move the cursor to the character(s) you wish to change, and then press the appropriate letter or number key. The new character will replace the old character.•If you do not wish to change the address, go directly to Step 5.5Press .STOPMENUSPEED DIAL6Make the desired changes to the name.•If you do not wish to change the name, go directly to Step 7.7Press .8Return to Step 2 to edit or clear another address, or press to exit.STOPFax to E-mail TransmissionFollow the steps below to send a document to an e-mail recipient.♦The document will be sent as an attachment to an e-mail message.♦You can specify the recipient by directly entering an e-mail address, or by selecting an address that has been stored as explained in the previous section.1Flip up the feeder cover (➊) and adjust the document guides to the width of your document (➋).12](https://usermanual.wiki/Sharp/HRO00053.User-Manual/User-Guide-696524-Page-47.png)
![Fax to E-mail Transmission462Insert the document face down with the top edge going in first.•Up to 20 letter-size sheets (5 legal-size sheets) can be placed in the feeder at once.•For more information on loading the document, see page 49.•If desired, press to set the resolution and contrast (see p. 50).3Enter the destination e-mail address using one of the following methods:•Press , press , and enter the address with the letter and number keys (p. 8). When finished, press .•If the address has been stored in the A, B, or C key, press the key.•If the address has been stored in a Rapid Key, press the Rapid Key.•If the address has been stored in a Speed Dial number, press and enter the Speed Dial number.•To search for a stored address, press (this eliminates stored fax numbers from the search), press or until the name or address appears, and press .Note: If [CHECK E-MAIL SETTING] RESOLUTION/RECEPTION MODESPEED DIALappears, your SMTP server or sender address has not been entered in the e-mail settings (p. 42).4If you need to select or change any of the e-mail options, press and follow Steps 5 and 6 below. (Note that settings selected here are temporary. To make permanent changes, see p. 42.)If you do not wish to change the e-mail options, go directly to Step 7.•To exit the e-mail options, press and go to Step 7.5Press or until the desired option appears, and press ( is not necessary for the FILE FORMAT setting). Change the option as explained below (use the letter keys to enter text and to delete text; p. 8). •E-MAIL SUBJECT: Enter a subject (max. 128 characters). When finished, press .•E-MAIL MESSAGE: Enter a message (max. 256 characters). When finished, press .•FILE FORMAT: Press for TIFF or for PDF. (Make sure the recipient has an image viewer that can show images in the selected format.)•FILE NAME: Enter a name for the scanned file (max. 40 characters).](https://usermanual.wiki/Sharp/HRO00053.User-Manual/User-Guide-696524-Page-48.png)
![Fax to E-mail Transmission473. Fax to E-mailWhen finished, press .(If a file name is not entered, the name “UXB800-yymmddhhmmss”, where “yymmddhhmmss” is the year, month, day, hour, minute, and second the file was created, is automatically assigned.)6When you have finished configuring the e-mail options, press . (If the display shows [PRESS START TO SCAN], it is not necessary to press .)7Press to begin transmission.Note: The recipient may have security settings in their e-mail program or virus protection software that prevent the file attachment from being received or opened. In this case, ask the recipient to try changing the settings.Sending a message onlyYou can also send a short e-mail message without including a document. Perform Steps 3 through 7 of the above procedure (enter the message in Step 5). After Step 7, [SEND W/O DOCUMENT?] / [1=YES,2=NO,W/T DOC.]will appear. Press to select “YES”. The message will be sent.[CONNECTION ERROR]This appears when communication does not take place correctly on your local network, usually due to a problem with the cable connections. Make sure that the cable ends are securely inserted in the LAN ports. Make sure that the correct cable is being used and that the cable is good. Make sure that your router or hub is powered on.[SERVER ERROR]This appears when the machine cannot connect to your mail server or there is no response from the mail server. Make sure the SMTP server setting is correct (p. 43). If you have configured “POP before SMTP” settings in the Web pages, make sure these settings are correct.[SERVER NOT FOUND] / [SMTP]This appears when an incorrect host name is entered for your SMTP server. Check the SMTP server setting (p. 43). [SERVER NOT FOUND] / [DHCP]This appears when the machine is unable to automatically obtain an IP address. Restart your router or other device that acts as your DHCP server.[CABLE DISCONNECTED]This may appear below any of the above messages. Check the same items as in [CONNECTION ERROR] above.If an undelivered mail report is sent to inform you that your e-mail message was not successfully delivered, the report will be sent to the sender address entered in the e-mail settings (page 42).Error messagesIf transmission is not successful because the machine is unable to connect to your mail server, one of the following error messages will appear.](https://usermanual.wiki/Sharp/HRO00053.User-Manual/User-Guide-696524-Page-49.png)
![Network Settings48segments are separated by periods). If a segment does not have 3 digits, enter zeros as needed.Example: IP address = 192.168.1.2You must enter: 192.168.001.002•If you make a mistake, press to move the cursor to the mistake and enter the correct number.6When finished entering the number, press .7The next setting will appear in the display. Repeat Steps 4 through 6 to configure the next setting, or press to exit.STOPInitializing the network settingsIf you need to return the network settings to their initial state, follow the steps below.•Initializing the settings enables DHCP and clears the IP address and related settings.1Press , then until [NETWORK SETTING] appears.2Press twice, then to show [INITIALIZE SETTINGS]. 3Press twice.MENUIf your network requires that you assign a static (permanent) IP address to the machine, follow the steps below to disable DHCP (automatic IP address assigment) and configure the network settings.•Consult your network administrator for the information that must be entered. After DHCP is disabled, the settings that must be configured appear in the following order (these settings only appear when DHCP is set to NO):IP ADDRESSSUBNET MASKDEFAULT GATEWAYDNS (PRIMARY)DNS (SECONDARY)1Press , then until [NETWORK SETTING] appears.2Press twice. [DHCP] will appear.3Press for NO (the machine will not obtain an IP address automatically).•[IP ADDRESS] will appear. (If you wish to configure a different setting, press or .) 4Press .5Press the number keys to enter the required number.•Three digits must be entered in each segment of the number (the MENUNetwork Settings](https://usermanual.wiki/Sharp/HRO00053.User-Manual/User-Guide-696524-Page-50.png)
![Resolution and Contrast50Resolution and Contrast2Place the document face down with the top edge going in first, and insert it all the way into the feeder. Make sure that the roller draws the document in.•Display: [READY TO SEND] .3Adjust the resolution and/or contrast settings (p. 50), and then dial the receiving machine (p. 51).Removing a document from the feeder1Open the cover (➊) and remove the document (➋).•Caution: Attempting to remove a document without opening the cover may damage the feeder mechanism.You can adjust the resolution and contrast before sending a document.♦The default resolution setting is STANDARD. The default contrast setting is AUTO.♦Adjust the settings each time you don't want to use the default settings.Note: The resolution and contrast settings are only effective for sending; not for receiving.Resolution settingsContrast settingsSTANDARD Use STANDARD for ordinary documents. This provides the fastest transmission.FINE Use FINE for documents containing small letters or fine drawings.SUPER FINE Use SUPER FINE for documents containing very small letters or very fine drawings.HALF TONE Use HALF TONE for photographs and illustrations. The original will be reproduced in 64 shades of gray.AUTO Use AUTO for normal documents.DARK Use DARK for faint documents.122Close the cover, pressing down firmly on both front corners.](https://usermanual.wiki/Sharp/HRO00053.User-Manual/User-Guide-696524-Page-52.png)
![Sending a Fax: Normal Dialing514. Sending Faxes1Load the document(s).•The resolution/contrast cannot be adjusted unless the document is loaded.2Press one or more times until the desired resolution and contrast settings appear in the display.•The first time you move through the list of resolution settings, the contrast setting AUTO will appear next to each resolution setting. The second time you move through the list, the contrast setting DARK will appear.Note: In order to transmit in SUPER FINE resolution, the receiving machine must also have that resolution. If not, your machine will automatically step down to FINE.RESOLUTION/RECEPTION MODEIf you prefer to use FINE for the default resolution setting, change the “FINE PRIORITY” setting (p. 69).Sending a Fax: Normal DialingWith Normal Dialing, you pick up the handset (or press ) and dial by pressing the number keys. ♦If a person answers, you can talk with them through the handset before sending the fax.SPEAKER♦Normal Dialing allows you to listen to the line and make sure the other fax machine is responding.1Load the document(s).•If desired, press to set the resolution and/or contrast.2Pick up the handset or press . Listen for the dial tone.3Dial the fax number of the receiving machine (press the number keys).4Wait for the connection. You will either hear a fax tone or the other person will answer.•If the other person answers, ask them to press their Start key (if you pressed , pick up the handset to speak with them). The receiving machine will issue a fax tone.5When you hear the fax tone, press . Replace the handset.•If the transmission is completed successfully, the machine will beep once.•If an error occurs, the machine will beep three times and print a Transaction Report to inform you of the problem (p. 75).Note: If the transmission is unsuccessful and the display shows [DOCUMENT JAMMED], remove the document as explained on page 88. RESOLUTION/RECEPTION MODESPEAKERSPEAKER](https://usermanual.wiki/Sharp/HRO00053.User-Manual/User-Guide-696524-Page-53.png)
![Sending a Fax: Auto Dialing52Sending a Fax: Auto DialingYou can store your most frequently dialed fax and phone numbers in Rapid Keys and Speed Dial numbers. ♦A number stored in a Rapid Key is dialed by simply pressing the Rapid Key. A total of 36 Rapid Keys are available. (Note: Attach the Rapid Key labels as shown on page 7.)♦A number stored in a Speed Dial number is dialed by pressing , the 2-digit Speed Dial number, and then . A total of 63 Speed Dial numbers are available.Note: E-mail addresses can also be stored in Rapid Keys and Speed Dial numbers (see page 44).Storing fax and phone numbersFollow the steps below to store a fax or phone number using the machine’s operation panel.♦Fax/phone numbers can also be stored using the machine’s Web page. To access the Web page, see page 42.1Press , , then .2To store a number in a Rapid Key, press the desired Rapid Key.To store a number in a Speed Dial number, press and enter the desired 2-digit number (01 to 63).Display: [SELECT DEST. TYPE]SPEED DIALMENUSPEED DIAL•If you prefer to have the machine suggest an available Rapid Key / Speed Dial number at the end of the procedure, press .3Press to select “FAX”.Display: [FAX # MODE]4Enter the fax or phone number with the number keys (max. of 32 digits). (Note: A space cannot be entered.)•To clear a mistake, press .•If a pause is required between any of the digits to access a special service or an outside line, press . The pause appears as a hyphen (two seconds per pause). Several pauses can be entered in a row.5Press .6Enter the name of the destination (max. 20 characters). •For information on using the letter keys, see page 8.7Press . •If you selected a Rapid Key or Speed Dial number in Step 2, the display will briefly show [STORED], and then [NEW NUMBER]. Go to Step 8.•If you did not select a Rapid Key or Speed Dial number in Step 2, the display will show the next available Rapid Key or Speed Dial number. If that number is acceptable, press and go to Step 8. If not, press MENU](https://usermanual.wiki/Sharp/HRO00053.User-Manual/User-Guide-696524-Page-54.png)
![Sending a Fax: Auto Dialing534. Sending Faxesthe desired Rapid Key, or press and enter the desired 2-digit Speed Dial number, and go to Step 8.8Return to Step 2 to store another number, or press to exit. Editing and clearing auto-dial numbersTo make changes to a previously stored auto-dial number, or clear a number, follow these steps:1Press , , then .2Press the Rapid Key (or press and enter the 2-digit Speed Dial number) of the number that you want to edit or clear. (You can also press or until the number appears and press .) Display: [1=EDIT, 2=CLEAR] 3Press for “EDIT” or for “CLEAR”.•If you selected “CLEAR”, go to Step 7.4If you selected “EDIT”, make the desired changes to the number.•Press or to move the cursor to the digit or digits you wish to change, and then enter the new digit. The new digit will replace the old digit.SPEED DIALSTOPMENUSPEED DIAL•If you do not wish to change the number, go directly to Step 5.5Press .6Make the desired changes to the name.•Press or to move the cursor to the letter or letters you wish to change, and then press the appropriate letter key. The new letter will replace the old letter.•If you do not wish to change the name, go directly to Step 7.7Press .8Return to Step 2 to edit or clear another number, or press to exit.Using an auto-dial number to send a fax1Load the document(s). If desired, press to set the resolution and/or contrast.2Select the fax number using one of the methods below:STOPRESOLUTION/RECEPTION MODE](https://usermanual.wiki/Sharp/HRO00053.User-Manual/User-Guide-696524-Page-55.png)
![Sending a Fax: Auto Dialing554. Sending FaxesRedialYou can automatically redial the last number dialed on the machine.1Load the document(s).•If desired, press to set the resolution and/or contrast.2Press once. Make sure the display shows the number you wish to dial.3If you are sending a fax, press . Dialing begins.If you are making a phone call, lift the handset. Dialing begins.Note: If the transmission is unsuccessful and [DOCUMENT JAMMED] appears in the display, remove the document as explained on page 88. RESOLUTION/RECEPTION MODEAutomatic redialingIf you use auto dialing (including Direct Keypad Dialing) to send a fax and the line is busy, the machine will automatically make three redial attempts at intervals of five minutes. During this time, [RECALLING] will appear in the display, followed by the attempt number. You will not be able to dial any other locations while the message appears.♦To clear the message and stop automatic redialing, press .Under certain conditions, automatic redialing may stop before three redialing attempts are made.STOP](https://usermanual.wiki/Sharp/HRO00053.User-Manual/User-Guide-696524-Page-57.png)
![Batch Page Numbering56Use this feature to add a slash and the total number of pages to each page number on transmitted fax pages (for example, "P. 1/5", "P.2/5", etc.). This allows the recipient to check for missing pages.1Load the document(s).2Press , then until [PAGE COUNTER] appears.3Press .Display: [ENTER # (01 - 99)] 4Enter the total number of pages (“01” to “99”) with the numeric keys.Example: 5 pages .5If desired, press to set the resolution and/or contrast.6Dial the receiving machine and send the fax.•To cancel a batch number entry, remove the document from the feeder or press .•If the number of pages actually transmitted is not the same as the batch number entered, an alarm will sound and [PAGE COUNT ERROR] will appear in the display. “PAGE E.” will also appear in the NOTE column of the Transaction Report if printed.MENURESOLUTION/RECEPTION MODESTOPBatch Page Numbering Sending a Fax From MemoryTo increase transmission speed, you can send a fax through the machine’s memory. After transmission, the fax is automatically cleared from memory.Note: If a power failure occurs while sending a fax from memory, you must repeat the operation.To send a fax through memory, load the document, press , and dial using one of the methods below. (Note that an e-mail destination cannot be selected.)♦Press a Rapid Key.♦Press , enter a 2-digit Speed Dial number, and press .♦Enter the fax number with the number keys and press .♦Press repeatedly to select an auto-dial number and press .♦Press once to select the last number dialed and press .If [MEMORY FULL] appears, see If the memory becomes full on page 61.SPEED DIAL](https://usermanual.wiki/Sharp/HRO00053.User-Manual/User-Guide-696524-Page-58.png)
![Using AUTO Mode575. Receiving Faxes5. Receiving FaxesUsing AUTO ModeUsing MANUAL ModeTo select AUTO mode, press (with no document in the feeder) until [AUTO] appears in the display.In AUTO mode, the machine automatically answers all calls on 4 rings and receives incoming faxes.♦If you pick up the handset before the machine answers, you can talk to the other party and receive a fax as explained in Using MANUAL Mode below.RESOLUTION/RECEPTION MODETo change the number of rings on which the machine answers calls, change the “NUMBER OF RINGS” setting (p. 69).Answering with the machine’s handsetImportant: If a document is loaded in the machine’s feeder, remove it before performing the steps below.1When the machine rings, pick up the handset.2If you hear a fax tone, wait until the display shows [RECEIVING] and then replace the handset.•If [RECEIVING] does not appear (or if you have set the Fax Signal Receive setting to NO (pp. 69, 71)), press to begin reception.3If the other party first speaks with you and then wants to send a fax, press after speaking. (Press before the sender presses their Start key.)•When [RECEIVING] appears in the display, hang up.The machine automatically reduces received faxes as needed to fit the paper. If you prefer to have all faxes printed at full size, change the “RECEIVE RATIO” setting (pp. 69 and 72).To select MANUAL mode, press (with no document in the feeder) until [MANUAL] appears in the display.In MANUAL mode, you must answer all calls (even faxes) by picking up the machine’s handset or an extension phone connected to the same line.RESOLUTION/RECEPTION MODEAnswering a call on an extension phone connected to the same line1Answer the extension phone when it rings. 2If you hear a soft fax tone, wait until you hear pronounced, high-pitched fax tones, then hang up. 3If the machine doesn't respond, or if the other party first talks to you and then wants to send a fax, set the phone down (do not hang up), walk](https://usermanual.wiki/Sharp/HRO00053.User-Manual/User-Guide-696524-Page-59.png)
![TEL/FAX Mode58over to the machine, lift the machine’s handset, and press .•The above step is necessary if you have set the “FAX SIGNAL RX” setting to NO (pp. 69 and 71).Putting a call on holdTo put the other party on hold during a phone call, press . When this is done, they cannot hear you. You can put the handset back in the cradle without breaking the connection. When you are ready to speak with the other party again, pick up the handset. If you did not put the handset back in the cradle, press again to resume conversation.INTERCOM/HOLDINTERCOM/HOLDTEL/FAX ModeTo select TEL/FAX mode, press (with no document in the feeder) until [TEL/FAX] appears in the display.When the reception mode is set to TEL/FAX, the machine automatically answers all calls on 2 rings. After answering, the machine monitors the line for about five seconds to see if a fax tone is being sent.♦If the machine detects a fax tone (this means that the call is an automatically dialed fax), it will automatically receive the fax.RESOLUTION/RECEPTION MODE♦If your machine doesn't detect a fax tone (this means that the call is a voice call or manually dialed fax), it will make a special ringing sound for 15 seconds to alert you to pick up the machine’s handset (to change the number of seconds, see p. 69 and “PSEUDO RING DURATION” on p. 70). If you don't answer within this time, the machine will send a fax tone to the other machine to allow the calling party to send a fax manually.Note: Only the machine will make the special ringing sound. An extension phone will not ring after the machine initially answers the call.Incoming faxes will be received to memory when printing is not possible, such as when the machine runs out of paper, the print cartridge needs replacement, or the paper jams.When you have received a fax in memory, [FAX RX IN MEMORY] will appear in the display, alternating with a message that indicates the problem. When you resolve the problem, the stored faxes will automatically print out.♦If you received faxes to memory because the machine ran out of paper, be sure to add paper that is the same size as the paper previously used, or the fax print-out size will not match the size of the printing paper.Reception to Memory](https://usermanual.wiki/Sharp/HRO00053.User-Manual/User-Guide-696524-Page-60.png)
![596. Making Copies6. Making Copies1Load the document(s). (Maximum of 20 letter sheets or 5 legal sheets.)•If desired, press to set the resolution and/or contrast.2Select the following copy settings as needed:•Enlarge/reduce: Press or to select 100%, 125%, 135%, 200%, 70%, 88% or 94%. Default setting: 100%.•Number of copies per original: Enter a number from 1 to 99. Default setting: 1Example: Press for two copies3When you are ready to begin copying, press .RESOLUTION/RECEPTION MODECOPY/HELPIf [MEMORY FULL] appears...If you place many originals in the feeder, the memory may become full before all pages can be scanned (the display will show [MEMORY FULL]). If this happens, only the pages that were scanned will be copied and the remaining pages will automatically feed out. Repeat the copy procedure for the remaining pages, including the page that was being scanned when the memory became full.Note: It may not be possible to make a copy of an original if a high resolution setting is used and/or the original contains so much detailed content that the memory becomes full before scanning finishes.ABCABCABCCCBBAAOriginalsSorted (SORT COPY) Not sorted (MULTI COPY)Example: Two copies each of three originalsSorting copiesThe machine is initially set to not sort copies. If you wish to have copies sorted as shown below, change the “SORT COPY” setting to YES (pp. 69 and 73).The machine can be used as a convenience copier. Follow the steps below to make copies.](https://usermanual.wiki/Sharp/HRO00053.User-Manual/User-Guide-696524-Page-61.png)
![Broadcasting617. Special FunctionsBroadcasting using a Group KeyIf the destinations to which you want to broadcast have all been stored in one Group Key (see Storing numbers in Group Keys which follows), you can perform the broadcast operation using the following simplified procedure:1Load the document(s).•If desired, press to set the resolution and/or contrast.2Press the appropriate Group Key ( or ). •If the group is a fax group, transmission will begin.RESOLUTION/RECEPTION MODE33/G1 34/G2•If the group is an e-mail group, you can press to select e-mail options (see Steps 4 to 6 on page 46). When you are ready to begin transmission, press .Storing destinations in Group KeysFollow the steps below to store a group of destinations in a Group Key.♦Rapid Keys 33/G1 and 34/G2 can be used as Group Keys. A key cannot be simultaneously programmed as both a Group Key and a Rapid Key.♦Up to 20 fax or e-mail destinations can be stored in one Group Key. ♦The destinations must be all fax or all e-mail. It is not possible to mix fax and e-mail destinations.♦Only Rapid Key and Speed Dial numbers can be stored in a Group Key. Full numbers cannot be stored.1Press , then until [ENTRY MODE] appears.2Press , then until [GROUP ENTRY] appears.3Press (SET) to store a group. (Press (CLEAR) to clear a group.)•If [GROUP SPACE FULL] appears, both keys have already been programmed. Clear one of the keys and then store a group.MENUIf the memory becomes full...If the memory becomes full during scanning, [MEMORY FULL] will appear in the display.♦Press to send the pages which have been stored up to that point in memory (the remaining pages will automatically feed out). After transmission, the memory will be cleared and you can send the remaining pages. You will also need to send the page which was being scanned when the memory filled up.♦ To cancel the entire transmission, press .STOP](https://usermanual.wiki/Sharp/HRO00053.User-Manual/User-Guide-696524-Page-63.png)
![Caller ID (Requires Service)624Press the Group Key that you want to use ( or ). (If you are clearing a Group Key, press the Group key that you want to clear and go to Step 8.)•If [ALREADY STORED] or [RAPID # STORED] appears, the key has already been programmed. Clear the key or try the other Group Key.5Select a destination using one of the following methods:•Press a Rapid Key.•Press and enter a 2-digit Speed Dial number.•Press or until the desired destination appears in the display.•Press , , or (only for an e-mail destination).6Press to enter the destination.7Repeat Steps 5 and 6 for each of the other desired destinations (maximum of 20).•You can press to scroll through and check your entered destinations. To delete a destination, press when it appears.8When you have finished entering the destinations, press .9Press to exit. 33/G1 34/G2SPEED DIALSTOPImportant: To use this function, you must subscribe to a Caller ID service from your phone company. The machine may not be compatible with some Caller ID services.Caller ID (Requires Service)If you subscribe to a Caller ID service, you can have the machine and cordless handset show the name and number of the caller when you receive a call.1Press , then until [OPTION SETTING] appears.2Press , then until [CALLER-ID] appears.3Press (YES) to turn on Caller ID. (To turn off Caller ID, press and go to Step 7.)4If the area code must not be included when you dial a local phone number (within your area code), press to select SET and enter your area code in Step 5. (This will remove the area code from local numbers stored in the Caller ID list, allowing you to automatically dial those numbers from the list (see Caller ID list on page 63).)If you do not need to have the area code removed from local numbers in the Caller ID list, press and go to Step 7.MENU](https://usermanual.wiki/Sharp/HRO00053.User-Manual/User-Guide-696524-Page-64.png)
![Caller ID (Requires Service)637. Special Functions5Enter the 3 digits of your area code.6Press .7Press to exit.Note: Some caller ID services may not provide the name of the caller. In this case, only the phone number will appear when you receive a call.Display messagesOne of the following messages will appear while the machine rings if caller information is not available.NO SERVICENo caller information was received. Make sure that your service has been activated.CALLER-ID ERRORNoise on the telephone line prevented reception of caller information.OUT OF AREAThe call was made from an area which does not have Caller ID service, or the service is not compatible with your service.PRIVATE CALLCaller information was not provided at the caller’s request.STOPCaller ID listThe machine keeps a log of the most recent 30 calls and faxes you have received (the Caller ID list). You can view the list and automatically dial a number from the list.♦The list is only available if you have Caller ID service and have turned on the Caller ID function.♦After you have received 30 calls, each new call will delete the oldest call.♦The Caller ID list can also be printed. See page 74.1Press until [<REVIEW CALLS>] appears.2Press or to scroll through the list.•To exit the list, press .3To dial a number, display the number and:•Fax: Load the document and press . Transmission will begin.•Voice call: Pick up the handset. Dialing will begin automatically.Deleting calls from the listTo delete a single call from the list, display the call and press . To delete all calls from the list, hold down for 3 seconds while viewing any number in the list.STOP](https://usermanual.wiki/Sharp/HRO00053.User-Manual/User-Guide-696524-Page-65.png)
![Blocking Unwanted Faxes64The Anti Junk Fax function blocks reception of faxes from a fax number that you specify.♦If you are using the Caller ID function, the Anti Junk Fax function will block voice calls as well as faxes from your specified Anti Junk Number.To use this function, enter the fax number that you want to block. Only one number can be entered.1Press , then until [ENTRY MODE] appears.2Press , then until [ANTI JUNK #] appears.3Press (SET) to store an Anti Junk number. (To clear a previously stored number, press (CLEAR) and go to Step 5.)4Enter the number with the number keys (max. 20 digits).5Press .6Press to exit.♦When a fax is blocked (or when a voice call is blocked if you are using the Caller ID function), a transaction report (page 75) will print to inform you (unless “TRANSACTION LIST” on page 70 is set to “NEVER PRINT”).MENUSTOPDuplex Scanning is convenient for transmitting or copying two-sided documents. When this function is selected, you simply feed all pages of the document through the machine once, turn the stack of pages over, and feed the stack through again. The machine will automatically sort the pages into the correct order (front of 1st page, back of 1st page, front of 2nd page, back of 2nd page, etc.). ♦Note that any blank sides must be included when scanning the pages (if the number of pages is not equal each time the machine scans the stack, an error will result).1Load the documents. Make sure the pages are placed front-side down, with the first page on the bottom.•If desired, press to set the resolution and/or contrast.2Press and then .3Perform all steps of the desired copy or transmission operation.4When all pages of the document have been scanned, turn the stack over (do not change the page order) and load the stack again.5Press .RESOLUTION/RECEPTION MODEDUPLEXBlocking Unwanted Faxes Duplex Scanning](https://usermanual.wiki/Sharp/HRO00053.User-Manual/User-Guide-696524-Page-66.png)
![Receiving Faxes to E-mail657. Special FunctionsReceiving Faxes to E-mailYou can have incoming faxes from specified fax numbers (or all fax numbers) automatically converted to e-mail and forwarded to designated e-mail recipients.♦This provides a convenient means of forwarding received faxes to someone who is out of the office.♦This function can also be used to send copies of all received faxes to an administrator for centralized document storage.Storing (or clearing) groups of originating fax numbers and forwarding e-mail addressesTo use the Receive Fax to E-mail function, you must first store one or more groups of originating fax numbers and forwarding e-mail addresses.♦One originating fax number and one forwarding e-mail address can be stored in each group. When a fax is received, the machine will check each stored group, and if the originating number of the received fax matches a fax number in one of the groups, the machine will forward the fax to the e-mail address in that group.♦You can also omit entry of an originating fax number in a group and have faxes from all originating fax numbers forwarded to the e-mail address.♦Up to 10 groups can be stored.1Press , then until [RCV FAX TO E-MAIL] appears.2Press , then to show [FORWARDING ADDRESS] / [1=SET, 2=CLEAR]3Press to select “SET”.•To clear a previously stored group, press .4Enter a 2-digit number from “01” to “10” (this number is used to identify the group you will store).•If you are clearing a group, enter the 2-digit number of the group you wish to clear and go to Step 8.5Enter the originating fax number.•If you wish to have faxes from all originating fax numbers forwarded, go directly to Step 6 without entering a fax number.6Press .7Enter the e-mail address to which you wish to have the faxes forwarded.•For information on using the letter keys, see page 8.8Press .9Return to Step 4 to store (or clear) another group, or press to exit.MENUSTOP](https://usermanual.wiki/Sharp/HRO00053.User-Manual/User-Guide-696524-Page-67.png)
![Receiving Faxes to E-mail66Activating (and deactivating) Receive Fax to E-mailAfter you have stored one or more Receive Fax to E-mail groups, follow the steps below to activate the Receive Fax to E-mail function.1Press , then until [RCV FAX TO E-MAIL] appears.2Press .3Press to select “ON”.•To turn off Receive Fax to E-mail, press .4Press to exit.Printing forwarded faxesThe machine is initially set to not print received faxes that are forwarded. If you want the machine to print forwarded faxes, follow the steps below.1Press , then until [RCV FAX TO E-MAIL] appears.2Press , then until [PRINT RECEIVED FAX] appears.3Press to select YES (print forwarded faxes) or to select NO.4Press to exit.MENUSTOPMENUSTOPPrinting a reportThe machine is initially set to print a fax forwarding report only when a fowarding error occurs. If you would like the machine to print a report each time it forwards a received fax, follow the steps below.1Press , then until [RCV FAX TO E-MAIL] appears.2Press , then until [REPORT SETTING] appears.3Press (PRINT ERROR ONLY) to print a report only when an error occurs, or (ALWAYS PRINT) to print each time a fax is forwarded.4Press to exit.MENUSTOP](https://usermanual.wiki/Sharp/HRO00053.User-Manual/User-Guide-696524-Page-68.png)
![Secure Receive677. Special FunctionsSecure ReceiveTo prevent others from viewing or taking your received faxes, use the Secure Receive function. When this function is activated, received faxes are held in memory without being printed. To print the faxes, a 4-digit “secure code” must be entered.Setting a secure codeThe secure code is used to print received faxes. Follow the steps below to set a secure code.•The secure code can be any 4-digit number.1Press , then until [SECURE # SET] appears.2Press .3Enter a 4-digit secure code. 4Press .•The machine will print the secure code for your records.•Take care not lose the print-out or forget the code. In the event that you forget the code and have kept no record, contact Sharp’s Customer Assistance Center at 1-877-794-8675.SECUREActivating Secure ReceiveFollow the steps below to activate Secure Receive.•Secure Receive cannot be activated unless a secure code has been set.1Press , then until [ACTIVATE SECURE RCV.] appears.2Press .3Press to select “YES”. 4Press to exit.Printing received faxesWhen the memory is holding one or more received faxes, [RECEIVED SECURE FAX] will appear in the display. Follow the steps below to print the faxes.1Press until [SECURE DATA PRINT] appears.2Press .3Enter the 4-digit secure code. 4Press .•Printing will begin.•If the wrong code is entered, [WRONG SECURE #] will appear. Go back to Step 3.SECURESTOPSECURE](https://usermanual.wiki/Sharp/HRO00053.User-Manual/User-Guide-696524-Page-69.png)
![Secure Receive68Deactivating Secure ReceiveIf you need to deactivate Secure Receive (faxes will be automatically printed when received), follow the steps below.1Press , then until [ACTIVATE SECURE RCV.] appears.2Press .3Press to select “NO”. 4Enter the 4-digit secure code. 5Press .•The display will briefly show [NO SELECTED] and then the date and time.•If the wrong code is entered, [WRONG SECURE #] will appear. Go back to Step 4.SECUREClearing the secure codeTo clear the secure code, follow the steps below.•Secure Receive must be deactivated before you can clear the secure code.1Press , then until [SECURE # CLEAR] appears.2Press .3Enter the 4-digit secure code. 4Press .•The display will briefly show [CLEARED] and then the date and time.•If the wrong code is entered, [WRONG SECURE #] will appear. Go back to Step 3.SECURE](https://usermanual.wiki/Sharp/HRO00053.User-Manual/User-Guide-696524-Page-70.png)
![Option Settings698. Option/Print Settings8. Option Settings and Print SettingsThe option settings and print settings allow you to customize the operation of the machine to better suit your needs. The option settings are related to general operation. The print settings are related to printing.The option settings and print settings have been initially configured at the factory. To change a setting, follow the steps below to display the desired setting, and then change the setting as explained in the tables that follow.1Press , then until [OPTION SETTING] or [PRINT SET-UP] appears.MENU2Press , then repeatedly until the desired setting appears. •The option settings and print settings are described in the tables below and on the following pages.3Enter a selection for the setting by pressing the number keys as explained in the table.4After entering a selection, the subsequent option/print setting will appear in the display. To exit the settings, press .STOPOption SettingsMake a selection for the displayed setting as explained below. This is done in step 3 of the above procedure.Setting DescriptionFINE PRIORITY This is used to change the default resolution for faxing from STANDARD to FINE. Press (YES) to select FINE, or (NO) to select STANDARD. Initial setting: NO (STANDARD)NUMBER OF RINGSThis is used to set the number of rings on which the machine answers calls when the reception mode is set to AUTO. Enter any number from 2 to 5.Initial setting: 4 rings.](https://usermanual.wiki/Sharp/HRO00053.User-Manual/User-Guide-696524-Page-71.png)
![749. Printing ListsYou can print lists showing settings and information entered in the machine. 1Press , then until [LISTING MODE] appears.2Press .3Press or until the desired list (see below) appears.•ACTIVITY LIST: This report shows information on your most recent transmissions and receptions (combined maximum of 30). The headings are the same as in the Transaction Report (see the next section). The logged transactions are erased after the report is printed. To have the report print automatically whenever the number of logged transactions reaches 30, see page 69 and “AUTO PRINT OUT” on page 71.• DESTINATION LIST: This shows the fax and e-mail destinations that have been stored in Rapid Key and Speed Dial numbers (pp. 44 and 52).MENU•GROUP LIST: This shows the destinations that are stored in the Group Keys (p. 61).•SETUP LIST: This shows your currently entered sender’s name, sender’s number, and anti-junk fax number, your current selections for the option settings, print setup, and receive faxes to e-mail, and a sample of the header printed at the top of every fax page you transmit (HEADER PRINT).•CALLER-ID LIST: This shows information on your 30 most recently received calls and faxes (p. 63). (This list is only available if you are using the Caller ID function.)•RECEIVE FAX TO E-MAIL LIST: This shows the Receive Fax to E-mail settings that have been stored (page 65).•NETWORK SETTING LIST: This shows the machine’s current IP address and other network/Internet settings (page 48).4Press to print the list.](https://usermanual.wiki/Sharp/HRO00053.User-Manual/User-Guide-696524-Page-76.png)
![Improving Print Quality7710. Main-tenanceImproving Print QualityAligning the print cartridgeIf print quality is not satisfactory, first try aligning the print cartridge.Note: Make sure that paper is loaded before beginning this procedure.1Press , then until [PRINT SET-UP] appears.2Press , then until [ALIGN CARTRIDGE] appears.3Press to print an alignment page. (To enter an alignment value without printing a page, press .)MENUIn this example, “15” is closest to a straight line. 5Enter the number of the straightest line with the number keys.•To clear a mistake, press .6Press . [CLEAN NOZZLES]7Press to exit.STOPCleaning the print cartridge nozzlesIf print quality is still not satisfactory after aligning the print cartridge, clean the print cartridge nozzles.1Press , then until [PRINT SET-UP] appears.2Press , then until [CLEAN NOZZLES] appears.3Press .•The machine prints a test pattern similar to the one shown in the following step.MENUCleaning the housingWipe the external parts and surface of the machine with a dry cloth.Caution: Do not use benzene or thinner. These solvents may damage or discolor the machine.5Close the cover, pressing down firmly to make sure it clicks into place.4In the page that the machine prints, locate the line that is closest to a completely straight line.](https://usermanual.wiki/Sharp/HRO00053.User-Manual/User-Guide-696524-Page-79.png)

![Messages and Signals8711. Trouble-shootingSERVER ERROR A Fax to E-mail transmission was not successful because the machine could not connect to your mail server or there was no response from the mail server. Make sure the SMTP server setting is correct (p. 43). If you have configured “POP before SMTP” settings in the Web pages, make sure these settings are correct. If [CABLE DISCONNECTED] appears on the bottom line, see “CONNECTION ERROR” on page 85.SERVER NOT FOUND/CABLE DISCONNECTEDSee “CONNECTION ERROR” on page 85.SERVER NOT FOUND/DHCPA Fax to E-mail transmission was not successful because the machine was unable to automatically obtain an IP address. Restart your router or other device that acts as your DHCP server.SERVER NOT FOUND/SMTPA Fax to E-mail transmission was not successful because an incorrect host name is entered for your SMTP server. Check the SMTP server setting (p. 43).Audible signalsContinuous tone 3 seconds Indicates the end of transmission, reception, or copying.Intermittent tone (3 beeps)5 seconds(1 second on, 1 second off)Indicates incomplete transmission, reception, or copying.](https://usermanual.wiki/Sharp/HRO00053.User-Manual/User-Guide-696524-Page-89.png)
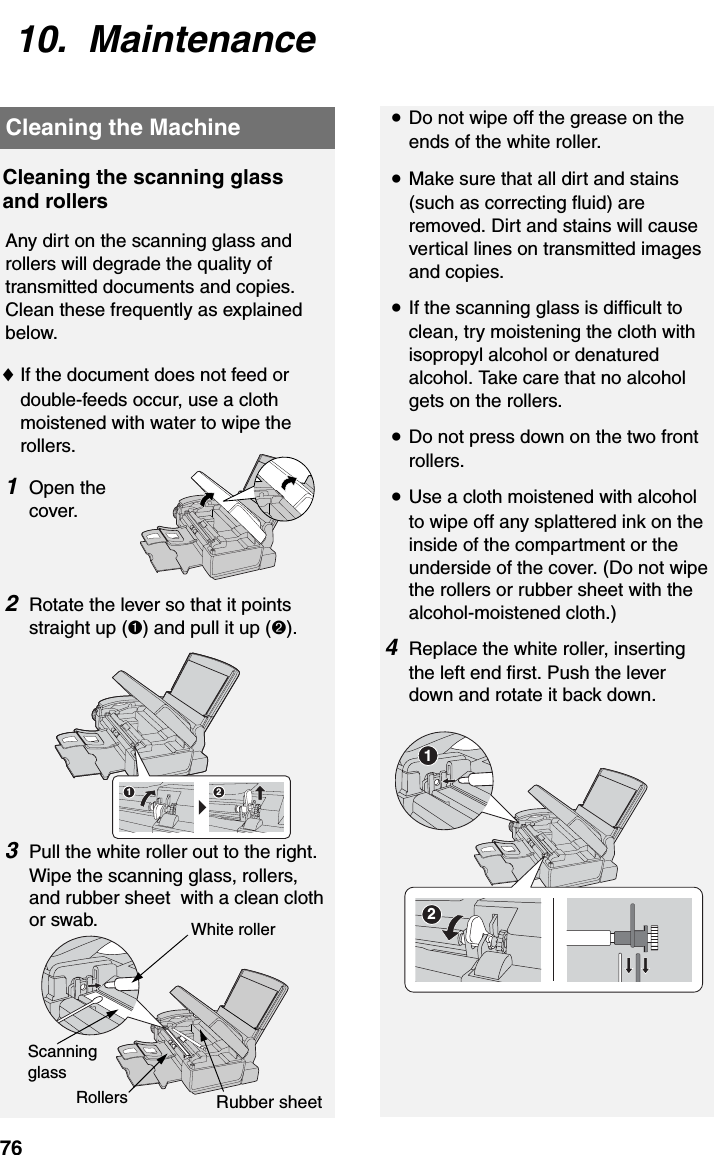
![Clearing Paper Jams88Clearing a jammed documentIf the original document doesn’t feed properly during transmission or copying, or [DOCUMENT JAMMED] appears in the display, first try pressing . If the document doesn't feed out, remove it as explained below.Important: Do not try to remove a jammed document without releasing it as explained below. This may damage the feeder mechanism.1Open the cover (➊). Rotate the lever so that points straight up (➋), and pull it up (➌). Pull the roller out to the right, and remove the document (➍).Clearing Paper JamsClearing jammed printing paper1Open the cover (➊). Pull the jammed paper forward or backward out of the machine as appropriate (➋), taking care not to tear it. 3241212Replace the white roller, inserting the left end first. Push the lever down and rotate it back down (➊).Close the cover, pressing firmly on both front corners (➋).2Close the cover, pressing down firmly on both front corners.212](https://usermanual.wiki/Sharp/HRO00053.User-Manual/User-Guide-696524-Page-90.png)

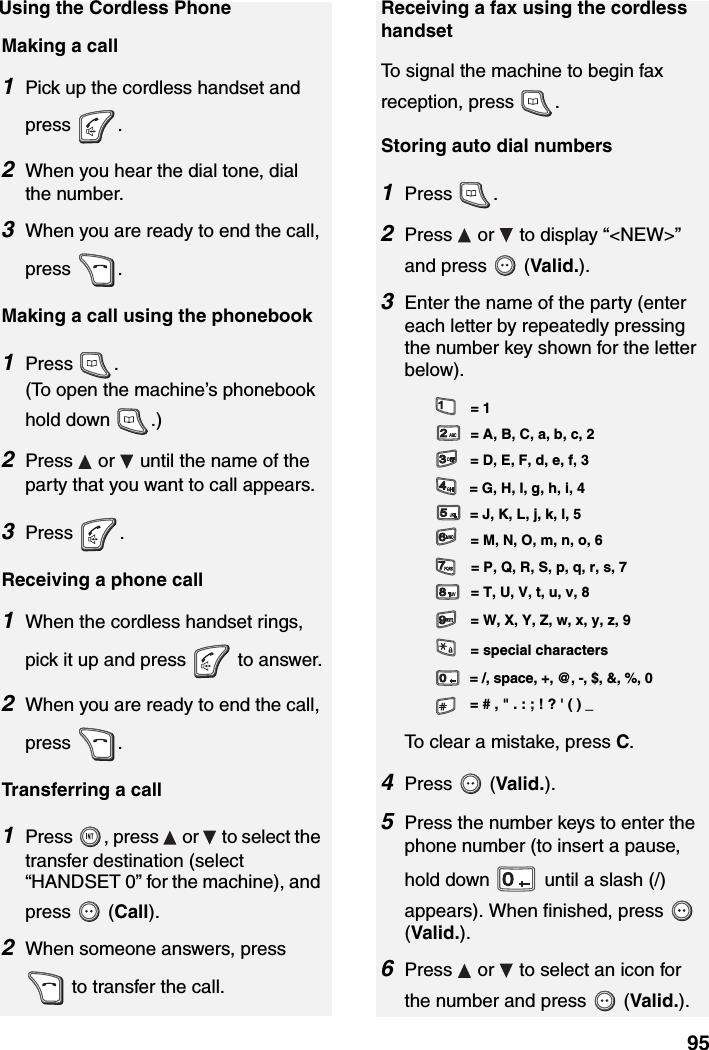
![97Utilización del teléfono inalámbricoPara hacer una llamada1Levante el auricular inalámbrico y oprima .2Marque el número al escuchar el tono de marcar. 3Si está listo para terminar la llamada, oprima . Para hacer una llamada usando el directorio telefónico1Oprima .(Para abrir el directorio telefónico del aparato, mantenga oprimido .)2Oprima o hasta que aparezca el número de la persona que busca.3Oprima .Para recibir una llamada1Cuando suene el timbre del auricular inalámbrico, levántelo y oprima para contestar la llamada.2Si está listo para terminar la llamada, oprima .Para transferir una llamada1Oprima , oprima o para seleccionar el destino al cual desea transferir la llamada (seleccione “HANDSET 0” del aparato), y oprima (Call).2Cuando alguien conteste, oprima para transferir la llamada.Para recibir un fax mediante el auricular inalámbricoPara indicar al aparato que comience a recibir el documento, oprima .Cómo almacenar números de marcación automática1Oprima .2Oprima o para mostrar “<NEW>” y oprima (Valid.).3Ingrese el nombre de la persona (ingrese cada letra oprimiendo repetidamente la tecla del número mostrado para la misma).Para borrar un número equivocado, oprima C.4Oprima (Valid.).5Oprima las teclas de número para ingresar el número de teléfono (para ingresar un espacio, mantenga la tecla oprimida hasta que aparezca una diagonal [/]). Cuando haya terminado, oprima (Valid.).6Oprima o para seleccionar un icono para el número y a continuación oprima (Valid.).= A, B, C, a, b, c, 2= 1= D, E, F, d, e, f, 3= G, H, I, g, h, i, 4= /, espacio, +, @, -, $, &, %, 0= J, K, L, j, k, l, 5= M, N, O, m, n, o, 6= # , " . : ; ! ? ' ( ) _= P, Q, R, S, p, q, r, s, 7= W, X, Y, Z, w, x, y, z, 9= caracters especiales= T, U, V, t, u, v, 8](https://usermanual.wiki/Sharp/HRO00053.User-Manual/User-Guide-696524-Page-99.png)