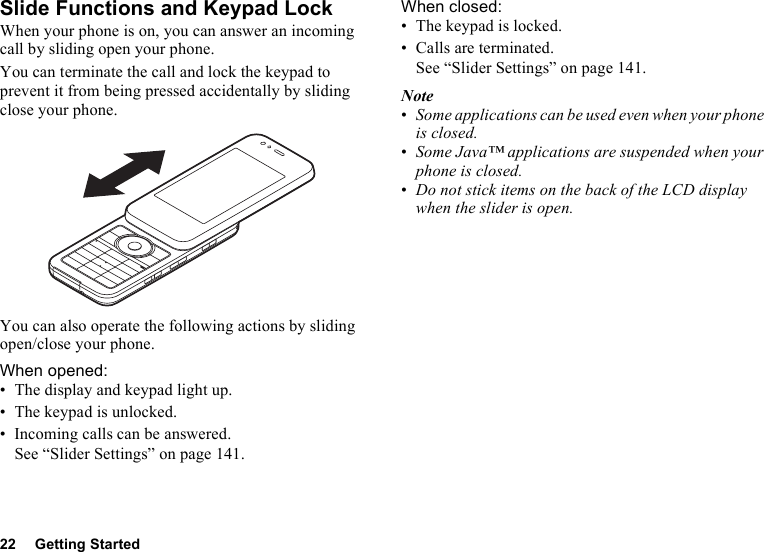
Sharp HRO00074 Cellular Transceiver With Bluetooth Enabled User Manual Manual
Sharp Corporation Cellular Transceiver With Bluetooth Enabled Manual
UserManual.wiki
>
Sharp
>
HRO00074 User Manual
>
Manual
Contents
1.
Manual
2.
Bluetooth Logo
3.
Users Manual
4.
BT Logo
5.
User Manual
Manual
Navigation menu
Upload a User Manual
Namespaces
Wiki Guide
HTML
PDF
Info
Views
User Manual
Discussion / Help
Navigation


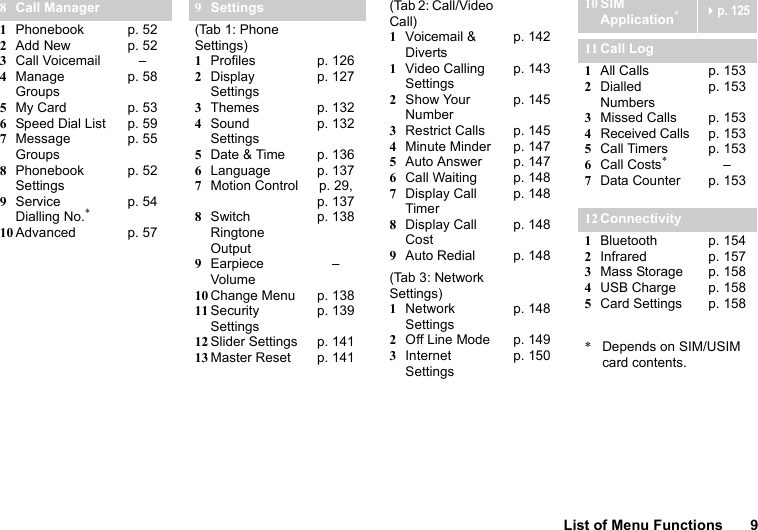
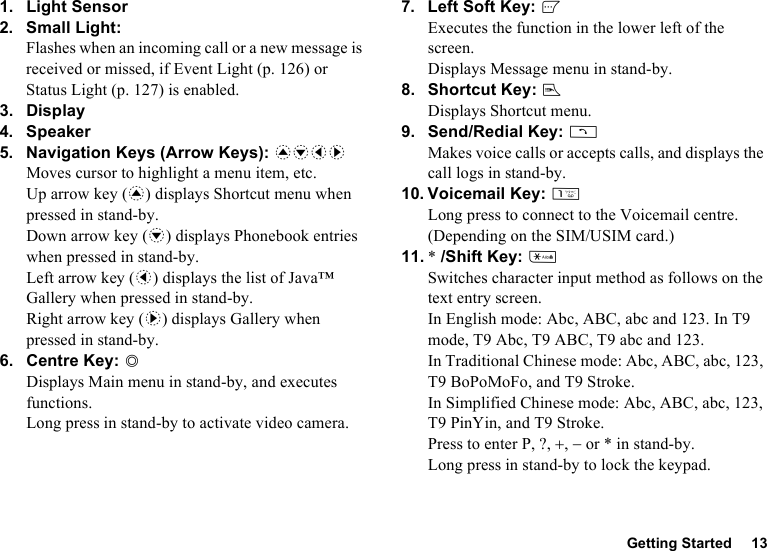
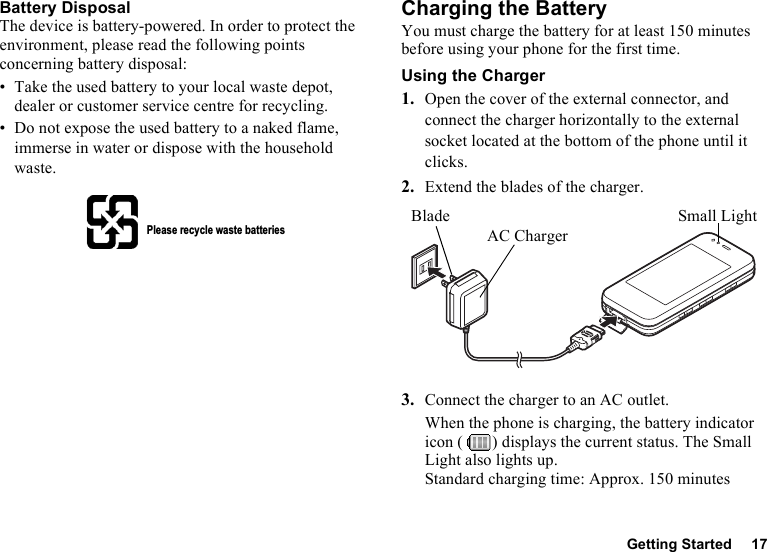
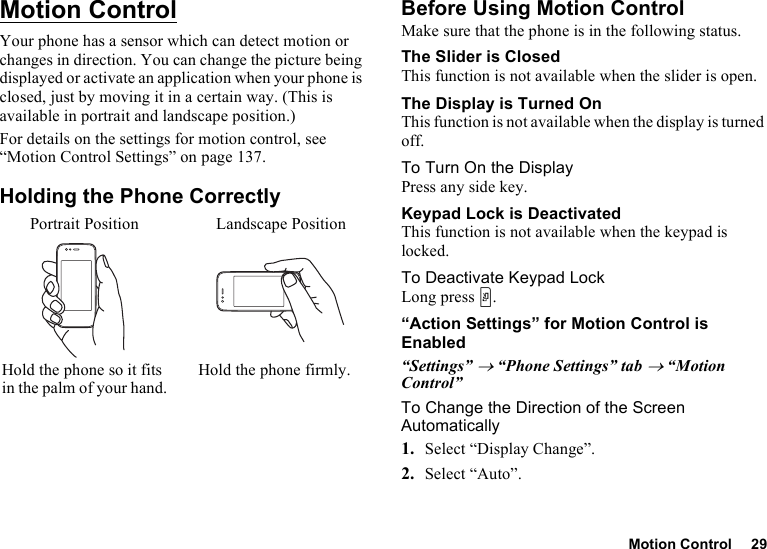
![4Introduction[FarEasTone and Logo] are trademarks or registered trademarks of FarEasTone Telecommunications Co., Ltd. in Taiwan and other countries.Customer Service Call: 0800-058-885Also Sharp Corp. is authorized with bona fide use of the foregoing trademark in relating course of trade in Japan.Information contained in this manual is the property of FarEasTone and Sharp. FarEasTone and Sharp reserve the right to change product specifications without prior notice. FarEasTone and Sharp reserve the right to change information contained in this manual without prior notice.This product is licensed under the MPEG-4 Visual Patent Portfolio License for the personal and non-commercial use of a consumer to (i) encode video in compliance with the MPEG-4 Video Standard (“MPEG-4 Video”) and/or (ii) decode MPEG-4 Video that was encoded by a consumer engaged in a personal and non-commercial activity and/or was obtained from a licensed video provider. No license is granted or implied for any other use. Additional information may be obtained from MPEG LA. See http://www.mpegla.com.This product is licensed under the MPEG-4 Systems Patent Portfolio License for encoding in compliance with the MPEG-4 Systems Standard, except that an additional license and payment of royalties are necessary for encoding in connection with (i) data stored or replicated in physical media which is paid for on a title by title basis and/or (ii) data which is paid for on a title by title basis and is transmitted to an end user for permanent storage and/or use. Such additional license may be obtained from MPEG LA, LLC. See http://www.mpegla.com for additional details.MPEG Layer-3 audio coding technology licensed from Fraunhofer IIS and Thomson.This product employs Adobe® Flash® Lite™ technology developed by Adobe Systems Incorporated.Adobe® Flash® Lite™ Copyright © 2003-2007 Adobe Systems Incorporated. All rights reserved.Adobe and Flash are either trademarks or registered trademarks of Adobe Systems Incorporated in the United States and/or other countries.“Document Viewer” is powered by Picsel Technologies.Picsel, Picsel Powered, Picsel Cube Logo, Picsel File Viewer and Picsel Document Viewer are Trademarks or Registered Trademarks of the Picsel Group of Companies.QR Code is a registered trademark of DENSO WAVE INCORPORATED.IrSS™, IrSimple™ and IrSimpleShot™ are trademarks or registered trademarks of the Infrared Data Association in the U.S.A. and/or in other countries.Contains iType™ font engine and font from Monotype Imaging Inc.Monotype® is a trademark of Monotype Imaging Inc. registered in the U.S. Patent and Trademark Office and may be registered in certain jurisdictions.](https://usermanual.wiki/Sharp/HRO00074.Manual/User-Guide-991214-Page-5.png)
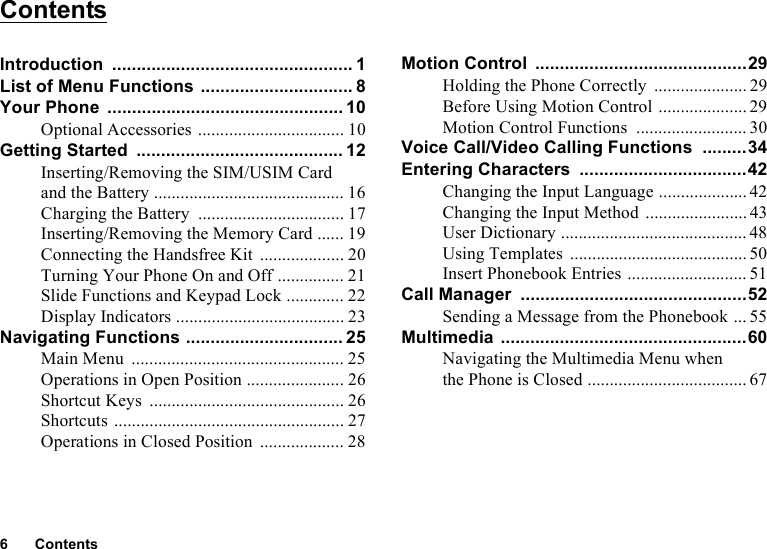
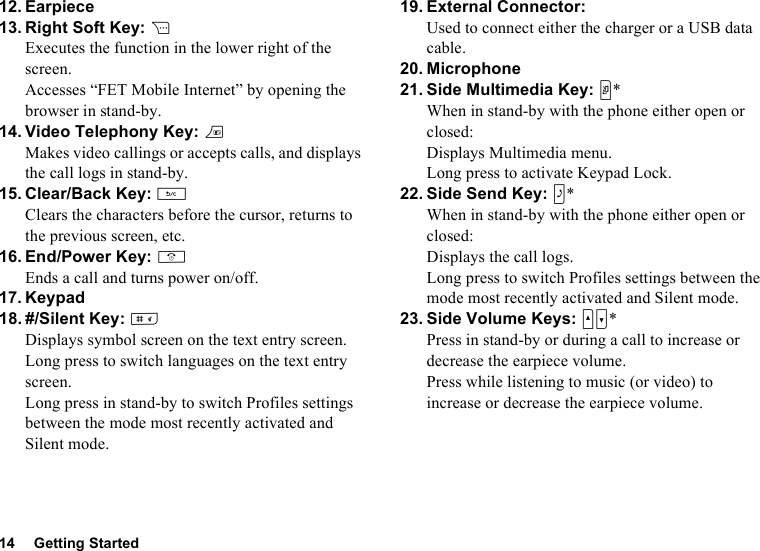
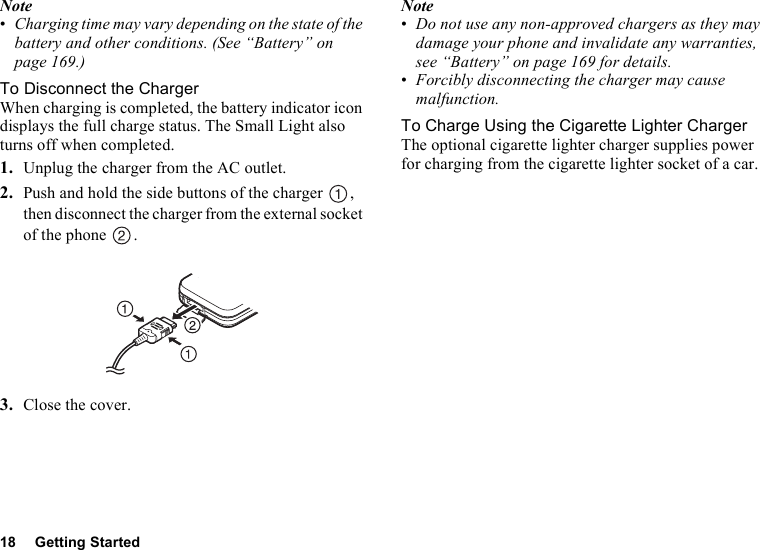

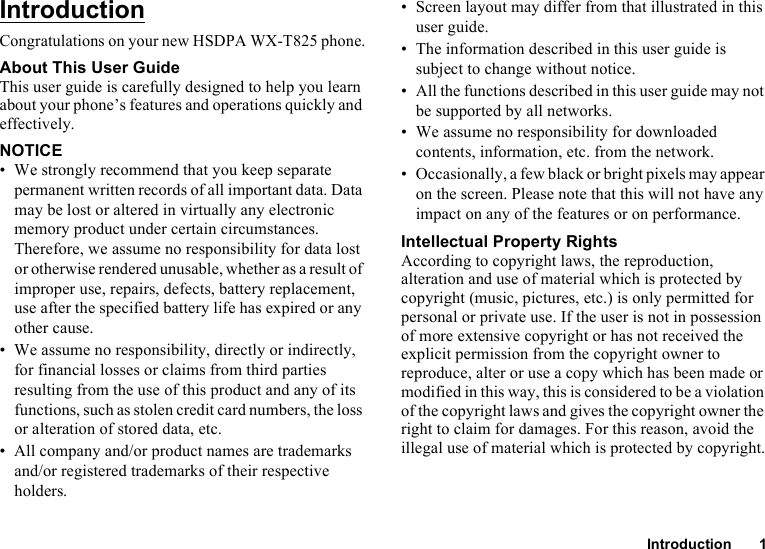
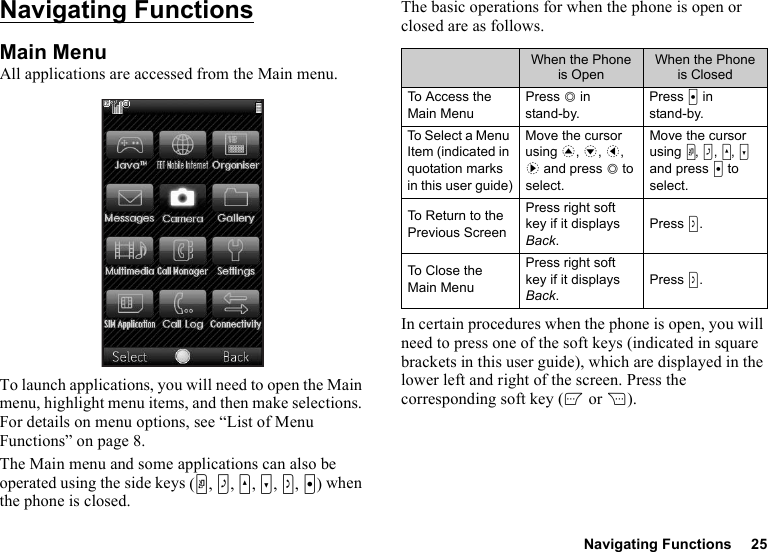
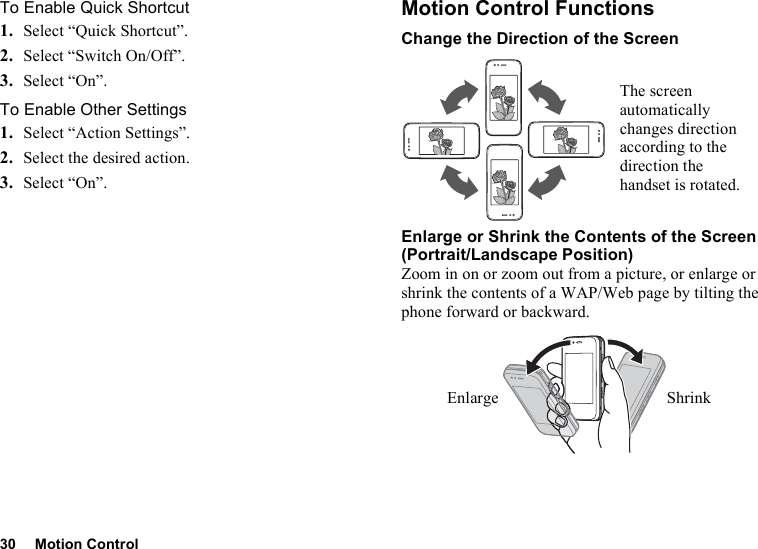
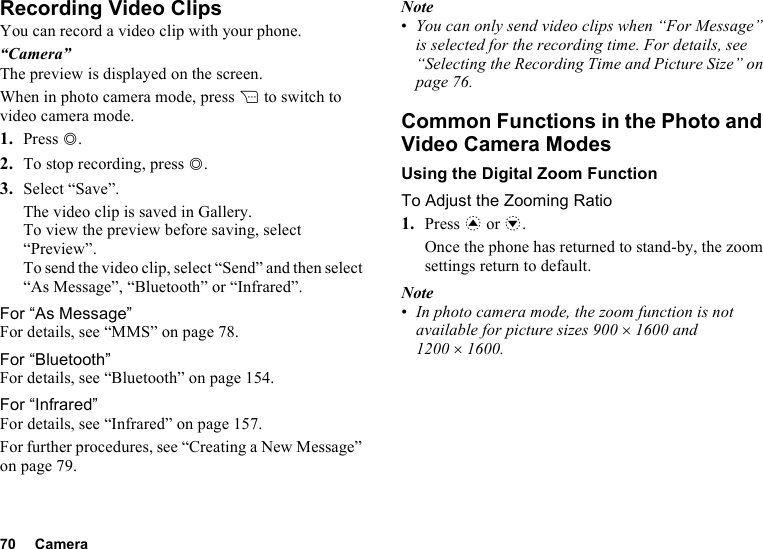
![Getting Started 23Display Indicators 1. / : Strength of received signal/Service out of range: HSDPA: 3G (UMTS)/GPRS: GSM: GPRS enabled: Roaming outside network2. / : Connection to the server [established/communicating]3. / : Voice call [incoming/in progress]4. / / : Video calling communication mode enabled [voice/video/voice and video]5. / : Alerts [text message and multimedia message/Email]6. ///: Mailbox full [SIM/USIM card only/handset only/both SIM/USIM card and handset/Email only]7. : “Voice Calls” diverts set to “Always”Right soft keyCentre keyLeft soft keyIndicator area](https://usermanual.wiki/Sharp/HRO00074.Manual/User-Guide-991214-Page-24.png)
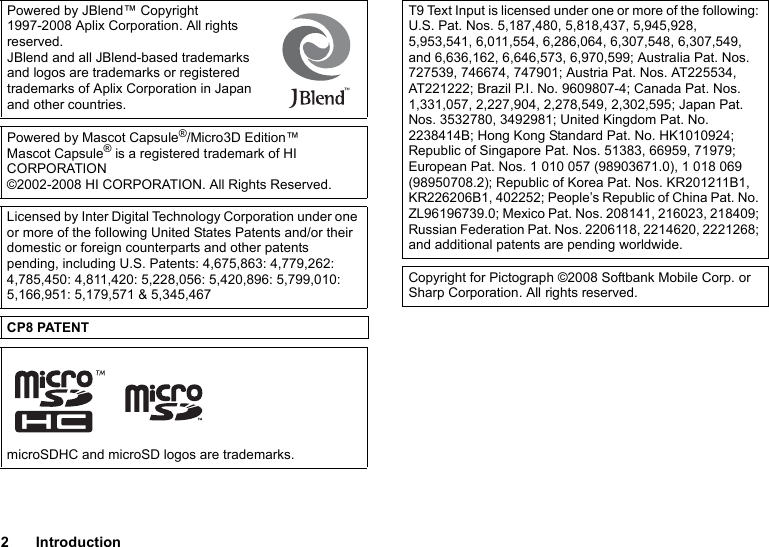
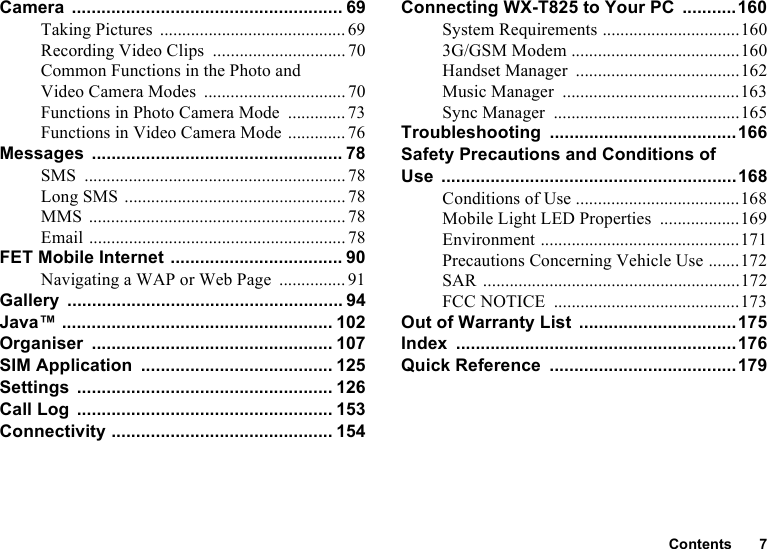
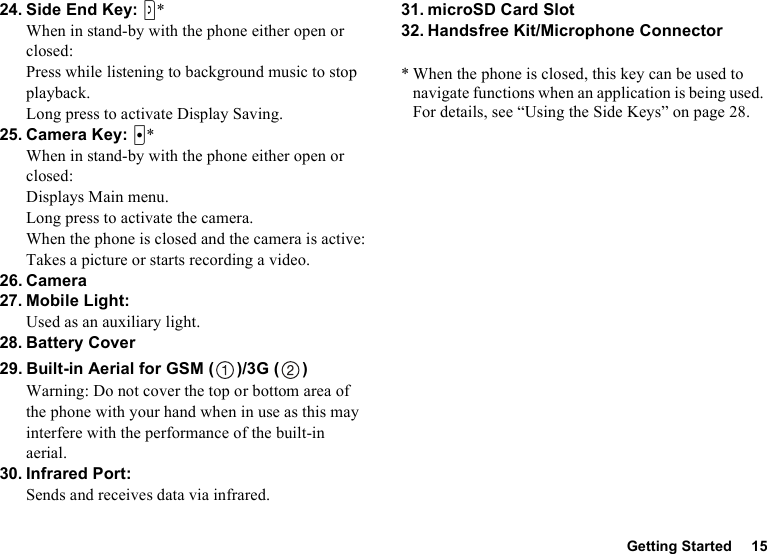
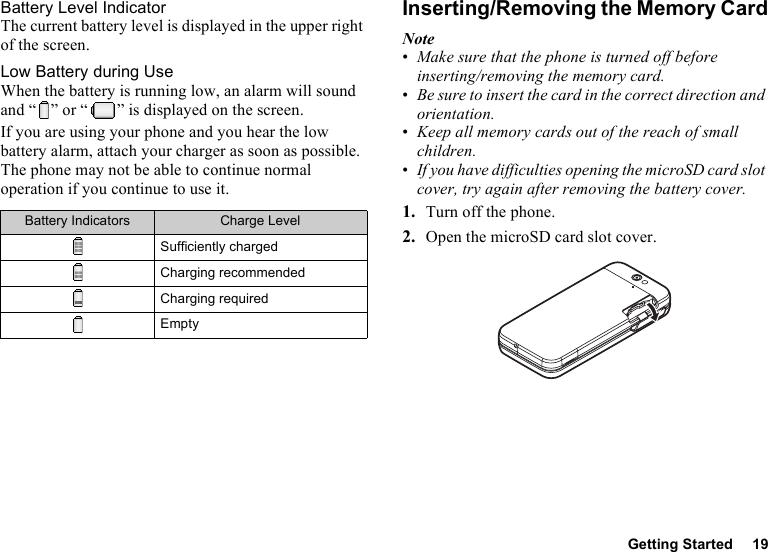
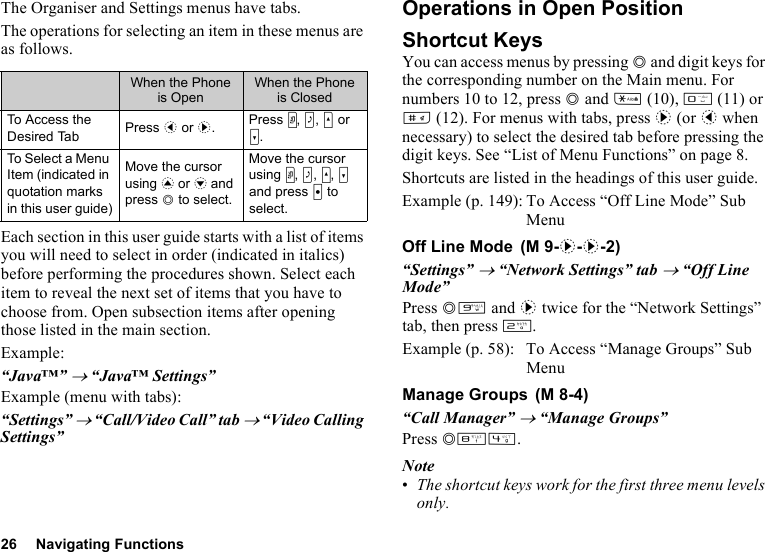
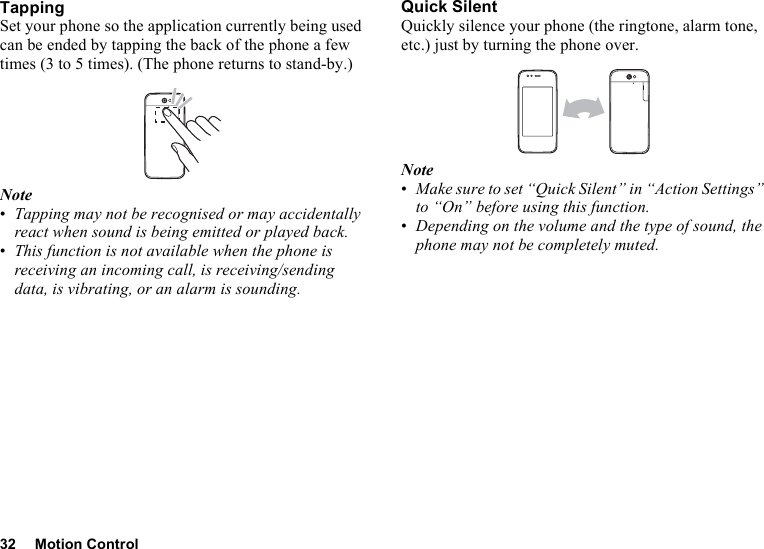
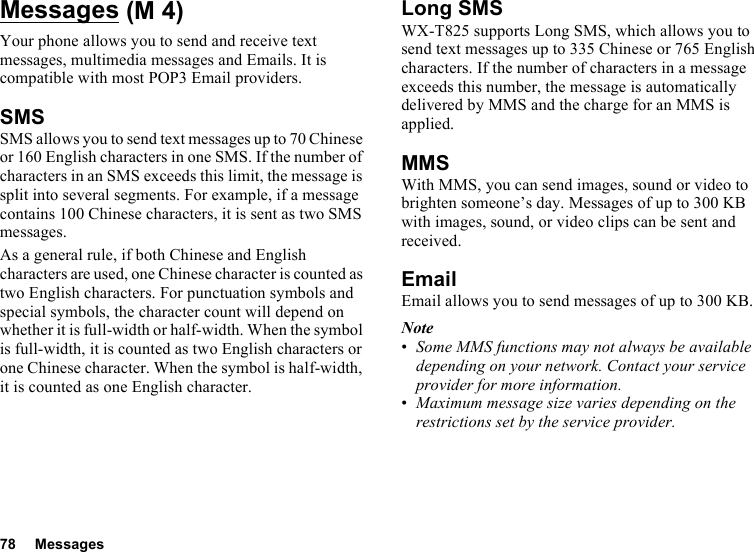
![24 Getting Started8. //////// : Connection status [USB cable [stand-by/exchanging information]/IrDA setting [stand-by/exchanging information]/Bluetooth wireless setting [stand-by/exchanging information/talking with the Bluetooth headset/Hide my phone/playing back music with the Bluetooth headset]]9. / / : Java™ application [executed/suspended]/Music player10. : Secure WAP/Web page displayed11. / / : Silent/vibration setting [silent/vibration enabled/silent and vibration enabled]12. / : Speaker mode [speaker phone on/microphone muted]13. : Memory card inserted14. / : Battery level15. : Daily alarm enabled16. / : Schedule entry enabled [with/without reminder alarm]17. : Outbox contains unsent messages [text message/multimedia/Email]18. / / : WAP/OTA provisioning alerts [WAP alert/OTA provisioning alert/WAP and OTA provisioning alerts]19. : Voicemail message alert20. : “Show Secret Data” set to “On”21. : Function Lock enabled22. : Keypad Lock enabled23. (No display)/ / / : Current profile [Normal/Car/Silent/Personal]24. : Hour minder enabled25. : Auto answer enabled](https://usermanual.wiki/Sharp/HRO00074.Manual/User-Guide-991214-Page-25.png)
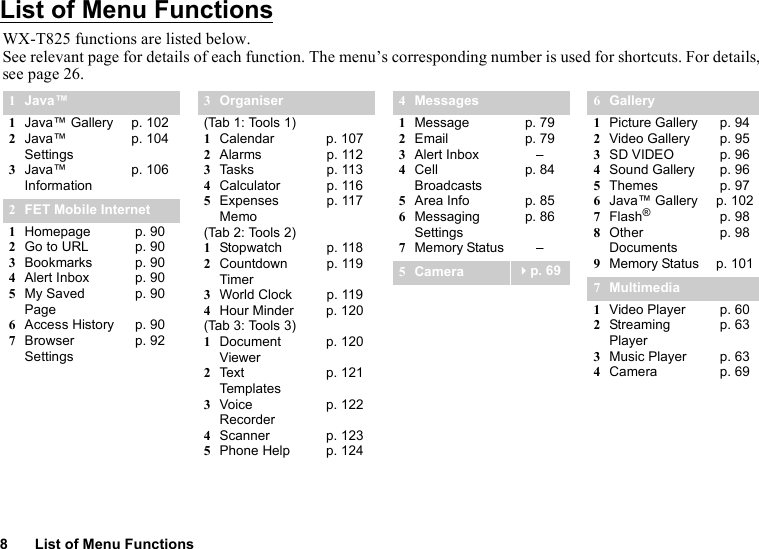
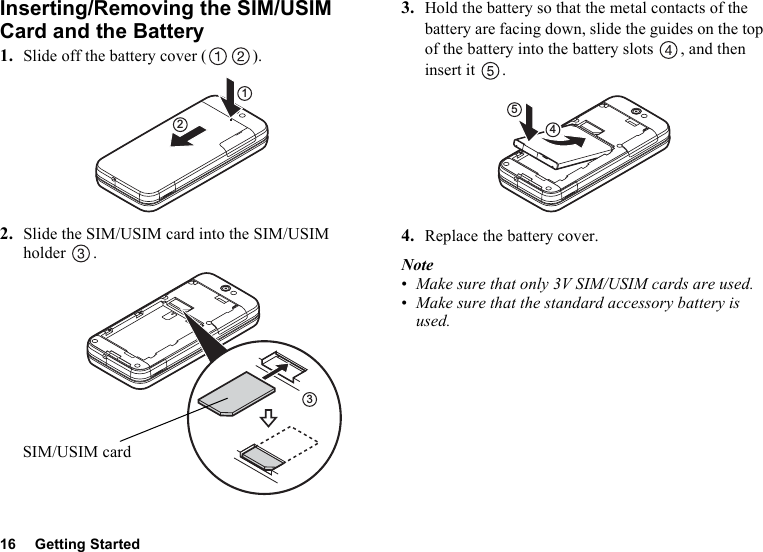
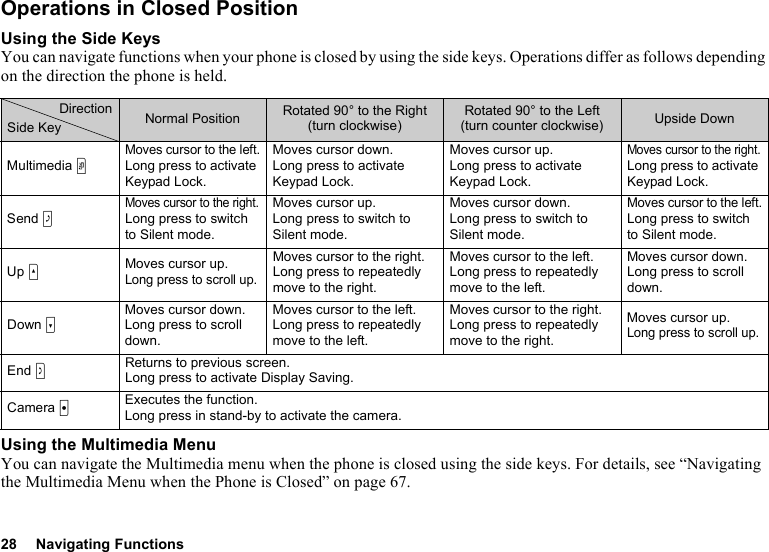
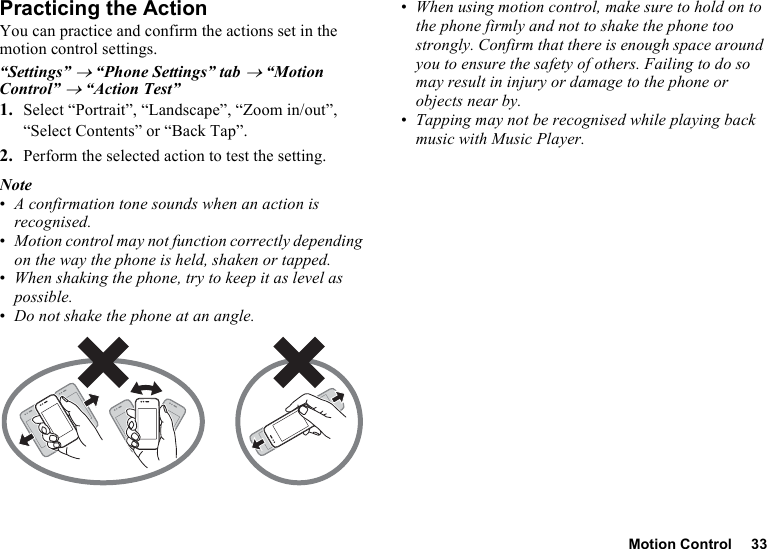
![Navigating Functions 27ShortcutsYour phone has a shortcut function (press E in stand-by) which enables you to access the desired menu quickly. The default shortcuts are as follows (shortcuts assigned to G-O can be customised):• Main menu• Enter Phone Number•G: Inbox•H: Create Message•I: Bookmarks•J: Calendar•K: Phonebook•L:Gallery•M: Calculator•N:Alarms•O:BluetoothTo Use the Shortcut Key1. Press E in stand-by.2. Select the desired item or number.To Customise the Assigned Shortcuts1. Press E in stand-by.2. Highlight the shortcut you wish to customise from G-O.3. Press [Options] and select “Assign”.The list of the available items is displayed.4. Select the desired item.Note•To move the item in the list that appears in step 1, highlight the item, press [Options] and select “Move”. Then press a or b to the desired location and press B.•To reset the customised shortcut, press [Options] and select “Set to Default” in step 2.](https://usermanual.wiki/Sharp/HRO00074.Manual/User-Guide-991214-Page-28.png)
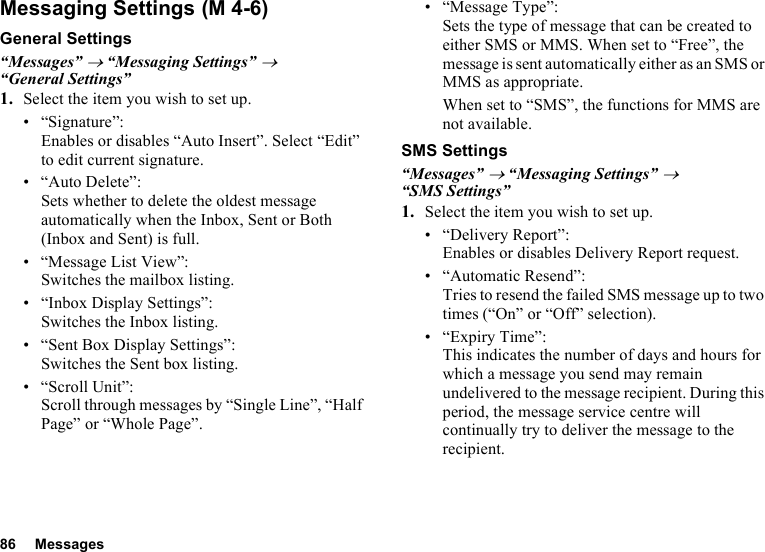
![Motion Control 31Select a Sound File or Picture (Portrait/Landscape Position)Select the previous or next picture, sound or document file by shaking the phone once to the left or to the right.Quick ShortcutSet your phone so an application is activated by shaking the phone sideways a few times. (This is only available in stand-by.)You can access the Gallery folder by shaking the phone sideways about 3 times in portrait position.In landscape position, you can access the Java™ Gallery folder by shaking the phone sideways about 3 times.The application set to Quick Shortcut can be changed.To Change the Assigned Quick Shortcut“Settings” → “Phone Settings” tab → “Motion Control” → “Quick Shortcut” → “Quick Shortcut Entry”1. Select “Portrait” or “Landscape”.2. Select the desired application and press [Assign].Note•To delete an assigned shortcut, highlight “Portrait” or “Landscape” in step 1, press [Options] and then press [Delete].•To reset the assigned shortcut, highlight “Portrait” or “Landscape” in step 1, press [Options] and then press [Reset Settings].About 3×About 3×](https://usermanual.wiki/Sharp/HRO00074.Manual/User-Guide-991214-Page-32.png)
![34 Voice Call/Video Calling FunctionsVoice Call/Video Calling FunctionsMaking a Voice Call1. Enter the area code and the phone number you wish to dial, and then press D to dial.If you enter the wrong number, press U to delete the number to the left of the cursor.Emergency Calls1. Enter 112 or 911 using the keypad and press D to dial.Note•Emergency calls may not be able to be made on all mobile phone networks when certain network services and/or phone features are in use. Contact your service provider for more information.•This emergency number can normally be used to make an emergency call in any country, with or without a SIM/USIM card inserted, if a 3G (UMTS)/GSM network is within range.International Calls1. Long press Q until a + (international dialling prefix) sign is displayed.2. Enter the country code, followed by the area code (without the leading zero) and the phone number, and press D to dial.Adding an Entered Phone Number to the Phonebook1. After entering a phone number, press [Options] and select “Save Number”.For details on creating a new entry, see “Adding a New Phonebook Entry” on page 52.Showing or Hiding My Phone Number on the Display of the Called Party1. After entering a phone number, press [Options], select “Show My ID” or “Hide My ID” and press D to dial.](https://usermanual.wiki/Sharp/HRO00074.Manual/User-Guide-991214-Page-35.png)
![Voice Call/Video Calling Functions 35Speed DiallingThe digit keys (G to O) can be used for speed dial. Up to 8 phone numbers from the Phonebook memory (Handset and SIM/USIM) can be assigned to H to O. The phone number of the Voicemail centre is assigned to G.For details on setting the speed dial list, see “Speed Dial List” on page 59.1. To dial a number using the speed dial, long press any of the digit keys (G to O) in stand-by.The phone number saved in the speed dial list is dialled.RediallingYou can redial numbers in the call log. Select from specific categories or “All Calls”. Specific categories contain up to 30 numbers and the “All Calls” list contains up to 90.1. Press D in stand-by.2. Select the category from “All Calls”, “Dialled Numbers”, “Missed Calls” or “Received Calls”.To switch logs, press c or d.3. Highlight the phone number you wish to call.4. Press D to redial a voice call or T to redial a video calling.Answering a Voice CallWhen an incoming call is detected, the phone rings.1. Press D or B to answer the call.Or press any key except F, U, S, [Options], [Busy], X or side keys when the “Any Key Answer” function is enabled. Set the Any Key Answer function in the profile of each mode (p. 127).You can answer an incoming call by sliding open your phone if “Calls on Open” is set to “On” in Slider Settings (p. 141).Tip•If you have subscribed to the Calling Line Identification (CLI) service and the caller’s network sends the number, the caller’s number is displayed on the screen. If the caller’s name and number are saved in the Phonebook, the caller’s name is displayed on the screen.•If the number is a restricted number, the display shows “Withheld”.•When you receive a call from the person whose picture is registered in the Phonebook, the picture and name are displayed.](https://usermanual.wiki/Sharp/HRO00074.Manual/User-Guide-991214-Page-36.png)
![36 Voice Call/Video Calling FunctionsRejecting an Incoming Call1. Press F while the phone is ringing to reject a call you do not wish to answer.Letting the Caller Know You are Unavailable1. Press [Busy] while the phone is ringing to send a busy tone to the caller.In Call Menu (Voice Call)Your phone has additional functions available while a call is in progress.Adjusting the Earpiece VolumeYou can adjust the earpiece volume to five levels.1.Press V or W to display the Earpiece Volume screen.2. Press V (or a/d) to increase the volume of the call or press W (or b/c) to decrease the volume.3. Press B when the volume is set to the desired level.Turning the Speaker On and OffYou can talk via the loudspeaker on the phone when it is on.1. During a call, press B.Putting a Call on HoldThis function allows you to manage two calls at the same time. If you wish to make another call while you are talking to someone, you can put the current call on hold to call someone else.To Make Another Call during a Call1. During a call, press [Options] and select “Hold”.The current call is put on hold.2. Press [Options] and select “Dial New Number”.3. Enter the phone number you wish to make another call to, then press D.Tip•You can also make another call by entering the phone number during a call instead of step 1. The current call is automatically put on hold.](https://usermanual.wiki/Sharp/HRO00074.Manual/User-Guide-991214-Page-37.png)
![Voice Call/Video Calling Functions 37Accessing SMS/MMS Menu during a Call1. During a call, press [Options] and select “Messages”.The following options are available: “Create Message” to make an SMS and MMS, or “Inbox”, “Sent” or “Drafts” to access these folders. For details on SMS and MMS, see “SMS” and “MMS” on page 78.Call WaitingThis service notifies you of another incoming call while you have a call in progress.1. During a call, press [Options] and select “Hold & Answer” to answer the second call.The first call is put on hold and you can now talk to the second caller.You can also answer the second call by pressing D.Note•You need to set “Call Waiting” to “On” if you wish to use the Call Waiting service (p. 148).•Call Waiting service may not be available on all networks. Contact your service provider for more information.•If you do not wish to answer the second call, press [Options] and select “Busy” in step 1. If “Reject” is selected, the log of the second call is saved as a missed call.Conference CallConference call is a call with more than 2 participants. You may include up to 5 participants in a conference call.To Make a Conference CallYou must have one active call and one held call.1. During a call, press [Options] and select “Conference All” to join the conference call.2. Press F to end the conference call.](https://usermanual.wiki/Sharp/HRO00074.Manual/User-Guide-991214-Page-38.png)
![38 Voice Call/Video Calling FunctionsNote•The conference call service may not be available on all networks. Contact your service provider for more information.•To end the call with all participants, press [Options] and select “End All Call(s)”.•To reject adding more participants to the current party, press [Options] and select “Reject”, or you can send the busy tone by selecting “Busy”.•You have more options for the conference call after selecting “Conference All” in step 1:•To put all participants on hold, select “Hold All”.•To put all participants except the current call on hold, select “Private”.To Add New Participants to the Conference Call1. Press [Options] and select “Dial New Number”.2. Enter the number you wish to include in the conference call and press D to dial.3. Press [Options] and select “Conference All” to join the conference call.If you wish to add other participants, repeat steps 1 to 3.To End the Call with a Conference Call Participant1. During a conference call, highlight the person that you wish to disconnect from the conference call.2. Press [Options] and select “End This Call”.To Have a Private Conversation with One of the ParticipantsIf you wish to have a private conversation with one of the participants, you may select the participant from the conference list and put the other participants on hold.1. During a conference call, select the person that you wish to talk to.2. Press [Options] and select “Private”.3. Once you have finished the private conversation, press [Options] and select “Conference All” to return to the conference call.Muting the Microphone1. During a call, press [Mute].To use the microphone again, press [Unmute].](https://usermanual.wiki/Sharp/HRO00074.Manual/User-Guide-991214-Page-39.png)
![Voice Call/Video Calling Functions 39Making a Video CallingNote•Video callings can only be made and received if both parties have 3G capable phones and 3G coverage. See “Display Indicators” on page 23.•Make sure that the battery is fully charged and the signal is strong before using this function.•Turn the loudspeaker on or use a handsfree kit so that you can talk while looking at the video calling screen on the display.•Use the camera to send live video images.Making a Video CallingTo Make a Video Calling by Entering the Phone Number First1. Enter the area code and the phone number you wish to dial, and then press T to dial.If you enter the wrong number, press U to delete the number to the left of the cursor.When connected, the image of the called party and yours are displayed on the screen.Tip•If the called party’s phone is not video calling enabled, you can press F and enter the phone number again to make a voice call.Answering a Video CallingWhen an incoming call is detected, the phone rings.1. Press D to answer the call with video, or press B or [Options] and select “Hide Picture” to answer with voice only.Tip•If you have subscribed to the Calling Line Identification (CLI) service and the caller’s network sends the number, the caller’s number is displayed on the screen. If the caller’s name and number are saved in the Phonebook, the caller’s name is displayed on the screen.Rejecting an Incoming Call1. Press F while the phone is ringing to reject a call you do not wish to answer.Letting the Caller Know You are Unavailable1. Press [Busy] while the phone is ringing to send a busy tone to the caller of an incoming call letting them know that you cannot answer the call.](https://usermanual.wiki/Sharp/HRO00074.Manual/User-Guide-991214-Page-40.png)
![40 Voice Call/Video Calling FunctionsIn Call Menu (Video Calling)Muting the Microphone1. During a video calling, press [Mute].To use the microphone again, press [Unmute].Swapping ImagesYou can swap images displayed on the video calling screens.1. During a video calling, press [Options] and select “Switch Images”.2. Select “Priority to Incoming”, “Priority to Outgoing”, “Incoming Up” or “Outgoing Up”.Changing the Outgoing ImageDuring a video calling, you can switch the image shown to the caller between the camera image and an alternative image.1. During a video calling, press [Options] and select “Camera Picture”.2. Select “External Camera” or “Alternative Image”.“External Camera”: The image through the camera is displayed and sent to the receiver.“Alternative Image”: The camera is turned off and the image selected in “Alternative Image” of “Video Calling Settings” (p. 143) is used.Turning the Speaker On and OffYou can talk via the loudspeaker on the phone when it is on.1. During a video calling, press [Options] and select “Loudspeaker On”.Note•In a high-noise environment, you may not be able to continue a call or make a clear call. We recommend that you use the handsfree kit. •With this option, there may be interruption if you increase the earpiece volume. We recommend that you decrease the earpiece volume or use the handsfree kit.](https://usermanual.wiki/Sharp/HRO00074.Manual/User-Guide-991214-Page-41.png)
![Voice Call/Video Calling Functions 41Video Calling SettingsTo Adjust the Quality of the Incoming or Outgoing ImageYou can adjust the quality of the called party’s or caller’s image.1. During a video calling, press [Options] and select “Video Calling Settings”.2. Select “Incoming Picture Quality” or “Outgoing Picture Quality”.3. Select “Normal”, “Quality Priority” or “Frame Rate Priority”.“Normal”: The standard quality is used.“Quality Priority”: The quality of the picture takes precedence over the frame rate.“Frame Rate Priority”: The frame rate takes precedence over the quality.To Turn the Backlight On or OffYou can turn on the backlight of your screen.1. During a video calling, press [Options] and select “Video Calling Settings”.2. Select “Backlight”.3. Select “Always On”, “Always Off” or “As Normal Setting”.When “Always On” is selected, the backlight will always be on during a video calling.When “As Normal Setting” is selected, the backlight will time out depending on the Backlight setting (p. 129).To Adjust the Video Exposure1. During a video calling, press [Options] and select “Video Calling Settings”.2. Select “Exposure”.3. Press a (Light) or b (Dark).](https://usermanual.wiki/Sharp/HRO00074.Manual/User-Guide-991214-Page-42.png)
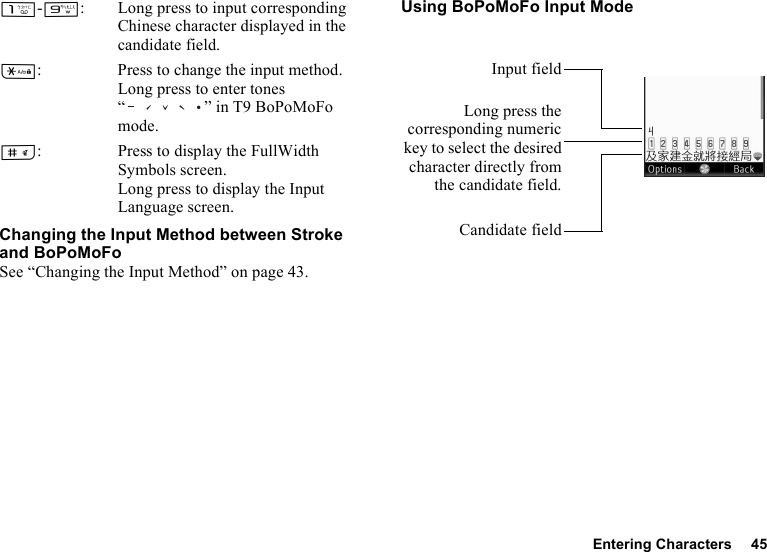
![42 Entering CharactersEntering CharactersWhen entering characters to create Phonebook entries, text messages or multimedia messages, etc., press the corresponding keys.In multi-tap input method, press each key until the desired character is displayed. For example, press H once for the letter A or twice for the letter B.Press the following keys to:Long press the following keys to:Changing the Input Language1. On the text entry screen, press [Options] and select “Input Language”.2. Select the desired language.G:Enter:. (full-stop) , (comma) ? ! : ; ' (apostrophe) " / 1Q:Enter:(space) + = < > € £ $ ¥ % & 0P: Switch character case among four modes:Abc, ABC, abc and 123.R: Display the pictograms and symbols input screen.G-O: Enter 1-9 numbers.Q: Enter space in Numeric mode or to enter 0 in other modes.P: Shift between multi-tap and T9 mode.R: Display the Input Language options screen.](https://usermanual.wiki/Sharp/HRO00074.Manual/User-Guide-991214-Page-43.png)
![Entering Characters 43Changing the Input Method1. On the text entry screen, press [Options] and select “Input Method”.2. Select the input method you wish to use.Tip•In T9 or multi-tap mode, you can switch input mode as follows by pressing P.English/T9 modeEnglish/Multi-tap modeTraditional Chinese/T9 modeInput MethodInput Language = EnglishInput Language = Traditional ChineseInput Language = Simplified ChineseT9 ModeT9 AbcT9 ABCT9 abcT9 BoPoMoFoT9 StrokeT9 PinYinT9 StrokeMulti-tap modeAbcABCabcNumericAbcABCabcNumericAbcABCabcNumeric](https://usermanual.wiki/Sharp/HRO00074.Manual/User-Guide-991214-Page-44.png)
![44 Entering CharactersT9 English ModeUsing T9 English ModeT9 text input method is a shortcut to enter text easily and quickly. 1. On the text entry screen, press [Options].2. Select “Input Method”.3. Select the T9 mode (T9 Abc, T9 ABC, T9 abc) you wish to change. “ ” is displayed on the screen.4. Press the keys to enter characters.5. Press a or b to select the word you wish to input.6. If you wish to clear the word, highlight it and long press U.7. Press B to complete the selection.Tip•If you press Q instead of step 6, a space is inserted next to the selected word.T9 BoPoMoFo and T9 Stroke ModeIn T9 BoPoMoFo and T9 Stroke mode, keys are as follows.T9 BoPoMoFo and T9 Stroke Mode KeysKey BoPoMoFo StrokeSpaceWildcardGo to the pictograms and symbols input screen.GHIJKLMNOPQR](https://usermanual.wiki/Sharp/HRO00074.Manual/User-Guide-991214-Page-45.png)
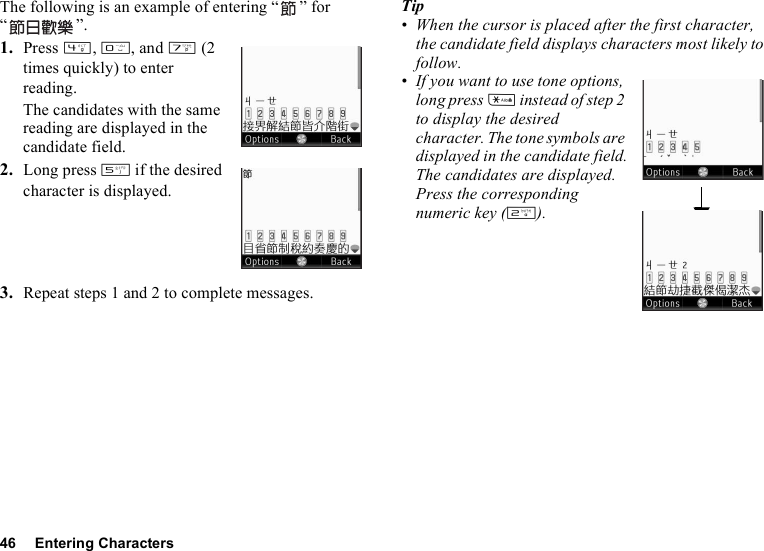
![Entering Characters 47Using Stroke ModeThe following is an example of entering “ ”.1. Change the input mode to T9 Stroke mode.2. Press I G J to display the corresponding stroke for “”.3. Long press the corresponding key to complete the selection (in this case M).Selecting the Character to Input1. Perform steps 1 and 2 in “Using BoPoMoFo Input Mode” on page 45 or “Using Stroke Mode”.2. Press b to highlight the Chinese character.3. Press c or d to select the character you wish to input and press B.You can also enter the desired Chinese character by pressing the candidate number directly using the keypad.Entering Pictograms and Symbols1. On the text entry screen, press [Options] and select “Add Symbol”.The history for the pictograms screen is displayed first.Press A to see all pictograms.Press C to switch to the symbols screen.2. Select the pictogram or symbol you wish to use and press B.Note•Pictograms are only available for SMS/MMS messages and Text Template. However, pictograms can be used in an application other than SMS, MMS or Text Template in the following cases:•When the pictogram is saved in a text template and that text is inserted using “Insert Template”.•When pasting text using “Copy” and “Paste”.](https://usermanual.wiki/Sharp/HRO00074.Manual/User-Guide-991214-Page-48.png)
![48 Entering CharactersUser DictionaryYou can create your own word list for alphabet text and T9 Chinese input.English User DictionaryNote•This function is only available when “Input Language” is set to “English”.To Create a New Entry1. On the text entry screen, press [Options] and select “User Dictionary”.2. Select “Add New Word”.3. Enter a new word.To Edit a Word in the List1. On the text entry screen, press [Options] and select “User Dictionary”.2. Highlight the desired word.3. Press [Options] and select “Edit”.4. Modify the word.To Delete a Word1. On the text entry screen, press [Options] and select “User Dictionary”.2. Highlight the desired word.3. Press [Options] and select “Delete”.4. Select “Yes” or “No”.Chinese User DictionaryYou can enter Chinese characters, alphabet, symbols and numbers for Chinese word lists.Note•This function is only available when “Input Language” is set to “Traditional Chinese” or “Simplified Chinese”.•Only capital letters can be used for acronyms.To Create a New Entry1. On the text entry screen, press [Options] and select “Chinese User Dictionary”.2. Select “Add New Word”.3. Enter a new word.](https://usermanual.wiki/Sharp/HRO00074.Manual/User-Guide-991214-Page-49.png)
![Entering Characters 49To Edit a Word in the List1. On the text entry screen, press [Options] and select “Chinese User Dictionary”.2. Highlight the desired word.3. Press [Options] and select “Edit”.4. Modify the entry word.To Delete a Word1. On the text entry screen, press [Options] and select “Chinese User Dictionary”.2. Highlight the desired word.3. Press [Options] and select “Delete”.4. Select “Yes” or “No”.Finding an EntryYou can recall Chinese word entries by entering the first few characters.The following is an example from the Chinese User Dictionary.Please notice the word is already stored at this example.1. Press L (3 times quickly), then long press G and enter “”.2. The character “ ” appears at .Normally “ ” appears here.3. Long press O and enter “”.This example is using BoPoMoFo mode](https://usermanual.wiki/Sharp/HRO00074.Manual/User-Guide-991214-Page-50.png)
![50 Entering Characters4. Long press O, then the following characters appear.Note•This function is not available, if the entry word is less than 4 letters or no Chinese characters are included.Since the candidate characters appear at , you can use this as a shortcut if the word is made up of Chinese characters. You only have to long press O without having to search for the characters which follow.•If there was a stored word which shares the first 1-4 characters, such as “ ”, candidate “ ” appears at or .The most recently used entry appears at , and if there were 3 or more entries that start with “ ”, the oldest candidate is erased.•If there were a stored word that shares the first 5 or more characters, such as “ ”, after “ ” is entered, the entry is completed with the most recently used character.Using TemplatesYou can use the phrases registered in Text Templates when entering characters.For details on creating the text template, see “Adding Phrases to Text Templates” on page 121.1. On the text entry screen, move the cursor to the point you wish to insert the template.2. Press [Options] and select “Advanced”.3. Select “Insert Template”.4. Select the desired text template.](https://usermanual.wiki/Sharp/HRO00074.Manual/User-Guide-991214-Page-51.png)
![Entering Characters 51Copying, Cutting and Pasting Text1. On the text entry screen, press [Options] and select “Advanced”.2. Select “Copy” or “Cut”.3. Move the cursor to the first letter to be copied or to be cut, then press B.4. Move the cursor to the last letter to highlight the area, then press B.5. Move the cursor to the point you wish to paste the letters.6. Press [Options] and select “Advanced”.7. Select “Paste”.8. Select the desired item.Insert Phonebook EntriesYou can insert the entries registered in Phonebook when entering characters.For details on creating the Phonebook entries, see “Call Manager” on page 52.1. On the text entry screen, move the cursor to the point you wish to insert the Phonebook Entry.2. Press [Options] and select “Advanced”.3. Select “Insert Phonebook Entry”.4. Select the desired Phonebook Entry.The selected entry is inserted.](https://usermanual.wiki/Sharp/HRO00074.Manual/User-Guide-991214-Page-52.png)
![52 Call ManagerCall ManagerYou can store the phone numbers and Email addresses of your friends, family and colleagues in the Phonebook.Your phone can store up to 1000 entries. For each entry, you can enter information including up to 5 phone numbers and 5 Email addresses. There is a limit to the number of characters that can be entered for each item. The character limit differs for the handset memory and SIM/USIM card memory.Adding a New Phonebook EntryThe amount of phone numbers that you can store to the SIM/USIM card is dependent on its capacity. Contact your service provider for details.Selecting the Storage MemoryYou can choose either the phone or SIM/USIM card memory locations to store the new entry.“Call Manager” → “Phonebook Settings” → “Save to”1. Select from “Handset”, “SIM” or “Choice”.Tip•“Choice” prompts you to choose the memory every time you save a new entry.Registering a New Entry“Call Manager” → “Add New”If you select the “Choice” option for the memory to be used, the selection is between “To Handset” and “To SIM”.1. Select the field you wish to fill in, and enter the relevant information.2. Press [Save] when finished.Tip•To create an entry, at least one field must be filled (“Last Name”, “First Name”, “Add Phone Number” or “Add Email Address” for the handset memory; “Name”, “Add Phone Number” or “Add Email Address” for the USIM memory; “Name” or “Add Phone Number” for the SIM memory). (M 8) (M 8-8-3) (M 8-2)](https://usermanual.wiki/Sharp/HRO00074.Manual/User-Guide-991214-Page-53.png)
![Call Manager 55Sending a Message from the Phonebook“Call Manager” → “Phonebook”1. Select the desired entry including the phone number or Email address you wish to use.2. Select the desired phone number or Email address.3. When a phone number is selected in step 2, select “Create Message”.For further procedures, see “Creating a New Message” on page 79.Using Mailing ListsYou can create a mailing list to send the same message to a group of recipients at once. Up to 20 groups can be registered.To Create a New Mailing List“Call Manager” → “Message Groups” → “Add New Group”1. Enter the group name.The new group name is displayed following the last group on the Group List screen.To Add Recipients to a GroupUp to 20 recipients can be registered in each list.“Call Manager” → “Message Groups”1. Select the desired group name.2. Select “Assign New Entry”.3. Select the desired entry.The detailed screen is displayed.4. Select the desired phone number or Email address.Tip•If you modify the entry assigned in the group, you need to re-assign it to the group. Select the entry, press [Options], then select “Re-assign Entry” in step 2.•To remove an entry from the group, select the entry, press [Options], then select “Remove Entry” in step 2.•To remove a group, press [Options] and select “Delete” in step 1.To Send a Message Using a Mailing List“Call Manager” → “Message Groups”1. Highlight the desired group name.2. Press [Options] and select “Create Message”.For further procedures, see “Creating a New Message” on page 79. (M 8-7) (M 8-7-1)](https://usermanual.wiki/Sharp/HRO00074.Manual/User-Guide-991214-Page-56.png)
![56 Call ManagerEditing Phonebook Entries“Call Manager” → “Phonebook”1. Highlight the entry you wish to edit.2. Press [Options] and select “Edit”.3. Modify the information.4. Press [Save] when finished.Adding a Thumbnail to EntriesOnly Phonebook entries saved to the handset can have thumbnails attached to them.“Call Manager” → “Phonebook”1. Highlight the desired entry.2. Press [Options] and select “Edit”.3. Select “Picture”.4. Select “Assign Picture”.5. Select the desired picture.6. Press [Save] when finished.Note•If you delete a picture in the handset memory, the corresponding thumbnail is also deleted.•You can take a picture for a thumbnail by selecting “Take Picture” in step 4.Assigning a Ringtone or a Ring Video Clip to Each Entry“Call Manager” → “Phonebook”1. Highlight the desired entry.2. Press [Options] and select “Edit”.3. Select “Tone/Video for Voice Call”, “Tone/Video for Video Calling” or “Tone/Video for New Message”.4. Select “Assign Tone”.5. Select “Preset Sounds”, “Sound Gallery”, “Video Gallery” or “Flash®”.6. Select the desired tone or video clip.For details on selecting a ringtone or a ring video clip, see “Assigning a Ringtone for an Incoming Call” or “Assigning a Ring Video Clip for an Incoming Call” on page 133.7. Press [Save] when finished.](https://usermanual.wiki/Sharp/HRO00074.Manual/User-Guide-991214-Page-57.png)
![Call Manager 57Deleting Phonebook EntriesDeleting All Phonebook Entries“Call Manager” → “Advanced” → “Delete All Entries”1. Select from “Handset Entries”, “SIM Entries” or “Both Entries”.2. Enter your handset code.The default handset code is “9999”. For details on changing the handset code, see “Changing the Handset Code” on page 140.Deleting a Phonebook Entry“Call Manager” → “Phonebook”1. Highlight the desired entry.2. Press [Options] and select “Delete”.Managing the PhonebookCopying Phonebook Entries between SIM/USIM Card and Handset“Call Manager” → “Advanced” → “Copy All Entries”1. Select “From SIM to Handset” or “From Handset to SIM”.Note•When you insert the SIM/USIM card into your phone for the first time and start the Phonebook application, the confirmation screen is displayed automatically, asking you if you wish to copy or not. The number of Phonebook entries to be copied varies depending on the SIM/USIM capacity.•If the memory space is not enough to save all entries, you cannot complete copying. (M 8-10-3) (M 8-10-1)](https://usermanual.wiki/Sharp/HRO00074.Manual/User-Guide-991214-Page-58.png)
![58 Call ManagerSending a Phonebook Entry“Call Manager” → “Phonebook”1. Highlight the desired entry.2. Press [Options] and select “Send Phonebook”.3. Select “As Message”, “As Email”, “Via Bluetooth” or “Via Infrared”.For “As Message”For details, see “MMS” on page 78.For “As Email”For details, see “Email” on page 78.For “Via Bluetooth”For details, see “Bluetooth” on page 154.For “Via Infrared”For details, see “Infrared” on page 157.Receiving a Phonebook EntryWhen the phone receives a Phonebook entry, a confirmation message is displayed in stand-by.1. Select “Yes”.The received entry is saved in the Phonebook. Select “No” to reject.Tip•For details on entering Infrared or Bluetooth wireless settings, see “Connectivity” on page 154.Manage GroupsDifferent ringtones can be set for each category. If you do not change a category ringtone, the ringtone assigned in the Profiles menu is used.“Call Manager” → “Manage Groups”1. Highlight the desired category.2. Press [Options] and select “Assign Tone/Video”.3. Select “For Voice Call”, “For Video Calling” or “For New Message”.4. Select “Assign Tone”.5. Select “Preset Sounds”, “Sound Gallery”, “Video Gallery” or “Flash®”.6. Select the desired tone or video clip.For details on selecting a ringtone or a ring video clip, see “Assigning a Ringtone for an Incoming Call” or “Assigning a Ring Video Clip for an Incoming Call” on page 133. (M 8-4)](https://usermanual.wiki/Sharp/HRO00074.Manual/User-Guide-991214-Page-59.png)
![Call Manager 59Editing the Category NameYou can edit category names to be assigned to the Phonebook entries.“Call Manager” → “Manage Groups”1. Highlight the desired category name.2. Press [Edit] and select “Edit Name”.3. Modify the name.Speed Dial ListYou can set a maximum of 8 phone numbers in the Speed Dial list (p. 35).Setting Phonebook Entries in the Speed Dial ListTo Create a New Entry for Speed Dial or Speed Mail“Call Manager” → “Speed Dial List”1. Select an empty entry.2. Press [Assign].3. Select the desired Phonebook entry.4. Select the desired phone number.5. Press B.You can now also assign an Email address for Speed Mail.6. Select the desired Email address.7. Press B.8. Press [Save] to save the details to the selected digit key.Tip•The nine digit keys (G-O) correspond to Speed Dial list numbers.To Change the Speed Dial List or the Speed Mail List“Call Manager” → “Speed Dial List”1. Select the entry you wish to change.2. Press [Options] and select “Change”.3. Select the “Call number” or “Mail address” you wish to modify.4. Press [Change].5. Select the phone number or Email address to assign.If you wish to remove the entry, select “Do not Assign”.6. Press [Save].Memory StatusThis function helps you to check the memory used in the Phonebook.“Call Manager” → “Advanced” → “Memory Status” (M 8-6) (M 8-10-2)](https://usermanual.wiki/Sharp/HRO00074.Manual/User-Guide-991214-Page-60.png)
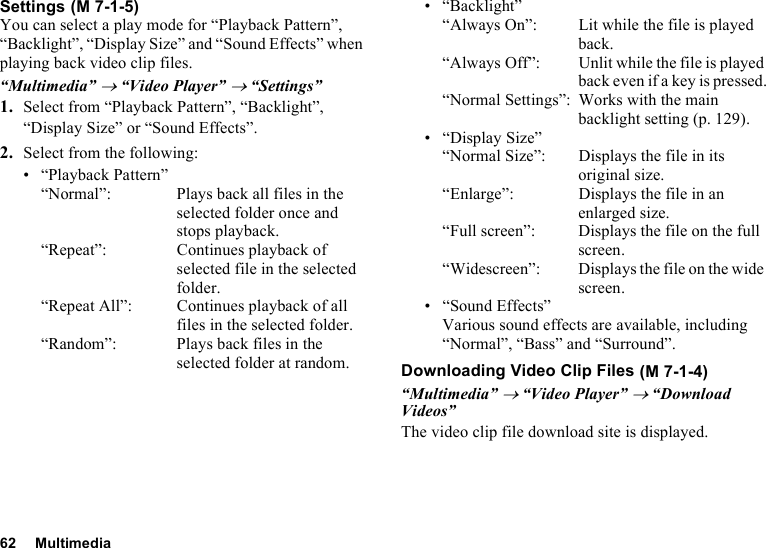
![60 MultimediaMultimediaVideo PlayerVideo Player supports MPEG-4, 3GPP and H.264 format video files.Playing Back Video Clip Files“Multimedia” → “Video Player” → “My Videos”1. Select “Handset Memory” or “Memory Card”.2. Select “All Videos” or the desired playlist.3. Select the desired file.To pause playback, press B.To stop playback, press U.Tip•You can control the Video Player by using the following keys:a/b: Increases or decreases the volume.b (long press): Mutes.d: Jumps to the next file.c: Returns to the start of the current file.cc: Jumps to the previous file.d (long press): Fast-forwards.c (long press): Rewinds.The side keys can be used to change the volume level.•Pressing H changes the size of the video display in the following order: Normal Size, Enlarge, Full screen and Widescreen. Note that this does not change the Display Size setting.•Pressing Q displays the help information.To Play Back or Resume Playback of the Last File“Multimedia” → “Video Player” → “Last Played Video”Searching for a File to Be Played Back“Multimedia” → “Video Player” → “My Videos”1. Select “Handset Memory” or “Memory Card”.2. Select “All Videos” or the desired playlist.3. Press [Options] and select “Search”.4. Enter a few letters of the title and press B.Search results are displayed with the first matching title highlighted (non-matching titles are greyed out). Press a or b to select other matching titles. The search will match the entered text with any part of the title. (M 7) (M 7-1) (M 7-1-1)](https://usermanual.wiki/Sharp/HRO00074.Manual/User-Guide-991214-Page-61.png)
![Multimedia 61Adding a File to the PlaylistYou can add files to a playlist.“Multimedia” → “Video Player” → “My Videos”1. Select “Handset Memory” or “Memory Card”.2. Select “All Videos” or the desired playlist.3. Highlight the file you wish to add to the playlist.4. Press [Options] and select “Add to Playlist”.The playlists are displayed. For details on creating a playlist, see “Adding a New Playlist”.5. Select the desired playlist.The file highlighted in step 3 is saved.To delete files from the playlist, highlight the file in the playlist and press [Options]. Then select “Delete from Playlist”.Adding a New PlaylistYou can create a playlist and register desired files in it.“Multimedia” → “Video Player” → “My Videos”1. Select “Handset Memory” or “Memory Card”.2. Press [Options] and select “Add New Playlist”.3. Enter the desired playlist name.4. Press B.Note•To delete the playlist, highlight the playlist and press [Options]. Then select “Delete Playlist”.](https://usermanual.wiki/Sharp/HRO00074.Manual/User-Guide-991214-Page-62.png)
![64 Multimedia2. Select the desired sound file.To pause playback, press B.To stop playback, press F and go back to stand-by, then press F again. Select “Yes” when the pop-up appears.Note•Select “My Music” to update the list of available music tracks. •You are asked whether or not to play sounds when the Silent mode is activated.•When the motion control setting for “Music” is set to “On” (p. 138), you can change the sound file being played back by shaking the phone sideways. This is only available when the phone is closed.•When you receive a call, playback of the current file is paused, and you can receive the call. After the call ends, playback resumes automatically.Tip•You can return to the Main menu screen while playing back the file in the background.•You can create your playlist by listing only the desired files (p. 66).•Sound files in both the handset and the memory card are displayed in a single view.•When listening to music using an A2DP compatible Bluetooth handsfree device, play back the file from Music Player.•To select the playback pattern, press [Options] and select “Playback Pattern”.“Normal”: Plays back all files in the selected folder once and stops playback.“Repeat”: Continues playback of selected file in the selected folder. “Repeat All”: Continues playback of all files in the selected folder.“Random”: Plays back files in the selected folder at random.“Random Repeat”:Continues playback of files in the selected folder at random.](https://usermanual.wiki/Sharp/HRO00074.Manual/User-Guide-991214-Page-65.png)
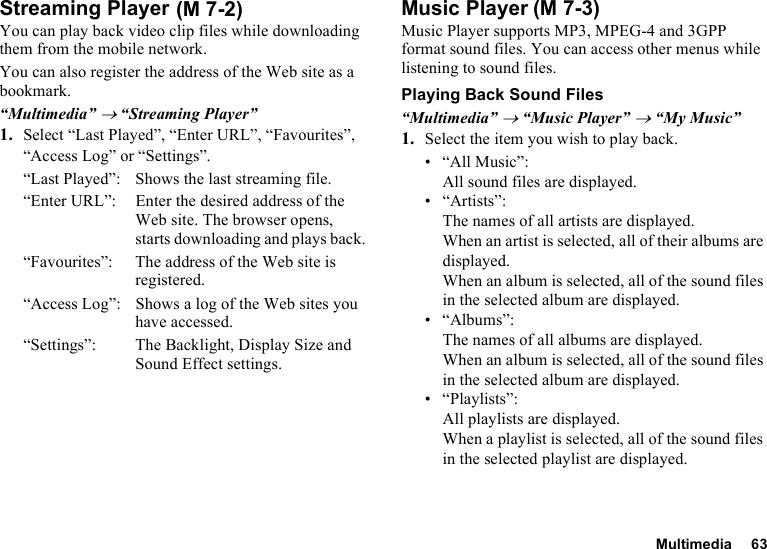
![Multimedia 65•While in the Music Player, the player can be controlled by using the following keys:a/b: Increases or decreases the volume.b (long press): Mutes.d: Jumps to the next file.c: Returns to the start of the current file.cc: Jumps to the previous file.d (long press): Fast-forwards.c (long press): Rewinds.F: Plays back the file in the background.The side keys can be used to change the volume level.To Play Back or Resume Playback of the Last File“Multimedia” → “Music Player”1. Select “Last Played Music”.“Currently Playing” is displayed when a file is being played back.Searching for a File to Be Played Back“Multimedia” → “Music Player” → “My Music”1. Select “All Music” or the desired album or playlist.2. Press [Options] and select “Search”.3. Enter a few letters of the title and press B.Search results are displayed with the first matching title highlighted (non-matching titles are greyed out). Press a or b to select other matching titles. The search will match the entered text with any part of the title.Sorting Files“Multimedia” → “Music Player” → “My Music” → “All Music”1. Press [Options] and select “Sort”.2. Select “By Title”, “By Artist”, “By Album” or “By Genre”.Sort results are displayed.](https://usermanual.wiki/Sharp/HRO00074.Manual/User-Guide-991214-Page-66.png)
![66 MultimediaAdding a File to the PlaylistYou can add files to a playlist.“Multimedia” → “Music Player” → “My Music” → “All Music”1. Highlight the file you wish to add to the playlist.2. Press [Options] and select “Add to Playlist”.The playlists are displayed. For details on adding a playlist, see “Adding a New Playlist”.3. Select the desired playlist.The file highlighted in step 1 is saved.To delete files from the playlist, highlight the file in the playlist and press [Options]. Then select “Delete from Playlist”.Note•You can store up to 99 files in one playlist. However, the total number of files stored on your phone cannot exceed 350 files.Adding a New PlaylistYou can create your own playlist, storing and managing your favourite tracks and the order of tracks. “Multimedia” → “Music Player” → “My Music” → “Playlists”1. Press [Options] and select “Add New Playlist”.2. Enter the desired playlist name.Note•To delete the playlist, highlight the playlist and press [Options]. Then select “Delete Playlist”.•You can create up to 99 playlists.Downloading Music Files“Multimedia” → “Music Player” → “Download Music”The music file download site is displayed.](https://usermanual.wiki/Sharp/HRO00074.Manual/User-Guide-991214-Page-67.png)
![Camera 71Adjusting the Exposure“Camera” → [Options] → “Shooting Settings” → “Exposure”“Camera” → [Options] → “Record Settings” → “Exposure”1. Press d (Bright) or c (Dark).: (Dark → Normal → Bright)Once the phone has returned to stand-by, the brightness settings return to default.Switching the Focus Mode“Camera” → [Options] → “Shooting Settings” → “Focus”“Camera” → [Options] → “Record Settings” → “Focus”1. Select the desired option.: Auto Focus: Manual Focus:MacroSelecting the Picture or Video QualitySelect the appropriate option.“Camera” → [Options] → “Picture Quality”“Camera” → [Options] → “Video Quality”1. Select the desired picture or video quality.: Super Fine:Fine: NormalNote•The better quality you select, the larger the file size becomes.Using the Self-TimerSelect the appropriate option.“Camera” → [Options] → “Self-timer”1. Select “2sec”, “5sec” or “10sec”. When you select one of these options, the corresponding indicator (“ ”, “ ”, or “ ”) is displayed on the screen.Select “Off” to cancel the self-timer.](https://usermanual.wiki/Sharp/HRO00074.Manual/User-Guide-991214-Page-72.png)
![72 CameraSelecting the Storage MemorySelect the appropriate option.“Camera” → [Options] → “Settings” → “Save New Pictures”“Camera” → [Options] → “Settings” → “Save New Videos”1. Select the desired location from “To Handset Memory”, “To Memory Card” or “Choice”.Note•If you select “Choice”, select the desired location every time you save.Auto SaveYou can set the phone to save pictures and video clips automatically.“Camera” → [Options] → “Settings” → “Auto Save”1. Select “On” or “Off”.Using the Help Function“Camera” → [Options] → “Help”Mobile LightTo Change the Mobile Light ModeSet the mobile light according to your purpose.“Camera” → [Options] → “Mobile Light”1. Select the desired mode.“On” ( ): The light is always on.“Auto” ( ): The light turns on if the phone detects that the conditions are dark.“Low Light” ( ) (photo camera mode only):Select this mode for macro shooting.“Off ”: The light is always off.The corresponding indicator is displayed on the screen. Select “Off” to turn it off.Switching between the Photo and Video Camera ModesYou can switch between the photo and video camera modes by pressing C.](https://usermanual.wiki/Sharp/HRO00074.Manual/User-Guide-991214-Page-73.png)
![Camera 73Common Shortcut KeysIf multiple options exist, they switch each time you press each of the following keys.Note•The “Switches the display modes” option is available in “Preview” before you save a video clip. See “Recording Video Clips” on page 70.Functions in Photo Camera ModeSelecting the Picture SizeYou can select the size of pictures. All taken pictures are saved in the JPEG format.“Camera” → [Options] → “Picture Size”1. Select the desired size.1200 × 1600/900 × 1600/960 × 1280/480 × 640/240 × 400/240 × 320/120 × 160Photo Camera Video CameraDFocus LockGFocusHSwitches Viewfinder between with and without indicatorsSwitches the display modes in the Preview screenIScan BarcodeJSave New Pictures Save New VideosKPicture SizeLScene MicrophoneMPicture Quality Video QualityNSelf-timerOZoom Max/MinQHelpRMobile Light](https://usermanual.wiki/Sharp/HRO00074.Manual/User-Guide-991214-Page-74.png)
![74 CameraContinuous ShootThere are various modes for taking continuous shots.“Camera” → [Options] → “Modes” → “Continuous Shoot”1. Select the desired mode.The following continuous shoot modes are available:“Off”: The continuous shoots are cancelled.“4 Pictures”/“9 Pictures” ( / ): Takes 4 or 9 pictures continuously. After selecting this mode, select from “Fast”, “Normal”, “Slow” or “Manual”.“Overlapped” ( ): Overlaps continuous pictures into one picture and makes an afterimage. After selecting this mode, select “Fast” or “Normal”.Note•When you select “Manual” to take continuous pictures, press B manually at the desired speed.•You cannot use the Continuous Shoot function for picture sizes larger than 480 × 640 pixels. “9 Pictures” and “Overlapped” are not available for picture sizes larger than 240 × 400 pixels.Taking Panorama Pictures“Camera” → [Options] → “Modes” → “Panorama”1. Select “On” and press B.2. Move the phone slowly to keep the + mark aligned with the assisting lines, and press B.3. Select “Save”.Note•The image is captured automatically if the bar in the lower right turns blue before B is pressed in step 2.To Set the Assisting Lines“Camera” → [Options] → “Settings” → “Panorama Settings” → “Assisting Lines”1. Select “On” or “Off”.Note•An error message is displayed if you move the phone fast when taking panorama pictures with this setting on.](https://usermanual.wiki/Sharp/HRO00074.Manual/User-Guide-991214-Page-75.png)
![Camera 75To Set the AE-LockWhen this setting is enabled, the exposure setting is fixed for the same brightness level.“Camera” → [Options] → “Settings” → “Panorama Settings” → “AE-Lock”1. Select “Enable” or “Disable”.Barcode/ScanYou can read barcodes in QR code format. For details, see page 123.“Camera” → [Options] → “Barcode/Scan” → “Scan Barcode”1. Display the barcode.2. Press [Scan].The scanned result is displayed.Camera EffectsYou can select from various camera effects.“Camera” → [Options] → “Modes” → “Camera Effects”1. Select from “Sepia”, “Monochrome”, “Negative” or “Sketch”.Selecting a FrameYou can select the frame from preset patterns or Picture Gallery.“Camera” → [Options] → “Modes” → “Add Frame”1. Select “Preset Frames” or “Picture Gallery”.2. Select the desired frame.The selected frame is confirmed on the display.3. Press B.Note•Images larger than 240 pixels [W] × 400 pixels [H] cannot be used.Selecting the SceneYou can select the appropriate mode by scene when you take a picture.“Camera” → [Options] → “Scene”1. Select from “Auto”, “Night”, “Sports” or “Text”.](https://usermanual.wiki/Sharp/HRO00074.Manual/User-Guide-991214-Page-76.png)
![76 CameraUsing the Full ScreenYou can display the preview on the full screen without the soft key area and indicator area.“Camera” → [Options] → “Settings” → “Display Indicators” → “Full Viewfinder”Note•To return to the normal viewfinder, select “Normal Viewfinder”.Selecting the Shutter Sound“Camera” → [Options] → “Settings” → “Shutter Sound”1. Select the desired shutter sound from 3 preset patterns.To play back the shutter sound, press [Play] in step 1.Note•Continuous Shoot uses the specialised shutter sound that cannot be changed using the above settings.•The shutter sound remains active even when “General Volume” (p. 132) is set to “Silent” to prevent unauthorised use.Functions in Video Camera ModeSelecting the Display Size“Camera” → [Options] → “Display Size”1. Select “Standard” or “Expand”.Selecting the Recording Time and Picture Size“Camera” → [Options] → “Record Time/Size”1. Select “For Message”, “Extended Video” or “SD VIDEO”.“For Message” ( ): Limits the size to send a message depending on service providers.“Extended Video” ( ): Less than 30 minutes (depending on the memory).“SD VIDEO” ( ): Records in SD Video format.2. Select the desired picture size.If “For Message” is selected, select “QCIF(176×144)” or “SubQCIF(128×96)”.If “Extended Video” is selected, select “QVGA(320×240)”, “HQVGA(240×176)”, “QCIF(176×144)” or “SubQCIF(128×96)”.If “SD VIDEO” is selected, select “QVGA(320×240)”.](https://usermanual.wiki/Sharp/HRO00074.Manual/User-Guide-991214-Page-77.png)
![Camera 77Note•If you select “For Message” for the recording time, the file size is limited depending on the service provider. Therefore, the quality is also limited for the setting.•“Send” is not displayed after recording in the Extended Video mode.Recording Video Clips with SoundTo record a video clip with sound, the microphone needs to be activated.“Camera” → [Options] → “Microphone”1. Select “On” or “Off”.Note•The microphone is already turned on in the default setting. Select “Off” to record a video clip without the sound.•The file size of a video clip can be reduced if the sound is not recorded.Video Encoding“Camera” → [Options] → “Settings” → “Video Encode”1. Select the appropriate format.](https://usermanual.wiki/Sharp/HRO00074.Manual/User-Guide-991214-Page-78.png)
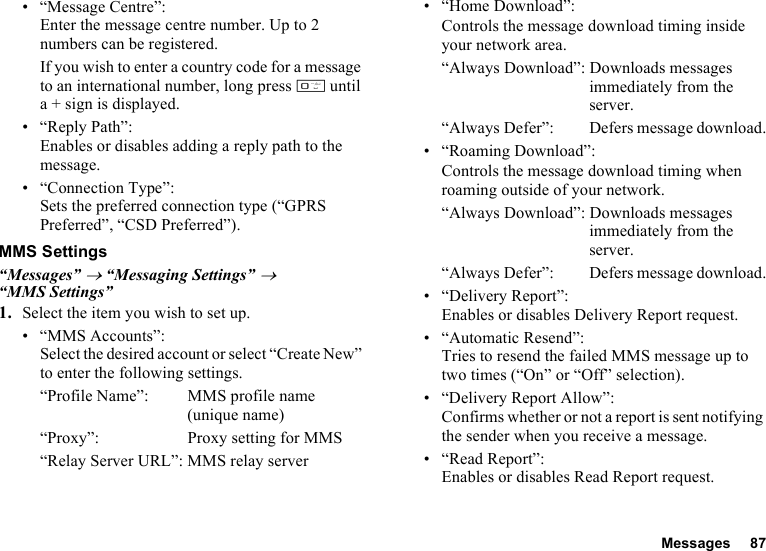
![Messages 79Creating a New Message(SMS/MMS)“Messages” → “Message” → “Create Message”(Email)“Messages” → “Email” → “Create Email”1. Select the recipient field.2. Select the desired method to enter the recipient’s details.3. For MMS, enter or select the Email address or phone number from the Phonebook. For SMS, enter or select a phone number. For Email, enter or select an Email address.• To add multiple Email addresses or phone numbers, highlight the recipient field, press [Options], select “Edit Recipients” and select “Add Recipient”. Enter or select the Email address or phone number from the existing Phonebook.• To change the recipient mode, press [Options], select “Edit Recipients” and highlight the desired recipient. Press [Options] and select “Change to To”, “Change to Cc” or “Change to Bcc”.• To add a subject, highlight the subject field and press B. Then enter the subject in the subject entry screen and press B.4. Place the cursor in the message field.5. Press B to display the message entry screen.Enter the message and press B.6. Press [Options] and select “Send”.“Send” is not available when no recipients are set.After the message is sent, the message is moved to the Sent box.Note•When you create an SMS message, the mode is automatically switched to MMS in the following cases:•When an Email address is entered in the recipient field.•When a subject is entered.•When the size of entered text has exceeded the SMS size limit.Tip•To send the same message to a group of recipients, select “Select Message Group” in step 2, then select the desired group name. For details on creating a mailing list, see “To Create a New Mailing List” on page 55.](https://usermanual.wiki/Sharp/HRO00074.Manual/User-Guide-991214-Page-80.png)
![80 MessagesTo Add a Slide Show1. Perform steps 1 to 5 in “Creating a New Message” on page 79.2. Press [Options] and select “Add Slide”.3. Select “Add Slide After” or “Add Slide Before”.4. Enter another message.If you wish to set the duration of each slide, highlight your message or other inserted item such as a picture or sound file. Press [Options] and select “Slide Duration”, then select the desired duration. Repeat steps 2 and 3 to add more slides.Tip•You can create messages up to 300 KB. Each slide can contain one picture and/or one sound file or video clip.To Attach Data1. In step 6 in “Creating a New Message” on page 79, press [Options] and select “Insert Item”.2. Select “Picture”, “Sound”, “Video”, “Attach Contact”, “Attach Appointment”, “Others” or “Flash®”.When selecting “Attach Contact” or “Attach Appointment”, go to step 4.3. Select the desired option and then select the desired file.If you wish to attach pictures, sounds or video clips that are saved, select “Saved Pictures”, “Saved Sound” or “Saved Video”.If you wish to take new pictures, record sounds or video clips, select “Take Picture”, “Record Voice” or “Record Video”.4. Select the desired data.If you wish to select your own Phonebook entry, select “My Card”.When attaching an appointment, select the desired day including a schedule entry you wish to add and select the desired schedule entry.Note•When attaching JPEG files, select the appropriate resize option, as the maximum message size for sending varies depending on the service provider.](https://usermanual.wiki/Sharp/HRO00074.Manual/User-Guide-991214-Page-81.png)
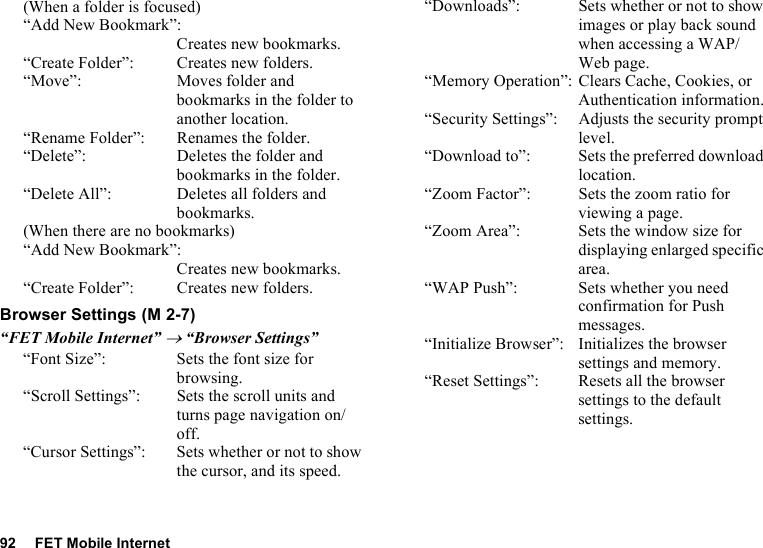
![Messages 81To Remove Attachments1. In step 6 in “Creating a New Message” on page 79, highlight the desired item, press [Options] and then select “Remove Picture”, “Remove Sound”, “Remove Video” or “Remove Item”.Using the Sending OptionsYou can use the message sending options for each type of message.1. Press [Options] and select “Messaging Settings”.• “Delivery Report” (“On”, “Off”) (SMS/MMS): Enables or disables Delivery Report when the message is successfully sent to the recipient.• “Expiry Time” (“Maximum”, “1 hour”, “12 hours”, “1 day”, “1 week”) (SMS/MMS): Sets Expiry Time for a message to be saved in the server.• “Priority” (“High”, “Normal”, “Low”) (MMS/Email): Prioritises composed messages.• “Read Report” (“On”, “Off”) (MMS): Confirms whether or not a report is sent notifying the sender that the message has been read.2. Press [Options] and select “Send”.After the message is sent, the message is moved to the Sent box.Note•The current message size displayed while you are creating the message is an approximation.•If a message cannot be sent for some reason, the message stays in the Outbox and the “ ” is displayed in stand-by.•To send the message in the Outbox, highlight the message, press [Options] and select “Resend”.Tip•To save the message without sending, press [Options] and select “Save to Drafts” in step 6 in “Creating a New Message” on page 79.•You can send the following items attached to multimedia messages. Details are given in the following sections.•Gallery data•Phonebook entry•Schedule entry created by Calendar, etc.•You can use the template option to help you compose messages. For details on using this option, see “Using Templates” on page 50.](https://usermanual.wiki/Sharp/HRO00074.Manual/User-Guide-991214-Page-82.png)
![82 MessagesSending a Message in the Drafts Box(SMS/MMS)“Messages” → “Message” → “Drafts”(Email)“Messages” → “Email” → “Drafts”1. Highlight the desired message.2. Press [Options] and select “Edit & Send”.3. Modify the message, if necessary.4. Press [Options] and select “Send”.“Send” is not available when no recipients are set.Reading a MessageMessages you receive are saved in the Inbox.(SMS/MMS)“Messages” → “Message” → “Inbox”(Email)“Messages” → “Email” → “Inbox”1. Select a folder.2. Select the message you wish to view.Note•When the motion control setting for “Messaging” is set to “On” (p. 138), you can change the size of the text by tilting the phone forward or backward. This is only available when the phone is closed.Storing the Phone Number of a Sender in the Phonebook(SMS/MMS)“Messages” → “Message” → “Inbox”(Email)“Messages” → “Email” → “Inbox”1. Select a folder.2. Highlight the message from which you wish to store the phone number or Email address.3. Press [Options] and select “Save Address”.The new Phonebook entry screen including the phone number is displayed. For details on creating a new Phonebook entry, see “Adding a New Phonebook Entry” on page 52.](https://usermanual.wiki/Sharp/HRO00074.Manual/User-Guide-991214-Page-83.png)
![Messages 83Calling the Phone Number of a Sender Embedded in the Message(SMS/MMS)“Messages” → “Message” → “Inbox”1. Select a folder.2. Highlight the message containing the phone number you wish to dial.3. Press [Options] and select “Call Sender”.Downloading a Single MMS“Messages” → “Message” → “Inbox”1. Select a folder.2. Highlight the message alert ( ) you wish to download.3. Press [Options] and select “Download”.Replying to a Message or to All Addresses(SMS/MMS)“Messages” → “Message” → “Inbox”(Email)“Messages” → “Email” → “Inbox”1. Select a folder.2. Highlight the message you wish to reply to.3. Press [Options] and select “Reply” (to sender only) or “Reply All” (to all other recipients listed in the original To or Cc lists).4. Select “Reply” or “Reply with History”.5. Enter the message.6. Press [Options] and select “Send”.“Send” is not available when no recipients are set.](https://usermanual.wiki/Sharp/HRO00074.Manual/User-Guide-991214-Page-84.png)
![84 MessagesForwarding a Message(SMS/MMS)“Messages” → “Message” → “Inbox”(Email)“Messages” → “Email” → “Inbox”1. Select a folder.2. Highlight the message you wish to forward.3. Press [Options] and select “Forward”.4. Perform steps 1 to 6 in “Creating a New Message” on page 79.Sorting the Messages in the List(SMS/MMS)“Messages” → “Message” → “Inbox”(Email)“Messages” → “Email” → “Inbox”1. Select a folder.2. Press [Options] and select “View Settings”.3. Select “Sort”.4. Select the desired sort option.Cell BroadcastsYou can receive cell broadcast messages or general messages such as weather forecasts and traffic reports. This information is broadcast to subscribers in certain network areas.This function may not be available on all mobile phone networks. Contact your service provider for more information.Enabling/Disabling Cell Broadcasts“Messages” → “Cell Broadcasts” → “Switch On/Off”1. Select “On” or “Off”.Reading Cell Broadcast Messages“Messages” → “Cell Broadcasts” → “Read Messages”1. Select the desired subject.2. Scroll the screen to read the message.3. Press U. (M 4-4)](https://usermanual.wiki/Sharp/HRO00074.Manual/User-Guide-991214-Page-85.png)
![Messages 85Setting Languages for Cell Broadcast Messages“Messages” → “Cell Broadcasts” → “Settings” → “Language”1. Highlight the desired language and press B to check.2. Press [Save].Subscribing to Cell BroadcastsSelect the page of the cell broadcast message that you want.“Messages” → “Cell Broadcasts” → “Settings” → “Set Info Subjects”1. Select “Add/Remove”.2. Highlight the desired subject and press B to check.3. Press [Save].Tip•If the desired subject is not in the list that appears in step 2, select “Create Subject” in step 1, then enter the subject code to add a page. For details on the subject code, contact your service provider.Area InfoThe Area Info is the message information that operators send to subscribers in certain areas.When you receive Area Info, the message (area code) is displayed in stand-by.Enabling/Disabling Area Info“Messages” → “Area Info”1. Select “On” or “Off”.Note•This function may not be available on all mobile phone networks. Contact your service provider for more information.•If Area Info is set to “On”, the stand-by time will decrease. (M 4-5)](https://usermanual.wiki/Sharp/HRO00074.Manual/User-Guide-991214-Page-86.png)
![88 Messages• “Read Report Allow”:Enables or disables Read Report Allow when the recipient is required to inform the sender that the message has been read.• “Expiry Time”: This indicates the number of days and hours for which a message you send may remain undelivered to the message recipient. During this period, the message service centre will continually try to deliver the message to the recipient.• “Slide Duration”:Sets the duration of the slide.• “Slide Auto Play”:Enables or disables Slide Auto Play.• “Send File Settings”: Sets whether or not to send and save the file settings.• “Max Message Size”:Sets the maximum message size for sending and disables sending MMS messages exceeding that size.• “Creation Mode”:When set to “Free”, you can attach files of any format to the mail. When set to “Restricted”, only files in certain formats and size can be attached. The “Restricted” setting has priority over “Max Message Size”.• “Hide Number”:Sets whether to show or hide the sender’s address.• “Delivery Time” (“Immediate”, “1 hour”, “12 hours”, “1 day”, “1 week”): Sets the time the message is delivered after [Options] is pressed and “Send” is selected.• “Anonymous Rejection”:Enables or disables the rejection of messages from anonymous senders.To Activate the MMS Account Profile1. Select “MMS Accounts”.2. Select the desired profile you wish to activate.](https://usermanual.wiki/Sharp/HRO00074.Manual/User-Guide-991214-Page-89.png)


![FET Mobile Internet 91Navigating a WAP or Web Page•a b c d: Moves the cursor in the screen.•A: Launches the option menu if it has not been launched. Used to select an option from the option menu.•B:Executes the highlighted item in the screen.•C: Launches “FET Mobile Internet” by opening the browser when in stand-by. Moves to previous page when the browser is active.•F(short press): Exits the browser.(long press): Turns off the phone.Note•When the motion control setting for “Browser” is set to “On” (p. 138), you can zoom in or zoom out by tilting the phone forward or backward. This is only available when the phone is closed.•When the phone is closed, use the side keys to navigate the WAP/Web page.Editing Bookmarks“FET Mobile Internet” → “Bookmarks”1. Select the desired URL, and press [Options].You can edit the list of Bookmarks by the following options:(When a bookmark is focused)“Edit”: Edits the URL address of the bookmark.“Add New Bookmark”:Creates new bookmarks.“Create Folder”: Creates new folders.“Open in New Tab”: Opens a bookmark in a new tab. (This option is available only when the options menu is opened from the browser screen.)“Send”: Sends the URL address to recipients.“Move”: Moves bookmarks to another location or into a folder.“Details”: Displays detailed information of the WAP/Web page.“Delete”: Deletes a bookmark.“Delete All”: Deletes all bookmarks. (M 2-3)](https://usermanual.wiki/Sharp/HRO00074.Manual/User-Guide-991214-Page-92.png)
![FET Mobile Internet 93Browser Options when OnlineYou can use the various options of the browser.A → [Options]“Home”: Goes to the homepage.“Alert Inbox”: Displays WAP Push alerts.“Forward”: Goes to the next page.“Open This Frame”: Opens the selected frame. (This option is available only when a frame page is displayed.)“Bookmarks”: Displays the Bookmarks menu. See page 91.“My Saved Page”: Displays all the browser screenshots saved in the handset memory.“Copy Text”: Copies the text on the WAP/Web page.“Reload Page”: Reloads the WAP/Web page to get updated information.“Go to URL”: Allows you to type in the URL of a site directly. Handset browser will go to the WAP/Web page that you entered.“Save Items”: Saves items from the browsing pages.“Fit to Screen Width”/“Actual Page Width”:Allows the browser to display in complete page mode or Virtual Screen mode.“Convenient Functions”:Displays functions for page operation.“Access History”: Shows previously browsed pages.“Flash®Menu”: Displays Flash® menu. (This option is available only when a Flash® file is displayed.)“SVG Menu”:Displays SVG menu. (This option is available only when a SVG file is displayed.)“Open in New Tab”: Opens a new window. (This option is available only when one window is opened and a URL is highlighted.)“Tab Menu”: Displays the tab menu. (This option is available only when two or more windows are opened.)“Settings”: Displays the settings menu.“Help”: Displays the browser help screen.“Exit”: Exits the browser.](https://usermanual.wiki/Sharp/HRO00074.Manual/User-Guide-991214-Page-94.png)
![94 GalleryGalleryGallery contains all your pictures, music and videos. You can also transmit pictures, sounds and video clips via infrared or Bluetooth wireless technology to other OBEX-enabled devices.Picture GalleryPictures that are taken by your phone’s camera or images that are downloaded from mobile Internet sites can be viewed, edited and organised.Viewing Pictures“Gallery” → “Picture Gallery”1. Select the file you wish to view.The selected picture is displayed.Note•To switch between viewing handset or memory card content, select the first item in the options menu.•When the motion control action setting for “Image Viewer” is set to “On” (p. 138), you can change the picture being displayed by shaking the phone sideways. This is only available when the phone is closed.Tip•You can scroll through your pictures with P and R.•To change the default view of pictures (Inline Display, Grid View or Display Preview), press [Options], select “Manage Items” and then select “Change List View”.Using Images as Wallpaper“Gallery” → “Picture Gallery”1. Highlight the file you wish to use as wallpaper.2. Press [Options] and select “Set as Wallpaper”.Editing Pictures“Gallery” → “Picture Gallery”1. Highlight the file you wish to edit.2. Press [Options] and select “Edit”.3. Select “Picture Editor” or “Composite”.4. Select the desired option.Note•“Picture Editor” may not be available depending on the original picture and copyright issued. (M 6)(M 6-1)](https://usermanual.wiki/Sharp/HRO00074.Manual/User-Guide-991214-Page-95.png)
![Gallery 95Saving an Image to Phonebook EntriesYou can use this option only for pictures saved in the handset memory.“Gallery” → “Picture Gallery”1. Highlight the file you wish to add to Phonebook.2. Press [Options] and select “Add to Contacts”.To save as a new entry, select “As New”.To overwrite, select “As New Detail” and then select the data you wish to save.For details on entering a name, see “Adding a New Phonebook Entry” on page 52.Downloading Picture Files“Gallery” → “Picture Gallery” → “Download More”The picture file download site is displayed.Video GalleryVideo clips that are recorded by your phone’s video camera or video clips that are downloaded from mobile Internet sites can be viewed and organised.Playing Back Video Clip Files“Gallery” → “Video Gallery”1. Select the file you wish to play back.To pause playback, press B.To resume, press B again.To stop playback, press U.Note•To switch between viewing handset or memory card content, select the first item in the options menu.Using a Video Clip as a Ring Video ClipYou can set your video clip to play back when the phone rings.“Gallery” → “Video Gallery”1. Highlight the desired video clip.2. Press [Options] and select “Set as Ring Video”.Tip•For other option menus, see “Common Option Menus” on page 99.(M 6-2)](https://usermanual.wiki/Sharp/HRO00074.Manual/User-Guide-991214-Page-96.png)
![96 GalleryDownloading Video Clip Files“Gallery” → “Video Gallery” → “Download More”The video clip file download site is displayed.SD VIDEOVideo clips with the “ASF” format that are recorded by a video camera can also be managed with SD VIDEO.“Gallery” → “SD VIDEO”1. Select the desired file.To pause playback, press B.To resume, press B again.To delete a file, highlight the file, press [Options] and select “Delete”.Note•By default, video clips are recorded in 3GP format. To enable SD VIDEO recording, change the setting in the Video Camera as shown below.[Options] → “Record Time/Size” → “SD VIDEO”Sound GalleryThe downloaded sound files and the AMR data recorded by Voice Recorder are managed in Sound Gallery. The default ringtones are not contained within Sound Gallery. Only the sound files that can be played back on the phone are stored in Sound Gallery.Playing Back Sound Files“Gallery” → “Sound Gallery”1. Select the file you wish to play back.To stop playback, press U.Note•Playback may not be available for some sound files. A2DP function is available only when playing back from music player and is not available when playing back from Gallery.•To switch between viewing handset or memory card content, select the first item in the options menu.(M 6-3) (M 6-4)](https://usermanual.wiki/Sharp/HRO00074.Manual/User-Guide-991214-Page-97.png)
![Gallery 97Using the Sound Files as a Ringtone“Gallery” → “Sound Gallery”1. Highlight the file you wish to use as a ringtone.2. Press [Options] and select “Set as ringtone”.Tip•For other option menus, see “Common Option Menus” on page 99.Downloading Sound Files“Gallery” → “Sound Gallery” → “Download More”The sound file download site is displayed.ThemesYou can easily customise the display by using the theme files.Note•Preset themes are not included in “Themes” in “Gallery”.Viewing Previews“Gallery” → “Themes”1. Highlight the theme file you wish to preview.2. Press B.The selected theme file is displayed.Note•To switch between viewing handset or memory card content, select the first item in the options menu.Setting a Theme“Gallery” → “Themes”1. Select the desired theme file.The selected theme file is set as the default theme.Tip•Even after a theme is set, you can set a wallpaper regardless of the set theme. In this case, the other items follow the set theme.•For other option menus, see “Common Option Menus” on page 99.Downloading Theme Files“Gallery” → “Themes” → “Download More”The theme file download site is displayed.(M 6-5)](https://usermanual.wiki/Sharp/HRO00074.Manual/User-Guide-991214-Page-98.png)
![98 GalleryFlash®Playing Back Flash® Files“Gallery” → “Flash®”1. Select the file you wish to play back.To stop playback, press U.Note•Flash® files of up to 150 KB can be played back. Using Images as Wallpaper“Gallery” → “Flash®”1. Highlight the file you wish to use as wallpaper.2. Press [Options] and select “Set as Wallpaper”.Using the Sound Files as a Ringtone“Gallery” → “Flash®”1. Highlight the file you wish to use as a ringtone.2. Press [Options] and select “Set as ringtone”.Other DocumentsSome types of files are stored in the Other Documents folder of the phone. You can edit and use these files as Gallery data.Opening a Document File“Gallery” → “Other Documents”1. Select the desired file.Note•To switch between viewing handset or memory card content, select the first item in the options menu.Tip•For other option menus, see “Common Option Menus” on page 99.(M 6-7) (M 6-8)](https://usermanual.wiki/Sharp/HRO00074.Manual/User-Guide-991214-Page-99.png)
![Gallery 99Common Option MenusFor using the desired file type, first select the appropriate folder in the Gallery menu. Gallery contains the following folders.“Gallery” → “Picture Gallery”“Gallery” → “Video Gallery”“Gallery” → “SD VIDEO”“Gallery” → “Sound Gallery”“Gallery” → “Themes”“Gallery” → “Java™ Gallery”“Gallery” → “Flash®”“Gallery” → “Other Documents”Activating Files with Copyright Protection (DRM)Some pictures, sound files, video clips, Flash® files and theme files have a digital copy protection program, which is called DRM (Digital Rights Management). You need to activate the digital licence permission to open the files. Files protected with DRM are displayed with .1. Select the appropriate folder for the desired file type.2. Highlight the file you wish to activate.3. Press [Options] and select “Get Contents Key”.Note•Some pictures with DRM may not be opened even when an attempt is made to activate it.Sending Gallery DataFor details on Infrared and Bluetooth wireless technology, see “Connectivity” on page 154.1. Select the appropriate folder for the desired file type.2. Highlight the desired file.3. Press [Options] and select “Send”.4. Select “As Message”, “As Email”, “Bluetooth”, “Infrared” or “Send via IrSS”.For “As Message”For details, see “MMS” on page 78.For “As Email”For details, see “Email” on page 78.For “Bluetooth”For details, see “Bluetooth” on page 154.For “Infrared”For details, see “Infrared” on page 157.](https://usermanual.wiki/Sharp/HRO00074.Manual/User-Guide-991214-Page-100.png)
![100 GalleryNote•Pictures/Sounds/Video clips/Themes/Flash® files/Other Documents data protected by copyright cannot be sent attached to a message, with the exception of Separate Delivery files.•When pairing, you need to enter your passcode when establishing contact with a Bluetooth wireless technology enabled device for the first time.Receiving Gallery DataWhen the phone receives Gallery data, a confirmation message is displayed in stand-by.1. Select “Yes”.The received data is saved in the corresponding Gallery folder.Tip•For details on Infrared or Bluetooth wireless settings, see “Connectivity” on page 154.Using Gallery DataYou can copy, move, sort, rename, and delete the saved Gallery data.1. Select the appropriate folder for the desired file type (p. 99).2. Highlight the desired file.3. Press [Options] and select “Manage Items”.4. Select the desired option.“Sort”: Sorts files according to a specific sequence.“Rename”: Renames the file or folder.“Create Folder”: Creates a new folder.“Change List View”:Changes the list view.“Check All”: Selects all files in the list.“Delete All”: Deletes all files in the folder.Note•“Manage Items” is not available for “Java™ Gallery”.To Delete the File1. Select the appropriate folder for the desired file type (p. 99).2. Highlight the desired file.3. Press [Options] and select “Delete”.](https://usermanual.wiki/Sharp/HRO00074.Manual/User-Guide-991214-Page-101.png)
![Gallery 101To See the Gallery Details1. Select the appropriate folder for the desired file type (p. 99).2. Highlight the file you wish to view the details of.3. Press [Options] and select “Details”.Selecting Multiple FilesYou can select more than one item from Gallery for moving, copying, managing and deleting.Note•The following procedure applies when entries other than “Download More” are highlighted.1. Select the appropriate folder for the desired file type (p. 99).2. Highlight the file you wish to select.3. Press [Options] and select “Check”.4. Repeat steps 2 and 3 until you select all the desired files.Tip•To remove the check, highlight the file again and select “Uncheck” in step 3.•If you wish to unselect all, select “Manage Items” in step 3 and select “Uncheck All”.•You can quickly check, uncheck, check all or uncheck all items by using the H, J and L keys.H: Check/uncheck currently highlighted item.J: Checks all items in the current folder.L: Unchecks all checked items in the current folder.Memory StatusThis function helps you to check the memory status of the handset memory or memory card. Memory status covers the following:Handset Memory: Pictures, Videos, Sound Gallery, Themes, Java™ Gallery, Flash®, Other Documents, Others, Total and FreeMemory Card: Pictures, Videos, Sound Gallery, Themes, Flash®, Other Documents, Others, Total and Free“Gallery” → “Memory Status”1. Select “Handset Memory” or “Memory Card”. (M 6-9)](https://usermanual.wiki/Sharp/HRO00074.Manual/User-Guide-991214-Page-102.png)
![102 Java™Java™Java™ GalleryThe list of Java™ applications is displayed.Downloaded applications are displayed in order starting from the latest one.Downloading Applications“Java™” → “Java™ Gallery” → “Download More”1. Select the desired application.Before downloading the application you are asked to confirm what you are about to receive. After checking the information on the confirmation screen, the application can be downloaded.2. Press B to start downloading.3. Press B when finished.Note•User authentication may be required before downloading the application on some information screens.Executing Applications“Java™” → “Java™ Gallery”1. Select the title of the application you wish to execute.The selected application is executed. When using network connection type applications, connection to the network can be selected.2. To end the application, press F and select “End”.Setting as a Screensaver for the Display“Java™” → “Java™ Gallery”1. Highlight the file you wish to use as a screensaver.2. Press [Options] and select “Set as Screensaver”. (M 1) (M 1-1)](https://usermanual.wiki/Sharp/HRO00074.Manual/User-Guide-991214-Page-103.png)
![Java™ 103Setting PermissionYou can set permission for selected Java™ applications.“Java™” → “Java™ Gallery”1. Highlight the desired Java™ application.2. Press [Options] and select “Permission”.3. Select one of the following options:“Phone Call”: Sets permission to make voice calls.“Network Access”: Sets permission to access the network.“Messaging”: Sets permission to perform SMS messaging.“Autorun”: Sets permission to perform the Autorun function.“Bluetooth Conn.”: Sets permission to connect via Bluetooth.“Read User Data”: Sets permission to read user data, such as Phonebook entries, mailbox (Inbox) and Gallery data.“Write User Data”: Sets permission to write entries in your phone, such as Phonebook entries, mailbox (Inbox) and Gallery data.“Use Multimedia”: Sets permission to use the multimedia recording.4. Select one of the following options:“Always Ask”: The confirmation message is displayed every time network access is executed.“Ask Once”: The confirmation message is displayed the first time network access is executed.“Never Ask”: The confirmation message is not displayed while execution of network access is authorised.“No”: Execution of network access is not authorised.Note•Options displayed in step 4 depend on the item selected in step 3.•To clear all the permission settings, select “Reset” in step 3.•Some permissions are not available for some Java™ applications.•“Bluetooth Conn.”, “Read User Data” and “Write User Data” may not be available in step 3.](https://usermanual.wiki/Sharp/HRO00074.Manual/User-Guide-991214-Page-104.png)
![104 Java™Viewing Application InformationYou can check the information of Java™ applications.“Java™” → “Java™ Gallery”1. Highlight the desired Java™ application.2. Press [Options] and select “Information”.Deleting an ApplicationYou can delete an application in the folder.“Java™” → “Java™ Gallery”1. Highlight the desired Java™ application.2. Press [Options] and select “Delete”.Java™ SettingsApplication VolumeYou can set the volume of the application such as the sound effect to one of the five levels or silent. When the profile is set to “Silent”, the “General Volume” setting (p. 132) has priority.“Java™” → “Java™ Settings” → “Application Volume”1. Press a (or d) to increase the volume or press b (or c) to decrease the volume and then press B.Backlight“Java™” → “Java™ Settings” → “Backlight” → “Switch On/Off”1. Select from “Always On”, “Always Off” or “Normal Settings”.“Always On”: Lit while the application is operated.“Always Off”: Unlit while the application is operated even if a key is pressed.“Normal Settings”: Works with the main backlight setting (p. 129). (M 1-2) (M 1-2-1)](https://usermanual.wiki/Sharp/HRO00074.Manual/User-Guide-991214-Page-105.png)
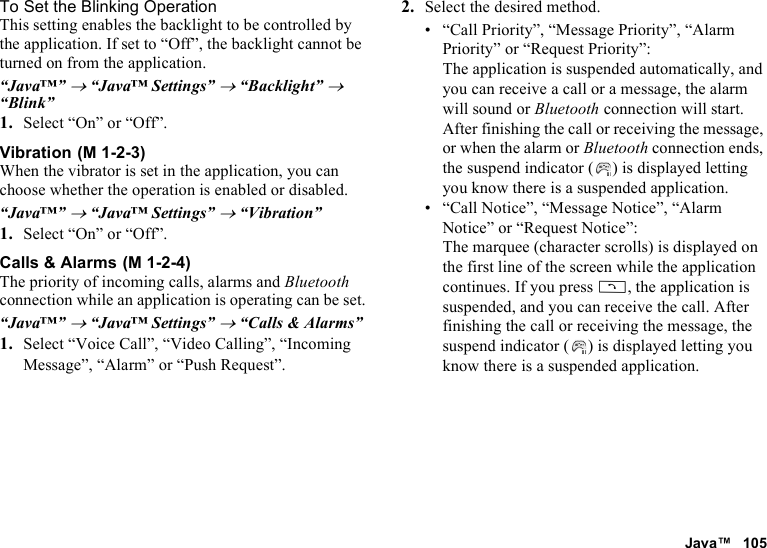
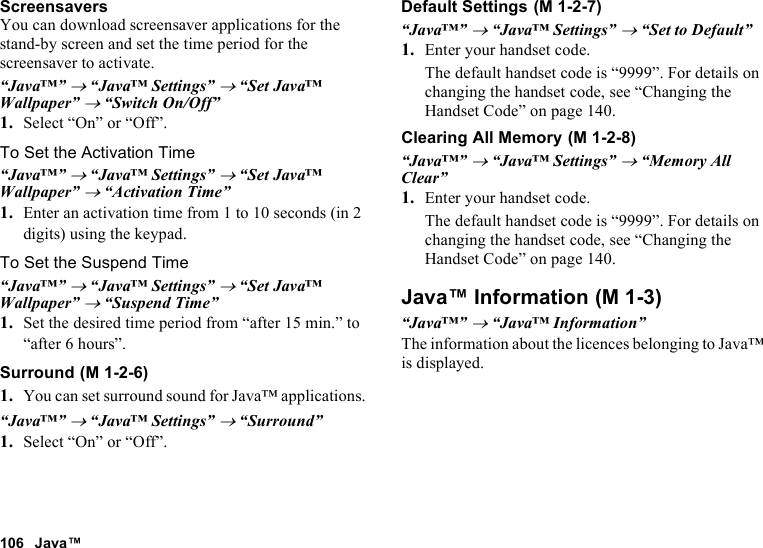
![Organiser 107OrganiserCalendarThe calendar allows you to easily schedule appointments.These entries can also be sent via Bluetooth wireless technology to a PC to share the same schedules. When you exchange entries with other devices, the date and time displayed may be different to that of the original data depending on the data format of the receiving device.Creating a New Entry“Organiser” → “Tools 1” tab → “Calendar”1. Select the desired day to which you want to add an event.2. Select “Add New Entry”.3. Enter the subject.4. Enter the start date and time.5. Select the desired category.6. Select the reminder time.When selecting “Other”, enter the desired reminder date and time.7. Press [Save].Note•If the date and time settings have not been entered, the date and time entry screen is displayed (p. 136).•The reminder will not sound when the profile is set to “Silent”, but will sound when “General Volume” (p. 132) is set to “Silent”.•You can display the Stamp screen by pressing H in the monthly calendar view. Select the desired category.To Change the Settings1. Select the item you wish to change in the New Entry screen.• “Reminder”: Sets options including “Reminder Time”, “Assign Tone/Video” and “Duration” for the reminder.• “Repeat”: Sets the number of times the reminder sounds.•“Location”:Sets the location for the schedule entry.• “Description”: Enables entering a memo for the schedule entry.• “Secret”: Sets to show or hide the schedule entry. Set to “On” to make the data secret or select “Off” to leave it as it is. (M 3) (M 3-1)](https://usermanual.wiki/Sharp/HRO00074.Manual/User-Guide-991214-Page-108.png)
![108 OrganiserViewing a Schedule Entry“Organiser” → “Tools 1” tab → “Calendar”1. Select the day you wish to view.2. Select the desired entry.To Search by Date1. In any view, press [Options] and select “Go to”.2. Select “Today” to display today or “Enter Date” to enter the desired date.Tip•You can control the view by using the following:Monthly or 2-month viewP: Displays the previous month.R: Displays the next month.Q: Displays the Help screen.H: Displays the Stamp screen (monthly view only).J: Displays the Set Colour screen.K: Moves the cursor to today.L: Displays the Find (By Subject) screen.N: Displays the Go to (Enter Date) screen.O: Displays the Find (By Category) screen.c/d: Moves the cursor to left (the previous day) or to right (the next day).a/b: Moves the cursor upward (last week) or downward (next week).Weekly viewP: Displays the previous week.R: Displays the next week.Q: Displays the Help screen.J: Displays the Set Colour screen.K: Moves the cursor to today.L: Displays the Find (By Subject) screen.N: Displays the Go to (Enter Date) screen.O: Displays the Find (By Category) screen.c/d: Moves the cursor to left (the previous day) or to right (the next day).a/b: Moves the weekly view up or down (the previous hour or next hour).](https://usermanual.wiki/Sharp/HRO00074.Manual/User-Guide-991214-Page-109.png)
![Organiser 109Setting a ColourYou can highlight a date or days of the week with seven colour options.For Date Colour“Organiser” → “Tools 1” tab → “Calendar”1. Press [Options] and select “Calendar Settings”.2. Select “Set Colour”.3. Select “By Date”.4. Select the desired colour.Note•To reset the colour setting, select “Reset Colour” in step 4. For Days of the Week Colour“Organiser” → “Tools 1” tab → “Calendar”1. Press [Options] and select “Calendar Settings”.2. Select “Set Colour”.3. Select “By Week” and then select days of the week you wish to colour.4. Select the desired colour.Tip•The selected date/days are also highlighted on the calendar on the stand-by screen.Note•If the same date is set with both a date colour and a day of the week colour, the date is highlighted in the date colour.•Up to 100 days can be set for the highlights.Setting a HolidayYou can set personal holidays in the calendar.“Organiser” → “Tools 1” tab → “Calendar”1. Press [Options] and select “Calendar Settings”.2. Select “Set Holiday”.3. Enter the name.4. Enter the date.5. Select the desired frequency.6. Press [Save].](https://usermanual.wiki/Sharp/HRO00074.Manual/User-Guide-991214-Page-110.png)
![110 OrganiserFinding a Schedule EntryYou can search for a schedule entry by subject or category.To Search by a Subject“Organiser” → “Tools 1” tab → “Calendar”1. In any view, press [Options] and select “Find”.2. Select “By Subject”.3. Enter a few letters of the subject.Search results are displayed in time order.To Search by a Category“Organiser” → “Tools 1” tab → “Calendar”1. In any view, press [Options] and select “Find”.2. Select “By Category”.3. Select a desired category.Search results are displayed in time order.Editing a Schedule Entry“Organiser” → “Tools 1” tab → “Calendar”1. Select the day you wish to edit.2. Highlight the entry you wish to edit, press [Options], then select “Edit”.3. Select the desired item and modify the entry.4. Press [Save].Deleting Schedule Entries1. In any view, press [Options] and select “Delete”.2. Select the desired option.“This Appointment” (daily view): Deletes the selected entry.“All This Day”: Deletes all entries for the selected day.“All This Month” (monthly view): Deletes all entries for the selected month.“Last Two Months” (2-month view): Deletes all entries for the selected two months.“All This Week” (weekly view): Deletes all entries for the selected week.“Up to Last Month” (monthly view): Deletes all entries before the selected month.“Up to Last Week” (weekly view): Delete all entries before the selected week.“All Appointments”: Deletes all entries in this application.](https://usermanual.wiki/Sharp/HRO00074.Manual/User-Guide-991214-Page-111.png)
![Organiser 111Sending a Schedule Entry“Organiser” → “Tools 1” tab → “Calendar”1. Select the day including schedule entries you wish to send.2. Highlight the entry you wish to send, press [Options], then select “Send”.3. Select “As Message”, “As Email”, “Via Bluetooth” or “Via Infrared”.For “Via Bluetooth”For details, see “Bluetooth” on page 154.For “Via Infrared”For details, see “Infrared” on page 157.Note•When pairing, you need to enter your passcode when establishing contact with a Bluetooth wireless technology enabled device for the first time.Receiving a Schedule EntryWhen the phone receives a schedule entry, a confirmation message is displayed in stand-by.1. Select “Yes”.The received entry is saved in the Calendar.Select “No” to reject.Tip•For details on entering Infrared or Bluetooth wireless settings, see “Connectivity” on page 154.Viewing the Memory Status1. In any view, press [Options] and select “Memory Status”.](https://usermanual.wiki/Sharp/HRO00074.Manual/User-Guide-991214-Page-112.png)
![112 OrganiserAlarmsSetting the AlarmsThe alarm function allows you to be alerted at a specified time.Note that you need to set the current date and time before setting the alarm function if it has not been done already.“Organiser” → “Tools 1” tab → “Alarms”1.Select the blank line (--:--) you wish to set an alarm to.2. Enter the desired time.3. Press [Save].To Change the Settings1. Select the item you wish to change in the Set Alarm screen.• “Subject”: Sets the subject for the alarm setting.• “Repeat”:Sets the number of times the alarm sounds.• “Assign Tone/Video”:Assigns a tone or video clip file to the alarm.• “Snooze”:Sets the snooze option.• “Alarm Volume”:Sets the desired volume.The alarm will not sound when “Alarm Volume” is set to “Silent”.• “Vibration”:Sets the vibration pattern of the alarm.For details on selecting a vibration, see “Vibration” on page 135.•“Duration”:Sets the duration of the alarm.Resetting an Alarm“Organiser” → “Tools 1” tab → “Alarms”1. Highlight the alarm you wish to reset.2. Press [Options] and select “Reset Alarm”.Resetting All Alarms“Organiser” → “Tools 1” tab → “Alarms”1. Press [Options] and select “Clear All”. (M 3-2)](https://usermanual.wiki/Sharp/HRO00074.Manual/User-Guide-991214-Page-113.png)
![Organiser 113Setting for Silent ProfileYou can set whether to sound the alarm when the profile is set to “Silent”.“Organiser” → “Tools 1” tab → “Alarms” → “Settings” → “For Silent Profile”1. Select “Ring” or “Do not Ring”.Setting the Alarm to the World Clock TimeYou can set the alarm to sound according to the time of the World Clock.“Organiser” → “Tools 1” tab → “Alarms” → “Settings” → “Link to World Clk”1. Select “On” or “Off”.TasksYou can register your schedule as task entries for a given date or time.Creating a New Entry“Organiser” → “Tools 1” tab → “Tasks”1. Select “Add New Entry”.2. Enter the subject.3. Enter the due date and time.4. Press [Save].Note•If the date and time settings have not been entered, the date and time entry screen is displayed (p. 136).To Select the Reminder Time1. On the New Entry screen, select “Reminder”.2. Select “Reminder Time”.3. Select the reminder time.When selecting “Other”, enter the desired reminder date and time.To Change the Type of Alarm Tone or Video Clip File1. On the New Entry screen, select “Reminder”.2. Select “Assign Tone/Video”.3. Select “Preset Sounds”, “Sound Gallery”, “Video Gallery” or “Flash®”.4. Select the desired tone or video clip file.For details on selecting a ringtone or a ring video clip, see “Assigning a Ringtone for an Incoming Call” or “Assigning a Ring Video Clip for an Incoming Call” on page 133. (M 3-3)](https://usermanual.wiki/Sharp/HRO00074.Manual/User-Guide-991214-Page-114.png)
![114 OrganiserTo Change the Duration of Alarm Tone or Video1. On the New Entry screen, select “Reminder”.2. Select “Duration”.3. Select the desired duration.To Set the Alarm Volume“Organiser” → “Tools 1” tab → “Tasks”1. Press [Options] and select “Alarm Settings”.2. Select “Alarm Volume”.3. Press a (or d) to increase the volume or press b (or c) to decrease the volume and then press B.To Set the Vibration“Organiser” → “Tools 1” tab → “Tasks”1. Press [Options] and select “Alarm Settings”.2. Select “Vibration”.3. Select “On”, “Link to Sound” or “Off”.To Set for the Silent ProfileYou can set whether to sound the alarm when the profile is set to “Silent”.“Organiser” → “Tools 1” tab → “Tasks”1. Press [Options] and select “Alarm Settings”.2. Select “For Silent Profile”.3. Select “Ring” or “Do not Ring”.To Set the Priority1. On the New Entry screen, select “Priority”.2. Select “Normal”, “High” or “Low”.To Change the Description1. On the New Entry screen, select “Description”.2. Enter a memo for the task entry.To Make the Entry Secret1. On the New Entry screen, select “Secret”.2. Select “On” to make the data secret or select “Off” to leave it as it is.](https://usermanual.wiki/Sharp/HRO00074.Manual/User-Guide-991214-Page-115.png)
![Organiser 115To Unlock the Secret Settings TemporarilyYou can show the secret tasks temporarily.“Organiser” → “Tools 1” tab → “Tasks”1. Highlight the desired entry.2. Press [Options] and select “Unlock Temporarily”.Note•Once the phone has returned to stand-by, the temporarily unlocked tasks are reset as secret data.Making the Entry Completed or Uncompleted“Organiser” → “Tools 1” tab → “Tasks”1. Highlight the desired entry.2. Press [Done].To make the entry incomplete, press [Not Yet].Finding a Task EntryTo Search by a Subject“Organiser” → “Tools 1” tab → “Tasks”1. Press [Options] and select “Find”.2. Select “By Subject”.3. Enter a few letters of the subject and press B.Search results are displayed in time order.To Search by a Due Date“Organiser” → “Tools 1” tab → “Tasks”1. Press [Options] and select “Find”.2. Select “By Due Date”.3. Select a desired due date and press B.Search results are displayed in time order.Sending a Task Entry“Organiser” → “Tools 1” tab → “Tasks”1. Highlight the task entry you wish to send.2. Press [Options] and select “Send”.3. Select “As Message”, “As Email”, “Via Bluetooth” or “Via Infrared”.For “Via Bluetooth”For details, see “Bluetooth” on page 154.For “Via Infrared”For details, see “Infrared” on page 157.Note•When pairing, you need to enter your passcode when establishing contact with a Bluetooth wireless technology enabled device for the first time.](https://usermanual.wiki/Sharp/HRO00074.Manual/User-Guide-991214-Page-116.png)
![116 OrganiserViewing the Memory Status“Organiser” → “Tools 1” tab → “Tasks”1. Press [Options] and select “Memory Status”.Deleting Entries“Organiser” → “Tools 1” tab → “Tasks” → [Options] → “Delete”1. Select the desired option.“This Task”: Deletes the selected entry.“All Completed Tasks”: Deletes all checked entries.“All Tasks”: Deletes all entries.CalculatorThe calculator function performs the 4 arithmetic calculations using up to 12 digits.“Organiser” → “Tools 1” tab → “Calculator”Key operations for calculation are as follows:To enter a decimal point, press P.To clear the entered number or function, press U.To do the calculations, press B.To start a new calculation, press U. (M 3-4)](https://usermanual.wiki/Sharp/HRO00074.Manual/User-Guide-991214-Page-117.png)
![Organiser 117Rate ConversionYou can also use the calculator as a currency calculator to convert from/to a home currency using a conversion rate that you enter.To Set a Currency Conversion Rate“Organiser” → “Tools 1” tab → “Calculator” → [Options] → “Currency Converter” → “Exchange Rate”1. Select “Domestic” or “Foreign”.2. Enter the domestic or foreign currency.To Convert a Value“Organiser” → “Tools 1” tab → “Calculator”1. Enter the value to be converted.2. Press [Options] and select “Currency Converter”.3. Select “Convert to Domestic” or “Convert to Foreign”.Expenses MemoYou can record an expenses memo with pre-defined or edited categories.Recording in the Expenses Memo“Organiser” → “Tools 1” tab → “Expenses Memo” → “Add New Expense”1. Enter the expenses using the digit keys.2. Select the desired category.Expenses memo is registered.Viewing Totals“Organiser” → “Tools 1” tab → “Expenses Memo” → “Totals”Recorded expenses are displayed on the screen.To Change Category1. In the total view, highlight the desired item.2. Press [Change].3. Select the desired category. (M 3-5) (M 3-5-1) (M 3-5-2)](https://usermanual.wiki/Sharp/HRO00074.Manual/User-Guide-991214-Page-118.png)
![118 OrganiserTo Change Amount1. In the total view, highlight the desired item.2. Press [Options] and select “Change Amount”.3. Enter the desired amount using the digit keys.To Delete a Recorded Item or All Items1. In the total view, highlight the desired item.2. Press [Options] and select “Delete Item” or “Delete All”.Editing the Category Name“Organiser” → “Tools 1” tab → “Expenses Memo” → “Edit Category”1. Select the desired category name.2. Modify the name.StopwatchYou can store 4 lap times when using the stopwatch function.“Organiser” → “Tools 2” tab → “Stopwatch”1. Press [Start].Press [LAP] to view the lap time before the stopwatch stops. Last 4 lap times are saved.2. Press [Stop].Tip•You can save a record of lap times and the stop time by pressing [Options] and selecting “Save to Templates”.Resetting the Time1. After stopping the stopwatch, press [Options] and select “Reset”. (M 3-5-3) (M 3-d-1)](https://usermanual.wiki/Sharp/HRO00074.Manual/User-Guide-991214-Page-119.png)
![Organiser 119Countdown Timer“Organiser” → “Tools 2” tab → “Countdown Timer”1. Enter the time to count.You can set the time from 1 second to 60 minutes.2. Press [Start].Press [Suspend] to pause the countdown.Press [Resume] to continue counting.3. When the countdown has finished, press [Stop] and then press [Start] to start the countdown again.Editing the Countdown Time1. In the countdown start screen, press [Options] and select “Edit”.2. Modify the desired time.World ClockSetting the Time Zone“Organiser” → “Tools 2” tab → “World Clock”1. Press [Edit] and select “Set Time Zone”.The current time zone is indicated by red line on the world map.2. Press c or d to change the time zone.3. Press [Accept].To Set the Custom Time Zone“Organiser” → “Tools 2” tab → “World Clock”1. Press [Edit] and select “Set Time Zone”.2. Press [Custom].3. Enter the desired city name and time difference.Setting Daylight Saving“Organiser” → “Tools 2” tab → “World Clock”1. Press [Edit] and select “Daylight Saving”.2. Select “On” or “Off”. (M 3-d-2) (M 3-d-3)](https://usermanual.wiki/Sharp/HRO00074.Manual/User-Guide-991214-Page-120.png)
![120 OrganiserHour MinderHour Minder function informs you of the time by sounding a tone.“Organiser” → “Tools 2” tab → “Hour Minder”1. Select “Switch On/Off”.2. Select “On” or “Off”.3. Select “Select Time”.4. Select the desired time.5. Select “Save”.To Change the Settings“Organiser” → “Tools 2” tab → “Hour Minder”1. Select “Advanced”.2. Select the item you wish to change.“Assign Tone/Video”:Assigns a tone or video clip file.“Volume”: Sets the volume.“Vibration”: Sets the vibration.“Duration”: Sets the duration.“For Silent Profile”:Sets whether to sound a tone when the profile is set to “Silent”.“Link to World Clk”:Sets to sound a tone according to the time of the World Clock.Document ViewerYou can view PC documents.“Organiser” → “Tools 3” tab → “Document Viewer”1. Select the file you wish to view.To cancel reading, press U or C.Note•You can view the following types of files with the document viewer: PDF (.pdf), Microsoft Excel (.xls), Microsoft Word (.doc), Microsoft PowerPoint (.ppt).•For the shortcut keys that can be used in the document viewer, refer to the help by pressing [Options] and selecting “Help”. •A file of up to 10 MB can be opened.•Some files may not be displayed correctly depending on the type or size, such as a file of vertical text (not supported) or when the memory runs out while viewing a large document. •Some PDF files may not be displayed correctly due to a shortage of memory even if the file size is not large when numerous fonts are embedded or image data is pasted. (M 3-d-4) (M 3-d-d-1)](https://usermanual.wiki/Sharp/HRO00074.Manual/User-Guide-991214-Page-121.png)
![Organiser 121•Depending on how the PDF document was created, some characters in a PDF file may not be displayed.•Document files that are saved in Gallery or linked in a WAP/Web page can be viewed with the document viewer.•When the motion control setting for “Document Viewer” is set to “On” (p. 138), you can zoom in or zoom out by tilting the phone forward or backward. This is only available when the phone is closed.•Document files that are protected with a password cannot be viewed with the document viewer.Text TemplatesYou can register up to 500 text templates for use in text messages and multimedia messages. The maximum capacity of the text templates is 8192 characters.Adding Phrases to Text Templates“Organiser” → “Tools 3” tab → “Text Templates” → “Add New Template”1. Enter the text.2. Select the desired category.Editing Text Templates“Organiser” → “Tools 3” tab → “Text Templates”1. Highlight the text template you wish to edit.2. Press [Options] and select “Edit Text”.To view the text template, press B.To delete the text template, press [Options] and select “Delete”.3. Modify the text and press B.Changing the Category“Organiser” → “Tools 3” tab → “Text Templates”1. Highlight the desired text template.2. Press [Options] and select “Change Category”.3. Select the desired category. (M 3-d-d-2)](https://usermanual.wiki/Sharp/HRO00074.Manual/User-Guide-991214-Page-122.png)
![122 OrganiserSending Text Templates“Organiser” → “Tools 3” tab → “Text Templates”1. Highlight the text template you wish to send.2. Press [Options] and select “Send Template”.3. Select “As Message”, “Via Bluetooth” or “Via Infrared”.For “Via Bluetooth”For details, see “Bluetooth” on page 154.For “Via Infrared”For details, see “Infrared” on page 157.Voice RecorderThis allows you to record a voice clip, which can be used to remind you of schedule entries or be sent within a multimedia message. The recorded voice clip is saved in Sound Gallery. Voice clips are saved in .amr format.Recording a Voice Clip“Organiser” → “Tools 3” tab → “Voice Recorder”1. Press B to start recording.To stop recording before the recording time is over, press B.2. Select “Save” to save the voice clip.Note•Press a (or V) or b (or W) to adjust the sound volume when playing back the recorded file.Sending Voice Clips“Organiser” → “Tools 3” tab → “Voice Recorder”1. Press B to start recording.To stop recording before the recording time is over, press B.2. Select “Save and Send”.Selecting the Record Time“Organiser” → “Tools 3” tab → “Voice Recorder” → [Options] → “Record Time”1. Select “For Message” or “Extended Voice”.When selecting “Extended Voice”, voice clips are automatically saved to a memory card.Selecting Storage Memory“Organiser” → “Tools 3” tab → “Voice Recorder” → [Options] → “Save Recording to”1. Select the desired location.When selecting “Choice”, you can select the location when saving a voice clip. (M 3-d-d-3)](https://usermanual.wiki/Sharp/HRO00074.Manual/User-Guide-991214-Page-123.png)
![Organiser 123ScannerWith the built-in digital camera, you can read barcodes in QR code format. The scanned data can be saved as a Phonebook entry, URL, Email address and text.Note•When scanning does not take place, it may be due to one of the following reasons: type or size of barcode, scratches, dirt, damage, print quality, light reflection, etc.Reading Barcodes“Organiser” → “Tools 3” tab → “Scanner” → “Scan Barcode”1. Display the barcode using the camera.2. Press [Scan].3. Press [Options] and select the desired option.The options vary depending on the scanned data.“Save”: The result is saved.“Send Message”: The result is sent as SMS or MMS.“Save to Templates”: The result is saved as text.“Copy”: The result is copied.To Select the Focus Mode“Organiser” → “Tools 3” tab → “Scanner” → “Scan Barcode”1. Press [Options] and select “Focus”.2. Select “Auto Focus”, “Macro” or “Manual Focus”.To Use Continuous Scanning1. In scanning mode, press [Options] and select “Continuous Scan”.2. Select “On” or “Off ”.To Set the Mobile Light“Organiser” → “Tools 3” tab → “Scanner” → “Scan Barcode”1. Press [Options] and select “Mobile Light”.2. Select “On” or “Off”.To Adjust the Exposure“Organiser” → “Tools 3” tab → “Scanner” → “Scan Barcode”1. Press [Options] and select “Exposure”.2. Select the desired exposure. (M 3-d-d-4)](https://usermanual.wiki/Sharp/HRO00074.Manual/User-Guide-991214-Page-124.png)
![124 OrganiserViewing the Scanned Data“Organiser” → “Tools 3” tab → “Scanner” → “Scanned Results”1. Highlight the data you wish to view, then press [View].Phone HelpYou can view the help list and use it to guide you in the phone’s functions.“Organiser” → “Tools 3” tab → “Phone Help”1. Select “Settings Method”, “Common Functions” or “Key Operation”.2. Press a or b. (M 3-d-d-5)](https://usermanual.wiki/Sharp/HRO00074.Manual/User-Guide-991214-Page-125.png)
![126 SettingsSettingsPhone SettingsSetting a ProfileThere are 4 profiles: “Normal”, “Car”, “Silent” and “Personal”.Activating a Profile“Settings” → “Phone Settings” tab → “Profiles”1. Select the desired profile.Note•When a profile is set, the corresponding indicator described on page 24 is displayed in stand-by.•The settings of “Normal” profile cannot be changed.•For “Silent” and “Car” profiles, some of the settings, such as volume level, cannot be changed.Tip•In stand-by, long press R to switch Profiles between Silent mode and the profile most recently activated.Resetting Profile Settings“Settings” → “Phone Settings” tab → “Profiles”1. Highlight the profile you wish to reset.2. Press [Reset].3. Enter your handset code.The default handset code is “9999”. For details on changing the handset code, see “Changing the Handset Code” on page 140.Event LightYou can set the Small Light to flash when receiving an incoming call or a new message.“Settings” → “Phone Settings” tab → “Profiles”1. Highlight “Car”, “Silent” or “Personal”.2. Press [Edit].3. Select “Event Light”.4. Select the desired option.“For Voice Call”: Flashes when an incoming voice call is received.“For Video Calling”: Flashes when an incoming video calling is received.“For New Message”: Flashes when a new message is received.“Java Start”: Flashes when Bluetooth notification is received.“Delivery Report”: Flashes when a delivery report is received. (M 9) (M 9-1)](https://usermanual.wiki/Sharp/HRO00074.Manual/User-Guide-991214-Page-127.png)
![Settings 127Status LightYou can set the Small Light to flash when you miss any incoming calls or new messages.“Settings” → “Phone Settings” tab → “Profiles”1. Highlight “Car”, “Silent” or “Personal”.2. Press [Edit].3. Select “Status Light”.4. Select the desired option.“For Missed Call”: Flashes when an incoming voice call is missed.“For New Message”: Flashes when a new message is missed.“Java Start”: Flashes when Bluetooth notification is missed.“Delivery Report”: Flashes when a delivery report is missed.Any Key AnswerYou can answer a call by pressing any key except F, U, S, [Options], [Busy], X or side keys. For details, see page 35.“Settings” → “Phone Settings” tab → “Profiles”1. Highlight “Car”, “Silent” or “Personal”.2. Press [Edit].3. Select “Any Key Answer”.4. Select “On” or “Off”.Setting the DisplayYou can change the display settings.Setting the WallpaperYour phone includes preset pictures to be used as wallpaper in stand-by. Pictures taken with the phone’s digital camera or images downloaded from a WAP site can also be used as wallpaper.“Settings” → “Phone Settings” tab → “Display Settings” → “Wallpaper”1. Select “Vertical” or “Horizontal”.2. Select the folder in which the picture you wish to set is contained.Pictures can be selected from “Preset Pictures”, “Picture Gallery”, “Flash®” or “Other Documents”.3. Select the desired picture.4. After displaying the picture, press B.Note•Some pictures cannot be used because of their picture and data types.•Wallpaper can be linked to a theme. Select “Link to Theme” in step 2. (M 9-2) (M 9-2-1)](https://usermanual.wiki/Sharp/HRO00074.Manual/User-Guide-991214-Page-128.png)
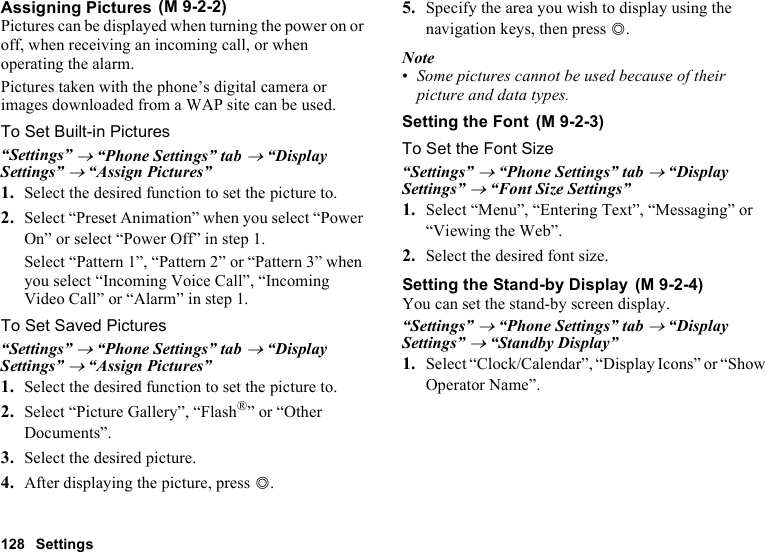
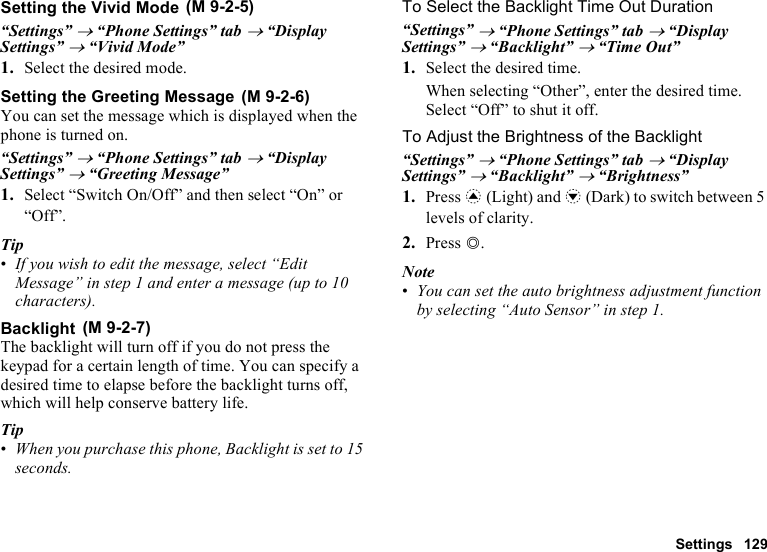
![130 SettingsSetting the Display SavingThe screen of this phone will automatically turn off after a given amount of time. You can change the length of time before the Display Saving goes into effect, which will help conserve battery life.“Settings” → “Phone Settings” tab → “Display Settings” → “Display Saving”1. Select the desired time.When you purchase this phone, Display Saving is set to 1 minute.Note•To cancel the Display Saving: The display saving continues until either a key is pressed or there is an incoming alert. The first key press only cancels this function. You must press another key in order to enter any numerical or text value.Setting the Display MannerYou can set the backlight to turn off for a specified time. If any operation is performed while Display Manner is set, the backlight turns on. Display Manner is resumed when the backlight dims.“Settings” → “Phone Settings” tab → “Display Settings” → “Display Manner”1. Select “Switch On/Off”.2. Select “On” or “Off”.To Set the Screen Time Out when the Phone is Closed“Settings” → “Phone Settings” tab → “Display Settings” → “Display Manner”1. Select “Lights out period”.2. Enter the start time and end time.3. Press [Save].Note•Enter the start and end times according to the format set in “Time Format”.•If the clock settings have not been entered, the date and time entry screen is displayed (p. 136). (M 9-2-8) (M 9-2-9)](https://usermanual.wiki/Sharp/HRO00074.Manual/User-Guide-991214-Page-131.png)
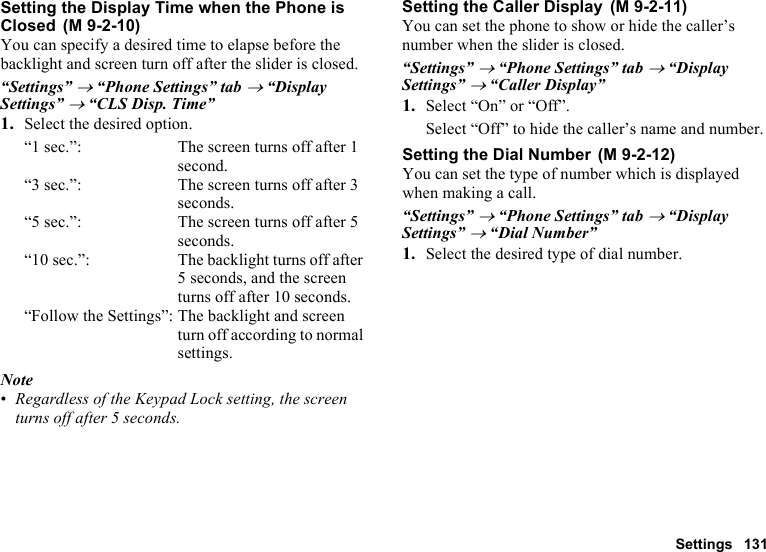

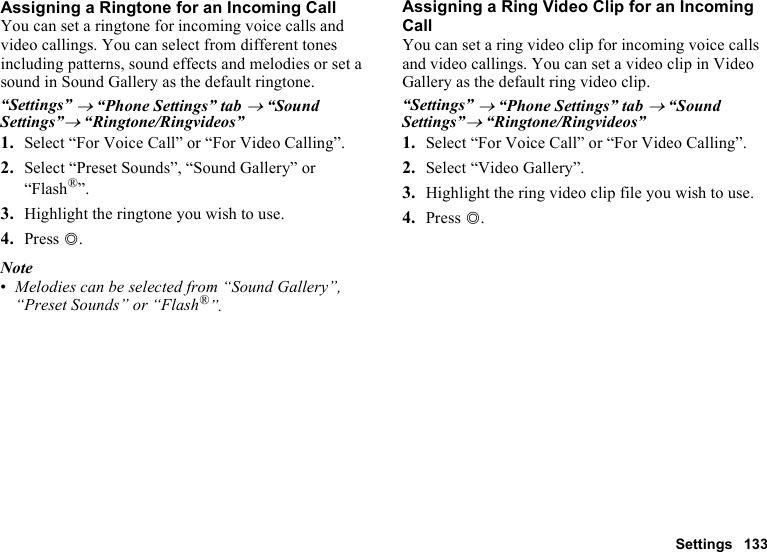
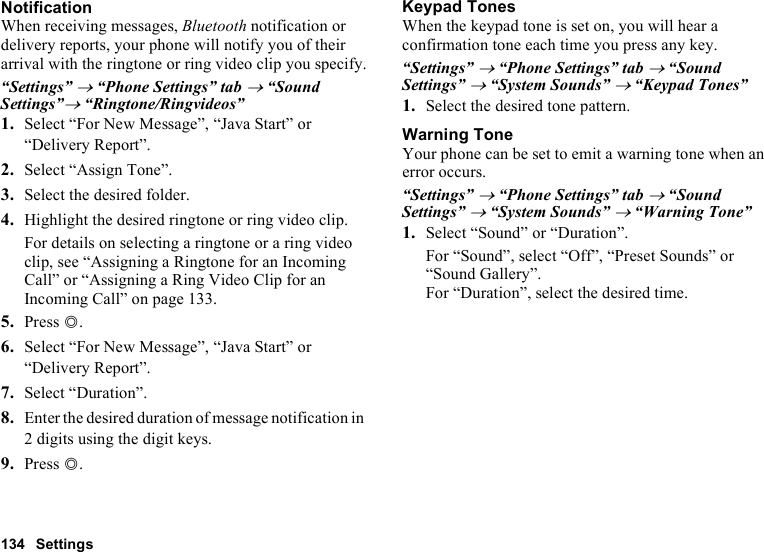
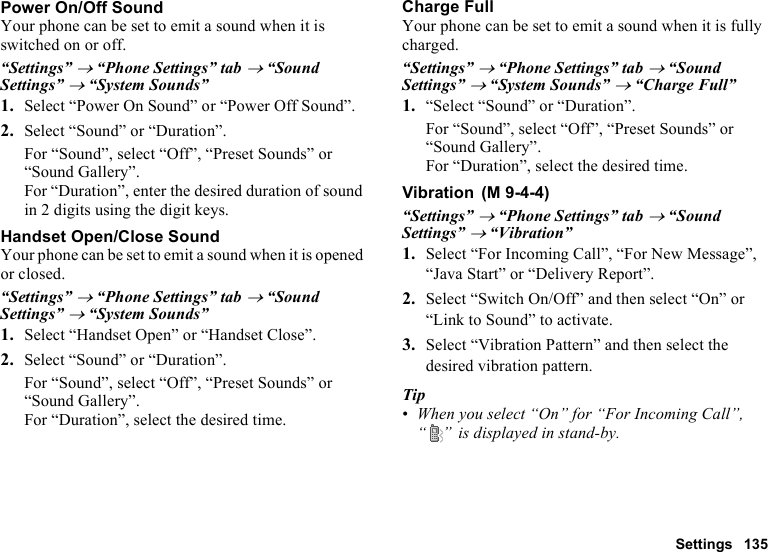
![136 SettingsSurround SoundYou can set surround sound.“Settings” → “Phone Settings” tab → “Sound Settings”→ “Surround”1. Select “On” or “Off”.Date & TimeYou need to set the correct time and date in order for your phone’s various time-based functions to work correctly.“Settings” → “Phone Settings” tab → “Date & Time” → “Set Date/Time”1. Enter the day, month, year and time using the digit keys.Tip•When you enter the time in the 12-hour format, press a or b to switch between am and pm. The order in which the date and time is displayed is based on the format setting.To Set Daylight Saving“Settings” → “Phone Settings” tab → “Date & Time” → “Daylight Saving”1. Select “On” or “Off”.To Set the Time Zone“Settings” → “Phone Settings” tab → “Date & Time” → “Set Time Zone”1. Press c or d to select the home city to set.2. Press B.To Customise the Time Zone“Settings” → “Phone Settings” tab → “Date & Time” → “Set Time Zone”1. Press [Custom].2. Enter the city name.3. Enter the time-zone differences using the digit keys.Press a or b to switch between − and +.4. Press B.World ClockFor details, see page 119.To Select the Time Format“Settings” → “Phone Settings” tab → “Date & Time” → “Time Format”1. Select “24 Hour” or “12 Hour”. (M 9-4-8) (M 9-5-1) (M 9-5-2) (M 9-5-4) (M 9-5-5)](https://usermanual.wiki/Sharp/HRO00074.Manual/User-Guide-991214-Page-137.png)
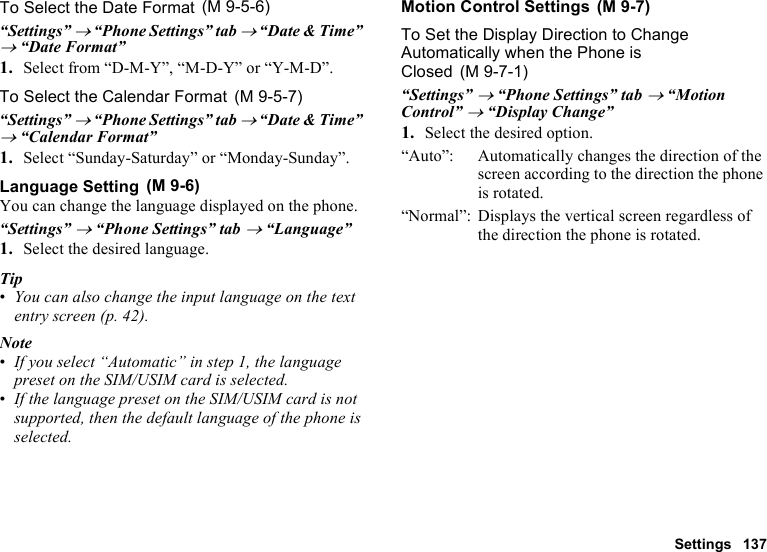
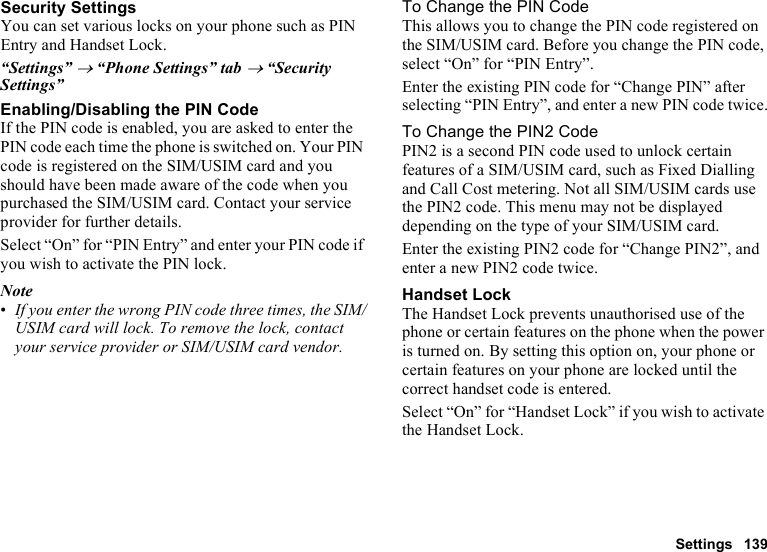
![140 SettingsFunction LockBy setting this option on, all the functions of your phone will be locked until the correct handset code is entered.Enter your handset code after selecting “Function Lock”.To Turn Off the Function LockEnter your handset code in stand-by to turn the Function Lock off.Phonebook LockThe Phonebook Lock function prevents unauthorised use of your Phonebook.Select “On” to lock or “Off” to unlock for “Phonebook Lock” and enter your handset code.The default handset code is “9999”. For details on changing the handset code, see “Changing the Handset Code”.History LockThe History Lock function prevents unauthorised access to Call Log. By setting this option on, Call Log cannot be viewed until the correct handset code is entered.Press [Check] to lock or [Uncheck] to unlock.Showing Secret DataBy setting this option on, the hidden data can be displayed.Select “On” to display or “Off” to hide for “Show Secret Data”. Enter your handset code when you select “On”.The default handset code is “9999”. For details on changing the handset code, see “Changing the Handset Code”.Changing the Handset CodeThe default handset code is “9999”.Select “Change Handset Code” and enter the old handset code, then enter a new handset code twice.](https://usermanual.wiki/Sharp/HRO00074.Manual/User-Guide-991214-Page-141.png)
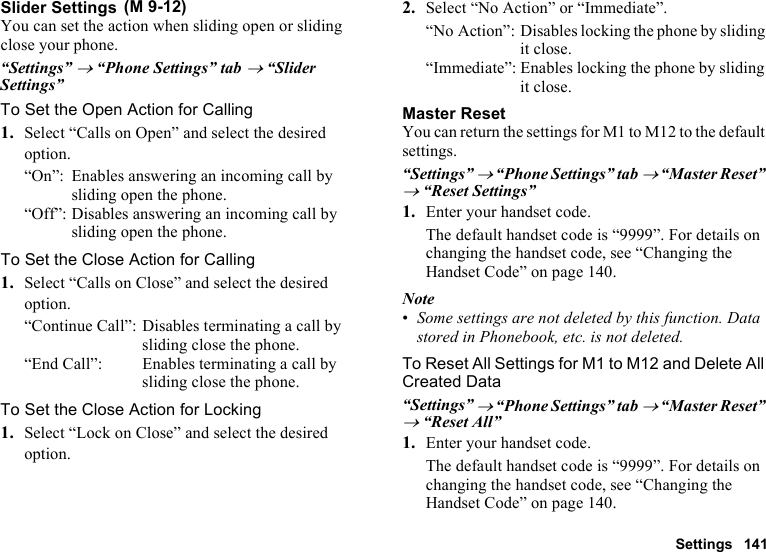

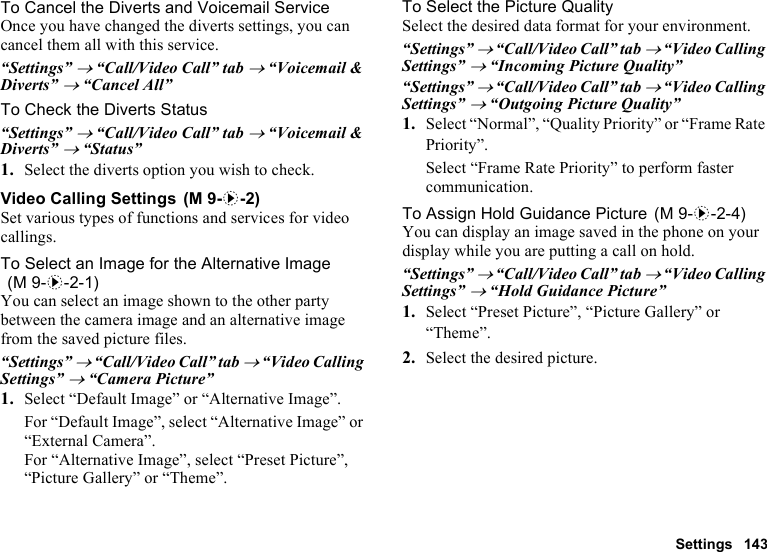
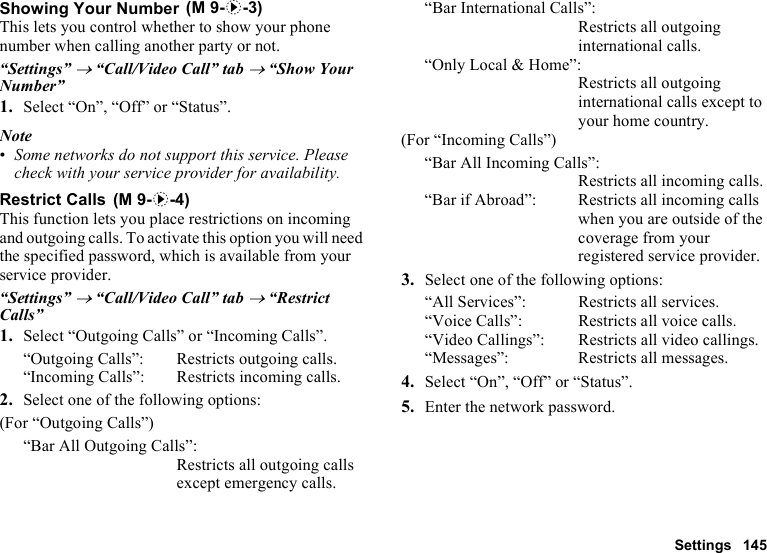
![146 SettingsTo Cancel Settings“Settings” → “Call/Video Call” tab → “Restrict Calls”1. Select “Outgoing Calls” or “Incoming Calls”.2. Select “Cancel All”.3. Enter the network password.Fixed Dialling NumbersThis option is available on most SIM/USIM cards for mobile phones. It allows you to configure a SIM/USIM card so that it can only be used to make calls to numbers on a predefined list.Note•This service depends on the SIM/USIM card.To Enable Fixed Dialling Numbers“Settings” → “Call/Video Call” tab → “Restrict Calls” → “FDN”1. Select “Switch On/Off”.2. Select “On” to enable this function.3. Enter your PIN2 code.To Add a New Name“Settings” → “Call/Video Call” tab → “Restrict Calls” → “FDN”1. Select “Edit Dial List”.2. Select a blank field.3. Enter your PIN2 code.4. Add a name and a phone number.For details on adding a name and phone number, see “Adding a New Phonebook Entry” on page 52.5. Press [Save].Rejecting an Incoming CallYou can register phone numbers you do not wish to answer.To Reject the Registered Number“Settings” → “Call/Video Call” tab → “Restrict Calls” → “Rejected Numbers” → “Switch On/Off”1. Select “On” or “Off”.To Register the Rejected Number“Settings” → “Call/Video Call” tab → “Restrict Calls” → “Rejected Numbers” → “Set Rejecting Number”1. Select a blank field.2. Enter the desired number.](https://usermanual.wiki/Sharp/HRO00074.Manual/User-Guide-991214-Page-147.png)
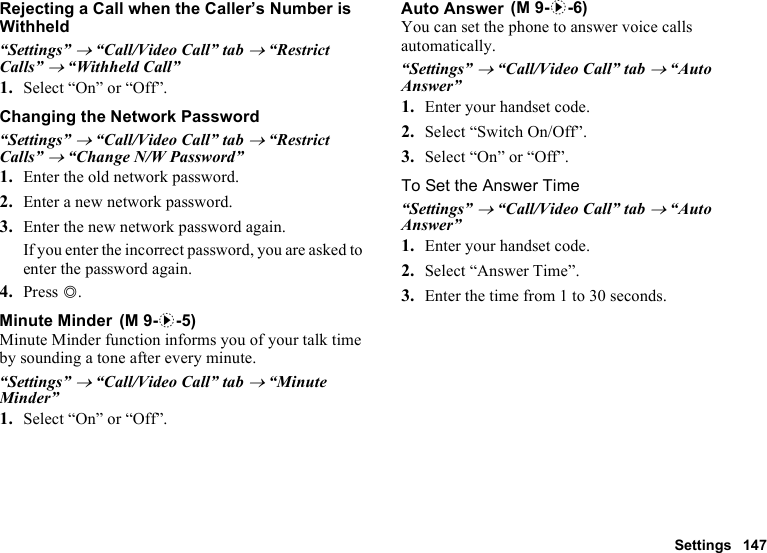
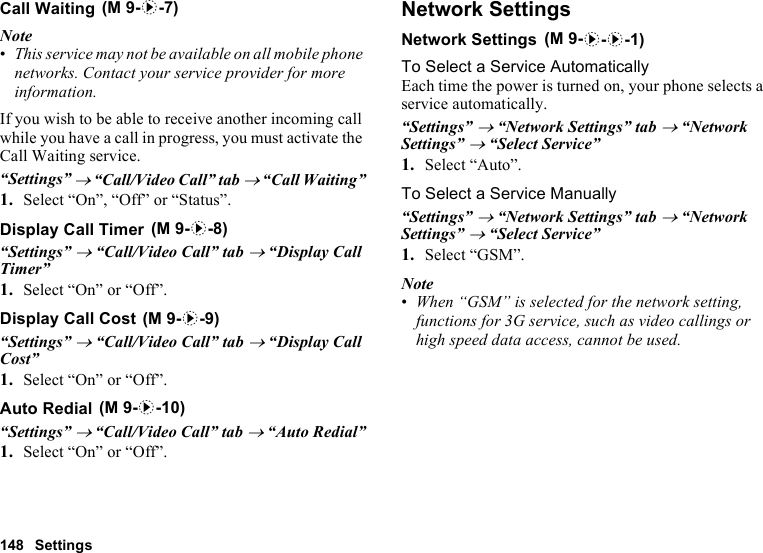
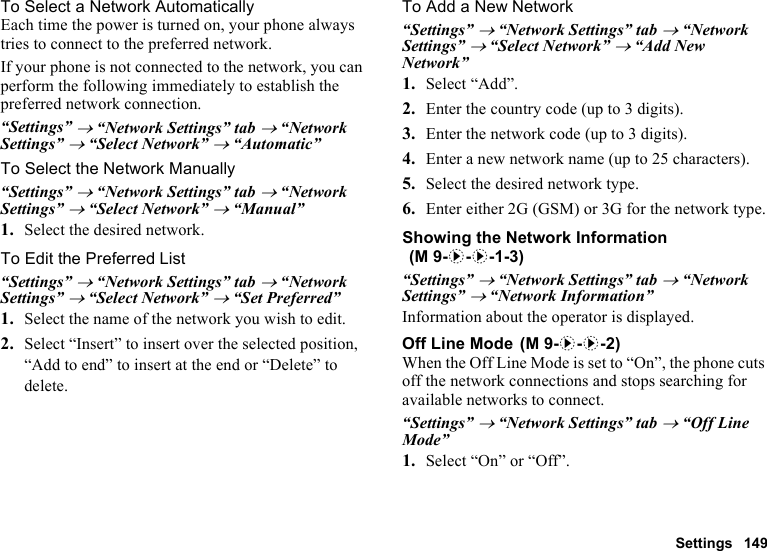
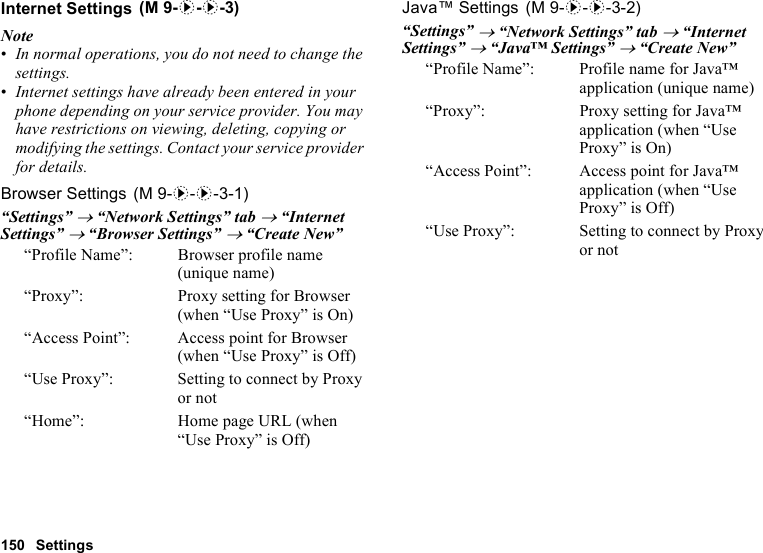
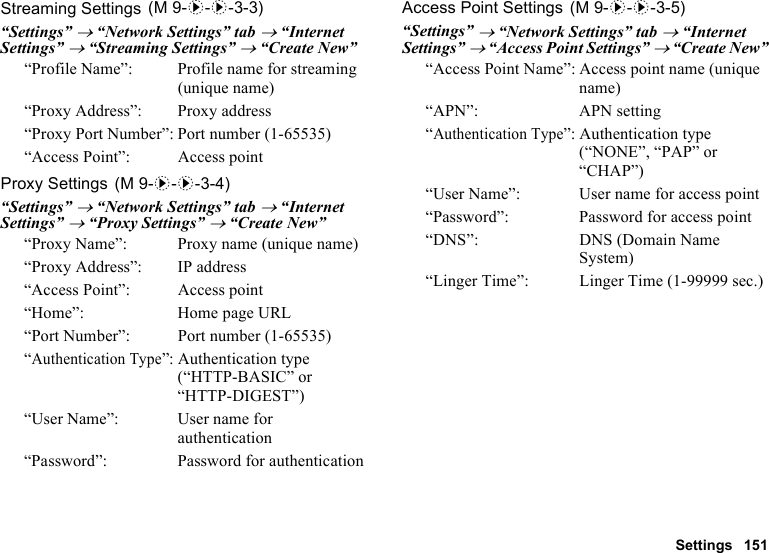
![152 SettingsRe-provisioning Settings“Settings” → “Network Settings” tab → “Internet Settings” → “Re-provisioning Settings” → “Execute Pending”Clearing DNS Cache“Settings” → “Network Settings” tab → “Internet Settings” → “Clear DNS Cache”To Activate the Browser/Java™/Streaming Profile“Settings” → “Network Settings” tab → “Internet Settings”1. Select “Browser Settings”, “Java™ Settings” or “Streaming Settings”.2. Select the desired profile you wish to activate.To Edit/View/Copy/Delete the Browser/Java™/Streaming/Proxy/Access Point Profile“Settings” → “Network Settings” tab → “Internet Settings”1. Select “Browser Settings”, “Java™ Settings”, “Streaming Settings”, “Proxy Settings” or “Access Point Settings”.2. Highlight the desired profile.3. Press [Options] and select the desired option.“Edit”: Modify the desired item.“View”: Confirm the details of the profile.“Copy”: Enter the new file name.“Delete”: Select “Yes” to delete. (M 9-d-d-3-6) (M 9-d-d-3-7)](https://usermanual.wiki/Sharp/HRO00074.Manual/User-Guide-991214-Page-153.png)
![Call Log 153Call LogThe phone will record the last 30 missed calls, received calls and dialled numbers.Viewing Call Log“Call Log”1. Select from “All Calls”, “Dialled Numbers”, “Missed Calls” or “Received Calls”.The selected call log list is displayed.To switch logs, press c or d.2. Select the phone number you wish to view.If you wish to dial the number, press D to make a voice call or T to make a video calling.Tip•You can also confirm call logs by pressing D in stand-by.Sending Messages1. In the call log list, highlight the phone number or name you wish to send a message to.2. Press [Options] and select “Create Message”.For details on creating a message, see “Creating a New Message” on page 79.Deleting a Call Log1. In the call log list, press [Options] and select “Delete” or “Delete All”.Call TimersThis function lets you check the duration of your calls.Checking the Duration of the Last Call and All Calls“Call Log” → “Call Timers”1. Select “Dialled Calls” or “Received Calls”.Resetting Call Timers“Call Log” → “Call Timers” → “Clear Timers”1. Enter your handset code.The default handset code is “9999”. For details on changing the handset code, see “Changing the Handset Code” on page 140.Data CounterYou can confirm the number of bytes used in the data transmission.“Call Log” → “Data Counter”1. Select “Last Data” or “All Data”.Resetting All Data Counter“Call Log” → “Data Counter” → “Clear Counter” (M 11) (M 11-5) (M 11-5-3)](https://usermanual.wiki/Sharp/HRO00074.Manual/User-Guide-991214-Page-154.png)
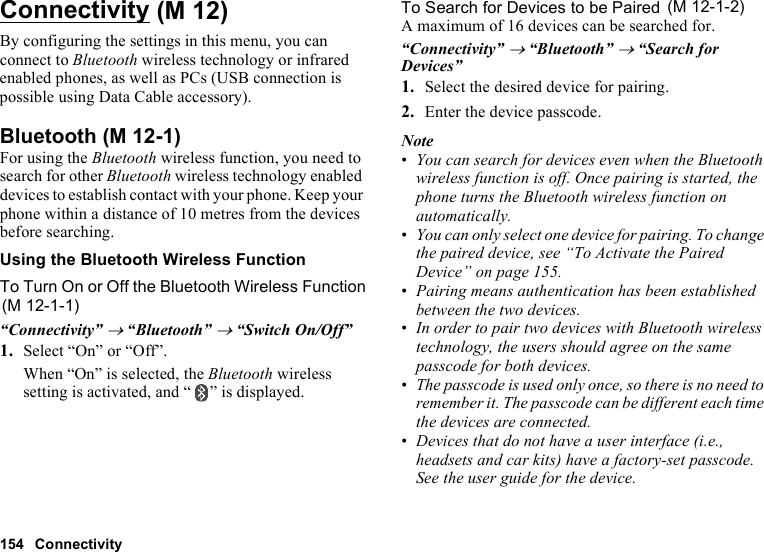
![Connectivity 155Tip•You can save battery power by turning the Bluetooth wireless function off while it is not in use. Turn the Bluetooth wireless function off in “To Turn On or Off the Bluetooth Wireless Function” on page 154 or in “To Turn Off Automatically” on page 157.•During a call, you can divert voice calls to the paired handsfree device. Press [Options], select “Transfer Audio” and then “To Handset” or “To Bluetooth”.To Activate the Paired DevicePaired devices are listed by tabs for all devices for handsfree devices and for Audio devices.“Connectivity” → “Bluetooth” → “Paired Devices”1. Press d to switch to the list for handsfree devices. 2. Select the desired device you wish to activate.To Check the Paired Handsfree Devices“Connectivity” → “Bluetooth” → “Paired Devices”1. Press d to switch to the list for handsfree devices. 2. Highlight the desired handsfree device.3. Press [Options] and select “Set to Prior Connect”.To Check the Audio Device“Connectivity” → “Bluetooth” → “Paired Devices”1. Press d twice to switch to the list for audio devices.2. Highlight the desired audio device.3. Press [Options] and select “Set to Prior Connect”.To Rename or Delete the Paired Devices “Connectivity” → “Bluetooth” → “Paired Devices”1. Press c or d to switch between all paired devices and handsfree devices. 2. Highlight the desired device.3. Press [Options].4. Select “Change Name” or “Delete”.You can rename or delete by pressing B after selecting desired device.](https://usermanual.wiki/Sharp/HRO00074.Manual/User-Guide-991214-Page-156.png)
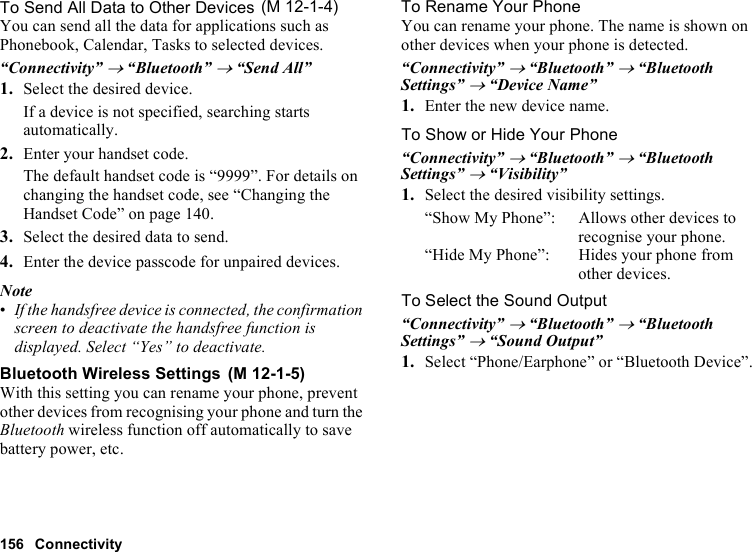
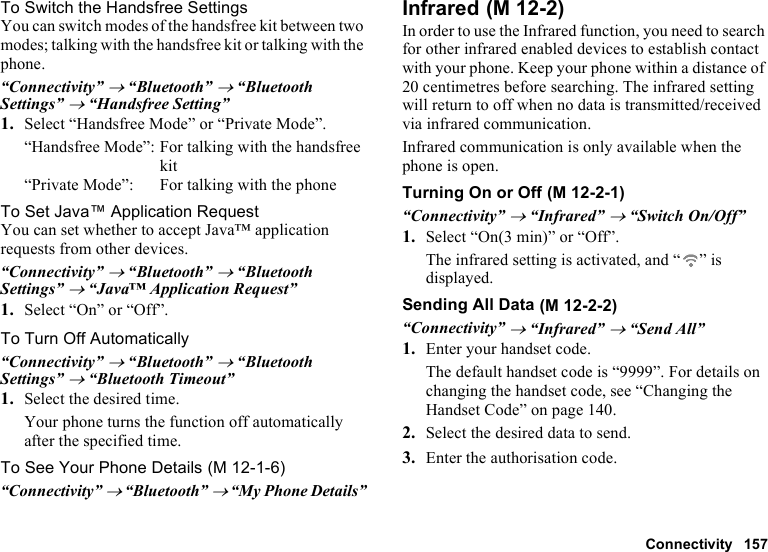
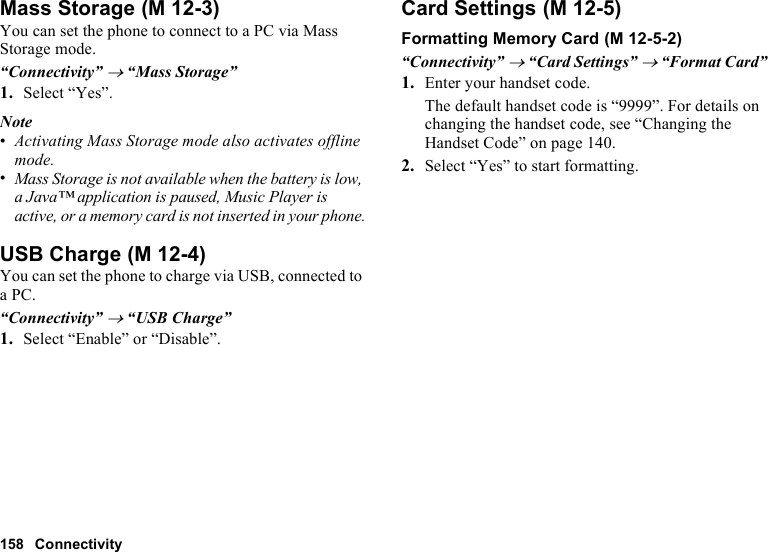
![Connectivity 159Making a Backup FileWith a memory card inserted in your phone, you can back up data in Messages (Inbox, Drafts, Sent Messages), Call Manager, Message Groups, Calendar, Tasks, Text, and Bookmarks in the handset memory to the memory card. You can also restore the backup data from the memory card.“Connectivity” → “Card Settings” → “Backup/Restore” → “Backup”1. Enter your handset code.The default handset code is “9999”. For details on changing the handset code, see “Changing the Handset Code” on page 140.2. Check off the desired items to back up and press [Execute].To back up all files, press [Options] and select “Check All” to check off all items. Then press [Execute].3. Select “Yes” to start backing up the data.Restoring a Backup File“Connectivity” → “Card Settings” → “Backup/Restore” → “Restore”1. Enter your handset code.The default handset code is “9999”. For details on changing the handset code, see “Changing the Handset Code” on page 140.2.Check off the desired items to restore and press [OK].To restore all files, press [Options] and select “Check All” to check off all items. Then press [OK].3. Select the desired file to restore and press [OK].A confirmation message indicating deletion from the handset memory is displayed.4. Select “Yes” to start restoring.Deleting a Backup File“Connectivity” → “Card Settings” → “Backup/Restore” → “File Management”1. Select the desired folder.2. Check off the desired files to delete and press [Delete].To delete all backup files, press [Options] and select “Check All” to check off all files. Then press [Delete].3. Select “Yes” to start deleting.](https://usermanual.wiki/Sharp/HRO00074.Manual/User-Guide-991214-Page-160.png)
![160 Connecting WX-T825 to Your PCConnecting WX-T825 to Your PCYou can use the following functions by connecting the WX-T825 to your PC using a USB data cable or via Bluetooth wireless technology:• 3G/GSM modem• Handset Manager for WX-T825• Music Manager for WX-T825• Sync Manager for WX-T825Note•Operation with software not provided by Sharp is not guaranteed.System RequirementsOperating System:Windows 2000*, Windows XP**, Windows Vista* Service Pack 4 or later** Service Pack 2 or laterSupported Software:Microsoft Outlook/Outlook ExpressInterface:USB port or Bluetooth wireless portCD-ROM driveTo use Music Manager, DirectX9 and Windows Media Player 9 or later are required.3G/GSM ModemYou can use WX-T825 as a 3G/GSM modem to access the Internet from your PC. Connect your phone to your PC via Bluetooth wireless technology or USB interface. Software installation on your PC is required. Modem via the USB Data Cable1. Insert the CD-ROM into your PC’s CD-ROM drive.The WX-T825 CD-ROM screen is displayed.If the WX-T825 CD-ROM screen is not displayed, double-click [Launcher.exe] in your CD-ROM.2. Select the USB driver from the on-screen instructions of your CD-ROM, and start installation of USB driver software following the on-screen instructions of your CD-ROM.•During installation, the on-screen instructions ask you to connect your phone to your PC. Power on your phone and attach the phone to the USB port of your PC using the USB data cable (optional accessory).3. Follow the on-screen instructions to complete installation.](https://usermanual.wiki/Sharp/HRO00074.Manual/User-Guide-991214-Page-161.png)
![Connecting WX-T825 to Your PC 1614. Select the modem driver from the on-screen instructions of your CD-ROM, and install modem driver software following the on-screen instructions of your CD-ROM.5. Follow the on-screen instructions to use your phone as a modem driver.• When the on-screen instructions ask for the modem driver type, select the cable as a modem driver.Modem via Bluetooth Connection1. Turn on the Bluetooth wireless function of your phone.For details, see “To Turn On or Off the Bluetooth Wireless Function” on page 154.2. Pair your PC with your phone.For details on pairing your PC with your phone, see “To Search for Devices to be Paired” on page 154.3. Insert the CD-ROM into your PC’s CD-ROM drive.The WX-T825 CD-ROM screen is displayed.If the WX-T825 CD-ROM screen is not displayed, double-click [Launcher.exe] in your CD-ROM.4. Select the modem driver from the on-screen instructions of your CD-ROM, and install modem driver software following the on-screen instructions of your CD-ROM.5. Follow the on-screen instructions to use your phone as a modem driver.• When the on-screen instructions ask for the modem driver type, select Bluetooth as a modem driver.Note•Modem communication is not possible while communicating with the Handset Manager via Bluetooth wireless technology or USB interface.•It is not recommended that you make or answer calls when you are using WX-T825 as a GSM/GPRS modem. The operation may be interrupted.•Your phone exhausts the battery when connected to a PC, even when not communicating.•For a detailed explanation on how to use the modem driver, please click and refer to the help on the modem driver.](https://usermanual.wiki/Sharp/HRO00074.Manual/User-Guide-991214-Page-162.png)
![162 Connecting WX-T825 to Your PCHandset ManagerYou can transmit the following items between your phone and your PC, and can use Phonebook entries on your PC:• Gallery files (pictures/sounds/video clips/themes/Flash® files/Other Documents data)• Phonebook entries• Schedule entriesVia USB Data Cable1. Insert the CD-ROM into your PC’s CD-ROM drive.The WX-T825 CD-ROM screen is displayed.If the WX-T825 CD-ROM screen is not displayed, double-click [Launcher.exe] in your CD-ROM.2. Select Handset Manager from the on-screen instructions of your CD-ROM, and start installation of Handset Manager software following the on-screen instructions of your CD-ROM.• If you have not installed the USB driver, follow steps 2 and 3 on page 160.3. Follow the on-screen instructions to complete installation.• During installation, the on-screen instructions ask you to select an interface. Select the USB data cable as an interface.4. Power on your phone and attach the phone to the USB port of your PC using the USB data cable (optional accessory).5. Launch Handset Manager from the relevant folder.6. Enter your handset code.7. Follow the on-screen instructions of Handset Manager.For details, see the User Guide Software which is installed within Handset Manager or our web-site, http://www.sharp-mobile.com.](https://usermanual.wiki/Sharp/HRO00074.Manual/User-Guide-991214-Page-163.png)
![Connecting WX-T825 to Your PC 163Via Bluetooth1. Insert the CD-ROM into your PC’s CD-ROM drive.The WX-T825 CD-ROM screen is displayed.If the WX-T825 CD-ROM screen is not displayed, double-click [Launcher.exe] in your CD-ROM.2. Select Handset Manager from the on-screen instructions of your CD-ROM, and start installation of Handset Manager software following the on-screen instructions of your CD-ROM.3. Follow the on-screen instructions to complete installation.• During installation, the on-screen instructions ask you to select an interface. Select Bluetooth as an interface.4. Launch Handset Manager from the relevant folder.5. Enter your handset code.6. Follow the on-screen instructions of Handset Manager.Note•Some large files may not be able to be transmitted from the PC to the phone.•Applications (Camera, Gallery, etc.) cannot be run when the phone is connected to the PC via Bluetooth wireless technology interface or USB data cable.•If you have already installed Sharp Handset Manager, you need to uninstall the previous one.•If you have trouble with installation, uninstall Handset Manager, restart your PC, reinstall Handset Manager and restart.•For details, see the User Guide Software which is installed within Handset Manager or our web-site, http://www.sharp-mobile.com.Music ManagerYou can manage the playlist and exchange sound files on your PC. Available files are the sound files in the following formats: MP3, AAC, 3GPP.Tip•MP3 files with two or more periods (“.”) used in the file name cannot be saved.](https://usermanual.wiki/Sharp/HRO00074.Manual/User-Guide-991214-Page-164.png)
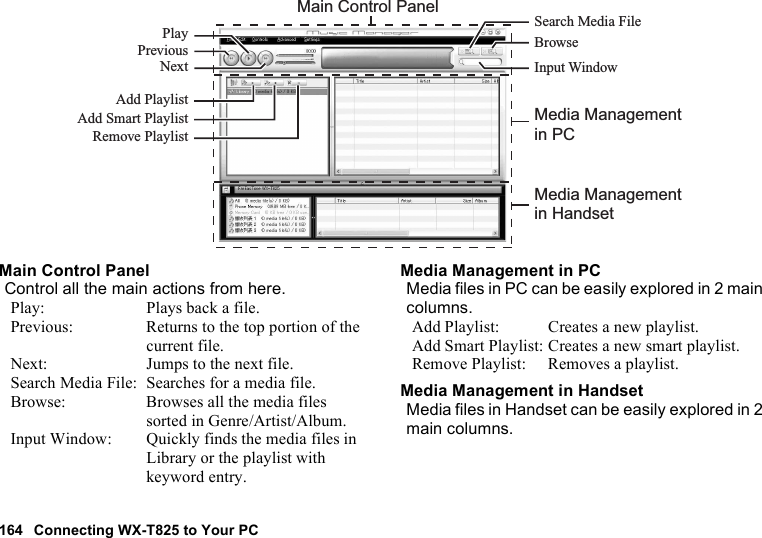

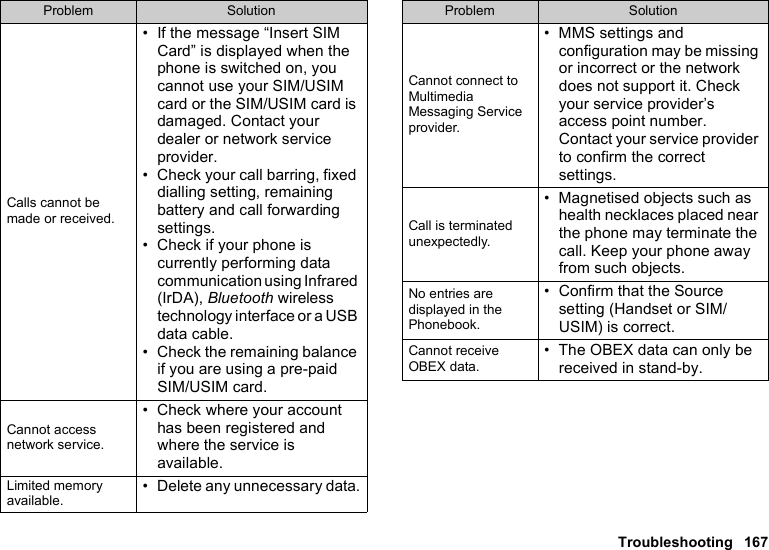
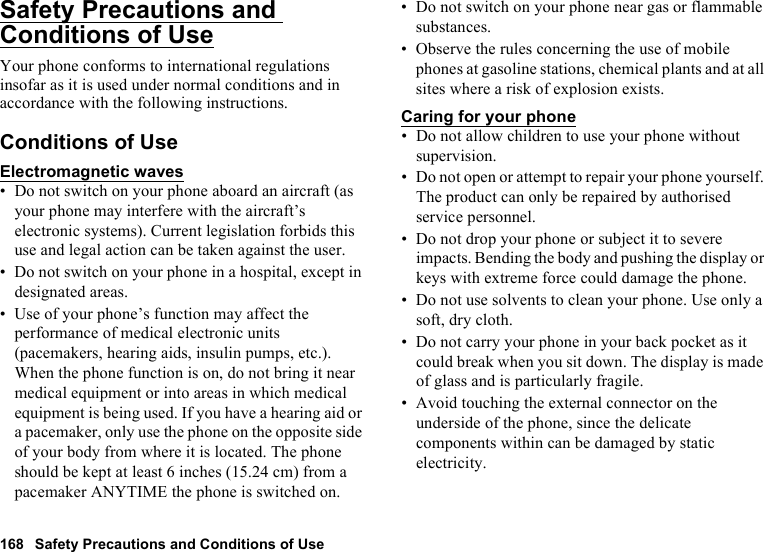
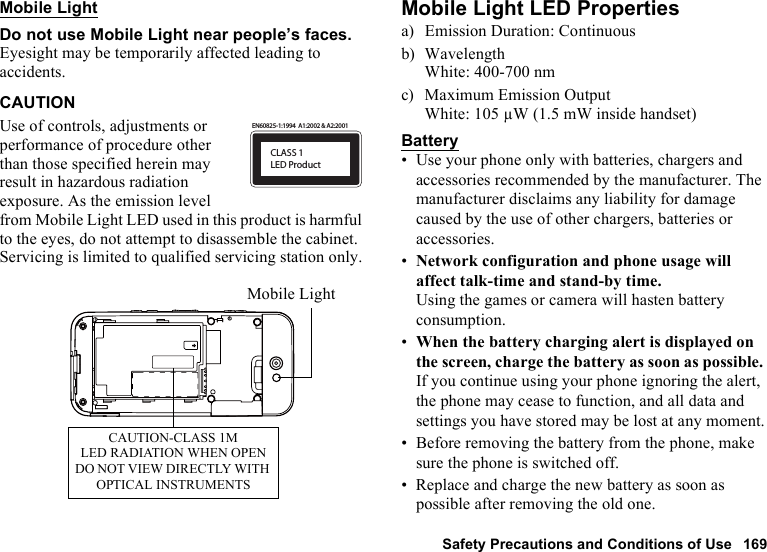
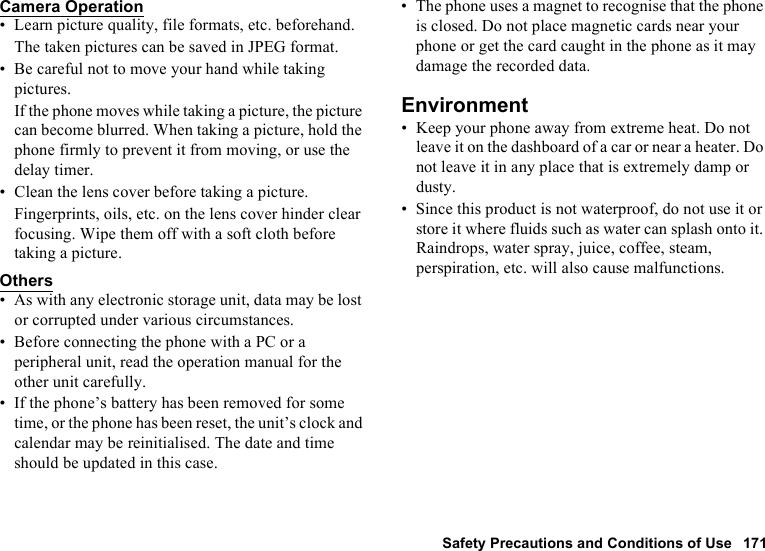
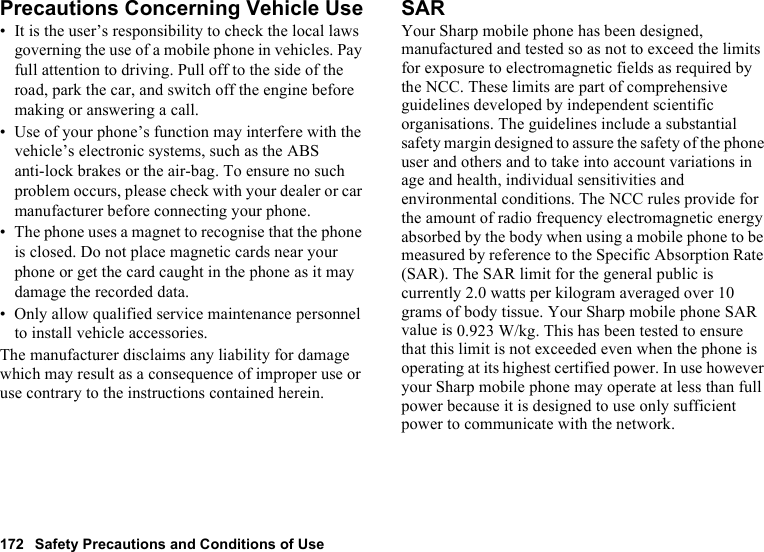
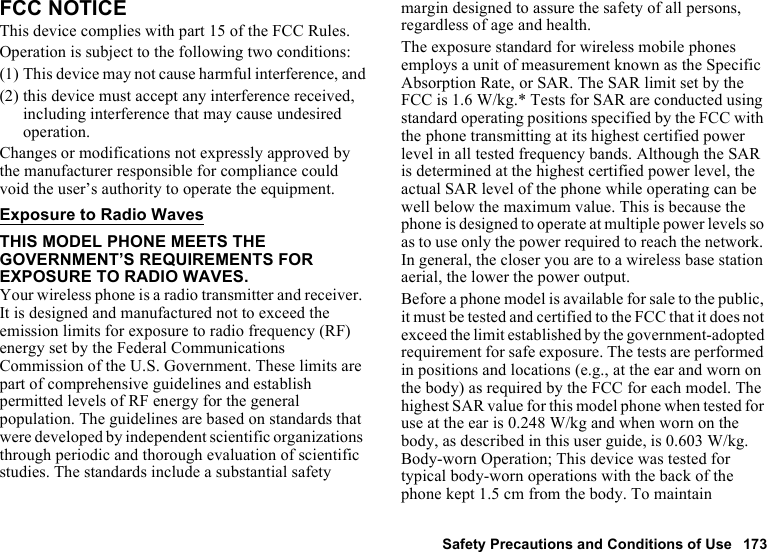
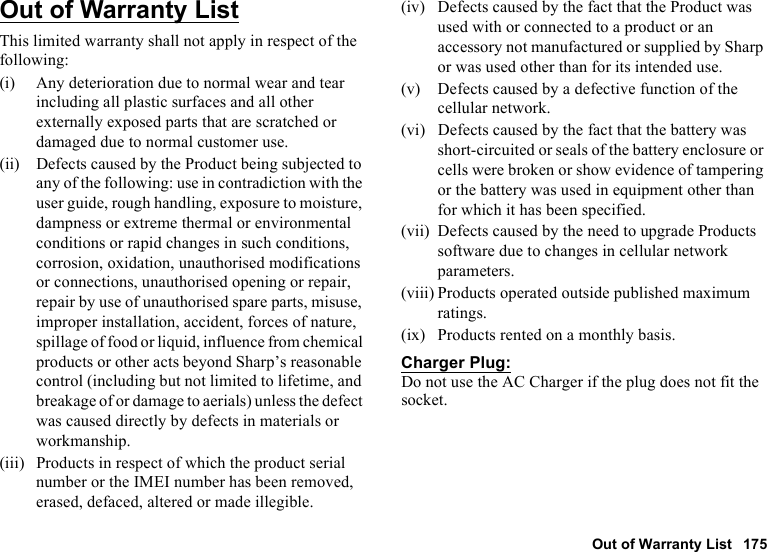
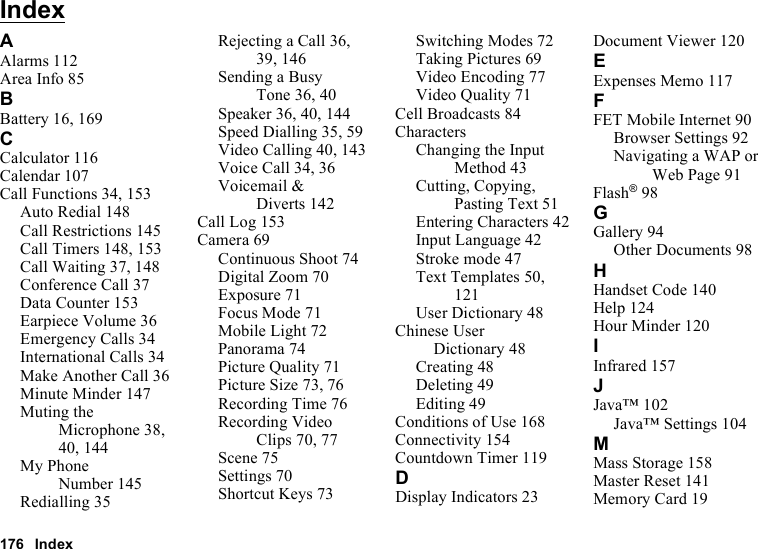
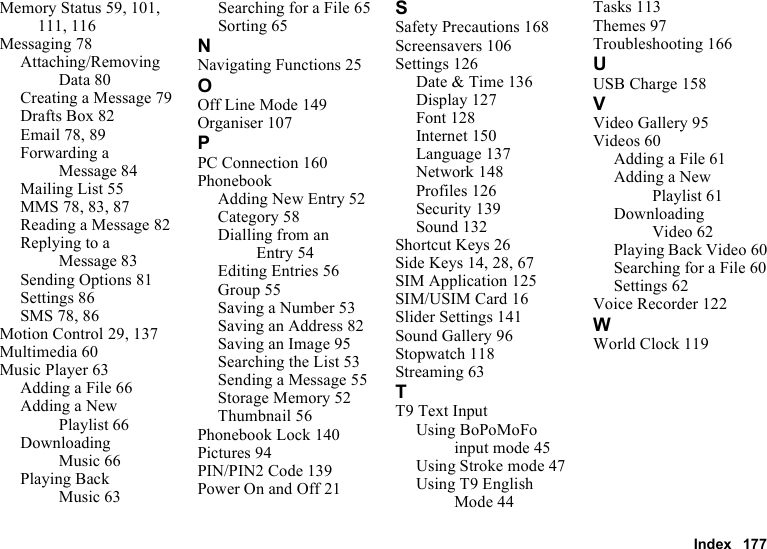

![Quick Reference 179Quick ReferenceFunction Key ShortcutsTo display the Main menu.BTo mute and unmute the microphone during a call.C [Mute]To turn Silent mode on. Long press R.Special FeaturesTo adjust earpiece volume during a call Press V or W a few times.To display:Individual Call TimerB QK, then select “Received Calls” or “Dialled Calls”.Reset Call Timer B QK, then select “Clear Timers”.Navigating MenusPress B to display the Main menu.WX-T825MessagesPress B during stand-by and select “Messages”.Press a or b to scroll.Press B.MessageEmailAlert InboxCell BroadcastsArea InfoMessaging SettingsMemory StatusCreate MessageInboxDraftsSentOutboxTe m pl a t e sCreate EmailInboxDraftsSentOutboxTe m pl a t e sSwitch On/OffRead MessagesSettingsOnOffGeneral SettingsSMS SettingsMMS SettingsEmail SettingsSpeed Mail ListACUpDownLeft RightBasic OperationPower On/Off Long press F.Make a call Enter number, press D.Answer a call Press D.End a call Press F.PhonebookStoring name and number1. Enter the phone number in stand-by.2. Press A [Options], select “Save Number” & “As New”.3. Fill each field.4. Press C [Save].Camera/VideoTaking pictures/Recording video clips1. Press B, select “Camera”.2. Press C to switch between photo and video camera modes.3. Press B to take a picture or video.Voice RecorderPress B, select “Organiser”, press d twice, then select “Voice Recorder”.Voice MailLong press G (FET Voice Mail as default setting). Alternatively, direct dial HHH (FET Voice Mail as default setting).](https://usermanual.wiki/Sharp/HRO00074.Manual/User-Guide-991214-Page-180.png)