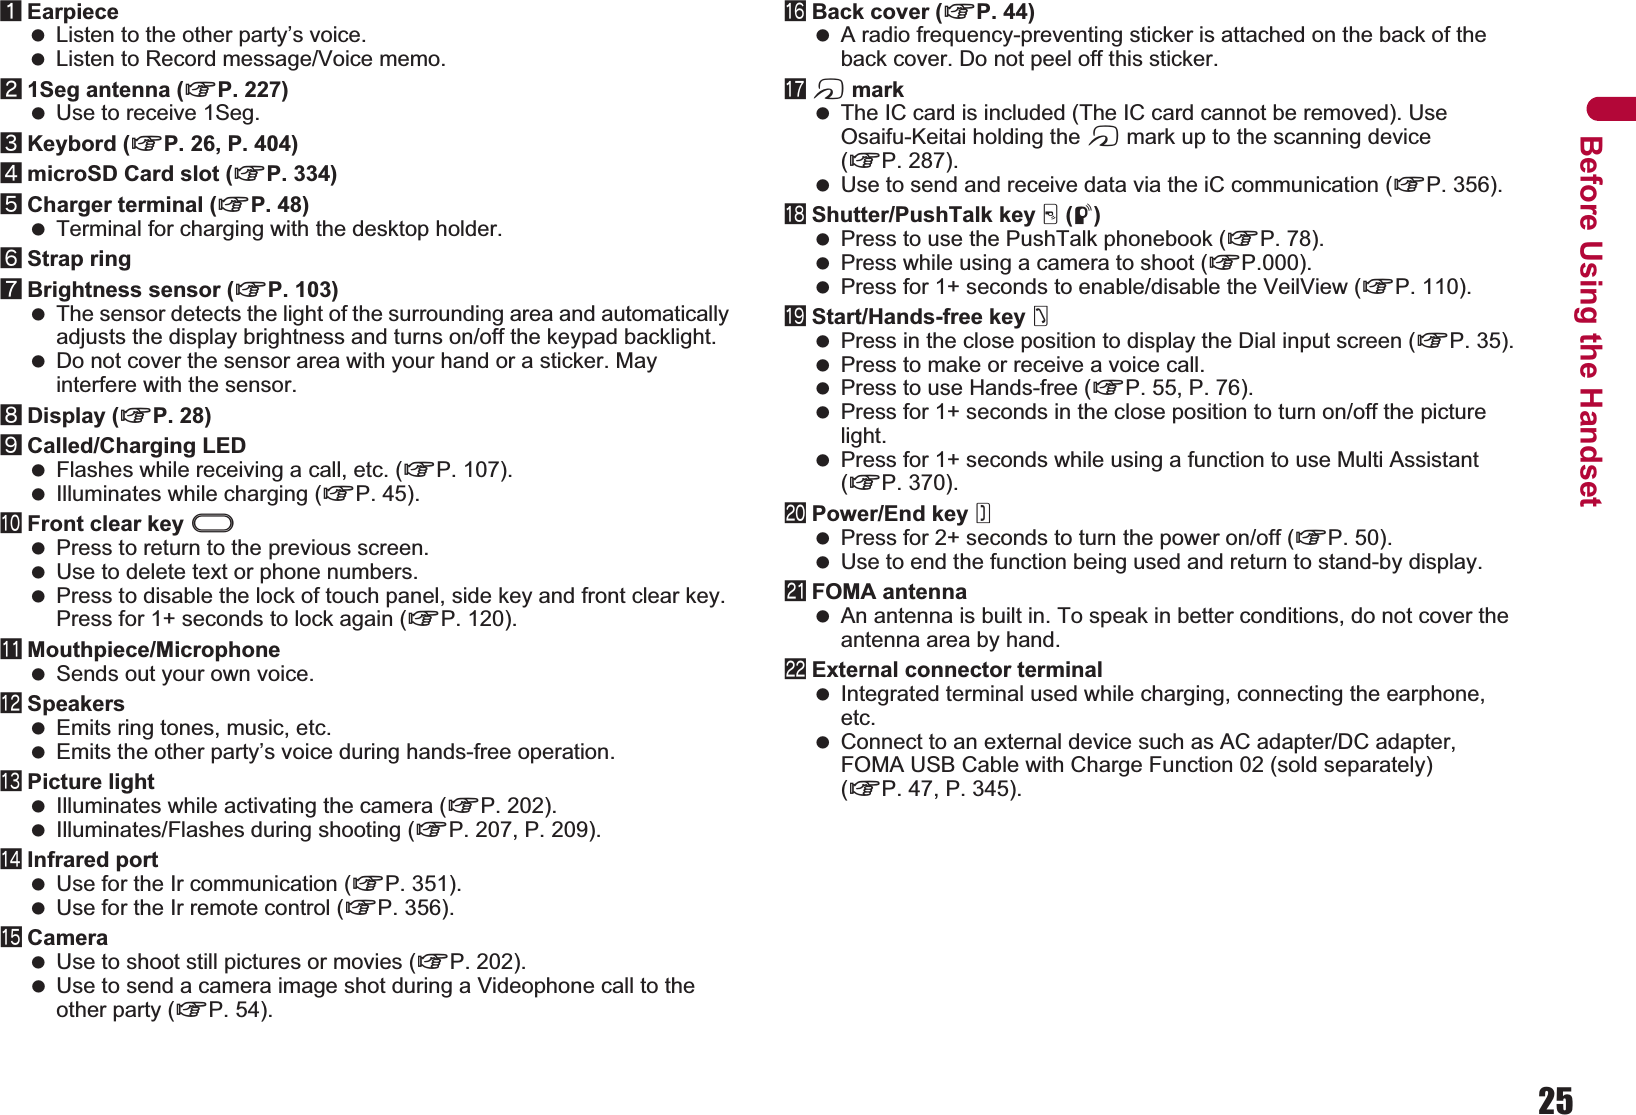
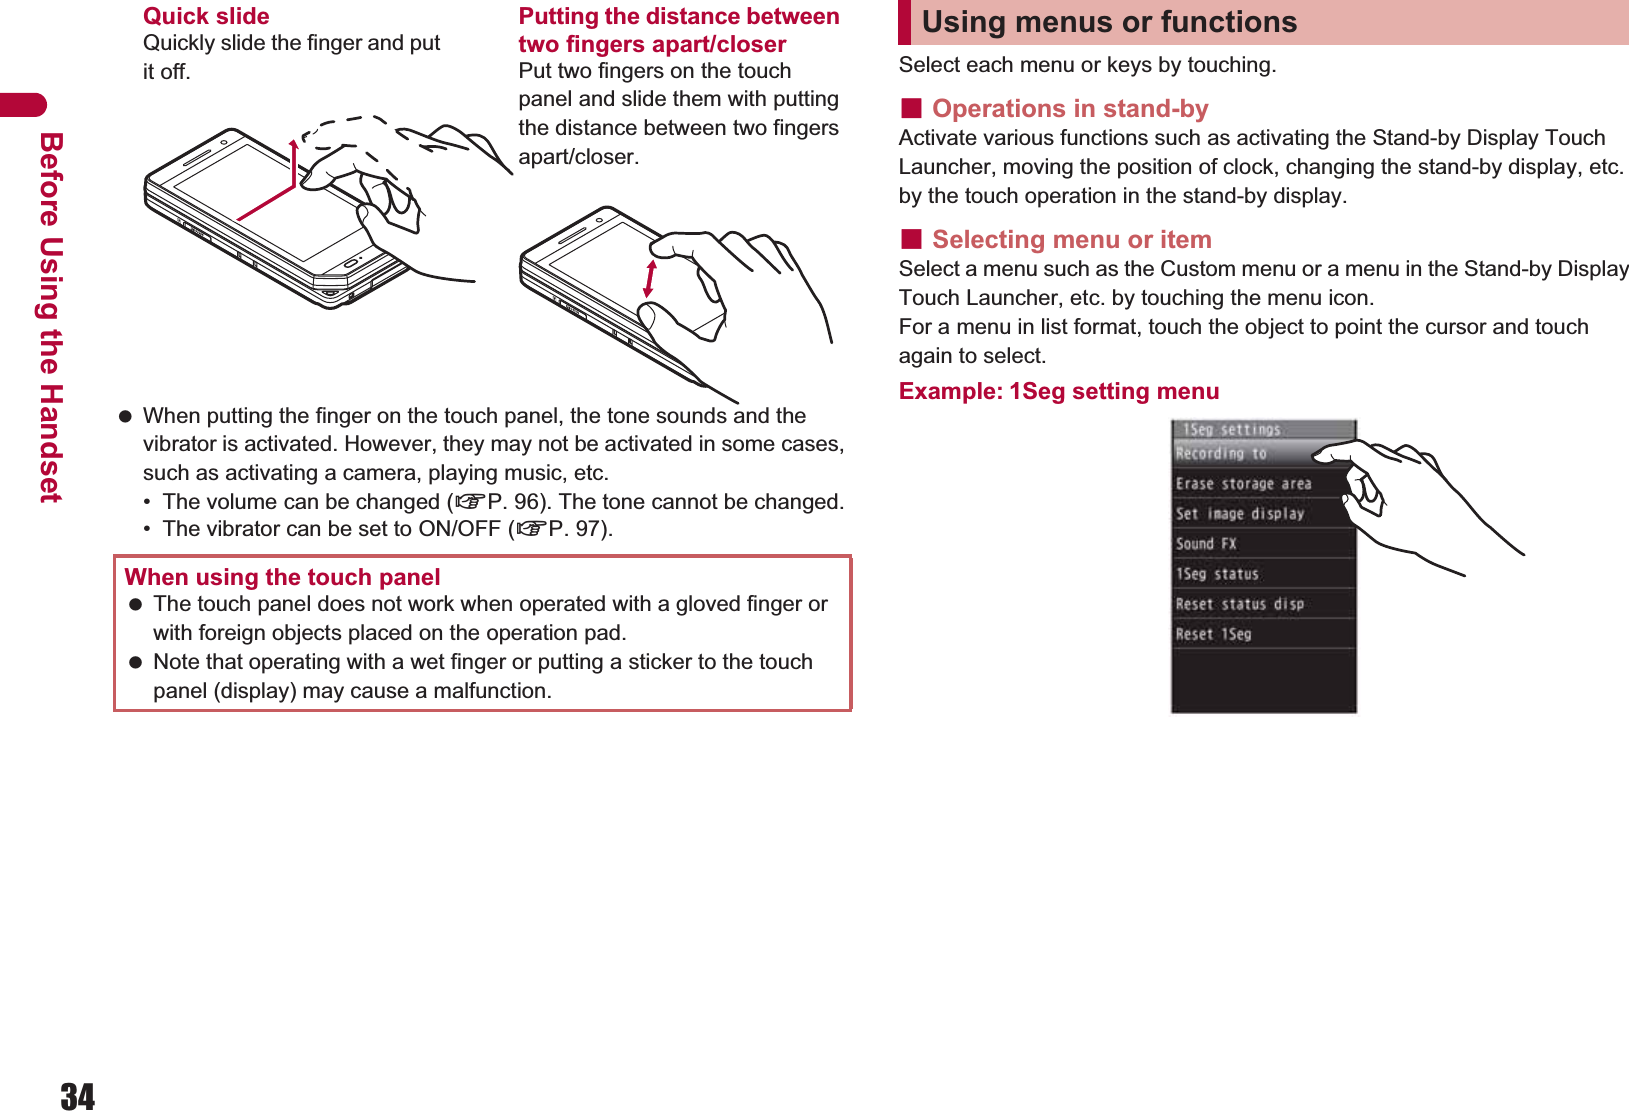
Sharp HRO00088 Cellular Phone User Manual
Sharp Corporation Cellular Phone
UserManual.wiki
>
Sharp
>
HRO00088 User Manual
Users Manual
Navigation menu
Upload a User Manual
Namespaces
Wiki Guide
HTML
PDF
Info
Views
User Manual
Discussion / Help
Navigation
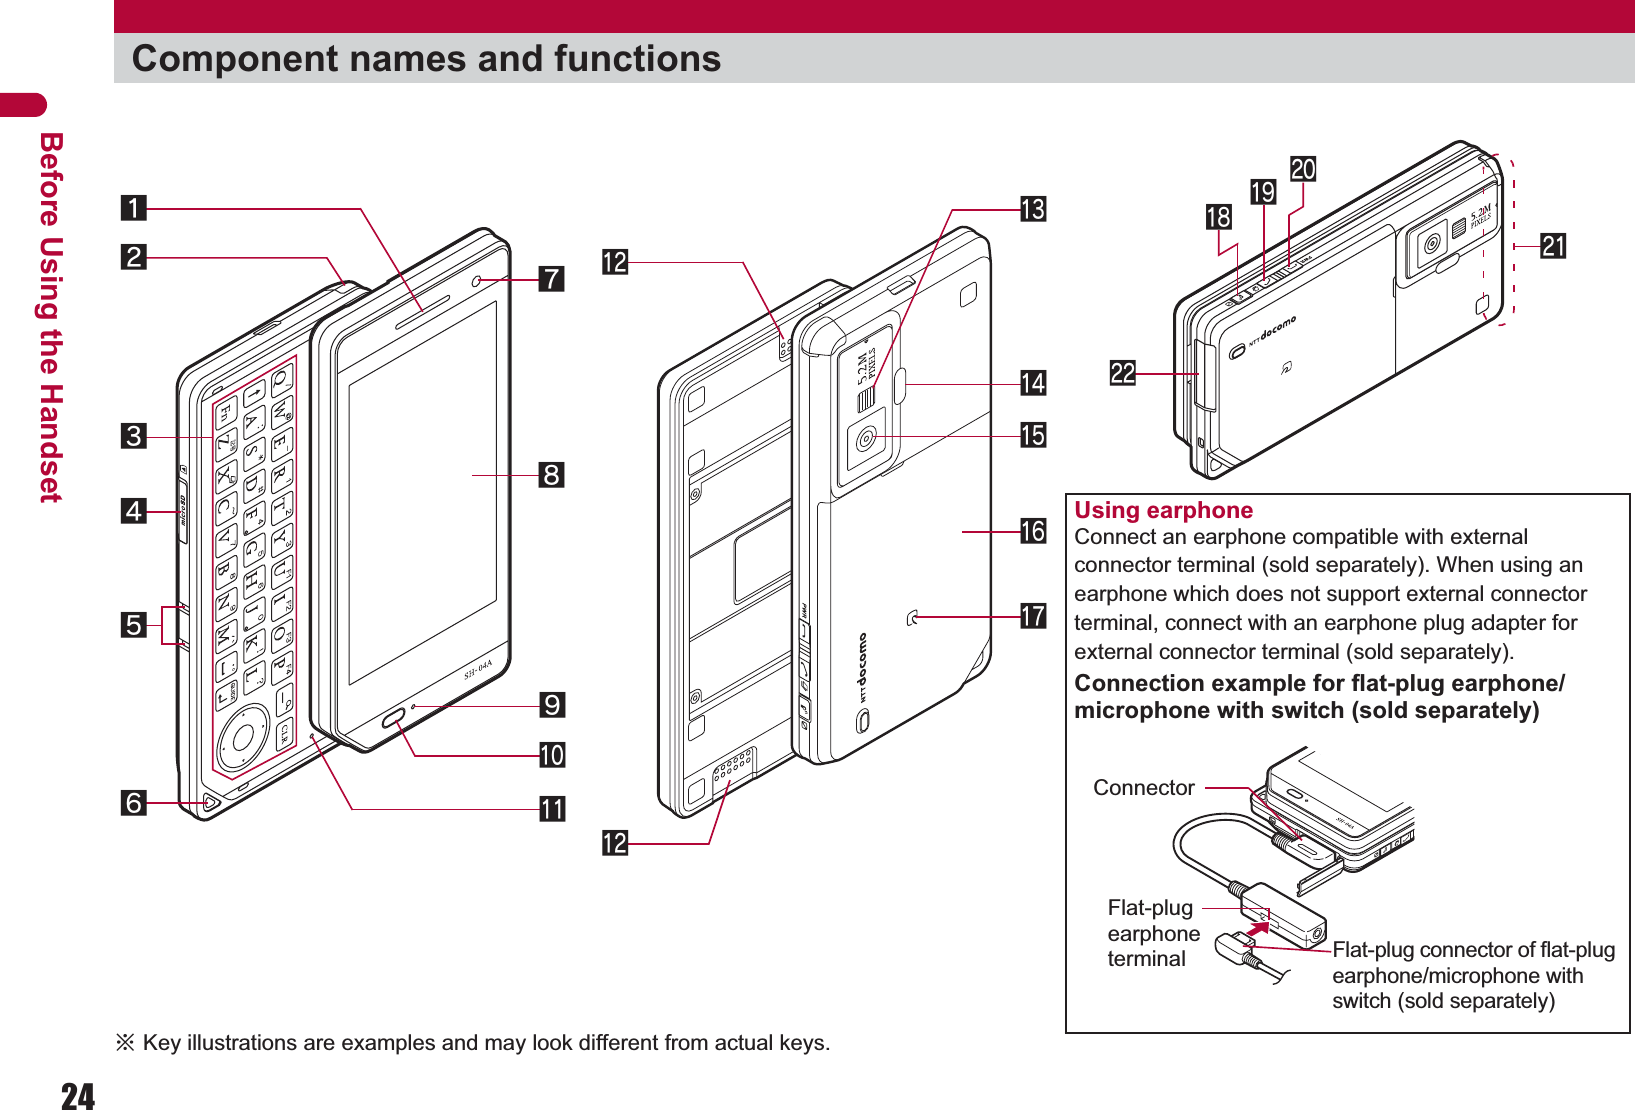
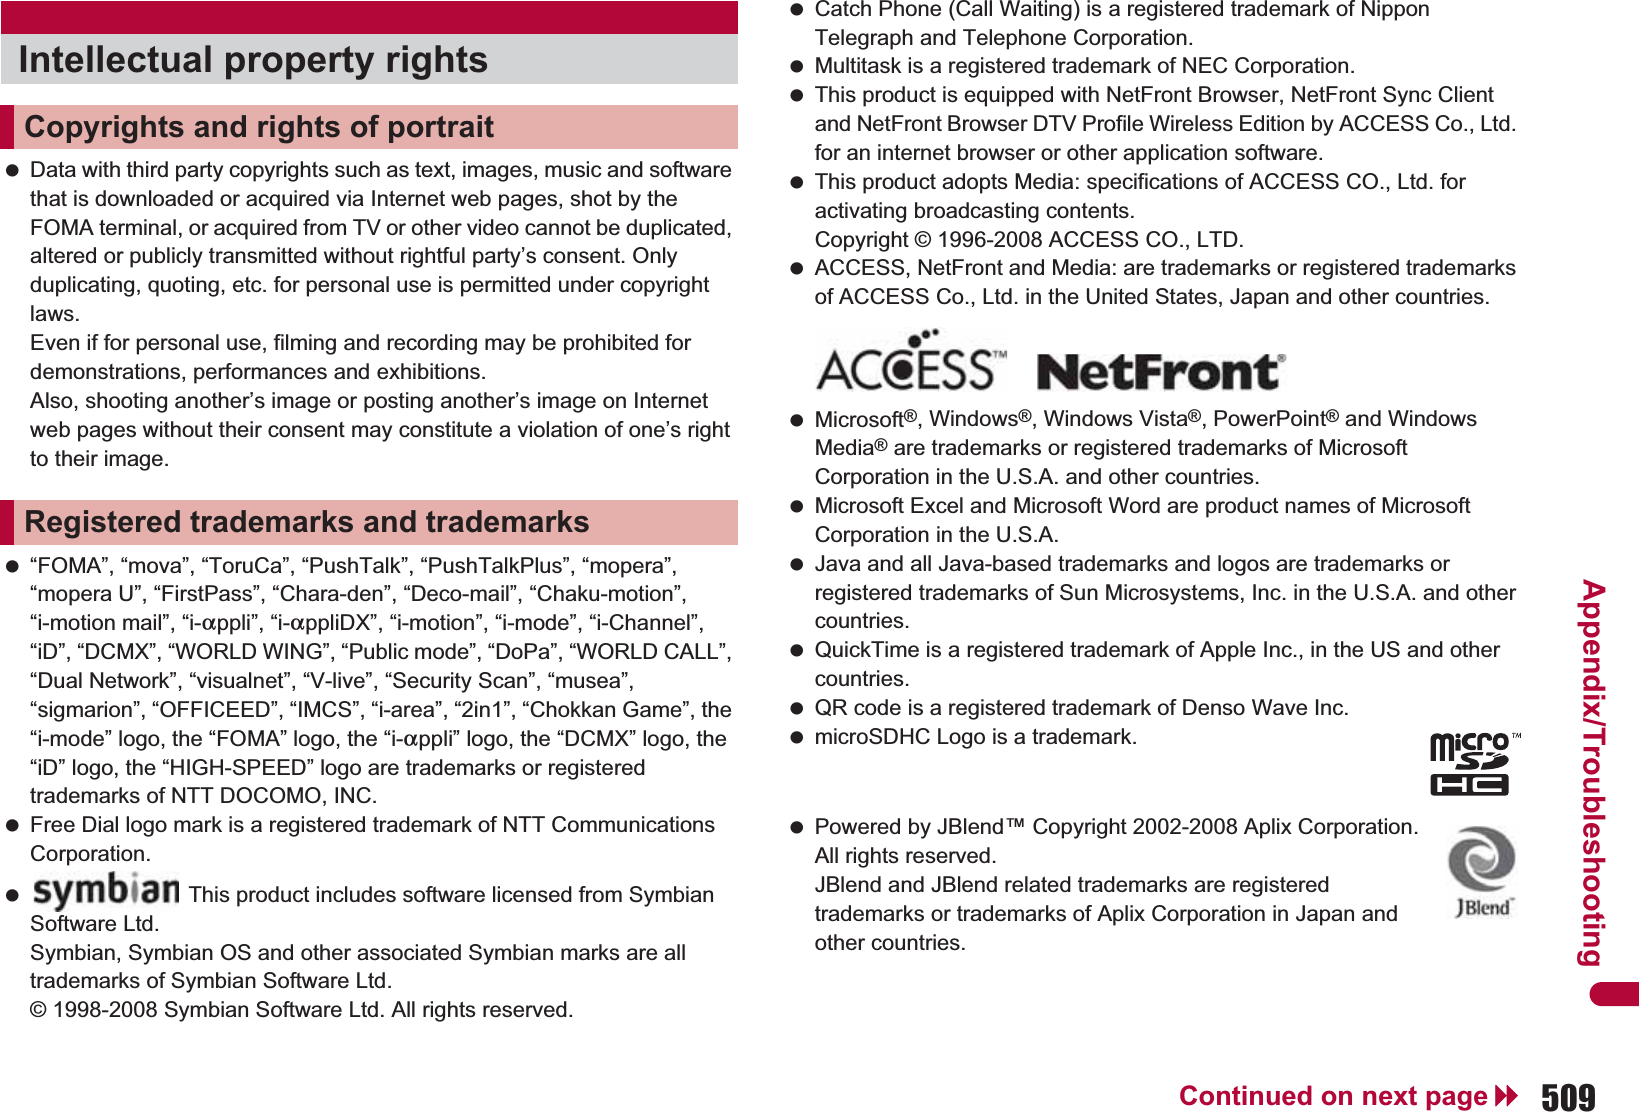
![28Before Using the Handset1Signal status When A appears, the handset is outside the service area or in a place with no signal. Signal icon can be changed (nP. 106).2Battery level/Charging (nP. 49) Battery icon can be changed (nP. 106).3i-mode/Full Browser (nP. 164, P. 190)4SSL (nP. 166, P. 190) When o appears while Multi Assistant is used, function such as i-mode, Full Browser, i-appli or Software update is being used with Multi Assistant.5i-appli (nP. 261)*i-appli is set as the stand-by display, but cannot be used. The i-appli icons do not appear in the i-Widget screen.6GPS (nP. 296, P. 304)Viewing display]Indication of the signal strength]no pStrong Weak"Battery level{Charging12345 7pmlkjihgnuv>b cq or f e ds<z wxt6 a8 9y7=AABNO Indicates i-mode/Full Browser statusoSSL compatible sites are viewedSSL compatible Internet web pages are viewedSSL/TLS pages are viewedGi-appli is being activatedi-appli stand-by is being activatedNi-appli stand-by is set*Ii-appliDX is being activatedi-appliDX stand-by is being activatedQi-appliDX stand-by is set*A (blue)Location request menu is set to [Loc. provision:ON]/[Reject No. unset]Location request menu is set to [Permission sched.] and Location provision is permittedA (gray) Location request menu is set to [Permission sched.] and Location provision is rejectedBGPS positioning](https://usermanual.wiki/Sharp/HRO00088/User-Guide-1054466-Page-18.png)
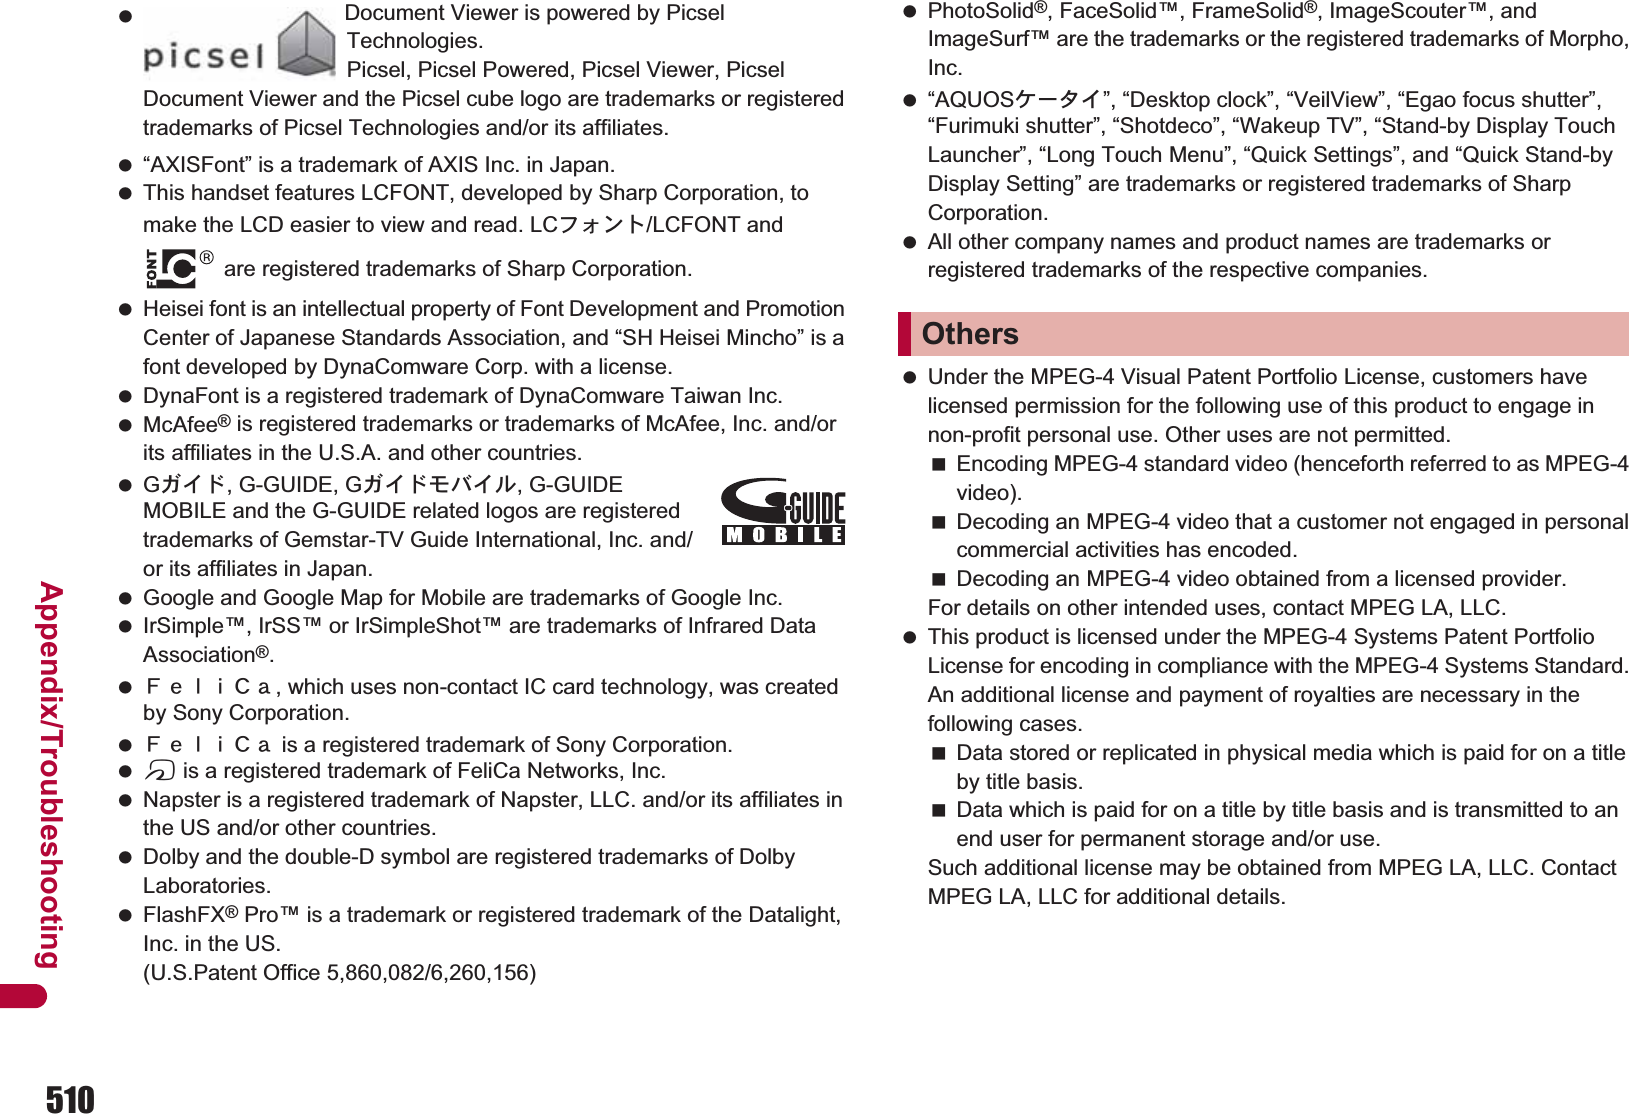
![29Continued on next pageBefore Using the Handset7Ir communication/Bluetooth communication/External device8i-mode mail/SMS/Area Mail received (nP. 138)9Message R/F received (nP. 155)aStorage status of i-mode center (nP. 138, P. 155) The status may not always be indicated even if messages are held at the i-mode center.bmicroSD Card (nP. 334)cClock display (nP. 51) Small clock icon can be changed (nP. 106).d1Seg being recorded (nP. 235)eRecord message (nP. 69) When there are messages, D to P appears, indicating the total number of both types of messages. When there are three Record messages (voice calls) and two Record messages (Videophone), kappears.fSilent (nP. 95)gVibrator (nP. 97)hManner mode (nP. 99)iPublic mode (Drive mode) (nP. 67)ji-appli call (nP. 276)kIC card lock (nP. 288)lRestriction indicator (nP. 115, P. 121)JData is communicated with another device using the Ir communication function (nP. 351)Data is sent using the Ir remote control (nP. 356)#Data is communicated with another device using the Bluetooth function (nP. 395)NConnected to commercially available Bluetooth compatible keyboard (nP. 394)t(green)Connected to an external device and transmitting packetst (red) Connected to an external device and sending/receiving packet datauConnected to an external device and transmitting 64K dataUhHv[Indicates the status of the i-mode mail/SMS/Area Mail receptionIndicates the status of the memory to store received mailABJIndicates the reception status of the Message R/FIndicates the status of the memory to store Message R/FWGIXSTKLIndicates the storage status of the mail and Message R/F^ (gray) microSD Card is inserted^ (pink) microSD Card is being useda1Seg is being recorded]Record message is set[The phone ring volume [Silent] is setbVibration mode is setZManner mode is set_Public mode (Drive mode) is setaNew i-appli callHIC card is lockedRSecret mode is setSSecret data is being editedTKeypad dial lockUAll lock is setVFunction lock is setWKeypad dial lock and Function lock are setK (red) Secret mode, Function lock and Keypad dial lock are set](https://usermanual.wiki/Sharp/HRO00088/User-Guide-1054466-Page-19.png)
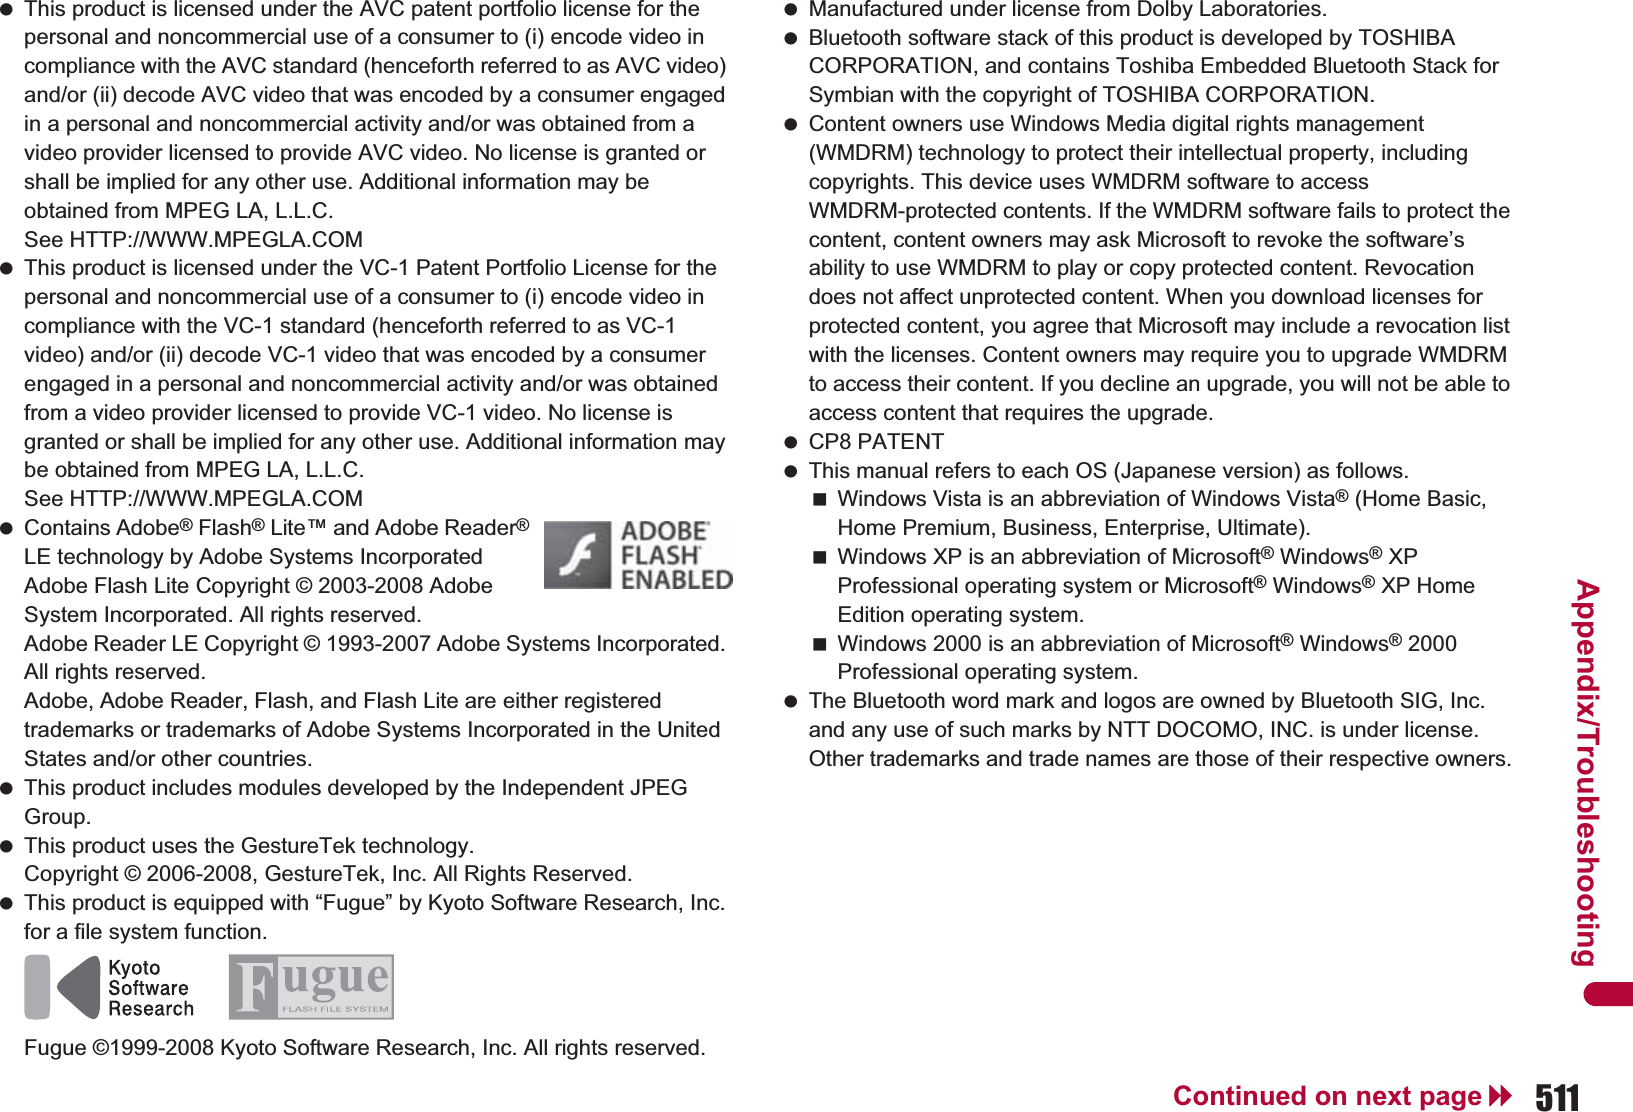
![30Before Using the HandsetmHands-free (nP. 55, P. 76, P. 393)nAlarm (nP. 236, P. 372, P. 377)* Appears only when an Alarm is set for that day.oMusic&Video Channel program reservation (nP. 245)pi-mode mail send reservation (nP. 138)qEarphone/microphone connection (nP. 388) Appears when Auto answer for PushTalk is set even if an earphone/microphone is not connected.rUSB mode (nP. 345)sFOMA card errortSelf mode (nP. 117)uPushTalk (nP. 76)vBluetooth (nP. 391) The Bluetooth icon does not appear during SSL page display.wVeilView (nP. 110) The VeilView icon does not appear during International roaming or while 1Seg is recorded.x3G/GSMK (blue) Touch panel/Side key lock, Secret mode, Function lock and Keypad dial lock are setXTouch panel/Side key lock is set; (red) Hands-free in progress; (green) USB hands-free in progresslMute in progress (only when in the open position)MBluetooth hands-free in progress\Alarm is setSchedule alarm is set*Reception reserve alarm is set*Recording reserve alarm is set*Wakeup TV is set*0Appears 12 hours before Music&Video Channel program distribution=Mail with send reservation;Mail failed to be automatically sentsWhen voice/Videophone call in Auto answer setting is set to [ON] and while an earphone/microphone (sold separately) is connectedWhen PushTalk in Auto answer setting is set to [ON]xFOMA USB Cable with Charge Function 02 (sold separately) is connected in the Communication modeRAppears when FOMA card is malfunctioning or not insertedBAppears when a card other than the FOMA card is insertedgSelf mode is setaDuring PushTalk transmissionL (blue)Stand-by for Bluetooth registrationStand-by for Bluetooth connectionConnected to BluetoothL (gray)During power saver mode for Bluetooth (Appears when data is not transmitted from the FOMA terminal for a set length of time)PVeilView is set4 (green) 3G network (Packet transmission is available)4 (red) 3G network (Packet transmission is not available)KGSM/GPRS network (Packet transmission is available)JGSM/GPRS network (Packet transmission is not available)](https://usermanual.wiki/Sharp/HRO00088/User-Guide-1054466-Page-20.png)
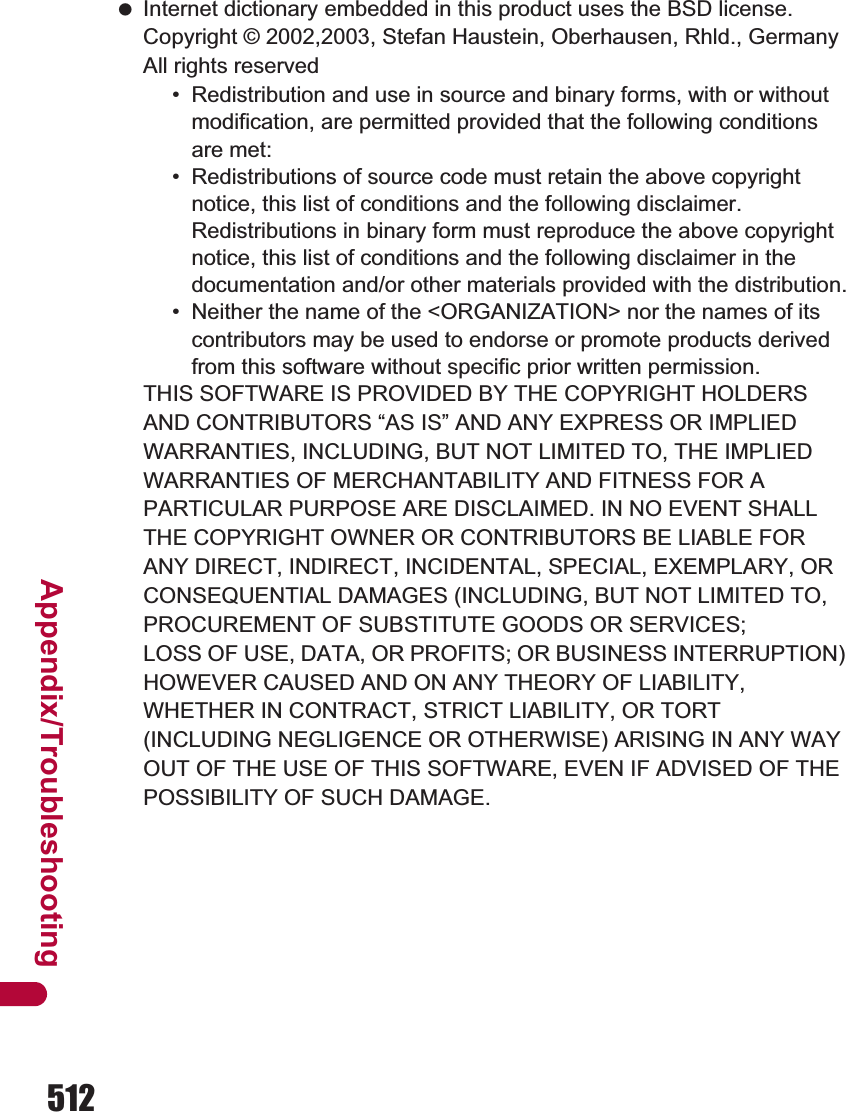
![31Before Using the HandsetyStatus of Comics setting (nP. 363) Status of Comics setting icon does not appear during hands-free operation or receiving information display.zToruCa (nP. 290) The ToruCa icon does not appear during hands-free operation, receiving information display or e-comic display.<Receiving information (nP. 185) Receiving information icon does not appear during hands-free operation.>Multitask (nP. 370)Indicates functions that are running.IFrame display is setHPage display is setQUnread ToruCaCNew informationgFour or more applications are running2Shoot still picture3Shoot movie*Videophone 4Character reader (OCR)hVoice call 5Bar code readertPhonebook ]Card readerkPushTalk/PushTalk phonebook,Information reader)Shotdeco#Modem transmission (appears during data transmission)vVoice recorderwScheduleiSoftware update yText memo, Stand-by memoCMap/GPS zCalculator(Bluetooth function 6Manga&BookReaderjReceive via Ir/iC/USB/Bluetooth communication=Quick search>ToruCali-appli {Alarmmi-mode, i-Channel, WEB Mail8TimernFull Browser, Internet movie player}microSD9General settings/i-concier 0Voice memo/Record messageXReceive informationpMail, SMS, Message R/F, Check new messages7Document Viewerf1SegqMail/Decome-Anime/SMS being composed ^Reception reserve/Recording reserve alarm sounds|Received calls *Data Security Service;Received messages uData box!Redial sMUSIC:Sent messages "Own number microSD Card is referred to as [microSD] or [SD] on the FOMA terminal (nP. 334). Some of the screen shots in this manual have been modified or abbreviated. The display for the FOMA terminal is manufactured using high-precision technology, but it may occasionally contain dots that fail to light or that remains permanently lit. This is not a malfunction.](https://usermanual.wiki/Sharp/HRO00088/User-Guide-1054466-Page-21.png)
![32Before Using the HandsetDisplay stock icons in stand-by when a call is missed or new mail is received. In stand-by, select stock icons to check notice details.Stock icon type*1 When the 2in1 mode is set to [Dual mode], the number of [A mode] and [B mode] appears each.*2 The message that appears differs depending on the menu screen or position of the FOMA terminal.1In stand-by, a stock icon appears.2Select the stock icon.:Touch the stock icon to point the cursor and touch again.:After the details are checked, the stock icon and message disappear.In the i-Widget screen, multiple i-Widget can be activated simultaneously and viewed as a list. For details on operation of i-Widget nP. 282Checking notices with stock iconIcon Message PageBxx missed call*1 P. 68FRecorded messages Fxx message/Axxmessage P. 70Exx voice mail*1 P. 415Cxx mail message P. 139, P. 160Lxx New Message R P. 156Qxx New Message F P. 156Dxx new ToruCa P. 2905New auto send result P. 1386Update complete P. 497Check update P. 497Update required P. 495Check for update P. 495DUSB mode setting P. 345tDownload successful (Music&Video Channel) P. 245gDownload failed (Music&Video Channel) P. 2454Charge limit exceeded P. 385Stock iconMessageNumber of entries@Send loc - No resp P. 306Send loc - Resp P. 306Send loc - Failed P. 306aNew i-appli call P. 276GCustom menu/Basic menu/Menu*2 P. 38 Stock icons do not appear while the i-motion set as stand-by is played or the i-appli stand-by is being activated.Displaying and operating i-WidgetIcon Message Page](https://usermanual.wiki/Sharp/HRO00088/User-Guide-1054466-Page-22.png)
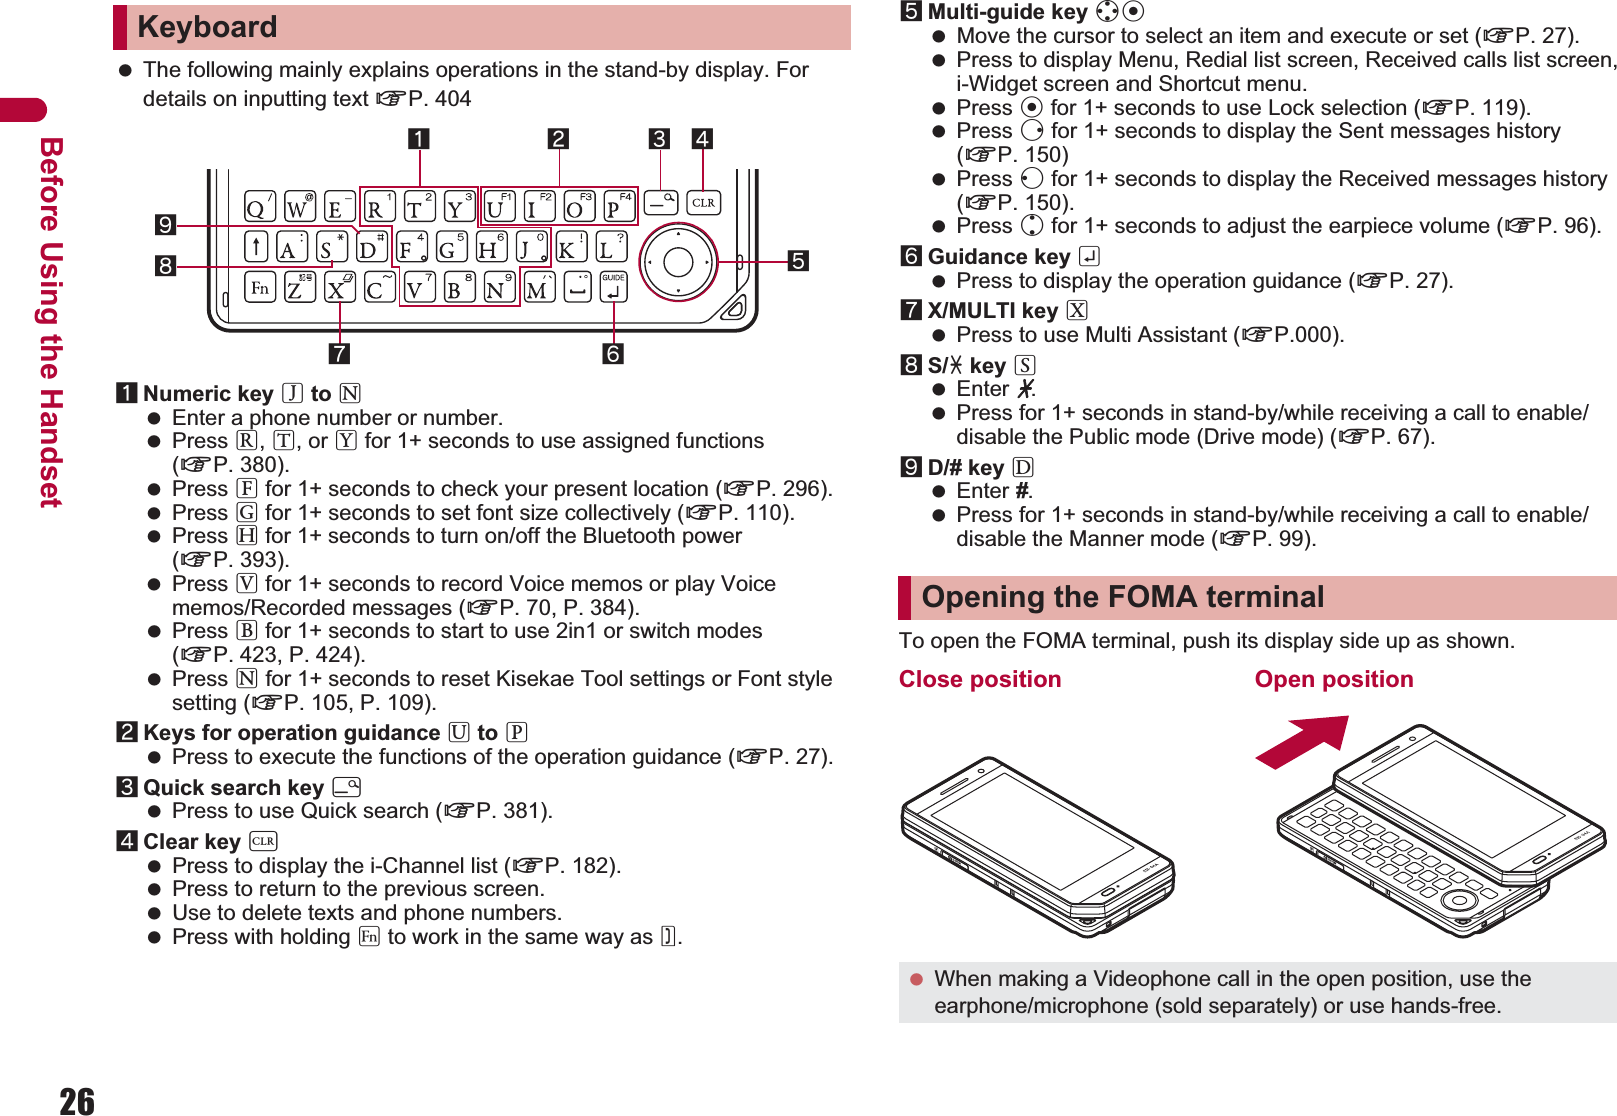
![35Before Using the HandsetɡSwitching pagesWhen a menu contains multiple pages, quickly slide to the left/right to switch pages.Example: Mail settingɡSubmenu (nP. 40)ɡControl key While using the function, touch the screen to display control keys.Example: MUSIC Player• Touch the area other than the control keys to hide the control keys (excluding 1Seg). Touch [F] to display next keys.ɡSlide operation The slide operation is available for adjusting the volume or scrolling the screen. Be careful not to touch a key displayed on the screen.ɡNumber entryWhen numbers such as the phone number, terminal security code, or Pin code are required to be entered, the numeric panel appears in the close position. Touch the numeric part.If an input field appears for time setting, etc., touch the field to move the cursor there and enter numbers in the position.ɡCharacter entry (nP.000)Slide to the left1/3 page 2/3 pageSlide to the right3/3 pageSlide to the leftSlide tothe rightSlide to the rightSlide to the left The control keys always appear while camera is activated or music data is played (excluding while displaying images/lyrics).](https://usermanual.wiki/Sharp/HRO00088/User-Guide-1054466-Page-25.png)
![36Before Using the HandsetThe touch panel is automatically locked while making a voice/Videophone/PushTalk call, receiving a call, or calling (including while playing a reply message, recording sounds, and recording Voice memo (during call)) to prevent from errors. To temporarily disable the lock: Press z.• Press z for 1+ seconds to lock again. Touch panel lock is temporarily disabled when the FOMA terminal is opened. It is locked again when the FOMA terminal is closed. This function is not linked with Touch panel/Side key lock (nP. 120).Set, change or save functions from the menu screens.Set the start menu that displayed when [$] is selected in the Stand-by Display Touch Launcher. When Stand-by touch launcher display is set to [OFF], touch the wall paper on the stand-by display (excluding an area where the clock or i-Channel ticker is displayed, and the Pict area) to display the start menu.1In the Stand-by Display Touch Launcher, select [$]/[Settings]/[Disp/LED/Power saver]/[Menu priority].:In the Custom menu/Basic menu: Select [Submenu]/[Menupriority].2Select the start menu/[Yes].Locking touch panelSetting and selecting menuThe explanations in this manual are based on how to retrieve a function from the Custom menu. As for functions retrieved from the Stand-by Display Touch Launcher and the Quick Settings, how to retrieve from those menus is individually explained.Setting start menu <Menu priority>Locking screene.g.) During a callStart menu CharacteristicsCustom menu The preset Kisekae Tool (nP. 104) can be selected and set. Each Kisekae Tool consists of different functions and designs. Kisekae Tools can be downloaded from sites and used.Preset Kisekae ToolsBlack ڐఱιΣνȜ(Large)Ώϋίσ(Simple) Θͼτ·ΠιΣνȜBasic menu Select the icon displayed on the menu to retrieve the function.](https://usermanual.wiki/Sharp/HRO00088/User-Guide-1054466-Page-26.png)
![37Before Using the HandsetɡSwitching set start menu temporarilySwitch the start menu temporarily. When the stand-by display reappears, the start menu returns to the one set in Menu priority.Use the Horizontal display menu. *1 When Stdby toch lnch disp is set to [OFF], the Start menu/Horizontal display menu appears.*2 Turning is not available in the open position.Turnsideways/Set to open positionTurn sideways/Set to open positionTouch the stand-by display (wall paper)*1Stand-by Display Touch Launcher (horizontal)Stand-by (vertical)Turnlongways*2Basic menuCustom menu[Basic][Custom]Stand-by Display Touch Launcher (vertical)Horizontal display menuStand-by (horizontal)Touch the stand-by display (wall paper)*1Turnsideways/Set to open positionTurnlongways*2[$]Turnlongways*2[$]t (in the open position)](https://usermanual.wiki/Sharp/HRO00088/User-Guide-1054466-Page-27.png)
![38Before Using the Handset For details on operating shortcut menu nP. 380 For details on the available functions nP. 446 All menus can be operated by the touch operation, or with w. Touch a menu item to select from the Custom menu or Basic menu. For menus in list format, such as 1Seg setting, touch a menu item to point the cursor and touch again. When a menu contains multiple pages, quickly slide to the left/right to change pages. Alternatively, scroll or change pages with w. The method for selecting functions may differ depending on the Kisekae Tool set for the Custom menu. Press z or c to re-select a function, and the previous screen reappears. Press H to return to stand-by.ɡRetrieving from the Custom menuɡRetrieving from the Basic menuɡRetrieving from the Horizontal display menuRetrieving a function from each menuWhen a stock icon (nP. 32) appears in stand-by, select G to show the each menu.Touch operation or the way of activating 1Seg with the Multi-guide key is explained as an example below.[1Seg]Custom menu When [1Seg] appearsWhen 1Seg is activated[Acti-vate1Seg] When the Custom menu image is changed by Kisekae Tool, the operation may differ from the description in this manual. In this case, switch the menu screen to the Basic menu (nP. 36) or perform the Reset menu screen (nP. 105).Basic menu When [1Seg] appearsWhen 1Seg is activated[1Seg][Acti-vate1Seg][1Seg]orwt[Acti-vate1Seg]orwtHorizontal display menu When [1Seg] appearsWhen 1Seg is activated](https://usermanual.wiki/Sharp/HRO00088/User-Guide-1054466-Page-28.png)
![39Before Using the HandsetTouch the Pict area in the stand-by display to display the Quick Settings. Touch each key to point the cursor and touch again to activate related setting menus. Press z or touch the area other than the Quick Settings to return to the stand-by display. For details on the avialable functions nP.000Touch the wall paper on the stand-by display (excluding an area where the clock or i-Channel ticker is displayed, and the Pict area) to display the Stand-by Display Touch Launcher. Touch each key in the Stand-by Display Touch Launcher to activate the corresponding function. For details on the avialable functions nP.000 If no operations are performed for approximately 5 seconds, z,c, or H is pressed, or the area other than the Stand-by Display Touch Launcher is touched, the stand-by display reappears.ɡSetting whether to display Stand-by Display Touch Launcher <Stdby toch lnch disp>1In the Custom menu, select [Settings]/[Disp/LED/Power saver]/[Set screen]/[Stdby toch lnch disp].2Select the setting. Press the key corresponding to the menu item number when connecting the Bluetooth compatible keyboard to select a function. However, in the Custom menu/Horizontal display menu, a function may not be selected by using the menu item numbers.Retrieving a function from Quick SettingsTouch the Pict areaStand-by Quick SettingsPictareaRetrieving a function from Stand-by Display Touch LauncherStand-by Stand-by Display Touch LauncherWallpaperTouch the wall paper](https://usermanual.wiki/Sharp/HRO00088/User-Guide-1054466-Page-29.png)
![40Before Using the HandsetWhile using the function, slide from the upper right to the lower left (or from the upper left to the lower right) to display the Submenu. To display the Submenu, touch [C] of the control key, [Submenu] in the operation guidance or [D] on the upper part of the screen, or press I. When the Submenu contains multiple pages, slide up/down to scroll the screen and display items. To hide the Submenu, touch the area other than the Submenu. Press z or c to return to the previous screen (menu).Use this function for unsure operations. After the Support Book appears, check the explanation and operation procedures of each function. In addition, directly start functions that were looked up in the Support Book.1In the Stand-by Display Touch Launcher, select [9]/[Support Book].2Select a menu or item.:To start functions directly: Select the function to start/[Yes].A FOMA card is an IC card that records personal information, such as phone numbers. A FOMA card can store phonebook data and SMS. By switching FOMA cards, multiple FOMA terminals can be used for different purposes as needed. If a FOMA card is not inserted, transmission functions such as voice/Videophone/PushTalk calls, i-mode, mail transmission and packet transmission are not available on the FOMA terminal.Selecting a function from Submenu Submenu may not appear depending on the function.Submenu screenSupport BookDisplaying Support BookFOMA cardUsing FOMA card](https://usermanual.wiki/Sharp/HRO00088/User-Guide-1054466-Page-30.png)
![41Continued on next pageBefore Using the Handset Before inserting or removing the FOMA card, turn off the power, position the back facing upwards and remove the battery pack. Close and hold the FOMA terminal firmly with your both hands.ɡInserting FOMA card1Hook a finger on the tab and pull the tray out (1).:Pull out the tray straight until it stops.2Hold the FOMA card with the IC facing down and set on the tray (2).3Push the tray all the way in (3).ɡRemoving FOMA card1Hook a finger on the tab, pull the tray out (1) and remove the FOMA card (2).:Do not allow the FOMA card to fall when removing it.The FOMA card has a “PIN1 code” and a “PIN2 code”.Both are set to [0000] by default but can be changed to a four- to eight-digit number by the user (nP. 114).The FOMA terminal has built-in FOMA card security functions (FOMA card restriction functions) as functions for protecting personal data and files. When data or files are retrieved using any of the following methods or i-appli is running with the FOMA card inserted into the FOMA terminal, FOMA card security functions are automatically set in the retrieved data or files.When a file such as an image, melody or PDF is downloaded from a site or Internet web pageWhen a site or Internet web page is saved as a screen memoWhen i-mode mail with a file attached is receivedWhen i-appli is running Data, files or software with FOMA card security functions run only when in use with the FOMA card inserted at time of acquisition. Display, play, attach to i-mode mail, run software, send data using Ir communication function and iC communication function, and copy to microSD Card can be executed. These operations cannot be performed if a different FOMA card is inserted. The following indicates the data for which FOMA card security is set.Melody Image (including animation and Flash movie)Screen memo Chaku-uta®/Chaku-uta full®Chara-den File attached to Message R/FInserting/Removing FOMA cardNotchIC (gold)2Tray31 TabFit the notch of the FOMA card to that of the tray.12 Inserting or removing the FOMA card forcibly may damage the card or deform the tray. Use caution. Refer to the FOMA card user’s guide for more information on the FOMA card. Do not misplace the FOMA card once it is taken out. When the tray falls off, slide the tray in straight along the guide rail.Security codesFOMA card security functions <FOMA card security functions>](https://usermanual.wiki/Sharp/HRO00088/User-Guide-1054466-Page-31.png)
![42Before Using the Handseti-motion ToruCa (details) imagePDF data Image inserted to Deco-mail or signatureKisekae Tool Videophone picture memoMachi-chara i-appli (including i-appli stand-by)Download dictionaryDownload fontContents transfer compatible dataImage in Message R/FMusic&Video Channel programDeco-mail template with data which FOMA card security functions are setDecome-Anime Templatee-book/e-dictionary/e-comic saved in the [Comic] folderFile attached to i-mode mail other than the following• ToruCa ȆPhonebook ȆSchedule• Bookmark ȆDocumentsɦ“Chaku-uta” is a registered trademark of the Sony Music Entertainment (Japan) Inc. The following indicates the settings saved in the FOMA card.Own number PIN settingSelect language SSL certificatesSMS center SMS expirySMS input character The following explanation refers to the FOMA card inserted at time of data/files retrieval as “one’s own FOMA card” and other FOMA cards as “another’s FOMA card”. When one’s own FOMA card is replaced with another’s FOMA card, the data or files for which FOMA card security functions are set cannot be set as stand-by displays or ring tones. When a FOMA card is replaced with another’s FOMA card, FOMA card security functions are activated and if data or file retrieved from a site is set as the stand-by display or ring tone, the setting is reset to the default. When one’s own FOMA card is re-inserted, the setting returns.Example: When setting [Melody A], for which FOMA card security functions are set, as a ring toneWhen one’s own FOMA card is taken out or is replaced with another’s FOMA card, ring tone returns to default setting. When one’s own FOMA card is put back, the ring tone returns to [Melody A]. FOMA card security functions cannot be set for data received using Ir communication or data transmission functions, and still pictures/movies, etc. shot with the FOMA terminal. It is possible to move or delete data or files for which FOMA card security functions are set even when another’s FOMA card is inserted. Running i-appli by selecting highlighted text in i-mode mail details screen cannot be performed or retrieved when FOMA card security functions are set.One’s own FOMA card security functions are set for downloaded data, files attached to received mail and i-appli that have been run, allowing viewing and playback of data.When another’s FOMA card is inserted, data with one’s own FOMA card security functions set cannot be viewed or played back.One’s own FOMA cardAnother’s FOMA cardDifferent FOMA card inserted](https://usermanual.wiki/Sharp/HRO00088/User-Guide-1054466-Page-32.png)
![47Continued on next pageBefore Using the Handset[Read “FOMA AC Adapter 01/02 (sold separately) and FOMA DC Adapter 01/02 (sold separately) user’s guide” carefully.] Battery pack can be charged even in the open position.1Open the external connector terminal cover (1) and insert the AC or DC adapter connector horizontally into the external connector terminal (2).:Check the direction (See diagram) of the connector, keep it parallel with the FOMA terminal and firmly push all the way in until it clicks.2When inserting the AC adapter power plug into an outlet or inserting the DC adapter power plug into a car cigarette lighter socket, Charge start sound is heard, charging LED illuminates, and charging starts.3When Charge end sound is heard and charging LED turns off, charging is complete.:When removing the connector, always hold the release buttons on both sides (1) and unplug it by pulling out horizontally (2).Charging by using AC adapter/DC adapterConnector (Face the side with the arrows up)2Release buttons1Charging LEDExternal connector terminalExternal connector terminal cover100V AC outletFor AC adapter For DC adapterCigarette lighter socket121](https://usermanual.wiki/Sharp/HRO00088/User-Guide-1054466-Page-37.png)
![48Before Using the Handset[Read “Desktop Holder SH24 (sold separately) user’s guide” carefully.]1Face the side with the arrows of the AC adapter connector up and insert it into the connector terminal of the desktop holder (1).:Keeping the connector parallel with the desktop holder, firmly push it all the way in until it clicks.2Insert the AC adapter power plug into an outlet (2).3When placing the FOMA terminal in the desktop holder, Charge start sound is heard, charging LED illuminates, and charging starts.:Place the FOMA terminal in the direction of the arrow until it clicks as the figure shows (3).4When Charge end sound is heard and charging LED turns off, charging is complete.:Hold the desktop holder and lift the FOMA terminal out. Do not forcibly insert or remove. May cause damage to the external connector terminal and the connector. Pull the adapter out of the outlet or cigarette lighter socket if it will not be used for a long time. Do not forcefully pull the external connector terminal cover. May damage the cover. Do not place objects near the FOMA terminal when charging. May damage the FOMA terminal.When using a DC adapter The DC adapter should only be used in negative grounded vehicles (12 and 24V DC). Do not use with the car engine shut off. May drain the car battery. The DC adapter fuse (2A) is a consumable. For replacement, purchase a new fuse at a local automobile supply shop. Refer to the FOMA DC Adapter 01/02 user’s guide for details.Charging by using desktop holderConnector(Face the side with the arrows up) FOMA AC Adapter 01/02100V AC outlet3Charging LED12Charging with the desktop holder stood upCharging becomes available with the desktop holder stood up by using the stand behind the desktop holder. Do not force to make the stand behind stand up.](https://usermanual.wiki/Sharp/HRO00088/User-Guide-1054466-Page-38.png)
![49Before Using the Handset1In the Custom menu, select [Settings]/[General settings]/[Check status]/[Battery level].:Wait approximately 2 seconds and the display disappears.:The battery level sound is heard at the volume set in Key/Touch sound (nP. 96).[Battery empty. Unsaved data will be lost. Ending current operation] appears if battery starts to run out (Select [Agree] to clear the message). After a while, an alert tone sounds. The warning screen stating that the battery runs out appears, handset operations are disabled and power turns off after approximately 60 seconds. During a voice/Videophone call, the alert tone sounds and [Battery empty. Unsaved data will be lost. Ending current operation] appears. The call is disconnected after approximately 20 seconds. At the same time, the screen above appears and after approximately 60 seconds, the power turns off. Alert tone does not sound when Manner mode or Public mode (Drive mode) is set (Alert tone sounds during a call). Pull the AC adapter out of the outlet when left unused for a long period of time. When Charge start sound is not heard or when charging LED does not illuminate, check that the FOMA terminal is placed securely in the desktop holder (except when terminal is turned off, Manner mode is set or Charge start sound is Silent). When placing the FOMA terminal in the desktop holder, be careful that the strap is not caught in between the handset and the desktop holder.Battery levelChecking battery level"Battery level is still sufficient.#Battery level is low.$Battery is almost empty. Charge the battery.%Battery is empty (Power will turn off soon).{Battery pack is being charged.Checking battery level with sound and displayGraphicSound Three beeps Two beeps One beepStatusBattery is sufficiently full.Battery is running low.Battery is almost empty. Charge the battery.If battery runs out](https://usermanual.wiki/Sharp/HRO00088/User-Guide-1054466-Page-39.png)
![50Before Using the Handset1Press H (for 2+ seconds).:It may take some time for the wakeup screen to appear.:The wakeup screen appears followed by the initial settings screen. Proceed to Initial setting (nP. 50).:If initial settings have been completed, the screen shown on the right appears when power is turned on. This screen is called the “stand-by display”.Welcome mail:“Welcome$ΟιͺΣι%&”(Welcome$Decome-Anime%&) and “ݢ௸༭ȶςͺιȜσȷ͈̮մඤ” (Information of Early Warning “Area Mail”) are saved by default.:To check a welcome mail: In stand-by, select the stock icon C (mail message).• For details on the following operations nP. 1431Press H (for 2+ seconds).:It may take some time for the power to be turned off (The end screen appears on the display until the power is turned off).1In the Custom menu, select [୭]/[๊֚୭]/[Bilingual]/[English].:To switch the display language from English to Japanese: In the Custom menu, select [Settings]/[General settings]/[Select language]/[ུࢊ].The initial settings screen appears automatically when the power is turned on for the first time. Each setting item can also be set from Menu (When the initial settings are complete, the stand-by display appears). When items that have not been set remain, the setting screen appears every time the power is turned on.1Set the date and time (nP. 51).2Register a terminal security code (nP. 113).3Set the Key/Touch sound (nP. 96).Power ON/OFFTurning power ON/OFFTurning power ON If initial settings are not yet completed, the setting screen appears every time the power is turned on. If the FOMA card is not inserted, [Insert UIM] and a FOMA card error appear (nP. 30). When [Enter PIN1 code] appears, enter the PIN1 code (nP. 114). When a FOMA card is replaced with a new card, the terminal security code (four to eight digits) must be entered after turning on the terminal. If a correct terminal security code is entered, stand-by display appears. When a wrong terminal security code is entered five times, the power is turned off. However, turning on the power again is possible. When A appears, the handset is outside the service area or in a place with no signal. Move to a place where the icon disappears.Stand-by displayTurning power OFFSelect languageChanging screen display to English If a FOMA card is inserted, settings are saved to the FOMA card as well. When the setting of the FOMA terminal handset and the setting of the inserted FOMA card are different, the setting in the FOMA card is prioritized.Initial settingMaking initial settingDate and time settings Change terminal security codeKey/Touch sound Location request menuFont size settings](https://usermanual.wiki/Sharp/HRO00088/User-Guide-1054466-Page-40.png)
![51Continued on next pageBefore Using the Handset4Set GPS Location provision ON/OFF (nP. 304).5Set the font size (nP. 109).:When the initial settings are complete, the software update function confirmation screen appears. Read the description and select [Agree] (When the initial settings are made from the menu or the software update is set to other than [auto-update], the confirmation screen does not appear).Set the date and time on the FOMA terminal.1In the Custom menu, select [Settings]/[General settings]/[Date settings].2Select the [Auto time correction] field/select the setting.;Select [ON]/[Complete].;Select [OFF]/select the [Date] field/enter the date/[OK]/select the [Time] field/enter the time (24-hour format)/[OK]/[Complete].• When entering month, day and time, add 0 before numbers one through nine (example: 01, 02, 03, etc.).• Set the date and time from 00:00 January 1, 2001 to 23:59 December 31, 2050. Press H to cancel the initial settings.Date settingsSetting date and time When Limit settings is set to [Enable], the terminal security code must be entered in the Date settings. The date and time that are set are saved even if the battery pack is removed, but if the battery pack remains removed for approximately 30 seconds or more, the settings are reset. Also, if the battery remains empty, the settings may be reset. When this happens, set again after charging the battery. If the date and time are not set correctly, the following functions cannot be used properly.Redial, Received calls Auto power ON/OFFAlarm ScheduleSSL (authentication) i-appli Auto startStarting i-appliDX Reception, RecordingMachi-chara Software updatePattern definitions updateRecord message (voice), Record message (Videophone calls)Camera image titles/shooting datePlayback of i-motion or music data with expiration date/period for replayView of e-books/e-dictionaries/e-comics with expiration date/period for browseWhen Auto time correction is set to [ON] When the power is turned on, the FOMA terminal adjusts the time by connecting to the network’s time information. If the FOMA terminal does not adjust the time even when the power is turned on, turn off the power and restart. Time may not be adjusted depending on the signal status. Time may be off by a few seconds. When time difference is adjusted overseas, the local time and date and ! appear in Redial, Received calls, Received/Sent messages history (SMS only), and Received/Sent messages list. The received/sent messages are not displayed in order of the displayed time and date but the mail reception/send. ! does not appear in the Unsent messages for mail messages. If the date order display is set for the Unsent messages, unsent messages are displayed in the order of the displayed time and date. Time correction may not be performed depending on the overseas network.](https://usermanual.wiki/Sharp/HRO00088/User-Guide-1054466-Page-41.png)
![52Before Using the HandsetɡChanging time zone manually <City>1In the Date settings screen, select the [Auto time correction] field/[OFF]/[City].2Select a time zone/select a city/[Complete].Display your number (caller ID) on the other party’s phone (display) when making a voice/Videophone/PushTalk call. Handset number (caller ID) is important personal information. Be very careful about your caller ID setting. The Notify caller ID function is available only on compatible phone devices.1In the Custom menu, select [Settings]/[NW Services]/[Notify caller ID].2Select [Activate/Deactivate].:To check the setting: Select [Check setting].3Select the setting.:To notify caller ID: Select [Yes].:To not notify caller ID: Select [No]. When checking your own phone number during a call nP. 551In the Custom menu, select [Phone]/[Owner Information].:Alternatively, press 0 in the Horizontal display menu.:To switch between Number A and Number B (when 2in1 [Dual mode] is used): Select [Number A]/[Number B]. During overseas use, Japan time and local time (or time set in City) appear in the dual display except for the following cases.When Auto time correction is set to [ON] and time correction information is not being received from an overseas networkWhen Auto time correction is set to [OFF] and City is set to the city in the same time zone as JapanNotify caller IDNotifying the other party of your phone numberSetting Notify caller ID/No caller ID in advance Notify caller ID setting cannot be set from outside the service area.Own numberChecking your own phone number When changing the Number B of 2in1, use any of the following methods to obtain the correct Number B.Set 2in1 function OFF and then perform 2in1 setting again to set 2in1 function ONCheck the 2in1 subscription When a FOMA card exchange (2in1 subscriber b 2in1 nonsubscriber) is performed, set 2in1 function OFF. When a FOMA card exchange (2in1 subscriber b 2in1 subscriber) is performed, check the 2in1 subscription. For details on Owner information nP. 382](https://usermanual.wiki/Sharp/HRO00088/User-Guide-1054466-Page-42.png)
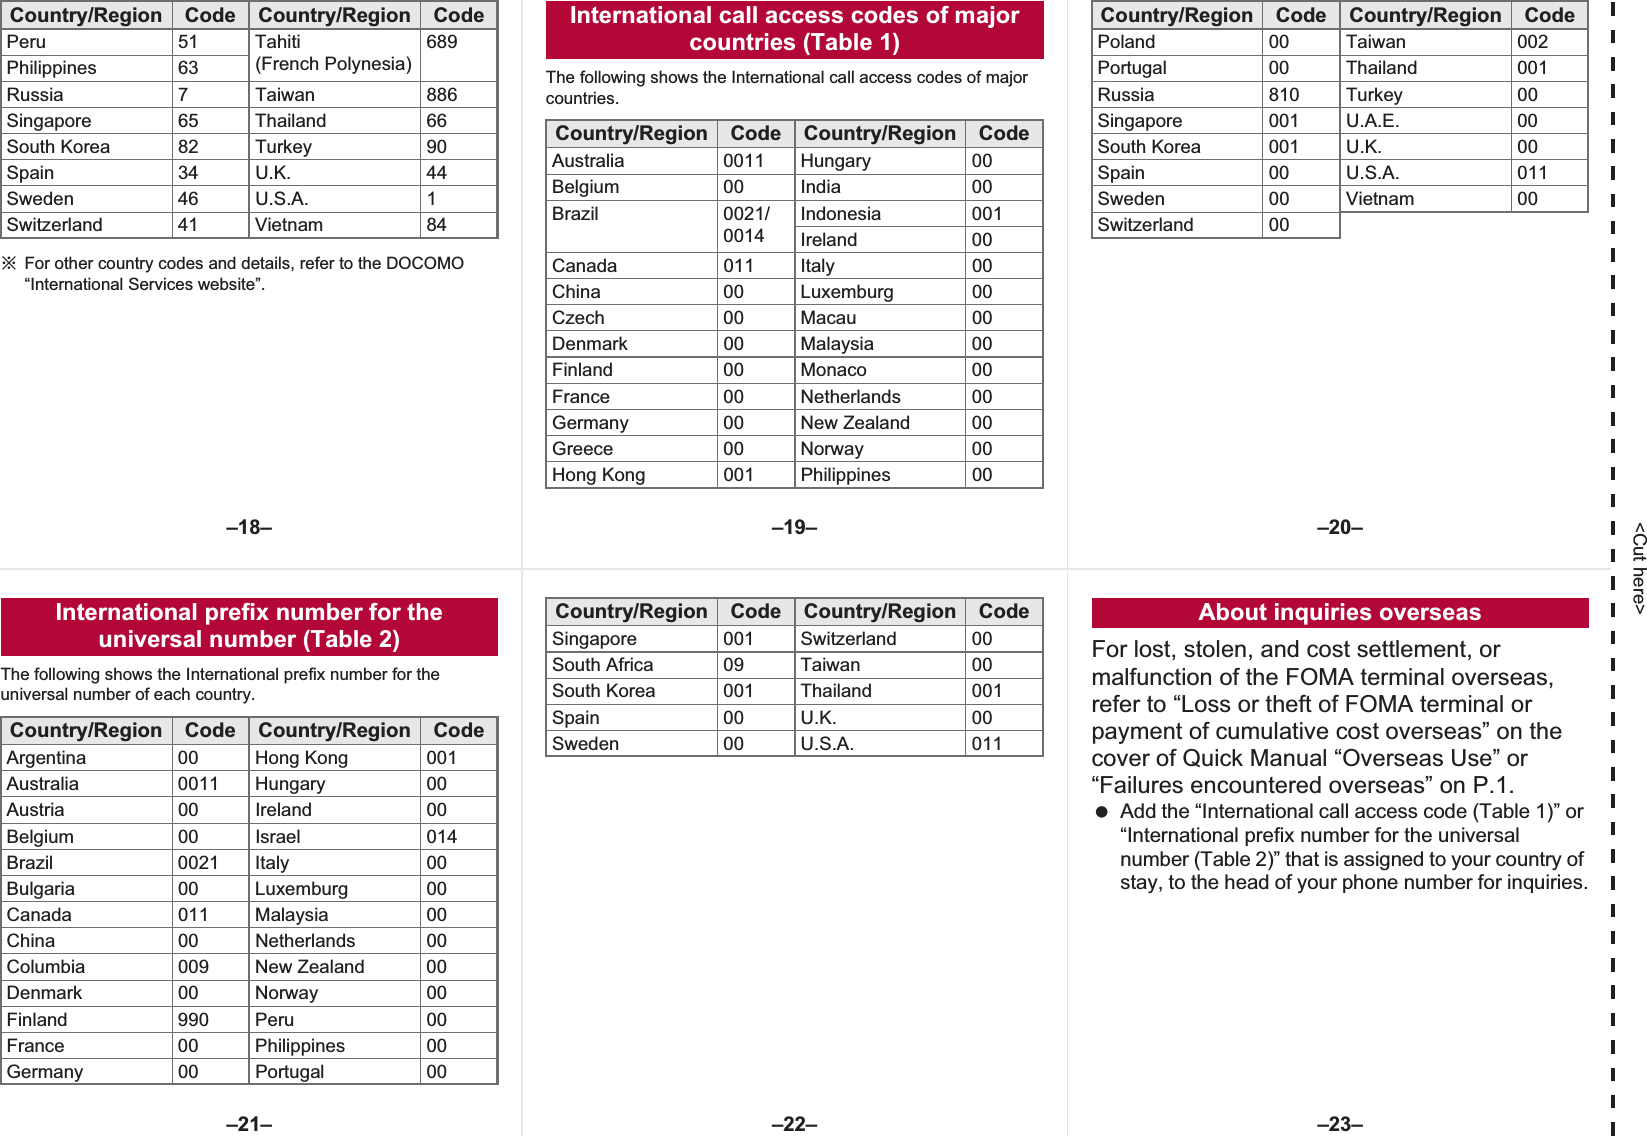
![430Overseas UseInternational roaming (WORLD WING) is a service that enables you, using overseas telecommunications carrier’s networks, to make calls and use i-mode.Use this FOMA terminal for voice/Videophone calls, i-mode and SMS with the phone number and mail address used in Japan. Network services such as Voice Mail and Call Forwarding Services can also be used. This service is available in the 3G network and GSM/GPRS network service areas. Refer to the DOCOMO “International Services website” for details on the area. By default, the FOMA terminal is set to automatically switch networks (nP. 436). Refer to the following before using the FOMA terminal overseas.“Mobile Phone User’s Guide [International Services]”“Mobile Phone User’s Guide [Network Services]”PDF file “٬ٸ̮၌ဥ΄ͼΡ” pre-installed in [My Documents] of Data boxCountry codes of major countriesThe following shows “Country code” used when making international calls (nP. 61) or setting International dial assist (nP. 62). For other country codes and details, refer to the DOCOMO “International Services website”.Outline of international roaming (WORLD WING)Country/Region Code Country/Region CodeAustralia 61 Maldives 960Austria 43 Netherlands 31Belgium 32 New Caledonia 687Brazil 55 New Zealand 64Canada 1 Norway 47China 86 Peru 51Czech 420 Philippines 63Egypt 20 Russia 7Fiji 679 Singapore 65Finland 358 South Korea 82France 33 Spain 34Germany 49 Sweden 46Greece 30 Switzerland 41Hong Kong 852 Tahiti(French Polynesia)689Hungary 36India 91 Taiwan 886Indonesia 62 Thailand 66Italy 39 Turkey 90Japan 81 U.K. 44Macau 853 U.S.A. 1Malaysia 60 Vietnam 84](https://usermanual.wiki/Sharp/HRO00088/User-Guide-1054466-Page-44.png)
![432Overseas Use If subscribed to the FOMA service before August 31, 2005 but not subscribed to “WORLD WING”, a subscription for “WORLD WING” is required. Some payment plans are not available. Insert the WORLD WING compatible FOMA card (other than blue) to the FOMA terminal (nP. 41).ɡAbout charging batteries Precautions for handling the AC adapter nP. 16 Methods for charging the AC adapter nP. 45ɡAbout browsing i-mode sitesTo browse i-mode site overseas, the settings for overseas use must be made from iMenu in advance.i-mode site: Select [iMenu]/[English]/[Options]/[InternationalSettings]/[i-mode services Settings]. Refer to “Mobile Phone User’s Guide [International Services]” and “Mobile Phone User’s Guide [i-mode] FOMA version” for details.ɡAbout setting network serviceIf subscribed to network services, Voice Mail Service, Call Forwarding Service or other services can be used overseas. Some network services may not be set or checked depending on overseas telecommunications carrier. In addition, some network services are available only in Japan. Refer to “Mobile Phone User’s Guide [International Services]” and “Mobile Phone User’s Guide [Network Services]” before departure. To use network services overseas, set Remote Control (nP. 422, P. 438) to “Activate”.ɡAbout inquiries overseasFor lost, stolen, and cost settlement, or malfunction of the FOMA terminal overseas, refer to “Loss or theft of FOMA terminal or payment of cumulative cost overseas” or “Failures encountered overseas” on the back of this manual. Note that any call or transmission charges incurred after the FOMA terminal is lost or stolen are charged to the subscriber. Add the “International call access code (Table 1)” or “International prefix number for the universal number (Table 2)” that is assigned to your country of stay, to the head of your phone number for inquiries. For the latest information of the international call access code and the international prefix number for the universal number, refer to the DOCOMO “International Services website”.International call access codes of major countries (Table 1)The following shows the International call access codes of major countries. Communication charges to Japan will apply.Country/Region Code Country/Region CodeAustralia 0011 Monaco 00Belgium 00 Netherlands 00Brazil 0021/0014New Zealand 00Norway 00Canada 011 Philippines 00China 00 Poland 00Czech 00 Portugal 00Denmark 00 Russia 810Finland 00 Singapore 001France 00 South Korea 001Germany 00 Spain 00Greece 00 Sweden 00Hong Kong 001 Switzerland 00Hungary 00 Taiwan 002India 00 Thailand 001Indonesia 001 Turkey 00Ireland 00 U.A.E. 00Italy 00 U.K. 00Luxemburg 00 U.S.A. 011Macau 00 Vietnam 00Malaysia 00](https://usermanual.wiki/Sharp/HRO00088/User-Guide-1054466-Page-46.png)
![433Overseas UseInternational prefix number for the universal number (Table 2)The following shows the International prefix number for the universal number of each country. Communication charges or other charges to your country of stay will apply. Communication charges to your country of stay will apply when calling from the mobile phone. Some codes may not be used. Note that the universal number may not be used for calls from a mobile phone, payphone or hotel. The universal number can be used only for countries listed above. Calling from a hotel may cost you extra call charges requested by the hotel (You are responsible for the call charges). Confirm with the hotel before making calls.The service is available in the 3G network and GSM/GPRS network service areas.The FOMA terminal is set to automatically search for the network when the power is turned on, and to be connected to the available telecommunications carrier in your country of stay. When Auto time correction (nP. 51) is set to [ON], if information with time and time differences is received from overseas telecommunications carrier which is being connected, time and time differences on the FOMA terminal clock are corrected. The correction timing differs depending on the telecommunications carrier. Auto time correction may not be available overseas. In such case, correct the time manually (nP. 51). If the connected telecommunications carrier is changed when Auto time correction is set to [ON], a screen notifying that time difference is adjusted may appear. When Operator name display (nP. 437) is set to [Display on], the telecommunications carrier connected appears in stand-by. When Clock display (nP. 100) is set to [ON(Large)], the local time and Japan time appear (excluding regions keeping the same standard time as Japan time). Talk time or stand-by time may be reduced to half the normal time depending on the network condition of your country of stay.By default, the FOMA terminal is set to automatically search for the network and to be connected to the FOMA network when the power is turned on after homecoming. If the Network search mode is set to [Manual], switch to the FOMA network (DOCOMO) manually or change to [Auto]. Set the 3G/GSM setting to [AUTO] or [3G].Country/Region Code Country/Region CodeArgentina 00 Luxemburg 00Australia 0011 Malaysia 00Austria 00 Netherlands 00Belgium 00 New Zealand 00Brazil 0021 Norway 00Bulgaria 00 Peru 00Canada 011 Philippines 00China 00 Portugal 00Columbia 009 Singapore 001Denmark 00 South Africa 09Finland 990 South Korea 001France 00 Spain 00Germany 00 Sweden 00Hong Kong 001 Switzerland 00Hungary 00 Taiwan 00Ireland 00 Thailand 001Israel 014 U.K. 00Italy 00 U.S.A. 011Using at your country of staySetting after homecoming](https://usermanual.wiki/Sharp/HRO00088/User-Guide-1054466-Page-47.png)
![434Overseas UseMake a call from overseas using the international roaming service.Make a call from your country of stay to Japan or other countries.1In stand-by, press s/keep touching [0(+)]/enter country code, area code (city code) and other party’s phone number.:When the area code (city code) begins with 0, omit the 0 when dialing (However, include 0 when making a call to landline phones in some countries or regions such as Italy).2Select [B] or press s (Phone)/select [V.phone].ɡMaking an international call outside your country of stay using Country code conversionSet Country code conversion (nP. 62) to [ON] and set the country code frequently called to easily make an international call. 0 at the beginning of a phone number is automatically converted to the country code set in Country code conversion.Example: Make a call from phonebook1In the Stand-by Display Touch Launcher, select [6]/select the other party.2Select [Phone] or press s (Phone)/select [V.phone].3Select [Call].:To dial a phone number as stored in the phonebook: Select [Original number].ɡMaking a call to the phone in country saved in Set country codeSave a country code using Set country code (nP. 63) to select a country code before making an international call. The following operation is available overseas only.1In stand-by, press s/enter a phone number/[Submenu]/[Add prefix setting]/[International Call].2Select the country code.3Press s (Phone)/select [V.phone].Make a domestic call at your country of stay in the same way as you do in Japan.1In stand-by, press s/enter a phone number.2Press s (Phone)/select [V.phone].:Always dial the area code (city code), even when the number is in the same area.:When making a domestic call at your country of stay using the phonebook, select [Original number] in step 3 of “Making an international call outside your country of stay using Country code conversion” on P. 434.Making a call at your country of stayMaking a call outside your country of stay (including Japan)Making a call in your country of stay Refer to the DOCOMO “International Services website” for details on available countries, country codes and telecommunications carriers. Even when Notify caller ID of the network service (nP. 52) is set to “Send ID”, [Unavailable] or [User unset] appears depending on the telecommunications carrier, and the caller ID may not be displayed correctly.](https://usermanual.wiki/Sharp/HRO00088/User-Guide-1054466-Page-48.png)
![435Overseas UseWhen making a call to a “WORLD WING” subscriber overseas, make an international call to Japan regardless of your country of stay.1In stand-by, press s/keep touching [0(+)]/enter country code 81 (Japan) and the other party’s mobile phone number excluding 0.2Select [B] or press s (Phone)/select [V.phone].Receive a call overseas in the same way as you do in Japan.1Press s to receive an incoming call.:Speak to the caller.ɡHaving calls made to your FOMA terminal from JapanTo receive an international call from Japan, have your phone number dialed just as a domestic call in Japan.090 (or 080)-XXXX-XXXX Calling from Received calls may not be available since the phone number may not be displayed correctly.ɡHaving calls made to your FOMA terminal from countries other than JapanHave the international call access code and 81 (Japan) added to the beginning of your phone number, and 0 excluded as an international call to Japan regardless of your country of stay.International call access code of the country of the caller-81-90 (or 80)-XXXX-XXXXSet the communication system supporting your area and telecommunications carrier.1In the Custom menu, select [Settings]/[Phone settings]/[Other settings]/[International Roam.]/[3G/GSM setting].2Select the communication method.Making a call to a WORLD WING subscriber overseasReceiving a call overseas Even when a caller tried to notify of caller ID, it might not be notified depending on the used telecommunications carrier. When a call is received during international roaming, the call is forwarded from Japan. Call charges to Japan are incurred by the caller and receiving charges by the receiver.Having calls to your FOMA terminal3G/GSM settingSetting network communication system](https://usermanual.wiki/Sharp/HRO00088/User-Guide-1054466-Page-49.png)
![436Overseas Use Set to manually select a telecommunications carrier. Re-search a network to set another telecommunications carrier. Check that the Network search mode is set to [Auto] when A appears even after homecoming. If telecommunications carrier is selected with [Manual] set abroad, manually set to the FOMA network (DOCOMO) again or change to [Auto] after homecoming.1In the Custom menu, select [Settings]/[Phone settings]/[Other settings]/[International Roam.]/[Network search mode].2Select the setting.;Select [Auto]/[Yes].• When [Auto] is set: Select [Auto].;Select [Manual]/select a telecommunications carrier.• The telecommunications carrier is changed.;Select [Network re-search].• The host network is changed automatically if the Network search mode is set to [Auto]. If set to [Manual], select a telecommunications carrier.Check the status whether making a call, data transmission or packet transmission is available.1In the Custom menu, select [Settings]/[Phone settings]/[Other settings]/[In-area status]/[Agree].Specify the priority order of telecommunications carriers connected to when the Network search mode is set to [Auto]. Save up to 20.1In the Custom menu, select [Settings]/[Phone settings]/[Other settings]/[International Roam.]/[Network search mode]/[PLMN setting].:To check the saved telecommunications carrier’s detailed information: Select the telecommunications carrier.2Point the cursor to the priority order/[Submenu].3Select the saving method.;Select [PLMN manual select]/enter a country code (MCC)/[OK]/enter a network code (MNC)/[OK]/select a communication method.;Select [UPLMN by list]/select a telecommunications carrier/select a communication method.• To search a telecommunications carrier from country name: Select [UPLMN by list]/[Search]/select a country name/select a telecommunications carrier/select a communication method.;Select [Set VPLMN to PLMN].• Save the telecommunications carrier currently connected to.;Select [Change priority]/select a destination.;Select [Delete]/[Delete one].;Select [Delete]/[Delete all]/enter the terminal security code/[OK].4Select [Yes].Network search modeSetting a search method of telecommunications carrierChecking communication services available <In-area status>PLMN settingSetting a telecommunications carrier to preferentially connect to](https://usermanual.wiki/Sharp/HRO00088/User-Guide-1054466-Page-50.png)
![437Overseas UseSet whether to display a telecommunications carrier name currently connected to in stand-by during international roaming.1In the Custom menu, select [Settings]/[Phone settings]/[Other settings]/[International Roam.]/[Operator name disp].2Select the setting/[Yes].ɡWhen displaying a telecommunications carrierWhen a call is received during international roaming, the caller hears the guidance stating that international roaming is activated. Make this setting while still in Japan.1In the Custom menu, select [Settings]/[Other NW Services]/[Roaming guidance].2Select an item.3Select [Yes].Set the FOMA terminal to reject calls during roaming. Select whether to bar all incoming calls or only the Videophone and 64K data communication calls. Depending on the overseas telecommunications carrier, the setting cannot be made. Unable to use 64K data communication overseas.1In the Custom menu, select [Settings]/[Phone settings]/[Other settings]/[International Roam.]/[Call barring].2Select an item.;Select [Activate]/[Yes]/select the barring method/enter the network security code/[OK].;Select [Deactivate]/[Yes]/enter the network security code/[OK].;Select [Check setting].Operator name dispDisplaying a telecommunications carrier during roamingRoaming guidanceActivating roaming guidanceTelecommunications carrier nameCall barringSetting incoming call to reject during roaming](https://usermanual.wiki/Sharp/HRO00088/User-Guide-1054466-Page-51.png)
![438Overseas UseWhen the FOMA terminal is outside the service area, turned off, or a received call cannot be answered during International roaming, the information of the call (Received date and time or caller ID) is notified with SMS.1In the Custom menu, select [Settings]/[Phone settings]/[Other settings]/[International Roam.]/[Missed Call Notice].2Select an item.;Select [Activate]/[Yes].;Select [Deactivate]/[Yes].;Select [Check setting].Use network services such as Voice Mail and Call Forwarding from overseas. Set at a country to stay. Voice Mail and Call Forwarding subscription are required to use Voice Mail (Int.) and Call Forward (Int.). To use network services overseas, set Remote Control (nP. 422) to “Activate” in advance. If operated from overseas, international call charges for your country of stay are incurred.1In the Custom menu, select [Settings]/[Phone settings]/[Other settings]/[International Roam.].2Select an item.;Select [Voice Mail(Int.)]/select an item of Voice Mail Service.;Select [Call Forward (Int.)]/select an item of Call Forwarding Service.;Select [Remote access (Int.)].;Select [Caller ID req (Int.)].;Select [Roam. guidance(Int.)].;Select [MissedCallNoticeInt.].3Select [Yes]/operate according to the voice guidance.Missed Call NoticeUsing Missed Call Notice function during roamingInt’l servicesUsing network services during roaming](https://usermanual.wiki/Sharp/HRO00088/User-Guide-1054466-Page-52.png)
![515e22_dz10_7e.fm[515/520]Appendix/TroubleshootingThis model phone SH-04A meets the MIC’s* technical regulation for exposure to radio waves.The technical regulation established permitted levels of radio frequency energy, based on standards that were developed by independent scientific organizations through periodic and thorough evaluation of scientific studies. The regulation employs a unit of measurement known as the Specific Absorption Rate, or SAR. The SAR limit is 2 watts/kilogram (W/kg)** averaged over ten grams of tissue. The limit includes a substantial safety margin designed to assure the safety of all persons, regardless of age and health. The value of the limit is equal to the international guidelines recommended by ICNIRP***.All phone models should be confirmed to comply with the regulation, before they are available for sale to the public. The highest SAR value for this model phone is 0.928 W/kg. It was taken by the Telecom Engineering Center (TELEC), a Registered Certification Agency on the Radio Law. The test for SAR was conducted in accordance with the MIC testing procedure using standard operating positions with the phone transmitting at its highest permitted power level in all tested frequency bands. While there may be differences between the SAR levels of various phones and at various positions, they all meet the MIC’s technical regulation. Although the SAR is determined at the highest certified power level, the actual SAR of the phone during operation can be well below the maximum value.For further information about SAR, please see the following websites:Specific Absorption Rate (SAR) of mobile phoneWorld Health Organization (WHO)http://www.who.int/peh-emf/ICNIRPhttp://www.icnirp.de/MIChttp://www.tele.soumu.go.jp/e/ele/body/index.htmTELEChttp://www.telec.or.jp/ENG/Index_e.htmNTT DOCOMOhttp://www.nttdocomo.co.jp/english/product/SHARP Corporationhttp://www.sharp.co.jp/products/menu/phone/cellular/sar/index.html* Ministry of Internal Affairs and Communications** The technical regulation is provided in Article 14-2 of the Ministry Ordinance Regulating Radio Equipment.*** International Commission on Non-Ionizing Radiation ProtectionEuropean RF Exposure InformationYour mobile device is a radio transmitter and receiver. It is designed not to exceed the limits for exposure to radio waves recommended by international guidelines. These guidelines were developed by the independent scientific organization ICNIRP and include safety margins designed to assure the protection of all persons, regardless of age and health.The guidelines use a unit of measurement known as the Specific Absorption Rate, or SAR. The SAR limit for mobile devices is 2 W/kg and the highest SAR value for this device when tested at the ear was 0.683 W/kg*.As SAR is measured utilizing the devices highest transmitting power the actual SAR of this device while operating is typically below that indicated above. This is due to automatic changes to the power level of the device to ensure it only uses the minimum level required to reach the network.The World Health Organization has stated that present scientific information does not indicate the need for any special precautions for the use of mobile devices. They note that if you want to reduce your exposure then you can do so by limiting the length of calls or using a hands-free device to keep the mobile phone away from the head.* The tests are carried out in accordance with international guidelines for testing.Hereby, Sharp Telecommunications of Europe Ltd, declares that this SH-04A is in compliance with the essential requirements and other relevant provisions of Directive 1999/5/EC.A copy of the original declaration of conformity can befound at the following Internet address:http://www.sharp.co.jp/k-tai/Declaration of Conformitye22_dz10_7e.fm 515 ページ 2008年12月25日 木曜日 午前11時12分](https://usermanual.wiki/Sharp/HRO00088/User-Guide-1054466-Page-54.png)
![516e22_dz10_7e.fm[516/520]Appendix/TroubleshootingInformation to UserThis equipment has been tested and found to comply with the limits of a Class B digital device, pursuant to Part 15 of the FCC Rules. These limits are designed to provide reasonable protection against harmful interference in a residential installation. This equipment generates, uses and can radiate radio frequency energy and, if not installed and used in accordance with the instructions, may cause harmful interference to radio communications.However, there is no guarantee that interference will not occur in a particular installation; if this equipment does cause harmful interference to radio or television reception, which can be determined by turning the equipment off and on, the user is encouraged to try to correct the interference by one or more of the following measures:1. Reorient/relocate the receiving antenna.2. Increase the separation between the equipment and receiver.3. Connect the equipment into an outlet on a circuit different from that to which the receiver is connected.4. Consult the dealer or an experienced radio/TV technician for help.FCC RF Exposure InformationYour handset is a radio transmitter and receiver.It is designed and manufactured not to exceed the emission limits for exposure to radio frequency (RF) energy set by the Federal Communications Commission of the U.S. Government.The guidelines are based on standards that were developed by independent scientific organisations through periodic and thorough evaluation of scientific studies. The standards include a substantial safety margin designed to assure the safety of all persons, regardless of age and health.The exposure standard for wireless handsets employs a unit of measurement known as the Specific Absorption Rate, or SAR. The SAR limit set by the FCC is 1.6 W/kg.The tests are performed in positions and locations (e.g., at the ear and worn on the body) as required by the FCC for each model. The highest SAR value for this model handset when tested for use at the ear is 0.685 W/kg and when worn on the body, as described in this user guide, is 0.582 W/kg.Body-worn Operation; This device was tested for typical body-worn operations with the back of the handset kept 1.5 cm from the body. To maintain compliance with FCC RF exposure requirements, use accessories that maintain a 1.5 cm separation distance between the user’s body and the back of the handset. The use of beltclips, holsters and similar accessories should not contain metallic components in its assembly.The use of accessories that do not satisfy these requirements may not comply with FCC RF exposure requirements, and should be avoided. The FCC has granted an Equipment Authorization for this model handset with all reported SAR levels evaluated as in compliance with the FCC RF emission guidelines. SAR information on this model handset is on file with the FCC and can be found under the Display Grant section of http://www.fcc.gov/oet/fccid after searching on FCC ID APYHRO00088.Additional information on Specific Absorption Rates (SAR) can be found on the Cellular Telecommunications & Internet Association (CTIA) Website at http://www.phonefacts.net.The Japan Export Administration Regulations (“Foreign Exchange and International Trade Law” and its related laws) will be applied to this product and its accessories under certain conditions. The Export Administration Regulations are also applied. To export or reexport this terminal and its accessories, conduct all legally required procedures at your own risk and expense. For details on the procedures, contact the Ministry of Economy, Trade and Industry or the US Department of Commerce.FCC Notice This device complies with part 15 of the FCC Rules.Operation is subject to the following two conditions:(1) This device may not cause harmful interference, and (2) this device must accept any interference received, including interference that may cause undesired operation. Changes or modifications not expressly approved by the manufacturer responsible for compliance could void the user’s authority to operate the equipment.Export Administration Regulationse22_dz10_7e.fm 516 ページ 2008年12月25日 木曜日 午前10時41分](https://usermanual.wiki/Sharp/HRO00088/User-Guide-1054466-Page-55.png)

![<Cut here>General Inquiries <docomo Information Center>ɦService available in: English, Portuguese, Chinese, Spanish, Korean.ɦAvailable from mobile phones and PHSs.For DOCOMO mobile phones(In Japanese only)ɦUnavailable from fixed-line telephones, etc.For fixed-line telephones(In Japanese only)ɦAvailable from mobile phones and PHSs. Please confirm the phone number before you dial.For DOCOMO mobile phones(In Japanese only)ɦUnavailable from fixed-line telephones, etc.For fixed-line telephones(In Japanese only)ɦAvailable from mobile phones and PHSs. Please confirm the phone number before you dial.1In the Stand-by Display Touch Launcher, select [6]/[Submenu]/[New]/[Phone].2Enter a name/[OK]/9/enter a phone number/[OK]/select a phone type icon/S/enter a mail address/[OK]/select a mail address type icon/[Complete]/[OK]/select Add to PushTalk PB.ɡOther save itemsQ: Group F: Secret codea: Company/school <: Select ring toneq: Department V: Mail ring toner: Title q: Called LED colorN: Postal code -: Called LED patternO: Postal address :: Mail/Message LED colorj: Location info +: Mail LED patternP: Birthday 8: Picture call setG: Memo 1: Substitute image;: Secret1In the Stand-by Display Touch Launcher, select [2]/[1]/point the cursor to a phone number/[Submenu]/[Add to phonebook]/[Save new to phone]/add to the phonebook.Quick ManualRegistration/Contactss0120-005-250 (toll free)r(No prefix) 151 (toll free)s0120-800-000 (toll free)SH-04AIf you have problems with your FOMAr(No prefix) 113 (toll free)s0120-800-000 (toll free)Adding entries to phonebook (Phone) Adding entries to phonebook from Redials/Received calls1In the Stand-by Display Touch Launcher, select [6]/point the cursor to a name/[Submenu]/[Edit data]/[Edit]/select an item/edit.1In the text input screen, select [Chara]/select the input mode.1Enter a character/[YZA/a].1Point the cursor to the text and press z.1In the text input screen, select [Submenu]/[Phrase(Hold F4)]/select a phrase/[OK].1In the text input screen, select [Pict/Sym].:To enter symbols: Select [Symbol].:To enter pictographs: Select [Pict].:To switch between pictograph and Deco-mail pictograph: Select [Pict]/[Pict-D].:To switch between single- and double-byte symbols: Select [Fulpitch]/[Hlfpitch].1In the text input screen, select [Submenu]/[Emoticon(Hold F3)]/select an emoticon.Ex.) When entering a message1In the text input screen, select [Submenu]/[Copy]/[Cut]/move the cursor to the start position/[Start].2Move the cursor to the end position/[Copy]/[Cut].3Select [Submenu]/[Paste].4Move the cursor to the paste position/[Paste].Ex.) ͈ࣽΞΣΑ3শt1In the text input screen, select [̥] (twice)/[Conv]/[ࣽ].:As each hiragana character is entered, conversion candidates appear and they can be selected.2Select [Conv]/[͈].3Select [̹][̈́][̯]/[1-tch]/[ΞΣΑ].:Select [1-tch] for One-touch conversion.4Select [Chara]/[1]/[3].Editing phonebook entriesText inputChanging input modeSwitching upper/lower caseDeleting textUsing phrasesEntering pictographs/symbolsEntering emoticonsCutting/Copying/Pasting textText input example–1– –2––4––3– –5–](https://usermanual.wiki/Sharp/HRO00088/User-Guide-1054466-Page-61.png)
![<Cut here>:Select [Chara] (five times) for single-byte alphanumeric mode.5Select [Chara]/[̜]/[̯] (twice)/[YZA/a]/[Conv]/[শ].:Select [YZA/a] for dakuten mark.6Select [Pict/Sym]/t.1In the Custom menu, select [Settings]/[Disp/LED/Power saver]/[Font style]/[Font style setting]/select the font.1In the Custom menu, select [Settings]/[Disp/LED/Power saver]/[Font style]/[Font size]/[Individual setting]/select the [Input] field/select the font size/[Yes].:To change collectively: In stand-by, press 5 (for 1+ seconds).1In the Stand-by Display Touch Launcher, select [#]/& (q)/& (q).ɡShooting panoramic pictures1In the still picture shooting screen, select [Submenu]/[Select size]/[Panorama(2560×640)]/& (q)/move the FOMA terminal to either direction of left or right/&(q)/& (q).1In the still picture shooting screen, select [Submenu]/[Switch camera-mode]/[Movie]/& (q)/& (q)/[Save].1In the Custom menu, select [Data box]/[My picture]/select a still picture.1In the Custom menu, select [Data box]/[i-motion]/select a movie.1In the Custom menu, select [1Seg]/[Channel setting].2Point the cursor to the save destination/[Submenu]/[Auto channel set]/[Yes].Changing font (font style)Changing font sizeCameraShooting still picturesShooting moviesDisplaying still picturesPlaying back moviesWatching 1SegPerforming Automatic channel setting3Select an area/select a prefecture/district/[OK]/[Yes]/[Yes].1In the Custom menu, select [1Seg]/[Channel setting]/select a channel list.1In the Custom menu, select [1Seg]/[Activate 1Seg].:To record a movie of 1Seg programs: While watching 1Seg, keep touching [X].:To record 1Seg programs as a still picture: While watching 1Seg, touch [X].1In the Custom menu, select [Data box]/[1Seg]/select a video.1In the Custom menu, select [Data box]/[MUSIC]/select music data.1In the Stand-by Display Touch Launcher, select [7]/[Compose message]/select the [To] field/select the input method.;Select [Search phonebook]/select a recipient.;Select [Sent messages]/select a recipient.;Select [Rcvd messages]/select a recipient.;Select [Mail members]/select a mail member.;Select [Direct input]/enter an address/[OK].Selecting a channel listWatching 1SegWatching videosMusic playbackUsing MUSIC PlayerOperations for MUSIC PlayerTo pause/play & (q) or [g]To stop[f]To adjust the volume[V]/[W]To play previous song/return to the beginning of song [d]To play next song[c]To end MUSIC Player H/[Yes]MailComposing and sending i-mode mail–7––10––6– –8––11––9–](https://usermanual.wiki/Sharp/HRO00088/User-Guide-1054466-Page-62.png)
![<Cut here>2Select the [Sub] field/enter a subject/[OK]/[Msg]/enter the message text/[OK]/[Send].1In the text input screen, select [Submenu]/[Decorate mail]/select a decoration type/specify decoration/input text/[OK]/[Send].1In the Stand-by Display Touch Launcher, select [7]/[Compose message]/select the attachment field (No attachment)/select the file to attach.;Select [Image]/point the cursor to the image/[OK].;Select [Melody]/point the cursor to the melody/[OK].;Select [i-motion]/point the cursor to i-motion/[OK].;Select [ToruCa]/point the cursor to ToruCa/[OK].;Select [PDF]/point the cursor to the PDF/[OK].;Select [Phonebook]/select a save destination/select a name.;Select [Schedule]/select a save destination (/select a day)*/select a schedule.* No operation is needed if [microSD] is selected as the save destination;Select [Bookmark]/select a save destination/select a bookmark.;Select [Document]/point the cursor to the file/[OK].;Select [Other]/select a file.;Select [Start cam (still)]/[A]/& (q)/[Save]/& (q).;Select [Start cam (movie)]/[Rec]/& (q)/[Stop]/&(q)/[Save].1In the Stand-by Display Touch Launcher, select [7]/[Compose SMS]/select the [To] field/[Direct input]/enter an address/[OK]/[Msg]/enter the message/[OK]/[Send].1Mail is automatically received.2Select [Mail]/select the mail.1In the Stand-by Display Touch Launcher, select [7]/[Check new messages].:SMS: In the Stand-by Display Touch Launcher, select [7]/[Check new SMS].1In the received message details screen, select [Submenu]/[Reply/Forward].2Select the reply method.3Compose and send a mail.1In the received message details screen, select [Submenu]/[Reply/Forward]/[Forward].2Enter an address and send a mail.Sending Deco-mailAttaching a fileComposing and sending SMSReceiving mail automaticallyChecking new i-mode mailReplying to i-mode mailForwarding i-mode mail1In the Stand-by Display Touch Launcher, select [$].2In the Custom menu/Function menu, select the function.3In the Menu list, select the function.1In the Custom menu/Basic menu, select [Basic]/[Custom].Menu listRetrieving functions from the Custom menu/Basic menuSwitching between the Custom menu/Basic menuSnd/Vibrator/MannerSelect volume Received call volume, phone ring vol, Mail ring vol, PushTalk tone vol, Key/Touch sound, Standby i-motion, Charge start sound, Charge end sound, Timer sound, GPS volumeSelect sound Select ring tone, Select mail tone, PushTalk tone, Shutter sound, Timer sound, GPS toneVibrator Vibration mode, Mail vibration, GPS vibrator, Touch vibratorManner mode ON (Normal, Silent, Original), OFFHeadset settingRing time setting Mail ring time set, PT ring time set, GPS ring time setSet mute ring timeHold/On hold tone Set on hold tone, Set hold toneSound playback Melody stereo fx, Melody equalizer, Pref playback soundSnd/Vibrator/Manner Disp/LED/Power saverSet screen Stand-by display, Clock display, Calendar display, Stand-by memo disp, Stdby toch lnch disp, Desktop clock, Stdby slide-link setFont style Font style setting, Font sizeThemes Kisekae Tool, Call/Rcv display, Send/Rcv display, Animate notices, Signal/batt/s clock, Machi-chara, Color theme settingLED settings Called LED, Mail LED, Notice LED, In-call LED, Alarm/Timer LED, IC card LED, Slide-linked LED, GPS LEDDisplay img qualityVibrant image mode, Control by scene–13– –14––16––15– –17––12–](https://usermanual.wiki/Sharp/HRO00088/User-Guide-1054466-Page-63.png)
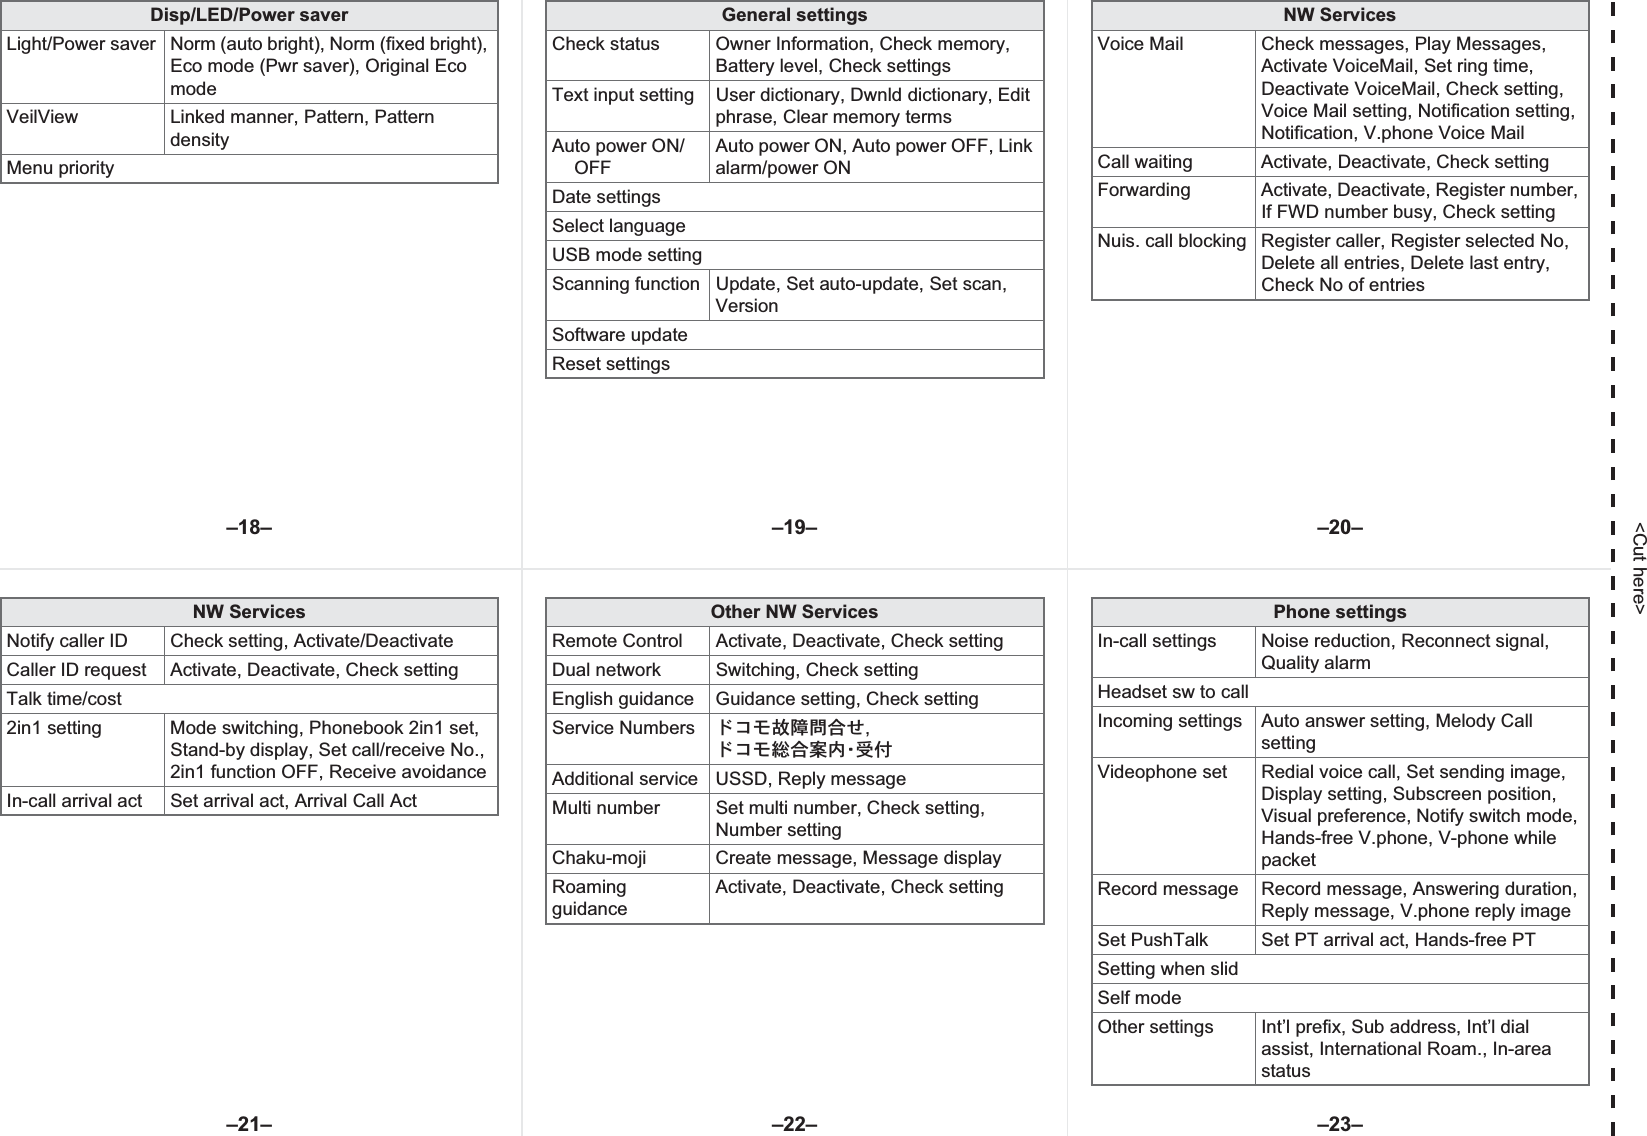
![<Cut here>SecuritySecret modeUIM Settings PIN1 code input set, Change PIN1 code, Change PIN2 codeAccept/Reject callsAccept calls, Reject calls, Reject unknown, User unset, Reject payphone, Reject not supportShow call/receivedShow rcvd calls, Show redialShow sent/receivedShow sent messages, Show rcvd messagesLock settings All lock, Keypad dial lock,Function lock, Multi lock set, IC card lock, Multi lock auto-setChange security codeWriting authenticDelete all data Delete user data, Del secret datai-concier settingsIncoming settings Select volume, Select sound, Vibrator, Ring time setting, LED settingInformation displayOther settingsInitial settingOwn numberQuick SettingsVeliView BluetoothLocation Public modeRcvCall vol Manner modeRec msg Self modeAlarm Lock selectVibrator Eco modeStand-by Display Touch Launcher9Quick search0Full Browser (Google)!Mapping appli(i-concier$Start menu8i-mode menu)1Seg%i-Widget (longways)=Program guide i-appli (sideways)ɦWhen the confirmation screen appears, select [Yes].Voice Mail Service is a paid option (monthly fees apply) that requires subscription.1In the Custom menu, select [Settings]/[NW Services]/[Voice Mail].2Select [Activate VoiceMail]/[Activate VoiceMail].:To deactivate: Select [Deactivate VoiceMail].:To play messages: Select [Play Messages]/[Play(voice call)]/[Play(videophone)].:To check messages: Select [Check messages].Call Waiting is a paid option (monthly fees apply) that requires subscription.1In the Custom menu, select [Settings]/[NW Services]/[Call waiting].2Select [Activate].:To deactivate: Select [Deactivate].:To check settings: Select [Check setting].Call Forwarding Service is a free option (no monthly fees) that requires subscription.1In the Custom menu, select [Settings]/[NWServices]/[Call Forwarding].2Select [Activate]/[Activate].:To deactivate: Select [Deactivate].:To check settings: Select [Check setting].Subscription is not required (no monthly fees).1In the Custom menu, select [Settings]/[NWServices]/[Caller ID request].2Select [Activate].:To deactivate: Select [Deactivate].:To check settings: Select [Check setting].#Shoot still picture7Mail menu6Phonebook5Dial input screen1Received calls2Redial/Manner mode settingOther functionsActivate Multi Assistant (Multitask)s (for 1+ seconds)Network servicesVoice Mail ServiceCall WaitingCall Forwarding ServiceCaller ID Request Service–25– –26––28––27– –29––24–](https://usermanual.wiki/Sharp/HRO00088/User-Guide-1054466-Page-65.png)
![<Cut here>Icon list12345 7 b cpmlkjihgnq or fetus><zdwxv6 a89y1]Signal status2"Battery level{Charging37=AABNO i-mode/Full Browser4oSSL5GNIQ i-appli6AB GPS7J#Ntu Ir communication/Bluetooth communication/External device8UhHv[i-mode mail/SMS/Area Mail received 9ABJMessage R/F receivedaWGIXSTKL Storage status of i-mode centerb^ (gray) microSD Card is inserted^ (pink) microSD Card is being usedcClock displayda1Seg being recordede]D to PkRecord messagef[SilentgbVibratorhZManner modei_Public mode (Drive mode)jai-appli callkHIC card lock lRSTUVWKX Restriction indicatorm;Hands-freelMute in progress (only when in the open position)MBluetooth hands-freeɦRefer to P. 28 to P. 31 of the manual for detailed explanations of displayed icons.n\Alarmo0Music&Video Channel program reservationp=; i-mode mail send reservationqsEarphone/Microphone connectionrxUSB modesRFOMA card is malfunctioning or not insertedBNon-FOMA card is insertedtgSelf modeuaPushTalkvLBluetoothwPVeilViewx4KJ 3G/GSMyIH Status of Comics settingzQToruCa<CReceiving information >Multitask<Emergency contacts in case of loss or other accidents>Omakase LockɦOmakase Lock is a paid service. However, if Omakase Lock is subscribed while or at the same time as when the use of FOMA terminal is suspended, or if the user is a member of docomo Premier Club, the usage fee of Omakase Lock is not charged. Additionally, if Keitai Anshin Pack (Mobile Phone Security Package) is subscribed, Omakase Lock is available for a flat-rate.Enable/Disable Omakase Locks0120-524-360 Office hours: 24hoursOther contacts<Contacts: ><Contacts: ><Contacts: >ɦPlease confirm the phone number before you dial.–31––34––30– –32––35––33–](https://usermanual.wiki/Sharp/HRO00088/User-Guide-1054466-Page-66.png)
![<Cut here>For DOCOMO mobile phonesɦIf you use the SH-04A, you should dial the number +81-3-5366-3114.For fixed-line telephones<Universal number>ɦSee P.19 to P.20 and P.21 to P.22 for international call access codes of major countries (Table1) and international prefix number for the universal number (Table2).For DOCOMO mobile phonesɦIf you use the SH-04A, you should dial the number +81-3-6718-1414.For fixed-line telephones<Universal number>ɦSee P.19 to P.20 and P.21 to P.22 for international call access codes of major countries (Table1) and international prefix number for the universal number (Table2).Refer to the following before using the FOMA terminal overseas.“Mobile Phone User’s Guide [International Services]”“Mobile Phone User’s Guide [Network Services]”PDF file “٬ٸ̮၌ဥ΄ͼΡ” pre-installed in [My Documents] of Data boxɡSetting in Japan1In the Stand-by Display Touch Launcher, select [8]/[iMenu]/[English]/[Options]/[International Settings]/[i-mode services Settings]/[Yes]/select the [Enter i-mode Password] field/enter the i-mode password/[OK]/[OK].ɡSetting in overseas1In the Stand-by Display Touch Launcher, select [8]/[iMenu]/[English]/[International Settings]/[i-mode services Settings]/[Yes]/select the [Enter i-mode Password] field/enter the i-mode password/[OK]/[OK].Quick Manual “Overseas Use”Loss or theft of FOMA terminal or payment ofcumulative cost overseas <docomo Information Center> (24-hour service)International call access code of your country of stay (Table 1)-81-3-5366-3114* (toll free)* Communication charges to Japan will apply when you make a call from a fixed-line telephone.International prefix number for the universal number (Table 2)-800-0120-0151**Communication charges or other charges to your country of stay will apply.SH-04AFailures encountered overseas<Network Technical Operation Center>(24-hour service)International call access code of your country of stay (Table 1)-81-3-6718-1414* (toll free)* Communication charges to Japan will apply when you make a call from a fixed-line telephone.International prefix number for the universal number (Table 2)-800-5931-8600**Communication charges or other charges to your country of stay will apply.Preparing for overseas useSetting i-modeɡSetting in Japan1In the Custom menu, select [Settings]/[Other NW Services]/[Remote Control]/[Activate]/[Yes].ɡSetting in overseas1In the Custom menu, select [Settings]/[Phonesettings]/[Other settings]/[International Roam.]/[Remote access (Int.)]/[Yes]/operate according to the voice guidance.1In the Custom menu, select [Settings]/[General settings]/[Date settings]/select the [Auto time correction] field/[ON]/[Complete].1In the Custom menu, select [Settings]/[General settings]/[Date settings]/select the [Auto time correction] field/[OFF].2Select [City]/select a city/[Complete].1In the Custom menu, select [Settings]/[Phone settings]/[Other settings]/[International Roam.]/[3G/GSM setting]/select the communication method. Unable to use 64K data communication by connecting a PC, etc. overseas.Setting remote accessCorrecting date and time automaticallySetting time zone manuallyAvailable network3G network AvailableGSM network AvailableGPRS network AvailableSetting network communication systemAvailable services overseasCommunication service 3G GSM GPRSVoice call AAAVideophone ABBi-mode mail ABAi-mode ABAi-Channel ABAi-concier ABAi-Widget ABASMS AAAPacket transmission by connecting a PC, etc. ABA–1– –2––4––3– –5–](https://usermanual.wiki/Sharp/HRO00088/User-Guide-1054466-Page-67.png)
![<Cut here>Default setting: Auto (Automatically switches telecommunications carriers)1In the Custom menu, select [Settings]/[Phone settings]/[Other settings]/[International Roam.]/[Network search mode].2Select [Auto]/[Yes].:To manually switch telecommunications carriers: Select [Manual]/select a telecommunications carrier.:To re-search for the host network: Select [Network re-search].1In the Custom menu, select [Settings]/[Phonesettings]/[Other settings]/[International Roam.]/[Network search mode]/[PLMN setting]/point the cursor to the number of the priority order/[Submenu].2Select [PLMN manual select]/enter a country code (MCC)/[OK]/enter a network code (MNC)/[OK]/select a communication method/[Yes].:To save from a telecommunications carrier list: Select [UPLMN by list]/select a telecommunications carrier/select a communication method/[Yes].:To save the telecommunications carrier currently connected to: Select [Set VPLMN to PLMN]/[Yes].:To change the priority: Select [Change priority]/select a destination/[Yes].1In the Custom menu, select [Settings]/[Phonesettings]/[Other settings]/[International Roam.]/[Operator name disp]/[Display on]/[Yes].Setting a search method of telecommunications carrierNetwork search modeSetting a telecommunications carrier to preferentially connect toDisplaying a telecommunications carrier name in stand-byTelecom-municationscarrier nameIf Network search mode is set to [Auto], reset Network search mode to the FOMA network (DOCOMO) automatically when the power is turned on after homecoming.ɡSetting to FOMA network (DOCOMO) manually1In the Custom menu, select [Settings]/[Phone settings]/[Other settings]/[International Roam.]/[Network search mode]/[Manual]/[DOCOMO].ɡUsing + to make an international call1In stand-by, press s/keep touching [0(+)]/enter the country code, area code (city code) and other party’s phone number/[B] or s (Phone)/[V.phone].:When the area code (city code) begins with 0, omit the 0when dialing. However, include 0 when making a call to landline phones in some countries or regions such as Italy.ɡMaking an international call outside your country of stay using country code conversion0 at the beginning of a phone number is automatically converted to the country code set in Country code conversion.Example: Make a call from the phonebook1In the Stand-by Display Touch Launcher, select [6]/select the other party/ [Phone] or s(Phone)/[V.phone]/[Call].ɡMaking an international callSave a country number using Set country code to select a country code before making an international call.The following operation is available overseas only.1In stand-by, press s/enter a phone number/[Submenu]/[Add prefix setting]/[International Call]/select the country code/[B] or s(Phone)/[V.phone].1In stand-by, press s/enter a phone number/[B] or s (Phone)/[V.phone].ɡMaking a call to the phone in your country of stay using phonebook1In the Stand-by Display Touch Launcher, select [6]/select the other party/[Phone] or s(Phone)/[V.phone]/[Original number].Setting after homecoming Making a callMaking a call outside your country of stay (including Japan)Making a call in your country of stay–7––10––6– –8––11––9–](https://usermanual.wiki/Sharp/HRO00088/User-Guide-1054466-Page-68.png)
![<Cut here>ɡMaking a call to a WORLD WING subscriber overseasEven when making a call to the phone in your country of stay, make an international call to Japan if the call recipient is a “WORLD WING” subscriber overseas.1In stand-by, press s/keep touching [0(+)]/enter 81/enter the other party’s mobile phone number excluding the first 0/[B] or s (Phone)/[V.phone].1Press s to answer an incoming call.ɡHaving calls made to your FOMA terminal from JapanEnter the phone number in the same way as it is entered in Japan and make a call.ɡHaving calls made to your FOMA terminal from countries other than JapanEnter international call access code of the country of the caller-81-user’s phone number excluding the first 0 and make a call.Make this setting while still in Japan.ɦWhen the confirmation screen appears, select [Yes].1In the Custom menu, select [Settings]/[Other NW Services]/[Roaming guidance].2Select [Activate].:To deactivate: Select [Deactivate].:To check settings: Select [Check setting]. Depending on the overseas telecommunications carrier, the setting cannot be made.1In the Custom menu, select [Settings]/[Phone settings]/[Other settings]/[International Roam.]/[Call barring].2Select [Activate]/[Yes]/select the barring method/enter the network security code/[OK].:To deactivate: Select [Deactivate]/[Yes]/enter the network security code/[OK].:To check settings: Select [Check setting].1In the Custom menu, select [Settings]/[Phone settings]/[Other settings]/[International Roam.]/[Missed Call Notice].2Select [Activate]/[Yes].:To deactivate: Select [Deactivate]/[Yes].:To check settings: Select [Check setting].Receiving callsSetting roaming guidance Call barringMissed Call Notice Set in your country of stay. To use network service overseas, set Remote Control to “Activate”.ɦWhen the confirmation screen appears, select [Yes].ɦOperate according to the voice guidance.1In the Custom menu, select [Settings]/[Phonesettings]/[Other settings]/[International Roam.]/[Voice Mail(Int.)].2Select [Activate Voice Mail].:To deactivate: Select [Deactivate].:To play messages: Select [Play Messages].:To set the service: Select [Voice Mail settings].1In the Custom menu, select [Settings]/[Phone settings]/[Other settings]/[International Roam.]/[Call Forward (Int.)].2Select [Activate].:To deactivate: Select [Deactivate].:To set the service: Select [Settings].1In the Custom menu, select [Settings]/[Phone settings]/[Other settings]/[International Roam.]/[Roam. guidance(Int.)].1In the Custom menu, select [Settings]/[Phone settings]/[Other settings]/[International Roam.]/[MissedCallNoticeInt.].The following shows “Country code” used when making international calls or setting International dial assist.Using network serviceVoice Mail (Int.)Call Forward (Int.)Roaming guidance (Int.)Missed Call Notice (Int.)Country codes of major countriesCountry/Region Code Country/Region CodeAustralia 61 Hong Kong 852Austria 43 Hungary 36Belgium 32 India 91Brazil 55 Indonesia 62Canada 1 Italy 39China 86 Japan 81Czech 420 Macau 853Egypt 20 Malaysia 60Fiji 679 Maldives 960Finland 358 Netherlands 31France 33 New Caledonia 687Germany 49 New Zealand 64Greece 30 Norway 47–13– –14––16––15– –17––12–](https://usermanual.wiki/Sharp/HRO00088/User-Guide-1054466-Page-69.png)