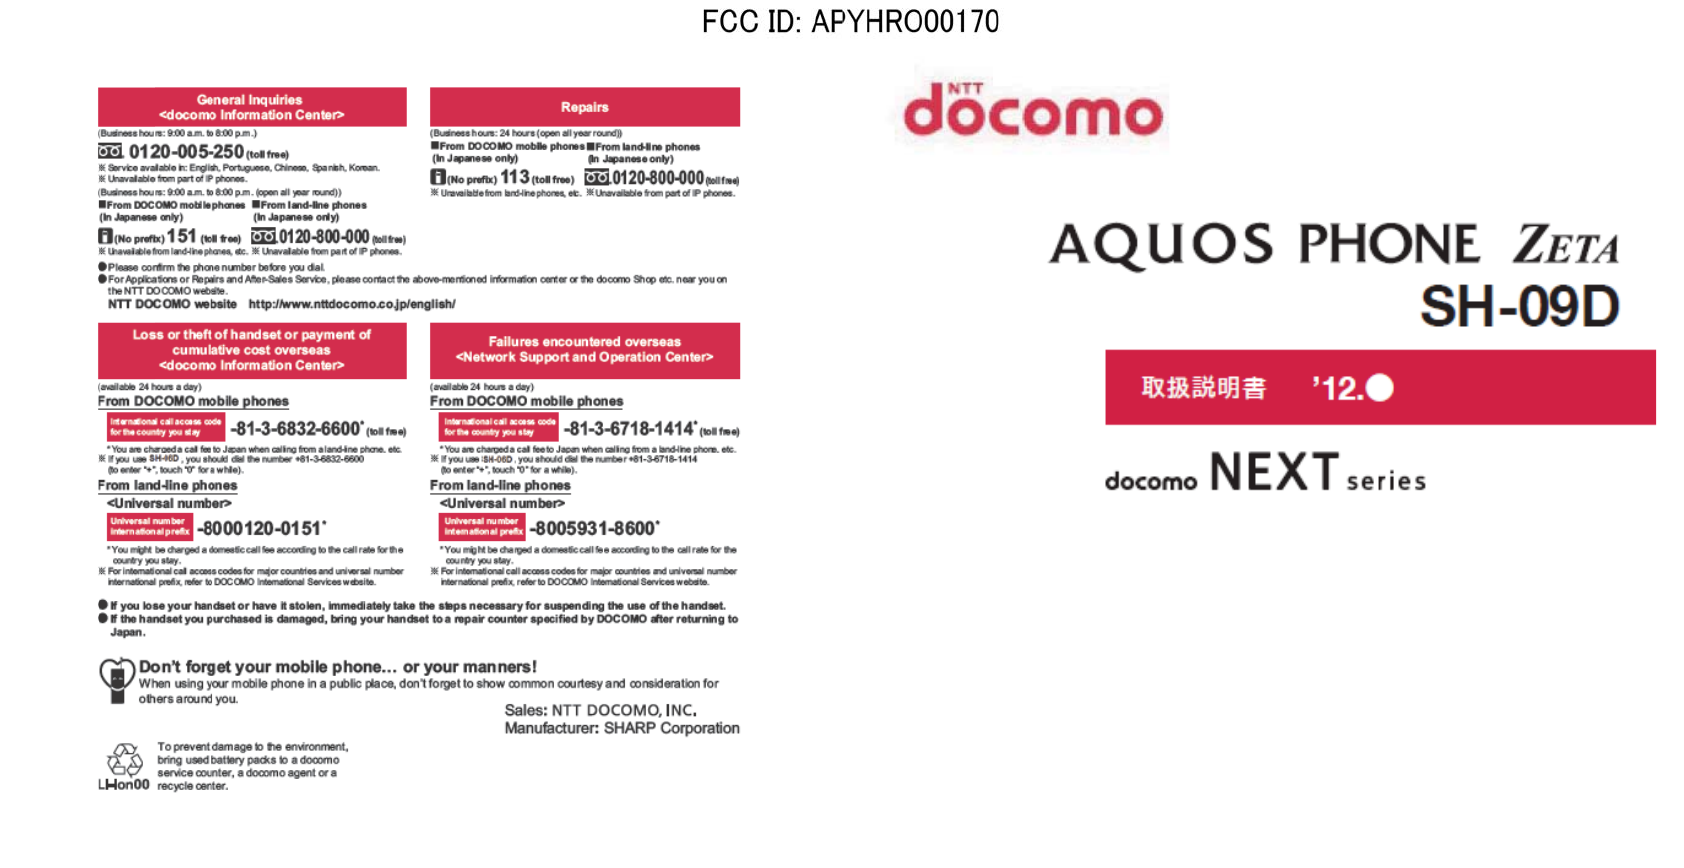
Sharp HRO00170 Cellular Phone User Manual Operation manual
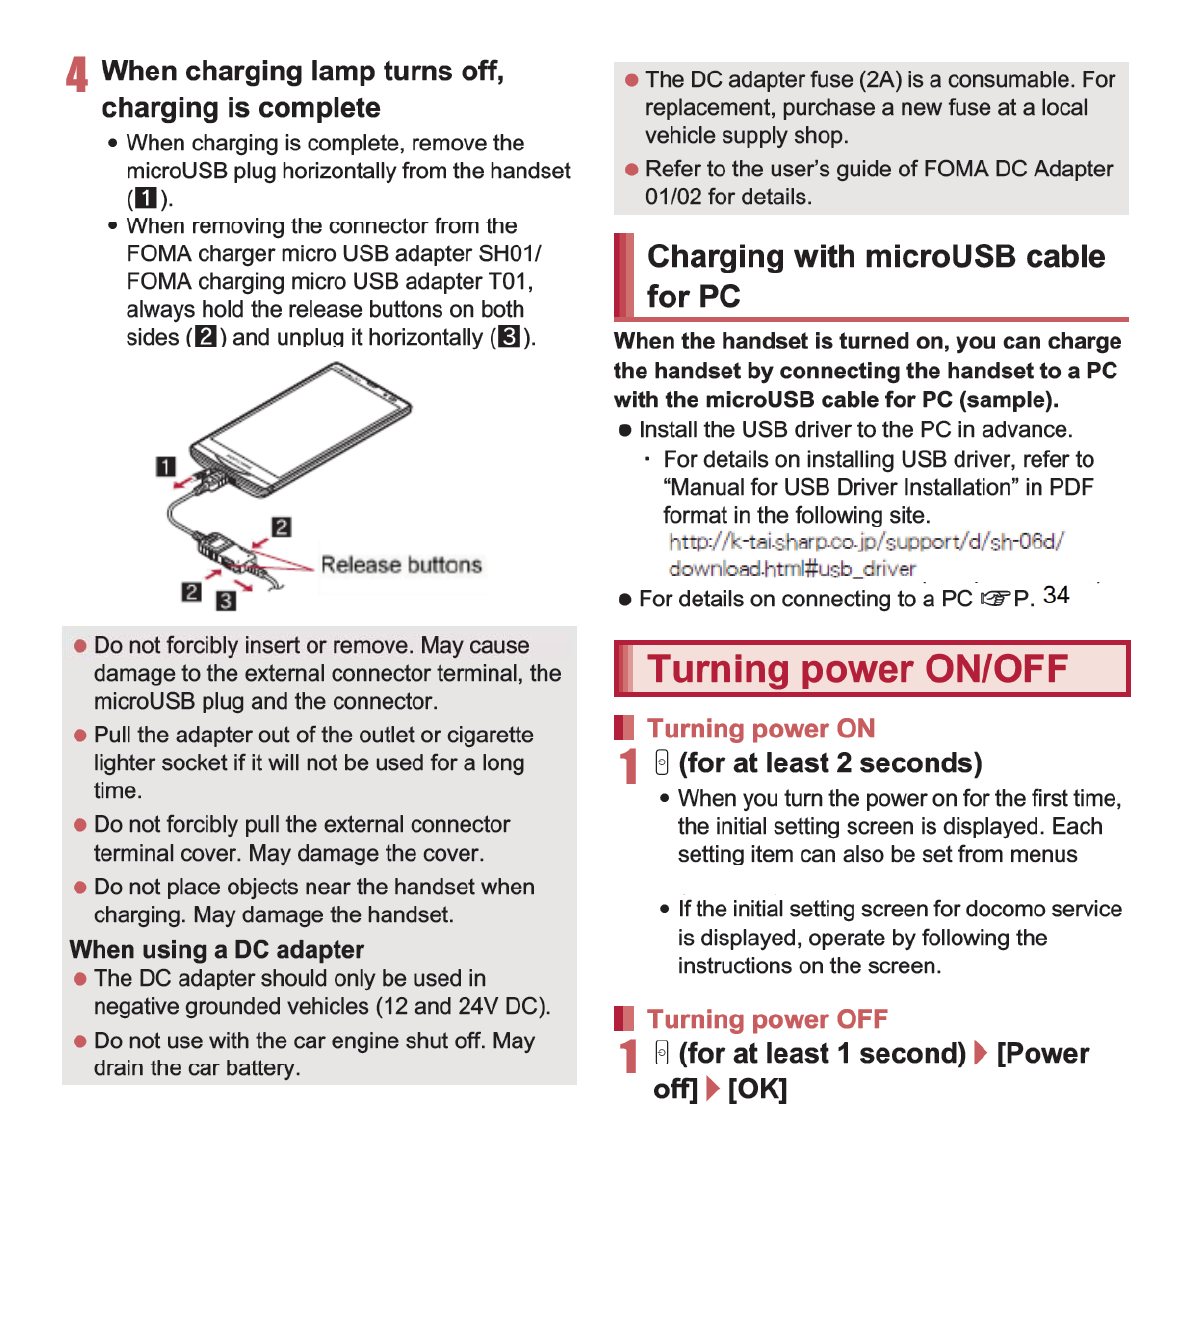
Sharp Corporation Cellular Phone Operation manual
Sharp >
Contents
- 1. Operation manual
- 2. Operation Manual
- 3. User Manual BT DoC
Operation manual
6Contents/Precautions
Before use, read these “Precautions” carefully
and use your handset properly.
Keep this manual in a safe place for future
reference.
These precautions contain information intended
to prevent bodily injury to the user and to
surrounding people, as well as damage to
property, and must be observed at all times.
The following symbols indicate the different
degrees of injury or damage that may occur if
information provided is not observed and the
handset is used improperly.
The following symbols indicate specific
directions.
Precautions (ALWAYS
FOLLOW THESE
DIRECTIONS)
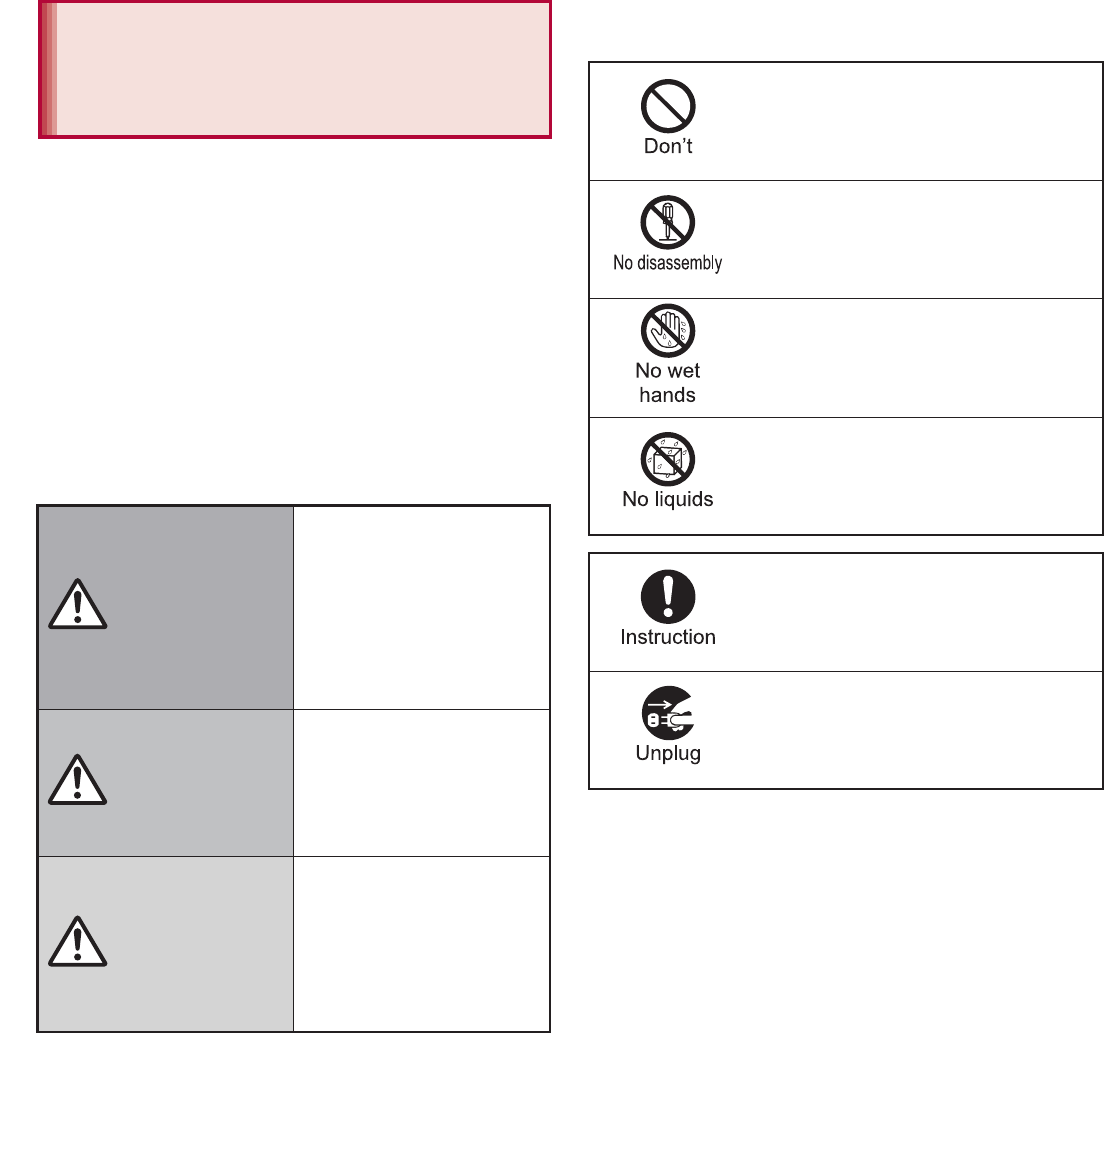
Danger
This symbol
indicates that “death
or serious bodily
injury may directly
and immediately
result from improper
use”.
Warning
This symbol
indicates that “death
or serious bodily
injury may result
from improper use”.
Caution
This symbol
indicates that “minor
injury and/or
property damage
may result from
improper use”.
Indicates a prohibited action.
Indicates not to disassemble the
device.
Indicates not to handle the device
with wet hands.
Indicates not to use the device
near water or get it wet.
Indicates that instructions
specified are compulsory (must
be followed).
Indicates that the power cord must
be unplugged from the outlet.
7
Contents/Precautions
“Precautions” is explained in the following
seven sections.
Handling the handset, battery pack, adapters
(including charger micro USB adapter), desktop
holder and docomo mini UIM card
(general) . . . . . . . . . . . . . . . . . . . . . . . . . . . . P. 7
Handling the handset . . . . . . . . . . . . . . . . . . P. 8
Handling battery pack . . . . . . . . . . . . . . . . . P. 11
Handling adapters (including charger micro USB
adapter) and desktop holder . . . . . . . . . . . . P. 12
Handling docomo mini UIM card. . . . . . . . . P. 13
Handling near electronic medical equipment
. . . . . . . . . . . . . . . . . . . . . . . . . . . . . . . . . . P. 13
Viewing 3D images . . . . . . . . . . . . . . . . . . . P. 14
Do not use, store or leave the
equipment in locations subject to
high temperatures, such as near a
fire, in direct sunlight or inside a
vehicle on a hot day.
May cause fires, burns or bodily injury.
Do not place the equipment inside
cooking appliances such as
microwave ovens or pressure
cookers.
May cause fires, burns, bodily injury or electric shock.
Do not attempt to disassemble or
modify the equipment.
May cause fires, burns, bodily injury or electric shock.
Do not get the equipment wet with
water, drinking water, pet urine, etc.
May cause fires, burns, bodily injury or electric shock.
Refer to the following for details on waterproofness.
n“Waterproof/Dust-proof” on P. 21
Use only the battery packs and
adapters (including charger micro
USB adapter) specified by NTT
DOCOMO for use with the handset.
May cause fires, burns, bodily injury or electric shock.
Do not subject the equipment to
strong force or impacts or throw it.
May cause fires, burns, bodily injury or electric shock.
Do not allow conductive materials
(such as metal objects and pencil
lead) to come into contact with the
charger terminal, external connector
terminal or earphone/microphone
terminal. In addition, do not insert
such objects.
May cause fires, burns, bodily injury or electric shock.
Do not cover or wrap the equipment
with bedding, etc. when using or
charging.
May cause fires or burns.
Handling the handset, battery
pack, adapters (including
charger micro USB adapter),
desktop holder and docomo
mini UIM card (general)
Danger
Warning
8Contents/Precautions
Be sure to turn off the handset and
not to charge the battery in locations
such as gas stations where
flammable gas is generated.
May cause a gas explosion or fire.
To use Osaifu-Keitai in locations such as gas stations,
be sure to turn off the power in advance (If the
Osaifu-Keitai lock setting is activated, disable the lock
before turning off the power).
If you notice anything unusual, such
as an unusual odor, overheating,
discoloration or deformation during
use, charging or storage, immediately
follow the instructions below.
Unplug the power cord from the
outlet or cigarette lighter socket.
Turn off the handset.
Remove the battery pack from the
handset.
May cause fires, burns, bodily injury or electric shock.
Do not leave the equipment on
unstable surfaces, such as on a
wobbly table or sloped surface.
May fall and cause injury.
Do not store the equipment in
locations that are subject to
humidity, dust or high temperatures.
May cause fires, burns or electric shock.
If being used by a child, have a
guardian teach him/her the proper
handling procedures. In addition,
check that the child is using the
equipment as directed.
May result in bodily injury.
Keep the equipment out of the reach
of young children.
A young child may swallow the equipment or suffer
other bodily injury.
Be very careful when using the
handset connected to adapters
(including charger micro USB
adapter) repeatedly or for long
periods of time.
The handset, battery pack or adapters (including
charger micro USB adapter) may become warm if 1Seg
etc. is used for a long time while charging.
Touching high temperature areas for a prolonged
period of time may cause skin irritations, itchiness or
low-temperature burns in some people.
Do not aim the infrared port towards
the eyes.
May cause eye injury.
Do not aim the infrared port towards
home electric appliances with an
infrared device during infrared
communication.
May interfere with the operation of infrared devices and
cause an accident.
Caution
Handling the handset
Warning
10 Contents/Precautions
If you are using electronic medical
equipment, contact the respective
manufacturer or dealer to check
whether the operation of the
equipment is affected by signals.
May interfere with the operation of electronic medical
equipment, etc.
Turn off the handset near
high-precision electronic devices or
devices that use weak electronic
signals.
May interfere with the operation of electronic devices.
Take particular care with the following devices
Hearing aids, implanted cardiac pacemakers, implanted
cardioverter-defibrillators or other electronic medical
equipment. Fire alarms, automatic doors, and other
equipment controlled by electronic signals. If you use
an implanted cardiac pacemaker, implanted
cardioverter-defibrillator or other electronic medical
equipment, contact the respective manufacturer or
dealer to check whether the operation of the equipment
is affected by signals.
If the display part or camera lens is
damaged, be careful of broken glass
and the exposed inside of the
handset.
The surface of the display is covered by a protective
film while the surface of the camera lens is covered by a
plastic panel so as to minimize the possibility of glass
scattering. However, touching the broken or exposed
parts may cause injury.
Do not swing the handset by its
antenna, strap, etc.
May hit you or others around you, resulting in bodily
injury.
Do not use a damaged handset.
May cause fires, burns, bodily injury or electric shock.
For using a motion sensor and
geomagnetic sensor, check the
safety around, hold the handset and
do not swing them more than
necessary.
May cause injury etc.
If the display is broken and the liquid
crystal then leaks, do not get the
liquid on your skin (face, hands,
etc.).
May result in loss of eyesight and harm to your skin.
If the liquid comes into contact with your eyes or mouth,
immediately rinse your eyes or mouth with clean water
and see a doctor.
If the liquid comes into contact with your skin or clothes,
immediately wipe it off with alcohol, and wash with
water and soap.
The surface of the display is covered
with a protective film for ensuring
the security against any damages
caused by the handset being
dropped or receiving a strong
impact etc. Do not remove the film
forcibly or damage it.
Using the equipment with the film removed may
damage the display and cause bodily injury.
If you use the handset in a vehicle,
contact the vehicle manufacturer or
dealer to check whether the
operation of the vehicle is affected
by signals.
May interfere with the operation of electronic equipment
in some vehicle models. In such cases, stop using the
handset.
Caution
11
Contents/Precautions
Use of the handset may cause skin
irritations such as itchiness, rashes
or eczema in some people. If this
occurs, immediately stop using the
handset and seek medical treatment.
For details on materials of each part n“Material list”
on P. 15
Look at the display in a well-lit place,
keeping a certain distance from the
screen.
Otherwise, eyesight may be weakened.
Check the type of battery using the information
printed on the battery pack label.
Do not touch terminals with metallic
objects such as wires. In addition,
do not carry or store the battery
pack with metallic necklaces, etc.
The battery pack may catch fire, explode, overheat or
leak.
Check that the battery pack is facing
the correct direction before you
attach it to the handset. If you are
having difficulty fitting the battery
pack to the handset, do not use
excessive pressure to force the
battery into place.
The battery pack may catch fire, explode, overheat or
leak.
Do not throw the battery pack into a
fire.
The battery pack may catch fire, explode, overheat or
leak.
Do not puncture, hit with a hammer
or step on the battery pack.
The battery pack may catch fire, explode, overheat or
leak.
If the battery fluid, etc. comes into
contact with your eyes, do not rub
your eyes but immediately rinse
your eyes with clean water. Then
seek prompt medical treatment.
May result in loss of eyesight.
If any trouble such as a deformation
or scratches caused by dropping the
battery pack is found, never use it.
The battery pack may catch fire, explode, overheat or
leak.
If the battery pack leaks or emits an
unusual odor, immediately stop
using it and move it away from any
naked flames or fire.
The battery fluid is flammable and could ignite, causing
a fire or explosion.
Do not allow a pet to bite the battery
pack.
The battery pack may catch fire, explode, overheat or
leak.
Handling battery pack
Label Battery type
Li-ion00 Lithium-ion
Danger
Warning
12 Contents/Precautions
Do not dispose of used battery
packs in ordinary garbage.
May cause fires or damage to the environment. Place
tape over the terminals to insulate unnecessary battery
packs, and take them to a docomo Shop, retailer or
institution that handles used batteries in your area.
Do not use or charge a wet battery
pack.
The battery pack may catch fire, explode, overheat or
leak.
If the battery fluid, etc. leaks, do not
get the liquid on your skin (face,
hands, etc.).
May result in loss of eyesight and harm to your skin.
If the liquid comes into contact with your eyes, mouth,
skin or clothes, immediately rinse them with clean
water.
If the liquid, etc. comes into contact with your eyes or
mouth, see a doctor immediately after rinsing your eyes
or mouth.
Do not use if the cord of the adapter
(including charger micro USB
adapter) is damaged.
May cause fires, burns or electric shock.
Never use the AC adapter or the
desktop holder in humid locations
such as a bathroom.
May cause fires, burns or electric shock.
The DC adapter should only be used
in negative grounded vehicles.
Never use it in positive grounded
vehicles.
May cause fires, burns or electric shock.
Do not touch adapters (including
charger micro USB adapter) if you
hear thunder.
May cause electric shock.
Take care not to short-circuit the
charger terminal when connected to
an outlet or cigarette lighter socket.
Also, take care not to allow any part
of your body (hands, fingers, etc.) to
come into contact with the charger
terminal.
May cause fires, burns or electric shock.
Do not place heavy objects on the
cord of the adapter (including
charger micro USB adapter).
May cause fires, burns or electric shock.
When plugging/unplugging the AC
adapter into/from the outlet, do not
allow metallic straps or other
metallic objects to come into contact
with the prongs of the plug.
May cause fires, burns or electric shock.
Do not handle the cord of the
adapters (including charger micro
USB adapter), the desktop holder or
the outlet with wet hands.
May cause fires, burns or electric shock.
Caution
Handling adapters (including
charger micro USB adapter)
and desktop holder
Warning
13
Contents/Precautions
Always use the specified power
supply and voltage.
When using overseas, use the AC
adapter that is available overseas.
Using the incorrect voltage may cause fire, burns or
electric shock.
AC adapter: 100V AC
DC adapter: 12/24V DC (for negative grounded
vehicles only)
AC adapter available overseas: 100 to 240V AC
(Connect only with a household AC outlet)
If the fuse in the DC adapter blows,
always replace it with a fuse of the
specified type.
May cause fires, burns or electric shock. Refer to the
respective manuals for information on the correct fuse
specifications.
Wipe off any dust on the power plug.
May cause fires, burns or electric shock.
Fully plug the AC adapter into the
outlet.
May cause fires, burns or electric shock.
Always grasp the adapters when
unplugging the power plug from the
outlet or cigarette lighter socket. Do
not forcibly pull by the cord of the
adapter (including charger micro USB
adapter).
May cause fires, burns or electric shock.
Unplug the power plug from the
outlet or cigarette lighter socket
when not using for a long time.
May cause fires, burns or electric shock.
Should water or other liquids enter
the equipment, remove the power
plug from the outlet or cigarette
lighter socket immediately.
May cause fires, burns or electric shock.
Always unplug the power plug from
the outlet or cigarette lighter socket
before cleaning the equipment.
May cause fires, burns or electric shock.
Be careful with the cutting surface
when detaching the docomo mini
UIM card.
May cause bodily injury.
The precautions detailed here conform to the
guidelines drawn up by the Electromagnetic
Compatibility Conference Japan, regarding the
protection of electronic medical equipment
from signals emitted by mobile phones.
Handling docomo mini UIM card
Caution
Handling near electronic
medical equipment
19
Contents/Precautions
Do not insert the docomo mini UIM card to
the handset with a label or sticker attached
on the card.
May cause a malfunction.
The handset supports the security function
that meets the Bluetooth specification for
security during communication using
Bluetooth functions. However, the security
may not be sufficient depending on the
configuration. Take care of the security while
making communication using Bluetooth
function.
Even if any leak of data or information
occurs while making communication using
Bluetooth function, DOCOMO shall not be
liable for any loss of content.
The handset can use headset, hands-free,
audio, keyboard, object push, serial port and
phone book access. Also, audio/video
remote-control may be available depending
on the audio (only with compatible Bluetooth
devices).
Radio frequencies
The radio frequencies the Bluetooth function
of the handset uses are as follows.
ӱ
2.4: This radio equipment uses the 2.4 GHz band.
ӲFH: The modulation system is the FH-SS system.
ӳ1: The estimated coverage distance is 10 m or
less.
Ӵ
: All radio frequencies between 2400
MHz and 2483.5 MHz are used and the frequencies
for mobile object identifiers shall not be avoided.
Wireless LAN (WLAN) uses radio waves to
communicate information. Therefore, it has
an advantage of freely connecting to the LAN
within the service area. On the other hand, if
security setting is not set, it is possible for a
malicious third party to intercept the
communication contents or hack. It is
recommended to set security setting at your
own risk and judgement.
Notes on using Bluetooth
function
ӱġ Ӳġ ӳġ
Ӵġ
Cautions on using Bluetooth devices
Bluetooth operates at radio frequencies
assigned to the in-house radio stations for
a mobile object identifier that have to be
licensed and is used in production lines of
a factory, specific unlicensed low power
radio stations, and amateur radio stations
(hereafter, referred to “another radio
station”) in addition to industrial, scientific,
medical devices or home electric
appliances such as microwave ovens.
1. Before using the handset, make sure that
“another radio station” is not operating
nearby.
2. If radio interference between the handset
and “another radio station” occurs,
avoid interference by moving
immediately to another place or “turning
off the power”.
3. Contact the number listed in “General
Inquiries” on the back of this manual for
further details.
Notes about wireless LAN
(WLAN)
20 Contents/Precautions
Wireless LAN
Do not use wireless LAN near magnetic devices
such as electric appliances or AV/OA devices or in
radio waves.
ƦMagnetism or radio waves may increase noises or
disable communications (especially when using a
microwave oven).
ƦWhen used near TV, radio, etc., reception
interference may occur or channels on the TV
screen may be disturbed.
ƦIf there are multiple wireless LAN access points
nearby and the same channel is used, search may
not work correctly.
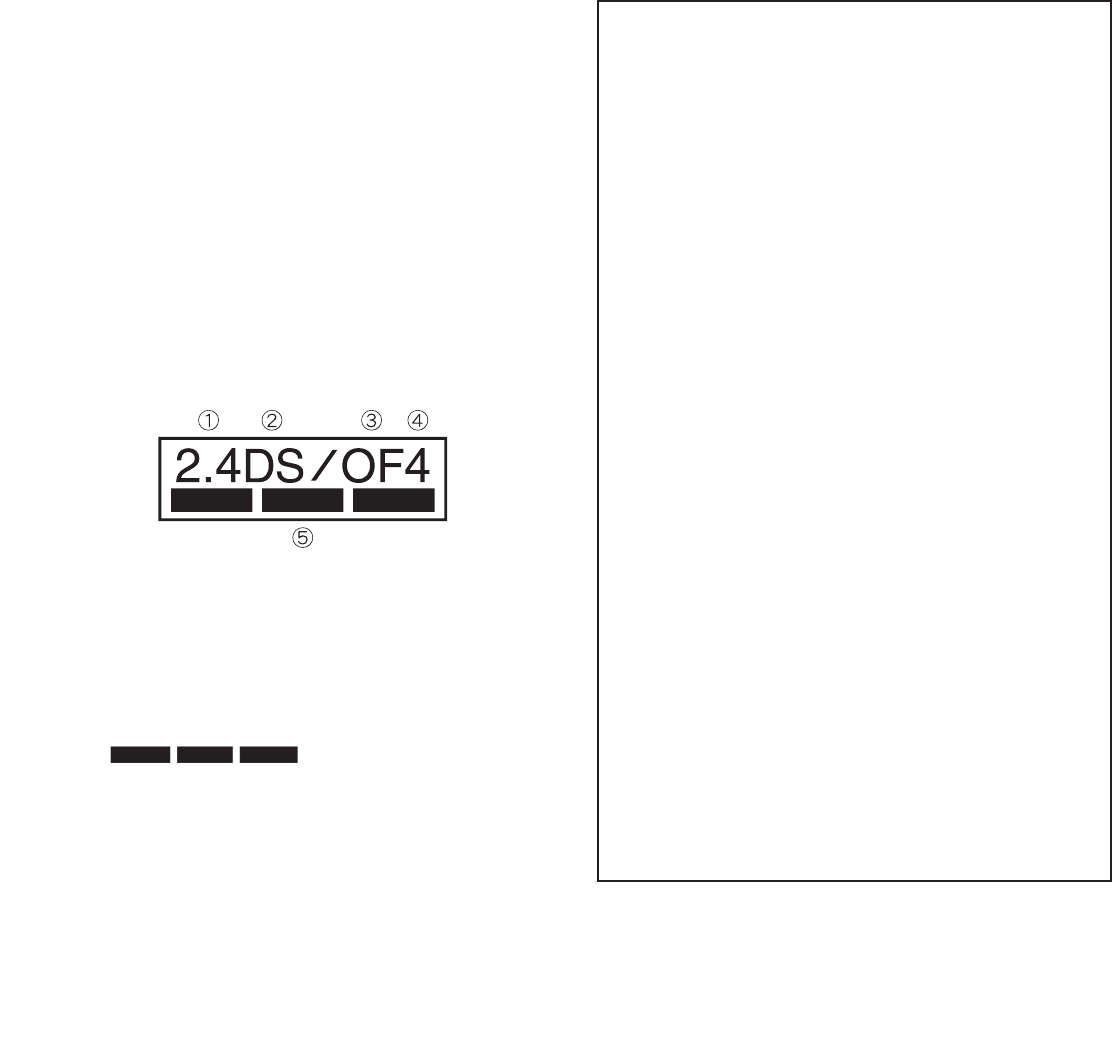
Radio frequencies
The radio frequencies the WLAN-installed
devices use are indicated on the battery
storage section of the main body of the
handset. The following are the descriptions:
ӱ2.4: This radio equipment uses the 2400 MHz
band.
ӲDS: The modulation system is the DS-SS
system.
ӳOF: The modulation system is the OFDM system.
Ӵ4: The estimated coverage distance is 40 m or
less.
ӵ: All radio frequencies
between 2400 MHz and 2483.5 MHz are used
and the frequencies for mobile object identifiers
shall not be avoided.
Available channels for the handset’s wireless LAN
are between 1 to 13. Note that other channel access
points cannot be connected.
Available channels vary depending on the country.
For use in an aircraft, contact the airline beforehand.
There are restrictions on the use of wireless LAN in
some countries or regions such as France. If you
intend to use wireless LAN overseas, check the local
laws and regulations beforehand.
Cautions on using 2.4 GHz devices
WLAN-installed devices operate at radio
frequencies assigned to the in-house radio
stations for a mobile object identifier (radio
stations requiring a license) used in
production lines of a factory, specific
unlicensed low power radio stations (radio
stations requiring no license), and amateur
radio stations (radio stations requiring a
license) in addition to industrial, scientific,
medical devices or home electric
appliances such as microwave ovens.
1. Before using this device, make sure that
the in-house radio stations for a mobile
object identifier, specific unlicensed low
power radio stations and amateur radio
stations are not operating nearby.
2. If the device causes harmful radio
interference to the in-house radio
stations for a mobile object identifier,
immediately change the radio frequency
or stop use, and contact the number
listed in “General Inquiries” on the back
of this manual for crosstalk avoidance,
etc. (e.g. partition setup).
3. If the device causes radio interference to
specific unlicensed low power radio
stations for a mobile object identifier or
amateur radio stations, contact the
number listed in “General Inquiries” on
the back of this manual for further
details.
21
Contents/Precautions
The FeliCa reader/writer function in the
handset uses weak electric waves in the
handling of which does not require a license
of radio station.
The frequency in use is the 13.56 MHz band.
When another reader/writer is being used
nearby, keep enough distance from it. Make
sure that there is no radio station using the
same frequency band in the nearby area.
Never use the handset that is modified.
Using a modified device violates the Radio
Law.
The handset has acquired the certification of
conformity with technical regulations for the
specified radio station based on the Radio Law, and
the “Technical Conformity Mark ” is printed on
the model nameplate of the handset as a proof. If
the screws of handset are removed and a
modification is given to the inside, the certification of
conformity with technical regulations will become
invalid. Never use the handset without the valid
certification. Doing so violates the Radio Law.
Be careful when using the handset while
driving a motor vehicle.
Using a mobile phone in hand while driving is
regarded as a punishable act.
However, the punishment has no application in
some cases such as when rescuing sick and injured
people or maintaining public safety.
Use the FeliCa reader/writer function only in
Japan.
The FeliCa reader/writer function in the handset
conforms to the domestic radio wave standards.
Using the function overseas may result in
punishment.
Never change the basic software improperly.
This may be regarded as a conversion of software
and repairs may be refused.
Be careful not to connect the handset to PC
using the microUSB cable for PC (sample) in
areas where the use of mobile phones is
prohibited.
Power may turn on automatically.
There are individual differences in how
people perceive 3D images.
Keep the display parallel to your eyes when
watching 3D images.
SH-01D is waterproof to IPX5*1 and IPX7*2
standards, and dust-proof to IP5X*3 standards if
the external connector terminal cover is
securely closed as well as the back cover is
attached.
*1 IPX5 means that phone keeps functioning after
being subjected to a jet flow (approximately
12.5 liters/min) discharged from a nozzle (inner
diameter: 6.3 mm), from all directions
(approximately 3 m from the handset) for 3
minutes or more.
*2 IPX7 means that SH-01D phone keeps
functioning after it is slowly submerged to depth
of 1 m in static tap water at room temperature,
left there for approximately 30 minutes and
then taken out.
*3 IP5X means the level of dust protection. Phone
keeps functioning in safety after it is left in the
device containing dust (diameter: 75 Ђm or
smaller) for 8 hours, agitated and then taken
out.
FeliCa reader/writer
Caution
Viewing 3D images
Waterproof/Dust-proof
31
Before Using the Handset
Back up the data saved on a microSD Card and
store in another place. DOCOMO shall not be
liable for any loss or change of the saved data.
Before inserting or removing (including after
unmounting) the microSD Card, turn off the
power, position the back facing upwards and
remove the battery pack. Hold the handset
securely with your both hands. Data may be
damaged or operation may not work properly.
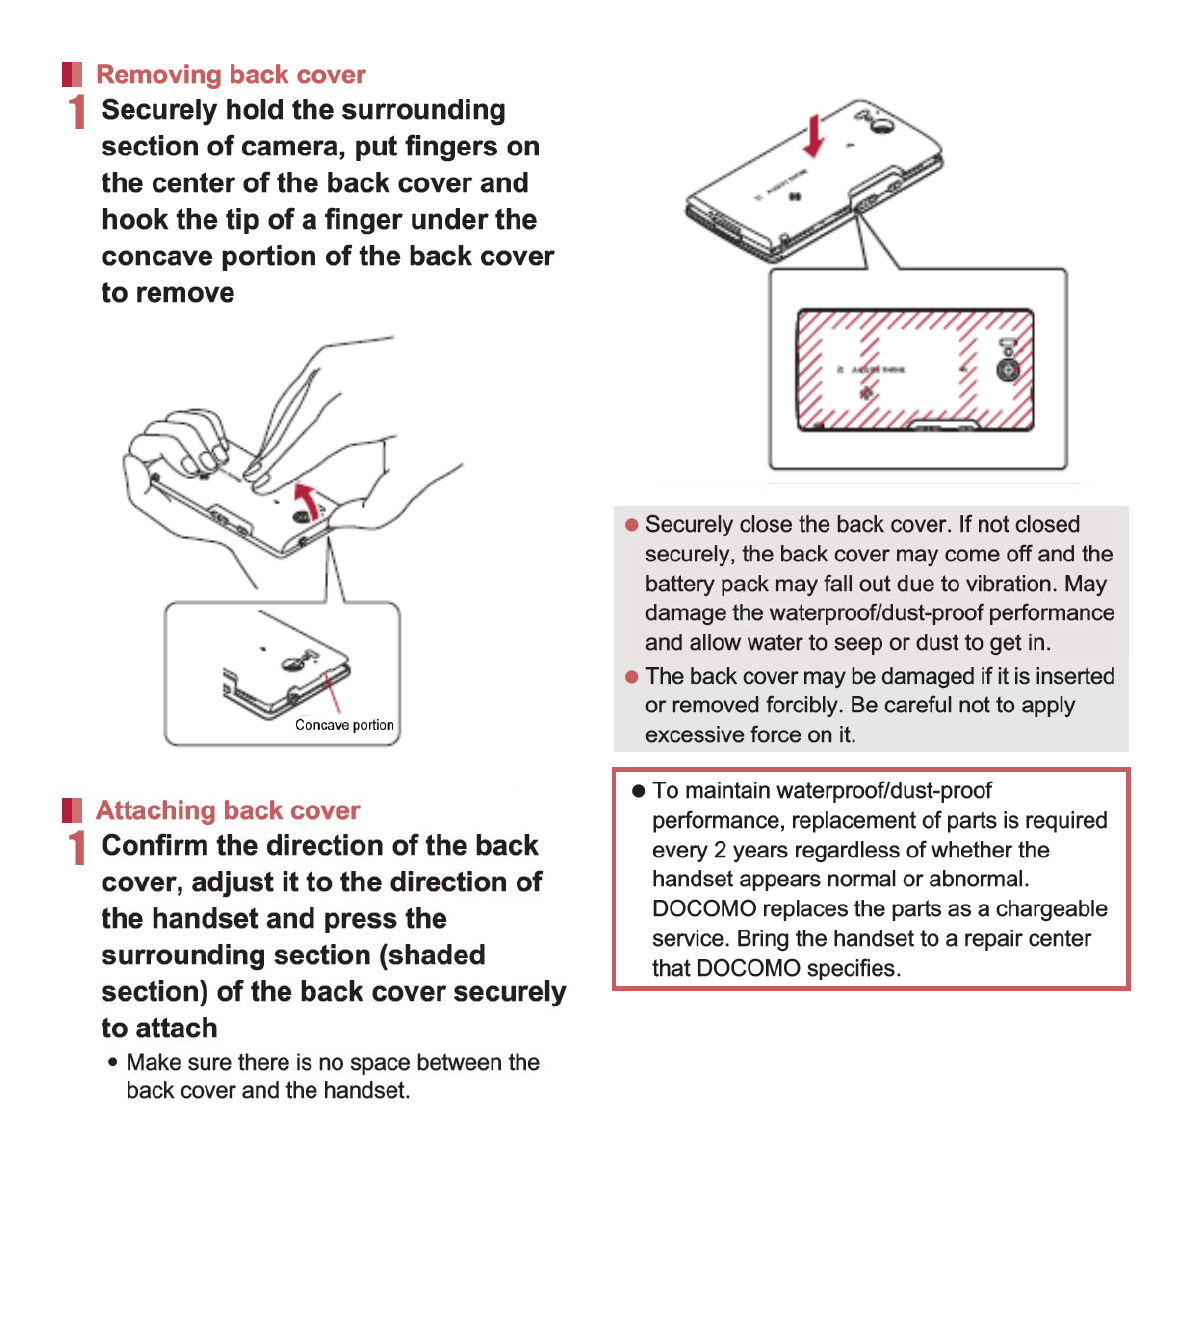
1Remove the back cover (nP. 23)
2Insert the microSD Card slowly with
the metal terminal side turned down
:Do not force the microSD Card in at an angle
or with the wrong side down.
The microSD Card slot may be damaged.
:Insert the microSD Card slowly with your
fingers until a click is heard.
3Attach the back cover (nP. 23)
1Remove the back cover (nP. 23)
2Gently push the microSD Card
towards inside (1)
:Push the microSD Card until it clicks. It will
eject towards you. Pulling it forcibly may
damage the handset or the microSD Card.
3Remove the microSD Card (2)
:Remove the microSD Card by slowly pulling
it straight out.
4Attach the back cover (nP. 23)
Use the Battery Pack SH3 exclusive to the
handset.
For attaching or removing the battery pack, turn
off the power, position the back facing upwards,
and hold the handset securely with your both
hands.
1Remove the back cover (nP. 23)
Inserting microSD Card
Removing microSD Card
Battery pack
Attaching battery pack


33
Before Using the Handset
While charging, the handset may not turn on
even when charging lamp is illuminated in red.
Charge longer and try turning power on again.
Frequently recharging the battery when its power
is still remaining enough may shorten the life of
the battery pack. It is recommended to use the
battery to a certain level before recharging.
The following figures are estimated times for
charging an empty battery pack with the handset
turned off.
Charging lamp illuminates in red while charging,
and it turns off when charging is completed.
Check that the battery pack has been properly
attached when charging lamp flashes red. The
lamp also flashes red when the battery pack has
reached the end of its service life.
The battery pack can also be charged with the
handset turned on (While charging, the battery
icon appears with [w] superimposed).
When the battery becomes warm, charging may
automatically stop even if the battery has not
been fully charged. Charging resumes after the
temperature lowers to an appropriate
temperature.
For details on time of use nP. 165
Battery pack is a consumable product. Service
time per charge is gradually reduced every time
the battery is charged.
When service time per charge is reduced to
about half of the default time, this means that the
battery pack is approaching the end of its service
life. In such a case, it is recommended to replace
the battery pack as soon as possible. Depending
on usage, the battery pack may swell as it
approaches the end of its service life, but this will
not cause problems.
If watching 1Seg, etc. is available while charging
for a long time, the service life of the battery pack
may become shorter than estimated.
To prevent damage to the environment, bring
used battery packs to a docomo service counter,
a docomo agent or a recycle center.
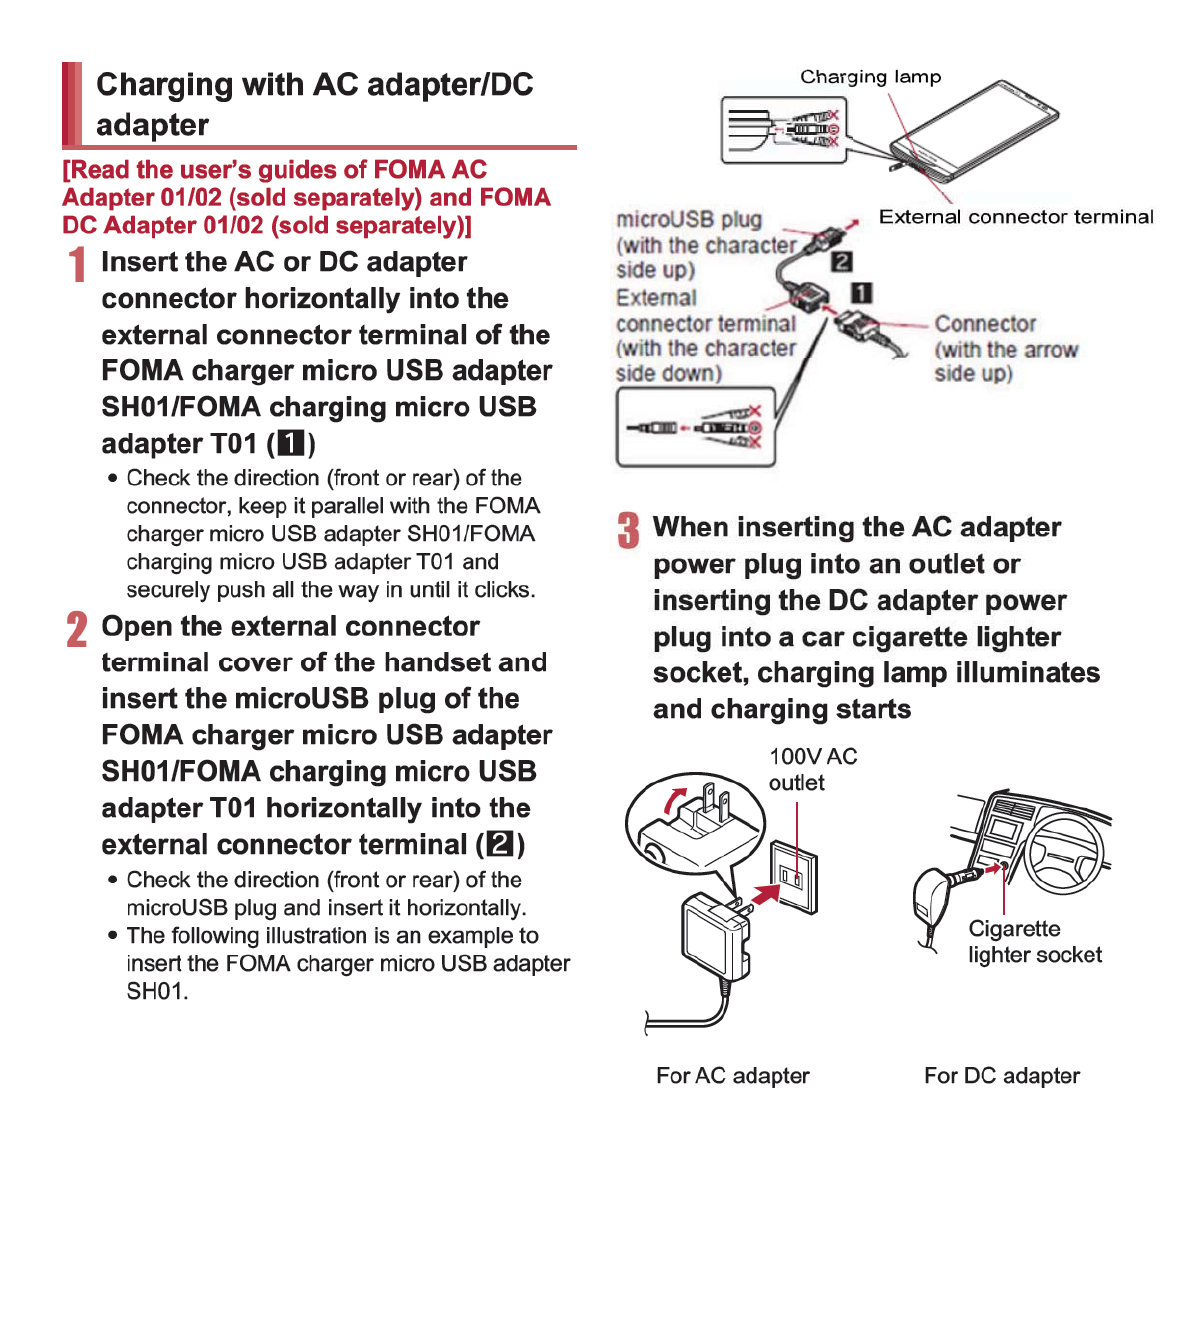
Estimated charge time and lamp display
FOMA AC Adapter 01/02 Approx. 240 min
FOMA DC Adapter 01/02 Approx. 240 min
Estimated time of use when fully charged
Continuous talk
time
FOMA/3G
Approx. 290 min
GSM
Approx. 450 min
Continuous
stand-by time
FOMA/3G
At rest: Approx. 420 hr
(Network Mode: 3G/
GSM(Auto))
GSM
At rest: Approx. 260 hr
(Network Mode: 3G/
GSM(Auto))
1Seg watching
time
Approx. 190 min
Battery pack service life
37
Before Using the Handset
The screen is off and the sleep mode is activated
when H is pressed or the handset is not in use for a
set length of time.
Press H in the sleep mode to deactivate the sleep
mode.
When the power is turned on or the sleep mode is
deactivated, the touch panel is locked.
Drag [J] to [K] to unlock.
Key operation in touch panel unlock screen
To set/disable the manner mode: y (for at least
1 second)
To turn on the mobile light: x (for at least 1
second)
ƦPress any of the keys or touch [J] to turn it off.
To turn off power: H (for at least 2 seconds)
You can operate by touching the touch panel
(display) directly with your finger.
Operations differ depending on the function and
screen in use.
Touch a key or an item displayed on the screen to
select or set it.
1Put your finger on the touch panel
and put it off
Sleep mode
Touch panel lock
If there is an unchecked missed call etc., an icon is
displayed on the unlock screen. If you slide the icon
upward before unlocking the touch panel, the
corresponding screen is displayed.
The mobile light will automatically turn off
approximately 30 seconds after it turns on.
Basic operation
Operation of touch panel
Cautions when using the touch panel
The touch panel is designed to be lightly
touched with your finger. Do not forcefully
press with your finger or press with a pointed
object (fingernail, ballpoint pen, pin, etc.).
In the following cases, the touch panel may
not work even if you touch it. May cause a
malfunction.
Operation with a gloved finger
Operation with a fingernail
Operation with foreign objects placed on
the operation pad
Operation on the touch panel on which a
protective sheet or a sticker is put
Operation while the touch panel is wet
Operation with fingers wet with sweat or
water
Touch
38 Before Using the Handset
When you touch the screen for a while, a menu
may appear depending on the function and screen
in use.
1Keep your finger on the touch panel
Slide your finger up/down while a menu is
displayed etc. to scroll the screen or slide (drag) an
icon, widget, etc. to move it to the desired position
while keeping touching it.
In addition, when you touch a menu or item by
mistake, slide your finger away from the menu or
item to cancel the selection.
1Keep your finger on the touch panel
and slide it
Flick your finger to the left/right in the home screen
etc. to switch pages.
1Move your finger like sweeping the
touch panel
Pinch out/Pinch in while displaying an image etc. to
zoom in/out.
1Put two fingers on the touch panel
and slide them with putting a
distance between two fingers apart
(pinch out)/closer (pinch in)
When a check box is displayed beside the setting
item, you can set it enabled/disabled or [ON]/[OFF]
by touching it.
Example: Wireless and network screen,
Alarm screen
[0]: Enabled, [1]: Disabled
Touch for a while
Slide/Drag
Flick
Pinch out/Pinch in
Operation while using function
Switching the settings

42 Before Using the Handset
If you use Wi-Fi function of the handset, you
can use mail or internet by connecting to your
home, corporate network or access points of
public wireless LAN service.
Packet communication is also available while
Wi-Fi function is enabled. Wi-Fi connection is
prioritized while Wi-Fi connection is set, but the
connection will be automatically switched to that
of 3G/GPRS network once Wi-Fi connection is
terminated. Note that packet communication
charges will be incurred in such cases.
Refer to the manual of your wireless LAN base
unit when using the access point at home.
Operate access point registration near the
access point.
Enable Wi-Fi before setting.
1In the home screen, [R]/
[Settings]/[Wireless &
networks]/[Wi-Fi settings]
2Select an item
Wi-Fi: Enable Wi-Fi function.
Network notification: You get notified by the
notification icon when open Wi-Fi network is
detected.
Wi-Fi sleep policy: Set the timing to switch
Wi-Fi sleep.
Easy Wi-Fi registration: Register
WPS-compatible access point.
Auto login settings: You can set the handset
to log in DOCOMO Public Wireless LAN
Service automatically when you come within
its service area.
Add Wi-Fi network: Register access points
which are not compatible with WPS
manually.
:Available access points are displayed as
items in “Wi-Fi networks”. To connect, select
an access point to be used/[Connect].
ƦIf you select an access point protected by
security, enter the password (security key).
Wi-Fi settings
The radio interference with Bluetooth
devices
Wireless LANs (IEEE 802.11b/g/n) use the
same frequency band (2.4 GHz) as Bluetooth
devices. Therefore, using the wireless LAN
device near a Bluetooth device may cause
radio interference, lowering of communication
speed, noise or connection failure. In this
case, turn off the Bluetooth device or keep the
handset and the wireless LAN device at least
approximately 10 m away from the Bluetooth
device.
[Easy Wi-Fi registration]
The registration process takes a few minutes.
After completion of the registration of the
access point, check that the proper connection
to the access point is acquired.
[Auto login settings]
Separate subscription is required to use
DOCOMO Public Wireless LAN Service.
In some service areas, automatic login function
may be unavailable.
If you set Auto-login to [ON], the handset logs in
automatically when coming within the service
area. Note that high charges may be incurred if
your subscription is Mzone daily plan and you set
Auto-login to [ON].

43
Before Using the Handset
1In the home screen, [R]/
[Settings]/[Wireless &
networks]/[Wi-Fi settings]/
z/[Advanced]
2Select an item
Use static IP: Specify a static IP address and
set whether to connect to Wi-Fi network.
IP address: Set the IP address.
Gateway: Set the gateway.
Netmask: Set the network mask.
DNS 1: Set the DNS 1.
DNS 2: Set the DNS 2.
1In the home screen, [R]/
[Settings]/[Wireless &
networks]/[Wi-Fi settings]
2Select the connected access
point/[Forget]
:Disconnect with the password retained.
Tethering function that connects Wi-Fi
compatible devices to the Internet by using the
handset as a Wi-Fi access point is available.
You can connect to up to five Wi-Fi compatible
devices simultaneously.
This function is available inside the FOMA
service area. However, this function may be
interrupted depending on the conditions on
communications or on network congestion.
This function is not available when docomo mini
UIM card is not inserted or in cases in which the
FOMA service is canceled or stopped.
1In the home screen, [R]/
[Settings]/[Wireless &
networks]/[Portable hotspot]
2Select an item
Portable Wi-Fi hotspot: Enable the Wi-Fi
tethering.
ƦCheck the details of the precautions before
use.
Portable Wi-Fi hotspot settings: Set the Wi-Fi
tethering settings such as network SSID and
security.
Ʀ[Configure Wi-Fi hotspot]/set each item/
[Save] to set Wi-Fi hotspot. Set security
setting if necessary. The security setting
supports WPA2 PSK.
Help: Display Help information.
This function may become unavailable
according to change of the log-in page contents
of DOCOMO Public Wireless LAN Service. In
this case, log in via the browser.
[Add Wi-Fi network]
This function supports WEP, WPA/WPA2 PSK,
802.1xEAP as the security setting.
Detailed settings
You can confirm the MAC address and the IP
address of the handset in Advanced.
Disconnecting
When you terminated the connection with Wi-Fi
function disabled, enable Wi-Fi function to
connect automatically if the previously
connected access point is available.
Wi-Fi tethering

44 Before Using the Handset
1In the home screen, [R]/[Email]
:Only when an account is not set, the account
setting screen appears.
2Enter mail address and password/
[Next]
:Provider information is preset for some mail
accounts, and a receiving mail server and a
sending mail server are automatically set.
:
When you use an account whose provider
information is not preset, it is necessary to set
a receiving mail server and a sending mail
server manually. For details on those settings,
contact the Internet service provider you use.
3Enter an account name and your
name/[Done]
1In the home screen, [R]/
[Settings]/[Accounts & sync]/
[Add account]
2Select the account type
3Set up an account
1In the home screen, [R]/
[Settings]/[Accounts & sync]
2Select an account/[Remove
account]/[Remove account]
If you forget your Google account password,
retrieve it.
1In the home screen, [R]/
[Browser]
2Enter “(http://www.google.com/) ” in
the URL entry field/[I]/[more]/
[Sign In]/[Can’t access your
account?]/follow the instructions
on the screen
Setting up mail account
The account which is registered first is
automatically given priority to normal use. To
change the priority, enable [Default account] on
the setting screen for the account on which you
want to place priority.
When the account type is Exchange, entering
“¥UsernameDomain” in the “Domain¥Username”
area is required to set a receiving mail server
manually depending on the provider to use.
Contact the administrator of the server for details.
Setting up Google account, etc.
When activating the application that requires an
account without setting the account, the
account setup screen appears.
Keep a separate memo of the set account and
password.
Deleting your account
Retrieving your Google account
password
63
Call/Network Services
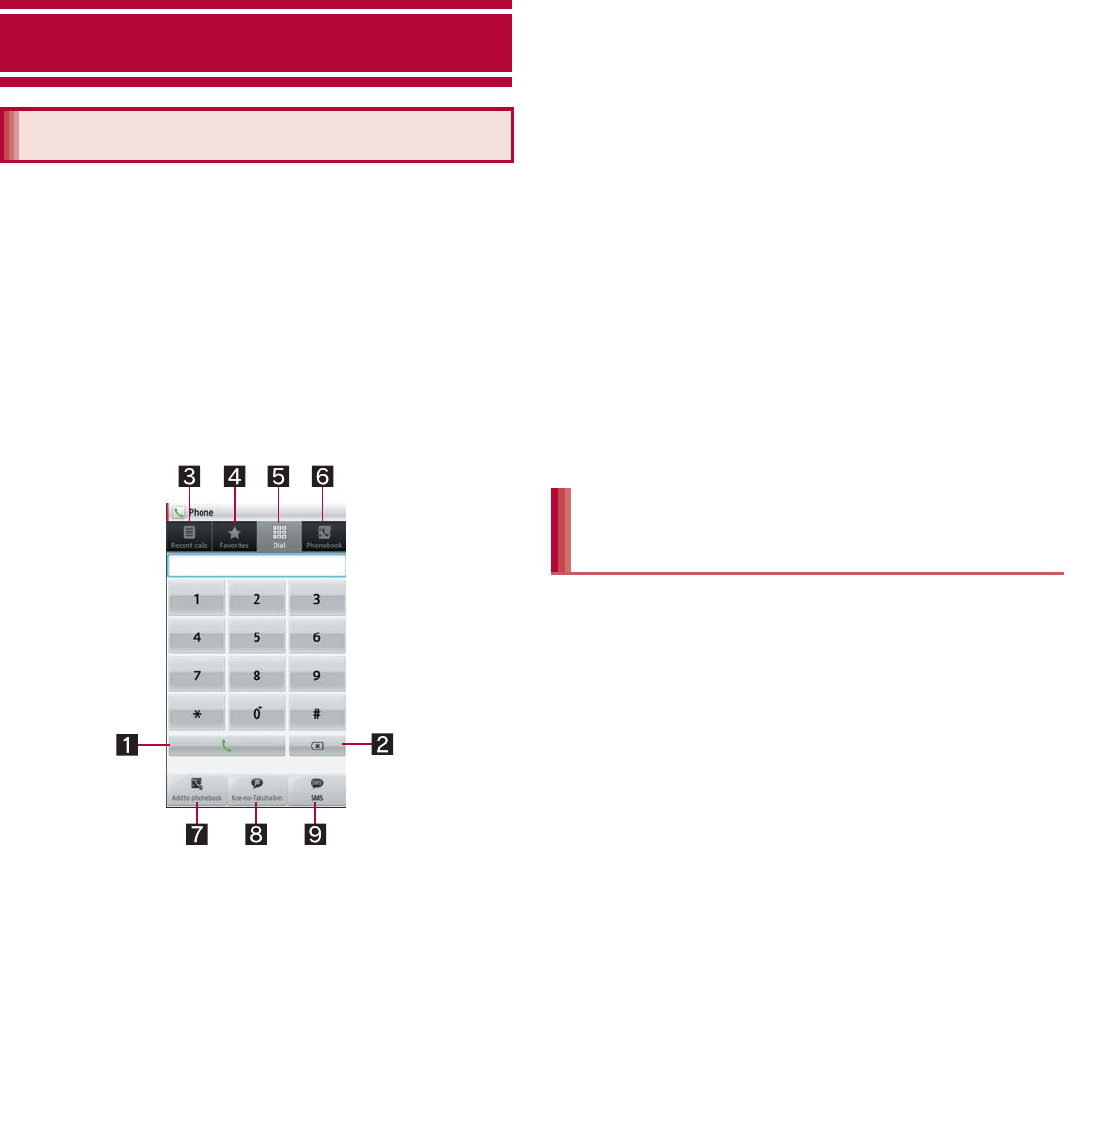
1In the home screen, [R]/
[Phone]/[Dial]
2Enter a phone number
:Always dial the area code, even when it is a
local number.
:You can set to notify/not to notify the other
party of your phone number for each call by
adding “186”/“184” to the head of the phone
number.
1Call
Make a call. Also, if there is an outgoing
history, touch to enter the latest outgoing
history when the phone number has not
been entered.
2Delete
Delete an entered number.
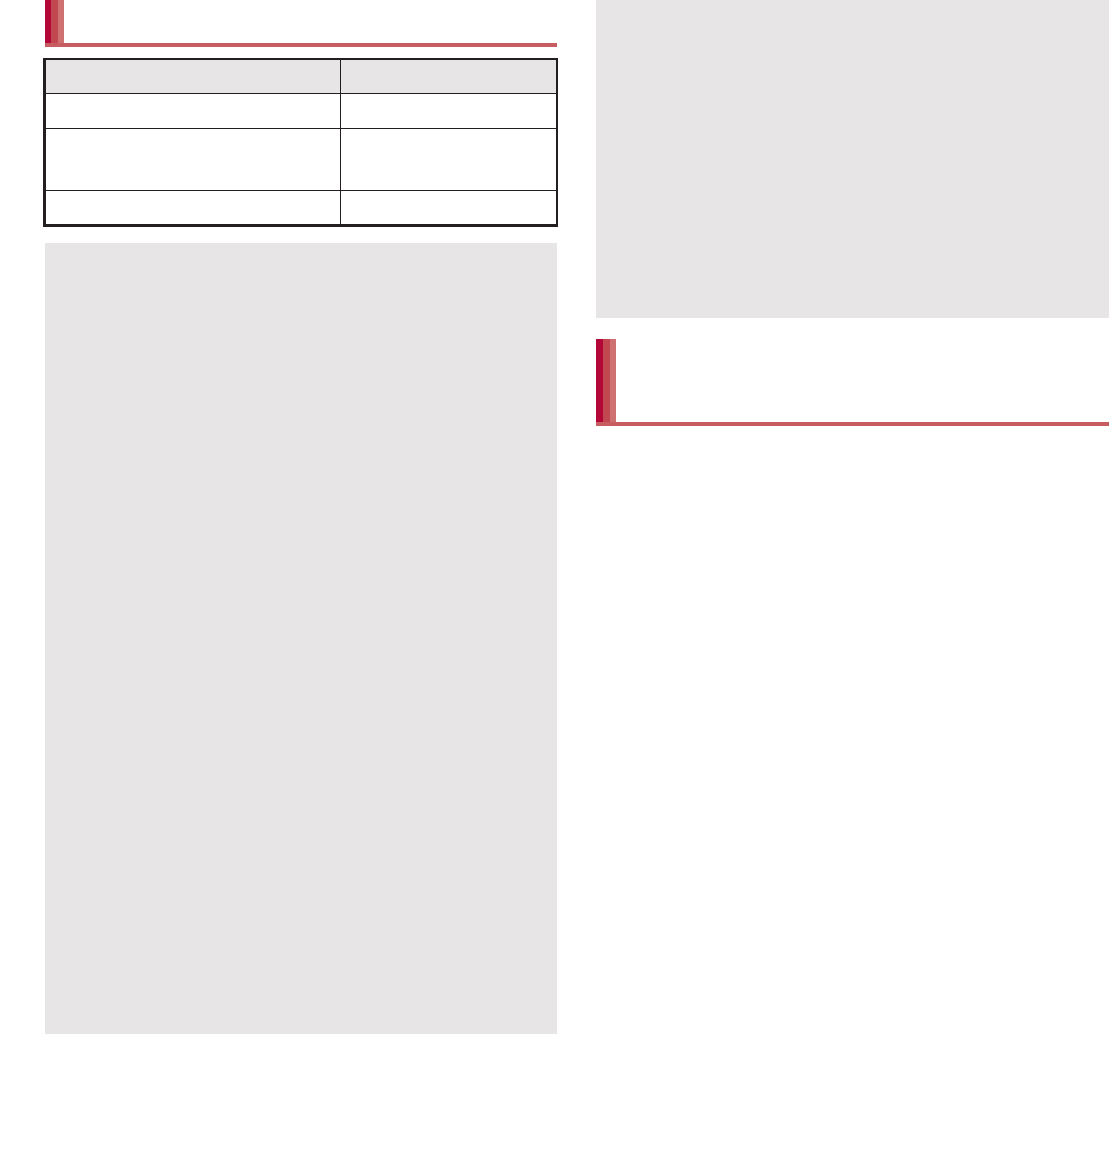
3Outgoing/Incoming history
4Favorites
Display the phonebook set to [Favorites]
by groups.
5Dial
Display the dial screen.
6Phonebook
7Add to phonebook
8Koe-no-Takuhaibin
For details of Koe-no-Takuhaibin, refer to
P. 76 “Koe-no-Takuhaibin” and the
DOCOMO website.
9SMS
3[0]
4[End] to end the call
1In the home screen, [R]/
[Phone]/[Dial]
2Enter a phone number/[
ɖ
] (for at
least 1 second)
3Enter a number to send/[0]
Call/Network Services
Making a call
Entering a push-button phone
signal
64 Call/Network Services
WORLD CALL is an international calling service
available from DOCOMO handset in Japan.
WORLD CALL is registered when FOMA
services are registered (excluding users who
did not apply for WORLD CALL).
You can call to about 240 countries and regions
worldwide. Calling to a fixed-phone and mobile
phone overseas is available.
For information on available countries and
telecommunications carriers, refer to “Mobile
Phone User’s Guide [International Services]” or
the DOCOMO International Services website.
WORLD CALL charges are billed with the
monthly FOMA service charges.
Commission and monthly usage fees are free.
Contact “General Inquiries” on the back of this
manual for details on WORLD CALL.
To make an international call through a company
other than DOCOMO, contact the representative
companies for instructions.
Emergency call
Emergency calls Phone number
Emergency call to police 110
Emergency call to fire
station/medical assistance 119
Emergency call at sea 118
The handset supports “Location notification of
emergency call”.
When dialing an emergency number such as
110, 119, and 118, the information of your
location (location information) is automatically
notified to the agency that received the
emergency call (e.g. the police station).
Depending on your location and the reception
status of the signal, the agency that received
the emergency call may not be able to confirm
the exact location.
If you are not sending your caller ID by calling
with “184” added or other means, your location
information and phone number are not notified.
However, if the agency that received the
emergency call considers your location
information and phone number necessary for
important purposes, such as life saving, the
agency can retrieve them regardless of your
settings.
In addition, the area/timing to introduce
“Location notification of emergency call”
depends on the state of preparation in each
agency that receives emergency calls.
In Japan, you cannot call to the emergency
number (110, 119 or 118) from the PIN code
entry screen and PUK (PIN Unlock Key) entry
screen, with a docomo mini UIM card locked.
When calling 110, 119, and 118 from your
handset, the police or fire stations may return
your call for verification purposes. State that
you are calling from a mobile phone, and give
your phone number and exact location.
Remain stationary to ensure that you are not
disconnected while making an emergency call,
and keep handset turned on to receive calls for
approximately 10 minutes afterwards.
Depending on the region, calls to the police or
fire station may not be connected.
International call (WORLD
CALL)
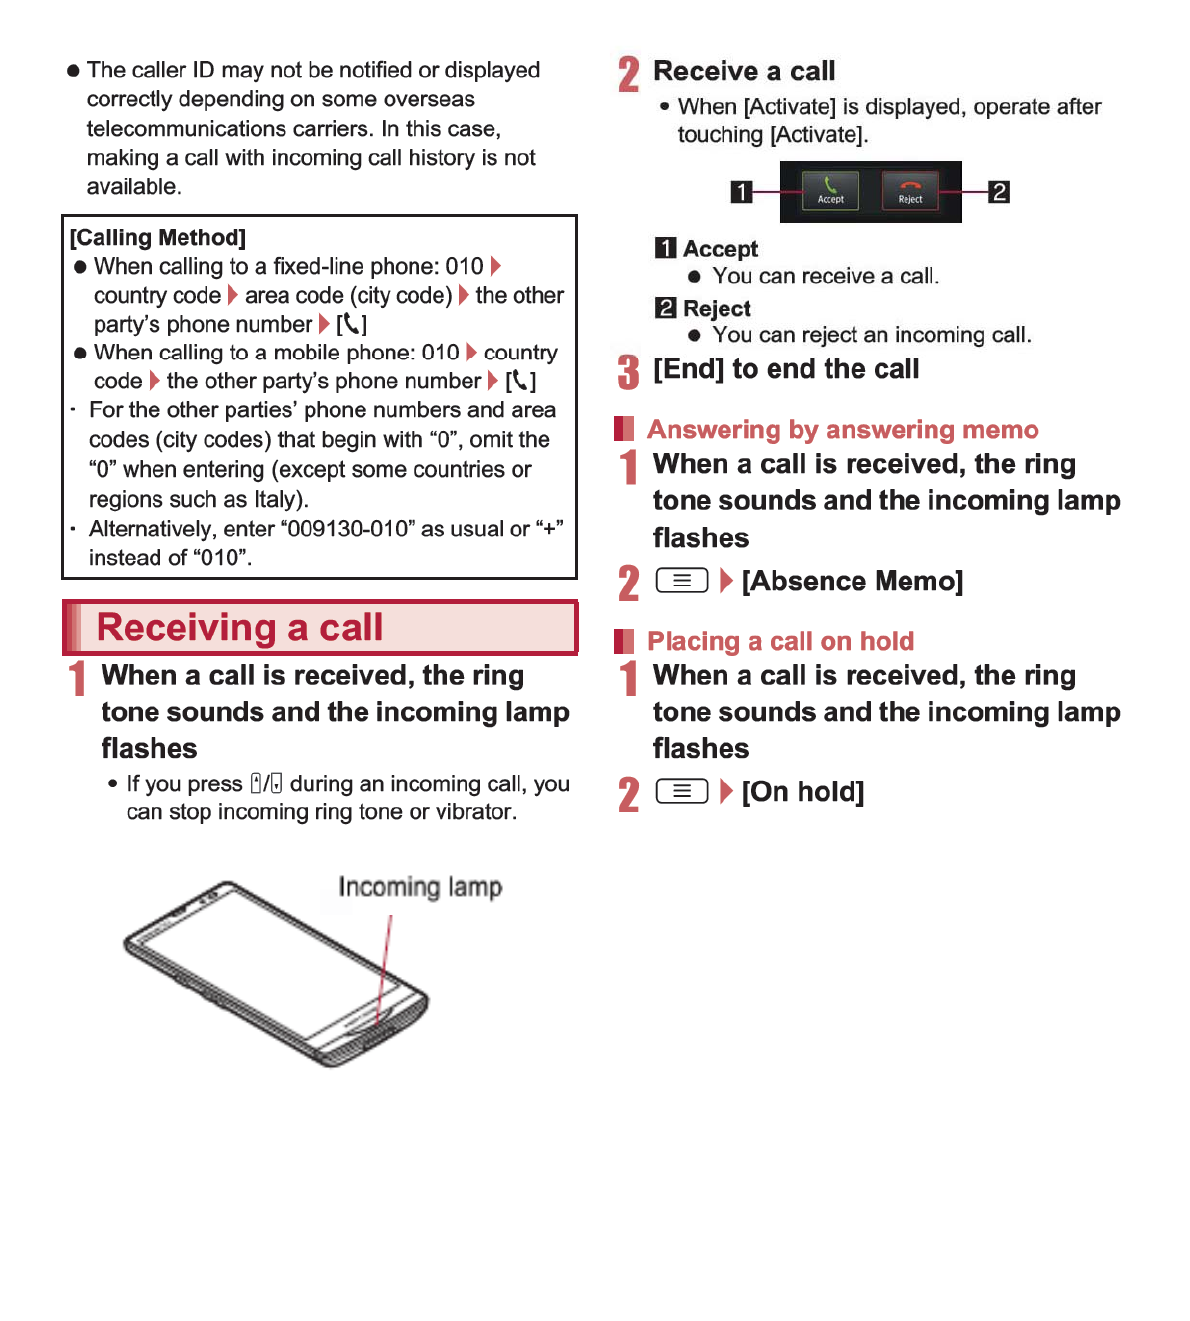

106 File Management
Insert a microSD Card in advance. However,
sending and receiving just single data may not
require the microSD Card.
Example: Still picture
1In the home screen, [R]/
[Contents Manager]
2Touch a still picture for a while/
[Share]/[Send by IC]
3Place the a mark on that of the
other party’s handset
4[Ok]
1Place the a mark on that of the
other party’s handset
2[Accept]
3Touch the status bar/select
received data
You can connect the handset to Bluetooth
devices wirelessly.
Wireless communications with all the Bluetooth
devices are not completely guaranteed.
Bluetooth function is not available in
Offline(airplane) mode.
Supported version
Bluetooth Specification Ver.3.0+EDR*1
Supported profiles*2 (Supported services)
HSP: Headset Profile*3
HFP: Hands Free Profile*4
A2DP: Advanced Audio Distribution Profile*5
AVRCP: Audio/Video Remote Control Profile*5
HID: Human Interface Device Profile*6
OPP: Object Push Profile*7
SPP: Serial Port Profile*8
PBAP: Phone Book Access Profile*9
*1 The handset and all Bluetooth function-installed
devices have ensured that they conform to the
Bluetooth specification according to the rules
that the Bluetooth SIG defines, and are all
authenticated. However, operating methods
might differ or data might not be exchanged
even when they are connected wirelessly,
depending on the features or specifications of
connecting devices.
*2 Standardizes the communication procedures of
Bluetooth device per feature of a device.
*3 Connect commercially available Bluetooth
compatible Headset to the handset to talk
wirelessly.
*4 Connect a commercially available Bluetooth
compatible hands-free device such as a car
navigation system to the handset to talk during
hands-free operation using the car navigation
system.
*5 Connect Wireless Earphone Set 02 (sold
separately) or commercially available Bluetooth
compatible audio device to the handset to play
music, sound of 1Seg, etc. wirelessly. Also,
remote control operation may be available from
Bluetooth devices. However, compatible
devices are limited depending on the data type.
Sending data
Receiving data
Bluetooth function
Supported version and supported
profiles

107
File Management
*6 Connect commercially available Bluetooth
compatible keyboard to Bluetooth devices to
enable you to enter characters with a keyboard.
*7 Connect a Bluetooth device to the handset with
the File transfer service to send and receive
data between them.
*8 Set the virtual connection with a serial cable
and interconnect between devices.
*9
Transfer phonebook data in the handset to a
Bluetooth device. Data is not displayed correctly
on the other party’s device depending on the
contents of the transferred phonebook data.
Refer to the manual for the Bluetooth device as
well.
When connecting the Wireless Earphone Set
02, connect it from the handset.
You cannot listen to sounds regardless of data
type with Bluetooth devices which are not
compatible with SCMS-T.
Precautions for handling the Bluetooth
device
Note the following when using the Bluetooth device.
Note the following to make good connection.
Keep the distance between the handset
and another Bluetooth device within
approximately 10 m with no obstructions in
sight. The distance that can make
connection may be shorter when there are
obstructions between them or depending
on the conditions of the surroundings (such
as walls or furniture) and the structure of a
building. Especially when there is a wall or
floor of reinforced concrete between them,
they may be unable to connect with each
other. Note the above mentioned distance
is not guaranteed.
Move the handset and another Bluetooth
device as far away as possible from home
electric appliances, AV devices, OA
devices, etc. before connection. The
Bluetooth device is liable to be adversely
affected by a microwave oven, so move it
as far away as possible from the microwave
oven while using it. Otherwise, normal
connection cannot be performed when
electric devices are powered on or
Bluetooth devices may cause noises or
reception failure on a TV or radio set (TV
images may degrade for specific channels
of UHF or satellite broadcasting).
Move the Bluetooth device to a place that
connection is possible when there is a
broadcast station or radio near the
Bluetooth device, and the handset cannot
be connected to the device. Strong radio
waves may prevent connection between
Bluetooth devices.
Wireless connection is available with
Bluetooth device put in a bag or pocket.
However, lowering of communication speed
or noise may result when you are in
between the Bluetooth device and the
handset.
Electromagnetic signals from the Bluetooth
device may affect the operation of electronic
medical equipment. As some cases may
result in accident, turn off the handset and
other Bluetooth devices in the following place.
On trains On airplanes In hospitals
Nearby automatic doors or fire alarms
In places such as gas stations where
flammable gas is generated

108 File Management
Set after enabling Bluetooth function.
To register/connect a Bluetooth device, the
Bluetooth passkey may need to be entered.
Before starting the registration, decide the 1- to
16-digit number. Enter the same number on the
handset and the other party’s Bluetooth device.
1In the home screen, [R]/
[Settings]/[Wireless &
networks]/[Bluetooth settings]
2Select an item
Bluetooth: Enable Bluetooth function.
Device name: Change the handset’s name.
Discoverable: Set whether to receive a
search request from other Bluetooth devices.
Discoverable timeout: Set the time that can
receive a search request.
ƦEnable Discoverable in advance.
aptX: Set whether to use aptX™.
Detailed Bluetooth Settings: Set Bluetooth
function.
Scan for devices: Search for the Bluetooth
devices around the handset and register
them in it. Depending on Bluetooth device, it
may start connecting after completing
registration.
ƦSet the other party’s Bluetooth device to the
registration stand-by status in advance.
:Touch a paired Bluetooth device for a
while/[Options…] to change the connection
type.
The radio interference with Wi-Fi
compatible devices
The Bluetooth devices use the same
frequency band (2.4 GHz) as wireless LANs
(IEEE 802.11b/g/n). Therefore, using the
Bluetooth device near a wireless LAN device
may cause the radio interference, lowering of
communication speed, noise or connection
fail. In this case, turn off the wireless LAN
device or keep the handset and the Bluetooth
device at least approximately 10 m away from
the wireless LAN.
Bluetooth settings
If you fail to connect, connection may become
available after re-registration of Bluetooth
devices.
[Bluetooth]
When the Bluetooth function is enabled, the
handset is set to receive a registration request/
connection request from other Bluetooth
devices. Enable Discoverable in advance to
allow the handset to be searched for by other
Bluetooth devices.
While in connection stand-by, even if a
connection request from a Bluetooth device is
received, connection may not be made
depending on the signal strength etc.
[Discoverable]
Setting is disabled automatically when the
period of time set for Discoverable timeout
passed after enabling.
[Scan for devices]
For details on the operations of the other party’s
Bluetooth device, refer to the manuals of the
Bluetooth device to be used.

109
File Management
1Registration request/Connection
request from Bluetooth device
2[Pair]
:Entering the Bluetooth passkey may be
necessary depending on the other party’s
Bluetooth device.
:The request confirmation screen of Bluetooth
connection may be displayed.
1In the Bluetooth setting screen,
touch the Bluetooth device to
disable the registration for a
while/[Unpair]/[Disconnect &
unpair]
1In the Bluetooth setting screen,
select the Bluetooth device to
disable the connection/[OK]
Insert a microSD Card in advance. However,
sending just single data may not require the
microSD Card.
Example: Still picture
1In the home screen, [R]/
[Contents Manager]
2Touch a still picture for a while/
[Share]/[Bluetooth]
:Set the receiving Bluetooth device to receive
data.
3Select a Bluetooth device to
connect to
1Send data from the sender’s
Bluetooth device
2Touch the status bar/select data
to receive/[Accept]
3Touch the status bar/select data
to receive
When receiving registration request
from Bluetooth device or connection
request from unregistered Bluetooth
device
Disabling registration of Bluetooth
device
Disabling connection of Bluetooth
device
Sending and receiving by
Bluetooth
Sending data
Receiving data
Note that if you select [Delete all before
registration] at receiving all data, all data
registered to the target function are deleted.
Some data cannot be received all.
When available memory space in the save
destination becomes insufficient, the data being
received to that point are saved and receiving
ends.

136 Applications
Osaifu-Keitai is a function which has built-in IC
card and allows you to pay, use as coupons or
collect stamps by simply holding the handset
over the scanning device at stores.
Moreover, you can access sites and web pages
by holding the handset over the scanning
device, and get the latest coupon, deposit
electronic money and check your usage by
using communication. In addition, for your
secure use, you can lock functions of
Osaifu-Keitai when you lost the handset.
For details on Osaifu-Keitai, refer to “
̮၌ဥ΄ͼ
ΡήΛ·
(sp
κȜΡ༎
)” (Mobile Phone User’s
Guide [sp-mode]) (in Japanese only).
ɦTo use Osaifu-Keitai compatible service, settings
are necessary on a website or an application.
The handset malfunctions may cause data
(including electronic money, points, etc.) saved
in the IC card to be lost or changed (Note that as
a rule, you will be asked to delete data when
leaving your handset for repairs, etc., since we
cannot keep your handset with such data still
remaining in it). For the service such as a
reissue, restoration, temporary keeping or
transfer of the data, contact your provider of
Osaifu-Keitai compatible service. Be sure to use
the Osaifu-Keitai compatible service including a
backup service for important data.
DOCOMO shall not be liable for any loss or
change of data in the IC card or other damages
of Osaifu-Keitai service caused by any reason
such as malfunctions and upgrading.
When the handset is stolen or lost, immediately
contact your provider of Osaifu-Keitai compatible
service for handling methods.
iC transfer service is a service that enables you
to move the data saved in the IC card to new
Osaifu-Keitai from the old one when changing
Osaifu-Keitai such as by changing models or
repairing the handset.
iC transfer service is available at a docomo
Shop near you.
For details on iC transfer service, refer to “
̮၌
ဥ΄ͼΡήΛ·
(sp
κȜΡ༎
)” (Mobile Phone
User’s Guide [sp-mode]) (in Japanese only).
To use Osaifu-Keitai compatible services,
download the Osaifu-Keitai compatible
application from Osaifu-Keitai compatible sites
and make the setting. Some services do not
need to download the Osaifu-Keitai compatible
application.
1In the home screen, [R]/
[Osaifu-Keitai]
:If the initial setting is not completed, the initial
setting screen appears.
2Select a service
Osaifu-Keitai iC transfer service
Using Osaifu-Keitai
You cannot use Osaifu-Keitai in the following
situations. However, you can pay by holding the
handset over a scanning device.
In Offline(airplane) mode
When you are charging the handset,
connecting a microUSB cable for PC
(sample) to it or connecting an earphone/
microphone to it while the docomo mini UIM
card is not inserted/When the handset has
never received radio wave
145
International Roaming
Check followings in Japan before using the handset
overseas.
Subscription
Check the status of a subscription for WORLD
WING. For details, contact “General Inquiries” on
the back of this manual.
Charging battery
Use FOMA AC Adapter 01 for Global use (sold
separately) or FOMA AC Adapter 02 (sold
separately) as an AC adapter for charging while
traveling overseas.
Charge
Overseas charges (call charges, packet
communication charges) differ from those in
Japan.
Since some applications automatically perform
packet communication, the packet
communication charges may be higher. Contact
the application provider for the operation of each
application.
Network service settings
If you subscribed to network services, network
services such as Voice Mail Service and Call
Forwarding Service are available from overseas.
However, some network services are not available.
To use network services overseas, setting
Remote operations to “Activate” is required.
Remote operations can be set in your country of
stay.
Some network services that can be set/disabled
etc. may not be available depending on overseas
telecommunications carriers.
The handset automatically connects to the
available telecommunications carrier when you turn
the power on in your country of stay.
Connection
When telecommunications carriers (nP. 147) is
set to [Select automatically], the suitable network is
automatically selected.
Overseas packet communication charges are
available with a fixed amount of charges as an
upper limit per day by connecting to a compatible
operator for telecommunications carriers manually.
To use this service, subscription to flat-rate packet
communication services is required. For details,
refer to “Mobile Phone User’s Guide [International
Services]” or the DOCOMO International Services
website.
Viewing the display
The type of network in use appears in the status
bar.
ƦWhile international roaming, [R] appears on
the upper left of the signal icon.
Connected operator can be checked in the status
panel.
Before use overseas
Check before departure
Set before departure
Check in your country of stay
3/0: During 3G communication/3G available
S/P: During GSM communication/GSM
available
146 International Roaming
Date & time
If [Automatic] of Date & time is enabled, the
handset receives information with time and time
differences from overseas telecommunications
carrier, then time and time differences are
corrected.
Time and time differences may not be adjusted
correctly depending on overseas
telecommunications carrier. In such a case, set
time zone manually.
The correction timing differs depending on the
telecommunications carrier.
For details on Date & time nP. 89
Inquiries
When the handset or the docomo mini UIM card
is lost or stolen overseas, promptly contact
DOCOMO and conduct a procedure for
canceling the use of service from your country of
stay. Refer to the back of this manual for
inquiries. Note that communication/calling
charges after the handset or the docomo mini
UIM card is lost or stolen are incurred to the
subscriber.
For land-line phone, etc., “International call
access number” of your country of stay or
“Universal number international prefix” is
required.
The handset automatically connects to the
DOCOMO network after homecoming. If it fails,
perform the following setting.
Set Network Mode to [3G/GSM(Auto)]
(nP. 147).
Set telecommunications carriers to [Select
automatically] (nP. 147).
At the time of purchase, the handset is set to
automatically search for and switch to available
networks. When you want to manually switch
networks, set by performing following
operations.
1In the home screen, [R]/
[Settings]/[Wireless &
networks]/[Mobile networks]
2Select an item
Data enabled: Enable data communication.
Data roaming: For details on Data roaming
nP. 146
Network Mode: For details on Network Mode
nP. 147
Access Point Names: Set an access point.
Network operators: For details on Network
operators nP. 147
Set whether to use data communication when
roaming.
1In the home screen, [R]/
[Settings]/[Wireless &
networks]/[Mobile networks]/
[Data roaming]
Check after homecoming
Settings to use overseas
Data roaming
147
International Roaming
Set a network to use.
1In the home screen, [R]/
[Settings]/[Wireless &
networks]/[Mobile networks]/
[Network Mode]
2Select an item
3G/GSM(Auto): Switch to an available
network automatically.
3G: Use 3G network.
GSM: Use GSM/GPRS network.
Search for networks and set a network operator
to use.
1In the home screen, [R]/
[Settings]/[Wireless &
networks]/[Mobile networks]/
[Network operators]
:Search for networks and a list of network
operators is displayed.
2Select a network operator
:To search for network operators again:
[Search networks]
:To select a network operator automatically:
[Select automatically]
1In the home screen, [R]/
[Phone]/[Dial]
2“+” (touch “0” for a while)/enter
country code, area code (city code)
and the other party’s phone
number/[0]
:Alternatively, enter a phone number/
z/[International call]/select a country
code to enter a country code.
ƦThe first “0” of the area code (city code) will
be omitted.
:When the area code (city code) begins with
“0”, omit the “0” when dialing (Include the “0”
when making a call to some countries or
regions such as Italy).
Network mode
Network operators
When networks are not searched, disable [Data
enabled] (nP. 146).
If you manually set network operators
overseas, set to [Select automatically] after
returning to Japan.
Making/Receiving a call
in your country of stay
Making a call outside your
country of stay (including Japan)
Even if you notify the caller ID, [Unknown] or [ID
Unsent] appears depending on the
telecommunications carrier, and the caller ID
may not be displayed correctly.

148 International Roaming
When you make a call to other countries from
your country of stay, you can make an
international call with simple operation using
International dial assist.
Set International dial assist in advance.
The first “0” of a phone number will be converted
to the country code you set in Country code
automatically.
1In the home screen, [R]/
[Phone]/[Dial]
2Enter a phone number/[0]
3[Converted number]
1In the home screen, [R]/
[Settings]/[Call settings]/
[Overseas setting]/[International
dial assist]
2Select an item
Automatic conversion function: Set whether
to make calls using International dial assist.
Country code: Set country code to use when
using International dial assist.
International prefix: Set international prefix to
use when using International dial assist.
You can make a domestic call in your country of
stay in the same way as you do in Japan.
Always dial the area code (city code), even when
the number is in the same area.
When you make a call to a “WORLD WING”
subscriber overseas, the call is made as an
international call to Japan regardless of your
country of stay.
1In the home screen, [R]/
[Phone]/[Dial]
2“+” (touch “0” for a while)/enter
country code “81” (Japan), the
other party’s mobile phone number
excluding the first “0”/[0]
You can receive a call overseas in the same way
as you do in Japan.
When having calls made to your handset from
Japan, have your phone number dialed just as a
domestic call in Japan.
When having calls made to your handset from
countries other than Japan, have the international
call access number and “81” (Japan) added to the
beginning of your phone number with the first “0”
excluded as an international call to Japan
regardless of your country of stay.
International call access number of the country of
the caller-81-90 (or 80)-XXXX-XXXX
Making a call using
International dial assist
Setting of International dial assist
Making a call in your country of
stay
Making a call to a WORLD
WING subscriber overseas
Receiving a call
When a call is received during international
roaming, the call is forwarded from Japan. Call
charges to Japan are incurred by the caller and
receiving charges by the receiver.
Having calls to your handset

175
Appendix/Index
The abbreviations of operating systems
(Japanese versions) below are used in this
manual.
Windows 7 stands for Microsoft® Windows® 7
(Starter, Home Basic, Home Premium,
Professional, Enterprise and Ultimate).
Windows Vista stands for Windows Vista®
(Home Basic, Home Premium, Business,
Enterprise and Ultimate).
Windows XP indicates the Microsoft®
Windows® XP Professional operating system
or Microsoft® Windows® XP Home Edition
operating system.
The Bluetooth word mark and logos are owned
by the Bluetooth SIG, INC. and any use of such
marks by NTT DOCOMO, INC. is under license.
Other trademarks and trade names are those of
their respective owners.
Google, Google logo, Android, Android Market,
Gmail, Google Maps, Google Talk, Google Maps
Navigation, Google Latitude, Google Places,
Google Voice Search, YouTube, and YouTube
logo are trademarks or registered trademarks of
Google Inc.
Mercury 3D is a generic name of 3D conversion
technology of Mercury System Co.,Ltd. The
authorization by Mercury System Co.,Ltd.
(Mercury@Mercury3d.co.jp) is required to
convert still image received from other media
(except still pictures taken by the handset) to
1920 × 1080 pixels or bigger 3D image for
commercial use.
Eco Backlight Control uses Assertive Display
technology by Apical Limited.
This product contains Audio Enhancement
technology by AM3D.