User Manual
ɜġIf you lose your handset or have it stolen, immediately take the steps necessary for suspending the use of the handset.
ɜġIf the handset you purchased is damaged, bring your handset to a repair counter specified by DOCOMO after returning to
Japan.
Sales:
Manufacturer: SHARP Corporation
Don’t forget your mobile phone… or your manners!
When using your mobile phone in a public place, don’t forget to show common courtesy and consideration for
others around you.
Universal number
international prefix
International call access code
for the country you stay
-81-3-6718-1414
*
(toll free)
-8005931-8600*
From land-line phones
From DOCOMO mobile phones
Failures encountered overseas
<Network Support and Operation Center>
<Universal number>
* You might be charged a domestic call fee according to the call rate for the
country you stay.
ɦ
For international call access codes for major countries and universal number
international prefix, refer to DOCOMO International Services website.
*
You are charged a call fee to Japan when calling from a land-line phone, etc.
ɦ If you use SH-01E, you should dial the number +81-3-6832-6600
(to enter “+”, touch “0” for a while).
* You might be charged a domestic call fee according to the call rate for the
country you stay.
ɦ
For international call access codes for major countries and universal number
international prefix, refer to DOCOMO International Services website.
*
You are charged a call fee to Japan when calling from a land-line phone, etc.
ɦ If you use SH-01E, you should dial the number +81-3-6718-1414
(to enter “+”, touch “0” for a while).
-8000120-0151*
Universal number
international prefix
-81-3-6832-6600
*
(toll free)
International call access code
for the country you stay
Loss or theft of handset or payment of
cumulative cost overseas
<docomo Information Center>
From DOCOMO mobile phones
From land-line phones
<Universal number>
(available 24 hours a day)(available 24 hours a day)
ɦ
Unavailable from land-line phones, etc.
ɡFrom DOCOMO mobile phones
(In Japanese only)
ɦ
Unavailable from land-line phones, etc.
(No prefix) 151 (toll free)
ɡ
From DOCOMO mobile phones
(In Japanese only)
Repairs
(Business hours: 24 hours (open all year round))(Business hours: 9:00 a.m. to 8:00 p.m.)
ɦ Unavailable from part of IP phones.
0120-800-000
(toll free)
ɡFrom land-line phones
(In Japanese only)
0120-005-250 (toll free)
ɦ Service available in: English, Portuguese, Chinese, Spanish, Korean.
(Business hours: 9:00 a.m. to 8:00 p.m. (open all year round))
ɦ Unavailable from part of IP phones. (No prefix) 113 (toll free)
General Inquiries
<docomo Information Center>
ɜ Please confirm the phone number before you dial.
ɜ
For Applications or Repairs and After-Sales Service, please contact the above-mentioned information center or the docomo Shop etc. near you on
the NTT DOCOMO website.
NTT DOCOMO websiteȁhttp://www.nttdocomo.co.jp/english/
ɦ Unavailable from part of IP phones.
ɡFrom land-line phones
(In Japanese only)
0120-800-000
(toll free)
INSTRUCTION MANUAL
SH-01E
’12.9 (1st Edition)
12J SM193
’12.9
1
㸭㸭∧
6Contents/Precautions
Before use, read these “Precautions” carefully
and use your handset properly.
Keep this manual in a safe place for future
reference.
These precautions contain information intended
to prevent bodily injury to the user and to
surrounding people, as well as damage to
property, and must be observed at all times.
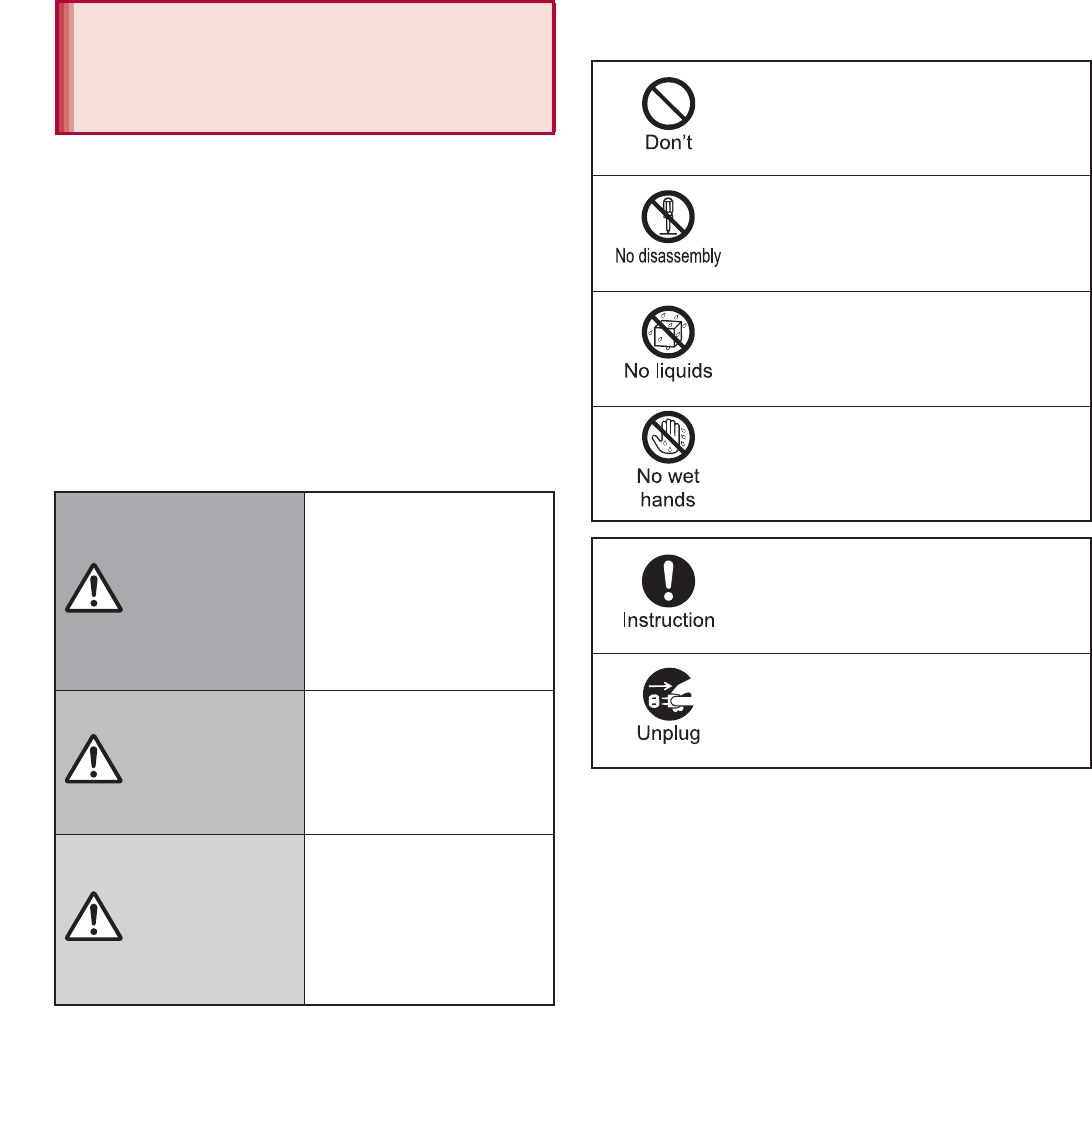
The following symbols indicate the different
degrees of injury or damage that may occur if
information provided is not observed and the
handset is used improperly.
The following symbols indicate specific
directions.
Precautions (ALWAYS
FOLLOW THESE
DIRECTIONS)
Danger
This symbol
indicates that “death
or serious bodily
injury may directly
and immediately
result from improper
use”.
Warning
This symbol
indicates that “death
or serious bodily
injury may result
from improper use”.
Caution
This symbol
indicates that “minor
injury and/or
property damage
may result from
improper use”.
Indicates a prohibited action.
Indicates not to disassemble the
device.
Indicates not to use the device
near water or get it wet.
Indicates not to handle the device
with wet hands.
Indicates that instructions
specified are compulsory (must
be followed).
Indicates that the power cord must
be unplugged from the outlet.
7
Contents/Precautions
“Precautions” is explained in the following six
sections.
Handling the handset, battery pack, adapters,
desktop holder, docomo mini UIM card and 1Seg
antenna cable (general) . . . . . . . . . . . . . . . . P. 7
Handling the handset . . . . . . . . . . . . . . . . . . P. 8
Handling battery pack . . . . . . . . . . . . . . . . . P. 11
Handling adapters and desktop holder . . . . P. 12
Handling docomo mini UIM card. . . . . . . . . P. 13
Handling near electronic medical equipment
. . . . . . . . . . . . . . . . . . . . . . . . . . . . . . . . . . P. 14
Do not use, store or leave the
equipment in locations subject to
high temperatures (near a fire or
heating unit, in a kotatsu, under
direct sunlight, inside a vehicle on a
hot day, etc.).
May cause fires, burns or bodily injury.
Do not place the equipment inside
cooking appliances such as
microwave ovens or pressure
cookers.
May cause fires, burns, bodily injury or
electric shock.
Do not attempt to disassemble or
modify the equipment.
May cause fires, burns, bodily injury or
electric shock.
Do not get the equipment wet with
water, drinking water, pet urine, etc.
May cause fires, burns, bodily injury or
electric shock.
Refer to the following for details on
waterproofness.
n“Waterproof/Dust-proof” on P. 21
Use only the battery packs and
adapters specified by NTT DOCOMO
for use with the handset.
May cause fires, burns, bodily injury or
electric shock.
Do not subject the equipment to
strong force or impacts or throw it.
May cause fires, burns, bodily injury or
electric shock.
Do not allow conductive materials
(such as metal objects and pencil
lead) to come into contact with the
charger terminal, external connector
terminal or earphone/microphone
terminal. In addition, do not insert
such objects.
May cause fires, burns, bodily injury or
electric shock.
Do not cover or wrap the equipment
with bedding etc. when using or
charging.
May cause fires or burns.
Handling the handset, battery
pack, adapters, desktop holder,
docomo mini UIM card and
1Seg antenna cable (general)
Danger
Warning
8Contents/Precautions
Be sure to turn off the handset and
not to charge the battery in locations
such as gas stations where
flammable gas is generated.
May cause a gas explosion or fire.
To use Osaifu-Keitai in locations such as
gas stations, be sure to turn off the power
in advance (If the Osaifu-Keitai lock setting
is activated, disable the lock before turning
off the power).
If you notice anything unusual, such
as an unusual odor, overheating,
discoloration or deformation during
use, charging or storage,
immediately follow the instructions
below.
Unplug the power cord from the
outlet or cigarette lighter socket.
Turn off the handset.
Remove the battery pack from the
handset.
May cause fires, burns, bodily injury or
electric shock.
Do not leave the equipment on
unstable surfaces, such as on a
wobbly table or sloped surface.
May fall and cause injury.
Do not store the equipment in
locations that are subject to
humidity, dust or high temperatures.
May cause fires, burns or electric shock.
If being used by a child, have a
guardian teach him/her the proper
handling procedures. In addition,
check that the child is using the
equipment as directed.
May result in bodily injury.
Keep the equipment out of the reach
of young children.
A young child may swallow the equipment
or suffer other bodily injury.
Be very careful when using the
handset connected to adapters
repeatedly or for long periods of
time.
The handset, battery pack or adapters may
become warm if 1Seg etc. is used for a
long time while charging.
Touching high temperature areas for a
prolonged period of time may cause skin
irritations, itchiness or low-temperature
burns in some people.
Do not aim the infrared port towards
the eyes.
May cause eye injury.
Do not aim the infrared port towards
home electric appliances with an
infrared device during infrared
communication.
May interfere with the operation of infrared
devices and cause an accident.
Caution
Handling the handset
Warning
9
Contents/Precautions
Do not point the illuminated light
directly at someone’s eyes.
Especially when you shoot still
pictures or moving pictures of
young children, keep 1 m or more
distance from them.
Do not use Mobile light near people’s
faces. Eyesight may be temporarily
affected leading to accidents.
Do not allow water or other liquids,
metal, flammable material or other
foreign objects to enter the docomo
mini UIM card or microSD Card slot
on the handset.
May cause fires, burns, bodily injury or
electric shock.
Do not shine the light at anyone
driving a car or other vehicles.
May prevent a driver from driving safely
and cause a traffic accident.
Turn off the handset in areas where
the use of mobile phones is
prohibited, such as in aircraft or
hospitals.
May interfere with the operation of
electronic devices and electronic medical
equipment.
Follow the instructions given by the
respective medical facilities regarding the
use of mobile phones on their premises.
Actions such as using a mobile phone
aboard aircraft are prohibited and
punishable by law.
However, follow the instructions on use of
the handset given by the airline if the
handset can be used aboard aircraft by
setting the handset such as setting it not to
emit radio wave.
Keep the handset away from the
ears during a call in which
hands-free is set or while the ring
tone is ringing.
When you attach the earphone/
microphone, etc. to the handset to
play games, music, etc., do not make
the volume too loud.
Excessive high volume may damage your
hearing.
Also, it may prevent you from hearing
ambient sounds and cause an accident.
Earphone Signal Level
The maximum output voltage for the music
player function, measured in accordance
with EN 50332-2, is 1mV.
If you have a weak heart, take extra
precautions when setting functions
such as the vibrator and ring tone
volume for incoming calls.
May have harmful effects on your heart.
If you are using electronic medical
equipment, contact the respective
manufacturer or dealer to check
whether the operation of the
equipment is affected by signals.
May interfere with the operation of
electronic medical equipment etc.
10 Contents/Precautions
Turn off the handset near
high-precision electronic devices or
devices that use weak electronic
signals.
May interfere with the operation of
electronic devices.
Take particular care with the
following devices
Hearing aids, implanted cardiac
pacemakers, implanted
cardioverter-defibrillators or other
electronic medical equipment. Fire alarms,
automatic doors, and other equipment
controlled by electronic signals. If you use
an implanted cardiac pacemaker,
implanted cardioverter-defibrillator or other
electronic medical equipment, contact the
respective manufacturer or dealer to check
whether the operation of the equipment is
affected by signals.
If the display part or camera lens is
damaged, be careful of broken glass
and the exposed inside of the
handset.
The surface of the display is covered by a
protective film while the surface of the
camera lens is covered by a plastic panel
so as to minimize the possibility of glass
scattering. However, touching the broken
or exposed parts may cause injury.
Do not swing the handset by its
strap etc.
May hit you or others around you, resulting
in bodily injury.
Do not use a damaged handset.
May cause fires, burns, bodily injury or
electric shock.
For using a motion sensor and
geomagnetic sensor, check the
safety around, hold the handset and
do not swing them more than
necessary.
May cause injury etc.
If the display is broken and the liquid
crystal then leaks, do not get the
liquid on your skin (face, hands,
etc.).
May result in loss of eyesight and harm to
your skin.
If the liquid comes into contact with your
eyes or mouth, immediately rinse your
eyes or mouth with clean water and see a
doctor.
If the liquid comes into contact with your
skin or clothes, immediately wipe it off with
alcohol, and wash with water and soap.
The surface of the display is covered
with a protective film for ensuring
the security against any damages
caused by the handset being
dropped or receiving a strong
impact etc. Do not remove the film
forcibly or damage it.
Using the equipment with the film removed
may damage the display and cause bodily
injury.
Caution
11
Contents/Precautions
If you use the handset in a vehicle,
contact the vehicle manufacturer or
dealer to check whether the
operation of the vehicle is affected
by signals.
May interfere with the operation of
electronic equipment in some vehicle
models. In such cases, stop using the
handset.
Use of the handset may cause skin
irritations such as itchiness, rashes
or eczema in some people. If this
occurs, immediately stop using the
handset and seek medical treatment.
For details on materials of each part
n“Material list” on P. 14
Look at the display in a well-lit place,
keeping a certain distance from the
screen.
Otherwise, eyesight may be weakened.
Check the type of battery using the information
printed on the battery pack label.
Do not touch terminals with metallic
objects such as wires. In addition,
do not carry or store the battery
pack with metallic necklaces etc.
The battery pack may catch fire, explode,
overheat or leak.
Check that the battery pack is facing
the correct direction before you
attach it to the handset. If you are
having difficulty fitting the battery
pack to the handset, do not use
excessive pressure to force the
battery into place.
The battery pack may catch fire, explode,
overheat or leak.
Do not throw the battery pack into a
fire.
The battery pack may catch fire, explode,
overheat or leak.
Do not puncture, hit with a hammer
or step on the battery pack.
The battery pack may catch fire, explode,
overheat or leak.
If the battery fluid etc. comes into
contact with your eyes, do not rub
your eyes but immediately rinse
your eyes with clean water. Then
seek prompt medical treatment.
May result in loss of eyesight.
If any trouble such as a deformation
or scratches caused by dropping the
battery pack is found, never use it.
The battery pack may catch fire, explode,
overheat or leak.
If the battery pack leaks or emits an
unusual odor, immediately stop
using it and move it away from any
naked flames or fire.
The battery fluid is flammable and could
ignite, causing a fire or explosion.
Handling battery pack
Label Battery type
Li-ion00 Lithium-ion
Danger
Warning
12 Contents/Precautions
Do not allow a pet to bite the battery
pack.
The battery pack may catch fire, explode,
overheat or leak.
Do not dispose of used battery
packs in ordinary garbage.
May cause fires or damage to the
environment. Place tape over the terminals
to insulate unnecessary battery packs, and
take them to a docomo Shop, retailer or
institution that handles used batteries in
your area.
Do not use or charge a wet battery
pack.
The battery pack may catch fire, explode,
overheat or leak.
If the battery fluid etc. leaks, do not
get the liquid on your skin (face,
hands, etc.).
May result in loss of eyesight and harm to
your skin.
If the liquid comes into contact with your
eyes, mouth, skin or clothes, immediately
rinse them with clean water.
If the liquid etc. comes into contact with
your eyes or mouth, see a doctor
immediately after rinsing your eyes or
mouth.
Do not use if the cord of the adapter
is damaged.
May cause fires, burns or electric shock.
Never use the AC adapter or the
desktop holder in humid locations
such as a bathroom.
May cause fires, burns or electric shock.
The DC adapter should only be used
in negative grounded vehicles.
Never use it in positive grounded
vehicles.
May cause fires, burns or electric shock.
Do not touch adapters if you hear
thunder.
May cause electric shock.
Take care not to short-circuit the
charger terminal when connected to
an outlet or cigarette lighter socket.
Also, take care not to allow any part
of your body (hands, fingers, etc.) to
come into contact with the charger
terminal.
May cause fires, burns or electric shock.
Do not place heavy objects on the
cord of the adapter.
May cause fires, burns or electric shock.
Caution
Handling adapters and desktop
holder
Warning
13
Contents/Precautions
When plugging/unplugging the AC
adapter into/from the outlet, do not
allow metallic straps or other
metallic objects to come into contact
with the prongs of the plug.
May cause fires, burns or electric shock.
Do not handle the cord of the
adapters, the desktop holder or the
outlet with wet hands.
May cause fires, burns or electric shock.
Always use the specified power
supply and voltage.
When using overseas, use the AC
adapter that is available overseas.
Using the incorrect voltage may cause
fires, burns or electric shock.
AC adapter: 100V AC
DC adapter: 12/24V DC (for negative
grounded vehicles only)
AC adapter available overseas: 100 to
240V AC (Connect only with a household
AC outlet)
If the fuse in the DC adapter blows,
always replace it with a fuse of the
specified type.
May cause fires, burns or electric shock.
Refer to the respective manuals for
information on the correct fuse
specifications.
Wipe off any dust on the power plug.
May cause fires, burns or electric shock.
Fully plug the AC adapter into the
outlet.
May cause fires, burns or electric shock.
Always grasp the adapters when
unplugging the power plug from the
outlet or cigarette lighter socket. Do
not forcibly pull by the cord of the
adapter.
May cause fires, burns or electric shock.
Unplug the power plug from the
outlet or cigarette lighter socket
when not using for a long time.
May cause fires, burns or electric shock.
Should water or other liquids enter
the equipment, remove the power
plug from the outlet or cigarette
lighter socket immediately.
May cause fires, burns or electric shock.
Always unplug the power plug from
the outlet or cigarette lighter socket
before cleaning the equipment.
May cause fires, burns or electric shock.
Be careful with the cutting surface
when removing the docomo mini
UIM card.
May cause bodily injury.
Handling docomo mini UIM card
Caution
21
Contents/Precautions
The FeliCa reader/writer function in the
handset uses weak radio waves in the
handling of which does not require a license
of radio station.
The frequency in use is the 13.56 MHz band.
When another reader/writer is being used
nearby, keep enough distance from it. Make
sure that there is no radio station using the
same frequency band in the nearby area.
Never use the handset that is modified.
Using a modified device violates the Radio
Law.
The handset has acquired the certification of
conformity with technical regulations for the
specified radio station based on the Radio Law, and
the “Technical Conformity Mark ” is printed on the
model nameplate of the handset as a proof. If the
screws of handset are removed and a modification is
given to the inside, the certification of conformity
with technical regulations will become invalid. Never
use the handset without the valid certification. Doing
so violates the Radio Law.
Be careful when using the handset while
driving a motor vehicle.
Using a mobile phone in hand while driving is
regarded as a punishable act.
However, the punishment has no application in
some cases such as when rescuing sick and injured
people or maintaining public safety.
Use the FeliCa reader/writer function only in
Japan.
The FeliCa reader/writer function in the handset
conforms to the domestic radio wave standards.
Using the function overseas may result in
punishment.
Never change the basic software improperly.
This may be regarded as a conversion of software
and repairs may be refused.
Be careful not to connect the handset to a PC
using Micro USB Cable 01 (sold separately)
in areas where the use of mobile phones is
prohibited.
Power may turn on automatically.
SH-01E is waterproof to IPX5*1 and IPX7*2
standards, and dust-proof to IP5X*3 standards if
the external connector terminal cover is
securely closed as well as the back cover is
attached.
*1 IPX5 means that phone keeps functioning after
being subjected to a jet flow (approximately
12.5 liters/min) discharged from a nozzle (inner
diameter: 6.3 mm), from all directions
(approximately 3 m from the handset) for 3
minutes or more.
*2 IPX7 means that SH-01E phone keeps
functioning after it is slowly submerged to depth
of 1 m in static tap water at room temperature,
left there for approximately 30 minutes and
then taken out.
*3 IP5X means the level of dust protection. Phone
keeps functioning in safety after it is left in the
device containing dust (diameter: 75 Ђm or
smaller) for 8 hours, agitated and then taken
out.
FeliCa reader/writer
Caution
Waterproof/Dust-proof

23
Contents/Precautions
1Securely hold the handset with
your both hands, slightly open the
back cover by hooking the tip of a
finger under the concave portion of
it (1), unhook the tabs by sliding
the tip of the finger down to the
bottom of the handset (2) and
remove the back cover upward (3)
1Confirm the direction of the back
cover, adjust it to the direction of
the handset and press the
surrounding section (shaded
section) of the back cover securely
to attach
:Make sure there is no space between the
back cover and the handset.
Removing back cover
Concave
portion
Attaching back cover
Securely close the back cover. If not closed
securely, the back cover may come off and the
battery pack may fall out due to vibration. May
damage the waterproof/dust-proof performance
and allow water to seep or dust to get in.
The back cover may be damaged if it is
attached or removed forcibly. Be careful not to
apply excessive force on it.
34 Before Using the Handset
If you watch 1Seg etc. while charging for a long
time, the service life of the battery pack may
become shorter than estimated.
Refer to user’s guide of FOMA AC Adapter 01/02
(sold separately), FOMA AC Adapter 01 for
Global use (sold separately), FOMA DC Adapter
01/02 (sold separately), AC Adapter 03 (sold
separately) or DC Adapter 03 (sold separately).
FOMA AC Adapter 01 covers only 100V AC.
FOMA AC Adapter 02/FOMA AC Adapter 01 for
Global use/AC Adapter 03 covers from 100 to
240V AC.
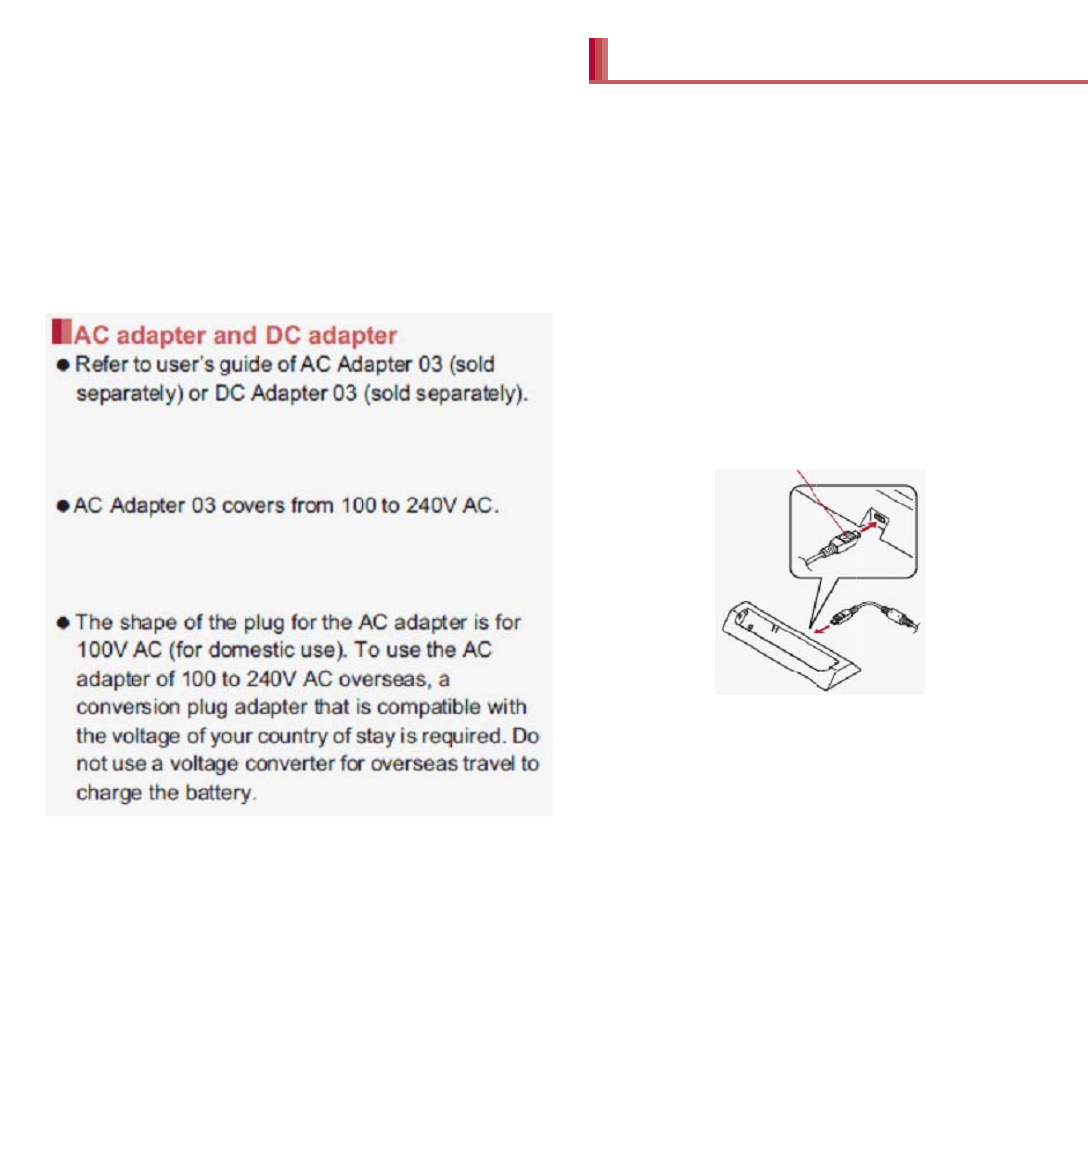
The shape of the plug for the AC adapter is for
100V AC (for domestic use). To use the AC
adapter of 100 to 240V AC overseas, a
conversion plug adapter that is compatible with
the voltage of your country of stay is required. Do
not use a voltage converter for overseas travel to
charge the battery.
It is recommended to use AC Adapter 03 for
charging with the desktop holder.
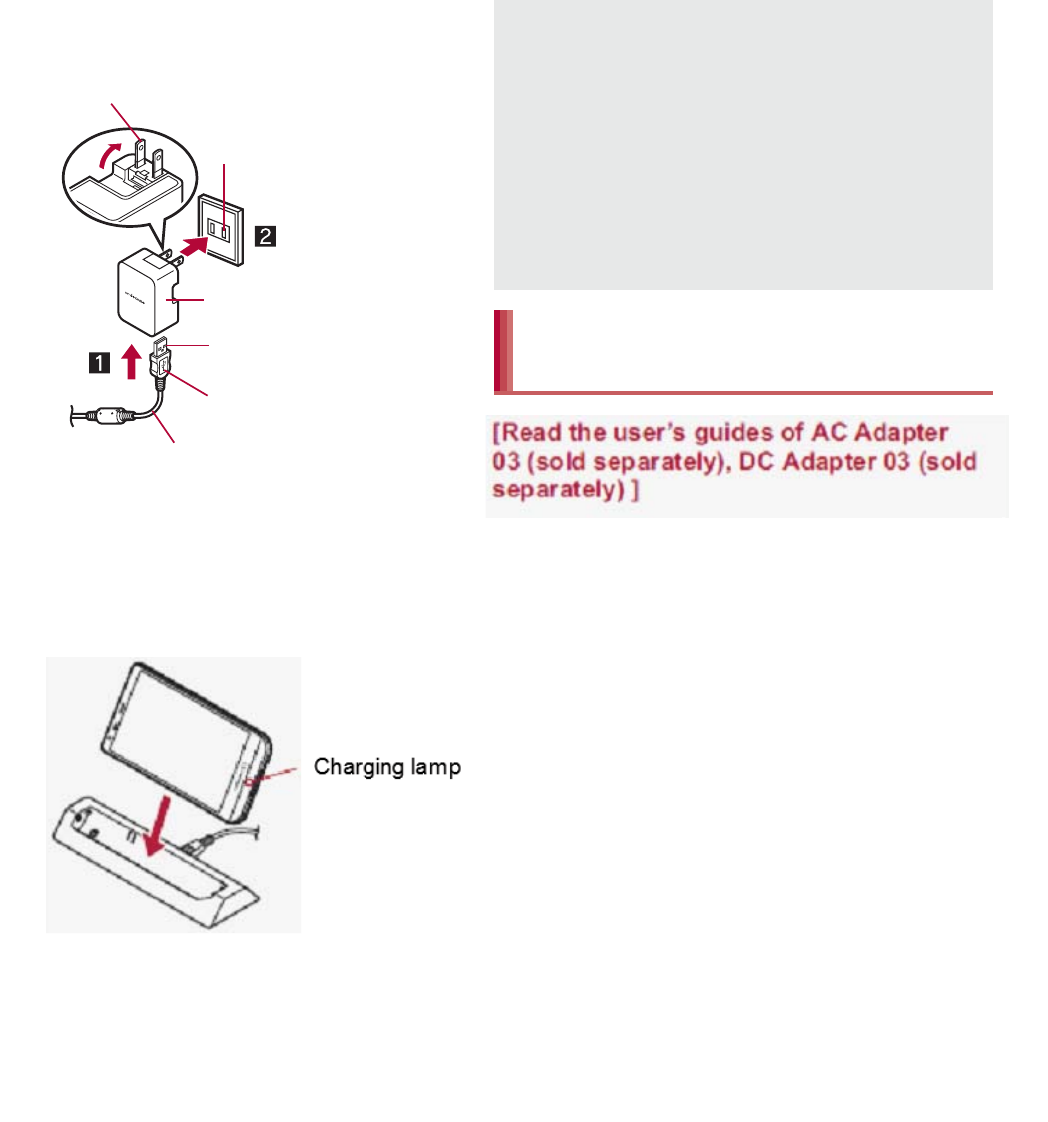
1Insert the microUSB plug of a
microUSB cable horizontally into
the connector terminal of the
desktop holder with the USB mark
side turned up
:Check the direction (front or rear) of the
microUSB plug and insert it horizontally.
2Insert the USB plug of the
microUSB cable horizontally into
the USB connector of an AC
adapter with the USB mark side
facing you (1)
:Check the direction (front or rear) of the USB
plug of the microUSB cable and insert it
horizontally into the AC adapter.
AC adapter and DC adapter
Charging with desktop holder
microUSB plug
(with USB mark up)
35
Before Using the Handset
3Insert the AC adapter power plug
into an outlet (2)
4When placing the handset in the
desktop holder, the charging lamp
illuminates and charging starts
:
Place the handset in the direction of the arrow
and make sure that a click is heard.
5When charging is complete, the
charging lamp turns off
:Hold the desktop holder and lift the handset.
[Read the user’s guides of FOMA AC
Adapter 01/02 (sold separately), FOMA DC
Adapter 01/02 (sold separately), AC Adapter
03 (sold separately), DC Adapter 03 (sold
separately) and FOMA Charger microUSB
Adapter SH01/FOMA charging microUSB
adapter T01 (sold separately)]
Following operations describe how to charge
with AC Adapter 03 or DC Adapter 03.
1Open the external connector
terminal cover of the handset and
insert the microUSB plug of a
microUSB cable/DC adapter
horizontally into the external
connector terminal with the USB
mark side turned up
:Check the direction (front or rear) of the
microUSB plug and insert it horizontally.
100V AC outlet
USB mark
microUSB cable
AC Adapter 03
Power plug
USB plug
Charging lamp
Pull the AC adapter out of the outlet if it will not
be used for a long time.
When the charging lamp does not illuminate,
check that the handset is placed securely in the
desktop holder.
When placing the handset in the desktop
holder, be careful not to catch a strap, etc.
You cannot charge the battery by connecting
the desktop holder and a PC via a microUSB
cable.
Charging with AC adapter/DC
adapter
i
m
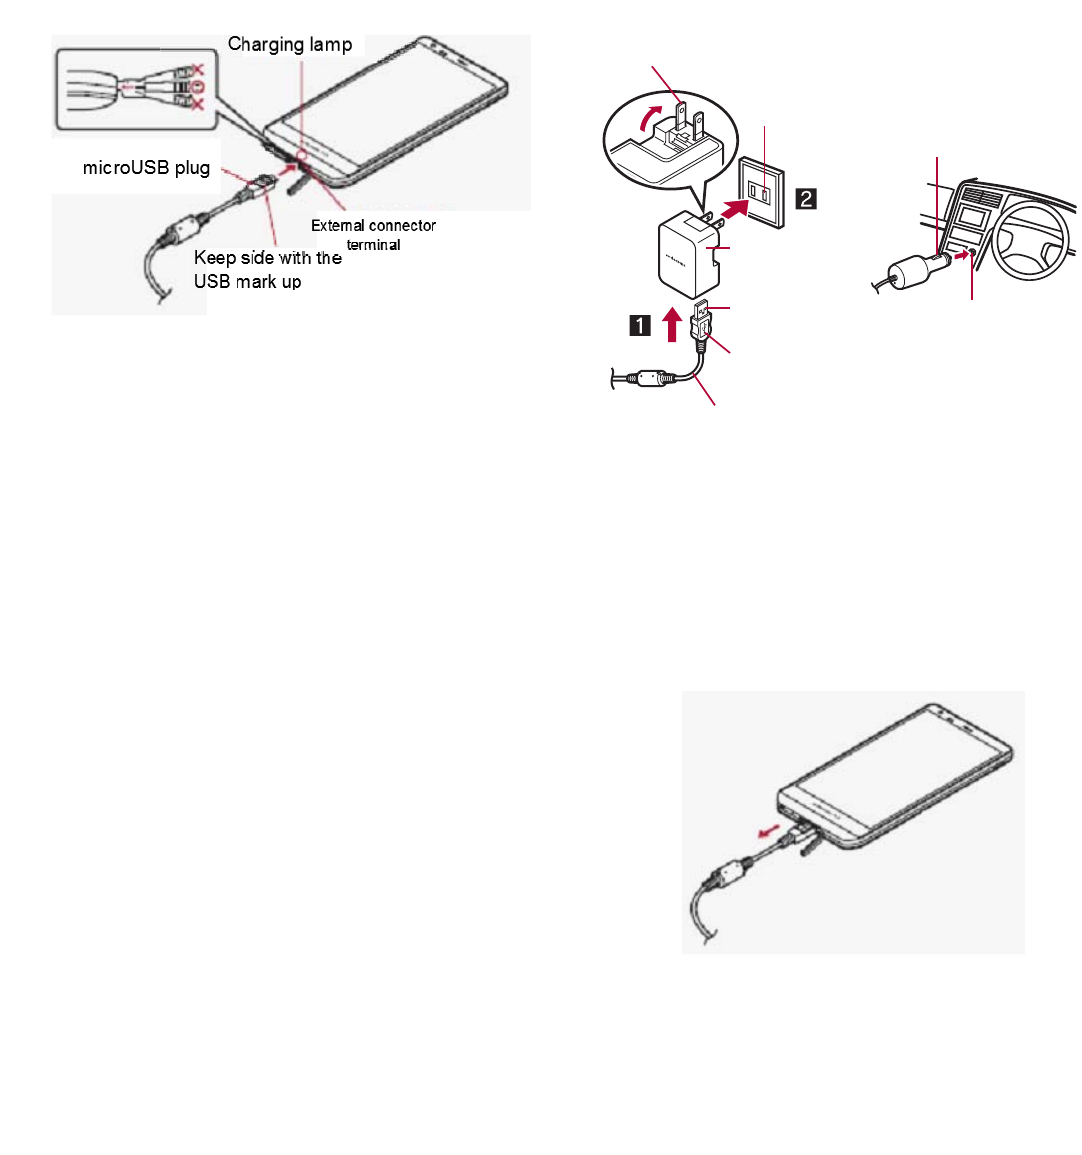
36 Before Using the Handset
2Insert the USB plug of the
microUSB cable horizontally into
the USB connector of an AC
adapter with the USB mark side
facing you (1)
:Check the direction (front or rear) of the USB
plug of the microUSB cable and insert it
horizontally into the AC adapter.
3When inserting the AC adapter
power plug into an outlet (2) or
inserting the DC adapter power
plug into a car cigarette lighter
socket, the charging lamp
illuminates and charging starts
4When charging is complete, the
charging lamp turns off
:When charging is complete, remove the
microUSB plug horizontally from the external
connector terminal.
External connector
terminal
Charging lamp
microUSB plug
(with USB mark up)
100V AC
outlet
Cigarette
lighter socket
For AC adapter For DC adapter
USB mark
microUSB cable
AC Adapter
03
Power plug
Power plug
USB plug

37
Before Using the Handset
When the handset is turned on, you can charge
the handset by connecting the handset to a PC
with Micro USB Cable 01 (sold separately).
Install the USB driver to the PC in advance. If the
USB driver has not been installed on the PC, you
cannot charge the battery by connecting the
handset to the PC via Fast transfer mode.
ƦFor details on installing USB driver, refer to
“Manual for USB Driver Installation” in PDF
format in the following site.
(http://k-tai.sharp.co.jp/support/d/sh-0e/ (in
Japanese only)
For details on connecting to a PC nP. 111
1H (for at least 2 seconds)
:When you turn the power on for the first time,
the initial setting screen is displayed. Each
setting item can also be set from menus
(nP. 42).
:If the initial setting screen for docomo service
is displayed, operate by following the
instructions on the screen.
1H (for at least 1 second)/
[Power off]/[OK]
Do not forcibly insert or remove. May cause
damage to the external connector terminal, the
microUSB plug and the USB plug.
Pull the adapter out of the outlet or cigarette
lighter socket if it will not be used for a long
time.
Do not forcibly pull the external connector
terminal cover. May damage the cover.
Do not place objects near the handset when
charging. May damage the handset.
FOMA Charger microUSB Adapter SH01/
FOMA charging microUSB adapter T01 (sold
separately) is required to charge with FOMA
AC Adapter 01/02 or FOMA DC Adapter 01/02.
When using a DC adapter
The DC adapter should only be used in
negative grounded vehicles (12 and 24V DC).
Do not use with the car engine shut off. May
drain the car battery.
The DC adapter fuse is a consumable product.
For replacement, purchase a new fuse at a
local vehicle supply shop.
Refer to the user’s guide of
DC Adapter 03 for details.
Charging with Micro USB Cable
01
Turning power ON/OFF
Turning power ON
Turning power OFF
38 Before Using the Handset
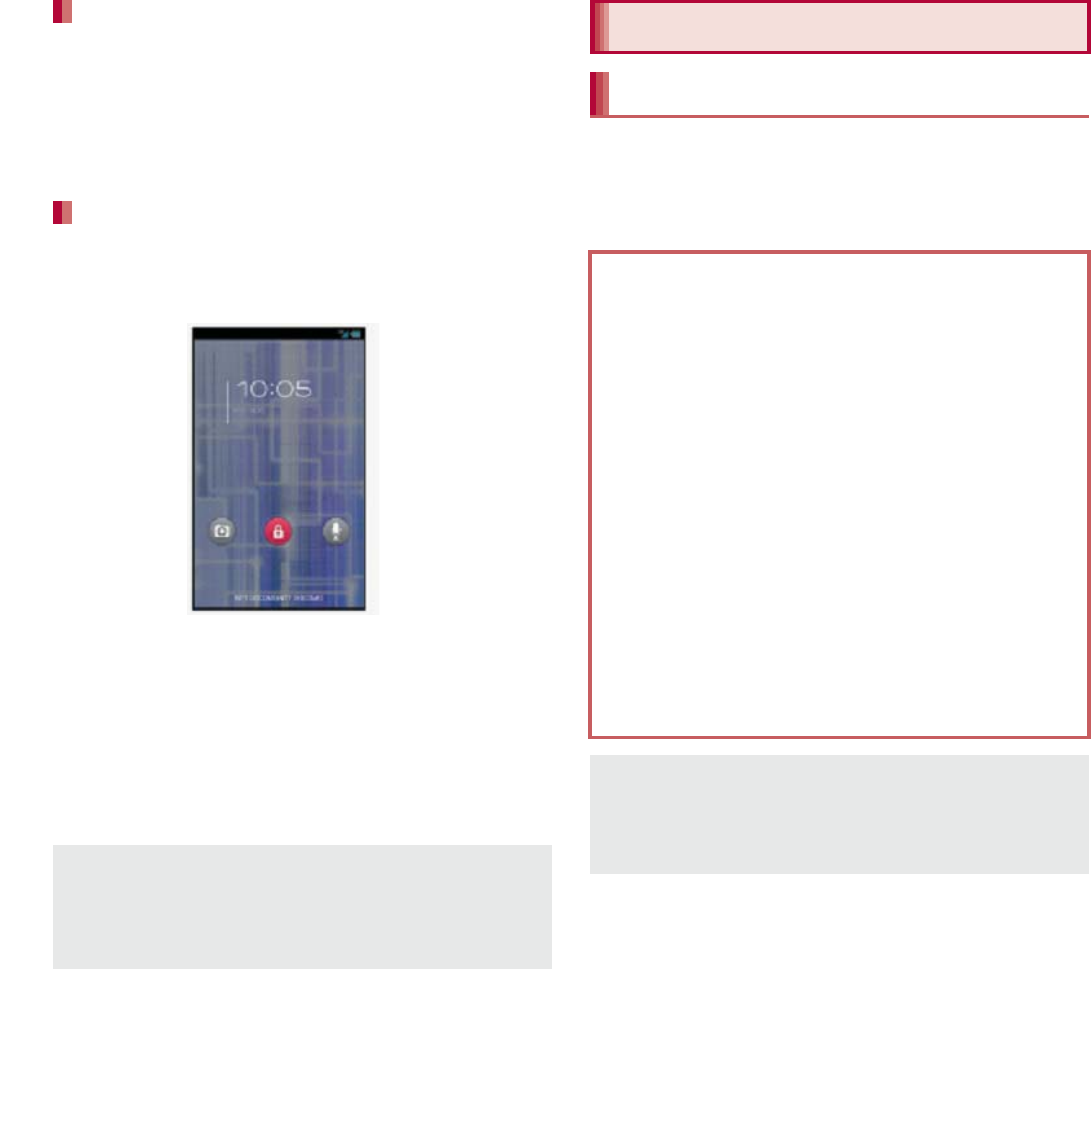
The screen is off and the sleep mode is activated
when H is pressed or the handset is not in use
for a set length of time.
Press H in the sleep mode to deactivate the
sleep mode.
When the power is turned on or the sleep mode is
deactivated, the touch panel is locked.
Touch [J] to unlock.
Operations in touch panel unlock screen
To set/disable the manner mode: y (for at least
1 second)
To turn on the mobile light: x (for at least 1
second)
ƦPress any of the keys or touch [J] to turn it off.
To activate the camera: [K]
You can operate by touching the touch panel
(display) directly with your finger.
Operations differ depending on the function and
screen in use.
Sleep mode
Touch panel lock
The mobile light will automatically turn off
approximately 30 seconds after it turns on.
The status panel is displayed when Screen lock
is set to [Slide or Touch].
Basic operation
Operation of touch panel
Cautions when using the touch panel
The touch panel is designed to be lightly
touched with your finger. Do not forcefully
press with your finger or press with a pointed
object (fingernail, ballpoint pen, pin, etc.).
In the following cases, the touch panel may
not work even if you touch it. May cause a
malfunction.
Operation with a gloved finger
Operation with a fingernail
Operation with foreign objects placed on
the operation pad
Operation on the touch panel on which a
protective sheet or a sticker is put
Operation while the touch panel is wet
Operation with fingers wet with sweat or
water
Operations may be interrupted if you touch
other than a confirmation screen or the status
bar while the confirmation screen etc. is
displayed.
39
Before Using the Handset
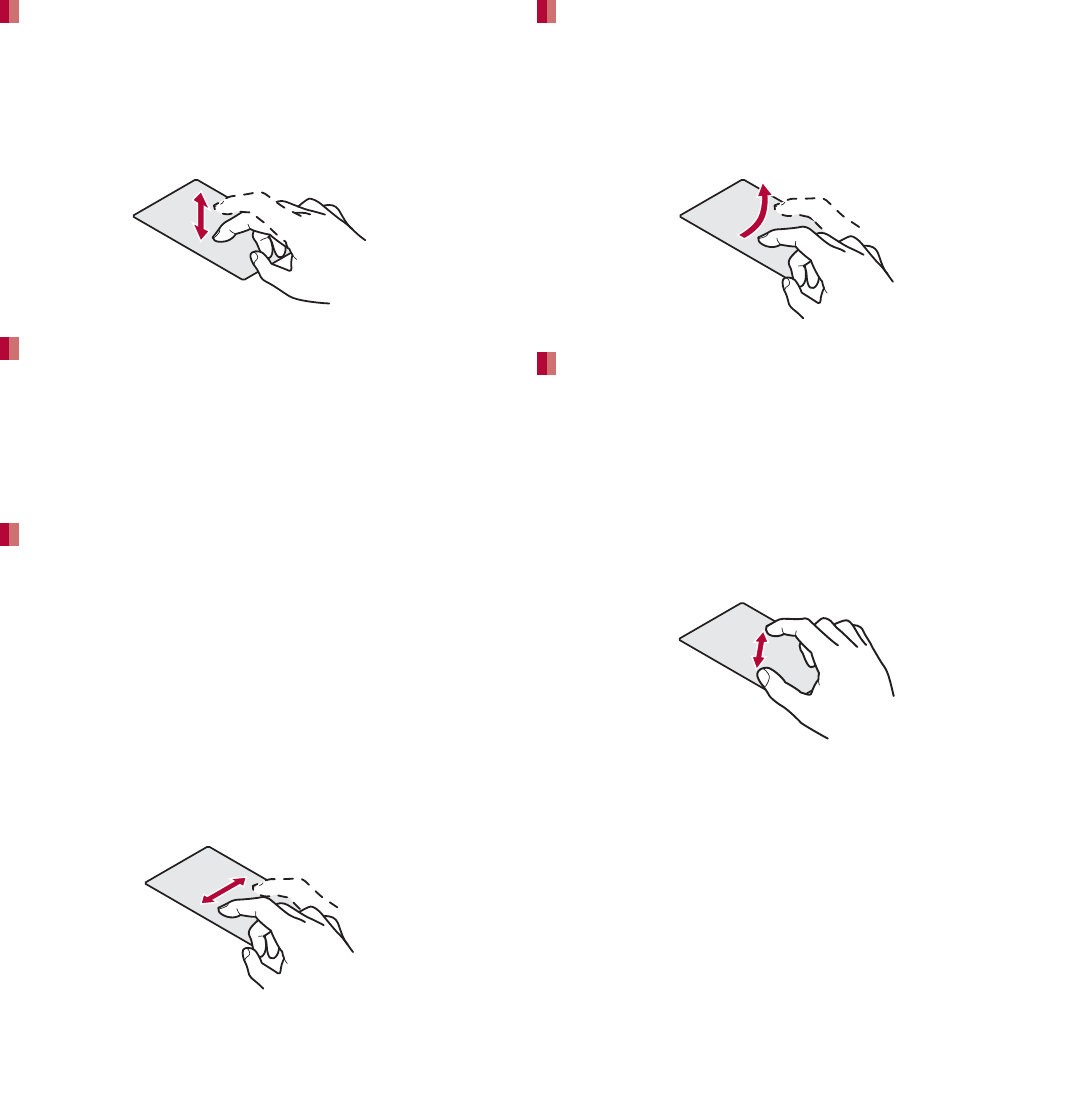
Touch a key or an item displayed on the screen to
select or set it.
1Put your finger on the touch panel
and put it off
When you touch the screen for a while, a menu
may appear depending on the function and screen
in use.
1Keep your finger on the touch panel
Slide your finger up/down while a menu is
displayed etc. to scroll the screen or slide (drag) an
icon, widget, etc. to move it to the desired position
while keeping touching it.
In addition, when you touch a menu or item by
mistake, slide your finger away from the menu or
item to cancel the selection.
1Keep your finger on the touch panel
and slide it
Flick your finger to the left/right in the home screen
etc. to switch pages.
1Move your finger like sweeping the
touch panel
Pinch out/Pinch in while displaying an image etc. to
zoom in/out.
1Put two fingers on the touch panel
and slide them with putting a
distance between two fingers apart
(pinch out)/closer (pinch in)
Touch
Touch for a while
Slide/Drag
Flick
Pinch out/Pinch in

19
Contents/Precautions
Wireless LAN (WLAN) uses radio waves to
communicate information. Therefore, it has
an advantage of freely connecting to the LAN
within the service area. On the other hand, if
security setting is not set, it is possible for a
malicious third party to intercept the
communication contents or hack. It is
recommended to set security setting at your
own risk and judgement.
Wireless LAN
Do not use wireless LAN near magnetic devices
such as electric appliances or AV/OA devices or in
radio waves.
ƦMagnetism or radio waves may increase noises or
disable communications (especially when using a
microwave oven).
ƦWhen used near TV, radio, etc., reception
interference may occur or channels on the TV
screen may be disturbed.
ƦIf there are multiple wireless LAN access points
nearby and the same channel is used, search may
not work correctly.
Radio frequencies
The radio frequencies the WLAN-installed
devices use are indicated on the back of the
display side. The followings are the
descriptions:
ӱ2.4: This radio equipment uses the 2400 MHz
band.
ӲDS: The modulation system is the DS-SS
system.
ӳOF: The modulation system is the OFDM system.
Ӵ4: The estimated coverage distance is 40 m or
less.
ӵ: All radio frequencies
between 2400 MHz and 2483.5 MHz are used
and the frequencies for mobile object identifiers
shall be avoided.
Available channels for the handset’s wireless LAN
are between 1 to 13. Note that other channel access
points cannot be connected.
Available channels vary depending on the country.
For use in an aircraft, contact the airline beforehand.
Notes about wireless LAN
(WLAN)
ӱġ Ӳġ ӳġ Ӵġ
ӵġ
20 Contents/Precautions
The FeliCa reader/writer function in the
handset uses weak radio waves whose
handling does not require a license of radio
station.
The frequency in use is the 13.56 MHz band.
When another reader/writer is being used
nearby, keep enough distance from it. Make
sure that there is no radio station using the
same frequency band in the nearby area.
The FM transmitter function in the handset
uses weak radio waves requiring no licenses
for radio stations.
It uses 77.4 to 85.0 MHz frequency band. To
avoid adversely affecting surrounding FM
radio users, do not set the same frequency
band as an FM broadcasting station in your
area for using.
Cautions on using 2.4 GHz devices
WLAN-installed devices operate at radio
frequencies assigned to the in-house radio
stations for a mobile object identifier (radio
stations requiring a license) used in
production lines of a factory, specific
unlicensed low power radio stations (radio
stations requiring no license), and amateur
radio stations (radio stations requiring a
license) in addition to industrial, scientific
and medical devices or home electric
appliances such as microwave ovens.
1. Before using this device, make sure that
the in-house radio stations for a mobile
object identifier, specific unlicensed low
power radio stations and amateur radio
stations are not operating nearby.
2. If the device causes harmful radio
interference to the in-house radio
stations for a mobile object identifier,
immediately change the radio frequency
or stop use, and contact the number
listed in “General Inquiries” on the last
page of this manual for crosstalk
avoidance, etc. (e.g. partition setup).
3. If the device causes radio interference to
specific unlicensed low power radio
stations for a mobile object identifier or
amateur radio stations, contact the
number listed in “General Inquiries” on
the last page of this manual for further
details.
Channels available in the 5 GHz band
In the 5 GHz frequency band, three bands of
5.2 GHz/5.3 GHz/5.6 GHz band (W52/W53/
W56) are available.
Ʀ
W52 (5.2 GHz band/36, 38, 40, 44, 46, 48
ch)
Ʀ
W53 (5.3 GHz band/52, 54, 56, 60, 62, 64
ch)
Ʀ
W56 (5.6 GHz band/100, 102, 104, 108,
110, 112, 116, 118, 120, 124, 126, 128, 132,
134, 136, 140 ch)
Using 5.2 GHz/5.3 GHz band wireless LAN
(W52/W53) outdoors is prohibited by the
Radio Law.
FeliCa reader/writer
FM transmitter
67
Call
1In the home screen, [R]/
[Phone]/[Dial]
2Enter a phone number
:Always enter the city code, even when it is a
local number.
:You can set to notify/not to notify the other
party of your phone number for each call by
adding “186”/“184” to the head of the phone
number.
1Call
Make a call. Also, if there is an outgoing
call history, touch to enter the latest
outgoing call history when the phone
number has not been entered.
2Delete
Delete an entered number.
3Outgoing/Incoming call history
4Favorites
Display the contacts set to [Favorites] by
groups.
5Dial
Display the dial screen.
6Add to phonebook
7Koe-no-Takuhaibin
For details of Koe-no-Takuhaibin, refer to
the DOCOMO website.
8Phonebook
Display the phonebook.
3[0]
4[End] to end the call
1In the home screen, [R]/
[Phone]/[Dial]
2Enter a phone number/[z]/[Add
wait]
3Enter a number to send/[0]
4[Yes] during the call
Call
Making a call
Entering touch-tone signals
Emergency call
Emergency calls Phone number
Police 110
Fire and ambulance 119
Marine emergency 118
68 Call
WORLD CALL is an international calling service
available from DOCOMO handset in Japan.
WORLD CALL is registered when FOMA
services are registered (excluding users who
did not apply for WORLD CALL).
You can call to approximately 240 countries and
regions worldwide. Calling to a land-line phone
and mobile phone overseas is available.
For information on available countries and
network operators, refer to “Mobile Phone User’s
Guide [International Services]” or the DOCOMO
International Services website.
Commission and monthly usage fees are free.
Contact “General Inquiries” on the back of this
manual for details on WORLD CALL.
To make an international call through a company
other than DOCOMO, contact the respective
companies for instructions.
The caller ID may not be notified or displayed
correctly depending on overseas network
operators. In this case, making a call with
incoming call history is not available.
The handset supports “Location notification of
emergency call”.
When dialing an emergency number such as 110,
119, and 118, the information of your location
(location information) is automatically notified to
the agency that received the emergency call (e.g.
the police station). Depending on your location
and the reception status of the signal, the agency
that received the emergency call may not be able
to confirm the exact location.
If you are not sending your caller ID by calling
with “184” added or other means, your location
information and phone number are not notified.
However, if the agency that received the
emergency call considers your location
information and phone number necessary for
important purposes, such as life saving, the
agency can retrieve them regardless of your
settings.
In addition, the area/timing to introduce
“Location notification of emergency call”
depends on the state of preparation in each
agency that receives emergency calls.
In Japan, you cannot make a call to the
emergency number (110, 119 or 118) when a
docomo mini UIM card is not inserted, from the
PIN code entry screen, while the PIN code is
locked or from the PUK (PIN Unlock Key) entry
screen.
When calling 110, 119, and 118 from your
handset, the police or fire stations may return
your call for verification purposes. State that
you are calling from a mobile phone, and give
your phone number and exact present location.
Remain stationary to ensure that the call is not
disconnected while you are on the line, and
keep the handset turned on to receive calls for
approximately 10 minutes afterwards.
Depending on the region, calls to the police or
fire station of the local area may not be made.
International call (WORLD CALL)
[Calling Method]
When calling to a land-line phone: 010/
country code/area code (city code)/the other
party’s phone number/[0]
When calling to a mobile phone: 010/country
code/the other party’s phone number/[0]
ƦFor the other parties’ phone numbers and area
codes (city codes) that begin with “0”, omit the
first “0” when entering (except some countries
or regions such as Italy).
ƦAlternatively, enter “009130-010” as usual or “+”
instead of “010”.
69
Call
1When a call is received, the ring
tone sounds and the incoming lamp
flashes
:If you press x/y during an incoming call, you
can stop the ring tone, vibrator or flash of the
incoming lamp.
2Receive the call
:Operate after touching [Activate].
1Reject
You can reject the incoming call.
2Accept
You can receive the call.
3[End] to end the call
1When a call is received, the ring
tone sounds and the incoming lamp
flashes
2[z]/[Quick responses]
3Select a response
1When a call is received, the ring
tone sounds and the incoming lamp
flashes
2[z]/[On hold]
1When a call is received, the ring
tone sounds and the incoming lamp
flashes
2[z]/[Absence Memo]
Playing an answering memo
1In the home screen, [R]/
[Settings]/[Call]
2[Call/Ans Memo]/[Answering
Memo List]/select an answering
memo
You can carry out operations such as using a
hands-free call and adjusting the in-call volume
according to the using condition during a call.
1Add call*
Place a current call on hold and make a call to
another party.
Receiving a call
Quick responses
Incoming lamp
Placing a call on hold
Answering by answering memo
Operation during a call
104 File Management
Use infrared communication to send and
receive data to and from other handsets which
also support infrared communication.
Send and receive phonebooks, sp-mode mails,
profiles, business cards, memos, schedules,
bookmarks, ToruCa, data shot by camera, data
in Gallery, data recorded with the voice recorder,
etc.
The handset infrared communication function
complies with IrMC™ 1.1 standard. However,
depending on the data, some data may not be
sent or received even when the other party’s
handset complies with IrMC™ 1.1 standard.
Infrared communication is not available in
Airplane mode.
To enter docomo application password or
passcode and to enter authentication code are
required for sending and receiving all data items.
The authentication code is a password exclusive
to infrared communication. Before starting data
communication, the sender and receiver must
enter the same user-specified four-digit code.
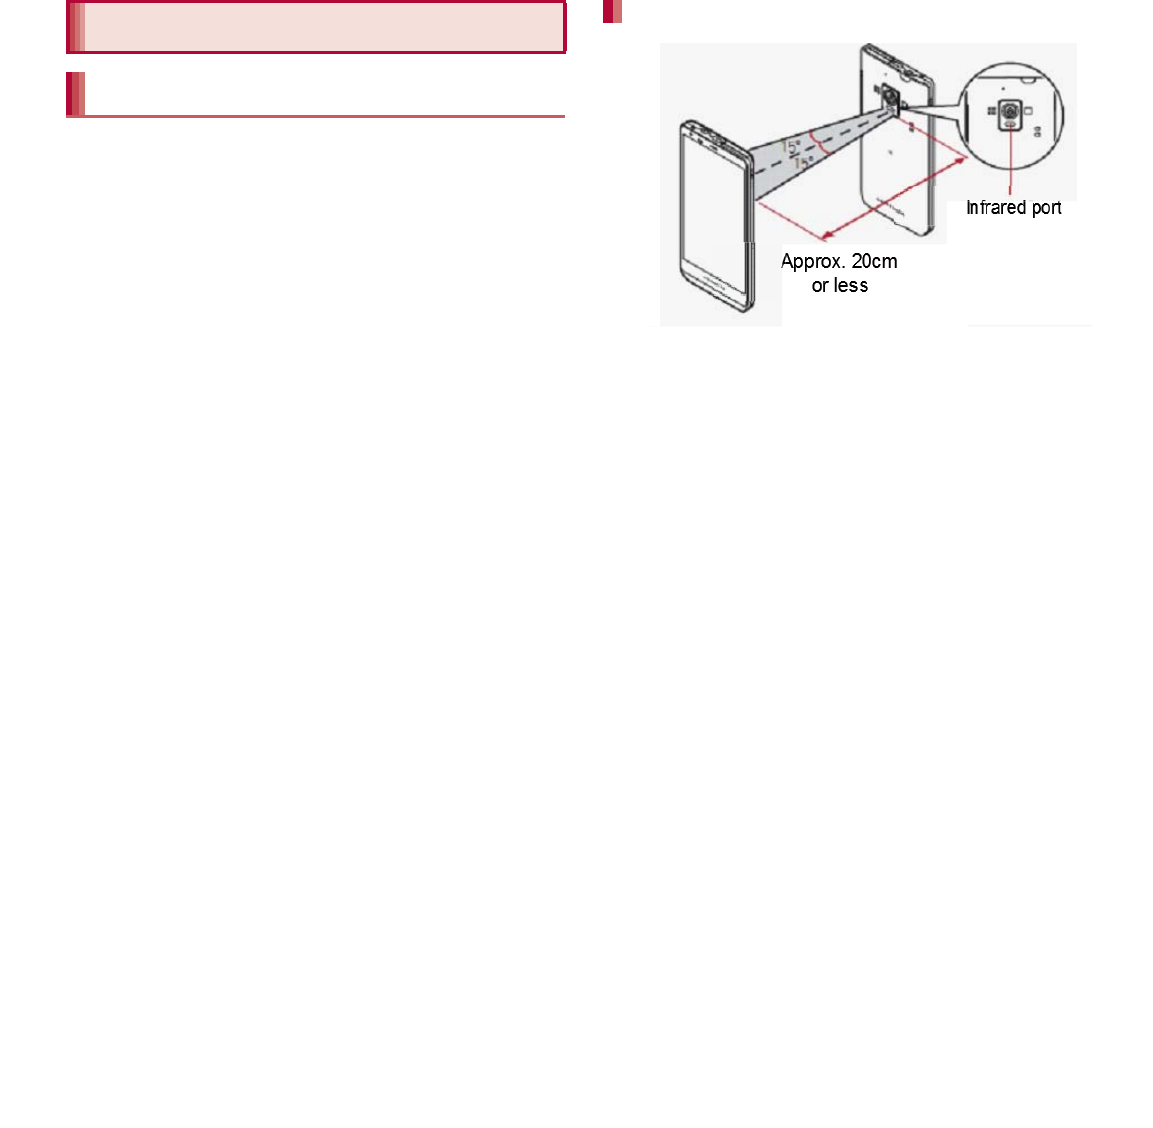
Face the infrared ports of the receiver’s and
sender’s handsets with each other and set the
distance between them to approximately 20 cm
or less as shown.
While doing infrared communication, keep the
infrared ports facing each other and do not move
them.
Infrared communication may not function
properly in areas of direct sunlight, directly under
fluorescent lights or near other equipment using
infrared signals.
If either of the infrared ports is dirty, infrared
communication will become difficult. Take care
not to scratch the ports, and wipe off any dirt with
a soft cloth.
Infrared communication
Using infrared communication
When using infrared communication
Approx. 20 cm
or less
Infrared port
15°
15°
105
File Management
When sending data, you can also operate from
each function (menu).
1In the home screen, [R]/[Send/
receive by infrared]
2Select an item
Single: Receive single data.
Multiple: Receive all data.
Single: Select data and send.
Multiple: Send all data by selecting an
application.
:Perform the operation for receiving and
sending at the same time.
:After the operation for receiving, the handset
waits to receive data. Infrared
communication automatically begins when
data is sent from sender’s handset within
approximately 30 seconds.
You can send and receive data with other
handsets equipped with iC communication
function.
Make initial setting of Osaifu-Keitai in advance
(nP. 119).
In the following cases, you cannot perform iC
communication.
During Airplane mode
During Osaifu-Keitai lock
In the following cases, data may not be sent by
iC communication.
During a call During charging
During earphone/microphone connection
During USB connection
sp-mode mails, business cards, memos,
schedules and ToruCa cannot be sent by iC
communication. For details on other data that
can be sent and received, refer to “Infrared
communication” (nP. 104).
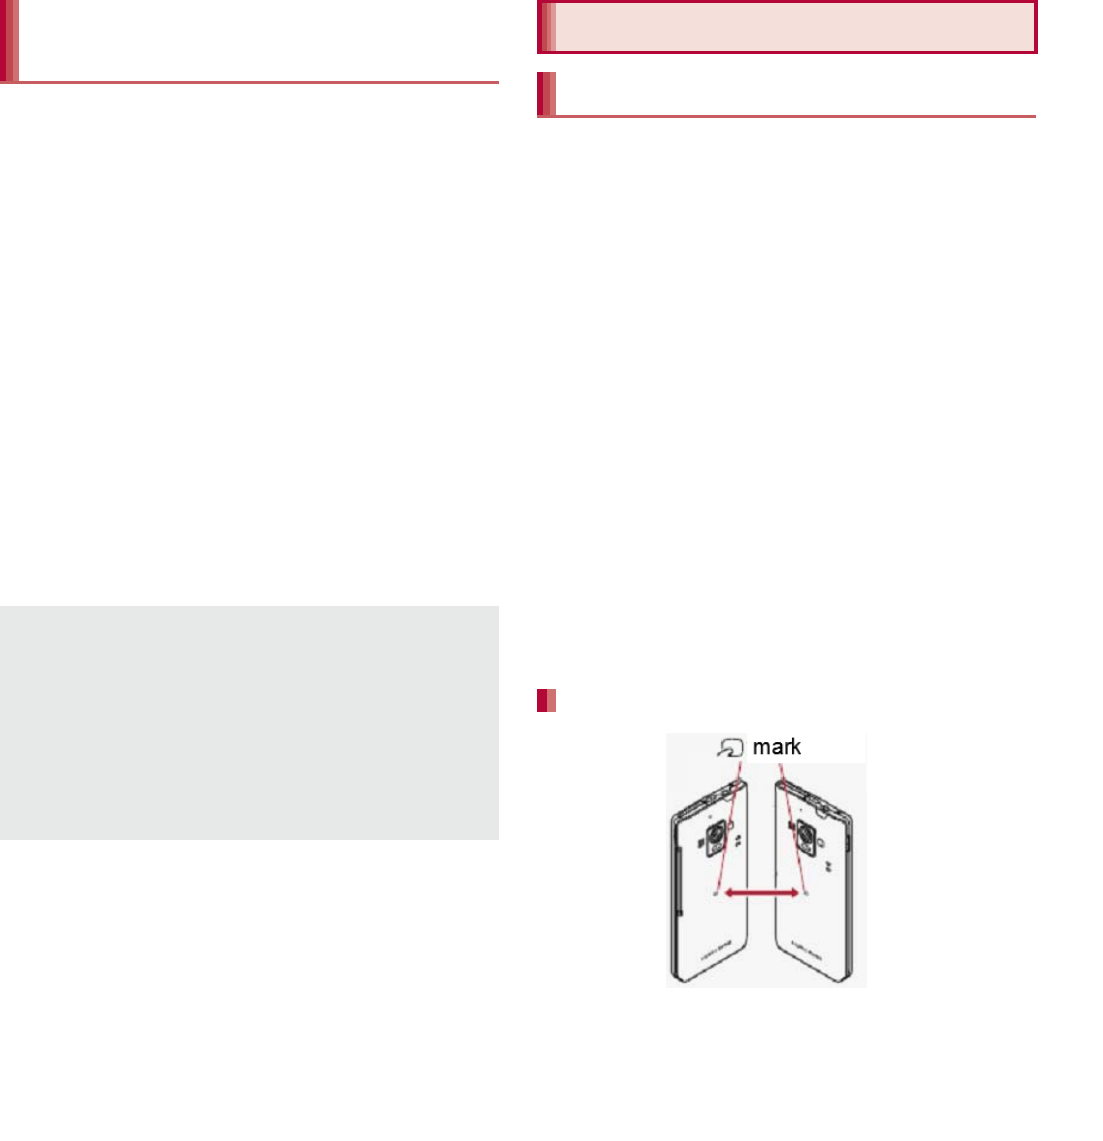
Use while placing the a mark of receiver’s
handset on that of sender’s handset as shown.
Sending and receiving by
infrared
Note that if you select [Delete all before
registration] when receiving all data, all data
registered to the target function are deleted.
Receiving all data is not available depending on
the data type.
When available space in the save destination
becomes insufficient, the data being received to
that point are saved and receiving ends.
iC communication
Using iC communication
When using iC communication
mark
n
using
iC
communicatio
106 File Management
Do not move the handset until sending and
receiving of data is completed.
There may be some cases in which data are
poorly sent and received or the screen is off by
positioning the handset near depending on the
other party’s handset. In that case, put a distance
between the a marks apart/closer or move
them up/down or to the left/right.
To enter authentication code is required for
sending and receiving all data items. The
authentication code is a password exclusive to
iC communication. Before starting data
communication, the sender and receiver must
enter the same user-specified four-digit code. In
addition, to enter passcode may be required for
sending all data items.
Example: Still picture
1In the home screen, [R]/
[Contents Manager]
2Touch a still picture for a while/
[Share]/[Send by IC]
3[Ok]
4Place the a mark on that of the
other party’s handset
1Place the a mark on that of the
other party’s handset
2[Accept]
3Drag the status bar down/select
received data
You can connect the handset to Bluetooth
devices wirelessly.
Wireless communications with all the Bluetooth
devices are not completely guaranteed.
Supported version
Bluetooth Specification Ver..0+EDR*1
Supported profiles*2 (Supported services)
HSP: Headset Profile*3
HFP: Hands Free Profile*4
A2DP: Advanced Audio Distribution Profile*5
AVRCP: Audio/Video Remote Control Profile*5
HID: Human Interface Device Profile*6
DUN: Dial-up Networking Profile*7
OPP: Object Push Profile*8
SPP: Serial Port Profile*9
PBAP: Phone Book Access Profile*10
PAN: Personal Area Networking Profile*11
HDP: Health Device Profile*12
Sending and receiving by iC
Sending data
Receiving data
Bluetooth function
Supported version and supported
profiles

107
File Management
*1 The handset and all Bluetooth function-installed
devices have ensured that they conform to the
Bluetooth specification according to the rules
that the Bluetooth SIG defines, and are all
authenticated. However, operating methods
might differ or data might not be exchanged
even when they are connected wirelessly,
depending on the features or specifications of
connected devices.
*2 Standardizes the communication procedures of
Bluetooth device per feature of a device.
*3 Connect a commercially available Bluetooth
compatible headset to the handset to talk
wirelessly.
*4 Connect a commercially available Bluetooth
compatible hands-free device such as a car
navigation system to the handset to talk during
hands-free operation using the car navigation
system etc.
*5 Connect a commercially available Bluetooth
compatible audio device to the handset to play
music, audio of 1Seg, etc. wirelessly. Also,
remote control operation may be available from
Bluetooth devices. However, compatible
devices are limited depending on the data type.
*6 Operate the handset from a commercially
available input device compatible with
Bluetooth such as a keyboard and mouse by
connecting one to the handset via Bluetooth.
*7 Connect a Bluetooth compatible PC etc. to the
handset via Bluetooth to use the handset as a
modem and make data communications. Note
that packet communication charges are
incurred.
*8 Connect a Bluetooth device to the handset with
the file transfer service to send and receive
data between them.
*9 Set the virtual connection with a serial cable
and interconnect between devices.
*10 Transfer phonebook data in the system
memory to a Bluetooth device. Data is not
displayed correctly on the other party’s device
depending on the contents of the transferred
phonebook data.
*11 Join a PC network etc. and share the Internet
connection.
*12 Communicate data with a commercially
available health appliance compatible with
Bluetooth such as a weighing machine.
Refer to the manual for the Bluetooth device as
well.
You may not hear sounds such as 1Seg with
Bluetooth devices which are not compatible
with SCMS-T.

108 File Management
Precautions for handling the Bluetooth
device
Note the following when using the Bluetooth device.
Note the following to make good connection.
Keep the distance between the handset
and another Bluetooth device within
approximately 10 m with no obstructions in
sight. The distance that can make
connection may be shorter when there are
obstructions between them or depending
on the conditions of the surroundings (such
as walls or furniture) and the structure of a
building. Especially when there is a wall or
floor of reinforced concrete between them,
they may be unable to connect with each
other. Note the above mentioned distance
is not guaranteed.
Move the handset and another Bluetooth
device as far away as possible from home
electric appliances, AV devices, OA
devices, etc. before connection. The
Bluetooth device is liable to be adversely
affected by a microwave oven, so move it
as far away as possible from the microwave
oven while using it. Otherwise, normal
connection cannot be performed when
other electric devices are powered on or
Bluetooth devices may cause noises or
reception failure on a TV or radio set.
Move the Bluetooth device to a place where
connection is possible when there is a
broadcast station or radio near the
Bluetooth device and the handset cannot
be connected to the device. Strong radio
waves may prevent connection between
Bluetooth devices.
Wireless connection is available with
Bluetooth device put in a bag or pocket.
However, lowering of communication speed
or noise may result when you are in
between the Bluetooth device and the
handset.
Electromagnetic signals from the Bluetooth
device may affect the operation of electronic
medical equipment etc. As some cases may
result in accident, turn off the handset and
other Bluetooth devices in the following place.
On trains On airplanes In hospitals
Nearby automatic doors or fire alarms
In places such as gas stations where
flammable gas is generated
The radio interference with Wi-Fi
compatible devices
The Bluetooth devices use the same
frequency band (2.4 GHz) as wireless LANs
(IEEE 802.11b/g/n). Therefore, using the
Bluetooth device near a wireless LAN device
may cause the radio interference, lowering of
communication speed, noise or connection
failure. In this case, turn off the wireless LAN
device or keep the handset and the Bluetooth
device at least approximately 10 m away from
the wireless LAN.

109
File Management
To register/connect a Bluetooth device, the
Bluetooth passkey may need to be entered.
Before starting the registration, decide one- to
sixteen-digit number. Enter the same number on
the handset and the other party’s Bluetooth
device.
Set the other party’s Bluetooth device to the
registration stand-by status in advance.
1In the home screen, [R]/
[Settings]/[Bluetooth]
2Slide [OFF] to the right
3Select a Bluetooth device/[Pair]
:Entering the Bluetooth passkey may be
necessary depending on the other party’s
Bluetooth device. Also, some Bluetooth
devices may start connecting after
completing registration.
:To display/hide the handset’s name on the
other party’s Bluetooth device: [SH-01E]
ƦThe handset name is automatically hidden
when the period of time set for Visibility
timeout has passed.
:To search for Bluetooth devices: [SEARCH
FOR DEVICES]
:Touch [B] of a paired Bluetooth device to
change the name and the connection type of
the other party’s Bluetooth device.
1Registration request/Connection
request from Bluetooth device
2Drag the status bar down/[Pairing
request]/[Pair]
:When the confirmation screen about the
settings on pairing appears, select [Pair].
:Entering the Bluetooth passkey may be
necessary depending on the other party’s
Bluetooth device.
:The confirmation screen for connection may
be displayed.
Bluetooth
If you fail to connect, connection may become
available after re-registration of Bluetooth
devices.
When the Bluetooth function is enabled, the
handset is set to receive a registration request/
connection request from other Bluetooth
devices. Perform the setting for displaying the
handset’s information on the other party’s
Bluetooth device in advance to allow the
handset to be searched for by other Bluetooth
devices.
While in connection stand-by, even if a
connection request from a Bluetooth device is
received, connection may not be made
depending on the signal status etc.
For details on the operations of the other party’s
Bluetooth device, refer to the manuals of the
Bluetooth device to be used.
When receiving registration request
from Bluetooth device or connection
request from unregistered Bluetooth
device

110 File Management
1In the Bluetooth screen, [B] of the
Bluetooth device to unregister/
[Unpair]
1In the Bluetooth screen, select the
Bluetooth device to disconnect/
[OK]
Set after enabling Bluetooth function.
1In the Bluetooth screen, [z]
2Select an item
Rename phone: Change the handset’s
name.
Visibility timeout: Set the time to be displayed
on the other party’s Bluetooth device.
aptX: Set whether to use aptX®.
Handsfree setting: Set whether to always
have voices emitted from the connected
Bluetooth compatible hands-free device
during a voice call.
Show received files: Display the history of
data received via Bluetooth connection.
Example: Still picture
1In the home screen, [R]/
[Contents Manager]
2Touch a still picture for a while/
[Share]/[Bluetooth]
:Set the receiver’s Bluetooth device to receive
data.
3Select a Bluetooth device to
connect to
1Send data from the sender’s
Bluetooth device
2Drag the status bar down/select
data to receive/[Accept]
3Drag the status bar down/select
the received data
Disabling registration of Bluetooth
device
Disabling connection of Bluetooth
device
Setting Bluetooth
Sending and receiving by
Bluetooth
Sending data
Receiving data
Note that if you select [Delete all before
registration] at receiving all data, all data
registered to the target function are deleted.
Some data cannot be received all.
When available space in the save destination
becomes insufficient, the data being received to
that point are saved and receiving ends.
111
File Management
1Insert the microUSB plug of Micro
USB Cable 01 (sold separately)
horizontally into the external
connector terminal on the handset
(1)
2Insert the USB plug of Micro USB
Cable 01 horizontally into the USB
connector on the PC (2)
:For details on the mode of USB connection
nP. 100
You can use a microSD Card inserted into the
handset as external memory for a PC.
Insert a microSD Card and set the mode of USB
connection to [Card reader mode] in advance
(nP. 100).
When using a microSDXC Card, refer to
Transferring data (nP. 112). When a message
indicating to format the microSDXC Card is
displayed, do not format it.
1Connect the handset to a PC via
Micro USB Cable 01
:The USB mass storage screen appears. If
the screen does not appear, drag the status
bar down and select [USB connected].
2[Turn on USB storage]
:When the confirmation screen is displayed,
check the content and select [OK].
3Use as a microSD reader/writer
4Perform secure hardware removal
on the PC after use
5[Turn off USB storage]
6Disconnect Micro USB Cable 01
from the handset
External device
connection
Connecting the handset and
PC
Use a USB cable Micro USB Cable 01. USB
cables for PC are not available, since the plug
shape is different.
Using a USB HUB may prevent the equipment
from working normally.
Keep side
with the
characters
up
Open external connector
terminal cover
Micro USB
Cable 01
Do not remove Micro USB Cable 01 while
exchanging data with PC. Data may be
damaged.
Windows XP, Windows Vista and Windows 7 all
of which are Japanese version are available OS
of PCs for the connection.
microSD reader/writer
119
Applications
Osaifu-Keitai is a function which has built-in IC
card and allows you to pay, use as coupons or
collect stamps by simply holding the handset
over the scanning device at stores.
Moreover, you can access sites and web pages
by holding the handset over the scanning
device, and get the latest coupon, deposit
electronic money and check your usage by
using communication. In addition, for your
secure use, you can lock functions of
Osaifu-Keitai when you lost the handset.
For details on Osaifu-Keitai, refer to “
̮၌ဥ΄ͼ
ΡήΛ·
(sp
κȜΡ༎
)” (Mobile Phone User’s
Guide [sp-mode]) (in Japanese only).
ɦTo use Osaifu-Keitai compatible service, settings
are necessary on a website or an application.
The handset malfunctions may cause data
(including electronic money, points, etc.) saved
in the IC card to be lost or changed (Note that as
a rule, you will be asked to delete data when
leaving your handset for repairs etc., since we
cannot keep your handset with such data still
remaining in it). For the service such as a
reissue, restoration, temporary keeping or
transference of the data, contact your provider of
Osaifu-Keitai compatible service. Be sure to use
the Osaifu-Keitai compatible service including a
backup service for important data.
DOCOMO shall not be liable for any loss or
change of data in the IC card or other damages
of Osaifu-Keitai service caused by any reason
such as malfunctions and model changes.
When the handset is stolen or lost, immediately
contact your provider of Osaifu-Keitai compatible
service for handling methods.
iC transfer service is a service that enables you
to move the data saved in the IC card to new
Osaifu-Keitai from the old one when changing
Osaifu-Keitai such as by changing models or
repairing the handset.
iC transfer service is available at a docomo
Shop near you.
For details on iC transfer service, refer to “
̮၌
ဥ΄ͼΡήΛ·
(sp
κȜΡ༎
)” (Mobile Phone
User’s Guide [sp-mode]) (in Japanese only).
To use Osaifu-Keitai compatible services,
download the Osaifu-Keitai compatible
application from Osaifu-Keitai compatible sites
and make the setting. Some services do not
need to download the Osaifu-Keitai compatible
application.
1In the home screen, [R]/
[Osaifu-Keitai]
:If the initial setting is not completed, the initial
setting screen appears.
2Select a service
Osaifu-Keitai iC transfer service
Using Osaifu-Keitai
You cannot use Osaifu-Keitai in the following
situations. However, you can pay by holding the
handset over a scanning device.
In Airplane mode
When you are charging the handset,
connecting Micro USB Cable 01 (sold
separately) to it or connecting an earphone/
microphone to it while the docomo mini UIM
card is not inserted/When the handset has
never received radio wave
120 Applications
Hold the a mark of the handset over the
scanning device to use as electronic money or
railway tickets, to retrieve ToruCa, etc.
Pay attention to the following points when
holding the a mark over the scanning device.
Do not contact between the handset and the
scanning device
Hold the a mark in parallel with the scanning
device
Slowly hold the a mark over the center of the
scanning device
If the scanning device does not recognize the
built-in IC card, hold the a mark over the
scanning device and move the handset
around
Do not attach a metallic substance on the a
mark side
1Hold the a mark over the
scanning device
2Confirm that the data is scanned
Lock the function of Osaifu-Keitai.
Perform the same operation to disable the lock.
1In the home screen, [R]/
[Osaifu-Keitai]
2[Lock Settings]/[Next]/enter the
passcode/[OK]/[OK]
ToruCa is an electronic card that can be
imported to the handset. You can retrieve it as
store information or a coupon from a scanning
device or sites. Retrieved ToruCa is saved in
the “ToruCa” application and you can display/
search/update it using the application.
For details on ToruCa, refer to “
̮၌ဥ΄ͼΡ
ήΛ·
(sp
κȜΡ༎
)” (Mobile Phone User’s
Guide [sp-mode]) (in Japanese only).
1In the home screen, [R]/[ToruCa]
Holding over scanning device
mark
Osaifu-Keitai lock setting
ToruCa
Packet communication charges may be
incurred for retrieving, displaying or updating
ToruCa.
ToruCa provided for i-mode handsets may not
be retrieved/displayed/updated.
The following functions may not be used
depending on the settings of IP (Information
Provider).
Retrieving from a scanning device
Updating
Sharing ToruCa
Moving or copying to a microSD Card
Displaying a map
scanning
device

151
International Roaming
International roaming (WORLD WING) is a
service that enables you to use the same phone
number and mail address of the handset as you
use in Japan in the service area of DOCOMO
affiliated overseas network operators without
changing your phone number and mail address.
You can use calls and SMS without any
changes in settings.
Available network
The handset is rated as Class 4. You can use it in
the 3G network and GSM/GPRS network service
area. In addition, this service is available in
countries and regions supporting 3G 850 MHz/
GSM 850 MHz. Check the available area.
For areas out of Xi area such as overseas,
connect to 3G or GSM/GPRS network.
Refer to the following before using the
handset overseas.
“Mobile Phone User’s Guide [International
Services]”
DOCOMO International Services website
* Enable Data roaming to use data communication
when roaming (nP. 153).
Check followings in Japan before using the handset
overseas.
Subscription
Check the status of a subscription for WORLD
WING. For details, contact “General Inquiries” on
the back of this manual.
Charging battery
Use FOMA AC Adapter 01 for Global use (sold
separately), FOMA AC Adapter 02 (sold
separately) or AC Adapter 03 (sold separately)
as an AC adapter for charging while traveling
overseas.
International Roaming
Outline of international
roaming (WORLD WING)
For country codes, international call access
number, universal number international prefix
and information on available countries, regions,
and network operators, refer to “Mobile Phone
User’s Guide [International Services]” or the
DOCOMO International Services website.
Available services
overseas
Main communication
service 3G
3G850
GSM
(GPRS)
LTE
Call AAAB
SMS AAAB
Mail*AAAB
Browser*AAAB
Some services are not available depending on
the network operator or network.
Before use overseas
Check before departure

152 International Roaming
Charge
Overseas charges (call charges, packet
communication charges) differ from those in
Japan.
Since some applications automatically perform
packet communication, the packet
communication charges may be higher. Contact
the application provider for the operation of each
application.
Network service settings
If you subscribed to network services, network
services such as Voice Mail Service, Call
Forwarding Service and Caller ID Display Request
Service are available from overseas. However,
some network services are not available.
To use network services overseas, setting
Remote operations to “Activate” is required.
Remote operations can be set in your country of
stay.
Some network services that can be set/disabled
etc. may not be available depending on overseas
network operators.
The handset automatically connects to the
available network operator when you turn the
power on in your country of stay.
Connection
When Network operators (nP. 154) is set to
[Select automatically], the suitable network is
automatically selected.
Overseas packet communication is available with a
fixed amount of charges as an upper limit per day
by connecting to a compatible network operators.
To use this service, subscription to flat-rate packet
communication services in Japan is required. For
details, refer to “Mobile Phone User’s Guide
[International Services]” or the DOCOMO
International Services website.
Viewing the display
[U] is displayed during international roaming.
3G/GSM/HSPA is available.
Connected network operator can be checked in
the status panel.
Date & time
If [Automatic date & time] and [Auto timezone] of
Date & time are enabled, the handset receives
information on time and time differences from
overseas network operator, then time and time
differences are corrected.
Time and time differences may not be adjusted
correctly depending on overseas network
operator. In such a case, set time zone manually.
The correction timing differs depending on the
network operator.
For details on Date & time nP. 100
Set before departure
Check in your country of stay
153
International Roaming
Inquiries
When the handset or the docomo mini UIM card
is lost or stolen overseas, promptly contact
DOCOMO and conduct a procedure for
canceling the use of service from your country of
stay. Refer to the back of this manual for
inquiries. Note that communication/call charges
after the handset or the docomo mini UIM card is
lost or stolen are incurred to the subscriber.
For land-line phone etc., “International call
access number” of your country of stay or
“Universal number international prefix” is
required.
The handset automatically connects to the
DOCOMO network after returning to Japan. If it
fails, perform the following settings.
Set Network Mode to [LTE/3G/GSM (Auto)]
(nP. 153).
Set Network operators to [Select automatically]
(nP. 154).
At the time of purchase, the handset is set to
automatically search for and switch to available
networks. When you want to manually switch
networks, set by performing following
operations.
1In the home screen, [R]/
[Settings]/[Network settings]/
[Mobile networks]
2Select an item
Data enabled: Enable data communication.
Data roaming: For details nP. 153
Access Point Names: Set an access point.
Network Mode: For details nP. 153
Network operators: For details nP. 154
Set whether to use data communication when
roaming.
1In the home screen, [R]/
[Settings]/[Network settings]/
[Mobile networks]/[Data roaming]
Set a network to use.
1In the home screen, [R]/
[Settings]/[Network settings]/
[Mobile networks]/[Network Mode]
2Select an item
LTE/3G/GSM (Auto): Switch to an available
network automatically.
LTE/3G: Use 3G network.
GSM: Use GSM/GPRS network.
Check after homecoming
Settings to use overseas
Data roaming
Network mode
154 International Roaming
Search for networks and set a network operator
to use.
1In the home screen, [R]/
[Settings]/[Network settings]/
[Mobile networks]/[Network
operators]
:If the confirmation screen for data
communication is displayed, check the
content and select [OK].
:Search for networks and a list of network
operators is displayed.
2Select a network operator
:To search for network operators again:
[Search networks]
:To select a network operator automatically:
[Select automatically]
1In the home screen, [R]/
[Phone]/[Dial]
2“+” (touch “0” for a while)/enter
country code, area code (city code)
and the other party’s phone
number/[0]
:Alternatively, enter a phone number/[z]/
[International call]/select a country code to
enter a country code.
ƦThe first “0” of the area code (city code) will
be omitted.
:When the area code (city code) begins with
“0”, omit the first “0” when dialing (Include the
“0” when making a call to some countries or
regions such as Italy).
Network operators
If you manually set network operators
overseas, set to [Select automatically] after
returning to Japan.
Making/Receiving a call
in your country of stay
Making a call outside your
country of stay (including Japan)
Even if you notify the caller ID, [Unknown],
[Private number], etc. appears depending on
the network operator, and the caller ID may not
be displayed correctly.
155
International Roaming
When you make a call to other countries from
your country of stay, you can make an
international call with simple operation using
International Dial Assist.
Set International dial assist in advance.
The first “0” of a phone number will be converted
to the country code you set in Country code
automatically.
1In the home screen, [R]/
[Phone]/[Dial]
2Enter a phone number/[0]
3[Converted number]
1In the home screen, [R]/
[Settings]/[Call]/[Roaming
settings]/[International dial assist]
2Select an item
Automatic conversion function: Set whether
to make calls using International Dial Assist.
Country code: Set country code to use when
using International Dial Assist.
International prefix: Set international prefix to
use when using International Dial Assist.
You can make a domestic call in your country of
stay in the same way as you do in Japan.
Always enter the area code (city code), even
when the number is in the same area.
When you make a call to a “WORLD WING”
subscriber overseas, the call is made as an
international call to Japan regardless of your
country of stay.
1In the home screen, [R]/
[Phone]/[Dial]
2“+” (touch “0” for a while)/enter
country code “81” (Japan), the
other party’s mobile phone number
excluding the first “0”/[0]
You can receive a call overseas in the same way
as you do in Japan.
Making a call using
International Dial Assist
Setting of International Dial Assist
Making a call in your country of
stay
Making a call to a WORLD
WING subscriber overseas
Receiving a call
When a call is received during international
roaming, the call is forwarded from Japan. Call
charges to Japan are incurred by the caller and
receiving charges by the receiver.

156 International Roaming
When having calls made to your handset from
Japan, have your phone number entered just as a
domestic call in Japan.
When having calls made to your handset from
countries other than Japan, have the international
call access number and “81” (Japan) added to the
beginning of your phone number with the first “0”
excluded as an international call to Japan
regardless of your country of stay.
International call access number of the country of
the caller-81-90 (or 80)-XXXX-XXXX
Set international roaming.
1In the home screen, [R]/
[Settings]/[Call]/[Roaming
settings]
2Select an item
Restricting incoming calls: Set whether to
reject incoming calls during international
roaming.
Incoming notification while roaming: Set
whether to notify you of incoming call
information (date and time of calls or caller
ID) by SMS, when you are in a place with no
signal, the handset is turned off or you fail to
answer an incoming call during international
roaming.
Roaming guidance: Set whether to play the
guidance notifying the other party who
makes a call to you during international
roaming that you are using international
roaming.
International dial assist: For details
nP. 155
Network service: For details nP. 156
You can use network services such as Voice
Mail Service or Call Forwarding Service
overseas.
1In the home screen, [R]/
[Settings]/[Call]/[Roaming
settings]/[Network service]
2Select an item
Remote operation(charged): Set remote
operations.
Caller ID notification request
service(charged): Set Caller ID Display
Request Service.
Roaming call notification(charged): Set
Incoming notification while roaming.
Roaming guidance(charged): Set Roaming
guidance.
Voice mail(charged): Set Voice Mail Service.
Call forwarding(charged): Set Call
Forwarding Service.
Having calls to your handset
Setting international
roaming
Roaming settings
Network services during
roaming
173
Appendix/Index
This model SH-02E mobile phone complies with
Japanese technical regulations and
international guidelines regarding exposure to
radio waves.
This mobile phone was designed in observance of
Japanese technical regulations regarding exposure
to radio waves (*1) and limits to exposure to radio
waves recommended by a set of equivalent
international guidelines. This set of international
guidelines was set out by the International
Commission on Non-Ionizing Radiation Protection
(ICNIRP), which is in collaboration with the World
Health Organization (WHO), and the permissible
limits include a substantial safety margin designed
to assure the safety of all persons, regardless of
age and health condition.
The technical regulations and international
guidelines set out limits for radio waves as the
Specific Absorption Rate, or SAR, which is the
value of absorbed energy in any 10 grams of tissue
over a 6-minute period. The SAR limit for mobile
phones is 2.0 W/kŨ. The highest SAR value for this
mobile phone when tested for use at the ear is
W/kŨ. There may be slight differences
between the SAR levels for each product, but they
all satisfy the limit.
The actual SAR of this mobile phone while
operating can be well below that indicated above.
This is due to automatic changes to the power level
of the device to ensure it only uses the minimum
required to reach the network. Therefore in general,
the closer you are to a base station, the lower the
power output of the device.
This mobile phone can be used in positions other
than against your ear. This mobile phone satisfies
the international guidelines when used with a
carrying case or a wearable accessory approved by
NTT DOCOMO, INC. (*2). In case you are not
using the approved accessory, please use a
product that does not contain any metals, and one
that positions the mobile phone at least 1.5 cm
away from your body.
The World Health Organization has stated that “a
large number of studies have been performed over
the last two decades to assess whether mobile
phones pose a potential health risk. To date, no
adverse health effects have been established as
being caused by mobile phone use.”
Please refer to the WHO website if you would like
more detailed information.
(http://www.who.int/docstore/peh-emf/publications/
facts_press/fact_english.htm)
Please refer to the websites listed below if you
would like more detailed information regarding
SAR.
Specific Absorption Rate
(SAR) of Mobile Phone
Ministry of Internal Affairs and Communications
Website:
(http://www.tele.soumu.go.jp/e/sys/ele/index.htm)
Association of Radio Industries and Businesses
Website:
(http://www.arib-emf.org/index02.html) (in Japanese
only)
NTT DOCOMO, INC. Website:
(http://www.nttdocomo.co.jp/english/product/sar/)
SHARP Corporation Website:
(http://www.sharp.co.jp/products/menu/phone/
cellular/sar/index.html) (in Japanese only)
)
(
p
jp
g
p
(
)
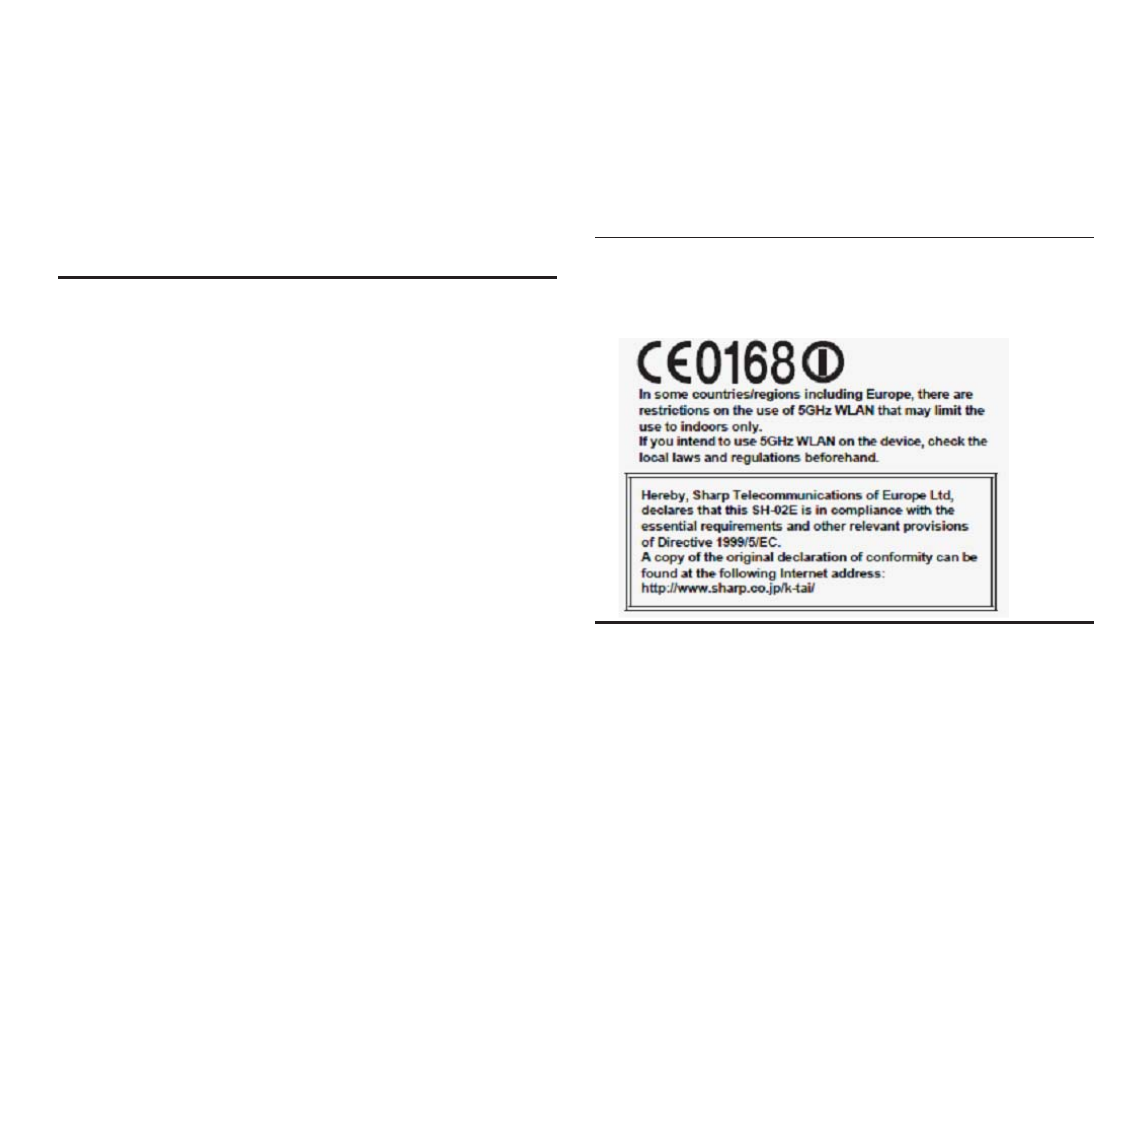
174 Appendix/Index
*1 Technical regulations are defined by the
Ministerial Ordinance Related to Radio Law
(Article 14-2 of Radio Equipment Regulations).
*2 Regarding the method of measuring SAR when
using mobile phones in positions other than
against the ear, international standards
(IEC62209-2) were set in March of 2010. On
the other hand, technical regulation is currently
being deliberated on by national council (As of
October, 2011).
European RF Exposure Information
Your mobile device is a radio transmitter and
receiver. It is designed not to exceed the limits for
exposure to radio waves recommended by
international guidelines. These guidelines were
developed by the independent scientific
organization ICNIRP and include safety margins
designed to assure the protection of all persons,
regardless of age and health.
The guidelines use a unit of measurement known
as the Specific Absorption Rate, or SAR. The SAR
limit for mobile devices is 2 W/kŨ and the highest
SAR value for this device when tested at the ear
was W/kŨ*.
As SAR is measured utilizing the devices highest
transmitting power the actual SAR of this device
while operating is typically below that indicated
above. This is due to automatic changes to the
power level of the device to ensure it only uses the
minimum level required to reach the network.
The World Health Organization has stated that
present scientific information does not indicate the
need for any special precautions for the use of
mobile devices. They note that if you want to
reduce your exposure then you can do so by
limiting the length of calls or using a hands-free
device to keep the mobile phone away from the
head.
* The tests are carried out in accordance with
international guidelines for testing.
Declaration of Conformity
Hereby, Sharp Telecommunications of Europe Ltd,
declares that this SH-01E is in compliance with the
essential requirements and other relevant provisions
of Directive 1999/5/EC.
A copy of the original declaration of conformity can be
found at the following Internet address:
(http://www.sharp.co.jp/k-tai/) (in Japanese only)
FCC Notice
This device complies with part 15 of the FCC
Rules.
Operation is subject to the following two
conditions:
(1) This device may not cause harmful
interference, and (2) this device must accept any
interference received, including interference that
may cause undesired operation.
Changes or modifications not expressly
approved by the manufacturer responsible for
compliance could void the user’s authority to
operate the equipment.
175
Appendix/Index
Information to User
This equipment has been tested and found to
comply with the limits of a Class B digital device,
pursuant to Part 15 of the FCC Rules. These limits
are designed to provide reasonable protection
against harmful interference in a residential
installation. This equipment generates, uses and
can radiate radio frequency energy and, if not
installed and used in accordance with the
instructions, may cause harmful interference to
radio communications.
However, there is no guarantee that interference
will not occur in a particular installation; if this
equipment does cause harmful interference to radio
or television reception, which can be determined by
turning the equipment off and on, the user is
encouraged to try to correct the interference by one
or more of the following measures:
1. Reorient/relocate the receiving antenna.
2. Increase the separation between the equipment
and receiver.
3. Connect the equipment into an outlet on a circuit
different from that to which the receiver is
connected.
4. Consult the dealer or an experienced radio/TV
technician for help.
FCC RF Exposure Information
Your handset is a radio transmitter and receiver.
It is designed and manufactured not to exceed the
emission limits for exposure to radio frequency (RF)
energy set by the Federal Communications
Commission of the U.S. Government.
The guidelines are based on standards that were
developed by independent scientific organizations
through periodic and thorough evaluation of
scientific studies. The standards include a
substantial safety margin designed to assure the
safety of all persons, regardless of age and health.
The exposure standard for wireless handsets
employs a unit of measurement known as the
Specific Absorption Rate, or SAR. The SAR limit
set by the FCC is 1.6 W/kŨ.
The tests are performed in positions and locations
(e.g., at the ear and worn on the body) as required
by the FCC for each model. The highest SAR value
for this model handset when tested for use at the
ear is 0. W/kŨ and when worn on the body, as
described in this user guide, is W/kŨ.
Body-worn Operation; This device was tested for
typical body-worn operations with the back of the
handset kept 1.0 cm from the body. To maintain
compliance with FCC RF exposure requirements,
use accessories that maintain a 1.0 cm separation
distance between the user’s body and the back of
the handset. The use of belt clips, holsters and
similar accessories should not contain metallic
components in its assembly.
5GHz WLAN Operation in USA
㼃㼕㼠㼔㼕㼚㻌㼠㼔㼑㻌㻡㻚㻝㻡㻌㻙㻡㻚㻞㻡㻌㻳㻴㼦㻌㼎㼍㼚㼐㻘㻌㼁㻺㻵㻵㻌
㼐㼑㼢㼕㼏㼑㼟㻌㼍㼞㼑㻌㼞㼑㼟㼠㼞㼕㼏㼠㼑㼐㻌㼠㼛㻌㼕㼚㼐㼛㼛㼞㻌
㼛㼜㼑㼞㼍㼠㼕㼛㼚㼟㻌㼠㼛㻌㼞㼑㼐㼡㼏㼑㻌㼍㼚㼥㻌㼜㼛㼠㼑㼚㼠㼕㼍㼘㻌㼒㼛㼞㻌
㼔㼍㼞㼙㼒㼡㼘㻌㼕㼚㼠㼑㼞㼒㼑㼞㼑㼚㼏㼑㻌㼠㼛㻌㼏㼛㻙㼏㼔㼍㼚㼚㼑㼘㻌
㻹㼛㼎㼕㼘㼑㻌㻿㼍㼠㼑㼘㼘㼕㼠㼑㻌㻿㼑㼞㼢㼕㼏㼑㼟㻌㻔㻹㻿㻿㻕㻌
㼛㼜㼑㼞㼍㼠㼕㼛㼚㼟㻚
ear is
0
.
W
/
k
Ũ
an
d
w
h
en worn on t
h
e
b
o
d
y,
as
d
escr
ib
e
d
i
n t
hi
s user gu
id
e,
i
s
W
/k
Ũ
.
The use o
f
belt cli
ps
, holsters and
s
imil
a
r
accesso
ri
es
s
h
ou
l
d
n
o
t
co
nt
a
in m
e
t
a
lli
c
co
mp
onents
i
n
i
ts assem
b
ly
.
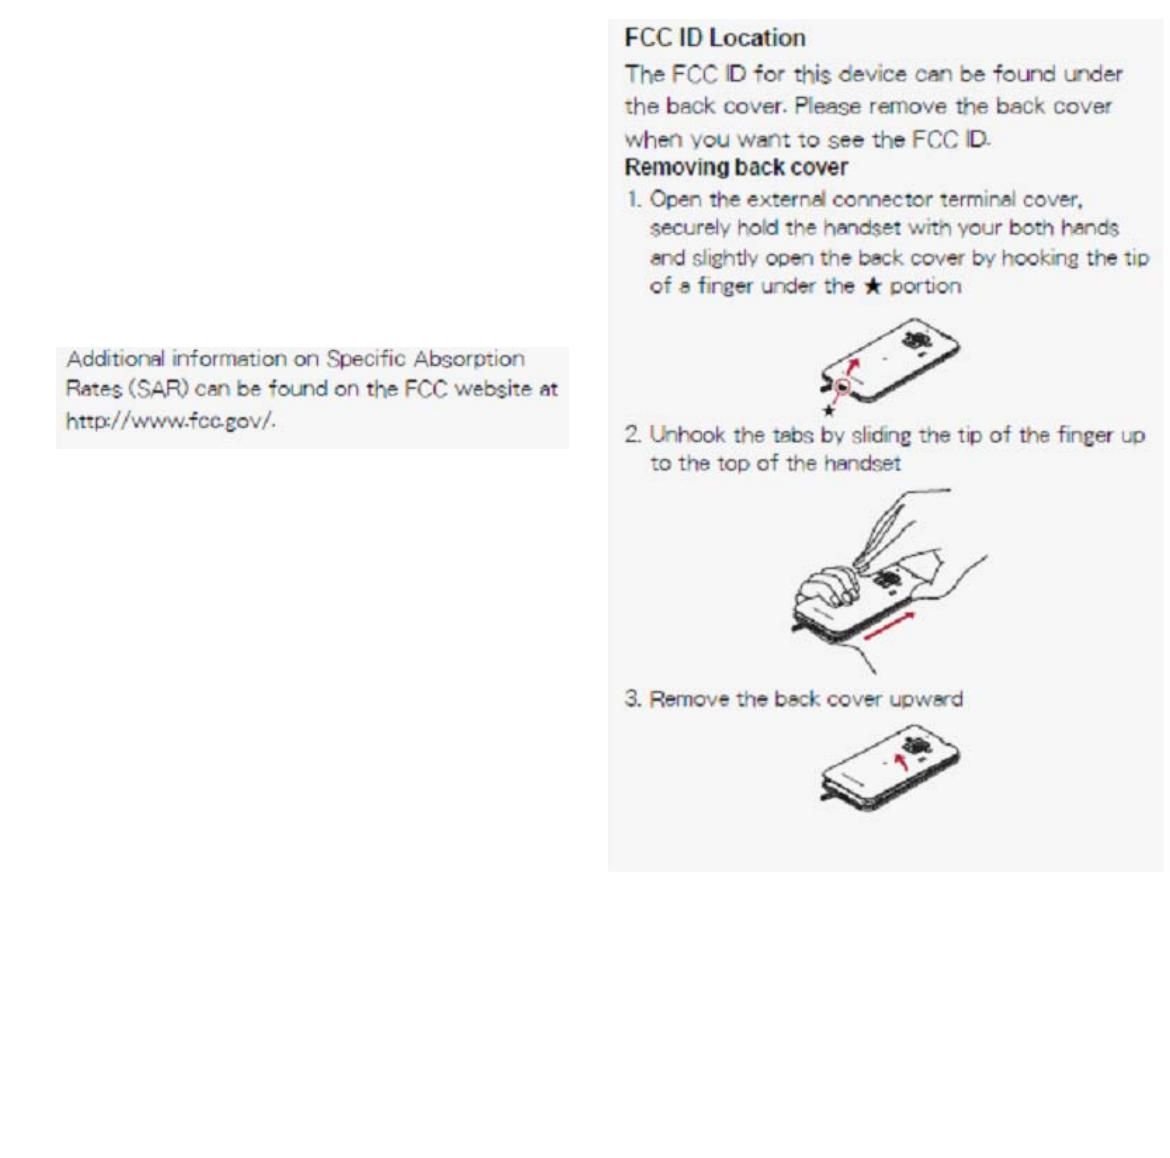
176 Appendix/Index
The Japan Export Administration Regulations
(“Foreign Exchange and Foreign Trade Act”
and its related laws) will be applied to this
product and its accessories under certain
conditions. The Export Administration
Regulations are also applied. To export or
reexport the handset and its accessories,
conduct all legally required procedures at your
own risk and expense. For details on the
procedures, contact the Ministry of Economy,
Trade and Industry or the US Department of
Commerce.
Data with third party copyrights such as text,
images, music and software that is downloaded
via Internet web pages, acquired by TV, video,
etc. or shot by the handset cannot be duplicated,
altered or publicly transmitted without rightful
party’s consent. Only duplicating, quoting, etc.
for personal use is permitted under copyright
laws.
Even if for personal use, filming and recording
may be prohibited for demonstrations,
performances and exhibitions.
Also, shooting another’s image or posting
another’s image on Internet web pages without
their consent may constitute a violation of one’s
right to their image.
The use of accessories that do not satisfy these
requirements may not comply with FCC RF
exposure requirements, and should be avoided.
The FCC has granted an Equipment Authorization
for this model handset with all reported SAR levels
evaluated as in compliance with the FCC RF
emission guidelines. SAR information on this model
handset is on file with the FCC and can be found
under the Display Grant section of (http://
www.fcc.gov/oet/ea/fccid/) after searching on FCC
ID APYHRO00.
Additional information on Specific Absorption Rates
(SAR) can be found on the Cellular
Telecommunications & Internet Association (CTIA)
Website at (http://www.ctia.org/) .
Export Administration
Regulations
Intellectual Property Right
Copyrights and rights of
portrait
177
Appendix/Index
“FOMA”, “dιΣνȜ”, “dζȜΉΛΠ”, “̤ͼέ
ΉȜΗͼ”, “ToruCa”, “mopera”, “mopera U”,
“Deco-mail”, “i-appli”, “i-mode”, “̅ΙλΥσ”,
“iD”, “WORLD WING”, “WORLD CALL”, “ςͺ
ιȜσ”, “̅ϋΏͿσ”, “sp-mode”, “eΠςΓ
Μ”, the “iD” logo and the “Xi” logo are
trademarks or registered trademarks of NTT
DOCOMO, INC.
“Catch Phone (Call waiting service)” is a
registered trademark of Nippon Telegraph and
Telephone Corporation.
Microsoft®, Windows®, Windows Media®,
Windows Vista® and Exchange® are trademarks
or registered trademarks of Microsoft
Corporation in the United States and/or other
countries.
Oracle and Java are registered trademarks of
Oracle and/or its affiliates.
Other names may be trademarks of their
respective owners.
QR code is a registered trademark of Denso
Wave Inc.
microSD Logo, microSDHC Logo and
microSDXC Logo are trademarks of SD-3C, LLC.
Included Document Viewer is Documents To Go
provided by DataViz,Inc.
©2010 DataViz, Inc. and its licensors. All rights
reserved. DataViz, Documents To Go and InTact
Technology are trademarks or registered
trademarks of DataViz, Inc.
The handset features LCFONT, developed by
Sharp Corporation, to make the LCD easier to
view and read. LCέϋΠ/LCFONT and
are registered trademarks of Sharp
Corporation.
Rovi, G-GUIDE, G-GUIDE MOBILE and G-Guide
related logos are trademarks or registered
trademarks of Rovi Corporation and/or its
subsidiaries in Japan.
OBEX™ is a trademark of Infrared Data
Association®.
a is a registered trademark of FeliCa
Networks, Inc.
Manufactured under license from Dolby
Laboratories.
Dolby and the double-D symbol are registered
trademarks of Dolby Laboratories.
PhotoScouter® and TrackSolid® are registered
trademarks of Morpho, Inc.
and AOSS™ are the trademarks of
BUFFALO INC.
Wi-Fi® is a registered trademark of Wi-Fi
Alliance®.
Wi-Fi Direct™, Wi-Fi Protected Setup™ and
Wi-Fi Protected Setup logo are trademarks of
Wi-Fi Alliance®.
The Wi-Fi Protected Setup Mark is a mark of the
Wi-Fi Alliance.
“mixi” is a registered trademark of mixi, Inc.
“Twitter” is a registered trademark of Twitter, Inc.
Registered trademarks and
trademarks

178 Appendix/Index
DLNA®, the DLNA Logo and DLNA
CERTIFIED™ are trademarks, service marks, or
certification marks of the Digital Living Network
Alliance.
Sharp Corporation has acquired DLNA
certification for the device.
This product includes software developed by the
OpenSSL Project for use in the OpenSSL
Toolkit. (http://www.openssl.org/)
This product includes cryptographic software
written by Eric Young (eay@cryptsoft.com)
Portions Copyright © 2004 Intel Corporation
This product partly uses the software of Intel
Corporation.
iWnn of OMRON SOFTWARE Co., Ltd. is used
for conversion methods for Japanese language,
and for phrase prediction methods for English.
iWnn© OMRON SOFTWARE Co., Ltd.
2008-2012 All Rights Reserved.
iWnn IME © OMRON SOFTWARE Co., Ltd.
2009-2012 All Rights Reserved.
Shin Go M, the font type installed in this product,
is provided by Morisawa & Company, Ltd.
* Shin Go is a registered trademark of Morisawa
& Company, Ltd.
MyScript® Stylus Mobile is a trademark of
VISION OBJECTS.
aptX is a registered trademark of CSR plc.
“AQUOS”, “AQUOS PHONE”, “Feel UX”,
“VeilView”, “FAMILINK”, “MediaJet”, “ܿ”,
“Dock to play”, “AQUOS PHONE” logo and “
ܿ” symbol are trademarks or registered
trademarks of Sharp Corporation.
All other company names and product names
are trademarks or registered trademarks of the
respective companies.
FeliCa is a contactless IC card technology
developed by Sony Corporation. FeliCa is a
registered trademark of Sony Corporation.
Under the MPEG-4 Visual Patent Portfolio
License, customers have licensed permission for
the following use of this product to engage in
non-profit personal use. Other uses are not
permitted.
Encoding MPEG-4 standard video (henceforth
referred to as MPEG-4 video).
Decoding an MPEG-4 video that a customer
not engaged in personal commercial activities
has encoded.
Decoding an MPEG-4 video obtained from a
licensed provider.
For details on other intended uses, contact
MPEG LA, LLC.
This product is licensed under the MPEG-4
Systems Patent Portfolio License for encoding in
compliance with the MPEG-4 Systems Standard.
An additional license and payment of royalties
are necessary in the following cases.
Data stored or replicated in physical media
which is paid for on a title by title basis.
Data which is paid for on a title by title basis
and is transmitted to an end user for
permanent storage and/or use.
Such additional license may be obtained from
MPEG LA, LLC. Contact MPEG LA, LLC for
additional details.
Others

179
Appendix/Index
This product is licensed under the AVC patent
portfolio license for the personal and
noncommercial use of a consumer to (i) encode
video in compliance with the AVC standard
(henceforth referred to as AVC video) and/or (ii)
decode AVC video that was encoded by a
consumer engaged in a personal and
noncommercial activity and/or was obtained from
a video provider licensed to provide AVC video.
No license is granted or shall be implied for any
other use. Additional information may be
obtained from MPEG LA, L.L.C.
See (http://www.mpegla.com)
This product is licensed under the VC-1 Patent
Portfolio License for the personal and
noncommercial use of a consumer to (i) encode
video in compliance with the VC-1 standard
(henceforth referred to as VC-1 video) and/or (ii)
decode VC-1 video that was encoded by a
consumer engaged in a personal and
noncommercial activity and/or was obtained from
a video provider licensed to provide VC-1 video.
No license is granted or shall be implied for any
other use. Additional information may be
obtained from MPEG LA, L.L.C.
See (http://www.mpegla.com)
Content owners use Microsoft PlayReady™
content access technology to protect their
intellectual property, including copyrighted
content. This device uses PlayReady technology
to access PlayReady-protected content and/or
WMDRM-protected content. If the device fails to
properly enforce restrictions on content usage,
content owners may require Microsoft to revoke
the device’s ability to consume
PlayReady-protected content. Revocation should
not affect unprotected content or content
protected by other content access technologies.
Content owners may require you to upgrade
PlayReady to access their content. If you decline
an upgrade, you will not be able to access
content that requires the upgrade.
CP8 PATENT

180 Appendix/Index
The abbreviations of operating systems
(Japanese versions) below are used in this
manual.
Windows 7 stands for Microsoft® Windows® 7
(Starter, Home Basic, Home Premium,
Professional, Enterprise and Ultimate).
Windows Vista stands for Windows Vista®
(Home Basic, Home Premium, Business,
Enterprise and Ultimate).
Windows XP indicates the Microsoft®
Windows® XP Professional operating system
or Microsoft® Windows® XP Home Edition
operating system.
The Bluetooth word mark and logos are owned
by the Bluetooth SIG, INC. and any use of such
marks by NTT DOCOMO, INC. is under license.
Other trademarks and trade names are those of
their respective owners.
Google, Google logo, Android, Android logo,
Google Play, Google Play logo, Google+,
Google+ logo, Gmail, Gmail logo, Calendar logo,
Google Maps™, Google Maps logo, Google
Talk, Google Talk logo, Google Chrome™,
Google Chrome logo, Google Voice Search™
logo, Picasa™, Picasa logo, YouTube and
YouTube logo are trademarks or registered
trademarks of Google Inc.
This product includes software based on GNU
General Public License (GPL), GNU Lesser
General Public License (LGPL) and other
licenses.
For details on licenses of related software, in the
home screen, [R]/[Settings]/[Device info]/
[Legal information]/[Open source licenses].
Source codes of software based on GPL, LGPL
and Mozilla Public License (MPL) can be
referred to on the following site for free. For
details, refer to the following site.
https://sh-dev.sharp.co.jp/android/modules/oss/)
(in Japanese only)
The handset can unlock the SIM lock. Unlock the
SIM lock to use non-DOCOMO SIM cards.
SIM lock can be unlocked at a docomo Shop.
Commission is incurred separately for unlocking
SIM lock.
When using non-DOCOMO SIM card, it cannot
be used in LTE. Also, some services and
functions are unavailable. DOCOMO shall not
guarantee any operation of the handset.
For details on unlocking SIM lock, refer to the
DOCOMO website.
Open source software
Unlocking SIM lock