Sharp HRO00184 Cellular Phone User Manual 12 APYHRO00184 Draft Operation Manual rev5
Sharp Corporation Cellular Phone 12 APYHRO00184 Draft Operation Manual rev5
Sharp >
Contents
- 1. operational manual
- 2. operationa manual
- 3. DOC of Bluetooth compliance
- 4. operation manual
operational manual

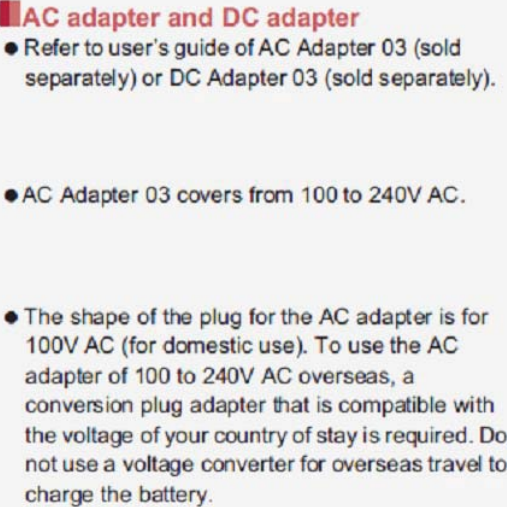
![35Before Using the Handset3Insert the AC adapter power plug into an outlet (2)4When placing the handset in the desktop holder, the charging lamp illuminates and charging starts:Place the handset in the direction of the arrow and make sure that a click is heard.5When charging is complete, the charging lamp turns off:Hold the desktop holder and lift the handset.[Read the user’s guides of FOMA AC Adapter 01/02 (sold separately), FOMA DC Adapter 01/02 (sold separately), AC Adapter 03 (sold separately), DC Adapter 03 (sold separately) and FOMA Charger microUSB Adapter SH01/FOMA charging microUSB adapter T01 (sold separately)] Following operations describe how to charge with AC Adapter 03 or DC Adapter 03.1Open the external connector terminal cover of the handset and insert the microUSB plug of a microUSB cable/DC adapter horizontally into the external connector terminal with the USB mark side turned up:Check the direction (front or rear) of the microUSB plug and insert it horizontally.100V AC outletUSB markmicroUSB cableAC Adapter 03Power plugUSB plugCharging lamp Pull the AC adapter out of the outlet if it will not be used for a long time. When the charging lamp does not illuminate, check that the handset is placed securely in the desktop holder. When placing the handset in the desktop holder, be careful not to catch a strap, etc. You cannot charge the battery by connecting the desktop holder and a PC via a microUSB cable.Charging with AC adapter/DC adapterim](https://usermanual.wiki/Sharp/HRO00184.operational-manual/User-Guide-1861202-Page-12.png)
![37Before Using the HandsetWhen the handset is turned on, you can charge the handset by connecting the handset to a PC with Micro USB Cable 01 (sold separately). Install the USB driver to the PC in advance. If the USB driver has not been installed on the PC, you cannot charge the battery by connecting the handset to the PC via Fast transfer mode.ƦFor details on installing USB driver, refer to “Manual for USB Driver Installation” in PDF format in the following site.(http://k-tai.sharp.co.jp/support/d/sh-0e/ (in Japanese only) For details on connecting to a PC nP. 1111H (for at least 2 seconds):When you turn the power on for the first time, the initial setting screen is displayed. Each setting item can also be set from menus (nP. 42).:If the initial setting screen for docomo service is displayed, operate by following the instructions on the screen.1H (for at least 1 second)/[Power off]/[OK] Do not forcibly insert or remove. May cause damage to the external connector terminal, the microUSB plug and the USB plug. Pull the adapter out of the outlet or cigarette lighter socket if it will not be used for a long time. Do not forcibly pull the external connector terminal cover. May damage the cover. Do not place objects near the handset when charging. May damage the handset. FOMA Charger microUSB Adapter SH01/FOMA charging microUSB adapter T01 (sold separately) is required to charge with FOMA AC Adapter 01/02 or FOMA DC Adapter 01/02.When using a DC adapter The DC adapter should only be used in negative grounded vehicles (12 and 24V DC). Do not use with the car engine shut off. May drain the car battery. The DC adapter fuse is a consumable product. For replacement, purchase a new fuse at a local vehicle supply shop. Refer to the user’s guide of DC Adapter 03 for details.Charging with Micro USB Cable 01Turning power ON/OFFTurning power ONTurning power OFF ((((((((((((((](https://usermanual.wiki/Sharp/HRO00184.operational-manual/User-Guide-1861202-Page-14.png)
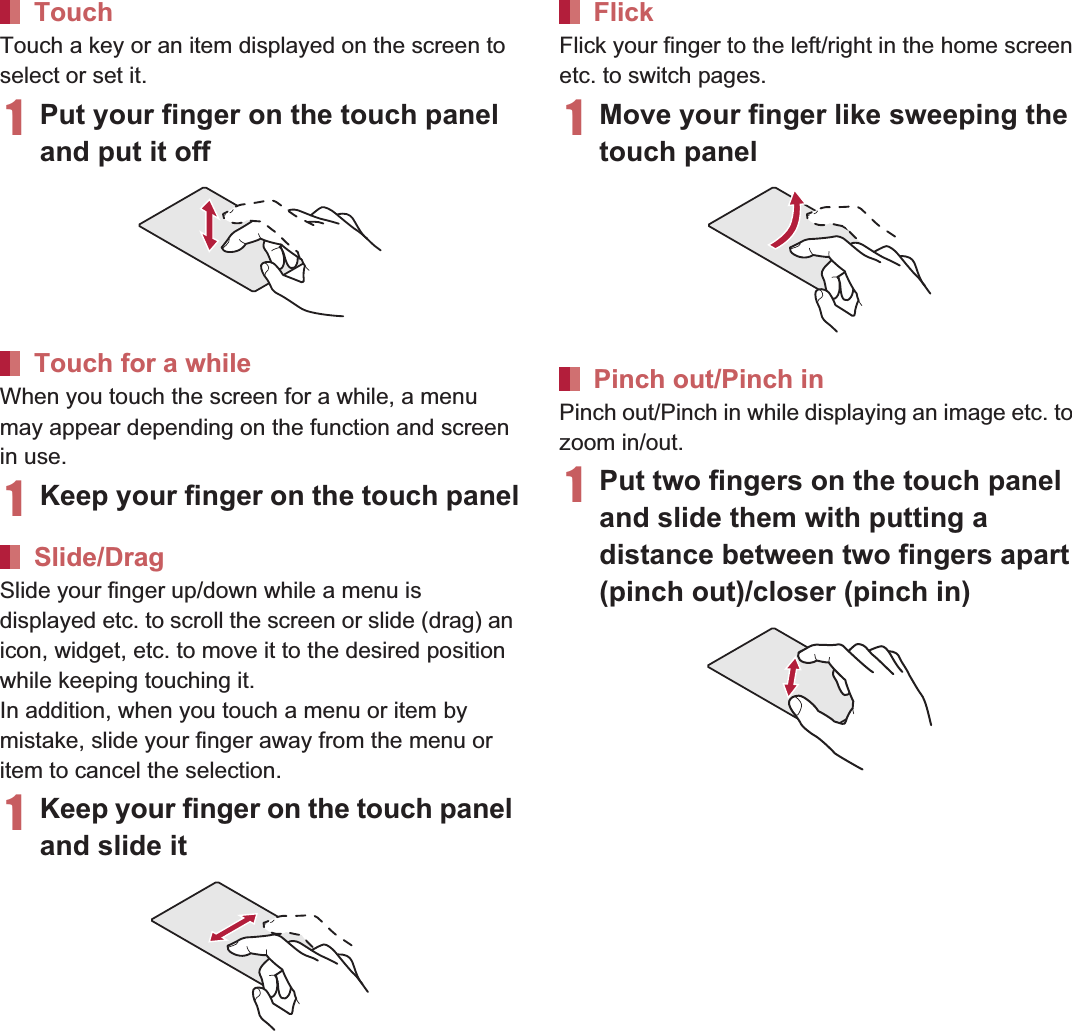
![38 Before Using the HandsetThe screen is off and the sleep mode is activated when H is pressed or the handset is not in use for a set length of time.Press H in the sleep mode to deactivate the sleep mode.When the power is turned on or the sleep mode is deactivated, the touch panel is locked.Touch [J] to unlock.Operations in touch panel unlock screen To set/disable the manner mode: y (for at least 1 second) To turn on the mobile light: x (for at least 1 second)ƦPress any of the keys or touch [J] to turn it off. To activate the camera: [K]You can operate by touching the touch panel (display) directly with your finger. Operations differ depending on the function and screen in use.Sleep modeTouch panel lock The mobile light will automatically turn off approximately 30 seconds after it turns on. The status panel is displayed when Screen lock is set to [Slide or Touch].Basic operationOperation of touch panelCautions when using the touch panel The touch panel is designed to be lightly touched with your finger. Do not forcefully press with your finger or press with a pointed object (fingernail, ballpoint pen, pin, etc.). In the following cases, the touch panel may not work even if you touch it. May cause a malfunction.Operation with a gloved fingerOperation with a fingernailOperation with foreign objects placed on the operation padOperation on the touch panel on which a protective sheet or a sticker is putOperation while the touch panel is wetOperation with fingers wet with sweat or water Operations may be interrupted if you touch other than a confirmation screen or the status bar while the confirmation screen etc. is displayed.](https://usermanual.wiki/Sharp/HRO00184.operational-manual/User-Guide-1861202-Page-15.png)
![67Call1In the home screen, [R]/[Phone]/[Dial]2Enter a phone number:Always enter the city code, even when it is a local number.:You can set to notify/not to notify the other party of your phone number for each call by adding “186”/“184” to the head of the phone number.1Call Make a call. Also, if there is an outgoing call history, touch to enter the latest outgoing call history when the phone number has not been entered.2Delete Delete an entered number.3Outgoing/Incoming call history4Favorites Display the contacts set to [Favorites] by groups.5Dial Display the dial screen.6Add to phonebook7Koe-no-Takuhaibin For details of Koe-no-Takuhaibin, refer to the DOCOMO website.8Phonebook Display the phonebook.3[0]4[End] to end the call1In the home screen, [R]/[Phone]/[Dial]2Enter a phone number/[z]/[Add wait]3Enter a number to send/[0]4[Yes] during the callCallMaking a callEntering touch-tone signalsEmergency callEmergency calls Phone numberPolice 110Fire and ambulance 119Marine emergency 118](https://usermanual.wiki/Sharp/HRO00184.operational-manual/User-Guide-1861202-Page-19.png)
![68 CallWORLD CALL is an international calling service available from DOCOMO handset in Japan.WORLD CALL is registered when FOMA services are registered (excluding users who did not apply for WORLD CALL). You can call to approximately 240 countries and regions worldwide. Calling to a land-line phone and mobile phone overseas is available. For information on available countries and network operators, refer to “Mobile Phone User’s Guide [International Services]” or the DOCOMO International Services website. Commission and monthly usage fees are free. Contact “General Inquiries” on the back of this manual for details on WORLD CALL. To make an international call through a company other than DOCOMO, contact the respective companies for instructions. The caller ID may not be notified or displayed correctly depending on overseas network operators. In this case, making a call with incoming call history is not available. The handset supports “Location notification of emergency call”.When dialing an emergency number such as 110, 119, and 118, the information of your location (location information) is automatically notified to the agency that received the emergency call (e.g. the police station). Depending on your location and the reception status of the signal, the agency that received the emergency call may not be able to confirm the exact location.If you are not sending your caller ID by calling with “184” added or other means, your location information and phone number are not notified. However, if the agency that received the emergency call considers your location information and phone number necessary for important purposes, such as life saving, the agency can retrieve them regardless of your settings.In addition, the area/timing to introduce “Location notification of emergency call” depends on the state of preparation in each agency that receives emergency calls. In Japan, you cannot make a call to the emergency number (110, 119 or 118) when a docomo mini UIM card is not inserted, from the PIN code entry screen, while the PIN code is locked or from the PUK (PIN Unlock Key) entry screen. When calling 110, 119, and 118 from your handset, the police or fire stations may return your call for verification purposes. State that you are calling from a mobile phone, and give your phone number and exact present location.Remain stationary to ensure that the call is not disconnected while you are on the line, and keep the handset turned on to receive calls for approximately 10 minutes afterwards. Depending on the region, calls to the police or fire station of the local area may not be made.International call (WORLD CALL)[Calling Method] When calling to a land-line phone: 010/country code/area code (city code)/the other party’s phone number/[0] When calling to a mobile phone: 010/country code/the other party’s phone number/[0]ƦFor the other parties’ phone numbers and area codes (city codes) that begin with “0”, omit the first “0” when entering (except some countries or regions such as Italy).ƦAlternatively, enter “009130-010” as usual or “+” instead of “010”.](https://usermanual.wiki/Sharp/HRO00184.operational-manual/User-Guide-1861202-Page-20.png)
![69Call1When a call is received, the ring tone sounds and the incoming lamp flashes:If you press x/y during an incoming call, you can stop the ring tone, vibrator or flash of the incoming lamp.2Receive the call:Operate after touching [Activate].1Reject You can reject the incoming call.2Accept You can receive the call.3[End] to end the call1When a call is received, the ring tone sounds and the incoming lamp flashes2[z]/[Quick responses]3Select a response1When a call is received, the ring tone sounds and the incoming lamp flashes2[z]/[On hold]1When a call is received, the ring tone sounds and the incoming lamp flashes2[z]/[Absence Memo]Playing an answering memo1In the home screen, [R]/[Settings]/[Call]2[Call/Ans Memo]/[Answering Memo List]/select an answering memoYou can carry out operations such as using a hands-free call and adjusting the in-call volume according to the using condition during a call.1Add call* Place a current call on hold and make a call to another party.Receiving a callQuick responsesIncoming lampPlacing a call on holdAnswering by answering memoOperation during a call](https://usermanual.wiki/Sharp/HRO00184.operational-manual/User-Guide-1861202-Page-21.png)
![105File Management When sending data, you can also operate from each function (menu).1In the home screen, [R]/[Send/receive by infrared]2Select an itemSingle: Receive single data.Multiple: Receive all data.Single: Select data and send.Multiple: Send all data by selecting an application.:Perform the operation for receiving and sending at the same time.:After the operation for receiving, the handset waits to receive data. Infrared communication automatically begins when data is sent from sender’s handset within approximately 30 seconds.You can send and receive data with other handsets equipped with iC communication function. Make initial setting of Osaifu-Keitai in advance (nP. 119). In the following cases, you cannot perform iC communication.During Airplane modeDuring Osaifu-Keitai lock In the following cases, data may not be sent by iC communication.During a call During chargingDuring earphone/microphone connectionDuring USB connection sp-mode mails, business cards, memos, schedules and ToruCa cannot be sent by iC communication. For details on other data that can be sent and received, refer to “Infrared communication” (nP. 104). Use while placing the a mark of receiver’s handset on that of sender’s handset as shown.Sending and receiving by infrared Note that if you select [Delete all before registration] when receiving all data, all data registered to the target function are deleted. Receiving all data is not available depending on the data type. When available space in the save destination becomes insufficient, the data being received to that point are saved and receiving ends.iC communicationUsing iC communicationWhen using iC communication markile placing theamark of receiver](https://usermanual.wiki/Sharp/HRO00184.operational-manual/User-Guide-1861202-Page-23.png)
![106 File Management Do not move the handset until sending and receiving of data is completed. There may be some cases in which data are poorly sent and received or the screen is off by positioning the handset near depending on the other party’s handset. In that case, put a distance between the a marks apart/closer or move them up/down or to the left/right.To enter authentication code is required for sending and receiving all data items. The authentication code is a password exclusive to iC communication. Before starting data communication, the sender and receiver must enter the same user-specified four-digit code. In addition, to enter passcode may be required for sending all data items.Example: Still picture1In the home screen, [R]/[Contents Manager]2Touch a still picture for a while/[Share]/[Send by IC]3[Ok]4Place the a mark on that of the other party’s handset1Place the a mark on that of the other party’s handset2[Accept]3Drag the status bar down/select received dataYou can connect the handset to Bluetooth devices wirelessly. Wireless communications with all the Bluetooth devices are not completely guaranteed.Supported versionBluetooth Specification Ver..0+EDR*1Supported profiles*2 (Supported services)HSP: Headset Profile*3HFP: Hands Free Profile*4A2DP: Advanced Audio Distribution Profile*5AVRCP: Audio/Video Remote Control Profile*5HID: Human Interface Device Profile*6DUN: Dial-up Networking Profile*7OPP: Object Push Profile*8SPP: Serial Port Profile*9PBAP: Phone Book Access Profile*10PAN: Personal Area Networking Profile*11HDP: Health Device Profile*12Sending and receiving by iCSending dataReceiving dataBluetooth functionSupported version and supported profiles](https://usermanual.wiki/Sharp/HRO00184.operational-manual/User-Guide-1861202-Page-24.png)
![109File Management To register/connect a Bluetooth device, the Bluetooth passkey may need to be entered. Before starting the registration, decide one- to sixteen-digit number. Enter the same number on the handset and the other party’s Bluetooth device. Set the other party’s Bluetooth device to the registration stand-by status in advance.1In the home screen, [R]/[Settings]/[Bluetooth]2Slide [OFF] to the right3Select a Bluetooth device/[Pair] :Entering the Bluetooth passkey may be necessary depending on the other party’s Bluetooth device. Also, some Bluetooth devices may start connecting after completing registration.:To display/hide the handset’s name on the other party’s Bluetooth device: [SH-01E]ƦThe handset name is automatically hidden when the period of time set for Visibility timeout has passed.:To search for Bluetooth devices: [SEARCH FOR DEVICES]:Touch [B] of a paired Bluetooth device to change the name and the connection type of the other party’s Bluetooth device.1Registration request/Connection request from Bluetooth device2Drag the status bar down/[Pairing request]/[Pair]:When the confirmation screen about the settings on pairing appears, select [Pair].:Entering the Bluetooth passkey may be necessary depending on the other party’s Bluetooth device.:The confirmation screen for connection may be displayed.Bluetooth If you fail to connect, connection may become available after re-registration of Bluetooth devices. When the Bluetooth function is enabled, the handset is set to receive a registration request/connection request from other Bluetooth devices. Perform the setting for displaying the handset’s information on the other party’s Bluetooth device in advance to allow the handset to be searched for by other Bluetooth devices. While in connection stand-by, even if a connection request from a Bluetooth device is received, connection may not be made depending on the signal status etc. For details on the operations of the other party’s Bluetooth device, refer to the manuals of the Bluetooth device to be used.When receiving registration request from Bluetooth device or connection request from unregistered Bluetooth device](https://usermanual.wiki/Sharp/HRO00184.operational-manual/User-Guide-1861202-Page-27.png)
![110 File Management1In the Bluetooth screen, [B] of the Bluetooth device to unregister/[Unpair]1In the Bluetooth screen, select the Bluetooth device to disconnect/[OK] Set after enabling Bluetooth function.1In the Bluetooth screen, [z]2Select an itemRename phone: Change the handset’s name.Visibility timeout: Set the time to be displayed on the other party’s Bluetooth device.aptX: Set whether to use aptX®.Handsfree setting: Set whether to always have voices emitted from the connected Bluetooth compatible hands-free device during a voice call.Show received files: Display the history of data received via Bluetooth connection.Example: Still picture1In the home screen, [R]/[Contents Manager]2Touch a still picture for a while/[Share]/[Bluetooth]:Set the receiver’s Bluetooth device to receive data.3Select a Bluetooth device to connect to1Send data from the sender’s Bluetooth device2Drag the status bar down/select data to receive/[Accept]3Drag the status bar down/select the received dataDisabling registration of Bluetooth deviceDisabling connection of Bluetooth deviceSetting BluetoothSending and receiving by BluetoothSending dataReceiving data Note that if you select [Delete all before registration] at receiving all data, all data registered to the target function are deleted. Some data cannot be received all. When available space in the save destination becomes insufficient, the data being received to that point are saved and receiving ends.](https://usermanual.wiki/Sharp/HRO00184.operational-manual/User-Guide-1861202-Page-28.png)
![111File Management1Insert the microUSB plug of Micro USB Cable 01 (sold separately) horizontally into the external connector terminal on the handset (1)2Insert the USB plug of Micro USB Cable 01 horizontally into the USB connector on the PC (2):For details on the mode of USB connection nP. 100You can use a microSD Card inserted into the handset as external memory for a PC. Insert a microSD Card and set the mode of USB connection to [Card reader mode] in advance (nP. 100). When using a microSDXC Card, refer to Transferring data (nP. 112). When a message indicating to format the microSDXC Card is displayed, do not format it.1Connect the handset to a PC via Micro USB Cable 01:The USB mass storage screen appears. If the screen does not appear, drag the status bar down and select [USB connected]. 2[Turn on USB storage]:When the confirmation screen is displayed, check the content and select [OK].3Use as a microSD reader/writer4Perform secure hardware removal on the PC after use5[Turn off USB storage]6Disconnect Micro USB Cable 01 from the handsetExternal device connectionConnecting the handset and PC Use a USB cable Micro USB Cable 01. USB cables for PC are not available, since the plug shape is different. Using a USB HUB may prevent the equipment from working normally.Keep side with the characters upOpen external connector terminal coverMicro USB Cable 01 Do not remove Micro USB Cable 01 while exchanging data with PC. Data may be damaged. Windows XP, Windows Vista and Windows 7 all of which are Japanese version are available OS of PCs for the connection.microSD reader/writer3U4P](https://usermanual.wiki/Sharp/HRO00184.operational-manual/User-Guide-1861202-Page-29.png)
![119ApplicationsOsaifu-Keitai is a function which has built-in IC card and allows you to pay, use as coupons or collect stamps by simply holding the handset over the scanning device at stores.Moreover, you can access sites and web pages by holding the handset over the scanning device, and get the latest coupon, deposit electronic money and check your usage by using communication. In addition, for your secure use, you can lock functions of Osaifu-Keitai when you lost the handset.For details on Osaifu-Keitai, refer to “̮၌ဥ΄ͼΡήΛ· (spκȜΡ༎)” (Mobile Phone User’s Guide [sp-mode]) (in Japanese only).ɦTo use Osaifu-Keitai compatible service, settings are necessary on a website or an application. The handset malfunctions may cause data (including electronic money, points, etc.) saved in the IC card to be lost or changed (Note that as a rule, you will be asked to delete data when leaving your handset for repairs etc., since we cannot keep your handset with such data still remaining in it). For the service such as a reissue, restoration, temporary keeping or transference of the data, contact your provider of Osaifu-Keitai compatible service. Be sure to use the Osaifu-Keitai compatible service including a backup service for important data. DOCOMO shall not be liable for any loss or change of data in the IC card or other damages of Osaifu-Keitai service caused by any reason such as malfunctions and model changes. When the handset is stolen or lost, immediately contact your provider of Osaifu-Keitai compatible service for handling methods.iC transfer service is a service that enables you to move the data saved in the IC card to new Osaifu-Keitai from the old one when changing Osaifu-Keitai such as by changing models or repairing the handset.iC transfer service is available at a docomo Shop near you.For details on iC transfer service, refer to “̮၌ဥ΄ͼΡήΛ· (spκȜΡ༎)” (Mobile Phone User’s Guide [sp-mode]) (in Japanese only). To use Osaifu-Keitai compatible services, download the Osaifu-Keitai compatible application from Osaifu-Keitai compatible sites and make the setting. Some services do not need to download the Osaifu-Keitai compatible application.1In the home screen, [R]/[Osaifu-Keitai]:If the initial setting is not completed, the initial setting screen appears.2Select a serviceOsaifu-Keitai iC transfer serviceUsing Osaifu-Keitai You cannot use Osaifu-Keitai in the following situations. However, you can pay by holding the handset over a scanning device.In Airplane modeWhen you are charging the handset, connecting Micro USB Cable 01 (sold separately) to it or connecting an earphone/microphone to it while the docomo mini UIM card is not inserted/When the handset has never received radio wave](https://usermanual.wiki/Sharp/HRO00184.operational-manual/User-Guide-1861202-Page-30.png)
![120 ApplicationsHold the a mark of the handset over the scanning device to use as electronic money or railway tickets, to retrieve ToruCa, etc. Pay attention to the following points when holding the a mark over the scanning device.Do not contact between the handset and the scanning deviceHold the a mark in parallel with the scanning deviceSlowly hold the a mark over the center of the scanning deviceIf the scanning device does not recognize the built-in IC card, hold the a mark over the scanning device and move the handset aroundDo not attach a metallic substance on the a mark side1Hold the a mark over the scanning device2Confirm that the data is scannedLock the function of Osaifu-Keitai. Perform the same operation to disable the lock.1In the home screen, [R]/[Osaifu-Keitai]2[Lock Settings]/[Next]/enter the passcode/[OK]/[OK]ToruCa is an electronic card that can be imported to the handset. You can retrieve it as store information or a coupon from a scanning device or sites. Retrieved ToruCa is saved in the “ToruCa” application and you can display/search/update it using the application.For details on ToruCa, refer to “̮၌ဥ΄ͼΡήΛ· (spκȜΡ༎)” (Mobile Phone User’s Guide [sp-mode]) (in Japanese only).1In the home screen, [R]/[ToruCa]Holding over scanning device markOsaifu-Keitai lock settingToruCa Packet communication charges may be incurred for retrieving, displaying or updating ToruCa. ToruCa provided for i-mode handsets may not be retrieved/displayed/updated. The following functions may not be used depending on the settings of IP (Information Provider).Retrieving from a scanning deviceUpdatingSharing ToruCaMoving or copying to a microSD CardDisplaying a mapanning device](https://usermanual.wiki/Sharp/HRO00184.operational-manual/User-Guide-1861202-Page-31.png)
![151International RoamingInternational roaming (WORLD WING) is a service that enables you to use the same phone number and mail address of the handset as you use in Japan in the service area of DOCOMO affiliated overseas network operators without changing your phone number and mail address. You can use calls and SMS without any changes in settings.Available networkThe handset is rated as Class 4. You can use it in the 3G network and GSM/GPRS network service area. In addition, this service is available in countries and regions supporting 3G 850 MHz/GSM 850 MHz. Check the available area. For areas out of Xi area such as overseas, connect to 3G or GSM/GPRS network.Refer to the following before using the handset overseas.“Mobile Phone User’s Guide [International Services]”DOCOMO International Services website* Enable Data roaming to use data communication when roaming (nP. 153).Check followings in Japan before using the handset overseas.Subscription Check the status of a subscription for WORLD WING. For details, contact “General Inquiries” on the back of this manual.Charging battery Use FOMA AC Adapter 01 for Global use (sold separately), FOMA AC Adapter 02 (sold separately) or AC Adapter 03 (sold separately) as an AC adapter for charging while traveling overseas.International RoamingOutline of international roaming (WORLD WING) For country codes, international call access number, universal number international prefix and information on available countries, regions, and network operators, refer to “Mobile Phone User’s Guide [International Services]” or the DOCOMO International Services website.Available services overseasMain communication service 3G3G850GSM(GPRS)LTECall AAABSMS AAABMail*AAABBrowser*AAAB Some services are not available depending on the network operator or network.Before use overseasCheck before departure](https://usermanual.wiki/Sharp/HRO00184.operational-manual/User-Guide-1861202-Page-32.png)
![152 International RoamingCharge Overseas charges (call charges, packet communication charges) differ from those in Japan. Since some applications automatically perform packet communication, the packet communication charges may be higher. Contact the application provider for the operation of each application.Network service settingsIf you subscribed to network services, network services such as Voice Mail Service, Call Forwarding Service and Caller ID Display Request Service are available from overseas. However, some network services are not available. To use network services overseas, setting Remote operations to “Activate” is required. Remote operations can be set in your country of stay. Some network services that can be set/disabled etc. may not be available depending on overseas network operators.The handset automatically connects to the available network operator when you turn the power on in your country of stay.ConnectionWhen Network operators (nP. 154) is set to [Select automatically], the suitable network is automatically selected.Overseas packet communication is available with a fixed amount of charges as an upper limit per day by connecting to a compatible network operators. To use this service, subscription to flat-rate packet communication services in Japan is required. For details, refer to “Mobile Phone User’s Guide [International Services]” or the DOCOMO International Services website.Viewing the display [U] is displayed during international roaming. 3G/GSM/HSPA is available. Connected network operator can be checked in the status panel. Date & timeIf [Automatic date & time] and [Auto timezone] of Date & time are enabled, the handset receives information on time and time differences from overseas network operator, then time and time differences are corrected. Time and time differences may not be adjusted correctly depending on overseas network operator. In such a case, set time zone manually. The correction timing differs depending on the network operator. For details on Date & time nP. 100Set before departureCheck in your country of stay](https://usermanual.wiki/Sharp/HRO00184.operational-manual/User-Guide-1861202-Page-33.png)
![153International RoamingInquiries When the handset or the docomo mini UIM card is lost or stolen overseas, promptly contact DOCOMO and conduct a procedure for canceling the use of service from your country of stay. Refer to the back of this manual for inquiries. Note that communication/call charges after the handset or the docomo mini UIM card is lost or stolen are incurred to the subscriber. For land-line phone etc., “International call access number” of your country of stay or “Universal number international prefix” is required.The handset automatically connects to the DOCOMO network after returning to Japan. If it fails, perform the following settings. Set Network Mode to [LTE/3G/GSM (Auto)] (nP. 153). Set Network operators to [Select automatically] (nP. 154).At the time of purchase, the handset is set to automatically search for and switch to available networks. When you want to manually switch networks, set by performing following operations.1In the home screen, [R]/[Settings]/[Network settings]/[Mobile networks]2Select an itemData enabled: Enable data communication.Data roaming: For details nP. 153Access Point Names: Set an access point.Network Mode: For details nP. 153Network operators: For details nP. 154Set whether to use data communication when roaming.1In the home screen, [R]/[Settings]/[Network settings]/[Mobile networks]/[Data roaming]Set a network to use.1In the home screen, [R]/[Settings]/[Network settings]/[Mobile networks]/[Network Mode]2Select an itemLTE/3G/GSM (Auto): Switch to an available network automatically.LTE/3G: Use 3G network.GSM: Use GSM/GPRS network.Check after homecomingSettings to use overseasData roamingNetwork mode](https://usermanual.wiki/Sharp/HRO00184.operational-manual/User-Guide-1861202-Page-34.png)
![154 International RoamingSearch for networks and set a network operator to use.1In the home screen, [R]/[Settings]/[Network settings]/[Mobile networks]/[Network operators]:If the confirmation screen for data communication is displayed, check the content and select [OK].:Search for networks and a list of network operators is displayed.2Select a network operator:To search for network operators again: [Search networks]:To select a network operator automatically: [Select automatically]1In the home screen, [R]/[Phone]/[Dial]2“+” (touch “0” for a while)/enter country code, area code (city code) and the other party’s phone number/[0]:Alternatively, enter a phone number/[z]/[International call]/select a country code to enter a country code.ƦThe first “0” of the area code (city code) will be omitted.:When the area code (city code) begins with “0”, omit the first “0” when dialing (Include the “0” when making a call to some countries or regions such as Italy).Network operators If you manually set network operators overseas, set to [Select automatically] after returning to Japan.Making/Receiving a call in your country of stayMaking a call outside your country of stay (including Japan) Even if you notify the caller ID, [Unknown], [Private number], etc. appears depending on the network operator, and the caller ID may not be displayed correctly.](https://usermanual.wiki/Sharp/HRO00184.operational-manual/User-Guide-1861202-Page-35.png)
![155International RoamingWhen you make a call to other countries from your country of stay, you can make an international call with simple operation using International Dial Assist. Set International dial assist in advance. The first “0” of a phone number will be converted to the country code you set in Country code automatically. 1In the home screen, [R]/[Phone]/[Dial]2Enter a phone number/[0]3[Converted number]1In the home screen, [R]/[Settings]/[Call]/[Roaming settings]/[International dial assist]2Select an itemAutomatic conversion function: Set whether to make calls using International Dial Assist.Country code: Set country code to use when using International Dial Assist.International prefix: Set international prefix to use when using International Dial Assist.You can make a domestic call in your country of stay in the same way as you do in Japan. Always enter the area code (city code), even when the number is in the same area.When you make a call to a “WORLD WING” subscriber overseas, the call is made as an international call to Japan regardless of your country of stay.1In the home screen, [R]/[Phone]/[Dial]2“+” (touch “0” for a while)/enter country code “81” (Japan), the other party’s mobile phone number excluding the first “0”/[0]You can receive a call overseas in the same way as you do in Japan.Making a call using International Dial AssistSetting of International Dial AssistMaking a call in your country of stayMaking a call to a WORLD WING subscriber overseasReceiving a call When a call is received during international roaming, the call is forwarded from Japan. Call charges to Japan are incurred by the caller and receiving charges by the receiver.](https://usermanual.wiki/Sharp/HRO00184.operational-manual/User-Guide-1861202-Page-36.png)
![156 International RoamingWhen having calls made to your handset from Japan, have your phone number entered just as a domestic call in Japan.When having calls made to your handset from countries other than Japan, have the international call access number and “81” (Japan) added to the beginning of your phone number with the first “0” excluded as an international call to Japan regardless of your country of stay.International call access number of the country of the caller-81-90 (or 80)-XXXX-XXXXSet international roaming.1In the home screen, [R]/[Settings]/[Call]/[Roaming settings]2Select an itemRestricting incoming calls: Set whether to reject incoming calls during international roaming.Incoming notification while roaming: Set whether to notify you of incoming call information (date and time of calls or caller ID) by SMS, when you are in a place with no signal, the handset is turned off or you fail to answer an incoming call during international roaming.Roaming guidance: Set whether to play the guidance notifying the other party who makes a call to you during international roaming that you are using international roaming.International dial assist: For details nP. 155Network service: For details nP. 156You can use network services such as Voice Mail Service or Call Forwarding Service overseas.1In the home screen, [R]/[Settings]/[Call]/[Roaming settings]/[Network service]2Select an itemRemote operation(charged): Set remote operations.Caller ID notification request service(charged): Set Caller ID Display Request Service.Roaming call notification(charged): Set Incoming notification while roaming.Roaming guidance(charged): Set Roaming guidance.Voice mail(charged): Set Voice Mail Service.Call forwarding(charged): Set Call Forwarding Service.Having calls to your handsetSetting international roamingRoaming settingsNetwork services during roaming](https://usermanual.wiki/Sharp/HRO00184.operational-manual/User-Guide-1861202-Page-37.png)

![180 Appendix/Index The abbreviations of operating systems (Japanese versions) below are used in this manual.Windows 7 stands for Microsoft® Windows® 7 (Starter, Home Basic, Home Premium, Professional, Enterprise and Ultimate).Windows Vista stands for Windows Vista® (Home Basic, Home Premium, Business, Enterprise and Ultimate).Windows XP indicates the Microsoft® Windows® XP Professional operating system or Microsoft® Windows® XP Home Edition operating system. The Bluetooth word mark and logos are owned by the Bluetooth SIG, INC. and any use of such marks by NTT DOCOMO, INC. is under license. Other trademarks and trade names are those of their respective owners. Google, Google logo, Android, Android logo, Google Play, Google Play logo, Google+, Google+ logo, Gmail, Gmail logo, Calendar logo, Google Maps™, Google Maps logo, Google Talk, Google Talk logo, Google Chrome™, Google Chrome logo, Google Voice Search™ logo, Picasa™, Picasa logo, YouTube and YouTube logo are trademarks or registered trademarks of Google Inc. This product includes software based on GNU General Public License (GPL), GNU Lesser General Public License (LGPL) and other licenses.For details on licenses of related software, in the home screen, [R]/[Settings]/[Device info]/[Legal information]/[Open source licenses]. Source codes of software based on GPL, LGPL and Mozilla Public License (MPL) can be referred to on the following site for free. For details, refer to the following site.https://sh-dev.sharp.co.jp/android/modules/oss/) (in Japanese only) The handset can unlock the SIM lock. Unlock the SIM lock to use non-DOCOMO SIM cards. SIM lock can be unlocked at a docomo Shop. Commission is incurred separately for unlocking SIM lock. When using non-DOCOMO SIM card, it cannot be used in LTE. Also, some services and functions are unavailable. DOCOMO shall not guarantee any operation of the handset. For details on unlocking SIM lock, refer to the DOCOMO website.Open source softwareUnlocking SIM lock](https://usermanual.wiki/Sharp/HRO00184.operational-manual/User-Guide-1861202-Page-45.png)