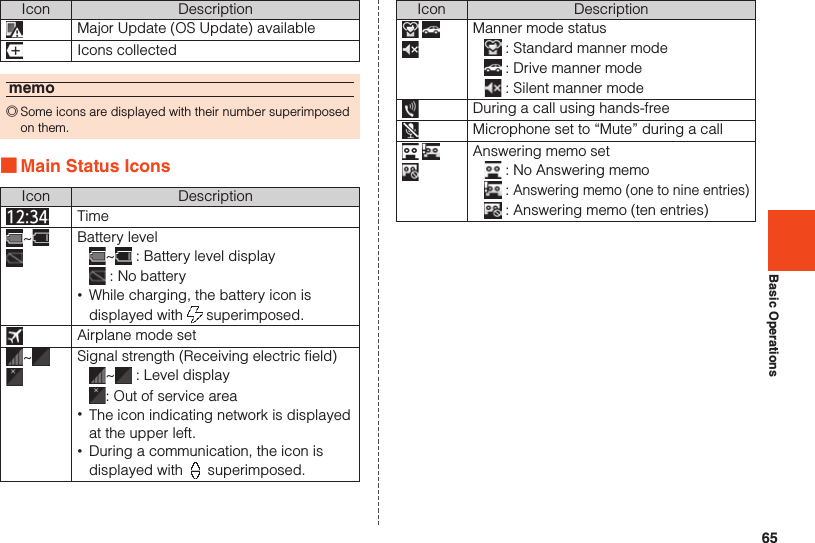
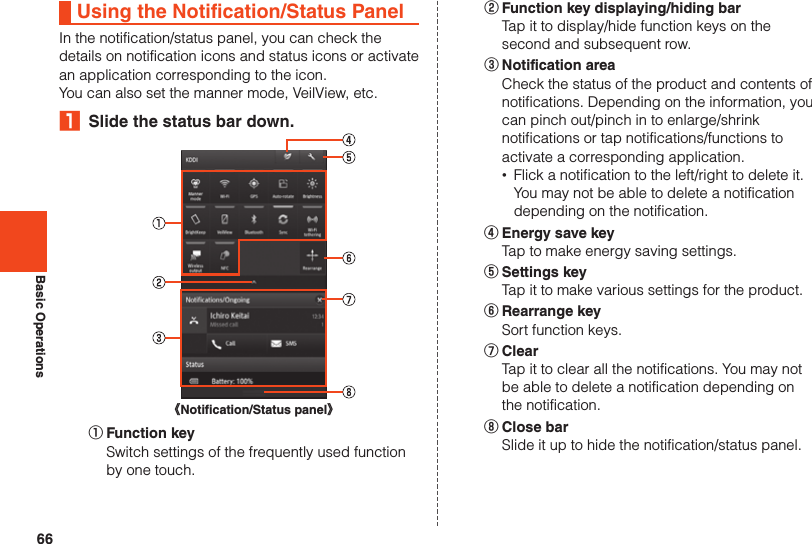
Sharp HRO00192 Mobile phone supporting GSM, WCDMA, 802.11a/b/g/n, NFC, Bluetooth and GPS. User Manual II
Sharp Corporation Mobile phone supporting GSM, WCDMA, 802.11a/b/g/n, NFC, Bluetooth and GPS. II
Sharp >
Contents
User Manual II
![iiPrefaceThank you for buying the “AQUOS PHONE SERIE SHL22” (simply called the “SHL22” or the “product” from here on).Before using the product, be sure to read the “Basic Manual” (this PDF manual) on the au homepage to ensure correct use. After you have finished reading this PDF manual, be sure to store it and the printed manuals (Accessories) in safe places so that you can retrievethem whenever you need them. If you lose the printed manuals (Accessories), contact an au shop or Customer Service Center.Operating Instructions ■“Basic Manual” (This PDF Manual)This manual describes basic operations of major functions.For detailed descriptions of various functions, refer to the “Instruction Manual application” (Japanese) that can be used on the product or “Full Instruction Manual” (Japanese) on the au homepage:http://www.au.kddi.com/support/mobile/guide/manual/ ■“Instruction Manual Application” (Japanese)You can use the “Instruction Manual application” on the product to check detailed operational procedures. Also, you can activate intended functions from an explanation screen depending on the functions.On the home screen, tap [APPS] → [Instruction Manual]. •To use the application for the first time, you need to download and install it by following on-screen instructions. ■Downloading ManualsYou can download the “Basic Manual” (this PDF manual) and the “Full Instruction Manual” (Japanese) or “Setting Guide” in PDF format from the au homepage.Safety PrecautionsBefore you start using the product, be sure to read the “Safety Precautions” to ensure correct use.Before you assume that the product is malfunctioning, check for possible remedies in the following au Customer Support site of au homepage:http://www.au.kddi.com/support/mobile/trouble/repair](https://usermanual.wiki/Sharp/HRO00192.User-Manual-II/User-Guide-2015131-Page-2.png)
![3Desktop holder (SHL22PUA) •Instruction Manual (Japanese) •Setting Guide (Japanese) •Before Using the Product (Japanese)The following items are not included in the package. •AC adapter •Earphone •microUSB cable •microSD memory card •Purchase a specified charger (sold separately). •Illustrations of cell phones in this manual are only for reference. They may look different from the actual product.memo ◎The battery is built into the product.Using au Disaster Countermeasure Applicationau Disaster Countermeasure is an application in which you can use Disaster Message Board, Emergency Rapid Mail (Earthquake Early Warning, Disaster and Evacuation Information, and Tsunami Warning) and Disaster Voice Messaging Service.₁ On the home screen, [APPS] → [au災害対策] (au Disaster Countermeasure).The au Disaster Countermeasure menu is displayed.《au Disaster Countermeasure menu》](https://usermanual.wiki/Sharp/HRO00192.User-Manual-II/User-Guide-2015131-Page-5.png)
![4 ■Using Disaster Message BoardDisaster Message Board is a service to enable customers in disaster areas to register their safety information via LTE NET when large-scale disasters, such as an earthquake whose Japan seismic scale is approximately 6-lower or more, occur. The registered safety information can be checked by customers using au phones, and also from other carriers’ cell phones, PCs, etc.For details, refer to “Disaster Message Board Service” on the au homepage.₁ From the au Disaster Countermeasure menu, [災害用伝言板] (Disaster Message Board).Follow the on-screen instructions for registration/confirmation.memo ◎To register the safety information, an e-mail address (~ezweb.ne.jp) is required. Set the e-mail address in advance. ◎Deletion of the safety information and configurations for Safety Notification Mail are not available during wireless LAN (Wi-Fi®) connection. ◎The Company does not guarantee the quality of this service. The Company, regardless of the cause, shall not be liable for any problems related to registration of safety information due to the concentration of access to this service or equipment errors, any loss due to the damage, ruination, etc. of safety information or any loss arising from registered safety information. ■Using Emergency Rapid MailEmergency Rapid Mail is a service to collectively deliver Earthquake Early Warning and Tsunami Warning provided by the Japan Meteorological Agency, and Disaster and Evacuation Information provided by the national government or the local governments to au phones in the specified areas. •At the time of purchase, receiving setting of Emergency Rapid Mail (Earthquake Early Warning, and Disaster and Evacuation Information) is set to “受信する” (Receive). You can receive Tsunami Warning by setting 災害・避難情報 (Disaster and Evacuation Information).When receiving Earthquake Early Warning, secure your safety and act composedly according to the surrounding situations.When receiving Tsunami Warning, leave sea coasts immediately and evacuate to safe places such as hills and strongly-built tall buildings.](https://usermanual.wiki/Sharp/HRO00192.User-Manual-II/User-Guide-2015131-Page-6.png)
![5₁ From the au Disaster Countermeasure menu, [緊急速報メール] (Emergency Rapid Mail).The inbox is displayed.Select a mail to check to display the details of the mail.削除(Delete)Delete received mails.設定(Settings)緊急地震速報 (Earthquake Early Warning)Set whether to receive Earthquake Early Warning. •Tap [受信する] (Receive)/[受信しない] (Not receive) → [OK].災害・避難情報 (Disaster and Evacuation Information)Set whether to receive Disaster and Evacuation Information, and Tsunami Warning. •Tap [受信する] (Receive)/[受信しない] (Not receive) → [OK].音量 (Volume)Set the volume of the receiving sound.バイブ (Vibrator)Set whether to activate the vibrator at the time of reception.設定(Settings)マナー時の鳴動 (Linkage to the manner mode)Set whether to notify you with the manner mode settings applied in the manner mode.緊急地震速報 (Earthquake Early Warning)Check the operations of the receiving sound and vibrator for Earthquake Early Warning.災害・避難情報 (Disaster and Evacuation Information)Check the operations of the receiving sound and vibrator for Disaster and Evacuation Information, and Tsunami Warning.memo ◎This service is available only in Japan (Not available overseas). ◎Emergency Rapid Mail is free of both information charges and communication charges. ◎Emergency Rapid Mail cannot be received while the power is turned off or during a call. ◎Emergency Rapid Mail may not be received during communication such as while sending and receiving SMSs/ e-mails and while using the browser or when you are in a place where the signal cannot be received (e.g. tunnels and basements) or the signal is weak, even within the service area.](https://usermanual.wiki/Sharp/HRO00192.User-Manual-II/User-Guide-2015131-Page-7.png)
![7 ■Using Disaster Voice Messaging ServiceDisaster Voice Messaging Service is a service to record voices with a smartphone and deliver them as a voice message to people to whom you want to deliver the information that you are safe when large-scale disasters occur.₁ From the au Disaster Countermeasure menu, [災害用音声お届けサービス] (Disaster Voice Messaging Service). ■Sending voices (Send)Tap “声をお届け” (Send voices) and operate in order of “①お届け先を選択”* (Select to whom to send) → “②お届けしたい声を録音” (Record voices to send).* You can also select to whom to send your voices from the address book. ■Receiving voices (Receive)You will be notified via a pop-up screen or an SMS that a voice message has been received. You can listen to the message by receiving (downloading) and playing the voice message. •If the receivers are using a smartphone on which an au Disaster Countermeasure application supporting Disaster Voice Messaging Service is not enabled or using an au cell phone, they will be notified via an SMS. •If the receivers are notified via an SMS, the information will not be saved in the au Disaster Countermeasure application.memo ◎Sending and receiving voice messages are available only when you are using LTE/3G network. Disable wireless LAN (Wi-Fi®) communication etc. before use. ◎Voice messages can be recorded for up to 30 seconds. ◎Voice messages can be exchanged among au cell phones as well as between NTT docomo and SoftBank Mobile cell phones. ◎Voices may not be heard when the media sound volume is set to low. ◎When no free space is left on the main unit (memory), voice messages may not be saved or played. ◎Some cell phones cannot receive voice messages. For details, refer to the au homepage.](https://usermanual.wiki/Sharp/HRO00192.User-Manual-II/User-Guide-2015131-Page-9.png)
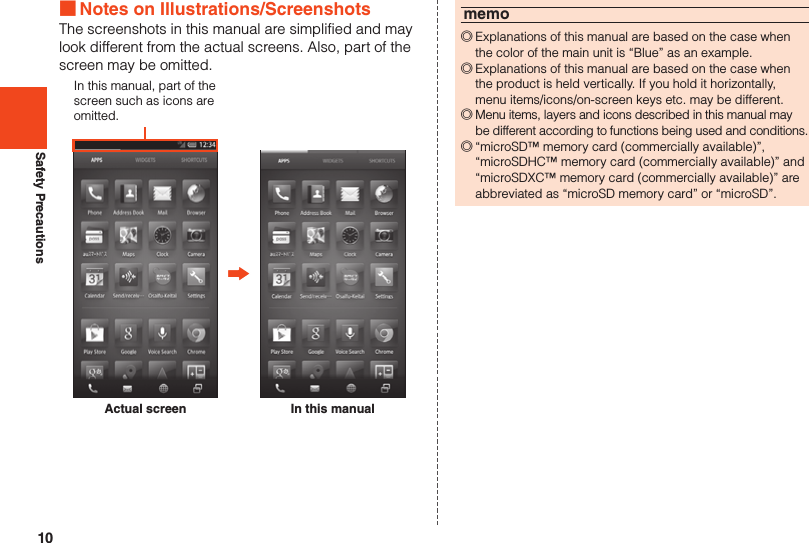
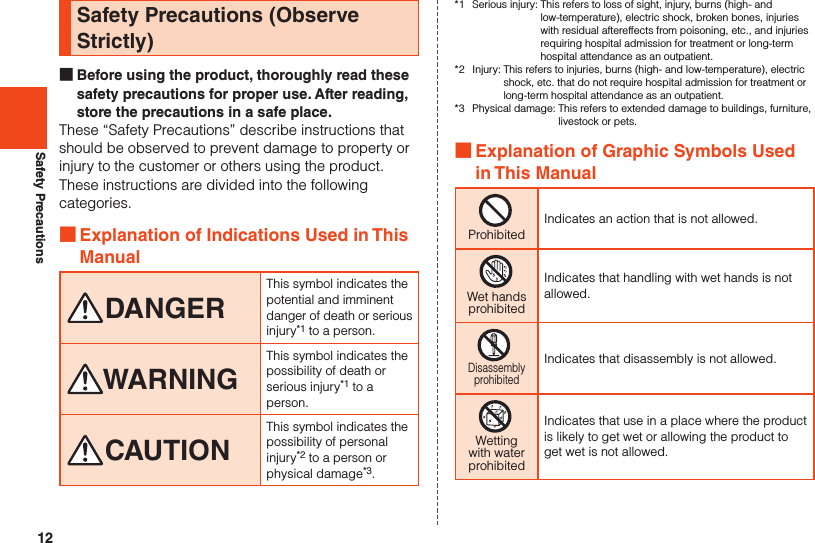
![9Safety PrecautionsIllustrations and Descriptions in This Manual ■Note on Key IllustrationsIn this manual, the key illustrations are simplified as shown below. ■Description of Operations for Selecting Item/Icon/Key etc.In this manual, operation procedures are described as below.Description ExplanationOn the home screen, [APPS] → [Phone] → Enter “141” → [Call].Tap “APPS” at the top of the home screen and tap “ Phone”. Then tap in order of “ ”, “ ” and “”. Lastly, tap “ ”.f (hold down for at least 2 seconds).Hold f down for at least 2 seconds.* Tapping is to select a key or icon displayed on the screen by lightly tapping it with your finger.](https://usermanual.wiki/Sharp/HRO00192.User-Manual-II/User-Guide-2015131-Page-11.png)


![25Safety Precautions ■Main unit ●Do not forcefully press, tap or intentionally subject the display to strong impact. Doing so might cause scratching or damage. ●Do not forcefully press sharp objects or hard objects against keys or display surface. Doing so might cause scratching or damage. The touch panel is designed to be lightly touched by fingers. Do not apply strong pressure with your fingers or sharp-pointed objects (such as ballpoint pens and pins) on the touch panel. In the following cases, the product may not respond to touching the touch panel, or errors in operation may occur. •Operation with gloved hands •Operation with fingernails •Operation with a foreign object placed on the touch panel •Operation with a protective film or sticker on the touch panel •Operation with water drops left or condensation formed on the surface •Operation with wet or sweaty fingers •Operation under water ●Never use modified au cell phones. Use of a modified device violates the Radio Law.You can perform the following operations to confirm the unique authentication and standard marks (including certification/authentication numbers) for the product. On the home screen, tap [APPS] → [Settings] → [Device info] → [Authentication]. The product has acquired the certification of conformity with technical regulations for the specified radio station based on the Radio Law and certification of conformity with technical regulations for the terminal based on the Telecommunications Business Law, and the “Technical Conformity Mark ” can be confirmed in the product as a certificate. Confirm contents of electrical certificates in the product for information on certification. If the screws of the product are removed and modifications are made to the internal components, the certification of conformity with technical regulations will become invalid. Never use the product without the valid certification. Doing so violates the Radio Law. ●To prevent unlawful modification, the product has been designed so that it cannot be easily disassembled. Modifying the product is prohibited by the Radio Law. ●Contents saved in the product, such as contacts, mails and bookmarks might be altered or lost by an accident, fault, repair or mishandling. Be sure to keep a copy of important contents. Note that the Company assumes no responsibility for any damages or lost profits resulting from altered or lost contents.](https://usermanual.wiki/Sharp/HRO00192.User-Manual-II/User-Guide-2015131-Page-27.png)

![39Safety PrecautionsNotes on Using Bluetooth®/Wireless LAN (Wi-Fi®) FunctionsFrequency BandBluetooth® and wireless LAN (Wi-Fi®) functions (2.4 GHz band) of the product use frequencies in the 2.4 GHz band ranging from 2.402 GHz to 2.480 GHz.You can perform the following operations to confirm information on frequency band.On the home screen, [APPS] → [Settings] → [Device info] → [Authentication]. •Bluetooth® function: 2.4FH1/XX4The product uses the 2.4 GHz band.FH1 uses FH-SS as the modulation scheme. The interference distance is about 10 m or less. XX4 uses other schemes. The interference distance is about 40 m or less.Bands of mobile unit identification devices cannot be avoided. •Wireless LAN (Wi-Fi®) function: 2.4DS/OF4The product uses the 2.4 GHz band.DS-SS and OFDM are used as the modulation schemes. The interference distance is about 40 m or less.Bands of mobile unit identification devices can be avoided.Channels available with the 2.4 GHz band wireless LAN (Wi-Fi®) of the product are between 1 to 13. Available channels differ depending on the country. For use in airplane, check with the airline company in advance.Precautions about Bluetooth® •The Bluetooth® function of the product conforms to the domestic standards of Japan and FCC standards and EC directives, and has been certified. •The 2.4 GHz band used by wireless LAN (Wi-Fi®) and Bluetooth® devices is shared by various other devices. For this reason, Bluetooth® device use technologies for minimizing effects from other devices using the same radio frequency band. In some cases, however, the communication speed and connectable range may be decreased, or disconnection may occur, due to interference by other devices. •The communication speed and connectable range vary depending on the distance between communication devices, obstacles and the Bluetooth® devices used.](https://usermanual.wiki/Sharp/HRO00192.User-Manual-II/User-Guide-2015131-Page-41.png)


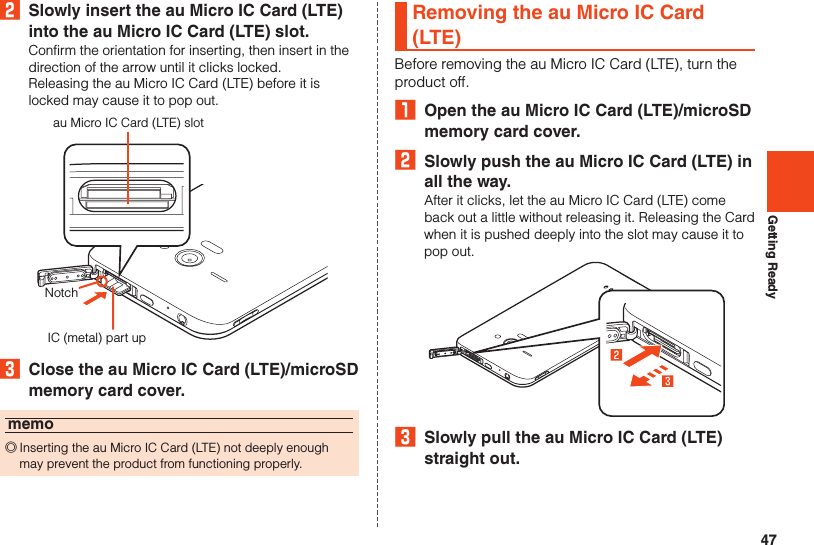
![48Getting Ready4 Close the au Micro IC Card (LTE)/microSD memory card cover.Using a microSD Memory CardmicroSD Memory CardYou can save, move and copy data by attaching one of microSD memory cards (including microSDHC memory cards and microSDXC memory cards) in the product.memo ◎The maximum file size available on a microSD memory card is 2 GB per file when saving data to a microSD memory card. ◎A microSD memory card initialized on other devices may not work on the product properly. On the home screen, tap [APPS] → [Settings] → [Storage] → [Erase microSD] → [Erase microSD card] → Unlock → [Erase everything] to initialize the microSD memory card. ◎To play/display data on the microSD memory card, on the home screen, tap [APPS] → [Contents Manager] and use Contents Manager. ◎Some copyright protected data may not be played on the product even if they can be moved/copied from a PC etc. to a microSD memory card successfully. ◎microSDXC memory cards are available only on SDXC compatible devices. If you attach a microSDXC memory card to a device that does not support SDXC, the message inducing you to initialize the card may be displayed. However, do not initialize the card. If you initialize a microSDXC memory card on a device that does not support SDXC, it will erase data on the microSDXC memory card and rewrite the file system. Part of space on the microSDXC memory card may become unavailable. ■Handling Precautions •Do not turn off the product or subject it to impact while microSD memory card data is being accessed. Doing so may cause data corruption. •The product supports microSD/microSDHC/microSDXC memory cards. For the supported microSD/microSDHC/microSDXC memory cards, contact each microSD memory card vendor or refer to the au homepage.Attaching a microSD Memory CardBefore attaching a microSD memory card, turn the product off.₁ Open the au Micro IC Card (LTE)/microSD memory card cover.](https://usermanual.wiki/Sharp/HRO00192.User-Manual-II/User-Guide-2015131-Page-50.png)

![50Getting Ready3 Slowly pull the microSD memory card straight out.4 Close the au Micro IC Card (LTE)/microSD memory card cover.memo ◎Do not remove the microSD memory card forcefully. Doing so may result in damage or data loss. ◎Applications installed to a microSD memory card cannot be used once you remove the microSD memory card. ◎The microSD memory card may become warm after a long time use, but this is not a fault.Checking the IMEIAn IMEI (international mobile station equipment identity) is a special identification code assigned to each phone. You can pull the IMEI tray out to confirm the IMEI of the product.₁ Turn the product off and remove the microSD memory card. •For details on removing a microSD memory card, refer to “Removing the microSD Memory Card” (▶P. 49).2 Slowly pull the IMEI tray out straight by the tab.microSD memory card slotIMEI trayTabmemo ◎The IMEI is information required when requesting servicing or repairs. ◎The IMEI tray cannot be removed from the main unit. Take care not to apply force when handling. ◎You can also operate the main unit to confirm the IMEI. On the home screen, [APPS] → [Settings] → [Device info] → [Status]](https://usermanual.wiki/Sharp/HRO00192.User-Manual-II/User-Guide-2015131-Page-52.png)
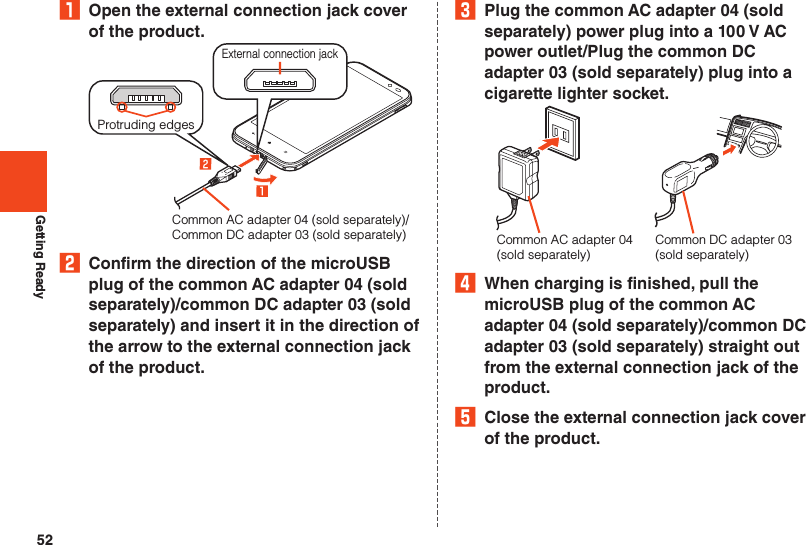
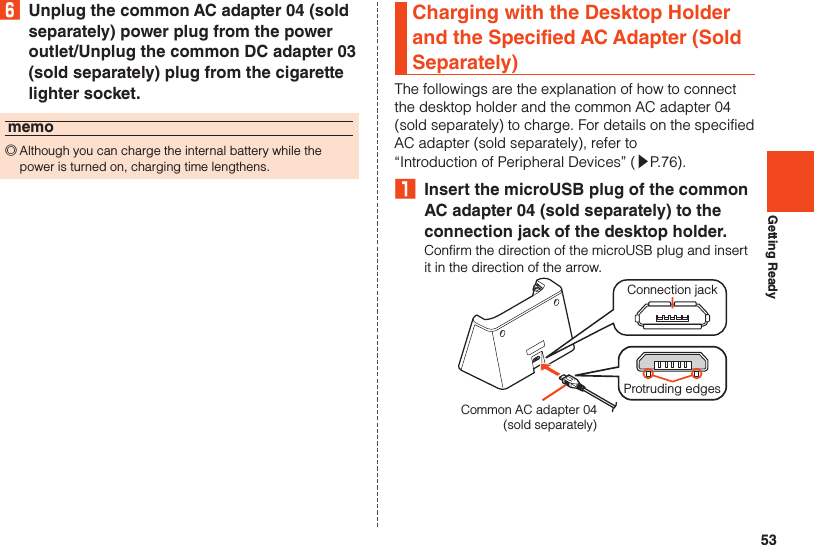
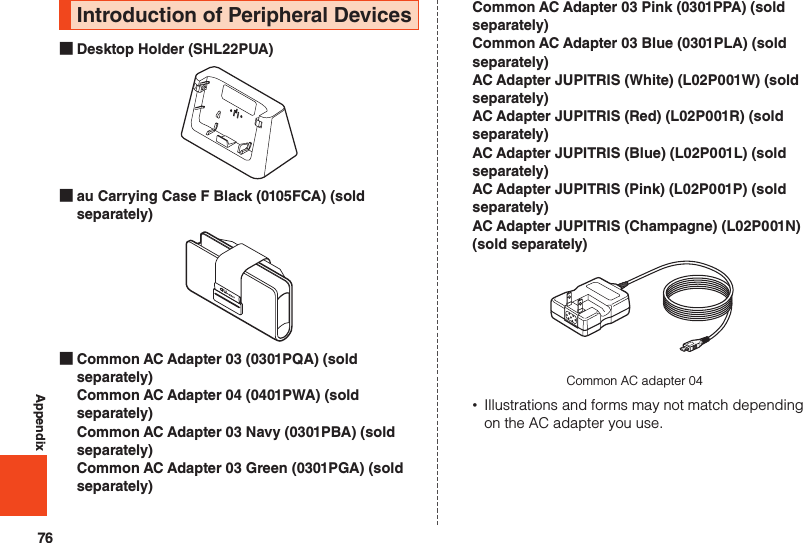
![51Getting ReadyChargingChargingWhen you purchase the product, the internal battery is not fully charged. Be sure to charge the internal battery before use. •If the performance of the battery does not recover (e.g. the usable time after each charge has become extremely short), the internal battery may be at the end of service life. On the home screen, tap [APPS] → [Settings] → [Device info] → [Status] → [Battery status] to check the charging performance of the internal battery. •While charging, the charging/incoming/key indicator illuminates in red, and the battery icon is displayed with superimposed. When charging is finished, the charging/incoming/key indicator goes out.memo ◎Depending on the operation procedure and usage environment, the temperature inside the product may get high and the product may even get heated. In such case, charging may stop for security reasons. ◎Charging the internal battery while using the camera function etc. may lengthen the charging time. ◎If you perform various operations with a specified charger (sold separately) connected to the product, charging/discharging may take place repeatedly in a short time. Frequently charging the internal battery shortens its service life. ◎If you charge the internal battery when the battery has run out, the charging/incoming/key indicator may not illuminate soon. However, charging is in progress. ◎If the charging/incoming/key indicator flashes in red, force the power off (▶P. 56) and turn the product on again. If the indicator continues to flash, stop charging the internal battery and contact an au shop or the Secure cell phone support center. ◎If you stop charging while the charging/incoming/key indicator still illuminates during charging, the cell phone may be left not fully charged even if is displayed on it. In such case, the usage times shorten.Charging with the Specified AC Adapter (Sold Separately)/Specified DC Adapter (Sold Separately)The followings are the explanation of how to connect the common AC adapter 04 (sold separately)/common DC adapter 03 (sold separately) to charge. For details on the specified AC adapter (sold separately)/specified DC adapter (sold separately), refer to “Introduction of Peripheral Devices” (▶P. 76).](https://usermanual.wiki/Sharp/HRO00192.User-Manual-II/User-Guide-2015131-Page-53.png)

![56Getting Ready ■Turning the Power Off₁ f (hold down for at least 2 seconds).2 [Power off] → [OK]. ■Restarting the ProductYou can restart the product after turning it off.₁ f (hold down for at least 2 seconds).2 [Reboot] → [OK]. ■Turning the Power Off ForciblyYou can force the product to turn off if the screen freezes or you are unable to turn the product off.₁ f (hold down for at least 11 seconds).The power is turned off when the product vibrates two times.memo ◎After the product vibrates the first time, release f before it vibrates the second time to reboot the product. ◎If the power is turned off forcibly, unsaved data will be deleted. Do not turn the power off forcibly unless you cannot operate the product. ■Rebooting in Safe ModeTurn the product off then boot it in a state close to that at time of purchase.If operation of the product is unstable, it may be due to applications installed after purchasing the product. If symptoms improve when booted in safe mode, uninstalling the applications you installed may remedy symptoms.₁ f (hold down for at least 2 seconds).2 Long touch “Power off” → [OK].“Safe mode” is displayed at the bottom of the screen when the product is booted in safe mode.To end safe mode, reboot the product.memo ◎When the product is turned off, you can boot it in safe mode by f (hold down for at least 2 seconds) to turn it on, and then pressing d until the Welcome Sheet (Lock Screen) is displayed. ◎It is recommended that you back up your data on the product before booting in safe mode. ◎Widgets that you yourself created may be deleted. ◎Safe mode is not a normal state for the product to be booted in. End safe mode before normal use.](https://usermanual.wiki/Sharp/HRO00192.User-Manual-II/User-Guide-2015131-Page-58.png)
![58Getting ReadySwitching the Display Language to EnglishYou can switch the display language for function names and other items to English.₁ On the home screen, [アプリ] (APPS).2 [設定] (Settings).3 [言語と文字入力] (Language & input).4 [言語(Language)を選択] (Select language).5 [English].](https://usermanual.wiki/Sharp/HRO00192.User-Manual-II/User-Guide-2015131-Page-60.png)

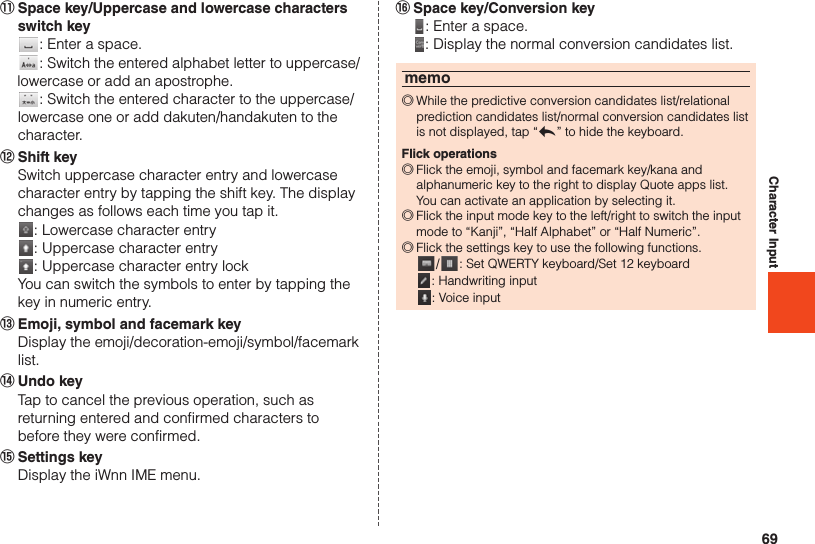
![67Character InputSwitching Software Keyboards₁ On the character entry screen, [ ] → [Change input UI] → [Set QWERTY keyboard]/[Set 12 keyboard].Viewing the Character Input Screen《Character entry screen (12 Key)》《Character entry screen (QWERTY)》⑯⑮① Character entry area② Input candidates list If the predictive conversion is enabled, the predictive conversion candidates list is displayed when characters are entered. If the relational prediction is enabled, the relational prediction candidates list is displayed when you select a candidate. Enter characters and tap “ ” to display the normal conversion candidates list. •You can enlarge the candidates list area by tapping “ ”. If you tap “ ”, it returns to the original display.](https://usermanual.wiki/Sharp/HRO00192.User-Manual-II/User-Guide-2015131-Page-69.png)

![70PhoneMaking CallsEntering a Phone Number and Making a Call₁ On the home screen, [APPS] → [Phone].2 Enter a phone number.When calling to a fixed-line phone, enter the phone number starting with the area code even if you are in the same area.3 [Call] → Talk.4 [End call].memo ◎Even when “In Call” is displayed, the other party may not have taken the call. Start talking after making sure that the other party has taken the call. ◎If you cover the screen while making a call/talking, it is turned off. ◎Call charges for calls made with “1401” added are subtracted from the registered balance on an au prepaid card that you have bought. ◎Note that even if you cover the mouthpiece, the sound can be conveyed to the other party. ◎Even if “Airplane mode” is set, you can call to the emergency number (110, 119, 118) and Customer Service Center (157). ◎Execute the following operations to return to the call screen after activating another application during a call. •Tap “#” to return to the home screen, activate “Phone” and tap “Return to call in progress”. •Slide the status bar down and tap “Ongoing call”. ■Emergency Call Location NotificationThe product supports “Emergency call location notification” so that if you make an emergency call to Police, Fire and Ambulance or Regional Coast Guard Headquarters, your current location (GPS information) will be transmitted to the agency receiving the emergency call.memo ◎In this section, Police (110), Fire and Ambulance (119) and Regional Coast Guard Headquarters (118) are collectively referred to as the emergency call receiving agency. ◎This feature may not yet be available at some emergency call receiving agencies. ◎If you add “184” before the emergency call number 110/ 119/118, the emergency call receiving agency will not be notified of your location and phone number. ◎In places where signal reception from GPS satellites or a base station is relatively poor, such as in an underground mall, inside a building or behind a tall building, the emergency call receiving agency may be notified of some other place different from your actual location. ◎When GPS cannot be used to notify of your location, base station signal is used instead.](https://usermanual.wiki/Sharp/HRO00192.User-Manual-II/User-Guide-2015131-Page-72.png)
![71Phone ◎When making an emergency call to Police, Fire and Ambulance or Regional Coast Guard Headquarters, always confirm where you are, and tell them your exact location on the phone. Note that depending on the area where you are calling, your call may not be connected to the agency having jurisdiction over that area. ◎If the emergency call receiving agency determines that human lives and health are in danger, they will be able to acquire the caller’s location information during the call or within a certain period of time after the call.Using Menu on the Phone Number Entry Screen₁ On the home screen, [APPS] → [Phone] → [e].2au CS Center Make a call to 157 (Customer Service Center).Create SMS Create an SMS.Add Prefix Add a prefix to the phone number.Restrict Calls SettingSet whether to restrict making a call. •Even while Restrict Calls Setting is set to ON, you can make a call to emergency call numbers and 157 (Customer Service Center). Even in roaming, you can make a call to emergency call numbers.Settings Make call settings.Operations on the Call ScreenVolume Adjust the call volume (the other party’s voice). Also, you can reduce ambient noises and make it easier for the other party to hear your voice by using “Noise suppression”.Mute/Mute OFF Set whether to convey your voice to the other party.DIAL Display number keys. You can send touch-tone signals and add a call.Voice Memo Record the other party’s voice and your voice during a call.Speaker/Speaker OFFSet whether to call using hands-free.Address Book Display the address book.](https://usermanual.wiki/Sharp/HRO00192.User-Manual-II/User-Guide-2015131-Page-73.png)
![72PhonememoNoise suppression ◎Do not cover the sub microphone with your hand when using Noise suppression. Otherwise the measurement of noises will not be properly performed.Calling Overseas from au Phones (au International Call Service)You can make international calls without any specialprocedure from the product.Example: To call “212-123-XXXX” in the USA from the product₁ On the home screen, [APPS] → [Phone].2 Enter the international access code “010”.Long touch “0” to enter “+” and “010” is automatically added when calling.3 Enter the country code of the USA “1”.4 Enter the area code “212”.If the area code starts with “0”, dial it without including the “0” (There are some exceptions such as fixed-line phones in some countries or regions including Italy and Moscow).5 Enter the phone number of the other party “123XXXX” → [Call].memo ◎The monthly limit fee is set for the au International Call Service. The au International Call Service is unavailable from when the limit fee is confirmed to be exceeded until the end of the same month. ◎Even if you cannot use the service by exceeding the limit fee, you can use from the first day of the next month. Also, you can use the domestic call as usual while the service is stopped. ◎International call charges are billed together with monthly local call charges. ◎If you do not wish to use the service, you can set not to use the au International Call Service. For au International Call Service: From au phones 157 (area code not required) (toll free) From fixed-line phones 0077-7-111 (toll free) Open 9:00 to 20:00 (everyday)](https://usermanual.wiki/Sharp/HRO00192.User-Manual-II/User-Guide-2015131-Page-74.png)
![73PhoneReceiving CallsAnswering an Incoming Call₁ Slide “Answer” down during an incoming call.When you receive a call while the backlight illuminates (except for when the Welcome Sheet (Lock Screen) is displayed), tap “Answer”.2 Talk → [End call].Putting a Call on Hold₁ Slide “Answer Holding” down during an incoming call.When you receive a call while the backlight illuminates (except for when the Welcome Sheet (Lock Screen) is displayed), tap “Answer Holding”.The call is put on hold. The other party will hear voice guidance indicating that the call is put on hold.2 [Answer] while the call is put on hold.The hold state is released.memo ◎The call charges are charged on the other party who has made a call to you while the call is put on hold as well. ◎If you disable the hold state once, you cannot put the call on hold again. ◎You can put the call on hold only when the product is used in Japan.Sending SMS to an Incoming Call₁ Slide “Quick reply” down during an incoming call.When you receive a call while the backlight illuminates (except for when the Welcome Sheet (Lock Screen) is displayed), tap “Quick reply”.2 Select a message to send.You can create and send an SMS by tapping “Custom message”.The incoming call is disconnected. The other party will hear voice guidance.memo ◎If the other party’s phone number is not notified, Quick reply is not available. Also, Quick reply may not be available depending on the communication condition.](https://usermanual.wiki/Sharp/HRO00192.User-Manual-II/User-Guide-2015131-Page-75.png)
![74PhoneUsing Menu While Receiving a Call₁ [e] during an incoming call.2Absence MemoAnswer a call with the message of the Answering memo and record the other party’s message.Reject Disconnect an incoming call. The other party will hear voice guidance.Forwarding Forward an incoming call to the specified phone number without answering it.Silent Silence the ringtone and stop vibrator or incoming lamp.memo ◎When forwarding an incoming call without specifying a phone number, the call is forwarded to Answering Service if you have activated the service. Also, when Answering Service is suspended, you cannot forward calls.](https://usermanual.wiki/Sharp/HRO00192.User-Manual-II/User-Guide-2015131-Page-76.png)
![75SettingsDisplaying Setting MenuFrom Settings, you can set up and manage functions.₁ On the home screen, [APPS] → [Settings].Item DescriptionProfile Check or edit your profile.Call Make settings for call.Sound Change manner mode settings and volume, tones, etc. for media playback and ringtone.Display Make settings for brightness of the screen, switching text fonts, etc.au ID setting Set au ID.Storage Check memory space of microSD memory card and the main unit, initialize microSD memory card, etc.Battery & Energy savingCheck energy saving settings and battery usage.Speech launcher settingsMake settings for launching applications by speech recognition.Home applicationsSwitch home applications to use.Application Uninstall applications etc.Wi-Fi Make settings for Wi-Fi®.Easy Setting (HOME)Activate au Wi-Fi connection tool.Item DescriptionBluetooth Make settings for Bluetooth®.Data usage Make settings for data traffic.More... Make settings for network such as Airplane mode and Home network settings.Location servicesMake settings for location services.Lock & Security Make settings for product lock or security.Language & inputSet the language to be displayed and make settings for character input.Reset all Restore the default settings.Add accountAdd an account to use. The types of set accounts are displayed above “Add account”.Date & time Make settings for the date and time.Accessibility Set user support services.Device info Check the signal level etc.Initial setting Make initial settings.](https://usermanual.wiki/Sharp/HRO00192.User-Manual-II/User-Guide-2015131-Page-77.png)
![79AppendixTrouble Detail(out of service area icon) is displayed. •Is reception good enough? (▶P. 65) •Is the product within the service area? (▶P. 65) •Is your hand etc. off the area around the internal antenna? (▶P. 44)A message indicating that charging is necessary is displayed. •The battery is almost empty. (▶P. 51)When making a call, a beeping sound is heard from the receiver and a connection cannot be established. •Is reception good enough? (▶P. 65) •Is the product within the service area? (▶P. 65) •The wireless line is busy or the other party is on another line. Try again later.If symptoms do not improve after checking each of the above, information is provided through au Customer Support on the au homepage below.http://www.au.kddi.com/support/mobile/trouble/repairUpdating Software or OSSoftware UpdateThe product supports the software update.₁ On the home screen, [APPS] → [Settings] → [Device info] → [Software update].2Software updateCheck whether software update is necessary or not. The confirmation starts when you tap “Yes”. When it is necessary, you can download data for software update.Auto-check settingsSet whether to regularly check presence of data for software update available. ■Notes on Software Update •You are charged for data communication when connecting to the Internet from the product by using packet communication. •When software update is necessary, you will be informed on au homepage, etc. For details, contact an au shop or Customer Service Center (call toll-free 157). In addition, users of the SHL22 will receive a notice from au, when software update is necessary to improve the functionality of the SHL22.](https://usermanual.wiki/Sharp/HRO00192.User-Manual-II/User-Guide-2015131-Page-81.png)
![80Appendix •It is recommended to back up your data before updating software. •If the software update is performed, the product will restart before and after the update. •If the software update has failed or stopped, perform the same procedures again. •If the software update fails, it may become impossible to operate the product. If this happens, bring it to an au shop or PiPit (not accepted by some shops). •Charge the battery sufficiently before starting update. If the battery level is insufficient or the battery runs out during the update, the software update will fail. •Check out the signal reception status. The software update may fail if the product is in a place with bad signal reception status. •Various data registered on the product (address books, mails, still pictures, music data, etc.) and information of settings will not be changed even after software is updated. However, note that data may not be protected depending on the state of the product (fault, damage, getting wet with water, etc.). •After software is updated, the download of next update software may automatically start (consecutive update). •The software update is not available during international roaming.Do not conduct the following operations during the software update •Do not move during software update.The following operations are not available during the software update •Operations are not available during software update. Making a call to 110 (Police), 119 (Fire and Ambulance), 118 (Regional Coast Guard Headquarters) or 157 (Customer Service Center) is not available either. Also, the alarm etc. does not function.Major Update (OS Update)Major update is a function to update the OS of the product. •Attach a microSD memory card in advance.₁ On the home screen, [APPS] → [Settings] → [Device info] → [Major Update].2Confirm updateManually check presence of data for OS update available.Start update Carry out OS update via Wi-Fi®.Check for updatesSet whether to regularly and automatically check presence of data for OS update available.](https://usermanual.wiki/Sharp/HRO00192.User-Manual-II/User-Guide-2015131-Page-82.png)
![93Appendix •iWnn of OMRON SOFTWARE Co., Ltd. is used for conversion methods for Japanese language, and for phrase prediction methods for English. iWnn © OMRON SOFTWARE Co., Ltd. 2008-2013 All Rights Reserved. iWnn IME © OMRON SOFTWARE Co., Ltd. 2009-2013 All Rights Reserved. •Powered by emblend Copyright 2009-2010 Aplix Corporation. All rights reserved. emblend is a name of Japanese product provided by Aplix Corporation. •The font type pre-installed in this product, Shin Go M, is licensed by Morisawa Inc. solely for the use with this product. “Morisawa” and “Shin Go” are registered trademarks or trademarks of Morisawa Inc. •Portions Copyright ©2004 Intel Corporation •aptX is a registered trademark of CSR plc. •The internal speech recognition engine uses by Advanced Media, Inc. •The product includes pictograms that SHARP CORPORATION is licensed by NTT DOCOMO, INC. ■Open Source Software •The product includes software based on GNU General Public License (GPL), GNU Lesser General Public License (LGPL) and other licenses. For details on licenses of related software, on the home screen, tap [APPS] → [Settings] → [Device info] → [Legal information] → [Open source licenses]. •Source codes of software based on GPL, LGPL and Mozilla Public License (MPL) can be referred to on the following site for free. For details, refer to the following site. https://sh-dev.sharp.co.jp/android/modules/oss/ ■OpenSSL License【OpenSSL License】Copyright © 1998-2009 The OpenSSL Project. All rights reserved.This product includes software developed by the OpenSSL Project for use in the OpenSSL Toolkit. (http://www.openssl.org/)THIS SOFTWARE IS PROVIDED BY THE OpenSSL PROJECT “AS IS” AND ANY EXPRESSED OR IMPLIED WARRANTIES, INCLUDING, BUT NOT LIMITED TO, THE IMPLIED WARRANTIES OF MERCHANTABILITY AND FITNESS FOR A PARTICULAR PURPOSE ARE DISCLAIMED. IN NO EVENT SHALL THE OpenSSL PROJECT OR ITS CONTRIBUTORS BE LIABLE FOR ANY DIRECT, INDIRECT, INCIDENTAL, SPECIAL, EXEMPLARY, OR CONSEQUENTIAL DAMAGES (INCLUDING, BUT NOT LIMITED TO, PROCUREMENT OF SUBSTITUTE GOODS OR SERVICES; LOSS OF USE, DATA, OR PROFITS; OR BUSINESS INTERRUPTION) HOWEVER CAUSED AND ON ANY THEORY OF LIABILITY, WHETHER IN CONTRACT, STRICT LIABILITY, OR TORT (INCLUDING NEGLIGENCE OR OTHERWISE) ARISING IN ANY WAY OUT OF THE USE OF THIS SOFTWARE, EVEN IF ADVISED OF THE POSSIBILITY OF SUCH DAMAGE.【Original SSLeay License】Copyright © 1995-1998 Eric Young (eay@cryptsoft.com) All rights reserved.This product includes cryptographic software written by Eric Young (eay@cryptsoft.com)](https://usermanual.wiki/Sharp/HRO00192.User-Manual-II/User-Guide-2015131-Page-95.png)